
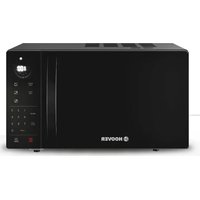
HPMW25STB - Microwave Oven HOOVER - Free user manual and instructions
Find the device manual for free HPMW25STB HOOVER in PDF.
| Brand | Hoover |
| Model | HPMW25STB |
| Product type | Microwave oven |
| Capacity | 25 liters |
| Microwave power | 900 W |
| Power consumption | 230 V / 50 Hz, 1400 W |
| Operating frequency | 2450 MHz |
| External dimensions (H x W x D) | 281 mm x 483 mm x 407 mm |
| Cavity dimensions (H x W x D) | 220 mm x 340 mm x 344 mm |
| Net weight | Approximately 13.9 kg |
| Display | 24-hour clock, time and power indicators |
| Cooking functions | Microwave cooking, quick defrost, weight defrost, multi-stage cooking, delayed start |
| Power levels | 6 levels (100%, 80%, 60%, 40%, 20%, 0%) |
| Start modes | Quick start, delayed start |
| Safety | Child lock, door lock system |
| ECO function | Yes (energy saving) |
| Turntable | Removable glass tray, roller ring, shaft |
| Compatible materials | Heat-resistant glass, ceramic, microwave-safe plastic, kitchen paper; no metal |
| Cleaning and maintenance | Clean with a damp cloth, mild detergent; avoid abrasives; tray and ring dishwasher safe |
| ISM class | Class B, Group 2 |
| Usage | Household use only, do not use outdoors |
Frequently Asked Questions - HPMW25STB HOOVER
User questions about HPMW25STB HOOVER
0 question about this device. Answer the ones you know or ask your own.
Ask a new question about this device
Download the instructions for your Microwave Oven in PDF format for free! Find your manual HPMW25STB - HOOVER and take your electronic device back in hand. On this page are published all the documents necessary for the use of your device. HPMW25STB by HOOVER.
USER MANUAL HPMW25STB HOOVER
TEXHINUeCKNE XAPAKTEPNUCTIKI 4
YCTAHOBKA 5
3JIeKTPOMAHHTHbIE NOMEXN 5
3A3EMJIeHNE 5
PPIIROTOBJIeHHeBPEXIME MIKPOBOJH 6
IPEDTEM,KAKOBPATITbCBACEPBNCHYO CNYK6
YKA3AHNIO BbIbOPY Nocybl 6
KOMNOHEHTbIMNKPOBOJHOBOIPEU 7
NAHEJIb ynpABJIeHnI 8
ynpabJIeHHe PecbIO 9
HACTPOIKA YACOB 9
ПИГOTOBЛЕНИЕВ PЕЖIMЕ БИCTPOGO CTAPTA 9
YCTAHOBKA BPEMEHN IPIIOTOBJIEN MOLUHOCTN 9
БыICTРЕ PA3MOPAXKIBAHINE 9
PA3MOPAXMBAHNEIO BECY 9
OTJIOXEHbI CTAPT 10
PPIIOTOBIEHNEENII BHECKOJIbKO 3TANOB 10
ФУнклгяЗКО 10
HACTPOIKA 3AUHTbIOT DETEI 10
OuNCTKA I UXoI. 11
MEPbI IPREIOCTOPOXHOCTN BO N3BEXAHNE BO3MOXHORO BO3DEINCTBnA IN3BbITOUHON MKNPOBOJHOBOJ 3HEPRn
- He donyckaetca ekcnnyataunna daHHo n c otkpbltoBDBepue, taK ka Ka60ta c otkpblto DBepue cnocobHa co3daTb BpeHoe BO3deNCTBne MmKpOBOJHOBOJ HEPnI. BaXHo He meuatb pa6ote 3aueJok DBepUi N He NobpeDHTb ux.
- He donyckaetcnaomeeHne IIObIX oBekTOB MeXdy IINCeBOJ YactbIO neu n DBepei HnHaKoJIeHne 3aRpa3HeHn nn OCTaTKOB YNCTraIeO CpeDCTba Ha yNtOHNTbHbIX NOBepxHOCTaX.
- 3a npeaaetcra kcnnyatnpoBaTb neyb npn haJIyHn nobpejdeHn. Oco6eHNO BaXHO, TTo6bl DBePca neu 3akpbIbIacb HaJIeXaIIM o6pa3OM n TTo6bl OTCytCTBOBaNIOBpeJDeHn:
a)Дверць (Дeфорmaци),
6)neTeJIb n 3aUeJOK (cIOMaHbI nn HennOTHO 3akpenNeHbI),
B)ynIIOHTeINbHbIX npOKnaOdk DBepcbl ynnIOTHITeINbHbIX NOBepxHOCTeN.
4. PerynipOBKn n peMOHT MKNPOBOHOBO N neu DoJXHbI BbINONHrTbcra TOnbKO KbaNnCnUPOBaHHbIM cepBcHbIM nepcoHaON
B630PACHOCTb
TEXHnueCKXAPAKTEPNUK
Ecnn neyb He pa6oTaet:
- Y6eIITecb, yTo neyI npabInbHo nOdkNoyeHa. EcnI 3To He TaK, n3BnKeNte BnKy IHHypa I3 po3eTKN, noDoxIte 10 cekyHd n CHOba BCTaBBte BnKy B po3eTKy.
- IpoBepbTe, He neperopeI nn npedoxpAHnteIb Hne OTKIOUHINcIaBToMaTnueckN BblKIOuAteJIb. EcnH OHn nCnpaBHbI, npOBepbTe nCnpaBHOCTb po3ETKn dpyrIM 3JKeKtpoPnP6Opom.
- y6eIITecb B TOM, qTO neyb 3anpOpaMMIOBaHa npaBnIbHO uYcTaHOBJ TaMep.
- 6eITeB B TOM, yTo IBebp HAnEJxHO 3aKpbIta, 3AMOK DBepn 3aUeJIKNHyT. B npOTNBOM cnyae rehepaun MInkpoBOJIHOBOH 3Heprn He HaHHTcR.
EcnHnUero n3 BblwepeuepcneHHoro He nomorIPO peuHT npo6JIeMy, opaTntecb K npOaBcy nIN B cepBncbI ueTp. HE nbTAITEcB PEMOHNTPOBAT NeYb CAMOCTOATEJbHO.
YKA3AHNЯ NO BblBOPY NOCyDbl
- MinkpoBoJIHbI He npoxOaT cKBO3b MeTaJI. IcNoIb3yIe ToJbKO nocUdy, IoXoOJaUHO dIg NcNoIb3OBaHnB MinkpoBOHOBbIX neuax. He donyckaetcra IcNoIb3OBaHne B MinkpoBOHOBo Neu MeTaJInuYeCKnx KOHTeHepOB dIpykTOB pNTAHN HAnNTKOB. I3rOToBntb MoKeT pa3peWntb NcNoIb3OBaHne MeTaJINuCeckNX KOHTeHepOB dI pyroTOBNeHnB MinkpoBOHOB o Neu OnpeDeJeHHo fOpMb i pa3Mepa. B 3tOM clyuae BblweyKa3aHHoe Tpe6OBaHne HenpImMeHMo.
- MinkpoBONHbI He npoxOaTcKBO3b MeTaN. NoTOMy He dOnyckaTcNcNoNb3OBaHne nocybIMeTaJIIN3aUnei nn MeTAJIINueckoekn dekopaunei.
- TAKKe HeJIb3a IcNoJIb3OBAt b N3dEJIy I3 nepepa6oTaHHo 6ymar n npn npriroTOBJeHn Niu B MInKpOBOJHOBOM pexIme, TAK KaK OHN MOrY T COePkaT MeTaJIINueCKne YactNUbl, KOTOpbIe CnOCo6HbI BbIbBaTb NOBJIeHne NcKp N/IIN BO3rOpaHne.
- PekomeHnyeTcNcNoJIb3OBAbT KpyIbIe IIN OBaJIbHbIe 6JIIOda, a He KBaIpaTHbIe IIN npoIoNroBaTbIe, TAK KaK eDa, pacNoJoxKeHHaB B yrJax, IMeet TeHndeHcUHO K nepepeBy.
- Дяпpeдотьрашени聪еррета OTдьньх усakTKOB мжно Испьзваь TOHк noLOCKn aIOMHHeBOI FOЛг. Ho 6ydte ocToPOxKbl, He nCNoJIb3yIte e e CInuKOM MHorO. PacctoRHe mExd noIOckamdoJHKHO 6bITb He MeHee 1ДIOIMa (2,54 cm). CnICOK HIXe coDEpKHT yka3AHn NO npabINbHomy Bbl6Opnyocdybl.
YPOBEHb MOUHOCTN (POWERLEVEL)
HaKMTe Ha 3Ty KHOKNy OOnH pa3, a 3aTeM NcNoJb3yNeTcNpOBoBle KHOKN, YTO6bl YCTaHOBNTb yPoBeHb MoUHOCTN nproTOBHeHry, OTnHbI OT NOHOM MOUHOCTH.
PA3MOPAXNBAHNE NO BECY
AbTomatnueckn HactpaunBaet uKn pa3MopaxNBAHn npu BBeDeHm BEca npOdyKta, KOtOpbHyxHO OTTaTb.
БыICTPOE PA3MOPAXUBAHNE
Ipa pa3MopaxNBaHn IpnpoDyKTOB, KOToPbIe He NOxOJrT Ipa pa3MopaxNBaHn No BEcy.
BPEM
HaKMTe Ha 3Ty KHOKNy OOnH pa3, a 3aTe mNcNoJb3yIte UΦpOBBie KHOKN, yTO6bl yCTaHOBNb BpeMeHN npiroTOBneHn.
NAMATb (MEMORY)
NcnoB3yIte 3Ty KONky IJn HaCTpoKIMHORO3TaIHbIX nporpaMM npiroTOBNeHn.
UNΦPOBAKJIABNATYPA
IcnoB3yIte, YTO6bI BBecTn BpEmr, 3aAdTb ypoBeHb MOUHOCTN uYka3aTb BEC npOdyKTOB.
4ACbl (CLOCK)
Ucnonb3yIe TnHaCTpoKn BpeMeHn.
OTJIOXEHHbI CTAPT (START DELAY)
I03BOJnEeT 3anporpaMMnpoBaT npiroTOBneHne B 3aDaHHoe BpeM.
БыICTРbl CTAPT (QUICK START)
ДябьICTporo 3anycka Neu Ha NOHOn MOUHOCn HaxMMTe KHonky HeckOblko pa3,уTO6bI yCTaHOBtB BpeM npiroTOBHeHry. YdepKunBaIte KHonky BbICTpbI CTAPT B TeueHne 3 cekyHd, yTO6bI aKTHBnPoBaTbФyHKcNIO 3KO.
CTON(STOP)
Haxmte nIc6poca Tekyuee Hactpoyn nn c6pocacnCTembl.
CTAPT (START)
Haxmnte 3nycka nporpaMMbl npiroTOBneHn npa3MopaxNBAH.

ynpabJIeHne IeYbIO
Bo Bpemn npiroTOBJIeHnO ndHokpaTHoe HxKATne KONKn CTOTnpuBOJNT K npnoctaHOBKe nporpaMMbl, HxKATne KONKn CTAPT - Ke ee Bo3o6HOBJIeHnIO. Ppr nboHOM HxKATn N KONKn CTOT nporpaMma 6ydet OTMeHeHa.
IIO OKOHaHn npoPamMbHa 3KpaHe NOBtCn HaNncb End, n npO3ByaT3ByKOBbIe CnHaNbl, KOToPbIe 6dyT pa3daBaTbc KaKdIe DBe MNHyTbI, NOKa He 6yDen T HxKaTa NIO6aK HONka INN OTKpbTa DBePca.
HACTPOINKA YACOB
- KocHTecb kHONKuAChI OAnH pa3.
- LiofoBbIMKHOJIKAIMBBeIITe Bpemr.
- KocHTecb KhoNk YAcbl eue pa3.
1 KACAHNE 15 cekyHd
2 KACAHIA 30 cekyHd
3 KACAHN 1 MHyTa
4 KACAHN 2 MHyTbI
Donyctm, C NOMOuBIO DaHHo FyHKUH HxKHO HAcTpOHTb Neb Ha npiroTOBHeHne B TeueHne 1 MNHyTbHa MOUHOCTn 100%
- HaxmTe KhoNky BbICTPbI CTAPT3 pa3a, noka Ha duCnnee He noBntcra 1:00
- HaxmTe KhoNky CTAPT.
YCTAHOBKA BPEMEH NIPNIGOTOBNEHIMMOUHOCTN
- Haxmnte KhoNky BPEMr.
- C nOMOsbIO KnaBnU cIuΦpOBoKnaBnAtypbI yCTaHOBNTe BpeM npriTOBJIeHnMaKcImaJIbHoe BpeM npriTOBJIeHncoCTaBJIeT 99 MmHT n 99 CeKyHd.
- HaxmTe KhoNkyUPOBEHb MOUHOCTn HeCKoJIbKO pa3ДЯ Bbl6opa HuxHoTo yPoBHe MoUHOCTn (cM.Ta6nTu).
- Haxmte KhoNky CTAPT nHaayana npuroToBneHnry.
| Нар��е Кнорки УPOBEнь Мошноctи | Мошност приготовлия |
| 1 pa3 | 100% |
| 2 pa3a | 80% |
| 3 pa3a | 60% |
| 4 pa3a | 40% |
| 5 pa3 | 20% |
| 6 pa3 | 0% |
PIMMEAHHE: Bo Bpem npiroTOBHeHn npOBepntb ypoBeHb MOUHOCTN MOKHO HaxKaTneM KhoKN YPOBEHb MOUHOCTN. Ecn N Bbl XOTnte rOToBHTb Ha nonHOJ MOUHOCTN, npOnyCTnte 3.
БбICTPOE PA3MOPAKIMBAHNE

I03BOJnEe pa3MopaxNBaTb npOdyKtbl, KOToPbIe He IoXoJrT dIpa pa3MopaxNBaHnIO NO Becy. DOnyCTm, Bam Heo6xOIMMo yCTaHOBnTB npOrpamMy pa3MopaxNBaHnHa 5 mN H 30 cek.
- HaxMMTe KhoNky BbICTPOE PA3MOPAXKUBAHNE.
- HaxmTe uΦpObIe KnaBn5,3,0.
- HaxmTe KhoNky CTAPT.
PIMMEUHNE: MaKcImaJIbHoE BpEmpa3MopaxnBaHn coCTabIeT 99 MInHy T 99ceyH.Bo BPempa3MopaxnBaHn CnCTemaCdeJaET nay3u pa3dactcra 3ByKOBo CNrHaJ DNHaNoMHAnnoB3oBATeIIO O Heo6xOdmocTNpepeBepHyT npOdykTb. 3aTeM HAKMTe KHOKNCTAPT nnpOdoNKeHn pa3MopaxnBaHn.
PA3MOPAXMBAHNEIO BECY

Bpempa3MopaxnBaHnnaMOuHOCTb yctaHaBnBaIOTc aBTOMaTnueeCKn NocNe TOrO, KaK Bbl BBeTe BEc pa3MopaxnBaEmbIX npOdyKTOB. MakmahlHo dOnyCTmblnBec dNra KaXdoi KaTerOpnn npNBedeH Hxke.
HACTPOIKA 3AUHTbI OT DETEIN
Блорва OT DeTeи npeToBpaaet NcNoIb3OBaHne Neu DeTbMn, OCTaBJIeHHbIMn 6e3 npncmToPa.
HnHaCTpOKn (BpeKmE OxuaHna):ecnB TeueHne OndHO MNHyTbI He 6yDeT BblNOJHeHO HnKaKnx DeiCTBn, neyb aBTOMaTNUeCKn IpeKlnHouHTcra BpeKm 6JIOKNPOBKn OT dTeen.
Дя OTMeHbI(B pexnme 6noknpOBKn OT DeTeN): OTKpoIte NIN 3akpoIte DBepuY neu, YTObI OTMeHHTb nporpaMMy.
OuNTKA N yXoJ
- IpeeOnCTKoB BbIKJIOHHTe ney b OTCOeHNHTe eOT 3JIeKTpueckoCetN.
- IopdepKnBaTe KaMepy neu B uCTOte. BpbI3n NnUc CTeHOK neu BbITnpaTe BnaJHO TpIko. Pn 60nee CInbHom 3arpa3HeHm MOxHO nCNoIb3OBaTb MfKoe MOIOue cpeCTBO. He CNeDyeT NcNOIb3OBaTb NylBBePn3aTOpbI INn Dpyrne CInbHbIe MOIOue cpeCTBa, cnOCo6HbIe NCnOpTtB NOBepXHOCT bBepn.
- HapyxHbIe NOBepxHOCTn CJIeJeT npOTnpaTB BnaxHoN TkaHbIO. Bo n36exKaHne NOBpeKdEHN pa6OuNX Yacte BHyTpN Neu BOa He DoJnxHa nonaDaTb B BeHTNJraUHOHHbE OTBepCTnA.
4.ДЯудаленяЗагрзнел npotpnte c DByx CTOpOH DBepb,CTeKIO,yILOTHHTEN DBepen I npinerauuzne DeTann. He nCnoNb3yIte abpa3nBhIe YIcTgUne cpeDCTBa. - He donyckaetc nCnoB3ObaHne napoochntTeJIe.
- He donyckaTe nonadaHnB OdbI Ha naHeIb ynpabNeHn. IpOtpTe eMgKoYtB BnaXHO TkaHbIO. PnUcTKe naneN ynpabNeHn OCTaJIte DBePcy neu OTkpItOn dJa npedOTbpaueHn ee clyuaHoro BKIOUeHn.
- Пи НИЧИ И Н Девр КОДЕHCATA пopotпге erо мягкIM полOTeHcEМ. 3To moKet npOINOnTn, ecN MнКpoBoJHOBa Neb pa6OtaeВ yCNoBnx BblCOKo BJIaXHOCTN. 3To HopMaIbHo.
- Heo6xoJIMO peRyIpaH OunIaTb CTeKJIHHbI NOBOpOTbI CTOn.ErO MoXHO BbIMbITb T'ENIOI MbIbHO BODe IIN B NocydOMoeHoi MaUNHe.
- POnIK NOBOPOTHO CTOJa I non KamepbI cneDuYeT peryJnRAHPO OUYaTb IJN ppeDToBpaUeHIN NoRbHeHrype3MepHO 7yMa.IpocTe npotPntE non KamepbI neu TprNKo, CJeKCa CMouEHHO paCTBOpOM MmKOrO MOUeero cpeDcTBa.PoJIkoBoE KOJIcuO MOXHO BbIMbITb BODoI INI IN B NocydOMoeHNo MaunHe. Pn o6paTHoH yCTaHOBKe POJIka NOBOPOTHO CTOJa CneDInTe 3a TeM, YTObblcnoBHT erO B npabunlbHoe noLOxHHe.
10.Дя удаленя захов n3 neун сноьуITE cneуоши MeToD:HaTpTe Ha Tepke 1 JIMOH, Cmeшайт erO cЧашков BODIи nporpeite daHHyIO cMeCb B neu B TeeyHne 5 MInHyT. 3aTeM TцatelbHo npOTpTE neyчntoМЯrkОТРANKOi.
11.ДЯЗAMeHbI NaMnBb I Neu ObaPauaTeCb B cepBnChbI YeHTp. - Heobxodmo perynapno ouuatab uyadnyt b n3 he octaTK nuun. Headexaaqay ouncka neu moket npnbectn K nobpejdeHIO NOBepxHOCTN, yMehbseHIO cpoKa Cnyk6bl, H, BepoTHO, K onachon cnTyauun.
- He BbIbpaCbIbAaIe NeYb BMeCTe C 6bITOBbIM MycOpOM. Ee cIeNyET cDaTb B COOTBeTCTByUOuN npHmHbI NyHKT.
- Пп пьвом И спльзовани Neун BOЗмохно NOВЛени Неблшогу Дыima N/NIN 3aanax. 3TO Hopmaльhoeягелп,Тak КAKпчИЗ�OTOBнeHaИЗ NICTOBОСТANII,ПOKpbITOM MacLOM,И рп erO INcapаени B NaЧальнь мрпod pa60тbl может NOВЯЯбс 3anax. 3TO 6bICTpo npoДeT.
PykoBOcTBo noJIb3ObaTeJIaTakKe MoJHo cKaaTa b c HaJero caIHa: www.hoover.ru
Please read these instructions carefully before installing and operating the oven.
CE
By placing the mark on this product, we are confirming compliance to all relevant European safety, health and environmental requirements which are applicable in legislation for this product.
WASTE MANAGEMENT AND ENVIRONMENTAL PROTECTION
This appliance is labelled in accordance with European Directive 201/19/EU regarding electric and electronic appliances (WEEE). The WEEE contain both polluting substances (that can have a negative effect on the environment) and base elements (that can be reused.) It's important that the WEEE undergo specific treatments to correctly remove and dispose of the pollutants and recover all the materials. Individuals can play an important role in ensuring that the WEEE do not become an environmental problem; it is essential to follow a few basic rules:
- The WEEE should not be treated as domestic waste;
- The WEEE should be taken to dedicated collection areas managed by the town council or a registered company.
In many countries, domestic collections may be available for large WEEEs. When you buy a new appliance, the old one can be returned to the vendor who must accept it free of charge as a one-off, as long as the appliance is of an equivalent type and has the same functions as the purchased appliance.
PRECAUTIONS TO AVOID POSSIBLE EXPOSURE TO EXCESSIVE MICROWAVE ENERGY
- Do not attempt to operate this oven with the door open since open door operation can result in harmful exposure to microwave energy. It is important not to defeat or tamper with the safety interlocks.
- Do not place any object between the oven front face and the door or allow soil or cleaner residue to accumulate on sealing surfaces.
- Do not operate the oven if it is damaged. It is particularly important that the oven door close properly and that there is no damage to the
a. Door (bent),
b. Hinges and latches (broken or loosened),
c. Door seals and sealing surfaces.
- The oven should not be adjusted or repaired by anyone except properly qualified service personnel.
CONTENTS
PRECAUTIONS TO AVOID POSSIBLE EXPOSURE TO EXCESSIVE MICROWAVE ENERGY 1
CONTENTS 1
IMPORTANT SAFETY INSTRUCTIONS 2
SPECIFICATIONS 4
INSTALLATION 4
RADIO INTERFERENCE 4
GROUNDING INSTRUCTIONS 5
MICROWAVE COOKING PRINCIPLES 5
BEFORE YOU CALL FOR SERVICE 5
UTENSILS GUIDE 6
PART NAMES 6
CONTROL PANEL 7
HOW TO SET THE OVEN CONTROLS 8
SETTING THE CLOCK 8
SETTING COOKING TIME AND POWER 8
QUICK START COOKING 8
JETDEFROST 9
WEIGHT DEFROST 9
MULTI-STAGE COOKING 9
START DELAY COOKING 10
CHILD LOCK. 10
ECO FUNCTION 10
CLEANING AND CARE 11
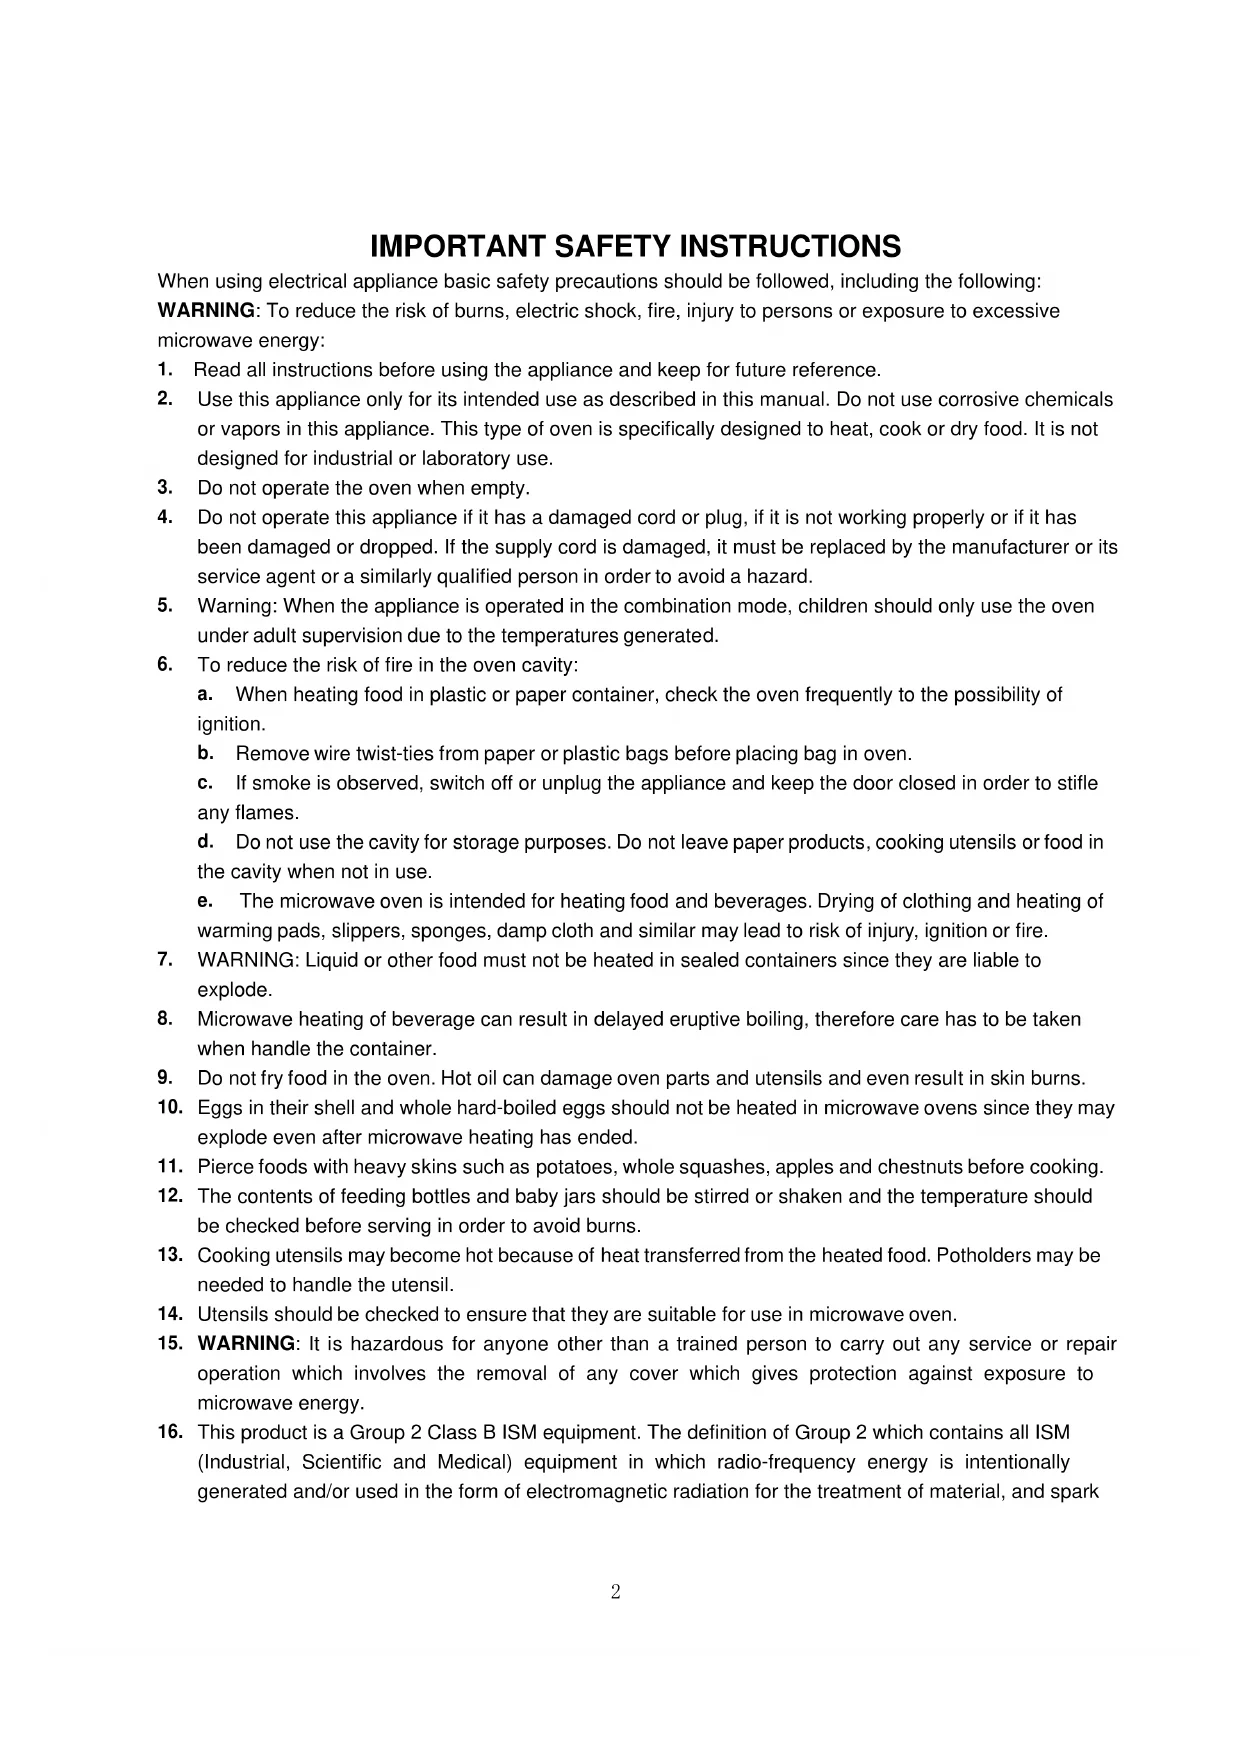
IMPORTANT SAFETY INSTRUCTIONS
When using electrical appliance basic safety precautions should be followed, including the following:
WARNING: To reduce the risk of burns, electric shock, fire, injury to persons or exposure to excessive microwave energy:
- Read all instructions before using the appliance and keep for future reference.
- Use this appliance only for its intended use as described in this manual. Do not use corrosive chemicals or vapors in this appliance. This type of oven is specifically designed to heat, cook or dry food. It is not designed for industrial or laboratory use.
- Do not operate the oven when empty.
- Do not operate this appliance if it has a damaged cord or plug, if it is not working properly or if it has been damaged or dropped. If the supply cord is damaged, it must be replaced by the manufacturer or its service agent or a similarly qualified person in order to avoid a hazard.
- Warning: When the appliance is operated in the combination mode, children should only use the oven under adult supervision due to the temperatures generated.
- To reduce the risk of fire in the oven cavity:
a. When heating food in plastic or paper container, check the oven frequently to the possibility of ignition.
b. Remove wire twist-ties from paper or plastic bags before placing bag in oven.
c. If smoke is observed, switch off or unplug the appliance and keep the door closed in order to stifle any flames.
d. Do not use the cavity for storage purposes. Do not leave paper products, cooking utensils or food in the cavity when not in use.
e. The microwave oven is intended for heating food and beverages. Drying of clothing and heating of warming pads, slippers, sponges, damp cloth and similar may lead to risk of injury, ignition or fire.
-
WARNING: Liquid or other food must not be heated in sealed containers since they are liable to explode.
-
Microwave heating of beverage can result in delayed eruptive boiling, therefore care has to be taken when handle the container.
-
Do not fry food in the oven. Hot oil can damage oven parts and utensils and even result in skin burns.
-
Eggs in their shell and whole hard-boiled eggs should not be heated in microwave ovens since they may explode even after microwave heating has ended.
- Pierce foods with heavy skins such as potatoes, whole squashes, apples and chestnuts before cooking.
- The contents of feeding bottles and baby jars should be stirred or shaken and the temperature should be checked before serving in order to avoid burns.
- Cooking utensils may become hot because of heat transferred from the heated food. Potholders may be needed to handle the utensil.
- Utensils should be checked to ensure that they are suitable for use in microwave oven.
- WARNING: It is hazardous for anyone other than a trained person to carry out any service or repair operation which involves the removal of any cover which gives protection against exposure to microwave energy.
- This product is a Group 2 Class B ISM equipment. The definition of Group 2 which contains all ISM (Industrial, Scientific and Medical) equipment in which radio-frequency energy is intentionally generated and/or used in the form of electromagnetic radiation for the treatment of material, and spark
erosion equipment. For Class B equipment is equipment suitable for use in domestic establishments and in establishments directly connected to a low voltage power supply network which supplies buildings used for domestic purpose.
- This appliance is not intended for use by persons (including children) with reduced physical, sensory or mental capabilities, or lack of experience and knowledge, unless they have been given supervision or instruction concerning use of the appliance by a person responsible for their safety.
- Children should be supervised to ensure that they do not play with the appliance.
- The microwave oven is only used in freestanding.
- WARNING: Do not install oven over a range cooktop or other heat-producing appliance. If installed could be damaged and the warranty would be avoid.
- The microwave oven shall not be placed in a cabinet.
- The door or the outer surface may get hot when the appliance is operating.
- Warning: Accessible parts may become hot during use. Young children should be kept away.
- During use the appliances becomes hot. Care should be taken to avoid touching heating elements inside the oven, for cooking ranged and ovens.
- The temperature of accessible surfaces may be high when the appliance is operating.
- The appliance shall be placed against a wall.
- Appliance is not to be used by children or persons with reduced physical, sensory or mental capabilities, or lack of experience and knowledge, unless they have been given supervision or instruction
- WARNING: If the door or door seals are damaged, the oven must not be operated until it has been repaired by a competent person
- The instructions shall state that appliances are not intended to be operated by means of an external timer or separate remote-control system.
- The microwave oven is for household use only and not for commercial use.
- Never remove the distance holder in the back or on the sides, as it ensures a minimum distance from the wall for air circulation.
- Please secure the turntable before you move the appliance to avoid damages.
- Caution: It is dangerous to repair or maintain the appliance by no other than a specialist because under these circumstances the cover have to be removed which assures protection against microwave radiation. This applies to changing the power cord or the lighting as well. Send the appliance in these cases to our service centre.
- The microwave oven is intended for defrosting, cooking and steaming of food only.
- Use gloves if you remove any heated food.
- Caution! Steam will escape, when opening lids or wrapping foil.
- This appliance can be used by children aged from 8 years and above and persons with reduced physical, sensory or mental capabilities or lack of experience and knowledge if they have been given supervision or instruction concerning use of the appliance in a safe way and understand the hazards involved. Children shall not play with the appliance. Cleaning and user maintenance shall not be made by children unless they are aged from 8 years and above and supervised.
- If smoke is emitted, switch off or unplug the appliance and keep the door closed in order to stifle any flames.
SPECIFICATIONS
| Power Consumption: | 230V/50Hz, 1400W(Microwave) |
| Microwave Power Output: | 900W |
| Operation Frequency: | 2450MHz |
| Outside Dimensions: | 281mm(H)×483mm(W)×407mm(D) |
| Oven Cavity Dimensions: | 220mm(H)×340mm(W)×344mm(D) |
| Oven Capacity: | Compact 25 Litres |
| Net Weight: | Approx.13.9 kg |
INSTALLATION
- Make sure that all the packing materials are removed from the inside of the door.
- WARNING: WARNING: Check the oven for any damage, such as misaligned or bent door, damaged door seals and sealing surface, broken or loose door hinges and latches and dents inside the cavity on on the door. If there is any damage, do not operate the oven and contact qualified service personnel.
- This microwave oven must be placed on a flat, stable surface to hold its weight and the heaviest food likely to be cooked in the oven.
- Do not place the oven where heat, moisture, or high humidity are generated, or near combustible materials.
- For correct operation, the oven must have sufficient airflow. Allow 20cm of space above the oven, 10cm at back and 5cm at both sides. Do not cover or block any openings on the appliance. Do not remove feet.
- Do not operate the oven without glass tray, roller support, and shaft in their proper positions.
- Make sure that the power supply cord is undamaged and does not run under the oven or over any hot or sharp surface.
- The socket must be readily accessible so that it can be easily unplugged in an emergency.
- Do not use the oven outdoors.
RADIO INTERFERENCE
Operation of the microwave oven can cause interference to your radio, TV, or similar equipment. When there is interference, it may be reduced or eliminated by taking the following measures:
- Clean door and sealing surface of the oven.
- Reorient the receiving antenna of radio or television.
- Relocate the microwave oven with respect to the receiver.
- Move the microwave oven away from the receiver.
- Plug the microwave oven into a different outlet so that microwave oven and receiver are on different branch circuits.
GROUNDING INSTRUCTIONS
This appliance must be grounded. This oven is equipped with a cord having a grounding wire with a grounding plug. It must be plugged into a wall receptacle that is properly installed and grounded. In the event of an electrical short circuit, grounding reduces risk of electric shock by providing an escape wire for the electric current. It is recommended that a separate circuit serving only the oven be provided. Using a high voltage is dangerous and may result in a fire or other accident causing oven damage.
WARNING Improper use of the grounding plug can result in a risk of electric shock.
Note:
- If you have any questions about the grounding or electrical instructions, consult a qualified electrician or service person.
- Neither the manufacturer nor the dealer can accept any liability for damage to the oven or personal injury resulting from failure to observe the electrical connection procedures.
The wires in this cable main are colored in accordance with the following code:
Green and Yellow = EARTH
Blue = NEUTRAL
Brown = LIVE
MICROWAVE COOKING PRINCIPLES
- Arrange food carefully. Place thickest areas towards outside of dish.
- Watch cooking time. Cook for the shortest amount of time indicated and add more as needed. Food severely overcooked can smoke or ignite.
- Cover foods while cooking. Covers prevent spattering and help foods to cook evenly.
- Turn foods over once during microwaving to speed cooking of such foods as chicken and hamburgers. Large items like roasts must be turned over at least once.
- Rearrange foods such as meatballs halfway through cooking both from top to bottom and from the center of the dish to the outside.
BEFORE YOU CALL FOR SERVICE
If the oven fails to operate:
- Check to ensure that the oven is plugged in securely. If it is not, remove the plug from the outlet, wait 10 seconds, and plug it in again securely.
- Check for a blown circuit fuse or a tripped main circuit breaker. If these seem to be operating properly, test the outlet with another appliance.
- Check to ensure that the control panel is programmed correctly and the timer is set.
- Check to ensure that the door is securely closed engaging the door safety lock system. Otherwise, the microwave energy will not flow into the oven.
IF NONE OF THE ABOVE RECTIFIES THE SITUATION, THEN CONTACT A QUALIFIED TECHNICIAN.
DO NOT TRY TO ADJUST OR REPAIR THE OVEN YOURSELF.
UTENSILS GUIDE
- Microwave cannot penetrate metal. Only use utensils that are suitable for use in microwave ovens. Metallic containers for food and beverages are not allowed during microwave cooking. This requirement is not applicable if the manufacturer specifies size and shape of metallic containers suitable for microwave cooking.
- Microwave cannot penetrate metal, so metal utensils or dishes with metallic trim should not be used.
- Do not use recycled paper products when microwave cooking, as they may contain small metal fragments which may cause sparks and/or fires.
- Round /oval dishes rather than square/oblong ones are recommend, as food in corners tends to overcook.
- Narrow strips of aluminum foil may be used to prevent overcooking of exposed areas. But be careful don't use too much and keep a distance of 1 inch (2.54cm) between foil and cavity.
The list below is a general guide to help you select the correct utensils.
| COOKWARE | MICROWAVE |
| Heat-Resistant Glass | Yes |
| Non Heat-Resistant Glass | No |
| Heat-Resistant Ceramics | Yes |
| Microwave-Safe Plastic Dish | Yes |
| Kitchen Paper | Yes |
| Metal Tray | No |
| Metal Rack | No |
| Aluminum Foil & Foil Containers | No |
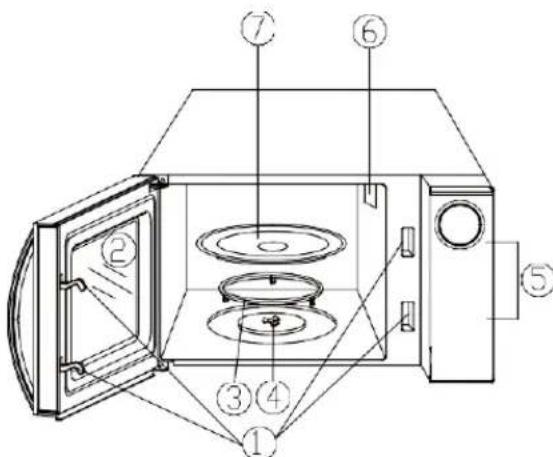
PART NAMES
- Door Safety Lock System
- Oven Window
- Roller Ring
- Shaft
- Control Panel
- Wave Guide (Please do not remove the mica plate covering the wave guide)
- Glass Tray
CONTROL PANEL

- MENU ACTION SCREEN
Clock, cooking time, power, action indicators are displayed.
- POWER LEVEL
Press this button once and then use the number button to set a cooking power level other than full power.
- WEIGHT DEFROST

Automatically sets proper defrosting cycle once you have entered the weight of the food to be thawed.
JET DEFROST

Customize defrosting time for food outside the categories or exceeding the max. allowable weight by weight defrost.
TIME
Press the TIME button once and then use the number buttons to set cooking time.
- MEMORY
Use this button to set a multistage cooking program.
- NUMBER PADS
Touch to enter clock time, set power level, and indicate food weight.
CLOCK
Use to set the time of day.
START DELAY
Delay start control allows you to put food into the oven and program it to start cooking at a later time.
- QUICK START
To start the oven quickly at full microwave power, you can press this button a number of times to indicate cooking time. Press the QUICK START button for three seconds to active ECO function
STOP
Touch to clear current setting or reset the system.
START
Touch to start a cooking or defrosting program.
HOW TO SET THE OVEN CONTROLS
During cooking, if press STOP pad once, the program will be paused, and then press START pad to resume, but if you press STOP pad twice, the program will be cancelled.
End will display with beeps to remind the program is over, and it will sound every two minutes until you press any pad or open the door.
SETTING THE CLOCK
To enter the oven clock time,
- Touch CLOCK button.
- Use the number pads to enter time.
- Touch CLOCK button again to confirm.
NOTE: This is a 24-hour clock. You can check the clock time when cooking is in progress by touching the CLOCK button.
SETTING COOKING TIME AND POWER
- Touch TIME pad.
- Use the number pads to set a cooking time. The longest time you can set is 99 minutes and 99 seconds.
- Press POWER LEVEL pad a number of time to enter the power level. (Please check the following table).
- Touch START to start cooking.
| Press POWER LEVEL pad | Power Level |
| Once | 100% |
| Twice | 80% |
| 3 times | 60% |
| 4 times | 40% |
| 5 times | 20% |
| 6 times | 0% |
NOTE: During cooking, you can check the current power level by touching POWER LEVEL pad. If you want to cook at full power level, omit the third step.
QUICK START COOKING
With quick start cooking, you touch the QUICK START button a number of times to state cooking time and the oven will work at full power level.
| Touch once | 15 seconds |
| Touch twice | 30 seconds |
| Touch 3 times | 1 minute |
| Touch 4 times | 2 minutes |
Suppose you want to set the oven to microwave for 1 minute at 100% power level.
- Touch the QUICK START button 3 times, "1:00" will appear in the display.
- Touch START button.
JET DEFROST
JET DEFROST lets you customize defrosting time, you can use it to defrost food not covered, or its weight exceeds the maximum allowable by weight defrost.
Suppose you want to set the oven to defrost for 5 minutes and 30 seconds.
- Touch JET DEFROST button.
- Touch number buttons 5,3,0.
- Touch START button.
NOTE: The longest defrost time you can set is 99 minutes and 99 seconds. During defrosting, the oven will pause and sound beep to remind user to turn the food over and then press START to resume.
WEIGHT DEFROST
Automatically sets proper defrosting cycle once you have entered the weight of the food to be thawed. Maximum allowable weight for each category is shown below.
| FOOD CATEGORY | MAXIMUM WEIGHT | DISPLAY |
| Meat | 2300g | d1 |
| Poultry | 4000g | d2 |
| Seafood | 900g | d3 |
Suppose you want to defrost 600g shrimp.
- Touch WEIGHT DEFROST button 3 times. "d3" will appear in the display.
- Touch number buttons 6,0,0.
- Touch START button.
NOTE:
The oven will not start if you happen to enter weight in excess of the maximum recommended.
- For food exceeding these maximum weights, use the JET DEFROST program.
During defrosting, the oven will pause and sound beep to remind user to turn the food over and then press START to resume.
MULTI-STAGE COOKING
Some recipes may require setting a multi-stage program involving defrosting, and different power levels. The following example shows the steps in setting up such a program.
- Input jet defrost program.
- Touch MEMORY button.
- Input microwave cooking program.
- Touch MEMORY button again
- Input another microwave cooking program with probably lower power level settings.
- Touch START button.
NOTE: Jet Defrost and Weight Defrost must be set as the first stage in a multistage cooking program while quick start cooking is unavailable.
START DELAY COOKING
You can put food in the oven, and program the oven to start up in a later time within the oven's clock cycle. Suppose you want to set the oven to start-up at 2 o'clock.
- Place food in the oven and close the door.
- Set a cooking program (except start delay cooking program).
- Touch START DELAY button.
- Touch number buttons 2,0,0.
- Touch START button.
NOTE: When start delay function takes effect, touch START DELAY can check the delay time. And then touch STOP when the display shows the time can cancel the function.
CHILD LOCK
The child lock prevents unsupervised operation by children.
To set, in standby mode, if there is not any operation within one minutes the oven will auto enter child lock mode.
To cancel, in child lock mode, open or close the oven door once can cancel the program.
ECO FUNCTION
Set the method: In standby mode, long pressing QUICK START button pad three seconds can turn off the display screen and a beep will sound. The oven will enter power saving mode.
Lifting method: During the power saving mode, it will be canceled by press any pad and a beep will sound. The display screen will light up.
CLEANING AND CARE
- Turn off the oven and remove the power plug from the wall socket before cleaning.
- Keep the inside of the oven clean. When food splatters or spilled liquids adhere to oven walls, wipe with a damp cloth. Mild detergent may be used if the oven gets very dirty. Avoid the use of spray and other harsh cleaners as they may stain, streak or dull the door surface.
- The outside surfaces should be cleaned with a damp cloth. To prevent damage to the operating parts inside the oven, water should not be allowed to seep into the ventilation openings.
- Wipe the both sides of the door and window, the door seals and adjacent parts frequently with a damp cloth to remove any spills or spatters. Do not use abrasive cleaner.
- A steam cleaner is not be used.
- Do not allow the control panel to become wet. Clean with a soft, damp cloth. When cleaning the control panel, leave oven door open to prevent oven from accidentally turning on.
- If steam accumulates inside or around the outside of the oven door, wipe with a soft cloth. This may occur when the microwave oven is operated under high humidity condition. And it is normal.
- It is occasionally necessary to remove the glass tray for cleaning. Wash the tray in warm sudsy water or in a dishwasher.
- The roller ring and oven floor should be cleaned regularly to avoid excessive noise. Simply wipe the bottom surface of the oven with mild detergent. The roller ring may be washed in mild sudsy water or dishwasher. When removing the roller ring from cavity floor for cleaning, be sure to replace in the proper position.
- Remove odors from your oven by combining a cup of water with the juice and skin of one lemon in a deep microwaveable bowl, microwave for 5 minutes. Wipe thoroughly and dry with a soft cloth.
- When it becomes necessary to replace the oven light, please consult a dealer to have it replaced.
- The oven should be cleaned regularly and any food deposits removed. Failure to maintain the oven in a clean condition could lead to deterioration of the surface that could adversely affect the life of the appliance and possibly result in a hazardous situation.
- Please do not dispose this appliance into the domestic rubbish bin; it should be disposed to the particular disposal center provided by the municipalities.
Four à micro-ondes
MODELE:HMW25STB
Manuel du propriété
Castanho = SOB TENSão
COMO COZINHAR COM FORNO DE MICRO-ONDAS


- MEPbI IPREIOCTOPOXHOCTN BO N3BEXAHNE BO3MOXHORO BO3DEINCTBnA IN3BbITOUHON MKNPOBOJHOBOJ 3HEPRn
- B630PACHOCTb
- YKA3AHNЯ NO BblBOPY NOCyDbl
- YPOBEHb MOUHOCTN (POWERLEVEL)
- PA3MOPAXNBAHNE NO BECY
- БыICTPOE PA3MOPAXUBAHNE
- BPEM
- NAMATb (MEMORY)
- UNΦPOBAKJIABNATYPA
- 4ACbl (CLOCK)
- OTJIOXEHHbI CTAPT (START DELAY)
- БыICTРbl CTAPT (QUICK START)
- CTON(STOP)
- CTAPT (START)
- ynpabJIeHne IeYbIO
- HACTPOINKA YACOB
- YCTAHOBKA BPEMEH NIPNIGOTOBNEHIMMOUHOCTN
- БбICTPOE PA3MOPAKIMBAHNE
- PA3MOPAXMBAHNEIO BECY
- HACTPOIKA 3AUHTbI OT DETEIN
- OuNTKA N yXoJ
- CE
- WASTE MANAGEMENT AND ENVIRONMENTAL PROTECTION
- PRECAUTIONS TO AVOID POSSIBLE EXPOSURE TO EXCESSIVE MICROWAVE ENERGY
- CONTENTS
- IMPORTANT SAFETY INSTRUCTIONS
- SPECIFICATIONS
- INSTALLATION
- RADIO INTERFERENCE
- GROUNDING INSTRUCTIONS
- Note:
- MICROWAVE COOKING PRINCIPLES
- BEFORE YOU CALL FOR SERVICE
- UTENSILS GUIDE
- PART NAMES
- CONTROL PANEL
- - MENU ACTION SCREEN
- - POWER LEVEL
- - WEIGHT DEFROST
- JET DEFROST
- TIME
- - MEMORY
- - NUMBER PADS
- CLOCK
- START DELAY
- - QUICK START
- STOP
- START
- HOW TO SET THE OVEN CONTROLS
- SETTING THE CLOCK
- SETTING COOKING TIME AND POWER
- QUICK START COOKING
- WEIGHT DEFROST
- MULTI-STAGE COOKING
- START DELAY COOKING
- CHILD LOCK
- ECO FUNCTION
- CLEANING AND CARE
- Four à micro-ondes
- Manuel du propriété
- COMO COZINHAR COM FORNO DE MICRO-ONDAS
Brand : HOOVER
Model : HPMW25STB
Category : Microwave Oven