
DCR-VX2100E - Camcorder SONY - Free user manual and instructions
Find the device manual for free DCR-VX2100E SONY in PDF.

User questions about DCR-VX2100E SONY
0 question about this device. Answer the ones you know or ask your own.
Ask a new question about this device
Download the instructions for your Camcorder in PDF format for free! Find your manual DCR-VX2100E - SONY and take your electronic device back in hand. On this page are published all the documents necessary for the use of your device. DCR-VX2100E by SONY.
USER MANUAL DCR-VX2100E SONY
Digital Video Camera Recorder Mini DV Digital Video Cassette
Operating Instructions
Before operating the unit, please read this manual thoroughly, and retain it for future reference.
Инструкции по заци.
Ipeed 3Kcnpnyataauei annapaTa BHIMATEbHIO npOHTNe daHHoe pykoBOIDCTBO IN COXpAHNTe erO IaJIaJIbHeuIX CNpaBOK.
HANDYCAM

InfoLITHIUM

SERIES

Cassette
Memory


MEMORY STICK TM
DCR-VX2100E
English
Welcome!
Congratulations on your purchase of this Sony Digital Handycam camcorder. With your Digital Handycam, you can capture life's precious moments with superior picture and sound quality. Your Digital Handycam is loaded with advanced features, but at the same time it is very easy to use. You will soon be producing home video that you can enjoy for years to come.
WARNING
To prevent fire or shock hazard, do not expose the unit to rain or moisture.
To avoid electrical shock, do not open the cabinet.
Refer servicing to qualified personnel only.
Notice
If static electricity or electromagnetism causes data transfer to discontinue midway (fail), restart the application or disconnect and connect the i.LINK cable again.
NOTICE ON THE SUPPLIED AC POWER ADAPTOR FOR CUSTOMERS IN THE UNITED KINGDOM
A moulded plug complying with BS1363 is fitted to this equipment for your safety and convenience.
Should the fuse in the plug supplied need to be replaced, a fuse of the same rating as the supplied one and approved by ASTA or BSI to BS1362 (i.e., marked with 串 or 串 mark) must be used.
If the plug supplied with this equipment has a detachable fuse cover, be sure to attach the fuse cover after you change the fuse. Never use the plug without the fuse cover. If you should lose the fuse cover, please contact your nearest Sony service station.
For the customers in Europe ATTENTION
The electromagnetic fields at the specific frequencies may influence the picture and sound of this camcorder.
This product has been tested and found compliant with the limits sets out in the EMC Directive for using connection cable shorter than 3 meters.
"Memory Stick"
Pysckn
Добpo пожаловать!
I03dpaBnem BAc c npno6peTeHnem
BnuDeokamepbl Digital Handycam dpmbbl
Sony.C nmooubO BVdeokamepbl Digital
Handycam moXhO 3aNeuatLeT DOpOrne Bam
MRHOBEHNJ XN3H N PpeBOCXoNDbIM
KaueCTBOM 3o6paKeHn I 3Byka.
BnuDeokamepbl Digital Handycam ochaSeHa
YCOBepseHcTBOBaHHbIMN fYHKUHMN, HO B TO
Xe BpMa ee OChb JERKO INCNoB3OBA Tb.
Bckope Bbl 6yDte CO3DaBaTb CEmeHbIe
BnuDeonpoPpAMMbI, KOTOpBMn CMOXeTe
HacnaKdaTbcra B NocJeDuOuine RoDbI.
PNEyPPEKDEHNE
Checking supplied accessories 5
Quick Start Guide 6
Getting Started
Using this manual 10
Step 1 Preparing the power supply 13
Step 2 Setting the date and time 20
Step 3 Inserting a cassette 22
Recording - Basics
Recording a picture 24
Shooting backlit subjects (BACK LIGHT) 34
Using the spot light function 35
Self-timer recording 36
Checking the recording - END SEARCH / EDITSEARCH /Rec Review 38
Playback - Basics
Playing back a tape 40
Viewing the recording on TV 46
Advanced Recording Operations
Recording a still image on a tape
-Tape Photo recording 48
Shooting with all the pixels -PROG.SCAN 51
Using the guide frame 53
Using the wide mode 54
Using the fader function 56
Using special effects - Picture effect 58
Using special effects - Digital effect 60
Shooting with manual adjustment 63
Adjusting the white balance 72
Adjusting recording level manually -Sound recording level 75
Preseting the adjustment for picture quality -Custom preset 77
Using the PROGRAM AE function 79
Focusing manually 83
Interval recording 85
Frame by frame recording
- Cut recording 89
Marking an Index 91
AdvancedPlaybackOperations
Quickly locating a scene using the zero set memory function 93
Searching for a recording by index -Index search. 95
Searching the boundaries of recorded tape by title - Title search 97
Searching a recording by date -Date search. 99
Searching for a photo - Photo search/Photoscan 101
Playing back a tape with picture effects.....104
Playing back a tape with digital effects..... 105
Editing
Dubbing a tape 107
Dubbing only desired scenes - Digital program editing 110
Using with an analog video unit and a PC - Signal convert function 128
Recording video or TV programs 130
Inserting a scene from a VCR - Insert editing 134
Audio dubbing 137
Superimposing a title 143
Making your own titles. 149
Labeling a cassette 151
Erasing the cassette memory data 153
Customizing Your Camcorder
Changing the menu settings 156
"Memory Stick" Operations
Using a "Memory Stick" - introduction..... 170
Recording still images on a "Memory Stick"
- Memory Photo recording 177
Superimposing a still image in a "Memory Stick" on a moving picture
- MEMORY MIX 182
Recording an image from a tape as a still image 187
Copying still images from a tape
- Photo save 191
Viewing a still picture - Memory Photo playback 193
Copying an image recorded on a "Memory Stick" to tapes 198
Playing back images continuously -SLIDE SHOW 200
Preventing accidental erasure -Image protection 202
Deleting images 204
Writing a print mark - Print mark 208
Additional Information
Usable cassettes 210
About i.LINK 214
Troubleshooting 216
Self-diagnosis display 222
Warning indicators and messages 230
Using your camcorder abroad 233
Maintenance information and precautions. 234
Specifications 241
Quick Reference
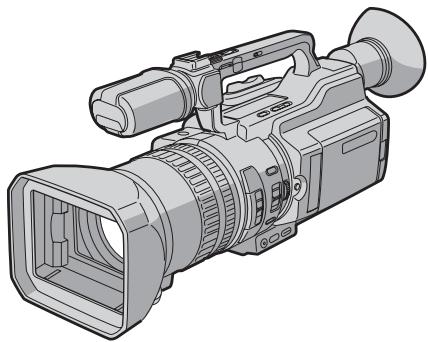
Identifying the parts and controls 243
Quick Function Guide 256
Index 258
PpOBepKa npnilaraembix
PpHaIeXHocTei 5
PykoOIOCTBO IO 6bICTpOMy 3aNycky 8
BbICTpbn nonck 3nn3oJa c nmoou bO yHKcnn naMrtn HnyeBOI OTMeTKN.93
Ponck rpaHnC 3aHnCn Ha JIeTne PTO TnTpY -Ponck TnTpA. 97
Ponck 3aHcN no daTe - PONCK DaTbI .99
Bocnpoun3BeJeHne JeHTbI c 3epeKtamn n3o6paJxHn .104
Bocnpo3BeHeHneJeHTbIcZnDpOBbIMN 300eKtAMn. 105
MOHTAX
PepesanbIeHTbl. 107
Pte3aINCb TJIbKO HUxKbIX 3nIM3oOB -IuΦpOBoB BnDEoMOHTaX n0 nporpAMme 110
UcnoIb3OBAHnE c aHaJIORoBbIM BInDeOobOpyDoBaHnEM n PI-K-ФyHKuIa npoe6pa3OBAHnI CNrHana 128
3aHbBnDeo nIITeIeporpaMM 130
BCTaBka 3nI3OJa C BnIeOMarHnToΦoHa - MoHTax BCTaBKn. 134
Aydnopepe3a\Pncb 137
HanoKeHne TnTpa 143
Co3dHHe BaIINX CO6CTBENHbIX TITPOB ... 149
MapKnpOBKa kaccetbl 151
CTipaHne daHHbIX naMRTN Kaccetbl 153
BbIOpHHeHnHmNvBnDyalbHbIX yCTaHOBOK Ha BnDeOKamepe
I3MeHeHne yCTaHOBOK MeHIO 156
Операцис "Memory Stick"
KpaTKoe pyKOBOCTBO nO cyHKnIaM ....257
AaabntbIyka3aTeIb 259
Checking supplied accessories
Пюверka пилагаembIXпринадLEXHOCTei
Make sure that the following accessories are supplied with your camcorder.
V6eIntecb, YTOB KOMPJIeKT NocTAbKN BUNeOKaMepbl BXOJAT CNeIyHOuIe PnHnAJIeXKHOCTN.
| 1 | 2 | 3 |
| 4 | 5 | 6 |
| 8 | 9 |
1 Wireless Remote Commander (1) (p. 252)
2 AC-L15A/L15B AC Adaptor (1), Mains lead (1) (p. 14)
NP-F570 rechargeable battery pack (1) (p. 13, 14)
4 R6 (size AA) battery for Remote Commander (2) (p. 253)
[5] "Memory Stick" (1) (p. 170)
6 A/V connecting cable (1) (p. 46, 107)
7 Shoulder strap (1) (p. 249)
Hood with a lens cap (1) (p. 247)
[9] 21-pin adaptor* (1) (p. 47)
- The models with C€ mark printed on their bottom surfaces only.
1 BeçncpoBóNbI pyJbT dNCTaHcUHOHOrO ynpabLeHn (1) (ctp. 252)
2AaanTep nepemehnoro ToKa AC-L15A/ L15B (1), npoBOD 3JneKtponntaHnra (1) (ctp. 14)
3 Перахаимьбатейнь 6лOK NP-F570 (1) (ctp. 13, 14)
4 BaTaPeIka R6 (pa3Mepa AA) nla npIbTa DnCTaHcHOnHOro ynpaBHeHra (2) (ctp. 253)
[5] "Memory Stick" (1) (ctp. 170)
6 CoeunHntelbHbI Ka6eIb ayDIO/BuDeo (1) (ctp. 46, 107)
7Плець pemehb(1)(cTp.249)
8Блендаобъektнвас Крblшков(1)(ctp. 247)
9 21-wTbIpbKOBbI aanTeP* (1) (cTp.47)
*ToIbKO MOJeIN CO 3HaKOM C€ Ha HnXHei CTOpOHe.

This guide introduces you to the basic way of recording/ playback. See the pages in parentheses "() for more information.
1 Connecting the mains lead (p. 18)
Use the battery pack when using your camcorder outdoors (p. 13).
Connect the plug with its
mark facing toward the
LCD panel side.

AC Adaptor (supplied)
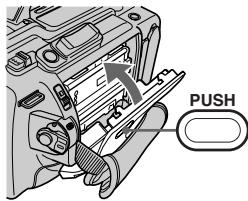
2 Inserting a cassette (p. 22)
While pressing the small blue button on the EJECT switch, slide it in the direction of the arrow.

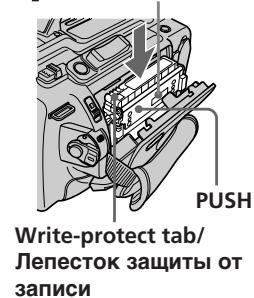
Push the middle portion of the back of the cassette to insert it. Insert the cassette into the cassette compartment with the window facing out and the write-protect tab facing upward.
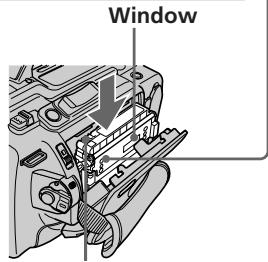
Write-protect tab
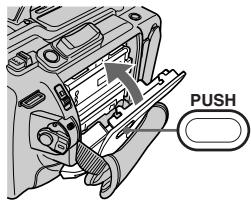
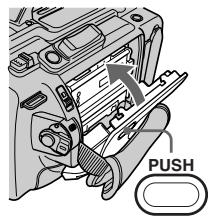
3 Close the cassette compartment by pressing the PUSH mark on it.
4 Close the cassette lid by pressing the PUSH button on the cassette lid.
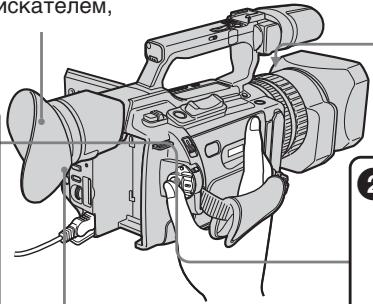
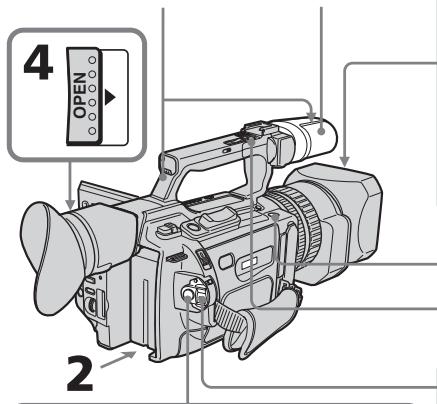
Viewfinder
When the LCD panel is closed, use the viewfinder placing your eye against its eyecup.

Press START/ STOP. Your camcorder starts recording. To stop recording, press START/STOP again.

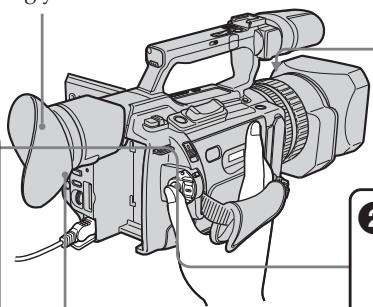

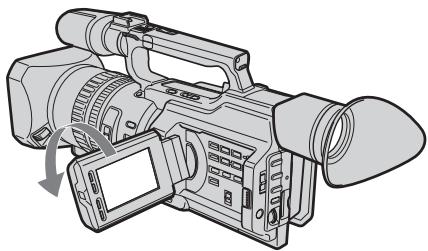
Slide OPEN back in the mark direction to open the LCD panel.


Open the shutter of the hood with a lens cap. For more information about attaching the hood with a lens cap, see page 247.

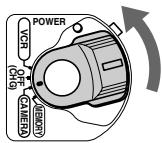
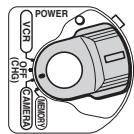
Set the POWER switch to CAMERA while pressing the small green button.
If the ND1 or ND2 indicator flashes, see page 68.
4
Monitoring the playback picture on the LCD screen (p. 40)

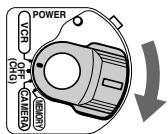
Set the POWER switch to VCR while pressing the small green button.

Press to rewind the tape.


Press to start playback.

NOTE
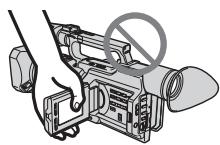
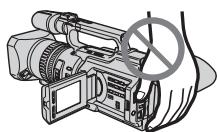
Do not pick up your camcorder by holding the viewfinder, the LCD panel, the battery pack, or the microphone.


PykoBoIcTBo IIO 6bICTpOmy 3aIpycky

B 3TOM pykoBOJCTBE ONICbIbAOTcOCHOBHbE cyHKUIN 3aNNC/BOcnpOn3BeDEHn. Cm. cTpaHnCiB b KpyrJIbIX cKo6kax “()”ДЯ NOJIyueHn IOJpO6hIx CBeDeHn.
1ПодсоeДиненue npOBODa 3JIeKТрОпNTaHЯ (cTp. 18)
JIenecTOK 3aunTbI OT 3aUNC
BudonckaTeIb
Ecn n anenb JKKd 3aKpbIta, BocnoIb3yI TeCb BINOcKaTeJeM, IJaB D OKyJnP.
Hakmte KhoNky START/STOP. Bndeokamepa nayhet 3anncb. Inaoc Hacmte khoNky START/ STOPepe pa3.

3пегдвиьт
пегкюать
OPEN наазд
нарравлени
стор讯', чтоы OTкрьт
панелжКД.

OTKpoIte wTOpKy 6JIeHdbI o6BJeKTbBa C KpbIshKoJ. DOnOIHNITeJIbHbIe CBeDEHnO pNkpePJIeHnI 6JIeHDbI o6BJeKTbBa C KpbIshKoJ CM. Ha cTp.247.
Haxab MaJIeHbKyU 3eJIeHyo KHOJky, yCTaHOBnTe nepeKJIuOyatelb POWER B noJoxKeHne CAMERA.
Ecn mnaet nndkaTOp ND1 nnND2,cm. cTp.68.
4
He noDnHMaIe BnDeoKamepy, depJa ee 3a BnDoNcKaTeB, naHb JKd, 6atapeHbI bJOK nIN MKNpOph.


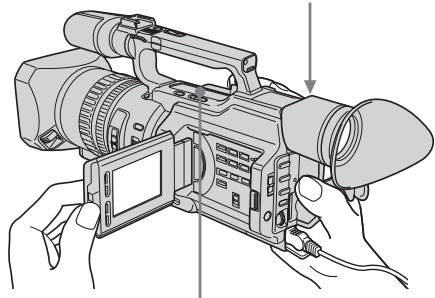
Getting Started Using this manual
As you read through this manual, buttons and settings on your camcorder are shown in capital letters.
e.g. Set the POWER switch to CAMERA.
When you carry out an operation, you can hear a beep or a melody sound to indicate that the operation is being carried out.
Note on cassette memory
Your camcorder is based on the DV format. You can only use mini DV cassettes with your camcorder. We recommend that you use a tape with cassette memory [11].
The functions which require different operations depending on whether or not the tape has cassette memory are:
- Searching the end point of the recording - end search (p. 38, 45)
- Searching a recording by index - index search (p. 95)
- Searching a recording by date - date search (p. 99)
- Searching for a photo - photo search (p. 101). The functions you can operate only with cassette memory are:
- Searching the boundaries of recorded tape by title - title search (p. 97)
Superimposing a title (p. 143) - Making your own titles (p. 149)
- Labeling a cassette (p. 151).
For details, see page 210.

You see this mark in the introduction of the features that are operated only with cassette memory.
Tapes with cassette memory are marked with CIII (Cassette Memory).
-ПадroТовkaКЗкплуаци -ИсpoЛьзOBанneДаHHOrOpyKOBODCTBa
JIeHTbIC KaCCTeHOn nAMrTbIO MapKnpyOTcC nOMOuBIO 3HaKa CII (KACCtHAR nAMrTb).
Note on TV colour systems
TV colour systems differ by country or region. To view your recordings on a TV, you need a PAL system-based TV.
Copyright precautions
Television programs, films, video tapes, and other materials may be copyrighted. Unauthorized recording of such materials may be contrary to the provision of the copyright laws.
Precautions on camcorder care
Lens and LCD screen/finder
- The LCD screen and the finder are manufactured using extremely high-precision technology, so over 99.99% of the pixels are operational for effective use. However, there may be some tiny black points and/or bright points (white, red, blue or green in colour) that constantly appear on the LCD screen and the finder. These points are normal in the manufacturing process and do not affect the recording in any way.
- Do not directly shoot the sun. Doing so might cause your camcorder to malfunction. Take pictures of the sun in low light conditions such as dusk.
IcnoJb3OBAHne daHHOROpyKOBOIDCTBa
CnCTeMbI ZBETHORo TeJeBnDeHn
Bpa3nHbIX cTpaHax n pernoHax
NCNoIb3yIOCTcpa3HbIe CnCTEmbl CuBeTHORO
TeJIeBnDEHnA. IIn npocMoTa BaJnx
3aIncEi Ha 3kPaHe TeJIeBn3Op Hne6xOdmo
NCNoIb3OBaTB TeJIeBn3Op Ha 6a3e CnCTEmbl
PAL.
Пре dioctepexeHne o6 abTOpcOM npaBe
TeIeBn3IOHbIe npOrpaMMbl, KINoOpJbMbI, BInDeOJeHTbl I pyrIne MaTePnaJIb MoYrT 6bITb 3aUuIeHbI aBTOpCKM npabOM. HeIiueH3npoBaHnHa 3aIncb TaKnx MaTePnaIOB MOKeT npOTNbOpEHTb pIoXKeHHa 3aKOHa o6 aBTOpCKOM npabe.
Mepblpeoctopoxhoctn npnyxoide 3a Bndeokamepoi
ObekTnB n 3KpaH XXI/ BnOncKaTeIb
3KpaH KKД n BvdoonckateIb
n3ROTOBHeI C NcNoJIb3OBAHNEM
BbICOKOTUHO TExHOJOrN, n 6OJIee
99,99% TOeK pa6OtaHT n 3ΦΦeKTNBHO
NCIOJIb3yIOTc. OdHako Ha 3KpaHe KKД
n B BvdoONCKaTeIe MOrTy NOCToRHHO
NOBJIaTbC4 YepHbI eN IIN rPkHe UCBETHbIe
TOkN (6eJIbIe, KpachIbe, CInHne NII
3eJIeHbIe). POnBLeHne 3tIX ToeK
06bIuHO CB83aHO C npOn3BOJCTBeHHbIM
npOeCCOM, n OHN HIKoMn O6pa3OM He
BJINrHOT Ha 3aNNCb.
- He HaboDHTe BnDEOkamepy nprMo Ha coNHe. 3To MoKet npNBecTn K HEnCnpaBHOCTn BnDEOkamepbl. BbINOpHnIte CbEMky CoNtca B yCNOBnX Hn3KoN OCBeUeHHOCTn, HApPmEp, npn 3aKaTe coNHa.
- Do not let your camcorder get wet. Keep your camcorder away from rain and sea water. Letting your camcorder get wet may cause your camcorder to malfunction. Sometimes this malfunction cannot be repaired a.
- Never leave your camcorder exposed to temperatures above 60^ (140^) , such as in a car parked in the sun or under direct sunlight [b].
- Be careful when placing the camera near a window or outdoors. Exposing the LCD screen, the finder or the lens to direct sunlight for long periods may cause malfunctions [c].
IcnoJb3OBAHne daHHOROpyKOBOIDCTBa
He donyckaite noBHeHn BnaI chApykn BHyTpni BInDeOkampeI. IpeOxpaHnTe BInDeOkamepy OTdoKJaN MOpCKoB ODbI. BlaRa MoKet npBeCTn K HeNoLaKam B pa60Te BInDeOkampeI. NHorda HEnCnpaBHOCTb yCTpaHnTb HeBO3MOXHO a.
- Hikorda He octabJrte Bndeokamepy Be MeCTax, rIe TempepaTpa NDoHnMaetc CbIiE 60 ^ C , Hapmep, B aBTOMoBnIe, PnpnapKOBaHHom B COJIHeHOM MceTe, INI IOI pIpyMbIM COJIHeHbIM CBETOM [b].
- ByIbTe BHNMaTeIbHbI, KOrJa ocTaNJIeTe KaMepy B6Jn3n OkHa nIN BHe NOMEuEHn. Bo3dEnCTBne npAmoro CoNHeuHOro CBeta Ha 3KpaH XKД, BnOOnCKaTeIb nIN ObBeKTnB TeueHHe NInTEbHO RpeMeHn MoKeT npNBecTn K IN HeNCnPabHocTn [c].
[b]
[c]
Contents of the recording cannot be compensated if recording or playback is not made due to a malfunction of the camcorder, video tape, etc.
Coepxmoe 3aHncaHHoro MaTePnana HeBO3MOXHO BOCCTaHOBNTb,ecJIN 3aNcB nJIN BOCpOu3BeJeHHe NOpUyHJIncb NO npuHHe HNCpBaHocTb BNDeOKaMepbI, BNDeOJeHTbI N.T.
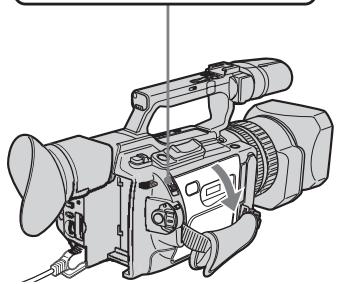
Step 1 Preparing the power supply
Installing the battery pack
Install the battery pack to use your camcorder outdoors.
(1) Lift up the viewfinder.
(2) Insert the battery pack in the direction of the mark on the battery pack. Slide the battery pack until it clicks.
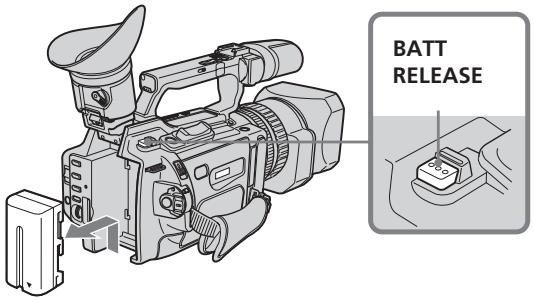
To remove the battery pack
Lift up the viewfinder.
Slide the battery pack out in the direction of the arrow while pressing BATT RELEASE down.
ДлСНТИЗБАТЕЙНОВ6ЛOKA
IOnHmnte BnOuCKaTeJIb.
IpeBnBTe 6aTapeHbI 6IOK B HnpaBHeHn CTpEKN, HxkAB KhONky BATT RELEASE BHN3.
Charging the battery pack
Use the battery pack after charging it. Your camcorder operates only with the "InfoLITHIUM" battery pack (L series).
(1) Open the DC IN jack cover and connect the AC Adaptor supplied with your camcorder to the DC IN jack with the plug's mark facing toward the LCD panel side.
(2) Connect the mains lead to the AC Adaptor.
(3) Connect the mains lead to the wall socket.
(4) Set the POWER switch to OFF (CHG). Charging begins.
The remaining battery time is indicated in minutes on the display window.
When the remaining battery indicator changes to , normal charge is completed. To fully charge the battery (full charge), leave the battery pack attached for about one hour after normal charge is completed until FULL appears on the display window. Fully charging the battery allows you to use the battery longer than usual.
3apka 6aTapeHoro 6Joka
IcnoJIb3yIte 6aTapeHbI 6Jok nocJe erO 3apRdkn.
Ba7a BIndeOkamepa pa6oTaet TOnbKO c 6aTapeHbIM 6JIOKOM "InfoLITHIUM" (cepN L).
(1)ОТкpoиTe KрblИСуг He3da DC IN n noДcoeДинITE aДаNTepпepeMeHnHOTo TOKa,ПрИлагаeMbI K BИdeOKeMaPepe,К rHe3dY DC IN TAK,чTOбы MeTka ▲HaшTekepe 6blOBpaScheHaВ cSTOPHy naHelen JKKД.
(2)ПодсоeДинHTe npOBoД nITaHnK aДаNTepу nepemEHHorO TOka.
(3)ПодсоeДинHTe ПОВOD эЛeКТрОпИТаHЯ K cTeБОй рОзЕтKE.
(4)Установпейреклочатуь POWER в положене OFF (CHG).Начнетсу Заряда.
B OKoUke dinCInpe 6yJeT OTo6paKaTbcra BpEmr ocTabWeroC3apJaBa MmHyTax. EcInn HndkaTop ocTabweroC3apJa n3MeHHTcra Ha ,3TO 3HaUHT, yTO HOpMaJIbHaa 3apJDKa 3abepWeHa.Длг NOIHOH 3apJDKn 6bATEpeHoro 6NoKA (NoHAA 3apJDKa) ocTaBte 6bATEpeHbI b6LOK pOKnIOueHHbIM pN6bn3nteJbHO Ha ODNH cAC NocLe 3aBePeHnHOPMaJIbHOJ 3apJDKu DoTex nop, NOKa B OKoUke dinCInpe He noBHTcna INDkaucnFULL. POnHAR 3apJDKa 6bATapeHoro 6NoKa IO3BOJnEe Bam IcNoJIb3OBaTb 6bATEpeHbI 6NoK DOnIbSe, Yem OblyHNO.

Step 1 Preparing the power supply
After charging the battery pack
Disconnect the AC Adaptor from the DC IN jack on your camcorder.
Note on the remaining battery time indicator
The remaining battery time indicator on the LCD screen/display window or in the viewfinder indicates the recording time using the viewfinder. The indicator may not be correct, depending on the conditions in which you are recording. When you close the LCD panel and open it again, it takes about one minute for the correct remaining battery time to be displayed.
Notes
- Prevent metallic objects from coming into contact with the metal parts of the DC plug of the AC adaptor. This may cause a short-circuit, damaging the AC Adaptor.
- Keep the battery pack dry.
- When the battery pack is not to be used for a long time, charge the battery pack once fully, and then use it until it fully discharges again. Keep the battery pack in a cool place.
Until your camcorder calculates the actual remaining battery time
"---- min" appears in the display window.
While charging the battery pack, no indicator appears or the indicator flashes in the display window in the following cases:
- The battery pack is not installed correctly.
- The AC Adaptor is disconnected.
- Something is wrong with the battery pack.
When using the AC Adaptor
Be sure to use it near the wall socket. If a malfunction occurs, disconnect the plug from the wall socket.
IyHKT 1 POnrToBka NcToUHnKa nHTAHN
IocJe 3apRKn 6aTapeHoro 6Loka
OTcoeHnHTe aanTep npeMeHHoro TOKa OT rHe3da DC IN BnDeokamepbl.
IHHdkatop octabwerooc BpeMeHn pa60tb6aTapen
INHdkaTop ocTabwerooc BpeMeHN pa6oTbI
6batapeHa 3kpaHe KKDb OKHe DnCnner NnB BVIOONCKaTeNe IOKa3bIBaET BpeM 3aNNc CnOMOsbu BOIONCKaTeN. INHdkaun MOKeT
6bITb HE COBCEM TOHOn, B 3aBNCMOCTN OTycNOB, B KOTOpBX IpON3BOIDTCN 3aNNCb.
EcIn 3akpbIT TaHEnb KKd n OTKpblt eeCHOBA,TO pN6JIIN3nteJbHo uepe3 MNHyTu
IORBNTCA INHdkaUN, OTO6paXaUOua
TOOHoe OCTabWeeec BpeM pa6oTbI 6batapei.
PpimueaHn
- He donyckaTe cOpnkocHOBeHHaMeTaNlUeCKnX npeDMToB C MeTaNlUeCKnM YuCArTM NtKepea NoCToAHHOrO ToKa aAnTepea nepemEHORo ToKa.3TO MoKet npNBecTu K KopoTKOMy 3AmbKaHnIO n NobpexdEHNIO aanTepea nepemEHORo ToKa.
-ДерхитебатеиньблOKВсyxOM COCTOHAHIN.
Korda 6aTapeHbI 6nok He nCnoJIb3yeTcB TeueHne dInTeJbHO npOMeKytKa BpemeH, pIoHocTbIO 3apAInTe erO, a 3aTeM nCNoJIb3yIte, nOKa OH He pa3PdNTcR OKOHuaTeJbHo. XpaHnte 6aTapeHbI 6nok B IpoxlaHOM MecTe.
ItoTexnop, nokaBaasa Bndeokamepa He onpeJeHIT DeiCTBNTbHeBpemr octabwerooc3apya6atapeHoro 6loka
Bokouke dincnpe 6yed otobpaKaTbcnHdkaun "--min".
Bo Bpem 3apAekn 6aTapeHoro 6IokaB OKoUke DncIpeH He 6yDet OTo6paKaTbc HndKATOp Nn OH 6yDet MraTb B CJeDyUOxN CnyaX:
-Батapestеньшблok yctahOBJIENHe npaBnIbHO.
- OToCoeInHeH aAnTep nepemehnHO ToKa.
- HencpaBHOCTb 6aTapeHoro 6loka.
Approximate minutes to charge an empty battery pack
ПибИЗNTeIbHObEВpeMВ MmHyTaXДп ЗарДКИ ПОЛHOCТьЮ pa3рЖeHHOrO 6aTapeHOrO 6noka
Recording time/Bpema 3auncs
| Battery pack/ Батуарейный 6лок | Recording with the viewfinder/ Запись с помошью видаочкателя | Recording with the LCD screen/ Запись с помошью экрана XXКД | ||
| Continuous/ Нерревая | Typical*/ Тушична* | Continuous/ Нерревая | Typical*/ Тушична* | |
| NP-F550 | 145 (135) | 80 (70) | 130 (115) | 70 (60) |
| NP-F570 (supplied/ Вхордт вkomплект) | 225 (200) | 120 (100) | 195 (175) | 100 (90) |
| NP-F730 | 260 (235) | 145 (130) | 230 (205) | 125 (110) |
| NP-F750 | 305 (265) | 170 (145) | 265 (235) | 145 (130) |
| NP-F770 | 460 (410) | 255 (220) | 400 (360) | 215 (190) |
| NP-F960 | 560 (500) | 310 (280) | 480 (430) | 265 (240) |
| NP-F970 | 685 (615) | 375 (340) | 600 (540) | 330 (295) |
Approximate minutes of recording time when you use a fully charged battery
Numbers in parentheses () indicate the time using a normally charged battery. You cannot use the NP-500/510/710 battery pack on your camcorder.
Pn6H3nteBHOe BpMa 3aNcN B MHyTax
PnNCIOb3OBAHm NIOHOCbIO 3apXKeHHOrO
6bataeHOrO 6Joka
LcΦbB CkO6Kax()yKa3bIaIOT BpeM npn nCnOJb3OBAHm 6batapeHoro 6lOKa c HOpMaJIbHOJ 3apJIKoJ.
B30J BnDEOkAmepe HeJb3r NcNOJb3OBA Tb 6batapeHbI 6lOK NP-500/510/710.
Step 1 Preparing the power supply
- Approximate minutes when recording while you repeat recording start/stop, zooming and turning the power on/off. The actual battery life may be shorter.
IyHKT 1 POnrToBka NCTOChnKa nHTAHN
* PnIbIIm3nteIbHoe BpeMBA MmHytax npn 3aIncn C HeoIHOKpaTHbIM IyckOM/ oCTaHOBkO, yBeJIuYeHHeM N3O6paJKeHnB n BKIOUcHHeM/BbIKIOUcHHeM IITaHnA. PhAKTUnCeKn cPOK cnLxkb6bl 6aTaapeHOrO 6lOka MoKet 6bItb Kopoye.
Playing time/BpemBAocnpoun3BedeHn
| Battery pack/ Батарейный 6лok | Playing time on LCD screen/ Верma Воспpon3ведения на заразе XXД | Playing time with LCD closed/ Верma Воспpon3ведения с заразе XXД |
| NP-F550 | 185 (165) | 225 (195) |
| NP-F570 (supplied/) Вхочит B komпликт) | 275 (245) | 335 (300) |
| NP-F730 | 305 (275) | 385 (345) |
| NP-F750 | 375 (335) | 460 (415) |
| NP-F770 | 560 (500) | 685 (615) |
| NP-F960 | 680 (610) | 830 (745) |
| NP-F970 | 840 (755) | 1015 (910) |
Approximate minutes of playing time when you use a fully charged battery
Numbers in parentheses () indicate the time using a normally charged battery. You cannot use the NP-500/510/710 battery pack on your camcorder.
Notes
- The supplied battery pack is charged a little.
- Some types of the battery packs may not be sold in your region or country.
- Approximate recording time and continuous playing time at 25^ (77^) . The battery life will be shorter if you use your camcorder in a cold environment.
PnI6JIIN3NTeJIbHOE BpEMA BOCpON3BeDeHINB MInHyTAX PnI NcNoJIb3OBAHN NOpHOCtBuO3apJKeHHOro 6aTapeHOro 6loka
LncpbB B cKo6kax()yKa3bIBaHT BpMa npn nCnoIb3OBAHm 6bTaapeHoro 6lOkac HOpMaIbHOJ 3apJKOi.
B3tO BVnDeokampe HeIb3r nCnoIb3OBaTb 6bTaapeHbI 6lOK NP-500/510/710.
PpIMeuaHn
- Пилагаимь 6atapeинь 6nok qacTuH0 3apJKeH.
- Bo3MOxHb, B BaIe O6IaCTn IIN CTpaHe B npOJaXe HET HeKOTOpBIX TUNOB 6aTapeHbIX 6JIOKOB.
-ПиблзntelhoeВрмяЗпси ненрьИногВОспpon3БeДЕнгИ пу 25^ . Пи ИСПОЛьЗOBАнИ ВИDEОКамеры холдьxUCIOBЯxCРOKСЛУЖБI 6batapeиногоБLOKAcOKpaanzaetcR.
Step 1 Preparing the power supply
What is "InfoLITHIUM?"
The "InfoLITHIUM" is a lithium ion battery pack which can exchange data such as battery consumption with compatible video equipment. This unit is compatible with the "InfoLITHIUM" battery pack (L series). Your camcorder operates only with the "InfoLITHIUM" battery. "InfoLITHIUM" battery packs (L series) have the 1 InfoLITHIUM 1 mark.
"InfoLITHIUM" is a trademark of Sony Corporation.
If the camcorder is immediately turned off
Even if the remaining battery time is enough to operate, charge the battery pack fully again. The correct remaining time is displayed.
Connecting to the wall socket
When you use your camcorder for a long time, we recommend that you power it from the wall socket using the AC Adaptor.
(1) Open the DC IN jack cover and connect the AC Adaptor to the DC IN jack on your camcorder with the plug's mark facing toward the LCD panel side.
(2)Connect the mains lead to the AC Adaptor.
(3) Connect the mains lead to the wall socket.
Step 1 Preparing the power supply
Precaution
The set is not disconnected from the AC power source (wall socket) as long as it is connected to the wall socket, even if the set itself has been turned off.
Notes
- The mains lead must only be changed at an authorized service shop.
- AC Adaptor can supply power even if the battery pack is attached to your camcorder.
- Do not use the AC Adaptor placed in a narrow space, such as between a wall and furniture.
- The DC IN jack has source priority. This means that the battery pack cannot supply any power if the mains lead is connected to the DC IN jack, even when the mains lead is not plugged into the wall socket.
Using a car battery
Use the Sony DC Adaptor/Charger (optional).
Mepbl npedoctoPOXHOCTN
Annapat He OTKIouaetcO NTocuHnKa nepemehoro ToKa Do Tex nop, noka OH noCoedHHK 3JIeKTPnuecko CeTN, daXe ecn cam annapat BbIKNoch.
PpimueaHnA
-Пювов Злесктугеля Сселует 3амени Тольков ТОМ MacTepeckо, y KOTOPО Имeelca pa3peшен.
Питане OT aадпета перемен HorTo TOKa MoKTe ПОдаваТьСД АжЕВ Слуаe, ecnI 6bTaapeHbI 6bok npNKpenJIEN K BnDEOKampe.
- He IncnoIb3yIte aIaIantep nepemehnHOro TOKa, ecIn OH pacnoIOXeH B y3KOM npocTpaHCTBe, HapnpMeMxJy CTeHoN Me6eJIbI.
- THe3do DC IN o6IaJaet npOpntetom nTochnka. 3To 03Haayet, YTO pTaHne OT 6bataeHoro 6lOka He noJaetc, Noka npoBOD 3NeKtpOniTahnIPOCoEINHeN K rHe3dy DC IN, daJe ecIn npOBOD 3NeKtpOniTahnI He BkIoUeH B CeTeByIO pO3eTky.
UcnoJIb3ObaHne aBTOMo6nIbHOrO aKKymyIaTopa
IcnoJIb3yIte aanTep/3apnHoe yCTpoIcTBO nocToHHoro ToKa Sony (npno6peTaIOTc IdoNoHNHeJIbHO).
Step 2 Setting the date and time
Set the date and time when you use your camcorder for the first time. "CLOCK SET" will be displayed each time that you set the POWER switch to CAMERA or MEMORY unless you set the date and time settings. If you do not use your camcorder for about four months, the date and time may be cleared from memory (bars may appear) because the built-in rechargeable battery installed in your camcorder will have been discharged (p.236).
First, set the year, then the month, the day, the hour and then the minute.
(1) Press MENU to display the menu in the standby mode.
(2)Turn the SEL/PUSH EXEC dial to select, then press the dial.
(3)Turn the SEL/PUSH EXEC dial to select CLOCK SET, then press the dial.
(4) Turn the SEL/PUSH EXEC dial to adjust to the desired year, then press the dial.
(5) Set the month, day and hour by turning the SEL/PUSH EXEC dial and pressing the dial.
(6) Set the minute by turning the SEL/PUSH EXEC dial and pressing the dial by the time signal. The clock starts to move.
(7) Press MENU to erase the menu display.
Step 2 Setting the date and time
The year changes as follows:
Tod n3mehreTc sJeDyUoMn 6pa30m:

If you do not set the date and time
"---:---:---" (time) and "-------" (date) are recorded on the data code of the tape and the "Memory Stick."
Note on the time indicator
The internal clock of your camcorder operates on a 24-hour cycle.
EcIn Bbl He yctaHOBte daTy n BpeMa
B Kode daHbIX Ha IeHTe n KapTe namTn "Memory Stick" 6ydt 3aIncAna Hndnkaun "---:-:---"(BpeM) n ------" (daTa).
BCTpoehhble yacbl 3ToI BNdeOkamepbpa6oTaIOB V24-ycaOBOM pexkme.
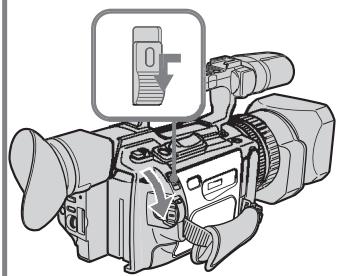
Step 3 Inserting a cassette
(1) Install the power source.
(2) While pressing the small blue button on the EJECT switch, slide it in the direction of the arrow. After the cassette lid is opened, the cassette compartment automatically opens.
(3)Push the middle portion of the back of the cassette to insert it. Insert the cassette in a straight line deeply into the cassette compartment with the window facing out and the write-protect tab facing upward.
(4) Close the cassette compartment by pressing the PUSH mark on it.
(5) Close the cassette lid until it clicks by pressing the PUSH button on the lid.
Пун=kТ 3Установka kaccetbl
(1)YCTaHOBnTe NCTOuHnK nHTaHnA.
(2)Haxkab He6oBbUyIO CnHIOU KhoNky Ha nepeKJIouateIe EJECT,nepeDInhTe erO B HanpaBJeHN cTpeKN. Pocne OTkpItnK pbluKn KaccetHOrO OTeKa KaccETbl OTcK OTkoPec TaBOMaTHueckn.
(3)HaXMMTe NocpeDInHe 3aDHeN CTOpObI kaccTeblnEe yCTaHOBKn. BcTaBbTe Kaccety no npAmoB KaccTeblnOTcEK Do yNopa, TaK YTO6b OkoShko 6blNo oBaPauSeHO HApxky, a JeNEcTOK 3aunTbI OT 3aINCn - BBepx.
(4)3aKpOInTe KaccTeHbI OToCek, HaxKaB Ha HEM MeTky PUSH.
(5)3aKpOHTe Do ⅢeUKhA KpbIshky KacceTHoro oTcKa, HaxBaHa Hei KhONKy PUSH.
2
3,4
5
To eject a cassette
Follow the procedure above, and take out the cassette in step 3.
Note
The cassette lid will not be closed when you press any part of the lid other than the PUSH button.
IIN3BLeeHnKaccetbI
BbIIOJIHnTE yka3aHHyIO BblIe npOeDpy N BblbTe Kaccety BnyKKe 3.
PpimueaHne
KpbIka kaccetHoro oTceKa He 3aKpoETc, ecnnaKaTb Ha Kakyo-lno Dpyryu YacTb Ha KpbIke,a He Ha PUSH.
Step 3 Inserting a cassette
When you use mini DV cassettes with cassette memory
Read the instruction about cassette memory to use this function properly (p. 210).
To prevent accidental erasure
Slide the write-protect tab on the cassette to SAVE.
NyHKT 3 YcTaHOBKa KaccTebl
PnHcNoJIb3OBAHmKaccET MmH DV C KACCETHOI NaMrtbIO
If the grip strap prevents the cassette lid from opening fully
Adjust the length of the grip strap (p. 249).
If flashes even if the cassette has been inserted
Press the PUSH button again to close the cover firmly.
EcIn pemeHb Ia 3axBaTa He No3BOJnE TNOJIHOCTbO OTKpbITb KpbIiKy KaccetHoro OTcKa
OtperyunpyTe dInHy pEmnI dIaXBaTa (cTp.249).
Korda mraet nHdkauny, daxe ecnBCTaBHeHa Kacceta
HaKMMTe KhoNkPy PUSH eue pa3, yTo6bl NIOHTaKpbItb KpbIuKy.
Recording a picture
Your camcorder automatically focuses for you.
(1) Open the shutter of the hood with a lens cap. For more information about attaching the hood with a lens cap, see page 247.
(2) Install the power source and insert a cassette. See "Step 1" to "Step 3" (p. 13 to 23) for more information.
(3) Set the POWER switch to CAMERA while pressing the small green button. Your camcorder is set to the standby mode.
(4) Slide OPEN in the direction of the mark to open the LCD panel.
The picture now being shot is displayed on the LCD screen, and it disappears from the viewfinder screen.
(5) Press START/STOP. Your camcorder starts recording. The "REC" indicator appears.
The camera recording lamps located on the front and rear of your camcorder light up. To stop recording, press START/STOP again.
You can use REC START/STOP located on the handle or front instead of START/STOP on the rear.
Camera recording lamps/ Microphone/ JAmnoUKN 3aInscn KamepbI MkPofoH
5
40min REC 0:00:01
3aannscb n3o6paXeHnA
If the ND1 or ND2 indicator flashes on the LCD screen or in the viewfinder
The ND filter is necessary. Set the ND FILTER selector to 1 or 2. However, if you change the position during recording, the brightness of the picture may change or audio noise may occur. This is not a malfunction. We recommend that you check the position of the ND FILTER selector before shooting. See "Using the ND filter" on page 67.
Notes
- Fasten the grip strap firmly.
- Do not touch the microphone during recording.
Note on the recording mode
Your camcorder records and plays back in SP (standard play) mode and in LP (long play) mode. Select SP or LP in the menu settings. In LP mode, you can record 1.5 times as long as in SP mode.
When you record a tape on your camcorder in LP mode, we recommend playing the tape on your camcorder.
Note on the LOCK switch
When you slide the LOCK switch to the left, the POWER switch can no longer be set to MEMORY accidentally. The LOCK switch is set to the right as a default setting. We recommend that you set the LOCK switch to the left when you record on a cassette.
Note on the progressive recording mode
If you intend to use the images on your PC or play the images back as still images, we recommend that you set PROG. SCAN to ON in the menu settings before shooting (p. 51). The picture quality may improve in this mode, but if you shoot a moving subject, the image may shake when it is played back.
3ainnbcn06paXeHna
KordaHa 3kpaHe KKД uInB BvdoNcKaTeIe Muraet uHdNkaTOp ND1 uNu ND2
Tpe6yeTcAФnIbTp ND.YcTaHOBtTe nepeKIOuOaTeNb ND FILTER B nIoXeHne 1 nII 2.ПиИЗMeHEnI NOLOXeHn BO BpeM 3aIINCS MoKET I3MeHNbCra RPKOCTb I3o6paKeHnI INI NOBaNbCsr yM. OdHaKO 3TO He ABJIeTC HeNCpRaBHOCtBu. PIoNoXeHne peKIOUOaTeN ND FILTER peKOMeHdyETc npOBepaTb NepeD cBeMKo. Cm."Unonb3OBAHneФnIbtpaND"Ha cTp. 67.
PpimueaHn
- HαdēχκHo πρικρεπιte peMeHь επλaXbaTa.
- Bo Bpemr 3aIncn He npKacauTecb K MmKpOpoHy.
PpimueaHne nopexmy 3anncn
Baisha Bndeokamepa BbIOnHne3aIncb N Bocpnon3BedeHne B pexime SP (CTahapTHoe Bocpnon3BedeHne) N B pexime LP (DolrOrrpaIOoee Bocpnon3BedeHne). BbIepeNTe pexumSP nIN LP BycTaHOBkax MeHIO. B pexime LP Bbl MoKeTe BblOnHtB 3aIncb B 1,5 pa3a dOnbSe no BpeMeHN, cEM B pexime SP.
EcInIeHTa6bIJa3aIINcaHaHa3ToiBUNDeOKaMepeBpeKIMeLP,eepeKOMeHdyeTcBOCIpOIN3BOIDtBa3ToiJKeBUNDeOKaMepe.
IpekeIIOUaTeJIb LOCK
Ecni nepeBnHyb nepeKIOuateIb LOCK BJIeBO,nepeKIOUaTeIb POWER yxe HEBO3MOxHO CnyaHIO yCTaHOBtB NOLOXeHHe MEMORY. IpeKIOUaTeIb LOCK Ha npEINPnATmN-3rOTOBtene YcTaHbNBAeTcB NpABoe NoLOXeHHe (yCTaHOBtNo yMOJuaHIO).PiN 3aIncn Ha KaccETy peKOMeHdyETc yCTaHOBtB nepeKIOUaTeIb LOCK B JleBOe noLOXeHHe.
Transition between the last scene you recorded and the next scene is smooth as long as you do not eject the cassette even if you turn off your camcorder. When you use a tape with cassette memory, however, you can make the transition smooth even after ejecting the cassette if you use the end search function (p. 38).
However, check the following:
- When you change the battery pack, set the POWER switch to OFF (CHG).
- Do not mix recordings in the SP mode and ones in the LP mode on one tape.
Note on tape transition
The playback picture may be distorted or the time code may not be written properly between scenes when:
- You change the recording mode (SP/LP).
- You record in LP mode.
If you leave your camcorder in standby mode for five minutes while the cassette is inserted
Your camcorder automatically turns off. This is to prevent tape wear and save battery power. To resume the standby mode, set the POWER switch to OFF (CHG), and to CAMERA again. When a cassette is not inserted, your camcorder does not turn off.
IpeexoM mExdy nocLeHnIM 3aIncaHhbIM 3n30oDM nCleDyUcIM 3n3oDM 6yDet PnaBbIM, NOKa He 6yDet N3BneHa KaccTeA, daxke npN OTKIOHeHN BundeOKaMepbI.
OndaKo npn nCnoB3ObaHm IeHtbc KaccTeHNo namrTbIO MOxHO CO3aBaTb PnaBbIy nepExoJ, daKe nocLe N3BneueHH KaccTebl, ecnn nCnoJIb3yeTc yHKuY "POnck KOHa" (ctp. 38).
Ondako Heo6xOIMO OTMeTb CneDyUouee:
-Призаменебатарейногорлokа yctahOBnTe nepeKlnuOaTeJIb POWER b noJoxHeNc OFF (CHG).
- He cIeJyTe Ha oJHoi JIeHTe DeJaTb 3aIncu B peKIme SP u LP.
PpmeaHne no nepexOdy
Bocnpn3BoDmOe n3o6paKHeNe MoKeT 6bIb NcKaJcHo, IIN Jx Ke KOd BpeMeHn MoKeT 6bIb 3aIncan He npabInbHO MeJy CueHaMn, ecJI:
Adjusting the LCD screen
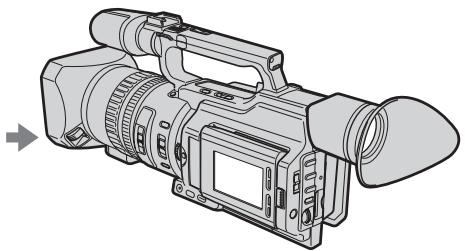
The LCD panel is opened up to 90 degrees and it rotates about 90 degrees to the viewfinder side and about 180 degrees to the lens side. If you turn the LCD panel over so that it faces the other way in standby or recording mode, the indicator appears on the LCD screen and in the viewfinder (Mirror mode).
3aHcB n3o6paXeHnA
PerynipoBka 3KpaHa KKД
PanaJIb XXKД packpbIbAeTcH Ha 90 rpaJycOB n BpaaaETcH np6n3nteJbHO Ha 90 rpaJycOB B CTOpOHy BnOuCKaTeJIr n np6n3nteJbHO Ha 180 rpaJycOB B CTOpOHy oBeKTINBa. EcIn Bbl NOBepHeTe NaJIb XXKД TAK,чTo OHa 6yDet HnPaBHeHa B DpyryIO CTOpOHy BpeXmE OxNdaHn IIN 3aIncn,Ha 3kpaHe XXKД n B VnOuCKaTeJIe NOrBNTcH INDnKaTOp (3epkaJIbHbI peXmI).
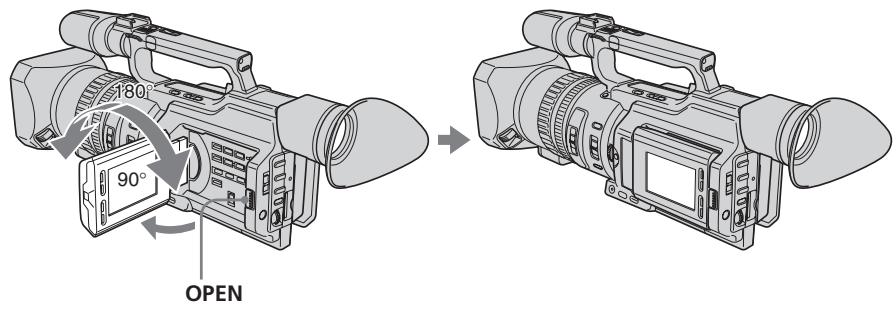
To close the LCD panel, set it vertically and swing it into the camcorder body until it clicks.
Note
When you open the LCD panel, the viewfinder is automatically turned off, however, it is not turned off when the LCD panel is turned over or the camcorder is in mirror mode.
When you adjust the angle of the LCD panel Make sure that the LCD panel is opened up to 90 degrees.
YTo6b3aKpbItb paHene JXKD,yCTaHOBnTe ee BepTKaJIbHo,a 3aTeM npICoEeHNITe ee K KopnyCy BnDeOKaMebpI Do ueJyKa.
Примейнке
PnO tKpbTnn naneJN KKД BUNOnCKaTeIb aBTOMaTnueeCKn OTKnIOUaETcR, Ondako OH He oTKIIIOuAeTcR, ecn naneJIb KKД nepeBepHyTa IIN BnDEOKaMepa HaxoDNTcR B 3epKaJIbHOM peXIMe.
Ppi peryunipobKe yrgna naHEn JKKd
Y6eIITecb, YTO IaHEnIb XXKД OTKpbIHa Ha 90 rpaIycob.
When using both the LCD screen and the viewfinder during shooting
The usable time of the battery pack when using both the LCD screen and the viewfinder will be shorter a little than when using the viewfinder only.
Pictures in the mirror mode
The picture on the LCD screen is a mirror-image. However, the recording picture will be normal.
During recording in mirror mode
ZERO SET MEMORY on the Remote Commander does not work.
Indicators in the mirror mode
The STBY indicator appears as and REC as . Some of the other indicators appear mirrorreversed and others are not displayed. However, if you close the LCD panel with the LCD screen turned over, indicators appear normally.
Adjusting the brightness of the LCD screen
To adjust the brightness of the LCD screen, press LCD BRIGHT + or -.
The battery life is longer when the LCD panel is closed. Use the viewfinder instead of the LCD screen to save the battery power.
PnncnoB3ObaHnn 3KpaHa KKn BUNDOCKaTeJI BO BPem CbEMKn
Bpma60b6aTapeHoro 6noka npinncnoIb3OBAHm 3KpaHa KKJn BnuOnCKaTeJIyDeT HEmHO rMeHbSe, yem npin nCNoJIb3OBAHm ODHOro BNOnCKaTeJIa.
I3o6paXeHnB 3epKaJIbHOM pexHmE
N3o6paKHeHa 3KpaHe KKd 6ydet OTo6paKaTbCra 3epKaJIbHo. Ondako 3aIncblBaemoe N3o6paKHeHa 6ydet HOpMaJIbHbIM.
Bo Bpem 3aHncn B 3epKaJIbHom peXKIMe
KhoNka ZERO SET MEMORY Ha nyIbTe duCTaHIOHOrO ynpabJeHn He pa6oTaE.
HdkaTopbIB3epKaIbHOMpeXmme
INHdkaTop STBY NOBHTCB VbIe , a INHdkaTop REC B bIe . HeKOTOpbIe dpyrHe INHdkaTopbI IOBbTcB 3epKaJIbHO OTo6paXeHHOM BVJe, a HEKOTOpbIe I3 HIX He 6yUyt OTo6paXaTbcra COBCem. OJHaKO, ecIn 3aKpbITnaneJIb XKd c pepeBepHytBM 3KpaHOM XKII, INHdkaTopbI bUyT OTo6paXaTbcra B obUYHom BVJe.
Perylnpobka npKoctn 3KpaHa KKd
On the LCD screen backlight
You can change the brightness of the backlight.
Select LCD B.L. in the menu settings (p. 156).
Even if you do the LCD screen adjustment using the LCD BRIGHT + / - buttons, or using LCD B.L. and LCD COLOUR items in the menu settings
The recorded picture will not be affected.
Recording in a low position
You can record in a low position to get an interesting recording angle. Lift up the viewfinder or rotate the LCD panel with the screen facing up to record from a low position. In this case, it is useful to use the REC START/ STOP located on the handle or front of the camcorder.
3ainnbcn06paXeHnA
3aHnnoDcBtKa 3KpaHa KKd
BbMoKTe N3MeHrTb RpKoCTb 3aDHei noCBeTkN. BbI6epnte KOMaHny LCD B.L. BycTaHOBkax MeHIO (ctp. 156).
(1) Set the POWER switch to OFF (CHG).
(2) Close the LCD panel.
(3) Eject the cassette.
(4) Remove the battery pack.
Pocje 3aipncn
(1)YctaHOBInTe nepeKJIouaTeIb POWER B noJIOKeHne OFF (CHG).
(2)3aKpoIe paHenJI KKJ.
(3)Изгелкту касу.
(4)OTcoeHNHtE 6aTapeHbI 6JIOK.
Adjusting the viewfinder
If you record pictures with the LCD panel closed, check the picture with the viewfinder. Adjust the viewfinder lens to your eyesight so that the images in the viewfinder come into sharp focus.
Lift up the viewfinder and move the viewfinder adjustment lever.
PerynipoBka BuidonckaTeJIa
EcIn Bb6yTe 3aNcBbTaB n3oPaxKeHn np3akpItToI naHeI JKKD, KOHTpolnyTe n3oPaxKeHne C NOMOuB bUOnCKaTeJIr. OtperyuPyTe oBeKtNB bUOnCKaTeJIr B COOTBeTCTBm CO CBOIM 3peHnE, YTObl n3oPaxKeHn B BVOnCKaTeJIe 6BJIN YeTKO cfoKycnpoBaHbI.
IopHIMnTE BUNOscKaTeNb npbYarpeRyINpOBKn BUNoSCKaTeN.
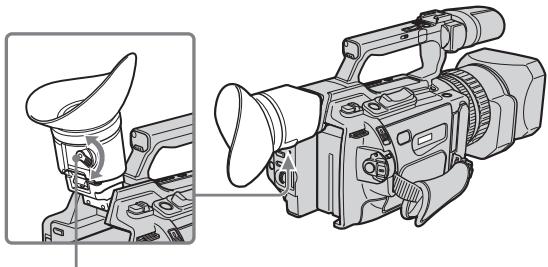
Viewfinder adjustment lever/Pbuchok perynipobkn BIDONCKaTeIa
To adjust the brightness of the viewfinder screen, use the VF B.L. item in the menu settings (p. 156).
Even if you adjust the viewfinder screen backlight
The recorded picture will not be affected.
The eyecup
You can attach the eyecup with the large part of it located on both left and right. See page 247 for details.
3To He NoBJIaReT Ha 3aIncaHHOe n3o6paXeHne.
OkyIap
OkyIrp MoKHO NOIOCoEINHtB TaKIM
obpa3OM, YTObI erO IwipoKaY aCtB
pacNoIarIaIc KaK CJIeBa,TaK N cnpBa.
PiOpObHbIe CBeDeHnI npVeDeHbI Ha CTp. 247.
Using the zoom feature
To zoom using the zoom lever/ handle zoom lever
Press the power zoom lever a little for a slower zoom. Press it deeper for a faster zoom.
Using the zoom function sparingly results in better-looking recordings.
"T" side: for telephoto (subject appears closer)
"W" side: for wide-angle (subject appears farther away)
When using the handle zoom lever, you can change the zooming speed using the handle zoom switch.
H:Fast
L: Slow
Handle zoom switch/
Переклочаель
Трансфoksшипучke

Notes
- When the handle zoom switch is set to OFF, you cannot operate the handle zoom lever.
- The handle zoom switch does not interlock with the zoom lever of the camcorder.
When you shoot close to a subject
If you cannot get a sharp focus, press the "W" side of the power zoom lever until the focus is sharp. You can shoot a subject that is at least about 80~cm (about 2 feet 5/8 inch) away from the lens surface in the telephoto position, or about 1cm (about 1 / 2 inch) away in the wide-angle position.
IcnoJb3ObaHne yHKcuu TpaHcΦokaun
ДлгТрансфокациспомошьюpbiчakka Трансфокаци/рьчakkaТрансфокациHa pyчke
Clerka haxmnte Ha pbyar npnbOda TpaHcfoKaTopaДЯ MeDneHNoI
TpaHcΦokaun. HaxMnte Ha Hero cunbHee dIy yckopeHHo TpaHcΦokaun.
UmepeHHoe nCNoIb3OBAHne fYHKcIMn TpaHCpokaun ObecneuBaet HauNyUWe pe3yJbTaTbI.
CTopoha "T":ДЯ TelepepoTo (Obeekt npi6JInxKaeTcR)
CtopoHa"W":IINIPOJIOKeHnI"IINPOKOyOrIbHbI"(O6bekT ydaJIaTeTc)
Ppi nCIOJIb3OBAHn pblUaKkA TpaHCpokaun Ha pyuKe MOXHO N3MeHrTb CKOpocTb TpaHCpokaun Ppi NOMoUs nepeKlIOuAteJr TpaHCpokaun Ha pyuKe.
H: YckopeHHO
L:3aMeIeHNO
PpimueaHn
- PbyaJok TpaHcΦokaun Ha puKHe He pa6oTaET, KOrJa nepeKInuOaTeIb TpaHcΦokaun Ha puKHe yCTaHOBnEe B noLoXeHne OFF.
-ПepeknHouaTeIb TpaHcfoKauznHa pyKe He 6JokpyeT pIyauKoK TpaHcfoKauzn KaMepbl.
PnCsbemKe oBekTa c 6JIn3KOro nOIOXeHn
EcIn BbI He moKxTe noJyUHTb cheTkyo fokcnpOBky, haxMnte Ha cTOpOHy "W" pbuHa prnB0da TpAnCfoKaTopa do nOlyueHn qTeKoJfokcnpOBKn. B noLoXeHN "TeJeToMoXHO BblOnJIHrTa CbEMKy o6BeKTA, KOTOpBI HAXOINTcHa paCCTOHN He MeHee 80 cm OT o6BeKtNa IIN OKONO 1 CM B noLoXeHN "ShIpOKOYroNbHbI".
To zoom using the zoom ring
Using the zoom ring, you can control the zoom by your desired speed and you can make fine adjustments.
During recording, turn the zoom ring to the desired speed.
If you turn the zoom ring quickly, the zoom may not respond to the zoom ring. Rotate the zoom ring with appropriate speed.
Using the digital zoom - Zoom greater than 12 ×
Zoom greater than 12× is performed digitally, if you set D ZOOM to 24× or 48× in the menu settings. The digital zoom function is set to OFF as a default setting (p. 156). If you use the digital zoom function, the picture quality deteriorates.
PpmeaHne
ПрибьICTPOM NOBOPOTKOJIbca TpaHcΦOKaTOPa,CKOpOCTb TpaHcΦOKaUMOKET He MeHrTbcra. BpaauTe KOJIbTO TpaHcΦOKaTOPa CCOOTBeTCTByUoSei CKOpOCTbIO.
IcnoJb3ObaHneФyHKcunuΦpOBToTpaHcΦokaun - TpaHcΦokaun6oJee 12×
TpaHcfoKaUa 6olee 12× BbInonHaeTc
ufoBbIM MeToDM npu yCTaHOBKe IJRA
napaMeTp a D ZOOM 3HaueHnra 24x nIa 48x B
yCTaHOBkax MeHIO. FUnHKUa UcFpBOO
TpaHCfoKaUHa nIpeDnPnAITNI
n3rOToBHTeNe yCTaHaBnBaETC B
IPOLOKeHne OFF (BbIK), RbJIouSeecr
ycTaHOBKn o yMOJIuaHNIO (ctp. 156). Pn
NCNoIb3OBAHN fynKUa UcFpBOO
TpaHCfoKaUm yXdUaETC KaueCTBO
n3o6paKeHna.
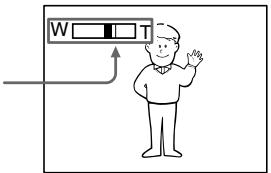
The right-ended portion of the bar shows the digital zooming zone.
The digital zooming zone appears when you set D ZOOM to 24× or 48× .
Праьан CTOPОн ПОLOсь�Я экpane He nOKa3bIbaeT 3Ony uФрOBоТраHcФOKaци.
30ha zcpobov TpaHcfokaunnoBnAETcN, KOrda B npametpe D ZOOM yctaHaBnBaETcN 3NaueHne 24x nIIN 48x.
You cannot use the digital zoom:
- When you set PROG. SCAN to ON in the menu settings (p. 156).
- When the POWER switch is set to MEMORY.
Indicators displayed during recording
The indicators are not recorded on the tapes.
UcfoPobA TpaHcfoKaun He 6yndet pa6oTaTb:
- EcnnapameTp PROG. SCAN yctaHOBJIeH B noJoxKeHne ON B yctaHOBkax MeHIO (CTp. 156).
-Ecni nepeKniOuTaTeB POWER ycTaHOBJIeH B noJIOKeHne MEMORY.
ИнданаТоры, оTOбрахаemье BO ВремаЗпсн
INdkaTOpbI He 3aInCbBaIOTcHa KacceTbI.
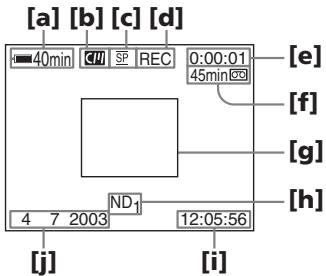
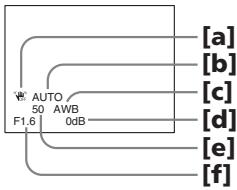
[a]Remaining battery time
This appears after you turn on the power and wait for a while.
[b]Cassette memory
This appears when using a tape with cassette memory.
[c] Recording mode
[d]STBY/REC
[e] Time code/Tape counter
[f] Remaining tape
This appears after you insert a cassette.
[g]Guide frame
[h]ND filter
This flashes when the ND FILTER selector should be set. After you have set the ND FILTER selector, the ND FILTER position selected is indicated. (When the ND OFF position is selected, the indication disappears.)
[i] Time
The time is displayed about five seconds after the POWER switch is set to CAMERA or MEMORY.
[j] Date
The date is displayed about five seconds after the POWER switch is set to CAMERA or MEMORY.
aOctabweecBpempa60tbI 6atapeHoro 6Joka 3TOT INDnKaTOp NOBnEcTc NocJe BKNIOeHnI PNTAHN IPOoSeCTBnI HEKOTOPOro BpeMeHn.
[b]KaccetHaJaPnAMrTb 3TOI INHdNkaTOP NOABJIeTcra PnI NCIOJb3OBAHmN KACCETHOJnAMrTI.
[c]Pexm3aIncN
[d]STBY/REC
[e]KoD BpeMeHn/CyeTyn JeHTbI
[f]OCTaBwaJcRJIeHTa 3TOT INHdNkATOp NOBJIeTcR IocNe yCTaHOBKn KAccTebl.
[g]KoHTpOJIbHaIpaMka
[h]Фильтр ND
Oh miraet, korga Heo6xOIMO yctahOBtI nepeKlIOaTeJIb ND FILTER. Iocne yctahOBKn nepeKlIOuatoJIa ND FILTER B noJIOXeHne ND FILTER oTo6paJaaTcR COOTBeTCTBlyIOuaJnHNikauJN. (Ppi ycTaHOBke nepeKlIOUaTeJIa B noJIOXeHne ND OFF nHNikauJN nCye3HeT.)
[i]Bpemr
The time code indicates the recording or playback time, "0:00:00" (hours : minutes : seconds) in CAMERA mode and "0:00:00:00" (hours : minutes : seconds : frames) in VCR mode. You cannot rewrite only the time code.
Remaining tape indicator
The indicator may not be displayed accurately depending on the tape.
Note on recording date/time
Recording date/time is not displayed during shooting, however, it is automatically recorded on the tape. You can check the recording date/ time during playback by pressing DATA CODE.
Shooting backlit subjects (BACK LIGHT)
When you shoot a subject with the light source behind the subject or a subject with a light background, use the backlight function.
Press BACK LIGHT in standby, recording, or memory mode.
The indicator appears on the LCD screen or in the viewfinder.
To cancel, press BACK LIGHT again.
KoB BpeMeHH
KoI BVPeMeHnyka3bIbaeT BVPeM 3aIncn IINBocnpOn3BeDeHnra,“0:00:00”(aCsbI:MHyTbI:cekyhDbI)BpeXmmeCAMERAu“0:00:00"(aCsbI:MHyTbI:cekyhDbI:KaIpbI)BpeXmmeVCR.Bbl He moKeTe nepe3anncatbToJbKO KoI BVPeMeHn.
Hndkatop octabweeJJeHTbI
Ioka3aHnIHdNkAtopaMOryt 6bItb HToCHbIMN B3aBcImOcTn OT JeHTbl.
PpmeHnno DaTe/BpeMeHH 3aHnc
ДаТВрЕМЯЗАПИСН He OTOБРAPKAJOТСВ BO BpeMЯ CьEMКи,ОДHAKO OН aBTOMaTHyeCKN 3aПSCbIbAJOТСЯ HaJIeHTy.ДaTy/BpeMЯ 3aПИСN MOЖHO npOBePITb B pEXIMe BOCpOni3BeDENHЯ,нжав KhONkY DATA CODE.
CbeMa o6BeKToB 3aDHe npDCBETKOI (BACK LIGHT)
EcIn BbBbIOJIHReTe CbEMKy o6BeKTa c nCTOHHKOM CBeTA N03aI IN Hero IIN JKe o6BeKTA CO CBETNbIM fOHOM, IcN0lb3yIte fYHKUIO 3aDHe IIOCBETKN.
B pexime oxuaHna, 3aicn uJn naTn haxmte KhoNky BACK LIGHT.
HnDkaTop nOBuTcHa 3KpaHe KKД nIN B BuONCKaTeNe.
Дя OTmeны НжмITE KhoIGNky BACK LIGHT eue pa3.
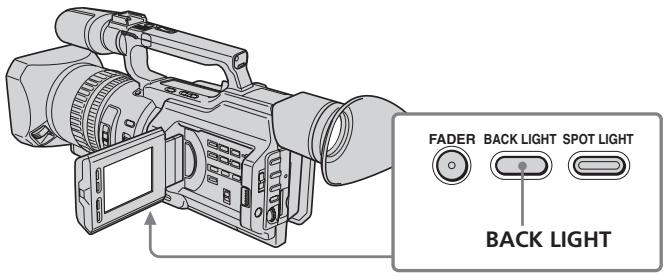
If you press one of the following buttons when using the backlight function
The backlight function will be canceled.
-
SPOT LIGHT
-
EXPOSURE
When you manually adjust the exposure
You cannot use the backlight function.
Using the spot light function
This function prevents people's faces, for example, from appearing excessively white when shooting subjects lit by strong light, such as in the theater.
Press SPOT LIGHT in standby, recording, or memory mode.
The indicator appears on the LCD screen or in the viewfinder.
To cancel, press SPOT LIGHT again.
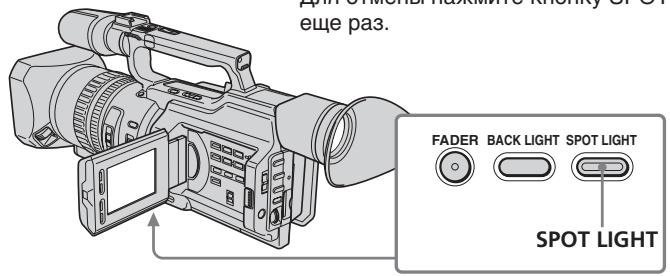
If you press one of the following buttons when using the spot light function
The spot light function will be canceled.
-
BACK LIGHT
-
EXPOSURE
When you manually adjust the exposure
You cannot use the spot light function.
You cannot use the spot light mode while in the following settings:
- Shutter speed value of 1/25 or smaller
Old movie - Low lux mode of the PROGRAM AE function
3ainnbcn06paXeHnA
EcIn HaxKaTb Ondy n3 cIeMyUoIcx KHOJOK npn IcNoB3OBAHmN FyHKcN 3aDHei NOdCBETKn
ФункцязднйпocCBetkn6удET
OTKJIIOUeHa.
- SPOT LIGHT
-EXPOSURE
Pnp yHno npEpynloBKe 3Kcno3n
HeIb3a IcNoIb3OBaTb 0yHKnIIO 3aIHeI IOIDCBeTKN.
IcnoJb3ObaHne pexMa npoxKeTOpHOro ocBeueHnA
DaHHaФyHKUH N03BOJRAET BbINONHATb CbEMky TAKIM O6pa3OM, YTO6bl Ntca NIODeH He BByIJIeN CNIIKOM 6JeDNbIMn, HAnpIMep, npr CbEMKe O6beKToB V TeaTpe, rIde Yacto PnpMeHNReTc RkOe OCBeSeHne.
B pexmme oXnidaHna, 3aIncn nIi naMRTn hakmnte KhoNky SPOT LIGHT.
Ha 3KpaHe XXKD nnn B BuDOnsKaTepe NOBnTcN INdNkAToP
Длг OTменин Нжмп Te Khoиky SPOT LIGHT etc pa3.
EcIn HaxKaTb Ondy n3 CneIkyOuXx KHOJOK npn IcNoJIb3OBoAHm NfYHKU npOXXeKTopHOrO OCBeueHn
Функци npoxkeKtopHOrO ocbeHnIyJeT OTKJIouHeHa.
Self-timer recording
You can make a recording with the self-timer. This recording is useful when you want to record yourself. You can also use the Remote Commander.
(1) Press (self-timer) in standby mode. The (self-timer) indicator appears on the LCD screen or in the viewfinder.
(2) Press START/STOP. Self-timer starts counting down from 10 seconds with a beep sound. In the last two seconds of the countdown, the beep sound gets faster, then recording starts automatically.
3aHcB no TaMepy camo3anycka
BbMOKTe BbINOJIHnTb 3aIncb no TaImepy
cMo3aNyUcKa. 3Ta 3aIncb MOKeT
PnroDnTbCBA TOM Cnyuae, KOrDa
Heo6xOIMo 3aIncatb Ce6B. IInr 3TOrO
MOXHO TaKke IcNoJIb3OBaTb NylbT
INCTaHIOHHoro ynpabJIeHnI.
(1)BpeKIMe OXnDaHnHaXMMTe KHOJky (TaImep cAmO3anycka).Ha 3kpaHe KKД nIN B BuDOnCKaTeNe NOBNTcN INDnKaTOp (TaImep cAmO3anycka).
(2)HaXmnte KhoNky START/STOP. TaMep cAmo3aynycka HaChet o6paTHbI OTCuET C 10 cekyHd C 3ymMepehblc nHaIOM. B NocleDnHe DBe cekyHdbI o6paTHOrO OTCuETa 3ymMepeHbI CnHaJI 6yDet 3ByuAtb Yaue, a 3aTeM ABToMaTnueckn HaChETc 3aInCb.
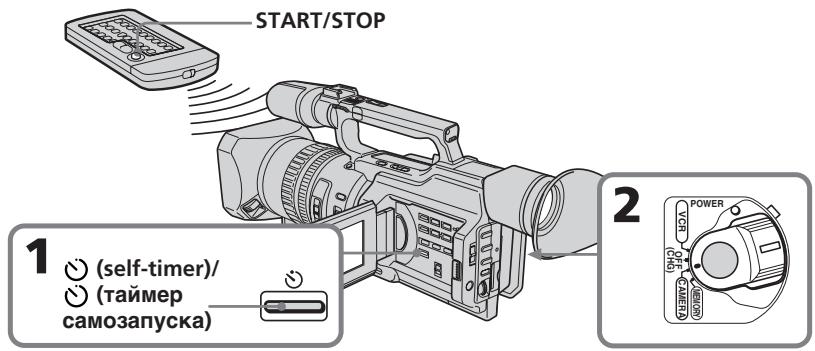
To stop the self-timer before recording
Press START/STOP again. Use the Remote Commander for convenience.
To record still pictures on tapes using the self-timer
Press PHOTO in step 2 (p. 50).
IIO octaHOBk TaMepa camo3anycka nepeed 3anncbIO
HaxmTe KhoNky START/STOP eue pa3. Iydo6tBa nCnoIb3yIte npIbT ICTaHIOHHO ynpabNeHnA.
To record still pictures on a "Memory Stick" using the self-timer
Press (self-timer), then press PHOTO in memory mode (p. 181).
To cancel self-timer recording
Press (self-timer) so that the indicator disappears from the LCD or viewfinder screen while your camcorder is in standby mode.
Note
The self-timer recording is automatically canceled when:
- Self-timer recording is finished.
- The POWER switch is set to OFF (CHG) or VCR.
3ainnbcn06paXeHnA
Checking the recording - END SEARCH / EDITSEARCH / Rec Review
You can use these buttons to check recorded pictures or shoot so that the transition between the last recorded scene and the next scene you will record is smooth.
Пювера запси - END SEARCH / EDITSEARCH/ Пюсмотр запси
BbMOKTe NcNoJIb3OBAt bTn KHOJKN dIIN npOBepKn 3aNcAHHbIX n3o6paKeHn ININ CbeMkn, YTO6bl NEpEXoM MEkDy NocJIeDNHM 3aNcAHHbIM 3nN30oDM nCleDyIOUIM 3aNcBiBaembIM 3nN30oDM 6bl IINABHBm.
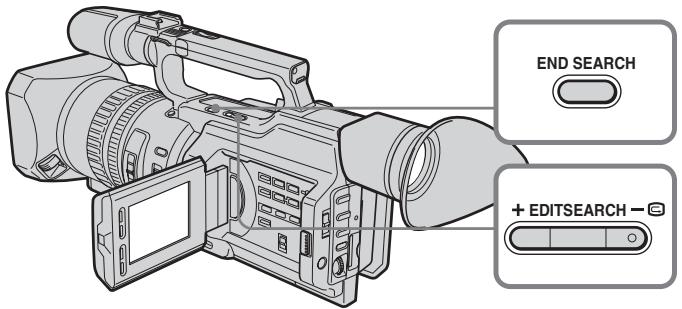
Searching the end point of the recording — END SEARCH
You can easily go to the end of the last recorded portion.
Press END SEARCH in standby mode. The camcorder rewinds or fast-forwards the tape and the last five-second recorded picture is played back. After playback the camcorder turns to standby mode. You can monitor the sound from the speaker or headphones.
Changing the next recording start point — EDITSEARCH
You can change the next recording start point in standby mode.
Hold down the + / - side of EDITSEARCH in standby mode. The recorded picture is played back.
- : to go forward
- : to go backward
Release EDITSEARCH to stop playback. If you press START/STOP, re-recording begins from the point you released EDITSEARCH. You cannot monitor the sound.
Checking the recording - END SEARCH / EDITSEARCH / Rec Review
Checking the last recorded picture — Rec Review
You can check the last recorded portion.
Press the - side of EDITSEARCH momentarily in standby mode.
The last few-seconds of picture is played back and the camcorder returns to standby. You can monitor the sound from the speaker or headphones.
End search function
When you use a tape without cassette memory, the end search function does not work once you eject the cassette after you have recorded on the tape. If you use a tape with cassette memory, the end search function works even once you eject the cassette.
If there is a blank portion at the beginning or between the recorded portions, the end search function may not work correctly (p. 210).
—Playback - Basics — Playing back a tape
You can monitor the playback picture on the LCD screen. If you close the LCD panel, you can monitor the playback picture in the viewfinder. You can also control playback using the Remote Commander supplied with your camcorder.
(1) Install the power source and insert the recorded tape.
(2) Set the POWER switch to VCR while pressing the small green button. The video control buttons light up.
(3) Slide OPEN in the direction of the mark to open the LCD panel.
(4) Press to rewind the tape.
(5) Press to start playback.
(6) To adjust the volume, press either of the VOLUME + / - buttons.
- Bocnpon3BeDeHne - OchOBhIe noLOXeHnA - Bocnpon3BeDeHne JeHTbl
When monitoring on the LCD screen
You can turn the LCD panel over and move it back to the camcorder body with the LCD screen facing out.
Bo Bpem npocmoTpa Ha 3Kpahe KKd
Moxho napeBepHyt bnaHb ynpaBHeHnI aCIOxNtB ee C Kopnycom BnDeOkaMpbl, TaK yTo 3kpan KKd 6ydt obaeH hapxy.
When you close the LCD panel
You cannot monitor the sound from the speaker. However, when the LCD panel is turned over to view on the LCD screen, you can monitor the sound from the speaker.
Ecnn 3aKpbItb NaHeJIb XKd
HeIb3a 6yIeT npocnyuBaTb 3Byk uepe3 rpOMKOrOBOpntB. Ondako, ecIn 3KpaH KKd obpaueH hapxy, 3Byk moXHo 6yIeT npocnyuBaTb uepe3 rpOMKOrOBOpntB.
To control the display of the screen indicators
Press DISPLAY on the camcorder or on the Remote Commander supplied with your camcorder.
The indicators appear on the LCD screen.
To make the indicators disappear, press DISPLAY again.
Your camcorder automatically records not only images on the tape but also the recording data (date/time or various settings when recorded) (Data code).
Press DATA CODE on the camcorder or on the Remote Commander supplied with your camcorder in playback mode.
The display changes as follows: date/time various settings (SteadyShot, white balance, gain, shutter speed, aperture value, exposure mode) no indicator

Date/time/ DaTa/BpeMa
aSteadyShot OFF
[b]Exposure mode/PROGRAM AE mode
[c] White balance
[d]Gain
[e]Shutter speed
[f] Aperture value
To not display the various settings
Set DATA CODE to DATE in the menu settings (p. 156).
The display changes as follows: date/time no indicator
IcnoJb3OBAHneФyHKcNnKoJa DaHHbIX
Bndeokamepa aBTOMaTNUeCKN 3aINCbIbAeT HaJeHTy He ToJbKO n3O6paXeHn, Ho I daHHbIe O 3aINcN (daTy/BpeM INI pa3HbIe yCTaHOBKn pni 3aINcN) (KoI daHHbIX).
B pexime Bocnpoun3BeDHeNHaXmnte KhoNky DATA CODE Ha BnDeOkaMepe IIn Ha nyIbTe DnCTaHnOHnHO yIpabLeHnI, npnilaraemoro K BnDeOkaMepe.
INDnkaun6ydtN3MeHrTbCnEduOuIM 06pa3om:
daTa/Bpemr pa3HbIe ycTaHOBKn (ycTouINBa cEmKa, 6aHaHC 6enoro, yCInHeHne, CKOpOcTb 3aTBopa, BENuHnHa dnaΦpaRmbl, peKIM 3KcNo3nU) 6e3 INDnKaU
Various settings/ Pa3hbIe yCTaHOBKn
a3NaueHne OFF dIpyHKn SteadyShot
[b]PexkIM 3KcIIOzHIN/peXkIM PROGRAM AE
[c]BaIaHc 6eIoro
[d]YcunJeHne
[e] CkopoocTb 3aTbopa
[f]BelenuHaDnaaparMbI
ДЯ OTMeHbI OTO6paXKeHn pa3HbIX yCTaHOBOK
YcTaHOBnTe napaMeTp DATA CODE b noIoxKeHne DATE B ycTaHOBkax MeHIO (Ctp. 156).
ИндикадиьудETИЗМЕНЯТбССLEДУЮПIM 6obpa30m:
daTa/BpeMRA 6e3 INHnKaauu
Recording data
Recording data is your camcorder's information when you have recorded something. In CAMERA mode, the recording data will not be displayed.
When you use the data code function, "--- ----" (date) or "--- : -- : --" (time) appears if:
- A blank portion of the tape is being played back.
- The tape is unreadable due to tape damage or noise.
- The tape was recorded by the camcorder without the date and time set.
Data code
When you connect your camcorder to the TV, the data code also appears on the TV screen (p. 46).
Note on the date/time indicator
Recording date/time is not displayed during shooting, however, it is automatically recorded on the tape. You can check the recording date/ time during playback by pressing DATA CODE.
If the exposure adjustment is set to minimum
"CLOSE" is displayed at the location of the aperture value.
3aHncaHHbIe daHHbIe
3aIncaHbIe DaHHbIe CoepKaT INHΦopMaciNo 3aIncn, BbIOnJIeHHoB BInDeOKaMePoJ. BpeXIme CAMERA DaHHbIe OTo6paKaTaBcR He 6y.DyT.
Пи ИСПОЛБЗОВАнИ ΦУнКЦМ NOдааньх NOВДBAHOTСССМВОЛы -- ---" (датa) Или "---:---"(Врем), ecл:
- Bocnpon3boDntcH He3aIncAHbI yuactokJeHTbl.
-JeHTa He NoJaTaC TcHtBbAHnIO n3-3a NOBpeKJeHn INI NOMex.
-3aIncb Ha JeHTy 6bIJa BbINOnHeHa BnDeOkamepoB 6eYcTaHOBKn DaTbI IN BpemEni.
KoD daHHbIX
Ecni BnDeokamepy nOdcoeDInHnTb K TeNeBn3OpY, KoI DaHHbIX TaKxE 6yDet OTo6paKaTaBcHa 3kPaHe TeNeBn3Opa (Ctp.46).
HdkaTop DaTbI/BpeMeHN
ДаТВБЕМЯ 3aПИСН He OTOБРАЖАЛТСВ BO BpeMЯ CБЕМКи,ОДHAKO OнI aBTOMaTHyeCKN 3aПИСыВaIOTСHa JIeHTy.ДaTY/BpeMЯ 3aПИСn MOЖH IOpOBePITb B pEKMe BOCПоиЗВeDEнг,нжав KhONkY DATA CODE.
EcIn yctaHOBHeO MmHMaJIbHoe 3HaueHne 3KcNoKOppeKuIN
BmecTo 3naueHnIaΦpaarmbI OTO6paKaetcHaAINCb "CLOSE".
Various playback modes
To operate video control buttons, set the POWER switch to VCR.
To view a still picture (playback pause)
Press I during playback. To resume normal playback, press or I
To advance the tape
Press in stop mode. To resume normal playback, press .
To rewind the tape
Press in stop mode. To resume normal playback, press .
To change the playback direction
Press < on the Remote Commander during playback to reverse the playback direction. To resume normal playback, press .
To locate a scene monitoring the picture (picture search)
Keep pressing or during playback. To resume normal playback, release the button.
To monitor the picture at high-speed while advancing or rewinding the tape (skip scan)
Keep pressing while rewinding or while advancing the tape. To resume rewinding or advancing, release the button
To view the picture at slow speed (slow playback)
Press during playback. For slow playback in the reverse direction, press < on the Remote Commander, then press . To resume normal playback, press .
Pa3nUHbIepeXmMbI BocnpOn3BeDeHnA
ДяИСПОЛБЗOBАнHA KHONOK ynpaBNeHЯ BIndeOn3O6paXeHem yCTaHOBITe nepeKIIIOUcaTeIb POWER B noLoJKeHne VCR.
ДлпрсмOTpa HeNodBnKHOrO n36paXeHnna (nay3a BocnpOn3BeDeHnna)
HaxMMTE BO BVPMe BO CXPPOIN3BEdENH KONKY II.ДЯ BO3O6HOBNeH N ObUHOrO BOCPPOIN3BEdENH HAXMMTE KHONK YIJIII
Дя уckopehno nepemOTkn JentbI BnepeD
HaxMMTE B PEXMME OCTAHOBKN KHONKY ▷.ДЯ BO3O6BHOJIENNA O6bIYHOROBOCNP0U3BeDEHINHAxMMTE KONKY
IaH3MeHeHHHaNPaBHeHH BocPOn3BeDeHH
HaxmTe KhoNky <Ha npIbTe
DnCTaHNOHHOrO ynpaBHeHn BO BpeM
BOcPOn3BeDeHn DnA N3MeHeHn
HaNPaBHeHn BOCpON3BeDeHn.
BO3o6HOBHeHn O6bUHOrO BOCpON3BeDeHn
HaxmTe KhoNky
To view the picture at double speed
Press × 2 on the Remote Commander during playback. For double speed playback in the reverse direction, press < , then press × 2 on the Remote Commander. To resume normal playback, press .
To view the picture frame-by-frame
Press on the Remote Commander in playback pause mode. For frame-by-frame playback in the reverse direction, press To resume normal playback, press
To search the last scene recorded (END SEARCH)
Press END SEARCH in stop mode. The last five seconds of the recorded portion plays back and stops.
In various playback modes
Sound is muted.
- The previous picture may remain as a mosaic image during playback.
When the playback pause mode lasts for five minutes
Your camcorder automatically enters the stop mode. To resume playback, press
Slow playback
Slow playback can be performed smoothly on your camcorder, however, this function does not work for a signal output through the DV Interface.
When you play back a tape in reverse
Horizontal noise may appear at the center, or the top and bottom of the screen. This is not a malfunction.
OHaKO 3TO He ABJRAETc HEnCnPaBHOCTbIO.
Viewing the recording on TV
Connect your camcorder to your TV or VCR with the A/V connecting cable supplied with your camcorder to watch the playback picture on the TV screen. You can operate the video control buttons in the same way as when you monitor playback pictures on the LCD screen. When monitoring the playback picture on the TV screen, we recommend that you power your camcorder from the wall socket using the AC Adaptor (p. 18). Refer to the operating instructions of your TV or VCR.
Open the jack cover. Connect your camcorder to the TV using the A/V connecting cable supplied with your camcorder. Then, set the TV/VCR selector on the TV to VCR.
If your TV is connected to a VCR
Connect your camcorder to the line input on the VCR by using the A/V connecting cable supplied with your camcorder. Set the input selector on the VCR to LINE.
If your TV or VCR is a monaural type
Connect the yellow plug of the A/V connecting cable to the video input jack and only the white plug to the audio input jack on the VCR or the TV. The red plugs are not used.
EcnI TeJIeBn3Op NODKJIIOUeH K BnDEOMaHnToΦOHy
IoiDCoeDInHnTe BnDeOKeMaMepy K BXoDHomy
rHe3dy BnDeOmaHnTOΦoHa C NOMoUbO
COeDInHnTeJIbHO rKabeJy aYdIOBvNdeO,
KOTOpBn pnpIaRaTcK BnDeOkaMepe.
VCTaHOBtceJeKToP BxODoHO CmHnHa Ha
BnDeOmaHnTOΦoHe B NOJoxHeNE LINE.
EcnI TeJIeBn3Op nJIN BUndeOMaHHToΦOH MOHOΦOHnueCKO Tnna
IoiDCoeDHHTe JKeTbI BHTeKep
coEHNHITbHOrKa6eJIa ayDIOBvIDeoK
BXOHDOMy IHe3dy BnDEOCINHana NToIbKO
6JIbI WTeKep - K BXODHOMy IHe3dy
ayDNOCINHANA Ha BnDEOMaHHToDOHe NNI
TELEBnOpe. KpaChIbe WTeKepbI He
NCNOLb3yIOTcR.
If your TV/VCR has a 21-pin connector (EUROCONNECTOR)
The models with mark printed on their bottom surfaces only
EcIn B TeLeBn3Ope/BnIeOMaHrNtOfoHe ImeTeTc 21-ItbIpbKOBbI pa3beM (EUROCONNECTOR)
ToIbKO MoJeN CO 3HaKOM Cc Ha HnXHei CTopoHc
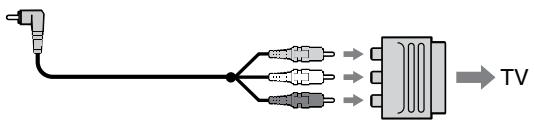
Use the 21-pin adaptor supplied with your camcorder.
This adaptor is exclusive to an output.
If your TV or VCR has an S video jack
Connect using an S video cable (optional) to obtain high-quality pictures. With this connection, you do not need to connect the yellow (video) plug of the A/V connecting cable. Connect the S video cable (optional) to the S video jacks on both your camcorder and the TV or the VCR. This connection produces higher quality DV format pictures.
When you adjust the TV screen
If you monitor the shooting picture, not the playback picture, set COLOUR BAR to ON in the menu settings (p. 156). The colour bar is displayed on the TV screen.
IcnoIb3yIte 21-ItbIpbKOBbl aanTep, npnlaeraMbl K BnDeokamepe.
JaHHbI aanTep npeHa3Nauehen NCKHOUHTeJIbHO DnIa BbIOda.
EcnB TeleBn3ope nn BnDEOMarHnToΦOHe NMeETcBnDeOrHe3do S.
BbIOnHInTe coeINHeHne c nOMOuBIO
BUNeOKa6eJIaS (npno6petaOTcra
DOnONHnTeNbHO) dJa nOnyueHnra
BbICOKoKaueCTBeHNOrO n3OBpaXeHnra. Ppi
TaKOM CoeINHeHn He HxNHO nOKnIOuaTb
KeJtBn (BnuDeo) uTeKeP coeINHTeNBHO
Ka6eJIa aydno/BnuDeo. PoDCoeINHTe
BUNeOKa6eJIb S (npno6petaOTcra
doONHnTeNbHO) K BUNeOreH3dAm S Ha
BUNeOKaMepe n TeJeBN3ope nJi
BUNeOMaHnTOΦOHe. 3To coeINHeHne
Pi3BOJnAET NOLyUHTb BbICOKoKaueCTBeHNHO
n3OBpaXeHne φopMaTa DV.
Hactpoika n36paXeHnHa 3KpaHe TelenBn3opa
Для KOнтpoля KauecTba ИЗбраженя рпс cbeMke, a He BOCnpOIN3BeDEHnN,В yctaHOBkax MeHIO Для napaMeTpca COLOUR BAR yCTaHOBInTe 3NaueHne ON (ctp. 156).Ha 3KpaHe TelenBn3opa 6yJET OTObpaKaTbcr YCBETOBaII NOloCa.
- Advanced Recording Operations — Recording a still image on a tape - Tape Photo recording
You can record still images on tapes with all the pixels in the progressive recording mode.
See page 52 for details. This mode is useful when you print images using a video printer (optional).
Besides the operation described here, your camcorder can record still images on a "Memory Stick" (p. 177).
(1) In standby mode, keep pressing PHOTO lightly until a picture freezes. The CAPTURE indicator appears. Recording does not start yet.
To change the image, release PHOTO, select an image again, and then press and hold PHOTO lightly.
(2) Press PHOTO deeper.
The still image on the LCD screen or in the viewfinder is recorded for about seven seconds. The sound during those seven seconds is also recorded.
The still image is displayed on the LCD screen or in the viewfinder until recording is completed.
The number of still images recordable on a mini DV cassette
You can record about 510 images in SP mode and about 765 images in LP mode on a 60-minute cassette.
- ycoBepweHCTBOBaHHbIe Opeaun CbemKn 3aIncB HEnOdBnXHOro N3O6paXeHnHa IeHTy - 3aIncB φotorpaΦn Ha IeHTy
HEnoDbNnBHeI N3O6paXeHnMoXHO 3aNNcBtBaTb Ha KacceTbIBpeXnMe npOrpeccNBHO CBeMKn C COxpaHHeHem BcEx NIKCeNoB. NoDpo6HbIe CBeDeHn npuBeDeHbHa cTp.52.DaHNbI peXm POnE3eH,ecn HynKHO paCneUaTaTb N3O6paXeHn C nOMoUb BO BInDeOpnPHTepa (PnpO6pTaIOTcA donoHNTeNbHO).
Kpome BblSeONCaHHO onepaun, BnDEOkamepa MOKeT BblINJHrTb 3aNNcb HeNoDnBXhBIX N3O6paXeHn Ha "Memory Stick" (cTp.177).
(1)В рекиме окданая deprжпс сlerka haxатуй кногку PHOTO до,text по,poka He noBUTcHЯ NOДBMЖhoe n3O6paXeHne. ПявNTc ИндИКaTOp CAPTURE. 3aInCb euple He hyuHaeTc. ДЯн ИЗмЕни ИЗбрахени OTnyCtNe KhoNkY PHOTO, Bbl6epnte I3O6paXeHne ChOba,a 3aTeM haxmte И deprxнite сlerka haxaтуй кногку PHOTO.
(2)HaXmTe KhoNkY PHOTO cnIbHee. HeoDbVnKHoe n3O6paXeHne Ha 3KpaHe KKД nII B vIOnckaTeNe 6yDet 3aINcBbATbcr OKOJIc CEMN cekyHd. B TeueHne 3Tnx CEMN cekyHd 6yDet 3aINcBbATbcr N 3ByK. HeoDbVnKHoe n3O6paXeHne oTo6paXaEtcra Na 3KpaHe KKД nII B vIOnckaTeNe DO Tex nop, NOKa He 3aKOHHTcra 3aINCb.
1
PHOTO
CAPTURE
2


MaKcMaJIbHoe KOJIuYeCTBO HeNoDBrNkHbIX 3nO6paXeHn, KOTOpoe MOKeT 6bITb 3aIncAHO Ha KaCCeTy MUN DV.
Ha 60-MnHyTHoN KAcCeTe MoXHo 3aIncatb npImepH0 510 n3o6paXeHn B pexKMe SP n okono 765 n3o6paXeHn B pexKMe LP.
Recording a still image on a tape - Tape Photo recording
Notes
- During tape photo recording, you cannot change the mode or setting.
- The PHOTO button does not work:
- While the fader function is set or in use.
- While the digital effect function is set or in use.
- Do not shake the camcorder during tape photo recording. The recorded image may be blurred.
To do tape photo recording using the Remote Commander
Press PHOTO on the Remote Commander. Your camcorder immediately records an image on the LCD screen or in the viewfinder.
When you do tape photo recording during normal CAMERA recording
You cannot check an image on the LCD screen or in the viewfinder by pressing PHOTO lightly. Press PHOTO deeper. The still image is then recorded for about seven seconds and your camcorder returns to standby mode.
When shooting a moving object in Tape Photo recording
When playing back the image by another unit, the image may be blurred. This is not a malfunction.
3aHcB HeNoDBrXHHOro m3o6paXeHnHaJeHTy-3aHcB ΦOTorpaΦnHaJeHTy
PpimueaHn
- Bo Bpemr foTOcBEmKn Ha JeHTy HeBO3MOXHO N3MeHnTb peKIM NJIYCTaHOBky.
-KhONka PHOTO He pa6oTaet: -ecn yCTaHOBJeHa nJIn nCNoJIb3yeTcA cyHKUra 1peiDepa -ecn yCTaHOBJeHa nJIn nCNoJIb3yeTcA cyHKUra 1nOPOBbIX 3oEeKTOB.
He denaiTe pe3Knx DnBxehn Bndeokamepo Bo Bpemr fOToCbEmKn Ha IeHTy. 3aIncbIbAeMOe n3O6paXeHne MoXeT 6bITb HeYETKIM.
Recording a still image on a tape - Tape Photo recording
Self-timer tape photo recording
You can make a tape photo recording with the self-timer. This mode is useful when you want to record yourself. You can also use the Remote Commander.
(1) Press (self-timer) in standby mode. The (self-timer) indicator appears on the LCD screen or in the viewfinder.
(2) Press PHOTO deeply. Self-timer starts counting down from 10 with a beep sound. In the last two seconds of the countdown, the beep sound gets faster, then recording starts automatically.
3aHcB HeNoDBrXHOrO m3o6paXeHHaJeHTy-3aHcB ΦOTorpaΦnHaJeHTy
To cancel self-timer recording
Press (self-timer) so that the indicator disappears from the LCD or viewfinder screen while your camcorder is in standby mode. You cannot cancel the self-timer recording using the Remote Commander.
Note
The self-timer recording mode is automatically canceled when:
- Self-timer tape photo recording is finished.
- The POWER switch is set to OFF (CHG) or VCR.
Shooting with all the pixels - PROG. SCAN
To import moving images to your PC to view still images, we recommend you record in progressive recording mode. To use progressive recording mode, follow the procedure below. Still images produced this way are more stable than those recorded on a tape in normal mode, and thus are more suitable for analysing high-speed action such as sports scenes. (Since this camcorder takes in an image every 1/15 of a second in progressive recording mode, moving images recorded in this mode may be subject to too much jitter. To view moving images, we recommend recording in normal mode.)
CbeMka c nCNoJIb3OBAHHeM BCex NIKceIob - PROG. SCAN
YTo6bIMNOpTnPOBaT bDNJxUeNEcR
H3O6paXeHnHa KOMNbIOTep dJI npOCMOTpa
HeNOOBHXhBbIX N3O6paXeHn, peKOMeHdyETcR
BbIOJINrTa 3aINCb BpeXmE pORpeCCNBHO
cbEMKn. dJI INcIOb3OBAHNPEXmIA
pORpeCCNBHO CBEmKn BbIOJINHTE
CJeDyUoUme DeICTBnR. dJI INcIOb3OBAHN
pORpeCCNBHO rPEXmA BbIOJINHTE
DeIcTBnR, ONiCAHNbIe HNXe. HeNoDBXhBie
H3O6paXeHn, NOUYaeMbIe TaKIM O6pa3OM,
ABJIOCTCB 60oeye yCTOuINBBIMn IO CpABHEHIO C TeMn, KOTOpBte 3aINCaHBn Ha KACCetY B
O6bIyHOM peXmE, I nO3tOMy 60oe ne IOdXoJrT
dJI aANJIn3a 6bICTPOnDBNXuIXc cSeH,
HanprIMep CnOPTNBHbIX COpeBHOBaHN.
(1oCKoJIbky B pOrpeccNBHom peXmE
BuDEOkamepa CHImaET N3O6paXeHne KaJdyo1
1/15 ceKHyDbI, DnBIXuINEc H3O6paXeHn,
3aINCaHNbIE B 3tOM peXmE, MOrYT CINbHO
DpoKaTb. dJI npOCMOTpa DnBIXuIXcR
H3O6paXeHn peKOMeHdyETcR 3aINCbIBaTb B
O6bIyHOM peXmE.)


(1) Press MENU to display the menu in standby mode.
(2)Turn the SEL/PUSH EXEC dial to select M, then press the dial.
(3)Turn the SEL/PUSH EXEC dial to select PROG.SCAN, then press the dial.
(4) Turn the SEL/PUSH EXEC dial to select ON, then press the dial.
(5) Press MENU to erase the menu display. The PROG. SCAN indicator lights up.
(1)HaxmTe KhoNky MENU dlya OTo6paXeHnMeHIO BpeXmE OxuHaHn.
(2)Повернente ДИСК SEL/PUSH EXEC ДЯ
Выбopa уCTановки m, a 3aTeM нажмITE
НдИСК.
(3)ПовернITE ДИСК SEL/PUSH EXEC ДЯ
Выбoga установки PROG. SCAN, a 3aTem
НжмITE НДИСК.
(4)ПовернITE ДИСК SEL/PUSH EXEC ДЛЯ ВИбopa установки ON, a за tem нажмITE на ДИСК.
(5)HaXMMTe KHONky MENU ДЯуДаленй ИнДИКаци МЕню. 3aRopNTcH INДИКaTOp PROG. SCAN.
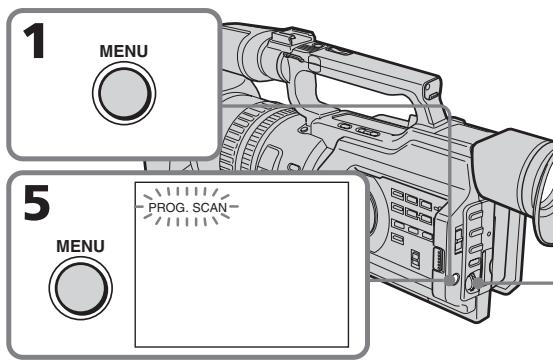
To return to normal mode
Select OFF in step 4, then press the SEL/PUSH EXEC dial.
ДяВОЗВ paTаВOBыньpeхиM
BbI6epnTe yCTaHOBky OFF B nyHKte 4,3aTeM haxmTe Ha dNcK SEL/PUSH EXEC.
Note on the progressive recording mode
A normal TV broadcast divides the screen into two finer fields and displays them in turns every 1/50 of a second (Interlace format). Thus, the actual image displayed in an instant covers only half of the apparent image area. Displaying the whole image simultaneously on a full screen is called displaying with all the pixels. In this mode, the resolution of the still picture is clearer than in the normal mode. This camcorder takes in an image every 2/25 of a second, which may cause the image of a moving object to go out of focus. This camcorder is originally programmed to record in the normal TV format.
When shooting under fluorescent light
When shooting in progressive recording mode under fluorescent light or light bulbs, a rare phenomenon may happen in which the screen lights up brightly (Flicker phenomenon). This is not a malfunction. If you want to stop this phenomenon, set PROG. SCAN to OFF in the menu settings.
In the progressive recording mode
You cannot use the following operations:
-Digital zooming
- Wide mode
You can easily make the picture be on a horizontal line using the guide frame. The guide frame is not recorded.
(1) Press MENU to display the menu in standby, recording, or memory mode.
(2)Turn the SEL/PUSH EXEC dial to select, then press the dial.
(3)Turn the SEL/PUSH EXEC dial to selectGUIDEFRAME, then press the dial.
(4) Turn the SEL/PUSH EXEC dial to select ON, then press the dial.
(5) Press MENU to erase the menu display. The guide frame is displayed on the LCD screen or in the viewfinder.
Исpenьзованке КонтPORьною рамки
MoxhoIeKo BbIPOBHArTb N3O6paXeHne no roPn3OHTaIN C NOMOUsbHO KOHTpOJIbHO paMKu. 3aIncB KOHTpOJIbHO paMKu Ha JeHTy He IPOUN3BOIDTCa.
(1)HaxmTe KhoNky MENUДлЯ
OTobpaXeHnMaMeHIO BpeXmme OxuJaHnA,
3aIncn NJI namrTn.
(2)ПовернITE диСEL/PUSH EXEC дя Вьбopa установки , a 3aTeM нажмITE ha диСК.
(3)ПовернITE ДИСК SEL/PUSH EXEC ДИВьбopa установки GUIDEFRAME,Затем нажмITE на ДИСК.
(4)ПовернITE ДИСК SEL/PUSH EXEC ДЛЯ ВИбopa установки ON, a за tem нажмITE на ДИСК.
(5)Haxmnte KhoNky MENUДгудалени
ндикалп мени. КоHTрьная рамka
OTOBpaKaeta.Tа на захаре XXД и в
ВИДОИСКАТЕ.
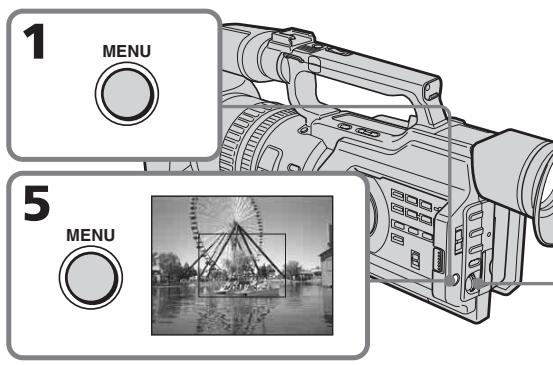

To clear the guide frame
Select OFF in step 4, then press the SEL/PUSH EXEC dial or simply press DISPLAY.
Note
The guide frame indicates only a rough level. The size and position of the guide frame do not affect the setting of the camcorder.
If you setGUIDEFRAME to ON
The other screen indicators are also displayed on the LCD screen.
Длг OTMeHbI OTo6paXeHnKoHTpoJIbHoi paMKn
BbIbeIpTe yCtahOBky OFF B nyHKe 4, a 3aTeM hXaMnTe nck SEL/PUSH EXEC nnn KhoNkY DISPLAY.
Примеане
KoHTpOlbHaJa paMka NOKa3bIBaet TOnIbKO npIMepHbI yPoBeHb. Pa3MebpI nNoIOXKeHne KOHTpOlbHOJ paMKn He BInrIoT Ha yCTaHOBKn BVNeOKaMepbl.
EcInI nIa napametpaGUIDEFRAME yctahOBJIeHO 3NaueHne ON
You can record a 16:9 wide picture to watch on a 16:9 wide-screen TV (16:9WIDE).
Black bands appear on the screen during recording in the 16:9WIDE mode a. The picture during playing back in the 4:3 mode on a wide-screen TV [b] or a normal TV [c]* is compressed in the widthwise direction. If you set the screen mode of the wide-screen TV to the full mode, you can watch pictures of normal images [d].
- Played in 4:3 mode. When you play a picture in the wide mode, it appears as you have seen on the LCD screen or in the viewfinder a.
In standby mode, set 16:9WIDE to ON in in the menu settings (p. 156).
B pexime oKxndaHna ycTaHOBnte napameTp 16:9WIDE B noIooKeHne ON B C yctaHOBkax MeHIO (CTp. 156).
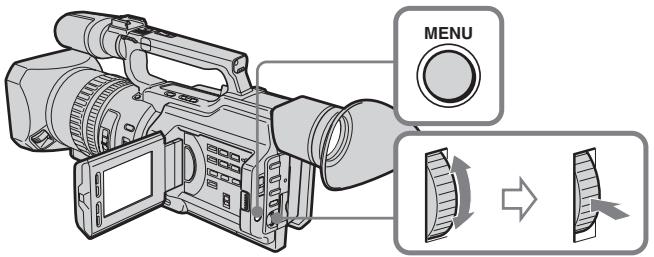
To cancel the wide mode
Set 16:9WIDE to OFF in the menu settings (p. 156).
Длг OTмehы 施рokoэКраHHoropexima
YcTaHOBnTe npaMeTp 16:9WIDE B noJIOXeHne OFF BycTaHOBkax MeHIO (Ctp. 156).
In wide mode, you cannot select the following modes:
- Old movie
- Progressive recording mode
During recording
You cannot operate the wide mode function. When you cancel the wide mode, set your camcorder to the standby mode and then set 16:9WIDE to OFF in the menu settings.
B WnpoKo3KpaHHom pekmHeJb3a BbI6paTb cJeDyUOupe pekmbl:
- Cтаринhoe KINHO
- Pexim nporpeccnBHOc bEmKn
BoBpeMa 3aHmch
He pa6oTaET shpOKo3KpaHHbI peXnM. EcnnHyxHNO OTMeHNITb shpOKo3KpaHHbI peXnM, yCTaHOBnTe BnDeOkamepy B peXnM OxNdaHnA, a 3aTEM ycTaHOBnTe peXnM 16:9WIDE B nOJoxKeHne OFF B ycTaHOBkax MeHIO.
Using the fader function
You can fade the picture in or out to give your recording a professional appearance.
When fading in, the picture gradually changes from black-and-white to colour.
When fading out the picture gradually changes from colour to black-and-white.
MONOTONE
(1) When fading in [a]
In standby mode, press FADER until the desired fader indicator flashes.
When fading out [b]
In recording mode, press FADER until the desired fader indicator flashes.
The indicator changes as follows:
FADER MONOTONE OVERLAP
WIPE DOT no indicator
The last selected fader mode is indicated first.
(2) Press START/STOP. After the fade in/out is carried out, your camcorder
automatically returns to the normal mode.
IcnoJb3ObaHne yHKcnn feiepa
Press FADER until the indicator disappears.
Note
You cannot use the following functions while using the fader function, and vice versa:
- Digital effect
- Low lux mode of PROGRAM AE (Only in OVERLAP, WIPE, or DOT mode)
-Tape Photo recording
-Interval recording - Cut recording
When the OVERLAP, WIPE, or DOT indicator appears
Your camcorder automatically stores the image recorded on a tape. As the image is being stored, the fader indicator flashes fast, and the playback picture appears.
ДЯ OTMeHbI ΦyHKcH Φeɪdepa
HaximaiTe KhoIky FADER do tex nop, noka He Icye3He T HdkaTop.
PpimeyaHne
Using special effects - Picture effect
You can digitally process images to obtain special effects like those in films or on TV.
NEG. ART a: The colour and brightness of the picture is reversed.
SEPIA: The picture gets sepia-toned.
B&W: The picture appears in monochrome (black-and-white).
SOLARIZE [b]: The light intensity is emphatic, and the picture looks like an illustration.
SLIM [c]: The picture expands vertically.
STRETCH [d]: The picture expands horizontally.

[b]
IcnoIb30BaHne cpeunalbHbIX əΦΦeKTOB - ΘΦΦeKT n3O6paXeHnA
O6pa60Ky 306paXeHnI cIpPoBbIM MeTODOM MOxHO BbIIOJIHTb IJI IIOJIyEHeHn CNeUaJIbHbIX 3cΦeKToB, KaK B KInHOΦuNbMax NII Na Ha TeIeBuJeHn.
NEG. ART a: Lbet n npkoctb n3o6paKeHH 6dyT HeTaTNBbIMN.
SEPIA: 1306paJHHe 6yIeT B cBeTe CENII.
B&W: 1306paXeHne 6yJeT MOHOxPOMHbIM (YePHo- 6eJIbIM).
SOLARIZE [b]: Frkoctb CBeTa 6ydeT yCnIeHNo, a N3O6paXeHne 6yDeT BvIgJaTeB KaK pncyHok.
SLIM [c]: ɪəsɒpʌɡeHne pɑːtɪnɛTcŋ no Bερɪnɪkʌnɪ.
(1) In standby or recording mode, press PICTURE EFFECT.
(2)Turn the SEL/PUSH EXEC dial to select the desired picture effect mode. The picture effect indicator changes as follows:
NEG.ART SEPIA B&W
SOLARIZE SLIM STRETCH
Using special effects - Picture effect
To cancel the picture effect function
Press PICTURE EFFECT so that the indicator disappears.
While using the picture effect function
You cannot select the old movie mode.
When you turn the power off
The picture effect function will be automatically canceled.
When PROG. SCAN is set to ON in the menu settings
You cannot select SLIM and STRETCH.
IcnoJb3OBAHne cneuaJIbHbIX 3ΦΦeKToB - ΘΦΦeKT n3o6paXKeHnA
IIT OTMeHbI yHKun 3ΦΦeKTOB n3o6paXeHH
Hakmte KhoNky PICTURE EFFECT, yTo6bI HndkaTOp nCye3.
PnncnoB3OBaHmФyHKcNn 3ΦΦeKta n3o6paXeHn
Helen3a Bb6paTb peXm CTapuHHoro KIno.
PnBbIKIOHeHNIITaHNA
EcIn npaMeTp PROG. SCAN yCTaHOBJIeH B NOJoxHe N ON yCTaHOBkax MeHIO
HeIb3a Bbl6paTb peKmbl SLIM n STRETCH.
Using special effects - Digital effect
You can add special effects to recorded pictures using the various digital functions. The sound is recorded normally.
STILL
You can record a still image so that it is superimposed on a moving picture.
FLASH (FLASH MOTION)
You can record still images successively at constant intervals.
LUMI. (LUMINANCEKEY)
You can swap a brighter area in a still image with a moving picture.
TRAIL
You can record the picture so that an incidental image like a trail is left.
OLD MOVIE
You can add an old movie type atmosphere to pictures. The black bands appear on the upper and lower of the screen to change the virtual screen size to the cinemascope size, and the picture effect is set to SEPIA.
IcnoIb3OBAHne CpeuHaJIbHbIX 3ΦΦeKToB -LHΦpOBoH ΘΦΦeKT
BbMOKeTe DObaJIbTb CneIaJIbHbIe 3ΦΦeKtbl Ha 3aIINcblBaEMOE N3o6paXeHne C nOMOsbIO pa3IINHbIX cIpOboBix cyHKuN. 3aIINcblBaEmbl 3Byk 6yJeT O6bHbIM.
STILL
BbIMoKTe3aINcSbIbTaHHeNoDBNXHoe n3o6paXeHne dIra HAIoXeHn erO ha noDVBHXHO n3o6paXeHne.
FLASH (FLASH MOTION)
BbIMoKeTe 3aINcBbAtb HEnODbXHbIe n3o6paXeHnI NOcIeNoBaTeNbHO uepe3 onPeJeENHbIe INHTepBaJIbI.
LUMI. (LUMINANCEKEY)
BbMOKTe N3MeHrTb npKHe MeCTa Ha HEnoDBNIXHOM N3O6paXeHn Ha NpDBrXhBiE N3O6paXeHn.
TRAIL
BbMOKTe3aINcMbTaBn3O6paXeHne C 3ΦΦeKToM 3aNa3DbBaHn.
OLD MOVIE
BbMOKeTe BbIIOJIHNITb CbEMKy C3ΦΦeKTOM CTaPnHHOrO KInHO. B BerxHeN HnXHHe N YaCTn 3KpaHa NOBnHOTcY ePhHbE NNoOcBi TaK, YTO6bI PnIDaTb BNPTyAJIbHOMy 3KpaHy npONOpznn KINHO3KpaHa, PnI 3TOM 3ΦΦeKT n3OpaXeHn yCTaHOBnE B NIOJoxKeHne SEPIA.
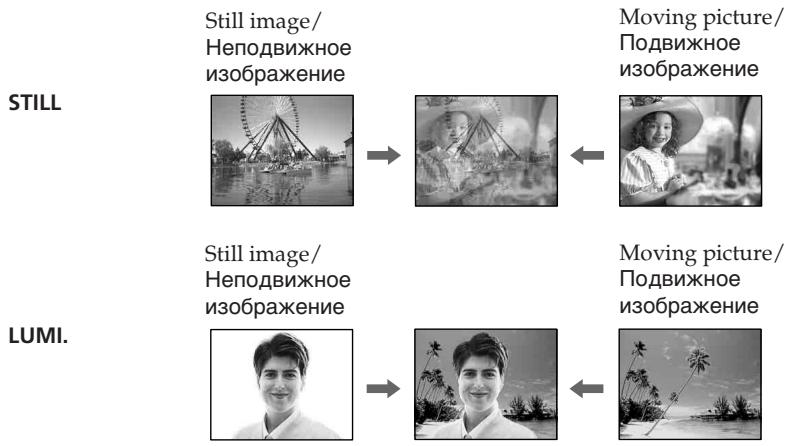
Using special effects - Digital effect
(1) In standby or recording mode, press DIGITAL EFFECT. The digital effect indicator appears.
(2)Turn the SEL/PUSH EXEC dial to select the desired digital effect mode. The digital effect indicator changes as follows: STILL FLASH LUMI. TRAIL OLD MOVIE
(3) Press the SEL/PUSH EXEC dial. The indicator lights up and the bar appears. In STILL and LUMI modes, the still image is stored in memory.
(4) Turn the SEL/PUSH EXEC dial to adjust the effect.
Items to be adjusted
| STILL | The rate of the still image you want to superimpose on the moving picture |
| FLASH | The interval of flash motion |
| LUMI. | The colour scheme of the area in the still image which is to be swapped with a moving picture |
| TRAIL | The time until the incidental image vanishes |
| OLD MOVIE | No adjustment necessary |
The longer the bar on the screen, the stronger the digital effect. The bar appears in the following modes: STILL, FLASH, LUMI. and TRAIL.
IcnoJb3OBAHHe cneuaJIbHbIX 3ΦΦeKTOB -LcnpoBOI 3ΦΦeKT
Using special effects - Digital effect
To cancel the digital effect
Press DIGITAL EFFECT. The digital effect indicator disappears.
Notes
- The following functions do not work in digital effect mode:
-Fader
- Low lux mode of PROGRAM AE
-Tape Photo recording
-Shutter speed (1/25 or smaller) adjustment
-
The following functions do not work in old movie mode:
-
Wide mode
- Picture effect
- PROGRAM AE
- Spot light mode
- Shutter speed adjustment
When you turn the power off
The digital effect function will be automatically canceled.
IcnoJb3ObaHne cneuaJIbHbIX 3ΦΦeKToB -LmΦpOBoI 3ΦΦeK
ДЯ OTMeHbI UΦpOBOrO 3ΦΦeKtA
Haxmnte KhoNky DIGITAL EFFECT.
INHnKaTOp UnpoBOrO 3ppeKta nCHe3HeT.
Примеань.
BpeKIme cUcfoBoro 30fpeKta He pa6oTaIOT cNeUHOUIne FyHKuIN:
-Φeɪdεp
-PeЖIM Hn3KoO OcBeUeHocTn PROGRAM AE
-ΦOTOCbEMKaHaJIeHTy
-Pereynipobka ckopoctn 3atbopa (1/25 n Hnke)
BpeXnme cTapHHoro KInHO He pa6oTaHOT cnDeyuOuIeФyHKUIN:
-山npoko3KpaHbIpeXIM
-3ΦΦeKt n306paXeHnA
-PROGRAM AE
-PeKIM npoXekTopHO OcBeueHnA
-Pereynipobka ckopoctn 3aTbopa
PnBbIKJIIOHeHHIITaHNA
ФункцИЗ UNDPPOBbIX 3ФСФЕKTOB
ABTOMATNUECKN OTMENHReTcR.
Shooting with manual adjustment
Under normal conditions, this unit automatically makes various adjustments as it shoots. However, you can adjust the following functions manually to suit your preference.
Functions you can adjust by setting the AUTO LOCK selector to the center (auto lock release) position
Brightness (exposure), shutter speed, white balance, and PROGRAM AE
Functions you can adjust in menu settings Deactivating the SteadyShot
Functions you can adjust by using other selectors/rings
ND filter, zebra pattern, focus, and zoom
The following describes how to adjust all the functions mentioned above except white balance (p. 72), PROGRAM AE (p. 79), focus (p. 83), and zoom (p. 31).
AUTO LOCK selector
Set the selector as shown below to maintain or release the settings of the functions.
CbeMka c nCnoJb3OBAHnEm pyHOn peYnIpOBKn
B HopMaIbHbIX yCIOBnIX daHHOe yCTpoiCTBO aBTOMaTnueCKn npOn3BOJNT pa3JIuHbIe HAcTPOiKn B IpoUcECE cBemKn. Ondako, INCXOJa n3 CO6CTBeHHbIX ppeIIOuTeHni, MOXHO peRyIInpOBaTb BpyHyIO CneJeYIOuNe fYHKuIN.
Функци, KOTOpbIe MOxHObpeRyIuPObaTb, yCTaHOBnB nepeKJIIOUcATEb AUTO LOCK B ueHTpaJIbHOe NOLOXeHne (OTKJIIOUeHne aBTOMaTHueCKoIpeRyIuPOBKn)
Apkoctb (aKcno3nua), cKoPoCTb 3aTbopa, 6aIaHc 6eIoro n PROGRAM AE
Функши, KOTOpbIe MOxHOb perynipoBaTb B yCTaHOBkax MeHIO
OTKJIIOUeHHeФyHKuINyCTOuINBOcBEMKn
Функции, KOTOpbIe MOxHo pEryIuPoBaTb, IcNoJIb3yI npYrne nepeKJIuOHaTeJIn/DnCKN ΦINbTp ND, nolocatbI yabIoH, φokyc n TpaHcΦokaun
Select this position to let the unit adjust all the functions automatically.
HOLD [b]
Select this position after setting the functions manually to maintain the settings.
AUTO LOCK [a]
BbI6epNTe 3To nIoNoJxHne, YTO6bl yCTpoJIcTBO cAmO aBTOMaTnueCKn npOn3BOJnIO HAcTPOJKN BcEx φyHKm.
HOLD [b]
Iocne puHOn hAcTpoKn BbIbepnte 3TO nIOJKeHHe, YTO6bl COxpaHHTb BbINOJIHeHHbIe yCTaHOBKn.
Shooting with manual adjustment
Manual position (AUTO LOCK release) [c] Select this position to adjust the functions listed above manually.
If you use the video flash light (optional)
We recommend that you set the AUTO LOCK selector to AUTO LOCK.
Note
When you manually adjust the exposure during backlight or spot light mode, the backlight or spot light function will be automatically canceled.
Adjusting exposure
Adjust the exposure manually under the following cases.
- The background is too bright (back lighting)
Insufficient light: most of the picture is dark - Bright subject and dark background
- To record the darkness faithfully
CbeMa c nCNoJIb3OBAHnEM pyHou peryIuropOBKn
PyuHaHa NaCTpOJa (OTKJIIOUeHne AUTO LOCK) [c]
Bb6epnte3to npoJxHne, yTo6bl BpyHypopeynpobatb fynKcun, npeuNCnEHHbIe Bbiwe.
PnncnoIb3OBaHmBnDEOBcIbIKn (npno6peTaIOTCdONJIHHTeJbHO)
PekomehnyeTcYcTaHaBnBAtb nepeKniouaTeIb AUTO LOCK B noLoxeHne AUTO LOCK.
PpimueaHne
PnHacTpoKe 3KcNo3uNIN BpyHyU BOpeXIMe 3aJNeI PODCBETKN IIN npOKeKTopHO OCBSeHNEI yHKUNI 3aJNeI PODCBETKN IIN IPOXeKTopHO OCBSeHNEI 6yDyT aBTOMaTHueCKN OTKnIOUeHbI.
PerynpoBka 3Kcno3n
BbInolHnIe pyHyIOpepyIINOpBky 3KcNo3nIuN B cJeDuOxN clyaX.
-ΦOH CnIuKOM CBETbI (NIOCBETKa c3a,I)
- HeioctatoUHO CBeta: 3NaHTeJIbHaY auctb n3o6paXeHnTeMHaY
-Apkni oBbeKT Ha TemHom pOhe
Heo6xoJIMOCb CHIMaTb IMeHHO TEMHOe n3o6paXeHne
Shooting with manual adjustment
(1) Set the AUTO LOCK selector to the center (auto lock release) position while the camcorder is in standby, recording, or memory mode.
(2) Press EXPOSURE. The exposure indicator appears on the LCD screen or in the viewfinder.
(3) Turn the EXPOSURE dial to adjust the exposure. As you turn the dial, the iris value changes between OPEN and CLOSE and the gain value changes between 0 dB and 18dB. To brighten the picture, adjust the level to the + side.
CbeMka c nCNoJIb3OBAHnEm pyHOn peRyInpOBKn
To return to automatic exposure mode
Set the AUTO LOCK selector to AUTO LOCK or press EXPOSURE. The exposure indicator disappears from the LCD or viewfinder screen.
If you press PROGRAM AE when adjusting the exposure manually
The exposure comes back to automatic adjustment again.
Дя BO3BpaTаВ ржим abTomatNueCKO 3KcNo3nCm
YcTaHOBnTe nepeKJIIOUaTeIb AUTO LOCK B noLoXeHne AUTO LOCK nIIN haXmIte KhONky EXPOSURE. INdNkaTOp 3KnO3nIu nCue3HeT c 3kpaHa KKД nIIN bNdoNcKaTeIa.
EcIn BO BpempyHoi peryIINPOBKn 3Kcno3nHaxaTb KhoNky PROGRAM AE 3KcNo3nIa CHoBa nepeKJIouaetcB pexm ABTomATnueckO peryIINPOBKn.
Adjusting the shutter speed
(1) Set the AUTO LOCK selector to the center (auto lock release) position while the camcorder is in standby, recording, or memory mode.
(2)If the PROGRAM AE indicator is lit, press PROGRAM AE repeatedly until the indicator disappears from the LCD or viewfinder screen.
(3) Press SHUTTER SPEED. The shutter speed indicator appears on the LCD screen or in the viewfinder.
(4)Turn the SEL/PUSH EXEC dial to select the desired speed. The available shutter speed ranges from 1/3 to 1/10000. As you turn the dial, the shutter speed changes as follows:
$$ \begin{array}{l} 1 / 3 \longleftrightarrow 1 / 6 \longleftrightarrow 1 / 1 2 \longleftrightarrow 1 / 2 5 \longleftrightarrow \dots \longleftrightarrow \ 1 / 3 5 0 0 \longleftrightarrow 1 / 6 0 0 0 \longleftrightarrow 1 / 1 0 0 0 0 \ \end{array} $$
To increase the shutter speed, select a smaller setting (large value indicator on the LCD screen or in the viewfinder).
PerynloBka ckopocTn 3aTbopa
(1)KorДаКамеранхоДиТСВ рекИмe OxuДан,在3aПиСи nIIM nIamTn, yCTaHOBInTe NepeKJIIOUcATEnelb AUTO LOCK B ueHTpaNbHoe noIOnOKeHne (OTKIIIOUeHne aBTOMaTnueCKoI peryInpOBKn).
(2)Ecni ropnt INdikatop PROGRAM AE, Haxmnte KhoNky PROGRAM AE HeCKoJIbKO pa3, Ioka INdikatop He Icye3net c 3KpaHa KKД nII BnOuNcKaTeJIa.
(3)Haxmnte SHUTTER SPEED. Ha 3kpahe XXKД nIN B vINOscKaTeNe NOBNTcR INDnKaTOp CKOPOCTN 3aTBopa.
(4)ПовернITE ДИСК SEL/PUSH EXEC ДЯ
Выбopa hyжно ckopoctи. Сkopocstь
Затвopa может 6ыть установлеса В
празделax ot 1/3 до 1/10000. Рп
поворе ДИСКА СКОРOCТь 3аТВopa
Измениетс сдуюшим образим:
1/3 ↔ 1/6 ↔ 1/12 ↔ 1/25 ↔ ... ↔
1/3500 ↔ 1/6000 ↔ 1/10000
Дя вевшиейся КСОРСТь 3aTВopa
Выберпite MEньшee 3нчЕни (Инданкотр
Болшей Величинь на захал�)
Виюнскате).

To return to automatic shutter speed mode
Set the AUTO LOCK selector to AUTO LOCK or press SHUTTER SPEED. The shutter speed indicator disappears from the LCD or viewfinder screen.
ДлЯ BO3ВpaTаВ реки m abTomatNuceckoI peYlnpOBKn CKOPOCTn 3aTBopa
YcTaHOBInTe nepeKlnOuataJIb AUTO LOCK bIIOJoxeHne AUTO LOCK nIN hAXMnTe SHUTTER SPEED. INdikatOp ckopocTn 3aTBopa nCye3HeT c ekpaHa JKKД nIN BIDOnCKaTeJIa.
Shooting with manual adjustment
When shooting at slow shutter speed
At slow shutter speed, automatic focus may be lost. Use a tripod and adjust the focus manually.
When shooting under fluorescent light or light bulbs
When shooting under fluorescent light or light bulbs, a rare phenomenon may happen in which the screen lights up brightly depending on the shutter speed (Flicker phenomenon).
If you set the shutter speed value to 1/25 or smaller
You cannot use the spot light (p. 35) and digital effect (p. 60) functions.
Using the ND filter
Using the ND filter (the ND filter 1 setting corresponds to 1/4 of the quantity of light and the ND filter 2 setting corresponds to 1/32 of the quantity of light), you can record a picture clearly by adjusting light amounts, even if you shoot under too bright conditions.
CbeMa c nCNoJIb3OBAHnEm pyHOn peRyIInpOBKn
PnCbEMKe C Hn3Ko CKOpocTbIO 3aTBopa
PnCbEmKe C Hn3KoN CkOpocTbIO 3aTbopa MoKeT He pa6OtaTb ABtOMaTnuecka KfokycnpOBka. NcNoJIb3yIte IITaTINB U yCTaHOBNTe fOkyc BpyHyIO.
CbeMaKpnpOcBSeHmIaMnAmN DHeBHOrO CBeta NJIaMnAmN HakaJIuBaHnA
Bo BpemcBemKn npn OCBeueHnn JaMaPamN DHeBHOrO CBeta Nn JIaMnAm HaKaIINBaHn MOKeT BO3HnKHyTb peKOE RaJIeHne, pN KOTOpOM 3KpaH rPKo BCnbIXnBaET 3aBNCIMOCtN OT CKOpocTn 3aTBopa (Mepuahne).
EcIn yctaHOBLeHa BEmuHnA cKOpocTn 3aTBopa,paBna1/25nn HnXe
HeIb3a 6yIeT nCnOJIb3OBAbT cyHKnU m npOKeKToPHoro OcBeUeHnA (CTp. 35) n cnΦpOBOrO 3ΦΦeKTa (CTp. 60).
IcnoJIb3OBAHnE qnJIbTp a ND
IcnoIb3yIΦnIbTpND (no3nIa IΦnIbTp a ND cooTBeTCTByET 1/4 KOInueCTBa CBeta, a no3nIa 2ΦnIbTp a ND cooTBeTCTByET 1/32 KOInueCTBa CBeta), MOXHO OTHTINBO CHATB KapTHNKy, KOTOPa npi 3tOM He BbIeT n3 φokyca, 6dyuH npK OCEeHHoH.
When the ND1 or ND2 indicator flashes on the LCD screen or in the viewfinder
The ND filter is necessary. When ND 1 flashes, set the ND FILTER selector to 1 so that the ND 1 indicator lights up on the LCD screen or in the viewfinder. When ND 2 flashes, set the ND FILTER selector to 2 so that the ND 2 indicator lights up on the LCD screen or in the viewfinder.
When ND OFF flashes on the LCD screen or in the viewfinder
The ND filter is not necessary. Set the ND FILTER selector to OFF so that the indicator disappears from the LCD or viewfinder screen. The ND filter is now deactivated.
CbeMa c nCNoJIb3OBAHnEm pyHOn peRyInpOBKN
KordaHa 3kpaHe KKД nIn B BnDOnCKaTeJI Mnrae TnHnKaTOp ND1 nIn ND2
Tpe6yETca pfntp ND.
Korda miraet nHdkaTop ND 1, yctanohBnte nepekluateIb ND FILTER B noLoxKeHne 1, tO6bl Ha 3kpaHe KKД nII BnDOnckaTeNe 3aropeJcRnHdkaTop ND 1.
Korda mnaeT nHnkaTop ND 2, yctahOBnte nepeKnioateIb ND FILTER B noLoXeHne 2, uTo6bl Ha 3kpaHe KKД nII BnDOnckaTeNe 3arOpEJIcHnHnKaTop ND 2.
Korda mnaeT nHnkaTop ND OFF ha əkpahe XKKД nIb B VbdoNcKaTeNe
ФильТР ND He HuykeH. YcTaHOBuTe nepeKluOaTeIb ND FILTER B noLoXKeHne OFF, uTo6bl Ncye3 InDnKaTOp Ha 3KpaHe XXKД nII IN B BuOnCKaTeJIe. ΦильТР ND TeNepb OTKnIOUeH.

Notes
- If you set the ND FILTER selector to another positions during recording, the picture may be blurred or audio noise may occur. We recommend that you check the position of the ND FILTER selector before shooting.
- When shooting a too bright object, diffraction off the small aperture may cause slight off set in focusing. This phenomenon is quite common with a use of a video camera recorder. Using the ND filter will reduce influence of such phenomenon, and you can attain a better shooting condition.
If you use the video flash light (optional)
Set the ND FILTER selector to OFF when you use the flash.
PpIMeuaHn
- EcIn BO Bpem3aIncn nepeDbHHyTb nepeKluOaTeIb ND FILTERB dpyroe noJoxHe, n3o6paKeHne MOxET CtaTb Hepe3KIM IIN MoXeT NOABUTcA Wym. IonoJoxHe nepeKluOaTeIaN DFilter PEkOMeHdyETc npOBeprTb nepeCbeMKoN.
Bo Bpemr CbemKn CmIshKom Rpkoro 06bekTa DnDpaKun npn He6OJbWOM 3NaueHn MdaCpaMbl MOKeT Bbl3BaT JnerKOe CmeUeHne fokycnpOBKn. 3To BNOJIHe O6bHuOE ABLeHne npn IcNcIb3OBAHN BInDeOkampeB.Ipn NcNolb3OBAHn FInlbTpA ND 3TO ABNeHne cTAHOBNTcMeHee 3aMeTHbIM, n DOCTNraOTc 6OJee 6laorponprrthbe yCNoBNaCbEMKn.
PnHcNIOJIb3OBAHmBnDEOBcIbIiKu (npno6peTaIOTcI dONOIHTeJIbHO)
Ecnin nCnoJb3yeTcBnblIka,yCTaHOBtenepeKluoyatel NB FILTER B noLoXeHne OFF.
Shooting with the zebra pattern
You can set the camcorder to display a zebra pattern (diagonal stripes) in the portion of the picture on the LCD screen or in the viewfinder with a subject whose brightness exceeds a certain level. When the ZEBRA selector is set to 100, the portion of the picture where zebra pattern appears is an area of high brightness and overexposure. You can check the picture level of a subject by displaying the zebra pattern. Use the zebra pattern as a guide for adjusting the exposure and shutter speed so that you can get the desired picture.
Set the ZEBRA selector to 70 or 100 in standby or memory mode.
CbeMka c nCNoJIb3OBAHnEm pyHOn peRyInpOBKn
CbeMka c nCnoJb3ObaHne mnoLocatoro 7a6l0ha
Moxho hactpoNTb BndeokamepyHa
OTobpaXeHne nOncatoro 0a6NoHa
(DnAHOHbHbIX nOIOc)B Toi Yactn
n3obpaXeHn Ha 3kpaHe XKDi IINB
BUNOICKaTeIe, rIe npKocTb npBeBbIaet
OppeDenHbI ypoBeHb. Korda
peKeKnIOuYateN ZEBRA yCTaHOBlen B
noLOXeHne 100, noLoCaTb Ia6IoN
OTobpaXaETcR B O6NaCTx C BtCOKO
rpkocTbIO nepeDeepKko. MoXHO npOBepTuB
yPoBeHb npKocTn 06BeKTA, OTO6pa3N B
noLoCAtb Ia6NoH. NoLoCAtb Ia6NoH
NCnOlb3yETcR B KaueCTBe OPNEHTnpa DInl
HACTPOKN Heo6XoDMoN 3KcNO3nUIM N
CKOPoCTN 3aTBopa dJI NOJUeHnAR
XeJaEMOrO n3obpaXeHnR.
UcTaHOBiTte nepeKJIIOuataTeIb ZEBRA B noIooKeHne 70 nIu 100 B peKIme OxNdaHn IJIN pAMrTn.
| Setting | Meaning |
| 70 | The zebra pattern appears in the portion of the picture on the LCD screen or in the viewfinder with a subject whose brightness is about 70%. |
| 100 | The zebra pattern appears in the portion of the picture on the LCD screen or in the viewfinder with a subject whose brightness exceeds more than 100%. |
| OFF | The zebra pattern does not appear on the LCD screen or in the viewfinder. |
To erase the zebra pattern
Set the ZEBRA selector to OFF.
Note on shooting with the zebra pattern
Even though you see the zebra pattern on the LCD screen or in the viewfinder, the zebra pattern is not recorded.
When the SteadyShot function is working, the camcorder compensates for camera-shake. You can release the SteadyShot function when you do not need to use it. The indicator appears on the LCD screen or in the viewfinder. Do not use the SteadyShot function when shooting a stationary object with a tripod.
(1) Press MENU to display the menu in standby or memory mode.
(2)Turn the SEL/PUSH EXEC dial to select , then press the dial.
(3)Turn the SEL/PUSH EXEC dial to select STEADYSHOT, then press the dial.
(4) Turn the SEL/PUSH EXEC dial to select OFF, then press the dial.
(5)Press MENU to erase the menu display.
OTKJIIOUeHHe ΦyHKcUN yCTOuHBoCbEMKn (SteadyShot)
Korda BkIIOUeHa yHKuYyCTOuHBOB
cBeMKN, BnDEoKAMepa KOMNeHCnpyET
noDparINBaHn. Korda 3Ta yHKuNHe
Tpe6yeTcA, ee MOxHO OTKJIOHTb. Ha 3KpaHe
XKJI nII B vIDOnCKaTeJe NOBtCn
mHdkaTop "FF. He nCNoJIb3yIte yHKuIO
yCTOuHBOB cBeMKN pPi CbeMKe
HEPOdBHXHoro OBekTA c NOMOsbIO
WtATnBa.
(1)HaKMMTe KhoNky MEnu Iyra OTo6paXeHnMaMeHbpeXmE OxuaHnra JIIN PAMrTn.
(2)ПовернITE диСEL/PUSH EXEC ДЯ Вьбopa установки ,а затем нажмITE на диСК.
(3)ПовернITE ДИСК SEL/PUSH EXEC ДЯ Вьбopa установки STEADYSHOT, затем нажмITE ДИСК.
(4)ПовернITE диСEL/PUSH EXEC дя Вьбopa OFF, 3aTeM нахмITE диСК.
(5)Haxmnte KhoNky MENUДгу ydaJIeHnIHdIkaCm MeHIO.
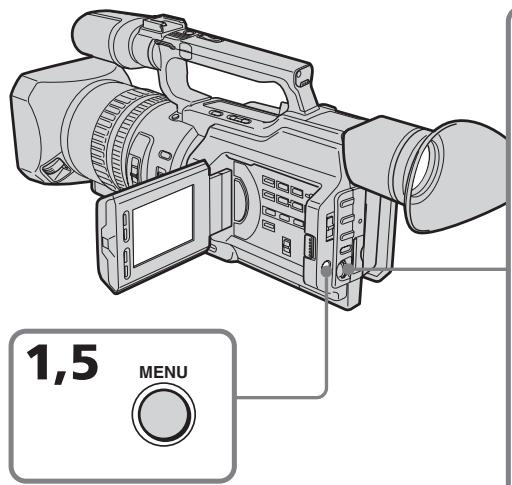
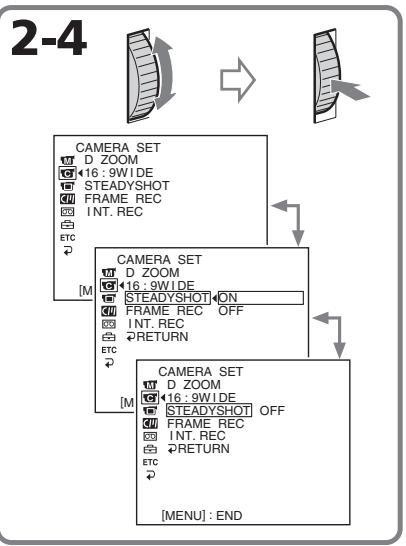
Shooting with manual adjustment
To activate the SteadyShot function again
Select ON in step 4, then press the SEL/PUSH EXEC dial.
Notes on the SteadyShot function
- The SteadyShot function will not correct excessive camera-shake.
- If you use a tele conversion lens (optional) or a wide conversion lens (optional), these lens may influence the SteadyShot function.
CbeMka c nCNoJIb3OBAHnEm pyHOn peRyIInpOBKn
YTO6bI CHOBA AKTINB3NPOBaTb yHKZU yCTOnyHBOB CbeMK
BbIbePte ON bnyKTe 4,3aTeM haxMnTe DNCK SEL/PUSH EXEC.
PpmeaHnno fynKcnn yCTOuBOB CbeMKN
Adjusting the white balance
White balance adjustment makes white subjects look white and allows more natural colour balance for camera recording. Normally, white balance is automatically adjusted. You can obtain better results by adjusting the white balance manually when lighting conditions change quickly or when recording outdoors: e.g., neon signs, fireworks.
(1) Set the AUTO LOCK selector to the center (auto lock release) position while the camcorder is in standby, recording, or memory mode.
(2) Press WHT BAL. The white balance indicator appears on the LCD screen or in the viewfinder.
(3)Turn the SEL/PUSH EXEC dial to select the appropriate white balance mode under the following conditions. As you turn the dial, the display changes as follows:
(One-push white balance) (Outdoor) (Indoor)
PeruInpoBka 6aJahCa 6eJoro CBeTa
Perylnpobka 6aIahca 6eIoro 6BeTa
No3BOJnEeT PnIaTb 6eblm O6beKtam
NCTINHO 6eIbI 6eBET N do6ntbC 6oJIee
ecTeCTBeHOrO 6eTOBOrO 6aIahca npi
cBeMeke. O6bIHyO perylnpobka 6aIahca
6eIoro 6eBaTa BbIOJIHaTe cABTomAtuYeCKn.
Perylnpobka 6aIahca 6eIoro 6eBaTBApyHyIO
No3BOJnEe T NoIyUHT lyUHne pe3yIbTaTb I
TEX CnyuaX, KORda ycNOBna OCBeSeHn
6bICTPO N3MeHrOTc NII npi CBeMe Ha
yInue: HApnIMep, HeOHOBx BBIEcOK,
feIepBepKOB.
(1)Korda KaMepa HaxoDntcBpeXnme OxNdaHnra,3aINCS INI nnPamrTn, yCTaHOBnTe nepeKJIouCteInb AUTO LOCK B CEHTpaJIbHoE NOLOXeHne (OTKnIOueHne aBTOMaTHueCKO peRyIIpOBKn).
(2)HaxmTe KhoNky WHT BAL. Ha 3KpaHe XKД nIи B vIOnckaTeJI neBnTcI nHdNKaTOP 6aIahCa 6eIoro cBeTa.
(3)ПовернITEДСКSEL/PUSH EXECдЯ
Быбoga HeobxOДимо rpeЖIMа 6baIahca
6eIoro B cIeIyUOuX yCIOBnIX.При
ПовороTe ДИСКУHДИКaцИЯ ИЗМeHЯТсЯ
cIeIyUOuM O6pa3OM:
(6baIaHc 6eIoro OДИМ hαKATneM)←
(ha yIIne)← (nomeIeHne)
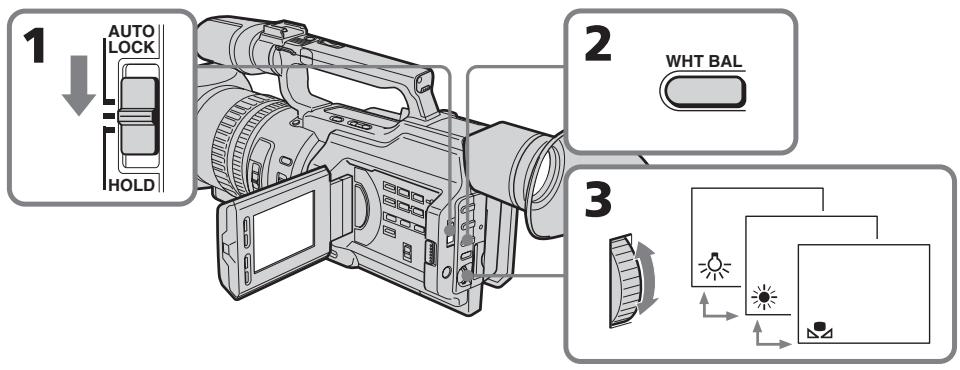
Adjusting the white balance
| Indicator | Shooting conditions |
| (Outdoor) | ·Adjusting the white balance according to the light source. This operation is not available during recording. Follow the procedure described below to adjust the setting again. |
| ·Recording a sunset/sunrise, just after sunset, just before sunrise, neon signs, or fireworks ·Under a colour matching fluorescent lamp | |
| (Indoor) | ·Lighting condition changes quickly ·Too bright a place such as a photography studio ·Under sodium lamps or mercury lamps |
If you have selected in step 3
When you set the white balance to one-push white balance mode, the setting is locked and maintained even if lighting conditions change. You can achieve recording with natural colours without the image being affected by ambient light.
(With the indicator on the screen)
(1) Aim a white object such as paper fully.
(2) Press the SEL/PUSH EXEC dial.
The indicator flashes quickly. When the white balance has been adjusted and stored in the memory, the indicator stops flashing. The setting will be maintained even if the battery is detached.
To return to automatic adjustment
Set the AUTO LOCK selector to AUTO LOCK or press WHT BAL. The white balance indicator disappears from the LCD or viewfinder screen.
PerynipoBka 6aJaanca 6eJoro Cbeta
Ecnn B nyHKTe 3 Bbl6paHa yCTaHOBKa
EcIn yCTaHOBHepeXIMpeYIpOBKn 6aIahCa 6eIoro OJHm HaxaTneM,TO BbIbpaHHa YCTaHOBKaΦNKcnpyeTcN COxpaHHeTcDoTexnop,Noka He N3MeHrTcN ycIOBnOcBeSeHn.B pe3yIbTaTe NOnyAeTc3aIncb C eCTeCTBeHHbIMN CuBeTAM,Ha N3oBpaXeHne He BJIureT OkpykaUoHmCBET. (KOrda Ha 3kpane ropNT INDnKATOp
(1)HaBeIte Ha oBekT 6eIoro CuBeta, HapnMpE nIcT 6eIoB 6yMarI.
(2)HaKmTe HaДnCK SEL/PUSH EXEC. HndkaTop 7aCto 3amiraet. Nocne HacTpoiKn 6bIaHca 6eIoro n coXpaHeHra erO B nAmrtn HndkaTop nepectaHET MIRatb. HacTpoiKa coXpaHntc TaJke nocle OTKIOUeHRA 6bTaapei.
YTo6bI CHOBA BKJIIOUHTb peXIM abTOMaTHUeCKo HAcTpOuKn
YcTaHOBInTe nepeKlnUOaTeJIb AUTO LOCK B noJIOXeHne AUTO LOCK nIIN hAkmnte KhoNky WHT BAL. INdNkaTOp 6aJaHca 6eIOro nCue3HeT C kPaHa JKKД nIIN B BVIOONCKaTeNe.
Notes on white balance
- When you shoot with studio lighting or video lighting, use the (indoor) mode.
- When you shoot with fluorescent lighting, readjust the white balance using the (onepush white balance) mode, or use the automatic white balance mode. If you use the (indoor) mode, white balance may not be adjusted appropriately.
Shooting when lighting conditions have changed
- When lighting conditions have changed, readjust the white balance while the camcorder is in standby mode.
-
In automatic white balance mode, point your camcorder at a white subject for about 10 seconds after setting the POWER switch to CAMERA to get a better adjustment when:
-
You detach the battery for replacement.
- You bring your camcorder outdoors from the interior of a house, or vice versa.
If the indicator does not stop flashing after you press the SEL/PUSH EXEC dial
The white balance cannot be set. Use the automatic white balance mode.
Perylnpobka 6aJaanca 6eJoro CBeTa
3ameaHnO tHOcHTeJIbHo 6aHaHa c6eIoro
-Пис bemke CO CTyДинБИМ OCBeшенEM
ИИС C NOMOцьЮ BИДеОПОДСВЕТКИ
ИСПОЛьзУтЕ рекIM 杂(В РОмeшени).
-Пи CBemke cOCBeSeHnEM lamPamn DHeBHorO CBeTa OTperyIpyuTe 6aIaHc 6eIoro, nCNoIb3yra peXIM (peYInpOBKa 6aIaHaC6eIoro OdHm HaxKaTneM) IIN ABToMaTHueckOn peYInpOBKn. B cIyuae IcNoIb3OBAHHpeXIMa (B NOMeUeHN), peryIpOBKa 6aJIaHaC6beIoro MoKet BbINOJIHTbcr HeBepHO.
Cbemka npn n3mehn ycnoBn OCBeueHn
- Ecnn ycnOBnO nOcBeUeHnI3MeHnJIncb, nepeKJIouHTe BnDEoKaMepy B pexIM OxuHaHn I 3aHOBo OTperyJnpyIte 6aJaHc 6enoro.
Bpejnme aBTOMaTNUeCKo peYInpOBKn 6anaHc6eNOro HnPaPbTe BnDEOkamepy Ha 6eIbI ppeMeT npi6IIm3ntelbHo Ha 10 cekyHd nocJe yCTaHOBVKn nepeKIOuOteTl PAOWER B nIoJXeHne CAMERA dIra nOnyuHHe yLyUWeHHo NODcTPOkN peYInpOBKn, KOrDa:
-Bbl otcoeHHaTe 6batapeHbI 6nok nn 3aMeHbl.
-BbI BixOndTe C KAmepoN 13 NOMEeHnHa yIuCy IIN HAO6OpOT.
Ecnn Hndnkatop npoDJIkaET MraTb nocJe haxKaTna Ha ndck SEL/PUSH EXEC
BaIaHc 6eIoro HeBO3MOXHO yCTaHOBnTb.
IVcNoIb3yItepeKIM aBTOMaTHueCKO
peYIpOBKn 6aIIaHca.
Adjusting recording level manually – Sound recording level
You can adjust the recording sound level. Use headphones to monitor the sound when you adjust it.
Setting up the menu
(1) Set the POWER switch to CAMERA or VCR.
(2) Press MENU to display the menu.
(3)Turn the SEL/PUSH EXEC dial to select 0, then press the dial.
(4) Turn the SEL/PUSH EXEC dial to select MIC LEVEL, then press the dial.
(5)Turn the SEL/PUSH EXEC dial to select MANUAL, then press the dial.
(6) Press MENU to erase the menu display.
Adjusting the recording level
(7) Press AUDIO LEVEL to display the recording level adjustment display in standby or recording mode.
(8)Turn the SEL/PUSH EXEC dial to adjust the recording level.
Perylnpobka ypOBnHa 3aIncn BpyHyIO - YpOBeHb 3aIncn 3ByKa
Moxho HactpanBaT ypoBeH 3aIncn 3Byka.
IpynpocnyuBHaNn 3Byka BO Bpemr
peynilpOBKn nCOnJb3yIte Hayshnkn.
HactpoKa MeHIO
(1)Установпейсякючateь POWER в положене CAMERA ии VCR.
(2)HaxmTe KhoNkY MENU dIa OTo6paXeHHa MeHIO.
(3)ПовернITE диck SEL/PUSH EXEC дяьвобoga утановки ,а затем нажмITEHa диck.
(4)Повернite ДИСК SEL/PUSH EXEC ДЯ Вьбopa установки MIC LEVEL, затем нажмITE на ДИСК.
(5)Повернite ДИСК SEL/PUSH EXEC ДИВбopa установки MANUAL, 3atemНаЖМITE на ДИСК.
(6)HaxmTe KhONkY MENU dny ydaJIeHnIy HNDKauN MeHIO.
Perylnpobkaypobh3aanns
(7)HaKmTe KhoNky AUDIO LEVEL nIy oTo6paKeHnE 3kpAha peryInpOBKn yPoBnI 3aIncn B pexIme OxuIaHn IJI 3aIncn.
(8)ПовернITE ДИСК SEL/PUSH EXEC Дпгуларовки уровь заимс.

Adjusting recording level manually - Sound recording level
aRecording level meter
[b]Decreases the recording level
[c] Increases the recording level
To clear the recording level adjustment display
Press AUDIO LEVEL again.
To adjust the recording level automatically
Select AUTO in step 5, then press the SEL/PUSH EXEC dial.
Notes on the manual adjustment
- The recording level setting is retained for about five minutes after removing the battery.
- The recording level indicator appears at the lower-right on the LCD screen or in the viewfinder.
The sound input through the AUDIO L/R jacks or DV Interface
You cannot adjust the recording level.
When MIC LEVEL is set to AUTO
You cannot adjust the recording level, however, the recording level adjustment display is displayed.
PerynipoBka ypOBH3aIncn BpyHyIO - YpOBeHb 3aIncn 3Byka
aИндикадуовьзлпси
[b]yMeHbShaET yPOBHeh 3aIINcN
[c]YBENIINBaETyPOBeHb3aIINCn
Длг OTMeHbI OTO6paXeHHa 3KpaHapeRyJnPobBKN yPoBn3aNcN
Haxmnte KhoNky AUDIO LEVEL eue pa3.
ДЯ abTomaTnuecko NaCTpoNkурOBH3aHnCn
BbIepeNte yctaHOBky AUTO B nyHKte 5, 3aTeM haxMnTe dNcK SEL/PUSH EXEC.
3ameaHnO OTHCntelbHo pyHOn perynnpOBKn
- HactpoKa ypOBn 3aIncu CoXpaHReTcB TeueHne npMepHo PAn MHyT nocNe OTKluOeHn 6aTapen.
- INДИКATOP yPOBHA 3aIINc OTO6paxKaETcBA npabOM HIXHem yIy Ha 3KpaHe XXD nII B BVIDONCKaTeNe.
BbOJ 3ByKOBOrO CnHana Ypee3 rHe3da AUDIO L/R nnn nHTepfec. DV
YpOBeH 3aIncn HepepyIynpyeTcA.
Korda komaHa MIC LEVEL yctaHOBneHa B noJoxHeAUTO
PerynipOBka ypOBH 3aIncn HeBO3MOxHa, HO 3kpan perynipOBKn ypOBH 3aIncn oTo6paXaetc.
Presetting the adjustment for picture quality - Custom preset
You can preset the camcorder to record the picture with the desired picture quality.
When presetting, adjust the picture by shooting a subject and checking the picture displayed on a TV using the menu settings.
(1)Press CUSTOM PRESET to display the CUSTOM PRESET menu in standby or memory mode.
(2) Press the SEL/PUSH EXEC dial.
(3)Turn the SEL/PUSH EXEC dial to select SET, then press the dial.
(4)Turn the SEL/PUSH EXEC dial to select ON, then press the dial.
(5)Turn the SEL/PUSH EXEC dial to select the desired item, then press the dial.
(6)Turn the SEL/PUSH EXEC dial to adjust the selected item, then press the dial.
(7) Press CUSTOM PRESET. The CUSTOM PRESET menu disappears and the indicator CP appears on the LCD screen or in the viewfinder.
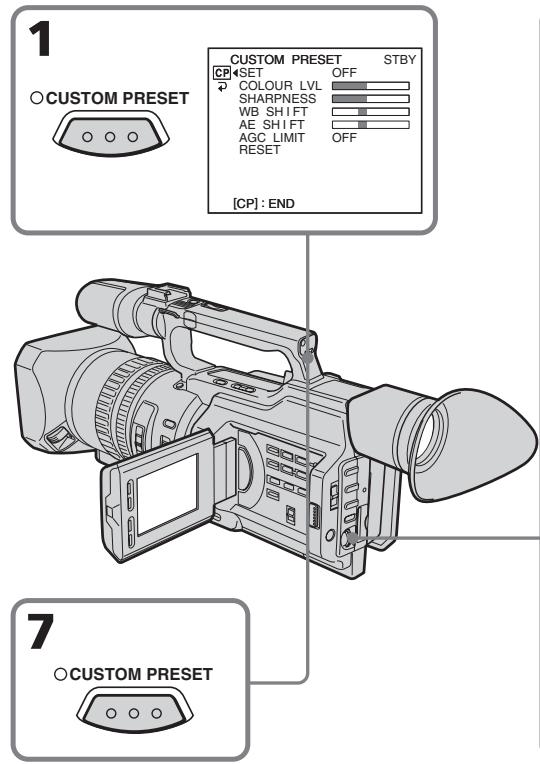
Select OFF in step 4, then press the SEL/PUSH EXEC dial.
To return to the standard setting
Select OK from the RESET item in step 5, then press the SEL/PUSH EXEC dial. To cancel, select RETURN, then press the SEL/PUSH EXEC dial.
To check the custom preset setting
Press CUSTOM PRESET while the camcorder is in standby, recording or memory mode.
The custom preset setting appears on the LCD screen or in the viewfinder.
Once you adjust AE shift
You can adjust the brightness of the picture according to recording circumstances or objects.
About the AGC Limit
When adjusting the exposure manually, the level of the gain is up to 18 dB (OFF).
When you preset the desired picture quality in CAMERA or memory mode
The preset is only available in each mode you preset. If you want to use a preset both in CAMERA and memory modes, you have to preset in each mode.
You can select from five PROGRAM AE (Auto Exposure) modes to suit your shooting situation, referring to the following.
Selecting the best mode
Select a proper PROGRAM AE mode referring to the following description.
ИспOLSьЗОВане функци PROGRAM AE
Moxho Bb6paTb OINH 3n pTeKmOB PROGRAM AE (aBtOMaTneckaY 3KcNo3nua) B COOTBeTCTBn C yCJIOBnMn CbeMKn,pyKOBOdCTByAc cJeDyOuIM.
Bb6op Han6oJee noDxoJzeropeXmu
BbIbePeTe Heo6xoJIMbI peKIM PROGRAM AE Ha oCHOBe CJeDyUOeTo OINcaHn.


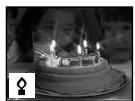
A: Aperture priority mode
Selecting the aperture to determine the desired depth of field. Gain and shutter speed are automatically set in combination with the aperture value to maintain appropriate exposure.
AE S:Shutter speed priority mode
Selecting the shutter speed manually. The exposure value changes in accordance with the selected shutter speed.
Sports lesson mode
Capturing high-speed action in sports such as golf or tennis
:Sunset&Moonmode
Recording sunset, night views, fireworks or neon signs
: Low lux mode
For recording a subject in insufficient light. Subject becomes bright.
A: Pexnmpnopteta dnaoparmbl Bb6op ndaoparmbl dny onpepehen Hne0xOIMoI rIy6BnHb pe3KocTn. YcIneHne CKOpoc3b 3aTbopa HactpauBaHTCn ABTomATUeCKN B COOTBETCTBn C yCTaHOBJEHbIM 3NaueHem Dnaoparmbl I pONyehn Hne0xOIMoI 3KcNo3uIN.
AE S: Pekim npnopnta ckopoctn 3aTbopa
Bb60p ckopoctn 3aTBopa BpyHyIO. 3NaueHne 3KcI03nUIN 13MeHReTcB COoTBeTCTBn C Bb6paHHoN CKoPoCTbIO 3aTBopa.
PexnCnoptnbixcoT3aHm
CbeMa 6bIcTpo DnKxuXxCoOBekToB, Hapnimep, BO BpeM Nrpbl B rOlbp nn TeHHNC
^ : Pexim 3aKaTa coJHca u LyHHoro OCBeueHnA
CbeMka 3aKaTOB cOnHca, HOnHbIX BnIOB, fpeepBepKOB IN HeOHOBix peKJaM
: Pekm Hn3KoN OcBeueHHOCTN
ДясевкOnObБeКTOBпи HeIOCTaTOHOMOCBeUeHIn.ObSeKT cTaHOBNTcApKIM.
Using the PROGRAM AE function
(1) Set the AUTO LOCK selector to the center (auto lock release) position while the camcorder is in standby, recording, or memory mode.
(2) Press PROGRAM AE. The PROGRAM AE indicator appears on the LCD screen or in the viewfinder.
(3)Turn the SEL/PUSH EXEC dial to select the desired PROGRAM AE mode. The PROGRAM AE mode changes as follows: Aperture priority mode Shutter speed priority mode Sports lesson mode Sunset & Moon mode Low lux mode When you select the aperture priority mode or the shutter speed priority mode, press the SEL/PUSH EXEC dial.
(4) In aperture priority mode (AE A) or shutter speed priority mode (AE S), turn the SEL/PUSH EXEC dial to select the desired aperture value (F value) or shutter speed.
Aperture priority mode:
Turn the SEL/PUSH EXEC dial to select the desired aperture value. As you turn the dial, the F value changes between F1.6 and F11.
For a smaller aperture, select a higher value. The gain and shutter speed change in accordance with the selected aperture value.
Shutter speed priority mode:
Turn the SEL/PUSH EXEC dial to select the desired shutter speed. As you turn the dial, shutter speed changes between 1/50 and 1/10000.
For a faster shutter speed, select a smaller value indicator on the LCD screen or in the viewfinder. The gain and aperture values change in accordance with the selected shutter speed.
Set the AUTO LOCK selector to AUTO LOCK or press PROGRAM AE. The PROGRAM AE indicator disappears from the LCD or viewfinder screen.
Notes
- In sports lesson mode, you cannot take close-ups. This is because your camcorder is set to focus only on subjects in the middle to far distance.
- In sunset & moon mode, your camcorder is set to focus only on distant subjects.
- The old movie mode and the shutter speed adjustment do not work in PROGRAM AE mode.
-
The following functions do not work in low lux mode:
-
Digital effect
-Overlap
-Wipe
-Dot
-Spot light mode -
While shooting in memory mode, the low lux and sports lesson modes do not work. (The indicator flashes.)
If you are recording under a discharge tube such as a fluorescent lamp, sodium lamp or mercury lamp
Flickering or changes in colour may occur in sports lesson mode. If this happens, turn the PROGRAM AE function off.
Even if the PROGRAM AE function is selected
You can adjust the exposure.
When you focus in telephoto
You cannot choose F1.6 and F2.
About the depth of field
The depth of field is the in-focus range, measured from the distance behind a subject to the distance in front. The depth of field can vary with the iris (F value) and the focal length. Lowering the F value (large iris) reduces the depth of field. Raising the F value (small iris) provides a larger depth of field. Zooming in telephoto position offers a smaller depth of field while the depth of field in the wide-angle position is greater.
| The depth of field | Shallow | Deep |
| Iris | Near open (Low F value) | Near close (High F value) |
| Zoom | Telephoto (T) | Wide (W) |
3NaueHnF1.6 n F2 cTaHOBraTcHedOCTyINbIMN.
O rnybne pe3koctn
Iy6bHa pe3KocTn -3To o6nactb pe3Ko
H3O6paXaEMOro pOcTpaHCTBa,
OppeJeMaer paCtOHNMeJy
PiOCKoCTMnpeed O6bEKTOM fokycuPobKn
n C3aHr Hero. Iy6bHy pe3KoCTn MOxHO
N3MeHraTb C nOmoUbIO npICOB0n DnaΦparmbl
(BeJInuHa F) uΦOKyCHO r paCtOHNr. Pn
ymeHbWeHn 3HaueHnF (6oJIbWaeBnUHa
DnaΦparmbl) Iy6bHa pe3KocTn
ymeHbShaETc. Ppi yBeJIuYeHn 3HaueHnF
(Manar BELnuHa DnaΦparmbl) Iy6bHa
pe3KocTn yBeJIuYBaEtc. CbEmKa B
noLOKeHn "TepeTO" o6ecneuHbaET
MeHbSyU Oy6bHy pe3KocTn, Iy6bHa
pe3KocTn B noLOKeHn "UInPOkOyrolhBn" -
6oJIbWe.
You can gain better results by manually adjusting the focus in the following cases:
-
The autofocus mode is not effective when shooting
-
subjects through glass coated with water droplets
horizontal stripes
-
subjects with little contrast with backgrounds such as walls and sky
-
When you want to change the focus from a subject in the foreground to a subject in the background
- Shooting a stationary subject when using a tripod
Pуная Фокусировka
JyUHne pe3yNbTaTbI C NOMOuBIO pyHOn JOKYCINOBKMOXHO NOJYuHTb B CNeDyUOxN CnyuaX:
-PeKIM aBTOMaTnueckoФokycnpOBkN YBJIeTcH He3ΦΦeKTnBHbIM PnB bIIOJIHeHm CbEMKn
-ObbeKToB Yepe3 CTeKIO, NOKpbIToe KaJIIMN
-ROPN3OHTaNbHbIX NOLOC
-06bEeKToB C MaIOn KOHTpAcTHoCTbHO Ha TaKOMΦOHe, KaK CTeHa UNI He6O
-ECnHyXHO BbIIOHNHTb N3MeHeHneФOKycuPbKcO6BeKtaHa nepeHemПlaHe Ha O6BeKt Ha 3aDhem ПlaHe
-При сбемке Ненивного объекта nomonшью StTaTnBa


(1) Slide FOCUS down to MANUAL in standby, recording, or memory mode. The indicator appears on the LCD screen or in the viewfinder in recording, standby, or memory mode.
(2) Turn the focus ring to sharpen the focus.
To return to the autofocus mode
Slide FOCUS up to AUTO to turn off the or indicator.
To focus in infinity
Slide FOCUS to INFINITY. The indicator appears on the LCD screen or in the viewfinder. This function is useful when the nearer subject is focused automatically, even though you want to focus on a faraway subject.
To shoot with auto focusing momentarily
Press PUSH AUTO.
The auto focus functions while you are pressing PUSH AUTO.
Use this button to focus on one subject and then another with smooth focusing.
When you release PUSH AUTO, manual focusing resumes.
To obtain the correct focus
First, focus on a subject manually with the zoom set toward the "T" (telephoto) side, then adjust the zoom by pressing the "W" side of the lever gradually.
When you shoot close to the subject
Focus at the end of the "W" (wide-angle) position.
changes as follows:
when recording a distant subject.
when the subject is too close to focus on.
PuchanФokycinpobka
HdNkAtop 6yETn3MeHrTbCnJeDyUOIMo6pa3OM:
Anpi 3aannc ydaJIeHHbIX oBeKToB.
ecn06bekt haxoNTcR cNIshKOM 6NI3KO, T06bblINONHHTfokycnpOBky Ha Hero.
Interval recording
You can make a time-lapse recording by setting the camcorder to automatically record and standby sequentially. You can achieve an excellent recording for flowering, emergence, etc., with this function.
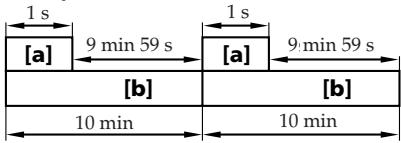
Example
a Recording time
[b] Waiting time
3a\Pncb c nHTepBaJamn
MoxHO BbIOnHnTb CbEMKc 3ΦΦeKTOM yCKOpEHNO rBnJKeHnRA, HAcTPOINB BuDeOKaMepy TaKIM o6pa3OM, YTO6bl OHa NocLeIOBaTeJIbHO BbIOnHnRA 3aINCb IN nepexOuIna B pEKM OxNdaHnA. C nOMoUbO 3ToIyHKcIM MoXHO IOnyUHTb YHNKaJIbHyIO CbEMKpACKpbITnRA CBETKa, NOABNeHnBAxCOIOB IN.T.D.

Ppimep
aBpeMa 3aannCn
[b]BpeMaOxuHaHnA
(1)Press MENU to display the menu in standby mode.
(2)Turn the SEL/PUSH EXEC dial to select, then press the dial.
(3)Turn the SEL/PUSH EXEC dial to select INT.REC, then press the dial.
(4) Turn the SEL/PUSH EXEC dial to select SET, then press the dial.
(5)Set INTERVAL and REC TIME.
① Turn the SEL/PUSH EXEC dial to select INTERVAL, then press the dial.
② Turn the SEL/PUSH EXEC dial to select the desired interval time, then press the dial.
The time: 30SEC 1MIN 5MIN 10MIN
③ Turn the SEL/PUSH EXEC dial to select REC TIME, then press the dial.
④ Turn the SEL/PUSH EXEC dial to select the desired recording time, then press the dial.
The time: 0.5SEC 1SEC 1.5SEC
2SEC
⑤ Turn the SEL/PUSH EXEC dial to select RETURN, then press the dial twice.
(1)HaKmTe KhoNky MEnu IJn OTo6paXeHnMeHIO BpeXmE OxUdHaHn.
(2)ПовернITE дИС K SEL/PUSH EXEC ДЯ
БИбора утСАНовКИ [a 3aTeM наЖМЛТЕ
HAДСК.
(3)ПовернITE ДИСК SEL/PUSH EXEC ДЯ
Выбoga установки INT. REC, за тем
надиме на дИСК.
(4)Повернite ДИСК SEL/PUSH EXEC ДИВьбopa утановки SET, заTem нажмпerte на дИСК.
(5) YctaHOBtTe npaMeTpbl INTERVAL n REC TIME.
① ПовернITE диck SEL/PUSH EXEC дяп Выбoga установки INTERVAL, затем НарKMITE на диck.
②ПовернITE диСК SEL/PUSH EXEC дя
Быбopa Heo6xOДмоМ
пpoДОЛЖИТeьHOCТи ИНтepВаla,
ЗaTeM нажмITEHa диСК.
Врema:30SEC←→1MIN←→5MIN←→
10MIN
③ ПовернITE ДИСК SEL/PUSH EXEC Дпь Выбoga установки REC TIME, затем НжмITE на ДИСК.
④ПовернITEДСК SEL/PUSH EXECДЯ
Выбopa Heo6xOДИМО Врemeи
Запси,Затем НжмITEHaДСК.
Врем:0.5SEC←1SEC←1.5SEC
←2SEC
⑤ ПовернITE ДИСК SEL/PUSH EXEC ДЯ
Выбoga RETURN,Затем Дважды
НжмITE на ДИСК.
1
MENU

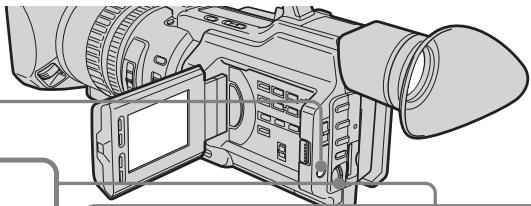
2-4

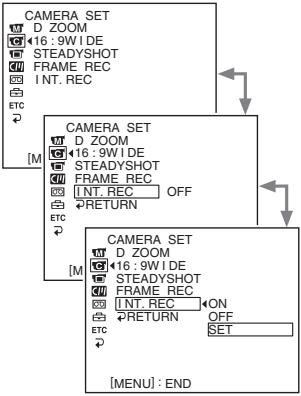
5


CAMERA SET
INT.REC
G INTERVAL 30SEC
REC TIME
RETURN

CAMERA SET
INT.REC
INTERV
REC TIN
RETN

CAMERA SET
INT. BEC
INTERVAL30SEC
REC TIME 1MIN
RETURN MIN
10MIN
白
ETC

CAMERA SET
INT. REC
INTERVAL
REC TIME 0.5SEC
RETURN 1SEC
1.5SEC
白
ETC
E
(6)Turn the SEL/PUSH EXEC dial to select ON, then press the dial.
(7) Press MENU to erase the menu display. The interval recording indicator flashes.
(8) Press START/STOP to start interval recording. The interval recording indicator lights up.
(6)ПовернITE ДИСК SEL/PUSH EXEC ДЯ
Выбopa установки ON, a за tem нажмITE
НдИСК.
(7)HaxmTe KhoNky MENU ydaIeHna HdNkaun MeHIO.3amraet HdNkaTOp 3aIcnc C nHTepBaIaNMI.
(8)Haxmnte KhoNky START/STOP, yTo6bI Haayt b3aNNcB c INTePbaJAMn. 3aRopNTcN INDkATOp 3aNNC n INTePbaJAMn.
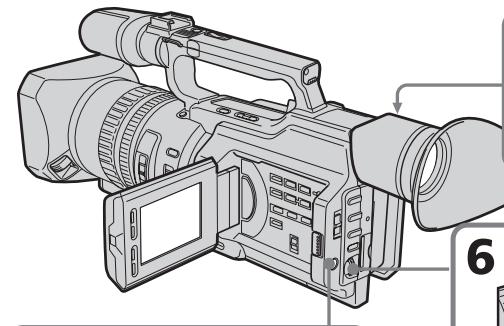

7
MENU

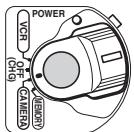
8

6


CAMERA SET
D ZOOM
G16:9WIDE
STEADYSHOT
FRAMEREC
INT.REC ON
RETURN
ETC
To cancel the interval recording
- Set INT. REC to OFF in the menu settings.
- Set the POWER switch to OFF (CHG), VCR or MEMORY.
To stop the interval recording momentarily and perform normal recording
Press START/STOP. You can perform normal recording only once. To cancel the normal recording, press START/STOP again.
Длг OTMeHbI 3aIncn C nHTepBaJamaN
- YctaHOBnTE KOMaHny INT. REC B nOJoxKeHne OFF bYcTaHOBkax MeHIO.
- YctaHOBITE nepeKlnOuTeJIb POWER b noIooxe NE OFF (CHG), VCR nIM MEMORY.
YTo6bIMrHOBeHNO OCTaHOBnTb 3aInCb C INHTepBaJAmN BbINOLHnTb 0b6bHyIO 3aInCb
HaxmTe KhONky START/STOP.ObuHyIO 3aNNcB MoXHO CdeIaTb TOnbKO OINH pa3. IJIa OTMeHbIO bUChHO 3aNcN HaxmTe KhONky START/STOP eue pa3.
Note on interval recording
You cannot do interval recording in memory mode.
On recording time
There may be a discrepancy in recording time of up to + / - 6 frames from the selected time.
Even if you press INDEX MARK during interval recording
You cannot mark an index.
3ameaHnOTHocHTeIbHO 3anncn C nHTepBaIamn
3aIncb c INHTepBaJIaMn HeBO3MOxHa BpeKIMe pAMrTn.
OBpeMeHN 3aIncn
PeaIbHoe Bpem3aIINCMMOKETOTJIuYATbcr OTBbIbpaHHoroHa+/-6KaIPOB.
Дахе ecин haжкыkhONky INDEX MARK BO BpeM 3aHNC c INHTepBaIamn
3aIncb INHeKCHOH MeTKn HeBO3MOxHa.
Frame by frame recording - Cut recording
You can make a recording with a stop-motion animated effect using cut recording. To create this effect, alternately move the subject a little and make a cut recording. We recommend that you use a tripod, and operate the camcorder using the Remote Commander after step 6.
(1) Press MENU to display the menu in standby mode.
(2) Turn the SEL/PUSH EXEC dial to select , then press the dial.
(3)Turn the SEL/PUSH EXEC dial to select FRAME REC, then press the dial.
(4) Turn the SEL/PUSH EXEC dial to select ON, then press the dial.
(5)Press MENU to erase the menu display. The FRAME REC indicator lights up.
(6) Press START/STOP to start cut recording. The camcorder makes a recording for about six frames, and returns to recording standby.
(7) Move the subject, and repeat step 6.
Frame by frame recording - Cut recording
To cancel the cut recording
- Set FRAME REC to OFF in the menu settings.
- Set the POWER switch to OFF (CHG), VCR, or MEMORY.
Notes on cut recording
- The last recorded cut is longer than other cuts.
- The proper remaining tape time is not indicated if you use this function continuously.
- You cannot mark an index during cut recording.
PokaProBa 3aInscb - 3aInscb c MOHTaXHbIMKaDpaMn
ДлЯ OTMeHbI 3aIncn C MOHTaXHbIMN KaIpaMn
- YctaHOBInTe KOMaHny FRAME REC B
- noIoxKeHne OFF B yctaHOBkaX MeHIO.
- YctaHOBtne nepeKlOuTaTeIb POWER b noIoxKeHne OFF (CHG), VCR nIM MEMORY.
3aMeuHnO OTHoCHTeNbHO 3aIncn C MOHTaXhblIMKaDpAMN
-Последни записн布局 Кадр дльшешостаьнг.
OCTaBWeecB BpEm 3aIncn Ha KaccTe OTo6paKaTa TcHbepHo,ecIn 3Ta cyHKnur NcNoJIb3yETcTc qACTo.
- Bo Bpem 3aIncn C MoHTaxKhbIMKaIpaMn HeBO3MOxH0 3aIncatb INHeKeCHbIe MeTKn.
If you mark an index at the scene you want to search for, you can easily search for the scene later (p. 95).
In recording mode [a]:
Press INDEX MARK.
The "INDEX MARK" indicator appears on the LCD screen or in the viewfinder for seven seconds and the index is marked after the indicator disappears.
In standby mode [b]:
Press INDEX MARK.
The "INDEX STBY" indicator appears on the LCD screen or in the viewfinder. And when you press START/STOP to start recording, the "INDEX STBY" indicator changes to "INDEX MARK" and after the indicator disappears, the index marking is complete.
The camcorder starts index-marking at the 11th frame from the recording start point. An index signal will be recorded on cassette memory about 0.3 sec, and on a tape about five seconds.
You can mark an index in VCR mode (p. 131).
3aHnscb Hndekchoi MeTKn
EcnI nIy onpeHEnHoro 3nH3Oa 3aHnCaTb INHeKCHyIO MeKy, TO B DaJIbHeHWeM MoXHO 6e3 Tpya erO hAIITN (CTp.95).
Bpekime 3aIncn [a]:
Haxmnte KhoNky INDEX MARK.
Ha 3kpahe KKД ИИВ BИДОNUCKaTeJIe B TeueHHe cEMN cEkyHd 3aROpNTcI INHДNKaTOP "INDEX MARK". INHdeKChaMeTka 6ydet 3aHncaHa nOcIe TOrO, KaK IcUe3HET INHДNKaTOP.
BpexKme OxuandaHn [b]:
HaxmTe KhoNky INDEX MARK.
Ha 3kpahe JKKД nIиВ bNIOncKaTeNe noBnTcR nHnKaTOp "INDEX STBY". Korda hAnmaeTcR KOnPka START/STOP dIy naHaIa 3aIInCn, BmecTo nHnDnKaTopa "INDEX STBY" noBnEeTcR nHnDnKaTOp "INDEX MARK", a KOrDa on HnCye3aET, yCTaHObKa nHNeKChO MeTKn 3aKOHYeHa.
Bndeokamepa yctaHaabnBaet nHDeKCHyO MeTKy Ha 11-OM KaJpe C ToUKN Haayala 3aIncN. INHeKChbI CNHAn 3aIncBIAeTcB KaccETHyIO pAmrTB np6bn3ntelHo B TeueHne O,3 c,a HaJeHTy - OKoNo 5 ceKyHd.
INdeKCHyMoTky MoXHO 3aIInCaTb B peXmE VCR (ctp.131).
![SONY DCR-VX2100E - BpexKme OxuandaHn [b]: - 1](/content/2019/09/48856/images/d8be85a8660ad775afa5385e090521cc3dc08aa63248bb89b11752ee671cf593.jpg)
![SONY DCR-VX2100E - BpexKme OxuandaHn [b]: - 2](/content/2019/09/48856/images/5c806f6154941d574dc4b320af1220b19283c7753db78f5491cb3f92017e3fe1.jpg)
INDEX MARK
![SONY DCR-VX2100E - BpexKme OxuandaHn [b]: - 3](/content/2019/09/48856/images/8837e5fa85c8c1cd560f48a4e9e667fda750f8978b218c7bfd9752e23f376701.jpg)
[b]
To cancel index marking
Press INDEX MARK again in standby mode.
Notes on the index
- Index marks are recorded during recording, you cannot mark an index after recording.
- Index signals will be recorded both on the tape and on cassette memory. If you use cassettes without cassette memory or the cassette memory is full, the signals will be recorded only on the tape.
- When you record over the recorded tape and mark an index on the tape, we recommend that you clear all data in the cassette memory before marking an index.
ДЯ OTMeHbI 3aHnCn INHeKCHOI METK
Hakmnte KhoNky INDEX MARK eue pa3, KOrda KaMepa HaxoDITcB peKIme OXuDaHn.
3ameuHnO THOCTeIbHo INHeKCHo METKN
- INHДЕКСВЕ MEТКИ YCТАнБЛВАЮТСВ BO BРМЯ 3aПИСN, 3aПИСь INHДЕКСΗО MEТКИ NOСLE CБЕМКИ HeBO3MOXHA.
- INДЕКСHье син haы 6ут 3аиcaHBi kak Ha JIeHTy, TAK I B KACCETHyIO nAMrTb. Ecni NcNoJIb3yETcR KACCetra 6e3 KACCETHOI nAMrTI nII N KACCETHaI nAMrTb nepeINJIHeHa, CnHaBIs 6uYT 3aINCAHBi TOJIbKO Ha JIeHTe.
-Прии ВьлОнHeHn 3aIncn uYcTaHOBKe nHdEChOH MeTKn HaJIeHTy,CoDEpXaUyO paHee CSeIaHHUo 3aINCb,IpeJxde Yem yCTaHaBInBaTb INHeKCHyO MeTKy, peKOMeHdyeTCaTEpeTb BCE DaAHHbIe N3 KACCETHOI pAMrTn.
- Advanced Playback Operations - Quickly locating a scene using the zero set memory function
Using the zero set memory function, your camcorder rewrites or advances the tape to locate the desired scene, and the searching automatically stops at the scene having a tape counter value of "0:00:00." You can do this with the Remote Commander.
(1) In playback mode, press DISPLAY if the counter is not on the LCD screen or in the viewfinder.
(2) Press ZERO SET MEMORY at the point you want to locate later. The tape counter shows "0:00:00" and the ZERO SET MEMORY indicator flashes.
(3) Press when you want to stop playback.
(4) Press to rewind the tape to the tape counter's zero point. The tape stops automatically when the tape counter reaches approximately zero. The ZERO SET MEMORY indicator disappears and the time code appears.
(5) Press . Playback starts.
—ycobepuehctBOaHbIe onepaunBocpO3BeDHeN HbICTpbIN NOCK 3n3Oda C NOMoUbO fYHKuIN PAMATN HJNeBOI OTMETKN
C NOMOJIbU FOYHKUIN NAMATN HJUEBOI OTMeTKn BnDEOKaMepaTbIbAeT JeHTy Ha3aI NJI INBpeEДЯ OTBICKAHN HUXHORO 3N3OJa C aBTOMaTNUeCKO NCTaHOKOB NONCKA Ha 3N3ODe, rJe NOKa3aHne CcETuNKa JENTbI -0:00:00). 3TO MOxHcNDaTb C NOMOJIbIO NjLbTa DInCTaHcUNOHHO ynpabJIeHNA.
(1)В рекиме ВOCПОИЗBEДЕНЯ НAKMITE KhoIGNy DISPLAY, ecn Ha 3ekpaHe JKKД ИЛВ BUNOINCKaTeNe He OTo6paKaeTcR CHTUKN.
(2)HaKMMTe KhoNky ZERO SET MEMORY B MeCTe, KOToPoE nOTpe6Byetc HauTn I03Xe. Ioka3aHne CteTuNka cTaHet paBbIM "0:00:00", n HauchET MmraTb INdNKaTOp ZERO SET MEMORY.
(3)HaxmTe KhONKy ,KoIJa Heo6xOJIMOCCTaHOBnTB BOCnpOn3BeJeHne.
(4)HaxmTe KhoNky △ДЯ yckOpEHNoI nepemOTkn JENTbHa3aD K HynEBoT TOUKe CHTuKa IeHTb.IeHTa OCTaHOBITcABTOmatueckn, KOJa CteTuK NOCTnHET HnyeBo OTMeTKn. INdikatop ZERO SET MEMORY nCue3HeT, nnoBtca KoD BpeMeHn.
(5)HaxMMTe KHOIIKy ▷. HaunetcBOCnpon3BeDenHe.
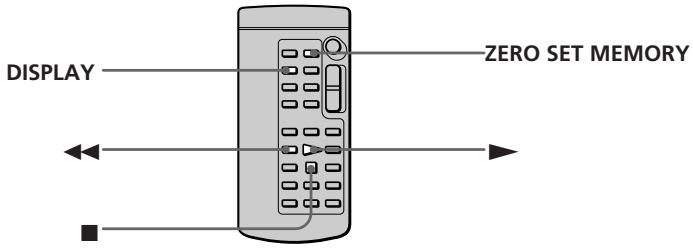
Notes
- When you press ZERO SET MEMORY again before rewinding the tape, the zero set memory function will be canceled.
- There may be a discrepancy of several seconds from the time code.
Приимейсаня
- Ecni eue pa3 haxkab KhoNky ZERO SET MEMORY Do naujia o6paTHo nepemOTkn JeHTbl,TO yHKJn pAmrHuJeBOI OTMeTKb ByET OTMeHeHa.
- Mexky KODOM BpemeHn IeICTBNTeJIbHbIM BpemeHem MOKeT 6blTb paCXoXJDeHne B HeCKOJIbKO CEKYHd.
Quickly locating a scene using the zero set memory function
When there is a blank portion between pictures on a tape
The zero set memory function may not work.
ZERO SET MEMORY functions also in standby mode
When you insert a scene in the middle of a recorded tape, press ZERO SET MEMORY at the point you want to end the insertion.
Rewind the tape to the insert start point, and start recording. Recording stops automatically at the tape counter zero point. Your camcorder returns to standby mode.
Быстпьй NOON 3ПИЗОДС NOMOДБЮ ФУHKДИ ПAMТИ HJLEBOI OTMETКI
EcIn Mekdy 3aHncaHHbIMn Ha JeHTe n3o6paKeHNm NMeETcH He3aHncaHHbIy yactOK
Функци памгтни hyнебов OTmetkn может He pa6oTaTb.
ФункцЯ ZERO SET MEMORY pa6oTaet TaKxE BpeXmE rOToBHOCTN K 3aHnC
Пив BCTaBKe 3иЗоДа В сеpeДИну ЗпИСаHнОЛ ЛЕТь, НжMЛte KНОнКУ ZERO SET MEMORYВ TOM МсTe, Гд Ужно ЗakOHчNTь BCTaBKy 3иЗоДа. ПеремотаTe ЛeHTy K MeTe HaЧАЯ BCTaBKN 3иЗоДа И нaчHNTe 3aIncb. 3aIncb OCTaHOBITc abTomatNueCKn B MeTe HyneBoI OTmETKn СчeТиКa. ВideOKamepa БерHeTcВ рexIM OxNiDaHINr.
Searching for a recording by index - Index search
You can automatically search for the point where an index is marked and start playback from that point (Index search). Use a tape with cassette memory for convenience. Use the Remote Commander for this operation. Use this function to check where indexes are marked or to edit the tape at each sequence where the index is marked.
Searching for the index point using cassette memory
You can use this function only when playing back a tape with cassette memory (p. 210).
(1) Set the POWER switch to VCR.
(2) Set CM SEARCH in to ON in the menu settings (p. 156). The default setting is ON.
(3) Press SEARCH MODE on the Remote Commander repeatedly, until the index search indicator appears. The indicator changes as follows: INDEX SEARCH TITLE SEARCH DATE SEARCH PHOTO SEARCH PHOTO SCAN no indicator
(4) Press or on the Remote Commander to select the index point for playback. Your camcorder automatically starts playing back at the selected index point.
Searching for a recording by index - Index search
To stop searching
Press ■.
In the 00 mark
- The bar in the 00 mark indicates the present point on the tape.
- The x mark in the 001 indicates the actual point you are trying to search for.
If a tape has a blank portion between recorded portions
The index search function may not work correctly.
If you mark an index onto an external input signal
"LINE" appears in the CH column.
The index of the recording start point when recorded from external audio equipment
The index mark is not recorded in cassette memory when recorded from external audio equipment. If you want to search for the index point, set CM SEARCH to OFF in the menu settings and search for the index point without cassette memory.
Searching for the index point without using cassette memory
(1) Set the POWER switch to VCR.
(2) Set CM SEARCH in to OFF in the menu settings (p. 156). If using a tape without cassette memory, skip this step.
(3) Press SEARCH MODE on the Remote Commander repeatedly, until the index search indicator appears. The indicator changes as follows: INDEX SEARCH DATE SEARCH PHOTO SEARCH PHOTO SCAN no indicator
(4) Press on the Remote Commander to search for the previous index point or press on the Remote Commander to search for the next index point. Your camcorder automatically starts playback at the selected index point. Each time you press or your camcorder searches for the previous or next index point.
To stop searching
Press ■.
Searching the boundaries of recorded tape by title - Title search

If you use a tape with cassette memory, you can search for the boundaries of recorded tape by title (Title search) (p. 210). Use the Remote Commander for this operation.
(1) Set the POWER switch to VCR.
(2) Set CM SEARCH in to ON in the menu settings (p. 156). The default setting is ON.
(3) Press SEARCH MODE on the Remote Commander repeatedly, until the title search indicator appears. The indicator changes as follows: INDEX SEARCH TITLE SEARCH- DATE SEARCH PHOTO SEARCH PHOTO SCAN no indicator
(4) Press or on the Remote Commander to select the title for playback. Your camcorder automatically starts playback of the scene having the title that you selected.
Searching the boundaries of recorded tape by title - Title search
To stop searching
Press ■.
If you use a tape without cassette memory You cannot superimpose or search for a title.
In the 00 mark
- The bar in the 00 mark indicates the present point on the tape.
- The x mark in the 00 indicates the actual point you are trying to search for.
If a tape has a blank portion between recorded portions
The title search function may not work correctly.
Searching a recording by date - Date search
You can automatically search for the point where the recording date changes and start playback from that point (Date search). Use a tape with cassette memory for convenience. Use the Remote Commander for this operation.
Use this function to check where recording dates change or to edit the tape at each recording date.
Searching for the date using cassette memory
You can use this function only when playing back a tape with cassette memory (p. 210).
(1) Set the POWER switch to VCR.
(2) Set CM SEARCH in to ON in the menu settings (p. 156). The default setting is ON.
(3) Press SEARCH MODE on the Remote Commander repeatedly, until the date search indicator appears.
The indicator changes as follows:
INDEX SEARCH TITLE SEARCH DATE SEARCH PHOTO SEARCH PHOTO SCAN no indicator
(4) Press or on the Remote Commander to select the date for playback. Your camcorder automatically starts playback at the beginning of the selected date.
Searching a recording by date - Date search
To stop searching
Press ■.
Note
If one day's recording is less than two minutes, your camcorder may not accurately find the point where the recording date changes.
In the 00 mark
The bar in the 00 mark indicates the present point on the tape.
- The x mark in the 00 indicates the actual point you are trying to search.
If a tape has a blank portion between recorded portions
The date search function may not work correctly.
Searching for the date without using cassette memory
(1) Set the POWER switch to VCR.
(2) Set CM SEARCH in to OFF in the menu settings (p. 156). If using a tape without cassette memory, skip this step.
(3) Press SEARCH MODE on the Remote Commander repeatedly, until the date search indicator appears. The indicator changes as follows: INDEX SEARCH DATE SEARCH PHOTO SEARCH PHOTO SCAN no indicator
(4) Press on the Remote Commander to search for the previous date or press on the Remote Commander to search for the next date. Your camcorder automatically starts playback at the point where the date changes. Each time you press or, your camcorder searches for the previous or next date.
To stop searching
Press
Searching for a photo - Photo search/Photo scan
You can search for a still picture you have recorded on a tape (photo search).
You can also search for still pictures one after another and display each picture for five seconds automatically regardless of cassette memory (photo scan). Use the Remote Commander for these operations.
Use this function to check or edit still pictures.
Searching for a photo using cassette memory
You can use this function only when playing back a tape with cassette memory (p. 210).
(1) Set the POWER switch to VCR.
(2) Set CM SEARCH in to ON in the menu settings (p. 156). Default setting is ON.
(3) Press SEARCH MODE on the Remote Commander repeatedly, until the photo search indicator appears.
The indicator changes as follows:
INDEX SEARCH TITLE SEARCH DATE SEARCH PHOTO SEARCH PHOTO SCAN no indicator
(4) Press or on the Remote Commander to select the date for playback. Your camcorder automatically starts playback of the photo having the date that you selected.
Searching for a photo - Photo search/Photo scan
To stop searching
Press ■.
In the 00 mark
- The bar in the 00 mark indicates the present point on the tape.
- The x mark in the 00 indicates the actual point you are trying to search for.
If a tape has a blank portion between recorded portions
The photo search function may not work correctly.
Searching for a photo without using cassette memory
(1) Set the POWER switch to VCR.
(2) Set CM SEARCH in to OFF in the menu settings (p. 156).
(3) Press SEARCH MODE on the Remote Commander repeatedly, until the photo search indicator appears. The indicator changes as follows: INDEX SEARCH DATE SEARCH PHOTO SEARCH PHOTO SCAN no indicator
(4) Press or on the Remote Commander to select a photo for playback. Each time you press or your camcorder searches for the previous or next photo. Your camcorder automatically starts playback of the photo.
To stop searching
Press ■.
(1) Set the POWER switch to VCR.
(2) Press SEARCH MODE on the Remote Commander repeatedly, until the photo scan indicator appears. The indicator changes as follows: INDEX SEARCH TITLE SEARCH DATE SEARCH PHOTO SEARCH PHOTO SCAN no indicator
(3) Press or on the Remote Commander. Each photo is played back for about five seconds automatically.
Сканировке сOTO
(1)YcTaHOBInTe IpeKJIIOUaTeIb POWER B noJIOKeHne VCR.
(2)HaximaiTe KhoNky SEARCH MODE Ha nyIbTe DnCTaHcIOHHOrO ynpaBLeHnI Do Tex nop, IOKa He NpOBuTcR INdInKaTOp nonCKa pOTOCKaHnPOBaHn. INdInKaTOp IN3MeHNeTcR CJeDyHOzIM o6pa3oM: INDEX SEARCH TITLE SEARCH DATE SEARCH PHOTO SEARCH PHOTO SCAN 6e3 INdInKaTopa
(3)HaxmTe I nnHa npIbTe nCTaHcUHOHorO ynpaBHeHn. KaJdoe foto 6yDet aBTOMaTnueckn oTo6paXaTbcra B TeueHne npi6bn3ntelbHo nTn CekyHd.
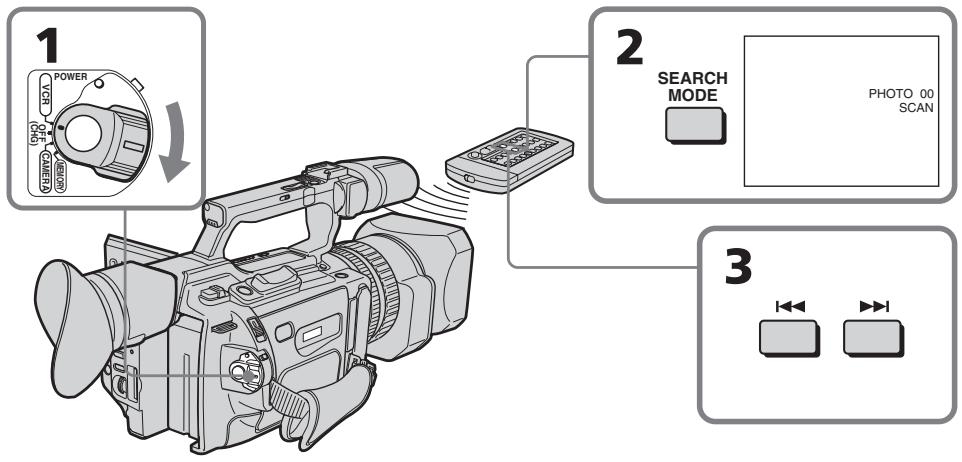
To stop scanning
Press ■.
ДлЯ OCTaHOBKи CkaHIpObaHnA
HaXMMTe KhONKy
Playing back a tape with picture effects
During playback, you can process a scene using the picture effect functions: NEG. ART, SEPIA, B&W and SOLARIZE.
In playback or playback pause mode, press PICTURE EFFECT and turn the SEL/PUSH EXEC dial until the desired picture effect indicator (NEG. ART, SEPIA, B&W or SOLARIZE) appears.
For details of each picture effect function, see page 58.
Bocnpon3BedeHne JeHTbIC 3ΦΦeKtAmn n3O6paXeHnA
Bo BpemBocPon3BeDeHnMOxHO BINOJON3MeHnTBnO6paXeHneC NOMOsbIO fHyHKnn 3ΦΦeKToBnO6paXeHnNE:NEG. ART,SEPIA,B&W n SOLARIZE.
BpeKIme BocpOIN3BeEHHn IInI naY3bl BOCpOIN3BeEHHn HaxMNTe KHOKNy PICTURE EFFECT INOBOPaHbAaTe DNCK SEL/PUSH EXEC Do Tex nop, noka He noRbITcN IHdNKaTOp HxhHoro ZnpoBOrO 3ΦeKtA (NEG. ART, SEPIA, B&W IIn SOLARIZE). IOnpO6HbIe CBeEHHn NO KaXdoI ΦyHKUIN cHpOBoBIX 3ΦeKToB npBVeDeHb Ha CTp. 58.
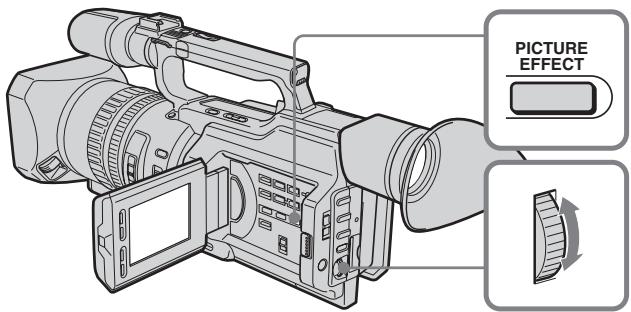
To cancel the picture effect function
Press PICTURE EFFECT so that the indicator disappears.
Notes
- You cannot process a picture using the picture effect function that is input from other equipment.
- To record pictures that you have processed using the picture effect function, record the pictures on the VCR, using your camcorder as a player.
Pictures processed by the picture effect function
Pictures processed by the picture effect function are not output through the DV Interface.
When you set the POWER switch to OFF (CHG) or stop playing back
The picture effect function will be automatically canceled.
Playing back a tape with digital effects
During playback, you can process a scene using the digital effect functions: STILL, FLASH, LUMI. and TRAIL.
(1) In playback or playback pause mode, press DIGITAL EFFECT and turn the SEL/PUSH EXEC dial until the desired digital effect indicator (STILL, FLASH, LUMI. or TRAIL) flashes.
(2) Press the SEL/PUSH EXEC dial. The digital effect indicator lights up and the bars appear. In STILL or LUMI mode, the picture is captured and is stored in memory as a still picture at the time you press the SEL/PUSH EXEC dial.
(3)Turn the SEL/PUSH EXEC dial to adjust the effect. For details of each digital effect function, see page 60.
Bocnpon3BeDeHne JeHTbI c uΦpOBbIMN 3ΦΦeKtAmN
Bo BpemBocnpOn3BeDeHnMoXHo BUNON3MeHbI N3OpaXeHne C NOMOuHO cyHKnI cNpPoBbIX 3cFcEKTOB: STILL, FLASH, LUMI. n TRAIL.
(1)В ржиме BOCPON3BEdENH nIи nay3bl BOCPON3BEdENH nAIXMITE KHOIIKY DIGITAL EFFECT nNoBOPaUNBaIte DNCK SEL/PUSH EXEC Do tex nop, noka He nauHET MInTaT nHnIKaTOP HxKHO r uFpOBOrO 3ePfEkTA (STILL, FLASH, LUMI. nIи TRAIL).
(2)HaXMMTe HaДNCK SEL/PUSH EXEC. 3aRopntc HnDnKATOp ZnΦpOBOrO 3ΦΦeKTA nIPOBAtc rIIOscbl BpeXmE STILL nI LUMI. BO BpeMra HaxKaTnA DnCKa SEL/PUSH EXEC nI06paXeHne CHIMaeTcN I COxPAnHETcB NAmTb KaK HeNoDbNkHOe nI06paXeHne.
(3)ПовернITE дСК SEL/PUSH EXEC дЯ
perулровkn зффект.
Порpoбные с蜱edingи по каддои
функши с蜱edingи зффектов
приваены наст.60.

To cancel the digital effect function
Press DIGITAL EFFECT so that the indicator disappears.
IITRAOTMEHbIyHKUNuPPOBbIX 300
HaxmTe KhoNky DIGITAL EFFECT, yTo6bl HnDnKaTOp nCye3.
Playing back a tape with digital effects
Notes
- You cannot process a picture using the digital effect function that is input from other equipment.
- To record pictures that you have processed using the digital effect function, record the pictures on the VCR, using your camcorder as a player.
Pictures processed by the digital effect function
Pictures processed by the digital effect function are not output through the DV Interface.
When you set the POWER switch to OFF (CHG) or stop playing back
The digital effect function will be automatically canceled.
Bocnpo3BeDeHne JeHTbI c cnΦpOBbIMn 0ΦΦeKTamn
Приимechания
Избрахен,在BБеДEHьe cДpyroaannapaTpybI,HEBO3MOxH0ИЗмEHЯТсNOMOuHIOФyHKUINZcPpOBbIXəΦΦeKTOB.
-ДяЗаисиИЗбрахжн,КOTOBIE6blIN BUNOIMeHbIC NOMOUBФyHKUIN UΦPBOBx3ΦΦEKTOB,3aNIMTe I3O6paXeHЯHaBnDeOMaHNToHON, INCNoIb3yR BnDEOKaMepyB KaueCTBe nJIeepa.
N3o6paXeHnBUNOn3MeHeHHbIe C NOMOsbIO FyHKnnu cPPOBbIX 3cpeKTOB N3o6paXeHnBUNOn3MeHeHHbIe C NOMOsbIO FyHKnnu cPPOBbIX 3cpeKTOB, He BBIOaTcayepesHTeppeic DV.
Ipn yctahOBke nepeKluoyateJIa POWER b noJIOxKeHne OFF (CHG) nII oCtahOBke BocnpOn3BeDeHnI
Функцицлфровьхсфektob aBTOMATNueckenOTMeHReTcR.
Using the A/V connecting cable
Connect your camcorder to the VCR using the A/V connecting cable supplied with your camcorder.
Before a dubbing
Set DISPLAY to LCD in the menu settings.
(Default setting is LCD.)
Set the input selector on the VCR to LINE, if available.
(1) Insert a blank tape (or a tape you want to record over) into the VCR, and insert the recorded tape into your camcorder.
(2) Set the input selector on the VCR to LINE. For details, refer to the operating instructions of the VCR.
(3) Set the POWER switch to VCR.
(4) Play back the recorded tape on your camcorder.
(5)Start recording on the VCR. For details, refer to the operating instructions of the VCR.
Парапсь lentы
UcnoIb3OBAHnE CoeHNHTelbHOro Ka6eJyauDNo/BuDeo
ПоДсоeДиНTe BИdeOKaМepу K BИдeОмагнITофОну CпOMOцьH O COeДиНTeЛьНOrO Kaбеля aydINO/BИdeO, KOTopbI npnlaeraTcK BИdeOKaМepe.
Peped nepe3anncbio
YcTaHOBnTe npaMeTp DISPLAY B nOIOXeHne LCD b ycTaHOBkax MeHIO. (ycTaHOBkoNo ymOnuHaHHIO ABJIeTcA LCD.)
YctaHOBtCe CeJIeKToPbI NepeKJIIOuTaTeIb BXoJHOrO CnIHana Ha BnDEomarHnTocPoHe B nIoJooKeHne LINE, ecJIn TaKOBoe IMeETcR.
(1)BcTaBbTe He3aIncAHHyIO JeHTy (UINJIeHTy,Ha KOTOpYIO Heo6XoJIMO BbIIOJIHNTb 3aIncb) B BNDeOMaHHTOΦOH IN BcTaBbTe 3aIncAHHyIO JeHTy B BNDeOKaMepy.
(2)VcTaHOBInTe CeIeKTop BXoDHorO CnHnHaHa HbNDeOMaHrHToΦOHe BNoJIOXKeHne LINE. IOpRo6HbIe CBeJeHnCM.B INHCTpyKuIN IO 3KcPnLyatauIN BnDeOMaHrHToΦOHa.
(3)Установпейpeключateь POWER в положене VCR.
(4)HaunHe BoCpOn3BedeHne 3aIncanHnoJIeHTbI Ha BnDeOKampe.
(5)HaunHe 3aIncB Ha BnDeomarHnToΦoHe. IopnpbHe CBeJeHnCm.B INCTpyKuIN No 3KnPyatauBn DeomarHnToΦoHa.
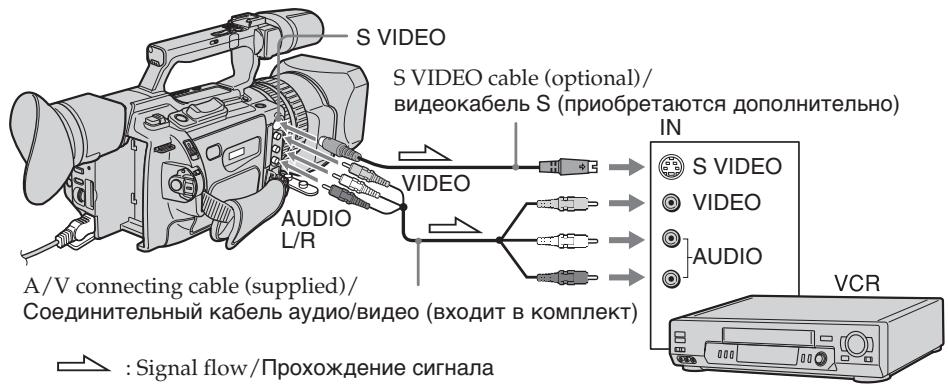
When you have finished dubbing the tape
Press on both your camcorder and the VCR.
Korda nepezannc bIeHTbI 3aKOHYeHa
HaxmTe KhONKy Ha BnDeokampe N ha BnDeomarHnToΦOHe.
Be sure to clear the indicators from the screen
If they are displayed, press the following buttons so as not to record the indicators on the dubbed tape:
- The DISPLAY button
- The DATA CODE button
- The SEARCH MODE button on the Remote Commander
You can edit on VCRs that support the following systems
8 8 mm, Hi8 Hi8, Digital8, VHS VHS S-VHS, VHSC VHS, VHSC S-VHSC, Betamax, Mini DV, DV or MICROMV
If your VCR is a monaural type
Connect the yellow plug of the A/V connecting cable to the video input jack and the white plug to the audio input jack on the VCR or the TV. The red plugs are not used.
Connect using an S video cable (optional) to obtain high-quality pictures
With this connection, you do not need to connect the yellow (video) plug of the A/V connecting cable. Connect the S video cable (optional) to the S video jacks on both your camcorder and the TV or the VCR. This connection produces higher quality DV format pictures.
If you use a LANC cable
You can edit precisely by connecting a LANC cable (optional) to this camcorder and other video equipment having a fine synchro-editing function, using this camcorder as a player.
Using an i.LINK cable
Simply connect the i.LINK cable (optional) to DV Interface and to DV Interface of the DV products. With a digital-to-digital connection, video and audio signals are transmitted in digital form for high-quality editing. You cannot dub the titles, display indicators or the contents of cassette memory.
06aTeIbHO OTKIOUHTe INHdNkaTOpbHa 3KpaHe
Ecni OHI OTobpaXaOTcH, HAKMTte cIeDyUOsiNE KHOKN, YTObI He 3aNcBIBaTb INdKATOpBI Na Hepe3aNcBIBaEMyIO JENTHY:
- Khonka DISPLAY
- Khonka DATA CODE
KhoKa SEARCH MODE ha npIbTe DnCTaHcUOHOro ynpaBHeHH
MOHTAX MOXHO BbINOJHrTa HbUdEOMaHrHToΦoHax, KOTOpbIe NOdEepKXBauT CNeDyOuNc NCTembl
8 MM, Hi8 Hi8, Digital8, VHS VHS, SVHS S-VHS, VHSC VHSC, SVHSC S-VHSC, Betamax, MiniDv miniDV, DV uJIM MICROMV
EcIn BnIeOMaHHToΦOH MOHOΦOHmYeCKOrO TnPa
IoiDCoeDInHnTe XeHTbI WTeKep COeINHnTEJbHOr KAbEJIa yAnIO/BuJeO K BxOJHOMy IHe3dy BuDEOCINHa, a 6BcIbI WTeKep - K BxOJHOMy IHe3dy ayDNOCINHa Na BvIDeOMaRHTOpHe JNl TEJBeIN3ope. KpaChbIe WTeKepbl He NcNoJIb3yIOTcR.
CoeunHeHne c nOmoBIO BnDeoKa6eJr S (PnOobpTaIOTcDOnONHnTeJIbHO) dNl NOJUeHn BIBOCOKoKaYeCTBeHHbIX n3O6paXehn
При ТAKOM COeINHeHIn He HUxHo ПОДКЛЮЧАБ КЕТВИ (BnDEO) WTeKep COeINHITeNBHO Ka6eJIa ayHIO/BnDEO. ПОДСоeINHITe BnDEOKa6eJIb S (ПрIOбPетаTOCT ДОПЛHITeNBHO) K ВиDEОгнESdAM S Ha BnDEOKaMpeи ТeLEBEIN3Ope ИИN BnDEOMaHHToФОHe. 3To COeINHINHe NO3BOJNAET NOJYuHtB ВьICOKOKaueCTBeHHOe N3OBpaXeHne ФOPMaT a DV.
Ecnn nCnNoJb3yETcKa6eJIb LANC
CoeinyenHe 3ToB BInDeoKamepbI c npyroB BInDeoanapatpyoN,IMHeOSeI cyHKnUIO TOuHO CNxHPOnH3aunm IJAN MOHTaKa, C NOMoubIO Ka6enaLANC (npno6peaOTcdoONHNTelbHO) n NocneDuOueIE NCpONb3OBaHnE BInDeoKamepbI B KaueCTBe PJIeepa N03BOJAE T BInOnHNTb OYeHb ToCHbM MoHTaK.
IcnoJb3OBaHne Ka6eJI i.LINK
IpocTo npoCoeDInHte Ka6eB i.LINK (PnO6peTaetcRdOpONHtneJIbHO) K nHTepceCy DV N K nHTepceCy DV annapatOB DV. Ppr nCnoNb3ObaHm nIcpPOBOrO CoeDInHeHn BNuDeo- ayDIOscIRHaNbI nepeDaIoTcR B IuPpOBOM BnDE, YTO oBeCeNeuBaET BbICOKOE KaueCTBO MOttaXa. TntPbI, INDkAToPbI Ha dNcPiee IIN CoepKaHHe KAcCEThoN NaMTrn nepe3aINCbIBaTb HeNb3r.
(1) Insert a blank tape (or a tape you want to record over) into the VCR, and insert the recorded tape into your camcorder.
(2) Set the input selector on the VCR to the DV input position if the VCR is equipped with an input selector. For details, refer to the operating instructions of the VCR.
(3) Set the POWER switch to VCR.
(4) Play back the recorded tape on your camcorder.
(5) Start recording on the VCR.
Ipee3anncb JeHTbl
(1)BCTaBbTe He3aIImcaHHyIO JeHTy (uINJeHTy,Ha KOTopyIO Heo6xoIIMO BbIIOJIHNbT 3aIncb) B BVNeOMaHHToΦOH IN BCTaBbTe 3aIImcaHHyIO JeHTy B BVNeOkaMepy.
(2)YcTaHOBInTe CeJIeKTop BXOJHOrO CnHnla Ha BnDeOMaHRnTOΦoHe (ecn TaKOBnIMeETcA) B nIoXKeHne DV. POpRo6HbIe CBeDEHn CM. B INHCTpyKuIMn NO 3KcNlyaTAtuIN BnDeOMaHRnTOΦoHa.
(3)Установпейрееклочатуль POWER в положене VCR.
(4)HaunHe BocnpOn3BedeHne 3aIncanHnoJIeHTbI Ha BnDeokamepe.
(5)HaunHe 3aIncb Ha BIndeomarHnTofohe.

When you have finished dubbing a tape
Press on both your camcorder and the VCR.
You can connect one VCR only using the i.LINK cable
Pictures processed by the digital effect or picture effect function
Pictures processed by the digital effect or picture effect function are not output through the DV Interface.
If you record a playback pause picture with the DV Interface
The recorded picture becomes rough. And when you play back the picture using other video equipment, the picture may jitter.
Korda nepezanncIeHTbI 3aKOHHeHa
HaKMTe KHONky Ha BnDeokamepe N Ha BnDeomarHHTOPOHe.
C nomoosbky Ka6eJia i.LINK moxho NOoCoEHHnTb TOJbKO OINH BnDEOMaHRHTOΦOH
N3o6paXeHnBUNOn3MeHeHHbIe C NOMOsbIOyHKcunuΦPOBbIX 3ΦΦeKTOB NINФyHKcun 3ΦΦeKTOB N3o6paXeHn
I3o6paKeHnB,INIOUN3MeHHeHbIE C NOMOuB0
fYHKUIN UcPObBIX 3oPfEeKTOB ININ
3oPfEeKTOB I3o6paKeHnB,HE BbIOJrTCA
uepe3 INTEppeic DV.
Pn3aIncn 1306paXeHnBpeKIme nay3bl BocpOun3BeDeHnC nOMoCbIO nHTepFeieCa D
3aIncsbIbAeMOeN3o6paXeHne 6yJeT HeueTKIM. PnB BocnpOn3BeDeHNn N3o6paXeHnHa npyroBnDeoannapaType OHO MoKET dpOkaTb.
Dubbing only desired scenes - Digital program editing
You can duplicate selected scenes (programs) for editing onto a tape without operating the VCR. Scenes can be selected by frame.
Ipe3aHcB TOnbKO HxKbIX 3n3oOB - CnΦpOBoB BnDEOMHTaX NO nPOrpaMMe
MoxHo HeckoIbKO pa3 3aIncbIbTaH KaaccTeY BbIbpaHHbIe IJRA MOHTaKa 3Nn3OdbI (nporpaMMbl), He ynpabJIa BnDeomarHnITocFOHOM. 3Nn3OdbI MoXHO BbIbpaTb IO KaIpaM.
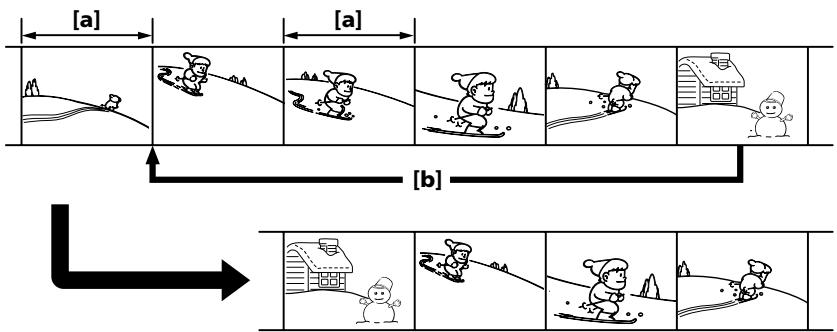
a Undesired frame
[b]Moves the scene
Before operating the digital program editing
Preparation 1 Connecting the VCR (p. 107, 109).
Preparation 2 Setting the VCR to operate by infrared rays emitter (p. 112)/Setting the VCR to operate with an i.LINK cable (p. 118).
Preparation 3 Adjusting the synchronization of the VCR (p. 119).
When you dub using the same VCR again, you can skip Preparations 2 and 3.
Using the digital program editing function
Operation 1 Making programs (p. 123).
Operation 2 Performing a digital program editing (Dubbing a tape) (p. 126).
aHeNyXhblKaIpa
[b]PepemeeHne3n30da
Ipeed Haayalom uippoBoro MOHTaKa no nporpamme
IoproToBka 1 POnKlNoyeHne BnDeomarHnToPohA (cTp. 107, 109).
IoproToBka 2 HacTroKa ynpaBLeHnBnuDeOMaHnTOphiHa OT INHpaKpaChoroN3NyUaTeJIa (ctp.112)/HacTroKaBnuDeOMaHnTOphiHa dJa pa6ObIc Ka6eJIemi.LINK (ctp.118).
IoproToBka 3 HacTpoKa CnHxPoHn3aCNI BnDEOMarHnTOphiA (CTp.119).
EcnI nepezacnb cHOBa BblIOJIHHReTc nOMOuBTOrO Je BnDEoMaHrNtOfoHa, IOnrTOBky 2 n3 MoXHO npOnyctntb.
IcnoJIb3OBAHnE ΦyHKcNn cnpoBOro MOHTaKa IIO nporpaMme
ДeнстВи e 1 CoctaBJIeHne nporpaMM (cTp. 123).
IeBtBne 2 BbInonHeHne uHpOboRo MOHTaKa IporpaMMbl (pepe3aINc b Kaccetbl) (ctp.126).
Dubbing only desired scenes - Digital program editing
Notes
- You cannot dub the titles, display indicators, or the contents of cassette memory.
- When you connect with an i.LINK cable, you may not be able to operate the dubbing function correctly, depending on the VCR. Set CONTROL to IR in the menu settings of your camcorder.
- You cannot send the control signal of the digital program editing through the (LANC) jack.
If you connect using an i.LINK cable
With digital-to-digital connection, video and audio signals are transmitted in digital form for high-quality editing.
Preparation 1: Connecting the VCR
Connect your camcorder and the VCR as shown on pages 107 and 109.
You can use an A/V connecting cable, or an i.LINK cable.
Ipee3aHcB ToJIbKO HUxHbIX 3nH3OoB -LncpOboB BnDEOMHTaX NO nporpaMMe
Примейань
Tntpbl,INHdNkATOpblHaDnCnIeN COdePkaHHe KaccTeHn NaMRTn He nepe3aNcblBaOTcA.
-Пи рпдклоченс сюкья Kaбеля i.LINKФункция перазиис может pa6oTaTB He npaВильBO, B 3aBиСмоCTN OT BndeOMarHHTOфona.
B yctaHOBkax MeHIO BnIeOKaMepbl yctaHOBnTE CONTROL B noJoxHeIr IR.
Preparation 2: Setting the VCR to operate by infrared rays emitter
To edit using the VCR, send the control signal by infrared ray to the remote sensor on the VCR. When you connect using the A/V cable, this procedure is required.
(1) Set the POWER switch to VCR on your camcorder.
(2) Turn the power of the connected VCR on, then set the input selector to LINE. When you connect a video camera recorder, set its POWER switch to VCR.
(3) Press MENU to display the menu.
(4)Turn the SEL/PUSH EXEC dial to select ETC, then press the dial.
(5)Turn the SEL/PUSH EXEC dial to select EDIT SET, then press the dial.
(6)Turn the SEL/PUSH EXEC dial to select CONTROL, then press the dial.
(7)Turn the SEL/PUSH EXEC dial to select IR, then press the dial.
Set the IR SETUP code
(8) Turn the SEL/PUSH EXEC dial to select IR SETUP, then press the dial.
(9)Turn the SEL/PUSH EXEC dial to select the IR SETUP code of your VCR, then press the dial. See "About the IR SETUP code" on page 114.
Ioprotobka 2:Hactpoika ynpableny BndeomarHHTofoha OT nHpapkpacHO n3nyateJIa
ДЯ BBINONHeHMAOTaKa C NCSNoB3OBaHNEM BnDEOMaHHTOFOHa MOxHO Nocblalb Ha erO IK-datuK INK-cnrHaNbl ynpabLeHNA. Ppi NpOKJIIOUeHmC NOMOuHo coeINHInTeJbHOro Ka6eNa aydno/BnDeo 3Ta npoueDpya o6ra3aTeJbHa.
(1)YcTaHOBInTe Ha BnIeOkaMepe nepeKIOuHaTeIb POWER B noJoxHeHne VCR.
(2)ВКЛIOЧИТЕ ПИТАнUE NOДКЛIOЧЕННORO BnDEOMaHnTOФОHAи yCTaHOBbTe ceJIeKTop BXoJdHOrO CnIHaNA B nIoJoxEHe LINE. Ppi nOДcoEduHEnNи BnDEOKaMepbl ycTaHOBbTE ee IpeEkIIOUcATEb POwER B nIoJoxEHe VCR.
(3)HaxmTe KhoNkY MENU dIa OTo6paXeHHa MeHIO.
(4)ПовернITE ДИСК SEL/PUSH EXEC ДЯ
Выбopa установки ETC, a 3aTeM нажмITE
На ДИСК.
(5)Повернite ДИСК SEL/PUSH EXEC ДЯ Вьбopa EDIT SET, a 3aTeM нажмITE Ha ДИСК.
(6)Повернite ДИСК SEL/PUSH EXEC ДИВИБОРA CONTROL, a 3aTeM нахмITE на ДИСК.
(7)Повернente ДИСК SEL/PUSH EXEC ДИВбopa IR,аЗатем надИСК.
YctaHObKa Koga IR SETUP
About the IR SETUP code
The IR SETUP code is stored in the memory of your camcorder. Be sure to set the correct code, depending on your VCR. Code number 1 is the default setting.
| Brand | IR SETUP code |
| Sony | 1, 2, 3, 4, 5, 6 |
| Aiwa | 47, 53, 54 |
| Akai | 50, 62, 74 |
| Alba | 73 |
| Amstrad | 73 |
| Baird | 30, 36 |
| Blaupunkt | 11, 83 |
| Bush | 74 |
| CGM | 36, 47, 83 |
| Clatronic | 73 |
| Daewoo | 26 |
| Ferguson | 76, 83 |
| Fisher | 73 |
| Funai | 80 |
| Goldstar | 47 |
| Goodmans | 26, 84 |
| Grundig | 9, 83 |
| Hitachi | 42, 56 |
| ITT/Nokia Instant | 36 |
| JVC | 11, 12, 15, 21 |
| Kendo | 47 |
| Loewe | 16, 47, 84 |
| Luxor | 89 |
| Mark | 26* |
| Matsui | 47, 58*, 60 |
| Mitsubishi | 28, 29 |
| Nokia | 36, 89 |
| Nokia Oceanic | 89 |
| Nordmende | 76 |
Hhopmaun o KoJe IR SETUP
KoI IR SETUP copejxntcB namrtn BndeokamepbI. YctaHObITe npaBnJIbHbI KoI, COOTBeTCTByUOsiN IcNoJIb3yEMOMY BnDEOMaHHTofoHy. IyoMOnHaHIO yCTaHaBnBaTeC KoI Homep 1.
| Фирma-нз�овител | КоД IR SETUP |
| Sony | 1,2,3,4,5,6 |
| Aiwa | 47,53,54 |
| Akai | 50,62,74 |
| Alba | 73 |
| Amstrad | 73 |
| Baird | 30,36 |
| Blaupunkt | 11,83 |
| Bush | 74 |
| CGM | 36,47,83 |
| Clatronic | 73 |
| Daewoo | 26 |
| Ferguson | 76,83 |
| Fisher | 73 |
| Funai | 80 |
| Goldstar | 47 |
| Goodmans | 26,84 |
| Grundig | 9,83 |
| Hitachi | 42,56 |
| ITT/Nokia Instant | 36 |
| JVC | 11,12,15,21 |
| Kendo | 47 |
| Loewe | 16,47,84 |
| Luxor | 89 |
| Mark | 26* |
| Matsui | 47,58*,60 |
| Mitsubishi | 28,29 |
| Nokia | 36,89 |
| Nokia Oceanic | 89 |
| Nordmende | 76 |
Dubbing only desired scenes - Digital program editing
| Brand | IR SETUP code |
| Okano | 60, 62, 63 |
| Orion | 58*, 70 |
| Panasonic | 16, 78 |
| Philips | 83, 84, 86 |
| Phonola | 83, 84 |
| Roadstar | 47 |
| SABA | 21, 76, 91 |
| Salora | 89 |
| Samsung | 22, 32, 52, 93, 94 |
| Sanyo | 36 |
| Schneider | 10, 83, 84 |
| SEG | 73 |
| Seleco | 47, 74 |
| Sharp | 89 |
| Siemens | 10, 36 |
| Tandberg | 26 |
| Telefunken | 91, 92 |
| Thomson | 76, 100 |
| Thorn | 36, 47 |
| Toshiba | 40, 93 |
| Universum | 47, 70, 84, 92 |
| W. W. House | 47 |
| Watson | 58, 83 |
- TV/VCR component
Note on remote control code
You cannot do assemble editing with some VCRs (for recording) if the remote control code does not correspond to this camcorder (for playback).
Ipee3aHncb TObkO HxKhbIX 3nN3oJOB -CnΦpOBoB BnDEOMONTaX NO nPporpaMMe
| Фирma-нз�овител | КоД IR SETUP |
| Okano | 60, 62, 63 |
| Orion | 58*, 70 |
| Panasonic | 16, 78 |
| Philips | 83, 84, 86 |
| Phonola | 83, 84 |
| Roadstar | 47 |
| SABA | 21, 76, 91 |
| Salora | 89 |
| Samsung | 22, 32, 52, 93, 94 |
| Sanyo | 36 |
| Schneider | 10, 83, 84 |
| SEG | 73 |
| Seleco | 47, 74 |
| Sharp | 89 |
| Siemens | 10, 36 |
| Tandberg | 26 |
| Telefunken | 91, 92 |
| Thomson | 76, 100 |
| Thorn | 36, 47 |
| Toshiba | 40, 93 |
| Universum | 47, 70, 84, 92 |
| W. W. House | 47 |
| Watson | 58, 83 |
- TB/BuNdeOemarHnToCpOH
3ameaHNOOTHOCTeHbHO KODa NylbTa DnCTaHcHOnHOrO ynpabLeHH
C HeKoTObIMN BUnDEOMaHHTOPOHaMn HeIb3R BbIIOJHrTb MOHTax (ДЯ 3aIINCU), ecN KoD nYbTa DnCTaHcUHOHOrO ynpabHeHnHE CoOTBETCTByET 3ToI BUNDeOKaMepe (ДЯ BOCpON3BeDeHnI).
Setting the buttons to cancel the recording pause on the VCR
(1)Turn the SEL/PUSH EXEC dial to select PAUSEMODE, then press the dial.
(2)Turn the SEL/PUSH EXEC dial to select the button to cancel recording pause on the VCR, then press the dial. The correct button depends on your VCR. Refer to the operating instructions of your VCR.
HacpoKa KhoNOK JIЯ OTMeHbI nay3bl npn 3aIncn Ha BIndeomarHHTOfoHe
(1)ПовернITE диСK SEL/PUSH EXEC дя Вьбopa PAUSEMODE, a 3aTeM habKMITE ha dNCK.
(2)ПовернITE диСK SEL/PUSH EXEC,чTo6bI Bbl6paTb KHONkY dIJI OTMeHbI Nay3bl npi 3aIncn Ha BnDEOMarHnTOfoHe, a 3aTeM HaxMMTE Ha dNCK. Bbl6op npabINbHOK HONk 3aBnCt OT BnDEOMarHnTOfoHa. O6paTntecb K INcTpkyKuIN NO 3KcPnyatauIN BnDEOMarHnTOfoHa.
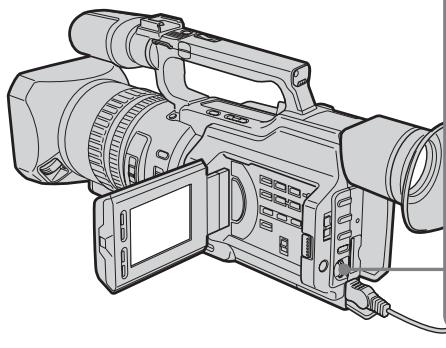
1,2


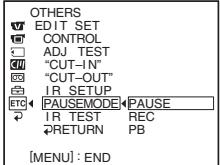

OTHERS
EDIT SET
CONTROL
ADJ TEST
“CUT-IN”
园“CUT-OUT”
自LBSETUR
TR-SETOP ETC4 PAUSEMODEL PAUSE
- PAUSEMODE PAUSE
RETURN
The buttons to cancel recording pause on the VCR
The buttons vary depending on your VCR. To cancel recording pause:
- Select PAUSE if the button to cancel recording pause is I.
- Select REC if the button to cancel recording pause is .
- Select PB if the button to cancel recording pause is .
KhONKnIJIa OTMeHbI nay3bI npn 3aIncn Ha BIndeomarHHTOΦOHe
KhoNKn OTnuaIOTcB 3aBncIMoCTn OT MoJeIN BIneOmaHHTofoHa. JIa OTMeHbI nay3bl npn 3aIncn:
- Bыберп Te PAUSE, ecлн Кногк Дг OТмeнbl nay3bl npn 3annc - I.
- BыбэрптЕ REC, ecлн Кногкдг OTмени.
- nay3bl 3aПСИ - ●.
- Bыбэрпт eP, ecn KhoIGNa Дя OТмeны nay3bl 3anciN - >.
Setting your camcorder and the VCR to face each other
Locate the infrared ray emitter of your camcorder and face it towards the remote sensor of the VCR.
Set the devices about 30~cm (about 11 7/8 in) apart, and remove any obstacles between the devices.
YcTaHOBKa BnDeOkaMepbI bNdeOMaHHTofoHa Dpyr npOTNB dpyra
HnphpaKpaCbHn3nyaTeIb BnDeokamepbl HeoXoIMHO npaBnTb Ha daTynK DnCTAHIOHORO ynpabJIeHn BnDEOMaHHTofoHa.
YcTaHOBnTe yCtpoNCTBa Ha paCCToHn HnpMepHo 30 cm n ycTpaHnTe JIObIe npENrTcBnMexJy HmN.
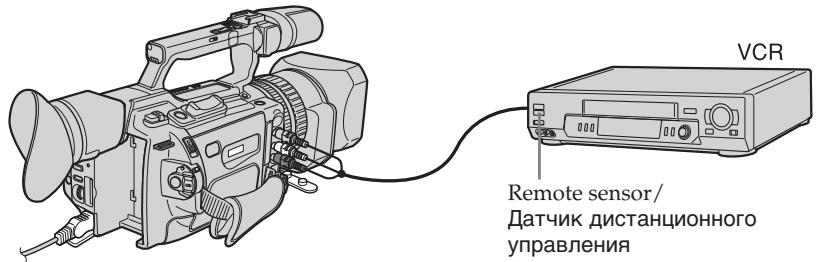
Confirming the VCR operation
(1) Insert a recordable tape into the VCR, then set it to recording pause.
(2) Turn the SEL/PUSH EXEC dial to select IR TEST, then press the dial.
(3)Turn the SEL/PUSH EXEC dial to select EXECUTE, then press the dial.
If the VCR starts recording, the setting is correct.
When finished, the indicator changes to COMPLETE.
When the VCR does not operate correctly
Set the IR SETUP code, or select the button to cancel the recording pause on the VCR.
Preparation 2: Setting the VCR to operate with an i.LINK cable
When you connect using an i.LINK cable (optional), follow the procedures below.
(1) Set the POWER switch to VCR on your camcorder.
(2)Turn the power of the connected VCR on, then set the input selector to DV input. When you connect a video camera recorder, set its POWER switch to VCR.
(3) Press MENU to display the menu.
(4)Turn the SEL/PUSH EXEC dial to select ETC, then press the dial.
(5)Turn the SEL/PUSH EXEC dial to select EDIT SET, then press the dial.
(6)Turn the SEL/PUSH EXEC dial to select CONTROL, then press the dial.
(7)Turn the SEL/PUSH EXEC dial to select i.LINK, then press the dial.
EcnBnDeomarHHTofoh pa6oTaet He npabnlbHO
YcTaHOBnTe KoI IR SETUP IIN BbIepeNTE KHONKy IJIr OTMeHbI NaY3bl Iprn 3aIncn Ha BInDeOMaHnToΦOHe.
Preparation 3: Adjusting the synchronization of the VCR
You can adjust the synchronization of your camcorder and the VCR.
Remove the cassette from the camcorder beforehand. We recommend that you prepare a pen and paper for notes.
When you connect to a Sony VCR using an i.LINK cable, and have set CONTROL to i.LINK, the setup below is not necessary.
IoproTOBka 3:HaCTpoKa CNHXPOHn3aunu BNDeOMarHnToΦoHa
Moxho hactpoHt cInxpoHn3aunIO
BnuDeokamepbI n BnuDeomarHnToPOHa.
PpeDbapnteBHO n3BLeKnte KaccTey n3
BnuDeokamepbI. PekOMeHNyETcN pInrOToBnTb
pykU n 6ymary dnn 3aMeTOk.
Ecni PoKnJIoucen BnuDeomarHnToPOH Sony c
nomoCbio Ka6eJIa.iLINK, n KomaHaDa
CONTROL ycTaHOBnHeA B noLoXeHne i.LINK,
OnncaHHyIO HnKe npOeDpyu hAcTpOKn
BbINOJIHrTB He HyXHo.
Dubbing only desired scenes
- Digital program editing
(1) Insert a recordable tape into the VCR, then set it to recording pause.
When you connect using an i.LINK cable and have set CONTROL to i.LINK, you do not have to turn the recording VCR to recording pause mode.
(2) Set the POWER switch to VCR.
(3) Press MENU to display the menu.
(4)Turn the SEL/PUSH EXEC dial to select ETC, then press the dial.
(5)Turn the SEL/PUSH EXEC dial to select EDIT SET, then press the dial.
(6)Turn the SEL/PUSH EXEC dial to select ADJ TEST, then press the dial.
(7)Turn the SEL/PUSH EXEC dial to select EXECUTE, then press the dial. CUT-IN and CUT-OUT are recorded on image for five times each to calculate the numerical values for adjusting the synchronization.
The EXECUTING indicator flashes on the LCD screen or in the viewfinder. When finished, the indicator changes to COMPLETE.
Ipee3aHncb ToJIbKO HUxHbIX 3nH3oJOB -LcHpOBoB BnDEOMHTaK NO IporpaMMe
(1)BcTaBbTe KacCeTy dIy 3aIncn B BVNeOMaHHToΦOH, 3aTeM yCTaHOBInTe pexIM naY3bl 3aIncn. EcnPiokKnIOHe NByIOJIHeNo C nOMOsbI Ka6eJI i.LINK uKOMaHda CONTROL yCTaHOBNeHa B noIOKeHne i.LINK, 3aINCbIAUoiN BVNeOMaHHToΦOH He HuxHo nepeBoDITb B pexIM naY3bl 3aIncn.
(2)Установпейсякolyчateь POWER в положене VCR.
(3)HaxmTe KhoNky MENU OTo6paXeHHaMeHIO.
(4)ПовернITE ДИСК SEL/PUSH EXEC ДИВБОРа yCTaHOBKN ETC, a 3aTeM hαЖМЛТЕ на ДИСК.
(5)Повернite ДИСК SEL/PUSH EXEC ДЯ Выбopa EDIT SET,аЗатем нахмITE на ДИСК.
(6)ПовернITE ДИСК SEL/PUSH EXEC ДИВыбopa ADJ TEST,а 3aTeM нахмITE HaДИСК.
(7)ПовернITE дSCK SEL/PUSH EXEC дЯ
Быбopa установки EXECUTE, a 3aTeM
нжмITE на дSCK.
Ha n3o6рхжене 3aNiшуTCя no пЯТь
MeTOK CUT-IN и CUT-OUT, поЗВОЛЮшпe
pacCUHЯть чИСLOвье 3нчаЧЕНДЯ
насТРОКИ сиХPoHиЗАцIM.
Ha зкране XXД и в ВИДоИСКаТele
mɪгай сиДиКaTOp EXECUTING. По
OKOHУанIM ИнДиКaTOp ИзМeHHTсЯ
COMPLETE.
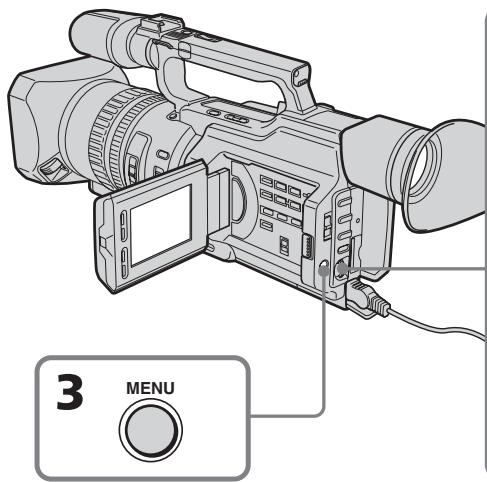

(8) Rewind the tape in the VCR, then start slow playback.
Take a note of the opening numerical value of each CUT-IN and the closing numerical value of each CUT-OUT.
(9) Calculate the average of all the opening numerical values of each CUT-IN, and the average of all the closing numerical values of each CUT-OUT.
(10) Turn the SEL/PUSH EXEC dial to select "CUT-IN," then press the dial.
(11) Turn the SEL/PUSH EXEC dial to select the average numerical value of CUT-IN, then press the dial.
The calculated start position for recording is set.
(12) Turn the SEL/PUSH EXEC dial to select "CUT-OUT," then press the dial.
(13) Turn the SEL/PUSH EXEC dial to select the average numerical value of CUT-OUT, then press the dial.
The calculated stop position for recording is set.
(14) Turn the SEL/PUSH EXEC dial to select RETURN, then press the dial.
Ipee3aHcB ToJIbKO HUxHbIX 3nN3oD0B -LncpOboB BnDEOMONTAX NO nporpaMMe
(8)Перемотайт e kaccetyВ BnDEOMaHHTOfoHe Ha NaHaNo, 3aTeM BKJIIOUHTe 3aMeJdIeHHoe BOCppon3BVeDeHne. O6paTInTe BnIMaHne Ha NaHaJIbHOe YncIcNoBoe 3NaueHne KaKdoN MeTKu CUTIN N KOHeHoe YncIcNoBoe 3NaueHne KaKdoN MeTKu CUT-OUT.
(9)PaccuTaNte cpeJHee 3NaueHne BCEx NaaJIbHbIX YNCIOBbIX 3NaueHn KKaXdoI MeTKn CUT-IN, a TaKxe cpeJHee 3NaueHne BCex KOHeuHbIX YNCIOBbIX 3NaueHn KaKDoJ MeTKn CUT-OUT.
(10)ПовернITE ДИСК SEL/PUSH EXEC ДЯ Вьбopa "CUT-IN", a 3aTeM нахмITE Ha ДИСК.
(11)ПовернITE диck SEL/PUSH EXEC дя
Быбopa срденero услобого зhaуени
CUT-IN, заетимпerte на диck.
Pacchintahhoe hyальhoe положенье
дя заимсу установно.
(12)ПовернITE ДИСК SEL/PUSH EXEC ДИBAбopa "CUT-OUT",аЗатем нахмITEHa ДИСК.
(13)Повернite ДИСК SEL/PUSH EXEC ДЯ
Быбopa срд HeroЧИСЮВОЗ 3haчЕня
CUT-OUT, за tem нажмITE на ДИСК.
Ращтанhoe кончhoe пложецпдя
Запис установно.
(14)ПовернITE ДИСК SEL/PUSH EXEC ДЯ
Быбopa RETURN, a 3aTeM нажмITE
На ДИСК.
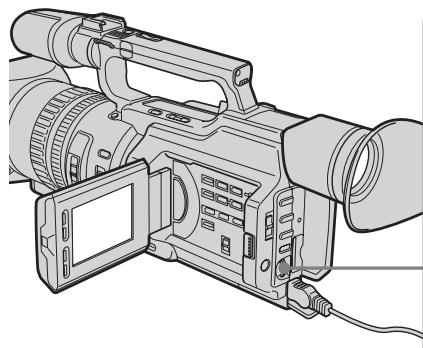
10,11


OTHERS
EDIT SET
CONTROL
ADJ TEST
“CUTIN”
“CUT-OUT"
IR SETUP
ETC PAUSEMODE
IR TEST
PRERETURN

OTHERS
EDIT SET
CONTROL
AD TEST 12
OUT-OUT 4
IR SETUP
ETC PAUSEMODE
B
RETURN
12,13


OTHERS
EDIT SET
CONTROL
ADJ TEST
“CUT-IN”
“CUT-OUT"
自IBSETU
ETC PAUSEMODE
□TASSEMENT
RETURN
OTHERS
EDIT SET
CONTROL
ADJ TEST
“CUT-IN”
“CUT-OUT”
自IBSETUP
ETC1 PAUSEMODE
□:18TSS
2RETURN
Dubbing only desired scenes - Digital program editing
Ipee3aHnCb TOnbKO HxKhbIX 3nH3oJOB -LnΦpOBoB BnDEOMONTAK NO nPporpaMMe
Errors in editing
If you connect your camcorder to Sony equipment with the DV jack, the range of errors is within + / - 5 frames.
The range may become wider in the following conditions:
- The interval between CUT-IN and CUT-OUT is less than five seconds (p. 123).
- CUT-IN or CUT-OUT is set at the beginning of the tape.
When "ENGAGE REC PAUSE" appears on the LCD screen or in the viewfinder
Turn the recording VCR to recording pause mode.
Note
If you start recording from the very beginning of the tape, the first few seconds of the tape may not record properly. Be sure to allow about 10 seconds' lead before starting the recording.
If the VCR does not operate correctly
Make sure the IR SETUP code is correct; reset if necessary.
When the operations of the VCR do not work with an i.LINK cable
Keep the i.LINK connection, and carry out Preparation 2 (p. 112) again. The audio and video signals are sent as digital signals.
OuN6Kn npn MOHTaxe
Ecnn BndeomarHHToΦon pa60taet HnnpaBnJbHo
Y6eIntecb B npaBnIbHocTn KoJa IR SETUP; npn Heo6xoDmOCTn nepeyctaHOBeTe erO.
EcInynpaBJIeHne BndeomarHHTofoHOM c Ka6eIem i.LINK he pa6oTaET
He oTKJIouyamaKabelb i.LINK,BbIIOJHnITE PoiDrOTOBky 2 (cTp.112) eue pa3. Aydno- n BnDEOCIRHaIbI nepeaIoTcB uNpOBoM BnIe.
Operation 1: Making Programs
(1) Insert the tape for playback into your camcorder, and insert a tape for recording into the VCR.
(2) Press MENU to display the menu.
(3)Turn the SEL/PUSH EXEC dial to select ETC, then press the dial.
(4)Turn the SEL/PUSH EXEC dial to select VIDEO EDIT, then press the dial.
(5)Search for the beginning of the first scene you want to insert using the video control buttons, then pause playback (p. 44).
ДeиctBne 1:CocTaBleHne nporpamM
(1)BCTaBbTe kaccety, cKOTOpO Heo6xOIMOCdelaTb 3aINcB,B BnDEOKaMepy,a Kaccety dIg 3aINCn-B BnDEOMarHHToOH.
(2)HaxmTe KhoNkY MENU dny OTo6paXeHHaMeHIO.
(3)ПовернITE ДИСК SEL/PUSH EXEC ДИВБОРа уТановки ETC, a 3aTeM нажмITE на ДИСК.
(4)ПовернITE ДИСК SEL/PUSH EXEC ДЯ
Выбopa VIDEO EDIT, за tem нахмite на
ДИСК.
(5)HaIInTe HaaIIO nepBOrO 3nI3oJa, KOToPbI Tpe6yeTc BCTaBntb, C NOMOuBIO KHOJOK BuDeOkoHTpOJIa, 3aTeM BKJIouHtPeXKM nay3bl BOcPOn3BeDeEHnA (CTp.44).
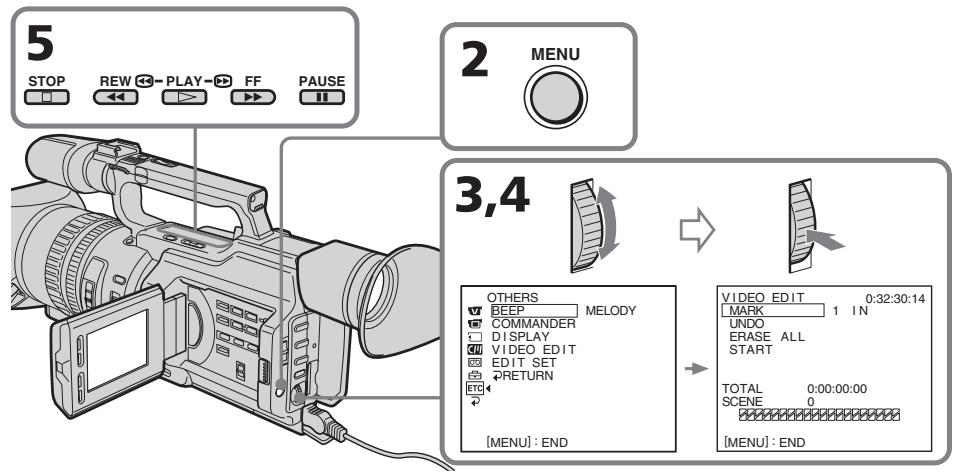
Dubbing only desired scenes
- Digital program editing
(6) Press the SEL/PUSH EXEC dial, or MARK on the Remote Commander. The CUT-IN point of the first program is set, and the top part of the program mark changes to light blue.
(7) Search for the end of the first scene you want to insert using the video operating buttons, then pause playback (p. 44).
(8) Press the SEL/PUSH EXEC dial, or MARK on the Remote Commander. The CUT-OUT point of the first program is set, then the bottom part of the program mark changes to light blue.
(9) Repeat steps 5 to 8, then set the program. When the program is set, the program mark changes to light blue.
You can set a maximum of 20 programs.
On a blank portion of the tape
You cannot set CUT-IN or CUT-OUT on a blank portion of the tape.
Note
The total time of the programs is indicated on the LCD screen or in the viewfinder, however, if the time code on the tape is not continuous, the time may not be indicated properly.
Ipee3aHcB ToJIbKO HUxHbIX 3n3oDob -LuΦpOBoB BnDEOMHTax NO npOrpaMme
(6)HaKmTe HaДnCK SEL/PUSH EXEC nI IN KhoNky MARK Ha pyJIte dIcTaHcuOHHorO ynpaBJeHnI.
MecTo hauana CUT-IN nepBoro 3aIporpammoBAAHORo 3n3Oda yCTaHOBJIeHO, n CBET BepXHeRo INHkAToPA MeTKI nporpaMMbMeHReTc H a CBeTNO-ToJyBoi.
(7)HaIInTe KOHeu nepBoro 3nH3oJa, KOToPbI Tpe6yeTcR BCTaBntb, C NMOUBo KHOJOK BnDEOKOHTpOJIa, 3aTeM BKJIOUHTe peKIM nay3bl BOCnPon3BeDeHnA (CTp.44).
(8)HaxmTe Ha nck SEL/PUSH EXEC nnn KhoNky MARK Ha nyIbTe nctaHnOHHoro ynpabJeHn.
MecTo OKOHuaHnCUT-OUT nepBoro 3aIporpammIOBAHHO 3N3Oda yCTaHOBJIeHO, N cBT HNXHeRo INHKnAtoPA MeTK nIporpAmMbMeHReTcHa CBeTNO-ROJyBoH.
Dubbing only desired scenes - Digital program editing
Erasing the last program
To change the end of the last program, delete the CUT-OUT mark.
To erase the whole program, delete both the CUT-IN and CUT-OUT marks.
(1)Turn the SEL/PUSH EXEC dial to select UNDO, then press the dial. The last set program mark flashes.
(2)Turn the SEL/PUSH EXEC dial to select EXECUTE, then press the dial and the setting is canceled.
To cancel erasing
Select RETURN in step 2, then press the SEL/PUSH EXEC dial.
Erasing all programs
(1)SelectVIDEOEDIT in the menu settings. Turn the SEL/PUSH EXEC dial to select ERASE ALL, then press the dial. All the program marks flash.
(2)Turn the SEL/PUSH EXEC dial to select EXECUTE, then press the dial and the settings are canceled.
To cancel erasing all programs
Select RETURN in step 2, then press the SEL/PUSH EXEC dial.
To cancel a program you have set
Press MENU.
The program is stored in memory until the tape is ejected.
Ipee3aHnCb TOnbKO HUxHbIX 3nH3oOb -LnΦpOBoB BnDEOMONTaK NO nPpOrpaMMe
YdaneHne n3 nporpaMMbI nocJeHero 3anporpaMMnpoBaHHoro 3nN3Oda
YTO6bI yCTaHOBnTb DpyrOe MeCTo OKOHuaHnI nocJeHrero 3aIporpaMMnpOBaHHoro 3nn3oJa, ydaJIte MeTKy CUT-OUT.
YTo6bI ydaJIntb n3 npOrpaMMbI BeCb 3aInporpaMMnpoBaHHb 3nH3Od, ydaJInte oBe MeTkn CUT-IN n CUT-OUT.
(1)Повернite ДИСК SEL/PUSH EXEC ДИВыбopa UNDO,аЗatemн haЖмITE HaДИСК.3amiraet MeTKa nocJIeДнeиnporpaMMbl.
(2)ПовернITE диСEL/PUSH EXEC дяпьбoga EXECUTE,Затем нахмпerte надИСК,и установka-byдET OTMeHeHa.
ДлгOTMeHbIydaJIeHnIa
BbIbePte RETURN B nyHKeT 2,3aTeM hakmTe Ha nick SEL/PUSH EXEC.
YdalenHe n3 nporpaMMbl BceX 3aInporpaMMPOBaHHbIX 3nN3ODoB
(1)ВьберпгteVIDEOEDITвустановкхMeHIO.ПовернITEДСКSEL/PUSH EXECДЯ ВьборaERASEALL,a3atEmHAЖМЛТЕHaДИСК.ЗamогаIOT MeTKn BCExnpoГрамM.
(2)ПовернITE диСEL/PUSH EXEC дяБыбoga EXECUTE,ЗаTem нажмite HaДИСК,и установский Дудт OTmehenbl.
ДЯ OTMeHbI ydaJIeHnB BCex 3anporpammnoPoBaHHbIX 3IN3OoB
BbIbePte RETURN B nyHKeTe 2,3aTeM naKMe Na dNcK SEL/PUSH EXEC.
ДЯ OTMeHbI nporpaMMbI
HaxmTe KhONky MENU.
Operation 2: Performing a digital program editing (Dubbing a tape)
Make sure your camcorder and VCR are connected, and that the VCR is set to recording pause. When you use an i.LINK cable, you do not have to set the VCR to recording pause. When you use a video camera recorder, set its POWER switch to VCR.
(1)SelectVIDEOEDIT. Turn the SEL/PUSH EXEC dial to select START, then press the dial.
(2)Turn the SEL/PUSH EXEC dial to select EXECUTE, then press the dial. The camcorder automatically searches for the beginning of the first program, then starts dubbing. The EXECUTING indicator flashes. The SEARCH indicator appears during search, and the EDIT indicator appears during edit on the LCD screen or in the viewfinder. The program marks light up after dubbing is complete. When the dubbing ends, your camcorder and the VCR automatically stop.
To stop dubbing
Press on this camcorder or on the Remote Commander.
To end the digital program editing function
Your camcorder stops when the dubbing is complete. Then the display returns to VIDEO EDIT in the menu settings. Press MENU to end the digital program editing function.
ДeиctBnE 2:ВынолнHeNue цфpoBOrO MOHTaKa прогамMbI (nepe3anCb kacceTbI)
Y6eIntecb, cT0 BnIeOkamepa nOdkIIOUeHa K BnIeOMarHnITofoHy, a BnIeOMarHnITofoH BKIIOUeH BPekIM na3bl npn 3aIncn. Ecnn IcNoIb3yeTcKa6eJIb i.LINK, BnIeOMarHnITofoH He HxKHO nepeBOIDtB BPekIM na3bl 3aIncn. Ppi 3aIncn Ha BnIeOkamepy yCTaHOBInTe ee nepeKIIouateJIb POWER B noLOXKeHne VCR.
Dubbing only desired scenes - Digital program editing
When the operations of the VCR do not work with an i.LINK cable
Keep the i.LINK connection, and carry out Preparation 2 (p. 112) again.
You cannot record on the VCR when:
- The cassette is not inserted.
- The tape has run out.
- The write-protect tab is set to the protect position.
- The IR SETUP code is not correct. (When IR is selected.)
- The setup to cancel recording pause is not correct (p. 116). (When IR is selected.)
NOT READY appears on the LCD screen when:
The program to operate the digital program edit has not been made.
- i.LINK is selected but an i.LINK cable is not connected. (When i.LINK is selected.)
- The power of the connected VCR is not turned on.
Ipee3aHcB ToJIbKO HUxHbIX 3nN3oD0B -LnΦpOBoB BnDEOMONTAX NO nPporpaMMe
EcIn ynpabJIeHne BndeOMarHnToΦoHOM c Ka6eIem i.LINK he pa6oTaet
He oTKJIouyA ka6eIb i.LINK, BblOnHnTe PoiDrTOBky 2 (cTp. 112) eue pa3.
Ha BnDeomarHnToΦoH He ydaCTc npOn3BecTn 3aNcB,ecn:
He BCTaBnHa KaCCeTa.
3aKoHunJaCbJeHTa.
- JIeNEcTOK 3aunTbI OT 3anncn yctaHOBneH B nOJoxKeHne dJa 3aunTbI.
- HenpaBnBbI KoI IR SETUP. (Korda BbIbpaH IR.)
- HenpabunbnaH aHcTpoKa InIa OTMeHbI na3bl npn 3annci (ctp. 116). (Korda BbIbpaH IR.)
HaIINscb NOT READY nOBnEeTcH a 3KpaHe KKd,ecIn:
- He coctablena nporpamma ynpablenenu cnpoobbIM MOHTaxkom nporpaMMbl.
- BbIbpaH i.LINK, Ho Ka6eB b.i.LINK He noqKnluoyen. (Korda BbIbpaH i.LINK.)
ПоДКЛЮЧЕНБИ BИДЕOMaRGHHTOФОH He BKJIQUEH.
Using with an analog video unit and a PC - Signal convert function
You can convert the analog input signal to the digital signal and output it from the DV Interface on this camcorder. You can capture images and sound from an analog video unit connecting a PC which has the i.LINK (IEEE1394) connector to your camcorder.
IcnoJIb3OBAHHe c aHaIIOROBbIM BnDeo6OpyOBoAHm IPK -ФункцЯ пeo6pa3OBAHry CnRHaJa
Moxho npeo6pa3oBAb aHaIIOROBb BxOHO
CnHaN B uΦpOBOu N bVbIECTn erO Ha
InTeppeic DV 3TOB BuDeOKaMebpI.
PiokJIIOUHb K BuDEOKaMepe KOmMbOTep C
pa3bEmOM i.LINK (IEEE1394), MoXHo ChIMMaTb
n3o6paKeHnN 3ByK c aHaIIOrOBOr
BuDeOyucToiCTBa.
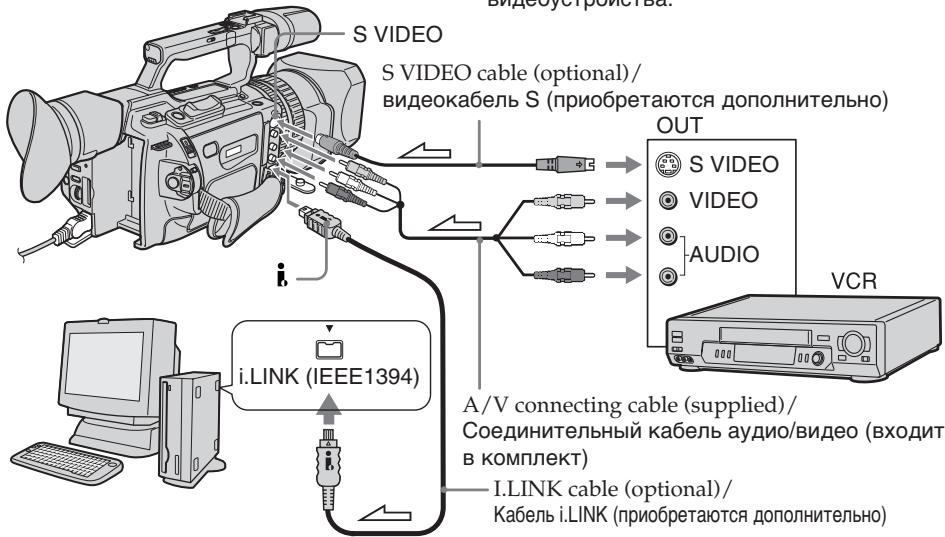
:Signalflow/IpoxoxdHneCnHaHa
(1) Set the POWER switch to VCR.
(2) Press MENU to display the menu.
(3)Turn the SEL/PUSH EXEC dial to select W, then press the dial.
(4)Turn the SEL/PUSH EXEC dial to select A / V DV OUT, then press the dial.
(5)Turn the SEL/PUSH EXEC dial to select ON, then press the dial.
(6) Press MENU to erase the menu display.
(7)Start playback on the analog video unit slightly ahead of the point from which you want to start capturing images.
(8)Start capturing procedures on your PC. The operation procedures depend on your PC and the software which you use. For details on how to capture images, refer to the instruction manual of your PC and your software.
(1)YctaHOBInTe npeKJIIOUaTeIb POWER B noJIOKeHne VCR.
(2)HaxmTe KhoNkY MENU dIa OTo6paXeHHa MeHIO.
(3)ПовернITE ДИСК SEL/PUSH EXEC ДЯ
Выбoga установки [W], a 3aTeM нажмITE
На ДИСК.
(4)ПовернITE диСK SEL/PUSH EXEC дяп Вьбopa A/V → DV OUT, затем нажмITE на диСК.
(5)ПовернITE диck SEL/PUSH EXEC Ддьбoga установки ON, a 3atem нажмптЕпдИСК.
(6)HaxmTe KhONkY MENU dny ydaJIeHnI INdNKaUN MeHIO.
(7)ВключITEpeЖIMBOСРпОИЗБЕДЕНЯHaHаЛOrOBOMBUNDEOуCTpoIcTBeHEMHOro paHbIeTOrOMeCTa,CKOTOpOROHyxHOHaYuTaB3aIINCbKa,IpOB.
(8)HaunHe 3aIncB KaPob Ha PI. POpAdoK DeICTBn npn 3TOM 3aBNCNT OT nCpOJIb3yEMOrO PI K nporpaMMHoro 0eScneueHn. BoIee noDpo6HyIO INΦopMauio O 3aNCS KaPob CM.B INHCTpyKUHX NO 3KcIpyatauMn PI NpOprpaMMHoro 0eScneueHn.
Using with an analog video unit and a PC - Signal convert function
After capturing images and sound
Stop capturing procedures on your PC, and stop the playback on the analog video unit.
Notes
- When you edit the captured image and sound from the analog video unit by a PC, you need to install an appropriate software which can exchange video signals between the camcorder and a PC.
- Depending on the condition of the analog video signals, the PC may not be able to output the images correctly when you convert analog video signals into digital video signals via your camcorder. Depending on the analog video unit, the image may contain noise or incorrect colours.
- The camcorder cannot output the digital signal when you input the analog signal that includes a copyright protection signal.
IcnoJIb3OBAHne c aHaJIoROBbIM BnDeo06OpyuObaHnem I PK -Функци пeo6pa3OBAHncaHnaJa
IocJIe 3aIInc KaIPOB n 3ByKa
PpeKpaTnTe IpoUeIpyu 3aIncn Ha PIK n OCTaHOBInTe BOCpOn3BeJeHne Ha aHaJIorOBOM BnDeOyCtpoIcTBe.
PpimueaHn
- PnMOHTaXe CHaTbIX KaIPOB u 3ByKa c aHaIaIOrOBO r BInDeOyCTPoIcTBa C NOMOuIO PIK Heo6xOdmo yCTaHOBuTb COOTBeTCTBvUOuEe IpOgPamMHOe oBeCneueHHe, CNoOC6Hoe nepeDaBaTb BInDeOcNHaJIbI MeKdy BInDeOkaMepoI u PIK.
B 3aBnCmOCTN OT KaueCTBa aHaIoroBOrO BnuDeocnHaJa, PIK MoXeT HnPaBnIbHO OTo6paXaTb KaIpbI NocE npeo6pa3OBAHnB InuDeokamepoA hAnlorOBbIX BnuDeocnHaIOB B uNΦpOBbIe. B 3aBncMOCnT OT aHaIoroBO rBnuDeocYcPoIcTBa, n3o6paXeHne MoXeT 6bITb paCnJIbBvCaTbIM INI C HnPaBnIbHOu CBtOnepedaey. - Bndeokamepa He MoKet BbIaBaTb cnΦpOBoN CnHaJ,ecnBxOdHOn aHaNoRoBb CnHaN CoepeKNT CnHaJ dJa 3aunTbI ABTopcKnX npab.
Recording video or TV programs
Using the A/V connecting cable
You can record a tape from another VCR or a TV program from a TV that has video/ audio outputs. Use your camcorder as a recorder.
(1) Insert a blank tape (or a tape you want to record over) into your camcorder. If you want to record a tape from the VCR, insert a recorded tape into the VCR.
(2) Set the POWER switch to VCR on your camcorder.
(3) Set DISPLAY in ETC to LCD in the menu settings (p. 156).
(4) Press MENU to erase the menu display.
(5) Press REC and the button on its right simultaneously on your camcorder, then immediately press on your camcorder.
(6) Press on the VCR to start playback if you record a tape from a VCR. Select a TV program if you record from a TV. The picture from a TV or VCR appears on the LCD screen or in the viewfinder.
(7) Press on your camcorder at the scene from which you want to start recording.
3a\Pncb BnDeo nJI TeJenporpaMM
IcnoJIb3OBAHnE CoeHNHTeNbHOrKa6eJyauDNo/BuDeo
Moxho BbINHnTb 3aNcB Ha JeHTy C dpYrOFO BnDEOMARHNToHa HnI 3aNcTaB TeJEbnIOHHy IPOrpaMMy C TeJEbn3Opa, KOtOpbl NmEe TnDeo/ayno BbIXobI. VcnoJIb3yIte BnDEokampey B kaeCTbe 3aNcBbBaOHero yCTpoiCTBa.
(1)BCTaBbTe YnCTyIO JIeHTy (JINI JIeHTy,Ha KOTOpYU HXYKHO BByIOJIHNTb 3aIInCb)BVnDEOkampey.EcNl He6OxIoMo CdeJaTb 3aIInCb C BnDEOMarHNToFOHa,BCTaBtE 3aIInCaHHyO JIeHTy BVnDEOMarHNToFOH.
(2)Установпей на видаокамеpe nepeклочатель POWER в положене VCR.
(3) YcTaHOBInTe KOMaHdY DISPLAY B ETC B NOJIOXeHne LCD B ycTaHOBkax MeHIO (ctp. 156).
(4)Haxmnte KhoNky MENUДя удалени
ндИкалу MeHIO.
(5)Оновременно нахмITE кноку RECи Кноку справа OT Hee Ha Bndeokamepe, 3aTem CPA3y нахмITE Kноку II Ha Bndeokamepe.
(6)HaKMnTe KhoNky Ha BnDeomarHnTOcoHe dIra Hauana BOCnpo3BedeHna,ecnn 3aInCb BbIOJnHReTc C BnDEomARHnTOcoHa. BbI6epnte TeLeBn3IOHOHyO npOrpaMMy, ecnn 3aINCBbIOJnHReTcC TeLeBn3OpA. N3O6paxehne C TeLeBn3OpA nn BnDEomARHnTOcoHa NOBHTc Ha 3KpaHe KKД nI IN B bINOOnCKaTeNe.
(7)Haxmnte KhONky Ha BnDeokamepe B TOM MeCTe, C KOToPOr HUxHO HaHaTb 3aINCb.
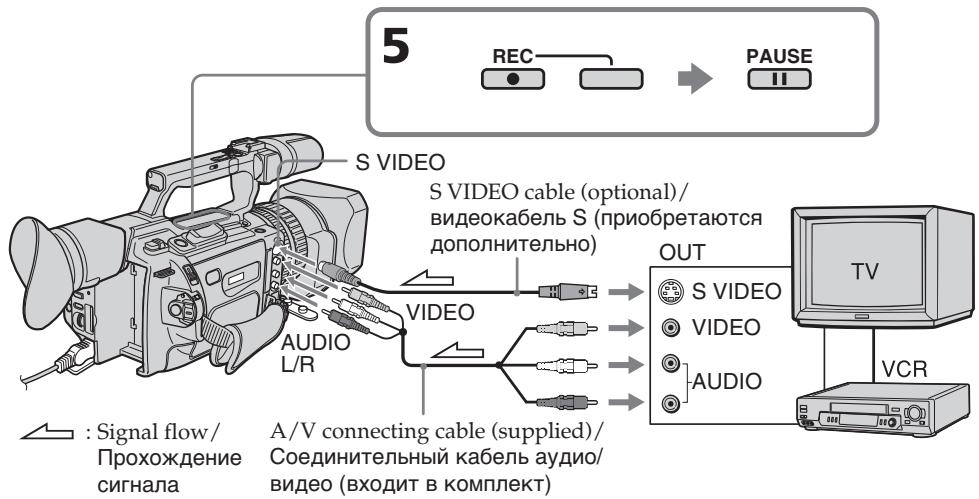
Recording video or TV programs
When you have finished recording
Press on both your camcorder and the VCR.
Using the Remote Commander
In step 5, press REC and MARK simultaneously, then immediately press. And in step 7, press at the scene from which you want to start recording.
If your VCR is a monaural type
Connect the yellow plug of the A/V connecting cable to the video output jack and the white plug to the audio output jack on the VCR or the TV. The red plugs are not used.
Connect using an S video cable (optional) to obtain high-quality pictures
With this connection, you do not need to connect the yellow (video) plug of the A/V connecting cable.
Connect an S video cable (optional) to the S video jacks of both your camcorder and the VCR.
This connection produces higher quality DV format pictures.
If you do various playbacks on the VCR during recording
The recorded picture may be blurred.
On the commander mode
Your camcorder works in the commander mode, VTR 2. Commander modes 1, 2 and 3 are used to distinguish your camcorder from other Sony VCRs to avoid remote control misoperation. If you use another Sony VCR in the commander mode VTR 2, we recommend changing the commander mode or covering the sensor of the VCR with black paper.
On index signal
The index is automatically marked on a tape when you start recording. If you mark the index using the INDEX MARK button during recording, "LINE" appears in the CH column on the INDEX SEARCH screen, and the index is recorded on cassette memory.
3a nscb Bndeo nn TeJe nporpamM
Pocne 3aBepweHn 3aHncn
HaKMMTe KHONky Ha BnDeOKampe n Ha BnDeOMaHHTOfoHe.
IcnoB3OBAHne npbTa dNCTaHUNHO ynpabNeHn
B nyHKTe 5 OndHObpeMeHHo HaxKMITE KhoNky REC n KHONKY MARK, 3aTEM cpa3y haxMITE KhoNky I. B nyHKTe 7 haxMITE KhoNky I B TOM MecTe, C KOtOPORO HyXHO Haayatb 3aIncb.
EcIn BnDeomarHHToOH MOHOHnueCKOROTINa
IoiKJIIOUHTe JKeIbTI bIy ITeKep COeINHITBeHORO KaBEnA ayDnO/BiDeo K BbIXOHDomy THe3Dy BnDEOCrHnA, a 6BeIbI ITeKep K bXbIXODMy THe3Dy ayDnOCrHnA hA bNtDEOMaHrTOΦOHe nJI NTeBEN3ope. KpaChbIe ITeKepbI He nCnONb3yOTcR.
Coeinyehnncn o nomoubIO bUdeoka6eJn S (npno6petaoTcR daononHnTeJIbHO) dny nOlyuHn BbICOKOKaYeCTBeHHbIX n3o6paXehn
Pn TaKOM COeINHeHn He HUxHo
NoDKIIOuA Tb JKeJIb (BnDeo) WTeKeP
COeINHtBeHOrO Ka6eJeA ayDnO/ BuDeo.
PiDoCoEINHtBe BnDeoKAbSeB S
(NpNO6peTaHO Tc DOnONHtBeJbHo) K
BnDeoRHe3dAm S Ha BnDeoKaMepe N
BnDeoMArHNToΦOHe.
3To CoeINHeNe I03BoJAE T NOJyHTb
BbICOKOKaueCTBeHNoe N3O6paXKeHne
ΦopMaTa DV.
Ecni BO Bpem3aIncnHa BVdeOMaHrHTofoHe BOCPON3BOJTCa pa3NHyBle 3nn3OdbI
3aIINcIbAeMOe I3O6paXeHne MOKeT 6bITb Hepe3KIM.
O pexnme npnbTa dncctaHOnHoro ynpablenia
3Ta BnDeOkamepa pa6oTaetB pexIme nybta DnCTaHmOHOrO ynpabLeHnV T 2. PexmbI pybta DnCTaHcNHO HpyapBeHn1 2, 2 n 3nCnoB3yOTcD nIa OTnHnI DaHHoB BnDeOkamepbI OT dpYnx BnDeOMarHnTOcoHOB dIpMbl Sony BO n36eKaHne HnpeAunbHnPa60tbl npbta DnCTaHcNHO YnpabLeHnE. Ecn IcNoB3yeTcDpyrO BnDEOMarHnTOcoH O npMbI Sony,pa6oTaUoSIn B pexIme VTR 2, peKOMeHNyETcN M3MeHNt bpeXIM npbTa DnCTaHcNHO YnpabLeHnN IN3aKpbIT DaTHNK DnCTaHcNHO HpyapBeHnR BnDeOMarHnTOcoHa YepHOb SymarO.
06 mHnekchom cnrgnaIe
CnHnI INDEKCHO MeTKn 3aINCbIeTcR cpa3y Nocne Hauana 3aIncN. EcnI INDEKCHaI MEtKa 3aINCbIaeTc C NOMOsbIO KHOKN INDEX MARK BO BpeM 3aIncN, B CTOn6Ze CH Ha 3kpaHe INDEX SEARCH IORBbIeTcR INDIIKAUHA "LINE", IN INDEKCHA METKa 3aINCbIaeTcR B KACCETHYIO NaMTb.
Using an i.LINK cable
Simply connect the i.LINK cable (optional) to DV Interface and to DV Interface of the DV products. With digital-to-digital connection, video and audio signals are transmitted in digital form for high-quality editing.
(1) Insert a blank tape (or a tape you want to record over) into your camcorder, and insert the recorded tape into the VCR.
(2) Set the POWER switch to VCR on your camcorder.
(3) Set DISPLAY in ETC to LCD in the menu settings (p. 156).
(4) Press MENU to erase the menu display.
(5) Press REC and the button on its right simultaneously on your camcorder, then immediately press on your camcorder.
(6) Press on the VCR to start playback. The picture to be recorded appears on the LCD screen or in the viewfinder.
(7) Press on your camcorder at the scene from which you want to start recording.
Icnojb3oBaHne ka6eJia.LINK
ПрocTo noДcoeДинITE ka6ь i.LINK (пробетаetся ДОЛНТельно) к Иntерфсйу DV n KИNTERФсйу DV annapatob DV. Пpru ZIчрOBOM coeДинENBnDEO- n ayDIOICRHaJI bI nepeDAIOTcB ZIчрOBOM BIDE,ЧTO OБЕСпУВаET BbICOKOE KaueCTBO MOHTaXa.
(1)BCTaBbTe He3aIncaHHyIOJeHTy (nJIJIeHTy,HaKOTopyHO HyXHO BbINOJHnHTb 3aIncb) B BuDeOKaMepy, a 3aIncaHHyIOJeHTy-B BuDeOMaHnHToOH.
(2)Установпей на видаокамеpe neреклочаюь POWER в положене VCR.
(3) YctaHOBInTe KOMaHny DISPLAY B ETC B noIoxKeHne LCD B ycTaHOBkax MeHIO (cTp. 156).
(4)HaxmTe KhoNky MENUДлЯ удалени Инданкayи MeHIO.
(5)ОДНовременно нахмITE кнOKК Y RECи KнOKК справа OT Hee Ha BИdeOKampe, 3aTeM cpa3y нахмITE KнOKК Ha BИdeOKampe.
(6)HaXMMTe KhoNky Ha BnDeomarHHTOΦOHe dIy Hauana BOCpOn3BVeDEHn. 3aIncbIbAemoe n3o6paKeHne IoRbITcH na 3kpaHe KKД nJI IN BnDOnCKaTene.
(7)HaKmTe KhONkI Ha BnDeokamepeB TOM MeCTe, C KOtOpOr HuyxHo HaaTb 3aINCb.
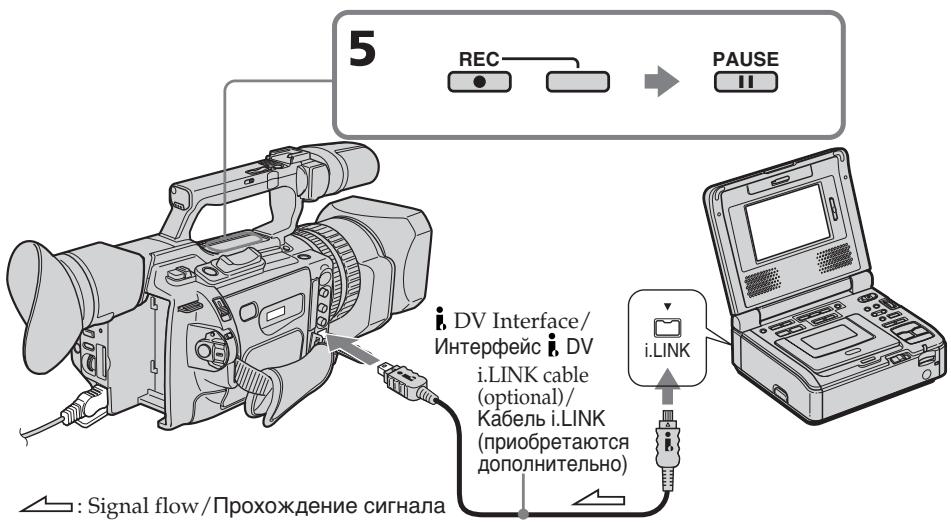
Recording video or TV programs
When you have finished recording
Press on both your camcorder and the VCR.
Using the Remote Commander
In step 5, press REC and MARK simultaneously, then immediately press. And in step 7, press at the scene from which you want to start recording.
Note
Your camcorder can only record PAL source. For example, French video or TV programs (SECAM) cannot be recorded correctly. See page 233 for details on TV colour systems. If you use a 21-pin adaptor to input PAL source, you need a dual direction 21-pin adaptor (optional).
You can connect only one VCR using the i.LINK cable
When you dub a picture in digital form
The colour of the display may be uneven. However this does not affect the dubbed picture.
If you record a still picture in playback pause mode via the DV Interface
The recorded picture becomes rough. And when you play back the picture using your camcorder, the picture may jitter.
Before recording
Press DISPLAY and make sure that the DV IN indicator appears on the LCD screen or in the viewfinder. The DV IN indicator may appear on both pieces of equipment.
On the commander mode
Your camcorder works in the commander mode, VTR 2. Commander modes 1, 2 and 3 are used to distinguish your camcorder from other Sony VCRs to avoid remote control misoperation. If you use another Sony VCR in the commander mode VTR 2, we recommend changing the commander mode or covering the sensor of the VCR with black paper.
3a nscb Bndeo nn TeJe nporpamM
Pocne 3aBepweHn3aHncn
HaxMMTe KhoNky Ha BnDeOKaMpe n Ha BnDeOMarHnToΦOHe.
IcnoJb3OBAHne npJbTa
DuctaHOnHHOrO ynpabNeHn
B NyHKTe 5 OJHObpeMeHHo HaxKMITE KHONKY REC IN KHONKY MARK,3aTEM cpa3y HaxMKTE KHNKTYI B NyHKTe 7 HaxMITE KHNKTY I B TOM MecTe, C KOtOPORO HxKHHOHaTaTb 3aAINCb.
PpmeaHne
Bndeokamepa MoKet 3aNcBtToIbKO c nCTOHNka CmHaNoB cTaNdapTa PAL. Hanpimep, ppaHcy3ckne TeJeBN3IOHbIe IIN BnDEOpPoraMMbl (cTaNdapt SECAM) 6byT 3aNcAcbH He npabuBHO. Noppo6Hoe CBeENH O CNTeMaX UBeTHoro TeJeBNDeHcM. Hc Tp.233.
Inserting a scene from a VCR - Insert editing
BcTaBka 3ПИЗОДa C BnIeOMaHnITOФОHA - MoHTaЖ BcTaBKN
You can insert a new scene from a VCR onto your originally recorded tape by specifying the insert start and end points. Use the Remote Commander for this operation. Connections are the same as on page 107 or 128. Insert a cassette containing the desired scene into the VCR.
Moxho BCTaBHTb HObIy 3nI3oD C
BnuDeomarHnTOcoHa Ha yJce 3aIncahHyIO
JIeHTy, yka3aB MeCTa erO hauana I
OKOHuaH.N. DnI 3ToI onepaunuN cNoIb3yIte
nybI nCTaHUnHO rypaBJeH.N. dAnHbIe
COeINHeHn aHaIOnuHbI ONcAHHbIM Ha CTp.
107 uIn 128.
BCTabTe Kaccety C Heo6xOIMbIM 3nI3oDM
BVnuDeomarHnTOfoH.
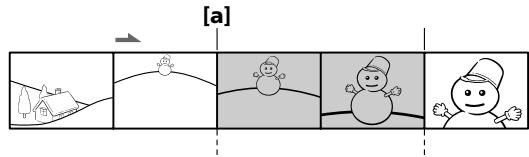
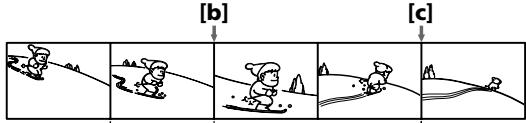
[B]
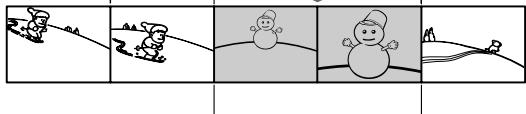
[C]
A: The tape that contains the scene to be superimposed
[B]: The tape to be edited
[C]: The tape after editing
[B]:ЛeHTaДЯ MOrTaJa
[C]:JIeHTa nOcNe MOHTaXa
Inserting a scene from a VCR - Insert editing
(1) Set the POWER switch to VCR on your camcorder.
(2)On the VCR, locate a point just before the insert start point a, then press I to set the VCR to the playback pause mode.
(3)On your camcorder, locate the insert end point [c] by pressing or . Then press I to set it to the playback pause mode.
(4) Press ZERO SET MEMORY on the Remote Commander. The ZERO SET MEMORY indicator flashes and the end point of the insert is stored in memory. The tape counter shows "0:00:00." If the tape counter does not appear, press DISPLAY.
(5)On your camcorder, locate the insert start point [b] by pressing , then press REC and the button on its right simultaneously, then immediately press I1 on your camcorder.
(6) First press on the VCR, and after a few seconds press on your camcorder to start inserting the new scene. Inserting automatically stops near the zero point on the tape counter. Your camcorder automatically returns to the recording pause mode.
BCTaBka 3nN3OJa C BnJeOMaHrHnTOΦoHa - MoHTaX BCTaBKn
(1)Установпей На Видаокамеpe nepeключateь POWER в поожене VCR.
(2)Ha BnIeOMaHHTofoHe HaIITe MeCTO, Ie 6yET BCTaBJIeN 3IN3OJ a, 3aTEM HaxMITE KHOJIky II JIy cTaHOBKn BnIeOMaHHTofoHa B pexm Nay3bl BOCpON3BeJeHnJ.
(3)Ha Bnideokamepe HaIInTe KOHeu BCTaBnIeMOrO 3nI3oJa [c], HaxKaB KHOKnky AniN ▷. 3aTe M hXmIte KHOKnKy IДЯ yCTaHOBKn ee B peXIM nay3bl BOCnpOn3BeDeHnY.
(4)Haxmnte KhoNky ZERO SET MEMORY Ha nylbTe DnctaHnOHHoro ynpabLeHn. HndkaTop ZERO SET MEMORY hauhet MraTb, a MeCTO OKOHuaHN BcTaBKn 6ydt CoXpaHeHO B naMaTn. Noka3aHne CHTuKa cTaHeT paBbIM "0:00:00". EcIn ChetYHK He NoRbITcA, HaxmTe KhoNky DISPLAY.
(5)Ha BndeOkamepe HaIInTe MeTo HaaIaN BCTabJIeMOrO 3NImOJa [b], HauKaB KHOJky , 3aTEM OndOBpeMeHNO HaXMITE KHOJky REC n KHOJky cnpaba OT Hee n Cpa3y HaXmTe KHOJky HA BnDeOkamepe.
(6) ChauJaHa HaxMnTe KhoNkY Ha BInDeOmaHHTofoHe N, CnyCTra HeCKoJIbKO CeKHyD, KHOJy HA BInDeOkaMepe DnIa HauJaBCTaBKn HOBoCcEhbl. BCTaBka OCTaHOBITcR aBTOMaTnueckn B MeCe T HyJeBOr OTMeTKn CHTuKa. BInDeOkaMepa aBTOMaTnueckn BepHeTcR B pexm nay3by 3aPiNCn.
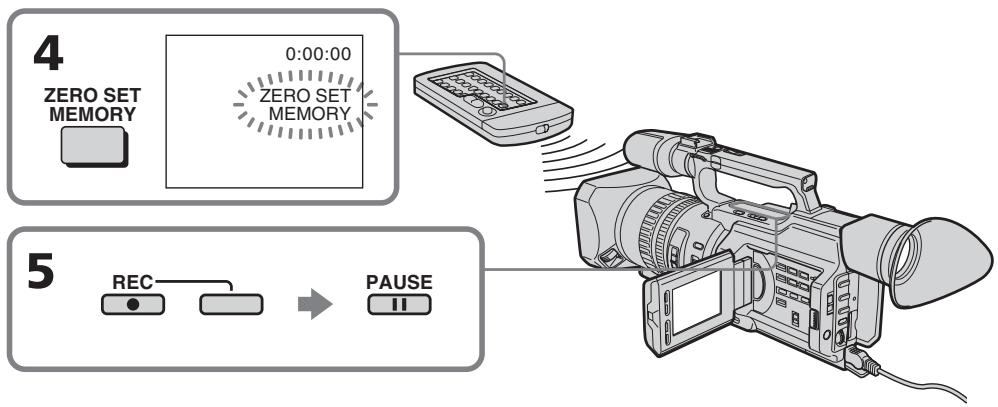
Inserting a scene from a VCR - Insert editing
To change the insert end point
Press ZERO SET MEMORY on the Remote Commander again after step 5 to erase the ZERO SET MEMORY indicator and begin from step 3.
Using the Remote Commander
In step 5, press REC and MARK simultaneously, then immediately press. And in step 6, press at the scene from which you want to start recording.
Note
The picture and sound recorded on the portion between the insert start and end points will be erased when you insert the new scene.
If you insert scenes on the tape recorded with an other camcorder (including an other DCR-VX2100E)
The picture and sound may be distorted. We recommend that you insert scenes on a tape recorded with your camcorder.
When the inserted picture is played back
The picture and sound may be distorted at the end of the inserted portion. This is not a malfunction.
The picture and sound at the start point and the end point may be distorted in the LP mode.
To insert a scene without setting the insert end point
Skip steps 3 and 4. Press when you want to stop inserting.
BCTaBka 3nH3Oda c BnDEomarHnToΦoHa - MoTax BCTaBKn
IIN3MeHnM MeCTa OKOHuaHN BCTaBKn
PnBocnpOn3BeDeHn BCTaBJeHHOro n306paXeHn
You can record an audio sound to add to the original sound on a tape by connecting audio equipment or a microphone. If you connect audio equipment, you can add sound to your recorded tape by specifying the starting and ending points. The original sound will not be erased. You can also use the Remote Commander for this operation.
Connecting the microphone with the MIC jack
Aydnopepe3a\Pncb
Bbl moKTe 3aIcIbIaTb ayDIOncrHan B DOnONHeHne K IepBOHaJIbHOMy 3BykU Ha IeHTe, IOdCoEduHbAydIoAnnapatypu IIN MMKPOFOH. EcII NOdCOeDInHeHa ayDIOaNnPaTaPpA,TO MOxHO Do6aBtB 3ByK Ha 3aIiCaHHyIO JeHTy, yKa3aB MeCTa HauJala N OKOHuaHn.IpeBOHaauJIbHb 3ByK npI 3OTM He 6byet CtePT.ДЯ 3ToI Otnepaun MoXHo TaKxe IcNOJIb3ObA Tb NyIbT DInCTaHIOHOYnpaBHeHn.
You can check the picture on TV by connecting with the video jack. You cannot monitor the additional sound by the speaker. Use the headphone jack.
Connecting the audio equipment with the MIC jack
PoiDcoeHHeHne ayDnOaannapaTpybI c NOMOuIO rHe3da MIC
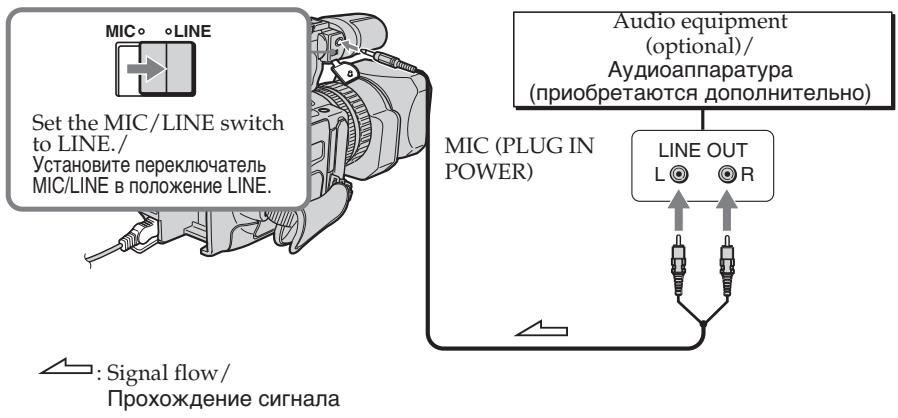
Connecting the microphone with the intelligent accessory shoe
We recommend that you use the gun microphone. If the microphone can select the zoom microphone type, set it to the gun microphone position. / Pekomehdyetcncnbo30BaTb HaprablenhmyMKpOoh. EcnI dIa MmKpOoHa MoXHO BbIpaTb TIN 3ymMmKpOoHa, yCTaHOBITE erO B IIOJKeHHe HApabJIeHHOro MmKpOoHa.
Dubbing with the AUDIO L/R jacks
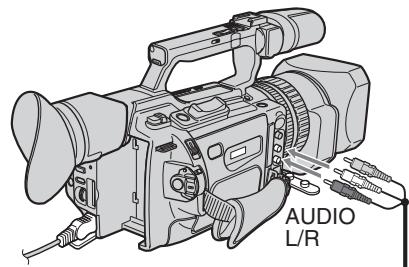

: Signal flow/
PpoxoXdHne cHana
Aydnopepe3anncb
Ipee3a\Pncb c pMOuBIO rHe3da AUDIO L/R
Audio equipment (optional)/ AydnoaannapaTypa (npnObpeTaTOCTdoONHHTelbHO)
AUDIO L
EOUT
L
R
AUDIO R
Do not connect the video (yellow) plug. / He noDCoeDnHnTe BnDeo (XeNTbI) uTekep.
Dubbing with the supplied microphone
No connection is necessary.
Notes
- When dubbing with the built-in microphone or an external one, you can check the recorded picture on the LCD screen, in the viewfinder, or on the screen of equipment connected with the VIDEO jack, and you can check the recorded sound by using headphones.
- When dubbing with the AUDIO L/R jacks, you can check the recorded picture on the LCD screen or in the viewfinder, and you can check the recorded sound by using a headphones.
- You can check both the original sound and new sound that will be dubbed, with headphones.
- You can adjust the balance of the new sound and original sound using AUDIO MIX in the menu settings. You can monitor the sound using headphones during audio dubbing.
Ipee3aHcB c nOmoBIO npilaraemoro mKpOfoHa
HnkaKe nOndoeDInHeNHe Tpe6yIOTc.
PpimueaHn
-Пипгелоргелунглгелунглгелунглгелунглгелунглгелунглгелунглгелунглгелунглгелунглгелунглгелунглгелунглg
Встwoюного ИИN BWEUHero MANKPOФОHA
мохно поверрьт bапсьlaBaeМоe
иЗБбражени на Крале XXKД,В
ВИДОИСКATEЕ ИИN Ha эКрале apnapatypbl,
пдкlioченho n Tomoшь Гизда VIDEO,
aТAKЖE 3АпсьlaBaeMbI 3ByK,ИСПЛьзУ
罗LOBьIE TELeФОьbl.
- Пи перазимс с поюгнот AUDIO L/R можно поверять заисьбаemoe n3обрахени на закpaneжКД ил в BИДОИСКАТЕ,а тakxe заисьбаemы 3BYK C NOMOПБЮ ГOLBHyX TeleФOHOB.
- KaK npBHOHaaybHbIy 3ByK, TaK n HOBbI 3ByK, KOTOpbI 6yDeT 3aNtCAH, MOXHO npOBepaTb C NOMOuBuTOJIOBbIX TeJeFOHOB.
- Moxho OTperylnpoBaT 6aIaHc HOBOro 3ByKa n IepBOHaayalbHoro 3ByKa nyTeM Bbl6opa yCTaHOBKn AUDIO MIX BV yCTaHOBkax MeHIO. Bbl MOKeTe KOHTPOJIuPoBaT 3ByK BO BpEmr ayDInOnepe3aPiNCn C NOMOuBu ROJOBhIx TelefoHOB.
Adding an audio sound on a recorded tape
(1)Insert the recorded tape into your camcorder.
(2) Set the POWER switch to VCR on your camcorder.
(3)Locate the recording start point by pressing. Then press at the point where you want to start recording to set your camcorder to the playback pause mode.
(4) Press AUDIO DUB. The green indicator appears on the LCD screen or in the viewfinder.
(5) Press I and start playing back the audio you want to record at the same time. The new sound is recorded in stereo 2 (ST2) during playback.
(6) Press at the point where you want to stop recording.
Aydnopepe3aIncb
Добavenhoe 3ByKOBOrO cnHanaHa 3aIncanHyo JeHTy
(1)BcTaBbTe 3aIncaHHyo JIeHTy B BuJeOKaMepy.
(2)Установские на видаокамеpe nepeклочатуль POWER в положенце VCR.
(3)HaHInTe MeTo HaaJa 3aIncH, Haxmua KHOKNy▶. 3aTeM HaxMnTe KHOKNy B TOM MecTe, THe HuxHo HaaTaB 3aIncB, DnY yCTaHOBKn BnDeOKamepbI B pexm nay3bl BOCnpon3BeDeHnJ.
(4)Haxmnte KhoNky AUDIO DUB. 3eHeBn INdKaTOp IIOBNTcHa 3KpaHe KKДиN BvDOnckaTeNe.
(5)HaXMMTe KHOJKy I N OJHOBpeMeHHO NaHnTe BOCpON3BeDeHne 3ByKa, KOtOpbI HxKHO 3aNcTaB. HoBbI 3ByK 6yDcT 3aNcH b PexKmE cTepeo 2 (ST2) BO BpEm BOCpON3BeDeHn.
(6)Haxmnte KhoNky B TOM MecTe, THe HxKHO 3aKoHcHTb 3aPiNCb.

Monitoring the new recorded sound
To play back the sound
Adjust the balance between the original sound (ST1) and the new sound (ST2) by selecting AUDIO MIX in the menu settings (p. 156).
KoHTpoJIb HOBOrO 3aIncaHnOrO 3ByKa
Дявocрpon3BedeHЯ 3ByKa
OtpereynipyTe 6aHnC MejNy nepBOHaayIbHbIM 3BykOM (ST1) nHObIM 3BykOM (ST2), BbI6paB KOMaHny AUDIO MIX BVcTaHOBkax MeHIO (cTp. 156).
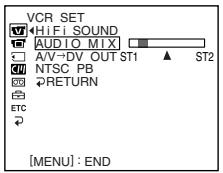
If you wait five minutes after you disconnect the power source or remove the battery pack, the setting of AUDIO MIX returns to the original sound (ST1) only. The default setting is for original sound only.
Notes
- New sound cannot be recorded on a tape already recorded in the 16-bit mode (p. 161).
- New sound cannot be recorded on a tape already recorded in the LP mode.
- You cannot add audio with the b , DV Interface.
If you make all the connections
The audio input to be recorded will take precedence over others in the following order.
- MIC (PLUG IN POWER) jack
- Intelligent accessory shoe
- AUDIO L/R jacks
Built-in microphone
If an i.LINK cable (optional) is connected to your camcorder
You cannot add sound to a recorded tape.
Yepe3 nIbMbMHyT nOcNe oTcoeDInHeHn ICTOCHNka nITaHnN uIN CHrTn8 bTaapeHOro 6Ioka yCTaHOBKa AUDIO MIX BepHcTcK nepBOHaJbHOMy 3ByKy (ST1). YcTaHOBKa no yMOJIaHnIO pPeJHa3HaueHa ToJbKO dIra nepBOHaJbHOrO 3ByKa.
Примейань
- HOBBI 3BYK HeIb3A 3aIINCaTb Ha JeHTy, 3aIINcaHHyU B 16-6HITOBOM pexIMe (cTp. 167).
- HoBbI 3ByK He MoXeT 6bITb 3aIncAH HaJeHtY, yJke 3aIncAHHyO B pexnme LP.
- HeJIb3Я ДобавиТь 3ByK Yepe3 Иnteppeic DV.
EcBbBbINHnBCE NOcOeHHeHn
3aIncbIbAembBxOJHO BnHJI 6yJeT NMeTb npOpNTeT Ha,IpyrMMn CnHAnAmn B CLeDyUoSe IocNeIOBaTeJIbHOCTN.
- _He3D0 MIC (PLUG IN POWER)
ДержателдЯ BCNOMORAtelbHbIX npHaJdNeXHOCTeI
-Гнэзда AUDIO L/R
BCTpoeHHbIMNKpOPOH
EcnK BnDekokamepe noDCoeHHeN Ka6eIb i.LINK (npno6peTaIOTCa DOnoJIHnTeJIbHO)
HeIb3a Iob6aBnTb 3ByK Ha 3aIncaHHyIO leHTy.
If you set the write-protect tab of the tape to lock
You cannot record on the tape. Slide the write-protect tab to release the write protection.
We recommend that you add new sound on a tape recorded with your camcorder
If you add new sound on a tape recorded with another camcorder (including an other DCR-VX2100E), the sound quality may deteriorate.
To add new sound more precisely
Press ZERO SET MEMORY on the Remote Commander at the point where you want to stop recording later in playback mode. Then, follow the procedure from step 3. Recording automatically stops at the point where ZERO SET MEMORY was pressed.
On blank portions
You cannot add an audio.
You can adjust the recording level manually using the recording adjustment display in the following cases:
- Dubbing with an optional external microphone or audio equipment through the MIC jack
- Dubbing with an optional external microphone installed into the intelligent accessory shoe
- Dubbing with the internal microphone
Aydnope3anncb
EcJIN 3aunTHbI JIeNEcTOK yCTaHOBJIeN B NOJIOXKeHne 3aunTbI OT 3aUNCn
HeIb3aIncbIbTa bHaJIeHTy.IpeEiBnHbTe IJIeNEcTOK 3aIuNTbl OT 3aIncn DnIOTKIOUeHn 3aIuNTbl.
PeKOMeHnyeTcI Do6aBJIrTb HObBi 3ByK HaJeHTy,3aNICAHHYIO C NOMOuBIO daHHoB BnDEOKamepbI
Придобаьени HOВОго 3БУКа HaJIeHTy, 3aIncaHnyC nOMOuBIO dpyroI BnDEOKaMepbI (BKJIQUaJdpyrYIO KAmepy DCR-VX2100E), kauecTBo 3ByKa MoKeT yxUdUnTbCra.
Дяболг TeUHorO IO6aBHeHЯ HOBOrO 3Byka
HaxmTe KhONky ZERO SET MEMORY Ha nyIbTe DnCTaHnOHHOro ynpabLeHnB TOM MeCTe, rIe HxKHO 3aKOHHTb 3aNcB I03Ke B peXmE BocpOn3BeDeHnR. 3aTEM BblONHtpe npOeDpyu n3 pYNkTa 3. 3aNcB aTOMATnueCKN OCTaHaBJIbAeTcB TOM MeCTe, rIe 6yJedt HxKaTa KhONka ZERO SET MEMORY.
Ha He3aHcAHHbIe yUaCTKn
HeBO3MOXHOIO6aBnTb 3ByK.
YpOBeHb 3aInc MoXHo pEryInpoBaTb BpyHyU, IcNoJIb3yЯ 3KpaH pEryInpOBKn 3aInc, B cIeDyUOxN Clyuayx:
-Pepe3aIncb c NOMOuI OIOJNHTeJIbHOro BHeUHero MKNPOcOHa IIN ayDnOaannapatypbI Ype3 rHe3do MIC
-Пepe3a\Pncb c NOMO\\I O DNOJHNTe\NbHorBHeuHrO MmKpOcfoHa, BCTaBJIeHHOro BVepKaTe\Nb IINB CnOMoRAte\NbHbIX npHa,dIeXHocTei
-Пepezaись c ПOMOцьв BCTpoeHHorO mKpOΦoHa
Superimposing a title

If you use a tape with cassette memory, you can superimpose the title while recording or after recording. When you play back the tape, the title is displayed for five seconds from the point where you superimposed it.
You can select one of eight preset titles and two custom titles (p. 149).
HanoxeHne Tntpa

EcIn BbI nCnObl3yeTe IeHTy c KaccetHNoI NaMrtbIO, BbI MoKTe BbIIOJIHTb HANOKeHne TITpa BO BpeM 3aIncn nnNnocNe 3aIncn. EcIn BbI BocPon3BOJnte IeHTy, TITp 6byet OTo6paKaTbcB TeueHne IaTIc KeYHc C TORo MeCTa, rDe BbI HANOKnIIN erO.
BbMOKeTe BbIbpaTb OINH N3 BOcBMn IpeBaPnteJIbHO yCTaHOBJIeHHbIX TITPOB IN DByX cO6CTBeHHbIX TITPOB (Ctp. 149).

You can also select the colour, size and position of titles./ Bby mojkeTe TaKKe BbybupaTb UBeT, pa3Mep n noJoxeHne TnTPOB.
(1) Press TITLE to display the title menu in standby, recording, playback, or playback pause mode.
(2)Turn the SEL/PUSH EXEC dial to select then press the dial.
(3)Turn the SEL/PUSH EXEC dial to select the desired title, then press the dial. The title flashes.
(4) Change the colour, size, or position, if necessary.
① Turn the SEL/PUSH EXEC dial to select the COLOUR, SIZE, or POSITION, then press the dial. The item appears.
② Turn the SEL/PUSH EXEC dial to select the desired item, then press the dial.
③ Repeat steps 1 and 2 until the title is laid out as desired.
(5) Press the SEL/PUSH EXEC dial again to complete the setting.
In playback, playback pause, or recording mode:
The "TITLE SAVE" indicator appears on the screen for five seconds and the title is set.
In standby mode:
The "TITLE" indicator appears. When you press START/STOP to start recording,
"TITLE SAVE" appears on the screen for five seconds and the title is set.
Haioxehne Tntpa
(1)HaKmTe KhONky TITLE dIy OTo6paKeHnMeHIO TITPOB B pEKMte OXNuDaHn,3aINcN, BOCpOu3BeDeHn INI nay3bIBOCpOu3BeDeHn.
(2)ПовернITE ДИСК SEL/PUSH EXEC ДЛЯ ВИБОпа установский, a 3aTeM нажмITE на ДИСК.
(3)ПовернITE диСК SEL/PUSH EXEC ДЯ
Быбopa hyжHorO тИТра, a 3aTeM habKMITE
На диСК. ТИТр начHET мигаТь.
(4)Измени Teцет,размер Или положенп.TNTpa,eclin HxKHO.
① ПовернITE диСК SEL/PUSH EXEC дя
Быбoga COLOUR, SIZE по
POSITION, a за tem нахмite на диСК.
Повьтся заlement.
② ПовернITE ДИСК SEL/PUSH EXEC Дпь Выбoga НУЖНО пункта, a 3aTeMHЯЖМЛТЕ на ДИСК.
③ Повторгийtenунковы 1и2do texnop, noka TnTp He 6byetpacnoJoxeH TaK, KaK HxKHO.
(5)HaxmTe HaДnCK SEL/PUSH EXEC ДЯЗавршени установки.
B pexime Bocnpoun3BeJeHn, nay3bl BOCnpoun3BeJeHn n 3aIncn:
B TeueHne IaTn CeKyuHn Ha 3KpaH eonBBNTCR HnDnKaTOp "TITLE SAVE", n yCTaHOBk TITpa 6yJeT 3aBepSeHa.
BpeKIme oKnIaHnI:
If you set the write-protect tab to lock
You cannot superimpose or erase the title.
Slide the write-protect tab to release the write protection.
To use a custom title
If you want to use the custom title, select in step 2.
If the tape has a blank portion
You cannot superimpose a title on that portion.
If the tape has a blank portion in the middle of the recorded parts
The title may not be displayed correctly.
EcIn 3aunTHbI JIeNcTOK yCTaHOBJeH B IIOJXKeHne 3aunTbI OT 3aINCn
BbHe CMOXeTe BbINOHNHTb HANOXeHne Nn CTnupHne TnTpa. IpeepdbHbTe neNecTOK 3aunTbOT 3aINCN dIg OTKJIIOUChENr 3aunTbI.
IINCNOJb3OBAHnCo6CTBeHHoroTNTpa
EcHn HUJXHO NcONb3ObAtb Co6CTBeHHbI THTp, Bbl6epnte BnyHKTe 2.
EcIn Ha JeHTe IMeETcR He3aIncaHbI yUaCTOK
B 3TOM yuactke haIOxHne TnTpA HeBO3MOxHO.
EcnHaJeHTe NMeETcH He3anucAHbIy uactOK Mekdy 3auncaHHbIMu YactAMN
Tttp MoKet OTo6paKaTbCn HnPaBnIbHo.
The titles superimposed with your camcorder
- They are displayed only on the DV™D' format video equipment with the index ttitle function.
- The point you superimposed the title may be detected as an index signal when searching a recording with other video equipment.
To not display titles
Set TITLE DSPL to OFF in the menu settings (p. 156).
Title setting
- The title colour changes as follows: WHITE YELLOW VIOLET RED CYAN GREEN BLUE
- The title size changes as follows:
SMALL LARGE
You cannot input more than 12 characters in LARGE size. - If you select the title size "SMALL," you have nine choices for the title position.
If you select the title size "LARGE," you have eight choices for the title position.
If the "FULL" mark appears
The cassette memory is full. If you erase the title, index data, date data, photo data, or cassette label in the cassette, you can then superimpose a title.
Tntpbl, haJIOXeHHbI c nOmoIbU BaSeB BnDeOKaMepbl
- OHI OTOBpaxaHTc TOnbKO Ha BnDeoannapaType fOpMaTa DV MinD c FyHKnei INHeKCHOrO HANOKeHrTtPOB.
- MecTo hanoXeHnT TnTp a MoKcTe 6bItb 6bHapxKeHO nINHeKCHomy CnHany npN PONCKe 3aPiNCi C NOMOuBIO DpyrO BnDeoannapaTypbl.
ДЯ OTMeHbI OTO6paXeHnTHTpOB
YcTaHOBnTe KOMaHny TITLE DSPL B noJoxeHne OFF By cTaHOBkax MeHIO (Ctp. 156).
YctaHObKa TnTpA
- LBeT TnTpa N3MeHReTcra CNeDyUOuM
06pa3oM:
WHITE (БЕЛын) ↔ YELLOW (ЖELТын)
← VIOLET (ФИОЛТОВын) ↔ RED
(KPACHын) ↔ CYAN (ГOLУБОн) ↔
GREEN (ЗЕLEHын) ↔ BLUE (СИНи) - Pa3mep TITpa N3MeHReTcra CNeIyUOuMm
06pa3om:
SMALL (MAJIeHbKn) LARGE
(BOJbUO)
Прибоблшомразмeperньзвовс
60лee 12 сиьолов.
- Ecni Bb6paH "SMALL" (MaIeHbKnI) pa3Mep TITpa, MoXHo Bbl6paTb OINH 3 DeBAtN BapnaHTOB CIMBOJOB BIO3NIuN TITpa.
EcIn Bb6paH "LARGE" (60JIbwoi) pa3Mep TnTPOB, MOXHO Bb6paTb OIN H3 BOCbMN BapnaHTOB CmBOJIOB B N03NcIM TnTpa.
EcJIN NOBNAETCA CMBON "FULL"
Kacctha naatb nepenonHeHa. EcnHa kaccTe cteptb TnTp, INdeKChbIe daHHble, INHoppMaunIO O daTe, daHHbIe fOTo NIN KacceTHyIO MapKnOpBky, TO nocIe 3TOro MOXHO CdeNaTb HANOKeHne TnTpA.
Erasing a title
(1) Set the POWER switch to VCR or CAMERA.
(2) Press MENU to display the menu.
(3)Turn the SEL/PUSH EXEC dial to select 10, then press the dial.
(4) Turn the SEL/PUSH EXEC dial to select TITLEERASE, then press the dial. The title erase display appears.
(5)Turn the SEL/PUSH EXEC dial to select the title you want to erase, then press the dial. The "ERASE OK ?" indicator appears.
(6) Make sure the title is the one you want to erase, and turn the SEL/PUSH EXEC dial to select OK, then press the dial. "OK" changes to "EXECUTE."
(7)Press the SEL/PUSH EXEC dial. "ERASING" flashes for about two seconds and "COMPLETE" appears after erasing the title.
CTpapanHe TnTpa
(1)Установпейсякючateь POWER в положене VCR ун сAMERA.
(2)HaxmTe KhoNkY MENU nOTo6paXeHHaMeHIO.
(3)ПовернITE диck SEL/PUSH EXEC дяп Вьбopa установки , a 3aTeM нажмITE на диck.
(4)ПовернITE диСK SEL/PUSH EXEC ДЯ
Быбopa TITLE ERASE, a 3aTeM habKMITE
НдИСК.
ПовьNTСА ИДИКAZИ CTIPAHAТ RA TITPa.
(5)Повернite ДИСК SEL/PUSH EXEC ДИВьбopa ТИТра, КOTOPБИ Вы XOTITE CTepeTb, a 3aTeM НЖМЛТЕ HaДИСК. ПовиТсУ ИДИКаТОР "ERASE OK ?".
(6)Y6eIntecb,yTO 3TO IMeHNO TOT TnTp, KOtOpBb Bbl XOTnTe CtepeTb, INOBepHnTe DnCK SEL/PUSH EXEC dIa Bblbopa KOMaHDbI OK,a 3aTeM haxmTe Ha nCK. INDnKaunr "OK" n3MeHnTCHa HnDnKauno "EXECUTE".
(7)HaxmnteHaIckSEL/PUSH EXEC. INdkaun“ERASING"MnraetnpimepHo DBe ckyNdbi,InnoCte CtnpaHnTtpa IOnBJIaTeCn Hndkaun“COMPLETE”.
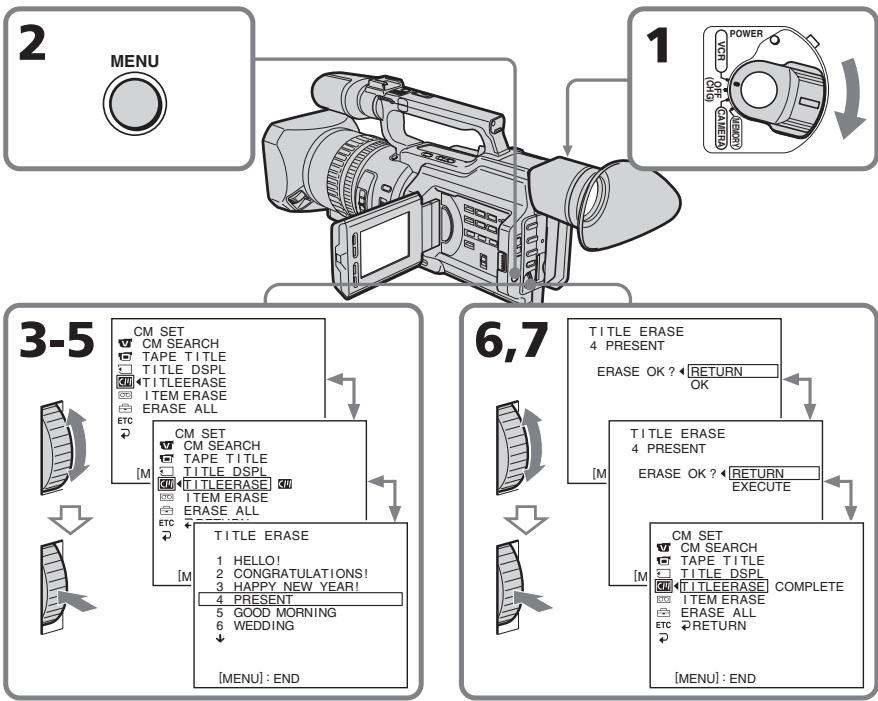
Superimposing a title
To cancel erasing
Select RETURN in step 6 or 7, then press the SEL/PUSH EXEC dial.
To erase all the titles
See "Erasing the cassette memory data" on page 153.
Hanoxehne Tntpa
ДЯ OTMeHbI ydaJIeHnI
Bb6epTe RETURN B nyHKeTe 6 nn7,3aTeM haxMtTe Ha nck SEL/PUSH EXEC.
Дяудалени BCex THTPOB
Cm. pa3dien "CTnpaHne daHHbIX nAMrTn Kaccetbl" Ha cTp. 153.
Making your own titles
CM only
You can make up to two titles and store them in cassette memory. Each title can have up to 20 characters.
(1) Press TITLE in the standby, playback, or playback pause mode.
(2)Turn the SEL/PUSH EXEC dial to select , then press the dial.
(3) Turn the SEL/PUSH EXEC dial to select CUSTOM1 SET or CUSTOM2 SET, then press the dial.
(4) Turn the SEL/PUSH EXEC dial to select the column of the desired character, then press the dial.
(5) Turn the SEL/PUSH EXEC dial to select the desired character, then press the dial.
(6) Repeat steps 4 and 5 until you have selected all characters and completed the title.
(7) To finish making your own titles, turn the SEL/PUSH EXEC dial to select [SET], then press the dial. The title is stored in memory.
(8) Press TITLE to erase the title menu display.
Co3dAnHe BaushxCo6CTBeHHbIX TnTPOB
CM only
MoxHo co3dAb He 60nee DByx TnTPOB IN COXPAHnTB IN B KACCETHO nAMrTI. KaKdbI NITP MOKet CoedeKaTb Do 20 CmMBJOB.
(1)HaxMnte KhoNkY TITLE BpeKIme OXmDAnH, BOcPOn3BEdEHNnIy3bl BOcPOn3BEdEHN.
(2)Повернite ДИСК SEL/PUSH EXEC ДИВБОGA yCTaHOBKN ⁸, a 3aTeM HaЖМЛТЕ HAДСК.
(3)ПовернITE ДИСК SEL/PUSH EXEC ДпьБбopa CUSTOM1 SET Ип CUSTOM2 SET,аЗТЕнхмпTe на ДИСК.
(4)Поверн'te ДИСК SEL/PUSH EXEC ДпЯ
Выбopa КОЛОНК И СУKHБИМ CBMBOЛOM, a
3aTEM НАЖМТЕ на DMCK.
(5)ПовернITE диСК SEL/PUSH EXEC дяВьбoga ружно ГСИМБОla,а 3aTeMHAЖМЛТЕ на дИСК.
(6)NoBToPnTe NyHkTbI 4 N5 DoTex npO, nOKa BbI He BbEbpNTe CcMBOJbI NoJIHOCTbIO He COCTABNTe TnTp.
(7)ДЯЗавершени COCTaBJIENH CBOUX co6CTBeHHbIX TITPOB NOBEPHNTe DnCK SEL/PUSH EXEC ДЯ Вьбopa KOMaHDbI [SET],аЗatemннмпу He nCk.TITp 6byTeT COxpaHEn B nAmrTn.
(8)HaxMMTe KhoNky TITLE dIa CtnpaHnIHdNKaUN MeHO TnTPOB.
1

PRESET TITLE
HELLO!
HAPPY BIRTHDAY
HARRY HOLIDAYS
CONGRATUATIONS
CONGRATULATION
OUR SWEET BABY
WEDDING
VACATION
THE END
2


3


4-6
1
2

TITLE SET
ABCD—10045
ABCDE 1234567890
KLMNO 1
RESTR [ ]
UWXY [SET]
7821

4

TITLE SET
S
ABCDE 12345
EGHJ67890
KLMNO
POSS [←]
LWWXY [SET]
78 21
To change a title you have stored
In step 3, select CUSTOM1 SET or CUSTOM2 SET, depending on which title you want to change, then press the SEL/PUSH EXEC dial. Turn the SEL/PUSH EXEC dial to select [ ] then press the dial to delete the title. The last character is erased. Enter a new title as desired.
If you take five minutes or longer to enter characters in standby mode while a cassette is in your camcorder, the power automatically goes off
The characters you have entered remain stored in memory. Set the POWER switch to OFF (CHG) once and then follow the procedure from step 7 again.
We recommend setting the operation in playback or playback pause mode or removing the cassette so that your camcorder does not automatically turn off while you are entering title characters.
To erase a character
Turn the SEL/PUSH EXEC dial to select [ ] then press the dial. The last character is erased.
To enter a space
Select [Z& ?!], then select the blank part.
Co3dHnE Baunx co6CTBeHHbIX TnTPOB
ДлЯИЗМЕHEнЯ COXpaHEnHOrO B namrTn TnTpA
B nyHKTe 3 BbI6epNTe yCTaHOBky CUSTOM1 SET nIN CUSTOM2 SET, B 3aBnCmOcTn OT TnTpA, KOTOpB BbXoTne NImMeHnTb, a 3aTe m HaxMnte DnCK SEL/PUSH EXEC. IObepHnTe DnCK SEL/PUSH EXEC dJa BBi6opa yCTaHOBKn [<], 3aTe m HaxMnte Ha DnCK dJaYdaJIeHn TnTpA. IocJeHn CmBOJ 6yDeT cTept. BBeIte HOBbI HxKhbl TnTp.
EcInBpeKIMeOxNdaHnB BBOcCMB0Ib3aHmMaetPITbNIN6oJeEMNHyt,KOrDaKaccTeHaXoDntCraBVnDeOKaMepe,PiTaHneABTomatUyecknOTKJIIOuHaETCR
CmBBoJIb, KOtOpble Bbl BBEnI, CoXpaHrTcB namrtn BuJeokAmepbl. YcTaHOBnTe nepeKlouaTeIb POWER B noJIOxKeHne OFF (CHG), a 3aTeM ChOba BblOnHnTe npOceDpy n3 nyHkTa 7.
PekomehnyetcnyctaHOBntb pekim BOCpOIN3BeDeHnI INI NaY3bl BOCpOIN3BeDeHnI INI IN3BLey KaCCeTy, YTO6bl BVNeOKeMaepa ABToMaTHeCKn He BbIKJIOUaJIac Bo BPeM BAoDa CmBOJIOB TITPOB.
Длг STИРАннсIMBOla
If you use a tape with cassette memory, you can label a cassette. The label can consist of up to 10 characters and is
stored in cassette memory. When you insert the labeled cassette and set the POWER switch to VCR, CAMERA, or MEMORY, the label is displayed for about five seconds.
(1) Insert the cassette you want to label.
(2) Set the POWER switch to VCR or CAMERA.
(3) Press MENU to display the menu.
(4)Turn the SEL/PUSH EXEC dial to select 10, then press the dial.
(5) Turn the SEL/PUSH EXEC dial to select TAPE TITLE, then press the dial. The tape title display appears.
(6) Turn the SEL/PUSH EXEC dial to select the column of the desired character, then press the dial.
(7) Turn the SEL/PUSH EXEC dial to select the desired character, then press the dial.
(8) Repeat steps 6 and 7 until you finish the label.
(9)Turn the SEL/PUSH EXEC dial to select [SET], then press the dial. The label is stored in memory.
Mapknipobka kaccetbl
CM only
To change the label you have made
Insert the cassette to change the label, and operate in the same way as you do to make a new label.
If you set the write-protect tab of the tape to lock
You cannot label the tape. Slide the write-protect tab to release the write protection.
If you have superimposed titles in the cassette
When the label is displayed, up to four titles also appear.
When the "-----" indicator has fewer than 10 spaces
The cassette memory is full.
The "-----" indicates the number of characters you can select for the label.
To erase a character
Turn the SEL/PUSH EXEC dial to select [ ] then press the dial. The last character is erased.
To enter a space
Select [Z& ?!], then select the blank part.
Mapknopbka kaccetbl
BbI He cMOXeTe BbIIOJIHNITb MapKIpOBKy JeHTb.IpePeBINbTeJeNEcTOK 3aunTbI OT 3aNNiDnO TKNHoyEHHaunTbI.
EcIn BblBbIOnHnHn HauOxHeNtTpoB Ha Kaccete
Korda oTo6paxaetcmaPknpoBbKa, TaKKe OTo6paxaetcdo Yetbipex TnTPOB.
EcInnHdNkATOp“----”coedePKNT MeHee 103HaKOB
Kaccettha namrB nepenolheha.
Индикатор"----”NOKa3bIbaeT KOJIuYeCTBO CIMBOLOB, KOTOpbIe MOxHOb Bbl6paTbДЯ МарКировки.
ДЯ STИРАнг CIMBOla
Erasing the cassette memory data
You can erase data stored in cassette memory, each item's data can be erased separately. You can also erase all items' data once.
Erasing each item's data separately
(1) Set the POWER switch to VCR or CAMERA.
(2)Press MENU to display the menu display.
(3)Turn the SEL/PUSH EXEC dial to select 10, then press the dial.
(4) Turn the SEL/PUSH EXEC dial to select ITEM ERASE, then press the dial.
(5) Turn the SEL/PUSH EXEC dial to select the item that you want to erase its data, then press the dial.
| Item | Meaning |
| INDEX ALL | Erases all the index data. |
| TITLE ALL | Erases all the title data. |
| DATE ALL | Erases all the date data. |
| PHOTO ALL | Erases all the photo data. |
(6)Turn the SEL/PUSH EXEC dial to select OK, then press the dial. "OK" changes to "EXECUTE."
(7) Press the SEL/PUSH EXEC dial. "ERASING" flashes for about two seconds and "COMPLETE" appears after erasing the selected item's data.
Erasing the cassette memory data
CTupaHne daHHbIX nAMrN Kaccetbl
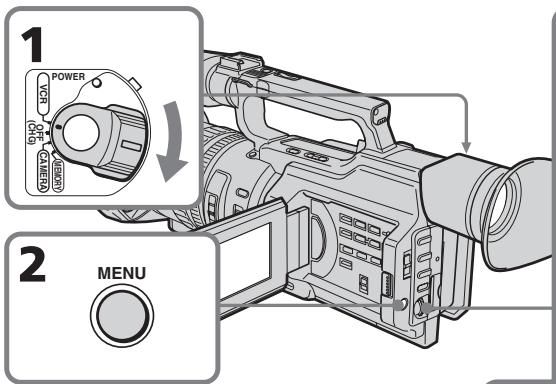
3-5


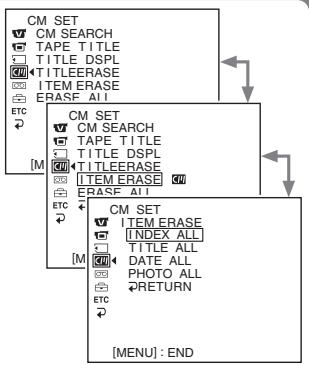

6,7


CM SET
ITEMERASE
INDEXALLRETURN
TITLEALLOK
DATE ALL
网PHOTOALL
RETRUN
FTC
2
CM SET
ITEMERASE
INDEXALLCOMPLETE
TITLALI
DATE ALL
PHOTO ALL
RETRIBN
To cancel erasing
Select RETURN in step 6 or 7, then press the SEL/PUSH EXEC dial.
ДЯТМЕнblуУдален<|im_start|>
Bb6epTe RETURN B nyHKe 6 nn7,3aTeM haxmTe Ha nck SEL/PUSH EXEC.
Erasing the cassette memory data
Erasing all the data in cassette memory
(1) Set the POWER switch to VCR or CAMERA.
(2) Press MENU to display the menu display.
(3) Turn the SEL/PUSH EXEC dial to select, then press the dial.
(4) Turn the SEL/PUSH EXEC dial to select ERASE ALL, then press the dial.
(5)Turn the SEL/PUSH EXEC dial to select OK, then press the dial. "OK" changes to "EXECUTE."
(6) Press the SEL/PUSH EXEC dial. "ERASING" flashes for about two seconds and "COMPLETE" appears after erasing all the data.
To cancel erasing
Select RETURN in step 5 or 6, then press the SEL/PUSH EXEC dial.
CTipaHne DaHHbIX NaMAtN KAcccTebl
CTupaHne BCex DaHHbIX B KACCETHOI NAMrTn
(1)YctaHOBInTe IpeKJIIOuHaTeIb POWER B noJoxKeHne VCR uIN CAMERA.
(2)Haxmte KhoNky MENUДЯ OTo6paXeHnДиCnJIeMHeIHO.
(3)ПовернITE диссг SEL/PUSH EXEC Ддя Вьбopa установки ,а затем нажмпесу Ддяч.
(4)ПовернITE ДИСК SEL/PUSH EXEC ДИВБЮGA ERASE ALL, a 3aTeM нажмITE Ha ДИСК.
(5)Поверн'te ДИСК SEL/PUSH EXEC ДЯ
Выбoga установки OK, a за tem нахмтЕ
на ДИСК. "OK" Meнгетса на "EXECUTE".
(6)HaKmTe HaДnCK SEL/PUSH EXEC. Индикага "ERASING" mIraeТnpIMepHOnДBE cekyHdbl,Ипocлe CTIpaHЯВCExДaHHbIX NOBJIaETcH INДикага "COMPLETE".
ДЯТOMeHbI ydaJIeHnA
Bb6epnte RETURN B nyHKe 5 nn 6,3aTe mnaMnTe Ha nCK SEL/PUSH EXEC.
- Customizing Your Camcorder - Changing the menu settings
To change the mode settings in the menu settings, select the menu items with the SEL/PUSH EXEC dial. The default settings can be partially changed. First, select the icon, then the menu item and then the mode.
(1) In standby, or when the POWER switch is set to VCR or MEMORY, press MENU.
(2)Turn the SEL/PUSH EXEC dial to select the desired icon, then press the dial to set it.
(3)Turn the SEL/PUSH EXEC dial to select the desired item, then press the dial to set it.
(4)Turn the SEL/PUSH EXEC dial to select the desired mode, then press the dial to set it.
(5) If you want to change other items, select RETURN and press the dial, then repeat steps 2 to 4.
For details, see "Selecting the mode setting of each item" (p. 158).
-BbInOpHHeHnHnBnDyaIbHbIX yctaHOBOK Ha BnDeOKaMepe -
Изменистановок мени
To make the menu display disappear
Press MENU.
Menu items are displayed as the following icons:
MANUAL SET
C CAMERA SET
VCR SET
LCD/VF SET
MEMORY SET
CM SET
TAPE SET
SETUP MENU
ETC OTHERS
ДЯТOrO,чTO6bICKpbITb INHДИКaцIHOMeHIO
HaxmTe kHOnKy MENU.
IyHKtbl MeHIO OTO6paXaHTcB BVNe InpuBeDeHHbIX HNXe NIKTORpAMM:
MANUAL SET
CAMERA SET
VCR SET
LCD/VF SET
MEMORY SET
CM SET
TAPE SET
SETUP MENU
ETC OTHERS
English
Selecting the mode setting of each item
is the default setting.
Menu items differ depending on the position of the POWER switch.
The LCD screen or viewfinder screen shows only the items you can operate at the moment.
| Icon/item | Mode | Meaning | POWER switch |
| AUTO SHTR | ON | To automatically adjust the electronic shutter* speed. | CAMERA |
| OFF | To fix the electronic shutter* speed. | MEMORY | |
| PROG. SCAN | OFF | Records still/moving pictures in the interlace format. | CAMERA |
| ON | Records still/moving pictures in progressive recording mode. | ||
| D ZOOM | OFF | To deactivate the digital zoom. Up to 12× zoom is carried out. | CAMERA |
| 24× | To activate the digital zoom. More than 12× zoom is performed digitally. This value goes up to 24× (p. 32). | ||
| 48× | To activate the digital zoom. More than 12× zoom is performed digitally. This value goes up to 48× (p. 32). | ||
| 16:9WIDE | OFF | To not record a 16:9 wide picture. | CAMERA |
| ON | To record a 16:9 wide picture (p. 54). | ||
| STEADYSHOT | ON | To compensate for camera-shake. | CAMERA |
| OFF | To cancel the SteadyShot function. Natural pictures are produced when shooting a stationary object with a tripod. | MEMORY |
* About the electronic shutter
The electronic shutter is the function used to adjust the shutter speed electrically.
Notes on the SteadyShot function
- The SteadyShot function will not correct excessive camera-shake.
- Attachment of a conversion lens (optional) may influence the SteadyShot function.
If you cancel the SteadyShot function
The SteadyShot OFF indicator appears. Your camcorder prevents excessive compensation for camera-shake.
| Icon/item | Mode | Meaning | POWER switch | |
| FRAME REC | ● OFF | Does not make a cut recording. | CAMERA | |
| ON | Makes a cut recording (p. 89). | |||
| INT. REC | ON | Makes an interval recording (p. 85). | CAMERA | |
| ● OFF | Does not make an interval recording. | |||
| SET | Sets the interval time and recording time. | |||
| HiFi SOUND | ● STEREO | To play back a stereo tape or dual sound track tape with main and sub sound (p. 212). | VCR | |
| 1 | To play back a stereo tape with the left sound or a dual sound tape with main sound. | |||
| 2 | To play back a stereo tape with the right sound or a dual sound track tape with sub sound. | |||
| AUDIO MIX | — | To adjust the balance between the stereo 1 and stereo 2 (p. 141). | VCR | |
| ST1 ▲ ST2 | ||||
| A/V→DV OUT | ● OFF | To output analog images in digital format using your camcorder. | VCR | |
| ON | To output digital images in analog format using your camcorder. | |||
| NTSC PB | ● ON PAL TV | To play back a tape recorded on your camcorder on a PAL system TV. | VCR | |
| NTSC 4.43 | To play back a tape recorded in the NTSC colour system on a TV with the NTSC 4.43 mode. | |||
| LCD B. L. | ● BRT NORMAL | To set the brightness on the LCD screen to normal. | VCR | |
| BRIGHT | To brighten the LCD screen. | CAMERA MEMORY | ||
| LCD COLOUR | — | To adjust the colour on the LCD screen with the SEL/PUSH EXEC dial. | VCR | |
| To get low-intensity | CAMERA MEMORY | |||
| VF B.L. | ● BRT NORMAL | To set the brightness on the viewfinder screen to normal. | VCR | |
| BRIGHT | To brighten the viewfinder screen. | CAMERA | ||
| GUIDEFRAME | ● OFF | Does not display the guide frame. | CAMERA | |
| ON | Displays the guide frame (p. 53). | MEMORY | ||
Notes on LCD B.L. and VF B.L.
- When you select "BRIGHT," battery life is reduced a little during recording.
- When you use power sources other than the battery pack, "BRIGHT" is automatically selected.
Changing the menu settings
| Icon/item | Mode | Meaning | POWER switch |
| CONTINUOUS | OFF | Not to record continuously. | MEMORY |
| ON | To record four images continuously (p. 178). | ||
| MULTI SCRN | To record nine images continuously (p. 178). | ||
| QUALITY | SUPER FINE | To record still images in the super fine image quality mode, using a “Memory Stick” (p. 174). | VCR MEMORY |
| FINE | To record still images in the fine image quality mode, using a “Memory Stick” (p. 174). | ||
| STANDARD | To record still images in the standard image quality mode, using a “Memory Stick” (p. 174). | ||
| PRINT MARK | OFF | To erase print marks on still images. | VCR MEMORY |
| ON | To write a print mark on the recorded still images you want to print out later. | ||
| PROTECT | OFF | To release protection from still images. | VCR MEMORY |
| ON | To protect selected still images against accidental erasure (p. 202). | ||
| SLIDE SHOW | To play back all the images as a slide show (p. 200). | MEMORY | |
| DELETE ALL | To delete all unprotected images (p. 206). | MEMORY | |
| FORMAT | RETURN | To cancel formatting. | MEMORY |
| OK | To format an inserted “Memory Stick.” 1. Select FORMAT with the SEL/PUSH EXEC dial, then press the dial. 2. Turn the SEL/PUSH EXEC dial to select OK, then press the dial. 3. After “EXECUTE” appears, press the SEL/PUSH EXEC dial. “FORMATTING” appears during formatting. “COMPLETE” appears when formatting is finished. | ||
| PHOTO SAVE | To duplicate images on a tape onto a “Memory Stick” (p. 191). | VCR |
Formatting erases all information on the "Memory Stick"
Check the contents of the "Memory Stick" before formatting:
- Formatting erases the protected image data on the "Memory Stick."
Notes on formatting
- Supplied or optional "Memory Stick"s have been formatted at the factory. Formatting with this camcorder is not required.
- While the display shows "FORMATTING," do not turn the POWER switch, press any button, or eject a "Memory Stick."
- You cannot format a "Memory Stick" if the write-protect tab on the "Memory Stick" is set to LOCK.
- Format again if the message "☑" appears.
If formatting fails
The "格式ERROR" message appears.
| Icon/item | Mode | Meaning | POWER switch | |
| CM SEARCH | ON | To search using cassette memory (p. 95, 97, 99, 101). | VCR | |
| OFF | To search without using cassette memory. | |||
| TAPE TITLE | To label a cassette (p. 151). | VCR CAMERA | ||
| TITLE DSPL | ON | To display the title you have superimposed. | VCR | |
| OFF | Not to display the title. | |||
| TITLEERASE | — | To erase the title you have superimposed (p. 147). | VCR CAMERA | |
| ITEM ERASE | — | To erase each item's data in cassette memory (p. 153). | VCR CAMERA | |
| ERASE ALL | — | To erase all the data in cassette memory (p. 155). | VCR CAMERA | |
| REC MODE | ● SP | To record in the SP (Standard Play) mode. | VCR CAMERA | |
| LP | To increase the recording time to 1.5 times the SP mode. | |||
| AUDIO MODE | ● 12BIT | To record in 12-bit mode (two stereo sounds). | VCR CAMERA | |
| 16BIT | To record in 16-bit mode (one stereo sound with high quality). | |||
Notes on the LP mode
- When you record a tape in the LP mode on your camcorder, we recommend playing back the tape on your camcorder. When you play back the tape on other camcorders or VCRs, noise may occur in pictures or sound.
- When you record in the LP mode, we recommend using a Sony Excellence/Master mini DV cassette so that you can get the most out of your camcorder.
- You cannot make audio dubbing on a tape recorded in the LP mode. Use the SP mode for the tape to be audio-dubbed.
- When you record in the SP and LP modes on one tape or you record some scenes in the LP mode, the playback picture may be distorted or the time code may not be written properly between scenes.
Notes on AUDIO MODE
- You cannot dub an audio sound on a tape recorded in the 16-bit mode.
- When playing back a tape recorded in the 16-bit mode, you cannot adjust the balance in AUDIO MIX.
Changing the menu settings
| Icon/item | Mode | Meaning | POWER switch |
| ○○REMAIN | ● AUTO | To display the remaining tape indication: ● for about eight seconds after your camcorder is turned on and calculates the remaining amount of tape ● for about eight seconds after a cassette is inserted and your camcorder calculates the remaining amount of tape ● for about eight seconds after ▲ is pressed in VCR mode ● for about eight seconds after DISPLAY is pressed to display the screen indicators ● for the period of tape rewinding, forwarding or picture search in the VCR mode | VCR CAMERA |
| ON | To always display the remaining tape indicator. | ||
| DATA CODE | ● DATE/CAM | To display date, time and various settings during playback. | VCR |
| DATE | To display date and time during playback. | ||
| MIC LEVEL | ● AUTO | Adjusts audio recording level automatically. | VCR |
| MANUAL | Adjusts audio recording level manually (p. 75). | CAMERA | |
| ○○CLOCK SET | — | To set the date or time (p. 20). | CAMERA MEMORY |
| LTR SIZE | ● NORMAL | To display selected menu items in normal size. | VCR |
| 2× | To display selected menu items at twice the normal size. | CAMERA MEMORY | |
| DEMO MODE | ● ON | To make the demonstration appear. | CAMERA |
| OFF | To cancel the demonstration mode. | ||
| ETC WORLD TIME | To set the clock to the local time. Turn the SEL/ PUSH EXEC dial to set a time difference. The clock changes by the time difference you set here. If you set the time difference to 0, the clock returns to the originally set time. | CAMERA MEMORY |
Notes on DEMO MODE
- You cannot select DEMO MODE when a cassette is inserted in your camcorder.
- DEMO MODE is set to STBY (Standby) at the factory and the demonstration starts about 10 minutes after you have set the POWER switch to CAMERA without a cassette inserted. To cancel the demonstration, insert a cassette, set the POWER switch to other than CAMERA, or set DEMO MODE to OFF.
| Icon/item | Mode | Meaning | POWER switch | |
| ETC | BEEP | ● MELODY | To chime a melody in normal operations, and beep a warning sound for five seconds. | VCR CAMERA |
| NORMAL | To beep in the following situations: When you turn on the power, the recording starts/ stops, or a warning message appears. | MEMORY | ||
| OFF | To cancel the melody, beep, and shutter click sound. | |||
| COMMANDER | ● ON | To activate the Remote Commander supplied with your camcorder. | VCR CAMERA | |
| OFF | To deactivate the Remote Commander to avoid remote control misoperation caused by an other VCR's remote control. | MEMORY | ||
| DISPLAY | ● LCD | To show the display on the LCD screen and viewfinder screen. | VCR CAMERA | |
| V-OUT/LCD | To show the display on a TV screen, LCD screen and viewfinder screen. | MEMORY | ||
| REC LAMP | ● ON | To light up the camera recording lamps at the front and rear of your camcorder. | CAMERA MEMORY | |
| OFF | To turn the camera recording lamps off. | |||
| COLOUR BAR | ● OFF | Does not display the colour bar. | CAMERA | |
| ON | Displays the colour bar. | |||
| VIDEO EDIT | To make programs and perform video editing (p. 123). | VCR | ||
| EDIT SET | To adjust and set the synchronization of your camcorder and a VCR for dubbing in video program editing mode (p. 112). | VCR | ||
Note
If you press DISPLAY with DISPLAY set to V-OUT/LCD in the menu settings, the picture from a TV or VCR will not appear on the LCD screen even when your camcorder is connected to outputs on the TV or VCR (except using an i.LINK cable).
When recording a close subject
When REC LAMP is set to ON, the red camera recording lamps on the front and rear of the camcorder may reflect on the subject if it is close. In this case, we recommend you set REC LAMP to OFF.
After more than five minutes after removing the power source
The "PROG. SCAN," "HiFi SOUND," "AUDIO MIX," "MIC LEVEL," and "COMMANDER" items are returned to their default settings.
The other menu items are held in memory even when the power source is removed.
Pycckn
Bb6op yctaHOBok peKIma kaJdoRo 3JeMeHTo
IyMOnJuaHnIO.
AIBAETCByCTaHOBkoI
IyHKbMeHIO OTnuiuAOTcB 3aBnCIMoCTN OT noLOXeHn IpeKJIouaTeJr POWER.
Ha 3KpaHe KKД ИИ BUNOuCKaTeIЯ OTO6paKaIoTc TOnbKO Te 3JIeMeHTbl, C KOTOpbIMN MOXHO BaHbMy MOMeHT pa60TaTb.
Злем entbl "PROG. SCAN," "HiFi SOUND," "AUDIO MIX," "MIC LEVEL"и "COMMANDER" BepHyTcK 3aBoДСКИМ yCTaHOBkAM.
— "Memory Stick" Operations — Using a "Memory Stick" – introduction
The "Memory Stick" is a new light and small recording media which, despite its size, can store more data than a floppy disk. You can use following types of "Memory Stick" on your camcorder. However, appearance on the list does not guarantee the operation of all types of "Memory Stick" on your camcorder.
| Types of "Memory Stick" | Recording / Playback |
| "Memory Stick" | ○ |
| "Memory Stick Duo"* | ○ |
| "MagicGate Memory Stick" | ○** |
| "MagicGate Memory Stick Duo"* | ○** |
| "Memory Stick PRO" | - |
| "Memory Stick PRO Duo"* | - |
- Attach the Memory Stick Duo adaptor before inserting it into the camcorder.
**"MagicGate" is a copyright protection technology that records and transfers the contents in an encrypted format. Note that data that uses "MagicGate" technology cannot be recorded or played on your camcorder.
On file format (JPEG)
Your camcorder compresses image data in JPEG format (extension .jpg).
Typical image data file name
100-0001: As displayed on the LCD screen or in the viewfinder of the camcorder.
Dsc00001.jpg: As displayed on your PC screen.
Before using a "Memory Stick"
-Операцис "Memory Stick" -
Испобьзованке “Memory Stick” - Вて deanе
"Memory Stick"-3TO HOBBI n He6oBbwoI npa3Mepy HocnteJIb 3aIIN,Ha KOTOpOM, HecMOTpR Ha eRO pa3Mep,MOKET XpaHHTbcr O6bEM DaHHbIX, RopA3Do 6oBbIw, Yem Ha rN6KOM DmCke.
Ha 3ToB BnIeOkaMepe MoXHo IcNoJIb3OBA Tb cIeDyIoune TInbI KapT "Memory Stick".
OndaKo HET rapaHTn, YTO BCE nepeuCneHbIe B cIncke Tnbl "Memory Stick" 6ydyT pa60TaTb Ha daHHoB BIndeokAmpe.
| Тиши "Memory Stick" | Запись/вocspoизve дени |
| "Memory Stick" | ○ |
| "Memory Stick Duo"* | ○ |
| "MagicGate Memory Stick" | ○** |
| "MagicGate Memory Stick Duo"* | ○** |
| "Memory Stick PRO" | - |
| "Memory Stick PRO Duo"* | - |
* PoiocoeHnHe aIaIep IJIa KapTb Memory Stick Duo, npexJe Yem BCTaBtB ee B VIneokamepy.
** "MagicGate" -剽TO TexHOLOrma3aunTbI aBTOpCKHX npab, KOTOPa 3aINCbIbAET n Ipeo6pa3yET coDePxAHHe B 3aUnnΦpOBAHHbI ΦOpMaT. POMHtE, TTO Ha 3ToB bInDeOkAmpe HeBO3MOxHO 3aINcA Tb NII BOCPOn3BecTn DaHbIe, CODePxAuIne CnHnJIbI 3aUnTb I O TexHOLOrma "MagicGate".
OΦopmaTeΦaJIIOB(JPEG)
3Ta BnDEOkamepa CxkMaet daHbIe n3o6paXKeHnB φOpMaT JPEG (c pacuHpeHHem .jpg).
06bHoe mMaJna DaHHbx n3o6paXeHn
100-0001:Kak oTo6paKaaeTcHa 3kpaHe XXKД nIIN B VbOnOckaTeNe BIndeOkamepbl
Dsc00001.jpg:Kak oTo6paxaeTcHa 3kpaHe PIK.
Перед Исторьанец "Memory Stick"

Terminal/KoHTaKTbI pa3bema
Rear/C3aAn

Front/Cnepeeni
- The position or the shape of the write-protect tab may differ depending on the "Memory Stick" you use.
- You cannot record or erase still images when the write-protect tab on the "Memory Stick" is set to LOCK.
-Положене Ииnpomma Лениста зштбоТОЗИСМОКЕТОЛИЧТБСВЗвИСМССТСТОпспльзему"Memory Stick".
- HénodBxHbIe n3o6paXeHnIe HeBO3MOxHO 3aunbIbATnIu CTnPaTb,ecnn IeneCTOK 3aunTbO T3anncnHa "Memory Stick" yctahOBJenB noJIoXeHne LOCK.
Using a "Memory Stick" - introduction
- We recommend backing up important data.
-
Image data may be damaged in the following cases:
-
If you remove the "Memory Stick," turn the power off, or detach the battery for replacement when the access lamp is flashing.
-
If you use a "Memory Stick" near static electricity or magnetic fields.
-
Prevent metallic objects or your finger from coming into contact with the metal parts of the connecting section.
- Stick its label on the labeling position.
- Do not bend, drop or apply strong shock to a "Memory Stick."
- Do not disassemble or modify a "Memory Stick."
- Do not let the "Memory Stick" get wet.
-
Do not use or keep a "Memory Stick" in locations that are:
-
Extremely hot such as in a car parked in the sun or under the scorching sun.
-Under direct sunlight. - Very humid or subject to corrosive gases.
- When you carry or store a "Memory Stick," put it in its case.
A "Memory Stick" formatted by a computer
A "Memory Stick" formatted by the Windows OS or Macintosh computers does not have a guaranteed compatibility with this camcorder.
Note on using the "Memory Stick Duo"
You can use a "Memory Stick Duo" in your camcorder after inserting it into the Memory Stick Duo adaptor.
You may damage the "Memory Stick Duo" or the Memory Stick slot on your camcorder in the following situations.
- When you insert a "Memory Stick Duo" that is not inserted into a Memory Stick Duo adaptor into the Memory Stick slot on your camcorder.
- When you insert the "Memory Stick Duo" in the wrong direction.
If you insert a "Memory Stick Duo" without a Memory Stick Duo adaptor by mistake, hold the camcorder so the Memory Stick slot is facing down, then hold the lid aside using a toothpick or similar object to let the "Memory Stick Duo" slide out.
Notes on image data compatibility
- Image data files recorded on a "Memory Stick" by your camcorder conform to the Design Rules for Camera File Systems universal standard (DCF98 standard) established by the JEIDA (Japan Electronic Industry Development Association). You cannot play back on your camcorder still images recorded on other equipment (DCR-TRV890E/TRV900/TRV900E or DSC-D700/D770) that does not conform to this universal standard. (These models are not sold in some areas.)
- If you cannot use a "Memory Stick" that is used with other equipment, format it with this camcorder (p. 160). However, formatting erases all information on the "Memory Stick."
"Memory Stick," and "MagicGate Memory Stick" are trademarks of Sony Corporation.
- "Memory Stick Duo" and "MEMORY STICK DUO" are trademarks of Sony Corporation.
- "Memory Stick PRO" and "MEMORY STICK PRO" are trademarks of Sony Corporation.
"MagicGate" and "MagicGate" are trademarks of Sony Corporation.
- All other product names mentioned herein may be the trademarks or registered trademarks of their respective companies.
Furthermore, "TM" and "®" are not mentioned in each case in this manual.
Приимechаши NO COBmecTnMoCTN dAnhhix N3o6paKeHn
-ФаилданьхиЗббрахж,在aпсаньгьвдeокамериHa“Memory Stick”,COOTBeTCTBYOT yHnBepcaJIbHOMy CTaHdapTy (DCF98),coIancho npabuamnpoeKtIpOBaHINФаиNoBbIX CnCTemДЯВидeокамер,ycTaHOBJIeHHomMyaccounaций JEIDA(rnohckoinccOuaHne pa3BNTIn 3JeKTPoHNOhpombyIeHHOCTn)Ha STOnB ViDeoKampeHeJIb3BBOcNITb HEnoDbXHbIeN36paXeHINaPcAHbIE Ha dpyroAnpapaType(DCR-TRV890E/TRV900/TRV900E nnn DSC-D700/D770),KOTopar HeCOOTBeTCTByET 3TomYUnBepCaJIbHOMyCTaHdapTy.(3TNMOdJIeN He npodaHTCBNeKOToBPbIX o6NaCTrx.)
- Ecni BbI He cMOxTe NcNoIb3ObAtb "Memory Stick", KOTOpBie McNoIb3yUoTcHa dpyroI annapaType, OToΦopMaTnpuYe IN C nOMoUsIb 3ToI BnDeOkAmepbl (CTp. 166). OdHako φoMpTaNpOBaHne ydaJIIT BCIO uHΦopMaunHO "Memory Stick".
"Memory Stick", "MagicGate Memory Stick" ABJIHOTcT TOPRObIMn MapKamN Sony Corporation.
"Memory Stick Duo" n "MEMORY STICK DUO" YBJIHOTc ToproBbIMn MapKaMn Sony Corporation.
"Memory Stick PRO" n "MEMORY STICK PRO" YBJIHOTcT TOPROBbIMu MapKaMn Sony Corporation.
"MagicGate" and "MagicGate" ABJIAOTC ToprobIMN Mapkamn Sony Corporation.
Bce npytne HnmeHOBaHnI npOdyKTOB, yNOMAHyTbIe B 3TOM DOKymEHTe, MOrYT 6bITb TOPROBbIMn MapKaMn IINI 3apeHnCTpnpoBaHbIMN TopROBbIMn MAPKaMn COOTBeTCTBVUxH KOMNaHn.
CIMBOJIb“TM”N“B KaJDom Cnyae He yNOMHaIOTcB DaHHom pyKOBoDCTBE.
Using a "Memory Stick" - introduction
Inserting a "Memory Stick"
Insert the "Memory Stick" with the Sony logo pointing toward the LCD panel and the mark pointing inward.
YcTaHOBka "Memory Stick"
BCTaBbTe "Memory Stick" c 3m6JIemOy Sony, yka3bIbAIOUeB HnpaBNeHn nAHeN JKKI, n Obo3HaYeHnEM 一 , HnpaBJIeHHbIM BHyTpB.
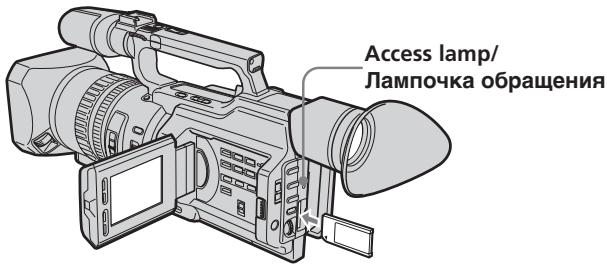
To eject a "Memory Stick"
Push the "Memory Stick" inward, then release your finger. The "Memory Stick" comes out a little.
ДяиЗВлесенЯ“Memory Stick”
Haxmnte Ha "Memory Stick", 3aTeM OTnycnte. "Memory Stick" BbIeT n3 OTceKa.
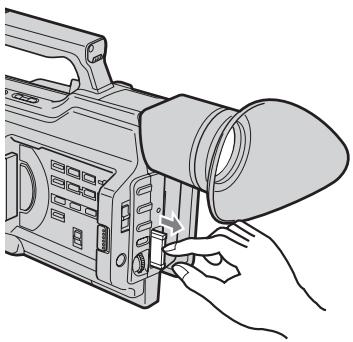
Note
The "Memory Stick" may pop out depending on the way you push it.
PpimueaHne
"Memory Stick" MoKet pe3ko BbICKOHTb n3 OTceKa, B 3aBcIMOCTn OT HaXaTnHa Hee.
When the access lamp is lit or flashing
Never shake or strike your camcorder. Do not turn the power off, eject a "Memory Stick" or remove the battery pack. Otherwise, image data breakdown may occur.
EcIn lamnocka obpauehenr ropnt nnn muraet
HnKoIa He TpncTe BInDeokAmepu HcTcYnte nO He. He BbIKNoaTe NITaHne, HeN3BNeKaIte "Memory Stick" n3 OTCeka nHe ydaJIHrTe 6bTapeHbI bIOK. B IpOTnbHom Clyuae DaHHbIe N3O6paXeHnA MoYr 6bITb NOBpeKdHbl.
Using a "Memory Stick" - introduction
If the "MEMORY STICK ERROR" indicator appears
The "Memory Stick" is broken, the file format is not proper, or the "Memory Stick" that you are using is not compatible with your camcorder. Eject the "Memory Stick," check it, and insert it again (p. 170).
Selecting the image quality mode
You can select the image quality mode in still picture recording. The default setting is SUPER FINE.
(1)Set the POWER switch to VCR or MEMORY. Make sure that the LOCK switch is set to the right (unlock) position.
(2) Press MENU to display the menu.
(3)Turn the SEL/PUSH EXEC dial to select, then press the dial.
(4)Turn the SEL/PUSH EXEC dial to select QUALITY, then press the dial.
(5)Turn the SEL/PUSH EXEC dial to select the desired image quality, then press the dial.
Исплььзоваиме "Memory Stick" - Вedlyнe
EcJIN NOBUNCS HNDAKATOP "MEMORY STICK ERROR"
"Memory Stick" NOBpeJxJaHa, faiI nMeet HecooTBeTCTByUoIuIe foOpMaT, IIN IcNoIb3yEmaay "Memory Stick" HecOBmecTIma C BnDeokamepoN. N3BNeKeNTe "Memory Stick", npOBepbTe ee n ChOBA yCTaHOBIne (ctp.170).
Bb6oppeKImaKaueCTBa n3o6paXeHn
Bo Bpem 3aIncn HenoDbuxHoro
1306paXeHn MOxHO BbI6paTb peKIM
kaueCTBa 1306paXeHn. IOp yMOJIuaHIO
1cNoIb3yeTcA SUPER FINE.
Using a "Memory Stick" - introduction
Image quality settings
| Setting(Display) | Meaning |
| SUPER FINE(SFN) | This is the highest image quality in this camcorder. The number of still images you can record is fewer than FINE. The image is compressed to about 1/3. |
| FINE(FINE) | Use this mode when you want to record high quality images. The image is compressed to about 1/6. |
| STANDARD(STD) | This is the standard image quality. The image is compressed to about 1/10. |
Note
In some cases, changing the image quality mode may not affect the image quality, depending on the types of images you are shooting.
Differences in image quality mode
Recorded images are compressed in JPEG format before being stored in memory. The memory capacity allotted to each image varies depending on the image quality mode selected. Details are shown in the table below.
| Image quality mode | Memory capacity |
| SUPER FINE | Approx. 190 KB |
| FINE | Approx. 100 KB |
| STANDARD | Approx. 60 KB |
Note on the image quality mode indicator
This is only displayed during recording.
Pa3IuynBpeKmE KaueCTBa n3O6paKeHn
IpeepoXpaHeHnEMBnamrT3aHncaHbIe
n306paxKeHnCkImaHTcBΦopMaTeJPEG.
ObemnamrT,BbldeJIeHHbIdIraKaKdoRo
n306paxKeHn,IM3MeHHeTcB3aBNCmMocTOnOT
BbIbpaHHOro peKIma KaueCTBa
n306paxKeHn.IoIpObHO3TO noka3aHO B
Tabnue.
The approximate number of images you can record on a "Memory Stick"
The approximate number of images you can record on a "Memory Stick" that is formatted using this camcorder varies depending on which image quality mode you select and the complexity of the subject.
ПиблзИтельhoe KOЛичEcTBo 306paXeHn, KOTOpoe MoxHo 3aIncatb Ha "Memory Stick"
Приблnteьhoe KOJIueCTBO
ИЗБРAXEнМ, KOTOPOE MOXH0 3aIncatbHa "Memory Stick", OTOfOpMaTnpOBaHHyO C
NOMOuBIO DAHHo BUNDeOKaMEpbI, MEHReTcB B
3aBNCIMOCtN OT BbIbpaHHO pexkma
KaueCTBa I3OBpaxeHn IN CNOxHocTn
ObbeKta.
| Image quality mode/Pexim Kauchestba u3o6paxeHn | |||
| SUPER FINE | FINE | STANDARD | |
| 16 MB type/16 M6 | 80 images/80 u3o6paxeHn | 160 images/160 u3o6paxeHn | 240 images/240 u3o6paxeHn |
| 32 MB type/32 M6 | 160 images/160 u3o6paxeHn | 325 images/325 u3o6paxeHn | 485 images/485 u3o6paxeHn |
| 64 MB type/64 M6 | 325 images/325 u3o6paxeHn | 650 images/650 u3o6paxeHn | 980 images/980 u3o6paxeHn |
| 128 MB type/128 M6 | 650 images/650 u3o6paxeHn | 1310 images/1310 u3o6paxeHn | 1970 images/1970 u3o6paxeHn |
Recording still images on a "Memory Stick" - Memory Photo recording
You can record still images on a "Memory Stick."
Before operation
Insert a "Memory Stick" into your camcorder.
(1) Set the POWER switch to MEMORY. Make sure that the LOCK switch is set to the right (unlock) position.
(2) Keep pressing PHOTO lightly until the desired still picture appears. The green mark stops flashing, then lights up. The brightness of the picture and focus are re-adjusted, being targeted for the middle of the picture and are fixed. Recording does not start yet.
(3) Press PHOTO deeply. The shutter clicks and the image is frozen. The image displayed on the screen will be recorded on the "Memory Stick." Recording is complete when the bar scroll indicator disappears.
3a\Pncb HeNoDvXhblx n3o6paXeHn Ha"Memory Stick" - 3a\Pncb foTOrpaФn B namrTb
Ha "Memory Stick" MoXHo 3aIcIbIaTb HENoDnKHbIe I3O6paKeHn.
Ipeed nayanom pa60tbI
BCTaBbTe "Memory Stick" B VnDeokamepy.
(1) YcTaHOBInTe nepeKJIouaTeIb POWER B noJIOKeHne MEMORY. Y6eDiNTecB, yTo nepeKJIouaTeIb LOCK ycTaHOBInB B npaBoe noJIOKeHne (pa3bIoKnipoBaH).
(2)ДерхиTe cIerKa hαkaToi Khonky PHOTO Do TEX nOp, noka He nOraBntc Tpe6yEmoe HEnoDnBxHoe n3OpaXeHne. 3eNeHai MeTka PpeKpaTnT MiraTb N 3aTeM 3aRopnTc. JpkocTb n3OpaXeHnN i φokCupOBkHa HactpnaBaIOTc NO ueHTpy n3OpaXeHnN ΜΦκCpUyTc. 3aInCb eue He NaunHaeTc.
(3)HaKmTe KhONkY PHOTO cnIbHHe. UeIKnET 3aTbOp, nI3o6paXeHne 3aΦnKcnpyEtCn. I3o6paXeHne Ha 3kpAe 3aIIuEeTcNa "Memory Stick". 3aIncb 6yDet 3aBepSeHa, kOrda nCye3HET INDnKaTOP B BVNe pOLOckn.

2

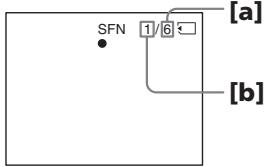

3

aThe number of images that can be recorded on the "Memory Stick"
[b]The number of recorded images
a KoJIuYeCTBO n3O6paXeHn, KOtOpoe MoKcET 6bIb 3aIncaHo Ha "Memory Stick"
[b]KoJIUmYeCTBO 3aIIMcaHHbIX N3O6paXeHnI
Recording still images on a "Memory Stick" - Memory Photo recording
When the POWER switch is set to MEMORY The following functions do not work: wide TV mode, digital effect, picture effect, title, digital zoom, fader, shutter speed (1/25 or smaller) adjustment, and low lux mode and sports lesson mode in PROGRAM AE. (The indicator flashes in the low lux or sports lesson mode.)
Note
When you press the PHOTO button lightly at step 2, the focus of the image seems to be momentarily out.
While you are recording a still image
You can neither turn off the power nor press PHOTO.
When you press PHOTO on the Remote Commander
Your camcorder immediately records the image that is on the screen when you press the button.
Recording images continuously
You can record still images continuously. Select one of the two modes described below before recording.
Continuous mode [a]
You can four record still images continuously. The number of images is in accordance with remaining capacity of the "Memory Stick."
Multi screen mode [b]
You can record nine still images continuously on a single page.
![SONY DCR-VX2100E - Multi screen mode [b] - 1](/content/2019/09/48856/images/22f79917a8b6f47b863a3f1271b243c3f05d0cc7be1215a500badda2b79101c7.jpg)
3aHnscb HeNoDvNkHbIX H3o6paXeHn Ha "Memory Stick" - 3aHnscb fOToRpaФn B namrTb
Ecni nepeKlnoyateIb POWER ycTaHOBJIEN B NOLOXeHne MEMORY
CneyuOuIe cyHKmH He pa6oTaIoT: UINpOKo3KpaHbI TeLEBn3HOHbI pEXM, ZnDpBOoN 3cpeKT, 3cpeKT N3O6paXeHnA, TnTp, UIMpOBa TRaHcPoKaun, fepJep, peryInpOBKa cKOpocTn 3aTBopa (1/25 nIn HnKe), pEXNM Hn3KO ONCeUeHNOCTn, a TAKKe pEXNM CnOPTNBbIX COCTa3AHn B PROGRAM AE. (INdIKatOP MInraet npn CbeMe B peXmHe Hn3KO ONCeUeHNOCTn INn CnOPTNBbIX COCTa3AHn.)
Ppmeuahne
Ecni cIerka HaxaTb KhoNky PHOTO B nyHKTe 2, Bo3HKnAeT OuSyueHne, YTO φokycnPovBa n3o6paXeHn KaTkoBpeMeHHO TepaETcR.
Ппзаимсн HeNoBdNxHOrO n3O6paXeHnA HeBO3MOxHO BbIKNoUHTb PntaHne IIN HaxaTb KhoNky PHOTO.
Ecnna Haxkab KhoNky PHOTO ha nyIbTe ductaHOnHO rypabLeHHA
Bvdeokamepa cpa3y ke 3anniet n06paekhe, KOptope 6ydt Ha 3kpahe B MOMET H XKATN KHONKN.
HenpepbIBhA 3aIncB n3o6paXeHn
Moxho BbIOnHrTb HeIpepbIbHyIO 3aNNcB HeNOdBNXbHbIX N3O6paXeHn.IpeE 3aNNcBO BbIbepNte OdIN H3 DByx peXuMoB, ONICaHHbIX NHXe.
HenpepbIbHbI peKIM [a]
Moxho BbInonHnTb HnpepbIBHyIO 3aINCb YeBtbpex HnOdBnXhBIX IN3o6paXeHn. KoIueCTBO IN3o6paXeHn 3aBNCIT OT o6bema Cbo6oJHO namrTaHa "Memory Stick".
Mhoro3kpaHHbIpeXmB[b]
Moxho 3aIncbIbAtb 9 HeIOBnKbIX n3o6paXeHn HnpepbIBHO Ha OJHO CTpaHnCe.
![SONY DCR-VX2100E - Mhoro3kpaHHbIpeXmB[b] - 1](/content/2019/09/48856/images/28f99d87bf44443a546d276223a0c99960d9703cf56c1975f95698e159304b6c.jpg)
[b]
Recording still images on a "Memory Stick" - Memory Photo recording
(1) Set the POWER switch to MEMORY. Make sure that the LOCK switch is set to the right (unlock) position.
(2) Press MENU to display the menu.
(3)Turn the SEL/PUSH EXEC dial to select l , then press the dial.
(4) Turn the SEL/PUSH EXEC dial to select CONTINUOUS, then press the dial.
(5)Turn the SEL/PUSH EXEC dial to select the desired setting, then press the dial.
3aHnscb HeNoDvNkHbIX n3o6paXeHn Ha "Memory Stick" - 3aHncb fOToIrpapn B namrTb
(1) YcTaHOBInTe nepeKJIIOUaTeIb POWER B noLoXeHne MEMORY. Y6eDiNTecB, yTo nepeKJIIOuAteIb LOCK ycTaHOBIne B npaBoe noLoXeHne (pa3bIoKnIpoBaH).
(2)HaxmTe KhoNky MENU OTo6paXeHHa MeHIO.
(3)ПовернITE ДИСК SEL/PUSH EXEC ДЯ
Выбoga уCTановки , a 3aTeM нажмITE
НдИСК.
(4)ПовернITE ДИСК SEL/PUSH EXEC ДЯ
Выбopa установки CONTINUOUS, за tem
нажмITE на ДИСК.
(5)ПовернITE диСEL/PUSH EXEC ДдьБбора кжелемоустановки,а затмнаджмпerte на диС.
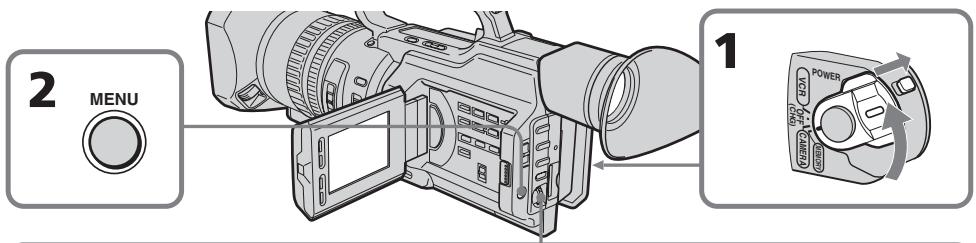

Recording still images on a "Memory Stick" - Memory Photo recording
Continuous shooting settings
| Setting | Meaning (indicator on the screen) |
| OFF | Your camcorder shoots one image at a time. (no indicator) |
| ON | Your camcorder shoots up to four still images at about 0.5 sec intervals. ( ) |
| MULTI SCRN | Your camcorder shoots nine still images at about 0.5 sec intervals and displays the images on a single page divided into nine boxes. ( ) |
If the capacity of the "Memory Stick" becomes full
FULL" appears on the screen, and you cannot record still pictures on this "Memory Stick."
The number of images in continuous shooting
The number of images you can shoot continuously varies depending on the remaining capacity of the "Memory Stick." The shutter always clicks four times, however, the number of images recordable may be less than four.
Note on using a video flash light (optional)
The video flash light does not work in the continuous or multi screen mode if you install it to the intelligent accessory shoe.
3aHnscb HeNoDvNkHbIX n3o6paXeHn Ha "Memory Stick" - 3aHnscb fOToRpaФn B namrTb
YctaHOBKn HnpepbIBHoN CbEMKn
Recording still images on a "Memory Stick" - Memory Photo recording
Self-timer memory photo recording
You can make a memory photo recording with the self-timer. This mode is useful when you want to record yourself. You can also use the Remote Commander.
(1) Set the POWER switch to MEMORY. Make sure that the LOCK switch is set to the right (unlock) position.
(2) Press (self-timer) in standby mode. The (self-timer) indicator appears on the LCD screen or in the viewfinder.
(3) Press PHOTO deeply. The self-timer starts counting down from 10 with a beep sound. In the last two seconds of the countdown, the beep sound gets faster, then recording starts automatically.
3aIncB HeNoDvNkHbIX n3o6paXeHn Ha "Memory Stick" - 3aIncB fOToIraPafN B namrTb
ФOTOCbEmKa NO TaMepy camo3anycka c coxpaHeHnem B namrtn
MOxHO BbINOJIHrTb FOToCbEMy C COxApaHEHmB NpAMrTn PO TaIeMpy cAmO3aNyCa. 3TOT pekmN OJe3EH B TOM cIyue, eCIn BbXOTNE CHrTb c6ra.ДЯ 3TOr MOxHO TAKKxE NCIOJIb3OBaTb PJIbT dINCTaHcUHOHOrO ynpabNeHnA.
To cancel self-timer recording
Press (self-timer) so that the indicator disappears from the LCD or viewfinder screen. You cannot cancel the self-timer recording using the Remote Commander.
Note
The self-timer recording mode is automatically canceled when:
- Self-timer recording is finished.
- The POWER switch is set to OFF (CHG) or VCR.
Superimposing a still image in a "Memory Stick" on a moving picture – MEMORY MIX
You can superimpose a still image you have recorded on a "Memory Stick" on the top of the moving picture you are recording.
M. CHROM (Memory chromakey)
You can swap a blue area of a still image such as an illustration or a frame with a moving picture.
M. LUMI (Memory luminancekey)
You can swap a brighter area of a still image such as a handwritten illustration or title with a moving picture. Record a title on a "Memory Stick" before a trip or event for convenience.
C. CHROM (Camera chromakey)
You can superimpose a moving picture on a still image that used as background. Shoot the subject against a blue background. The blue area of the moving picture will be swapped with a still image.
M. OVERLAP (Memory overlap)
You can make a moving picture fade in on top of a still image.
Haioxehne HenoDbXHHoro 1306paXeHnI3"Memory Stick" Ha 1oDbXHHoe 1306paXeHne-MEMORY MIX
HenoDbnJxHoe n3o6paXeHne, 3aIncahHoe Ha "Memory Stick", MoKHO hANOxntb Ha 3aIncblBaEMOE nOdbnJxHoe n3o6paXeHne.
M.CHROM (KHOIIKa 3aMeHbI NO ZBeTHOCTN) MoXHo 3aMeHbT CnHIO O6NaCTb HEnoDVBxHOrO N3O6paXeHnA, HApPIMep, pUCyHOK INI KApD, POnDVBxHbIM N3O6paXeHnE.
M. LUMI (KHOJKA 3aMeHbI NO rPkOcTn)
MozHo 3aMeHrTb 6oJIe CBeTnyU O6laCTb
HeNoDBNXHOrO n3O6paXKeHn, HApNImep,
pCsyHOK, CdEJaHHbI OT pyKn, INI TtTp,
NoDvBXHbIM n3O6paXKeHnEM. IpePe
nyTeWeCTBnEM INI KAKIM-Hn6yDb Co6bITnEM
3aIIuINTe TtTp dIyODOCTBa Ha "Memory Stick".
C.CHROM (KHOJKA ZBETHOCTN BUNDEOKAMepbl)
Повинхhoeи306paЖehne moxho haIoxnTb н HeNoDvBnxHoe n306paJxehne, KOtOpoe ИСпОЛьзуетсВ кaЧeCTBE foHa. ChIMNte OБьekt Ha cInHemФоHe. CInHЯчAstb Повинх Horo n306paJxehne 6yTe3amEHeHa Н HeNoDvBnxHoe n306paJxehne.
M. OVERLAP (HANOJXeHne C NOMOJIbIO nAMrTn)
Moxho CdeIaTb TaK, YTO6bl NOBnKHOe n3O6paXeHHe NocTeENHo NOBnIOc b IOBepx HenoDBNXHOro I3O6paXeHn.
Superimposing a still image in a "Memory Stick" on a moving picture - MEMORY MIX
HaNoxKeHne HenoBnXnHoro n3o6paXeHn 13 "Memory Stick" Ha noBnXnHoe n3o6paXeHne - MEMORY MIX
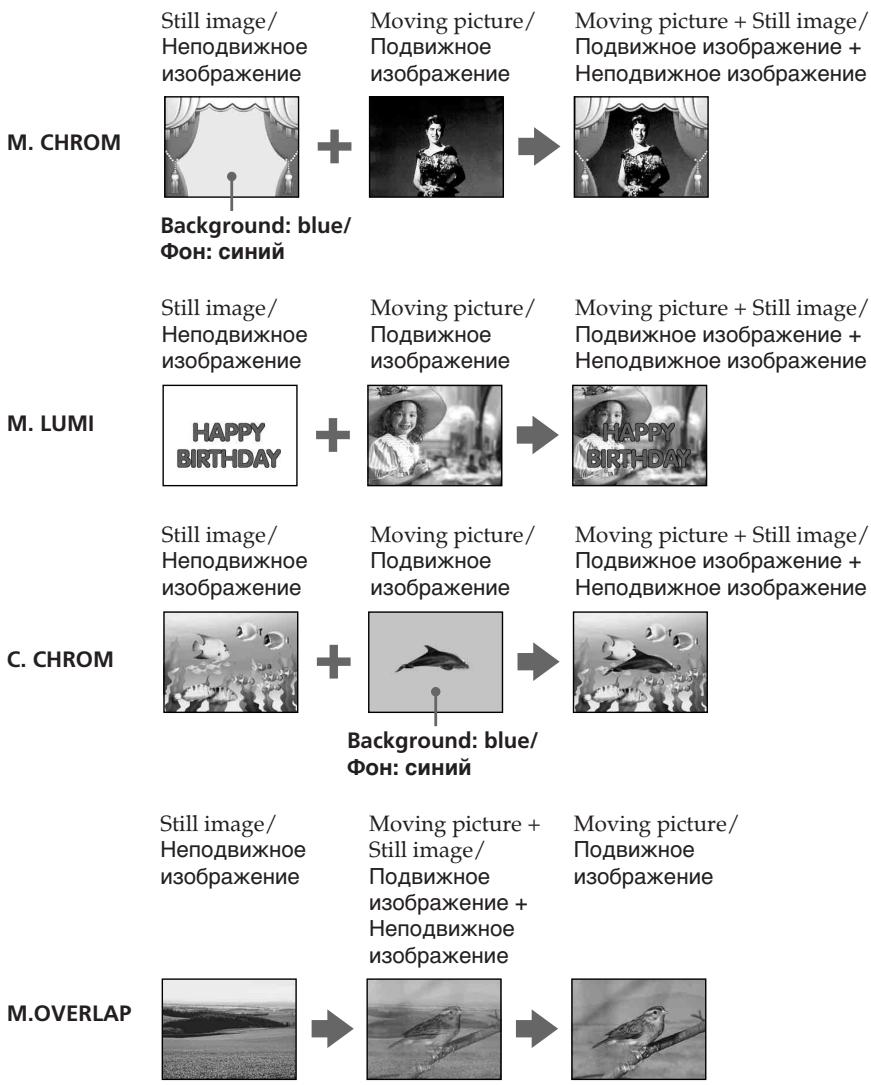
Superimposing a still image in a "Memory Stick" on a moving picture - MEMORY MIX
Before operation
Insert a recorded "Memory Stick" and a tape to be recorded into your camcorder.
(1) Set the POWER switch to CAMERA.
(2) Press MEMORY MIX in standby mode. The last recorded or last composed image appears on the lower part of the screen as a thumbnail image.
(3) Press MEMORY + / - or + / - on the Remote Commander to select the still image you want to superimpose. To see the previous image, press MEMORY - or - on the Remote Commander. To see the next image, press MEMORY + or + on the Remote Commander.
(4)Turn the SEL/PUSH EXEC dial to select the desired mode. The mode changes as follows: M.CHROM M.LUMI C.CHROM M.OVERLAP
(5) Press the SEL/PUSH EXEC dial. The still image is superimposed on the moving picture, and your camcorder is in standby mode.
(6)Turn the SEL/PUSH EXEC dial to adjust the effect.
(7) Press START/STOP to start recording.
HaIoxeHne HenoBnXhORo I3O6paXeHnI 13 "Memory Stick" Ha noBnXhOe I3O6paXeHne - MEMORY MIX
Superimposing a still image in a "Memory Stick" on a moving picture - MEMORY MIX
HaIoxKeHne HenoBnXnHO r3o6paXeHn 13 "Memory Stick" Ha noBnXnHoe 13o6paXeHne - MEMORY MIX
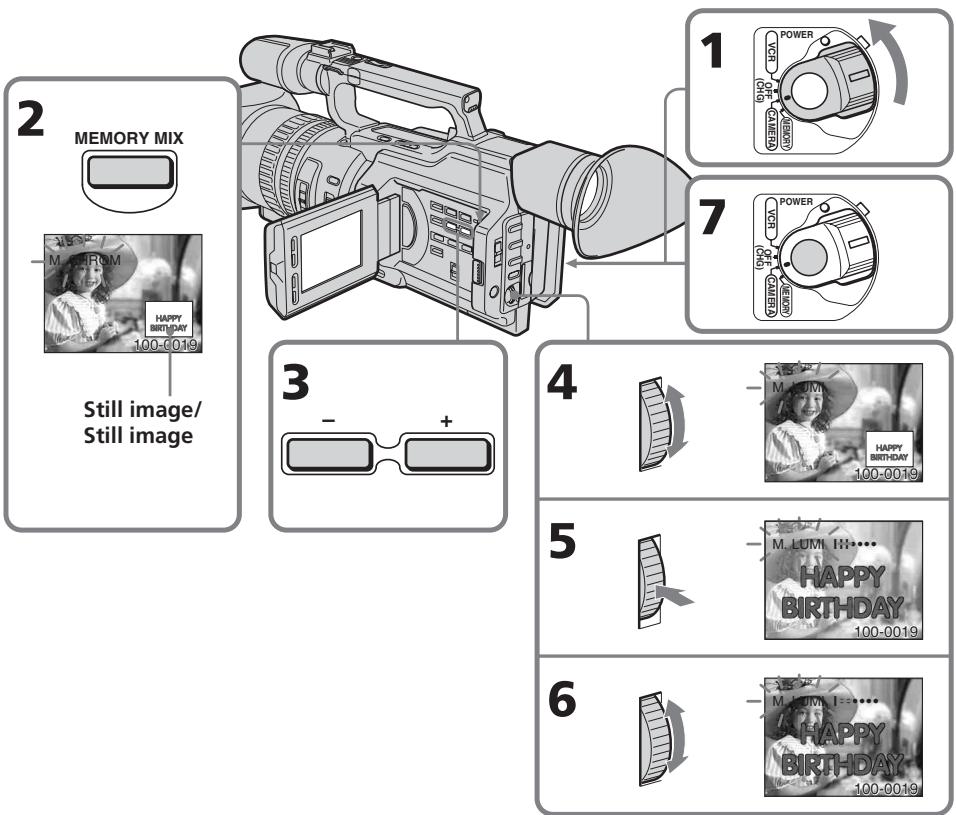
Items to be adjusted
| M. CHROM | The colour (blue) scheme of the area in the still picture which is to be swapped with a moving picture |
| M. LUMI | The colour (bright) scheme of the area in the still picture which is to be swapped with a moving picture |
| C. CHROM | The colour (blue) scheme of the area in the moving picture which is to be swapped with a still picture |
| M. OVERLAP | No adjustment necessary |
As the bar is shorter, the effect is enhanced.
3JemeHbI dIa peynpOBKn
Superimposing a still image in a "Memory Stick" on a moving picture - MEMORY MIX
To change the still image to be superimposed
Do either of the following:
- Press MEMORY+/-- after step 6.
- Press the SEL/PUSH EXEC dial after step 6, and repeat the procedure from step 3 (except M. OVERLAP).
To change the mode setting
Press SEL/PUSH EXEC dial after step 6, and repeat the procedure from step 4 (except M. OVERLAP).
To cancel MEMORY MIX
Press MEMORY MIX.
During recording
You cannot change the mode setting.
If a still image to be superimposed has lots of white areas
The thumbnail image may not be displayed clearly.
Image data modified with personal computers or shot with other equipment
You may not be able to play them back with your camcorder.
HaNoXeHne HenoBnXnHO r3o6paXeHn 13 "Memory Stick" Ha noBnXnHoe 13o6paXeHne - MEMORY MIX
UTo6bI n3MeHnTb HaKnaDaBbAeMOe HEnoDbNxHoe n3O6paXKeHne
BbnoJHnTe ONo n3 cJeDyUoJnx DeIcTBn.
-HaXMITE KHOny MEMORY+/- nocJe nyHKTa 6.
-HaXMMTe Ha NsCK SEL/PUSH EXEC nocne nyHKTa 6 n NobToPe npOeDpy c nyHKTa 3 (Kpome M. OVERLAP).
Moryt He BOCPON3BODITbC NOMOUsbIO daHHo BNDeOKaMepbI.
Recording an image from a tape as a still image
Your camcorder can read moving picture data recorded on a tape and record it as a still image on a "Memory Stick." Your camcorder can also take in moving picture data through the input connector and record it as a still image on a "Memory Stick."
Before operation
Insert a recorded tape and a "Memory Stick" into your camcorder.
(1) Set the POWER switch to VCR.
(2) Press. The picture recorded on the tape is played back.
(3) Keep pressing PHOTO lightly until the picture from the tape freezes. "CAPTURE" appears on the LCD screen or in the viewfinder. Recording does not start yet.
(4) Press PHOTO deeper. The image displayed on the screen will be recorded on a "Memory Stick." Recording is complete when the bar scroll indicator disappears.
3aHnscb n3o6paXeHnC KacCeTb KaK HeNoDvXHOrO n3o6paXeHn
Bndeokamepa moKet CHTbBaT daHbIe dBNkUyueoRc N3O6paXeHn, 3aNcAHHbIe Ha KaCCTe, IN 3aNcBtBaT INx KaK HeNoDbHXHoe N3O6paXeHne Ha "Memory Stick".
Bndeokamepa taKxe MoKeT npHnMaTb daHHbIe DnBxKyuEroC n3o6paXeHnYepe3 BXoHNo pa3bEm N 3aNNcBtB IN KAK HeNoDnBXHXHO eN3o6paXeHne Ha "Memory Stick".
Ipeed hauaJom pa60tbi
BcTaBbTe 3aIncanHny Kaccety "Memory Stick" B BuJeokamepy.
(1)YctaHOBnTe nepeKIOuHaTeJIb POWER B noJoxKeHne VCR.
(2)HaKMITE KHOIIKy ▷. HaHHeTcB BOCnpoIN3BeIeHne I3O6paXeHna, 3aNcAHHoro Ha KaCCTe.
(3)Держnte сlerkaнжкатои кногу PHOTOdoTexnopOKaИЗбрахенеСКасстыHe6ydt“3aФКСИРОВАHO”.Ha3KpaHEnKKДИNВBUNOINCKATEJI NOBHTCHINДИКAZHA"CAPTURE".3aINcБе HeHauINHaeTCA.
(4)Haxmnte KhoNky PHOTO cnIbHee. 3o6paXeHne Ha 3Kpahe 6yTe 3aIncAoHa "Memory Stick". 3aIncb 6yTe3aBepSeHa, KOrda IcYe3HET INDnKaTOp B BInde INoLcKn.
Recording an image from a tape as a still image
When the access lamp is lit or is flashing
Never shake or strike the unit. Also, do not turn the power off, eject a "Memory Stick" or remove the battery pack. Otherwise, image data breakdown may occur.
If "□" appears on the LCD screen or in the viewfinder
The inserted "Memory Stick" is incompatible with your camcorder because its format does not conform to that of your camcorder. Check the format of the "Memory Stick."
If you press PHOTO lightly in the playback mode
The playback pauses momentarily.
Sound recorded on a tape
You cannot record the sound from a tape.
Titles that are already recorded on tapes
You cannot record the titles on a "Memory Stick."
When you press PHOTO on the Remote Commander
Your camcorder immediately records the image that is on the screen when you press the button.
3aIncB n3o6paXeHnC KaccTebl KaK HenoDbNXHOrO n3o6paXeHn
Korda roput uH Muraet lamnoyka oshaenna
HnKOrda He TpRcnte BnDeokamepy n He cTuynte no He. TaKxe He BbIKIOuayte nITaHne, He BbIHMaJTe "Memory Stick" n3 OTceKa n He ChmMaTe 6bTaapeHbI bIok. B npOTIBHom Cnyae daHHbe I3O6paXeHnA MOryT 6blb NOBpeXJeHbl.
EcnHa 3KpaHe KKII nIN B VbDOnckaTeNe NOBHTCn INdkaun
YcTaHOBJIeHa "Memory Stick", KOTOPaH He COBMeCTmA C BnDEOKaMepoI, NocKoJIbKy ee fOpMaT He COOTBeTCTByET fOpMaTy BnDEOKaMepbI. PIOBepbTe fOpMaT "Memory Stick".
EcIn B peKIMe BOCpOn3BeDeHnC nErKa HaxaTb KhoNkY PHOTO
Bo BpemBocnpoun3BeDeneHcpa3y Je BKIOUOaETcay3a.
3Byk, 3aHcAHHbI Ha Kaccety
Helen3a 3ancaTb 3ByK C KaCCeTbl.
Tutpbl, pahee 3auncaHHbIe Ha KacceTbi
3Tn TITpbI HeJIb3aIINcbiBaTb Ha "Memory Stick".
Ecnna HaxaBk Honky PHOTO Ha nyIbTe ductaHOnHHoro ynpabLeHn
Bndeokamepa cpa3y ke 3aunweT n3o6paKeHne, KOtOpoe 6yJeT Ha 3KpaHe B MOMeHT HkaTnKHOKN.
Recording a still image from other equipment
(1) Set the POWER switch to VCR on your camcorder and set DISPLAY in ETC to LCD in the menu settings.
(2) Play back the recorded tape, or turn the TV on to see the desired program. The picture from the other equipment appears on the LCD screen or in the viewfinder.
(3) Follow steps 3 and 4 on page 187.
When recording an image through the VIDEO jack
3aIncB n3o6paXeHnC KaccTebl KaK HenoDbHXHO n3o6paXeHnA
3aIncb HeNoDbNxHOro n3o6paXeHnC dpyrOro o6OpyIOBaHnA
(1) yctahOBInTe npeKInOuHaTeIb POWER b noJIOxHeNc VCR hA BnDeOkAmepe IN KOMaHdY DISPLAY B ETC B noJIOxHeNc LCD B yctahOBkax MeHIO.
(2)Hauchte Bocnpou3BeJeHne 3aIncahHoi JeHTbI INI BKJIQUHTe TeJIeBUN3Op IJnIPOcMOrpa JxelaemOINpOrpaMMbl. I3o6paJKeHne C dpyrTOObOpyIDOBaHHn IoRBAITcH Ha 3KpaHe JXKD INI INB UNOCKaTeJIe.
(3)BbInonHnTe nyHKtbl 3 n 4 h cTp.187.
Connect the yellow plug of the A/V connecting cable supplied with your camcorder to the video output jack on the VCR or the TV.
Connect using an S video cable (optional) to obtain high-quality pictures
With this connection, you do not need to connect the yellow (video) plug of the A/V connecting cable.
Connect an S video cable (optional) to the S video jacks of both your camcorder and the VCR/TV.
This connection produces higher quality DV format pictures.
IopKJIIOUHTe JKeNTbI WTekep coeHNHTeBHO KabeJe ayDNo/BuDeo, npJlaRaEMO K BnDEOKaMepe, K BbIXODHOMy rHe3Ny BnDEOCnHaHa Ha BnDEOMarHnToOpHe nLI TeLEBn3ope.
CoeHHeHnC nOMOsbIO BnDeoKa6eJIaS (PnIO6peTaIOTc DOONHnTeJbHO) dJIa NOJyEHn BBICOKoKaeeCTBeHHbIX 1306paXeHN
При ТаКOM-coeДинEHн He hyxHo ЮДКЛHQUaTb JKeIThb(BuDEo) WTekep соeДинТeьнОгO Ka6eЯ aUdno/BuDEo. ПОсeДинНeВиDeOKa6eьS (ПрИбpeTaHOTcДОПОнHtEыHо) K ВиDeORHe3dAm S Ha BnDEOkampeи ВиDeOMaHNToФоH/TeNebN3Ope. ЭTO coeДинEHne ПОЗВOLЯт NOluyHTb ВБСОКOKauchetBeHHoe N3O6paKExHne ФормATA DV.
Recording an image from a tape as a still image
When recording the image through the i DV Interface
3aIncB n3o6paXeHnC KaccTebl KaK HenoDbHXHO n3o6paXeHnA
Copying still images from a tape - Photos save
Using the search function, you can automatically take in only still images from tapes and record them on a "Memory Stick" in sequence.
Before operation
- Insert a recorded tape into your camcorder and rewind the tape.
- Insert a "Memory Stick" into your camcorder.
(1) Set the POWER switch to VCR.
(2) Press MENU to display the menu.
(3)Turn the SEL/PUSH EXEC dial to select l , then press the dial.
(4) Turn the SEL/PUSH EXEC dial to select PHOTO SAVE, then press the dial. "PHOTO BUTTON" appears on the LCD screen or in the viewfinder.
(5) Press PHOTO deeply. The still image from the tape is recorded on the "Memory Stick." The number of still images copied is displayed. "END" is displayed when copying is completed.
KoInpOBaHne HeIOBnXhblx 136paXeHn C KaccTebl - CoXpaHHe B pAMrTn fOToCHmKOB
C NOMOUsbO cyHKUIN NOUCKa MOxHo aBTOMaTnueckn BblBipapb TOnbKO HeNoDBrXKHbIe N3o6paXKeHn, IMeIOuNecr Ha KaccTeX, I NoCJIeIOBaTeJIbHO 3aIncbIBaTb ux Ha "Memory Stick".
Ipeed hauanom pa6oTbI
BCTaBBTe 3aHncaHHyIO KaccTeY B BIndeOKaMepu INpeMoTaIe ee Ha3a.
BCTaBbTe "Memory Stick" B BnDeokamepy.
(1)YcTaHOBInTe IpeKeJIIOUaTeIb POWER B noJIOXeHne VCR.
(2)Haxmnte KhoNky MENU OTo6paXeHHaMeHIO.
(3)ПовернITE ДИСК SEL/PUSH EXEC ДЯ
Выбoga уCTановки , a 3aTeM нажмITE
НдИСК.
(4)ПовернITE ДИСК SEL/PUSH EXEC ДЯ
Вьбора установки PHOTO SAVE, a
Затем нахмпerte Ндеск.На зкра themselves
ИИВ ВИДОПСКATERЕ NOВВТСЕ ИДИКАЦА
"PHOTO BUTTON".
(5)HaXMMTe KhoNkU PHOTO cnIbHHe. HEnoDBNXHoe n3o6paKeHne Ha KaccTe 3aNNuETcH a "Memory Stick". BydTe OTo6paKeHcO KOJIueCTBO cKONIpOBAHHbIX HEnoDBNXHbIX n3o6paKeHm. Po 3aBepSeHm NOKIpOBAHn8 bSydTe OTo6paKeHa INDnKaCnA "END".
Copying still images from a tape - Photo save
To cancel copying
Press MENU.
When the memory of the "Memory Stick" is full
"MEMORY FULL" appears on the LCD screen or in the viewfinder, and the copying stops. Insert another "Memory Stick" and repeat the procedure from step 2.
When the access lamp is lit or flashing
Never shake or strike your camcorder. Also, do not turn the power off, eject the "Memory Stick" or remove the battery pack. Otherwise, the image data breakdown may occur.
To record all the images recorded on the tape
Rewind the tape all the way back and start copying.
If the write-protect tab on the "Memory Stick" is set to LOCK
"NOT READY" appears when you select the item in the menu settings.
When you change the "Memory Stick" in the middle of copying
Your camcorder resumes copying from the last image recorded on the previous "Memory Stick."
KoHnpOBaHne HeNoDvXhblx 1306paXeHm c KaccTebl - CoXpaHeHne B nAmrTn fOToCHMkOB
ДЯ OTMeHbI KOnnpoBaHnA
HaxmTe KhoNky MENU.
B clyae nepenolneHn "Memory Stick"
Ha 3KpaHe JKД nII nВ B uDOnsKaTeNe nOraBNTcH INdNkaCnH "MEMORY FULL", n KoInpOBaHne ppeKpATNTcR. BCTaBbTe dpyrHyO "Memory Stick" n nobTOpHTe npOeDpyc nyHKTa 2.
EcIn lamnocka obaaeeHn ropnt nIIMraeT
HnKoIa He TpRcITe BnDEokamepy n He CTyUHTe NO He. TaKxHe HbIKIOuayTe nITaHne, He bYHMMaHTe "Memory Stick" n3 OTceKa n He cHmAJTe 6batapeHbI b6nOK. B npOTINBOM Cnyae DaHHbIe N3O6paXeHnA MOrYT 6bITb NOBpeKDeHbl.
Viewing a still picture – Memory Photo playback
You can play back still images recorded on a "Memory Stick." You can also play back six images at a time by selecting the index screen.
Before operation
Insert a "Memory Stick" into your camcorder.
(1) Set the POWER switch to VCR or MEMORY. Make sure that the LOCK switch is set to the right (unlock) position.
(2) Press MEMORY PLAY. The last recorded image is displayed.
(3) Press MEMORY + / - or + / - on the Remote Commander to select the desired still image. To see the previous image, press MEMORY - or - on the Remote Commander. To see the next image, press MEMORY + or + on the Remote Commander.
BCTaBbTe "Memory Stick" B VnDeokamepy.
(1)YcTaHOBInTe NepeKJIIOUaTeIb POWER B noJIOKeHne VCR nIN MEMORY. Y6eIInTeCb, yTO nepeKJIIOUaTeIb LOCK ycTaHOBIne B npABoE noJIOKeHne (pa36nOKupoBaH).
(2)Haxmnte KhoNky MEMORY PLAY. IoBvTcI nocJeDHee 3aIncaHHoe n3o6paXKeHne.
(3)HaXmnte KhoNkY MEMORY + / - nnI KNoKy + / - Na nylbTe InCTaHOnHO HorO ynpabLeHnI dIra Bbl6Op Tpe6yEmOro HnOdBnKHO r3o6paXKeHn.I TTo6bl npocMOTpeTb PpeDlNyUeE n3o6paXKeHne, HaxmTe KhoNkY MEMORY- nI - Ha nylbTe DnCTaHOnHOrO ynpabLeHn.I TTo6bl npocMOTpeTb CneDuOuSe e n3o6paXKeHne, HaxmTe KhoNkY MEMORY + nI + Ha nylbTe DnCTaHOnHOHorO ynpabLeHnI.
To stop memory photo playback
Press MEMORY PLAY again.
ДлЯ OCTAHOBKN BOCPON3BedeHNA FOTOCHIMKOB N3 NaMRTN
Haxmnte khoiky MEMORY PLAY eue pa3.
To play back recorded images on a TV screen
- Connect your camcorder to the TV with the A/V connecting cable supplied with your camcorder before operation.
- When operating memory photo playback on a TV or on the LCD screen, the image quality may appear to have deteriorated. This is not a malfunction. The image data is as good as ever.
- Turn the volume of the TV down before operation, or noise (howling) may be output from the TV speakers.
When no images are recorded on the "Memory Stick"
The message "NO FILE" appears.
Image data modified with personal computers or shot with other equipment
You may not be able to play them back with your camcorder.
Note on the date/time indicator
Recording date/time is not displayed, however, it is automatically recorded on the "Memory Stick." You can check the recording date/time while in memory playback mode by pressing DATA CODE.
Screen indicators during still image playback
Дя ВOCПОНЗBEDEHЯ 3aIncaHHbIX n3O6paXeHn Ha 3KpaHe TeJIeBn3Opa
-Перед началов BOCPON3BedeHIN
пдоCoEДинITE ВиДeoКамepy К Телевзору
С пOMOцью СоЕДинITEЛьНOrO KaБелЯуДиNo/BИДeo, KOTOPьй пипагаETСК
ВиДeoКамеpe.
-При ВOCIPON3BEdEHINФOTOCHIMKOBиЗnamЯтни за кране телевизорuaилжКдkaустBOИЗбрахенmaМоketуxduinbcsa.Оданko 3TO HeЯВлгетсанeнсправнocьHOДаHHbleИЗбрахеннHaxODTcB TOMxe COCTORHn,KaNKpexKde.
-Перед началов ВOCиронзевеняумьшптгомКоctьЗык TeleБИЗОра,Ин<aеВ ГрмКOrOBOPHTeIax MoKeT 6bITbCbliWeH Wym(rYn).
EcIn Ha "Memory Stick" oTCyTCTByOT 3aIncAHbIe N3O6paXeHnI
ПОВЛЯТСС COOБДЕНЕ “NOFILE”.
N3O6paXeHnH, n3MeHeHbIe c NOMOsbIO nepcoHaJIbHOro KOMNbOTepa IIN CHrTbIE C NOMOsbIO dpyroI annapaTypbl
Moryt He BOCPON3BOIDTBcC NOMOuHO daHHo BNDeOKaMepbI.
HndkaTop DaTb/BypeMeHN
ДаТВрЕМЗлпСн He OTOБРаЖаETСВ BO ВрЕМ CBeMKN,ОДнAKO OHN aBToMaTnueCKN 3aПИсьlaIbAIOТСЯ Ha“Memory Stick”.ДaТY/ BрЕМЗлпСи можно пpoBepNTbВ рeЖIMe BOCPOnI3BeDEHnI N3 namrtn npn HaxaTnN KhONKn DATA CODE.
3KpaHbIe INdNkAtOpbl BO BpemB OBCPOn3BeDeHn HEnoDbXhblx N3O6paXeHn
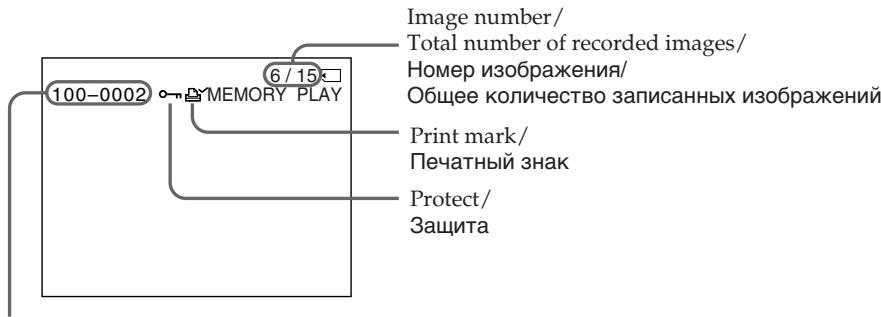
On data file name
- When the hyphen is indicated between the directory and the file number, this data file name means that this file corresponds to the DCF98 standard.
- When the underscore indicates that the file does not correspond to the DCF98 standard.
- The directory is not indicated if the file structure in the "Memory Stick" does not correspond to the DCF98 standard.
- The "Directory error" message may appear if the file structure in the "Memory Stick" does not correspond to the DCF98 standard. In this case, you cannot record on that "Memory Stick," however, you can play back images in the "Memory Stick."
- When the data file name is flashes, the file may be broken or the file format does not correspond to your camcorder.
Playing back six recorded images at a time (index screen)
You can play back six recorded images at a time. This function is especially useful when searching for a particular image.
(1) Set the POWER switch to VCR or MEMORY. Make sure that the LOCK switch is set to the right (unlock) position.
(2) Press MEMORY INDEX to display the index screen.
CbeHn8 oB mEnH paJna daHHbIX
- Ecnm MEXdy Ha3BaHnem DnpeKTopnn IN Homepom faaIJa IMeETcAdePnc, TaKoe INMf faJna O3NaHaayet, YTO OH COOTBeTCTByET cTahdapTy DCF98.
- EcIn Mexy Ha3BaHnEM DnpeKTopn IN HomepOM paJna IMeETC CnMBOINoUepKnBaHnRA, TaKOE mRpaJNA O3Haayet, YTO OH He COOTBETCTByET cTahdpy DCF98.
Директория He yka3bIbaeTcra,ecnntpykaiaHa"Memory Stick"HecooTBetCTByET cTahapTy DCF98. - Ecni CtpyKtpya faJna Ha "Memory Stick" He COOTBeTCTByeT CTAndapTy DCF98, MoKeT IORBnTBcA COO6UHeNHe 一 _ 0 ^ - DIRECTORY ERROR". B 3ToM cIyuae npOn3BOuNTb 3aIncb Ha "Memory Stick" HeJIb3r, HO MOxHO BOCpON3BOuNTb n3o6paXeHnC "Memory Stick".
Korda nMa faina daHbIX MnaeT,TO, BO3MOxHO,paJIN NOBpekJeH,INI erO φopMaT He COOTBeTCTByET daHHoB BnDeOKaMepe.
OndHOBpeMeHHoe BOCnpon3BedeHne 8eCTN 3aIncahhbIX n3o6paJxehn (HnndeKcbhI 3KpaH)
Moxho Bocnpon3BODnTb 1eCTb 3aIncAHhIx
m3o6paXeHn OndOBpemHeHO. 3Ta yHKnIa
ABJIETcOOC6eHHO yO6HoN npi
BbIOJIHeHn IONCKa OTdEJIbHbIX
m3o6paXeHn.
(1)УстановпейреклочатуРЕВ в положене VCR ил MEMORY. Yбдntecь,чт порклочатуь LOCK установпь в праBoE положене (pa36лokиюван).
(2)HaxmTe KhoNky MEMORY INDEX OTo6paXeHn INHeKCHOrO 3KpaHa.
Viewing a still picture – Memory Photo playback
A red mark appears above the image that is displayed before changing to the index screen mode.
MEMORY- : to display the previous six images
MEMORY +: to display the following six images
ПрсмOTР HeNoBnXHOrO n3o6paXeHn - BocnpOn3BeJeHne fOToCHmKOB u3 NaMrtN
HaɪnɪzɔpʌkæHENm nɒrBntc kpačhər Meɪtka ▷, KOTopər oTɔpʌpKaæTc npeəd nɛpeKlʊchEHNm B pɛkɪm INdEkCHOrO ɜːkpɑːha.
To return to the normal playback screen (single screen)
Press MEMORY + / - to move the mark to the image you want to display on full screen, then press MEMORY PLAY.
Files modified with personal computers
These files may not be displayed on the index screen. Image files shot with other equipment may not be displayed on the index screen either.
Note
When displaying the index screen, a number appears above each image. This indicates the order in which images are recorded on the "Memory Stick." These numbers are different from the data file names.
aIMRApaIa
[b]MeTka
Дя BO3Bpata KЭКpaHу OБьИнOrO BOCnpon3BeDEHnR (ОДиНочнь I 3KpaH)
Haxmte KhONky MEMORY + / - nIpeMeueHnMTeK Kn3o6paKeHnIO, KOtOpe HxKHO OTo6pa3ntb Ha nOJIbIeKpaH, a 3aTeM HaxmTe KhONky MEMORY PLAY.
3Tn paaibl Moryt He OTo6paKaTbca Ha HnHEKCHOM 3kpaHe. Paaibl N3o6paKeHn, CHaTBix C NOMOsbIO dpyro annapaTypbl, TaKke MOrY He OTo6paKaTbca Ha HnHEKCHOM 3kpaHe.
Ppmeuahne
Пио OTOBpaхжEHIN INDEKCHORO 3KpaHa NaK kaxdbIM n3OBpaхжEHm 6bYeT NOBnTbcH Homep. Oh yka3bIbAeT nocLeNoBaTeJIbHoCTb, B KOTOPoN I3OBpaXeHIn 6bIIN 3aIncaHbI Ha "Memory Stick". 3Tu HOMepa OTJIuHaiOTcN O TImeФaJIOB dAnHbIX.
Viewing the recorded images using a personal computer
The image data recorded with your camcorder is compressed in the JPEG format. You can see images recorded on a "Memory Stick" on a computer screen. Use the Memory Stick Reader/Writer (optional) or PC card adaptor for Memory Stick (optional) or floppy disk adaptor for Memory Stick (optional) for this operation. For detailed instructions on operation, refer to the operating instructions of your computer and the Memory Stick Reader/Writer, PC card adaptor for Memory Stick, or floppy disk adaptor for Memory Stick. For details, refer to the operating instructions of your accessory.
- Do not modify the directory of the file that corresponds to the DCF98 standard. The modified file will not be read.
- If you use the new "Memory Stick," be sure to use it first with this camcorder.
Copying an image recorded on a "Memory Stick" to tapes
You can copy still images or titles recorded on a "Memory Stick" to a tape.
Before operation
Insert a tape for recording and a "Memory Stick" for playback into your camcorder.
(1) Set the POWER switch to VCR.
(2) Using the video control buttons, search for a point where you want to record the desired still image. Set the tape to playback pause mode.
(3) Press REC and the button on its right simultaneously on your camcorder. The tape is set to the recording pause mode.
(4) Press MEMORY PLAY to play back the still image you want to copy.
(5) Press to start recording and press again to stop.
(6) If you have more to copy, repeat steps 4 and 5.
Ko\Pu\rO\BaHne n3ObpaXeHn, 3a\Pu\cA\HbIX Ha "Memory Stick",Ha Kaccetbl
Mожно КОПИРОВаТь HeNoДВИХНБIe иЗбрах ageing Ил.TИТрbl,ЗАпсангые Ha "Memory Stick",Ha kaccety.
Ipeed hauanpa60tbI
BCTaBbTe Kaccety,HaKOTopyIO 6yIeT npOn3BOuNTbcra 3aIncb, n "Memory Stick", c KOTOpO 6yIeT OcUyIeCTBnABytbcr BOCpOn3BeDeHHe, B BVNeOeKaMepy.
(1)YCTaHOBnTe IpeKJIouHaTeIb POWER B nOJoxKeHne VCR.
(2)C NOMOUIK HONOK BUNDEOKOHTPoJIa NaIINTE MECTO,OTKYDa HEO6XoIMHO HaATb 3aINCb Tpe6yEMOro HEnoDBNXHORIO306paxKeHN.YctAOnBtJeI KACCEtBI BpeKIM Nay3bl BOcPOnU3BeDeHNr.
(3)Одновременно нажмп Te Kноку RECи Кноку справа OT Hee Ha Bndeokampe. Дя кассты 6удет yctaHOBJIEN pexim nay3by 3anicn.
(4)HaKMMTe KhoNkY MEMORY PLAY nIbBocPpOIN3BeDEHnHENoDvXhHOrO n3o6paJxEHn, KOtOpoe Heo6xoIMo CKONPiPoBaTb.
(5)HaxMMTe KhoNky III, YTO6bl HaCyTb 3aINcB.ДЯ OCTaHOBa 3aINcN CHOba HaxMMTe KhoNky II.
(6)EcHn Heo6xOdmo TaKke CkONIpOBaTb npyIe n3o6paXeHna, noBTOpUte pYHKtbl 4n5.
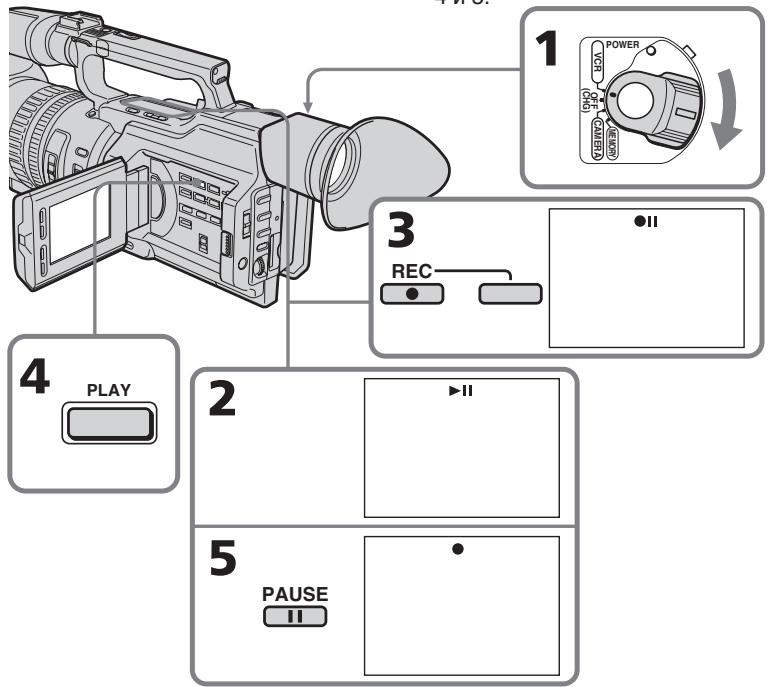
Copying an image recorded on a "Memory Stick" to tapes
To stop copying in the middle
Press
During copying
- You cannot operate the following buttons: MEMORY PLAY, MEMORY INDEX, MEMORY DELETE, MEMORY+, MEMORY -, and MEMORY MIX.
- If you continue copying, do not use EDITSEARCH to search for the point where you want to record the desired still image. If you do, the playback image disappears from the screen.
Note on the index screen
You cannot record the index screen.
Image data modified with personal computers or shot with other equipment
You may not be able to copy them with your camcorder.
If you press DISPLAY in standby or recording mode
You can see memory playback and the file name indicators in addition to the indicators pertinent to tapes, such as the time code indicator.
KoHnpoBaHne n3O6paXeHn, 3aHncaHHbIX Ha "Memory Stick", Ha KacceTbl
IIaOCTaHOBKn KOINpOBaHn, He DOxNdaRcB OKOHaHn
HaxmTe KhoNky
Bo BpemKaonipoBaHnA
- HeJIb3a nCNoJIb3OBaTb CNeIeIyIoUne KHOpKn: MEMORY PLAY, MEMORY INDEX, MEMORY DELETE, MEMORY + n MEMORY -, a TaKke MEMORY MIX.
- Bo Bpem KOnnpoBaHn Hnel3n noIb3ObaTbcKhONkOEDITSEARCH nIa IONcKa MeCTa,OTKyda He06xOIMo HaaytB 3aINCb HUxHOrO HeNOdBxHOrO n3OpaXeHnE. Ecn CdeNaTb 3To, BocPon3BOIDmoe n3OpaXeHne nCye3Het c 3KpaHa.
Ppimuehane no Hndekchomy 3KpaHy
HHeKChb3KpaH HeBO3MOXHO 3aNICA Tb.
I306paXeHnI, n3MeHeHHbIe c NOMOsbIO nepcoHaJIbHOro KOMNbIoTepe uIN CHaTbIe C NOMOsbIO dpyroI annapatypbl
Bo3MOxH0, IN Henb38 6yET cKoNIpOBAtB C nOMOuBO BnDeOkamepbl.
EcJn HaxaTb KhoNky DISPLAY B pexime OxuDaHnI nn 3aIncn
KpOME INHINKAToPOB,OTHOcRAUxCRA K KaCCeTaM,HaNPIMep,INHINKAToP KOJa BpeMeHN,MOXHO yBnDeTb INHINKAToPbI BOCPNOn3BeDeEHN I3 PAMrTN N IMeHN paJIa.
Playing back images continuously - SLIDE SHOW
You can automatically play back images in sequence. This function is useful especially when checking recorded images or during a presentation.
Before operation
Insert a "Memory Stick" into your camcorder.
(1) Set the POWER switch to MEMORY. Make sure that the LOCK switch is set to the right (unlock) position.
(2) Press MENU to display the menu.
(3)Turn the SEL/PUSH EXEC dial to select, then press the dial.
(4) Turn the SEL/PUSH EXEC dial to select SLIDE SHOW, then press the dial.
(5) Press MEMORY PLAY. Your camcorder plays back the images recorded on the "Memory Stick" in sequence.
HenpepbIBHoe BocnpoN3BedeHne n3o6paXeHn - SLIDE SHOW
Moxho aBTOMaTnueCKN BOCnPOn3BOoNTb
H3O6paXeHNB HnepepbIBHO
NoCNEoBaTeIbHOCTN. 3Ta fynKcN
OCo6eHNO yD06Ha npn pnoBepKe 3aIncaHHbx
H3O6paXeHN uIN BO BVpeMa Ipe3eHTaUIN.
Ipeed nayanom pa60tbi
BcTaBbTe "Memory Stick" B BnIeokamepy.
(1) YctaHOBInTe nepeKJIIOUaTeIb POWER B noLOXeHne MEMORY. Y6eINTEcB, yTO nepeKJIIOuAteIb LOCK ycTaHOBInB npaBOe noLOXeHne (pa3bIoKnPOBaH).
(2)HaxmTe KhoIky MENU OTo6paXeHHaMeHIO.
(3)ПовернITE диСEL/PUSH EXEC ДЯ Вьбopa уCTaHOBKN a 3aTeM haЖмITE Ha дИСК.
(4)ПовернITE ДИСК SEL/PUSH EXEC ДЯ
Быбopa установки SLIDE SHOW, a 3aTem
Надмпгу НДСК.
(5)HaXmTe KhoNky MEMORY PLAY. Bndeokamepa Bocnpo3BoDnT n3o6paXeHn, 3aIncaHbIe Ha "Memory Stick", B HnpepbIBHOI nocJeIOBaTeJbHOCTn.
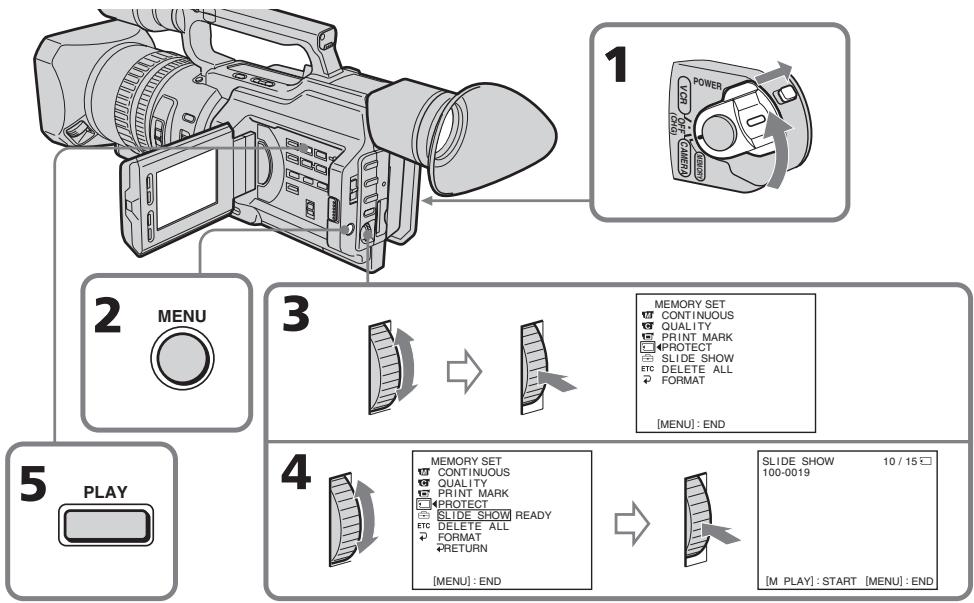
Playing back images continuously - SLIDE SHOW
To stop or end the slide show Press MENU.
To pause during a slide show
Press MEMORY PLAY.
To start the slide show from a particular image
Select the desired image using MEMORY + / - buttons before step 2.
To view the recorded images on TV
Connect your camcorder to a TV with the A/V connecting cable supplied with your camcorder before operation.
If you change the "Memory Stick" during operation
Be sure to follow the steps again from the beginning.
HenpepbIBHOe BOCnpoN3VeJeHne n3o6paXeHn - SLIDE SHOW
Дя OCTaHOBKил npeKpaUeHnA DeMOHcTpaCn N3O6paKeHn HaxmTe KhoNky MENU.
Ipee nHaayanom npoueybpI NOcOeHNHTe BnDEOKaMepy K TeNeBn3OpY C NMOuBIO COeHNHTJIbHOrO Ka6JIa aydno/BnDeo, IpnlaeraMoro K BnDEOKaMepe.
EcIn 3aMeHntb "Memory Stick" BO BpeMpa60tbl
BbInonHnTe Bce DeiCTBnC hauJa.
Preventing accidental erasure - Image protection
To prevent accidental erasure of important images, you can protect selected images.
Before operation
Insert a "Memory Stick" into your camcorder.
(1) Set the POWER switch to MEMORY or VCR. Make sure that the LOCK switch is set to the right (unlock) position.
(2) Play back the image you want to protect (p. 193).
(3) Press MENU to display the menu.
(4)Turn the SEL/PUSH EXEC dial to select, then press the dial.
(5)Turn the SEL/PUSH EXEC dial to select PROTECT, then press the dial.
(6)Turn the SEL/PUSH EXEC dial to select ON, then press the dial.
(7) Press MENU to erase the menu display. The "O-n" mark is displayed beside the data file name of the protected image.
Пре dioTbpaueHne cIyauHoro CTnpaHn - 3aunTa n3o6paXeHn
Длп п dedotврашин СсучайHorO CTираHHn Baxhhix N36paXeHn BbI6paHHbIe N36paXeHn MoXHO 3aunTnTb.
Ipeed hauanpa60TbI
BcTaBbTe "Memory Stick" B BnDeokamepy.
(1)Установпейсякючateь POWER в положене MEMORY ул ВСR.
Y6eIInTeCb, YTO nepeKlnuOaTeJIb LOCK yCTaHOBnE H IpaBOe NIOJXeHne (pa36IokIpOBaH).
(2) Bocnpoun3BeNeIte 1306paKeHne, KOTOpoe HUxKHO 3aUHTNb (CTp. 193).
(3)HaxmTe KhoNkY MENU OTo6paXeHHaMeHIO.
(4)ПовернITE ДИСК SEL/PUSH EXEC ДЯ
Выбopa установки , a 3aTeM нажмITE
На ДИСК.
(5)ПовернITE диСK SEL/PUSH EXEC ДдьБбopa установки PROTECT, a 3aTeM нажмITE на диСК.
(6)ПовернITE диСK SEL/PUSH EXEC Ддя Вьбopa установки ON, a 3atem нажмITE на диСК.
(7)HaxmTe KhoNky MENU ydaJeHHn HINKaun MEHO.PaOM C HazBaHNem paJla 3auuueHoro N3o6paXeHHn NOBNTc3Hak "O"
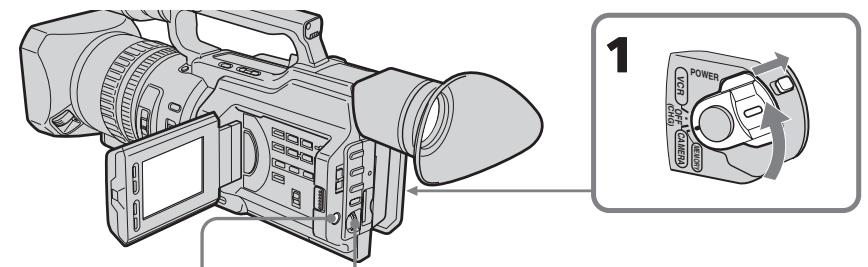
3,7
MENUE
4
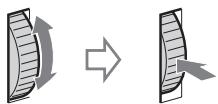
5
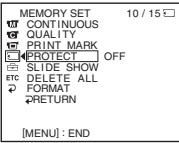
MEMORY SET CONTINUING PRINT MARK PRINT MARK PRINT STYLE SHOW THE TABLE ALL FORMAT
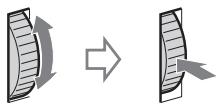
6


MEMORY SET 10/15
CONTINUOUS
QUALITY
PRINT MARK
PROPERTIES HON
SLIDE SHOW OFF
ETC DELETE ALL
FORMAT
RETURN
MEMORY SET CONTINUOL QUALITY 100% PROTECT SLIDE SHO DELETE AL 2 FORMAT RETURN
10/15□S ON V
Preventing accidental erasure - Image protection
To cancel image protection
Select OFF in step 6, then press the SEL/PUSH EXEC dial.
Note
Formatting erases all information on the "Memory Stick," including the protected image data. Check the contents of the "Memory Stick" before formatting.
If the write-protect tab on the "Memory Stick" is set to LOCK
You cannot carry out image protection.
ПпедOTВрашени слуайHoro cTиразня - 3ацNTa ИЗбрахеня
ДЯ OTMeHbI 3aUHTbI N3O6paXeHnA
Bb6epnte yctaHOBky OFF b nyHKTe 6, a 3aTeM hakmnte Ha dNcK SEL/PUSH EXEC.
Ppmeuahne
Bo Bpemf opmatipobAHn ydaJIaIOTcBce daHHbIe Ha "Memory Stick", BKIOUaJ daHHbIe 3aunuehhIX n3O6paXeHIn. IpeEi fopmatipobAHm m npOBepbTe coepxmoe "Memory Stick".
EcInI JeneCTOK 3aunTbI OT 3aHnCn Ha "Memory Stick" yctahOBJIeH B IonoJXeHne LOCK
BbIOnJIHnTb 3aunTy n3o6paXeHn8 6yJeT HeBO3MOxHO.
You can delete images stored in a "Memory Stick."
Deleting selected images
Before operation
Insert a "Memory Stick" into your camcorder.
(1) Set the POWER switch to MEMORY or VCR. Make sure that the LOCK switch is set to the right (unlock) position.
(2) Play back the image you want to delete (p. 193).
(3) Press MEMORY DELETE. "DELETE?" appears on the LCD screen or in the viewfinder.
(4) Press MEMORY DELETE again. The selected image is deleted.
YdaJIeHne BbIbpaHHbIX n3o6paxKeHn
Ipeed nayanom pa60tbi
BCTaBbTe "Memory Stick" B VbIeokamepy.
(1)Установпейсякючateь POWER в положене MEMORY ул ВСR.
Y6eIHTecb, YTO nepeKlnOuataTeJIb LOCK yCTaHOBnE H npaBOe nOLOXKeHne (pa36JIOKIpOBaH).
(2) Bocnpo3BeiNeIte 306paXeHne, KOtopoe Heo6xoJIMO ydaJIntb (cTp. 193).
(3)HaxmTe KhoNky MEMORY DELETE. HndnKaTOp "DELETE?" noBvTcra Ha 3KpaHe KKД nIиВионckaTeNe.
(4)Haxmnte KhoNky MEMORY DELETE eue pa3. BbI6paHoe n3o6paXeHne 6ydet ydaJeHo.
To cancel deleting an image
Press MEMORY - in step 4.
To delete an image displayed on the index screen
Press MEMORY + / - to move the mark to the desired image and follow steps 3 and 4.
ДЯ OTMeHbI ydaJIeHnI N3O6paXeHnI
Haxmnte KhoNky MEMORY - B nyHKte 4.
- To delete a protected image, first cancel image protection.
- Once you delete an image, you cannot restore it. Check the images to be deleted carefully before deleting them.
While "DELETING" appears
Do not turn the POWER switch or press any buttons.
If the write-protect tab on the "Memory Stick" is set to LOCK
You cannot delete any image.
Примеанья
He n3meHnIe nOLOXKeHne nepeKJIIOUaTeJIa POWER n He naXImaIte HnKaNX KHOJOK.
EcInI JeneCTOK 3aunTbI OT 3anCn Ha "Memory Stick" yctahOBJIeH B IonoJXeHne LOCK
HeBo3MoXHo 6yJeT yJaIITb Hn OJHO n3o6paJxHne.
Deleting all the images
You can delete all the unprotected images in a "Memory Stick."
Before operation
Insert a "Memory Stick" into your camcorder.
(1) Set the POWER switch to MEMORY. Make sure that the LOCK switch is set to the right (unlock) position.
(2) Press MENU to display the menu.
(3)Turn the SEL/PUSH EXEC dial to select, then press the dial.
(4) Turn the SEL/PUSH EXEC dial to select DELETE ALL, then press the dial.
(5)Turn the SEL/PUSH EXEC dial to select OK, then press the dial. "OK" changes to "EXECUTE."
(6) Press the SEL/PUSH EXEC dial. "DELETING" appears on the LCD screen or in the viewfinder. When all the unprotected images are deleted, "COMPLETE" is displayed.
YdaJIeHne Bcex n3o6paXKeHn
Moxho ydaTb BCE He3aunHHeHbI n3o6paxeHnHa "Memory Stick".
Ipeed hauanpa60tbI
BCTaBbTe "Memory Stick" B VbIeokamepy.
To cancel deleting all the images in the "Memory Stick"
Select RETURN in step 5 or 6, then press the SEL/PUSH EXEC dial.
Длг OTMeHbI ydaJIeHnB BCEx n3O6paxeHn Ha "Memory Stick"
BbI6epNTe RETURN B nyHKe 5 nJn 6,3aTeM haxmTe Ha nnck SEL/PUSH EXEC.
Writing a print mark - Print mark
You can specify the recorded still image to be printed out. This function is useful for printing out still images later.
Your camcorder conforms with the DPOF (Digital Print Order Format) standard for specifying the still images to print out.
Before operation
Insert a "Memory Stick" into your camcorder.
(1) Set the POWER switch to MEMORY or VCR. Make sure that the LOCK switch is set to the right (unlock) position.
(2) Play back the image to be printed out (p. 193).
(3) Press MENU to display the menu.
(4)Turn the SEL/PUSH EXEC dial to select, then press the dial.
(5)Turn the SEL/PUSH EXEC dial to select PRINT MARK, then press the dial.
(6)Turn the SEL/PUSH EXEC dial to select ON, then press the dial.
(7)Press MENU to erase the menu display. The "mark is displayed beside the data file name of an image.
3a\Pncb peuatHbIX 3HaKOB - Print Mark
Moxho yka3aTb 3aHncaHHbIe HenoDbNkHbIe
1306paXeHnI dIpaacpeaTk. 3Ta fynKcIa
YBIIETCn IONe3HO nIpnclEduOSeI
pacneatKn HenoDBNXhblx 1306paXeHnI.
DaHHa BnDeokamepa yDobnetBopReT
Tpe6oBaHNm CTaNapTa DPOF (uHpOboi
fOpMaT npAJa Ka neaTu) dJIra neaTu
HenoDbNkHbIX 1306paXeHnI.
Ipeed hauanom pa60tbi
BCTaBbTe "Memory Stick" B BnDeokamepy.
(1)Установпейсякючать POWER в положене MEMORY ул ВCR.
Y6eIntecb, YTO nepeKnIOuATEJIb LOCK yCTaHOBJIeH B IpaBOe NpOJOKeHne (pa36JIOKIpOBaH).
(2) Bocnpoun3BeNeIte n3ObpaXeHne, KOTOpoe Heo6xOJIMo paCneuTaTb (cTp. 193).
(3)HaxmTe KhoNkY MENU dЯ OTo6paXeHnMeHIO.
(4)ПовернITE дисс KSEL/PUSH EXECдяп Вьбopa установки ,а затем нажмite НдИСК.
(5)ПовернITE ДИСК SEL/PUSH EXEC ДЯ
Быбopa установки PRINT MARK, a за tem
Нашмпг Рд.
(6)ПовернITE диck SEL/PUSH EXEC Ддьбopa установки ON, a 3atem нажмiteHa диck.
(7)HaxmTe KhoNky MENU ydaJIeHnI HdNKaun MeHIO. PAnOM cHa3BaHHeM faIpa I3O6paXeHnI NOBNTcR 3HaK "
Writing a print mark - Print mark
3aIncb neuathbIX 3HaKOB - Print Mark
To cancel writing print marks
Select OFF in step 6, then press the SEL/PUSH EXEC dial.
If the write-protect tab on the "Memory Stick" is set to LOCK
You cannot write print marks on still images.
ДЯ OTMeHbI 3aINcN NeYaTHbIX 3HaKOB
BbIbePte yctaHOBky OFF b nyHKTe 6, a 3aTeM hakmTe Ha dNcK SEL/PUSH EXEC.
EcInI JeneCTOK 3aunTbI OT 3aHnCn Ha "Memory Stick" yctahOBJIeH B nOLOXeHne LOCK
BbI He cMOXKeTe 3aIncatb neaThbte 3HaKn Ha HENoDVBHXHbIX N3O6paXeHnX.
Selecting cassette types
You can use the Mini DV mini DV cassette only*. You cannot use any other 8 mm, Hi8 Hi8, Digital8, VHS VHS, VHSC, SVS S-VHS, SVSC S-VHSC, Betamax, DV or MICROMV cassette.
- There are two types of mini DV cassettes: with cassette memory and without cassette memory. Tapes with cassette memory have CIII (Cassette Memory) mark. Sony recommends that you use a tape with CIII mark to enjoy your camcorder fully.
The IC memory is built in the cassette with cassette memory. Using this IC memory, your camcorder can read, write, and search data such as the date of recording or titles. The functions using the cassette memory require successive signals recorded on the tape. If the tape has a blank portion in the beginning or between the recorded portions, a title may not be displayed properly or the search functions may not work correctly.
Not to make any blank portion on the tape, press END SEARCH to return to the end of the recorded portion before you begin the next recording when:
- You have ejected the cassette while recording.
- You have played back the tape in VCR mode. If there is a blank portion or discontinuous signal on your tape, re-record from the beginning to the end of the tape concerning above.
When you record, using a digital video camera recorder without a cassette memory function, on a tape recorded by one with the cassette memory function, the same result may occur.
Bb6op Tnna Kaccet
MOxHO NcNoB3OBAbT TOJIbKO KaCCeTbMIHN DV MinD*. HeJIb3a NcNoB3OBAbTH HnKaKne dpyrHe KacCEtBu TnA 8 mm, HiHi8, Digital8,VHS VHS,WSE VHSC,SVHS S-VHS, SWE S-VHSC,Betamax,DV nnn MICROMV.
* CyuectByet DbA Tnna Kaccet MmH DV: c KaccetHOI NaMTBIO N 6e3 KaccetHOI NaMTN. JeHTbIC KaccetHOI NaMTBO HMeOT 3NaK (kaccetHaJ naMTb). Kopnpaunr Sony peKOMeHyET IcNoIb3OBA Tb JENTy CO 3HaKOM CII, TaK KaK 3TO HaNoBoee NOxOJaTNI TIN dJa DaHHoB BnDeOKaMepbl.
Ha daHOM Tnne Kaccet yCTaHOBJeHa naMaTb B VIne INTErpaIbHo CXembl. BnuDeOKaMepa MoXeT CHTbIBaTb N 3aNNcBbTaB DaHHbIe, TaKne KaK DaTbI 3aNCSu NN TnTpbl N.T.D., Ha 3Ty INTErpaJIbHyO CXEmy NaMaTn.ДЯ ΦYHKm, INoJb3yOuXx KACCETHyO NaMaTb, Tpe6yETc 3aNcB H JeHTy NocENoBaTeIbHbIX CnHAnOB. EcHn Ha JeHte IMeETc He3aNNcaHHbI yuaCTOK B HauaJe IIN MEXdy 3aNcAHHbIMu YactAMn, TO TnTp MoXeT OTObpaKaTbCnCKaXeHNMaM, INI ΦYHKmI PONCKa MoXeT paBOTaB HEnpaBnIbHO.
ДЯТOrO,ЧTo6bI He ДOnyCTnTb NOBLeHnA
He3aNcAHbIX yuactKOB Ha JIeHTe, HaxMnTe
KhONkY END SEARCH ДЯВОЗВрАТК KOHcy
3aNcAHnOу yuactKa nepei HauJAMo
CneDyUoSei 3aInci,ecJI:
-KaccTa 6blIa n3BJeueHa BO BpEma 3aInci.
-JeHTa BocPon3BoDInLacb B pexmE VCR.
EcIHa JIeHTe IMeeTCR He3aNcAnHbI
yUaCTOK NIInpepbIBaOoiNcS CnHaNl,
BbINOJIHnTe nepe3aINCb C hauJa lo KOHca C
yuETOM BblWeckCa3aHHoro.
Takoi Je pe3yIbTaT MoXeT NOLyUHTcR npBbIINHeHn 3aIncn C NOMOu bU cIpPOBOB BnDEOkAmePbI 6e3 FyHKuN KACCETHOI nAMrTu HaJeHTy, 3aIncaHHU O NOMOu bIO FyHKuN KACCETHOI nAMrTu.
CIII4K mark on the cassette
The memory capacity of tapes marked with CIII4K is 4 K bits. Your camcorder can accommodate up to 16 K bits. 16 K bits tape is marked with CIII16K.
The maximum number of data recordable on cassette memory (when using 4 K bits cassette memory)
| Data | Numbers |
| INDEX | 32 (15 bytes/one item of the data) |
| TITLE | 25 |
| DATE | 6 (10 bytes/one item of the data) |
| PHOTO | 12 (10 bytes/one item of the data) |
| CASSETTE LABEL | 1 |
The numbers above are as a guide.
Copyright signal
When you play back
When you connect your camcorder to any other video camera recorder to dub a tape that has recorded copyright control signals for copyright protection, you may not record the tape that played back on your camcorder.
When you record
You cannot record software on your camcorder that contains copyright control signals for copyright protection of software.
"COPY INHIBIT" appears on the LCD screen, in the viewfinder or on the TV screen if you try to record such software.
Your camcorder does not record copyright control signals on the tape when it records.
Icnojb3yeMbte KacceTbI
12-bit mode: The original sound can be recorded in stereo 1, and the new sound in stereo 2 in 32kHz . The balance between stereo 1 and stereo 2 can be adjusted by selecting AUDIO MIX in the menu settings during playback. Both sounds can be played back. 16-bit mode: A new sound cannot be recorded but the original sound can be recorded in high quality. Moreover, it can also play back sound recorded in 32kHz , 44.1kHz or 48kHz . When playing back a tape recorded in the 16-bit mode, 16BIT indicator appears on the LCD screen or in the viewfinder.
When you play back a dual sound track tape
When you play back a dual sound track tape recorded in a stereo system, set HiFi SOUND to the desired mode in the menu settings (p. 156).
Sound from speaker
| HiFi SOUND mode | Playing back a stereo tape | Playing back a dual sound track tape |
| STEREO | Stereo | Main sound and sub sound |
| 1 | Left sound | Main sound |
| 2 | Right sound | Sub sound |
You cannot record dual sound programs on your camcorder.
AydnopeXm
12-6nTOBbI pexIM: IpeBOHaaJIbHbI 3ByK MoXeT 6bITb 3aIncAH Ha cTepeOphiOnHueckn KaHaN 1, a HOBbI 3ByK - Ha cTepeOphiOnHueckn KaHaN 2 B pexIme 32 KfU. BaIaHc MExJy cTepeOphiOnHueckm KaHaNOM 1 n CTepeOphiOnHueckm KaHaNOM 2 MOxHO OTpeYInpOBATb nyTEM BbIbopa yCTaHOBKn AUDIO MIX B yCTaHOBkax MeHIO BO BPem BoCpON3BeDeHnA. MoxHO BOCpON3BOIDMb o6a KaHaN. 16-6nTOBbI pexM: HEnb3aIncATb HOBbI 3ByK, ODAHko MOxHO 3aIncATb nepBOHaaylbHbI 3ByK BblCOKOro KaYeCTBa. KpOME TOTO, 3ByK MoXHO BOCpON3BOIDMb B peXImax 32 KfU, 44,1 KfU nII n48 KfU. Ppi BOCpON3BeDeHnJIeHTbl, 3aIncAHNoB V 16-6nTOBOM pexIMe, Na 3KpaHe KKД nII B BVIOINCKaTeJe NOBtca INdNKaTop 16BIT.
PnBocnpOn3BeJeHnn JeHTbI C DBOH0N 3ByKO0N DOPOXK0N
ПиВ BOCNpOu3BVeHm JIeHTbI C DBOHOn 3ByKOBoD OPOJCKoN, 3aIncAHHoB CTpeofoHnueckoC nCTeMe, yCTaHOBtE KOMaHdy HiFi SOUND B HnyKhbl peXmB yCTaHOBkax MeHIO (cTp.156).
3Byk chepe3 rpomKorOBopntelb
Be sure to affix a label only on the locations as illustrated below a so as not to cause malfunction of your camcorder.
Rewind the tape to the beginning, put the cassette in its case, and store it in an upright position.
If the cassette memory function does not work
Reinsert a cassette a few times. The gold-plated connector of mini DV cassettes may be dirty or dusty.
Cleaning the connector
If the gold-plated connector of mini DV cassettes is dirty or dusty, you may not operate the function using cassette memory. Clean up the gold-plated connector with cotton-wool swab, about every 10 times ejection of a cassette. [b]
Ucnojb3yeMbte KacceTbI
Your camcorder is equipped with the DV Interface based on i.LINK (IEEE1394) standard. This section explains the specifications and features of i.LINK.
What is i.LINK?
i.LINK is a digital serial interface designed to integrate the devices equipped with i.LINK connector. By connecting i.LINK devices, i.LINK allows your device to:
- Transmit and receive data such as digital audio and digital video signals in two ways
- Control other i.LINK devices
-Easily connect with another device using just an i.LINK cable.
Your i.LINK device is capable of connecting AV devices and perform various operations and data transfer. Further availability for connections with versatile equipment and operations will be planned in the future. Other advantages include the following feature. When connecting multiple i.LINK devices, your device cannot only perform operations and data transfer with the directly connected device but also perform them with any of the devices that are connected via other devices. Therefore, you will not need to concern the order of connecting devices. However, depending on the features and specifications of the connected devices, you may need to operate certain functions differently or may not be able to perform certain operations or data transfer.
Note
Your camcorder can be connected to one device with the i.LINK cable.
When you connect with a device that has two or more i.LINK connectors, refer to the operating instructions supplied with the connected device.
Tips
- i.LINK, a nickname for IEEE 1394 that Sony proposed, is a trademark supported by a majority of companies worldwide.
- IEEE 1394 is an international standard defined by IEEE, The Institute of Electrical and Electronics Engineers, Inc.
O ka6ene i.LINK
Bawa kaMepa obOpdyobaHa nHTeppeiCOM DV, paccuTaHbIM Ha ka6eIb cTaNdapTa i.LINK (IEEE1394).
B 3TOM pa3dene o6bAChEnbI xapakTepcntknNФункm i.LINK.
4To Takoe i.LINK?
i.LINK - 3To UnpoBoN nocJeDoBaTeIbHbI INHTepceic, npedHa3NaeHbI dIa IIOKNoUeHn OOBpOBAHnI, MeEOJero pa3bEmi LINK. PnioKnIOUeHm i.LINKycTpoCTB dpyr K dpyrf yHkUria I.LINK No3BOJAE TtM N yCTpoINCTBAM:
About data transfer speed of i.LINK
i.LINK defines a maximum data transfer speed of approximately 100, 200 and 400 Mbps* that are described as S100, S200 and S400 respectively.
For i.LINK devices, a maximum data transfer speed that the device supports is identified on "Specifications" page of the operating instructions supplied with the device or near its i.LINK connector.
With a device that does not identify the data transfer speed, the maximum data transfer speed that the device supports is S100.
When connecting with the device that support different data transfer speed, the actual data transfer speed may be different from those described on the i.LINK connectors.
*What is Mbps?
Mega bits per second. A measure of the rate at which data is transmitted per second. In case of 100 Mbps, 100 Mega bits of data can be transmitted per second.
i. LINK operation with your camcorder
For details on dubbing your camcorder to your VCR equipped with DV Interface, see page 108, 132.
Your camcorder is available for use with other devices equipped with Sony i.LINK connector (DV Interface) connector (eg. VAIO personal computer series).
Beware that some of the video equipment such as the Digital Televisions, the DVD recorders/ players or the MICROMV recorders/players are equipped with the i.LINK connector but not compatible with the DV equipment. Be sure to confirm whether the equipment is compatible with the DV equipment or not before connecting your camcorder to it.
For details on connection with i.LINK cable and necessary software, refer to the operating instructions supplied with the connected device.
Use Sony i.LINK cables
Use Sony i.LINK cables to connect the i.LINK devices.
4 pins 4 pins (For dubbing)
i.LINK and are trademarks.
O ckopocTn TpaHcnpTa daHHbIX B uei i.LINK
i.LINK npedocTabniet CneIyOuIe 3HaueHmMAkCmAmbHbX cKOpOcTe TPAHCnOpTa daHHbIX: OKo100,200 n400 M6nt/c*nn S100,S200 nS400 coOTBETCTBEHO.
If you run into any problem using your camcorder, use the following table to troubleshoot the problem. If the problem persists, disconnect the power source and contact your Sony dealer or local authorized Sony service facility. If "C:□□:□□" appears on the LCD screen, display window or in the viewfinder, the self-diagnosis display function has worked. See page 222.
In the recording mode
| Symptom | Cause and/or Corrective Actions |
| START/STOP does not operate. | ·The POWER switch is not set to CAMERA. →Set it to CAMERA. (p. 24) ·The tape has run out. →Rewind the tape or insert a new one. (p. 22, 44) ·The write-protect tab on the cassette is set to SAVE. →Use a new tape or slide the tab. (p. 22) ·The tape is stuck to the drum (moisture condensation). →Remove the cassette and leave your camcorder for at least one hour to acclimate. (p. 234) |
| The power goes off. | ·While being operated in CAMERA mode, your camcorder has been in the standby mode for more than five minutes. →Set the POWER switch to OFF (CHG) and then to CAMERA again. (p. 26) ·The battery pack is dead or nearly dead. →Install a charged battery pack. (p. 13, 14) |
| The image on the viewfinder screen is not clear. | ·The viewfinder lens is not adjusted. →Adjust the viewfinder lens. (p. 30) |
| The SteadyShot function does not work. | ·STEADYSHOT is set to OFF in the menu settings. →Set it to ON. (p. 156) |
| The autofocusing function does not work. | ·The camcorder is in manual focus mode. →Turn to auto focus mode. (p. 83) ·Shooting conditions are not suitable for autofocus. →Adjust focus manually. (p. 83) |
| The fader function does not work. | ·The digital effect function is working. →Cancel it. (p. 56) |
| A vertical band appears when you shoot a subject such as lights or a candle flame against a dark background. | ·The contrast between the subject and background is too high. This is not a malfunction. |
| Vertical streaks appear when you shoot a very bright subject. | ·This is called the smear phenomenon. This is not a malfunction. |
| Some tiny white spots appear on the LCD screen or in the viewfinder. | • When the shutter speed is too low or the low lux mode is selected. |
| Diagonal stripes appear on the screen. | • ZEBRA selector is set to 70 or 100. → Set ZEBRA selector to OFF. (p. 69) |
| Unknown pictures or messages are displayed on the LCD screen or in the viewfinder. | • If 10 minutes elapse after you set the POWER switch to CAMERA or DEMO MODE is set to ON in the menu settings without a cassette inserted, your camcorder automatically starts the demonstration. → Insert a cassette. The demonstration stops. You can also cancel DEMO MODE. (p. 162) |
| The click of the shutter does not sound. | • BEEP is set to OFF in the menu settings. → Set it to MELODY or NORMAL. (p. 156) |
| The image is not bright even if you use the video flash light. | • The ND FILTER selector is set to 1 or 2. → Set it to OFF. (p. 68) • The manual adjustment is not suitable for the situations. (The indicator flashes.) → Set the AUTO LOCK selector to AUTO LOCK, or cancel the manual adjustment. (p. 63) |
In the playback mode
| Symptom | Cause and/or Corrective Actions |
| The tape does not move when a video control button is pressed. | ·The POWER switch is not set to VCR. →Set it to VCR. (p. 40) |
| The playback button does not function. | ·The tape has run out. →Rewind the tape. (p. 44) |
| There are horizontal lines on the picture or the playback picture is not clear or does not appear. | ·The video head may be dirty. →Clean the heads using the Sony DVM12CL cleaning cassette (optional). (p. 235) |
| No sound or only a low sound is heard when playing back a tape. | ·The volume is turned to minimum. →Turn up the volume. (p. 40) ·AUDIO MIX is set to the ST2 side in the menu settings. →Adjust AUDIO MIX. (p. 156) |
| The title search function does not work. | ·The tape has no cassette memory. →Use a tape with cassette memory. (p. 97, 210) ·CM SEARCH is set to OFF in the menu settings. →Set it to ON. (p. 156) ·There is no title in the tape. →Superimpose the titles. (p. 143) ·The tape has a blank portion in the recorded portion. (p. 98) |
(continued on the following page)
| Symptom | Cause and/or Corrective Actions |
| Displaying the recorded date, date search function does not work. | The tape has no cassette memory. → Use a tape with cassette memory. (p. 99, 210) ·CM SEARCH is set to OFF in the menu settings. → Set it to ON. (p. 156) ·The tape has a blank portion in the recorded portion. (p. 100) |
| The new sound now being added, or that has been added to the recorded tape is not heard. | AUDIO MIX is set to ST1 side in the menu settings. → Set it to the side you want to monitor. (p. 156) |
| The title is not displayed. | TITLE DSPL is set to OFF in the menu settings. → Set it to ON. (p. 156) |
| The sound is muted or images do not appear when monitoring images through TV/VCR. | Pull out the A/V connecting cable from the AUDIO L/R and VIDEO jacks, then connect it again. |
In the recording and playback modes
| Symptom | Cause and/or Corrective Actions |
| The power does not turn on. | ·The battery pack is not installed, or is dead or nearly dead. → Install a charged battery pack. (p. 13, 14) ·The AC Adaptor is not connected to the wall socket. → Connect the AC Adaptor to the wall socket. (p. 18) |
| The end search function does not work. | ·The tape was ejected after recording when using a tape without cassette memory. (p. 38, 45) ·You have not recorded on the new cassette yet. (p. 38, 45) |
| The end search function does not work correctly. | ·The tape has a blank portion in the beginning or middle. (p. 39) |
| The picture does not appear in the viewfinder. | ·The LCD panel is open. → Close the LCD panel. (p. 27) |
| The battery pack is quickly discharged. | ·The operating temperature is too low. ·The battery pack is not fully charged. → Charge the battery pack fully. (p. 14) ·The battery pack is completely dead, and cannot be recharged. → Replace with a new battery pack. (p. 13) |
| The battery remaining indicator does not indicate the correct time. | ·You have used the battery pack in an extremely hot or cold environment for a long time. ·The battery pack is completely dead, and cannot be recharged. → Replace with a new battery pack. (p. 13) ·The battery is dead. → Use a full-charged battery pack. (p. 13, 14) |
| The cassette cannot be removed from the holder. | • The power source is disconnected. → Connect it firmly. (p. 13, 18) • The battery is dead. → Use a charged battery pack. (p. 13, 14) |
| The ⊥ and ▲ indicators flash and no functions except for cassette ejection work. | • Moisture condensation has occurred. → Remove the cassette and leave your camcorder for at least one hour to acclimateze. (p. 234) |
| CID indicator does not appear when using a tape with cassette memory. | • The gold-plated connector of the tape is dirty or dusty. → Clean the gold-plated connector. (p. 213) |
| Remaining tape indicator is not displayed. | • The ∅ REMAIN is set to AUTO in the menu settings. → Set it to ON to always display the remaining tape indicator. (p. 156) |
When operating using the "Memory Stick"
| Symptom | Cause and/or Corrective Actions |
| Operations do not function. | ·The POWER switch is set to CAMERA or OFF (CHG). →Set it to MEMORY or VCR. ·The “Memory Stick” is not inserted. →Insert a “Memory Stick.” (p. 173) |
| Recording does not function. | ·The “Memory Stick” has already been recorded to its full capacity. →Erase unnecessary images and record again. (p. 177, 204) ·The “Memory Stick” formatted incorrectly is inserted. →Format the “Memory Stick” or use another “Memory Stick.” (p. 160) ·The write-protect tab on the “Memory Stick” is set to LOCK. →Set the tab to write. (p. 170) |
| The image cannot be deleted. | ·The image is protected. →Cancel image protection. (p. 202) ·The write-protect tab on the “Memory Stick” is set to LOCK. →Set the tab to write. (p. 170) |
| You cannot format the “Memory Stick.” | ·The write-protect tab on the “Memory Stick” is set to LOCK. →Set the tab to write. (p. 170) |
| Deleting all the images cannot be carried out. | ·The write-protect tab on the “Memory Stick” is set to LOCK. →Set the tab to write. (p. 170) |
| You cannot protect the image. | ·The write-protect tab on the “Memory Stick” is set to LOCK. →Set the tab to write. (p. 170) ·The image to be protected is not being played back. →Press MEMORY PLAY to play back the image. (p. 193) |
| You cannot write a print mark on the still image. | ·The write-protect tab on the “Memory Stick” is set to LOCK. →Set the tab to write. (p. 170) ·The image that you will write a print mark is not being played back. →Press MEMORY PLAY to play back the image. (p. 193) |
(continued on the following page)
| Symptom | Cause and/or Corrective Actions |
| The photo save function does not work. | ·The write-protect tab on the “Memory Stick” is set to LOCK. →Set the tab to write. (p. 170) ·The battery pack is dead. →Install a charged battery pack or use the AC Adaptor instead of the battery pack. (p. 13, 18) |
Others
| Symptom | Cause and/or Corrective Actions |
| The title is not recorded. | ·The tape has no cassette memory. →Use a tape with cassette memory. (p. 143, 210) ·The cassette memory is full. →Erase unnecessary title. (p. 147) ·The tape is set to prevent accidental erasure. →Slide the write-protect tab to REC. (p. 22) ·Nothing is recorded in that position on the tape. →Superimpose the title to the recorded position. (p. 143) |
| The cassette label is not recorded. | ·The tape has no cassette memory. →Use a tape with cassette memory. (p. 151, 210) ·The cassette memory is full. →Erase some data. (p. 153) ·The tape is set to prevent accidental erasure. →Slide the write-protect tab to REC. (p. 22) |
| While editing using the i.LINK cable, recording picture cannot be monitored. | →Disconnect the i.LINK cable, and connect it again. (p. 108) |
| Digital program editing does not function. | ·The input selector on the VCR is not set correctly. →Check the connection and set up the selector position. (p. 107) ·The camcorder is not connected to Sony DV equipment (When the i.LINK cable is connected). →Set CONTROL to IR in the menu settings and set the recording VCR to be controlled by infrared rays. ·Setting program on a blank portion of the tape is attempted. →Set the program again on a recorded portion. (p. 124) ·Your camcorder and the VCR are not synchronized. →Synchronize them. (p. 119) |
| The Remote Commander supplied with your camcorder does not work. | ●COMMANDER is set to OFF in the menu settings. →Set it to ON. (p. 156) ●Something is blocking the infrared rays. →Remove the obstacle. ●The batteries are inserted in the battery holder with the +− polarities incorrectly. →Insert the batteries with the correct polarity. (p. 253) ●The batteries are dead. →Insert new ones. (p. 253) |
| The input picture does not appear on the LCD screen or in the viewfinder when your camcorder is connected to outputs on the TV or VCR. | ●DISPLAY is set to V-OUT/LCD in the menu settings. →Set it to LCD. (p. 156) |
| The melody or beep sounds for five seconds. | ●Moisture condensation has occurred. →Remove the cassette and leave your camcorder for at least one hour to acclimateze. (p. 234) ●Some troubles have occurred in your camcorder. →Remove the cassette and insert it again, then operate your camcorder. |
| When charging the battery pack, no indicator appears or the indicator flashes on the display window. | ●The AC Adaptor is disconnected. →Connect it properly. ●The battery pack malfunctions. →Contact your Sony dealer or local authorized Sony service facility. |
| You cannot charge the battery pack. | ●The POWER switch is not set to OFF (CHG). →Set it to OFF (CHG). |
| The camcorder is immediately turned off even if the amount of the battery remaining time is enough to operate. | ●Charge the battery pack fully again. The correct remaining time is displayed. |
| No function works though the power is on. | →Disconnect the mains lead of the AC Adaptor or remove the battery, then reconnect it after about one minute. Turn the power on. If the functions still do not work, press the RESET button located at the lower-right of the ZEBRA selector using a sharp-pointed object. (If you press the RESET button, all the settings including the date and time return to the default.) (p. 18, 245) |
Your camcorder has a self-diagnosis display function.
This function displays the current condition of your camcorder as a 5-digit code (a combination of a letter and figures) on the LCD screen, display window, or in the viewfinder. If a 5-digit code is displayed, check the following code chart. The last two digits (indicated by ) will differ depending on the state of your camcorder.
On the LCD screen or in the viewfinder, on the display window
Self-diagnosis display
C:□□:□□
You can service your camcorder yourself.
E:□□:□□
Contact your Sony dealer or nearest local authorized Sony service facility.
| Five-digit display | Cause and/or Corrective Actions |
| C:04:□□ | ● You are using a battery pack that is not an “InfoLITHIUM” battery pack. → Use an “InfoLITHIUM” battery pack. (p. 14) |
| C:21:□□ | ● Moisture condensation has occurred. → Remove the cassette and leave your camcorder for at least one hour to acclimatize. (p. 234) |
| C:22:□□ | ● The video heads are dirty. → Clean the heads using the Sony DVM12CL cleaning cassette (optional). (p. 235) |
| C:31:□□ | ● A malfunction other than the above. |
| C:32:□□ | ● Remove the cassette and insert it again, then operate your camcorder. → Disconnect the mains lead of the AC Adaptor or remove the battery pack. After reconnecting the power source, operate your camcorder. |
| E:61:□□ | ● A malfunction that you cannot service has occurred. |
| E:62:□□ | → Contact your Sony dealer and inform them of the 5-digit code. (example: E:61:10) |
If you are unable to rectify the problem even if you try corrective actions a few times, contact your Sony dealer or nearest local authorized Sony service facility.
YcTpaHHe HEnCnPaBHOCTeI
Ecni y Bac Bo3HnKla kakaJ-Im6o np6bIeMa npi nCpOJIb3OBAHN BInDeOkaMepbl, BocNoIb3yIteCb CneIyUoSeT TaBInCe IJr ee ycTaPHeHNA. EcI np6bIeMa He ycTaPAnEeTcA, TO cJeDyET OTCoeDHHb NCTOCHNK NITaHNA I O6paTtCBc B cepBnCHbIeHTp Sony iIN B MeCTHO eYONHomOueHHoe PpeDpNtRnE NO o6CnyXnBaHIO n3dEnl SNy. EcI na 3KpaHe XXKD, B OKHe dncPnE nnB vBIOOnCKaTeJe No8BNaLacb INDnKaZuN "C:□□:□□", 3TO o3Haayet, YTO cpa6OtaJa cyHKnIa DnCIIe CaMODaNarHocTKN. Cm. cTp. 229.
Bpekme 3ainnc
HndkauncaMoDnaarHOCTNK
C:□□:□□
BbIMoKTe BbINOHHTbOBcJyKbBaHne BaSei BnDEOkamepbI camOCToTeJIbHO.
E:□□:□□
O6paTntecb B cepBnchbIy ceHtp Sony nIN B 6nnKaiuwee MeCTHOe yNOLHOMOeHHOE npEaPnATne no o6cnykBaHIO u3deJIy Sony.
Warning indicators and messages
If indicators and messages appear on the LCD screen or in the viewfinder, check the following:
See the page in parentheses () for more information.
Warning indicators
The battery is dead or nearly dead Slow flashing:
The battery is nearly dead.
Depending on conditions, the indicator may flash, even if there are five to 10 minutes remaining. If this flashes, we recommend that you charge the battery or install the charged battery.
Fast flashing:
The battery is dead (p. 14).
The battery is completely dead.
Warning indicator as to tape
Slow flashing:
- The tape is near the end.
- No tape is inserted (p. 22).*
- The write-protect tab on the cassette is out (p. 22).*
Fast flashing:
The tape has run out.*
You need to eject the cassette
Slow flashing:
The write-protect tab on the cassette is out (p. 22).
Fast flashing:
- Moisture condensation has occurred (p. 234).
The tape has run out.
- The self-diagnosis display function is activated (p. 222).
Moisture condensation has occurred*
Fast flashing:
- Eject the cassette, turn off your camcorder, and leave it for about one hour with the cassette compartment open (p. 234).
PpeDynpexkaioune HndnKaTOpbl n COo6eHna
EcIn Ha 3KpaHe KKДиN B VnDOnckaTepe NoBnHOTc HnDnKaTOpbl N COo6eHnA, npOBepbTe cNeDuOuee:
Bolee npo6hnyu HOpmauCm. Ha cTpaHnue B KpyIbIX CkO6kax "( ).
PpeDynpexKaIOUeNnDnKcTOpbl
Warning indicators and messages
Warning indicator as to cassette memory
Slow flashing:
- No tape with cassette memory is inserted (p. 210).*
Self-diagnosis display (p. 222)
The still image is protected.
Slow flashing:
- The still image is protected (p. 202).*
Warning indicator as to "Memory Stick"*
Slow flashing:
- No "Memory Stick" is inserted (p. 173).
Fast flashing:
- Unreadable "Memory Stick" is inserted.
100-0001 " (Warning indicators) Memory Stick" file error*
Slow flashing:
- File is broken.
- File has no compatibility.
"Memory Stick" format error*
Fast flashing:
- There are two directories or more.
Data is broken. - "Memory Stick" is not formatted correctly (p. 160).
Warning messages
CLOCK SET
Set the date and time (p. 20).
FOR "InfoLITHIUM" BATTERY ONLY Use an "InfoLITHIUM" battery pack (p. 14).
- MEMORY FULL
The "Memory Stick" is full in photo save function (p. 192).
function(p:192): CLEANING CASSETTE
The video heads are dirty (p. 235).**
FULL
The tape cassette memory is full (p. 146).*
IpeDynpexkaTooJIne HndNKaTOpbl n coo6eHn
CII PpeDynpexJaIOuNn INHdkaTOp KacceTbI C nAmrTbIO
MeJenneHoe MInraHne:
- He yctaHOBLeHa IeHTa C KacceTHoI naMrtbTO (cTp. 210).*
Инданацma camodnaharoctnkn (ctp. 229)
m3o6paXeHne 3aunuHo
MeJenneHoe MInraHne:
- Ⅲo6paXeHne 3aunuEHO (cTp. 202).*
Ппсдурпесдаюши ИнданkaTop "Memory Stick"
MeJenneHoe MURaHne:
- He BCtAbJeHa "Memory Stick" (cTp. 173).
Быст Poe маганe:
- BCTABJIeHa HeuHTaEmaR "Memory Stick".
100-0001 "(Ппсдурждаоше инд Oшибka чтени Фαιюв ha Memory Stick"*
MeJenneHoe MrraHne:
-Фаил nobpeждн.
-Фаин HECOBMECTIM.
OuN6kaΦopMaTnpOBaHn“Memory Stick”*
Быст Poe маганe:
- IMeTeTcI DbA uIN 6oJIe KaTaNorOB.
-Даанные NOBpeKdEHbl.
"Memory Stick" OToΦopMaTIpOBaHa HEnpaBnJIbHo (CTp. 166).
Ppeynpexkaioune coo6eHnA
- CLOCK SET
YctaHOBInTe DaTy n BpEmr (cTp. 20).
FOR "InfoLITHIUM" BATTERY ONLY Исторьшто батерный бл_OK "InfoLITHIUM" (стр. 14).
- MEMORY FULL
"Memory Stick" nepenolheHa npn BbIOnHeHmФyHKcM COxpaHnH foTOCHIMKOB (CTP. 192).
CLEANING CASSETTE
3aŋpərənɪnɪc bɪndeərʊlɒbʌn (ctp. 235).**
FULL
Kaccettha namTb IeHTbl nepenonHeHa (cTp.146).

16BIT
AUDIO MODE is set to 16BIT.* You cannot dub new sound (p. 161).

REC MODE
REC MODE is set to LP.* You cannot dub new sound (p. 161).

TAPE
There is no recorded portion on the tape.* You cannot dub new sound (p. 142).

"i.LINK" CABLE
i.LINK cable is connected (p. 141).* You cannot dub new sound.

FULL
The "Memory Stick" is full (p. 180).*
FULL
The write-protect tab on the "Memory Stick" is set to LOCK (p. 170).*

NOFILE
No still image is recorded on the "Memory Stick".*

NO MEMORY STICK
No "Memory Stick" is inserted (p. 173).*

MEMORY STICK ERROR
The "Memory Stick" data is corrupted or the "Memory Stick" that you are using is not compatible with your camcorder (p. 174).*
FOMATERROR(p.160)
- DIRECTIONAL ERROR (p. 195)
- COPY INHIBIT
The tape contains copyright control signals for copyright protection of software (p. 211).*

TAPE END
The tape has reached the end of the tape (p. 44).*

NO TAPE
Insert a cassette tape (p. 22).*
- You hear the melody or beep sound.
** and the message appear alternately.
IpeynpejkaOuIne HndkaTOpbI n coo6eHn

16BIT
AUDIO MODE yctaHOBJIeH B noJoxKeHne 16BIT.* HObBI 3ByK HeBO3MOxHO nepe3aIncatb (CTp. 167).

REC MODE
REC MODE yctaHOBJIEN B NOJIOXeHne LP.* HbB3ByK HeBO3MOxHNo nepe3aIncatb (CTp. 167).

TAPE
Ha JeHTe HeT 3aHnCaHHoro yuactKa.* HOBbI 3ByK HEBO3MOxHO nepe3aHnCaTb (ctp.142).

“i.LINK” CABLE
Поdkлочен Ka6ьi.LINK (ctp. 141).* HOBь 3ByK HeBO3MOxHо nepe3aIncatb.

FULL
"Memory Stick" nepeonJIHeHa (ctp. 180).*

JIeNEcTOK 3aunTbI OT 3aHnCn Ha "Memory Stick" ycTaHOBnE B noLoXeHne LOCK (ctp. 170).*

NOFILE
Ha "Memory Stick" HeT 3aIncaHHbIX HenoDbXHbIX n3o6paKeHn.*

NO MEMORY STICK
He BCtBaIeHa "Memory Stick" (CTp. 173).*

MEMORY STICK ERROR
Данные на "Memory Stick" NOBpeXdHebl,Илп ИСпОьБЗЕмА "Memory Stick" HeCOВМecTUMa C BИdeOKamepoR (cTp.174).*

FORMAT ERROR (ctp. 166)*

- DIRECTIONAL ERROR (ctp. 195)*

PY INHIBIT
Ha JeHTe coOpExKaTcY npaBlaIOUne CnHaJIbI aBTOpCKNX npab DIA 3aUNiTBa bAToPCKNX npab Ha npoRpaMMHoe oBeCneueHne (ctp.211).*

TAPE END
IocnHHT KOHeU JeHtBi (cTp. 44).*

NO TAPE
BcTaBbTe Kaccety (ctp. 22).*

CnblIHTe MeLOJIO JIN 3yMMepHbN CnHaJ.

incoo6eHneOTo6paKaHOTcNooUepaEdNo.
Using your camcorder abroad
Using your camcorder abroad
You can use your camcorder in any country or region with the AC Adaptor supplied with your camcorder within 100V to 240V AC, 50/60 Hz.
Your camcorder is a PAL system based camcorder. If you want to view the playback picture on a TV, it must be a PAL system based TV with the AUDIO/VIDEO input jack. The following shows TV colour systems used overseas.
PAL system
Australia, Austria, Belgium, China, Czech Republic, Denmark, Finland, Germany, Great Britain, Holland, Hong Kong, Italy, Kuwait, Malaysia, New Zealand, Norway, Portugal, Singapore, Slovak Republic, Spain, Sweden, Switzerland, Thailand, etc.
PAL-M system
Brazil
PAL-N system
Argentina, Paraguay, Uruguay
NTSC system
Bahama Islands, Bolivia, Canada, Central America, Chile, Colombia, Ecuador, Jamaica, Japan, Korea, Mexico, Peru, Surinam, Taiwan, the Philippines, the U.S.A., Venezuela, etc.
SECAM system
Bulgaria, France, Guyana, Hungary, Iran, Iraq, Monaco, Poland, Russia, Ukraine, etc.
Simple setting of clock by time difference
You can easily set the clock to the local time by setting a time difference. Select WORLD TIME in the menu settings. See page 156 for more information.
Maintenance information and precautions
Moisture condensation
If your camcorder is brought directly from a cold place to a warm place, moisture may condense inside your camcorder, on the surface of the tape, or on the lens. In this condition, the tape may stick to the head drum and be damaged or your camcorder may not operate correctly. If there is moisture inside your camcorder, the beep sounds and the indicator flashes. When the indicator flashes at the same time, the cassette is inserted in your camcorder. If moisture condenses on the lens, the indicator will not appear.
If moisture condensation occurred
None of the functions except cassette ejection will work. Eject the cassette, turn off your camcorder, and leave it for about one hour with the cassette compartment open. Your camcorder can be used again if the indicator does not appear when the power is turned on again.
Note on moisture condensation
Moisture may condense when you bring your camcorder from a cold place into a warm place (or vice versa) or when you use your camcorder in a hot place as follows:
- You bring your camcorder from a ski slope into a place warmed up by a heating device.
- You bring your camcorder from an air-conditioned car or room into a hot place outside.
- You use your camcorder after a squall or a shower.
- You use your camcorder in a high temperature and humidity place.
How to prevent moisture condensation
When you bring your camcorder from a cold place into a warm place, put your camcorder in a plastic bag and tightly seal it. Remove the bag when the air temperature inside the plastic bag has reached the surrounding temperature (after about one hour).
Maintenance information and precautions
Removing Dust from Inside the Viewfinder
(1) While holding down the hook 1, slide the viewfinder in the direction of the arrow and remove it out 2.
(2) Clean the surface with a commercially available blower.
HnΦopMaucnno yxOy 3a annapaTom m Mepbl npeDoctOpoxHoCTn
YdaJIeHne 3aIrp3HeHn C BHyTpEHHeNCTOpOHbI BNDONCKaTeJr
(1)HaKIMaHa KpOuOK ①, CzBnHbTe OkyIap B HApBaJIeHIn CTpeKN I CHmMTE eFO ②.
(2)ПюизВоДиTe OчИСТКУ ПОБЕХОСТи CпомоцьЮ ИМЕЮЧEROСВ В пpoДаЖЕВОЗДУХОДYВHOrO ПИСnocОБлЕнЯ.
1
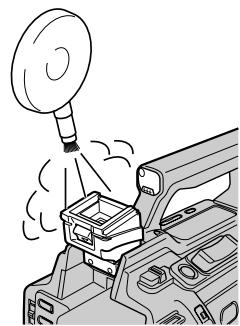
2
To reattach the viewfinder
Do step 1 above sliding the viewfinder in the reverse direction of the arrow.
Maintenance information
Cleaning the video head
To ensure normal recording and clear pictures, clean the video heads. The video head may be dirty when:
- mosaic-pattern noise appears on the playback picture.
- playback pictures do not move.
- playback pictures do not appear.
- the × indicator and "CLEANING CASSETTE" message appear one after another on the LCD screen or in the viewfinder.
YTo6bI CHOBA BCTaBnTb OkyJAp
Maintenance information and precautions
If the above problem, a or [b] occurs, clean the video heads for 10 seconds with the Sony DVM12CL cleaning cassette (optional). Check the picture and if the above problem persists, repeat cleaning.
HΦopMaци no yxOу 3a annapaTom mepbl npedocTopoxKHOCTn
Пи ВОЗнКНовен Иnpблел TИпаaИИ [b],почптЕВдeог罗OBКСпOMOцью счтЯшЕкасстБуSonyDVM12CL (приобетаIoTс дОПОнHTeЛьHo)ВTeЧЕн e 10ceyнД.ПроверТиЗОврахеHneI,ecnOnICANHbIe Bblse npблел He ycTpaineHbI, noBTOPHTe cNCTKy.
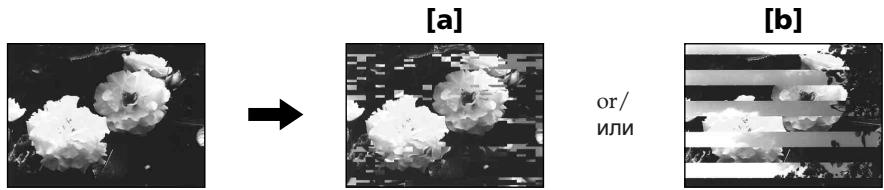
Cleaning the LCD screen
If fingerprints or dust make the LCD screen dirty, we recommend using a LCD Cleaning Cloth (optional) to clean the LCD screen.
Charging the built-in rechargeable battery
Your camcorder has a built-in rechargeable battery so that the date, time and other settings are retained even when the POWER switch is set to OFF (CHG). The built-in rechargeable battery is always charged as long as you are using your camcorder. The battery, however, will get discharged gradually if you do not use your camcorder. It will be completely discharged in about four months if you do not use your camcorder at all. Even if the built-in rechargeable battery is not charged, it will not affect your camcorder operation. To retain the date and time, etc., charge the battery if the battery is discharged.
Charging the built-in rechargeable battery
- Connect your camcorder to the wall socket using the AC Adaptor supplied with your camcorder, and leave your camcorder with the POWER switch set to OFF (CHG) for more than 24 hours.
- Or install the fully charged rechargeable battery pack on your camcorder, and leave your camcorder with the POWER switch set to OFF (CHG) for more than 24 hours.
UncTkα3KpaHaKKD
EcnHa 3KpaHe KKJIOBBArTcO TneuATkn
nAJIbueB INIIN PbIJ, IJIa OUYCTKN 3KpaHa
KKJ peKOMeHdyeTcN CNOJb3OBaTb
CneuaJIbHyIO TKaHb (npno6peTaIOTc
doONHHTeJIbHO).
3apKa BCTpoEHNoaKKyMylTOpHoi 6aTapeiKn
Bndeokamepa ochaeta BCtpoehno
akkymyIaTOPHO 6bataeIKo,
obecneuBaIOSe coXpaHene DaTbI,
BpeMeHN IpyrNx ycTaHOBOK DaJee npN
yctaHOBKe nepeKJIouaTeNA POWER B
NoLOXeNE OFF (CHG). BcTpoEHna
akKymyIaTOPHa 6bataeKa BcerDa
No3ApJXaeTcnp NcNOJb3OBaHN
BnDEokamepb. OdHaKO 6bataeKa
IOCTeHNO pa3PAnTcA, ecIn BnDEokamepa
He bDeT nCNoJb3OBAbTcB. EcIn
BnDEokamepa COBepseHNO He nCNoJb3UETcA, TO 6bataeKa NOINOCbTO pa3PAnTcR
pN6JIm3ntBeHo che3 QeTbipex Mecaua.
Daxe ecIn BcTPOEHNa AKKymyIaTOPHa
6bataeKa pa3PAnTcA, 3TO He NOBIIeT Ha
paBoTy BnDEokamepb. JnA COxPAHEnB N
nAMrTa DaTbI IN BpeMeHN CNe dyET 3apJNTb
6bataeKy, ecIn OHa pa3PAnKeHa.
3apraKa BCTpoEHHOaKKymyIATOPHO 6atapeKn
Maintenance information and precautions
Precautions
Camcorder operation
- Operate your camcorder on 7.2V (battery pack) or 8.4V (AC Adaptor).
- For DC or AC operation, use the accessories recommended in this operating instructions.
- If any solid object or liquid get inside the casing, unplug your camcorder and have it checked by a Sony dealer before operating it any further.
- Avoid rough handling or mechanical shock. Be particularly careful of the lens.
- Keep the POWER switch set to OFF (CHG) when you are not using your camcorder.
- Do not wrap your camcorder with a towel, for example, and operate it. Doing so might cause heat to build up inside.
- Keep your camcorder away from strong magnetic fields or mechanical vibration. Noise may appear on the image.
- Do not touch the LCD screen with a sharppointed object.
- If your camcorder is used in a cold place, a residual image may appear on the LCD screen. This is not a malfunction.
- While using your camcorder, the back of the LCD screen may heat up. This is not a malfunction.
On handling tapes
- Do not insert anything into the small holes on the rear of the cassette. These holes are used to sense the type and thickness of the tape and if the recording tab is in or out.
- Do not open the tape protect cover or touch the tape.
- Avoid touching or damaging the terminals. To remove dust, clean the terminals with a soft cloth.
HΦopMaζη no yxOy 3a annapaTom m Mepbl ppeoctopoXhOCTn
Mepblpeoctopoxhoctn
3KcnnyatazaBnuDeokamepbI
- 3KcπnyaTpyuTe BnDeokamepy ot 7,2 B (6aTaapeHbI b6nok) nJN 8,4B (AdaNTep nepemehnHO TOKa)
- YTo Kacaetc3KcNpyaTaunBnDeokampeblOT NOCTOHHORIO INepeMeHHORO TOKa,NCNOLb3yIne TpNaAdnLeXHoCTn,peKOMeHnyeMbIe B DaHHOINCHTpKUINo 3KcNpyaTaun.
- Ecπn BHytpb Koprnyca nona KaKoH-Nb6yDb TBePbI npEIMET INN XnDkoCTb, BByKJIIOuHTe BnDeOkaMepy n nepeD daJbHeNeiwe ee 3Knpyataune npOBepbTe ee y dUnepa Sony.
- He do npyskaite rpy6oro obpaueHnca Bnuideokamepoi nIIM mexaHnuecknx ynapoB. BybTe oc6oBeHHO OCTOpoxKnbI C 06bekTINBOM.
Korda Bndeokamepa He nCnoIb3yETc, ycTaHOBInTe nepeKnIOuATEJIb POWER B noLoXeHne OFF (CHG).
He 3abopauBaIte Bndeokamepy, HnnpimepB nOJOTEHue, Hne 3KcIpyaTnpuYe ee B TaKOM COCToHm. 3To MoKTe PnBcETN K NOBbUeHnIO TEMpepaTyb BHTpN BuDeokamepbI.
-Держnte BaSu Bndeokamepy noaIbwe ot CnIbHbIX MaHHTbIX NOEN I He noDBepraaiTe ee MexaHnueckoB N6paun. Ha n3obpaXeHN MOrYT Bo3HnKHyTb nomExN. - He npikacaiTecb K ekpaHy KKД ocTpbIMnpedMetam.
-Пи зкплуataци Baшев Вideokamepы вхолдом мосте, на заразец XXД можетовьгьсь сб оctatoчhoe ИЗбражень.Одано зто He явягся сенирабн检ью.
-При за валей вдега морь, 3адясторна за на с КД может HarpeBaTc.Онako зTo HeЯВЯETс НспразвhoCTbIO.
OTHOCHTeJIbHO 6OpaueHHcJeHTaMn
He BCTabJIrTe HnKaKINpEIMeTOB B MaJIeHbKne OTBepCTnHa 3aIdHei CTOpOHe KACcTebl.3TN OTBepCTnIcN0JIb3yOTcI dIg ONpeJeHInn TIna N TOJIuINHb IeHTbl, a TaKKe IJN ONpeJeHInn HaJIuNr IIN OTCyTCTBn JIeNEcTKa 3aUHTbl OT 3aIuNCn HaJIeHTe.
He OtkpbIbAte IpeDoXpaHITeIbHyIO KpbIbKU JeHTbI Ne IpnKaacaiTeCb KJeHTe.
He npikacaiTecb K noJIocam n He donyckaIte nx nobpeJdeHn. Iyn ydaJeHn Pblnn YnCTnte NOIoca C NOMOsbIO MRKoT KaHn.
Camcorder care
- Remove the tape, and periodically turn on the power, operate the CAMERA and VCR sections and play back a tape for about three minutes when your camcorder is not to be used for a long time.
- Clean the lens with a soft brush to remove dust. If there are fingerprints on the lens, remove them with a soft cloth.
- Clean the camcorder body with a dry soft cloth, or a soft cloth lightly moistened with a mild detergent solution. Do not use any type of solvent which may damage the finish.
- Do not let sand get into your camcorder. When you use your camcorder on a sandy beach or in a dusty place, protect it from the sand or dust. Sand or dust may cause your camcorder to malfunction, and sometimes this malfunction cannot be repaired.
AC Adaptor
- Unplug the unit from the wall socket when you are not using the unit for a long time. To disconnect the mains lead, pull it out by the plug. Never pull the mains lead itself.
- Do not operate the unit with a damaged cord or if the unit has been dropped or damaged.
- Do not bend the mains lead forcibly, or place a heavy object on it. This will damage the lead and may cause fire or electrical shock.
- Prevent metallic objects from coming into contact with the metal parts of the connecting section. If this happens, a short may occur and the unit may be damaged.
- Always keep metal contacts clean.
- Do not disassemble the unit.
- Do not apply mechanical shock or drop the unit.
Yxoid 3a Bndeokamepo
Korda Bndeokamepa B TeueHne IINTeIbHOrO BpeMeHN He NcNoJIb3yeTcR, BbIHMaJTe KAcCteTu n nepNOdUneCKN BKIOuayTe NITaHne, daTe Kamepe npa6oTaTB B pexime CAMERA u VCR, BKIOUyA BoCpOn3BeDeHne KAcceTbI npIMepHO Ha Tpi MNHyTbI.
- YIcHTNe ObBeKTHB C NOMOuBHO MArKoN KnCTOChn DnIy ydaJIeHn Ibln. EcIn NMeIOTc OTpeaTKn NaIbUeB Ha ObBeKTHBe, yDaJInte INC NOMOuBHO MArKoN TkaHn.
- YIcHTnTe KOpNc BvIeOKaMepbI C NOMOuBMO MArKoC cyXoT kAHN NIM MArKoT kAHN, CJIeRka CMOueHHo Cna6bIM pAcTBOPOM MOIOUero CpeCTBa. He IcNoIb3yIte HnKaKHe pAcTBOpuTeJIn, KOToPbIe MOrYT NOBpeDnTb NOKpbITne.
- He donyckaIte nopaDAnHna necka B Bndeokamepy. EcIn BblncnoIb3yeTe Bndeokamepy Ha necuHOM nJaXe nnB KaKOM-JIN60 nbIbHOM MeCTe, npedoxpaHraYte annapat OT necka nnPbJIn. PecOK nnPiNb MOrT npnbEcTn K HeNCnPabNHOCTn annpapata, KOtOpA INHGdAMoKet 6bItb HeycTpaHmOi.
AanTep nepemehHoro Toka
- OToCoeDInHnTe aannapat OT 3JeKtpnueckoCetN,ecn OH He nCNoJb3yETcA dIInTeJIbHOE Bpem.ДЯ OToCoeDInHeHnCeTeBOrO shHpaNotAHnTe erO 3a pa3bEm.HNKorDa He TAnHe 3a Cam shHyp.
He 3Kcnpnyatpyte annapat c nobpekdeHbIM uHypom, nIe ecn annapaT ypaI nn6bI nobpekden.
CnIbHO He nepeRn6aNte cTeBOi npoBoD n He CTaBbTe Ha Hero TReXeJIbIe IpEaMeTbI. 3TO MoXeT PnBcETr N K NOBpeJxDeHIO npoBOda N BbI3BaTb IOXap IIN NopaxKeHne 3JeKTPuYeCKIM TOKOM. - HnkaKne MeTaJIInueckNe PpeJMeTbI He DOJIINHbI COpNIKAcTaBcA C MeTaJIInueCKNMI KOHTaMn CoeINHITeNBHO INaCTINbI. EcIn 3TO cLIyUHTcA, TO MOKeT pOn3OHTn KOpOTKoe 3AmbIkaHne, n AnnapaT MoKeT 6bIT NOBpeXDeH.
Bcerda noДерхиBaTe MeTALnueckne KOHTaKtBi B YnCTOTE. - He pa3bpaaiTe annapaT.
- He noДверраиTe apпарт Мexанческоь Вьбраци и He роняte ero.
Maintenance information and precautions
- While the unit is in use, particularly during charging, keep it away from AM receivers and video equipment. AM receivers and video equipment disturb AM reception and video operation.
- The unit becomes warm during use. This is not a malfunction.
- Do not place the unit in locations that are:
- Extremely hot or cold
- Dusty or dirty
- Very humid
- Vibrating
Rechargeable battery pack
- Use only the specified charger or video equipment with the charging function.
- To prevent accident from a short circuit, do not allow metal objects to come into contact with the battery terminals.
- Keep the rechargeable battery pack away from fire.
- Never expose the rechargeable battery pack to temperatures above 60^ (140^) , such as in a car parked in the sun or under direct sunlight.
- Keep the rechargeable battery pack dry.
- Do not expose the rechargeable battery pack to any mechanical shock.
- Do not disassemble nor modify the rechargeable battery pack.
- Attach the rechargeable battery pack to video equipment securely.
- Charging while some capacity remains does not affect the original battery capacity.
- The rechargeable battery pack is not resistant to water. Do not wet the rechargeable battery pack.
- Unless you use the rechargeable battery pack for a long period, store the battery pack after you charge it fully and use it completely once a year.
- Store the rechargeable battery pack in a cool, dry place.
HΦopMaζη no yxOу 3a annapaTom m Mepbl ppeoctOpoxKHOCTn
-Прии снользовани annapa_ta,oc6eHHO BO BpeM3apdKn,depxKITE ero noJaIbwe ot npemHknOB AM-paNoBeeuaHn IBuDeoannapaTpybl.ПрemHnKnAMpaNoBeeuaHn IBuDeoannpaTpya HapyuahOT AM-paOnopnem n pa60ty BnuDeoannpaTpybl.
B npocce 3kcnnyataun annapat HarpebaeTc. Ondako 3TO He RbIaTeCnHeNCpabHOCtbo.
- He pa3meaTe annapaT B MecTax: -Upe3mepHo JapKnx UJIN XOJIoDhbIX
-ПьлбнБИХ ИИnpгЯЗнБИX
-OuehbBnaXhbIX
-ПоДвержЕньх Вибраци
Ipe3apXkaembI 6aTapeHbI 6JOK
Испόньзуй Te Tolько pekomeнДуемоe 3apЯДhoe yctpoiCТВО ИПи BndeoannapaTypCФунКцeнЗapЯДКИ.
-ПЯпгдOTьрашеня HeчсactHOrO cIyuaн 3-3a KOPOTKOrO 3aMbIkaHnI He DoNYcKaITe COpNKOCHOBEHnI MeTaNJIuYeCKnIX npdMeTOB C NOHOCAMN 6aTapeHOrO 6noka.
- He Āperknte pēpezapjkaemb i 6aṭapeηh b 6JOK B6Jn3n ORH.
- HnKorDa He noDbEprAaIe nepe3apXaembIi 6bataepHbI 6bok Bo3deJeCTBIO TeMnpaTpy CbIbIe 60^ ,HaNPmEp, He OCTabJIte Ero B aBTOMO6nIe, npuapKOBaHHOM B COJHeuHOM MeCTe, INI NOI pNpMbIM COJHeuHbIM CBEToM.
-Пepe3apjaKaembl6aTapeHbIb6Iok BcERda DoJXKeH 6bITb cyxM.
- He noDBepraIte nepe3apJxHaembI 6aTaapeHbI 6bOK Bo3dEiCTBnIO KaKnx-JIn6o MExaHnuecknX yIapOB.
- He pa3bpaTte nepe3apJkaembl 6bTaapeHbI 6bOK n He n3MeHnTe erO KOHCTpyKcIIO.
- NaedxHNO pnpKpePnIyTe nepe3apXkaembl 6aTaPeHbN b6JOK K BnDeoannapaType.
3apka6batapeHoro 6Ioka B clyuae octabweCRA EMKoCTn He OtpaKaetcna H eero IxCXOHDHOEMKoCTn.
- Pene3apJkaembI 6aTapeiHbI 6bOk He YBnIeTcR BOIOHePOnHuaembIM. He NoDBepraTe pepe3apJkaembI 6bTaPeHbI 6bOK Bo3dEiCTBnIO BnAIn.
- Ecni nepe3apxkaembI 6bataeHbI 6bok dInTeBHOE BPEM He IcNoJIb3yETc, nIOHOCTbO 3ApIaNTe eO IN XpaHITe OTdEJIbHO. Pepe3apXkaembI 6bataeHbI 6bOK Heo6xOIMO OINHOCTbO pa3pJxAtb OIN PA3 B rOJ.
-XpaHnte nepe3apXkaembI 6atapeHbI 6bLOK B cyxOM npOxJaDHom MeCTe.
Notes on dry batteries
To avoid possible damage from battery leakage or corrosion, observe the following:
- Be sure to insert the batteries with the + - polarities matched to the + - marks.
- Dry batteries are not rechargeable.
- Do not use a combination of new and old batteries.
- Do not use different types of batteries.
- Current flows from batteries when you are not using them for a long time.
- Do not use leaking batteries.
If batteries are leaking
- Wipe off the liquid in the battery compartment carefully before replacing the batteries.
- If you touch the liquid, wash it off with water.
- If the liquid get into your eyes, wash your eyes with a lot of water and then consult a doctor.
If any problem occurs, unplug your camcorder and contact your nearest Sony dealer.
Cyxne 6atapeiKu
Bo n36exkHne Bo3MOxHOro NOBpeKdEHHBnDEOKaMepbI BCNEcCTBne yTeuKNBHyTpeHHeRo BeuecTBa 6aTaapeek nnKopp03nn Co6JIOnaJte CNeDuOuSee:
-Пиустановкебатаразексоблюдайтправильнуюпалрноctь+ -В COOTBETCTBUN C MTeKAMN +-.
Cuyxie 6aTapei Kn HeIb3r nepe3apJXkaTb.
- He nCnoJIb3yIte HOBbie 6aTapeKn BMeCTe CO CTapblMn.
- He nçnojlb3yüte 6aTaapeiKn pa3Horo Tuna.
- Ecin 6aTapeKHe nCnOJIb3yOTcA DInTeJIbHOe BpEm, OHn NOCTeNEHHO pa3prXkaTc.
He nCnoJIb3yIe 6aTapeiKn, KOTOpBIE nOTEKIn.
EcIn npOn3oUna yTeuKa BHyTpEnHero BeuecTb6aTaapeek
-Перед Tem,кak замень батуейки,Тцателноюртпге octатуки КИДКОТВOTсЕдябатураек.
Bcnyae nonaandaHnJnkocTn Ha Koxy, CMOte ee BOdoi.
B cnyuae nonaadaHnJxuKoCTn B rJa3a, npomTe rJa3a 60JIbUIM KOINueCTBOM BObl, nOcNe Yero o6paTntecb K BpaCy.
B cnyae Bo3HKnHOBeHnKaKnx-Jn6o np6bEm,OTKJIIOUHTe BUNDeOKaMepy OT nCTOuHnKa NITaHnI O6paTntEcB B 6JnKaaWsiN cepBnChbI uehTp Sony.
Video camera recorder
System
Video recording system
2 rotary heads
Helical scanning system
Audio recording system
Rotary heads, PCM system
Quantization: 12 bits (Fs 32kHz stereo 1, stereo 2), 16 bits
(Fs48 kHz, stereo)
Video signal
PAL colour, CCIR standards
Usable cassette
Mini DV cassette with the _Min^Min mark printed
Tape speed
SP: Approx. 18.81mm / s
LP: Approx. 12.56mm / s
Recording/playback time (using cassette DVM60)
SP:1h
LP: 1.5 h
Fast-forward/rewind time (using cassette DVM60)
Approx. 2 min and 30 s
Viewfinder
Electric viewfinder (colour)
Image device
1/3 type CCD (3 Charge Coupled
Device)
Approx. 450 000 pixels
(Effective: Approx. 400 000 pixels)
Lens
Combined power zoom lens
Filter diameter 58mm (23/8 in)
12× (Optical), 48× (Digital)
F1.6-2.4
Focal length
6 - 72 mm (1/4 - 2 7/8 in)
When converted to a 35mm still camera
43.2 - 518.4 mm (1 3/4 - 20 1/2 in)
Colour temperature
Auto, Indoor (3200K),
Outdoor (5800K),
Minimum illumination
1 lux (F1.6)
Input/Output connectors
S video input/output
Input/output auto switch
4-pin mini DIN
Luminance signal: 1Vp - p
75 ohms, unbalanced
Chrominance signal: 0.3Vp - p
75 ohms, unbalanced
Video input/output
Input/output auto switch
RCA pin-jack, 1 Vp-p, 75 ohms,
unbalanced
Audio input/output
Input/output auto switch
RCA pin-jack, 327mV (at output impedance more than 47 kilohms)
Output impedance with less than 2.2 kilohms
Input impedance more than 47 kilohms
Headphones jack
Stereo minijack ( 3.5mm)
LANC control jack
Stereo mini-minijack ( 2.5mm)
MIC jack
Minijack, 0.388mV low impedance with 2.5 to 3.0VDC , output impedance 6.8 kilohms ( 3.5mm)
Stereo type
DV Interface
4-pin connector
Speaker
Dynamic speaker ( 20mm)
LCD screen
Picture
6.2 cm (2.5 type)
Total dot number
211000 (960× 220)
General
Power requirements
7.2 V (battery pack)
8.4 V (AC Adaptor)
Average power consumption
(when using the battery pack)
During camera recording using LCD
4.7 W
Viewfinder
4.1 W
Operating temperature
0^ to 40^ (32^ to 104^)
Storage temperature
-20^ to +60^ (-4^ to +140^)
Dimensions (approx.)
120× 159× 393mm (43 / 4× 63 / 8
× 151 / 2 in (w / h / d)
Mass (approx.)
1.5kg (3 lb 6 oz) including the
hood with a lens cap
1.6kg (3 lb 9 oz)
including the rechargeable battery
pack, NP-F570 and cassette
DVM60
Supplied accessories
See page 5.
AC Adaptor AC-L15A/L15B
Power requirements
100V-240VAC,50/60Hz
Current consumption
0.35 - 0.18 A
Power consumption
18W
Output voltage
DC OUT: 8.4V^*
Operating temperature
0^ to 40^ (32^ to 104^)
Storage temperature
-20^ to +60^ (-4^ to +140^)
Dimensions (approx.)
56× 31× 100mm
(21 / 4× 11 / 4× 4in)(w / h / d)
excluding projecting parts
Mass (approx.)
190 g (6.7 oz)
excluding the mains lead
- See the label on the AC Adaptor for other specifications.
Rechargeable battery pack NP-F570
Output voltage
DC 7.2 V
Capacity
15.8 Wh
Dimensions (approx.)
38.4 × 20.6 × 70.8 ~mm (19 / 16 ×
13 / 16× 27 / 8 in (w / h / d)
Mass (approx.)
100g (3.5 oz)
Type
Lithium ion
Design and specifications are subject to change without notice.
Texhnueckne xapaKtepncnkn
Büdeokamepa
Cnctema
CnCTema Bunde03aHNCN
2BpauoouneecraIOBKN
CNCTema HAKJIOHHO
Mexahnuecko pa3BepTKI
CnCTema aydno3anncn
Brazaounece rOJOBK, cIcTeMa UKM
Диckретмзuaим: 126nt(cDnur частобу 32KtC,стебоу 1,стебу 2), 166nt
(CDBrHACTOBt48KU,CTepeo) BudeocunHai
Lbetobov cnHnAL PAL, cTaNapr MKKP
IcnoJb3yemblkaccetbl
KacceTb MInH DV C neaTHbIM 3HAKOM MIN
CKOPoCTbJeHtbl
SP: npn61. 18,81 MM/c
LP: npn6n. 12,56 MM/c
Bpema 3aunnc/
Bocnpon3BeDenHn (npn
NCNoJIb3OBaHnKacCeTbl
DVM60)
SP:14
LP:1,54
Bpem yckopenno nepemotkn
BnpeDHa3aD (npn
NcNoJIb3OBaHnKacCeTbl
DVM60)
Pn6J.2MmH.n30ceK.
BudonckaTeJIb
3NeKTPMHeCKN BIVDOnCKaTeNb (UBeTHoH)
ΦOpMnPoBaTeIb n3o6paXeHn
P3C tyna 1/3 (3 npi60pa c 3apraDob C87BIO
Pn6n.450 000 ToeK
(Pa6o7ne: np6n. 400 000 ToueK)
06beKTHB
YHnBepcaIbHbI OBeKtNBC
3JIeKTPoPnBODOM
TpaHcDpOKaTOPa
Dnametp cnIbTpa 58 MM
12× (ontnueckn), 48x
(uOPOBO)
F1.6 - 2.4
ΦokychoepacctoHne
6-72MM
Ppi ppeo6pa30BaHnB 35-MM
dotokamepy
43,2-518,4MM
ZBETOBARTEMNEPaTpa
AByoteperyunopabane, B NomoucheHH (3 200 K),
Ha yIuIe (5 800 K),
MHHMaJIbHaO CBeUeHHOCTb
1 liokc (F1.6)
Pa3bembl BXoHbIX/ BblXOBhIX CnHaNo
BndeOBXoD/BnDeOBoXoD S
ABMATUHcKNeIpeKeNIOaTeNb BXOa/BXbXoA
4-TtBtBuKOBOE MmHr-3EoDIN CunHan rpkOCTu:1Ba ToKY,
75 OM, HecnMMMeTpnuHbI
CunhaJzBeteHOCTn:0,3BHa
TOUky, 75 OM, HecIMMeTpnuHbI
Bndeo BXoBbIXoD
ABTomatneckn nepeKlnoHaTeIb BxOJa/BxIXDa
Pa3bem RCA, pa3max cnHaJa 1
B BA ToCHQY,75 OM, HECHNMMETDYNHbIy
Aydno BXoB/BblXoD
ABytomatneckn nepeKlnoyateIbBxOa/BbXoDa
Pazbem RCA, 327 MB (pnp noHOM BixOJHOM COpTUBnEHN60nee 47 kOM)
ПОЛhoe ВьIxOДhoe
conpotribnene - Meehe 2,2 KOm
Pionhoe BXOthoe conpotribnene
6onee
47 KOM
THe3doIraoNobhix TeneΦoHOB
CTpeofoonueckoe MNHn-He3do (a 3,5 MM)
THe3do ynpableny LANC
CTpeofoonueckoe MNHn-He3do (2,5 MM)
THe3DO MIC
MnHrHe3do,0,388MB,Hm3Koe nOJIHOe cOnpOTaIBNeHMe OT 2,5 do 3,0B NoCToARHO TOKa, BbIXOJDHOe NJIHOe cOnpOTaIBNeHne
6,8 KOM (0 3,5 MM)
CtepeofoHueckn TIN
NHTepDcDV
4-WTbipbKOBbI pa3bEm
Громкоговорптуь
HnHAMK rPOMKOROBOpNTeJI
(0 20 MM)
3KpaH XKd
1306paXeHne
6,2 cm (TUN 2,5)
O6uee KOJINHECTBO 3JEMEHTOB 036pakheny
211000 (960× 220)
Oe xapaKTePncTnK
Tpe6oBaHnK nntaHnIO
7,2B(6aTaepenHbIn 6nok)
8.4 B (AaanTep nepemehnHoro TOKa)
CpeHnA noTpe6bEma MOUHOCT
(pnIcNIObn3OBAHnIN 6aTaapeHOro 6boka)
Bo Bpemra 3a nncn Bndeokamepo C nomoubjo KKJ
4.7BT
Budomskatelb 4.1BT
Pa6o7a TempepaTpa
Ot 0°C do 40°C
Temnepaotypa xpaHeH
OT-20°C Dno+60°C
Pa3mepbl (npn6n.)
120× 159× 393MM (W/B/r)
Bec (np6n.)
1,5K
BkIIOUa 6JIeHdY c KpbIiKoJ
06bekTnBa
1.6Kr
6aTapeHbI 6nK NP-F570 n
kaccety DVM60
Ppnilaraemble npHaJnxHOCTn
CM. cTp. 5.
AanTep nepemehHoro Toka
AC-L15A/L15B
Tpe6oBaHnK nIITaHmIO
100 B - 240 B nepemehoro toka, 50/60 T
PacxoToka
0.35-0.18A
Notpe6JIaMaMa MoUHocTb 18BT
BbIXoHoe HapRjXeHne
DC OUT: 8.4 B
Pa6o7a TemnepaTpa
O 0^ do 40^
TempepatypxpaenHn
OT-20°C dO +60°C
Pa3mepbl (npn6n.)
56× 31× 100MM
(Ⅲ/B/D), He BKJIIOHcA
BbICTyIaIOJIe YAcTNI
Bec (npn6J.)
190r
6e3 ceTeBOrO uHypa
*IOnONHnTeNbHbIeTexHnueckne XapAKTEpNCTKnCm.Ha 3TnKeTke aanTepe naPepMeHHoro TOKa.
Pepe3apjkaembIb 6aTapeHbI 6JOK
NP-F570
BbIXoHoe HapRjXeHne
7,2B noct. Toka
Mouhoctb
15.8BT-4.
Pa3mepbl (npn6n.)
38.4 × 20.6 × 70.8 MM(L / B / r)
Bec (np6n.)
100
TUN
JNTHeBO-NOHHbI
KOHCTpykUmaI INTEXHmueckneXapakETePNTKNM0yTmM3MHYbChB63
IpeDbapntbHOryBVeDOMnHeN.
- Quick Reference - Identifying the parts and controls
-ОпаTNBньсрвоунк -ОбоЗ nauseючачten peуларopob
Camcorder
Bvdeokamepa
1 INDEX MARK button (p. 91)
2 Zoom ring (p. 32)
3 Focus ring (p. 83)
ND FILTER selector (p. 68)
FOCUS selector (p. 83)
6 PUSH AUTO button (p. 83)
7 FADER button (p. 57)
8 BACK LIGHT button (p. 34)
END SEARCH button (p. 38)
10 EDITSEARCH buttons (p. 38)
11 EXPOSURE dial (p. 65)
12 EXPOSURE button (p. 65)
13 Display window (p. 253)
14 OPEN button (p. 24, 40)
15 SPOT LIGHT button (p. 35)
1 Khonka INDEX MARK (ctp. 91)
2 Kolbuc TpaHcfoKaTopa (ctp. 32)
3KoJIbUcΦokycnPoBKn (CTp.83)
4 CeIeKtop ND FILTER (cTp. 68)
5 CeIeKTop FOCUS (cTp. 83)
6 KhoNka PUSH AUTO (cTp. 83)
7 KhoNka FADER (cTp. 57)
8 Khonka BACK LIGHT (cTp. 34)
9 Khonka END SEARCH (cTp. 38)
10 Khonkn EDITSEARCH (cTp. 38)
11 Dnck EXPOSURE (cTp. 65)
12 Khonka EXPOSURE (cTp. 65)
13 Okoiko DnCnpe (cTp. 253)
14 KhoNka OPEN (ctp. 24, 40)
15 Khonka SPOT LIGHT (ctp. 35)
Mini

Digital Video Cassette
Cassette Memory
These are trademarks.
i4
Intelligent Accessory Shoe
Notes on the intelligent accessory shoe
- The intelligent accessory shoe supplies power to optional accessories such as a video light or microphone.
- The intelligent accessory shoe is linked to the POWER switch, allowing you to turn the power supplied by the shoe on and off. Refer to the operating instructions of the accessory for further information.
- The intelligent accessory shoe has a safety device for fixing the installed accessory securely. To connect an accessory, press down and push it to the end, and then tighten the screw.
- To remove an accessory, loosen the screw, and then press down and pull out the accessory.
06o3haueHne yacTei nperyIaTOpOB
Mini

Digital Video Cassette

Cassette Memory
TO TOPROBble MapK.
i4
Intelligent Accessory Shoe
PpIMeuaHnno No epKataTeIIO dna BCNOMOraTeNbHbIX npHaadJeXHoCTe
-ДержateлдЯ BCNOMORAteIbHbIX npHaJnEJXHOCTe NOJaet NITaHHe Ha BCNOMORAteJIbHbIe pInHaJnEJXHOCTu, TaKne KaK BnDeONoCDBeTKa INMmKpOPOH.
-Держateлдя BCNOMORAteIbHbIX npHaJnEkhOCTe coeHHe C nepeKJIouaTeIem POWER,уTO no3BoJrET BKJIQUaTb N BbIKJIQUaTb NOdaBaEMOE Ha derjkaTeIb nHTaHne.Поюбпье CBeDEHnnpINBOJATcB INHCTpyKUInno 3KcPnyaTaUIN BCNOMORAteIbHbIX npHaJnEkhOCTe.
BДержателдь BCNOMORAteIbIbIx npnHaJdIeXHOCTeI NMeETcnypeOxpaHTeINbHOe YCTPOICTBOI npHaJdEHHoIФIKCaUNyCTaHOBJIeHHoI npnHaJdIeXHocTn.ДлnoIcOeDInHeHnnpnHaJdIeXHOCTN HAKMITe ee BHN3doynopa, a 3aTeM 3aTaNHTe BnHT.
-ДЯСТЯнпинаджHOCTNOCla6bTe BnHT,a3aTeMHaKmTe npHaNEXKHOCTb BnI3И NOTAHITE ee.
16 Speaker
17 LCD screen (p. 27)
18 LCD BRIGHT buttons (p. 28)
VOLUME buttons (p. 40)
20 MEMORY PLAY button (p. 193)
21 DISPLAY button (p. 41)
22 MEMORY - button (p. 184, 193)
23 DATA CODE button (p. 41)
24 TITLE button (p. 144)
25 (self-timer) button (p. 36, 50, 181)
26 Battery pack (p. 13)
27 ZEBRA selector (p. 69)
28 RESET button (p. 221)
29 MEMORY INDEX button (p. 195)
30 MEMORY DELETE button (p. 204)
31 MEMORY + button (p. 184, 193)
32 MEMORY MIX button (p. 184)
33 PICTURE EFFECT button (p. 58)
34 DIGITAL EFFECT button (p. 61)
16 TpomKorOBopnteJb
17 3KpaH XXKd (cTp.27)
18 Khonkn LCD BRIGHT (ctp. 28)
19 KhonkVOLUME (cTp. 40)
20 Khonka MEMORY PLAY (cTp. 193)
21 Khonka DISPLAY (cTp. 41)
22 Khonka MEMORY - (ctp. 184, 193)
23 KhoNka DATA CODE (ctp. 41)
24 KhoNka TITLE (ctp. 144)
25 KhoNka (Taimep camo3anycka) (cTp. 36, 50, 181)
26 BaTaapeHbIb 6JIoK (cTp.13)
27 PepeKlouaTeIb ZEBRA (ctp. 69)
28 Khonka RESET (cTp. 228)
29 KhoNka MEMORY INDEX (ctp. 195)
30 Khonka MEMORY DELETE (ctp. 204)
31 Khonka MEMORY + (ctp. 184, 193)
32 KhoNka MEMORY MIX (ctp. 184)
33 KhoNka PICTURE EFFECT (CTp. 58)
34 Khonka DIGITAL EFFECT (cTp. 61)
Identifying the parts and controls
06o3haueHne yacTei nperyJrTopoB
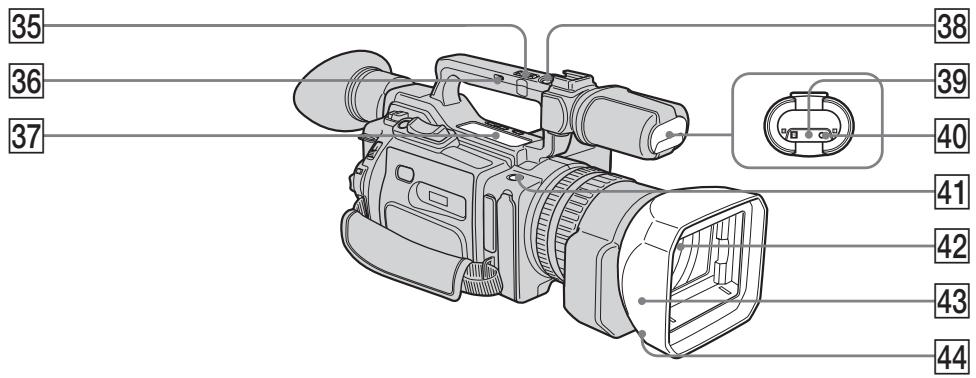
35 Handle zoom lever (p. 31)
36 Handle zoom switch (p. 31)
37 Video control buttons (p. 40, 44, 123)
SLOW (slow playback)
AUDIO DUB (dubbing)
STOP (stop)
REW (rewind)
PLAY (playback)
FF (Fast-forward)
PAUSE(pause)
REC (recording)
The control buttons light up when you set the POWER switch to VCR.
38 Handle REC START/STOP button (p. 29)
Remote sensor/infrared ray emitter
40 Camera recording lamp (p. 24)
41 REC START/STOP button (p. 29)
42 Lens
43 Hood with a lens cap (p. 247)
44 Lens hood fixing screw
35 PbyaXoK TpaHcfoKaun Ha pyuKe (cTp. 31)
36 BnHT dIa qKcaun 6JeHdbi oBeKeTnBa (cTp. 31)
37 KhoIKN BnDeOkoHTpOJIa (cTp. 40, 44, 123)
II SLOW (3aMeIeHoe Bocnpoun3BedeHne)
AUDIO DUB (nepezannc)
STOP (ocTaHOBka)
REW (yckopeHHa nepeMoTka Ha3a)
PLAY (Bocnpoun3BeJeHne)
FF (yckopenhna nepemotka bnepei)
II PAUSE (nay3a)
REC (3aIncb)
KhONKn ynpaBneHn POnCBeuBaHTcA, ecn npeKJIouaTeNb POWER ycTaHOBlen B noJIOKeHne VCR.
38 Khonka REC START/STOP ha pyuKe (cTp. 29)
39ДиctaHcNoHHbIceHcOp/ nHΦpaKpaChbI n3JyUaTeNb
40 JAMIOUka 3aINcBUNDeOKamepoI (CTp.24)
41 KhoIIka REC START/STOP (Haayao/OctaHOBka 3annc) (ctp.29)
42 06bektnB
43Бл endа obbeKTHBa c KpbIshKo (cTp. 247)
44 BnHT dIaФИKcauIgJIeHdbI 06BeKTnBa
Attaching/removing the eyecup
- When removing the eyecup, pull lightly the upper edge of it with your fingers a, insert a finger into the gap that appears between the eyecup and viewfinder [b], then remove it. When attaching the eyecup, fit it onto the camcorder slide it all the way along grooves until it stops.
- Do not pull the eyecup inward or with excessive force [c]. Doing so may damage the eyecup.
PpniKpenJIeHne/chTne okyIpa
-Пи CHATINOKyIpa cIeRka NOTAHnTe naJIbUaMn 3a erO BepxHn KpaJ a, BCTaBbTe napeu B NOBvBUnsCra 3a3Op MEXdY OKyIpyom N BVIOUNCKaTeJeM [b], 3aTEM CHIMITE erO. YTO6bl pInKpeNtB OKyIrp, HadeHbTe erO Ha KaMepu IN CDbHbTe Do ynpa BDoNb HAnpabJIoXn.
He cbopauhbaTe erO BHytpb n He npinaraTe n3nuiHnx ycnn [c]. 3To MoKet pInBecTn K NobpeJdeHIO OkyIpa.
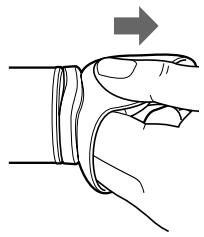
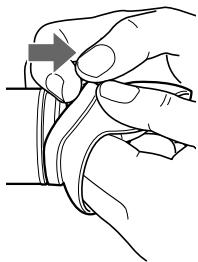
[b]
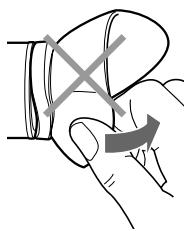
[c]
Attaching/removing the hood with a lens cap
To attach the hood with a lens cap, fit the line on the hood to the corresponding line on the lens frame, then screw the hood clockwise and tighten the lower hood fixing screw.
To remove the hood with a lens cap, loosen the lower hood fixing screw, and unscrew the hood with a lens cap counterclockwise.
PpKpeJIeHne/CHaTHe 6JeHdbI oBbeKTnBa c KpbIshKoI
YTo6bI NoIOCoEINHnTB 6NeHdy C KpbIshkoi O6bKeTnBa, COBMeCTnTe IINHIO Ha 6NeHDe C COOTBeTCTBYUoSe IINHeNHa KaApnpuyOe HacaIKe,3aTeM NOBepHnTe 6NeHny no YacOBoi CTpeJIke I 3aTHnTe HIXHN BnHT dIy FHKcaunn 6NeHdbI.
YTo6bI CnHTb 6JeHdy C KpbIiKoO oBeKTHBa, Ocna6bTe HNxHnB BNHT FIKCaUN 6JeHdbI INOBePHnte 6JeHdy C KpbIiKoO oBeKTHBa npOTNB YacOB0CtpeJIKN.
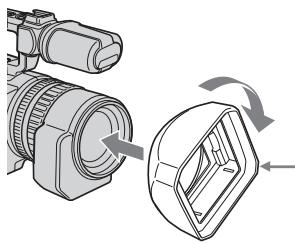
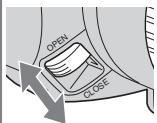
To open/close the shutter of the hood with a lens cap, slide the knob to your desired direction according to the arrow./
TTo6bl OTKpbIb/Tb/3aKpbIb 7Topky
6JIeNbIc KpbIuKoN OBeKtIBA,
npeBdInbTe pblaXok B HUxHOM
Ha npabNeHN B COOTbETCBN CO CTpeKNo.
When using additional filters
We recommend that you use Sony made filters.
PnncnoJb30aHH
DOnONHHTeNbHbIXΦnIbTpOB
PekomEnyetycncnOlb3oBaTbΦnIbTpbl npOn3B0ndCTBa Sony.
45 Hooks for shoulder strap
46 Power zoom lever (p. 31)
47 PHOTO button (p. 48, 177)
48 BATT (battery) RELEASE lever (p. 13)
49 PROGRAM AE button (p. 79)
50 AUTO LOCK selector (p. 63)
51 WHT BAL button (p. 72)
52 AUDIO LEVEL button (p. 75)
53 MENU button (p. 156)
54 SEL/PUSH EXEC dial (p. 156)
55 Memory Stick slot (p. 173)
56 Cassette lid (p. 22)
57 PUSH button (p. 22)
45 KpoukydIy npeyeBOrOpemHr
46 Pbyar npBoDa TpaHcfoKaTopa (ctp. 31)
47 Khonka PHOTO (cTp. 48, 177)
48 PbyaXoK BATT RELEASE (ctp. 13)
49 Khonka PROGRAM AE (cTp. 79)
50 PtepeKlnouaTeNb AUTO LOCK (cTp. 63)
51 Khonka WHT BAL (cTp. 72)
52 Khonka AUDIO LEVEL (cTp. 75)
53 KhoNka MENU (ctp. 156)
54ДиСК SEL/PUSH EXEC (cTp.156)
55 THe3do dIa Memory Stick (cTp. 173)
56 Kpbiuka kaccethoro otceka (ctp. 22)
57 Khonka PUSH (ctp. 22)
Identifying the parts and controls
58 Grip strap
59 LOCK switch (p. 24)
60 POWER switch (p. 24)
61 START/STOP button (p. 24)
62 SHUTTER SPEED button (p. 66)
63 Access lamp (p. 173)
Fastening the grip strap
Fasten the grip strap firmly.
Attaching the shoulder strap
Attach the shoulder strap supplied with your camcorder to the hooks for the shoulder strap.
Haedexho npikpeinTe pemehb dIa3xbaTa.
Ppukpenenne npeyeBoro peMHa
PπpKpeHnTe pIeYBoi pEmHb, npIpaRaembl K BaWeB vIeOkaMepe, K KpUoyKaM dJa pIeYBoOro pEMHa.
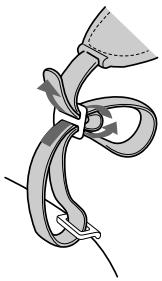
Identifying the parts and controls
06o3haueHne yacTei nperyJrTopoB
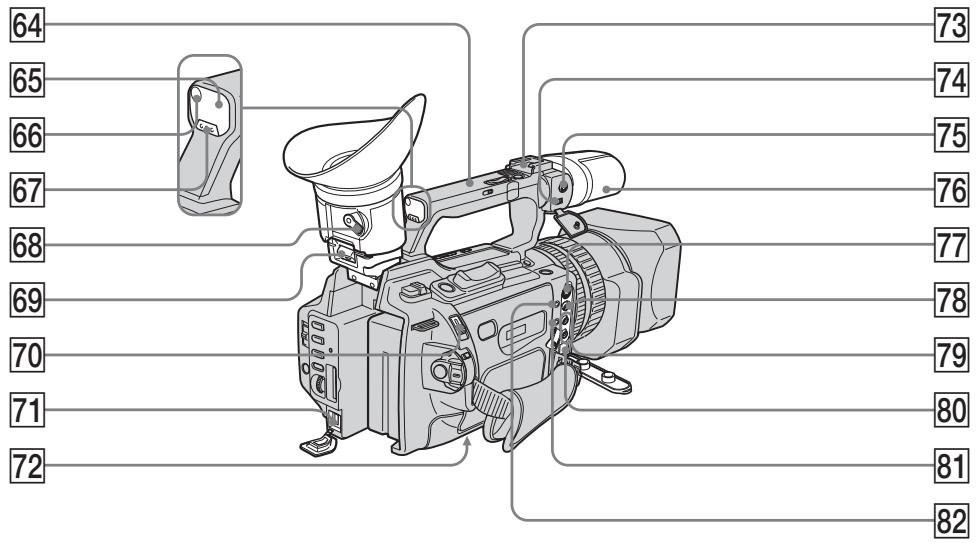
64 Carrying handle
65 Remote sensor
66 Camera recording lamp (p. 24)
67 CUSTOM PRESET button (p. 77)
68 Viewfinder adjustment lever (p. 30)
Hook for removing the viewfinder (p. 235)
70 EJECT switch (p. 22)
71 DCIN jack (p. 14)
72 Tripod receptacle
Make sure that the length of the tripod screw is less than 6.5mm (9/32 inch). Otherwise, you cannot attach the tripod securely and the screw may damage your camcorder.
73 Intelligent accessory shoe
74 MIC/LINE switch (p. 137)
64 Puyka dIJI nepeHocKn
65 DaTnK nctaHOnOHOro ynpaBHeHH
66 JIamnoquka 3aHncn BUndeokamepo (cTp.24)
67 Khoonka CUSTOM PRESET (cTp. 77)
68 PbyaXok perylnpoBkn BnDOnckaTeJI (cTp. 30)
69 KpOyOK dIa CHaTHa BnDoUckKaTeJI (cTp. 235)
70 IpekeKJIIOuataTeIb EJECT (cTp. 22)
71 THe3do DC IN (ctp. 14)
72 He3do dna wTaTnBa
Y6eIntecb, YTO IINHa BInHTa 7TaTnBa He npEByIshaet 6,5 MM. B IpOToNBOM Cnyae BbI He cMOxTe HaJExKHO pNkpeNTb 7TaTnB, a BInHT MoXET NOBpeNTb BInDeOKamepy.
73Держateлдя BCNOMORAteIbHbIX npHaadJeKHOCTeI
74 NepeKlnouaTeIb MIC/LINE (cTp. 137)
Identifying the parts and controls
MIC jack (PLUG IN POWER) (p. 137)
The MIC jack is used to supply the power to the "plug-in-power" microphone connected, and is used as an audio input jack for an external microphone or audio equipment. When connecting an external microphone, set the MIC/LINE switch to MIC, and when connecting audio equipment, set it to LINE.
76 Microphone (p. 139)
77 SVIDEO jack (p. 46, 107, 130, 189)
VIDEO jack (p. 46, 107, 130, 189)
79 AUDIO L/R jack (p. 46, 107, 130, 139)
80 DV Interface (p. 109, 132, 190)
This "i.LINK" mark is a trademark of Sony Corporation and indicates that this product is in agreement with IEEE 1394-1995 specifications and their revisions.
The DV Interface is i.LINK compatible.
81 LANC jack
LANC stands for Local Application Control Bus System. The LANC control jack is used for controlling the tape transport of video equipment and peripherals connected to it. This jack has the same function as the jack indicated as CONTROL L or REMOTE.
[headphones] jack
When you use headphones, the speaker on your camcorder is silent.
76 MmKpOcH (ctp. 139)
77 The3do SVIDEO (cTp. 46, 107, 130, 189)
78 THe3doVIDEO(cTp.46,107,130,189)
79 The3do AUDIO L/R (cTp. 46, 107, 130, 139)
80 Hntepceic DV (ctp. 109, 132, 190) 3HaK "i.LINK" ABJIeTcT TOPROBm MapkO KOpnpaunn Sony u yka3bIaet Ha To, UTO npOdyKUa COOTBeTCTByET TexHnueckm YcIOBnAM cTaHdApToB IEEE 1394-1995 n INX DOJONHEHM.
INThepceic DV aBnaeTcra i.LINK-COBMECTUMbIM.
81 THe3do LANC
LANC 6o3haaet CnCTemy KaHana MeCTHO ynpabLeHna. He3do ynpabLeHna LANC nOJb3yeTcIy KOHTPOJIa 3a nepeMeIeHNEM JeHTbl BInDeoanPapaTypbI N oDKnIOueHHbIX K HeI nepiFepriHbIX ycTpoIcTB. DaHHOe rHe3do IMeET TaKyo Jze fYHKUIO, KaK I pa3BeMbl, 6o3HaueHHbIE CONTROL L nnN REMOTE.
82 The3do (roIobHbIe TeIefoHbI)
EcnnncnojIb3yIOCTc rOJOBhIe TeJefoHbl, rPOMKOrOBOpHTeJIb Ha BInDeOkampe OTKluOaETc.
Remote Commander
The buttons that have the same name on the Remote Commander as on your camcorder function identically to the buttons on your camcorder.
1 Transmitter
Point toward the remote sensor to control your camcorder after turning on your camcorder.
ZERO SET MEMORY button (p. 93)
3 PHOTO button (p. 48, 177)
4 DISPLAY button (p. 41)
5 Memory control buttons (p. 184, 193)
6 SEARCH MODE button (p. 95, 97, 99, 101)
Video control buttons (p. 44)
REC button (p. 130)/MARK button (p. 124)
9 DATA CODE button (p. 41)
10 START/STOP button (p. 24)
11 Power zoom button (p. 31)
12 I /buttons (p. 95, 97, 99, 101)
13 AUDIO DUB button (p. 140)
1 PeredaTnuK
Iynpablenb Bndeokamepo HnpaBbTe PylbT Ha daTnK nocne ee BKluoyehna.
2 KhoNka ZERO SET MEMORY (cTp. 93)
3 KhoNka PHOTO (cTp. 48, 177)
4 KhoNka DISPLAY (cTp. 41)
5 KhoNknypaBHeHnPaMaTbIO (cTp. 184, 193)
6 KhoNka SEARCH MODE (cTp. 95, 97, 99, 101)
7 Khonkn BndeokOHpoJ (ctp. 44)
8 KhoNka REC (cTp. 130)/KhoNka MARK (cTp. 124)
9 KhoNka DATA CODE (ctp. 41)
10 Khonka START/STOP (ctp. 24)
11 KhoNka npuBoda TpaHcfoKaTopa (ctp. 31)
12 KhoNkn I/▶I (cTp. 95, 97, 99, 101)
13 Khonka AUDIO DUB (ctp. 140)
Identifying the parts and controls
Овознayaчесуpeгунларов
To prepare the Remote Commander
Insert two R6 (size AA) batteries by matching the + and - polarities on the batteries to the + - marks inside the battery compartment.
ДлnoiodrotOBKn nyIbTa ДиctahUHOHHorO ynpaBNeHn
BcTaBbTe DBe 6aTapeKn R6 (pa3Mepa AA), co6HIOdA nOJIrpHOCTb + n- co 3HaKaAMn + - BHyTpN OTCeKa dIy 6aTapeek.
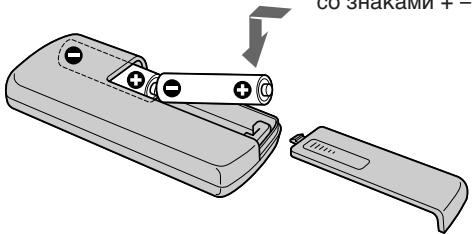
Notes on the Remote Commander
- Point the remote sensor away from strong light sources such as direct sunlight or overhead lighting. Otherwise, the Remote Commander may not function properly.
- Your camcorder works in the commander mode VTR 2. Commander modes 1, 2 and 3 are used to distinguish your camcorder from other Sony VCRs to avoid remote control misoperation. If you use another Sony VCR in the commander mode VTR 2, we recommend changing the commander mode or covering the sensor of the VCR with black paper.
Display window
PpmeaHnno npylbTy dntaHNoHHoro ynpabLeHn
Держnte ДистанционьдаТчнК ha pacCTOHHN OT CINbHbIX NCTOCHKOB CBeta, HAnpIMePnpAbx COJHeHbIX JUyEi NJIлambl npoeKTopa. B npOTnbHom cIyueae DnCTaONHOe ynpabLeHne MoXeT He DeIcTBOBaTb.
Данная Видаеокамера pa6oTaetВ ржиме nylbta dinCTaHcOnHOrO ynpabLeHnra VTR 2.Pexkmbi npbta dinCTaHcOnHOrO ynpabLeHnra1,2n3ncNoIb3yIOTcIЯ OTNuHnDAHHoB BnDEOkamepbI OTdpyrNx BVdeOMarHnTOΦOHOB cInpMbSONy BO n36ekaHne HnPaBnblHoN pa6oTbI npblTa dinCTaHcOnHOrO ynpabLeHnra.Ecnn NcNoIb3yETcDpyroBnDEOMarHnTOΦOH cInpMbSONy,pa6oTaIOUINBpeKmE VTR 2,peKoMeHNdyETcN3MeHnTBpeKmPnlbTa dinCTaHcOnHOrO ynpabLeHnRAJ3aKpbITb DaTynK dinCTaHcOnHOrO ynpabLeHnRA BnDEOMarHnTOΦOHa YepHOB6ymarO.
Okowko dincnjeA

Remaining battery time(p. 14)/
Tape counter (p. 93)/
Memory counter (p. 194)/
Time code (p. 33)/
Self-diagnosis (p. 222)
2 FULL charge (p. 14)
3 Remianing battery (p. 14)
1 OctabweecBpempa60tBi 6aTapeHoro6JloKa(cTp.14)/CcetTuK JeHTbI(cTp.93)/CcetTuK nAmrTn (cTp.194)/KoD BpeMeHc(cTp.33)/ CamoDaarHocTuKa (cTp.229)
2Полная зардka-FULL(cTp.14)
3 OcbTbunnc3aepd (ctp.14)
Operation indicators
Pa60yne nHnKaTopbI
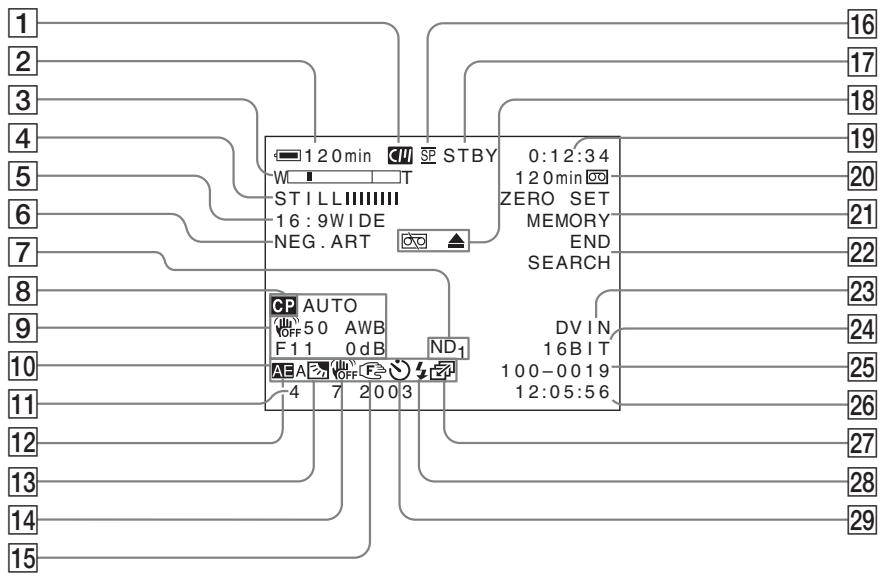
Cassette memory (p. 210)
2 Remaining battery time (p. 33)
3 Zoom (p. 31)/Exposure (p. 65)/Data file name (p. 170)
4 Digital effect (p. 60)/FADER (p. 56)/ MEMORY MIX (p. 184)
16:9WIDE (p. 54)/PROG. SCAN (p. 51)
6 Picture effect (p. 58)
ND filter (p. 68)
8 Custom preset (p. 77)
9 Data code (p. 42)
1 Kaccetha namr (ctp. 210)
2 OctabweecBpeMa pa6oTbI 6aTaepHoro 6noka (ctp.33)
3 TpaHcfoKaun (ctp. 31)/KcNo3nun (ctp. 65)/Mma faJIa daHHbIX (ctp. 170)
4 LcnpobOu3ΦΦeKt (ctp. 60)/FADER (ctp. 56)/MEMORY MIX (ctp. 184)
16:9WIDE (ctp. 54)/PROG. SCAN (ctp. 51)
6 3ΦΦeKt n3o6paXeHn (cTp.58)
7 Φιλυτρ ND (ctp. 68)
8 INHINBnDyaIbHaN HAcTpoKa (ctp.77)
9 KoJdHaHHbIX (ctp. 42)
Identifying the parts and controls
10 LCD bright(p. 28)/Volume (p. 40)
11 Date
12 PROGRAM AE (p. 79)
Backlight (p. 34)/Spot light (p. 35)
14 SteadyShot OFF (p. 158)
15 Manual focus/Infinity (p. 83, 84)
16 Recording mode (p. 161)
Standby/Recording (p. 24)/Video control mode (p. 44)/Image quality mode (p. 174)
Warning (p. 230)
19 Tape counter (p. 93)/Time code (p. 33)/ Self-diagnosis (p. 222)/Photo mode (p. 48)/Image number (p. 194)
Remaining tape (p. 33)/Memory playback (p. 194)
21 ZERO SET MEMORY (p. 93)/FRAME REC (p. 89)/Interval recording (p. 86)
22 END SEARCH (p. 38)
23 DV IN (p. 133)/A/V→DV OUT
24 Audio mode (p. 161)
25 Data file name
This indicator appears when the MEMORY MIX functions work.
26 Audio input level/Time
27 Continuous mode (p. 179)
Video flash ready
This indicator appears when you use the video flash light (optional).
Self-timer (p. 36)
Functions to adjust exposure (in the recording mode)
- In insufficient light
Low lux mode (p. 79)
- In dark environments such as sunset, fireworks, or general night views
Sunset & moon mode (p. 79)
- Shooting backlit subjects
BACK LIGHT (p. 34)
- In spotlight, such as at the theater or a formal event
SPOT LIGHT (p. 35)
Functions to give images more impact (in the recording mode)
- Smooth transition between scenes
FADER (p. 56)
- Taking a still picture
PHOTO (p. 48, 177)
- Digital processing of images
PICTURE EFFECT (p. 58)/DIGITAL
EFFECT (p. 60)
Superimposing a title
TITLE (p. 143)
Functions to give a natural appearance to your recordings (in the recording mode)
- Preventing deterioration of picture quality in digital zoom
D ZOOM MENU (p. 156)
- Focusing manually
Manual focus (p. 83)
- Recording fast-moving subjects
Sports lesson mode (p. 79)
Functions to be used in editing (in the recording mode)
- Watching the picture on a wide-screen TV
Wide mode (p. 54)
Viewing images using a personal computer
"Memory Stick" (p. 170)
Functions to be used after recording (in the playback mode)
- Digital processing of recorded images
PICTURE EFFECT (p. 104)/DIGITAL
EFFECT (p. 105)
- Displaying the date/time or various settings when you recorded
Data code (p. 42)
- Quickly locating a desired scene
Zero set memory (p. 93)
- Searching for scenes having a title
Title search (p. 97)
- Searching for scenes recorded in the photo mode
Photo search (p. 101)
- Scanning scenes recorded in the photo mode
Photo scan (p. 103)
- Playing back monaural sound or sub sound
HiFi SOUND MENU (p. 156)
Pexmm Hn3kOc OceueHHOCTn (CTp. 79)
Pexm 3aKaTa cOnHua n LyHHoTo OCBeSeHnA (CTp.79)
Péxim CnpTnBbIX COCTaHn (ctp. 79)
Функции,ИСПОЛьзУЕмБе пу PMOTахke(BpeЖиmeЗaПИСн)
"Memory Stick" (ctp. 170)
Camera chromakey 182
Cassette memory 10, 210
Charging battery 14
Charging the built-in rechargeable battery 236
Clock set 20
COLOUR BAR 163
Connection (dubbing a tape) 107 (viewing on TV) 46
Continuous 178
Custom preset 77
Cut recording 89
Data code 42
Date search 99
Date/time indicator 43
DEMO. 162
DIGITAL EFFECT 60
Digital program editing .... 110
DISPLAY 41
DOT 56
Dual sound track tape..... 212
Dubbing a tape. 107
E
EDITSEARCH 38
END SEARCH 38, 45
Exposure 64
External microphone (optional) 251
F, G, H
Fade in/out 56
FADER 56
FLASH MOTION 60
FOCUS. 83
Format 160
Full charge 14
Grip strap 249
Guide frame 53
Headphones jack 251
Heads 235
HiFi SOUND 159
I, J, K, L
i.LINK 214
Image protection 202
Image quality mode 174
INDEX MARK 91
INDEX (Multiple) display 195
Index search. 95
"InfoLITHIUM" battery .... 14
Intelligent accessory shoe . 138
Interval recording 85
JPEG 170
Labeling a cassette 151
LANC 251
LCD screen 27
LUMINANCEKEY 60
M, N
Main sound 159
Manual adjustment 63
Manual focus 83
Memory chromakey 182
Memory luminancekey..... 182
Memory mix 182
Memory overlap 182
Memory photo recording . 177
"Memory Stick" 170
Menu settings 156
MIC (PLUG IN POWER) .. 137
Mirror mode 27
Moisture condensation .... 234
MONOTONE 56
ND filter 67
Normal charge 14
O, P, Q
OLD MOVIE 60
Operation indicators 254
OVERLAP 56
PAL system 233
Photo scan 103
Photo search 101
PICTURE EFFECT 58
Picture search 44
Playback pause 44
Power sources
(battery pack) 13
(car battery) 19
(wall socket) 18
Power zoom 31
Printmark. 208
PROGRAM AE 79
Progressive recording 51
R, S
Rec Review 39
Recording level 75
Recording time 16
Remaining battery time indicator 33
Remaining tape indicator ... 33
Remote Commander 252
Remote control jack (LANC) 251
Remote sensor 246
RESET 221
SVIDEO jack 47,107,130
SEL/PUSH EXEC dial .... 156
Self-diagnosis display 222
Self-timer. 36, 50, 181
Skip scan 44
Slide show 200
Slow playback 44
Spotlight mode 35
STEADYSHOT 158
Stereo tape 212
STILL 60
Sub sound 159
T, U, V
Tape counter 93
Tape photo recording 48
Telephoto 31
Time code 33
Title 143
Title search 97
TRAIL 60
Transition 26
TV colour system 233
W, X, Y, Z
Warning indicators 230
White balance 72
Wide mode. 54
Wide-angle 31
WIPE 56
WORLD TIME 162
Write-protect tab 23,170
Zebra pattern 69
Zero set memory function .. 93
Zoom 31
Aлфавиньи yka3aTeJB
A,B,B,Γ
Aaantep npeemehnhoro Toka 14
Aydnopepe3a\Pncb 137
BanaHc 6eIoro 72
Batapehnhb 6bnok InfoLITHIUM .14
BaTapeHbIb 6Jok 13
Budoeorolobkn 235
BHeHMH MmKpOPOH (npNo6peTaTeCn DOONJHNTeBHO) 251
Bpem3aPncn 16
BcnoMOraTeJIbHbI 3Byk .. 169
Гнэздо SVIDEO ... 47, 107, 130
INdkaTopocTabweCnIeHTbl...33
HnDnkaunca moDnaHocTNKn ... 229
IcTouHnKIMITaHnM (aBTOMO6NJbHbI aKKyMynTOp) 19
(6aTaapeHbIb 6JIoK).....13
(ənEklptpuecka cetb) ... 18
KaccetHa namTb .... 10,210
KHONKa 3aMeHbI nO CBETHOCTn 182
KONKIA 3aMeHbI NO RPKOCTN 182
KHOKIKA BETHOCTNI BIDeOKAMEbp 182
KoD BpemeHn 33
KoI daHHbIX 42
KoHdEHaCauaBlaa.. 234
KoHTpOJIbHa paMka 52
JIeHTa C DBOHNo 3ByKOBoI DOpOxKoI. 212
JenecTOK 3aunTbI OT 3anncn ...23
Pay3a Bocnpoun3BedeHn..44
IpeepaHcB kaccetbl 107
PepexoI 26
Peeatb3nak 208
Ponck DaTbI 99
Ponckn306paXeHnA 44
Ponck MeToDom nporoHa... 44
Ponck no INdekcy 95
Ponck Tntpa 97
Ponna 3apka 14
PonocatbIuwa6noH. 69
PnDynpexJaOuOuIe INHkAToBpI 230
PporpeccnBna 3anncb .... 51
PpocMToTp 3aIncn 39
CtepeofoHnueckaJeHTa..212
CuetnK Jentbl 93
Taimep camo3anycka .. 36, 50, 181
TenefoTo 31
Tntp 143
TpaHcfoKaTop 31
Tpanchokaia 31
Y,Φ,L,L,3
UpoBHeB 3aIncn 75
YcTaHOBka yacob 20
YCTaHOBKN MeHIO 156
ΦnIbTp ND 67
ΦopMaT 166
ΦOTO3AπBcCOXPAHEnHEm BnAMTN 177
ΦOTONONCK 101
Data n3ROTOBLeHnI N3dEInnI.
BbMOKeTe y3HaTb DaTy n3rTOBLeHnna 13eHN, B3rJyHB Ha 0603NaueHne
"P/D:”, KOTOpoe HaxoJntcHa 3TnKeTke co Utpnx KOOM KapToHHoK Oko6Kn.
3HaKn, yKa3aHHbIe Ha 3TtKeTke CO uTpIX KOOM KApToHNO KOp6Kn.

- Mecu n3ROTOBHeHn
2.ФОИЗROTOВЕΝΥ
A-0, B-1, C-2, D-3, E-4, F-5, G-6, H-7, I-8, J-9
I3roTOBnteIb: CoH KopnopeuH
Ampec: 1-7-1 KonaH,
MnHaTo-Ky, TokNo 108-0075, JnoHna
CTpana-mpo3BODntel:JnoHn
http://www.sony.net/

Printed on 70% or more recycled paper using VOC (Volatile Organic Compound)-free vegetable oil based ink.
Haneuataho Ha 6bymare, n3rotoblenhno Ha 70% n 6boee n3 6bmaxkblx OTXODB, C nCnOJIb3OBaHNEm NeyaTHoN KpaCKn Ha oCHOBe pactnteIbHO macna 6e3 npImecen JIOC (JeTynx opraHnuecknx coEdHeHn).