
Camedia X100 - Camera OLYMPUS - Free user manual and instructions
Find the device manual for free Camedia X100 OLYMPUS in PDF.
| Product Type | Digital camera (shooting and playback) |
| Brand | Olympus |
| Model | Camedia X100 (equivalent to D-540ZOOM/C-310ZOOM) |
| Sensor | CCD 1/2.7" – 3.34 million pixels (total), 3.2 million effective |
| Lens | Olympus 5.8–17.4 mm (equiv. 38–114 mm in 35 mm), f/2.9–5.0, 7 elements in 6 groups |
| Optical zoom | 3× |
| Digital zoom | Up to 10× (combined with optical) |
| LCD screen | 1.8" TFT color, 85,000 pixels |
| Viewfinder | Real-image optical |
| Shutter speed | 1 to 1/2,000 sec (2 sec in Night Scene mode) |
| Shooting modes | Program Auto, Portrait, Landscape, Night Scene, Self-portrait, Video |
| Recording formats | JPEG (DCF) – SHQ, HQ, SQ1, SQ2; Video HQ, SQ |
| Storage media | xD-Picture Card |
| Connectivity | USB mini-B, DC IN jack (optional AC adapter) |
| Power source | 1 CR-V3 lithium battery or 2 AA batteries (alkaline or Ni-MH) |
| Dimensions (L × H × D) | 102 × 55.5 × 36.5 mm (without protrusions) |
| Weight | 150 g (without battery or card) |
| Other features | Auto flash/red-eye reduction/fill-in/flash off, self-timer, continuous shooting (1.5 fps), macro (2 cm at wide-angle), white balance, exposure compensation |
| Maintenance | Clean the lens with a soft cloth; protect from moisture and shocks; remove batteries if not used for extended periods |
| Safety | Do not disassemble; use only recommended batteries; do not expose to extreme temperatures |
| Spare parts and repairability | Standard batteries, USB cable included, optional AC adapter; contact an authorized service center for repairs |
| General information | Full manual available in PDF format; detailed reference manual on included CD-ROM |
Frequently Asked Questions - Camedia X100 OLYMPUS
User questions about Camedia X100 OLYMPUS
0 question about this device. Answer the ones you know or ask your own.
Ask a new question about this device
Download the instructions for your Camera in PDF format for free! Find your manual Camedia X100 - OLYMPUS and take your electronic device back in hand. On this page are published all the documents necessary for the use of your device. Camedia X100 by OLYMPUS.
USER MANUAL Camedia X100 OLYMPUS
These instructions are only for quick reference. For more details on the functions described here, refer to the "Reference Manual" on CD-ROM.
For connection to the PC or installation of provided software, refer to the Software Installation Guide included in the CD-ROM package.
Before using your camera, read this manual carefully to ensure correct use.
We recommend that you take test shots to get accustomed to your camera before taking important photographs.
These instructions are only a basic manual. For more details on the functions described here, refer to the Reference Manual on the CD-ROM.
For customers in North and South America
For customers in USA
Declaration of Conformity
Model Number : D-540ZOOM/C-310ZOOM/X-100
Trade Name : OLYMPUS
Responsible Party : Olympus America Inc.
Address : 2 Corporate Center Drive, Melville, New York
11747-3157 U.S.A.
Telephone Number : 1-631-844-5000
Tested To Comply With FCC Standards
FOR HOME OR OFFICE USE
This device complies with Part 15 of the FCC rules. Operation is subject to the following two conditions:
(1) This device may not cause harmful interference.
(2) This device must accept any interference received, including interference that may cause undesired operation.
For customers in Canada
This Class B digital apparatus meets all requirements of the Canadian Interference-Causing Equipment Regulations.
For customers in Europe

"CE" mark indicates that this product complies with the European requirements for safety, health, environment and customer protection. "CE" mark cameras are intended for sales in Europe.
Trademarks
- IBM is a registered trademark of International Business Machines Corporation.
- Microsoft and Windows are registered trademarks of Microsoft Corporation.
- Macintosh is a trademark of Apple Computer Inc.
- All other company and product names are registered trademarks and/or trademarks of their respective owners.
- The standards for camera file systems referred to in this manual are the "Design Rule for Camera File System/DCF" standards stipulated by the Japan Electronics and Information Technology Industries Association (JEITA).
GETTING STARTED
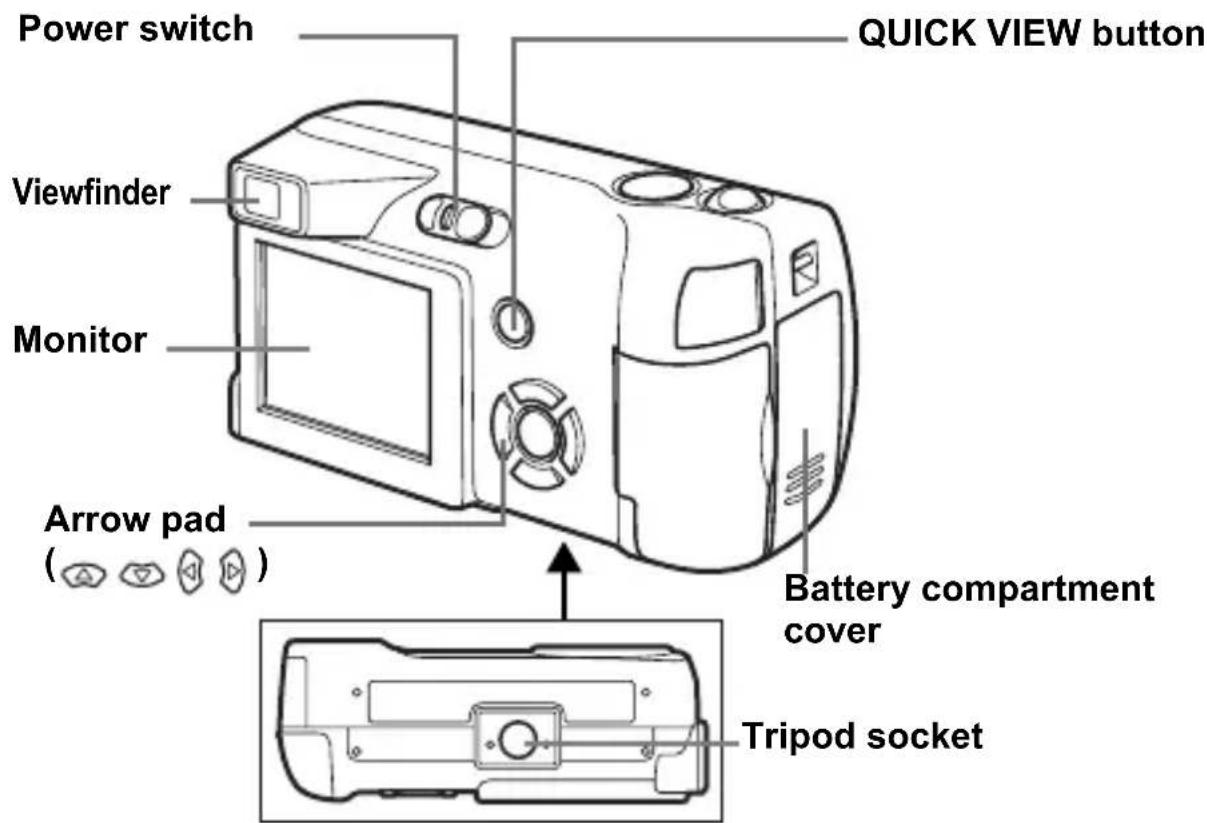
NAMES OF PARTS

Arrow pad
Buttons on the arrow pad have their respective functions. They are also used as direction buttons. and indicate which button to be pressed.

Shooting mode button

MONITOR INDICATIONS

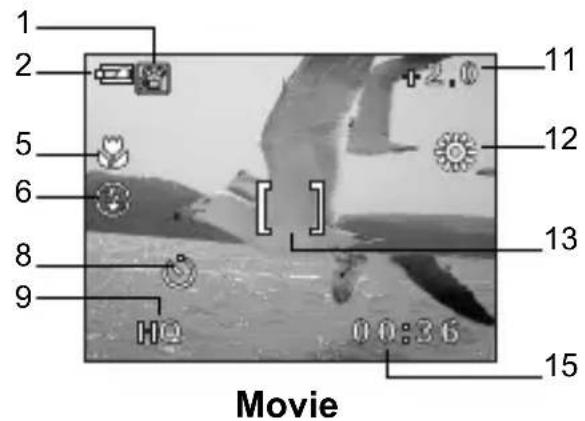
Shooting mode
| Items Indications | ||
| 1 | Shooting mode, , , , , | P 图 图 图 图 |
| 2 | Battery check, | |
| 3 | Green lamp | ○ |
| 4 | Flash standby Camera movement warning/Flash charge | (Lit) (Blinks) |
| 5 | Macro mode, | s |
| 6 | Flash mode, , | ① ② ③ |
| 7 | Sequential shooting, | □ □ |
| 8 | S e l f - t i m e r | |
| 9 | Record mode SHQ, HQ, SQ1, SQ2 | |
| 10 | Resolution | 2048×1536, 1600×1200, 640×480, etc. |
| 11 | Exposure compensation | -2.0, -1.5, -1.0, -0.5, +0.5, +1.0, +1.5, +2.0 |
| 12 | White balance | |
| 13 | AF target mark | [ ] |
| 14 | Memory gauge | □ □ □ |
| 15 | Number of storable still pictures Remaining recording time | 15 00:36 |
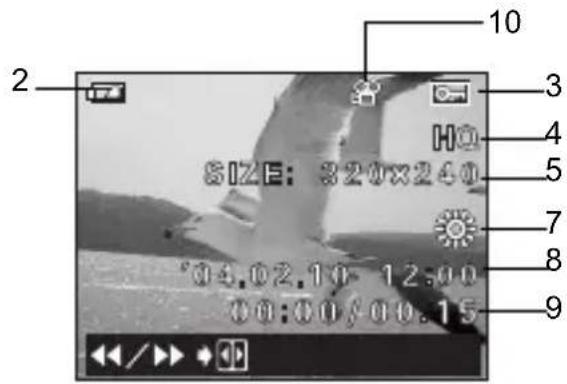
Playback mode
Screens when the information display is set to ON are shown below.

Still picture Movie
| Items Indications | ||
| 1 | Print reservation,Number of prints | ×10 |
| 2 | Battery check, | |
| 3 | Protect | |
| 4 | Record mode SHQ, HQ, SQ1, SQ2 | |
| 5 | Resolution | 2048×1536, 1600×1200, 640×480, etc |
| 6 | Exposure compensation | -2.0, -1.5, -1.0, -0.5, +0.5, +1.0, +1.5, +2.0 |
| 7 | White balance WB AUTO, , , , | |
| 8 | Date and time '04.02.10 12:30 | |
| 9 | File number (still picture),Number of framesElapsed time/Total recording time (movie) | 100-0016,1600:00:00/00:15 |
| 10 | Movie |

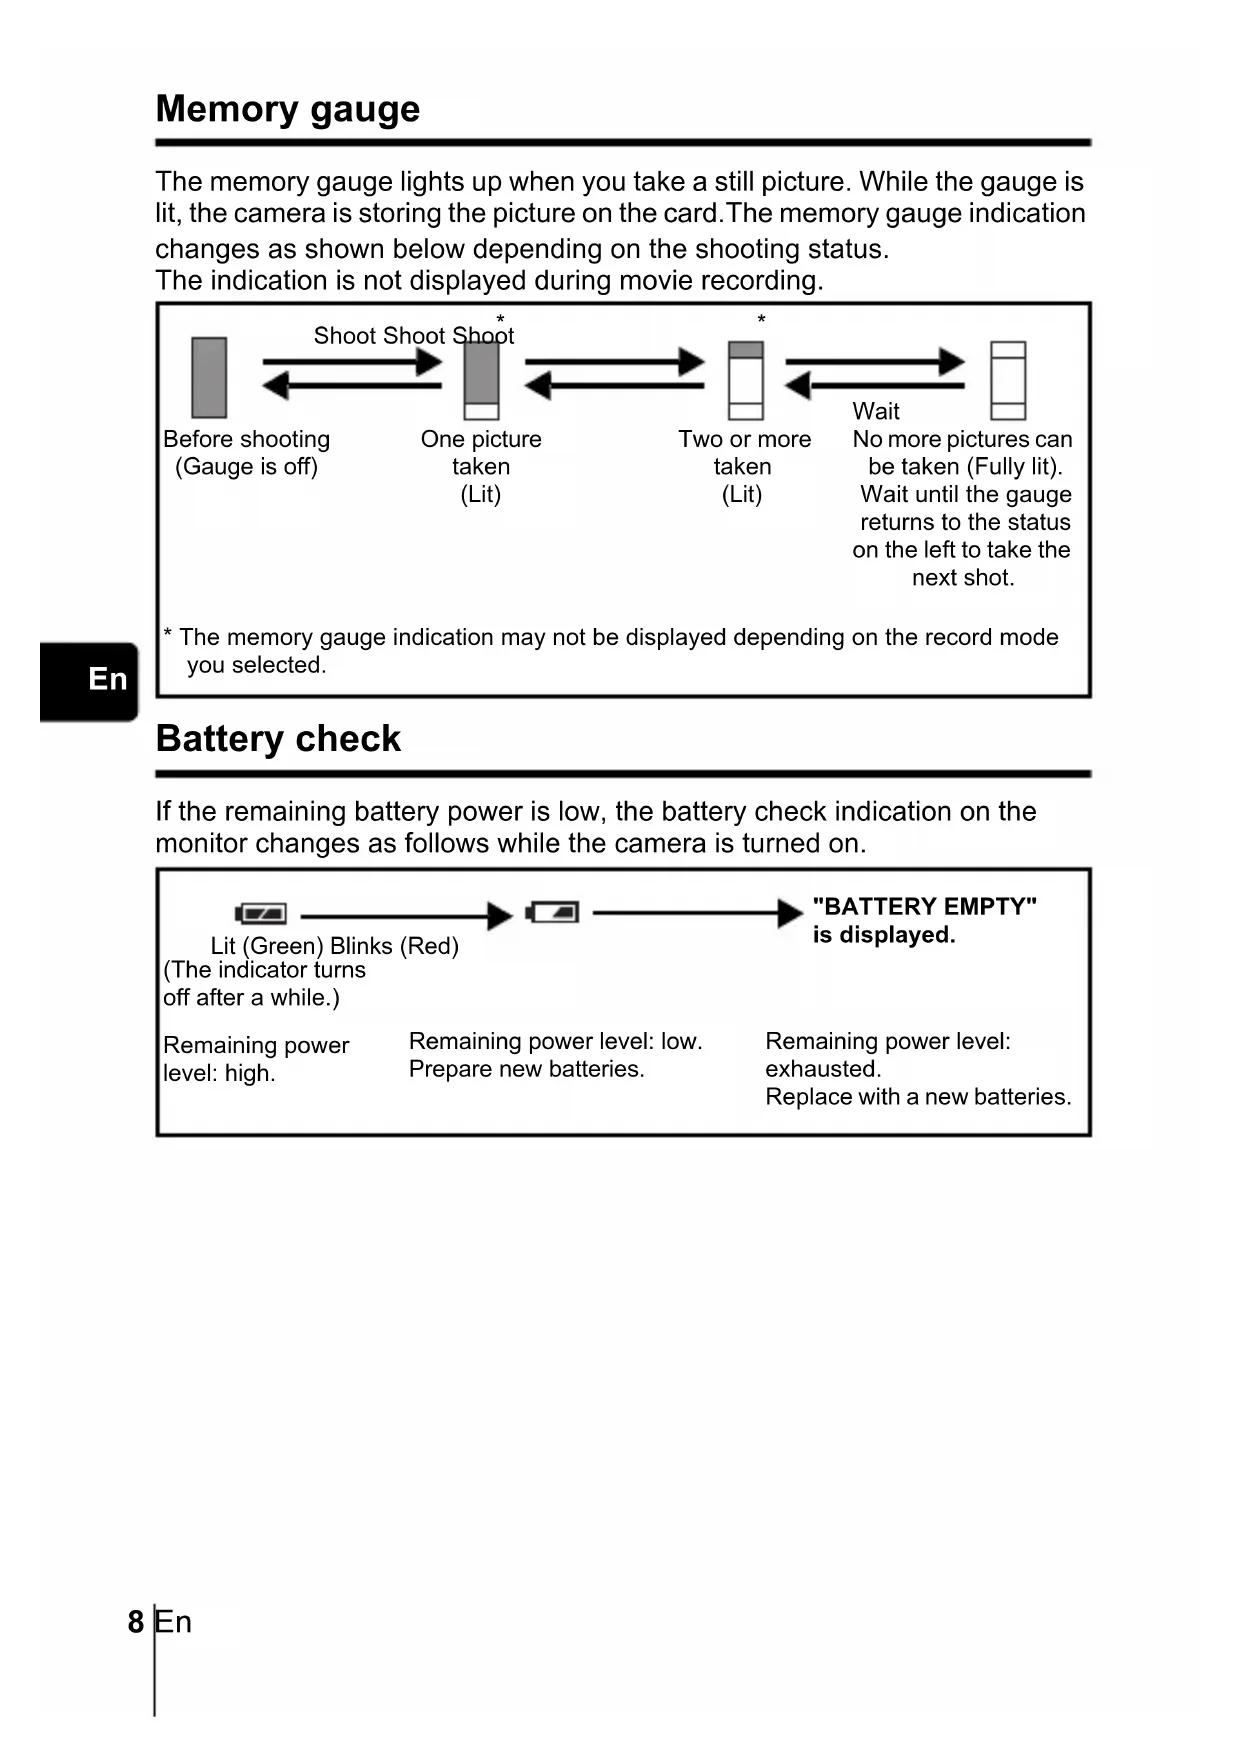
Memory gauge
The memory gauge lights up when you take a still picture. While the gauge is lit, the camera is storing the picture on the card. The memory gauge indication changes as shown below depending on the shooting status.
The indication is not displayed during movie recording.
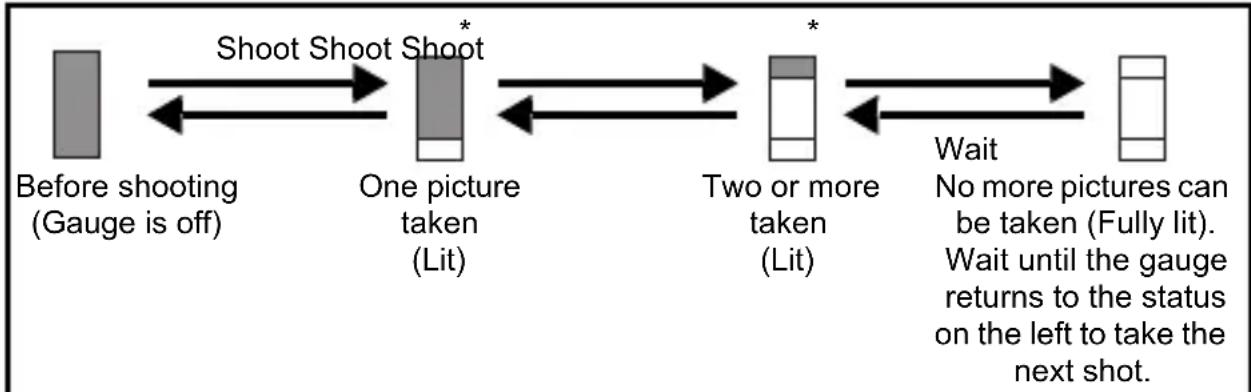
- The memory gauge indication may not be displayed depending on the record mode you selected.
Battery check
If the remaining battery power is low, the battery check indication on the monitor changes as follows while the camera is turned on.

ATTACHING THE STRAP
1 Thread the short end of the strap through the strap eyelet.
2 Thread the long end of the strap through the loop that has already gone through the eyelet.
3 Pull the strap tight, making sure that it is securely fastened and does not come loose.

LOADING THE BATTERIES
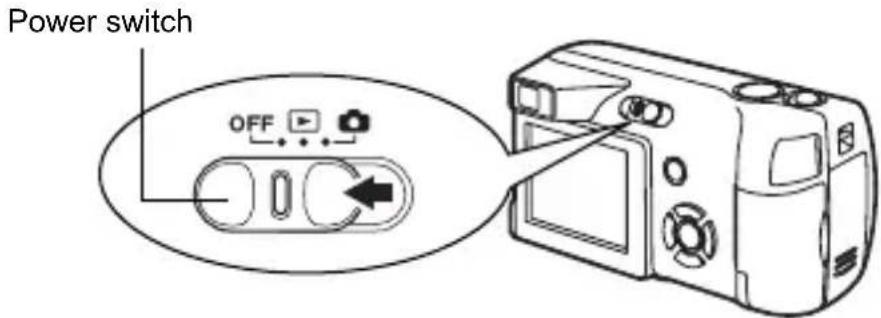
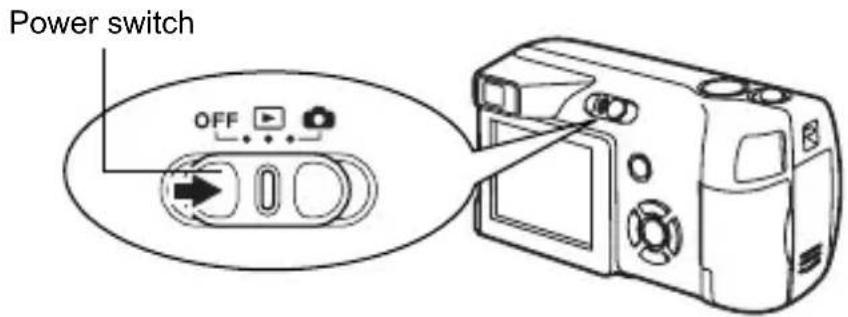
1 Make sure that the power switch is located at OFF.
Power switch

2 Slide the battery compartment cover in the direction of (A)
- The battery compartment cover is unlocked and opened in the direction of B
- Use the ball of your finger to slide the cover. Do not use your fingernail as this could result in injury.


3 Insert the batteries, making sure that they are correctly oriented as shown in the illustration.
The battery insertion direction mark is provided inside of the battery compartment.
When using AA (R6) batteries When using a CR-V3 lithium battery pack

There is a mark showing the correct way to insert the AA batteries on the bottom of the camera.
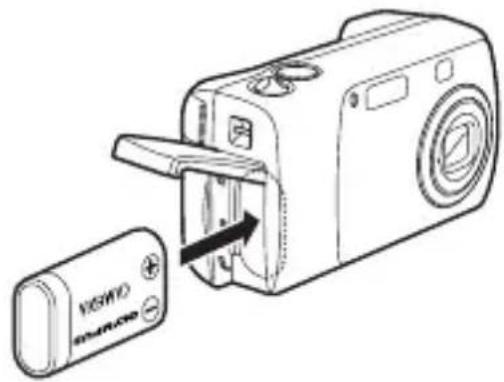
When using a CR-V3 lithium battery pack, insert it in the direction as shown in the illustration.
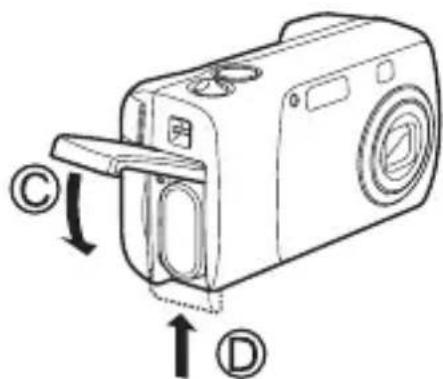
4 Close the battery compartment cover, then press it down and slide it in the direction shown D.
- If the battery compartment cover seems hard to close, do not force it. With the battery compartment cover shut, press the mark firmly and push it in the direction indicated by D.
Important
CR-V3 lithium battery cannot be recharged.
- Do not peel off the label from a CR-V3 lithium battery pack.
- Manganese (zinc-carbon) batteries cannot be used.
INSERTING A CARD
"Card" in this manual refers to the xD-Picture Card. The camera uses the card to record pictures.
1 Make sure that the power switch is located at OFF.

2 Open the card cover.
3 Face the card the correct way and insert it into the card slot as shown in the illustration.
- Insert the card while keeping it straight.
- The card stops with a click when it is inserted all the way.
- Inserting the card the wrong way or at an angle could damage the contact area or cause the card to jam.
- If the card is not inserted all the way, data may not be written to the card.

En

4 Close the card cover securely.
Removing the card
The position of the card inserted correctly
Make sure that the power switch is located at OFF.
- Push the card all the way in to unlock it, and let it return slowly. The card is ejected a short way and then stops. Hold the card straight and pull it out.
Note
Releasing your finger quickly after pushing the card all the way in may cause it to eject forcefully out of the slot.
When shooting pictures (Shooting mode)
Power on: Slide the power switch to, pressing and holding the lock button.
The camera turns on in the shooting mode. The lens extends and the subject is displayed on the monitor.


Power off: Slide the power switch to OFF.
The camera turns off. (The monitor also turns off.)
- Even if the monitor is turned off, the battery power is consumed unless the power switch is located at OFF.
Power on: Slide the power switch to.
The camera turns on in the playback mode. The monitor turns on and the last picture taken is displayed.
If no pictures have been taken yet, or the xD-Picture Card is empty, the message "NO PICTURE" is displayed on the monitor.
Power off: Slide the power switch to OFF.
The monitor and the camera turn off.

- Even if the monitor is turned off, the battery power is consumed unless the power switch is located at OFF.
SELECTING A LANGUAGE
1 Slide the power switch to pressing and holding the lock button.
- The camera turns on in the shooting mode.
- The lens extends and the monitor turns on.
2 Press
- The top menu is displayed.
3 Press on the arrow pad to select MODE MENU.
4 Press to select the SETUP tab, and press .
5 Press to select, and press.
- The green frame moves to the selected item.
6 Press to select a language, and press.
7 Press again to exit the menu.
8 Slide the power switch to OFF.
SETTING THE DATE AND TIME
1 Slide the power switch to pressing and holding the lock button.
- The camera turns on in the shooting mode.
- The lens extends and the monitor turns on.
2 Press
- The top menu is displayed.
3 Press on the arrow pad to select MODE MENU.
4 Press to select the SETUP tab, and press.
5 Press to select, and press.
- The green frame moves to the selected item.
6 Press to select one of the following date formats: Y-M-D (Year/Month/Day), M-D-Y (Month/Day/Year), D-M-Y (Day/Month/Year). Then press
- Move to the year setting.
- The following steps show the procedure used when the date and time settings are set to Y-M-D.
7 Press to set the year, and press to move to the month setting.
- To move back to the previous setting, press
The first two digits of the year are fixed.
8 Repeat this procedure until the date and time are completely set.
- The camera only displays the time in 24-hour time system ("2 p.m." would be "14:00").
9 Press

- For a more accurate setting, press when the time signal hits 00 seconds. The clock starts when you press the button.
10 Slide the power switch to OFF.

Note
- The date and time settings will be returned to the factory default settings if the camera is left without the battery for approximately 3 days.
MENUFUNCTIONS
TYPES OF MENUS
When you turn on the camera and press the top menu is displayed on the monitor. The functions of this camera are set from the menus. This chapter explains how the menus work, using the shooting mode screens.
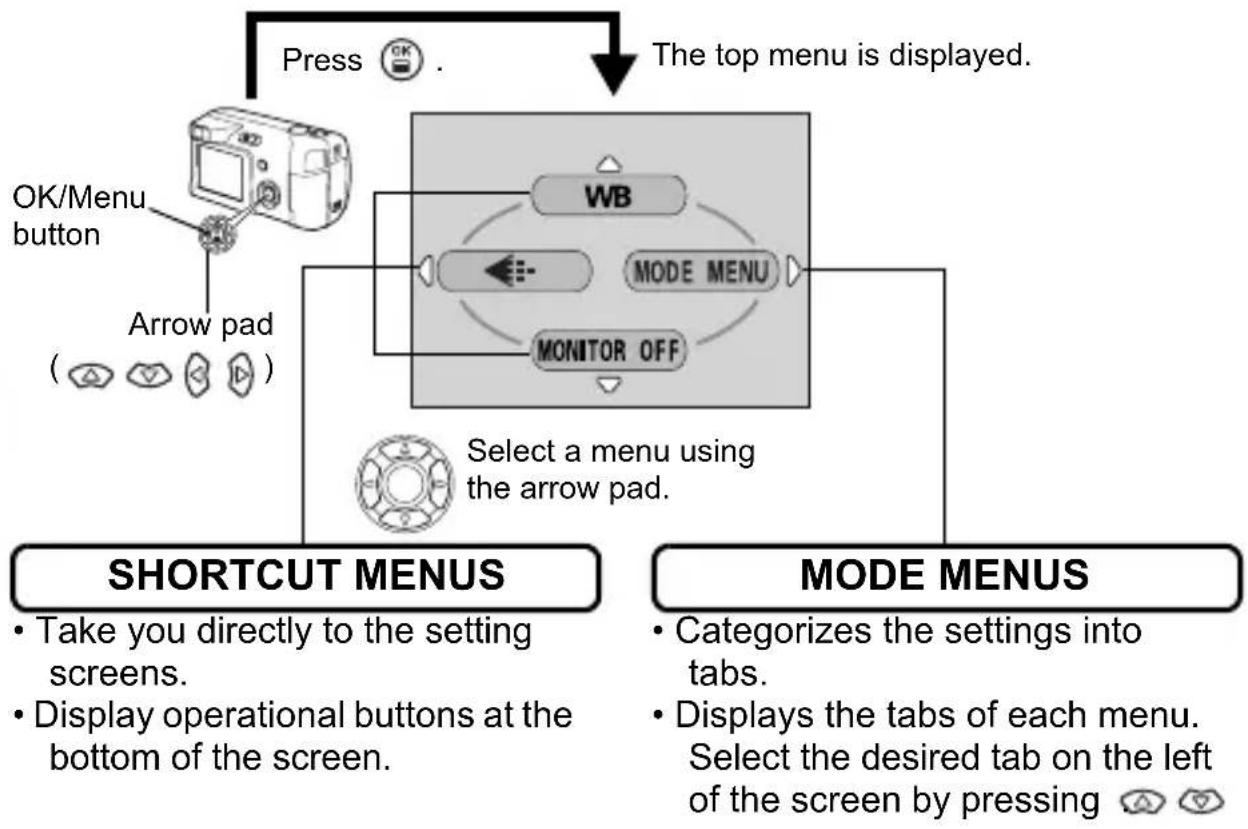
How to use the menus
1 Press to display the top menu. Press .
2 Press to select a tab, and press
3 Press toselect an item, and press .
4 Press to select a setting. Press to complete setting. Press again to exit the menu and return to shooting status.
Shooting mode
WB
Sets the appropriate white balance according to the light source.

Sets the image quality and resolution.
Still picture: SHQ, HQ, SQ1, SQ2
Movie:HQ,SQ
MONITOR OFF (MONITOR ON)
Sets whether or not the monitor also goes on when the camera turns on. If the monitor is set to off, the top menu displays MONITOR ON when the camera turns on.

Runs through all saved pictures one after another. It is displayed when the camera is playing back still pictures.
MOVIE PLAYBACK
Plays back movies. It is displayed when a movie is selected.
INFO
Displays all the shooting information on the monitor.

ERASE
En
Erases the selected still picture or movie.
The MODE MENU has 3 tabs. Press to select a tab and display the associated menu items.
These instructions are only for quick reference. For more details on the functions described here, refer to the “Reference Manual” on CD-ROM.
Shooting mode

En
| CAMERA tab | |
| Adjusts the brightness of the image (Exposure compensation). | |
| DIGITAL ZOOM | Enables the zoom shooting at larger magnification than the maximum optical zoom. |
| Allows pictures to be taken as close as 2 cm/0.8" from the subject. | |
| DRIVE | Selects a shooting mode from (Single-frame shooting) and (Sequential shooting). |
| PANorama | Allows panorama pictures to be taken with Olympus CAMEDIA-brand cards. |
CARD tab CARD SETUP Formats a card.
| SETUP tab | |
| ALL RESET | Selects whether to keep the current camera settings when you turn off the power. |
| # | Selects a language for on-screen display. |
| REC VIEW | Selects whether to display pictures on the monitor while saving them to a card. |
| FILE NAME Changes how file names are assigned. | |
| PIXEL MAPPING | Checks the CCD and image processing functions for errors. |
| # | Adjusts the brightness of the monitor. |
| # | Sets the date and time. |
En
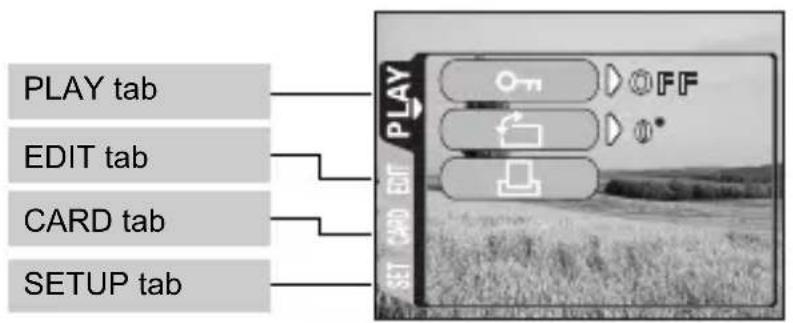
| PLAY tab | |
| ON | Protects pictures from accidental erasure. |
| Rotates pictures 90 degrees clockwise or counterclockwise. | |
| Stores print reservation information on the card. |
| EDIT tab | |
| Makes the file size smaller and saves it as a new file. | |
| INDEX Creates an index picture of a movie in 9 frames. | |
| CARD tab | |
| CARD SETUP | Erases all image data stored on the card. (ALL ERASE, FORMAT) |
| SETUP tab | |
| ALL RESET | Selects whether to keep the current camera settings when you turn off the power. |
| Selects a language for on-screen display. | |
| Adjusts the brightness of the monitor. | |
| Sets the date and time. | |
| Selects the number of frames in the index display. |
SHOOTING BASICS
Shooting mode
This camera allows you to take still pictures and record movies. This camera has 7 shooting modes to choose from depending on the shooting conditions and the effect you want to achieve.
The factory default setting of the shooting mode is PROGRAM AUTO. For normal shooting which does not require any special setting or effect, you do not need to follow this procedure.
1 Slide the power switch to, pressing and holding the lock button.
- The camera turns on in the shooting mode.
- The lens extends and the monitor turns on.

2 Press (O).
- The screen for selecting the shooting mode (virtual dial) is displayed.

Virtual dial screen
3 Select the mode best suited to your purpose from the following.
- Press to select the mode.
4 Press
- The shooting mode is set, and the virtual dial screen disappears. Even if the button is not pressed, the mode will be set and the screen will disappear.
Used for regular photography. The camera automatically makes the settings for natural color balance. Other functions, such as the flash mode and metering, can be adjusted manually.

(Portrait)
Suitable for taking a portrait-style shot of a person. The camera automatically sets the optimal shooting conditions.

(Landscape + Portrait)
Suitable for taking photos of both your subject and the landscape. The camera automatically sets the optimal shooting conditions.

(Landscape)
Suitable for taking photos of landscapes and other outdoor scenes. The camera automatically sets the optimal shooting conditions.

(Night scene)
Suitable for shooting pictures in the evening or at night. The camera sets a slower shutter speed than is used in normal shooting. If you take a picture of a street at night in any other mode, the lack of brightness will result in a dark picture with only dots of light showing. In this mode, the true appearance of the street is captured. The camera automatically sets the optimal shooting conditions. If you use the flash, you can take pictures of both the subject and the background.

(Self portrait)
Enables you to take a picture of yourself while holding the camera. Point the lens at yourself and the focus will be locked on you. The camera automatically sets the optimal shooting conditions. The zoom is fixed in the Wide position and cannot be changed.

(Movie)
Lets you record movies. The camera maintains the correct focus and exposure even if your subject moves. You cannot record movies with sound.
TAKING STILL PICTURES
You can take still pictures using either the monitor or the viewfinder. Both methods are easy as all you have to do is to press the shutter button.
1 Slide the power switch to, pressing and holding the lock button.
- The camera turns on in the shooting mode.
- The lens extends and the monitor turns on.
2 Decide the composition while looking at the image on the monitor.
- You can take pictures using the viewfinder, with the monitor turned off.
- When the monitor is off, the green lamp and mark are not displayed.
3 Press the shutter button gently (halfway) to adjust the focus.
- Focus and exposure are locked, when the green lamp lights steadily. (Focus Lock)
- When the flash is ready to fire, the mark lights.
4 Press the shutter button all the way (fully).
The camera takes the picture.
- The BUSY bar is displayed while the picture is stored on the card. The next shooting is available when the display goes off.

IF CORRECT FOCUS CANNOT BE OBTAINED (FOCUS LOCK)
When correct focus cannot be obtained on the subject you want to shoot, you can focus the camera on another point at roughly the same distance (focus lock) and take the picture as explained below.
1 Slide the power switch to, pressing and holding the lock button.
- The camera turns on in the shooting mode.
- The lens extends and the monitor turns on.
2 Position the AF target mark on the subject you want to focus on.
- When shooting a hard-to-focus subject, point the camera at an object about the same distance away as the subject.

AF target mark

3 Press the shutter button halfway until the green lamp lights.
- When the green lamp lights steadily, the focus and the exposure are locked.
- When the green lamp blinks, the focus and exposure are not locked. Release your finger from the shutter button, re-position your subject and press the shutter button halfway again.
4 Keeping the shutter button pressed halfway, recompose your shot.

Green lamp
5 Press the shutter button fully.
RECORDING MOVIES
You can record movies with this camera. You can play back the recorded movies with this camera. Sound can not be recorded.
1 Slide the power switch to, pressing and holding the lock button.
- The camera turns on in the shooting mode.
- The lens extends and the monitor turns on.
2 Press (to) to display the virtual dial screen.
3 Press to select , then press .
- Movie recording is set and the camera returns to the shooting mode.
- On the monitor, the dark and the remaining recording time of the current memory card are displayed.
4 Decide the composition while looking at the image on the monitor.
5 Press the shutter button halfway.
6 Press the shutter button fully to start recording.
- When recording a movie, the camera automatically adjusts the focus and exposure according to the moving subject.
- During movie recording, lights red.
7 Press the shutter button again to stop recording.
- When the remaining recording time has been used up, recording stops automatically.

- During movie recording, the flash and super macro mode are disabled.
- It takes longer to store movies than still pictures.
- The maximum recordable time varies depending on the conditions such as the record mode.
ZOOMING IN ON A SUBJECT (OPTICAL ZOOM)
Telephoto and wide-angle shooting are possible at 3 × magnification (the optical zoom limit, equivalent to 38 ~mm - 114 ~mm on a 35 ~mm camera). By combining the optical zoom with the digital zoom, zoom magnification can be increased to a maximum of approximately 10 × .
1 Slide the power switch to, pressing and holding the lock button.
- The camera turns on in the shooting mode.
- The lens extends and the monitor turns on.
2 Push/pull the zoom lever while observing the subject on the monitor.
3 Take the picture.

- Pictures taken with the digital zoom may appear grainy.

USING THE FLASH
1 Slide the power switch to pressing and holding the lock button.
The camera turns on in the shooting mode.
- The lens extends and the monitor turns on.
2 Press


- The current flash setting is displayed.
3 Press ) to change the flash mode to your desired setting.
Each time you press, the flash mode changes in the following sequence: "Auto-flash" - "Red-eye reduction flash" - "Fill-in flash" - "Flash off".
4 Press the shutter button halfway.
- When the flash is set to fire, the mark remains lit.
5 Press the shutter button fully to take the picture.
Auto-flash (No indication)
The flash fires automatically in low light or backlight conditions.
Red-eye reduction flash (
The red-eye reduction flash mode significantly reduces this phenomenon by emitting pre-flashes before firing the regular flash.
Fill-in flash (
The flash fires regardless of the available light.
Flash off ( ④
The flash does not fire even in low light conditions.
USING THE SELF-TIMER
This function is useful for taking pictures where you want to be included in the photograph. Fix the camera securely on a tripod on set it on a level surface for self-timer shooting.
En
1 Set the power switch at .
- The lens extends and the monitor turns on.
2 Press ② )。
- The current self-timer setting is displayed.
3 Press () to switch the self-timer mode on or off.
- The setting changes between ON and OFF each time is pressed. When the self-timer mode is selected, is displayed on the monitor.
4 Take the picture.
- The self-timer lamp lights up for approximately 10 seconds, and starts blinking. After blinking for approximately 2 seconds with a beep sound, the picture is taken.
- The self-timer mode is automatically canceled after one shot.
ADVANCED SHOOTING
SEQUENTIAL SHOOTING
This function allows you to take a rapid succession of still pictures by pressing and holding the shutter button (approximately 12 pictures at 1.5 frames per second only by sequential shooting in SQ2 mode). As you can choose the best picture from a series of sequential shots, you are recommended to use this mode when taking pictures of a moving subject. Focus, exposure and white balance are locked at the first frame. You can also erase the unwanted shots afterwards.

MENUFUNCTIONS-Mode menus
MACRO MODE SHOOTING
Use the macro mode to shoot proximal subjects (W:20cm to 50cm/T:50cm to 90cm).
1 Set the power switch at .
2 Press (品)
3 Press (to switch the macro mode on or off.
4 Take a picture.
VIEWING STILL PICTURES
1 Set the power switch at
- The monitor turns on and displays the last picture taken. (Single-frame playback)
2 Use the arrow pad to play back other pictures.
Jumps to the picture 10 frames back.
Displays the previous picture.

Displays the next picture.
Jumps to the picture 10 frames ahead.
3 Set the power switch at OFF.
- The monitor and camera turn off.
QUICK VIEW
This function lets you play back pictures while the camera is in the shooting mode. This is useful when you want to check shooting results and resume shooting quickly.
1 Press QUICK VIEW button while in the shooting mode.
2 Press the shutter button halfway or QUICK VIEW button to return to the shooting mode.
Close-up playback
Pictures displayed on the monitor can be enlarged in steps up to 4 times the original size.
1 Set the power switch at.
- The monitor turns on and displays the last picture taken.(Single-frame playback)
2 Use the arrow pad to display the still picture you want to enlarge.
- You cannot enlarge pictures with
3 Pull the zoom lever toward.
- The magnification increases each time the zoom lever is pulled.
- To return the picture to the original size (1x), push the zoom lever toward w .
Index display
This function lets you show several pictures at the same time on the monitor. The number of pictures shown can be 4, 9 or 16.
1 Set the power switch at.
- The monitor turns on and displays the last picture taken.(Single-frame playback)
2 Push the zoom lever toward to enter the index display mode.
- Use the arrow pad to select the picture.
- To return to the single-frame playback, pull the zoom lever toward
MOVIE PLAYBACKVIEWING MOVIES
1 Set the power switch at
- The monitor turns on and displays the last picture taken.(Single-frame playback)
2 Use the arrow pad to display the picture with .
3 Press
- The top menu is displayed.
4 Press to select Movie PLAYBACK.
5 Press to select PLAYBACK, and press.
- The movie is played back. When playback ends, the display automatically returns to the beginning of the movie.
- Fast forward/fast rewind functions are available during playback.
: Fast forward. Each press switches the speed between × 1, × 2 and × 20 .
: Fast rewind. Each press switches the speed between × 1 , × 2 and × 20 .
- The MOVIE PLAYBACK menu is displayed again after playback ends. PLAYBACK : Plays back the entire movie again. FRAME BY FRAME :
Plays back the movie manually one frame at a time.
EXIT : Leaves the movie playback mode.
Press to select from PLAYBACK, FRAME BY FRAME or EXIT,
and press OK
When FRAME BY FRAME is selected

: Displays the first frame of the movie.

: Displays the last frame of the movie.

: Displays the next frame. The movie can be played continuously by holding the button down.

: Displays the previous frame. The movie can be played continuously in reverse by holding the button down.

: Displays the MOVIE PLAYBACK menu.
PROTECTING PICTURES
You are recommended to protect important pictures to avoid accidentally erasing them.

Set the power switch at .
- The monitor turns on and displays the last picture taken.(Single-frame playback)
2 Use the arrow pad to display the picture you want to protect.

Press

- The top menu is displayed.
4 In the top menu, select MODE MENU PLAY on, and press.

Press to select ON, and press OK.
-
To cancel protection, select OFF.
-
Press again to exit the menu.

Note
- Protected pictures cannot be erased by the single-frame/all-frame erase function, but they are all erased when you execute format.
ERASING PICTURES
This function enables you to erase recorded pictures. You can choose the single-frame erase or the all-frame erase.

Note
- You cannot erase pictures that are protected. Cancel the protection before erasing such pictures.
- Once erased, pictures cannot be restored. Be careful not to accidentally erase pictures you want to keep.
Single-frame erase
This function erases only the picture displayed on the monitor. The all-frame erase function can be used to erase all the pictures on the card at once.
1 Set the power switch at.
- The monitor turns on and displays the last picture taken.(Single-frame playback)
2 Use the arrow pad to display the picture you want to erase.
3 Press.
- The top menu is displayed.
4 Press to select ERASE.
5 Press to select YES, and press.
- The picture is erased and the menu is closed.
All-frame erase
1 In the playback mode top menu, select MODE MENU CARD CARD SETUP, and press
2 Press to select ALL ERASE, and press.
3 Press to select YES, and press.
- All the pictures are erased.
CARD SETUP FORMATTING CARDS
This function lets you format a card. Formatting prepares cards to receive data. Before using non-Olympus cards or cards which have been formatted on a PC, you must format them with this camera.
All existing data, including protected pictures, are erased when the card is formatted. Make sure that you transfer important data to a PC before formatting a card in use.
1 In the top menu, select MODE MENU CARD CARD SETUP, and press
- Shooting mode
The FORMAT screen is displayed.
- Playback mode
The CARD SETUP screen is displayed.
2 If the FORMAT screen is displayed, press to select YES.
If the CARD SETUP screen is displayed, press

select FORMAT, and press .
When the FORMAT screen appears, press to select YES.
3 Press

- The BUSY bar is displayed and the card is formatted.
PRINT RESERVATION/DIRECT PRINT
WITH PRINT RESERVATION (DPOF)
DPOF is short for Digital Print Order Format. DPOF is the format used to record automatic print information from digital cameras.
If a card containing print reservation data is taken to a print shop that supports the DPOF format, the pictures can be printed according to the DPOF reservations. Or pictures can be printed out at home on a personal DPOF-compatible printer.
All-frame reservation
Use this feature to print all the pictures stored on the card. Select the desired number of prints and whether you want the date and time included.
Single-frame reservation
Use this feature to print only selected pictures. It is also used to change the reserved number of prints and the date/time settings. Display the frame you want to print and set the desired number of copies.
Resetting the print reservation data
This function allows you to reset all the print reservation data for the pictures stored on the card.
DIRECT PRINT (PictBridge)
By connecting the camera to a PictBridge-compatible printer with the USB cable, you can print out recorded pictures directly without the use of a computer.
PictBridge is the standard for connecting digital cameras and printers of different makers and printing out pictures directly.
PRINTPrints the selected picture.
ALL PRINT Prints all the pictures stored on the card.
MULTI PRINTPrints one picture in multiple layout format.
ALL INDEXPrints an index of all the pictures stored on the card.
PRINT ORDERPrints the pictures according to the print reservation data on the card. If no print reservations have been made, this option is not available.
Options for the print mode and other settings
- Available options for some settings such as the print mode and paper size may differ depending on the type of printer. For details, refer to the instruction manual of your printer.
For more details, refer to the "Reference Manual" on CD-ROM.
DOWNSLOADING PICTURES TO A COMPUTER
By connecting the camera to a computer with the provided USB cable, images on a card can be transferred to the computer. Some OS's (operating systems) may need a special setup before connecting to the camera for the first time. Follow the chart below. For details of the procedures in the chart, refer to the "Reference Manual" on the software CD. Also refer to the "Software Installation Guide" included in the CD-ROM package.
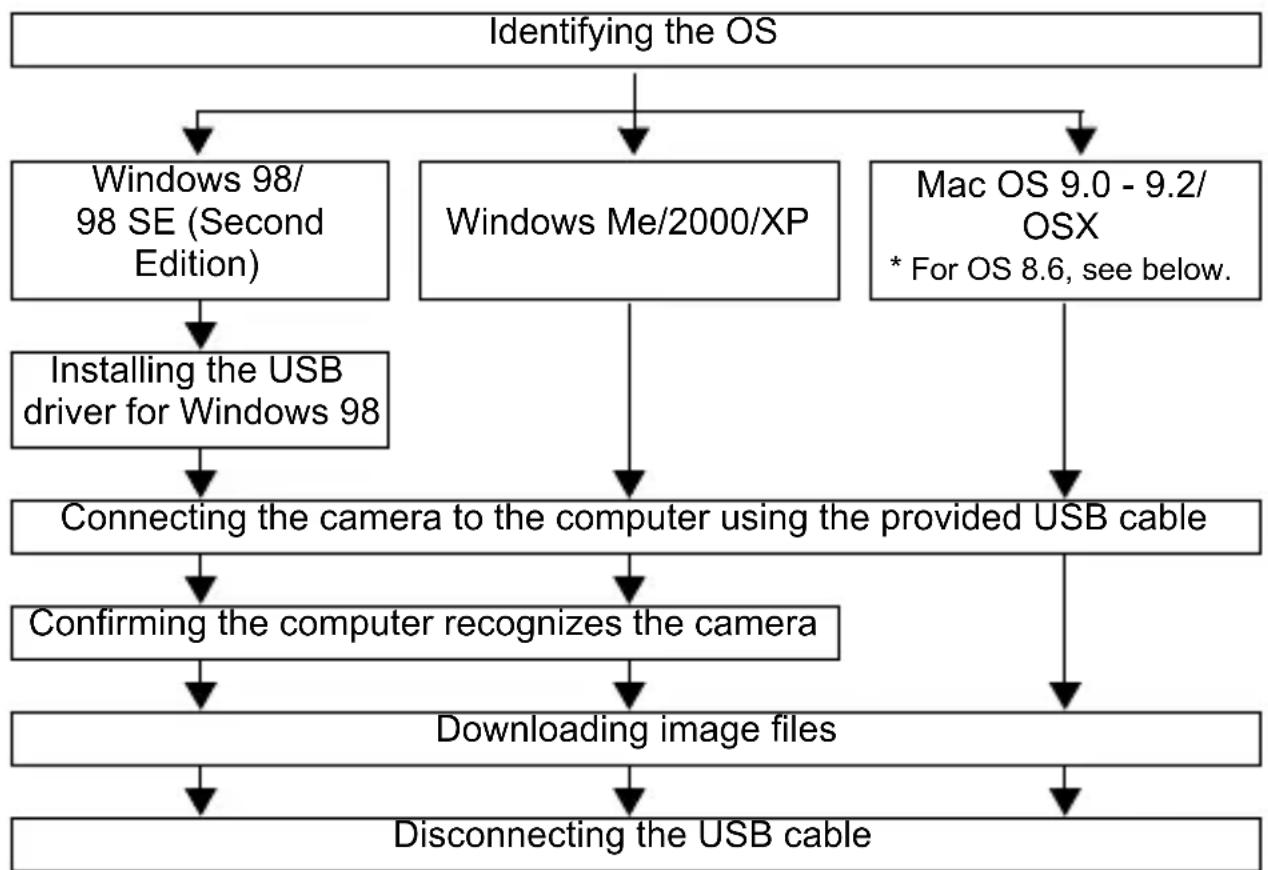
- Even if your computer has a USB connector, data transfer may not function correctly if you are using one of the operating systems listed below or if you have an add-on USB connector (extension card, etc.).
- Windows 95/NT 4.0
- Windows 98/98 SE upgrade from Windows 95
- Mac OS 8.6 or lower (except Mac OS 8.6 equipped with USB MASS Storage Support 1.3.5 installed at the factory)
- Data transfer is not guaranteed on a home-built PC system or PCs with no factory installed OS.

-
You can view images using: graphics applications that support the JPEG file format (Paint Shop Pro, Photoshop, etc.); Internet browsers (Netscape Communicator, Microsoft Internet Explorer, etc.); CAMEDIA Master software; or other software. For details on using commercial graphics applications, refer to their instruction manuals.
-
QuickTime is needed for playing back movies. QuickTime is included on the provided software CD.
- If you want to process images, make sure to download them to your computer first. Depending on the software, image files may be destroyed if the images are processed (rotated, etc.) while they are on the card.
FOR OTHER OS USERS
Users running other OS cannot use the provided USB cable to connect the camera directly to a computer.
Windows 95 Windows NT Mac OS before OS 9
You can download images directly to your computer using a PC card adapter.

ERROR CODES
| Monitor indication Possible cause Corrective action | ||
| NO CARD | The card is not inserted, or it cannot be recognized. | Insert a card or insert a different card. If the problem persists, format the card. If the card cannot be formatted, it cannot be used. |
| CARD ERROR | There is a problem with the card. | This card cannot be used. Insert a new card. |
| WRITE-PROTECT | Writing to the card is prohibited. | Read-only setting is applied to the card by a PC. Cancel the setting using the PC. |
| CARD FULL | The card is full. No more pictures can be taken or no more information such as print reservation can be recorded. | Replace the card or erase unwanted pictures. Before erasing, download important images to a PC. |
| NO PICTURE | There are no pictures on the card. | The card contains no pictures. Record pictures. |
| PICTUREERROR | The selected picture has a problem, therefore it cannot be played back on this camera. | Use image processing software to view the picture on a PC. If that cannot be done, the image file is damaged. |
| CARD-COVEROPEN | The card cover is open. Close the card cover. | |
| CARD SETUPPOWER OFFIYFONVATSILET+O Go+OK | The card is not formatted. Format the card. All data on the card is deleted. | |
| BATTERY EMPTY | The camera does not operate because the battery power runs out. | Load the new batteries. |
SPECIFICATIONS
Product type : Digital camera (for shooting and displaying)
Recording system
Still picture : Digital recording, JPEG (in accordance with Design rule for Camera File system (DCF))
Applicable: Exif 2.2, Digital Print Order Format (DPOF), standards PRINT Image Matching II, PictBridge
Movie : QuickTime Motion JPEG support
Memory : xD-Picture Card (16 - 512MB)
No. of storable pictures
When a 16MB card : Approx. 6 frames (SHQ: 2048× 1536 ) used Approx. 20 frames (HQ: 2048× 1536 ) Approx. 32 frames (SQ1: 1600× 1200 ) Approx. 165 frames (SQ2: 640× 480 )
No.of effective :3,200,000 pixels pixels
Image pickup : 1/2.7" CCD solid-state image pickup, 3,340,000 device pixels (gross)
Lens : Olympus lens 5.8 mm to 17.4 mm, f2.9 to 5.0, 7 elements in 6 groups (equivalent to 38 mm to 114 mm lens on 35 mm camera)
Photometric system : Digital ESP metering
Shutter speed : 1 to 1/2000 sec. (Night Scene mode: 2sec)
Shooting range: 0.5 m (1.6 ft.) to (W), 0.9 m (3.0 ft.) to (T) (normal)
0.2 m (0.7 ft.) to 0.5 m (1.6 ft.) (W), 0.5 m (1.6 ft.) to 0.9 m (3.0 ft.) (T) (macro mode)
Viewfinder : Optical real image viewfinder
Monitor: 1.8" TFT color LCD display, 85,000 pixels
Outer connector : DC-IN jack, USB connector (mini-B)
Automatic calendar : 2000 up to 2099 system
Operating environment
Temperature : 0^ to 40^ (32°F to 104°F) (operation)
-20°C to 60°C (-4°F to 140°F) (storage)
Humidity: 30% to 90% (operation)/ 10% to 90% (storage)
Power supply: 1 CR-V3 lithium battery pack, or 2 AA (R6)
alkaline batteries or NiMH batteries.
AC adapter (optional)
Manganese (zinc-carbon) batteries cannot be used.
Dimensions : 102mm (W) × 55.5mm (H) × 36.5mm (D)
$$ (4 ^ {\prime \prime} \times 2. 2 ^ {\prime \prime} \times 1. 4 ^ {\prime \prime}) $$
(excluding protrusions)
Weight: 150 g (0.3 lb.) (without batteries or card)
SPECIFICATIONS ARE SUBJECT TO CHANGE WITHOUT ANY NOTICE OR OBLIGATION ON THE PART OF THE MANUFACTURER.
TABLE DES MATIÈRES
GUIDERAPIDEDE DEMARRAGE 44
FONCTIONS DU MENU 56
PRISE DE VUES - INSTRUCTIONS DE BASE 62
PRISE DE VUE ELABOREE 69
AFFICHAGE 70
RÉSERVATION D'IMPRESSION/ IMPRESSION DIRECTE. 75
TRANSFERT DES PHOTOS VERS UN ORDINATEUR. 77
CODESD'ERREUR 79
CHARACTERISTIQUES 80
Fr
Adresse: 2 Corporate Center Drive, Melville, New York
11747-3157 U.S.A.
SI UNE MISE AU POINT SATISFAISANTE EST IMPOSSIBLE (MÉMORISATION DE LA MISE AU POINT)
Normes applicable: Exif 2.2, Digital Print Order Format (DPOF), PRINT Image Matching II, PictBridge
Video: Prise en charge de QuickTime Motion JPEG
Mémoire : carte xD-Picture Card (16 - 512 Mo)
Adresse : 2 Corporate Center Drive, Melville,
New York11747-3157, USA
Telefonnummer: 1-631-844-5000