
DCR-TRV125E - Camcorder SONY - Free user manual and instructions
Find the device manual for free DCR-TRV125E SONY in PDF.

| Product Type | Digital8 Camcorder |
| Brand | Sony |
| Model | DCR-TRV125E |
| Power | InfoLITHIUM L series lithium-ion battery (NP-F550) or AC adapter AC-L10A/L10B/L10C |
| Optical Zoom | 25x |
| Digital Zoom | 125x |
| Focus | Auto and manual |
| Viewfinder | Black and white |
| LCD Screen | Yes, with brightness adjustment |
| Special Features | NightShot, Super NightShot, Fader, Picture effects, Digital effects, PROGRAM AE, Backlight |
| Recording formats | Digital8, Hi8, standard 8mm (playback only) |
| Connectors | DV output (i.LINK), AV output, microphone input, headphone output |
| Supplied accessories | NP-F550 battery, AC adapter, remote control, AV cable, hand strap, lens cap |
| Safety | Moisture protection, maximum operating temperature 60°C |
Frequently Asked Questions - DCR-TRV125E SONY
User questions about DCR-TRV125E SONY
0 question about this device. Answer the ones you know or ask your own.
Ask a new question about this device
Download the instructions for your Camcorder in PDF format for free! Find your manual DCR-TRV125E - SONY and take your electronic device back in hand. On this page are published all the documents necessary for the use of your device. DCR-TRV125E by SONY.
USER MANUAL DCR-TRV125E SONY
Digital Video Camera Recorder [B]
Operating Instructions
Before operating the unit, please read this manual thoroughly, and retain it for future reference.
HCTPYKLIINIO 3KCNJYATAUIN
Ipeed 3Kcnpnyataunei annapaTa BnMaTeNbHO npOuyTHe, noXaJyNCTa, daHHOe pyKOBoDCTBO i COxpaHnTe erO dJaIbHeNIX CNpaBOK.
![SONY DCR-TRV125E - Digital Video Camera Recorder [B] - 1](/content/2020/04/48729/images/fdd2fcebf7fcbacbf9a28d55094202d19d4cae6910daa255f55759957ab0d8bc.jpg)
Digital Handycam
![SONY DCR-TRV125E - Digital Video Camera Recorder [B] - 2](/content/2020/04/48729/images/f02cc5b138292ee1d8b87c0dfadefcb2d9494599809eba8574f4ec52de4985f0.jpg)
InfoLITHIUM
TM
m = 311
SERIES
![SONY DCR-TRV125E - Digital Video Camera Recorder [B] - 3](/content/2020/04/48729/images/e65e7b889001b2d7e8c4b452f66250351c8d3be92f1d295eb60db84b940d1d88.jpg)
MEMORY STICK TM
![SONY DCR-TRV125E - Digital Video Camera Recorder [B] - 4](/content/2020/04/48729/images/fcd25c924fb1f9a53d6cb77f9134dcf0b1efaf6a04b22529a32435eec4401774.jpg)
Digital8
DCR-TRV120E/TRV125E/TRV320E
English
Welcome!
Congratulations on your purchase of this Sony Digital Handycam camcorder. With your Digital Handycam, you can capture life's precious moments with superior picture and sound quality.
Your Digital Handycam is loaded with advanced features, but at the same time it is very easy to use. You will soon be producing home video that you can enjoy for years to come.
WARNING
To prevent fire or shock hazard, do not expose the unit to rain or moisture.
To avoid electrical shock, do not open the cabinet.
Refer servicing to qualified personnel only.
NOTICE ON THE SUPPLIED AC POWER ADAPTOR FOR CUSTOMERS IN THE UNITED KINGDOM
A moulded plug complying with BS1363 is fitted to this equipment for your safety and convenience.
Should the fuse in the plug supplied need to be replaced, a 5 AMP fuse approved by ASTA or BSI to BS1362 (i.e., marked with 甲 or 乙 mark) must be used.
If the plug supplied with this equipment has a detachable fuse cover, be sure to attach the fuse cover after you change the fuse. Never use the plug without the fuse cover. If you should lose the fuse cover, please contact your nearest Sony service station.
ATTENTION
The electromagnetic fields at the specific frequencies may influence the picture and sound of this digital camcorder.
For the customers in Germany
Directive: EMC Directive 89/336/EEC.
92/31/EEC
This equipment complies with the EMC
regulations when used under the following
circumstances:
Residential area
Business district
Light-industry district
(This equipment complies with the EMC
standard regulations EN55022 Class B.)
Pycckn
Добpo пожаловать!
I03dpaBnaem BAc C npno6peTeHnEm daHHoB BIndeokamepbl Digital Handycam pnpMbly Sony. C nOmoUb BaWei BIndeokamepbl Digital Handycam Bbl cMOKeTe 3aneuATneTb DOpORHe Bam mHOBeHnJx3Hn C npEBOxCoDhbIM KaueCTBOM N3O6paXeHnN 3Byka.
BaHa BnDeOkaMepa Digital Handycam OChaSeHa yCOBepHeCTBOBaHHbIMN fYHKUHM, HO B TO JKe BpEme ee OueHb IerKo HcNoIb3OBaTb. Bckope Bbl 6yJeTe co3DaBaTb cEmeHbIe BnDeOpnporpaMMbI, KOTOpBMN MOKeTe HaCnJaXdTaCb rnoCneDyIOuine roDbI.
PNEyPPEXDEHNE
Checking supplied accessories 5
Quick Start Guide 6
Getting started
Using this manual 10
Step 1 Preparing the power supply 12
Installing the battery pack. 12
Charging the battery pack. 13
Connecting to the mains.. 18
Step 2 Inserting a cassette. 19
Recording - Basics
Recording a picture 21
Shooting backlit subjects
- BACK LIGHT 27
Shooting in the dark
- NightShot/Super NightShot ..... 28
Self-timer recording
(DCR-TRV320E only) 30
Checking the recording - END SEARCH/
EDITSEARCH/Rec Review 31
Playback - Basics
Playing back a tape 33
Viewing the recording on TV 38
Advanced Recording Operations
Recording a still image on a tape - Tape Photo recording 41
Using the wide mode 45
Using the fader function 46
Using special effects - Picture effect 49
Using special effects - Digital effect 51
Using the PROGRAM AE function. 54
Adjusting the exposure manually. 56
Focusing manually 57
Superimposing a title 59
Making your own titles 61
Inserting a scene 63
AdvancedPlaybackOperations
Playing back a tape with picture effects..... 64
Playing back a tape with digital effects..... 65
Enlarging recorded images - PB ZOOM... 66
Quickly locating a scene using the zero set memory function 67
Searching a recording by date -Date search 68
Searching for a photo - Photo search/ Photo scan. 70
Editing
Dubbing a tape 72
Customizing Your Camcorder
Changing the menu settings 76
Resetting the date and time. 89
"Memory Stick" operations
Using "Memory Stick"-introduction 91
Recording still images on "Memory Stick"
- Memory Photo recording 96
Superimposing a still image in the "Memory Stick" on a moving image
-MEMORYMIX. 101
Recording an image from a tape as a still image 105
Copying still images from a tape - Photo save 107
Viewing a still image - Memory photo playback 109
Enlarging still images recorded on "Memory Stick"s - Memory PB ZOOM. 113
Playing back images in a continuous loop -SLIDE SHOW 114
Preventing accidental erasure - Image protection. 116
Deleting images 118
Writing a print mark
- PRINT MARK 121
Additional Information
Digital8 system, recording and playback 123
About i.LINK. 125
Changing the lithium battery in your camcorder 127
Troubleshooting 129
Self-diagnosis display 134
Warning indicators and messages 135
Using your camcorder abroad 145
Maintenance information and precautions 146
Specifications 152
Quick Reference
Identifying the parts and controls. 154
Quick Function Guide 163
Index 165
-
Windows® is registered trademark or trademark of Microsoft Corporation, registered in the United States and other countries.
-
Macintosh is trademark of Apple Computer, Inc.
-
All other product names mentioned herein may be the trademarks or registered trademarks of their respective companies.
Furthermore, "TM" and "®" are not mentioned in each case in this manual.
IpoBepka npnilaraembIX npHaJdxKHOCTeI ... 5
PykoBoDCTBO no 6bIcTpomy 3anycky....8
Ioprotobka K 3Kcnnyatauun
IcnoIb3OBAHHe DaHHoro pyKOBoIDCTBa ....10
IyHKT 1 IoproTOBka nCTOuHnKa nHTaHn..12
UcTaHOBka 6aTapeiHoro 6Ioka 12
3apKa 6aTapeHoro 6noka 13
IopcoeHHeHne K cTeBoi po3etKe ....18
IyHKT 2 YcTaHObKa Kaccetbl 19
3aIncb - OCHOBhble NOJIOXeHnA
3ainncb n3o6paxKeHnna 21
CbeMa oBeKToB c 3aDHei
poDCBtKo-BACKLIGHT 27
Cbemka B TEMHOTE-Houhna cbeMka/
Houhanycunepcbemka 28
3aHnCb no TaMepy camo3anycka 30
Поберка заимс - END SEARCH/
Bocnpou3BeDeHne IeHTbI C uOpPobbIMN 65
YBeJIuHHe 3aIINcaHHbIX n3O6paXeHn -PB ZOOM 66
БыICTPoe OТБICKaHHe 3IIN3OJa c NOMOuBIO ФУнКUIMпamrtи HynEBoN OTMeTKn......67
OnepaTnBhblcnpaBOuHnK
0603haueHne yacte n peyIATOPOB 154
PykoBOCTBO NO 6bICTpbIM yHKUaM ....164
AilpaBnThbI yKa3aTeIb 166
- Windows® ABNIECTORO opMunalbHO 3apeHcTprpOBaHHoTROPBOI MAPKoi INI pPmEHbIM 3hAKOM Microsoft Corporation, 3apeHcTprpOBaHHbIM B CoeDInHeHHbx tTaTAX nDpyIWx ctpAHax.
Macintosh ABJAEcTcHmEHbIM 3aKOM Apple Computer, Inc.
Bce npytne Na3BaHnna n3denn, yka3aHHbIe B daHOM pyKOBOCTBe, MOrY T bItb TOPRoBbIMn MapKaMM INI 3apeNCTpnpoBaHHbIMn TOPROBbIMn MAPKaMM COOTBEcTByIOUxKOMnAnH.
06O3haENH“TM” 日 ^ 是 他6byyT yka3btaBcraB KAKDOM cnyae B daHONMO pyKOBOCTBe.
Make sure that the following accessories are supplied with your camcorder.
Y6eIntecb, cyTo cneIyUOuIe npHaIaNExKHOCTn npIraIaIOTcK BaSei BIndeokampe.
| 1 | 2 | 3 |
| 4 | 5 | 6 |
| 8 | 9 | 10 |
| 12 | 1 BeespravoDHbI NpIbT DnCTaHcUHOrO ynpaBLeHn (1) (ctp. 159) 2 CetbeH o aDanTep nepeMeHHoro Toka AC | |
1 Wireless Remote Commander (1) (p. 159)
2 AC-L10A/L10B/L10C AC power adaptor (1), Mains lead (1) (p. 13)
NP-F330 battery pack (1) (p. 12, 13)
DCR-TRV120E/TRV320E
NP-F550 battery pack (1) (p. 12, 13)
DCR-TRV125E only
4 CR2025 lithium battery (1) (p. 127)
The lithium battery is already installed in your camcorder.
R6 (Size AA) battery for Remote Commander (2) (p. 160)
6 A/V connecting cable (1) (p. 38)
7 Shoulder strap (1) (p. 156)
Lens cap (1) (p. 21)
9 PC serial cable (1) (p. 112) DCR-TRV320E only
"Memory Stick" (1) (p. 91) DCR-TRV320E only
11 Application software: PictureGear 4.1 Lite
(CD-ROM) (1) (p. 112)
DCR-TRV320E only
12 21-pin adaptor (1) (p. 39)
Contents of the recording cannot be compensated if recording or playback is not made due to a malfunction of the camcorder, video tape, etc.
1 BecepnoBODHyI NyIbT dNCTaHcNoHHoro ynpabJIeHn (1) (ctp. 159)
2 CetéBOI àdantep nepemehoro Toka AC-L10A/L10B/L10C (1) npoBoI 3JIeKtPonNTAHnI (1) (ctp. 13)
3 BaTapeHbIb 6LoK NP-F330 (1) (cTp.12, 13)
DCR-TRV120E/TRV320E
BaTapeHbI 6JOK NP-F550 (1) (cTp. 12, 13)
Toьko DCR-TRV125E
4ЛитуеваябаташикаCR2025(1)(cTp.127)
IITneBa 6TaapeKka yXe yCTaHOBnHeHa B BaSei BnDeokampe.
5 BaTapeiKa R6 (pa3Mepa AA) nIyNbTa DnCTaHnOHHoro ynpabJIeHn (2) (cTp. 160)
6 CoeHnTeBbI Ka6Ib ayDIO/BnDeo (1) (cTp. 38)
7Плесьов ремь (1) (ctp. 156)
KpbliKa oBbeKtNbA (1) (cTp.21)
9 Ka6eIb IaI na oocneIOBaTeIbHorO
NODCOEINHeHnK INK (1) (cTp. 112)
ToIbko DCR-TRV320E
10 "Memory Stick" (1) (ctp. 91)
Toько DCR-TRV320E
11Пикладhoe nporpaMMHoe obecneueHHe: PictureGear 4.1 Lite (CD-ROM) (1) (ctp. 112)
ToIbKO DCR-TRV320E
12 21-wTbIpbKOBbI aadantep (1) (ctp.39)
CoedpkaHne 3aNCn He MoKet 6bItb KOMJIeHCIOBAAHO B CUYae,ecJIN 3aNcB NIN BOCPON3BeDEHne HE BblOJIHeHb N3-3a HEnCNPBAHCOTHn BInDeOKaMePbI, BInDeOJIeHTb I T.I.

This chapter introduces you to the basic features of your camcorder. See the page in parentheses "() for more information.
1 Connecting the mains lead (p. 18)
Use the battery pack when using your camcorder outdoors (p. 12).
2 Inserting a cassette (p. 19)
Open the lid of the cassette compartment, and press EJECT. The compartment opens automatically.

2 Insert a cassette into the cassette compartment with its window facing out and the write-protect tab on the cassette up.
3 Close the cassette compartment by pressing the (PUSH) mark on the cassette compartment. The cassette compartment automatically goes down. Close the lid of the cassette compartment.
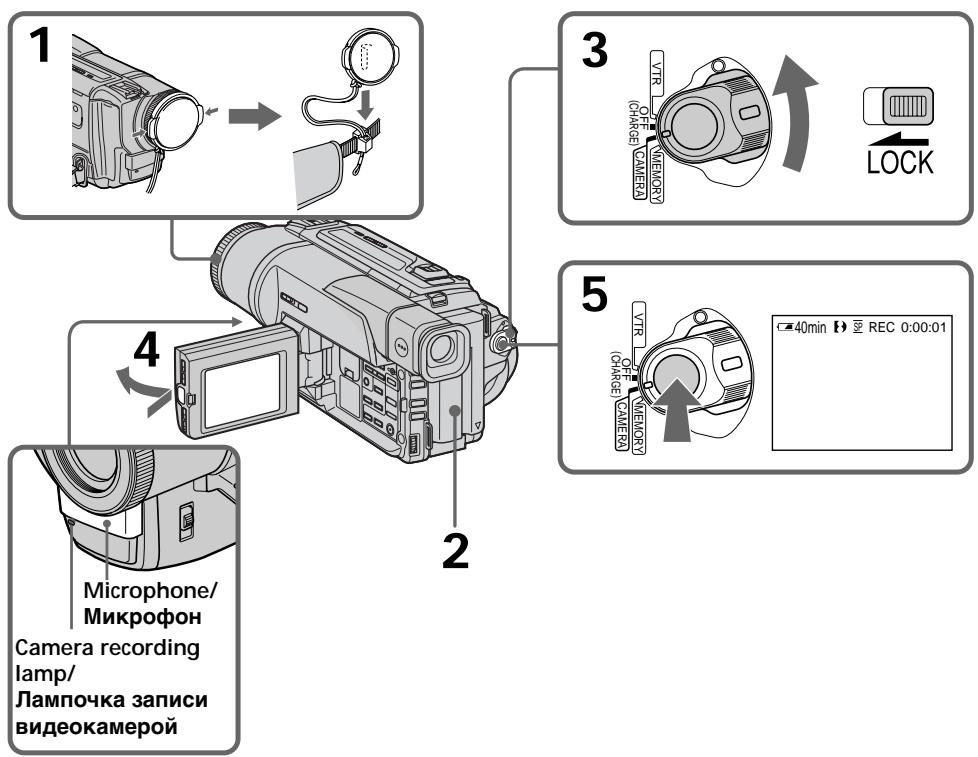
1 Remove the lens cap.
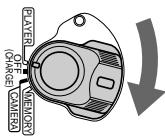
2 Set the POWER switch to CAMERA while pressing the small green button.

Press the red button. Your camcorder starts recording. To stop recording, press the red button again.

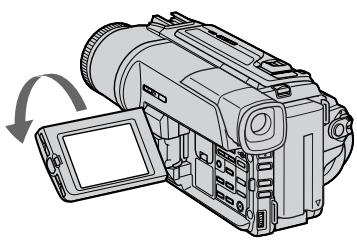
3 Open the LCD panel while pressing OPEN. The picture appears on the LCD screen
Viewfinder
When the LCD panel is closed, use the viewfinder placing your eye against its eyecup. The picture in the viewfinder is black and white.
4
Monitoring the playback picture on the LCD screen (p. 33)
Press to rewind the tape.
REW

Press to start playback.
PLAY

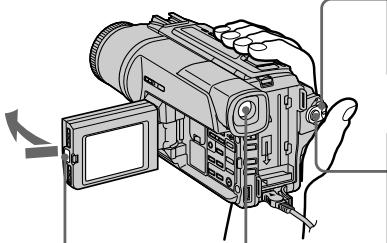
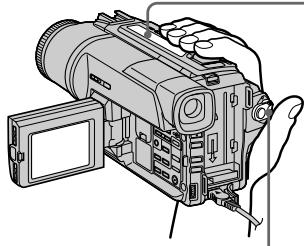
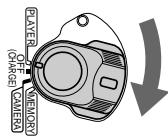
1 Set the POWER switch to PLAYER while pressing the small green button.
Note
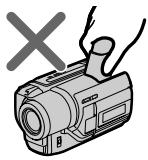
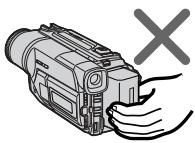
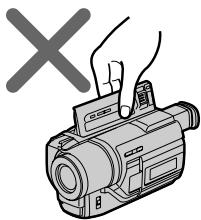
Do not pick up your camcorder by holding the viewfinder, the LCD panel or the battery pack.

PykoBoDcTBo nO 6bICTpOMy 3aIpycky

B daHnoI rnaBe npBbeHbIOcHbIe cyHKmN Bauei BndeokampeI. IOpRo6HbIE cBeDeHnIcoepXaTcR npBbeHbHa CTpaHnIe B KpyrIbIX cKo6kax "( ).
1 Повсоевинецпровoda злескгочиня (cTp. 18)
2 Haxmnte KhONky 4IJIy o6paTHoI nepeMOTKn JIeHTbl. PEW@
3 HaKMTe KONky IaHaayana BOCnpoIN3BeHIny.
1 UcTaHOBInTe nepeKlIOuAteIb POWER B noJooKeHne PLAYER, HaxKaB MaJeHbKyIO 3eJIeHyIO KHOKNy.
ПРИМЕЧАНЕ
He noHnMaTe BnDeOkAmepy, B3aBwncb 3a BnDOuCKaTeNb, NaHeNb KKd nIi 6aTaapeiHb 6Jok.


Using this manual
The instructions in this manual are for the three models listed in the table below. Before you start reading this manual and operating your camcorder, check the model number by looking at the bottom of your camcorder. The DCR-TRV320E is the model used for illustration purposes. Otherwise, the model name is indicated in the illustrations. Any differences in operation are clearly indicated in the text, for example, "DCR-TRV320E only."
As you read through this manual, buttons and settings on your camcorder are shown in capital letters.
e.g. Set the POWER switch to CAMERA.
When you carry out an operation, you can hear a beep sound to indicate that the operation is being carried out.
PnUyTeHn DaHHOro pyKOBoDCTBa yuHTbIbAaTe, UTO KHOKNi YcTaHOBKn Ha BNuDeOKaMepe NOKa3Ahbl 3arJaBbIMN bYKbAMN.
Types of differences/Tunbl pa3nny
| DCR- | TRV120E | TRV125E | TRV320E |
| MEMORY mark* (on the POWER switch) | — | — | ● |
| Знak MEMORY* (на поеклочате POWER) | |||
| Self-timer | — | — | ● |
| Таймер самоанусяа | |||
| Digital zoom | 100× | 125× | 100× |
| Lцфравиь варнообъektiv |
Provided/VMeetc
Not provided/OTcyTCTByET
- The model with MEMORY marked on the POWER switch is provided with memory functions. See page 91 for details.
Before using your camcorder
With your digital camcorder, you can use Hi8 Hi3/Digital8 [ ] video cassettes. Your camcorder records and plays back pictures in the Digital8 [ ] system. Also, your camcorder plays back tapes recorded in the Hi8 Hi3/standard 8 [ ] (analog) system. You, however, cannot use the functions in "Advanced Playback Operations" on page 64 to 71 for playback in the Hi8 Hi3/standard 8 [ ] system. To enable smooth transition, we recommend that you do not mix pictures recorded in the Hi8 Hi3/standard 8 [ ] with the Digital8 [ ] system on a tape.
*B moJenx co 3nakom MEMORY na nepeKIOHatele POWER ImeIoTc fynkui namrtn. Iopno6hIe CBeDeHn npuBeHeHa cTp.91.
Ipepe Naayom 3KcnpyaTaunu Baweyndeokamepbbl
ДлЯ BaшенцфpoBoBидевokamepbI Bbl MOXeTe NcNoIb3OBAtВидевokacceTbHi8HII8/ Digital8【).Baа Видевokamepa 3aInCbIbaet n BOCPoIN3BOuNTn3O6paXeHnB zuΦpOBOI CnCTeMe Digital8【).TaKxpe, Baа WnDeovKaMepa BOCPoIN3BOUHTnJIeHTbI, 3aInCaHbIe B CnCTeMe Hi8HI8/8【(aHAnorOBoI).OdHaKo, Bbl He MOXeTe NcNoIb3OBAtФyHKuBn B pa3deJe "YCOBepueHCTBOaHbIe OnpauZn BOCPoIN3BeDEHn" Ha cTpaHnCuax c 64 no 71 ДлЯ BOCpOIN3BeDEHnB CnCTeMe Hi8HI8/8【. ДлЯ obecneYeHn ПlaBHorO nepexoJa peKOMeHdyETcH Ye CMeShuBaT b Ha JHeT N3O6paXeHn, 3aInCaHbIe B CnCTeMe Hi8HI8/ 8【, C N3O6paXeHnAIM, 3aInCaHbIMn B CnΦpOBOi CnCTeMe Digital8【).
Note on TV colour systems
TV colour systems differ from country to country. To view your recordings on a TV, you need a PAL system-based TV.
Copyright precautions
Television programmes, films, video tapes, and other materials may be copyrighted.
Unauthorized recording of such materials may be contrary to the provision of the copyright laws.
Precautions on camcorder care
- The LCD screen and the viewfinder are manufactured using high-precision technology. However, there may be some tiny black points and/or bright points (red, blue, green or white) that constantly appear on the LCD screen and in the viewfinder. These points occur normally in the manufacturing process and do not affect the recorded picture in any way. Effective ratio of pixels and/or screen are 99.99% or more.
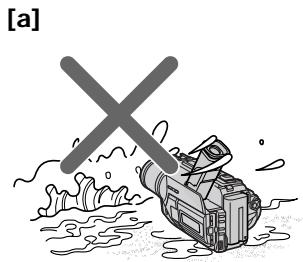
- Do not let your camcorder get wet. Keep your camcorder away from rain and sea water. Letting your camcorder get wet may cause your camcorder to malfunction. Sometimes this malfunction cannot be repaired [a].
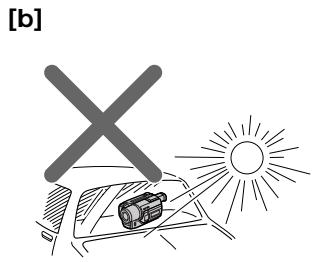
- Never leave your camcorder exposed to temperatures above 60^ (140^) , such as in a car parked in the sun or under direct sunlight [b].
- Do not place your camcorder so as to point the viewfinder, the LCD screen or lens toward the sun. The inside of the viewfinder, LCD screen or lens may be damaged [c].
Приимechаши по системам CBETHORO TEJIeBndeHnA
CnCTeMbI CBeTHORo TEJIeBUNDEHIN OITNIuHaOTcB 3aBNCIMOCTN OT cTpaHb.IIra npocMToPa Baunx 3aNInCe Hn 3KpaHe TELeBUN3Opa Bam Heo6OdImo NcNOJIb3OBaTb TEJIeBUN3Op, OCHOBAHbIh Na CNTeMe PAL.
Пре dioctepexeHne o6 aBTopcKom npaBe
TeIeBn3IOHHbIe IporpaMMbI, KINHOJIbMbI, BUNDeOJIeHTbI IN DpyrIe MaTePnaJIb MoYrT 6bITb 3aUHcEhbl ABTOPCKM npaBOM. HeNtueH3npoBaHnA 3aNNb TaKnx MaTePnaIOB MOxET npOTNbOpEChnT b NOJoxKeHnA 3aKoHa 06 aBTOpckOM npaBe.
Mepblpeoctopoxhoctn npnyxoide 3a Bundeokamepoi
3KpaH KKKI IN BIDONCKATEJIb N3ROTOBHeblc NOMOsbIO BbICOKONpeU3NOHHoTEXHOJOrn. Ondako Ha 3KpaHe KKINB BIDONCKATEJe MOYT NOCTOBHNOIBLITbCByPbIe U/INN JRPKHe UBETbIe TOUYK (KpachIbe, CInHne, 3ENbE HIN6eIbe).IOBLeHne 3THX TOeK BNOJIHHeHopMaJIbHO DIA IPOUecca CBEMKn INHKoIM6b4a3OM He BInReT Ha3AnCbIbAemoe N3OpaxKeHne.CbIiue 99,99% 3KpaHa npEdNa3uHcENo Dlan 3ΦΦeKTHBHorO NCnOJIb3OBAHn.
He donnyckaite, yTo6bI BnDeokamepa cTahOBuJacbBnaJxHoi. IpeDoxpanraite BnDeokamepy OT DoXJa MOpCKoB BoDbI. Ecnn Bbl HamOHTe BnDeokamepy, To 3TO MoKET npINBeCTN K HeINcnpABHOCTNa annapaTa, KOtopar He Bcerda MoKet 6bITb YcTpaneHa [a].
Hnkorga He octabJrIe Bndeokamepy B MeTe C TeMpepaTyPoB BbIe 60°C (140°F), KaK, HApPImep, B aBTOMoBIne, OCTabJeHHOM Ha COJIHHe IIN IOI pRmblcOJIHeYHbIM CBETOM [b].
- He pacnonaraiTe CBOIO Bndeokamepy TaKIM o6pa30M, YTO6bI BVDOINCKaTeJIb IINN 3KpAH KKD 6BJIN HAnpaBHeHb Ha CoJHcE. INHaue MoKeT 6bITb NOBpeXdEHO BHyTppeHHee yCTpoICTBO BnDOINCKaTeJIy IINN 3KpaHa JKKD [c].

Step 1 Preparing the power supply
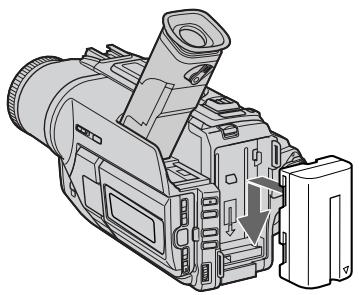
Installing the battery pack
Install the battery pack to use your camcorder outdoors.
Slide the battery pack down until it clicks.
UcTaHOBka 6aTapeHoro 6Joka
UctaHOBnte 6aTapeHbI 6JOK dJa TOrO, YTo6bl HcNoJIb3ObTaB BaSy BnDeokamepy BHe NOMeueHn.
IpeBnHbTe 6aTapeHb 6JOK BnH3, TaK TTObbl OH 3aueKNhync Ha MeCTe.
To remove the battery pack
Slide the battery pack out in the direction of the arrow while pressing BATT RELEASE down.
ДлСНТИЗБАТЕЙНОВ6ЛOKA
After installing the battery pack
Do not carry your camcorder by holding the battery pack. If you do so, the battery pack may slide off your camcorder unintentionally, damaging your camcorder.
Pocne yctahOBKn 6aTaapeHoro 6noka
He nepenocnte cboIO BnDeokamepy, B3raBnCb 3a 6baTeHbI bOk. Ecnn BbI TaK cdeJaTe, 6baTeHbI bOk MoKeT Hnpon3BOJbHO COckoJIb3HyTb C BaSeI BnDeokamepbl I nobpeDNTb ee.
Charging the battery pack
Use the battery pack after charging it for your camcorder.
Your camcorder operates only with the "InfoLITHIUM" battery pack (L series).
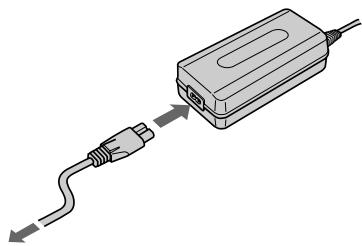
(1) Open the DC IN jack cover and connect the AC power adaptor supplied with your camcorder to the DC IN jack with the plug's mark facing up.
(2) Connect the mains lead to the AC power adaptor.
(3) Connect the mains lead to the mains.
(4) Set the POWER switch to OFF (CHARGE). Charging begins. The remaining battery time is indicated in minutes on the display window.
When the remaining battery indicator changes to normal charge is completed. To fully charge the battery (full charge), leave the battery pack attached for about 1 hour after normal charge is completed until FULL appears in the display window. Fully charging the battery allows you to use the battery longer than usual.
3apka 6aTapeHoro 6loKa
IcnoIb3yIte 6aTapeHbI 6nok IJNA BaSei BnDEOKaMepbl nOce erO 3apRKn. Ba7a BNDeOKaMepa pa6oTaET TOJIbKO C 6aTapeHbIM 6nOKOM "InfoLITHIUM" (cepN L).
After charging the battery pack
Disconnect the AC power adaptor from the DC IN jack on your camcorder.
Notes
- Prevent metallic objects from coming into contact with the metal parts of the DC plug of the AC power adaptor. This may cause a short-circuit, damaging the AC power adaptor.
- Keep the battery pack dry.
- When the battery pack is not to be used for a long time, charge the battery pack once fully, and then use it until it fully discharges again. Keep the battery pack in a cool place.
When the battery pack is charged fully
The LCD back light of the display window is turned off.
Remaining battery time indicator
The remaining battery time indicator in the display window roughly indicates the recording time with the viewfinder.
Battery pack
The supplied battery pack is charged a little.
Until your camcorder calculates the actual remaining battery time
"--min" appears in the display window.
While charging the battery pack, no indicator appears or the indicator flashes in the display window in the following cases:
- The battery pack is not installed correctly.
- The AC power adaptor is disconnected.
- Something is wrong with the battery pack.
Charging time/Bpem3apdKn
Pocne 3apdKn 6aTaapeHoro 6Joka
OTcoeINHnTe cTeBoa aanTep nepemehnHO ToKa oT rHe3da DC IN ha Bauei Bndeokamepe.
Приимейсаня
He donyckaTe KOHTaKTa MeTaNJIuYeCKnX npTeMeTOB C MeTaNJIuYeCKMn YAcCTMaI mTekepa NocToRrHOrO ToKa CeTeBOr aadTepa. 3To MOKeT pInbEcTu K KOpOTkOMy 3aMbkaHNIO NOBpeXdEHNIO BaWero ceTeBOr aadTepa.
- CodepknTe 6aTapeHbI 6nok B cyxom COCTOHHN.
Ecnn 6aTaapeHbI 6bok npEepnOlaeraTcH He nCNoB3OBaTb DnITeJIbHoE BpEM, 3apRdnte ero NPOHOCTBIO ODNH pa3, a3aTEM nCNoB3yIte Do Tex nop, NOKA OH CHOBA nPONHOCTbIO He pa3rJaNTcH. XpaHtE 6aTaapeHbI 6bok B npoxlaDHOM MecTe.
Ecn6atapeHbI 6loK 3apJxhen noHocTbIO
3aJHnIPOcBETKa KKDbOKoUke DnCJIpe BbIKJIIOHTCA.
ИндикаторВрemeиОctabшeroСязяда 6atapeйнoro 6лoka
ИнданаTop Времен octabweocr 3apra da 6atapenHoro 6noka B OKoUke ДиСпляпг npIbSnteHBo yka3bBaetВрмЯЗПСС C nOMOuSbBO BIDONCKATeTЯ.
BatapeHbI 6Jok
BaTapeHbIb 6nok yXe HEMHOr3apRjXeHa npEaPnATm-13r0ToBtTeJe.
DtoTex nop, noka Baasa Buaedeokamepa onpeednT deicTBnteHoe Bpem octabweroC3rapda 6bataeHoro 6bnoka
Bokouke dincnpe 6ydt OTo6paKaTbCnHdNkaZna "--min".
Bo BpMa 3apnK6batapeHoro 6loka HnKaKoHnDnKAtOp He NoaBHeTcR,nn HnDnKAtOp 6yEd MTraB B OKoWKe DncPnE B CnDyUOxN CnyAax:
-БатAPEйнblблok yctaHOJIeH He npabINbHO.
-ОтcoeДинен ceTeBOI aДaNTepпepeMeHnHOToKa.
-уTo-To He B nopraKa C 6aTapeHbIM 6IOKOM.
| Battery pack/Батуарейний 6лok | Full charge (Normal charge)/Полная заюда (нормальnahя заюда) |
| NP-F3301) | 150 (90) |
| NP-F530/F5502) | 210 (150) |
| NP-F730/F750 | 300 (240) |
| NP-F930/F950 | 390 (330) |
| NP-F960 | 420 (360) |
Approximate number of minutes to charge an empty battery pack
1) Supplied with DCR-TRV120E/TRV320E
2) Supplied with DCR-TRV125E
PnI6JIIN3IteJIbHOe BpEMBa MmHyTaX IJIa 3apJIKI PONHOCTbHpa3prXeHHoro 6aTapeHoro 6loka
1)PpunaraetcK DCR-TRV120E/TRV320E
2)Пилагаетск DCR-TRV125E
Recording time/Bpema 3auncn
DCR-TRV120E/TRV125E
| Battery pack/Batapeyenb6lok | Recording with the viewfinder/Запись с пomo涓ью видаочкателя | Recording with the LCD screen/Запись с пomo涓ью зараза XXД | ||
| Continuouss3) | Typical4) | Continuouss3) | Typical4) | |
| Hentpepbivkay3) | Т��пчнay4) | Hentpepbivkay3) | Т��пчнay4) | |
| NP-F3301) | 100 (90) | 55 (50) | 90 (80) | 50 (45) |
| NP-F530 | 165 (150) | 95 (85) | 145 (130) | 80 (75) |
| NP-F5502) | 200 (180) | 115 (100) | 175 (160) | 100 (90) |
| NP-F730 | 335 (300) | 190 (170) | 300 (270) | 170 (155) |
| NP-F750 | 410 (365) | 235 (210) | 365 (325) | 210 (185) |
| NP-F930 | 535 (480) | 305 (275) | 475 (430) | 270 (245) |
| NP-F950 | 630 (570) | 360 (325) | 555 (500) | 315 (285) |
| NP-F960 | 740 (665) | 420 (380) | 660 (590) | 375 (335) |
DCR-TRV320E
| Battery pack/Батуарейный 6лok | Recording with the viewfinder/Запись с помо二百 Вионскателя | Recording with the LCD screen/Запись с помо二百 зараза XXД | ||
| Continuouss3)Неррьевская3) | Typical4)Тлиочая4) | Continuouss3)Неррьевская3) | Typical4)Тлиочая4) | |
| NP-F3301) | 100 (90) | 55 (50) | 80 (70) | 45 (40) |
| NP-F530 | 170 (155) | 95 (90) | 125 (115) | 70 (65) |
| NP-F5502) | 205 (185) | 115 (105) | 155 (140) | 90 (80) |
| NP-F730 | 350 (310) | 200 (175) | 275 (250) | 155 (140) |
| NP-F750 | 425 (380) | 240 (215) | 325 (285) | 185 (160) |
| NP-F930 | 555 (500) | 315 (285) | 430 (385) | 245 (220) |
| NP-F950 | 650 (590) | 370 (335) | 495 (450) | 280 (255) |
| NP-F960 | 765 (685) | 435 (390) | 595 (535) | 340 (305) |
Approximate number of minutes when you use a fully charged battery
Numbers in parentheses " ( ) " indicate the time using a normally charged battery.
Supplied with DCR-TRV120E/TRV320E
2) Supplied with DCR-TRV125E
3) Approximate continuous recording time at 25^ (77^) . The battery life will be shorter if you use your camcorder in a cold environment.
4 Approximate number of minutes when recording while you repeat recording start/stop, zooming and turning the power on/off. The actual battery life may be shorter.
PnIbI3nteHbHOe BpMaB MInHyTax PnINcNoIb3OBAHmN POJIHOCTbIO 3apJXeHHoro6aTapeHOro 6noka
Yncla BCKo6kax()yka3bIbaOTBpeM npi nCNoIb3OBAHm 6aTaapeHoro 6Ioka C HOpMaIbHOJ 3apJdkOJ.
1)Пилагаетск DCR-TRV120E/TRV320E
2)ПилагаетскDCR-TRV125E
3]ПиблзnteьhoeВремнелрьвов
ЗАпсИп РтtemпетаType 25°C (77°F). Пи
ИСПОЛБЗОВАнN BИДЕОКамерь В XОЛДнБИХ
УСЛОВИХСРОСКLYЖБББaТAPEHOROБLOKA
БудETКОPOЧ.
4)ПиблзИтельhoeВремВ мHytaxпри 3aПИССн HeOДHOKpaTHbIM NysKOM/OCTaHOBKOI 3aПИСN, Hae3ДOM BnДeОКaМepbl I BKЛIOчEHnEM/BbIKЛIOчEHnEM ПТАнЯ. 發КТИЧЕСКсрOKсLNYЖБIЗapJa6batapeHOrO bLOka moKet 6bITb KopoYe.
Playing time/Bpema Bocnpon3BedeHnA DCR-TRV120E/TRV125E
| Battery pack/Батуейный 6лok | Playing time on LCD screen/B越来越大 B越来越大 | Playing time with LCD closed/B越来越大 B越来越大 |
| Вразу востоке XXД | Прinks�дзгдзгдзгдзгдзгдзгдзгдзгдзгдзгдзгдзгдзгдзгдзгдзgkД | |
| NP-F3301) | 85 (75) | 95 (85) |
| NP-F530 | 140 (125) | 160 (145) |
| NP-F5502) | 170 (155) | 195 (175) |
| NP-F730 | 290 (260) | 325 (290) |
| NP-F750 | 355 (315) | 395 (355) |
| NP-F930 | 460 (415) | 515 (465) |
| NP-F950 | 540 (485) | 610 (550) |
| NP-F960 | 640 (580) | 720 (645) |
DCR-TRV320E
| Battery pack/Батуейный 6лok | Playing time on LCD screen/B越来越大 B越来越大 XKД | Playing time with LCD closed/B越来越大 B越来越大 XKД |
| NP-F3301) | 75 (70) | 100 (90) |
| NP-F530 | 120 (110) | 165 (150) |
| NP-F5502) | 150 (135) | 200 (180) |
| NP-F730 | 270 (245) | 335 (300) |
| NP-F750 | 315 (275) | 410 (365) |
| NP-F930 | 420 (375) | 535 (480) |
| NP-F950 | 485 (440) | 630 (570) |
| NP-F960 | 580 (520) | 740 (665) |
Approximate number of minutes when you use a fully charged battery
Numbers in parentheses " ( ) " indicate the time using a normally charged battery. The battery life will be shorter if you use your camcorder in a cold environment.
1) Supplied with DCR-TRV120E/TRV320E 2) Supplied with DCR-TRV125E
PnIb3ntJIbHOe BpMaB MmHyTaX npNcNoIb3OBAHm NOnHOCTbIO 3apJKeHHoro6batapeHoro 6noka
LcΦpBv CkO6kax()yKa3bIbAOT BpEm npn nCNoIb3OBaHmN 6bTapeHOro 6JOKa c HopMaJIbHOI 3apIko. Ppi NcNoJIb3OBaHmN BIneOkampeBv XOIOhBIX yCIOBnIX CpOK cnjXkb6b6TaapeHoro 6JOKa 6Byet Kopoye.
1)PpunaraetcK DCR-TRV120E/TRV320E 2)PpunaraetcK DCR-TRV125E
Step 1 Preparing the power supply
The remaining battery time indicator The indicator may not be correct, depending on the conditions in which you are recording. When you close the LCD panel and open it again, it takes about 1 minute for the correct remaining battery time to be displayed.
The power may go off although the battery remaining indicator indicates that the battery pack has enough power to operate.
Charge the battery pack fully again so that the indication on the battery remaining indicator is correct.
What is "InfoLITHIUM"?
The "InfoLITHIUM" is a lithium ion battery pack which can exchange data such as battery consumption with compatible electronic equipment. This unit is compatible with the "InfoLITHIUM" battery pack (L series). Your camcorder operates only with the "InfoLITHIUM" battery. "InfoLITHIUM" battery packs have the Q InfoLITHIUM mark. "InfoLITHIUM" is a trademark of Sony Corporation.
По ИндikatopyВрemeHnOCTaBseroC3apya6atapeHoro6JloKa BO Bpem3aInci
INHdkaTOpMOKET6bITb HnPaBnblbHbIM B 3aBNCMOCtNOTyCNOBb,B KOTopbIX BBIOINHaeTc3anbc.EcnnBb3akpoete naHeIbKKDnOTkpoeTe ee ChOba,To npOJTe OKOLO1MNHyTB,IpeXdYeHn DaICnPee NOBNTcPiabNlbHOeBpEmOCTaBWeOcR 3apJa6bTaapeHoro6loka.
3apd MoKet 6bItb N3pacXoDobAH, XOTn HnDKaTOP BpeMeHn OCTaBweroC3apra6 BaTapeHoro 6LOKa 6yDet NOKa3bIbA Tb 3apd 6TaapeHoro 6LOKa BNoJIHe DOCTaTOHbI DJIr erO 3KcNJIyatauMn.
3apndte 6aTapeHbI 6NoK eue pa3, TaK TTo6bl noka3aHHe Ha INDkaTope oCTaBWeOcra 3apda 6aTapeHoro 6Loka 6bIIO npabInhBIM.
Connecting to the mains
When you use your camcorder for a long time, we recommend that you power it from the mains using the AC power adaptor.
(1) Open the DC IN jack cover, and connect the AC power adaptor to the DC IN jack on your camcorder with the plug's mark facing up.
(2) Connect the mains lead to the AC power adaptor.
(3) Connect the mains lead to the mains.
Подсоевнене К сеТБОй po3etke
EcIn BbI cObupaTecB nCnOJb3oBaTb BnDEOkamepy dNITeJIbHOE Bpemr, peKOMEnHyETcR NcNOb3oBaTb NITaHne OT 3JIeKTPuYeCKoCetn C NOMOuBO CeTeBOrO aDAnTEpa NpeMeHHoro TOka.
(1)ОткpoиTe KpbIshky rHe3da DC IN n
ПОДСоeДИнHTe cTeBOЯ aДanTep
переменHorO ToKa K rHe3dY DC IN ha Baшей
ВидевOKamepy,Тak YTO6bl 3нak ▲Ha
ШтЕке ьл обрашени Вьерх.
(2)ПодсоeДинHTe npOBOD эЛeКТрОпТанИΚ cTeBOMy aДaNTepу nepemEHORTo TOKa.
(3)ПодсоeДинHTe npOBOD эЛeКТрОпТанЯ K cTeВОй рoЗETKE.

1
2,3
PRECAUTION
The set is not disconnected from the AC power source (the mains) as long as it is connected to the mains, even if the set itself has been turned off.
Notes
- The AC power adaptor can supply power even if the battery pack is attached to your camcorder.
- The DC IN jack has "source priority". This means that the battery pack cannot supply any power if the mains lead is connected to the DC IN jack, even when the mains lead is not plugged into the mains.
Using a car battery
Use Sony DC Adaptor/Charger (not supplied).
PPEIOCTEPEXEHNE
Annapata He OTKIIOUaETcO Tn IcTOuHnKa nepemehHoro TOka (3JIeKTPnuecko CTeN) Do Tex nop, noka OH nOCDoeDInHe K 3JIeKTPnuecko CTeN, daxe eCn cam annapaT n BbIKJIOUeH.
PpmeaHn
-Питане OT ceTeBOrO aДanTepa NepeMeHnHO ToKa MoKET nOdaBaTbCЯдe BcIyae,ecnI 6bTaapeHbI bIok npIKpePnEN K BaSei BIndeOKaMepe.
ΓHe3do DC IN nIeMeT "PnOpntet NCTOChNka". 3To 3NaHT, YTO nITaHne OT 6aTapeHoro 6Loka He MoKTe PNODaBaTbCRe, ecIn npBOd 3JeKTPoNTaHnI POIDcOeDINHe K rHe3dy DC IN, daJxe cCnI npOBd 3JeKTPoNTaHnI n He nOIDcoEINHe N CcTeBOi po3eTke.
UcnoJb3ObaHne aBTOMo6nJbHOro aKKymyIaTopa
IcnoIb3yIte aIaITeP/3apIHOe yCTpoCTBO nOCTOaHOro ToKaΦnMpMb Sony (He npunaeraTc).
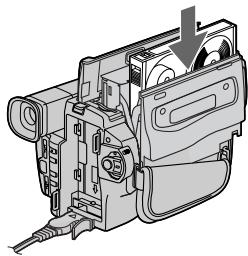
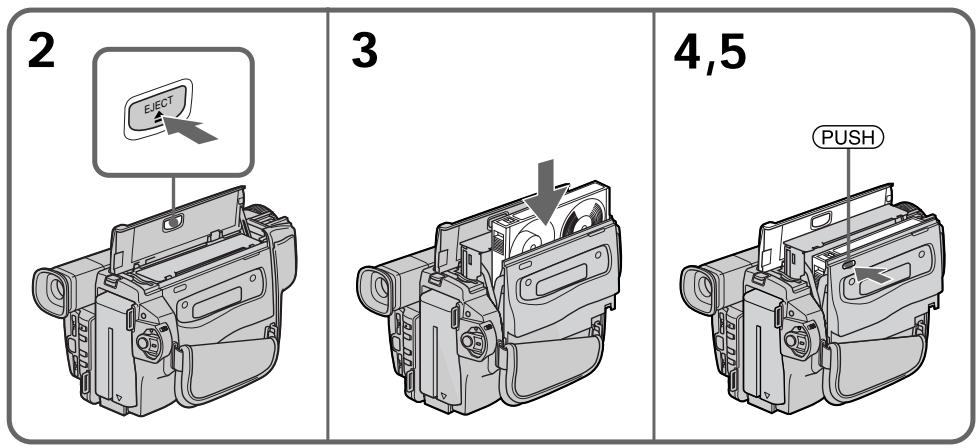
Step 2 Inserting a cassette
Пун=kT 2 YcTaHOBKa KacCeTbl
We recommend using Hi8 / Digital8 video cassettes.
(1) Prepare the power supply. (p. 12)
(2) Open the lid of the cassette compartment, and press EJECT. The cassette compartment opens automatically.
(3) Insert a cassette with its window facing out and the write-protect tab on the cassette up.
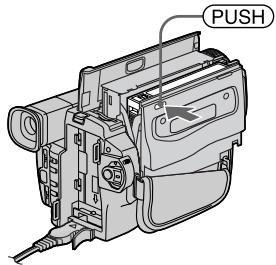
(4) Close the cassette compartment by pressing the PUSH mark on the cassette compartment. The cassette compartment automatically goes down.
(5) Close the lid of the cassette compartment.
PekOMeHnyETcH NcNOb3ObTaB BnDeOKacCeTbI Tuna Hi8 Hig/Digital8
(1)ПригOTOBБTe IСТОЧИК ПИТАнЯ (Стр. 12).
(2)ОТкpoиTe Kрьшky KacceThoro OTOceKa n HaxmTe KhoNky EJECT. KaccetHbI OTOceK abTomatUneCKn OTKpoeTcR.
(3)BCTaBbTe Kaccety, TaK YTObI OKOuKy 6blIO
obpaueHo Hapky, a IeneCTOK 3aunTbI
3aINcH a KaccTe BBepx.
(4)3aKpOte KaccetHbI OTCeK, HaxkAB MeTKy PUSH HaOTcKe. KaccetHbI OTCeK aBTOMaTnueckn 3aKpOeTc.
(5)3aKpOte KpbIuKy KaccTeHOro OTCeKa.
To eject a cassette
Follow the procedure above, and eject the cassette in step 3.
ДЯиЗВLEЧЕНЯ KACCEТы
BbIIOJIHnTe npINBeDeHNHyIO BblIe IpoUeDpyu N BbITOKHnTe KAccety BnyHKTe 3.
Notes
- Do not press the cassette compartment down. Doing so may cause malfunction.
- Your camcorder records pictures in the Digital8 system.
- The recording time when you use your camcorder is 2/3 of indicated time on Hi8 Hi8 tape. If you select the LP mode in the menu settings, indicated time on Hi8 Hi8 tape.
- If you use standard 83 tape, be sure to play back the tape on this camcorder. Mosaic-pattern noise may appear when you play back standard 83 tape on other camcorders (including other DCR-TRV120E/TRV125E/TRV320E).
- The cassette compartment may not be closed when you press any part of the lid other than the (PUSH) mark.
- Do not pick up your camcorder by holding the lid of the cassette compartment.
PpimueaHn
- He HaxkmaTe Bn3 KaccetbIOTcE. 3To MoKET pInBECTN K HEnCnpaBHOCTN.
Baisha Bndeokamepa BbIPOINHReT 3aINCb n3o6paXeHn B CnCTeme Digital8
BpeM3aHnCn npin nCpOJIb3OBAHN BaWei cnΦpOBoBN BnDEOKaMEpbI COCTABJnEeT 2/3 BpeMeH, yKa3aHHoro Ha JeHTe Hi8 HlE. Ecnn Bbl BbIbepInTe peXm LP By yCTaHOBkax, To BpeM3aHnCn 6yde paBHO MehBSe BpeMeH, yKa3aHHoro Ha JeHTe Hi8 HlE. - Ecni Bblncnol3yeTe cTaNdapThyIO JeHTy 8, To ee peKOMeHdyETcB OcnpOn3BOIDtB Ha 3Toi Jx e BnDeokampe. 3aIncahHbIe C nOmoJIbU BaIeI BnDeokampeB,Ha BaIeJ Xe BnDeokampeB. E Cnyae BCnpOn3BeDeHnra CTaHdapTHbIX JeHT TIna 8 Hn Dpynx BnDeokampax,MOYr NOBITcR NOMEXN MO3aunHO TIna (BKlouy A pyrme BnDeokampeB DCR-TRV120E/TRV125E/ TRV320E).
KaccTeHbIOTcEKMOKeTHe3aKpbITbcra,ecnBbHaXMeTeHaKaKoe-Im6oDpyroE MeCTOHaKpbIiKe,aHeHaMeTKy (PUSH). - He noДиИмай Te BndeOkaMepy 3a KpbIshky KaccetHOrO OTecka.
To prevent accidental erasure
Slide the write-protect tab on the cassette to expose the red mark.
InpedotBpaueHnCnyauHoro ctnpHnA
IpeBnHbTe IeneCTOK 3aunTb 3annc Ha KaCCTe, TaK YTO6bI NOBnlaCb Kpachar MetKa.

Recording a picture
Your camcorder automatically focuses for you.
(1) Remove the lens cap by pressing both knobs on its sides and attach the lens cap to the grip strap.
(2) Install the power source and insert a cassette. See "Step 1" and "Step 2" for more information (p. 12 to 20).
(3) Set the POWER switch to CAMERA while pressing the small green button. Your camcorder is set to the standby mode.
(4) Open the LCD panel while pressing OPEN. The viewfinder automatically turns off.
(5) Press START/STOP. Your camcorder starts recording. The REC indicator appears. The camera recording lamp located on the front of your camcorder lights up. To stop recording, press START/STOP again. The recording lamp lights up in the viewfinder when you record with the viewfinder.
3a\Pncb n3o6paXeHn
Baasa Bndeokamepa aBTOMaTHeCKN BbINOJIHReT fokcnpOBky 3a Bac.
(1)CHIMNEKpbIuKyObeKTnBa,Hax Kab Obe KhoNkHa ee KpOMKe,INpNIkpENITe KpbIuKyObeKTnBaKpeMHIOДЯ3aXbata.
(2) VCTaHOBIne NCTOCHNK IITaHIN IN BCTaBBTe KACCETy. PIOpO6HbIe CBeDEHNr PNBEDeHbI B "PHyHKTe 1" "PHyHKTe 2" (CTp. 12-20).
(3)Haxab ManeHyKyo 3eNeHyIO KHOIky, yctahOBHTe nepeKnIOuateIb POWER B nOLOXeHne CAMERA. Ba7a BnDeoKaMepa nepeKnIOUHTcB pexkIM OxNdaHna.
(4)Haxab KhoNky OPEN,otKpoIte naHeIb XKJ.BuOnCKaTeJI BbIKJIIOUHTcA bBTOMaTnueckn.
(5)Haxmnte KhoNky START/STOP.Baasa Bndeokamepa NaHet 3anncb. IoRbntc HnDnkaTOpREC.BbcBeNTcTaKke IaMNoUka 3annci,paCnoLoXeHHaHa NapeDHe nPaHeiBn DnEOKamepbl.ДЯ OCTaHOBKn 3annci Haxmnte KhoNky START/ STOP eue pa3. Pn 3annci C nOMOsbIO BVDoONckaTeJI, BHyTpNI Hero BbICBetNTcJMaMNoUka 3annci.
Notes
- Fasten the grip strap firmly.
- Do not touch the built-in microphone during recording.
Note on Recording mode
Your camcorder records and plays back in the SP (standard play) mode and in the LP (long play) mode. Select SP or LP in the menu settings (p. 76). In the LP mode, you can record 1.5 times as long as in the SP mode. When you record a tape in the LP mode on your camcorder, we recommend that you play back the tape on your camcorder.
Note on LOCK (DCR-TRV320E only)
When you slide LOCK to the left, the POWER switch can no longer be set to MEMORY accidentally. The LOCK is released as a default setting.
To enable smooth transition
You can make the transition between the last scene you recorded and the next scene smooth as long as you do not eject the cassette if you turn off your camcorder. When you change the battery pack, set the POWER switch to OFF (CHARGE).
If you leave your camcorder in the standby mode for 3 minutes
Your camcorder automatically turns off. This is to save battery power and to prevent battery and tape wear. To resume the standby mode, set the POWER switch to OFF (CHARGE) once, then turn it to CAMERA again.
PpimueaHn
ПлOTнО пиСТeRнITE рЕмeHь ДЯЗхВаТВИДЕOKaМeрbl.
- He npikacaiTebc K BCtpoeHHOMy MmKpOfoHy BO Bpem 3aPiCi.
PpimeyaHne no pexkmy 3anncn
BaSHA BnDEOKaMepa BbINOJHReT 3aNcB IN BOCPON3BeDeHne B pexmE SP (cTaHdapTHoe BOCPON3BeDeHne) IN B pexmE LP (DIOIroINpaOuSeBocPON3BeDeHne).BbIepeNtE KOMaHdy SP nI IN Lp B yCTaHOBkax MeHIO (CTp. 76).B pexmE LP Bbl MoXeTe BbINOJHATb 3aNcB B1,5 pa3a DoJIbWe NO BpeMeHN, Yem B pexmE SP. PnB bINOJHEnHn Ha BaWei BnDEOKaMepe 3aNcN Ha JIeHTy B pexmE LP peKOMeHdyETcB OCpON3BOIDITb 3Tu JIeHTy TaKxe Ha BaWei BnDEOKaMepe.
Приимechани по ржиму LOCK (Толъко DCR-TRV320E)
EcIn BbI nepeDbHHeTe nepeKluOaTeIb LOCK BJIeBO,nepeKluOaTeIb POWER yJke He MoKet 6bITb CnyauHaHO yCTaHOBLeH B NOLOKeHHe MEMORY.Pexm LOCK 6ydet yCTaHaBnBaTbCn OymOnuHaIO.
ДлобесоченплавHoro nepexoda
BbMOxKeTe BbIOnHbTb PJIaHBbI nepeXoDMexKdyNocLeDnHM 3aIncaHHbIM 3IN3OoDM INcEduOUM 3IN3OoDM Do Tex nop, nOKa HeIN3BLeueTe KAcCETu PpN BbIKJIOUeHOM INtAHm. PpN 3aMeHe 6aTaapeiHoro 6Ioka yCTaHOBe Tne peKJIIOuOaTeIb POWER B noLoXeHne OFF (CHARGE).
EcIn Bbl octaBnTe BaUy BuDeokamepy BpeKIMe OxuHaHa 3 MmHyTbI
Bndeokamepa BbIKHouTcA BtOMaTuYeCKn. 3To npedotBpaaaet pacxOa 3apra da 6aTaapeHoro 6Ioka n u3Hoc JeHTbl.ДЯ BO306HOBHeHnpeKIMa OxNdaHn yCTaHOBnte nepeKIOuateJIb POWER B noLOXKeHne 6Ioka yCTaHOBNTe cHaUana nepeKIOuateJIb POWER B noLOXKeHne OFF (CHARGE), a 3aTeM CHOba NOBepHnte erO b noLOXKeHne CAMERA.
Adjusting the LCD screen
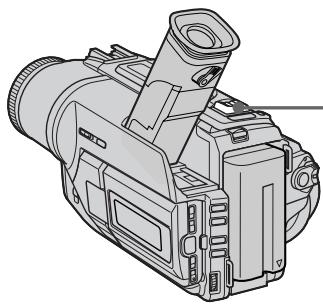
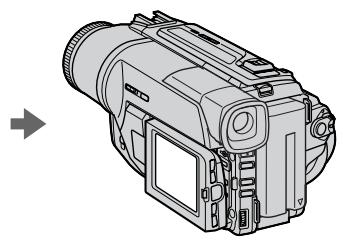
To adjust the brightness of the LCD screen, press either of the two buttons on LCD BRIGHT. The LCD panel moves about 90 degrees to the viewfinder side and about 180 degrees to the lens side.
If you turn the LCD panel over so that it faces the other way, the indicator appears on the LCD screen and in the viewfinder (Mirror mode).
Perynnpobka 3KpaHa KKd
When closing the LCD panel, set it vertically until it clicks, and swing it into the camcorder body.
Note
When using the LCD screen except in the mirror mode, the viewfinder automatically turns off.
When you use the LCD screen outdoors in direct sunlight
The LCD screen may be difficult to see. If this happens, we recommend that you use the viewfinder.
Picture in the mirror mode
The picture on the LCD is a mirror-image.
However, the picture will be normal when recorded.
During recording in the mirror mode
You cannot operate the ZERO SET MEMORY on the Remote Commander.
Indicators in the mirror mode
The STBY indicator appears as 11 and REC as
- Some of other indicators appear mirror-reversed and others are not displayed.
Pn3aKpbBaanPiHEnXKJyCTaHObnte ee BepTKaJIbHO, NOKa He pa3daCTcra 9eJIyOK,a 3aTEM pncOeDmHInTe ee K KopnyCy BVNeOkamepbl.
PpimcyaHne
Прии IncnoIb3OBAHn 3KpaHa KKД ВИДОИСКАТЕЛ abTOMaTHyeCKn BblKlHouaETcA, КрOME 3epKaJIbHOrO peKIma.
EcIn BbI nCnoJIb3yTe 3KpaH XKd BHe NOMeueHn IOD npRmblcONHeYhbIM CBETOM
Bo3MoXHo 6yIeT TpydHo pa3rIaTeb 3KpaH XXkД. B 3TOM cIyuae peKOMeHnyeTc nCIOB3OBA Tb BNDOCKaTeNb.
I306paXeHne B 3epKaJIbHom peXnme
N3o6paKeHne Ha 3KpaHe KKd 6yTeT OTo6paKaTbC3ePkaJIbHo. OJHaKo 3aIINCb N3o6paKeHn6yTeHOpMaJIbHOI.
Bo Bpem 3aIncn B 3epKaIbHOM pexKIme Bbl He moXeTe onepuPoBaT bKnOknZERO SET MEMORY Ha npIbTe nctauHOnHO.
(1) Set the POWER switch to OFF (CHARGE).
(2) Close the LCD panel.
(3) Eject the cassette.
Using the zoom feature
Move the power zoom lever a little for a slower zoom. Move it further for a faster zoom.
Using the zoom function sparingly results in better-looking recordings.
"T" side: for telephoto (subject appears closer)
"W" side: for wide-angle (subject appears farther away)
Zoom greater than 25× is performed digitally. To activate digital zoom, select the digital zoom power in D ZOOM in the menu settings. (p. 76) The picture quality deteriorates as the picture is processed digitally.
Pocje 3aipncn
(1)Установпейсяклочаель POWER в положене OFF (CHARGE).
(2)3aKpoTe naHeJIb XXKJ.
(3) N3BneKeNTe Kaccety.
IcnoJb3ObaHne yHKcHn Hae3da BndeOkamepbl
IpeeBnHbTe pbyar npuBoNDHO Bapnoo6BeKtNbCa cJeRka Iyra OTHCiTbHo MeJHeHOrO Hae3da BInDeOkaMepbl.
IpeeBnHbTe ero CnilbHee dIy yckOpEHOrO Hae3da BnDeOkamepbl.
IcnoJIb3OBAHnE cyHKuHn Hae3da BnDeOkamepebl B He6oJIbSOM KOJIncTeBte OBeCneUBaet HanJyUHnPe3yJbTaTbI.
CTopoHa "T":ДЯ TelepeToO (ObbeKT npBJInxKaeTcR)
CTopoha"W":ДлЯшпорokoyrobnHOrOВида (objeKуDAJIaRETCA)


Hae3d BnDEOKaMepb60nee 25× BbINOHNHeTcA ΣΦpOBbIM MToIOM.ДЯпиВeDeHINB DdeIcTBHe ΣΦpOBOrO BapNOo6bEKTbBa BbIbepInTe npIBoDHO ΣΦpOBoB BApNOo6bEKeTbD ZOOM B yCTaHOBkax MeHIO (Ctp.76).ПOCKOBky Opba6OTka N3O6paJxEHINB BbINOHNHeTcA ΣΦpOBbIM CnOC6OM, KaYeCTBO N3O6paJxEHNHEckONbKO yXuDHTcR.
The right side of the bar shows the digital zooming zone.
The digital zooming zone appears when you select the digital zoom power in D ZOOM in the menu settings./
IpaBaJCTOpOHa IIOJocbHa 3KpaHe NOKa3bIbAeT 3Ony UINΦpOBo TpaHcΦokaun.
Ecnn Bbl Bb6epnte npBNOHOn cnfpboBoB aPnoo6bekTINB D ZOOM bYcTaHOBkax MeHIO,POBNTC3OHa
ZnФрOBToTpaHcΦokauuN.

Notes on digital zoom
- Digital zoom starts to function when zoom exceeds 25 × .
- The picture quality deteriorates as you go toward the "T" side.
When you shoot close to a subject
If you cannot get a sharp focus, move the power zoom lever to the "W" side until the focus is sharp. You can shoot a subject that is at least about 80~cm (about 2 feet 5/8 inch) away from the lens surface in the telephoto position, or about 1cm (about 1 / 2 inch) away in the wide-angle position.
To record pictures with the viewfinder - adjusting the viewfinder
If you record pictures with the LCD panel closed, check the picture with the viewfinder. Adjust the viewfinder lens to your eyesight so that the indicators in the viewfinder come into sharp focus.
Lift up the viewfinder and move the viewfinder lens adjustment lever.
Indicators displayed in the recording mode
The indicators are not recorded on tape.
HДИКaTOPbl, OTo6paXkaemble BpeXmte 3aInscn
Time code (for tapes recorded in the Digital8 system only)
The time code indicates the recording or playback time, "0:00:00" (hours:minutes: seconds) in CAMERA mode and "0:00:00:00" (hours:minutes:seconds:frames) in PLAYER mode. You cannot rewrite only the time code. When you play back tapes recorded in the Hi8/ standard 8 system, the tape counter appears. You cannot reset the time code or the tape counter.
KoB BpeMeHn (ToIbKO JJIaJeHT, 3aIncAHbIX B uΦpOBoN CnCTeme Digital8 [9)
KoB BPeMeHn yka3bIbAeT BpMe 3aIIN cIIN BOCpOn3BeDeHn, "0:00:00" (cAsbI: MInHytbl: ceKyhDbl) B pexime CAMERA n "0:00:00:00" (cAsbI: MInHytbl: ceKyhDbl: KaApbl) B peXIMe PLAYER. Bbl He moKeTe nepe3aIncatb ToJIbKO KoB BPeMeHn. Ppi BocPOn3BeDeHn IeHT, 3aIINcaHHbIX B cIcTeMe Hi8/cTaHndapTHoi CcIcTeMe 8. Bbl He moKeTe nepeycTaHOBt b KoD BPeMeHn.
Shooting backlit subjects - BACK LIGHT
When you shoot a subject with the light source behind the subject or a subject with a light background, use the backlight function.
Press BACK LIGHT in CAMERA or MEMORY (DCR-TRV320E only) mode.
The indicator appears on the LCD screen or in the viewfinder.
To cancel, press BACK LIGHT again.
BACK LIGHT
If you press EXPOSURE when shooting backlit subjects
The backlight function will be canceled.
EcIn Bbl HaXMeTe KHOIpKy EXPOSURE npBbIOnJIHeHm CbeMKn OBeKToB c 3aDHeINoDCBETKO
Функця заднй посветки 6удETOTMeHeHa.
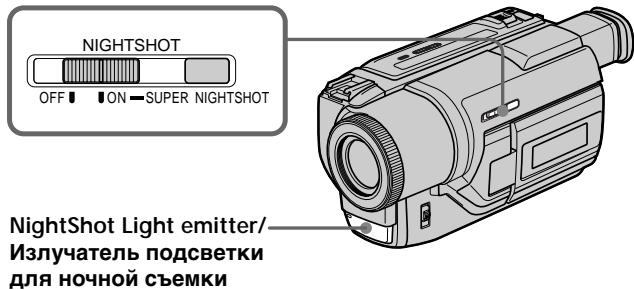
Shooting in the dark - NightShot/Super NightShot
The NightShot function enables you to shoot a subject in a dark place. For example, you can satisfactorily record the environment of nocturnal animals for observation when you use this function.
While your camcorder is in CAMERA or MEMORY (DCR-TRV320E only) mode, slide NIGHTSHOT to ON.
and "NIGHTSHOT" indicators flash on the LCD screen or in the viewfinder.
To cancel the NightShot function, slide NIGHTSHOT to OFF.
Cbemka B TemHote - HouHaBcBemKa/HouHaCynepcbemKa
Функцу Ночио CBemkn no3BONaTe Bam BblINHrtb Cbemky obeKToB B Temhblx MecTaX. Hanpimep, Bbl cmoKeTe C ycnexom BblOnHraTb Cbemky HOUHbIX JKNBOTbIX ДЯн Ha6JIIODeHn PpN INCNoIb3OBAHN DAHHoFФункцu.
B To Bpemr, KOrda BnDeokamepa HaxoDntcB Bpekime CAMERA uIN MEMORY (ToIbKO DCR-TRV320E), nepeBnHbTe nepeKIOuHaTeNb NIGHTSHOT B noLoXeHne ON.
INHdkaTopbI u "NIGHTSHOT"HaunhyT MnraTb Ha 3KpaHe KKД nII B VduOnckaTeJIe. IЯ OTMHeblФyHKUIn HOUHOH CbeMKn nepeBnHbTe pepeKJIIOuAteJIb NIGHTSHOT B noJIOKeHN OFF.
The Super NightShot mode makes subjects up to 16 times brighter than those recorded in the NightShot mode.
(1) Slide NIGHTSHOT to ON in CAMERA mode. 和 "NIGHTSHOT" indicators flash on the LCD screen or in the viewfinder.
(2) Press SUPER NIGHTSHOT. S and "SUPER NIGHTSHOT" indicators flash on the LCD screen or in the viewfinder.
To cancel the Super NightShot mode, press SUPER NIGHTSHOT again.
Using the NightShot Light
The picture will be clearer with the NightShot Light on. To enable NightShot Light, set N.S.LIGHT to ON in the menu settings (p. 76).
- Do not use the NightShot function in bright places (ex. outdoors in the daytime). This may cause your camcorder to malfunction.
- When you keep NIGHTSHOT set to ON in normal recording, the picture may be recorded in incorrect or unnatural colours.
- If focusing is difficult with the autofocus mode when using the NightShot function, focus manually.
While using the NightShot function, you can not use the following functions:
- Exposure
-PROGRAM AE
While using the Super NightShot function, you can not use the following functions:
-Fader
- Digital effect
- Exposure
- PROGRAM AE
Shutter speed in the Super NightShot mode
The shutter speed will be automatically changed depending on the brightness of the background. The motion of the picture will be slow.
NightShot Light
NightShot Light rays are infrared and so are invisible. The maximum shooting distance using the NightShot Light is about 3m (10 feet).
Примеанья
He nCnoJb3yIte cyHKUIO HcHOr cBEmKn B npKnx MeCTax (HaNPmep, Ha yNtce B dHeBHOe Bpem). 3TO MOKeT pInBeCTn K HeNCnpaBHOCTn BaWe BNDeOKaMepbl.
-Пиудержани установки NIGHTSHOTВ положени ON пиHopmaльно 3апси n3ображени мочет 6ыть 3апсано В Нелравиьньх Или HeeCTeCTBeHHbIX CBetax.
Ecnn pokycnpobka 3aTpudHeNA b aBTOMaTnuecckOM peXIMe PnI NcNOJb3OBaHIN pfYHKUH HCHOH CbeMKN, BblOJIHInTe pokycnpobky BpyHyIO.
PnncnoIb3OBAHnnyHKcnn HocHoN CbeMKn Bbl He MoXeTe nCNoJIb3OBA Tb cJeDyUoJne yHKn:
-3Kcno3nua
-PROGRAM AE
PnncnoIb3OBAHnn FyHKmN HcnpcBemKn Bbl He moKTe nCnoIb3OBaTb cJeDyUoJIne FyHKmN:
-Φeɪdεp
-LnDpOBoN 3ΦΦeKT
-3Kcno3nU
- PROGRAM AE
CkopocTb 3aTbopa B pexime HocHOn cynepcbemkn
CkopocTb 3aTbopa 6yDet aBTOMaTuYeCKn
m3MeHrTbcR B 3aBcIMoCTn OT rPkOCTn foHa.
BocPon3BeDeHne n3o6paXeHn6yDet
3aMeDJIeHHbIM.
Iopcbetka dna HOHcBemKu
JyynnoCBETKNIJIHNOHYOHcBEmKnYBJIOTCn INOpaKaPacbIMNIO3TOMYHEBINMbIMN.
MaKcImaJIbHoe paCCToRHaHne IJr CbEMKn npI NCIOJIb3OBAHmI IOCDBeTKn IJr HOuHOcBEmKn paBHO pIIMePHo 3 M.
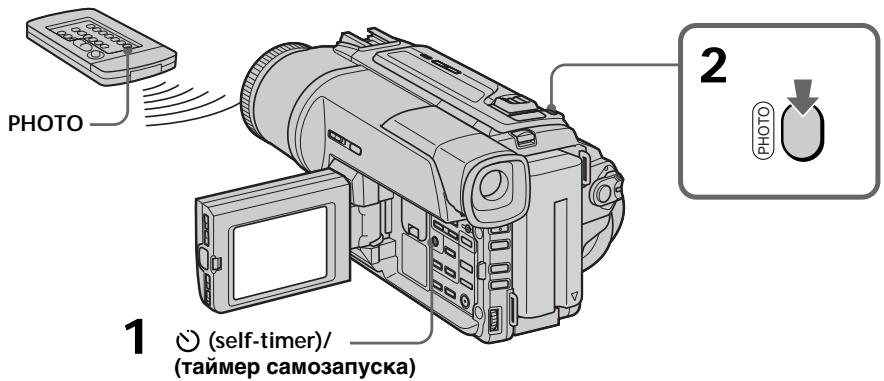
Self-timer recording
- DCR-TRV320E only
Recording with the self-timer starts in 10 seconds automatically. This mode is useful when you want to record yourself. You can also use the Remote Commander for this operation.
(1) Press (self-timer) in the standby mode. The (self-timer) indicator appears on the LCD screen or in the viewfinder.
(2) Press START/STOP. Self-timer starts counting down from 10 with a beep sound. In the last two seconds of the countdown, the beep sound gets faster, then recording starts automatically.
To stop the self-timer recording
Press START/STOP.
Use the Remote Commander for convenience.
To record still images using the self-timer
Press PHOTO in step 2. (p. 43)
To cancel self-timer recording
Press (self-timer) so that the indicator disappears from the LCD or viewfinder screen while your camcorder is in the standby mode.
Note
The self-timer recording mode is automatically cancelled when:
- Self-timer recording is finished.
- The POWER switch is set to OFF (CHARGE) or PLAYER.
3aInc b no TaMepy caMo3anycKa
-ToJbKO DCR-TRV320E
3aHnscb c nOmoBt TaMepa caMo3anycka haHHeTcra Ype3 10 cekyHd aBTOMaTHueckn.
3TOT pEXKIM RABNIETCR NOLE3HbIM B TOM cnyuae, ecnBbXOTNTe BblONHHTb 3aNNcB camoro ce6r.ДлэТоI onepaunn Bbl TAKKe moKeTe IcPONb3OBA Tb NylbT DnCTaHcNOHHORO ynpabNeHrA.
(1)HaxMMTe KHOIIky (Taimep cMo3anycka) BpeXIMe OxNJaHnHa. Ha 3KpaHe XKJI nIiB BUNOINCKaTeNe IONBNTc HINdNKatop (Taimep cMo3anycka).
(2)Haxmnte KhoNky START/STOP. TaMep cAmO3aNycka HauHET 6oPaTHbI OTCeT OT 10 C 3yMMepbIM CnHAnOM.B NocIeHNHe DBe CEkyHbI ObaPthOrO OTCeTa 3ymMePbHcINHaJbE 6yJeT 3BvUaTb aJaee, a 3aTEM ABTomATNuYeCKn HaunTeC4aInCb.
Checking the recording
- END SEARCH/EDITSEARCH/
Rec Review
You can use these buttons to check the recorded picture or shoot so that the transition between the last recorded scene and the next scene you record is smooth.
Поберka 3апссn
- END SEARCH/EDITSEARCH/
Ppocmpt 3aHncn
Bb moKeTe nCNoIb3ObaT bT N KHOJIg IJr npOBepK 3aNcAHHoro n3o6paXeHnI nn CbeMkn, TaK YTo6bl nePexOd MeJy PocJeHNM 3aNcAHHbIM 3n3Odom nCleDyOuIM 3aNcBbAebMbIM 3n3Odom 6bl PnaBbIM.
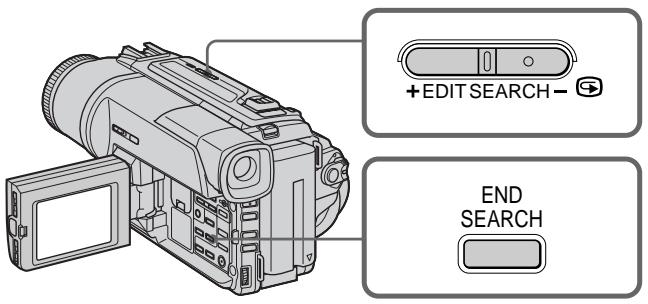
END SEARCH
You can go to the end of the recorded section after you record.
Press END SEARCH in the standby mode.
The last 5 seconds of the recorded section are played back and returns to the standby mode.
You can monitor the sound from the speaker or headphones.
EDITSEARCH
You can search for the next recording start point.
Hold down the + / - (⑤) side of EDITSEARCH in the standby mode. The recorded section is played back.
+ : to go forward
:to go backward
Release EDITSEARCH to stop playback. If you press START/STOP, re-recording begins from the point you released EDITSEARCH. You cannot monitor the sound.
END SEARCH
BbMOxKTe DoHTn Do KOHcza 3aNcaHHo YacTn JeHTbI NocNe BbINONHeHr 3aNNCn.
HaKmTe KhONky END SEARCH B pexkme OxndaHn. BydyT BocnpOn3BeDeHbI nOcneDnHe 5 cekyH, nocne Yero BnDeOkamepa BepHetcB peXkM OxndaHn. Bbl MoKeTe KOHTpOIpOBaTb 3Byk Chepe3 DnHaMK INN rOJOBHbI TeNeΦoHbl.
EDITSEARCH
BbMOKTe BbIIOJIHrTb NOnCK MeCTa HaYana cJeDyUoSeJ 3aNcN.
Дерхи te haxkaToI CTOpOHy +/- (⑤) KhoNkI EDITSEARCH B pexmme OxuHaHn. Byet BocnpOn3BeDeHa 3aIncaHHa YacTb.
+:ДлпnpoДвИженЯВпeрд
-:ДлЯ npoDbxkeHna3aI Otnyctnte KhoNky EDITSEARCH ДлЯ OCTaHOBKn BocnpOn3BeDeHn. EcIn Bbl HaxMeTe KhoNky START/STOP, NaHcTcH nepe3anCb c TOrO MeCTa, rDe Bbl OTynCTnII KhoNky EDITSEARCH. Bbl He MoXkTe KOHTpOJIuPoBaTb 3ByK.
Rec Review
You can check the section which you have stopped most recently.
Press the - (@) side of EDITSEARCH momentarily in the standby mode.
The section you have stopped most recently will be played back for a few seconds, and then your camcorder will return to the standby mode. You can monitor the sound from the speaker or headphones.
Notes
- END SEARCH, EDITSEARCH and Rec Review work only for tapes recorded in the Digital8 system.
- If you start recording after using the end search function, occasionally, the transition between the last scene you recorded and the next scene may not be smooth.
- Once you eject the cassette after you have recorded on the tape, the end search function does not work.
If a tape has a blank portion in the recorded portions.
The end search function may not work correctly.
Ppocmtp3aHcN
BbMOjKeTe npOBepnTb nocJeHIO 3aIncAHHyU YaCTb.
HaKMMTe KpaTkoBpeMeHNO CTOpOHy-() KNOpKN EDITSEARCH B pexmme OxuandaHn. ByUyt BocPOn3BeDeHbI NocJeHne HeCKoJIbKO cekyHd 3aIncAHHO qAcTn. Bbl MoKeTe KOHTpOJIropOBaTB 3ByK uePe3 akyCTNuYeCKyIO cnCTeMy IINr rOlOBhIe TeNeΦoHbI.
Примейаня
-Функци END SEARCH,EDITSEARCH n npocmoTpa 3aIncn pa6oTaH TOJIbKO dIJI neHT,3aIncaHHbIX B zuΦpOBoB CnCTeMe Digital8 F.
- Ecni BblcnyaHNo hauaJIi 3aIncb nocne IcnoIb3OBAHnI cyHKUIM NOnCKa KOHua 3aIncN,TO nepexoJ MekJy NocJeHNM 3aIncaHHbIM 3Pi3Odom IN CpeDyIOuIM 3aIncbIBaembIM 3Pi3Odom MOKeT He 6bITb PIIaBHbIM.
- Ecnn Bbl BbItonKnHe Kaccety nocne TOrO, KaK 6yJeT BbINONHeHa 3aNcB Ha JeHte, fynKcII NaNCKa KOHca 3aNcN He 6yJeT pa6oTaTb.
EcnHaJeHTeIMeETcH3aIncaHHbI yactOK
Функшия посяма может He pa60taTb.
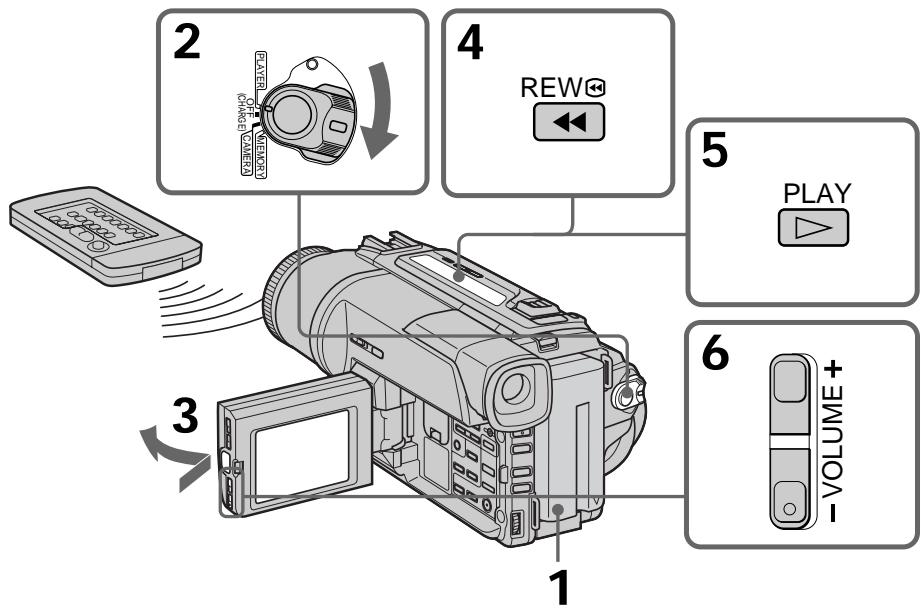
Playing back a tape
You can monitor the playback picture on the LCD screen. If you close the LCD panel, you can monitor the playback picture in the viewfinder. You can control playback using the Remote Commander supplied with your camcorder.
(1) Install the power source and insert the recorded tape.
(2) Set the POWER switch to PLAYER while pressing the small green button. The video control buttons light up.
(3) Open the LCD panel while pressing OPEN.
(4) Press to rewind the tape.
(5) Press to start playback.
(6) To adjust the volume, press either of the two buttons on VOLUME. The speaker on your camcorder is silent when the LCD panel is closed.
Bocnpo3BeDeHneJeHTbl
BbMOxKeTe KOHTpOINPOBaTb BOCpON3BODnMOe
13o6paXeHHe Ha 3KpaHe KKd. Ecnn Bbl
3aKpoEte NaHeJIb KKD, Bbl MoXeTe
KOHTpOINPOBaTb BOCpON3BODnMOe
13o6paXeHHe B BuOnCKaTeJIe. Bbl MOxTe
KOHTpOINPOBaTb BOCpON3BeJeHHe C NOMOuIO
nylbTa DnCTaHnOHHO UnpaBJIeHn,
PpIlaRaEMOrO K BaWe BnDeOkamepe.
(1)YCTaHOBNTe NCTOCHNK PINTAHN IN BCTaBBTe 3aNNCAHNyIOJIeHTy.
(2)HaxabaIeHbkyIO 3eJeHyIO KhONKy, yCTaHOBNTe nepeKNIIOHaTeJIb POWER B IIOJoxHeNe PLAYER. IOnBaNTcI INdNkaCnK HONOk ynpabJeHn.
(3)Haxab KhoNky OPEN, oTKpoIte naHeJIb XKJ.
(4)HaxmTe KhoNky dIy yckopeHHoI nepeMOTKn IeHTbI Ha3a.d.
(5)HaXMnTe KHOIpKy ▲IЯ BkJIIOueHnBOCnPOn3BeDeHnY.
(6)Дпярergyнорвкnpromkoctnнхимаite OdHy n3 DByX KhoNOK VOLUME. EcIn naHelb XXKД Ha BaSei Bndeokampe 3akpbIta, DnHaMik He 6ydet pa60TaTb.
When monitoring on the LCD screen
You can turn the LCD panel over and move it back to the camcorder body with the LCD screen facing out.
Bo BpemKoHTpoJHa 3KpaHe KKD
BbMOxKeT NOBepHyT baneHb ynpaBHeHnI npiDnHyT b ee o6paTHo Ha MeTO K KopnyCy BnDeokamepbl, TaK YTO 3kpan JKKd 6ydeT o6paueH hapxky.
To display the screen indicators - Display function
Press DISPLAY on your camcorder or the Remote Commander supplied with your camcorder.
The indicators appear on the LCD screen.
To make the indicators disappear, press DISPLAY again.
Your camcorder automatically records not only images on the tape but also the recording data (date/time or various settings when recorded) (Data code).
Press DATA CODE on your camcorder or the Remote Commander in the playback mode.
The display changes as follows: date/time various settings (SteadyShot, exposure AUTO/MANUAL, white balance, gain, shutter speed, aperture value) no indicator
472000
12:05:56
Not to display recording date
Set DATA CODE to DATE in the menu settings (p. 76).
The display changes as follows:
date/time no indicator
Notes on the data code function
- The data code function works only for tapes recorded in the Digital8 system.
- Various settings of the recording data are not recorded when recording images on "Memory Stick" (DCR-TRV320E)
Recording data
Recording data is your camcorder's information when you have recorded. In the recording mode, the recording data will not be displayed.
When you use data code function, bars ( ) appear if:
- A blank section of the tape is being played back.
- The tape is unreadable due to tape damage or noise.
- The tape was recorded by a camcorder without the date and time set.
Data code
When you connect your camcorder to the TV, the data code appears on the TV screen.
Bocnpoun3BeDeHne JeHTbI
IcnoJb3OBAHne cyHKcnn Koda daTbi
BaSHA BnDEOKaMepa aBtOMaTUnYeCKN 3aIncbIbAeT He ToJIbKO I3O6paKeHna JIeHTy, HO TaKke N DaHHbIe 3aIncn (JaTy/BpEmr IIn pa3HbIe yCTaHOBKn pnp 3aIncn).
(KoДаТы).
HaxmTe KhOnky DATE CODE Ha BaSei BnDeokampe nIy nIyIte dNCTaHcNOHOrO ynpaBLeHnB pexKMe BocpOn3BeJeHn.
HДИКАЦИ 6удET ИЗМЕнЯТьСА СLEДУЮЦИМ 6obpa30m:
daTa/BpEm pa3HbIe yCTaHOBKn (ycTouNbBa cnBemKa, 3KcNo3nA AUTO/MANUAL, 6aNaHC 6eIoro, ycInHeHne, ckOpocTb 3aTbopa, BeINuHa dnaaparMbI) 6e3 INHdkaun
AUTO
50AWB
F1.6 9dB
ДЯТOrO,ЧТобI He OTOбраЖаИncь ДaHHbIe 3aПСИ
YcTaHOBnTe KOMaHny DATE CODE B NIOJoxeHne DATE B yCtHaOBkax MeHIO (CTp. 76).
ИндикадиьудETИЗМЕНТбССLEДУЮШМОбразим:
JaTa/BpeM→6e3nHnKauu
PpmeaHne no fynKcnn Koda daHHbIX
-Функция КODа ДанhhbIX pa6OtaeТ TOЛьКОДЛЯН,ЗаПИСаHHbIXВцИфpoВОсССТЕмDigital8【].
-Пизлпси n3обрахжни Ha "Memory Stick" pa3нье утановки данhhix 3лпси He 3лпсьИвaitor (Toлько DCR-TRV320E).
3aHncaHHbIe daHHbIe
3aHncaHbIe daHbIe Hecyt INHOpMaIIO O 3aHcN, BbINOJIHeHHoB BaSei BInDeOKaMePoI. B pExKIme 3aHcN daHbIe OTo6paXaTbcr He 6yDt.
EcIn BbI nCnoJIb3yTe ΦyHKcIIO KOA daHHbIX, TO NOBBArTc NOJOCbl
Various playback modes
To operate video control buttons, set the POWER switch to PLAYER.
To view a still picture (playback pause)
Press I during playback. To resume playback, press I or
To advance the tape
Press in the stop mode. To resume normal playback, press .
To rewind the tape
Press in the stop mode. To resume normal playback, press .
To change the playback direction
Press < on the Remote Commander during playback to reverse the playback direction. To resume normal playback, press .
To locate a scene monitoring the picture (picture search)
Keep pressing or during playback. To resume normal playback, release the button.
To monitor the high-speed picture while advancing or rewinding the tape (skip scan)
Keep pressing while rewinding or while advancing the tape. To resume rewinding or advancing, release the button.
To view the picture at slow speed (slow playback)
Press on the Remote Commander during playback. For slow playback in the reverse direction, press < , then press on the Remote Commander. To resume normal playback, press
IaH3MeHeHHHaPaBHeHH BocPOn3BeDeHH
HaxmTe KhONKy <Ha nyIbTe DnCTaHcNHOHHo YynpaBNeHn BO BpEm BoCnpOn3BeDeHn IInn N3MeHnHa npBaBLeHn BOCpOn3BeDeHn. IInn Bo3O6HOBnEHn O6bHnORo BOCpOn3BeDEHn, OTNyCTnTE KhONKy
To view the picture at double speed Press × 2 on the Remote Commander during playback. For double speed playback in the reverse direction, press < , then press × 2 on the Remote Commander. To resume normal playback, press .
To view the picture frame-by-frame Press I on the Remote Commander in the playback pause mode. For frame-by-frame playback in the reverse direction, press To resume normal playback, press
To search the last scene recorded (END SEARCH)
Press END SEARCH in the stop mode. The last 5 seconds of the recorded section plays back and stops.
In the various playback modes
- Noise may appear when your camcorder plays back tapes recorded in the Hi8/standard 8 system.
Sound is muted. - The previous recording may appear as a mosaic image when playing back in the Digital8 system.
Notes on the playback pause mode
- When the playback pause mode lasts for 3 minutes, your camcorder automatically enters the stop mode. To resume playback, press .
- The previous recording may appear.
Slow playback for tapes recorded in the Digital8 E system
The slow playback can be performed smoothly on your camcorder; however, this function does not work for an output signal from the DV OUT jack.
When you play back a tape in reverse
Horizontal noise may appear at the center or top and bottom of the screen. This is not a malfunction.
Для посмотра BOCPON3BedeHn n306paXeHn Ha yDBoEHNo ckOpOCTn
HaxmTe KhoNky × 2 Ha npIbTe DnCTaHcNoHHOro YnpaBLeHn BO BpeMRAocPOn3BeDeHn.ДЯ BOCpON3BeDEHnHa yDBoeHHO CKOpOCTn B O6paTHOM HapBaJIeHN HaKmTe KhoNky < , a 3aTEM KhoNky × 2 Ha npIbTe DnCTaHcNoHHOro YnpaBLeHn.ДЯ BO3O6HOBNeHnOB6bUHOrO BOCpON3BeDEHn HaxmTe KhoNky
Длп покадровою npocmotpa BOCIPON3BedeHnИЗБОРЖЕнI
HaKMTe KHONKy II Ha npIbTe
DnCTaHUNOHORO ynpaBLeHnB pexKmE nay3bB OBCpOM3BeDEHn. DnPaNOKApOBoro
BOcPOn3BeDEHn B o6paTHOM HapPaBLeHn
HaKMTe KHONKy II. DnBa 03o6HOBLeHn
O6bUHOro BOCpOn3BeDEHn HaXMMTe KHNKpy
PnBocnpOn3BeDeHnJIeHTbI B 6paTHOM HaprabJeHHN
Ha 3kpahe MOrTy IONBnTbC rOpN3OHTaJIbHbIe NOMEXI NO UcHTpy NJIIN JxE BBePxy INBn3y 3KpaHa. 3TO He RbLnreTc HEnCnpaBHOCTbIO.
Viewing the recording on TV
Connect your camcorder to your TV or VCR with the A/V connecting cable supplied with your camcorder to watch the playback picture on the TV screen. You can operate the playback control buttons in the same way as when you monitor playback pictures on the LCD screen. When monitoring the playback picture on the TV screen, we recommend that you power your camcorder from the mains using the AC power adaptor (p. 13). Refer to the operating instructions of your TV or VCR.
Open the jack cover. Connect your camcorder to the TV using the A/V connecting cable. Then, set the TV/VCR selector on the TV to VCR.
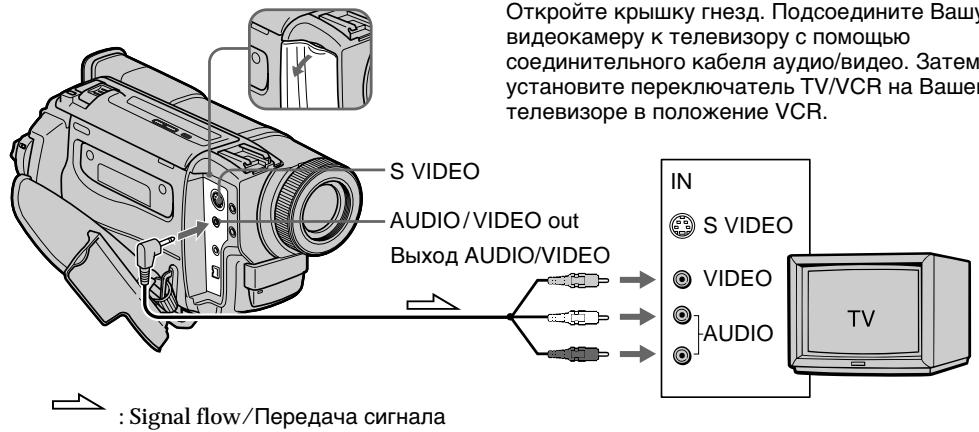
If your TV is already connected to a VCR
Connect your camcorder to the LINE IN input on the VCR by using the A/V connecting cable supplied with your camcorder. Set the input selector on the VCR to LINE.
If your TV or VCR is a monaural type
Connect the yellow plug of the A/V connecting cable to the video input jack and the white or the red plug to the audio input jack on the VCR or the TV. If you connect the white plug, the sound is L (left) signal. If you connect the red plug, the sound is R (right) signal.
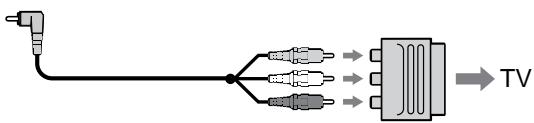
If your TV/VCR has a 21-pin connector (EUROCONNECTOR)
Use the 21-pin adaptor supplied with your camcorder.
EcnB Bawaem TeleBn3ope/KBM NmeeTc8 21-7bIpbKOBbl pa3beM (EUROCONNECTOR)
IcnoIb3yIte 21-7tBpBkoBbI aIaNTep, npnlaeraembl K Baewi BnuDeokamepe.
If your TV or VCR has an S video jack Connect using an S video cable (not supplied) to obtain high-quality pictures. With this connection, you do not need to connect the yellow (video) plug of the A/V connecting cable. Connect an S video cable (not supplied) to the S video jacks on both your camcorder and the TV or the VCR.
EcIn B BaWeM TeLeBn3OpE nN KBM
HMeeTc rHe3do S BnDeo
BbINOJIhnte CoeINHeHne C NMOUcbIO Ka6eJIa S
BvIDeo (He npINaraeTcR) IJN pONUyeHnI
BbICOKOkaueCTBeHHoro N3O6paXeHnI. Pn
DaHOM CoeINHeHn Bam He HxJHo
NoDCoeINHrTB JKeITbI WtKepe (BnDeo)
CoeINHtBHO Ro Ka6eJI aYdIO/BnDeo.
PiDCoeINHnTe Ka6eJIb S BnDeo (He
npINarAEcra) K rHe3dAm S BnDeo Ha BaWei
BnDEOkampe n BaWe m TeLeBn3ope nN KBM.
Using the AV cordless IR receiver
Once you connect the AV cordless IR receiver (not supplied) to your TV or VCR, you can easily view the picture on your TV. For details, refer to the operating instructions of the AV cordless IR receiver.
IcnoJb3OBAHne 6ecnpoBOdHorO IK aydnOBnDeOpnpemHnka
Iocne noDCoeHHeHnB 6ecnpoBDoHoro IK ayINOBuDeOpnepMHNka K BaewMy TeNeBIm3opy (He npinraaTc) Bb moTeJe IeKno HabIOdaTb n3OpaJKeHne Ha 3KpAne BaWero TeNEBIm3opa. IopDob6bIe CbeDEHnC oedePxatcB INHCTpykUm no 3KcPiyataun 6ecnpoBDoHoro IK ayINOBuDeOpnepMHNka.
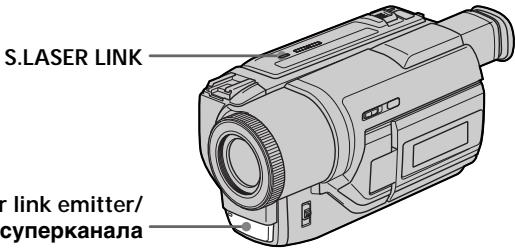
Super laser link emitter/ Излунател лаэрно су nepканда
Before operation
Attach the power supply such as the AC power adaptor to your camcorder, and insert the recorded tape.
(1) After connecting your TV and AV cordless IR receiver, set the POWER switch on the AV cordless IR receiver to ON.
(2) Turn the TV on and set the TV/VCR selector on the TV to VCR.
(3) Set the POWER switch on your camcorder to PLAYER.
(4) Press S.LASER LINK. The lamp of S.LASER LINK lights up.
(5) Press on your camcorder to start playback.
(6) Point the super laser link emitter at the AV cordless IR receiver. Adjust the position of your camcorder and the AV cordless IR receiver to obtain clear playback pictures.
Ipeed onepaunnei
Плкрpenite nctOчнм nITaHnA, takой кak ceteBOI aanTep nepemehNTO kαВашeи BIneokamepe, nCnOJIb3yIte 3aINCAHNHy JENTY.
(1)После подсоевиня К Baшему телевизору beczepobodnofo WK aydnoBVDeOpnemHnka yctahOBITE pepeKJIouateNB POWER Ha 6beCnpobDIOHM IK aydnoBVDeOpnemHnke B nopoXeHne ON.
(2) Bключтete TelebeBn3Op u yctahOBnTe ceNeKToP TV/VCRHaTeleBeN3Ope B noLoXeHne VCR.
(3) YctaHOBInTe NepeKInIOuATEJIb NITaHnHa Ha Bauei BInDeOkaMepe B NoIOXeHne PLAYER.
(4) Haxmnte KhONk S.LASER LINK. BbICBETNTCA JAMnOyka S.LASER LINK.
(5) HaxmTe KhoNky ▶ Ha Baew BIneokamepe DnHaayJa BKNIOUeHIN BOCPON3BeHnI.
(6) HanpaBbTe n3nyaTeIb Ia3epHOro cynepeKaHaHa Ha beCnpBoDnIbIK ayDIOINpEeMHNk. OtperyIuPyIte noLoXeHne BaSei BInDeOkaMePbI N 6cnpBOdHOrO NK ayDIOINDEOpEeMHNka DJI NOyueHnY qETKOrO BOCpnON3BODlMOrO n3O6paXeHn.

To cancel the super laser link function
Press S.LASER LINK. The lamp on the S.LASER LINK button goes out.
If you turn the power off
Super laser link function turns off automatically.
When super laser link is activated (the S.LASER LINK button is lit)
Your camcorder consumes power. Press S.LASER LINK to turn off the super laser link function when it is not needed.
is a trademark of Sony Corporation
IЯOTMeHbIФyHKcHnJa3epHOro cynepkHaJaNpepaun CnHAnOB
HaKmIte KhoNkY S.LASER LINK. JAmnoUka Ha KhoNke S.LASER LINK noracheT.
EcIn Bbl BbIKIOHTe NITaHHe
Ja3epHbI cynepkahan nepedaun CnHaJIOB BbIKJIouHTcra ABTomaTnueckn.
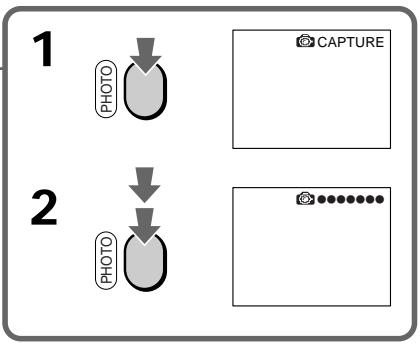
Recording a still image on a tape - Tape Photo recording
You can record a still image like a photograph. This mode is useful when you want to record a picture such as a photograph or when you print a picture using a video printer (not supplied). You can record about 510 images in the SP mode and about 765 images in the LP mode on a tape which can record for 60 minutes in the SP mode. Besides the operation described here, your camcorder can record still images on the "Memory Stick"s (p. 91) (DCR-TRV320E only).
(1) In the standby mode, keep pressing PHOTO lightly until a still image appears. The CAPTURE indicator appears. Recording does not start yet.
To change the still image, release PHOTO, select a still image again, and then press and hold PHOTO lightly.
(2) Press PHOTO deeper.
The still image on the LCD screen or in the viewfinder is recorded for about seven seconds. The sound during those seven seconds is also recorded.
The still image is displayed on the LCD screen or in the viewfinder until recording is completed.
3aIncb HEnoDbXHOrO N3O6paXeHnHa JIeHTy - FOToCbeMka Ha JIeHTy
BbMOxTe 3aINcBtBHeNOdBHXHoe
n3o6paXeHne nOIObHO FOToTpaΦm. DaHbI
peKIMn POJIe3EH,ecn Bb XOTNE 3aNcBtBaTb
n3o6paXeHne B BVNe dFOToCHMka IINJxJe npu
BbIOJIHEnn OTNeaTkoB C NOMOuBo
BUNDeOpnHTepa (He npNJarAetcR).
BbMOxTe 3aNcTa b OKO 510 n3o6paXeHn
B peXime SP n OKO7 765 n3o6paXeHn B
peXime LP JeHTe, KOtopaNo3BOJHaET
BbIOJHrTa 3aNcB T TeUeHne 60 MInyT B
peXime SP.KPome OINcaHHo 3deCb
onepaun, Baasa BVNeOekamepa MoXet
BbIOJHnTB 3aNcB HeNOdBNXbIX n3o6paXeHn
Ha "Memory Stick" (Ctp.91) (TOJbKO DCRTRV320E).
(1)В рекиме окданая deprхи te сlerka haxaTOI kHONkY PHOTO do tex nop,poka He nOBuTcra HENoDBNXHoe n3O6paXeHne. IoABITc rINDnKaTOP CAPTURE. 3aNcB noka eue He nHaayacb.ДЯ n3MeHEny HENoDbNXHoro n3O6paXeHne OTNyCTTe KHOKNy PHOTO, BbIbepITE HENoDBNXHoe n3O6paXeHne cHObA, a 3aTeM HAXMnTE i deprxKte cIerka haxaToI KNOKY PHOTO.
(2)Haxmnte KhoNky PHOTO cnIbHee.
HenoDbnKHOe 306paXeHne B
BnuOnckaTeNe HnHa 3KpaHe KKd 6yDet
3aNcBbATbcr OkOIO cEmu cekyHd. B
TeueHne 3Tnx CEMn cekyHd 6yDet
3aNcBbATbcr N 3ByK.
HenoDbnHexoe n3o6paXeHne 6yDet OTo6paXaTbcra Ha 3KpaHe KKД nInn B BuDOnCKaTeJIe Tex nop, noka 3a\Pncb He 6yDet 3aBepSeHa.
Notes
- During the tape photo recording, you cannot change the mode or setting.
- The PHOTO button does not work:
- while the digital effect function is set or in use.
- while the fader function is in use.
- When recording a still image, do not shake your camcorder. Mosaic-pattern noise may appear on the image.
To use the tape photo recording function using the Remote Commander
Press PHOTO in the Remote Commander. Your camcorder records an image on the LCD screen or in the viewfinder immediately.
When you use the tape photo recording function during normal CAMERA recording You cannot check an image on the LCD screen or in the viewfinder by pressing PHOTO lightly. Press PHOTO deeper. The still image is then recorded for about seven seconds, and your camcorder returns to the standby mode. During the seven seconds to record, you cannot shoot another still image.
Приимechanicals
- Bo BpemЯ φοτοсьeмки На Лentу Bын He moKeTe ИЗмeнтВежIM Ил.YcTaHOBky.
KhoNka PHOTO He pa6oTaet: -ecn yCTaHOBJIeHa nIIN cNoJIb3yeTcra 0yHKuIg UOpBOrO 3000kTa. -ecn nCnoJIb3yeTcra 0yHKUg FeiJepa.
-ПиЗЗИСН HeNoIbNIXHOrO n3O6paXeHnI He TpIcIte BaUy BIndeOkAmepy.Инaчe Na n3O6paXeHnI MoYr NOrBbTbCЯ NOMEXn M03aUnHOrO TtNa.
ДлнИСПОЛБЗOBAHИФУHKUIMФOTOCБЕМКИ На ЛENTу C ПОМОЧБЮ ПЛьТА ДИСТАЦНОHORO YYPABJIЕНИ
HaxmTe KhoNky PHOTO Ha nyIbTe
InCTaHOnHO HorO ynpaBLeHn. Ba7a
BnDEOKamepa TOTcAc Jx He NaHHeT 3aINCb
n3o6paKeHn Ha 3KpaHe XXD nIi B
BnDOINCKaTeIe.
Self-timer tape photo recording
- DCR-TRV320E only
You can record still images on tapes with the self-timer. This mode is useful when you want to record yourself. You can also use the Remote Commander for this operation.
(1) In the standby mode, press (self-timer). The (self-timer) indicator appears on the LCD screen or in the viewfinder.
(2) Press PHOTO firmly. Self-timer starts counting down from 10 with a beep sound. In the last two seconds of the countdown, the beep sound gets faster, then recording starts automatically.
CbeMaHaJeHTycNOMOzbuTo TaMepa cAmo3anycka
-ToJbKO DCR-TRV320E
BbMOxKeTe 3aINcBtBHeNoDbNxHbIe
n3O6paXeHnHaJeHTbC NOMoUbTo TaMepa
camO3aynycka. 3TOT pEXHM ABJNEETc
noJIe3HbIM,ecIn BbXoNTe BbINOHNHTb CbeMKy
camoro c6e.ДЯЗToI OpepaunBbTaKxE
MOxKeTe IcONb3OaBt PylbT DCtAnuHOHorO
ynpaBLeHnI.
(1)BpeKIMe OXnDaHnHaXMMTe KHOJky (TaMepa cAmo3anycKa).Ha 3kpane KKД nIN B BuOnCKaTeNe NOBNTca INDnKaTOp (TaMepa cAmo3anycKa).
(2)HaXMnTe CnIbHO KhoNkY PHOTO. TaHmep cAmO3aNyUcKa hauHET o6paTHbIOTcUeT BpeMeHn OT 10 c3yMMepHBIM cnHaJOM.B nocJeDHe DBe ceKynDbO6paTHORo OTCeta BpeMeHn,aactota 3ymMepHoro CnIHana 6yEdt 6bICTpee,a 3aTEM HaChEeTcAanncb.
To cancel self-timer recording
Press (self-timer) so that the indicator disappears from the LCD or viewfinder screen while your camcorder is in the standby mode. You cannot cancel self-timer recording with the Remote Commander.
Note
The self-timer recording mode is automatically canceled when:
- Self-timer recording is finished.
- The POWER switch is set to OFF (CHARGE) or PLAYER.
Printing the still image
You can print a still image by using the video printer (not supplied). Connect the video printer using the A/V connecting cable supplied with your camcorder.
Connect the A/V connecting cable to the AUDIO/VIDEO out jack and connect the yellow plug of the cable to the video input of the video printer. Refer to the operating instructions of the video printer as well.
IeuaTaHHe HEnoDbXJxHoRo n3o6paXeHn
BbMOKeTe BbINOJIHnIb neaTaHne HEnoDBNXKHO n3O6paKeHnC nOMOuBu BOeONpInHTepa (He npUraaeTc). IOnDCoeHNHTe BnDeOpnInTep c NOMOuBu COeHNHTbHOro Ka6eNa ayDNo/BnDeo, KOTOpB npUraaeTcK BaSei BnDeOkampe. POnDCoeHNHTe CoeHNHTbHbIK Ka6eNa ayDNo/ BnDeo K BbIXoHOMy rHe3dy AUDIO/VIDEO n NOdCoEHNHTe JeNTbIK WtEKeP Ka6eNa K BXoDHOMy rHe3dy BnDEOCnHaJa Ha BnDeOpInHTe. BocNoJb3yInTecb TaKke IHCTpyKUnei no 3KcnIpyataunn BnDeOpnHTepa.
If the video printer is equipped with S video input
Use the S video connecting cable (not supplied). Connect it to the SVIDEO jack and the S video input of the video printer.
EcIn B BnDeOpnpntepe NmEeTcBxOJHoe rHe3do S BnDeo
IcnoJIb3yIte CoeHNHTeJbHbI Ka6eJIb Ka6eJIb S BnDeo (He npinraeTcra). POnCoeHNHTe erO K rHe3dy S VIDEO n Ko BXoHOMy rHe3dy S BnDeo Ha BnDeOpnPnHTepe.
Using the wide mode
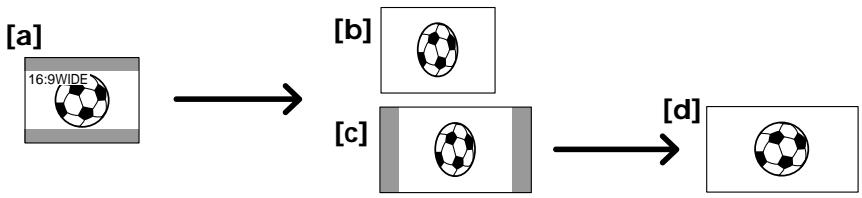
You can record a 16:9 wide picture to watch on the 16:9 wide-screen TV (16:9WIDE).
Black bands appear on the LCD screen or in the viewfinder (DCR-TRV320E only) during recording in 16:9WIDE mode [a]. The picture during playing back in the viewfinder (DCR-TRV120E/TRV125E), on a normal TV [b] or a wide-screen TV [c] are compressed in the widthwise direction. If you set the screen mode of the wide-screen TV to the full mode, you can watch pictures of normal images [d].
BbMoKTe3aIncSbBaTbIuPOKoOpMaTHoe n3o6paXeHMe 16:9dI npocMOTpa Ha uPOKo3kpanHOM TeLeBn3ope fOpMaTa 16:9 (16:9WIDE).
Bo Bpem 3aIncn B pexmme 16:9WIDE Ha
3kpaHe KKД nnn B buOnckatele (TolbKO
DCR-TRV320E) noBATcR cheHbe noLoCbl [a].
N3o6paXeHne BO Bpem BocPOn3BeDEHnB [a]
BnuOnckatene (DCR-TRV12OE/TRV125E) Ha
ObchyHom TeLeBn3ope [b] nnHa
UnPOKo3KpaHOM TeLeBn3ope [c] oyTe cKaTo
no UnPInHe. EcnB BiYcTaHOBHTpe pexm
3KpaHa NpOKo3KpaHnHO TLeBn3Opa B
NoHOnO3KpaHHb peXm, Bi MoXeTe
Ha6nOdaTb O6bUHbIe N3o6paXeHn86e
nCKaXeHn [d].
In the standby mode, set 16:9WIDE to ON in the menu settings (p. 76).
B pexime oKuJaHnY yCTaHOBInTe KOMaHny 16:9WIDE B noJoxKeHne ON B yCTaHOBkax MeHIO (cTp.76).
To cancel the wide mode
Set 16:9WIDE to OFF in the menu settings.
Длг OTMeHbI ShpOKO3KpaHOro peXIma
YcTaHOBnTe KOMaHny 16:9WIDE B noJIoXeHne OFF By cTaHOBkax MeHIO.
In the wide mode, you cannot select the following functions:
Old movie
- Bounce
During recording
You cannot select or cancel the wide mode. When you cancel the wide mode, set your camcorder to the standby mode and then set 16:9WIDE to OFF in the menu setting.
B shpOKo3KpaHOM pexime He moXeTe Bb6npaTb cIeIyUOJIne cyHKcUN:
You can fade the picture in or out to give your recording a professional appearance.
BbMOKeTe BbIOJNHTb PnABHOe BBeDeHne N BbIEDeHne 306paXeHn, YTO6bI PnJaTb BaewcBemke npoceccnoHaJIbHbI BnD.

[a]
STBY
REC
FADER


M.FADER (mosaic)/(m03aɪka)


BOUNCE1)2

OVERLAP2)


WIPE2)


DOT2) (random dot)/ (PpOu3B0lbHbIe OouKn)
[b]
STBY
REC
MONOTONE
When fading in, the picture gradually changes from black-and-white to colour.
When fading out the picture gradually changes from colour to black-and-white.
1) You can use this function when D ZOOM is set to OFF in the menu settings.
2) Fade in only
MONOTONE
Pn BBeDeHn N3O6paXeHne 6yDet nocTeenH0
N3MeHtbcr OT YepHO-6eNo DO UBeTHoro.
Pn BBeDeHn N3O6paXeHne 6yDet
IOCTeENHO N3MeHrTbcr OT UBeTHoro Do YepHO-
6eNo.
1) BblMOKeTe NcNoJIb3OBAb 3Ty cyHKcIIO ecnKOMaHdA D ZOOM ycTaHOBJeHa B noJIOKeHne OFF B yCTaHOBkax MeHIO.
2)ToIbko BVeDeHne n3O6paKeHHn
(1) When fading in [a]
In the standby mode, press FADER until the desired fader indicator flashes.
When fading out [b]
In the recording mode, press FADER until the desired fader indicator flashes.
The indicator changes as follows:
FADER M.FADER BOUNCE
MONOTONE OVERLAP
WIPE DOT
The last selected fader mode is indicated first of all.
(2) Press START/STOP. The fader indicator stops flashing.
After the fade in/out is carried out, your camcorder automatically returns to the normal mode.
(1)При ВБеDEDENи n3обрахеня [a]
B pexmme oKnidaHna, haxmMaTe KhoNkY FADER do Tex np, noka He hauHeT MInaTb HxKnbl mDkaTop feiepa.
Pn BbVeHnn n306paXeHn [b]
Bpekime 3aHncn, HaxkmaTe KhoNky
FADER Do Tex nop, noka He NaHcHT MmraTb HxKnbl mHdkaTop feidepa.
Инд 6byet n3MeHЯTbcra CneDyUOuM 06pa30m:
FADER M.FADER BOUNCE
MONOTONE OVERLAP WIPE DOT
IocneHn n3 BbIpaHHbIX pexmOB 贝depaOTobpaKaaETcNepBbIM.
(2)HaxMMTe KHOKNky START/STOP. INHnKaTOp Φeɪdερa nepectaHET Mɪræt b.
Iocne toro, KaB BbINOJIHeO BVeJeHne/ BbIEDeHne N3O6paXeHnA, BaWa BInDeOKaMepe aBTOMaTNUeCKN BepHETcB ObBuHbI pexIM.

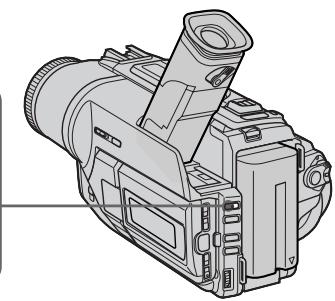
To cancel the fader function
Before pressing START/STOP, press FADER until the indicator disappears.
Длг OTMeHbI Функци Фeндара
П配电ТМ, КАнжаь КНОКУ START/STOP, Нжимаite КНОКУ FADER до ТЕ поп, пoka He Иче3HET ИндИКaTOp.
Notes
- The overlap, wipe and dot functions work only for tapes recorded in the Digital8 system.
-
You cannot use the following functions while using the fader function. Also, you cannot use the fader function while using the following functions:
-
Digital effect
- Low lux mode of PROGRAM AE (Overlap, wipe or dot function only)
Super NightShot
-Tape photo recording
Before operating the overlap, wipe or dot function
Your camcorder stores the image on the tape. As the image is being stored, the indicator flashes quickly, and the image you are shooting disappears from the LCD or viewfinder screen.
Depending on the tape condition, the image may not be recorded clearly.
While using the bounce function, you cannot use the following functions:
-Focus
-Zoom
- Picture effect
Note on the bounce function
The BOUNCE indicator does not appear in the following mode or functions:
-D ZOOM is activated in the menu settings
- Wide mode
- Picture effect
- PROGRAM AE
PpimeyaHne
-Функцин haLoKeHnI n3O6paKHeHn pa6oTaET TOnbKO JIeHT, 3aIncaHHbIX B cIuΦpOBoN cnCTeme Digital8 F).
- BbI He MoXeTe IcNoIb3OBA Tb CneIyUoIne
ФункцИ BO BpEМЯ IcNoIb3OBAHIMI ΦункцИ
ФeIepa. TakaKe, Bbl He MoXeTe
IcNoIb3OBA TbФункцИоФeIdepa BO BpEМЯ
IcNoIb3OBAHIMI CneIyUoIxФункцИ:
-LnDpOBoN 3ΦΦeKT
-Pexim Hn3KoO cBSeHocn PROGRAM AE (ToIbko FyHKuHa HAnIOxEHn, BbITeCHHeNr IToPKO INI NTOeHOrO n306paXeHn)
-Houha cynepcbemka
-ΦOTocbEmKa pa JIeHTy
Ipeed Tem, KaK BkJIIOHTb FyHKUHO HAIOXeHnRA, BbITEcHEHnA TOpKO nIIT OToeHOrO N3O6paXeHnR
BaSHA BnDEOKaMepa xpaHNT n3o6paxeHne HaJeHTe.Bo BpeM coXpaHEnH n3o6paxeHn HnDnKaTOp MnaeT 6bICTpO,a n3o6paxeHne, KOtOpoe Bbl ChmMaete,ncYe3Net c3kpaHa KKJnIIN 3KpaHa BnDoNcKaTeJI.B 3aBNCIMOCTN OT COCTOHN JENTbl, n3o6paxeHne MoKET 6bITb 3aIncaHO HeYETKO.
Bo BpemnncnoB3OBaHHyHKcnn nepeckaknBaHH BbI He MoKTe nCNOJb3OBAt cJeDyUoJIne FyHKcN:
-ФOKycnpOBka
- TpaHcΦokaun
-3cpfeKTn3o6paXeHn
PpmeaHne no fynKcnn nepeckaknBaHna INdkaTop BOUNCE He noBnreTcB
CLeDyUOxN pexImax nIIN npn IcNoIb3OBaHn CLeDyUOxN cyHKs:
-Komahda D ZOOM npBBeHa B DeIcTBne ByCTaHOBkax MeHIO
-ШпpoКоэКраHHь ржIM
-3ΦΦeKt n306paXeHn
-PROGRAM AE
Using special effects - Picture effect
IcnoJb3OBaHne cpeunajbHbIX 3ΦΦeKTOB - ΘΦΦeKT n3o6paXeHnA
You can digitally process images to obtain special effects like those in films or on the TV.
NEG. ART [a]: The colour and brightness of the image is reversed.
SEPIA: The image is sepia.
B&W: The image is monochrome (black-and-white).
SOLARIZE [b]: The light intensity is clearer, and the image looks like an illustration.
SLIM [c]: The image expands vertically.
STRETCH [d]: The image expands horizontally.
PASTEL [e]: The contrast of the image is emphasized, and the image looks like an animated cartoon.
MOSAIC [f]: The image is mosaic.
BbMOKTe BbINOnHrTb 6pb6Otky
1306paXeHnIuΦpOBbIM MeToOM dJI
10NtUyeHnI CnEuaJIbHbIX 3ΦΦeKTOB, KaB
KInOΦnJIbMax IIN Ha 3KpaHax TeNeBu3OpOB.
NEG. ART [a]: LbetияркocьиЗобрахени 6byT HeRaTNBbIMN.
SEPIA: 1306paXeHne 6yJeT B CBeTe cENIN.
B&W: 136paXeHne 6yJeT MOHOxPOMaTHueCKIM (YePHo-6enblM).
SOLARIZE [b]:Ярковс beteа 6удет усileнов, a n3o6paжени 6удет Bыгларыт KaK nllIOCTpaци.
SLIM [c]: ɪəsɒpʌkèHne pɑaTæHETcŋ no BερΤιKαJIŋ.
(1) Press PICTURE EFFECT in CAMERA mode. The picture effect indicator appears.
(2) Turn the SEL/PUSH EXEC dial to select the desired picture effect mode.
The indicator changes as follows:
NEG.ART SEPIA B&W
SOLARIZE SLIM STRETCH
PASTEL MOSAIC
HnDnKaTOp 6yJeT N3MeHrTbCra CneIyUOuIM 06pa30M:
NEG.ART SEPIA B&W
SOLARIZE SLIM STRETCH
PASTEL MosaIC
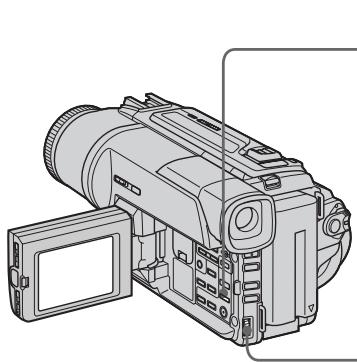
1
PICTURE EFFECT
2

NEG.ART
To turn the picture effect function off
Press PICTURE EFFECT.
While using the picture effect function You cannot select OLD MOVIE with DIGITAL EFFECT.
When you turn the power off The picture effect is automatically canceled.
BbHe MoXKeTe BbI6paTb peXm Old MOVIE KIno c NOMOuBHO yHKnD DIGITAL EFFECT.
EcIn Bbl BBIKJIOUHTe NITaHHe
BaSHA BnDEOKaMepa aBTOMaTNUeCKN BepHeTcB ObIyHbI peXMM.
Using special effects - Digital effect
IcnoJb3OBaHne cpeuaJIbHbIX 3ΦΦeKToB -UnpoBoN 3ΦΦeKT
You can add special effects to recorded images using the various digital functions. The sound is recorded normally.
STILL
You can record a still image so that it is superimposed on a moving image.
FLASH (FLASH MOTION)
You can record still images successively at constant intervals.
LUMI. (LUMINANCEKEY)
You can swap a brighter area in a still image with a moving image.
TRAIL
You can record the image so that an incidental image like a trail is left.
SLOW SHTR (SLOW SHUTTER)
You can slow down the shutter speed. The slow shutter mode is good for recording dark images more brightly. However, the image may be less clear.
OLD MOVIE
You can add an old movie type atmosphere to images. Your camcorder automatically sets the wide mode to ON, image effect to SEPIA, and the appropriate shutter speed.
BbMOKeTe Do6aJIbTb CneuaJIbHbIe 3ΦΦeKtbl K 3aINCbIbAeMOMy N3O6paXeHNI O NOMOcIbIO pa3HbIX cIΦpOBbIX ΦyHKU.3aINCbIbAeMbI 3Byk 6yDet ObiYHbIM.
STILL
BbMOKTe 3aIINcMbA Tb HEnIOBnXHoe n3o6paXeHne, KOtOpoe MOxHO HaIaratb Ha nOdBnXHoe n3o6paXeHne.
FLASH (FLASH MOTION)
Bb mojkeTe 3aIINcBiBaTb HenoDbVnXHbIe
1306paXeHnB B NocJeIOBaTeJIbHOCTu Chepe3
ONpeDeIeHHbIe INHTepBaJIbI.
LUMI. (LUMINANCEKEY)
BbIMoKTeI3MeHrTbApKHe MeCTaHa HEnOdBHXHOM I306paXeHn Ha NpDBrXHbIe I306paXeHn.
TRAIL
BbMOxKeTe 3aINcMbTaB n3O6paXeHne C 3ΦΦEKTOM 3aNa3DbBaHn.
SLOW SHTR (SLOW SHUTTER)
BbMOxKeTe 3aMeIINITb CKOpOCTb 3aTbopa. PExKIM MeIeHHOrO 3aTbopa ABnReTcN IOXoDAuIM IJIr 3aIINC TeMHbIX N3O6paXeHn B 60lee npKOM CBeTe. OdHaKO, N3O6paXeHne MOxKe TNOJyUHTbc MEHee YeTKIM.
OLD MOVIE
BbMOxKeTe npINBHOCnTb aTMoccpepy CTapHHNHO KIno B n3O6paXeHn. Ba7a BnDEOKaMepa 6yDet ABTomATuYeCKn yCTaHaBnBaTb 1nP0Ko3KpaHnB pExm B nIoXeHne ON, 3ΦΦeKT n3O6paXeHn B nIoXeHne SEPIA, N BbICTabNtB COOTBeTCTByIOUyIO CKOpOCTb 3aTBopa.
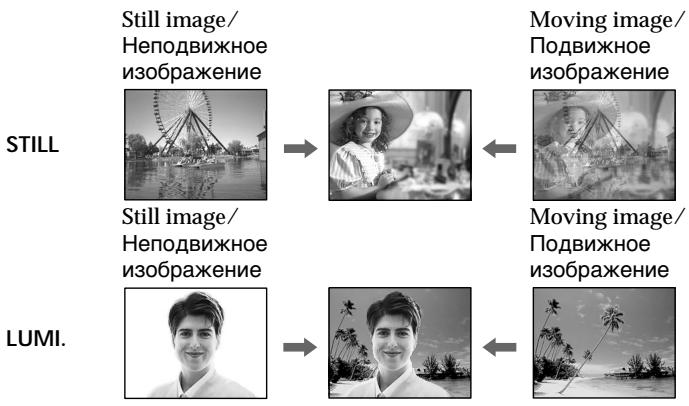
(1) Press DIGITAL EFFECT in CAMERA mode. The digital effect indicator appears.
(2) Turn the SEL/PUSH EXEC dial to select the desired digital effect mode. The indicator changes as follows: STILL FLASH LUMI. TRAIL SLOW SHTR OLD MOVIE
(3) Press the SEL/PUSH EXEC dial. The indicator lights up and the bars appear. In the STILL and LUMI modes, the still image is stored in memory.
(4) Turn the SEL/PUSH EXEC dial to adjust the effect as follows:
STILL - The rate of the still image you want to superimpose on the moving image
FLASH - The interval of flash motion
LUMI. - The colour scheme of the area in the still image which is to be swapped with a moving image
TRAIL - The vanishing time of the incidental image
SLOW SHTR -Shutter speed. The larger the shutter speed number, the slower the shutter speed.
OLD MOVIE - No adjustment necessary
The more bars there are on screen, the stronger the digital effect. The bars appear in the following modes: STILL, FLASH, LUMI and TRAIL.
(1)HaXMMTe KHOJky DIGITAL EFFECT B peXmme CAMERA. IoRbntcra INdkaTOp UΦpOBOrO əΦΦeKtA.
(2)ПовернITE ДИСК SEL/PUSH EXEC ДЯ
Выбopa рекиma hyжно уфpo borо
эфсөгта.
HnDnKaTOp 6yIeT n3MeHrTbCra CneDyUOuIM 06pa3OM:
STILL FLASH LUMI. TRAIL SLOW SHTR OLD MOVIE
(3)HaXMMTe DnCK SEL/PUSH EXEC.
BbICBeTnTCaHnDnKAtOp nNoBArTcN ONoCsbI. B pexImax STILL n LUMI. HenoDbVnxHoe n3o6paXeHne 6ydet coxApeHcO B naMrtn.
Using special effects - Digital effect
To cancel the digital effect
Press DIGITAL EFFECT.
Notes
- The following functions do not work during digital effect:
-Fader - Low lux mode of PROGRAM AE
-Tape photo recording
Super NightShot - The following functions do not work in the slow shutter mode:
- Exposure
- PROGRAM AE
- The following functions do not work in the old movie mode:
- Exposure
- Wide mode
- Picture effect
-PROGRAM AE
When you turn the power off
The digital effect is automatically canceled.
When recording in the slow shutter mode
Auto focus may not be effective. Focus manually using a tripod.
Shutter speed
| Shutter speed number | Shutter speed |
| SLOW SHTR 1 | 1/25 |
| SLOW SHTR 2 | 1/12 |
| SLOW SHTR 3 | 1/6 |
| SLOW SHTR 4 | 1/3 |
IcnoJb3OBAHHe cneuaJIbHbIX 3ΦΦeKToB - LInΦpOBoN 3ΦΦeKT
ДЯ OTmeHbI UΦpOBOrO 3ΦΦeKtA
Haxmnte KhoNky DIGITAL EFFECT.
Приимеань.
CneIyUOJIe cyHKnIe Hpea6oTIOt npn IcNoJIb3OBAHm NcIpPoBOrO 300
-Φeɪdεp
-PeXIM Hn3KoO OcBeueHocTn PROGRAM AE
-ΦOTOCbEMKaHaJIeHTy
-Houha cynepcbemka
CneIyUOuIeФyHKcIIN He pa6oTaIOB BpeKImMeMdJIeHHOrO 3aTBopa:
-3Kcno3nU
-PROGRAM AE
CneyuOuIe yHKun He pa6oTaIOBpeKIme CTapHHoro KINHO:
-3Kcno3nU
-山npoko3KpaHbIpeXIM
-3ΦΦeKt n306paXeHnA
- PROGRAM AE
PnBbIKJIOeHNIITaHNA
LunpoBoi 3ofoekt 6ydt aBtOMaTnueckn OTMeHEn.
Pn3aTncBpeXmmeMeIeHoro 3aTbopa
ABTOMATUeCKaФOKcnpOBKa MoKET 6bITb He 3ΦΦeKTnBHO. BbIIOJIHnteФOKcnpOBky BpyHyIO, NcIOnIb3yI TpeHORY.
CKopoctb 3aTBopa
| Величина скорoctи 3аТвopa | Скорочь 3aТвopa |
| SLOW SHTR1 | 1/25 |
| SLOW SHTR2 | 1/12 |
| SLOW SHTR3 | 1/6 |
| SLOW SHTR4 | 1/3 |
Using the PROGRAM AE function
You can select PROGRAM AE (Auto Exposure) mode to suit your specific shooting requirements.
Spotlight mode
This mode prevents people's faces, for example, from appearing excessively white when shooting subjects lit by strong light in the theatre.
Soft portrait mode
This mode brings out the subject while creating a soft background for subjects such as people or flowers.
Sports lesson mode
This mode minimizes shake on fast-moving subjects such as in tennis or golf.
Beach & ski mode
This mode prevents people's faces from appearing dark in strong light or reflected light, such as at a beach in midsummer or on a ski slope.
Sunset & moon mode
This mode allows you to maintain atmosphere when you are recording sunsets, general night views, fireworks displays and neon signs.
Landscape mode
This mode is for when you are recording distant subjects such as mountains and prevents your camcorder from focusing on glass or metal mesh in windows when you are recording a subject behind glass or a screen.
Low lux mode
This mode makes subjects brighter in insufficient light.
Исpenьзованецфункциng PROGRAM AE
BbMOxTe Bb6paTb peXm PROGRAM AE (aBTOMaTHueckKa CbEMka) B COOTBeTCTBm CO CnEuΦnueckMn TpeoBaHnAmK CbEmKe.
Pekim npoxektopHoro oCbeueHn
T PIIaXHbI N IblXHbI peXHM
3TOT pexmnpedotbpaaaetnoBnHeHemTeMHbIX IINI JIODeB 3OHe CNJbHOro CBeta NINOTpaxKeHHOro CBeta, HAnpImep, HaPiJaXe Bpa3rap JeTa INI HA CHEXHOM CKIOHe.
Pexim 3axoanda lyhbl
3TOT pEXKIM N03BOJnE8 T TOUHOCTN OTpAXaTB 6OCTaHOBky npi CbEMKe 3axoDB COJIHca, 06uHX HOHyBX BnIDOB, fneepBepKOB IN HEOHOBbIX peKlAm.
JaHdaΦThbI peKIM
3TOT pexmI NO3BONAEt BbINOJIHrTB CbEMKy OTdAeHHbIX O6BeKTOB, TaKNX KaK rOpbl, HAnpIMep, IN PpeODTbPaaaet FOKcNPOBky BnDEOkamepbHa CTekIO NIM MeTaIIuYeCKyO peWtKY Ha OKhax, KOrDa BbI BbINOHNaTe 3aNNCb O6BeKToB N03aDN CTekNa NIN peWtKn.
PexHM H3K0N OCBeUeHNOCTN
3TOT pexkIM delaet Obeekbl npn HeIOCTaTOHOM OCBeueHN.


(1) Press PROGRAM AE in CAMERA or MEMORY (DCR-TRV320E only) mode. The PROGRAM AE indicator appears.
(2) Turn the SEL/PUSH EXEC dial to select the desired mode.
The indicator changes as follows:

- In the spotlight, sports lesson and beach & ski modes, you cannot take close-ups. This is because your camcorder is set to focus only on subjects in the middle to far distance.
- In the sunset & moon and landscape modes, your camcorder is set to focus only on distant subjects.
-
The following functions do not work in the PROGRAM AE mode:
-
Slow shutter
Old movie -
Bounce
-
The following functions do not work in the low lux mode:
-Digital effect
-Overlap
-Wipe
-Dot
-
Exposure
-
While setting the NIGHTSHOT to ON, the PROGRAM AE function does not work. (The indicator flashes.)
- While shooting in MEMORY mode, the low lux mode does not work. (The indicator flashes). (DCR-TRV320E only)
If you are recording under a discharge tube such as a fluorescent lamp, sodium lamp or mercury lamp
Flickering or changes in colour may occur in the following modes. If this happens, turn the PROGRAM AE function off.
- Soft portrait mode
- Sports lesson mode
Adjusting the exposure manually
You can manually adjust and set the exposure. Adjust the exposure manually in the following cases:
- The subject is backlit
Bright subject and dark background - To record dark pictures (e.g. night scenes) faithfully
(1) Press EXPOSURE in CAMERA or MEMORY (DCR-TRV320E only) mode. The exposure indicator appears on the LCD screen or in the viewfinder.
(2) Turn the SEL/PUSH EXEC dial to adjust the brightness.
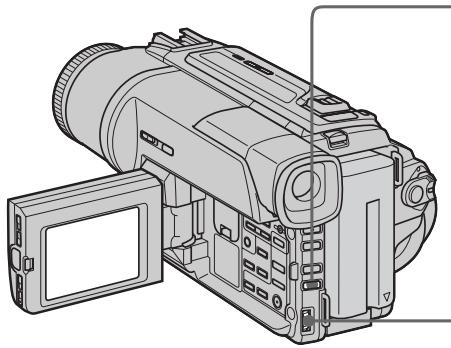
To return to the automatic exposure mode
Press EXPOSURE.
Notes
- When you adjust the exposure manually, the following function and modes do not work in CAMERA or MEMORY (DCR-TRV320E only) mode:
-Backlight
Old movie
- Slow shutter
- When you adjust the exposure manually, the backlight function does not work in MEMORY (DCR-TRV320E only) mode.
Your camcorder automatically returns to the automatic mode:
-if you change the PROGRAM AE mode
-if you slide NIGHTSHOT to ON
PerynpoBka 3Kcno3nCn BpyHyO
BbMOxKeTe OTpErpyInpObaTb N yCTaHOBnTb 3KcNo3NlUIO BpyHyIO.
Otpereynpyte3Kcno3nIOBpyHyIO B cIeJeUoXs Clyuayx:
-ObekT Ha fOHe 3aDHe NIOcBETKn
-Ярkin obbeKT Ha temHom fohe
ДяЗаис TeMHbIX n3O6paXeHn(Ha npimep, HOnHbIX cUeH)C 60JIbWoi DoCTOBePBOcTbIO
(1)Haxmte KhoNky EXPOSURE B pexime CAMERA uIM MEMORY (ToIbKO moJeB DCR-TRV320E).
Ha 3KpaHe XXKД ИИВ ВИДОИСКАТЕ NOIIBVITcH INДИΚAToP 3KKnO3NIM.
(2)ПовернITE ДИСК SEL/PUSH EXEC Дпгетулровки ркости.
1
EXPOSURE

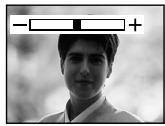
2

ДлЯ BO3BpaTаВ реким abTOMaTHueCKOJ 3KcNo3nCIN
HaxmTe KhoNky EXPOSURE.
Приимейсаня
You can gain better results by manually adjusting the focus in the following cases:
- The autofocus mode is not effective when shooting.
- subjects through glass coated with water droplets.
-horizontal stripes. - subjects with little contrast with backgrounds such as walls and sky.
- When you want to change the focus from a subject in the foreground to a subject in the background.
- Shooting a stationary subject when using a tripod.


(1) Set FOCUS to MANUAL in CAMERA or MEMORY (DCR-TRV320E only) mode. The indicator appears on the LCD screen or in the viewfinder.
(2) Turn the focus ring to sharpen focus.
ΦokycnpoBka BpyHyU
Bb mojke Te noluyntb lyuine pe3ynbTaTb nytem perynipOBKn BpynuHyo B cneDyUOxN CnyaX:
- Pexim ABTomatuecko fokycupOBKn ABJIeTcH HeΦeKTeBHBm pN BbINOJIHeHm CbeMKn.
-ObbeKTOBYepe3 NOKpbItOE KaIJIaMn CTeKJIo.
-ROPN3OHTaJIbHbI X IOJIOC.
-06bekTOB C MaJIoK KOHTpAcTHOCTbI Ho Ha TaKOM fOHe, KAK CTeHa Nn He6o.
EcIn BbI XOTnTE BbIOnHnTHb N3MeHeHne .ΦOKycuPobKn C ObbEkTa Ha nepeDhem PnaHe Ha Obbekt Ha 3aDhem PnaHe.
-Пи BылОЛнHeHn CсБМК CTaMuHaPbHbIX 06beKToB C ИСпОЛьЗВaHnE M TpeHOrn.
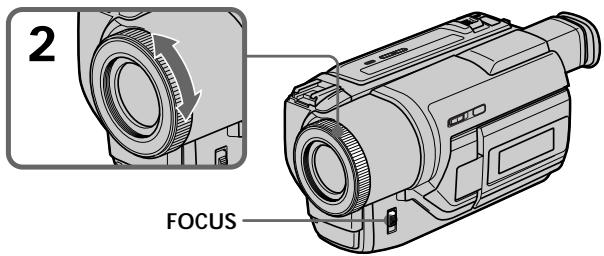
To return to the autofocus mode
Set FOCUS to AUTO.
To record distant subjects
When you press FOCUS down to INFINITY. The lens focuses on infinity and indicator appears. When you release FOCUS, your camcorder returns to the manual focus mode. Use this mode when your camcorder focuses on near objects even though you are trying to shoot a distant object.
Adjust the zoom by first focusing at the "T" (telephoto) position and then shooting at the "W" (wide-angle) position. This makes focusing easier.
When you shoot close to the subject
Focus at the end of the "W" (wide-angle) position.

changes to the following indicators:

when recording a distant subject.

when the subject is too close to focus on.
ДЯTOUHONΦOKYCUPOBKN
ÖtpereyninyTe o6bekTnB, c7aJana BblnoHNB φokcnpOBky B noJoxeHnN “T” (TepeTo), a 3aTEM BblnoHNB CbEMky B noJoxeHnN “W” (IinpOKoro yrna oxBaTa). Θto ynpocTnT φokcnpOBky.
PnBbINOHeHHN CbeMK B6JIn3n ObekTa
BbIOnHInTeΦOKyCnPOBky B KOHcpe NIOJoxeHHN "W" (Umpokoro yrna oxbaTa).
HdNkau

H3MeHNTcHa cIeMyOuJe

npi 3aIncu ydaJIeHnHO o6beKta.

ecnO6bEKT HaxoNTC R CNIWKOM 6Nt3KO, YTO6bl BbINONHHTb FOKYCINOBky Ha Hero.
Superimposing a title
HanoxeHne TnTpa
You can select one of eight preset titles and two custom titles (p. 61). You can also select the language, colour, size and position of titles.
BbMOXeTe Bb6paTb OINH IN3 BOCbMn
PpeBaPteBbOy c7aHOBNEHbIX TnTPOB IN DBYx
CObCTBEHNbIX TnTPOB (CTp. 61). BbMOxTe TaKxE
Bb6npaTb Ra3bIK, ZBeT, pa3MeR nIOxoHeM e TnTPOB.

(1) Press TITLE to display the title menu in the standby mode.
(2) Turn the SEL/PUSH EXEC dial to select , then press the dial.
(3) Turn the SEL/PUSH EXEC dial to select the desired title, then press the dial. The titles are displayed in the language you selected.
(4) Change the colour, size, or position, if necessary.
① Turn the SEL/PUSH EXEC dial to select the colour, size, or position, then press the dial. The item appears.
② Turn the SEL/PUSH EXEC dial to select the desired item, then press the dial.
③ Repeat steps ① and ② until the title is laid out as desired.
(5) Press the SEL/PUSH EXEC dial again to complete the setting.
(6) Press START/STOP to start recording.
(7) When you want to stop recording the title, press TITLE.
(1)Haxmnte KhONky TITLE dny oTo6paKeHnMeHOTNtPOB BpeKIMe OxuHaHn.
(2)ПовернITE ДИСК SEL/PUSH EXEC ДЯ Вьбogaустановки ,а заlem нахмITE ДИСК.
(3)ПовернITE ДИСК SEL/PUSH EXEC ДИЯ Bыбopa hyжно TИТра,а 3aTEm HAXMЛTe ДИСК.ТИТрbl 6уДТ OTOБРаKaTьсЯ HabыбраHHOM Bamn 8ЗblKe.
(4)Измени TeцBet, pa3Мер Или NOLOжЕнe TИТра, ecIM HIXHO.
① NIOBEPHNTe DnCK SEL/PUSH EXECДЯ BbIbOpa UBeTa, pa3Mepa Ил NOLOXKeHn TnTpA, a3aTeM HxKMHTe DnCK.
②ПовернITE дис SEL/PUSH EXECдя Вьобору hyжно hyKHTo,аЗTeM haxMNTe dNICK.
③ Повторгейtenунковы ①и ②do tex nop, noka TnTp He bdyet pacnoIoxKeH TaK, KaK hYxHo.
(5) Haxmte nck SEL/PUSH EXEC dny 3aBepseHn yCTaHOBKn.
(6) HaxmTe KhoNky START/STOP nHaJn 3aIncn.
(7) EcnB Bbl 3axOTnTe ocTaHOBnTb 3aINCb TnTpA, HaxMnTe KhONkY TITLE.
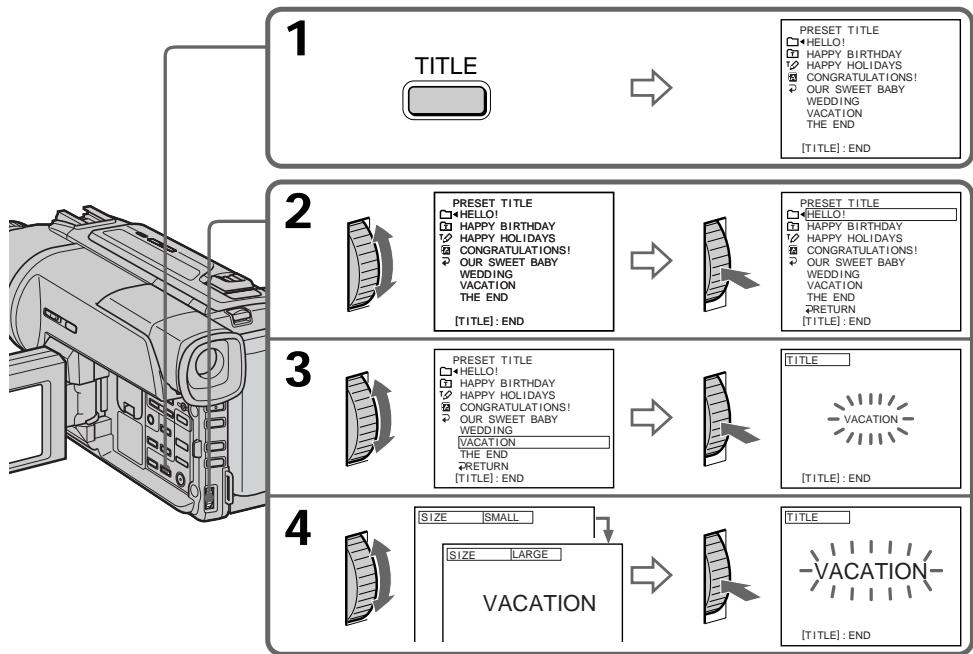
To superimpose the title while you are recording
Press TITLE while you are recording, and carry out steps 2 to 5. When you press the SEL/PUSH EXEC dial at step 5, the title is recorded.
To select the language of a preset title
If you want to change the language, select before step 2. Then select the desired language and return to step 2.
If you display the menu while superimposing a title
The title is not recorded while the menu is displayed.
To use the custom title
If you want to use the custom title, select in step 2.
If you have not made any custom title,
"---..." appears on the display.
Title setting
- The title colour changes as follows :
$$ \begin{array}{l} \text {W H I T E} \leftrightarrow \text {Y E L L O W} \leftrightarrow \text {V I O L E T} \leftrightarrow \text {R E D} \leftrightarrow \ \text {C Y A N} \leftrightarrow \text {G R E E N} \leftrightarrow \text {B L U E} \end{array} $$
- The title size changes as follows : SMALL LARGE
You cannot input more than 12 characters in LARGE size.
- The title position changes as follows :
$$ 1 \leftrightarrow 2 \leftrightarrow 3 \leftrightarrow 4 \leftrightarrow 5 \leftrightarrow 6 \leftrightarrow 7 \leftrightarrow 8 \leftrightarrow 9 $$
The larger the position number, the lower the title is positioned.
When you select the title size LARGE, you cannot choose position 9.
When you are selecting and setting the title You cannot record the title displayed on the screen.
When you superimpose a title while you are recording
The beep does not sound.
While you are playing back
You can superimpose a title. However, the title is not recorded on tape.
You can record a title when you dub a tape connecting your camcorder to the VCR with the A/V connecting cable. If you use the i.LINK cable instead of the A/V connecting cable, you cannot record the title.
Ecnn Bbl BbIbepnte pa3mep TnTpa LARGE, Bbl He cMOxKeTe Bbl6paTb nIoXKeHne 9.
PnBbIbOpe n yctaHOBKe TnTpa
BbI He MoKeTe 3aIncatb TnTp, OTo6paKaembI Ha 3KpaHe.
Pn HANOKeHH THTpa BO BpeMa 3aHncu 3yMMepHbN CnHaN He 6yJeT 3ByuAtb.
BoBpemBaocpon3BeDeHnA
BbMOKeTe HaIOXHTb TnTp. OHaKO TnTp He 6yIeT 3aNcAn Ha JeHtY.
BbMOxKeTe 3aNcTaT TnTp npnpe3aNcHJIeHTbl, NpOcEAnHNB BaUy BUnDeOKaMepy K KBMCnOmoBbO CoeINHInTeJbHorO ayDIO-/BUNdeoShuHa. EcnN BbIcNoB3yeTe Shyp I.LINK BMeCTO CoeINHInTeJbHorO ayDIO-/BUNdeoShuHa, BbHe CMOxKeTe 3aNcTaT TnTp.
Making your own titles
Co3dAnHe BaushxCo6CTBeHHbIX THTPOB
You can make up to two titles and store them in your camcorder. Each title can have up to 20 characters.
(1) Press TITLE in the standby or PLAYER mode.
(2) Turn the SEL/PUSH EXEC dial to select , then press the dial.
(3) Turn the SEL/PUSH EXEC dial to select the first line (CUSTOM1) or second line (CUSTOM2), then press the dial.
(4) Turn the SEL/PUSH EXEC dial to select the column of the desired character, then press the dial.
(5) Turn the SEL/PUSH EXEC dial to select the desired character, then press the dial.
(6) Repeat steps 4 and 5 until you have selected all characters and completed the title.
(7) To finish making your own titles, turn the SEL/PUSH EXEC dial to select [SET], then press the dial. The title is stored in memory.
(8) Press TITLE to make the title menu disappear.
BbMOKeTe COCTaBHT Do DBYx TnTPOB IN COXpaHHT bN X B NaMAtu BaWei BuDeokamepbI. KaJdbTnTnP MoKET coDEpxaTb Do 20 CmBBOIOB.
(1)HaxmTe KhONkY TITLE B pexnme OxndaHnI IN pexnme PLAYER.
(2)ПовернITE ДСК SEL/PUSH EXEC ДЯ
Быбoga установский ,а за tem нахшtenе ДСК.
(3)ПовернITE ДИСК SEL/PUSH EXEC ДИВьбора перво CBTOPOK (CUSTOM1) ИИ ВTOPО CBTOPOK (CUSTOM2), a 3aTeM HAZKMITE DИСК.
(4)ПовернITE ДИСК SEL/PUSH EXEC ДИВБОРа КОЛОНС HYХьIM CUMBOJLOM, a 3aTeM НЖМITE ДИСК.
(5)ПовернITE ДИСК SEL/PUSH EXEC ДИЯ ВИБОпа hyжно СИМВОЛа,а 3aTeM наЖМТЕ ДИСК.
(6)Повторгийпунковы 4и5do tex nop,пoka Bы He BBберпс Ссмьлы И пногсть He coctabinte TnTp.
(7)ДЯЗавершени COCTaBNeHnI CBOUx co6CTBeHHbIX TnTpOB NOBepHNTe DnCK SEL/ PUSH EXEC ДЯ BbIbOpa KImaHdI [SET], a 3aTeM haxmTe DnCK. TnTp 6ydt CoXpaHe H nAMRTN.
(8) Haxmte KhoNky TITLE, YTO6bI Ncye3nO MeHIO TNTPOB.
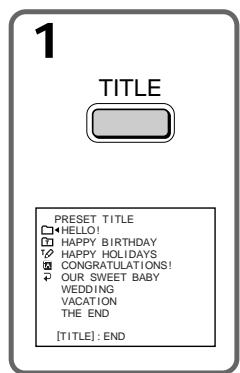
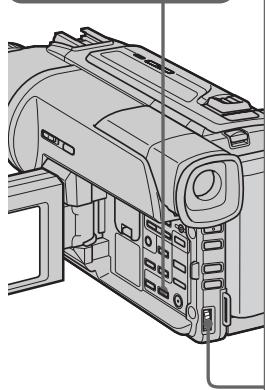
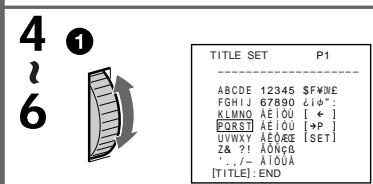
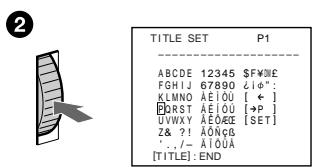

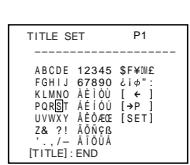

To change a title you have stored
In step 3, select CUSTOM1 or CUSTOM2, depending on which title you want to change, then press the SEL/PUSH EXEC dial. Turn the SEL/PUSH EXEC dial to select [] , then press the dial to delete the title. The last character is erased. Enter the new title as desired.
If you take 3 minutes or longer to enter characters in the standby mode while a cassette is in your camcorder
The power automatically goes off. The characters you have entered remain stored in memory. Set the POWER switch to OFF (CHARGE) once, and turn it to CAMERA again, then proceed from step 1.
We recommend setting the POWER switch to PLAYER or removing the cassette so that your camcorder does not automatically turn off while you are entering title characters.
If you select [ P2]
The menu for selecting alphabet and Russian characters appear. Select [ P1] to return to the previous screen.
To erase a character
Select [] . The last character is erased.
To enter a space
Select [Z& ?!], then select the blank part.
IIN3MeHeHH COxpaHeHHoro B nAMrTnTtPa
B nyHKte 3 Bbl6epnTe yctaHOBky CUSTOM1 nIIN CUSTOM2, B 3aBncmocTOn OT TnTpA, KOtOpBb Bbl xOTnTe n3MeHNb, a 3aTeM haxmTe dNCK SEL/PUSH EXEC. NObepnTe dNCK SEL/PUSH EXEC dNBAbOpa yCTaHOBKn [<], a 3aTEM haxmTe dNCK dNlaJeHnA TnTpA. PocneHnCmBOJ 6yJeT cTept. BBeDnTe HOBbH HxKbH TnTp.
Ecn np BBOe CmBBoJOB npOJeT 3 MnHyT nIb6oJIeB pReKIme OxUdAnHn np BCTaBJIeHHo KaccTe B BaSy BnDeOkamepy
Питainede ВьIKЛQUHTcA ABTomaTnueckn.
CmboJIb, KOtOpBie Bbl BBeI, CoXpaHrTcB namrtn BuJeokamepbI. YCTaHOBnTE Chauana nepeKnIOuATEnb POWER B noLoXeHne OFF (CHARGE), a 3aTeM cHOBa B noLoXeHne CAMERA, a 3aTeM NaHnTe C npHKTa 1.
PekomEnyetycYCTaHOBnTb nepeKIOuOaTeIb POWERBnoIOxKeHne PLAYERINBbHyTb kaccety,TO6blBa7a BnDEOKaMepa aBTOMaTnueckn He BbIKIOUaJaCb BO BpemBABOda CmMBOJOB TnTpA.
EcIn BbI BbIbpaJIyycTaHOBky [→P2]
IorBnTcMeHIOIy BbIbopa aIpaBNTa I pyCCKnx CmBBOIOB.ДЯ Bo3BpTa K npexHemy 3KpaHy BbIbepnte yCTaHOBky [ P1]
ДяудаленсCMBOna
Bb6epnte yctahOBky [].IocneHn CmBON 6ydt cTePT.
ДЯ ВБОДA ИТЕРВАЛ
BbI6epNTe 3nak [Z& ?!], a 3aTeM BbI6epNTe nyCTyIO rYeIKy.
You can insert a scene in the middle of a recorded tape by setting the start and end points. The previously recorded frames between these start and end points will be erased. Use the Remote Commander for this operation.
BbMOKTe BCTaBnTb 3IN3oD BcepeDInHe
3aNcAHHo JIeHTb IyTEM YcTaHOBKn TOeK
Haana N OKOHuaHry. Ppebldyuine
3aNcAHHbIe KaIpbI MekJy 3TUMN TOyKaAMn
Haana N OKOHuaHry 6yDt CteptbI. BbMOKTe
BbINOHNb 3TO, INCNoB3y PyJIbT
dNCTaHcUHOHoro ynpabJeHnR.
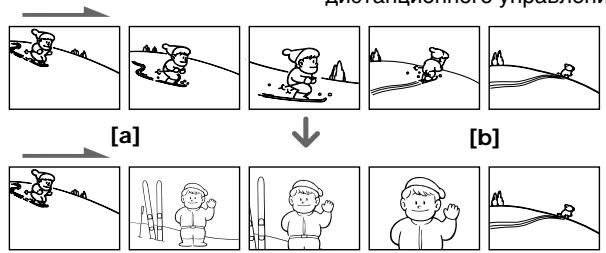
(1) While your camcorder is in the standby mode, keep pressing EDITSEARCH, and release the button at the insert end point [b].
(2) Press ZERO SET MEMORY. The ZERO SET MEMORY indicator flashes and the counter resets to zero.
(3) Keep pressing the - side of EDITSEARCH and release the button at the insert start point [a].
(4) Press START/STOP to start recording. The scene is inserted. Recording stops automatically near the counter zero point. Your camcorder returns to the standby mode.
(1)В рекиme Oжиданя BИдоЕКаМеррь, деркитЕ нахаToI KhoNky EDITSEARH n OTnycTnte KhoNky B ToUke OkOHuaHЯ ən3oJa [b].
(2)HaxmTe KhoNky ZERO SET MEMORY. HaHET MrraTb HnDnKaTop ZERO SET MEMORY, a Chetvn JeHTb 6yDet yCTaHOBJeB HynEBoe NOJIOKeHne.
(3)ДерхитЕнжатоI CTOPOHy - KHONKINEDITSEARHИ OTNyCTnTe KHONKY B TOUKeHaçaλа ən30nda [a].
(4)Haxmnte KhoNky START/STOP nHa?a 3aIncn. 3nI3oD BCTabJeH. 3aIncb OCTaHOBHTcA bTOMaTHueckn B HJNeBOI TOKe CHeTUnKa. Ba7a BInDeOkaMepa BepHeTcB PexKIM OxNuDaHna.
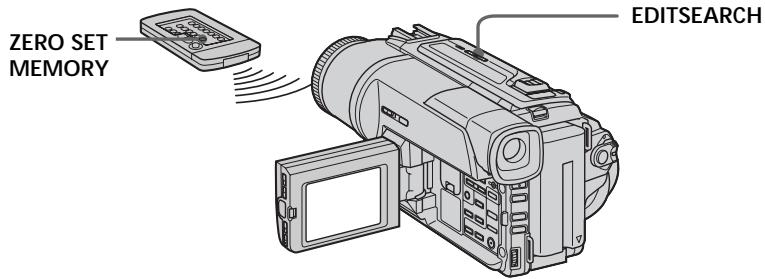
Notes
- The zero set memory function works only for tapes recorded in the Digital8 system.
- The picture and the sound may be distorted at the end of the inserted section when it is played back.
If a tape has a blank portion in the recorded portions
The zero set memory function may not work correctly.
Примейань
ΦyHKUINIpaTNIHJNe He pa6oTaETnJIeHT, 3aIncanHHbIX B cIcPpOBcNcTeMe Digital8 H.
ИЗбраженьи n 3Byk MOryT bIb NcKaжehbl B KOHc BCTaBJIeHHORO 3nN3OJa pRn BOCPON3BeDeHIN.
EcIn Ha IeHTe IMeETc H3aIncAHbI yactok
Playing back a tape with picture effects
During playback, you can process a scene using the picture effect functions: NEG.ART, SEPIA, B&W and SOLARIZE.
During playback, press PICTURE EFFECT and turn the SEL/PUSH EXEC dial until the desired picture effect indicator (NEG.ART, SEPIA, B&W or SOLARIZE) appears.
For details of each picture effect function, see page 48.
Bocnpo3BeDeHne JeHTbIC 3ΦΦeKtAmn n3o6paXKeHn
Bo BpemBocpnoun3BeJeHnBbMOKeTe BUNoIN3MeHATb N3O6paXeHne C NOMOuBu OfynKcN:NEG.ART,SEPIA,B&W u SOLARIZE.
Bo BpemB OBCnpOn3BeDeHnA, HaxMnte KhONKy PICTURE EFFECT n noBopaunBaIte nck SEL/ PUSH EXEC do tex nop, noka He naHnet MmRaTb INDnKaTop HxKHO rΦpOBOrO (NEG.ART, SEPIA, B&W u SOLARIZE). Iopno6hble cBeDeHnNo KaKdof yHKuIN ZΦpOBbIX 3ΦΦeKToB npBvEHeBHa CTp.48.
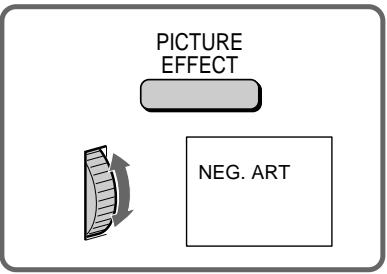
To cancel the picture effect function Press PICTURE EFFECT.
Notes
- The picture effect function works only for tapes recorded in the Digital8 system.
- You cannot process externally input scenes using the picture effect function.
- To record pictures that you have processed using the picture effect function, record the pictures on the VCR using your camcorder as a player.
Pictures processed by the picture effect function
Pictures processed by the picture effect function are not output through the DV OUT jack.
When you set the POWER switch to OFF (CHARGE) or stop playing back
The picture effect function is automatically canceled.
ДЯ OTMeHbI Φункин сифpoBbIX 3ФФeKTOB
Haxmte KhONky PICTURE EFFECT.
PpmeaHn
ΦYHKUH3ΦΦEKTOB n3o6paXeHn pa6oTaET TOJIbKO IJNJIeHT, 3aIINCAHHbIX B cIΦpOBoI CnCTeme Digital8
BbI He MoXeTe BUNOn3MeHrTb N3O6paXeHnAOT KBM INI TEnBeN3Opa C NOMOuBo FOyHKUIN3ΦΦeKTOB N3O6paXeHnA.
Длгздпсин3обрахжси Спспьзови Em 3ффektOB n3obpaхжн,ЗаиштЕ n3obpaхжн ha KBM,Испьзу Baшу BvideokamepyВ kaчесТВ пeйера.
n3o6paXeHne c 3ofoekTaMn n3o6paXeHn
CnHnI n3o6paXeHnI c 3ΦΦeKtAmn n3o6paXeHnI He nepeJaetcYpe3 BbIXoHoe rHe3do DV OUT.
EcIn Bby ycTaHOBnI nepeKJIouaTeIb POWER B nIoJoxeHne OFF (CHARGE) nIIOCTaHOBnI BOCpON3BeHne
Playing back a tape with digital effects
During playback, you can process a scene using the digital effect functions: STILL, FLASH, LUMI and TRAIL.
(1) During playback, press DIGITAL EFFECT and turn the SEL/PUSH EXEC dial until the desired digital effect indicator (STILL, FLASH, LUMI or TRAIL) flashes.
(2) Press the SEL/PUSH EXEC dial.
The digital effect indicator lights up and the bars appear. In the STILL or LUMI mode, the image where you press the SEL/PUSH EXEC dial is stored in memory as a still image.
(3) Turn the SEL/PUSH EXEC dial to adjust the effect.
For details of each digital effect function, see page 50.
Bocnpo3BeJeHne JeHtbi C uΦpObblm 3ΦΦeKtamN
Воврем Восчpen3BVEdENH,Бы можeteВиюнзмehaTь n3o6paXeHne C nOmoubIOункш:STILL,FLASH,LUMI.uTRAIL.
(1)Bo BpemB OBCnpOn3BeDeHn, HxKMnTe KHOkky DIGITAL EFFECT INOBopaunBaIte DnCK SEL/ PUSH EXEC IO tex nop, NOka He NaHcET MMrTaB INdKaTOp HxHOrO uΦpOBOrO 3ΦΦeKtA (STILL, FLASH, LUMI. nIN TRAIL).
(2)HaKmTe nck SEL/PUSH EXEC. BbCBeTnTcra HndIkataOp cnppOboRo 300eKtA u NOBaTcra NIOocbI.BpeKMe STILL nLUMI.N3o6paXeHne,Ha KOTopom Bbl HaKMeTe KOnkUy nck SEL/PUSH EXEC, 6byet 3aHeceHO bNaMaTb KaK HeNoDbuXhOe N3o6paXeHne.
(3)ПовернITE ДИСК SEL/PUSH EXEC ДЯ
perynipobBkN эфсекТа ИЗбражен.
Пдрбьге CBeDEнг� NO каддо Функци
цфробьх эфсекTOВ пивдевны на CTp. 50.
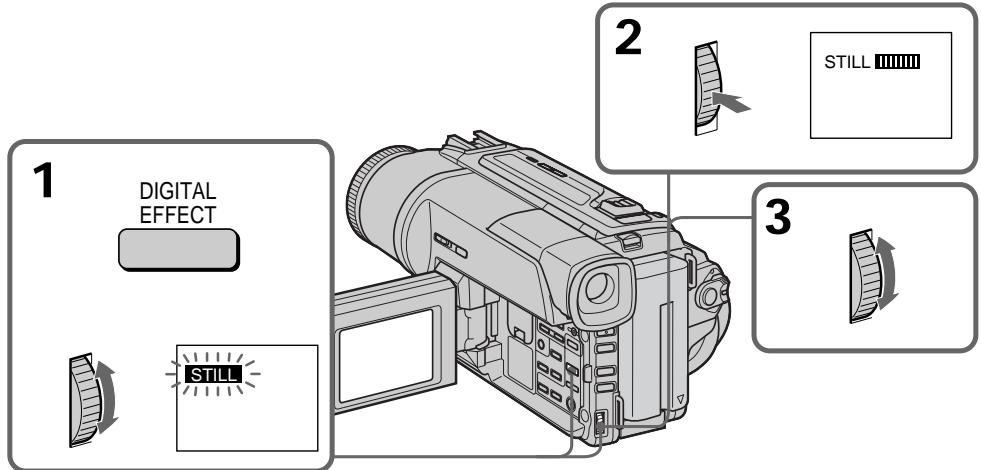
To cancel the digital effect function
Press DIGITAL EFFECT.
Notes
- The digital effect function works only for tapes recorded in the Digital8 system.
- You cannot process externally input scenes using the digital effect function.
- To record images that you have processed using the digital effect function, record the images on the VCR using your camcorder as a player.
Pictures processed by the digital effect function Pictures processed by the digital effect function are not output through the DV OUT jack.
When you set the POWER switch to OFF
(CHARGE) or stop playing back
The digital effect function is automatically canceled.
Enlarging recorded images - PB ZOOM
You can enlarge moving and still images recorded on tapes.
Besides the operation described here, your camcorder can enlarge still images recorded on "Memory Stick's (DCR-TRV320E only).
(1) Press PB ZOOM on your camcorder while you are playing back. The image is enlarged, and appears on the LCD screen or in the viewfinder.
(2) Turn SEL/PUSH EXEC dial to move the enlarged image, then press the dial. : The image moves downwards : The image moves upwards becomes available.
(3) Turn SEL/PUSH EXEC dial to move the enlarged image, then press the dial.
: The image moves rightward (Turn the dial downwards.)
: The image moves leftward (Turn the dial upwards.)
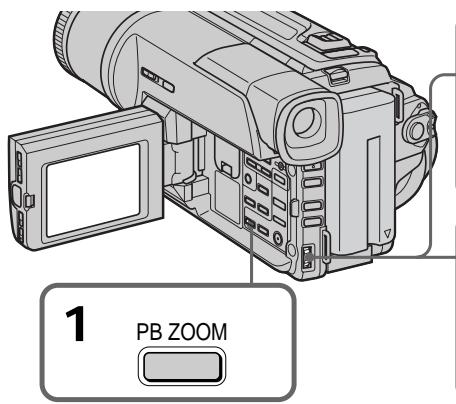
To cancel PB ZOOM function Press PB ZOOM.
Note
PB ZOOM works only for tapes recorded in the Digital 8 system.
- You cannot process externally input scenes using PB ZOOM function.
- To record pictures that you have processed using PB ZOOM function, record the pictures on the VCR using your camcorder as a player.
Pictures processed by PB ZOOM function
Pictures processed by PB ZOOM function are not output through the DV OUT jack.
When you set POWER switch to OFF (CHARGE) or stop playing back
PB ZOOM function is automatically canceled.
YBeJIuYeHne 3aIncaHHbIX n3o6paJxehn - PB ZOOM
BbMoXeTe yBEnuBaTb DnBxUneCa n HEnoDbXKhIe 1306paXeHn, 3aNcAhnbe Ha NeHTbl.
ПOMМООпЕАЦИ,ОПИСАнБИХВДанHOMpyKOBOДСТBE,Bausa ВИDEOKAMPERa ПОЗВЛЕТУВЕПИСТВ НЕОДВИХны ИЗборжени,ЗдИСАнБИХны Ha "Memory Stick"(Товко DCR-TRV320E).
(1) Haxmnte KhoNky PB ZOOM Ha BaWei BIndeokamepe BoBpeMa Bocnpn3BeDeHnI. N3o6paKeHne yBEmnTcR, aHa 3KpaHe JKd IINn B BNIOMcKeTe NoBnTc INHnDnKaunI
(2) ПовернITE ДСЕL/PUSH EXEC Дпяпегемеценье уBEReHENHOrо ИЗБрахен,在а 3aTeM HAXMITE DSCK.
Quickly locating a scene using the zero set memory function
БыICTpoe OTbICKaHne 3ПИЗODa C NOMOUI OФУHKUIN PAMRTN HUJIeBOI OTMeTKI
Your camcorder goes forward or backward to automatically stop at a desired scene having a counter value of "0:00:00".
Use the Remote Commander for this operation.
Use this function, for example, to view a desired scene later on during playback.
(1) In the playback mode, press DISPLAY.
(2) Press ZERO SET MEMORY at the point you want to locate later. The counter shows "0:00:00" and the ZERO SET MEMORY indicator flashes.
(3) Press when you want to stop playback.
(4) Press to rewind the tape to the counter's zero point. The tape stops automatically when the counter reaches approximately zero. The ZERO SET MEMORY indicator disappears and the time code appears.
(5) Press . Playback starts from the counter's zero point.
BaWbBnDeokamepa BbInOpNHeT npOdbNXKeHne BnpeIINH3aD C ABTOMATNeCKO NcTaHOBKO B HUYXHOM 3nN3oJe, rJe NOKa3AHne ChETyNkApabH0 "0:00:00".
BbMOKeTe BbINONHHTb 3TO C NOMOsbIO NyIbTa DnCTaHcNOHHOYnpaBHeHr.
IcnoIb3yIte 3Tu FyHKnIO, HApnIMep, IJr npocMToPA HyKHOro 3Nn3OJa n03Ke BO BpEmBOCpON3BeDEHIN.
(1) B pēxīmme BOCpɒnɪsBeDɛŋH naXmɪTe Khɒnɪk y DISPLAY.
(2) Haxmnte KhoNky ZERO SET MEMORY B MeCTe, KOtOpoe Bbl 3axOtNe hauTn no3xe. Ioka3aHne ChETuKAc cTaHcT paBbIM "0:00:00", n HaHTe Mrratb INdNKaTOp ZERO SET MEMORY.
(3) Haxmnte KhoNky ■, ecn Bbl 3axOTnte HaxaTb OCTaHOBntb BOCpON3BeDeHne.
(4) HaxmTe KhoNky ДЯусокорно nepemOTKn IeHbI Haua3d K hynEBoT OTOKe CcETnka. JIeHTa OCTaHOBITc ABOtMaTHUeCKn, ecIn cHTeTnK DOCTuHET HynEBoT OTMeTkn. INdkaTop ZERO SET MEMORY uCye3HeT, n NOBITcK KOД BpeMeHn.
(5) Haxmte KhoNky ▶. Bocnpo3BeDeHne HauHETcH CyHeB0IOTMeTkn CHTnka.
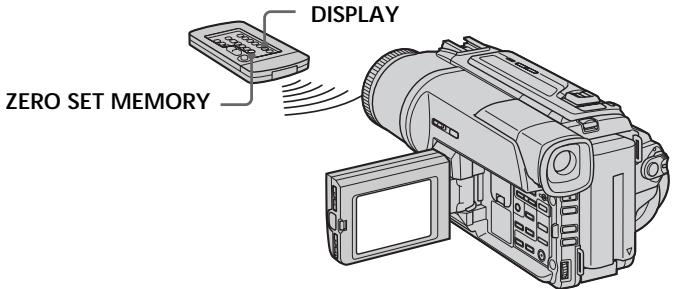
Notes
- The zero set memory function works only for tapes recorded in the Digital8 system.
- When you press ZERO SET MEMORY before rewinding the tape, the zero set memory function will be canceled.
- There may be a discrepancy of several seconds from the time code.
If a tape has a blank portion in the recorded potion
The zero set memory function may not work correctly.
ZERO SET MEMORY functions also in the standby mode
When you insert a scene in the middle of a recorded tape, press ZERO SET MEMORY at the point you want to end the insertion. Rewind the tape to the insert start point, and start recording. Recording stops automatically at the tape counter zero point. Your camcorder returns to the standby mode.
PpmeaHne
Фуннляпamгтн hyneboi OTmTeKn pa6Otaet TOnbKO ДЯЛТ,ЗИССАнHbX B zuФробОи CnCTeMe Digital8
EcinBbHaxMeTe KHOKNKY ZERO SET MEMORYdo HauhaIbOpaTHoN nepEMOTKnJeHTb,To yHKnUra nAMATNI HYNeBnOTMkTn 6yDet OTMeHeHa.
Moxet 6bIb paXOxDeHne B HeCKoJIbKO CeKYHd MekyDy KOOM BpEMEHn N DeICTBnTeJbHbIM BpEMEHm.
EcHnHaJeHTeMeKJy3aNcaHHbIMu yactkamm IMeTcH He3aNcaHHbI yactOK.
Searching a recording by date - Date search
You can automatically search for the point where the recording date changes and start playback from that point (Date search). Use the Remote Commander for this operation.
Use this function to check where recording dates change or to edit the tape at each recording date.
(1) Set the POWER switch to PLAYER.
(2) Press SEARCH MODE on the Remote Commander repeatedly, until the date search indicator appears.
The indicator changes as follows: DATE SEARCH PHOTO SEARCH PHOTO SCAN
(3) When the current position is [b], press to search towards [a] or press to search towards [c]. Your camcorder automatically starts playback at the point where the date changes.
Each time you press or , the camcorder searches for the previous or next date.
(1)Установпейразковая对外开放 POWER B noJOKeHne PLAYER.
(2)HaximmaTe NOBtOpHo KhoNky SEARCH MODE HaIyIbTe InCTaHcNoHnOro ynpaBHeHЯ DoTex NOp,IOKa He NoRbHTcra HndIkAToP NoCKa DaTbI. INdIkAToP 6yDeT N3MeHaTbCra CneDyUoUm 06pa3oM: DATE SEARCH PHOTO SEARCH PHOTO SCAN
(3)Ecni Tekyiue noIooXeHne COOTBeTCTByeT BapnaHTy [b], HaxMNTe KhONkY I dIa BbINoJIHeHn IOmCKa B HApPaBLeHn [a] NII Na HaxMNTe KhONkY I dIa BbINoJIHeHn IOncKa B HAppaBLeHn [c].BaIa BInDeOkAmepa ABTOMaTUnCeKn HaChET BOCpOn3BeDeHne B MeCTe, rIe N3MeHReTcA daTa.
BcKn pa3 npn HaxKaTm KHOKn I nnI ▷I, BInDeOKaMepa 6yDet BbINOpHArTb NOnCK ppebldyuee nnCneDyUoSe DaTbI.
Длг octahOBkn NOUCKa
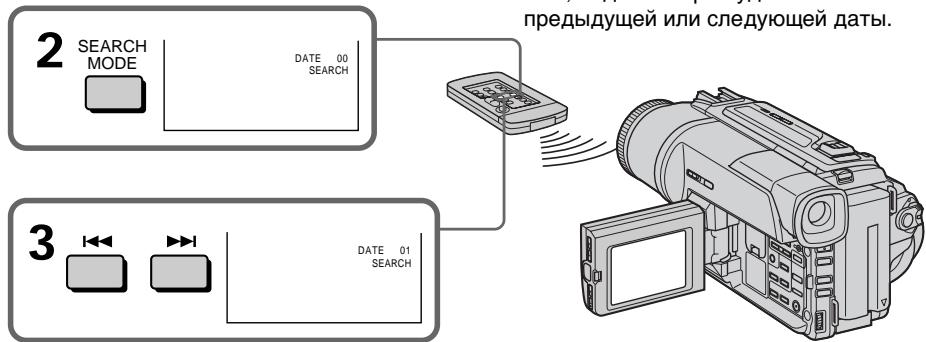
Press ■.
To stop searching
Hakmite KhONky
Searching a recording by date - Date search
- The date search works only for tapes recorded in the Digital8 system.
- If one day's recording is less than two minutes, your camcorder may not accurately find the point where the recording date changes.
If a tape has a blank portion in the recorded portions
The date search function may not work correctly.
Примеанья
- Pexim noncka daTbI cyHKUHOHpye TOnbkoДЯЛeHT,3aNcAHbIX BcnpoBcNCTeme Digital8【.
- EcInB KaKoI-Ni6o n3 dHei Ba7a 3aNinCb npOdoJXaIacb MeHee DByx MmHyT, Ba7a BnDeOKaMepa MoKet TOnHO He HaNTn MeCTo, rDe n3MeHHeTcR dAta 3aNinC.
EcIn Ha 3aHncaHHoJIeHT MeHOTcH He3aHncaHHbIe YUactKIN
Searching for a photo - Photo search/Photo scan
You can search for the still image recorded on tape (photo search).
You can also search for still images one after another and display each picture for five seconds automatically (photo scan). Use the Remote Commander for these operations.
Searching for a photo
(1) Set the POWER switch to PLAYER.
(2) Press SEARCH MODE on the Remote Commander repeatedly, until the photo search indicator appears.
The indicator changes as follows: DATE SEARCH PHOTO SEARCH PHOTO SCAN
(3) Press or to select the photo for playback. Each time you press or the camcorder searches for the previous or next photo. Your camcorder automatically starts playback from the photo.
(1) Set the POWER switch to PLAYER.
(2) Press SEARCH MODE on the Remote Commander repeatedly, until the photo scan indicator appears. The indicator changes as follows: DATE SEARCH PHOTO SEARCH PHOTO SCAN
(3) Press or . Each photo is played back for about 5 seconds automatically.
Сканироваиме Фото
(1)YcTaHOBInTe NepeKJIIOUaTeIb POWER B noJIOKeHne PLAYER.
(2)HaximmaTeNoBTOPOHaNyIbTe DnCTaHcUOnHOrO UnpaBLeHnKHOkny SEARCH MODE DoTex nop, NOKa He nOBHTcN HdNKaTOP FOToCKaHnPoBaHn. INdNKaTOp 6yDeT N3MeHrTcB CneDuOuIM o6pa3oM: DATE SEARCH PHOTO SEARCH PHOTO SCAN
(3)HaxmTe KhoNky I nnI. KaKdoe fOTo 6yJeT aBtOMaTnueckn oTo6paXaTbCЯPImEpeHo5ceKyHd.
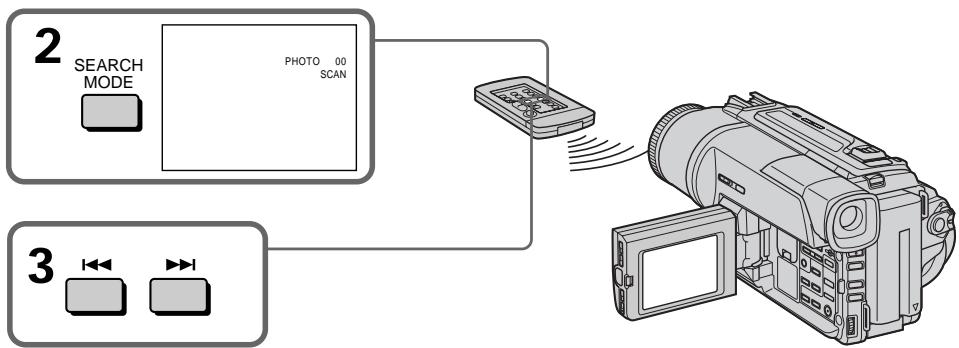
To stop scanning
Press ■.
ДлЯ OCTaHOBKn CKaHIpObaHnA
Haxmnte KhONky
Note
The photo search and photo scan work only for tapes recorded in the Digital8 system.
If a tape has a blank portion in the recorded portions
The photo search and photo scan functions may not work correctly.
PpimeyaHne
ΦOTONOENCK ΦOTOCKaHINPOBaHne ФунКцИОнHpyIOT TOЛьКО ДЛЯ ЛЕТ,ЗАПиСаHHbIX ВЦИФРОВСИСТЕМe Digital8#.
EcIn Ha 3aHcAHNo JIeHTe IMeOTc H3aHcAHbIe yAcTkn
Using the A/V connecting cable
Connect your camcorder to the VCR using the A/V connecting cable supplied with your camcorder.
(1)Insert a blank tape (or a tape you want to record over) into the VCR, and insert the recorded tape into your camcorder.
(2)Set the input selector on the VCR to LINE. Refer to the operating instructions of your VCR for more information.
(3)Set the POWER switch to PLAYER.
(4) Play back the recorded tape on your camcorder.
(5)Start recording on the VCR. Refer to the operating instructions of your VCR for more information.
UcnOJIb3OBAHnE CoeINHITeIbHOro Ka6eJyauDIO/BuDeo
PoioceiHnTe Bauy BnDeokamepy K KBMc nOmoIbIO coeHNHTelbHorO kaBEna ayDIO/ BnDeo, KOtOpBn npinaraetc Ka BaWei BnDeokamepe.
(1)BcTaBbTe He3aIncaHHyIO JeHTy (IIINJeHTy, Ha KOTopyIO Bbl XOTnte BblONHnTb 3aNtCb) B KBM u BcTaBbTe 3aIncaHhyIO JeHTy B BaUy BuDeOkamepy.
(2)YcTaHOBInTe CeJIeKTop BXoDHorO Ha KBM B noLoXKeHne LINE. BoJe e noIrpO6HbIe CBeDeHnBa CMOxKeTe HaHTN B INCTpyKuIN no 3KcPnyatauIN Baawero KBM.
(3)Установпейреклочаель POWER в положене PLAYER.
(4)HaunHe BocnpOn3BeJeHne 3aIncAHHoJIeHTbI Ha BaSei BnDeokampe.
(5)HaunHe 3aIncHb BaWem KBM. BoJe e noDpO6HbIe CBeDeHnB BcCMoKeTe HauTn BnHCTpyKuNn N0 3Kcnnyatau n BaJero KBM.
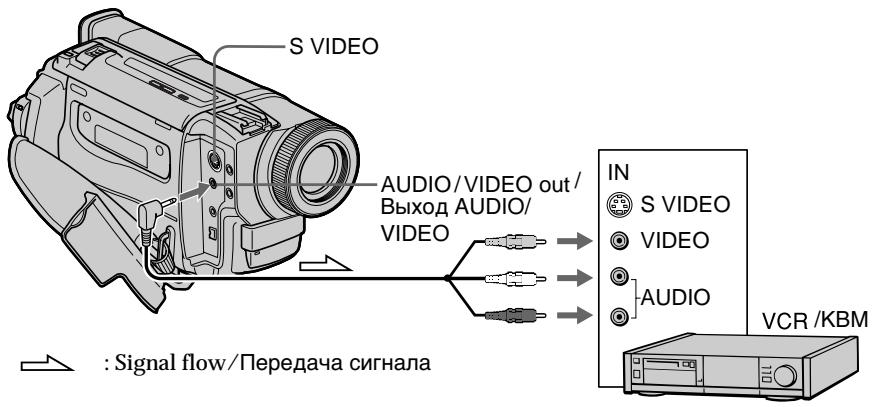
When you have finished dubbing a tape
Press on both your camcorder and the VCR.
EcnBb3aKoHnJInpe3aIncbJeHTbl
HaKMTe KHONKy KaKa Ha BnDeOKamepe, TaK n Ha KBM.
Be sure to clear the indicators from the screen If they are displayed, press the following buttons not to record the indicators on the dubbed tape:
- The DISPLAY button.
The DATE CODE button. - The SEARCH MODE button on the Remote Commander.
You can edit on VCRs that support the following systems:
8 8 mm, HiHi8, VHS VHS, SWS S-VHS, WHSC VHSC, SWS S-VHSC, Betamax, Mini DV or Digital8
If your VCR is a monaural type
Connect the yellow plug of the A/V connecting cable to the video input jack and the white or the red plug to the audio input jack on the VCR or the TV. When the white plug is connected, the left channel audio is output, and the red plug is connected, the right channel audio is output.
If your VCR has an S video jack
Connect using an S video cable (not supplied) to obtain high-quality pictures.
With this connection, you do not need to connect the yellow (video) plug of the A/V connecting cable.
Connect an S video cable (not supplied) to the S video jacks of both your camcorder and the VCR.
He 3a6ydbTe ydaJIbI hHdNKaTOpblc 3KpaHa
EcII Na 3KpaIe OTObpaKaJOTc HNdkaTOpbl,
HaxMITE CNeIyIOUne KHOJKN, YTO6bl He
3aIINCbIBaTb INHdkaTOpbl Ha
nepe3aINCbIABaEMyIOJeHTY:
- KhonKa DISPLAY
- Khonka DATE CODE
KhoNka SEARCH MODE ha npIbTe. ductaHOnHO ro ynpabNeHnA.
BbMOxTe BbINoINHrTb MOtAaK Ha KBM, KOtOpbIe NODepXnBaIOT CneDyUoune CnCTeMbI:
8 MM, Hi8 Hi8, VHS VHS, SVHS S-VHS, VHSVHSC, SVHSC S-VHSC, Betamax, Mini DV Digital8
EcnBaw KBM MOHOpOHneckoro Tnna
IoiocoeiHnITE JeTbI WTeKep CoeHNHTelbHO Ka6eJIa ayINO/BuJeO K BXoJHOMy BNuDeOrHe3Ny, a 6eJIb IIN KpaChbI WTeKep K BXoJHOMy ayInorHe3Ny Ha KBM IIN TeLeBn3ope. EcII nOIOcEOiHNH 6eJIb WTeKep, TO BvIXoJHbIM CnIHaIOM 6yDet 3ByK JEBORO KaHaJa, a ecII NIOcOeHNH KpaChbI WTeKep, TO BvIXoJHbIM CnIHaIOM 6yDet 3ByK npaBOr KOHaJa.
EcnB Baem KBM Umeetc rHe3do S Bndeo
BbIIOJIHnTeNoIOCoEiINHeHneC nOMOuIbKa6eJIa S BnDeo (He npInlaeraTcA) IJNn POJUyeHnB bICOKOKaueCTBeHHbIX N306paXeHn.
PnTaKOMNoDCoeDInHeHnBam He HuxHo NoDCoeDInHbT XeHTbI(BnDeo)WTeKepe CoeDHNHTeNbHO Ka6ena ayDNO/BuDeo.
Using the i.LINK cable (DV connecting cable)
Simply connect the i.LINK cable (DV connecting cable) (not supplied) to DV OUT and to DV IN/OUT of the DV products. With digital-to-digital connection, video and audio signals are transmitted in digital form for high-quality editing. You cannot dub the screen indicators.
(1)Insert a blank tape (or a tape you want to record over) into the VCR, and insert the recorded tape into your camcorder.
(2)Set the input selector on the VCR to DV IN if it is available.
Refer to the operating instructions of your VCR for more information.
(3)Set the POWER switch to PLAYER.
(4) Play back the recorded tape on your camcorder.
(5)Start recording on the VCR. Refer to the operating instructions of your VCR for more infomation.
IcnoJIb3OBAHnE Ka6eIaLINK (coeHNHTeBHyI Ka6eIb DV)
ПрocTopoIcoeHnHTeKa6eIb i.LINK (coeHnHTeJbHbI Ka6eIb cIΦpOBOr BIndeOcHraJa DV) (He npInaraetc) K rHe3dy
DV OUT n rHe3dy DV IN/OUT uNΦpoBbIX BnIeOn3dJIi. Ppi cIuΦpo-ucΦpOBOM COeINHeHIn BVJeO-i ayDIOscIRHaJIb IpePeaOTcB B uNΦpOBoFΦopMe dIa NocJeDuOeero BBICOKOKaueCTBeHHoro MOHTaxa. BbI He MoXeTe BBINOHNITb nepe3aIncB 3KpaHHbx INDkAToPOB.
(1)BcTaBbTe He3aIncahHyIO JeHTy (IINI JeHTy, Hau KOTopyIO XOTITE BbIOnJIHnITb 3aIncb) B KBM n BcTaBbTe 3aIncahHyIO JeHTy B BaUy BInDeOkAmepy.
(2) CmOTnTe INHCTpyKUIO NO 3eCnPyatauBnBaWero KBM dIa IOnyueHn DaJIbHeiweINHOpMaun.
(3)Установпейреклочаель POWER в положене PLAYER.
(4)HaunHe BocnpOn3BeJeHne 3aIncaHnoJIeHTbI Ha BaSei BnDeokampe.
(5)HaunTe 3aInc b Ha KBM. CmToPnTe IHCTpyKuIIO NO 3eCnPyatauB BaWero KBM dJa nOlyueHra daJIbHeJSei HOpMaun.
When you have finished dubbing a tape
Press on both your camcorder and the VCR.
EcnBb3aKoHnJIpepe3anCbJeHTbl
HaxmTe KhoNky KaK Ha BaSei BnDeokamepe, TaK n Ha KBM.
Note on tapes that are not recorded in the Digital8 system
The picture may fluctuate. This is not a malfunction.
During playback of tapes recorded in the Hi8/ standard 8 system
Digital signals are output as the image signals from the DV OUT jack.
You can connect one VCR only using the i.LINK cable (DV connecting cable).
See page 125 for details about i.LINK.
During digital editing
You cannot use PICTURE EFFECT or DIGITAL EFFECT button functions.
If you record playback pause picture via the DV OUT jack
The recorded picture becomes rough. Also, when you play back the recorded pictures on other video equipment, the picture may jitter.
Ппмочанne OTHOCHTeMbHO JIeH, KOTOpbIe 6blIIN 3aIncahbl He B cIuФpoBOB CnCTeme Digital8 F)
Bo3MOxHNO pOpaRnBaHne N3o6paXeHn. 3To He ABJIETcH HeNCpabHOCTbIO.
Bo BpemBocPon3BeHnJLeHbI, 3aHcAHHoB CnCTeMe Hi8/ctaHdapTHoH cnCTeMe 8
LHPOBbIE CnIHaNbI BbIBOaTcB KaueCTBe CnIHaIOB N3o6paJxHHe Ype3 BbIXoHoe rHe3do DV OUT.
BbMOXKeIIOCoEINHTb OINH TOJbKO KBM c NOMOsbIO Ka6eIaLINK (coeINHnTeJIbHOro Ka6eIa DV)
IIOIO6HbIe CBeDeHnI OTHOCHTelbHO i.LINK npINBeDeHbI Ha cTp. 125.
Bo Bpemr znpboBO r MOHTaxa
BbHe MoKTe NcNoJIb3OBAt bФyHKUIN KHOIOK PICTURE EFFECT nIu DIGITAL EFFECT.
Ipi3aHnHa nay3e BocPOn3BODmOro 1306paXeHHape3 rHe3do DV OUT
3aIncaHnOe 3o6paXeHne 6yDet NcKaXeHHbIM. TaKxE, pRn BocPon3BeDeHn 3aIncaHHbIX 3o6paXeHn Ha dpyro annapaType, 3o6paXeHne MoKeT POnpaRnBaTb.
Changing the menu settings
To change the mode settings in the menu settings, select the menu items with the SEL/PUSH EXEC dial. The default settings can be partially changed. First, select the icon, then the menu item and then the mode.
(1) In CAMERA, PLAYER or MEMORY (DCRTRV320E only) mode, press MENU.
(2) Turn the SEL/PUSH EXEC dial to select the desired icon, then press the dial to set.
(3) Turn the SEL/PUSH EXEC dial to select the desired item, then press the dial to set.
(4) Turn the SEL/PUSH EXEC dial to select the desired mode, and press the dial to set.
(5) If you want to change other items, select RETURN and press the dial, then repeat steps from 2 to 4.
For details, see "Selecting the mode setting of each item" (p. 77).
ДлгиИзмeнeняУстановКржIMаВуctановКax MEHIO BbIbePte ПИнкТы MEHIO CПOMOцьЮДИСКА SEL/PUSH EXEC.УстановКп NOуМЛчанHO MOxHIOЧастчно ИзмeнHTB.Счада ВьБePte NIKTORpamMy,3aTEM ПИНКТMeHIO,a3aTeM peXIM.
(1)В рекимеCAMERA,PLAYERилIMEMORY(TолькоDCR-TRV320E)нajкмтКногку MENU.
(2)ПовернITE дик SEL/PUSH EXEC дя Вьбoga hyжно IMKTOrgpamMbI,а зatem НжмTe диck dЯ ВьлОпНЕИ YCTAHOBKN.
(3)ПовернмTe ДИСК SEL/PUSH EXEC ДЯ ВьборунжОНТОРМБЛь,аЗATEM НAZMTeДИСДЯ ВьДЮПОНHENΥCTAHOBKN.
(4)ПовернITE дбС SEL/PUSH EXEC ДЯ Bыбoga hyхно PMKTOrgPamMbI,а zatem НжмTe ДИСД ДЯ BILIONHENY YCTAHOBKN.
(5) Ecln Bbl XOTNTe N3MeHHTb DpyTne NyKtbl, Bbl6epITe KOMaNDy RETURN,a 3atEm HaxMNTe DNCK, NOcNe Yero NOBtOpNte DeIeCTBnRnyHKTOB 2-4.
Changing the menu settings
To make the menu display disappear Press MENU.
Menu items are displayed as the following icons:
M MANUAL SET
CAMERA SET
PLAYER SET
LCD/VF SET (DCR-TRV320E only)/ LCD SET (DCR-TRV120E/TRV125E)
MEMORY SET (DCR-TRV320E only)
TAPE SET
SETUP MENU
ETC OTHERS
U3MeHeHne yCTaHOBOK MeHIO
ДЯТОТO,ЧТОБИСЧЕЗЛА ИНДИКАЦЯ MEHIO HaxмпTe Kногу MENU.
IyHKtbl MeHIO OTO6paXaHTcB BVNe InpBBeDeHHbIX HNXe NIKTORpAMM:
M MANUAL SET
CAMERA SET
PLAYER SET
LCD/VF SET (Tolbko DCR-TRV320E)/ LCD SET (DCR-TRV120E/TRV125E)
MEMORY SET (ToIbko DCR-TRV320E)
TAPE SET
SETUP MENU
ETC OTHERS
English
Selecting the mode setting of each item is the default setting.
Menu items differ according to the position of the POWER switch.
The LCD screen and the viewfinder show only the items you can operate at the moment.
| Icon/item | Mode | Meaning | POWER switch |
| AUTO SHTR | ●ON | To automatically activate the electronic shutter when shooting in bright conditions | CAMERA |
| OFF | To not automatically activate the electronic shutter even when shooting in bright conditions | ||
| D ZOOM | ●OFF | To deactivate digital zoom. Up to 25× zoom is carried out. | CAMERA MEMORY |
| 50× | To activate digital zoom. More than 25× to 50× zoom is performed digitally. (p. 24) | ||
| 100×* | To activate digital zoom. More than 25× to 100× zoom is performed digitally. (p. 24) | ||
| 16:9WIDE | ●OFF | — | CAMERA |
| ON | To record a 16:9 wide picture (p. 45) | ||
| STADYSHOT | ●ON | To compensate for camera-shake | CAMERA MEMORY |
| OFF | To cancel the SteadyShot function. Natural pictures are produced when shooting a stationary object with a tripod. | ||
| N.S. LIGHT | ●ON | To use the NightShot Light function (p. 28) | CAMERA MEMORY |
| OFF | To cancel the NightShot Light function |
- 125× (DCR-TRV125E only)
Notes on the SteadyShot function
- The SteadyShot function will not correct excessive camera-shake.
- Attachment of a conversion lens (not supplied) may influence the SteadyShot function.
If you cancel the SteadyShot function
The SteadyShot off indicator "appears. Your camcorder prevents excessive compensation for camera-shake.
| Icon/item | Mode | Meaning | POWER switch |
| HiFi SOUND | ●STEREO | To play back a stereo tape or dual sound track tape with main and sub sound | PLAYER |
| 1 | To play back a stereo tape with the left sound or a dual sound track tape with main sound | ||
| 2 | To play back a stereo tape with the right sound or a dual sound track tape with sub sound | ||
| TBC* | ●ON | To correct jitter | PLAYER |
| OFF | To not correct jitter. Set TBC to OFF when playing back a tape on which you have dubbed over and recorded the signal of a TV game or similar machine. | ||
| TBC stands for “Time Base Corrector”. | |||
| DNR* | ●ON | To reduce picture noise | PLAYER |
| OFF | To reduce a conspicuous afterimage when the picture has a lot of movement | ||
| DNR stands for “Digital Noise Reduction”. | |||
| AUDIO MIX | ——— | To adjust the balance between the stereo 1 and stereo 2 | PLAYER |
| ST1 ▲ ST2 | |||
| NTSC PB | ●ON PAL TV | To playback a tape recorded on your camcorder on a PAL system TV | PLAYER |
| NTSC 4.43 | To playback a tape recorded in the NTSC colour system on a TV with the NTSC 4.43 mode | ||
| PB MODE | ●AUTO | To automatically select the system (Hi8/standard 8 or Digital8) that was used to record on the tape, and play back the tape | PLAYER |
| Hi8/8 | To play back a tape that was recorded in the Hi8/ standard 8 system when your camcorder does not automatically distinguish the recording system | ||
- When you play back tapes recorded in the Hi8/standard 8 system only.
Notes on AUDIO MIX
- When playing back a tape recorded in the 16-bit mode, you cannot adjust the balance.
- You can adjust the balance only for tapes recorded in the Digital8 system.
Note on NTSC PB
When you play back a tape on a Multi System TV, select the best mode while viewing the picture on the TV.
Note on PB MODE
The mode will return to the default setting when:
- you remove the battery pack or power source.
- you turn the POWER switch.
| Icon/item | Mode | Meaning | POWER switch |
| LCD B. L. | ●BRT NORMAL | To set the brightness on the LCD screen normal | PLAYER CAMERA MEMORY |
| BRIGHT | To brighten the LCD screen | ||
| LCD COLOUR | To adjust the colour on the LCD screen, turning the SEL/PUSH dial to adjust the following bar. | PLAYER CAMERA MEMORY | |
| To lighten | → To darken | ||
| VF B.L.* | ●BRT NORMAL | To set the brightness in the viewfinder normal | PLAYER CAMERA MEMORY |
| BRIGHT | To brighten the viewfinder | ||
| CONTINUOUS* | ●OFF | Not to record continuously | MEMORY |
| MULTI SCRN | To record 9 images continuously (p. 97) | ||
| QUALITY* | ●FINE | To record still images in the fine image quality mode, using the “Memory Stick” | PLAYER MEMORY |
| STANDARD | To record still images in the standard image quality mode, using the “Memory Stick” | ||
| FLD./FRAME* | ●FIELD | To record moving subjects | MEMORY |
| FRAME | To record stopping subjects in high quality | ||
| PRINT MARK* | ●OFF | To cancel print marks on still images. | PLAYER MEMORY |
| ON | To write a print mark on the recorded still images you want to print out later | ||
| PROTECT* | ●OFF | Not to protect still images | PLAYER MEMORY |
| ON | To protect selected still iimages against accidental erasure (p. 116) | ||
| SLIDE SHOW* | To play back images in a continuous loop (p. 114) | MEMORY | |
| DELETE ALL* | To delete all the images (p. 119) | PLAYER MEMORY | |
| FORMAT* | ●RETURN | To cancel formatting. | PLAYER MEMORY |
| FORMAT | To format an inserted “Memory Stick.” 1. Select FORMAT with the SEL/PUSH EXEC dial, then press the dial. 2. Turn the SEL/PUSH EXEC dial to select FORMAT, then press the dial. 3. After “EXECUTE” appears, press the SEL/PUSH EXEC dial. “FORMATTING” appears during formatting. “COMPLETE” appears when formatting is finished. | ||
| PHOTO SAVE* | To duplicate still images (p. 107) | PLAYER |
- DCR-TRV320E only
Notes on LCD B.L. and VF.B.L. - When you select BRIGHT, battery life is reduced by about 10 percent during recording.
- When you use power sources other than the battery pack, BRIGHT is automatically selected.
Notes on formatting
- Supplied or optional "Memory Stick"s have been formatted at factory. Formatting with this camcorder is not required.
- Do not turn the POWER switch or press any button while the display shows FORMATTING.
- You cannot format the "Memory Stick" if the write-protect tab on the "Memory Stick" is set to LOCK.
- Format again if the message "\(s" appears.
Formatting erases all information on the "Memory Stick"
Check the contents of the "Memory Stick" before formatting.
- Formatting erases sample images on the "Memory Stick".
- Formatting erases the protected image data on the "Memory Stick."
| Icon/item | Mode | Meaning | POWER switch |
| REC MODE | ●SP | To record in the SP (Standard Play) mode | PLAYER CAMERA |
| LP | To increase the recording time to 1.5 times the SP mode | ||
| AUDIO MODE | ●12BIT | To record or play back in the 12-bit mode (two stereo sounds) | PLAYER* CAMERA |
| 16BIT | To record or play back in the 16-bit mode (the one stereo sound with high quality) | ||
| ○ REMAIN | ●AUTO | To display the remaining tape bar: • for about 8 seconds after your camcorder is turned on and calculates the remaining amount of tape • for about 8 seconds after a cassette is inserted and your camcorder calculates the remaining amount of tape • for about 8 seconds after ▲ is pressed in PLAYER mode • for about 8 seconds after DISPLAY is pressed to display the screen indicators • for the period of tape rewinding, forwarding or picture search in the PLAYER mode | PLAYER CAMERA |
| ON | To always display the remaining tape bar | ||
| DATA CODE | ●DATE/CAM | To display date, time and recording data during playback | PLAYER |
| DATE | To display date and time during playback |
Note on REC MODE
When you record on the standard 8 tape, your camcorder records in the SP mode even you select the LP mode in the menu settings. In this case, the indicator "8 mm TAPE SP REC, Hi8 TAPE LP/SP REC" appears on the LCD screen or in the viewfinder. Use the Hi8 Hi8 tapes for the LP mode.
Notes on the LP mode
- When you record a tape in the LP mode on your camcorder, we recommend playing the tape on your camcorder. When you play back the tape on other camcorders or VCRs, noise may occur in images or sound.
- When you record in the SP and LP modes on one tape or you record some scenes in the LP mode, the playback image may be distorted or the time code may not be written properly between scenes.
Note on AUDIO MODE
When playing back a tape recorded in the 16-bit mode, you cannot adjust the balance in AUDIO MIX.
*To dub a tape to another VCR
You cannot select AUDIO MODE for tapes recorded in the Digital8 system. You, however, can select AUDIO MODE when you dub tapes recorded in the Hi8/standard 8 system to another VCR using the i.LINK cable.
Changing the menu settings
| Icon/item | Mode | Meaning | POWER switch |
| CLOCK SET | —— | To reset the date or time (p. 89) | CAMERA MEMORY |
| LTR SIZE | ● NORMAL | To display selected menu items in normal size | PLAYER |
| 2× | To display selected menu items at twice the normal size | CAMERA MEMORY | |
| DEMO MODE | ● ON | To make the demonstration appear | CAMERA |
| OFF | To cancel the demonstration mode |
Notes on DEMO MODE
- You cannot select DEMO MODE when a cassette is inserted in your camcorder.
- DEMO MODE is set to STBY (Standby) at the factory and the demonstration starts about 10 minutes after you have set the POWER switch to CAMERA without a cassette inserted.
To cancel the demonstration, insert a cassette, set the POWER switch to other than CAMERA, or set DEMO MODE to OFF.
- When NIGHTSHOT is set to ON, the "NIGHTSHOT" indicator appears on the LCD screen or in the viewfinder and you cannot select DEMO MODE in the menu settings.
Changing the menu settings
| Icon/item | Mode | Meaning | POWER switch |
| ETC WORLD TIME | ——— | To set the clock to the local time. Turn the SEL/PUSH EXEC dial to set a time difference. The clock changes by the time difference you set here. If you set the time difference to 0, the clock returns to the originally set time. | CAMERA MEMORY |
| BEEP | ●MELODY | To output the melody when you start/stop recording or when an unusual condition occurs on your camcorder | PLAYER CAMERA MEMORY |
| NORMAL | To output the beep instead of the melody | ||
| OFF | To cancel all sound including shutter sound | ||
| COMMANDER | ●ON | To activate the Remote Commander supplied with your camcorder | PLAYER CAMERA MEMORY |
| OFF | To deactivate the Remote Commander to avoid remote control misoperation caused by other VCR's remote control | ||
| DISPLAY | ●LCD | To show the display on the LCD screen and in the viewfinder | PLAYER CAMERA MEMORY |
| V-OUT/LCD | To show the display on the TV screen, LCD screen and in the viewfinder | ||
| REC LAMP | ●ON | To light up the camera recording lamp at the front of your camcorder | CAMERA MEMORY |
| OFF | To turn the camera recording lamp off so that the subject is not aware of the recording | ||
| INDICATOR | ●BL OFF | To turn off the backlight on display window | PLAYER CAMERA MEMORY |
| BL ON | To turn on the backlight |
Note
If you press DISPLAY with DISPLAY set to V-OUT/LCD in the menu settings, the picture from a TV or VCR will not appear on the LCD screen even when your camcorder is connected to outputs on the TV or VCR. (Except when your camcorder is connected with the i.LINK cable.)
In more than 5 minutes after removing the power source
The AUDIO MIX, COMMANDER and HiFi SOUND items are returned to their default settings.
The other menu items are held in memory even when the battery is removed, as long as the lithium battery is installed.
Notes on INDICATOR
- When you select BL ON, battery life is reduced by about 10 percent during recording.
- When you use power sources other than the battery pack, BL ON is automatically selected.
Pysckn
BbI6Op yCTaHOBOK peXIma no KaXdOMy nyHkTy
yctaHOBka nO yMOJIaHnIO.
IyHKtbMeHIO OTJInaOTcB 3aBnCIMOCTN OIOJIOKeHHaPeKJIIOUaTeJIa.
Ha 3KpaHe KKД n B vIOnckaTeNe OTo6paXaETcR ToIbKO Te NyHKtbl, KOTOpbIMN Bbl MoKeTe OepnPoBaTb B daHbI MOMeHT BpeMeHn.
| Пиктогамma/пунckt | Рек imm | Пробноючеснио | Пиерковател SWITCH |
| AUTO SHTR | ●ON | Для abtOMatUcheKOrO prinVeDEHnA B DeiYCTBVE ЗлЕКТРОнHOrO 3aTВора ррс CBemke BApKnx uCNoBnIX | CAMERA |
| OFF | ДляPrepeDITbPraSeHnA ABTOMATUcheKOrO prinVeDEHnA В DeiYCTBVE АLEKTPOHOrO 3aTВора дже ррс CBemke В ApKnx uCNoBnIX | ||
| D ZOOM | ●OFF | Для OTKILOUeHnA ZIΦPBOrO BapNOOБьEeKTHBa. ВыIpOLHЯeSа Hae3d BvIeOKaMepbdo 25x. | CAMERA MEMORY |
| 50x | Для prinVeDEHnE B DeiYCTBVE ZIΦPBOrO BapNOOБьEeKTHBa. Hae3d BvIeOKaMepbdo B predeJax ot 25x do 50x BvIeIONHЯeTcR ZIΦPobByIM MeToDom (ctrp. 24) | ||
| 100x* | Для prinVeDEHnE B DeiYCTBVE ZIΦPBOrO BapNOOБьEeKTHBa. Hae3d BvIeOKaMepbdo B predeJax ot 25x do 100x BvIeIONHЯeTcR ZIΦPobByIM MeToDom (ctrp. 24) | ||
| 16:9WIDE | ●OFF | - | CAMERA |
| ON | Для здиси ШирокоэКраHORO ИЗбрахени 16:9 (ctrp. 45) | ||
| STEADYSHOT | ●ON | Для Komпенсану подрагИВаня BvIeOKaMepbdo | CAMERA MEMORY |
| OFF | Для OTм�ны Функции усточиво CBemkn. Ррс СБемке CTaIIIOHAPHOrO obtekta cnomoць ТрEHORn ПolyuayOTcR OЧeH becTeCTBHeNbI eI3OBpaJeHn. | ||
| N.S. LIGHT | ●ON | Для IncPONьЗованя Функции поДCBETКДЯ HOHNo СБемк (ctrp. 28) | CAMERA MEMORY |
| OFF | Для OTм�ны Функции поДСВETКДЯ HOHNo CBemkn |
*B HěkOtɒpIx 6oNáctTæx 125× (Toŋbko DCR-TRV125E)
PpmeaHnno yHKun yCTOuHBoCbeMK
-Функцу yctOuHBOB CbEMKn He B COCTOAHN KOMpeHCnpoBt bpe3MepHyTO pRACKy BnIeOKaMEpbI.
- IcnoJIb3OBAHne npeo6pa3OBAteIbHOro o6BeKTHBa (He npUlaeTcra) MOxET NOBnIaRbHa cyHKcHIO yCTOnuHBOI cbEMKn.
B cIyuae OTMeHbI cyHKcun yCTnHBo CBemKu
IIOBNTCA INDKNTOB BYIKHOUeHHOJ FyHKUIN yCTOuHBOB cBeMKN Baa BAJeOKaMepa npEdupeKdaET Ype3MePHyU KOMNeHcauHIO TpAChk.
| Пиктогамma/пун=kT | Рек imm | Преданачениe | П配电лковател SWITCH |
| HiFi SOUND | STEREO | Для BOCPON3BVEDEHINС TEPEOΦOHNCHECKЛЕNTБИЛМ Яve ЛЕТБI C DOPOJCKOДВУЗHONGO 3BYUHANIAprin ВОСРОП3BEDEHIN OCHOBHONGO I BCNOMORATELHONGO 3BYKA | |
| 1 | Для BOCPON3BVEDEHINCTEPEOΦOHNCHECKЛЕNTБI CO 3BYKOM OT ЛЕВО ГАКАЛ ИПЕЛНТС DOPOJCKO ДВУЗHONGO BESHAHINCS OCHOBHIM3BYKOM. | ||
| 2 | Для BOCPON3BVEDEHINCTEPEOΦOHNCHECKЛЕNTБI CO 3BYKOM OT ЛЕВО КАнALA ИПЕЛНТС DOPOJCKO DVBY3BNUHONGO BESHAHINCS BCSNOMORATELHBM 3BYKOM. | ||
| TBC* | ON | Для корpeKTIPOBKINДROЖAHIN | PLAYER |
| OFF | Для OTMENы KORPEKTIPOBKINДROЖAHIN.YSTAHOBITE KOMAnDy TBC B NOLOXEHNE OFF priN ВОСРОП3BEDEHINЛЕNTБI, на КOTOPУ, на КOTOPУ Вы ВИПОнIHIN NOBTOPHYU 3APINCSII INI 3APINCSALIN СИГНАЛ TELEVUN3HONHNO INRPSI INI NOIO6HOM MaSHINbI. | ||
| TBC OЗначаET "Вremеньй базовий корpeKTOP". | |||
| DNR* | ON | Для умehшения ИСКAZECHIN | PLAYER |
| OFF | Для умehшения замetedно NOBTOHRO ИЗБРASКЕН, сдпспспспспспспспспспспспспспспспспспспспспспспспспспспспспспспспспспспспспспспспспспспспспспспспспспспС Каналom 1 IN STPEOΦOHNCHECKIM KANALOM 2 | ||
| DNR OЗначаET "LIDФРОВЕ SHUMONODABLENHINE". | |||
| AUDIO MIX | —— | Для рergулировки саданca мexду STPEOΦOHNCHECKIM Каналom 1 IN STPEOΦOHNCHECKIM KANALOM 2 ST1 ST2 | |
| NTSC PB | ON PAL TV | Для BOCPON3BVEDEHINЛЕNTБI, здпсанно на Ваше видаOKAMepe, на ТELEVIN3OPE сисtemы PAL | PLAYER |
| NTSC 4.43 | Для BOCPON3BVEDEHINЛЕNTБI, здпсанно в СИСТЕ MцETHORO TELEVINDEHIN NTSC, на ТELEVIN3OPE c сисtemо NTSC 4.43 | ||
| PB MODE | AUTO | Для АВТOMATЧЕСКОВ ВИБОРСССТЕМы (Hi8/ СТANДAPТНО 8 ИПОДФРОВ Digital8), кOTOPА ИСПОЛЗВОВАСьД ДдзЗАПСИ на ЛЕТУ, и Дд ВОСРОП3BEDEHINЛЕNTБI | PLAYER |
| Hi8/8 | Для BOCPON3BVEDEHINЛЕNTБI, здпсанно в СИСТЕМ Hi8/СТANДAPТНО сисtemе 8, сдпь ВИDAОКAMePA АВТOMATЧЕСКИ Н расима STCITEMу ЗАПСИ | ||
*ToIbko npn BOCPon3BeHnn JeHT, 3aNcaHHbIX BCNTeMe Hi8/CTaHapTHOIN CNTeMe 8.
PpimueaHn no yHKun Audio MIX
PnI BOCnpOu3BedeHn IeHtI, 3aIncaHHHO B 16-6ntOBom pexHMe, BJI He moKeTe perynipoBaTb 6aJIaHC.
- BbI He MoXeTe peYunpoBaTb 6aJIaHc TOnbKO dJIaJIeHT, 3aIIncaHbIX B cIuΦpOBoC uCTeMe Digital8
PpimueaHne no Bocnpo3BeDeHHIO NTSC PB
ПиВОБСПОНЗВЕДЕНИЛЕNTыHAМУЛБТUNCISТЕМОнТЕLEВИЗОпЕВыБЕРИТЕHaHINPyUHINpeXIMBOВВрмЯ npOCMOТраИЗOBРAK经ENHЯЗКРАнТЕLEВИЗОра.
PpmeaHne no pexmy Bocpnon3BeDenPB MODE
PeximBepHeTcK yctaHOBKeNoymoluaHnIO npi:
-OTCOeINHeHn6bTaepenHoro 6noka nnN nCTOuHnKa nTaNHa.
- noBopoTe nepeKJIouaTeJr POWER.
Resetting the date and time
IpeyeCTaHOBKa DaTbI N BpemeHn
The default clock setting is set to London time for United Kingdom and to Paris time for the other European countries Time.
The date and time are held in memory by the lithium battery. If you replace the lithium battery with the battery pack or other power source connected, you need not reset the date and time. You must reset the date and time when the lithium battery becomes dead with no power source installed.
First, set the year, then the month, the day, the hour and then the minute.
(1) While the camcorder is in the standby mode, press MENU to display the menu settings.
(2) Turn the SEL/PUSH EXEC dial to select, then press the dial.
(3)Turn the SEL/PUSH EXEC dial to select CLOCK SET, then press the dial.
(4) Turn the SEL/PUSH EXEC dial to adjust the desired year, then press the dial.
(5) Set the month, day and hour by turning the SEL/PUSH EXEC dial and pressing the dial.
(6) Set the minute by turning the SEL/PUSH EXEC dial and pressing the dial by the time signal. The clock starts to move.
(7) Press MENU to make the menu settings disappear.
UcTaHOBKa YacOB N OymOJHaHIO COOTBeTCTByET BpeMeHN IOnDoHa IJa MoDeIeN CoeIINHeHHOro KOpOEbCTBa N BpeMeHN IApHX JaI dpyrHex EbponecknX MoDeIeN. DaTa N BpeMcoxpanaHTC T B nAmATn C nOMoCbIO NITneBO6 BaTapeKKn. EcIn Bbl OT NITneBO6 BaTapeKn nepeKlnOuHTecb Ha 6BaTapeHbI 6bok nII IN dpyroN oDcOeINHeHHbI nCTOuHKn NITAHN, Bam Huxho 6ydet NepeyeCTaHOBt bDatY n BpeM. Bam huxho TAKKe nepeyeCTaHOBt bDatY n BpeM, KOrda IITneBA6 BaTapeKpa p3pAnTcN b 3TO BPEM He 6ydet BCTaBNeH NCTOuyHK NITAHN. ChauJIya yCTaHOBt reod, 3aTeM MeCAu, DeHb, Yac n MInHYt.
(1)В ржиме ождади BAdeokamepi
нхмпг Кнорк MENU дя OTOбрахену
yCTaHOBOK MEHIO.
(2)ПовернITE ДИСК SEL/PUSH EXEC ДЯ Вьбopa ИДИКАЦИ , a 3aTeM НЖМТЕ ДИСК.
(3)ПовернITE ДИСК SEL/PUSH EXEC ДЯ
БИбopa KOMАнДы CLOCK SET, a 3aTeM
HAXKMITE ДИСК.
(4)ПовернITE ДИСК SEL/PUSH EXEC ДИВыбopa НУХHorO roda,а 3aTeM HЯЖМITE ДИСК.
(5) VCTAHOBNITTE MECRU, DEHb yac nyTEM BpaueHnIa NcKa SEL/PUSH EXEC n HAXMHNIA DNCKa.
(6)VcTaHOBnTe MmHyTuNyTEM BpaueHnI DaNCKa SEL/PUSH EXEC n HaxkImaHn I DaNCKa B MOMeHT nepeDaHu CnHra ToHOrO BpEmEH. YacbHaCyHT yHKsIOHnPoBaTb.
(7)HaxMMTe KhONKy MENU ДяTORO,ЧтобИСчeЗЛУ cTаHOBКМ MeHIO.
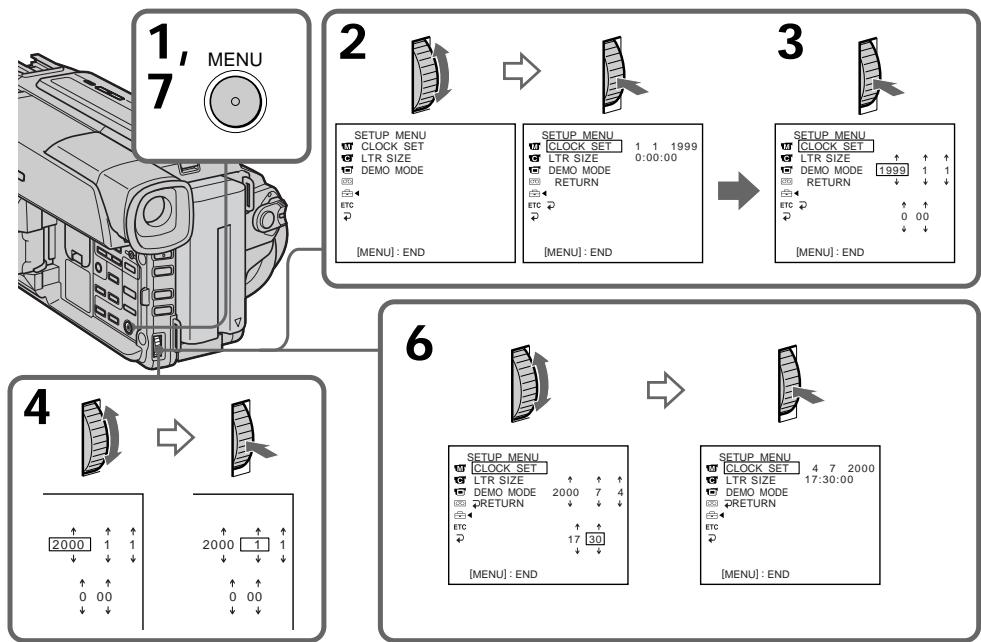
The year changes as follows:
Tod n3mehreTc cneDyUoHm o6pa30m:

If you do not set the date and time (^{- - - - - - - - - - } ") (- - : - : - - " is recorded on the tape and the "Memory Stick" (DCR-TRV320E only).
Note on the time indicator The internal clock of your camcorder operates on a 24-hour cycle.
EcIn Bbl He yctahOBnI DaTy u BpeM Ha IeHTy n "Memory Stick" ByedT 3aIIncbIbTaBcA INdIkaZnra -- ---" (ToJIbKO DCR-TRV320E).
PpimmeaHne no HndnKaTOpy BpeMeHN BcTpoehHbIe Yacbl BaSeB vBJeokamepbl pa6oTaIO T 24-YacOBom pexIme.
- "Memory Stick" operations - Using "Memory Stick"-introduction
- DCR-TRV320E only
You can record and play back still images on the "Memory Stick" supplied with your camcorder. You can easily play back, record or delete still images. You can exchange image data with other equipment such as a personal computer etc., using the serial port adaptor for "Memory Stick" (not supplied) or PC card adaptor for "Memory Stick" (not supplied).
On file format (JPEG)
Your camcorder compresses image data in JPEG format (extension.jpg).
Typical image data file name
100-0001: This file name appears on the LCD screen or in the viewfinder of your camcorder.
Dsc00001.jpg: This file name appears on the display of your personal computer.
Before using "Memory Stick"
-Операцис "Memory Stick" -
Исpenьзоване“Memory Stick”-ВveDEXHne
-ToJbKO DCR-TRV320E
Bbl MoxKeTe 3aIncbBaTb N BOCnPoI3BOIDntb HneOpDVBXHbIe I3O6paXeHnHa "Memory Stick", npInlaeraMoi K BaWei BnDeoKampe. Bbl MoxTe Ierko BblONHrTa BocPOnI3BeDeHne, nepe3aIinCb INm UdaJIeHne HeNoDVBXHbIX I3O6paXeHn. Bbl MoxTe BblONHrTa O6MeH daHHbIX I3O6paXeHn C dpyro annapaTypoi, TAKO KAK nepcoHaNbHbIKOMNbOTep IN T.I., nCnoIb3y aAnTep nopCneIOBaTeJbHorO npOta Ira "Memory Stick" (He npInlaraeTc), INn aadantTp PC-KapTbI dJa "Memory Stick" (He npInlaraeTc).
OΦopMaTe ΦaJNoB (JPEG)
BaSHA BnDEOKaMepa CxNMaet DaHbIe
m3o6paXeHnB fOpMaT JPEG (c pacShupeHnem
.jpg).
TINNUHoe mma faJna daHHbIX n3O6paXeHnA
Ipeed nCnoJb3ObaHneM“Memory Stick"
- You cannot record or erase still images when the write-protect tab on the "Memory Stick" is set to LOCK.
- We recommend backing up important data.
-
Image data may be damaged in the following cases:
-
If you remove the "Memory Stick", turn the power off, or detach the battery for replacement when the access lamp is flashing.
- If you use "Memory Stick"s under circumstances affected by static electricity or magnetic field.
- Prevent metallic objects or your finger from coming into contact with the metal parts of the connecting section.
- Stick its label on the labeling position.
- Do not bend, drop or apply strong shock to "Memory Stick"s.
- Do not disassemble or modify "Memory Stick"s.
BbI He MoXeTe 3aIINcIbIaTb IINI CTnpaTb HENoDbNIXHbIe N3O6paxKeHH, ECNI JIeNEcTOK 3aunIbI 3aIINcHa "Memory Stick" yCTaHOBJIeN B nonoJxHeNE LOCK.
- PekomeHnyetcBbIOnHrTb KOnIO BaxHbIX DaHHbIX.
-Данные ИЗбразжени могут сытповржденыВ следуоших счuyaх:
- EcInn BblbHynn "Memory Stick", BblKlnOchnn nIITaHne IINOTCOeHNHJN bTaapeHbN 6nOK dIЯЗмHeBTOBpeM, KOrJa Mrraet JAmnochka DoCTyna.
-пгообстгдх, кога BO3MOxH0 BO3dIeTbNE 3JIeKTOCTaUHeCKO rIM MArHtHOrO NOJ.
He npkaacaiTecb MeaJIiueckIMu YactrMn IIN BaIIMN nIaNbCaMn K MeTAJIiueckIM uCTaM coeJHInTeBbHx CekUIN.
- Hakne Te 3nKeTky B nO3nIM mApKnpoBkn.
- He cnBaeIte, he poHJIeTne CnJIbHO He TpAciTe "Memory Stick".
- He pa3bpaaiTe n He moiPhiuPyuTe "Memory Stick".
- Do not let "Memory Stick"s get wet.
-
Do not use or keep "Memory Stick"s in locations that are:
-
Extremely hot such as in a car parked in the sun or under the scorching sun
-Under direct sunlight - Very humid or subject to corrosive gases
- When you carry or store a "Memory Stick", put it in its case.
Formatting the supplied "Memory Stick"
Formatting with this camcorder is not required. The "Memory Stick" has been formatted in the FAT-format at factory.
"Memory Stick" supplied with your camcorder
- Sample images are recorded in the "Memory Stick" (p. 104). Note that these images will be deleted if you format the "Memory Stick."
- Stick the supplied label on the labeling position to prevent the accidental erasure. As for the labeling position, see the illustration on the previous page.
"Memory Stick"s formatted by a computer
"Memory Stick"s formatted by Windows OS or Macintosh computers do not have a guaranteed compatibility with this camcorder.
Notes on image data compatibility
- Image data files recorded on "Memory Stick"s by your camcorder conform with the Design Rules for Camera File Systems universal standard established by the JEIDA (Japan Electronic Industry Development Association). You cannot play back on your camcorder still images recorded on other equipment (DCRTRV890E/TRV900/TRV900E or DSC-D700/D770) that does not conform with this universal standard. (These models are not sold in some areas.)
- If you cannot use the "Memory Stick" that has been used on other equipment, format the "Memory Stick" on your camcorder following the steps on page 79. Note that all images on the "Memory Stick" will be deleted if you format it.
"Memory Stick" and are trademarks of Sony Corporation.
He donnyckaTe, Yo6bI "Memory Stick" CTAHOBNINCb BIAJXHbIMN.
- He IncnoIb3yIte n He xpaHnTe "Memory Stick" B MeCTax:
-PrpE3MepHO JxapKHX, HnPIMeR, B npnIapKOBaHOM IOJ COJIHcEM aBTOMO6JIe INI NOJ PAnJIaSHUM COJIHcEM.
-ПОД пэрмьIM COЛн electHybIM CBETOM
-B MeCTax OueHb BnaxKbIX NJIc COeprXaUx Koppo3IOHHbe ra3bl
- Пи пенистенияхранен "Memory Stick"положи te eeвфутлг.
Форматураиме пиларамо "Memory Stick"
Форматюрази He Na daHNo Bndeokamepe He Tpe6yeTc. "Memory Stick" yxe OTOfopMaTioPobaHa b fOpMaTe FAT ha npeiINpIaTmN-N3rOToBtene.
"Memory Stick",Прилaraемак Ваши Видаокаме Видаокаме Буши Видаокаме Видаокаме Видаокаме Видаокаме Видаокаме Видаокаме Видаокаме Видаокаме Видаокаме Видаокаме Видаокаме Видаокаме Видаокаме Видаокаме Видаокаме Budanach
Ha "Memory Stick" 3aɪncahbl oɒpɑzbl n3o6pɑæŋn (CTp.104).ɪmɛŋte B vɪdʒ, yʊ TTo 3tɪ n3o6pɑæŋn 6bʌyT yɪdaɪeHb, eɪcɪn B bɪ otfɔpəmʌtnpyeTe "Memory Stick".
HakneIe npnlaeraMyo 3TuKeTky B no3uinm MapKnipOBKn IJIN PnpOToBpAueHn CnyaHIOrO CTnpaHn. YTO Kacaetcno3uinm MapKnipOBKn, CM. pncyHOK NaPebdyUyuEi CTPaHnIe.
"Memory Stick", OTΦopMaTnpoBaHHaHa Na KOMNbITope
"Memory Stick", otфор matураьаня в Onepaционнoi сстeme Windows Или Macintosh, Moxet OKa3aTbCЯ COBmecTmOmС Даннов ВиDEOKamepoI.
Приимechаши NO COBmecTUMOCTI dAnhblixN3o6paKeHnI
AaIbI daHbIX n3O6paXeHnI, 3aNcAHHbIe Ha "Memory Stick" c nOmoUbIO dAnHOB BInDeOKaMepbl, OTBeaHT pIOEKTbIM Tpe6BaHmI dnn yHNBOTcABHbO cTaNdapTa paJIOBbIX CnCTEM BInDeOKaMepbl, a3p4o6ToaHnOrO JEIDA (rnoHckoi accOuaIaMeI 3JIeKTPoHNO IpnOMbIuJeHHocTN). BHe I moKeTe BOCPON3BOMDt b H BaWei BInDeOKaMephe HenoDIBHXbIE n3O6paXeHnI, 3aNcAHHbIe Ha npyro annapaType (DCRTVRV890E/TRV900/TRV900E nn DCS-D700/ D770), KOtopBle He COOTBeTcBYOT 3tOMy yHNBecAPbHOMO cTaNdApTy. (3Tm MoDenI He npOdaTOC B HEKOToBPbX perNoHax).
- Ecnn BbI He MoXeTe IcNoJIb3OBAtB "Memory Stick", KOTopA JcNOpJIb3OBAIaIb Ha dpyroI annpaIype, OToOpMaTnpUyTe "Memory Stick" Na BaIeB WIIeOkaMepe, CneIyur NHCtpyKuIN na Ctp. 85. IMeIte B VbIy, YTO BCE n3o6paxEHHa "Memory Stick" 6ydy ydaIeHbI, ecnn BbI oTcOpMaTnpyeTe ee.
"Memory Stick"и Мemory STck RAJIHOTcIФИМENHbIMN 3hakamS Sony Corporation.
Inserting "Memory Stick"
(1) Open the lid of the cassette compartment.
(2) Insert the "Memory Stick" with the mark facing toward the "Memory Stick" compartment as illustrated until it clicks.
(3) Close the lid of the cassette compartment.
YcTaHOBka "Memory Stick"
(1) OtkpoiTe KpbiUkky KaccetHoro oTceKa.
(2)BCTaBbTe "Memory Stick", TAK YTo6b3HaK ▲ 6bl Obpauen B CTOpOny OTCeKa dIra "Memory Stick", KAK Noka3aHo Ha pucynke, noka He pa3dactcTseJyOK.
(3)3aKpOte KpbIuKy KaccTeHOro OTCeKa.
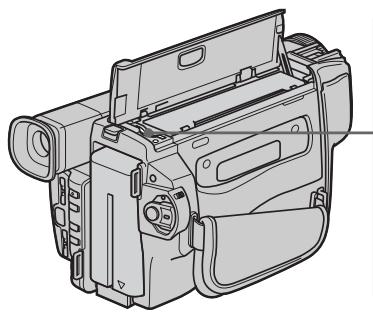
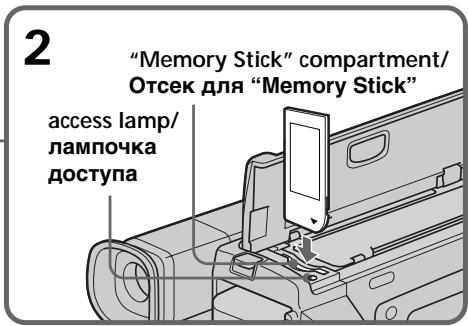
To eject the "Memory Stick"
Open the lid of the cassette compartment, then press the "Memory Stick" once lightly. The "Memory Stick" pops up.
When the access lamp is lit or flashing
Do not shake or strike your camcorder. Do not turn the power off, eject the "Memory Stick" or remove the battery pack. Otherwise, the image data breakdown may occur.
ДлгиИЗВLEЧЕНИА“Memory Stick"
OtkpoIte KpbIshky KaccTeHoro OtceKa, 3aTeM cnIeKa haxmTe "Memory Stick" oIN pa3. "Memory Stick" BbIeT n3 OTceKa.
Ecnn lamnoouka doctyna roput nnn mnaet
Hnkorga He Tpncnte H He Ctyuhte No Bauei BnDeokampe. He BbIKUoayte NtAHne, He n3BLekaite "Memory Stick" n3 OTceKa n He cHmawte 6aTapeHbI 6JOK. B npOTNBOM cLyuae daHHbIe N3O6paXeHnM OryT 6bITb NOBpeKdHebl.
Selecting image quality mode
You can select image quality mode in still image recording. Default setting is FINE.
(1) Set the POWER switch to PLAYER or MEMORY. Make sure that the LOCK is set to the right (unlock) position.
(2) Press MENU to make the menu display appear.
(3) Turn the SEL/PUSH EXEC dial to select then press the dial.
(4) Turn the SEL/PUSH EXEC dial to select QUALITY, then press the dial.
(5) Turn the SEL/PUSH EXEC dial to select the desired image quality, then press the dial.
(6) Press MENU to erase the menu display.
Bb6oppeKImaKaueCTBa n3o6paXeHn
BbMOxKeTe BbI6paTbpeKIMKaueCTBa
n3O6paXeHnI pN 3aINcHHeNoDbHXHO
n3O6paXeHnY. YcTaHOBKOI NO yMOJuaHIO
ABJIaReTcFINE.BbINOJIrTb 3aINcBpeKIMe
FINE.
(1)YcTaHOBnTe NepeKJIouaTeIb POWER B nOLOKeHne PLAYER uIN MEMORY. Y6eUInTeCb, yTo cNkCaTOp LOCK yCTaHOBJIeH B npAbOM (He3aФнКсИрВaHHOM) nOLOKeHIn.
(2)HaxMMTe KhoNkY MENU, YTO6bI Ha DnCJIeE NOBUNaCb INDnKaUNA MEHIO.
(3)ПовернITE дисK SEL/PUSH EXEC Ддя Вьбopa установки , a 3aTeM нажмITE дисK.
(4)ПовернITE ДИСК SEL/PUSH EXEC ДИВБОРа установки QUALITY, a 3aTeM HAZKMITE ДИСК.
(5)ПовернITE диck SEL/PUSH EXEC дяВыбoga похдацero КаесстаИзображени, a 3aTeM нажмITE диck.
(6)HaxmTe KhONkY MENU ДЯ CTIPAHIN
ИндIKEДи MHeI.O.
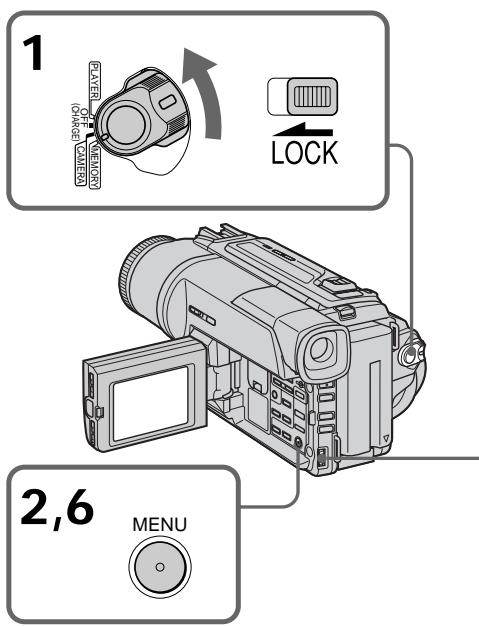
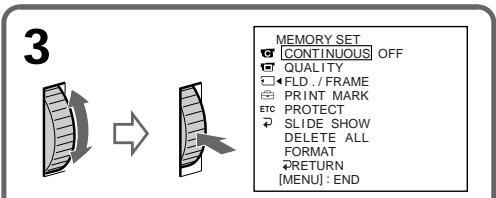

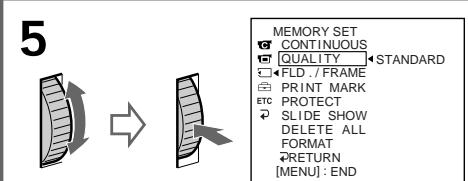
Note
In some cases, changing the image quality mode may not affect the image quality, depending on the types of images you are shooting.
Ppmeuahne
B HeKoTOpbIX cnyaJx, n3MeHHe npeXIma KaueCTBa n3O6paXeHHa MoKeT Otpa3NtbcHa KaueCTBe n3O6paXeHHi, B 3aBnCmOcTN OT TINOB n3O6paXeHHi, KOTOpbIe Bbl ChImaete.
Image quality settings
| Setting | Meaning |
| FINE (FINE) | Use this mode when you want to record high quality images. The image is compressed to about 1/6. |
| STANDARD (STD) | This is the standard image quality. The image is compressed to about 1/10. |
Differences in image quality mode
Recorded images are compressed in JPEG format before being stored into memory. The memory capacity allotted to each image varies depending on the selected image quality mode. Details are shown in the table below. (The number of pixels is 640 × 480 , regardless of image quality mode. The data size before compression is about 600 KB.)
| Image quality mode | Memory capacity |
| FINE | About 100 KB |
| STANDARD | About 60 KB |
Approximate number of images you can record on a "Memory Stick"
The approximate number of images you can record on a "Memory Stick" formatted using this camcorder varies depending on which image quality mode you select and the complexity of the subject.
Maximum number of images you can record on a "Memory Stick"
| Setting | 4MB | 8MB | 16MB | 32MB | 64MB |
| FINE | 40 | 81 | 164 | 329 | 659 |
| STANDARD | 60 | 122 | 246 | 494 | 988 |
Note on the image quality mode indicator This is only displayed during recording.
YctahOBKn KaueCTBa n3o6paXeHnA
Recording still images on "Memory Stick" - Memory Photo recording
- DCR-TRV320E only
You can select the FIELD or FRAME mode in still image recording. Your camcorder compensates for camera-shake when recording moving subjects in the FIELD mode. Your camcorder records still images in high quality in the FRAME mode. Select the FIELD or FRAME in the menu settings (p. 76).
Before operation
Insert a "Memory Stick" into your camcorder.
(1) Set the POWER switch to MEMORY. Make sure that the LOCK is set to the right (unlock) position.
(2) Keep pressing PHOTO lightly. The green mark stops flashing, then lights up. The brightness of the image and focus are adjusted being targeted for the middle of the image and are fixed. Recording does not start yet.
(3) Press PHOTO deeper. The image displayed on the screen will be recorded on the "Memory Stick". Recording is complete when the bar scroll indicator disappears.
3aɪncb HeɪnoɪdBʌŋkHbɪxɪn3ɔɒpʌkeHmɪ Ha “Memory Stick” - ΦOToCsbEmKa c COxpaHeHmE M B nʌmʌrɪ
-ToIbKO DCR-TRV320E
BbMoKeTe Bb6paTb peXIM FIELD nIframe np3aIncn HeNoDBrXhblx N3OpaXeHn. BaaBaNBeOkamape KomneHCnpyet NOpaIrBaHn np3aIncn DnBxuXncsObBeKToB BpeXime FILD. BaSa BnDeOkamape 3aIncsBaet HeNoDBrXhble N3OpaXeHn C BbICOKIM KaueCTBOM BpeXime FRAME.Bb6epnte OunIO Field nI frame B yctaHOBkax MeHIO (cTp.76).
Ipeed hauanom pa6oTbi
BCTaBbTe "Memory Stick" B BaUy BnIeokamepy.
(1)YcTaHOBIne IpeKJIIOUaTeIb POWER B noIOXeHne MEMORY. Y6eIInTEcb, yTO 0nkCaTOp LOCK ycTaHOBJIeN B npaBoe (He3aOKnCINPOBaHoe) noIOXeHne.
(2)Держп Te KhoIGNky PHOTO сlerka haxaToI. 3eHЯ MeTka PpeKpaTIT MmraTb I 6yDeT HnpepeBbHO BbICBeHbATbC8. RpkocTb N3o6paxehNиФokychoe paCCToHne perYlmpuyOTc npi HnpaBLeHHOCTN BnDEOKaMepbl Ha cepeDInHy N3o6paxehNи 3aФИKcnpOBaHb Ipn 3Tom. 3aINCb eHe He NaHcTeC8.
(3)HaxMMTe KhoNky PHOTO cnIbHee. H36pbaxeHne, OTO6paXaemoe Ha 3KpaHe, 6yDet 3aIncAHO Ha "Memory Stick". 3aIncB cHTaTcra 3aBepWeHHoJ, ecnn uChE3Net nepMeUauuNCnC NOLOCaTb IHNIMKaTOP.
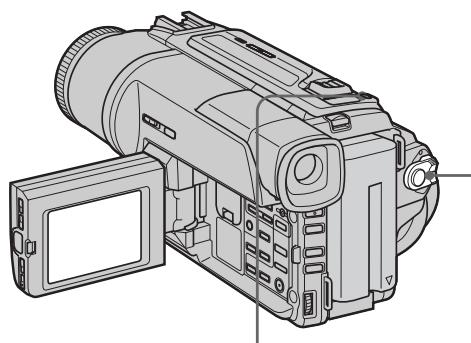
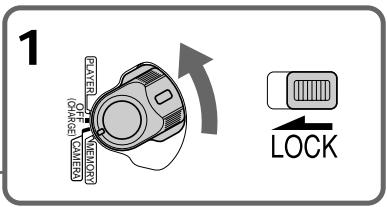

2
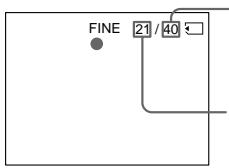
Number of images can be recorded on the "Memory Stick"/ KolnueCTBO n3o6paXeHn, KOtOpbIe MoxHO 3aNcA Tb Ha "Memory Stick"
Number of recorded images/
KoImyeCTBO 3aIncaHHbIX n3O6paXeHn

3

Notes
- When recording fast-moving subjects in the FRAME mode, the recorded image blurry.
- When recording in the FRAME mode, your camcorder may not correct camera-shake. We recommend that you shoot objects with a tripod.
- When recording still images at step 2 with the PHOTO button pressed lightly, the image momentarily flickers. This is not a malfunction.
- Before you shoot in autofocus mode, check that the subject is in sharp focus.
- The brightness of the picture and focus are adjusted on the center portion of the image.
When the POWER switch is set to MEMORY The following functions do not work: wide mode, digital effect, picture effect, title, low lux mode of PROGRAM AE.
When you are recording a still image You can neither turn off the power nor press PHOTO.
When you press the PHOTO button on the Remote Commander
Your camcorder immediately records the image that is on the screen when you press the button.
Recording images continuously
You can record still images continuously.
Multi screen mode
You can record 9 still images continuously on a single page.
PpimueaHn
-ПиузпсьбICTPO DBNIXUHXC86bEKTOBВ peKIMME FRAME,ИЗБРаЖЕне 6уДТ pa3MbITbIM.
ПиЗЗпИСВ ржIMe FRAME ФункцИКOMпЕнcaцип NDрарNBaHЯ Baшей BnDEOKaМерь мОжт paбOTаь HENpaBильно.РЕмсEHДуETcR BblINJIrT bCБeMky OББeKTOB C NOMOцьTO TPEHOrI.
-ПиЗЗпсИнHeNoДВиЖьIxИЗБрахжEHIN B
ПУнКTe 2С NOMOшьЮ CJERka HaxaToH KHNKn
PHOTO,ИЗБрахжЕНЕ мОжETΚAKOE-TO
МгROBERе МерцTa.ЗTO HeЯВлЯТСА
HENCPAPBHOCTbIо.
-ПелегсьемковВ ржима abTomatueckофokycinpobkn npOBepbTe,чTOбI obBeKT 6blYeTK cfoKycinpobAH.
-RpKoCTb obBekTa nФokychoe paccToHnne 6byT OTpeRyInpOBAhbl NO ueHTpy n3o6paJxehnI.
EcJn nepeKJIIOUaTeIb POWER ycTaHOBNeH B noJIOXeHne MEMORY
CneIyUoIme cyHKnIe He pa6OtaOT: IuPOKO3KpAHNbTeJIeBImIOHbpeXIM, ZnΦpOB0 3ΦΦeKt, 3ΦΦeKT N3O6paJxEHn, TNTp, peXIM H3K0k OcBeIeHNoCTn PROGRAM AE.
EcIn Bbl 3aIncbIbAeTe HeNoDbNkHoe n3o6paKeHne
BbI He MOKeTe HN BbIKNoHTb NITaHHe, HN HaxaTb KOnKy PHOTO.
EcnBbnaXMeTePHOTOHa npIbTe nCTaHnOHHoro ynpaBHeHn
Baua Bndeokamepa TOTcac Xe 3anuweT n06paKeHne, KOTOpoe 6ydt Ha 3kpaHe npn Haxkatn KNOHKn.
3ainnb n3o6paXeHn HnpepbIBHO
BbMOxKeTe 3aINCbIbTa bN3O6paXeHn HENpepbIBHO.
MHoro3KpaHbI pexHM
BbMOKeTe 3aINCbIBaTb 9 HeNoOBnKhbIX n06paXeHn HnpepbIBHO Ha OdHo CTpaHnCe.
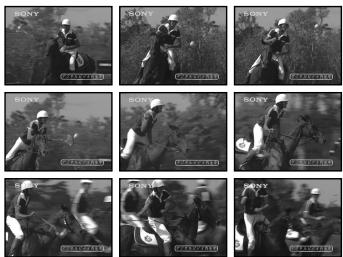
Recording still images on "Memory Stick" - Memory photo recording
(1) Set the POWER switch to MEMORY. Make sure that the LOCK is set to the right (unlock) position.
(2) Press MENU to make the menu display appear.
(3) Turn the SEL/PUSH EXEC dial to select , then press the dial.
(4) Turn the SEL/PUSH EXEC dial to select CONTINUOUS, then press the dial.
(5) Turn the SEL/PUSH EXEC dial to select the desired setting, then press the dial.
(6) Press MENU to erase the menu display.
3aIncb HeNoDvBxHbIX N3o6paJxHeNHa "Memory Stick" - FOToCbemKa cCOxpaHeHEm B PnAMrTn
(1)YctaHOBnte nepeKJIIOUaTeIb POWER B noJIOXeHne MEMORY. Y6eIInTeCb, yTO fNkcaTop LOCK ycTaHOBJIeH B npaBoe (He3aФнксИрOBaHhoe) noJIOXeHne.
(2)HaxMMTe KhoNkY MENU, YTO6bHa Ha IINcJIeep NOBUNaCb INDnKaUNA MEHIO.
(3)ПовернITE дис SEL/PUSH EXEC Ддя Вьбoga установки , a 3aTeM нажмITE дис.
(4)Повернite ДИСК SEL/PUSH EXEC ДИВьбopa установки CONTINUOUS, a 3aTeMHAKMITE DИСК.
(5)ПовернITE диСK SEL/PUSH EXEC ДпЯ Вьбopa кению установки,а затем НжмITE диСК.
(6)Haxmte KhoNky MENU Длг STupaHnru Hndnkaun MeHIO.
If the capacity of the "Memory Stick" becomes full
"FULL" appears on the LCD screen or in the viewfinder, and you cannot record still images on the "Memory Stick."
Eczn emkoctb "Memory Stick" nepenonHeHa
Ha 3KpaHe KKД nII B VnDOnCKaTeNe NOBHTcHnHnkaZn "FULL", N BbI He CMOKeTe3aNNCbIbTaH HeNoDbNkHbIe N3O6paXeHn Ha"Memory Stick".
Recording still images on "Memory Stick" - Memory photo recording
Continuous shooting settings
| Setting | Meaning (indicator on the screen) |
| OFF | Your camcorder shoots one image at a time. (no indicator) |
| MULTI SCRN | Your camcorder shoots 9 still images at about 0.3 sec intervals and displays the images on a single page divided into 9 boxes. ( ) |
Note on using the video flash light (not supplied)
The video flash light does not work in the multi screen mode if you install it to the accessory shoe.
3aIncb HeNoDvBxHbIX N3o6paJKeHn Ha "Memory Stick" - FOToCsbemKa c coXpaHeHmEB namATn
UcTaHOBKn HnpepbIBHOcBemKn
Self-timer memory photo recording
You can record still images on "Memory Stick"s with the self-timer. This mode is useful when you want to record yourself. You can also use the Remote Commander for this operation.
(1) Set the POWER switch to MEMORY. Make sure that the LOCK is set to the right (unlock) position.
(2) Press (self-timer). The (self-timer) indicator appears on the LCD screen or in the viewfinder.
(3) Press PHOTO firmly. Self-timer starts counting down from 10 with a beep sound. In the last two seconds of the countdown, the beep sound gets faster, then recording starts automatically.
To cancel self-timer recording
Press (self-timer) so that the indicator disappears from the LCD or viewfinder screen while your camcorder is in the standby mode. You cannot stop the recording with your Remote Commander.
Note
The self-timer recording mode is automatically canceled when:
- Self-timer recording is finished.
- The POWER switch is set to OFF (CHARGE) or PLAYER.
Superimposing a still image in the "Memory Stick" on a moving image - MEMORY MIX
HanoXeHne HenoBnXhOro n3o6paXeHn 13 "Memory Stick" Ha noDnXhOe n3o6paXeHne - MEMORY MIX
- DCR-TRV320E only
You can superimpose a still image you have recorded on the "Memory Stick" on top of the moving image you are recording.
M. CHROM (Memory chroma key)
You can swap a blue area of a still image such as an illustration or a frame with a moving image.
M. LUMI (Memory luminance key)
You can swap a brighter area of a still image such as a handwritten illustration or title with a moving image. Record a title on the "Memory Stick" before a trip or event for convenience.
C. CHROM (Camera chroma key)
You can superimpose a moving image on top of a still image such as an image can be used as background. Shoot the subject against a blue background. The blue area of the moving image will be swapped with a still image.
M. OVERLAP (Memory overlap)
You can make a moving image fade in on top of a still image.
-ToIbKO DCR-TRV320E
BbMOxKeTe HaIoxKntb HeNoDBrNxHoe n3o6paXeHne, 3aIncaHnOe Ha "Memory Stick", Ha 3aIncsblaemOe NDoBnXHoe n3o6paXeHne.
M. CHROM (KHOIIKA ZBETHOCTN NAMRTN)
BbMOXeMeHrTb MeCTaMn CnHIOU qAcTb HENoDBNXHOrO N3o6paXeHnC NDoBnxHbIM N3o6paXeHnEM.
M. LUMI (KhoNka npKoCTn naMATn)
BbMOKTeMeHrTaMeCTaMn6OJIeRpkyu 0aTbHeNoDBNKHORo N3OBpaKeHenI C IOBnKbHM N3OBpaKeHENm.3aIIuIte THTpHa "Memory Stick" nepeI nyTeWeJcTBnEM IIN kakIM-JIb6O cobItne m dIy yDObCTBa.
C.CHROM (KHONKa UBeTHOCTN BnDeOKaMEpbI)
BbMOxTe HaIOxNtB DnKUeecr
n3o6paXeHne NOBEx HEnoDnKHO
n3o6paXeHn, KOToPOe MOxTe CnyKtB fOHOM.
HaNPmep, BbMOxTe BInOJIHNt CbeMky
obEkeTa Ha rOy6om fOHe. fOny6aYacTb
NoDnBHXoR n3o6paXeHn NOMeHETc
MeCTAMn C HeNOoBnKhbIM n3o6paXeHnEM.
M. OVERLAP (nepekepbitne namrtn)
BbMOKeTe CcEaTb PnABHbI BBOID DnBxUyeroCn3o6paXeHn NOBEx HneEODbHXHOrO N3o6paXeHn.
Before operation
Insert a Hi8Hi Digital8 tape for recording and a "Memory Stick" into your camcorder.
(1) Set the POWER switch to CAMERA.
(2) Press MEMORY MIX in the standby mode. The last recorded or last composed image appears on the lower part of the screen as a thumbnail image.
(3) Press MEMORY + / - to select the still image you want to superimpose. To see the previous image, press MEMORY-. To see the next image, press MEMORY+.
(4)Turn the SEL/PUSH EXEC dial to select the desired mode. The mode changes as follows: M.CHROM M.LUMI C.CHROM M.OVERLAP
(5) Press the SEL/PUSH EXEC dial. The still image is superimposed on the moving image.
(6) Turn the SEL/PUSH EXEC dial to adjust the effect.
M. CHROM - The colour (blue) scheme of the area in the still image which is to be swapped with a moving image
M. LUMI - The colour (bright) scheme of the area in the still image which is to be swapped with a moving image
C. CHROM - The colour (blue) scheme of the area in the moving image which is to be swapped with a still image
M. OVERLAP- No adjustment necessary
The fewer bars there are on the screen, the stronger the effect.
Ipeed hauanom pa6oTbi
BcTaBbTe IeHTy Hi8 Hj8/Digital8 [DJIaIaIcN i "Memory Stick" B Bauy BnDeokamepy.
(1)Установпейсяклочаель POWER в положене CAMERA.
(2)HaXmTe KHOIpKy MEMORY MIX BpeKIme OxuandaHn. IocJeDHee 3aIncahHoe nIn CKOMTOHOBaHHOe N3OpaXeHne NOBUTcE HIXKHe Yactn 3KpaHa B BVNe KPOXOTHOro N3OpaXeHn.
(3)Haxmnte KhONky MEMORY+/-ДЯ BbIbopa HEnoDBINKHO I3O6paXeHnRA, KOtOpoe BbIXOTNE HAIOXNtB Ha NOdBxHnOE.ДЯ npocMToPa npeDbIduyUeRo I3O6paXeHnRAhaxmTe KhONky MEMORY-ДЯ npocMToPa cJeDyHOSeRo I3O6paXeHnRAhaxmTe KhONky MEMORY+.
(4)ПовернITE диСК SEL/PUSH EXEC ДдьБбopa hyжHoro peЖима.
Pexm 6ydtn3MeHbCnEduoIIM o6pa30m:
M.CHROM M.LUMI C.CHROM M. OVERLAP
(5)HaxmTe Dnck SEL/PUSH EXEC. HenoDbNxHoe n3o6paXeHne 6ydet HaIooKeHO Ha noDbNxHoe.
(6)ПовернITE диСК SEL/PUSH EXEC дяпуліровки зф\'екта.
M.CHROM -LBeTobarramma (rOly6a) yAcTkaBHeIOdBnXHOM n3o6paXeHN, KOTOpbIy 6yDeT 3aMeHen Ha nOdBnXHOe 3o6paXeHne
M.LUMI -LcBeToBa rAmMa (rpka) yUacTka B HeNoDvNxHOM n3o6paXeHN, KOtOpbI 6yDet 3aMeHeH Ha noDvNxHOe N3o6paXeHne
C.CHROM -LBeToBa rAmma (roJy6a) yuaCTka B HeNoDvNxHOM n3o6paXeHn, KOTOpBn 6yDet 3aMeHEn Ha NOdBnXHoe N3o6paXeHne
M. OVERLAP - He Tpe6eYETcHnKaKnx peryInpoBOK
Yem MeHbIe noIOc Ha 3KpaHe, Tem CInbHee 3ΦΦeKT.
(7) Press START/STOP to start recording.
(7)HaKMTe KhoNky START/STOP nHa?na 3aHnCn.
To change the still image to superimpose
Do either of the following:
- Press MEMORY+/- before step 7.
- Press the SEL/PUSH EXEC dial before step 7, and repeat the procedure from step 4.
To change the mode setting
Press the SEL/PUSH EXEC dial before step 7, and repeat the procedure from step 4.
To cancel M. CHROM/M. LUMI/ C. CHROM/M. OVERLAP
Press MEMORY MIX.
IaH3MeHeHH HeNoBuxxHoro 1306paXeHHdHaIOXeHH
BbInOpJHnTe cIeDyUouee:
-HaKmTe KhONkY MEMORY+/- nepei nyHKTOM 7.
-HaXMMTe DnCK SEL/PUSH EXEC nepei nyHKToM 7 nOBTopTe npoceDpy, HauHna c NyHKTa 4.
Superimposing a still picture in the "Memory Stick" on a moving image - MEMORY MIX
HanoXeHne HenoBnXHo r 3o6paXeHn 13 "Memory Stick" Ha noBnXHoe 3o6paXeHne - MEMORY MIX
During recording
You cannot change the mode setting.
The "Memory Stick" supplied with your camcorder stores 20 images
-For M.CHROM:18 images (such as a frame) 100-0001\~100-0018
-For C.CHROM:2 images (such as a background)100-0019-100-0020
Sample images
Sample images stored in the "Memory Stick" supplied with your camcorder are protected (p. 116).
When you select M.OVERLAP
You cannot change the still image or the mode setting.
Bo Bpem3a#ncs
BbI He MoXkeTe N3MeHnIt bYctaHOBky peKIma.
Recording an image from a tape as a still image
3a\Pncb n3o6paXeHnCJIeHTbI KaK HeNoDvXJHOrO n3o6paXeHnA
- DCR-TRV320E only
Your camcorder can read moving picture data recorded on a tape in the Digital8 system, and record it as a still image on a "Memory Stick".
Before operation
Insert a tape recorded in the Digital8 system and a "Memory Stick" into your camcorder.
(1) Set the POWER switch to PLAYER.
(2) Press . The image recorded on the tape is played back.
(3) Keep pressing PHOTO lightly until the image from the tape freezes. CAPTURE appears on the LCD screen or in the viewfinder. Recording does not start yet.
(4) Press PHOTO deeper. The image displayed on the screen will be recorded on the "Memory Stick". Recording is complete when the bar scroll indicator disappears.
-ToJbKO DCR-TRV320E
BaSha BnDeOkamepa MoKet CHTbIBaTb DaHHbIe DnBxUyEroOra N3o6paXeHnA, 3aNcAHHbIe Ha IeHTy BnDpOBoi CnCTeme Digital8 H, n 3aNcBtBaTb IN KAK HeNoDVBHXHOe N3o6paXeHne Ha "Memory Stick".
Ipeed hauaJom pa6oTbI
BCTaBbTe JIeHTy, 3aIINcaHHyIO B CnCTeMe Digital8 H "Memory Stick" B Bauy BnDeokamepy.
(1) YctaHOBInTe nepeKJIouaTeIb POWER B noJIOKeHne PLAYER.
(2)HaKMnte KHOIIKky ▷. HaHHeTcB BOCpOn3BeDeHne N3O6paXeHnA, 3aNcAHOrO HaJIeHTe.
(3)Дерхитсе сlerkaнжатокногу PHOTOdoTexnop,nokaиЗобразениHaJIente He6ydet3amopoxkeHo.HaэкpaneЖКДИINBVIДONCKaTeNe NOBHTCn INHДNkaUCAcapTURE.3anncb noka He NaHHTcN.
(4)HaKMMTe KhoNkU PHOTO cnJIbHee.
H3o6paXKeHne, OTo6paXaEmOe Ha 3kpAne,
6yDet 3aIncaHo Ha "Memory Stick". 3aIncb
cHTaETc3aBepuEHNo, ecIn NCye3Het
pepeMeuaOuHiCn PONocTb INDnKaTOP.
3

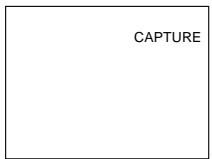

4

When the access lamp is lit or flashing Never shake or strike the unit. As well do not turn the power off, eject the "Memory Stick" or remove the battery pack. Otherwise, the image data breakdown may occur.
If appears on the LCD screen or in the viewfinder
The inserted "Memory Stick" is incompatible with your camcorder because its format does not conform with your camcorder. Check the format of the "Memory Stick".
If you press PHOTO lightly in the playback mode
Your camcorder stops momentarily.
Sound recorded on a tape
You cannot record the audio from a tape.
Titles superimposed
You cannot record the titles on the "Memory Stick". However, you can record the titles which have already been recorded on tapes.
When you press photo on the Remote Commander.
Your camcorder immediately records the image that is on the screen when you press the button.
EcInI JAMnOyKa DoCTyNa rOpNT nJIN Mmraet HIKoRda He Tprcnte n CtUHTe no Bauei BnDeokampe. TaKke, He BbIKJIOuayTe nITaHne, He n3BLeKaaiTe "Memory Stick" n3 OTcKa i He ChIMaHTe 6bTapeiHbI 6lOk. B npOTIBHom clyae daHHbI e N3OBpaXeHnMOryt 6bITb NOBpeXdeHbl.
EcHnHa3KpaHe XKД nIbB VbDOnckaTeNe NOBHTcH INDkaCua
BCTaBJIeHa "Memory Stick", kOTopar HecOBMeCTnMa C BaWei BInDeOKaMepoI, NocKoJIbKy ee φOpMaT He COOTBeTCTByET BInDeOKaMpe. ПpoBepbTe φOpMaT "Memory Stick".
EcIn B pexnme Bocnpn3BeDenr cnerKa haxaTb KhONkY PHOTO
BaSHA BnDeokamepa Ha MrHOBeHne OCTaHOBITcR.
HaIOXKeHHbIe TnTpbl
BbI He MoXeTe 3aINCbIBaTb 3ByK C JeHTbl.
Tntpbl, 3aHcaHHbIe Ha JeHTbl
BbHe MoKTe 3aINCbBaTb TnTpbl Ha "Memory Stick". OHaKo, BbMoKTe 3aINCbBaTb TnTpbl, KOtOpblye yKe 3aINCaHbHa JeHTbl.
EcIn BbI haxMeTe KhONkY cBemKn Ha nyJIbTe dNCTaHcUOHOrO ynpabLeHnA
Bawa Bndeokamepa ToTacKe 3aNiueT
H3o6paXeHne, KOtopoe 6yDet Ha 3kpaHe, KOrda
BbI HaxMeTe KhONKy.
Copying still images from a tape - Photo save
- DCR-TRV320E only
Using the search function, you can automatically take in only still images from tapes recorded in the Digital8 system and record them on a "Memory Stick" in sequence.
Before operation
- Insert a tape recorded in the Digital8 system and rewind the tape.
- Insert a "Memory Stick" into your camcorder.
(1) Set the POWER switch to PLAYER.
(2) Press MENU to make the menu display appear.
(3) Turn the SEL/PUSH EXEC dial to select , then press the dial.
(4) Turn the SEL/PUSH EXEC dial to select PHOTO SAVE, then press the dial. PHOTO BUTTON appears on the LCD screen or in the viewfinder.
(5) Press PHOTO firmly. The still image from the tape is recorded on the "Memory Stick". The number of still images copied is displayed. END is displayed when copying is completed.
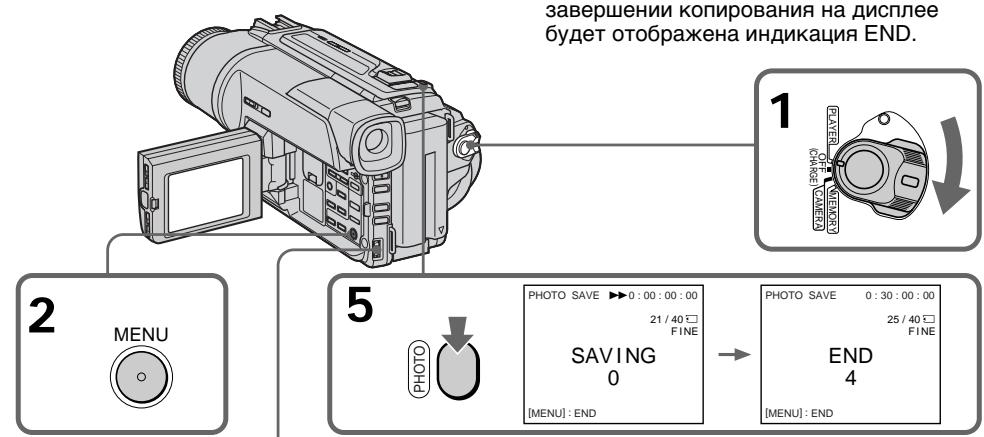
3


MEMORY SET
QUALITY FINE PRINT MARK PROTECT DELETE ALL FOR ANGIE 图片保存 SAVE RETURN

4
MEMORY SET
QUALITY
PRINTMARK
PROTECT
DELETE ALL
FORMAT
ETC PHOTO SAVE READY
RETURN


1
PHOTO SAVE 0:00:00:00
21/40□
FINE
PHOTO BUTTON
[PHOTO]:START MENU:END
KoNipOBaHne HeNoDBrXhblx n3O6paXeHn C JeHTbl-CoxpaHeHne fOTOCHMKO B PAMrTn
-ToIbKO DCR-TRV320E
NcnoB3yqyHKUIO NOCKa,BblMOKeTe ABOTMATTNECKB BYINONHHTb FOTOCHIMKNU TOIbKO HENoDBNXHBxN 036paxeHn C JENT, 3aNCAHbHbX B CNTeMe Digital8 , n 3aNcBIBaTb Nx Ha "Memory Stick" B nocJeIOBaTeJbHOCTn.
Ipeed hauanom pa60tbi
BCTaBbTeJeHTy,3aHncaHHyIO BcNCTeMe Digital8IupeMOTaHTeJeHTy.
- BCTaBbTe "Memory Stick" B BaUy BnDeOkaMepy.
(1)YCTaHOBInTe IepeKJIIOuHaTeIb POWER B NOJIOKeHne PLAYER.
(2)HaxMMTE KHOIIKyu MENU, YTO6bI Ha DnCJIeep NOBUNaCb INDINKAUma MeHIO.
(3)ПовернITE ДИСК SEL/PUSH EXEC ДИЯ ВИборустановки , a 3aTeM нахмITE ДИСК.
(4)ПовернITEДСЕL/PUSH EXEC ДЯ
Выбopa установки PHOTO SAVE, a 3aTeM
наджмITE ДСК. capitalized by KKD Или в
Виюнcke蒂е повитсаяндікагаши PMOTO
BUTTON.
(5)HaxMMTe CnIbHo KhoNkY PHOTO. HeoDbVnxKHe O3o6paXkeHne cJeHTbI 6ydet 3aIncAoHa "Memory Stick". Bydet oTo6paKeHO KOJIueCTBO HeoDbVnxHbIX cKnOIPoBaHbIx N3o6paXpeHn. Ito 3aBepWeHm KOIpOBAHnHa dIncPJIee 6ydet OTo6paXeHa INdkaunr END.
Copying still images from a tape - Photo save
To stop copying
Press MENU to stop copying.
When the memory of the "Memory Stick" is full
MEMORY FULL appears on the LCD screen, and the copying stops. Insert another "Memory Stick" and repeat the procedure from step 2.
When the access lamp is lit or flashing Do not shake or strike your camcorder. As well do not turn the power off, eject the "Memory Stick" or remove the battery pack. Otherwise, the image data breakdown may occur.
To record all the images recorded on the tape Rewind the tape all the way back and start copying.
If the write-protect tab on the "Memory Stick" is set to LOCK NOT READY appears when you select PHOTO SAVE in the menu settings.
When you change the "Memory Stick" in the middle of copying Your camcorder resumes copying from the last image recorded on the previous "Memory Stick".
KonipobaHne HeNoDbXhBIX n3o6paXeHn C JeHTbI - CoXpaHeHne fOTOCHIMKOB B NaMaTn
ДлЯ OCTAHOBК KONINPOBAHA
HaxmTe KhoNkY MENU dny ocTaHOBkn KOINPOBaHnI.
B clyuae nepenolneHn naMaTn "Memory Stick"
Ha 3KpaHe KKД NOBHTcH INdkaunEMEMORYFULL,И KONIpOBaHne OCTaHOBHTcH.BCTaBbTe dpyrIyO“Memory Stick"и NOBTOpnte npoceDpy,HaHHaC pYHKTa2.
EcIn lamnoka doctyna ropnt nIn Mmraet HnKOrda He Tprcnte n He cTpynte no Bauei BnDeokampe. TaKke, He BbIKluoyaIte nITaHne, He n3BLekaTe "Memory Stick" n3 OTceKa n He ChImaTe 6bTaapeHbI 6Iok. B npOTuBHOM cnUyae daHHbI e N3O6paKeHNr MOyT 6bITb NOBpeXdeHbl.
EcIn Bbl 3aMeHnTe "Memory Stick" BcepeDHe KOnIpoBaHnI
BaSHA BnDeOkamepa Bo3o6HOBNT KOIpOBaHne, NaHna c NocIeJHero I3o6paXeHn, 3aNcAnHoro Ha npebIyUsei "Memory Stick".
Viewing a still image - Memory photo playback
You can play back still images recorded on a "Memory Stick". You can also play back 6 images at a time by selecting the index screen.
Before operation
Insert a "Memory Stick" into your camcorder.
(1) Set the POWER switch to MEMORY or PLAYER. Make sure that the LOCK is set to the right (unlock) position.
(2) Open the LCD panel while pressing OPEN.
(3) Press MEMORY PLAY. The last recorded image is displayed.
(4) Press MEMORY + / - to select the desired still image. To see the previous image, press MEMORY-. To see the next image, press MEMORY +
-ToJbKO DCR-TRV320E
Bb moKTe BOCnpon3BOIDt b HenoDnBXHbIe
H3O6paXeHnA, 3aIncAHbIe Ha "Memory Stick".
Bb moKTe TaKxE BOCnpon3BOIDt b 6
H3O6paXeHn OJHOBpeMeHHo IyTEM Bb6opa
HNeKeCHOrO 3kpaHa.
Ipeed nayanom pa60tbi
BcTaBbTe "Memory Stick" B BaUy BnIeokamepy.
(1)YcTaHOBInTe npeKJIIOUaTeIb POWER B noJIOXeHne MEMORY uIN PLAYER. Y6eINTEcB, yTO cIKcaTOp LOCK ycTaHOBInE B npaBOM (He3aФИКСИРОВAHHom) NOJIOXeHn.
(2)Передвдвиьтейпегклочаел b OPEN b Hаразвлени 3нaka .3aTe mOTKpoiTe naHelen JKKI.
(3)Haxmnte KhoNky MEMORY PLAY. Bydet o76paxeHo nocJeDHee 3aIncaHhoe u3o6paxeHne.
(4)HaxmTe KhoNky MEMORY + / - Длг Вьбoga hyxhoro HeNoDBHXHOrO n3o6paKeHn.ДлТOrO,чTOБы yBnDeTbпрдIduuee n3o6paXeHn,HaxmTe KhoNky MEMORY-.ДлТOrO,чTOБы yBnDeTb cneDyUoSee n3o6paXeHn,HaxmTe KhoNky MEMORY+.
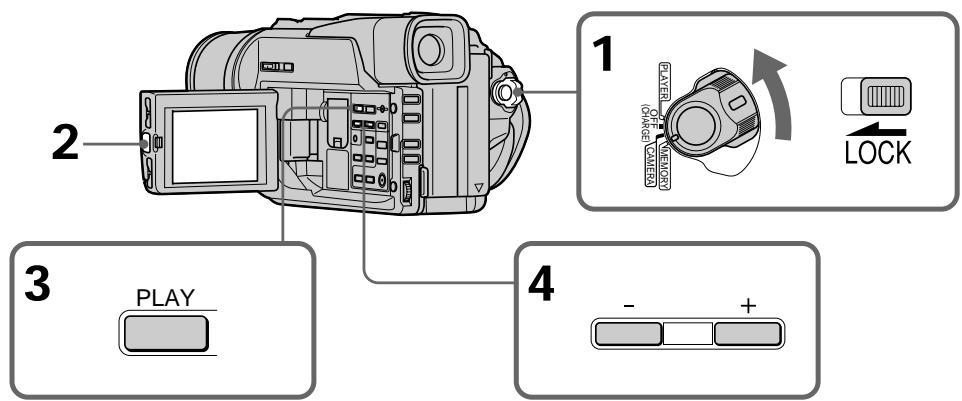
To stop memory photo playback
Press MEMORY PLAY.
ДлЯ OCTAHOBKN BOCPON3BedeHNA FOTOCHIMKOB 3I NaMATN
Haxmnte KhoNky MEMORY PLAY.
To play back recorded images on a TV screen
- Connect your camcorder to the TV with the A/V connecting cable supplied with your camcorder before the operation.
- When operating memory photo playback on a TV or the LCD screen, the image quality may appear to have deteriorated. This is not a malfunction. The image data is as good as ever.
- Turn the audio volume of the TV down before operation, or noise (howling) may be output from the TV speakers.
If "NO FILE" appears on the LCD screen or in the viewfinder
No image is recorded on the "Memory Stick".
Image data modified with personal computers or shot with other equipment
You may not be able to play them back with your camcorder.
Дя Воспpon3BedeHЯ 3aIncaHHbIX n3o6paXeHn Ha 3kpaH eTeLeBu30pa
-Перед началам Ворронзевеня
пд_COетинITE Baу WДеокамеру K
Телевизору с помоцью COeINHITelbHorO
Кабеля aydno/BuDeo, рплагаemoro K Baшей
Видаокамpe.
- PnBOCPON3BeDenHnФOTOCHNKMOB n3 namrHa 3KpaHe TeIeBn3Opa IIN KKD, KaYeCTBO N3o6paKeHn MOKeT yXyDInTBcA. 3TO He RaBnEeTcH NeuCnpaBHOCTbIO. DaHHbIe N3o6paKeHn HaxoJaTcB TOM Xe COCTOAHN, KAK n IpexKe.
-ПepeД HaayalOM BocnpOn3BedeHnY mEnbUnTe rPOMKoCTb TeJeBn3Opa BHn3, nHaueYepe3 akyctuYeCKyU CnCTeMy TeJeBn3Opa MoKeT NocbluWaTbCra Shym (3aBbIbAHne).
EcnHa 3KpaHe KKД nIиВ bNdoNcKaTeNe NOBNTcHnDnKaunr“NOFILE
Ha "Memory Stick" He 6byet 3anicaho HnkaKoro n3o6paXeHna.
DAnHbIe N3O6paXeHn, BUNoN3MeHeHHbIe C NOMOuBIO nepcoHaNbHOrO KOMNbHOtepa NJI CHaTbIe C NOMOuBIO dpyroI annapaTypbl
BbHe CMOKTe BOCnPoN3BecTu INC NOMOuBo C NOMOuBo BaWe BnDeOkamepbl.
Screen indicators during still image playback
3KpaHHbIe HNДИKaTOpbl BO BpeMBAocPpOu3BeDeHnA HeNoDvXhBIXn3o6paJxehn
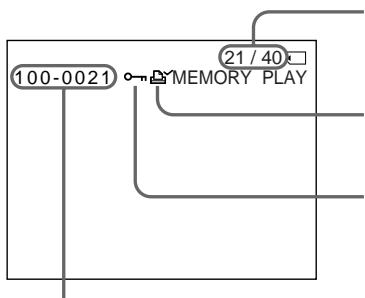
Image number/Total number of recorded images/Homep n3o6paXeHn/O6uee KOJIuYeCTBO 3aIIMcaHHbIX n3o6paXeHn
Print mark/3nak neaata
Protect indicator/ɪnʌdɪkaTOp 3aʌŋtbl
Data file name/IMaФаиla daHbIX
Playing back 6 recorded images at a time (index screen)
You can play back 6 recorded images at a time. This function is especially useful when searching for a particular image.
Bocnpo3BeJeHne 6 3aIncaHHbIX n3O6paXeHn OndHOBpeMeHHO (nHdEKCbHn 3KpaH)
BbMOKTe BOCPON3BecTn 6 3aNcaHbIX n3o6paXeHn OJHOBpeMeHHO. 3Ta cyHKcIy ABJIeTcra OC6eHNo Ione3Hoi npi BblOnHeHHn IONCKa OTdJIbHbIX n3o6paXeHn.
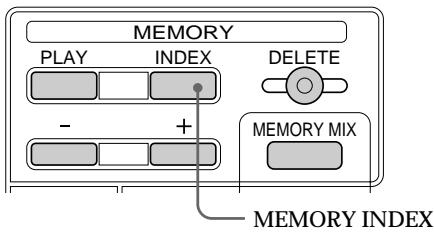
Press MEMORY INDEX.
A red mark appears above the image that is displayed before changing to the index screen mode.
HaxmTe KhoNky MEMORY INDEX.
Kpachar Metka noBntcHaI
n3o6paXeHNEm, KOtOpoe 6yET OTo6paXaTbcr
pepei n3MeHeHEm pexkma INDeKCHOrO
3kpaHa.
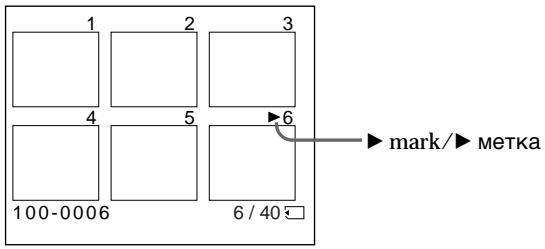
- To display the following 6 images, keep pressing MEMORY +.
- To display the previous 6 images, keep pressing MEMORY -.
To return to the normal playback screen (single screen)
Press MEMORY + / - to move the mark to the image you want to display on full screen, then press MEMORY PLAY.
-Дя OTobpaXeHn6Iyux6 n3o6paXeHn depKnte haxaToN KhoNky MEMORY+.
Длготобрахенпрдыуши6 n3obpaхени держnte нажато КногкY MEMORY-.
ДлЯ BOЗВраТа KЭКраHу 06ьИнHorO BOCПОН3ВЕDEнHA (ОДиHочньй 3Kран)
Hajmai Te KhoNky MEMORY +/--Дпяперемшенизда >КиЗбрахеню,КOTOPoe Bby XOTITE OTObpa3nTB Ha NOHbIйЗран, a 3aTeM HaxmTe KhoNky MEMORYPLAY.
Note
When displaying the index screen, the number appears above each image. This indicates the order in which images are recorded on the "Memory Stick". These numbers are different from the data file names.
Files modified with personal computer
These files may not be displayed on the index screen. Image files shot with other equipment may not be displayed on the index screen either.
Viewing the recorded images using a personal computer
The image data recorded with your camcorder is compressed in the JPEG format. If you use the application software, PictureGear 4.1 Lite supplied with your camcorder, you can see images recorded on the "Memory Stick" on a computer screen. Use the PC serial cable supplied with your camcorder for this operation.
Приимechаиме
Enlarging still images recorded on "Memory Stick"s - Memory PB ZOOM
YBéniuèHne 3aɪncaHHbIX HénoD-BHXbIX n3o6paXeHn Ha“Memory Stick”- PB ZOOM c πamTbHQ
- DCR-TRV320E only
You can enlarge still images recorded on a "Memory Stick".
Before operation
Insert a "Memory Stick" into your camcorder.
(1) Set the POWER switch to MEMORY or PLAYER. Make sure that the LOCK is set to the right (unlock) position.
(2) Press PB ZOOM on your camcorder while you are playing back. The still image is enlarged, and appears on the LCD screen or in the viewfinder.
(3)Turn SEL/PUSH EXEC dial to move the enlarged image, then press the dial. : The image moves downwards : The image moves upwards becomes available.
(4)Turn SEL/PUSH EXEC dial to move the enlarged image, then press the dial. : The image moves rightward (Turn the dial downwards) : The image moves leftward (Turn the dial upwards)
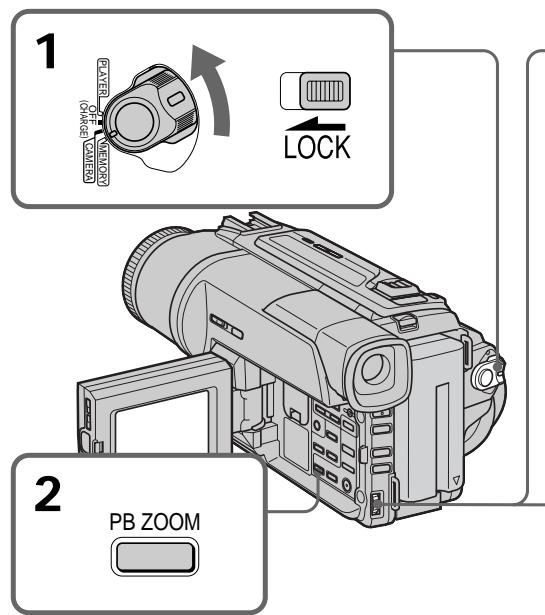
To cancel memory PB ZOOM function Press PB ZOOM.
-ToIbKO DCR-TRV320E
BbMOxTeYBeIeNvBaTb HnOdBnXHbIe n3o6paXeHnHa "Memory Stick".
Peped onepaunei
BcTaBbTe "Memory Stick" B BaUy BnDeokamepy
(1)УстановпейсяклочатуРОВЕ B
поножени MEMORY Или PLAYER.
Убдіпесь, что посяклочатуь LOCK
установпей в пра党支部 (небафmicрванhoe)
поножени.
(2) Haxmnte Khonky PB ZOOM Ha Baawe BnDEOKamepe BO BpMaB CBOpnn3BeDeHn. N3o6paKeHne yBemNtCn, a Ha 3KpaHe KKJ nIiB VBDONCKaTeNE NOBNTCn HnDkauinr ↑
(3)ПовернITE дис SEL/PUSH EXEC Дпяпегмшени вугеленгоизображени,а 3aTeMнжмITE DMCK.
Playing back images in a continuous loop - SLIDE SHOW
- DCR-TRV320E only
You can automatically play back images in sequence. This function is useful especially when checking recorded images or during a presentation.
Before operation
Insert a "Memory Stick" into your camcorder.
(1) Set the POWER switch to MEMORY or PLAYER. Make sure that the LOCK is set to the right (unlock) position.
(2) Press MENU to make the menu display appear.
(3) Turn the SEL/PUSH EXEC dial to select then press the dial.
(4) Turn the SEL/PUSH EXEC dial to select SLIDE SHOW, then press the dial.
(5) Press MEMORY PLAY. Your camcorder plays back the images recorded on the "Memory Stick" in sequence.
Bocnpon3BeJeHne n3o6paXeHn BHeIpepbIBHOI NOcJIeObATEJIbHOCTNIO 3aMKHyTOMy cIKJy - SLIDE SHOW
-ToJbKO DCR-TRV320E
BbMOKeTe aBTOMaTUnHeCKn BOCpOn3BOdntb n3O6paXeHnB HnpepbHBHO nocJeDoBaTeJbHoCTn.3TaФyHKUra RbLnETCa nOE3HO OOC6eHHo Prn npOBepKe 3aIncAHhIX n3O6paXeHn IIN BO BVpem Ppe3eHTaCmN.
Ipeed hauanpa60tbI
BcTaBbTe "Memory Stick" B BaUy BnIeokamepy.
(1)Установские посякточать POWERВ пооженке MEMORY nii VTR..Y6eДиТecь,Что ФнКсатор LOCK установLEM BпраВOM (He3aФИКСИРОВАHOM) поожени.
(2)HaxMMTe KhoNkY MENU, YTO6bHa Ha DnCpIee NOBUNaCb INDnKaIaM MeHIO.
(3)ПовернITE ДИСК SEL/PUSH EXEC ДИВБОGA yCTaHOBKN , a 3aTeM наЖМЛТЕ ДИСК.
(4)ПовернITE ДИСК SEL/PUSH EXEC ДЯ
Быбopa установки SLIDE SHOW, a 3aTem
нжмITE ДИСК.
(5)Haxmnte KhONky MEMORY PLAY. BawaBndeokamepa 6yJeT BOCnpOn3BOoNtBu3O6paKeHn, 3aIncanHbIe Ha "Memory Stick", B HnpepbHbHnNoCneDoBaTeNbHocTn.
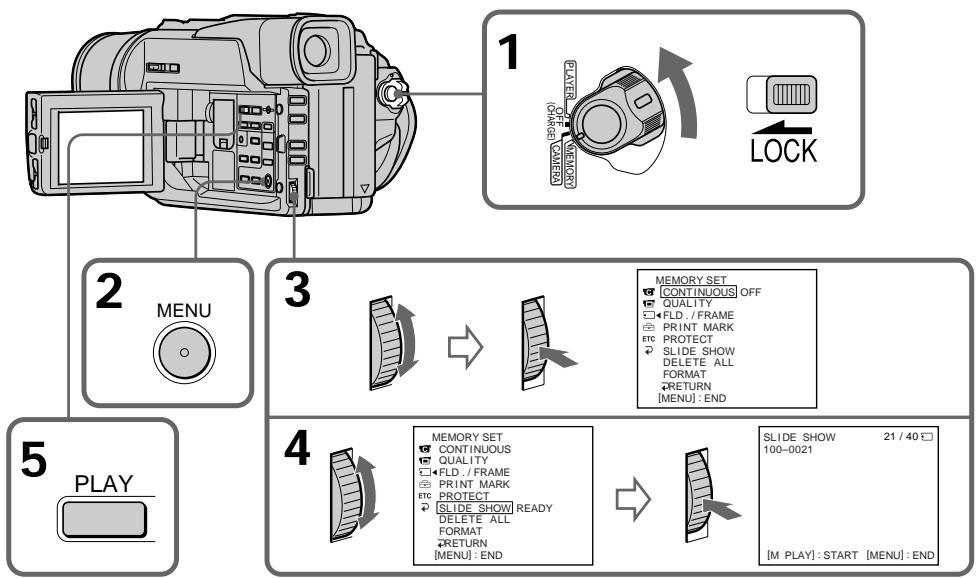
Playing back images in a continuous loop - SLIDE SHOW
Bocnpo3BeHne n3o6paXeHn BHeIpepbIBHOI NOcIeObAteJIbHOCTnIO 3AMKHyTOMy cIKJy - SLIDE SHOW
To stop the slide show
Press MENU.
To pause during a slide show
Press MEMORY PLAY.
To start the slide show from a particular image
Select the desired image using MEMORY + / - buttons before step 2.
To view the recorded images on TV
Connect your camcorder to a TV with the A/V connecting cable supplied with your camcorder before operation.
If you change the "Memory Stick" during operation
The slide show does not operate. If you change the "Memory Stick", be sure to follow the steps again from the beginning.
ДлЯ OCTaHOBKn NOKa3a CnaIDoB
HaxmTe KhONkY MENU.
Iy3bBoBpeMaoka3aJIOB
Hakmnte KhoNky MEMORY PLAY.
Дянана noka3a сайдов c onpedenenHoro n3o6paXeHnA
BbIeTe HxHHe N3o6paXeHne C nOmoaIO KHOIOK MEMORY +/- nepeI nyHKToM 2.
ДлпnpocmOTpa 3aHncanHbIX n3o6paxeHn Ha эКране TeJIeBu3opa
IpeeHaayanom npoceDpybI NOcOeHNHTe Bauy BnDeOKaMepy K TeJeBn3Opy C NOMOsbIO coeHNHTeBHorO Ka6JIa ayDnO/BnDeO, npinlaraemoro K Bawei BnDeOKaMepe.
B clyuae 3aemeHb "Memory Stick" BO Bpem npocmoTpa
Toka3 cnaIob npnoctaHOBNTc. B clyuae 3aMeHb "Memory Stick" Bam cJeNyET hauatb DeiCTBnR CHaHana.
Preventing accidental erasure - Image protection
- DCR-TRV320E only
To prevent accidental erasure of important images, you can protect selected images.
Before operation
Insert a "Memory Stick" into your camcorder.
(1) Set the POWER switch to MEMORY or PLAYER. Make sure that the LOCK is set to the right (unlock) position.
(2) Play back the image you want to protect (P. 109).
(3) Press MENU to make the menu display appear.
(4) Turn the SEL/PUSH EXEC dial to select , then press the dial.
(5) Turn the SEL/PUSH EXEC dial to select PROTECT, then press the dial.
(6) Turn the SEL/PUSH EXEC dial to select ON, then press the dial.
(7) Press MENU to erase the menu display. The o-n mark is displayed beside the data file name of the protected image.
Пре dioTbpaaehne cIyuahHoro CTnpaHn - 3aunTa n3o6paXeHn
-ToIbKO DCR-TRV320E
ДлпnpedotbpaаehнсclучайloroctupaHnBaxkhbIX n3obpaxeHn BblMOxTe 3aunTtBbIbpaHHbe n3obpaxeHn
Ipeed hauanpa0bI
BcTaBbTe "Memory Stick" B BaUy BnDeokamepy.
(1)YcTaHOBInTe npeKJIIOUaTeIb POWER B noLoXeHne MEMORY nIIN PLAYER. Y6eDiNTecB, yTO φnKcaTOp LOCK ycTaHOBJIeB B npaBOM (He3aФнКСИРОВАHHM) NOLOXeHIM.
(2) Bocnpou3BvEInTe u3o6paXeHne, KOTOpoe Bbl XOTnTe 3aunTnTB (CTp. 109).
(3)Haxmte KhoNky MENU,Чтобу на дисплец поBNJaCbИнДИКацЯ MEHIO.
(4)ПовернITE ДИСК SEL/PUSH EXEC ДЛЯ Вьбopa установский , a за tem нахмпес.
(5)ПовернITE диСK SEL/PUSH EXEC ДпЯ Вьбopa установки PROTECT, a 3aTeM НжмITE диСК.
(6)ПовернITE диСK SEL/PUSH EXEC ДЯ
Выбoga установки ON, a 3aTeM нажмпт
диСК.
(7)HaxmTe KhoNky MENU dIa cTnpaHnIHINKauuMeHNo.Ha HcnIe neBNTc3HaK O pRdOM c Ha3BaHnem paIla daHHbIX3aunueHHoro n3O6paXehnI.

Preventing accidental erasure - Image protection
Пре dioTbpaueHne clyuaHoroCTnpaHn - 3aunTa n3oPaxeHn
To cancel image protection
Select OFF in step 6, then press the SEL/PUSH EXEC dial.
ITRAOTMeHbI3aunTbIM3o6paXeHNIA
BbIbePeTe yCTaHOBky OFF bIpyHKte 6, a 3aTeM haxmTe dNCK SEL/PUSH EXEC.
Note
Formatting erases all information on the "Memory Stick", including the protected image data. Check the contents of the "Memory Stick" before formatting.
If the write-protect tab on the "Memory Stick" is set to LOCK
You cannot carry out image protection.
PpmeaHne
ΦopMaTIpOBAHnE CTnPaET BCIO INHΦopMaunHO Ha "Memory Stick", BKIoUaJ DaHHbIe 3aU\PuEHoro n3o6paXKeHn. IpoBepbTe coOpjxAHne "Memory Stick" nepeD φopMaTIpOBAHnEM.
EcIn JIeNecTOK 3aunTbI 3anmH Na "Memory Stick" yctahOBnE H noJIOXeHne LOCK
BbI He cMOXeTe BbIIOJIHnTb 3aUHTy n3o6paXeHn.
- DCR-TRV320E only
You can delete images stored in a "Memory Stick".
Before operation
Insert a "Memory Stick" into your camcorder.
Deleting selected images
(1) Set the POWER switch to MEMORY or PLAYER. Make sure that the LOCK is set to the right (unlock) position.
(2) Play back the image you want to delete (P. 109).
(3) Press MEMORY DELETE. "DELETE?" appears on the LCD screen.
(4) Press MEMORY DELETE again. The selected image is deleted.
YdaJIeHne n3o6paJxHn
-ToJbKO DCR-TRV320E
Bb moKTe ydaIITb n3O6paXeHn, xpaHmblie Ha "Memory Stick".
Ipeed nayanom pa60tbi
BcTaBbTe "Memory Stick" B BaCy BnIeokamepy.
YdaJIeHHe BbIbpaHHbIX N3O6paXKeHn
To cancel deleting an image
Press MEMORY - in step 4.
To delete an image displayed on the index screen
Press MEMORY + / - to move the indicator to the desired image and follow steps 3 and 4.
Notes
- To delete a protected image, first cancel image protection.
- Once you delete an image, you cannot restore it. Check the images to delete carefully before deleting them.
Длг OTMeHbI ydaJIeHnI n3O6paKeHnI
HaxmTe KhoNky MEMORY-B nyHKte 4.
Длг OTMeHbI n3O6paXeHnI, OTO6paXaemOrHa ИнDEkCHOM 3KpaHe
Hakmnte KhoNkY MEMORY +/-dna
nepemeueHNAHnKaTopa K HxHOMy 3nO6paKeHHIO BBINOHHTe DeiCTBnI NyHKTOB 3 n4.
PpimueaHn
Deleting all the images
You can delete all the unprotected images in the "Memory Stick".
(1) Set the POWER switch to MEMORY or PLAYER. Make sure that the LOCK is set to the right (unlock) position.
(2) Press MENU to make the menu display appear.
(3)Turn the SEL/PUSH EXEC dial to select, then press the dial.
(4)Turn the SEL/PUSH EXEC dial to select DELETE ALL, then press the dial.
(5) Turn the SEL/PUSH EXEC dial to select OK, then press the dial. OK changes to EXECUTE.
(6) Turn the SEL/PUSH EXEC dial to select EXECUTE, then press the dial. DELETING appears on the LCD screen. When all the unprotected images are deleted, COMPLETE is displayed.
YdaJIeHHe BCEx n3O6paXKeHn
BbMOxTeYdAnITb BCE He3aunuHnHbI n3o6paXeHnHa "Memory Stick".
(1)YcTaHOBnTe nepeKJIouyateIb POWER nIIN PLAYER B noJoxKeHne MEMORY. Y6eDnTeCb, yTo oKncatop LOCK ycTaHOBnB nPabOM (He3aΦnKcIPOBaHHOM) noJoxKeHn.
(2)HaxMMTe KhoNky MENU, YTO6bI Ha DnCJIeep NOBUNaCb INDnKaUNA MEHIO.
(3)ПовернITE ДИСК SEL/PUSH EXEC ДЯ Вьбogaустановки , a 3aTeM нахмптдИСК.
(4)Поверн'teДИСК SEL/PUSH EXEC ДЯ Вибopa установский DELETE ALL, a 3aTeM нахмтЕ дИСК.
(5)Повернerte ДСК SEL/PUSH EXEC ДЯ
БИБОпа усТановский OK,аЗатем нахмпerte
ДСК.ИнданачonaOKизменяна
Инданачona EXECUTE.
(6)ПовернITE ДИСК SEL/PUSH EXEC ДИЯ Вьбogaустановки EXECUTE,аЗatem нахмerte ДИСК.На Зкране XXД,поввсг синдікайдаDELETING.Korда БCE He3aunuцhenbilen3obpaженя 6duyt ydaJIeHbI,Ha nCnJIeenoRBNTcNДИнDIKAcaUNA COMPLETE.
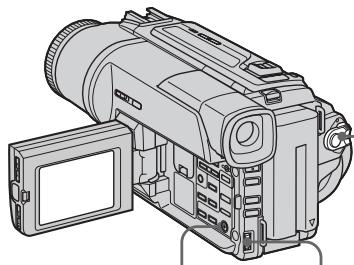
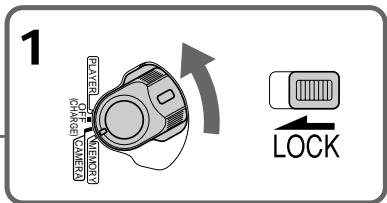
2

3

MEMORY SET
CONTINUOUS OFF
QUALITY
FLD./FRAME
PRINT MARK
ETC PROTECT
SLIDE SHOW
DELETE ALL
FORMAT
RETURN
MEMORY SET
CONTINUOUS
QUALITY
FLD./FRAME
PRINT MARK
ETC PROTECT
2.SLIDESHOW
DELETE ALL RETURN
[DELETE ALL]FORMAT OK
RETURN
MENUEND
4

MEMORY SET
CONTINUOUS
QUALITY
FLD./FRAME
PRINT MARK
ETC PROTECT
SLIDE SHOW
DELETE ALL READY
BEELETEALL)NEAB
RETFURN


MEMORY SET
CONTINUOUS
QUALITY
FLD./FRAME
PRINT MARK
ETC PROTECT
2.SLIDESHOW
DELETE ALL RETURN
[DELETE ALL]FORMAT OK
RETURN
MENUEND
OK
5

MEMORY SET
CONTINUOUS
QUALITY
FLD./FRAME
PRINTMARK
ETC PROTECT
SLIDE SHOW
DELETE ALL RETURN
FORMAT OK


MEMORY SET
CONTINUOUS
QUALITY
FLD./FRAME
PRINT MARK
ETC PROTECT
SLIDE
DELETE ALL RETURN
FORMAT EXECUT
DRETURN
[MANU]:END
6


MEMORY SET
CONTINUOUS
QALITY
FLD./FRAME
PRINT MARK
ETC PROTECT
SLIDE SHOW
DELETE ALL DELETING
FORMAT
RETURN
(MENU)END
To cancel deleting all the images in the "Memory Stick"
Select RETURN in step 5, then press the SEL/PUSH EXEC.
While DELETING appears
Do not turn the POWER switch or press any buttons.
If the write-protect tab on the "Memory Stick" is set to LOCK
You cannot delete images.
ДлЯ OTMeHbI ydaJIeHnB BCex n3o6paxeHn Ha "Memory Stick"
Bb6epnTe yctaHOBky RETURN B nyHKe 5, a 3aTe m haxmTe KhoNky SEL/PUSH EXEC
Bo Bpemr OTo6paXeHn HnDnKaun DELETING
He n3meHnIte noIoxKeHne nepeKJIouaTeTn POWER n He haxImaTe KaKx-1n60 KHOnOK.
EcInI IeneCTOK 3aunTbI 3annc Ha "Memory Stick" yctahOBlen B noJIOXeHne LOCK
BbHe moXeTe ydaIITb n3o6paXeHnA.
Writing a print mark - PRINT MARK
3aanncb neyaTHbIX 3HaKOB - PRINT MARK
- DCR-TRV320E only
You can specify the recorded still image to print out. This function is useful for printing out still images later.
Your camcorder conforms with the DPOF (Digital Print Order Format) standard for specifying the still images to print out.
Before operation
Insert a "Memory Stick" into your camcorder.
(1) Set the POWER switch to MEMORY or PLAYER. Make sure that the LOCK is set to the right (unlock) position.
(2) Play back the image you want to write a print mark (P. 109).
(3) Press MENU to display the menu.
(4) Turn the SEL/PUSH EXEC dial to select then press the dial.
(5) Turn the SEL/PUSH EXEC dial to select PRINT MARK, then press the dial.
(6) Turn the SEL/PUSH EXEC dial to select ON, then press the dial.
(7) Press MENU to erase the menu display. The mark is displayed beside the data file name of the image with a print mark.
-ToIbKO DCR-TRV320E
Bb mokeTe yka3aTb 3aIncaHbIe n3o6paXeHnI
dIra paCneYaTkN. 3Ta cyHKUIN RAJIHeTCR
noJIe3HOJ Ira paCneYaTKN HeNoDVBHXbIX
n3o6paXeHnIO3Xe.
Bawa Bnndeokamepa COOTBETCTBYET CTahdpTy DPOF (mnppoobcnyke6hbl foopmat paceanatkn) Iyka3aHn HenoDbXkHbIX n06paqehn Ipn paceanatKn.
IpeedHaayanompa6oTbi
BcTaBbTe "Memory Stick" B BaUy BnIeOkaMepy.
(1)Установские посяклочать POWER в положене MEMORY улл PLAYER.
Y6eIntecb, YTO fKcTOp LOCK yCTaHOBJIeB I npabOM (He3aФнкCupOBaHOM) nOIOxKeHn.
(2) Bocnpo3BvTe n3obpaXeHne,Ha KOTOpOM Bby XOTnte 3aIncaTb neaTbHn 3HaK (cTp.109).
(3) Haxmte KhoNky MENU, YTObI Ha DnCJIeep NOBUNOCb MEHO.
(4)ПовернITE ДИСК SEL/PUSH EXEC ДЯ Вьбogaустановки , a 3aTeM нахмITE ДИСК.
(5)ПовернITE ДИСК SEL/PUSH EXEC ДИЯ ВИборустаюВК PRINT MARK, a 3aTeM нажмптЕ ДИСК.
(6)ПовернITE ДИСК SEL/PUSH EXEC ДИЯ ВИбора установский ON, a 3aTeMuHaЖмITE ДИСК.
(7)HaxMnte KhoNkny MENU dIra cTupaHnI INDkaIaIIMeHO. Ha DCINPee NORBNTc 3Ahk PpADOM CHa3BaHMeФaJIa DaHHbIX N3O6paXeHnI C NeaTHbIM 3hAKOM.
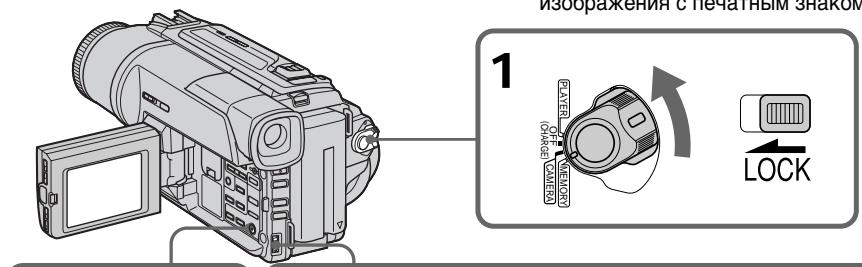

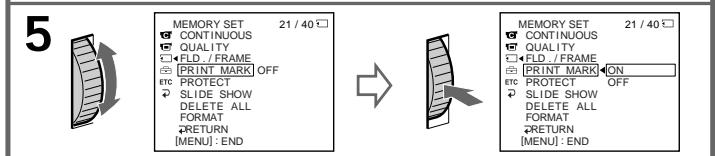
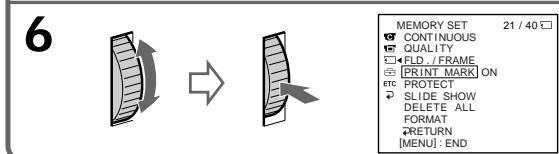
To cancel writing print marks
Select OFF in step 6, then press the SEL/PUSH EXEC dial.
If the write-protect tab on the "Memory Stick" is set to LOCK
You cannot write print marks on still images.
ДЯ OTMeHbI 3aInc NeayathbIX 3HaKOB
BbIbeIpTe yCTaHOBky OFF B nyHKte 6, a 3aTeM hakmTe Dnck SEL/PUSH EXEC.
EcInI IeneCTOK 3aunTbI 3annc Ha "Memory Stick" yctahOBnEn B noJIOxHeNc LOCK
BbHe MoXeTe 3aNcTaB neaThbIe 3HaKn Ha HenoDnKHbIe N3O6paXeHn.
Digital8 system, recording and playback
What is the "Digital8 [ ] system"?
This video system has been developed to enable digital recording to Hi8 H18/Digital8 D) video cassette .
Usable cassette tapes
We recommend using Hi8 H13/Digital8 video cassette.*
The recording time when you use your Digital8 system camcorder on Hi8 H18/standard 8 tape is 2/3 the recording time when using the conventional Hi8 H18/standard 8 system camcorder. (90 minutes of recording time becomes 60 minutes in the SP mode.)
- If you use standard 8 3 tape, be sure to play back the tape on this camcorder. Mosaic pattern noise may appear when you play back standard 8 3 tape on other VCRs (including other DCR-TRV120E/TRV125E/TRV320E).
Note
Tapes recorded in the Digital8 system cannot be played back on Hi8 Hi3/standard 8 (analog) system machine.
±b is a trademark.
Hi8 is a trademark.
D is a trademark.
Playback system
The Digital8 system or Hi8 Hi3/standard 8 system is automatically detected before the tape is played back.
During playback of tapes recorded in the Hi8 Hi8/standard 8 system, digital signals are output as the image signals from the DV OUT jack.
Display during automatic detection of system The Digital8 system or Hi8/standard 8 system is automatically detected, and the playback system is automatically switched to. During switching of systems, the screen turns blue, and the following displays appear. A hissing noise also sometimes can be heard.
H HiB / B During switching from Digital8 to Hi8 H18/standard 8
Hi8/3→: During switching from Hi8 H18/ standard 8 to Digital8
Playing back an NTSC-recorded tape
You can play back tapes recorded in the NTSC video system on the LCD screen, if the tape is recorded in the SP mode.
Copyright signal
When you play back
Using any other video camera recorder, you cannot record on a tape that has recorded copyright control signals for copyright protection of software which is played back on your camcorder.
When you playback a dual sound track tape
When you use tapes recorded in the Digital8 system
When you play back a Digital8 system tape which is dubbed from a dual sound track tape recorded in the DV system, set HiFi SOUND to the desired mode in the menu settings (p. 76).
Sound from speaker
| HiFi Sound Mode | Playing back a stereo tape | Playing back a dual sound track tape |
| STEREO | Stereo | Main sound and sub sound |
| 1 | Lch | Main sound |
| 2 | Rch | Sub sound |
When you use a tape recorded in the Hi8/standard 8 system
When you play back a dual sound track tape recorded in an AFM HiFi stereo system, set HiFi SOUND to the desired mode in the menu settings (p. 76).
Sound from speaker
| HiFi Sound Mode | Playing back a stereo tape | Playing back a dual sound track tape |
| STEREO | Stereo | Main sound and sub sound |
| 1 | Monaural | Main sound |
| 2 | Unnatural Sound | Sub sound |
PnBocnpOn3BeJeHn
Bocpnoun3BeDHeNJIeHT,3aHncaHHbIX B CnCTemE NTSC
BbMOKTe BOCPON3BOOHTbJeHtbl,3aNcAHHbE BVBeOeCtMe NTSC,Ha3KpaHe KKD,ecnIeHt a3nncAbapeXmpeSP.
CunhaabTOPcKOro npaba
PnBocpOun3BeJeHnn
IcnoIb3yKakyIO-Ni6o DpyryIO BVneOkaMepy, BbI He MokTe BeBInONHnTb 3aINCb Ha NEHTy,Ha KOTOp0i 6blI 3aINcHbI KOHTpOBhIe CnRHaJIb ABTOPCKOrnpBaJnI 3aUnThb ABTOPCKNx npAB npORpaMM, KOTOpBie BocPOn3BODAITCR BaWaeB INDeOkaMpe.
Pn BocnpOn3BeDeHn JeHTbI C DBOH0N 3ByKO0B DOPOXK0N
PnncnoJb3ObaHnn JeHT,3aNcAHHbx B zuΦpOBoCnCTeMé Digital8
Пи ВОСРОДЗБЕДЕМEN ЛНТБI B UNФОННОССТЕМ Digita8H,HA KOTOPYU BByONJIHHe Nape3aNcBЛЕТБ I cДынгь 3БУКOBОД DOPOZKKO,ЗАпСанHOВ NUNФОННО BИDEOCNUCTEme DV,yCTAHOBITE KOMaHdY HiFi SOUND B HyЖьй ржIM B yCTaHOBkax MeHIO (ftp.76).
3Byk OTДиHamnka
| Рек imm 3Byuahnia HiFi | Восpreneurбраздени Стесофонческо лeнтуbl | Восpreneurбраздени Лeнтуbl с двогно 3BykoBoi дорожков |
| STEREO | Стесофонческ 3Byk | Оснobно 3Byk и Вспомогателов 3Byk |
| 1 | Лeвий канал | Оснobно 3Byk |
| 2 | Правий канал | Вспомогателов 3Byk |
PnncnoJIb3ObaHnJeHT,3aIncaHbIX BcnCTeMe Hi8/ctaHdpTHoN cnCTeMe 8
Пи ВOCПОИЗBEДENH NENTbIC DBOIHOH 3BYKOBOI dOPOKJO, 3aIcAcaHOnB B CTpeoEOHnueeCKO CnCTeMe AFM HiFi, yctahONBte KOMAnDy HiFi SOUND B hYxKnbl pexkIM b YcTaHOBkax MeHIO (cTf.76).
3ByK OT DnHAMKa
The DV jack on this unit is an i.LINK-compliant DV input/output jack. This section describes the i.LINK standard and its features.
What is "i.LINK"?
i.LINK is a digital serial interface for handling digital video, digital audio and other data in two directions between equipment having the i.LINK jack, and for controlling other equipment.
i.LINK-compatible equipment can be connected by a single i.LINK cable. Possible applications are operations and data transactions with various digital AV equipment.
When two or more i.LINK-compatible equipment are connected to this unit in a daisy chain, operations and data transactions are possible with not only the equipment that this unit is connected to but also with other devices via the directly connected equipment.
Note, however, that the method of operation sometimes varies according to the characteristics and specifications of the equipment to be connected, and that operations and data transactions are sometimes not possible on some connected equipment.
Note
Normally, only one piece of equipment can be connected to this unit by the i.LINK cable (DV cable). When connecting this unit to i.LINK-compatible equipment having two or more i.LINK jack (DV jacks), refer to the instruction manual of the equipment to be connected.
About the Name "i.LINK"
i.LINK is a more familiar term for IEEE 1394 data transport bus proposed by SONY, and is a trademark approved by many corporations. IEEE 1394 is an international standard standardized by the Institute of Electrical and Electronic Engineers.
LcnpoBoe BnDeorHe3Do DV Ha daHHom annapaTe yDobIeTBopReT cTaHdpTy i.LINK n ABJIETcC BOMECTIMbIM C BXOHyB/M/BbIXOHDbIM rHe3DOM LcnpoBbIX BnDeocnHaJIOB DV. DaHHb pa3dE ONscbIbAe TcHdpT i.LINK n erO xapaKtePbIe OcOBeHNOCTN.
YTo Takoe "i.LINK"?
i.LINK ABJIeTcI NOcJIeOBoTaJIbHbIM INTEPpeIcom dIgOBa60TKn UcIpPoBbIX BUNEOcIRHaJIIOB, UcIpPoBbIX ayDInOCIRHaIOB u DpyrNX DaHHbIX B DByX HApPaBNeHx MExJy annpaAtypoi, IMeIOUe rHe3do i.LINK, n dJIy ynpaBHeHraDpyroanppaTypoi.
AnnapaTpa, COBmecTIma c i.LINK MOKET 6bITb
NoCDoeINHeHa NocpeIcTBOM OndHO R Ka6eJIa
i.LINK. Bo3MOXHbIMn PIPMEnHErMaR RAJIaOTcR
onepaunu NoobapOToKa daHNbIX C pa3NnHbIMn
BvDAMn UΦpOBoB BVdeOaPnAPaTybI. KOrda
DBA HIN 60Jee CoMBeCTMhBix C i.LINK annapata
NoCDoeINHeHb K DaHHOMy annapaty, onepaunu
NoobapOToKa daHNbIX BO3MOXHbI He ToJIbKO C
annapaTpyo, KOtOpaar NoCDoeINHeHa K
DaHHOMy annapaty, HO taKxe Jc DpyrIMn
PiN6bpamn YpeE3 HENOCpeIcTBeHNO
NoCDoeINHeHnyo annapatypy. Ondako CneJeT
YueCTb, YTO MeTOD onepnpoBaHryn INOrda
OTNIUaETC B 3aBNCIMoCTN OT XapaKTepNCHK IN
TEXNHueCKNX yCIOBNI NOCDoeINHeHHO
annapatypbI n TAKNE onepaunu In obo6oTka
DaHHbIX INOHJa RBAJIaOTcR HEBO3MOXHbIMn Ha
HeKOTopoN NoCDoeINHeHHO annapaType.
PpmeaHne
ObIyHO TOJIbKO OINH annapaT MOKeT 6bITb
NoCDoeDInHeN K DaHOMy annapaTy
nocpeCTBOM Ka6eN a.i.LINK (uHpOBoro
BnDeOkA6eN aLV).PnNoCoEduHeHn
daHHoro annapaTa K DByM nJIn 6oJee
coBMeCTmblm c i.LINK annapaTam
ObaaaiTeCb K pyKOBODCTBy IIO EKnpyaTu
NoCDoeDInHeHHo annapaTypbl.
OTHOCHTeIbHO Ha3BaHnI “i.LINK”
i.LINK ABnIeTcH Han60Jee 3HaKOMbIM
TePmHOM, npEINOxKeHHbIM SONY dIa IINbI nepeCbIInK DaHNbIX, COOTBeTCTByOuSeI yCNOBmI IEEE 1394, a TAKKe TOPROBmI MapKoI, YTBepXdEHHO MHOrIMn BHYTpEHHMn n 3apy6ExhMbIM KOpnpaunm.
IEEE 1394 ABnIeTcM MeJdyHapOdHbIM cTaHdApTOM, yCTaHOBLeHHbIM IHCTNTyTOM INHexeHepOB IO 3NeKToPoTexHnke I paAnIOJIeKTopHKe.
i.LINK Baud rate
i.LINK's maximum baud rate varies according to the equipment. Three maximum baud rates are defined:
S100 (approx. 100Mbps*)
S200 (approx. 200Mbps)
S400 (approx. 400Mbps)
The baud rate is listed under "Specifications" in the instruction manual of each equipment. It is also indicated near the i.LINK jack on some equipment.
The maximum baud rate of equipment on which it is not indicated such as this unit is "S100".
When units are connected to equipment having a different maximum baud rate, the baud rate sometimes differs from the indicated baud rate.
- What is "Mbps"?
Mbps stands for megabits per second, or the amount of data that can be sent or received in one second. For example, a baud rate of 100Mbps means that 100 megabits of data can be sent in one second.
i.LINK Functions on this unit
For details on how to dub when this unit is connected to other video equipment having DV jack, see page 74.
This unit can also be connected to other i.LINK (DV) compatible equipment made by SONY (e.g.
VAIO series personal computer) other than video equipment.
Before connecting this unit to a personal computer, make sure that application software supported by this unit already installed on the personal computer.
For details on precautions when connecting this unit, also refer to the instruction manuals for the equipment to be connected.
Required i.LINK Cable
Use the Sony i.LINK 4-pin-to-4-pin cable (during DV dubbing).
i.LINK and are trademarks.
Changing the lithium battery in your camcorder
When replacing the lithium battery, keep the battery pack or other power source attached. Otherwise, you will need to reset the date, time and other items in the menu settings hold in memory by the lithium battery.
Insert the battery with the positive (+) side facing out. When the battery becomes weak or dead, the indicator flashes on the LCD screen or in the viewfinder for about 5 seconds when you set the POWER switch to CAMERA or MEMORY (DCRTRV320E only). In this case, replace the battery with a Sony CR2025 lithium battery. Use of any other battery may present a risk of fire or explosion. Discard used batteries according to the manufacturer's instructions.
3aMeHa IHTNeBOI 6aTapeiKN B BaSei BnDeOkamepe
Pn3aMeHe IInTne Bo 6aTaepKn 6aTaepHbI
6JOK ININ dpyro INCTOCHNK IInTaHHN DOJXeH
6bITb PnIKpeJIenK BInDeOkamepe. B
IpOTNBOM cIyae Bam nOHaIOBtCn
IpeyeCTaHaBnBaTaB DaTy, BpEmn I Dpyrme
nyHKtbl B yCTaHOBkax MeHIO, XpaHIMbIX B
IamATn BInDeOkAmpbI C NOMOcIbIO IInTneBO
6bTaapeKn.
BcTaBbTe 6aTapeKy TaK, YTo6bl
noLoXnteIbHbI (+) noIoc 6bl nOpaueH
Hapxuy. EcnI 6aTapeKa cTahet Cna6o nn
pa3PnITcra, INDnKaTOp 6bDeT MIRaTb Ha
3kPaHe KKD nn B vIDOnckateNe OKONo 5
ceKyHd, eCnI nepeKnIOuChaTeN b POWER
ycTaHOBLeH B noLoXeHne CAMERA nn
MEMORY (TolbKO DCR-TRV320E). B 3tOM
cLyuae, 3aMeHNte 6aTapeKy Ha IInTHeByO
6aTapeKky Sony CR2025. NcNoIb3ObaHnne
dpyroB 6aTapeKn MoKet npINBeCTN K
NOXAPy nn B3pBlv. NIKBUnpUyIte
NCNoIb3OBAHHle 6aTapeKn B COOTBETCTBm C
INHCTpyKuJIMn PpeDnPnTAu-N3rTOBOTeJIa.
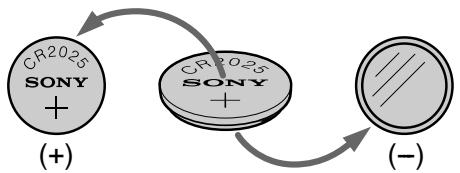
WARNING
The battery may explode if mistreated. Do not recharge, disassemble, nor dispose of it in fire.
Lithium battery
- Keep the lithium battery out of the reach of children.
- Should the battery be swallowed, immediately consult a doctor.
- Wipe the battery with a dry cloth to ensure good contact.
Lithium battery installed at the factory This battery may not last 1 year.
BHIMAHNE
EcIn c 6aTapeiKoH enpaBnIbHo 6paTaIbCra, OHa MoKeT B3OpBaTbCra. He nepe3apKaIte, He pa3bnpaIte n He 6pocaiTe B orOnb 6aTapeiKy.
Лтnevвая 6атуейka
XpaHInTe JInTneByo 6aTapeKy B MecTe, He DOCTYINOM dIa DeTei.
Bcnyae,ecnKTO-JIb6cnyaHNO nporNoTt 6batapeiKy, cJeDyET HEmdneHNO oBaPntbCk K BpaCy.
-Плотрипебата佩нкусхонTKaньюднообсяченихоршeroКо��тakta.
3ToI 6aTapeKIMoKeT He XBaTnTb Ha 1 roI.
Changing the lithium battery
(1) Open the LCD panel and open the lid of the lithium battery compartment.
(2)Push the lithium battery up once and pull it out from the holder.
(3) Install a Sony CR2025 lithium battery with the positive (+) side facing out.
(4) Close the lid.
3aMeHa NITNeBOB 6aTapeeKn
(1)OTkpoIe NaHeJI KKДи OTKpoIe KpbIshky OTeKa dIa IITneBOB 6aTapeiKn.
(2)HaxMMTeIITnEByIO6aTapeKbBExpOiHa pa3I BblbTe ee I3 DePkaTeJI.
(3) YctaHOBtne IInTneByo 6BaTapeIky Sony CR2025 TaK, YTo6bI nOIOxNtEnbHbI (+) nOIOc 6bln o6paueH hapyJy.
(4)ЗakpoNTe крbliKhY.
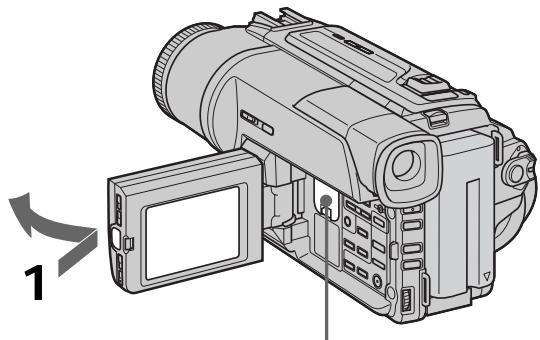

1
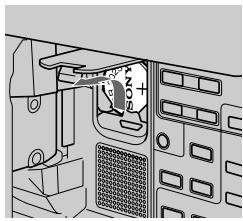
2
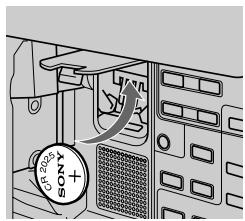
3
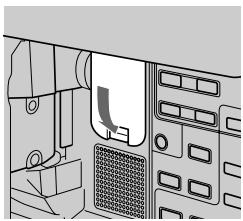
4
Troubleshooting
If you run into any problem using your camcorder, use the following table to troubleshoot the problem. If the problem persists, disconnect the power source and contact your Sony dealer or local authorized Sony service facility. If "C:□□:□□" appears on the LCD screen, in the viewfinder or the display window, the self-diagnosis display function has worked. See page 134.
In the recording mode
| Symptom | Cause and/or Corrective Actions |
| START/STOP does not operate. | ·The POWER switch is set to OFF (CHARGE), PLAYER or MEMORY (DCR-TRV320 only). →Set it to CAMERA. (p. 21) ·The tape has run out. →Rewind the tape or insert a new one. (p. 19, 33) ·The write-protect tab is set to expose the red mark. →Use a new tape or slide the tab. (p. 20) ·The tape is stuck to the drum (moisture condensation). →Remove the cassette and leave your camcorder for at least 1 hour to acclimate. (p. 146) |
| The power goes off. | ·While being operated in the CAMERA mode, your camcorder has been in the standby mode for more than 3 minutes. →Set the POWER switch to OFF (CHARGE) and then to CAMERA again. (p. 21) |
| The image on the viewfinder screen is not clear. | ·The viewfinder lens is not adjusted. →Adjust the viewfinder lens. (p. 25) |
| The SteadyShot function does not work. | ·STEADYSHOT is set to OFF in the menu settings. →Set it to ON. (p. 76) |
| The autofocusing function does not work. | ·FOCUS is set to MANUAL. →Set it to AUTO. (p. 57) ·Shooting conditions are not suitable for autofocus. →Set FOCUS to MANUAL to focus manually. (p. 57) |
| The fader function does not work. | ·The digital effect function is working. →Cancel it. (p. 53) |
| The picture does not appear in the viewfinder. | ·The LCD panel is open. →Close the LCD panel. (p. 23) |
| You cannot record in the LP mode. | ·The tape is the standard 8 tape. →Use Hi8 Digit8 tapes. (p. 80) |
| A vertical band appears when you shoot a subject such as lights or a candle flame against a dark background. | The contrast between the subject and background is too high. This is not a malfunction. |
| A vertical band appears when you shoot a very bright subject. | This is not a malfunction. |
| Some tiny white spots appear on the LCD screen or in the viewfinder. | Slow shutter, low lux or Super NightShot mode is activated. This is not a malfunction. |
| An unknown picture is displayed on the LCD screen or in the viewfinder. | If 10 minutes elapse after you set the POWER switch to CAMERA or DEMO MODE is set to ON in the menu settings without a cassette inserted, your camcorder automatically starts the demonstration. → Insert a cassette and the demonstration stops. You can also cancel DEMO MODE. (p. 81) |
| The picture is recorded in incorrect or unnatural colours. | NIGHTSHOT is set to ON. → Set it to OFF. (p. 28) |
| Picture appears too bright, and the subject does not appear on the LCD screen or in the viewfinder. | NIGHTSHOT is set to ON in a bright place. → Set it to OFF, or use the NightShot function in a dark place. (p. 28) |
| A horizontal black band appears when shooting a TV screen or computer screen. | Set STEADYSHOT to OFF in the menu settings (p. 76) |
In the playback mode
| Symptom | Cause and/or Corrective Actions |
| The tape does not move when a video control button is pressed. | · The POWER switch is set to CAMERA, OFF (CHARGE) or MEMORY (DCR-TRV320E only). → Set it to PLAYER. (p. 33) |
| The playback button does not work. | · The tape has run out. → Rewind the tape. (p. 33) |
| There are horizontal lines on the picture or the playback picture is not clear or does not appear. | · The video head may be dirty. → Clean the heads using the Sony V8-25CLD cleaning cassette (not supplied). (p. 147) |
| No sound or only a low sound is heard when playing back a tape. | · The stereo tape is played back with HiFi SOUND set to 2 in the menu settings. → Set it to STEREO. (p. 76) · The volume is turned to minimum. → Open the LCD panel and press VOLUME+. (p. 33) · AUDIO MIX is set to ST2 side in the menu settings. → Adjust AUDIO MIX. (p. 76) |
| The date search does not work correctly. | · The tape has a blank portion in the recorded portion (p. 69) |
| The picture which is recorded in the Digital8®system is not played back. | · PB MODE is set to Hi8/8 in the menu settings. → Set it to AUTO. (p. 76) |
| The tape which is recorded in the Hi8/ standard 8 system is not played back correctly. | · Set PB MODE to Hi8/8 in the menu settings. (p. 76) |
In the recording and playback modes
| Symptom | Cause and/or Corrective Actions |
| The power does not turn on. | ·The battery pack is not installed, or is dead or nearly dead. →Install a charged battery pack. (p. 12, 13) ·The AC power adaptor is not connected to the mains. →Connect the AC power adaptor to the mains. (p. 18) |
| The end search function does not work. | ·The tape was ejected after recording. ·You have not recorded on the new cassette yet. |
| The end search function does not work correctly. | ·The tape has a blank portion in the beginning or middle. |
| The battery pack is quickly discharged. | ·The operating temperature is too low. ·The battery pack is not fully charged. →Charge the battery pack fully again. (p. 13) ·The battery pack is completely dead, and cannot be recharged. →Replace with a new battery pack. (p. 12) |
| The battery remaining indicator does not indicate the correct time. | ·You have used the battery pack in an extremely hot or cold environment for a long time. ·The battery pack is completely dead, and cannot be recharged. →Replace with a new battery pack. (p. 12) ·The battery is dead. →Use a charged battery pack. (p. 12, 13) |
| The power goes off although the battery remaining indicator indicates that the battery pack has enough power to operate. | ·Charge the battery pack fully again so that the indication on the battery remaining indicator is correct. |
| The cassette cannot be removed from the holder. | ·The power source is disconnected. →Connect it firmly. (p. 13, 18) ·The battery is dead. →Use a charged battery pack. (p. 12, 13) |
| The ⌊ and ⌒ indicators flash and no functions except for cassette ejection work. | ·Moisture condensation has occurred. →Remove the cassette and leave your camcorder for at least 1 hour to acclimate. (p. 146) |
When operating using the "Memory Stick"
- DCR-TRV320E only
| Symptom | Cause and/or Corrective Actions |
| The “Memory Stick” does not function. | · The POWER switch is set to CAMERA or OFF (CHARGE). → Set it to MEMORY. (p. 94) · “Memory Stick” is not inserted. → Insert a “Memory Stick”. (p. 93) |
| Recording does not function. | · The “Memory Stick” has already been recorded to its full capacity. → Erase unnecessary images and record again. (p. 118, 96) · The “Memory Stick” formatted incorrectly is inserted. → Format the “Memory Stick” on your camcorder or use another “Memory Stick”. (p. 79) · The write-protect tab on the “Memory Stick” is set to LOCK. → Release the lock. (p. 91) |
| The image cannot be deleted. | · The write-protect tab on the “Memory Stick” is set to LOCK. → Release the lock. (p. 91) · The image is protected. → Cancel image protection. (p. 116) |
| You cannot format the “Memory Stick”. | · The write-protect tab on the “Memory Stick” is set to LOCK. → Release the lock. (p. 91) |
| Deleting all the images cannot be carried out. | · The write-protect tab on the “Memory Stick” is set to LOCK. → Release the lock. (p. 91) |
| You cannot protect the image. | · The write-protect tab on the “Memory Stick” is set to LOCK. → Release the lock. (p. 91) · The image to protect is not played back. → Press MEMORY PLAY to play back the image. (p. 109) |
| You cannot write a print mark on the still image. | · The write-protect tab on the “Memory Stick” is set to LOCK. → Release the lock. (p. 91) · The image to write a print mark is not played back. → Press MEMORY PLAY to play back the image. (p. 109) |
| The photo save function does not work. | · The write-protect tab on the “Memory Stick” is set to LOCK. → Release the lock. (p. 91) |
Others
| Symptom | Cause and/or Corrective Actions |
| The Remote Commander supplied with your camcorder does not work. | ·COMMANDER is set to OFF in the menu settings. →Set it to ON. (p. 76) ·Something is blocking the infrared rays. →Remove the obstacle. ·The batteries are inserted in the battery holder with the +– polarities incorrectly matching the +– marks. →Insert the batteries with the correct polarity. (p. 160) ·The batteries are dead. →Insert new ones. (p. 160) |
| The melody or beep sounds for 5 seconds. | ·Moisture condensation has occurred. →Remove the cassette and leave your camcorder for at least 1 hour to acclimate. (p. 146) ·Some troubles has occurred in your camcorder. →Remove the cassette and insert it again, then operate your camcorder. |
| While charging the battery pack, no indicator appears or the indicator flashes in the display window. | ·The AC power adaptor is disconnected. →Connect it firmly. (p. 18) ·Something is wrong with the battery pack. →Contact your Sony dealer or local authorized Sony service facility. |
Self-diagnosis display
Your camcorder has a self-diagnosis display function. This function displays the current condition of your camcorder as a 5-digit code (a combination of a letter and figures) on the LCD screen, in the viewfinder or in the display window. If a 5-digit code is displayed, check the following code chart. The last two digits (indicated by ) will differ depending on the state of your camcorder.
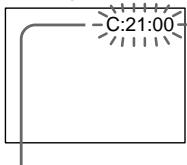
LCD screen, viewfinder or display window
Self-diagnosis display
C:□□:□□
You can service your camcorder yourself.
E:□□:□□
Contact your Sony dealer or local authorized Sony facility.
| Five-digit display | Cause and/or Corrective Actions |
| C:04:□□ | ·You are using a battery pack that is not an “InfoLITHIUM” battery pack. →Use an “InfoLITHIUM” battery pack. (p. 17) |
| C:21:□□ | ·Moisture condensation has occurred. →Remove the cassette and leave your camcorder for at least 1 hour to acclimate. (p. 146) |
| C:22:□□ | ·The video heads are dirty. →Clean the heads using the Sony V8-25CLD cleaning cassette (not supplied). (p. 147) |
| C:31:□□ | ·A malfunction other than the above that you can service has occurred. |
| C:32:□□ | ·Remove the cassette and insert it again, then operate your camcorder. →Disconnect the mains lead of the AC power adaptor or remove the battery pack. After reconnecting the power source, operate your camcorder. |
| E:61:□□ | ·A malfunction that you cannot service has occurred. |
| E:62:□□ | →Contact your Sony dealer or local authorized Sony service facility and inform them of the 5-digit code. (example: E:61:10) |
If you are unable to rectify the problem even if you try corrective actions a few times, contact your Sony dealer or local authorized Sony service facility.
Warning indicators and messages
If indicators and messages appear on the LCD screen, in the viewfinder or in the display window, check the following:
See the page in parentheses “( )” for more information.
Warning indicators
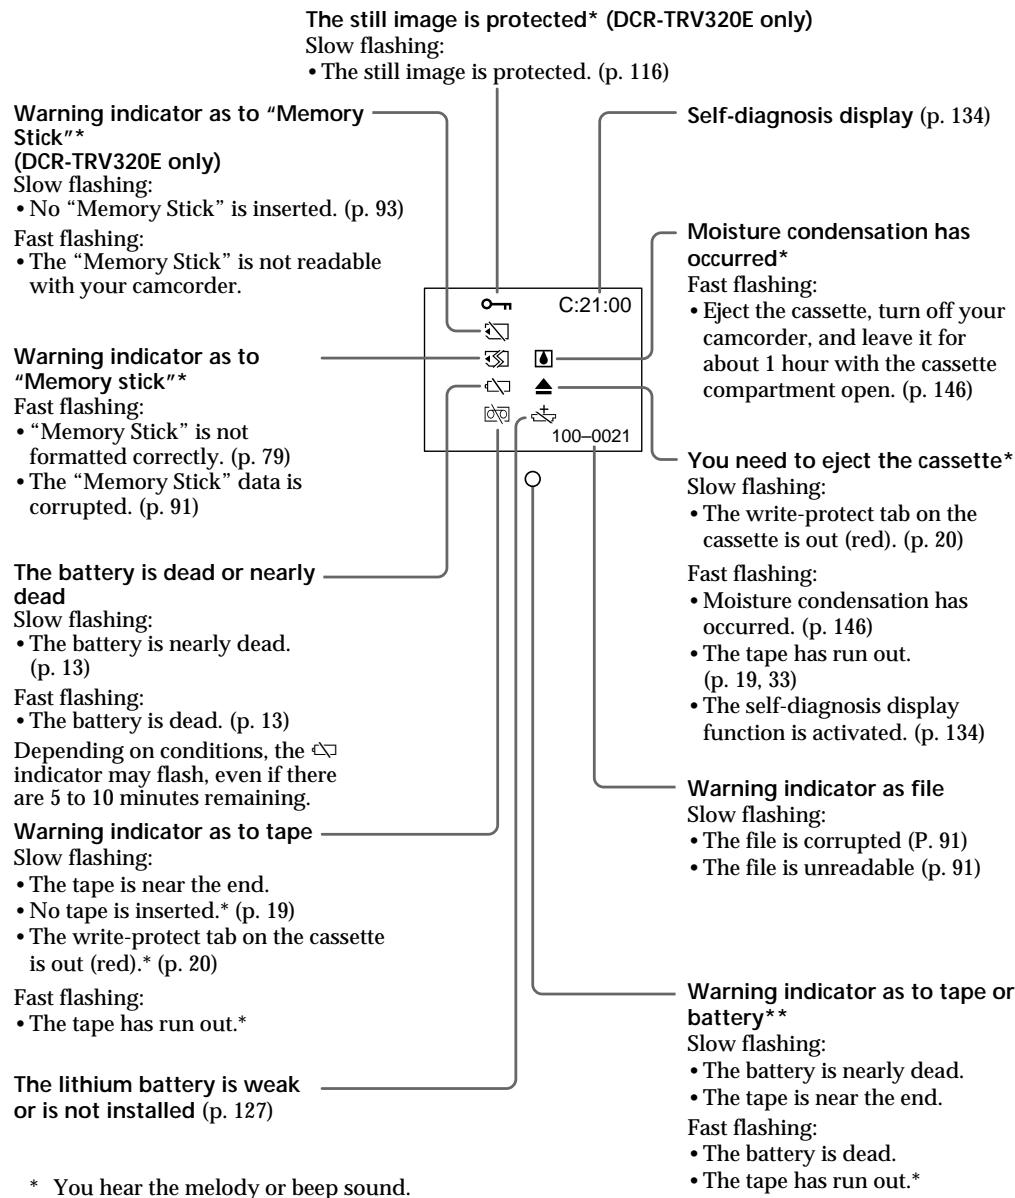
Warning messages
CLOCK SET
Reset the date and time. (p. 89)
FOR "InfoLITHIUM" BATTERY ONLY
Use an "InfoLITHIUM" battery pack. (p. 17)
- 8mm TAPE SP REC Hi8 TAPE LP/SP REC
Use Hi8 [H3/Digital 8] tapes when you record in the LP mode.* (p. 80)
TAPE END
The tape has run out.*
NO TAPE
Insert a cassette tape.* (p. 19)
CLEANING CASSETTE**
The video heads are dirty. (p. 145)
FULL
The "Memory Stick" is full.* (DCR-TRV320E only) (p. 98)
The write-protect tab on the "Memory Stick" is set to LOCK.* (DCR-TRV320E only) (p. 91)
NOFILE
No still image is recorded on the "Memory Stick".* (DCR-TRV320E only) (p. 110)
NO MEMORY STICK
No "Memory Stick" is inserted. (DCR-TRV320E only) (p. 93)
- MEMORY STICK ERROR
The "Memory Stick" data is corrupted.* (DCR-TRV320E only)
制 FORMAT ERROR
Check the type of formatting. (DCR-TRV320E only)
- DIRECTIONAL ERROR
The "Memory Stick" has more than one directory such as 100 msdfc.* (DCR-TRV320E only)
- You hear the melody or beep sound.
** The × indicator and “ 念 CLEANING CASSETTE” message appear one after another on the LCD screen or in the viewfinder.
Понск и устараенье несправност
Ecni y Bac Bo3Nkna kakaan-1n6o npo6nema npi nCnoIb3OBAHN BnDEoKaMepb, BocnoIb3yntecb cneDyoche Ta6nuei DnAOTbckAHn NycTaPAnHn npo6nembl. Ecni npo6nema He ycTpAnHeTcra, TO cJeDyeT OTCoeDInHb NCTOAHN IIOtaHn N o6paTnBc B cepBnchbI ceHTp Sony iIN B MeCTHOe yONHOHcE Hoope npdnpnTne no 0c2nyXnbAHHo 3deJin Sony. Ecni Ha 3kpaHe KKД, B BVDOCKATENE IIN B OKOWke dncnpe NOBnTcN IHDAKauNa "C:□□:□□", 3TO 3HaNT, YTO cpa60taJa cyHKuI dyCNpe CamoDnaHrOCTKn.CM. ctp. 142.
Bpekme 3aHncn
HdNkauncaMOnaHcHcTNK
C:□□:□□
BbMOKETe BbIOJHnTb
obcnykuaBaHne BaSei BnDeokamepbl
camOCTORTJIbHO.
E:□□:□□
O6paTITecB CepBnCHbI YeHTp Sony
HIN B MeCTHOYyONHOMOeHHoE
PpeDnprAtnE NO6cLyXNbBaHIO
H3dEnl Sony.
| ПЯтуз haunha hydikacuaя | Вераянай prочини и/nii MeToD yctpaHeHn | |
| C:04:☐☐ | • Вы Incpoь3уеTe 6aTapeйнь 6blok, кOTopь HeЯВlaeTc8 6batapeйньm 6blokom "InfoLITHIUM".→Исpoь3уITE 6aTapeйнь 6blok "InfoLITHIUM" (cTp.17) | |
| C:21:☐☐ | • ПюиЗошla kondeнcaця BlaRn.→ВыInьTe kaccSETu n ocTaBbTe BaSuBy bVideOKaMepyПрimepeHnoHa 1чacдяakKlImMaTn3aци.(cTp.146) | |
| C:22:☐☐ | • 3aGrp3NeHb BVdeOrOLOBkN.→ПочиТITE BVdeOrOLOBKN cnomoць OuchTeTbeHNoKaccETb Sony V8-25CLD (he npilaraeTc8). (cTp.147) | |
| C:31:☐☐ | • ПюиЗошla heloJaKa, otliucaUozaerSOTnpivBeHbIXbIiSe, KOTopyu Bby можete уcTpaHntb camocToTteHNo.→ВыInьTe kaccSETu n BCtaBbTe ee ChOBA, a 3aTeM BKVIIChuTeBaSuBy BVdeOKaMepy.→ОтcoeДинITE пrobOD 3JIeKTPoPHTaHnCEtEBOаДaNTepaперemEHnOToTKa ИлпжЕВуКБАТСУТeРaпepeMehnOToTKa ИлпжЕВуКБАТСУТeРaпepeMehnOToTKaИлпжЕВуКБАТСУТeРaпepeMehnOToTKaИлпжЕВуКБАТСУТeРaпepeMehnOToTKaИлпжЕВуКБАТСY | |
| E:61:☐☐ | • ПюиЗошla heloJaKa, кOTopyu Bby можete уcTpaHntbcamocToTteHNo.→ОбразиTeB в срвись的同时р Sony Илв МecThoeурлнOMоЧENHoe рeДпргTne по обсLuЖиВанЮ ИзделηSony, rde cleduet coo6uHnTb o 5-3NauchHom Кode. (прIMep:E:61:10) | |
| E:62:☐☐ |
EcHbHe MoKeTe CaMoCToAteIbHo yCtpaHnTb HEnOJaKy daKe nocLe onpOboHaHn COOTBeTCTByIOUxN MeToOB ycTaPHeHn HeCKoJIbKO pa3, 6oPaTntecb B cepBcHbI ueHTp Sony uIN B MecTHoe yNoHOMOeHHoe npedpnraTne no o6cnyXBaHnIO n3deJIn Sony.
IpeDynpexdauoHmHnDKaTOp OTHOCNTbHO JeHTbl
MeJenneHoe MItaHne:
- JeHTa NOUtn DOCTnIgna KOHua.
- He BCtAbJeHa Kaccetac JeHToi.* (CTp. 19)
JIeNEcTOK 3aunItbI 3aInCn Ha JeHTe OTCyTCTByeT (KpaChbI).* (CTp.20)
BbICTpoe MmraHne:
- JeHTa 3aKoHUnJaIacb.*
JIITNeBaa 6aTapeiKa pa3pRnIJaCb HJIN He yCTaHOBLeHa COBCem
(ctp. 127)
HdikauncaumcAmoHaarHoctnKu (ctp. 142)
ПОНЗОЛА KOндэнcaцьяВлагn\*
БыICTpoe MURHHe:
- BbIToJKNHtKe KaccTe, BbIKJIouHtKe BaUy BnDeOkaMepy n ocTaBbTe ee npImepHo Ha 1 yac C oTKpbItbIM KaccETbIM OTCekOM. (cTp. 146)
Bam Huxho n3Bneueb kaccety* MeDneHnoe mRanHe:
JIeNEcTOK 3aunITbI 3aINcN Ha JIeHTe OTCyTCTByET (KpaChbI).(CTp.20)
Быст Poe маганe:
Пюизошлakондсаць влаг.(cтp.146)
JIeHTa 3aKoHcHnlaCb. (CTp.19,33)
Cpa6oTaJaФyHKUH INDkaCmCaMDaHROCTKn. (cTp.142)
IpeynpexkaIOuHnDnKaTOp OTHOCTeJbHO paJa.
MeJenneHoe MuaHne:
-Фаил NOВржден (cTp.91)
-Фаин HeЧтaelСА (СТР.91)
PpeDynpexKaOnn INndkaTop OTHOCHTeNbHO JENTbI NIN 6atapeHoro 6loka**
MeDneHHeMnraHHe:
BaTapeHbIb 6nok NoTu naPazrKeH. (CTp.13)
- JeHTa NOUtn DoCTnIgla KOHua.
Быст两款Mоганe:
- BaTapeHbI bIok pa3pJxHe. (cTp. 13)
-ЛeHTa 3aKoHUnaCb.
* Bby ycblIiTe MeNoIOIO IIN 3yMMepHbI CnHaJI.
**TOT INHINKATOP NOABNTCA TOJIbKO B BNIOCKaTeJe.
Ppeynpexkaioune coo6eHnA
- CLOCK SET
IpeyectaHOBuTe DaTy N BpEmr. (CTp. 89)
FOR "InfoLITHIUM" BATTERY ONLY
IcnoIb3yIte 6aTapeHbI b6Iok "InfoLITHIUM". (ctp. 17)
- 8 mm TAPE SP REC Hi8 TAPE LP/SP REC
IcnoIb3yIteJIeHTbI Hi8 HII 8/Digital 8【),ecIn Bbl BblOnHReTe 3aIncbBpeKIme LP.* (ctp.86)
TAPE END
Jentha 3aKoHnJIacb.
NO TAPE
BCTaBbTe KacccTe.* (CTp. 19)
CLEANING CASSETTE**
3aŋpərənɪnncbVndeorolOBKn.(ctp.147)
FULL
EmkocTB "Memory Stick" 3anonHeHa.* (ToJIbKO DCR-TRV320E) (cTp.98)
He BCtabIeHa "Memory Stick". (ToIbko DCR-TRV320E) (ctp. 93)
- MEMORY STICK ERROR
Данные "Memory Stick" Историческая. (Толъко DCR-TRV320E)
- FORM ERROR
Поберытей пофоматиразовая。(ToькDCR-TRV320E)
- DIRECTION ERROR
Ha "Memory Stick" IMeTc8 60JIe, Yem OJHa DnpeKTopra, TakaJ KaK 100 msdf.* (ToIbKO DCR-TRV320E)
*BbI yCJIbIuNTe MeNoDiIO nII 3yMMepHbI cINHaI.
** INHdkaTOp 念 coo6eHne “CLEANING CASSETTE” 6ydyT noBbTbCnOHO 3a npyHM Ha 3kpahe KKД nIиВ bUdoNcKaTeNe.
Using your camcorder abroad
Using your camcorder abroad
You can use your camcorder in any country or area with the AC power adaptor supplied with your camcorder within 100V to 240V AC, 50/60 Hz.
Your camcorder is a PAL system based camcorder. If you want to view the playback picture on a TV, it must be a PAL system based TV with VIDEO/AUDIO input jack.
The following shows TV colour systems used overseas.
PAL system
Australia, Austria, Belgium, China, Czech Republic, Denmark, Finland, Germany, Great Britain, Holland, Hong Kong, Italy, Kuwait, Malaysia, New Zealand, Norway, Portugal, Singapore, Slovak Republic, Spain, Sweden, Switzerland, Thailand, etc.
PAL-M system
Brazil
PAL-N system
Argentina, Paraguay, Uruguay
NTSC system
Bahama Islands, Bolivia, Canada, Central America, Chile, Colombia, Ecuador, Jamaica, Japan, Korea, Mexico, Peru, Surinam, Taiwan, the Philippines, the U.S.A., Venezuela, etc.
SECAM system
Bulgaria, France, Guyana, Hungary, Iran, Iraq, Monaco, Poland, Russia, Ukraine, etc.
Simple setting of clock by time difference
You can easily set the clock to the local time by setting a time difference. Select WORLD TIME in the menu settings. See page 76 for more information.
Maintenance information and precautions
Moisture condensation
If your camcorder is brought directly from a cold place to a warm place, moisture may condense inside your camcorder, on the surface of the tape, or on the lens. In this condition, the tape may stick to the head drum and be damaged or your camcorder may not operate correctly. If there is moisture inside your camcorder, the beep sounds and the indicator flashes. When the indicator flashes at the same time, the cassette is inserted in your camcorder. If moisture condenses on the lens, the indicator will not appear.
If moisture condensation occurred
None of the functions except cassette ejection will work. Eject the cassette, turn off your camcorder, and leave it for about 1 hour with the cassette compartment open. Your camcorder can be used again if the indicator does not appear when the power is turned on again.
Note on moisture condensation
Moisture may condense when you bring your camcorder from a cold place into a warm place (or vice versa) or when you use your camcorder in a hot place as follows:
- You bring your camcorder from a ski slope into a place warmed up by a heating device.
- You bring your camcorder from an air-conditioned car or room into a hot place outside.
- You use your camcorder after a squall or a shower.
- You use your camcorder in a high temperature and humidity place.
How to prevent moisture condensation
When you bring your camcorder from a cold place into a warm place, put your camcorder in a plastic bag and tightly seal it. Remove the bag when the air temperature inside the plastic bag has reached the surrounding temperature (after about 1 hour).
HΦopMaζη nO yXoDy 3a aΠnapaTOM n Mepbl npεdOCTOpOχHQCTn
KoHdeHcaZnBlaRn
EcIn BnDeOkamepa npHeceha npAMo n3 XONoDHorO MeCTa B TeNIOe,TO BHyTpIn BnDeOkamepbI,Ha NOBepXHOCTn IeHTbI INn Ha 06BeKtNBe MoKET npOn3OITN KOHeHCaHcHnBlaRi. B TAKOM COCTOHNJLEHTa MoKET npININHyt K 6apabahy rONOBKN i 6yDet NOBpeJdeHa INn Jee BnDEOkamepa He CMOKET pa6oTaB HAnEkaUIM O6pa3OM. EcIn BHyTpIn BnDeOkamepbI npOn3OuJa KOnHeHCaCuaBn, TO npO3ByuHT 3yMmepHbI cRHaN, a Ha 3kpaHe XXKD 6yDet MmraTb INhDKaTOP .EcnB To Jx e camoe Bpemr 6yDet MmraTb INhDKaTop ,3TO 3NaHT, YTO B NDeOkamepy BCTaBNeHa kacceta.EcIn Bnara cKOHDeHCnpOBaNacb Ha 06BeKtNBe, INhDKaTOP NOABJIATbcr He 6yDet.
Ecn npon3oJla KOHcHcaJn BnaI
Hn Onda H3 cyHKui, KpOME BbITaIKBaHnKacCtBt, He 6yDyT pa6oTaB. N3BLeKeNTe KaccTe, BbIKIOHTe BnDEOKaMepu NocTAbbTe ee np6bn3ntelbHO Ha 1 yac C OTkpblIM KaccTeHbIM. Ecnn npn NOBTOPHOM BKIOUChENnNITAHNA INdNKATOp He nOBHTcHa DnCnIee, Bb MoXeTe CHOBA NOLb3OBaTbcR BnDEOKaMepo.
PpimeyaHnno KOHdeHcaunn BlaH
Bnara moKeT o6pa3oBaTbCra, ecIn Bbl npHecete BaUy BnDeokamepy nX xOIoNHoro MeCTa B TEnIoe (nnn Hao6OpOT) nnKorJa Bbl nCnoIb3yeTe BaUy BnDeokamepy B kApkOM MeCTe B cIeDyUoIcx CnyuAax:
-Bb npHecn Bauy BIndeokamepy c JbIXHOrCKIOHa B NOMeueHne, rJe cyHKUOHNpyo6oRpeBaTeIb.
-BbI npHecn BaUy BnDeokamepy n3 abTOMO6nJI nn I3 KOMHaTbIC BO3dYuHbIM KOHNIOHOPOBaHnEM B XapKoe MeCTO Ha yInue.
-BbIncnoB3yeTe Bndeokamepy nocne rpo3blnndoxJ.
-BbI nCnoJIb3yTe BaUy BnDeOkaMepy B OueHb XapKOM N BnaJxHOM MecTe.
Kak npedotBpaTb KOHdeHcaunBlaH
EcIn BnIeOKaMepa npHecHa n3 xOJIOHOro MeCTa B TeJIIOE,TO IIOJOKe TBe NIDeOKaMepy B IOnIN3TUNeHObB NAKET IN IOTNO 3AkJeIeero. BbInbTe BnIEOKaMepy n3 IOnIN3TUNeHOBOr ONaKeta, KOrTa TEMpePaTypa BO3Dyxa BHyTpN naketa DOCTnHET TempePaTypbOkpyKaIOUeRO BO3Dyxa (PpI6bn3ntelbHo uepe3 1 ac).
Maintenance information
Cleaning the LCD screen
If fingerprints or dust make the LCD screen dirty, we recommend using a LCD Cleaning Kit (not supplied) to clean the LCD screen.
Cleaning the video head
To ensure normal recording and clear pictures, clean the video heads.
When you playback/record in the Digital8 system
The video head may be dirty when:
- mosaic-pattern noise appears on the playback picture.
- playback pictures do not move.
- playback pictures are hardly visible.
- playback pictures do not appear.
- the x indicator and "CLEANING
CASSETTE" message appear one after another on the LCD screen or in the viewfinder.
HΦopmaunno yxody 3a annapatom
Ynctka 3KpaHa KKd
EcHnHa3KpaHe KKIOBbATcO TneuATKn IIN nbJIb, peKOMeHdyeTcB OBCN0lb3OBaTcO ouCTnTeIbHbIM HabOpom dJa KK(Dhe npinaraetc) dJy uCTkn KK.
甲CTKa BnDeOroJIOBOK
ДяобсеньяHopMaJIbHоЗаин chKOrO n3O6paXeHn CneDyet nepNoIynchck nCHCTNtB BnDEOrOJOBKn.
При Воспpon3beDEHn/3aIncB zuΦpoBoC cnCTeme Digital8【
BnDeOrOJOBKn BO3MOXHO 3aRpa3HeHbI,ecN:
-Ha BOCPON3BOIDMOM N3O6paXeHIN NOBBAJOTCA NOMEXN TUNA M03aKN.
- Bocnpo3BOdmoe n306paXeHne He DnurTaETcR.
- Bocnpo3B0DnMOe n3O6paXeHne c Tpydom pa3NIuHMo.
- Bocnpoan3BOJIMOe n306paXeHne He noBnTcRa Ha 3KpaHe.
-Ha 3kpaHe KKД nIN B BnDOnckaTeNe NOBbIaHOTcOdINH 3a DpyrIM INHdNkATOp COo6uHHe "CLEANINING CASSETTE".

When you play back in the Hi8/Standard 8 (analog) system
The video head may be dirty when:
- playback pictures contain noise.
- playback pictures are hardly visible.
- playback pictures do not appear.
or/nn

PnB BocnpOn3BeDeHmN B CnCTeMe (aHaIorOBo) Hi8/ctAndaprTHoN CnCTeMe 8
BndeorolOBKn BO3MOXHO 3aRpa3HeHbI,ecN:
-Bocnpoun3BOIDMOe n3o6paXeHne coedePknT NOMEXN.
- BocnpoIN3BODIMoe IN3OBpaXeHne C Tpydom pa3nUHMO.
- Bocnpo3B0DmOe 136paXeHne He nOBnTcHa 3KpaHe.

or/nn

If the above problems occur, clean the video heads with the Sony V8-25CLD cleaning cassette (not supplied). Check the picture and if the above problems persist, repeat cleaning.
B cnyae Bo3HKnHOBeHn yKa3aHHbIX BblIe np6IeM, NocHTte BInDeoROJOBKn C nOMOuI OouCTteJIbHoi KaccetbI Sony V8-25CLD (He npIraeTc). PpOBepTe n3O6paXeHne n, ecnn ONcaHbIe BblIe np6JIeMbI He yCTpaHnINCb, NOBTOpe YNCTKy.
Removing dust from inside the viewfinder (DCR-TRV120E/TRV125E)
(1) Remove the screw with a screwdriver (not supplied). Then, while holding the RELEASE knob up, turn the eyecup in a counterclockwise direction and pull it out.
(2) Clean the surface with a commercially available blower for a still camera.
(3) Turn the eyecup in a clockwise direction, then replace the screw.
YdaJIeHne NbIIN 3NHyTpN BvIDOnCKaTeJI (DCR-TRV120E/TRV125E)
(1) ①OTBnHTnTE BnHT C NOMOuBHO OTBepTKN (He npinlaraetc). ②3aTeM, DePka HaxaToi KhoNky RELEEASE, ③noBepHnTe OkyIap npOTNB YacOBoN CTpeJIKN I NOTaHnTe erO.
(2)Почистпе NOВЕРХИСТь C NOMОДБЮ BO3ДУXYОДВКИ ДЯ ФOTOАПAPATOB, KOTOPАг пиобразета ст OДЕЛБИ.
(3)Повернite Okулар по чавоь стpeлке,а 3aTeM 3aВиNTITE BINT OБрТно Ha MeCTO.

Caution
Do not remove any other screws. You may remove only the screw to remove the eyecup.
BHMaHne
He OTBnHnBaIe Dpyrne BnHTbI. Bbl MoKTe OTBnHnBaTb TOJbKO BnHT dJIa ChrTna OkyIpa.
Precautions
Camcorder operation
- Operate your camcorder on 7.2V (battery pack) or 8.4V (AC power adaptor).
- For DC or AC operation, use the accessories recommended in this operating instructions.
- If any solid object or liquid get inside the casing, unplug your camcorder and have it checked by a Sony dealer before operating it any further.
- Avoid rough handling or mechanical shock. Be particularly careful of the lens.
- Keep the POWER switch set to OFF (CHARGE) when you are not using your camcorder.
- Do not wrap your camcorder with a towel, for example, and operate it. Doing so might cause heat to build up inside.
- Keep your camcorder away from strong magnetic fields or mechanical vibration. Noise may appear on the image.
- Do not touch the LCD screen with your fingers or a sharp-pointed object.
- If your camcorder is used in a cold place, a residual image may appear on the LCD screen or in the viewfinder. This is not a malfunction.
- While using your camcorder, the back of the LCD screen may heat up. This is not a malfunction.
On handling tapes
Do not insert anything into the small holes on the rear of the cassette. These holes are used to sense the type and thickness of the tape and if the recording tab is in or out.
Camcorder care
- Remove the tape, and periodically turn on the power, operate the CAMERA and PLAYER sections and play back a tape for about 3 minutes when your camcorder is not to be used for a long time.
- Clean the lens with a soft brush to remove dust. If there are fingerprints on the lens, remove them with a soft cloth.
- Clean the camcorder body with a dry soft cloth, or a soft cloth lightly moistened with a mild detergent solution. Do not use any type of solvent which may damage the finish.
- Do not let sand get into your camcorder. When you use your camcorder on a sandy beach or in a dusty place, protect it from the sand or dust. Sand or dust may cause your camcorder to malfunction, and sometimes this malfunction cannot be repaired.
MepblnpedocTopoXHoctn
3KcnpnyataaBnDeOKamepbl
-3Kcnpnyatnpyute Bndeokamepy ot 7,2B (6aatapeHbN60k) nI IN8,4 B (ceTeBO aadantep nepemehHORO TOKA)
- UTo KacaetcA 3KcIpyaTaunBnDeokAmepbI OT NOCTOHHORIO INpeMeHHORO TOKA,MCN0JIb3yITe PnHAnJExHXoCTIn,peKOMHeYdEmbIe B daHHoINHCTpykUIM NO 3KcPnlyatauM.
Ecnk KaKoH-Nb6yB TBepdb npEmT nIi XnKoCtB nOaJIb BHTpyk KOpNcA, BbIKIOuHTe BInDeokampeu nPoBepBe y e y Inepa Sonye neped dabHeuwe ee 3cknnyatauei.
ИзбeraиТугбоуобразецьсВидевокамериMuMuexanHecKxuУадов.БydteOcobHoOCTOPOXHbIcO6bEeTbOMB.
- Eczn BVDeokamepa He NcNoIb3yETcR, yCTAHOBITeBbIKIOuATEb POWER BnIOJoxeHNN OFF (CHARGE).
He 3abopauHbai Te BaUy BnDeokAmepy, Hapnpimep, B nOToTeHne, U He 3KnIpyaTnpuYe ee B TaKOM COCTONHH. B npOTBnHM Cnayae MoKe Jpn03oTN NOBbUHEHne TEMNEpATpyB BHUTPN BnDeokAmepeB.
-ДерхиTe Bawy Bndeokamepy noaIbIe ot CnBbIX MAHINTHbIX NOEIN IINI MEXaHIneCKoB Bn6paIIN. Ha 3KpaIe KKД IINI BnDOnckaTeNe MOrYT NOBINTCBsI NOMExN.
- He npikacaiTebc K3kpany JKd cboimn panbamn nll octpbmnpedmetamn.
Pn3KcNpyataunBaae BInDeoKaMepbIBXoIOHOM MeCTe,Ha3kpaHE XKJINuB BNIOCMKATeNE MOKET NOBIAIbTcB OCTaTOOHoe N3O6paxKeHne.3To He ABJIIEETC HENCPNABHOCTbIO.
- Пи КснлуatauIM Bausь MИdeokamepbl,Здня CTOPOHA Kpauka KKД мокет HarpeBaTbC. 3TO He RAJIaTeT CHERICNpRaBHOCTbI.O.
06paueHne c JeHTamn
He BCTabJIrTe HmUero B MaIeHbKne OTBepCTnHa 3aJHNe CTOpOHe Kaccetbl. 3Tn OTBepCTnHcONJb3yIOCTn Dn ONPeJeHn Tnna NToIuINbI JeHTbl, a TAKCe DNpOEJeHn HauNHy INOTCYTCTBn JIeNEcTKa 3aUnTIb 3aIcn HaJeHTe.
Uxo3a Bndeokamepoi
-Пернодунесквынимаite кассуи Вьлочаite
питанe,oneрпуITE yctpoINCTBAMn CAMERA n
PLAYER n BOCPOn3BOJIne NHTy npORka 3-x
MHyT,ecnBaSA WbdeOKaMepHe Ne6ydet
NcNoJIb3OBAtCbE DInTeJIbHOe BPEMn.
- YnCTNTe OBeKTNB C NOMOuBIO MRAKKO KNUCTOcKNI DnyuaneHnN IyIN. EcNI NmEIOCTO NTNEaTKN NaNbueB Ha ObekTnBE, ydaJIne INX C NOMOuBIO MRAKKO TKAHN.
- UcTtE Kopnyc BInDeOkamepbI C NOMOuBc cyXoMRAKoTKaHINIMARKOITKaHIN,CLERKaCMoHeHHo pACTBOpOM yMepeHHOrO MOUeeroCpeCDtBa.He IcNoIb3yIte KaKnx-Jn6o TnOBpactBOPnTeJe,KOTOpBle MOrYT NOBpeDnTbOTDeJKy.
He donyckaTe nopaDHaHnA necka B BIndeokamepy.EcnBbIncnoJIb3yeTe BIndeokamepy Ha necaHOM IJHXe INI B KaKOMIbn6 nbIbHOM MeCTe, npedoxpAHte annpaT ot necka Hn nbI. NcEOK nIbMbMOTy npINBeCtN K HeICnPABHOCTn AnnpaTa, KOtOpA INOHdMoKeT bItb HeICnPABHMoN.
Connection to your PC
When inputting the image recorded by Hi8/ standard8 (analog) system into your PC, dub the image into a Digital8 or DV tape first, and then input it into your PC.
When inputting the image recorded by Hi8/ standard 8 system into Sony VAIO
The Program Capture function of DVgate motion doesn't work. To use this function, dub the image into a Digital8 or DV tape first, and then input it into your Sony VAIO.
AC power adaptor
- Unplug the unit from the mains when you are not using the unit for a long time. To disconnect the mains lead, pull it out by the plug. Never pull the mains lead itself.
- Do not operate the unit with a damaged cord or if the unit has been dropped or damaged.
- Do not bend the mains lead forcibly, or place a heavy object on it. This will damage the cord and may cause fire or electrical shock.
- Prevent metallic objects from coming into contact with the metal parts of the connecting section. If this happens, a short may occur and the unit may be damaged.
- Always keep metal contacts clean.
- Do not disassemble the unit.
- Do not apply mechanical shock or drop the unit.
- While the unit is in use, particularly during charging, keep it away from AM receivers and video equipment. AM receivers and video equipment disturb AM reception and video operation.
- The unit becomes warm during use. This is not a malfunction.
-
Do not place the unit in locations that are:
-
Extremely hot or cold
Dusty or dirty - Very humid
Vibrating
- Use only the specified charger or video equipment with the charging function.
- To prevent accident from a short circuit, do not allow metal objects to come into contact with the battery terminals.
- Keep the battery pack away from fire.
- Never expose the battery pack to temperatures above 60^ (140^) , such as in a car parked in the sun or under direct sunlight.
- Keep the battery pack dry.
- Do not expose the battery pack to any mechanical shock.
- Do not disassemble nor modify the battery pack.
- Attach the battery pack to the video equipment securely.
- Charging while some capacity remains does not affect the original battery capacity.
Notes on dry batteries
To avoid possible damage from battery leakage or corrosion, observe the following:
- Be sure to insert the batteries with the + - polarities matched to the + - marks.
- Dry batteries are not rechargeable.
- Do not use a combination of new and old batteries.
- Do not use different types of batteries.
- Current flows from batteries when you are not using them for a long time.
- Do not use leaking batteries.
If batteries are leaking
- Wipe off the liquid in the battery compartment carefully before replacing the batteries.
- If you touch the liquid, wash it off with water.
- If the liquid get into your eyes, wash your eyes with a lot of water and then consult a doctor.
If any problem occurs, unplug your camcorder and contact your nearest Sony dealer.
BaTapeHbIb 6Jok
- IcnoIb3yIte TOnIbKO peKoMeHdyEmoe 3apJHOe yCTPOIcTBO ININ BnDeoanpaTpy C 3apJHOHФyHKUeN.
-ДяпразТьразЕн HeCuaCTHOrO cIyUa н3-3a KOPOTKOrO 3aMbICAHNe He dONyCsKaIte КоТаКТаMeTaNJIuYeCECKNx NpeMDEtOB C nONIOcAMn 6bTapeHOrO 6Ioka. - He pacnojaraite 6aataeHbI 6Jok B6Jn3n orHa.
He noDBepraTe 6aTapeHbI bIOK Bo3deICTBnIO TEMpepaTycBbIe 60°C, HAnpIMep, B npNapKOBaHHOM NOI cOJIHcEM aBTOMoBJIne IINI pOJ pRmblcOJIHeuHbIM CBETOM.
CJIeInte 3a TEM, YTO6bI 6aTapeHbI 6JIOK 6bl cyxIM. - He noDBeprAte 6aTapeHbI bLoK BO3DeIcTBnIO KaKnx-ⅡbO MExaHnuecknx yIapOB.
- He pa36bpaTne n He BnDOn3MeHraTe 6aTapeiHbI 6Jok.
- Ппкрennialу Te 6atapeинь Stok K Bndeoannapatype nIoTHO.
- 3apЯДа в сCitye ocTbWeeSca EMKocTn 3apЯДа He OtpaKaTeCn Ha EMKocTn NepBoHaYalbHOro 3apЯДa.
EcIn npOn30uHa yTeKa BHyTpEnHero BeuecTb6aTaapeek
- Ipeed Tem, KaK 3aMeHnB 6aTapeiKn, TuaTeIbHO nPoTpIne OCTaTKN KNDKOCTN BOTcKe DnA 6aTapeek.
Bcnyae npanaDAnHJ KNDKoCTn Ha Koxy, npOMOte KNDKOCTb BOOn.
Bcnyae nonaadaHnJxNkocTn BIa3a, npomTe CBOI rla3a 60JIbUIM KONUeCTBOM BObl, nOcne Yero o6paNTecb K BpaUy.
B clyaee Bo3HKnHOBeHn KaKnx-JI6o Ipo6Jem, OTKJIouHTe BaUy BnDeOkamepy OT nCTOuHnKa nITaHnI N o6paTntEcB B 6nJaunn cepBnChbl n eHTp Sony.
Video camera recorder
System
Video recording system
2 rotary heads
Helical scanning system
Audio recording system
Rotary heads, PCM system
Quantization: 12 bits (Fs 32kHz
stereo 1, stereo 2), 16 bits
(Fs 48 kHz, stereo)
Video signal
PAL colour, CCIR standards
Recommended cassette
Hi8/Digital8 video cassette
Recording/playback time (using
90 min. Hi8 video cassette)
SP mode: 1 hour
LP mode: 1 hour and 30 minutes
Fastforward/rewind time (using
90 min. Hi8 video cassette)
Approx. 5 min.
Viewfinder
Electric Viewfinder:
- monochrome (DCR-TRV120E/ TRV125E)
monochrome LCD (DCR-TRV320E)
Image device
1/4 type CCD (Charge Coupled Device)
Approx. 800,000 pixels
(Effective: Approx. 400,000 pixels)
Lens
Combined power zoom lens
Filter diameter 37mm (1 1/2 in.)
25× (Optical), 100×^* (Digital)
- 125 × ( DCR - TRV125Eonly)
Focal length
3.7 - 92.5 mm (5/32 - 3 3/4 in.)
When converted to a 35mm still camera
48 - 1200 mm (1 15/16 - 47 1/4 in.)
Colour temperature
Auto
Minimum illumination
3 lux (F 1.6)
0 lux (in the NightShot mode)*
- Objects unable to be seen due to the dark can be shot with infrared lighting.
Input/output connectors
S video input/output
4-pin mini DIN
Luminance signal: 1 Vp-p,
75 ohms, unbalanced
Chrominance signal: 0.3Vp - p
75 ohms, unbalanced
Audio/Video output
AV MINIJACK, 1 Vp-p, 75 ohms, unbalanced, sync negative
327mV (at output impedance more than 47 kilohms)
Output impedance with less than
2.2 kilohms/Stereo minijack ( 3.5mm)
DV output
4-pin connector
Headphone jack
Stereo minijack (0 3.5 mm)
LANC control jack
(DCR-TRV120E/TRV125E)
LANC DIGITAL I/O jack
(DCR-TRV320E)
Stereo mini-minijack ( 2.5mm)
Transfer rate: Max 115.2 Kbps
RS-232C based
MIC jack
Stereo minijack ( 3.5mm)
LCD screen
Picture
2.5 type
50.3 × 37.4 ~mm (2 × 1 ~l / 2 in)
Total dot number
123,200 (560× 220)
General
Power requirements
7.2 V (battery pack)
8.4 V (AC power adaptor)
Average power consumption
(when using the battery pack)
During camera recording using
LCD
DCR-TRV120E/TRV125E:
3.6 W
DCR-TRV320E: 4.0 W
Viewfinder
DCR-TRV120E/TRV125E:
3.2 W
DCR-TRV320E: 3.1 W
Operating temperature
0^ to 40^ (32^ to 104^)
Storage temperature
-20°C to +60°C (-4°F to +140°F)
Dimensions (Approx.)
DCR-TRV120E/TRV125E:
107× 106× 233mm
(41 / 4× 41 / 4× 91 / 4 in.) (w / h / d)
DCR-TRV320E:
107× 106× 207mm
(41 / 4× 41 / 4× 81 / 4 in.) (w / h / d)
Mass (approx.)
DCR-TRV120E/TRV125E:
930 g (2 lb)
DCR-TRV320E: 960g (2 lb 1 oz)
excluding the battery pack, lithium
battery, cassette and shoulder strap
1.1 kg (2 lb 6 oz)
including the battery pack
NP-F330 or F550, lithium battery
CR2025, 90 min. Hi8 cassette, and shoulder strap
Supplied accessories
See page 5.
AC power adaptor
Power requirements
100-240VAC,50/60Hz
Power consumption
23 W
Output voltage
DC OUT: 8.4 V, 1.5 A in the
operating mode
Operating temperature
0^ to 40^ (32°F to 104°F)
Storage temperature
-20^ to +60^ (-4^ to +140^)
Dimensions (approx.)
125× 39× 62mm
(5× 19 / 16× 21 / 2 in.) (w / h / d)
excluding projecting parts
Mass (approx.)
280 g (9.8 oz)
excluding power cord
Battery pack
Output voltage
DC 7.2 V
Capacity
NP-F330:5.0 Wh
NP-F550:10.8 Wh
Dimensions (approx.)
38.4 × 20.6 × 70.8 ~mm
(19 / 16× 13 / 16× 27 / 8 in.)
(w/h/d)
Mass (approx.)
70g (3.4 oz)
Type
Lithium ion
"Memory Stick" (DCR-TRV320E only)
Memory
Flash memory
4MB: MSA-4A
Operating voltage
2.7 - 3.6 V
Power consumption
Approx. 45mA in the operating mode
Approx. 130~ A in the standby mode
Dimensions (approx.)
50× 2.8× 21.5mm
(2× 1 / 8× 7 / 8 in.) (w / h / d)
Mass (approx.)
4 g (0.14 oz)
Design and specifications are subject to change without notice.
Texhnueckne xapaKtepncnkn
Bvdeokamepa
CnCTema
Cnctema Bndeo3annc
2BpauaououecraTOLOBK
CnCTemaHaKIOHHOI
MexaHnuecko pa3BepTKN
Cnctemaaydno3aannc
DnckpeTn3aun:126ntOB
(CDbur qactotbl 32 kU, ctepeo 1, ctepeo 2), 16 mTob (CDbur qactotbl 48 kU, ctepeo)
BndeocnHa
LbeteBoi CnHAp PAL, cTaNapT MKKP
PekomeHdyemble kaccetbl
BndeokacctbHi8/Digital8
(DCR-TRV120E/TRV125E)
MOHOXOPMATUeCKM KJKD (DCR-TRV320E)
ΦopMnpoBaTeIb n3o6paXeHn
PnI pne06pa3oBAHmB 35-MM photokamepy
48 - 1200 MM
LBeTOBaTeMnepaTypa
AByopBAnHe
MmHmAJbHaOBcBueHHeHOCTb 3nk (F1,6)
0 JK (B pexmme HouHcBemKn)*
* CbEmky obBeKTOB, HEBNIMbIX B TEMHOTE, MOXHO BblIOJIHTb C NOMOJIbU INHpaPakpachORO OCBeIeHNIA.
Pa3beMbI BXOHyBIX/BbIXOHyBIX CnRHaNoB
BxOa/BbIXoA S BnDeo
4-WTbIPbKOBoe MHNrHe3do DIN
CINHAN rPKOCTN:pa3MaX1B, 75 OM, HECMNMTPIHbIIN
Cunhal zBteHocTn:pa3max0,3B,
75 Om, HecmmMeTpHbI
BbIXoD cnHana aydno/BnDeo
AV MINJACK, pa3mMax 1 B, 75 OM, HecMNMMTPOHbIb, 327 MB c
OTUPTAEbHON CHHXPOHN3aUmei (PnB BbXoHOM PONHOM cOPTOBNBEHNI 47 kOM)
PonHoe cOnpOTnBHeHne MeHee 2,2
KOM/CTpeofochoHuecCKoe MHNHrE3zo (O 3,5 MM)
DV BixoD uΦpOBOBVDueoCnHana
4-ITbIPbKOBbl pa3beM
THe3DOrOJIOBbIXTeIeΦoHOB
CTpeoOHmEeCKOE MHNH-THe3do (0,5 MM)
THe3o ynpBaBnHnLA NLC (DCR-TRV120E/TRV125E)
THe3oLANC DIGITALI/O (DCR-TRV320E)
CTpeoOHmueckoe MHHI-rHe3do (2,5 MM)
DCR-TRV120E/TRV125E:
3,2 B
DCR-TRV320E:3,1 B
Pa6o7a Tempepatya
OTo 0^ do 40^
TempepatypxpaheHH
O -20^ 1o+60°C
Pa3Mepbl (npu6Jn3.)
DCR-TRV120E/TRV125E:
107× 106× 233MM (W/B/r)
DCR-TRV320E:
107× 106× 207MM (W/B/r)
Bec (npn6Jn3.)
DCR-TRV120E/TRV125E: 930 r
DCR-TRV320E:
960r
He BKJIIOUaH batapeHbIbIbOK, NITnEByUb bataeKuY, Kaccety n PIIeueB opeMeH
1.1K
BkJIOUa 6aTapeHbI 6LoK
NP-F330 nJn F550, JIITNeBvIO
6aTapeiKy CR2025, 90-MnH.
kaccety Hi8 nIpeyeBOB pemeHb
PnnaaraembIe npnaadnxHocTn CM. ctrp.5.
Ceteboa aandaTep nepemehhoro TOka
Tpe6oBaHnK nntaHnIO
100-240BnepeMeHHoroToka,50/60Γu
Notpe6JrEma MoUHOCTb
23BT
BbIXoHoe HapnpxeHne
DC OUT: 8,4 B; 1,5 A B pa60yem
pekme
Pa6ooua TemnepaTpa
OTo 0^ do 40^
TemnepatypxaheHna
OT-20°C IDO +60°C
Pa3Mepbl (npn6Jln3.)
125× 39× 62MM (U/B/r)
He BKIOUaB BbICTyNaIOuNe YaCTN
Bec (npn6n3.)
280r
He BKIOUOaCeTeBOu SHyP
BaTapeiHbI 6JIOK
BbIXoHoe HapnpxeHne
7,2B noctoHHoro Toka
EMKOCTb
NP-F330:5.0BT-4
NP-F550:10.8BT-4
Pa3mepb (np6n3.)
38,4×20,6×70,8MM (U/B/r)
Bec (npn6nn3.)
70r
Tin
JIITNHEBO-NOHHbI
"Memory Stick"
(Tolbko DCR-TRV320E)
Namrta
Φn3u-naMaTb
4 M6: MSA-4A
Pa6ooye HaprJxKeHne
2,7-3,6B
Notpe6JrMaMoHocTb
Ppns3.45mA Bpa6oem pexime
Pn6JIn3.130MKAВpeKIme
OxndaHnA
Pa3Mepbl (npu6Jn3.)
50× 2,8× 21,5MM (U/B/Γ)
Bec (npn6n3.)
4
KOHCTpykunia nTexHmeeckne xapaKTepnctnIKoMUTy bItb NImEHeBb 63e yBEdOMLeHHa
Identifying the parts and controls
LCD BRIGHT buttons (p. 23)
2 OPEN button (p. 21)
3 VOLUME buttons (p. 33)
4 BATT RELEASE lever (p. 12)
5 POWER switch (p. 21)
6 START/STOP button (p. 21)
7 Hooks for shoulder strap (p. 156)
DC IN jack (p. 13)

This mark indicates that this product is a genuine accessory for Sony video products. When purchasing Sony video products, Sony recommends that you purchase accessories with this "GENUINEVIDEO ACCESSORIES"mark.
1 Khonk LCD BRIGHT (ctp. 23)
2 Khonka OPEN (ctp. 21)
3 KhonKn VOLUME (cTp. 33)
4 Pbyar BATT RELEASE (ctp. 12)
5 NepekeJIIOuHaTeIb POWER (cTp. 21)
6 Khonka START/STOP (cTp. 21)
7 KpOuKn dIJI pIeueBOrOp eMHa (cTp. 156)
8 THe3do DC IN (ctp. 13)

Video control buttons (p. 33, 36)
STOP (stop)
REW (rewind)
PLAY (playback)
FF (fastforward)
PAUSE (pause)
The control buttons light up when you set the POWER switch to PLAYER.
10 EDITSEARCH buttons (p. 31)
11 S.LASER LINK button (p. 40)
12 Focus ring (p. 57)
3 Microphone
14 Camera recording lamp (p. 21)
15 Infrared rays emitter (p. 28, 40)
16 SUPER NIGHTSHOT button (p. 28)
17 NIGHTSHOT switch (p. 28)
Display window (p. 161)
FOCUS switch (p. 57)
20 Tripod receptacle (base) Make sure that the length of the tripod screw is less than 6.5mm (9/32 inch). Otherwise, you cannot attach the tripod securely and the screw may damage your camcorder.
Remote sensor
9 KhoIKN BnDeOkoHTpOJIa (ctp. 33, 36)
STOP (ocTaHOBka)
REW (yckopeHHa nepemOTka Ha3a)
PLAY (Bocnpon3BeJeHne
FF (yckopeHHa nepemOTka Bnpei)
II PAUSE (nay3a)
KHONKIOKHTPONBABICBEUMAOTC npn yctahOBKe nepeKJIouaTeIa POWER B nnoJoxHeIe PLAYER.
10 Khonka EDITSEARCH (ctp. 31)
11 Khonka S.LASER LINK (cTp. 40)
12 KoIbIcOΦokycnpoBKn (ctp. 57)
13 Minkpofoh
14 Namna 3aHnCn BIndeokamepbI (ctp.21)
15 N3nyaTeIb INΦpaKpaChbIX Lyuei (ctp. 28, 40)
16 Khonka SUPER NIGHTSHOT (ctp. 28)
17Переклочаль NIGHTSHOT (ctp.28)
18 Okowko dncnJe (cTp. 161)
19 PnepeKJIIOUaTeIb FOCUS (cTp. 57)
20 The3do Ia TpeHorn (OCHOBaHne)
V6eIntecb, YTO dIINHA BnHTA TpeHOrn MeHee 6,5 MM. B IpOtnBnHOM Cnyae Bb He CMOxete NaHEXHO pNkPepNTb TpeHory, a BnHT MoKet NOpEiNb TaWy BnDeokamepy.
21 DaTnK dNCTaHcNoHOrO ynpabJIeHn
22 Eyecup
Viewfinder lens adjustment lever (p. 25)
[24] Viewfinder (p. 25)
25 MEMORY INDEX button (p. 111)
26 MEMORY PLAY button* (p. 109)
27 MEMORY - button (p. 102, 109)
28 LCD screen (p. 23)
29 Speaker
30 (self-timer) button (p. 30)
31 Eyecup RELEASE knob (p. 148)
32 MEMORY DELETE button (p. 118)
33 FADER button (p. 47)
34 BACK LIGHT button (p. 27)
35 PROGRAM AE button (p. 55)
EXPOSURE button (p. 56)
37 MEMORY MIX button (p. 102)
38 MEMORY + button (p. 102, 109)
DCR-TRV320E only
* DCR-TRV120E/TRV125E
20 OkyIap
23 Pbyar peryunipobkn oBekTnBa BvdoNcKaTeIa (ctp. 25)
24 BvOnsKaTeIb (CTp. 25)
25 Khonka MEMORY INDEX* (ctp. 111)
26 Khonka MEMORY PLAY (ctp. 109)
[27] Khonka MEMORY - (cTp. 102, 109)
28 3KpaH KKD (CTp. 23)
29ДиHAmNK
30 KhoNka (TaHmepa cAmO3anycka) (cTp. 30)
31 Khoŋka ocbo6oxdēHnO kʊyIpa RELEEASE** (ctp. 148)
32 Khonka MEMORY DELETE* (ctp. 118)
33 Khonka FADER (cTp. 47)
34 Khonka BACK LIGHT (cTp. 27)
35 Khonka PROGRAM AE (cTp. 55)
36 Khonka EXPOSURE (cTp. 56)
37 Khonka MEMORY MIX (ctp. 102)
38 KhoNka MEMORY ^+ (cTp. 102, 109)
Tórbko DCR-TRV320E
* DCR-TRV120E/TRV125E
Attaching the shoulder strap
Attach the shoulder strap supplied with your camcorder to the hooks for the shoulder strap.
PpikpenHe nIeYeBOpeMHa
PpNkpeNte PnIeYeBo pEmHb,
PpNlaeraMbl K BaSeB BnDeOkamepe, K
KpUQkam DnA PnIeYeBOrO peMHra.
39 Intelligent accessory shoe
40 DATA CODE button (p. 35)
41 DISPLAY button (p. 34)
42 Lithium battery compartment (p. 128)
PB ZOOM button (p. 66)
44 TITLE button (p. 59)
45 Power Zoom lever (p. 24)
46 "Memory Stick" lamp This lamp lights up while "Memory Stick" is in the "Memory Stick" compartment.
47 PHOTO button (p. 41)
48 DIGITAL EFFECT button (p. 51, 65)
49 END SEARCH button (p. 31)
50 PICTURE EFFECT button (p. 50, 64)
51 MENU button (p. 45, 76)
52 SEL/PUSH EXEC dial (p. 45, 76)
DCR-TRV320E only
Intelligent Accessory Shoe
Notes on the intelligent accessory shoe
- The intelligent accessory shoe supplies power to optional accessories such as a video light or microphone.
- The intelligent accessory shoe is linked to the POWER switch, allowing you to turn the power supplied by the shoe on and off. Refer to the operating instructions of the accessory for further information.
- The intelligent accessory shoe has a safety device for fixing the installed accessory securely. To connect an accessory, press down and push it to the end, and then tighten the screw.
- To remove an accessory, loosen the screw, and then press down and pull out the accessory.
39 DepxaTeJb dJa yctaHOBKn pInHaJdJeXHoCTeN
40 Khonka DATA CODE (cTp. 35)
41 Khonka DISPLAY (CTp. 34)
42OTCEK JNTHeBOB 6aTapeeKn (CTp.128)
43 KhoNka PB ZOOM (cTp. 66)
44 Khonka TITLE (ctp. 59)
45 Pbyar npuBODHOro Bapnoo6bektnBa (ctp. 24)
46 Jlamnoyka "Memory Stick"
3Ta lamnoka BbICBEHBAETC B TO BPEM, Korga "Memory Stick" BCTaBnEHa B OTCek "Memory Stick".
[47] Khonka PHOTO (cTp. 41)
48 Khonka DIGITAL EFFECT (ctp. 51, 65)
49 Khonka END SEARCH (cTp. 31)
50 Khonka PICTURE EFFECT (ctp. 50, 64)
[5] Khonka MENU (ctp. 45, 76)
52 Dnck SEL/PUSH EXEC (ctp. 45, 76)
*Toлько DCR-TRV320E
Intelligent Accessory Shoe
PpIMeuaHnOTHOCuTeNbHO DepXaTeJIaN yCTaHOBKn PpNHAdIeXHoCTeN
-Держателдя установки пинадлжхостелпогает пинадлжхости.Takne KaK BndeОngCBetKaJIN Mнкрфон.
-Держателдлу установки пинадлесхосте CBZ3ан с поевкючatelem POWER,позвяя Bam BKJIIOUATb И ВьКИJOUATb NOIDAaEMOE uepe3 deprжател птанe. Поробные с蜱сениnpибенbl B INHCTpyKUIN NO 3KcPnYATAuCIN BCNOMORAteIbHbIX пинадлесхостe.
B DepeKaTeNe IyCtahOBKn BCNOMoTaIeIbHbIX npHaJadLeXhOCTe NMeETcnpEdoxpaHITeJIbHOe yCTOIEBOI HADeXHOI KKCaUIN yCTaHOBHeHNO pHaJAdLeXHOctN. Jnla NOCDoeHNHeNpHaJADLeXHOCTN HAKMITE ee BHN3 n HaKMITE DO YNopa, a 3aTEM 3aTARHTe BnHT.
-ДЯСНТЯпINHAДнEXHOCKTи OCSa6bTe BnHT, a 3aTeM HAKMNTE npINHAДNEXHOCKTb BHN3 n NOTAHNTe ee.
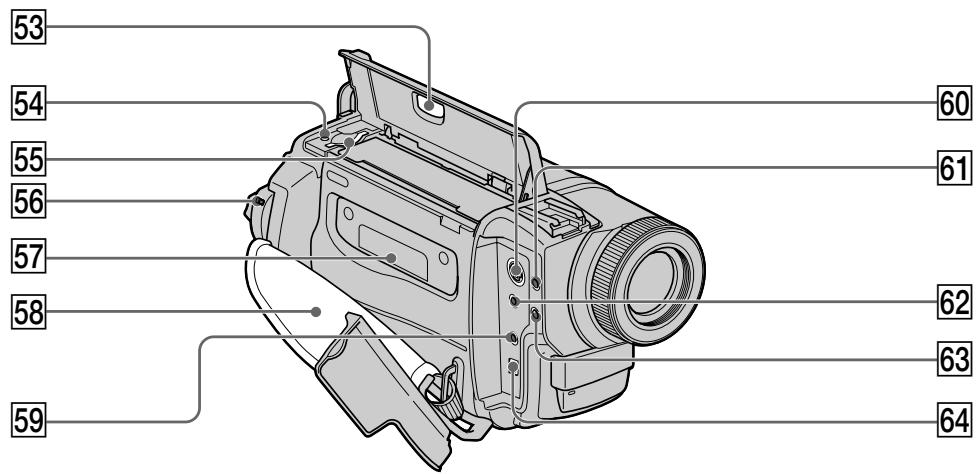
53 EJECT button (p. 19)
54 Access lamp (p. 93)
"Memory Stick" compartment (p. 93)
56 LOCK swich (p. 21)
57 Cassette compartment (p. 19)
58 Grip strap
59 LANC control jack (DCR-TRV120E/ TRV125E)
LANC DIGITAL I/O jack (DCR-TRV320E)
LANC stands for Local Application Control Bus System. The LANC control jack is used for controlling the tape transport of video equipment and other peripherals connected to the video equipment. This jack has the same function as the jack indicated as CONTROL L or REMOTE.
60 SVIDEO jack (p. 44)
61 (headphones) jack
62 AUDIO/VIDEO out jack (p. 44, 72)
63 MIC jack (PLUG IN POWER)
Connect an external microphone (not supplied). This jack also accepts a "plug-in-power" microphone.
64 DV OUT jack (p. 74)
The DV OUT jack is i.LINK compatible.
- DCR-TRV320E only
53 Khonka EJECT (ctp. 19)
54 JAmnoUka doctyna* (cTp. 93)
55 Otcek "Memory Stick" * (ctp. 93)
56 PtepekIIOuATeIb LOCK (ctp. 21)
57 KaccetHbI b OTcE (ctp. 19)
58 PemeNb IJIa 3aXBaTa
59 THe3do ynpabLeHnRA LANC (DCR-TRV120E/TRV125E) THe3do ynpabLeHnRA LANC/DIGITAL I/O (DCR-TRV320E) LANC O3NaHaet CnCTeMy KaHaIa MeCTHO rO ynpabLeHnRA. THe3do ynpabLeHnRA LANC nCNoJIb3YeTcI dIy KoHTpOJIa 3a nepeMeSeHnEM JeHTbI BnDeoAnPaPataTpbl N nepiFepriNbX YcTpoIcTB, NOdKIOUeHNbIX K He.I DaHHO rHe3do IMeET TaKyIO Jx eФuHKIIIO, KAK i pa3bEmbl, 6o3NaueHHbIe KaK CONTROL L nnI REMOTE.
60 THe3do SVIDEO (cTp. 44)
61 THe3doO (roJIOBHBie TeIeΦoHbI)
62 BbIXoHnOe rHe3do AUDIO/VIDEO (CTp. 44, 72)
63Ihe3doMIC(PLUGINPOWER) ⅡIeIIOIcOeHHeHnBHEuHreroMnKpOPOHa (HeIpiNaraeTc).3ToI rhe3doTaXKe IO3BOJRAETIOkKnIOUChNTb MnKpOPOH“C BbIKJIQUaTeJeM NITaHIA”.
64 THe3do DV OUT (ctp.74) THe3do DV OUT COBmecTnMo C KaHaJIo nepedau cnHaiob i.LINK. *ToJIbKO DCR-TRV320E
Fastening the grip strap
PpncTeRnBaHne pemHaIg 3axbata
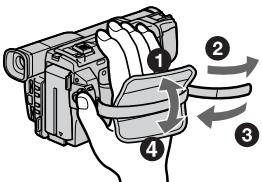
Fasten the grip strap firmly.
Remote Commander
The buttons that have the same name on the Remote Commander as on your camcorder function identically to the buttons on your camcorder.
PnncTeHnTe peMeHb dIa 3axBaTa nIoTHo.
NylbT DnctaHcNoHHoro ynpabJeHnA
KhoNknybTa DnCTaHcNoHOrO ynpaBJIeHnI, KOtOpblte IMeHOT OINHaKOBbIE HaIMeHOBaHnI C KhoNkamn Ha BIndeOkampe, fYHKcNoHpyIOT nDEHTNUHO.
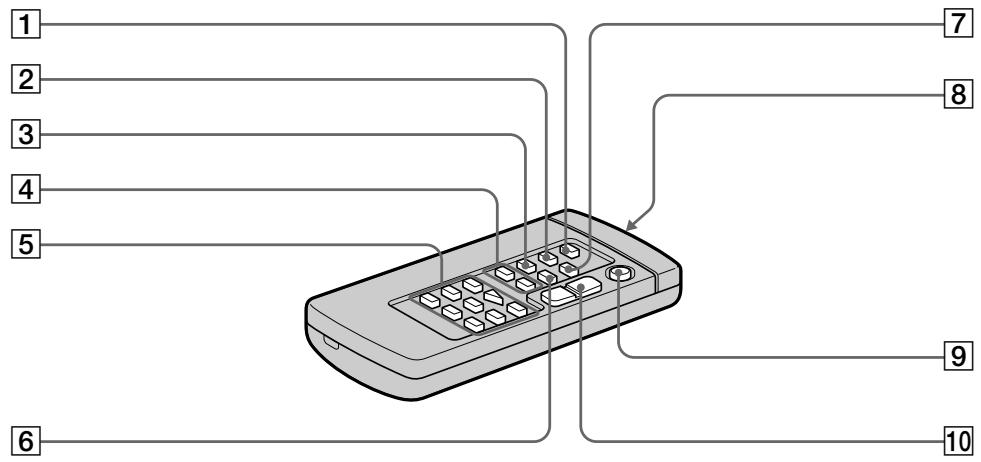
1 PHOTO button (p. 41)
2 DISPLAY button (p. 34)
3 SEARCH MODE button (p. 68, 70, 71)
4 I/ buttons (p. 68, 70, 71)
5 Tape transport buttons (p. 36)
6 DATA CODE button (p. 35)
ZERO SET MEMORY button (p. 63, 67)
Transmitter Point toward the remote sensor to control the camcorder after turning on the camcorder.
9 START/STOP button (p. 21)
10 Power zoom button (p. 24)
1 Khonka PHOTO (cTp. 41)
2 Khonka DISPLAY (cTp. 34)
3 Khonka SEARCH MODE (cTp. 68, 70, 71)
4 KhonknI /▶(ctp. 68, 70, 71)
5 Khonkn nepememeenhna Jehtbl (ctp. 36)
6 Khonka DATA CODE (ctp. 35)
7 Khonka ZERO SET MEMORY (ctp. 63, 67)
8 NpepaTnuK
HanpaBbTe Ha DaTnK DnI ynpaBJIeHH BInDeOKaMepo nocIe BKIOUeHH BInDeOKaMepbl.
9 Khonka START/STOP (p. 21)
10 Khonka npuBODHOro BapnoooBeKtNbA (cTp. 24)
To prepare the Remote Commander Insert 2 R6 (size AA) batteries by matching the and - polarities on the batteries to the + marks inside the battery compartment.
ДлnoiodrotOBKn nyIbTa ДиctahCuHOHHoro ynpaBNeHnA
BcTaBbTe 2 6aTapeiKn R6 (pa3Mepa AA), co6IIOJaHa,IaJIeKaUyIO IOnJIpHocTb + I - Ha 6aTapeiKax CO 3HaKaAMN + - BHyTpN OTCeKa dIa 6aTapeek.
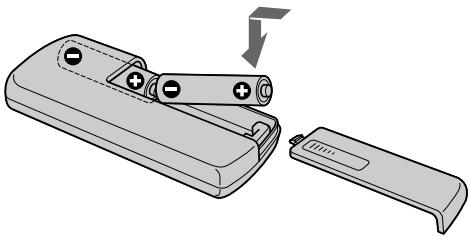
Notes on the Remote Commander
- Point the remote sensor away from strong light sources such as direct sunlight or overhead lighting. Otherwise, the Remote Commander may not function properly.
- Your camcorder works in the Commander mode VTR 2. Commander modes 1, 2 and 3 are used to distinguish your camcorder from other Sony VCRs to avoid remote control misoperation. If you use another Sony VCR in the Commander mode VTR 2, we recommend changing the Commander mode or covering the sensor of the VCR with black paper.
PpmeaHnK npIbTy dNCTaHcNoHHoro ynpabJIeHn
-ДерхиTe ДиСТанCUОнHьI ДaTчИК NOДaЛБWe OT CINbHbIX NCTOCHNkoB CBeTa, KaK HApPIMep, npRmble COJIHeuHbIe JyUH INJINNJIOMnHaцЯ. BnpOTnBHom cIyuae DInCTaHCUOHHoe ynpabLeHne MOKeT He DeiCTBOBaTb.
-Даннaria Вида ekamepa pa6oTaetВ ржиме
nylbTa dinCTaHNoHOrO ynpabLeHnRA VTR 2.
Pexkmbi pynbTa dinCTaHNoHOrO ynpabLeHnRA
1,2и 3ncNoIb3yIOrTdЯ OToNHy RA daHHO
BvduekamepbI OT dpyrIX KBMФрMbI Sony BO
n36eKahne He npaBInbHoi pa6oTbI
dInCTaHNoHOrO ynpabLeHnRA. EcIn Bbl
ncNoIb3yeTe dpyroKBMФрMbI Sony,
pa6oTaIoUmB pexkMeVTE R 2, Mbl
peKOMeHNyEM Bam n3MeHHTb ржIMуЛыТа
dInCTaHNoHOrO ynpabLeHnRA m3akpbITb
dInCTaHNoHHbI DAtYHK KBMчepHoR
6ymaroi.
Operation indicators

LCD screen and Viewfinder/ 3KpaH JKKn BnuOnskaTeJIb
1 Recording mode indicator/Mirror mode indicator (p. 23)
2 Format indicator (p. 123) [H, Hi or Or indicator appears.
Remaining battery time indicator (p. 13, 26)
4 Zoom indicator (p. 24)/Exposure indicator (p. 56)
Fader indicator (p. 47)/Digital effect indicator (p. 52, 65)
6 Wide mode indicator (p. 45)/FRAME indicator* (p. 96)
Picture effect indicator (p. 50, 64)
LCD bright indicator (p. 23)/Volume indicator (p. 33)/Data code indicator (p. 35)
9 PROGRAM AE indicator (p. 55)
Backlight indicator (p. 27)
11 SteadyShot off indicator (p. 77)
12 Manual focusing indicator (p. 57)
13 Self-timer indicator* (p. 30)
*DCR-TRV320E only
Pa60yne INdNkaTopbI

Display window/Okosko dincpnne
1Индикатop ржима 3апси/Nндикатop 3еркаль Horo ржима (cTp.23)
2 INHdNkATOpΦopMaTa (CTp.123) IIOABNTcH INHdNkATOp [H, H8 nIu 8.
3Инданкатор Врemeи OCTaBшeroCяразда 6batapeйнoro 6лoka (ст. 13, 26)
4 INHdNkATOp BapNoO6BeKtNbBa (ctp. 24)/ INHdNkATOp 3KcNo3nnn (ctp. 56)
5 INHdNkaTop feiepa (ctp. 47)/INHdNkaTop cnΦpOBoRo 3ΦΦeKta (ctp. 52, 65)
[6]ИнданkaTop Широкорматону рекима (Стр. 45)/ИнданkaTop FRAME* (Стр. 96)
7 INdikatop 3ΦΦeKta n3o6paXeHn (cTp.50,64)
8 INHДИКaTOP npKocTn XXD (ctp. 23)/ INHДИКaTOP rPOMKOcTn (ctp. 33)/ INHДИКaTOP KOda DaHHbIX (ctp. 35)
9 INdikatop PROGRAM AE (cTp. 55)
10 INHdIkaTop 3aJHeN IOcCBETK (ctp.27)
11 INHdIKATop BbIKIOeHHoФyHKcnn yctOuHBOBcBEmKn (cTp.83)
12Индикатор рунов Фокс neuropьк (cтр.57)
13 INHdkaTop TaMepa cAmO3anycka* (cTp. 30)
STBY/REC indicator (p. 21)/Video control mode (p. 36)
15 Tape counter indicator (p. 26, 63, 67)/Time code indicator (p. 26)/Self-diagnosis display indicator (p. 134)/Tape photo recording indicator (p. 41)
16 Remaining tape indicator (p. 26)
ZERO SET MEMORY indicator (p. 63, 67)
Search mode indicator (p. 31, 68, 70, 71)
19 NIGHTSHOT indicator (p. 28)
20 Audio mode indicator (p. 80)
21 Warning indicators (p. 133)
22 Recording lamp (p. 21) This indicator appears in the viewfinder.
Video flash ready indicator This indicator appears when you use the video flash light (not supplied).
24 Tape counter (p. 26, 63, 67)/Time code indicator (p. 26)/Self-diagnosis display indicator (p. 132)/Remaining battery time indicator (p. 13, 26)
25 FULL charge indicator (p. 13)
14 INdInKaTop STBY/REC (cTp. 21)/peXnM BnDeoKoHTpOJa (cTp. 36)
15 INHdkaTOP CteTNKa JIeHTbI (ctp. 26, 63, 67)/ INHdkaTOP KOJa BpeMeHN (ctp. 26)/ INHdkaTOP fYHKcN CaMOHaRHOCTNKn (ctp. 142)/INHdkaTOP fOToCbeMKn HaJeHTy (ctp. 41)
16 INHdNkatop octaBweCJHeHTbI (cTp.26)
17ИндикатOP ZERO SET MEMORY (ctp. 63, 67)
18 Иndикатop ржима посяка (стр. 31, 68, 70, 71)
19ИнданkaTop NIGHTSHOT (ctp.28)
20Инд aydnopexma (ctp. 86)
21 Pnepdynpexkaioune HndkaTopbI (ctp. 141)
22 JAMnoUka 3aHnCn (cTp.21) B VbDOnCKaTeJIe NOBuTcH INdNkAtOp.
23 INHДИКaTOP rOTOBHOCTH BnDEOBcNbIiKu 3TOT INHДИKaTOP NOBnAHTcR, KOrDa Bbl nCNoJIb3yTe BnDEOBcNbIiKU (He npInlaRaETcR).
24 INHINKATOP CHTHKA JIeHTbI (ctp. 26, 63, 67)/ INHINKATOP KOJa BpeMeHN (ctp. 26)/ INHINKATOP fYHKcN CaMOHaNRHOCTNK (ctp. 140)/INHINKATOP BpeMeHN OCTaBWeOCA 3apJa 6aTapeHOrO 6Joka (ctp. 13, 26)
25 INHdNKatop 3apAdkn FULL (cTp.13)
Functions to adjust exposure (in the recording mode)
In a dark place
- In insufficient light
- In dark environments such as sunset, fireworks, or general night views
- Shooting backlit subjects
- In spotlight, such as at the theatre
- In strong light or reflected light, such as at a beach in midsummer or on a ski slope
NIGHTSHOT (p. 28)
Low lux mode (p. 54)
Sunset & moon mode (p. 54)
BACK LIGHT (p. 27)
Spotlight mode (p. 54)
Beach & ski mode (p. 54)
Functions to give images more impact (in the recording mode)
- Smooth transition between scenes
- Taking a still image
FADER (p. 47)
Tape photo recording (p. 41)/
Memory photo recording* (p. 96)
PICTURE EFFECT (p. 50)/
DIGITAL EFFECT (p. 52)
Soft portrait mode (p. 54)
TITLE (p. 59)
-
Digital processing of images
-
Creating a soft background for subjects
Superimposing a title
Functions to give a natural appearance to your recordings (in the recording mode)
- Preventing deterioration of picture quality in digital zoom
D ZOOM MENU (p. 76) - Focusing manually
- Shooting distant subjects
- Recording fast-moving subjects
Manual focus (p. 57)
Landscape mode (p. 54)
Sports lesson mode (p. 54)
Functions to use in editing (in the recording mode)
- Watching the picture on a wide-screen TV
Wide mode (p. 45)
Viewing images using a personal computer
"Memory Stick"* (p. 91)
Functions to use after recording (in the playback mode)
- Digital processing of recorded images
PICTURE EFFECT (p. 64)/
- Displaying the date/time or recording data when you recorded
DIGITAL EFFECT (p. 65)
- Quickly locating a desired scene
Data code (p. 35)
- Searching for scenes recorded on tape in the photo mode
Zero set memory (p. 63, 67)
- Scanning scenes recorded on tape in the photo mode
Photo search (p. 70)
- Playing back on monaural sound or sub sound
Photo scan (p. 71)
- Playing back the picture on a TV without connecting a cord
HiFi SOUND MENU (p. 76)
SUPER LASER LINK (p. 40)
- DCR-TRV320E only
PykoBoCTBO IO 6bICTpbIM yHKnIaM
Camera chromakey 101
Charging battery 13
Clock set 89
Connection (viewing on TV) 38
(dubbing a tape) 72
Data code 35
Date search 68
DEMO. 81
DIGITAL EFFECT 51,65
Digital 8 system 123
DIGITAL I/O 158
DISPLAY 34
DOT 46
Dual sound track tape 124
Dubbing a tape 72
DV connecting cable. 74
E
EDITSEARCH 31
END SEARCH 31, 37
Exposure 56
External microphone (not supplied) 158
F, G, H
FADER 46
Fade in/out 46
FLASH MOTION 51
FOCUS. 57
Format 79
Full charge 13
Grip strap 159
Headphone jack 158
Heads 147
HiFi SOUND 78
I, J, K, L
i.LINK 74, 75
Image protection 116
Image quality mode 94
Index screen 111
"InfoLITHIUM" battery 17
Infrared rays emitter 28, 40
JPEG 91
LANC 158
LCD screen 23
LUMINANCEKEY 51
M, N
Main sound 78
Manual focus 57
Memory chromakey 101
Memory luminancekey 101
MEMORY MIX 101
Memory overlap 101
Memory Photo recording 96
"Memory Stick" 91
Menu settings 76
Mirror mode 23
Moisture condensation 146
Monaural 38
MONOTONE 46
Mosaic fader 46
NIGHTSHOT 28
Normal charge 13
O, P, Q
OLD MOVIE 51
Operation indicators 161
OVERLAP 46
PAL system 145
PB ZOOM 66
PC serial cable 112
Photo scan 71
Photo search 70
PICTURE EFFECT 49,64
Picture search 36
Playback pause 36
Power sources
(battery pack) 12
(the mains) 18
(car battery) 18
Printmark. 121
PROGRAM AE. 54
R
Recording time 15
Rec Review 32
Remaining battery time indicator 26
Remaining tape indicator 26
Remote Commander 159
Remote control jack (LANC) 158
Remote sensor 155
s
Self-diagnosis display 134
Self-timer 30
SEL/PUSH EXEC dial 157
Shoulder strap 156
Skip scan 36
Slide show 114
Slow playback 36
SLOW SHUTTER 51
STEADYSHOT 77
Stereo tape 124
STILL 51
Sub sound 78
SUPER LASER LINK 40,155
SUPER NIGHTSHOT 28
S video jack 44, 73
T, U, V
Tape counter 26
Tape Photo recording. 41
Telephote 24
Time code 26
Title 59
TRAIL 51
Transition 22
TV colour systems 145
W,X,Y,Z
Warning indicators 135
Wide-angle 24
Wide mode 45
WIPE 46
WORLD TIME 82
Write-protect tab 20
Zero set memory 63, 67
Zoom 24
AлфаВиТьи yka3aTeЛь
A, B, Γ
BaTapeHbIb 6Jok 12
BarapeHHb 6nok "InfoLITHIUM" 17
BapnoooBekeTINB 24
BBeDHeMn/BbIbEHeMe n3o6paXeHnA 46
BHEUHIN MMKPOCHEN (he npnnaeraTc) 158
Bpem3a.. 15
BcnoMoraTeIbHbI 3ByK 78
Tolobkn 147
THe3do rOIOBbIX TeJefoHOB ....158
The3do DiCTAHIOHORO ynpABeNHeI (LANC) 158
Tne3do S Bndeo 44,73
D,E,X,3
JaTnK DnCTANHIOHOrO ynpabLeHH 155
ДИСК SEL/PUSH EXEC 157
3aMeIeHHeBocnpoIeBdEHeH
3apda 6aapeHoro 6noka 13
3aunTa n3o6paXeHnI 116
3Byk AFM HiFi 124
3epkaIbHbI pexm 23
3nak neuata 121
3ymmepHbI cHnA.. 82
N, K, JI, M
3nnyaTeIbI INHΦpakpaChbIX LyuYeu 28,40
HndekchbniKpaan 111
NtHnKATOPBbEMHO OCTABUEOHR 3aRHa6bAeHHoBO Snoka...26
HnIkaTOp octabueCnJIeHTb 26
HnIkaaIcmaOImarHOCTNIK 134
NCTOCHNI NITAHNA (aBTOMO6JIbHbIaAKKyMnTOp) 18
(6aTapeuHbI 6nok) 12
(3eKtpuecka ceb) 18
Ka6eBnI por noceJeDoBaTeBnHOro nOdoCenHeHHc KIK. 112
KHOKI ZUEBTHOCTN BVDKOKAMpebl 101
KhoNka ZbETHOCTn namrtn 101
KhoNka npKoCTn namTn 101
KoI BpemeHn 26
KoI daHHbIX 35
KoHdEHCaunBlaIg 146
JIeTc a DboHOn 3bYkoBoI dOPOKkON 124
Jelenctok 3aunntb 3annc 20
MozanuHbIΦeHep 46
MonohoPonHueckn 3Byk 38
H, O
HopmaIbHa 3apJaKa 13
OCHOBHON 3ByK 75
P
PamrH hyneBOI OTMeTKI 63,67
Pay3a Bocnpn3BeJeHn 36
Ppe3aIncb IeHTbl 72
PpeekpbItne namrtn 101
PepexoI 22
PJIeueBoI peMeHb 156
IopoeDineHne Iepesaeinbc JentbI) 72
( npocmOTnHa 38
Ponck DaTbI 68
Ponck n306paXeHnA 36
Ponck MeToDom nporoHa 36
Poka3 cnaIOB 114
Ponha 3apka 13
PnDynpEeJdaoiueHnndKatoBb 135
PpocmoTp 3aHncn 32
PntbT dmtahunHoro npabaleHn 159
PerynpoBka BIDONCKaTeIa 25
PemeHdIa3aXbata. 159
Pexim KaheCTBa 306paXeHnA .... 94
PyuHaФokycuPoBka 54
C, T
CetEBo aanTep nepemEnHoro ToKa 13
CoedHHTeBbHki KaebIb ayduo/ BnEe 38,42,74
CoDHeHINTeBbHbKab6bIeNcPpBOrO BnDeoCtRHaNA DV 74
CnTeMbI ZbETHORO TeBENBENH 145
CnCTema PAL 145
CTepeofoHueckaJIeHTa 124
CueTnK IeHTbI 26
CuetyK Jentbl 26
TaMep camo3anycka 30
Tntpbl 57
y-
YcTaHOBka YacOB 89
YCTaHOBKe MEHIO 76
Функюнавьныеинданутopy...152
Φopmat 79
ΦOTONONCK 70
ΦOTOCKaHIpOBaHne 71
ΦOTOCbEmKa Ha JeHTy 41
ФOTOCБМКС COXPAHEHENEM B nAMATN 96
Lundpobar CnTeMa Digital8 123
山ipokoyrolbHaCbEmka 24
山Inpoko3KpaHHbIpeXIM 44
3KpaH XKД 23
3Kcno3nua 56
A,B,C,D
AUDIO MIX 78
AUDIO MODE 80
BACK LIGHT 27
BOUNCE 46
DEMO 81
DIGITAL EFFECT 51,65
DIGITAL I/O 158
DISPLAY 34
DOT 46
E,F,G,H
EDITSEARCH 31
END SEARCH 31, 37
FADER 46
FLASH MOTION 51
FOCUS 57
Hi-Fi SOUND 84
1-0
i.LINK 74,75
JPEG 91
LANC 158
LUMINANCE KEY 51
"Memory Stick" 91
MEMORY MIX 101
MONOTONE 46
NIGHTSHOT 28
OLD MOVIE 51
OVERLAP 46
P-Z
PB ZOOM 66
PICTURE EFFECT 49,64
PROGRAM AE 54
SLOW SHUTTER 51
STEADYSHOT 77
STILL 51
SUPER LASER LINK 40,155
SUPER NIGHTSHOT 28
TRAIL 51
WIPE 46
WORLD TIME 88
I3roTOBnteIb: CoHn Kopnpoeiun
Ampec: 6-7-35 Kntaunharaba,
山Inharaba-Ky, Tokio 141-0001, JnoHna
CtpaHa- npOn3BovdTeJIb: JnoHnIa
Sony on line
http://www.world.sony.com/
- Digital Video Camera Recorder [B]
- English
- Welcome!
- WARNING
- NOTICE ON THE SUPPLIED AC POWER ADAPTOR FOR CUSTOMERS IN THE UNITED KINGDOM
- ATTENTION
- For the customers in Germany
- Pycckn
- Добpo пожаловать!
- PNEyPPEXDEHNE
- Getting started
- Recording - Basics
- Playback - Basics
- Advanced Recording Operations
- AdvancedPlaybackOperations
- Editing
- Customizing Your Camcorder
- "Memory Stick" operations
- Additional Information
- Quick Reference
- PykoBoDCTBO no 6bIcTpomy 3anycky....8
- Ioprotobka K 3Kcnnyatauun
- 3aIncb - OCHOBhble NOJIOXeHnA
- OnepaTnBhblcnpaBOuHnK
- Connecting the mains lead (p. 18)
- Inserting a cassette (p. 19)
- Viewfinder
- Monitoring the playback picture on the LCD screen (p. 33)
- Note
- PykoBoDcTBo nO 6bICTpOMy 3aIpycky
- Повсоевинецпровoda злескгочиня (cTp. 18)
- ПРИМЕЧАНЕ
- Using this manual
- Before using your camcorder
- Ipepe Naayom 3KcnpyaTaunu Baweyndeokamepbbl
- Note on TV colour systems
- Copyright precautions
- Precautions on camcorder care
- Приимechаши по системам CBETHORO TEJIeBndeHnA
- Пре dioctepexeHne o6 aBTopcKom npaBe
- Mepblpeoctopoxhoctn npnyxoide 3a Bundeokamepoi
- Step 1 Preparing the power supply
- Installing the battery pack
- UcTaHOBka 6aTapeHoro 6Joka
- To remove the battery pack
- ДлСНТИЗБАТЕЙНОВ6ЛOKA
- After installing the battery pack
- Pocne yctahOBKn 6aTaapeHoro 6noka
- Charging the battery pack
- 3apka 6aTapeHoro 6loKa
- After charging the battery pack
- Notes
- When the battery pack is charged fully
- Remaining battery time indicator
- Battery pack
- Until your camcorder calculates the actual remaining battery time
- While charging the battery pack, no indicator appears or the indicator flashes in the display window in the following cases:
- Charging time/Bpem3apdKn
- Pocne 3apdKn 6aTaapeHoro 6Joka
- Приимейсаня
- Ecn6atapeHbI 6loK 3apJxhen noHocTbIO
- ИндикаторВрemeиОctabшeroСязяда 6atapeйнoro 6лoka
- BatapeHbI 6Jok
- DtoTex nop, noka Baasa Buaedeokamepa onpeednT deicTBnteHoe Bpem octabweroC3rapda 6bataeHoro 6bnoka
- Recording time/Bpema 3auncn
- Connecting to the mains
- Подсоевнене К сеТБОй po3etke
- PRECAUTION
- Using a car battery
- PPEIOCTEPEXEHNE
- PpmeaHn
- UcnoJb3ObaHne aBTOMo6nJbHOro aKKymyIaTopa
- Step 2 Inserting a cassette
- Пун=kT 2 YcTaHOBKa KacCeTbl
- To eject a cassette
- ДЯиЗВLEЧЕНЯ KACCEТы
- PpimueaHn
- Recording a picture
- 3a\Pncb n3o6paXeHn
- Note on Recording mode
- Note on LOCK (DCR-TRV320E only)
- To enable smooth transition
- If you leave your camcorder in the standby mode for 3 minutes
- PpimeyaHne no pexkmy 3anncn
- Приимechани по ржиму LOCK (Толъко DCR-TRV320E)
- ДлобесоченплавHoro nepexoda
- EcIn Bbl octaBnTe BaUy BuDeokamepy BpeKIMe OxuHaHa 3 MmHyTbI
- Adjusting the LCD screen
- Perynnpobka 3KpaHa KKd
- When you use the LCD screen outdoors in direct sunlight
- Picture in the mirror mode
- During recording in the mirror mode
- Indicators in the mirror mode
- PpimcyaHne
- EcIn BbI nCnoJIb3yTe 3KpaH XKd BHe NOMeueHn IOD npRmblcONHeYhbIM CBETOM
- I306paXeHne B 3epKaJIbHom peXnme
- Using the zoom feature
- Pocje 3aipncn
- IcnoJb3ObaHne yHKcHn Hae3da BndeOkamepbl
- Notes on digital zoom
- When you shoot close to a subject
- To record pictures with the viewfinder - adjusting the viewfinder
- Indicators displayed in the recording mode
- HДИКaTOPbl, OTo6paXkaemble BpeXmte 3aInscn
- Time code (for tapes recorded in the Digital8 system only)
- KoB BpeMeHn (ToIbKO JJIaJeHT, 3aIncAHbIX B uΦpOBoN CnCTeme Digital8 [9)
- Shooting backlit subjects - BACK LIGHT
- Shooting in the dark - NightShot/Super NightShot
- Cbemka B TemHote - HouHaBcBemKa/HouHaCynepcbemKa
- Using the NightShot Light
- NightShot Light
- Примеанья
- Iopcbetka dna HOHcBemKu
- Self-timer recording
- - DCR-TRV320E only
- To stop the self-timer recording
- To record still images using the self-timer
- To cancel self-timer recording
- 3aInc b no TaMepy caMo3anycKa
- -ToJbKO DCR-TRV320E
- Checking the recording
- - END SEARCH/EDITSEARCH/
- Rec Review
- Поберka 3апссn
- Ppocmpt 3aHncn
- END SEARCH
- EDITSEARCH
- Ppocmtp3aHcN
- Примейаня
- Playing back a tape
- Bocnpo3BeDeHneJeHTbl
- To display the screen indicators - Display function
- Not to display recording date
- Notes on the data code function
- Recording data
- When you use data code function, bars ( ) appear if:
- Data code
- Bocnpoun3BeDeHne JeHTbI
- IcnoJb3OBAHne cyHKcnn Koda daTbi
- (KoДаТы).
- ДЯТOrO,ЧТобI He OTOбраЖаИncь ДaHHbIe 3aПСИ
- PpmeaHne no fynKcnn Koda daHHbIX
- 3aHncaHHbIe daHHbIe
- EcIn BbI nCnoJIb3yTe ΦyHKcIIO KOA daHHbIX, TO NOBBArTc NOJOCbl
- Various playback modes
- To view a still picture (playback pause)
- To advance the tape
- To rewind the tape
- To change the playback direction
- To locate a scene monitoring the picture (picture search)
- To monitor the high-speed picture while advancing or rewinding the tape (skip scan)
- To view the picture at slow speed (slow playback)
- IaH3MeHeHHHaPaBHeHH BocPOn3BeDeHH
- To search the last scene recorded (END SEARCH)
- Slow playback for tapes recorded in the Digital8 E system
- Для посмотра BOCPON3BedeHn n306paXeHn Ha yDBoEHNo ckOpOCTn
- Длп покадровою npocmotpa BOCIPON3BedeHnИЗБОРЖЕнI
- PnBocnpOn3BeDeHnJIeHTbI B 6paTHOM HaprabJeHHN
- Viewing the recording on TV
- If your TV is already connected to a VCR
- If your TV or VCR is a monaural type
- If your TV/VCR has a 21-pin connector (EUROCONNECTOR)
- EcnB Bawaem TeleBn3ope/KBM NmeeTc8 21-7bIpbKOBbl pa3beM (EUROCONNECTOR)
- Using the AV cordless IR receiver
- IcnoJb3OBAHne 6ecnpoBOdHorO IK aydnOBnDeOpnpemHnka
- Super laser link emitter/ Излунател лаэрно су nepканда
- Before operation
- Ipeed onepaunnei
- To cancel the super laser link function
- IЯOTMeHbIФyHKcHnJa3epHOro cynepkHaJaNpepaun CnHAnOB
- Recording a still image on a tape - Tape Photo recording
- 3aIncb HEnoDbXHOrO N3O6paXeHnHa JIeHTy - FOToCbeMka Ha JIeHTy
- To use the tape photo recording function using the Remote Commander
- Приимechanicals
- ДлнИСПОЛБЗOBAHИФУHKUIMФOTOCБЕМКИ На ЛENTу C ПОМОЧБЮ ПЛьТА ДИСТАЦНОHORO YYPABJIЕНИ
- Self-timer tape photo recording
- CbeMaHaJeHTycNOMOzbuTo TaMepa cAmo3anycka
- Printing the still image
- IeuaTaHHe HEnoDbXJxHoRo n3o6paXeHn
- Using the wide mode
- To cancel the wide mode
- Длг OTMeHbI ShpOKO3KpaHOro peXIma
- During recording
- B shpOKo3KpaHOM pexime He moXeTe Bb6npaTb cIeIyUOJIne cyHKcUN:
- MONOTONE
- To cancel the fader function
- Длг OTMeHbI Функци Фeндара
- Before operating the overlap, wipe or dot function
- While using the bounce function, you cannot use the following functions:
- Note on the bounce function
- PpimeyaHne
- Ipeed Tem, KaK BkJIIOHTb FyHKUHO HAIOXeHnRA, BbITEcHEHnA TOpKO nIIT OToeHOrO N3O6paXeHnR
- Bo BpemnncnoB3OBaHHyHKcnn nepeckaknBaHH BbI He MoKTe nCNOJb3OBAt cJeDyUoJIne FyHKcN:
- PpmeaHne no fynKcnn nepeckaknBaHna INdkaTop BOUNCE He noBnreTcB
- Using special effects - Picture effect
- IcnoJb3OBaHne cpeunajbHbIX 3ΦΦeKTOB - ΘΦΦeKT n3o6paXeHnA
- To turn the picture effect function off
- EcIn Bbl BBIKJIOUHTe NITaHHe
- Using special effects - Digital effect
- IcnoJb3OBaHne cpeuaJIbHbIX 3ΦΦeKToB -UnpoBoN 3ΦΦeKT
- STILL
- FLASH (FLASH MOTION)
- LUMI. (LUMINANCEKEY)
- TRAIL
- SLOW SHTR (SLOW SHUTTER)
- OLD MOVIE
- To cancel the digital effect
- When you turn the power off
- When recording in the slow shutter mode
- IcnoJb3OBAHHe cneuaJIbHbIX 3ΦΦeKToB - LInΦpOBoN 3ΦΦeKT
- ДЯ OTmeHbI UΦpOBOrO 3ΦΦeKtA
- Приимеань.
- PnBbIKJIOeHNIITaHNA
- Pn3aTncBpeXmmeMeIeHoro 3aTbopa
- Using the PROGRAM AE function
- Spotlight mode
- Soft portrait mode
- Sports lesson mode
- Beach & ski mode
- Sunset & moon mode
- Landscape mode
- Low lux mode
- Исpenьзованецфункциng PROGRAM AE
- Pekim npoxektopHoro oCbeueHn
- T PIIaXHbI N IblXHbI peXHM
- Pexim 3axoanda lyhbl
- JaHdaΦThbI peKIM
- PexHM H3K0N OCBeUeHNOCTN
- If you are recording under a discharge tube such as a fluorescent lamp, sodium lamp or mercury lamp
- Adjusting the exposure manually
- To return to the automatic exposure mode
- PerynpoBka 3Kcno3nCn BpyHyO
- ДлЯ BO3BpaTаВ реким abTOMaTHueCKOJ 3KcNo3nCIN
- ΦokycnpoBka BpyHyU
- To return to the autofocus mode
- To record distant subjects
- When you shoot close to the subject
- ДЯTOUHONΦOKYCUPOBKN
- PnBbINOHeHHN CbeMK B6JIn3n ObekTa
- HdNkau
- H3MeHNTcHa cIeMyOuJe
- Superimposing a title
- HanoxeHne TnTpa
- To superimpose the title while you are recording
- To select the language of a preset title
- If you display the menu while superimposing a title
- To use the custom title
- Title setting
- When you superimpose a title while you are recording
- While you are playing back
- PnBbIbOpe n yctaHOBKe TnTpa
- Pn HANOKeHH THTpa BO BpeMa 3aHncu 3yMMepHbN CnHaN He 6yJeT 3ByuAtb.
- BoBpemBaocpon3BeDeHnA
- Making your own titles
- Co3dAnHe BaushxCo6CTBeHHbIX THTPOB
- To change a title you have stored
- IIN3MeHeHH COxpaHeHHoro B nAMrTnTtPa
- Ecn np BBOe CmBBoJOB npOJeT 3 MnHyT nIb6oJIeB pReKIme OxUdAnHn np BCTaBJIeHHo KaccTe B BaSy BnDeOkamepy
- Примейань
- Playing back a tape with picture effects
- Bocnpo3BeDeHne JeHTbIC 3ΦΦeKtAmn n3o6paXKeHn
- To cancel the picture effect function Press PICTURE EFFECT.
- Pictures processed by the picture effect function
- When you set the POWER switch to OFF (CHARGE) or stop playing back
- ДЯ OTMeHbI Φункин сифpoBbIX 3ФФeKTOB
- n3o6paXeHne c 3ofoekTaMn n3o6paXeHn
- EcIn Bby ycTaHOBnI nepeKJIouaTeIb POWER B nIoJoxeHne OFF (CHARGE) nIIOCTaHOBnI BOCpON3BeHne
- Playing back a tape with digital effects
- Bocnpo3BeJeHne JeHtbi C uΦpObblm 3ΦΦeKtamN
- To cancel the digital effect function
- Enlarging recorded images - PB ZOOM
- YBeJIuYeHne 3aIncaHHbIX n3o6paJxehn - PB ZOOM
- Quickly locating a scene using the zero set memory function
- БыICTpoe OTbICKaHne 3ПИЗODa C NOMOUI OФУHKUIN PAMRTN HUJIeBOI OTMeTKI
- If a tape has a blank portion in the recorded potion
- ZERO SET MEMORY functions also in the standby mode
- PpmeaHne
- EcHnHaJeHTeMeKJy3aNcaHHbIMu yactkamm IMeTcH He3aNcaHHbI yactOK.
- Searching a recording by date - Date search
- Searching for a photo - Photo search/Photo scan
- Searching for a photo
- Сканироваиме Фото
- To stop scanning
- ДлЯ OCTaHOBKn CKaHIpObaHnA
- EcIn Ha 3aHcAHNo JIeHTe IMeOTc H3aHcAHbIe yAcTkn
- Using the A/V connecting cable
- UcnOJIb3OBAHnE CoeINHITeIbHOro Ka6eJyauDIO/BuDeo
- When you have finished dubbing a tape
- EcnBb3aKoHnJInpe3aIncbJeHTbl
- Using the i.LINK cable (DV connecting cable)
- IcnoJIb3OBAHnE Ka6eIaLINK (coeHNHTeBHyI Ka6eIb DV)
- EcnBb3aKoHnJIpepe3anCbJeHTbl
- Changing the menu settings
- To make the menu display disappear Press MENU.
- U3MeHeHne yCTaHOBOK MeHIO
- ДЯТОТO,ЧТОБИСЧЕЗЛА ИНДИКАЦЯ MEHIO HaxмпTe Kногу MENU.
- IyHKtbl MeHIO OTO6paXaHTcB BVNe InpBBeDeHHbIX HNXe NIKTORpAMM:
- Selecting the mode setting of each item is the default setting.
- Notes on the SteadyShot function
- If you cancel the SteadyShot function
- Notes on AUDIO MIX
- Note on NTSC PB
- Note on PB MODE
- Notes on formatting
- Formatting erases all information on the "Memory Stick"
- Note on REC MODE
- Notes on the LP mode
- Note on AUDIO MODE
- *To dub a tape to another VCR
- Notes on DEMO MODE
- In more than 5 minutes after removing the power source
- Notes on INDICATOR
- Pysckn
- BbI6Op yCTaHOBOK peXIma no KaXdOMy nyHkTy
- PpmeaHnno yHKun yCTOuHBoCbeMK
- B cIyuae OTMeHbI cyHKcun yCTnHBo CBemKu
- PpimueaHn no yHKun Audio MIX
- PpimueaHne no Bocnpo3BeDeHHIO NTSC PB
- PpmeaHne no pexmy Bocpnon3BeDenPB MODE
- Resetting the date and time
- IpeyeCTaHOBKa DaTbI N BpemeHn
- - "Memory Stick" operations - Using "Memory Stick"-introduction
- On file format (JPEG)
- Typical image data file name
- Before using "Memory Stick"
- Исpenьзоване“Memory Stick”-ВveDEXHne
- OΦopMaTe ΦaJNoB (JPEG)
- TINNUHoe mma faJna daHHbIX n3O6paXeHnA
- Ipeed nCnoJb3ObaHneM“Memory Stick"
- Formatting the supplied "Memory Stick"
- "Memory Stick"s formatted by a computer
- Notes on image data compatibility
- Форматураиме пиларамо "Memory Stick"
- "Memory Stick",Прилaraемак Ваши Видаокаме Видаокаме Буши Видаокаме Видаокаме Видаокаме Видаокаме Видаокаме Видаокаме Видаокаме Видаокаме Видаокаме Видаокаме Видаокаме Видаокаме Видаокаме Видаокаме Видаокаме Budanach
- "Memory Stick", OTΦopMaTnpoBaHHaHa Na KOMNbITope
- Приимechаши NO COBmecTUMOCTI dAnhblixN3o6paKeHnI
- Inserting "Memory Stick"
- YcTaHOBka "Memory Stick"
- To eject the "Memory Stick"
- When the access lamp is lit or flashing
- ДлгиИЗВLEЧЕНИА“Memory Stick"
- Ecnn lamnoouka doctyna roput nnn mnaet
- Selecting image quality mode
- Bb6oppeKImaKaueCTBa n3o6paXeHn
- Ppmeuahne
- Differences in image quality mode
- Approximate number of images you can record on a "Memory Stick"
- Recording still images on "Memory Stick" - Memory Photo recording
- 3aɪncb HeɪnoɪdBʌŋkHbɪxɪn3ɔɒpʌkeHmɪ Ha “Memory Stick” - ΦOToCsbEmKa c COxpaHeHmE M B nʌmʌrɪ
- -ToIbKO DCR-TRV320E
- Ipeed hauanom pa6oTbi
- When you press the PHOTO button on the Remote Commander
- Recording images continuously
- Multi screen mode
- EcJn nepeKJIIOUaTeIb POWER ycTaHOBNeH B noJIOXeHne MEMORY
- EcIn Bbl 3aIncbIbAeTe HeNoDbNkHoe n3o6paKeHne
- EcnBbnaXMeTePHOTOHa npIbTe nCTaHnOHHoro ynpaBHeHn
- 3ainnb n3o6paXeHn HnpepbIBHO
- MHoro3KpaHbI pexHM
- 3aIncb HeNoDvBxHbIX N3o6paJxHeNHa "Memory Stick" - FOToCbemKa cCOxpaHeHEm B PnAMrTn
- If the capacity of the "Memory Stick" becomes full
- Eczn emkoctb "Memory Stick" nepenonHeHa
- 3aIncb HeNoDvBxHbIX N3o6paJKeHn Ha "Memory Stick" - FOToCsbemKa c coXpaHeHmEB namATn
- Self-timer memory photo recording
- Superimposing a still image in the "Memory Stick" on a moving image - MEMORY MIX
- HanoXeHne HenoBnXhOro n3o6paXeHn 13 "Memory Stick" Ha noDnXhOe n3o6paXeHne - MEMORY MIX
- CHROM (Memory chroma key)
- LUMI (Memory luminance key)
- CHROM (Camera chroma key)
- OVERLAP (Memory overlap)
- CHROM (KHOIIKA ZBETHOCTN NAMRTN)
- LUMI (KhoNka npKoCTn naMATn)
- C.CHROM (KHONKa UBeTHOCTN BnDeOKaMEpbI)
- OVERLAP (nepekepbitne namrtn)
- To change the still image to superimpose
- To change the mode setting
- To cancel M. CHROM/M. LUMI/ C. CHROM/M. OVERLAP
- IaH3MeHeHH HeNoBuxxHoro 1306paXeHHdHaIOXeHH
- Superimposing a still picture in the "Memory Stick" on a moving image - MEMORY MIX
- Recording an image from a tape as a still image
- 3a\Pncb n3o6paXeHnCJIeHTbI KaK HeNoDvXJHOrO n3o6paXeHnA
- Ipeed hauaJom pa6oTbI
- If SS appears on the LCD screen or in the viewfinder
- If you press PHOTO lightly in the playback mode
- Sound recorded on a tape
- Titles superimposed
- When you press photo on the Remote Commander.
- EcHnHa3KpaHe XKД nIbB VbDOnckaTeNe NOBHTcH INDkaCua
- EcIn B pexnme Bocnpn3BeDenr cnerKa haxaTb KhONkY PHOTO
- HaIOXKeHHbIe TnTpbl
- Tntpbl, 3aHcaHHbIe Ha JeHTbl
- EcIn BbI haxMeTe KhONkY cBemKn Ha nyJIbTe dNCTaHcUOHOrO ynpabLeHnA
- Copying still images from a tape - Photo save
- KoNipOBaHne HeNoDBrXhblx n3O6paXeHn C JeHTbl-CoxpaHeHne fOTOCHMKO B PAMrTn
- Ipeed hauanom pa60tbi
- To stop copying
- When the memory of the "Memory Stick" is full
- KonipobaHne HeNoDbXhBIX n3o6paXeHn C JeHTbI - CoXpaHeHne fOTOCHIMKOB B NaMaTn
- ДлЯ OCTAHOBК KONINPOBAHA
- B clyuae nepenolneHn naMaTn "Memory Stick"
- EcIn Bbl 3aMeHnTe "Memory Stick" BcepeDHe KOnIpoBaHnI
- Viewing a still image - Memory photo playback
- Ipeed nayanom pa60tbi
- To stop memory photo playback
- ДлЯ OCTAHOBKN BOCPON3BedeHNA FOTOCHIMKOB 3I NaMATN
- Screen indicators during still image playback
- 3KpaHHbIe HNДИKaTOpbl BO BpeMBAocPpOu3BeDeHnA HeNoDvXhBIXn3o6paJxehn
- Playing back 6 recorded images at a time (index screen)
- Bocnpo3BeJeHne 6 3aIncaHHbIX n3O6paXeHn OndHOBpeMeHHO (nHdEKCbHn 3KpaH)
- To return to the normal playback screen (single screen)
- ДлЯ BOЗВраТа KЭКраHу 06ьИнHorO BOCПОН3ВЕDEнHA (ОДиHочньй 3Kран)
- Files modified with personal computer
- Viewing the recorded images using a personal computer
- Приимechаиме
- Enlarging still images recorded on "Memory Stick"s - Memory PB ZOOM
- YBéniuèHne 3aɪncaHHbIX HénoD-BHXbIX n3o6paXeHn Ha“Memory Stick”- PB ZOOM c πamTbHQ
- Peped onepaunei
- Playing back images in a continuous loop - SLIDE SHOW
- Bocnpon3BeJeHne n3o6paXeHn BHeIpepbIBHOI NOcJIeObATEJIbHOCTNIO 3aMKHyTOMy cIKJy - SLIDE SHOW
- Ipeed hauanpa60tbI
- Bocnpo3BeHne n3o6paXeHn BHeIpepbIBHOI NOcIeObAteJIbHOCTnIO 3AMKHyTOMy cIKJy - SLIDE SHOW
- To stop the slide show
- To pause during a slide show
- To start the slide show from a particular image
- To view the recorded images on TV
- If you change the "Memory Stick" during operation
- ДлЯ OCTaHOBKn NOKa3a CnaIDoB
- Iy3bBoBpeMaoka3aJIOB
- Дянана noka3a сайдов c onpedenenHoro n3o6paXeHnA
- ДлпnpocmOTpa 3aHncanHbIX n3o6paxeHn Ha эКране TeJIeBu3opa
- B clyuae 3aemeHb "Memory Stick" BO Bpem npocmoTpa
- Preventing accidental erasure - Image protection
- Пре dioTbpaaehne cIyuahHoro CTnpaHn - 3aunTa n3o6paXeHn
- Ipeed hauanpa0bI
- Пре dioTbpaueHne clyuaHoroCTnpaHn - 3aunTa n3oPaxeHn
- To cancel image protection
- ITRAOTMeHbI3aunTbIM3o6paXeHNIA
- If the write-protect tab on the "Memory Stick" is set to LOCK
- EcIn JIeNecTOK 3aunTbI 3anmH Na "Memory Stick" yctahOBnE H noJIOXeHne LOCK
- Deleting selected images
- YdaJIeHne n3o6paJxHn
- YdaJIeHHe BbIbpaHHbIX N3O6paXKeHn
- To cancel deleting an image
- To delete an image displayed on the index screen
- Длг OTMeHbI ydaJIeHnI n3O6paKeHnI
- Длг OTMeHbI n3O6paXeHnI, OTO6paXaemOrHa ИнDEkCHOM 3KpaHe
- Deleting all the images
- YdaJIeHHe BCEx n3O6paXKeHn
- To cancel deleting all the images in the "Memory Stick"
- ДлЯ OTMeHbI ydaJIeHnB BCex n3o6paxeHn Ha "Memory Stick"
- Bo Bpemr OTo6paXeHn HnDnKaun DELETING
- EcInI IeneCTOK 3aunTbI 3annc Ha "Memory Stick" yctahOBlen B noJIOXeHne LOCK
- Writing a print mark - PRINT MARK
- 3aanncb neyaTHbIX 3HaKOB - PRINT MARK
- IpeedHaayanompa6oTbi
- To cancel writing print marks
- ДЯ OTMeHbI 3aInc NeayathbIX 3HaKOB
- Digital8 system, recording and playback
- What is the "Digital8 [ ] system"?
- Usable cassette tapes
- Playback system
- Copyright signal
- When you playback a dual sound track tape
- When you use tapes recorded in the Digital8 H system
- When you use a tape recorded in the Hi8/standard 8 system
- PnBocnpOn3BeJeHn
- CunhaabTOPcKOro npaba
- Pn BocnpOn3BeDeHn JeHTbI C DBOH0N 3ByKO0B DOPOXK0N
- PnncnoJb3ObaHnn JeHT,3aNcAHHbx B zuΦpOBoCnCTeMé Digital8
- PnncnoJIb3ObaHnJeHT,3aIncaHbIX BcnCTeMe Hi8/ctaHdpTHoN cnCTeMe 8
- What is "i.LINK"?
- About the Name "i.LINK"
- YTo Takoe "i.LINK"?
- OTHOCHTeIbHO Ha3BaHnI “i.LINK”
- i.LINK Baud rate
- i.LINK Functions on this unit
- Required i.LINK Cable
- Changing the lithium battery in your camcorder
- 3aMeHa IHTNeBOI 6aTapeiKN B BaSei BnDeOkamepe
- Lithium battery
- BHIMAHNE
- Лтnevвая 6атуейka
- Changing the lithium battery
- 3aMeHa NITNeBOB 6aTapeeKn
- Troubleshooting
- When operating using the "Memory Stick"
- Self-diagnosis display
- Warning indicators and messages
- Warning indicators
- Warning messages
- Понск и устараенье несправност
- HdNkauncaMOnaHcHcTNK
- IpeDynpexdauoHmHnDKaTOp OTHOCNTbHO JeHTbl
- JIITNeBaa 6aTapeiKa pa3pRnIJaCb HJIN He yCTaHOBLeHa COBCem
- HdikauncaumcAmoHaarHoctnKu (ctp. 142)
- ПОНЗОЛА KOндэнcaцьяВлагn\*
- Bam Huxho n3Bneueb kaccety* MeDneHnoe mRanHe:
- IpeynpexkaIOuHnDnKaTOp OTHOCTeJbHO paJa.
- PpeDynpexKaOnn INndkaTop OTHOCHTeNbHO JENTbI NIN 6atapeHoro 6loka**
- Ppeynpexkaioune coo6eHnA
- Using your camcorder abroad
- PAL system
- Simple setting of clock by time difference
- Maintenance information and precautions
- Moisture condensation
- If moisture condensation occurred
- Note on moisture condensation
- How to prevent moisture condensation
- HΦopMaζη nO yXoDy 3a aΠnapaTOM n Mepbl npεdOCTOpOχHQCTn
- KoHdeHcaZnBlaRn
- Ecn npon3oJla KOHcHcaJn BnaI
- PpimeyaHnno KOHdeHcaunn BlaH
- Kak npedotBpaTb KOHdeHcaunBlaH
- Maintenance information
- Cleaning the LCD screen
- Cleaning the video head
- When you playback/record in the Digital8 system
- HΦopmaunno yxody 3a annapatom
- Ynctka 3KpaHa KKd
- 甲CTKa BnDeOroJIOBOK
- При Воспpon3beDEHn/3aIncB zuΦpoBoC cnCTeme Digital8【
- When you play back in the Hi8/Standard 8 (analog) system
- PnB BocnpOn3BeDeHmN B CnCTeMe (aHaIorOBo) Hi8/ctAndaprTHoN CnCTeMe 8
- Removing dust from inside the viewfinder (DCR-TRV120E/TRV125E)
- YdaJIeHne NbIIN 3NHyTpN BvIDOnCKaTeJI (DCR-TRV120E/TRV125E)
- Caution
- BHMaHne
- Precautions
- Camcorder operation
- On handling tapes
- Camcorder care
- MepblnpedocTopoXHoctn
- 3KcnpnyataaBnDeOKamepbl
- 06paueHne c JeHTamn
- Uxo3a Bndeokamepoi
- Connection to your PC
- When inputting the image recorded by Hi8/ standard 8 system into Sony VAIO
- AC power adaptor
- Notes on dry batteries
- If batteries are leaking
- BaTapeHbIb 6Jok
- EcIn npOn30uHa yTeKa BHyTpEnHero BeuecTb6aTaapeek
- Video camera recorder
- System
- Input/output connectors
- LCD screen
- General
- "Memory Stick" (DCR-TRV320E only)
- Texhnueckne xapaKtepncnkn
- Bvdeokamepa
- CnCTema
- Cnctema Bndeo3annc
- Cnctemaaydno3aannc
- BndeocnHa
- ΦopMnpoBaTeIb n3o6paXeHn
- LBeTOBaTeMnepaTypa
- Pa3beMbI BXOHyBIX/BbIXOHyBIX CnRHaNoB
- BxOa/BbIXoA S BnDeo
- BbIXoD cnHana aydno/BnDeo
- DV BixoD uΦpOBOBVDueoCnHana
- THe3DOrOJIOBbIXTeIeΦoHOB
- THe3o ynpBaBnHnLA NLC (DCR-TRV120E/TRV125E)
- THe3oLANC DIGITALI/O (DCR-TRV320E)
- Pa6o7a Tempepatya
- TempepatypxpaheHH
- Pa3Mepbl (npu6Jn3.)
- Bec (npn6Jn3.)
- Ceteboa aandaTep nepemehhoro TOka
- Tpe6oBaHnK nntaHnIO
- Notpe6JrEma MoUHOCTb
- BbIXoHoe HapnpxeHne
- Pa6ooua TemnepaTpa
- TemnepatypxaheHna
- Pa3Mepbl (npn6Jln3.)
- He BKIOUaB BbICTyNaIOuNe YaCTN
- Bec (npn6n3.)
- BaTapeiHbI 6JIOK
- EMKOCTb
- Pa3mepb (np6n3.)
- Bec (npn6nn3.)
- "Memory Stick"
- (Tolbko DCR-TRV320E)
- Namrta
- Pa6ooye HaprJxKeHne
- Notpe6JrMaMoHocTb
- OxndaHnA
- Identifying the parts and controls
- Remote Commander
- NylbT DnctaHcNoHHoro ynpabJeHnA
- ДлnoiodrotOBKn nyIbTa ДиctahCuHOHHoro ynpaBNeHnA
- Notes on the Remote Commander
- PpmeaHnK npIbTy dNCTaHcNoHHoro ynpabJIeHn
- Operation indicators
- Pa60yne INdNkaTopbI
- Functions to adjust exposure (in the recording mode)
- Functions to give images more impact (in the recording mode)
- Functions to give a natural appearance to your recordings (in the recording mode)
- Functions to use in editing (in the recording mode)
- Functions to use after recording (in the playback mode)
- PykoBoCTBO IO 6bICTpbIM yHKnIaM
- E
- F, G, H
- I, J, K, L
- M, N
- O, P, Q
- R
- s
- T, U, V
- W,X,Y,Z
- AлфаВиТьи yka3aTeЛь
- A, B, Γ
- D,E,X,3
- N, K, JI, M
- H, O
- P
- C, T
- y-
- A,B,C,D
- E,F,G,H
- 1-0
- P-Z
Brand : SONY
Model : DCR-TRV125E
Category : Camcorder