
IB 6315 - Cooker TEKA - Free user manual and instructions
Find the device manual for free IB 6315 TEKA in PDF.

| Brand | TEKA |
| Model | IB 6315 |
| Product type | Cooker (induction hob) |
| Cooking type | Induction |
| Number of cooking zones | 4 zones (according to description of Flex Zone and Synchro functions) |
| Control type | Touch panel with sliding cursor |
| Display | LED indicators for power and timer |
| Cooking functions | 9 power levels, maximum power (P), keep warm, melting, simmering, rapid boil, sliding cooking |
| Special functions | Flex Zone, Synchro, Stop&Go, Lock (child safety) |
| Safety | Pan detection, automatic shutdown, control lock, residual heat indicator (H) |
| Pan detection | Works only with suitable pans (ferromagnetic base); automatic shutdown if no pan |
| Automatic shutdown | Yes, according to power level (see table 1 in manual) |
| Timer | Countdown from 1 to 99 minutes, automatic zone shutdown |
| Residual heat indicator | Symbol H displayed if zone is hot after turning off |
| Power supply | 230 V / 400 V, 50/60 Hz (depending on connection) |
| Cleaning | Damp cloth and mild detergent; scraper for stubborn stains; specific cleaner for ceramic glass |
| Maintenance | Clean regularly after cooling; avoid abrasive products and steam cleaners |
| Installation | Built-in; requires a separation board if placed above a drawer |
| Repairs | Official TEKA technical service only |
| Warranty | Warranty certificate provided (conditions to be checked) |
Frequently Asked Questions - IB 6315 TEKA
User questions about IB 6315 TEKA
0 question about this device. Answer the ones you know or ask your own.
Ask a new question about this device
Download the instructions for your Cooker in PDF format for free! Find your manual IB 6315 - TEKA and take your electronic device back in hand. On this page are published all the documents necessary for the use of your device. IB 6315 by TEKA.
USER MANUAL IB 6315 TEKA
A工程技术 is a tool to improve the performance of a system. It is used to improve the performance of a system by improving its performance and reducing its cost. It is also used to improve the performance of a system by improving its performance and reducing its cost.
Warning. If the ceramic glass breaks or cracks, immediately unplug the stovetop to avoid electric shocks.
This appliance is not designed to work with an external timer (not built into the appliance) or a separate remote control system.
Do not steam clean this device.
Warning. The device and its accessible parts may heat up during operation. Avoid touching the heating elements. Children younger than 8 years old must stay away from the hob unless they are permanently supervised.
This device may solely be used by children 8 years old or older, people with impaired physical, sensory or mental abilities, or those who lack experience and knowledge. ONLY when supervised or if they have been given adequate instruction on the use of the device and understand the dangers its use involves. User cleaning and maintenance may not be done
by unsupervised children.
Children must not play with the device.
Warning. It is dangerous to cook with fat or oil without being present, as these may catch fire. NEVER try to extinguish a fire with water! In this event disconnect the device and cover the flames with a lid, a plate or a blanket.
Do not store any object on the cooking areas of the induction hob. Prevent possible fire hazards.
The induction generator complies with current EU legislation We however recommend that anyone fitted with a device such as a pacemaker should refer to their physician, or if in doubt abstain from using the induction areas.
Metal object such as knives, forks, spoons and lids may not be placed on the surface of the hob as they may overheat.
After use always disconnect the hot plate, do not simply remove the pot or pan. Otherwise a malfunction may
occur if inadvertently another pot or pan is placed on it within the detection period. Prevent possible accidents!
If the supply cord is damaged, it must be replaced by the manufacturer, its service agent or similarly qualified persons in order to avoid hazard.
WARNING: Use only stovetop protectors designed by appliance manufacturer or indicated by the manufacturer in the instructions for use as adequate or stovetop protectors incorporated into the device. The use of inadequate protectors can cause accidents.
It is necessary to allow the appliance disconnection after installation. Disconnection devices must be incorporated to the fixed electrical installation, according to the installation regulations.
Installation
Installation with cutlery drawer
If you wish to install furniture or a cutlery drawer under the hob, a separation board must be fitted between the two. Accidental contact with the hot surface of the device's housing is thus prevented.
The board must be fitted 20mm beneath the under part of the stovetop.
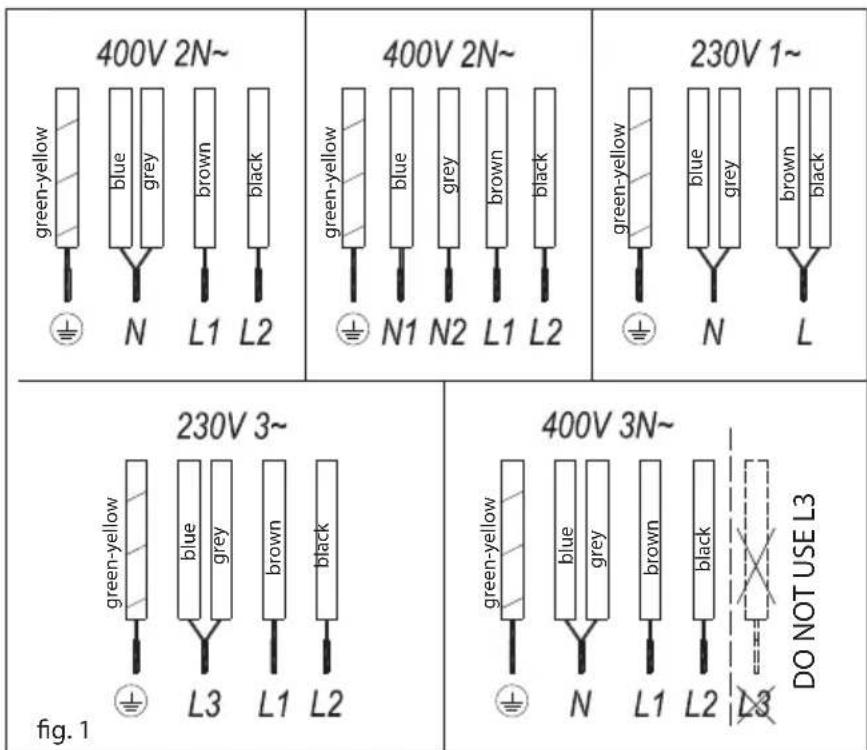
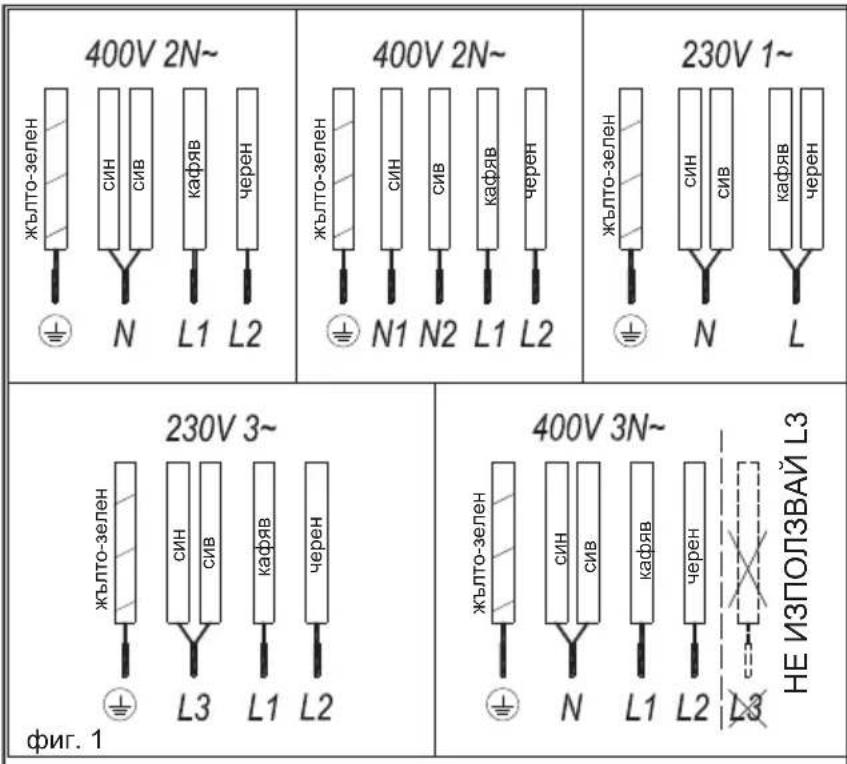
Electrical connection
Before you connect the stovetop to the mains, check that the voltage and frequency match those specified on the stovetop nameplate, which is underneath it, and on the Guarantee Sheet, or if applicable on the technical data sheet, which you must keep together with this manual throughout the product's service life.
Ensure that the inlet cable does not come into contact with the induction top housing or the oven housing, if it is installed in the same unit.
Warning:
The electrical connection must be properly grounded, following current legislation, otherwise the induction hob may malfunction.
Unusually high power surges can damage the control system (like with any electrical appliance).
It is advised to refrain from using the induction hob during the pyrolytic cleaning function in the
case of pyrolytic ovens, due to the high temperature that this type of device attains.
! Only the TEKA official technical service can handle or repair the appliance, including replacement of the power cable.
Before disconnecting the hob form the mains, we recommend switching off the cutoff switch and waiting for approximately 25 seconds before disconnecting from the mains. This time is required to allow for the complete discharge of the electronic circuitry and thus preclude the possibility of electric shock from the cable terminals.
i Keep the Guarantee Certificate or the technical data sheet together with the instructions manual throughout the product's service life. These contain important technical information.
Use and Maintenance
User instructions of the Touch Control
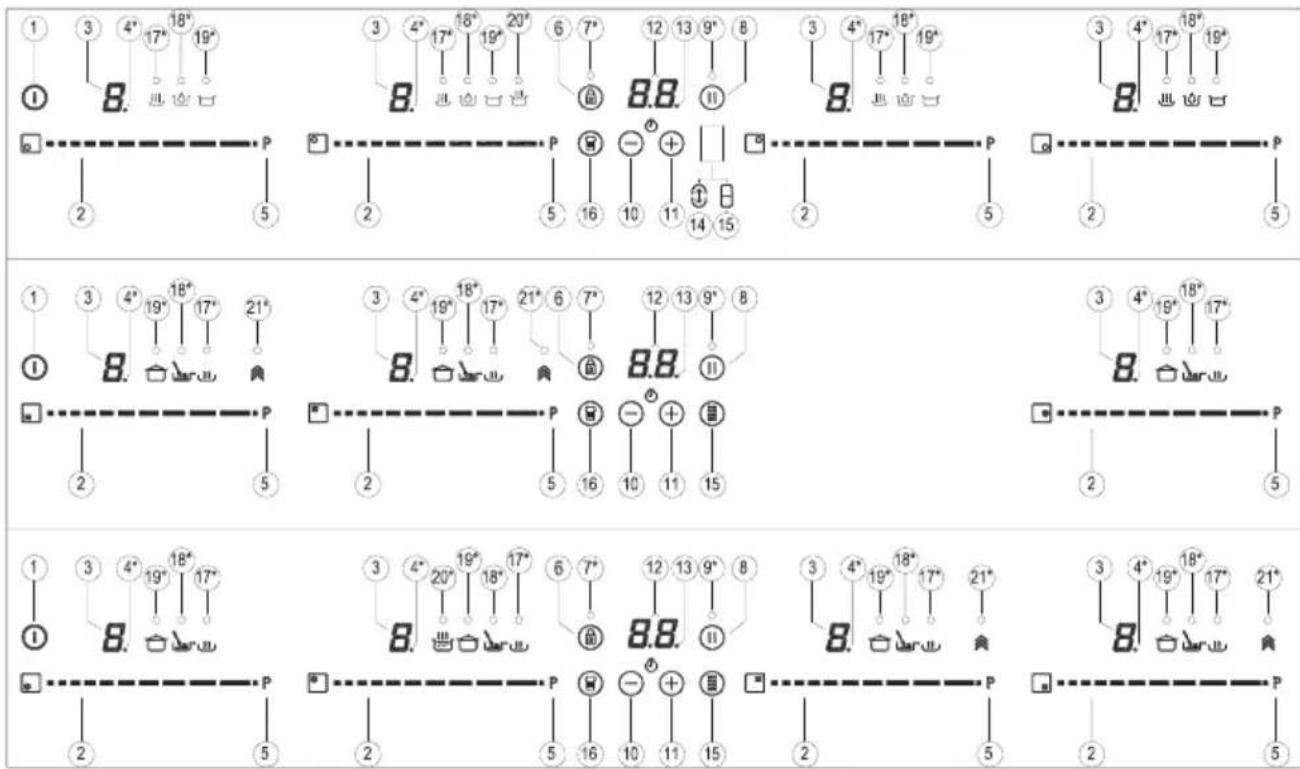
HANDLING ELEMENTS (fig. 2)
1 General on/off sensor.
Cursor slider for controlling power.
③ Power and/or residual heat indicator*.
4 Decimal dot of power and/of residual heat indicator.
⑤ Direct access to "Power" function.
Activation sensor for "Block" or "Stop&Go" functions.
⑦ Pilot indicator light "Block" function activated*.
8 Activation sensor for "Stop&Go" function.
9 Pilot indicator light "Stop&Go" function activated*.
"Minus" sensor for timer.
11 "Plus" sensor for timer.
12 Timer indicator.
13 Decimal dot of the timer.*
14 Activation sensor for "Synchro" function ; (depending on model).
15 Activation sensor for "Flex Zone" function ; (depending on model).
16 Activation sensor for "Chef" functions; (depending on model).
① Pilot indicator light "Keep Warm" function activated*; (depending on model).
18 Pilot indicator light" Melting function activated*, (depending on model).
Pilot indicator light "Simmering" function activated* (depending on model).
20 Pilot indicator light "Quick Boiling" function activated* (depending on model).
21 Pilot indicator light "Slide Cooking" function activated* (depending on model).
- Only visible while running.
The manoeuvres are done by means of the touch keys. You do not need to exert force on the desired touch key, you only need to touch it with your fingertip to activate the required function
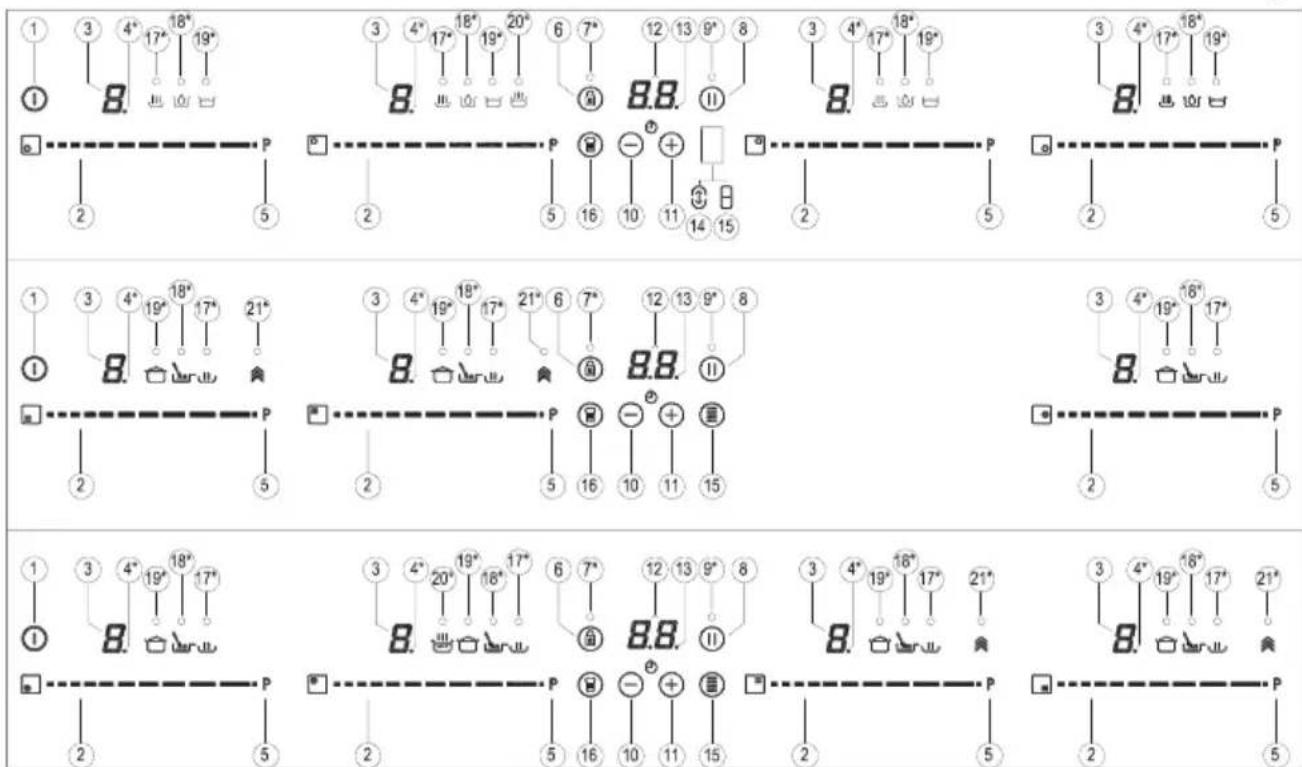
Fig.2
Each action is verified by a beep. Use the cursor slider (2) to adjust power levels (0 - 9) by sliding your finger over it. Sliding towards the right increases the value, whereas sliding towards the left decreases it.
It's also possible to directly select a power level by placing your finger directly on a desired point of the cursor slider (2)
In order to select a plate on these models, directly touch the cursor slider (2).
SWITCHING ON THE DEVICE
1 Touch the On touch key (1) for at least one second. The touch control will become active, a beep will be heard and the indicators (3) will light up displaying a "-". If any cooking area is hot, the related indicator will flash an H.
If you do not take any action in the next 10 seconds the touch control will switch off automatically.
When the touch control is activated, you can disconnect it at any time by touching the touch button (1), even if it has been locked (lock function activated). The touch button (1)
always has priority to disconnect the touch control.
ACTIVATING PLATES
Once the Touch Control is activated with sensor 1 (1), any plate can be turned on by following these steps:
1 Slide the finger or touch in any position of one of the cursors "slider" (2). The zone has been selected and simultaneously the power level will be set between 0 and 9. That power value will be shown on the corresponding power indicator and its decimal dot (4) will keep light up during 10 seconds.
2 Use the cursor slider (2) to choose a new cooking level between 0 and 9.
As long as the plate is selected, in other words, with the decimal (4) dot light up, its power level can be modified.
TURNING OFF A PLATE
Using the touch slider key (2) lower the power to level 0. The hotplate will switch off.
When a hot plate is switched off an
H will appear in its power indicator (3), if the glass surface of the related cooking area is hot and there is a risk of burns. When the temperature drops, the indicator (3) switches off (if the hob is disconnected), or otherwise a "-" will light up if the hob is still connected.
TURING ALL PLATES OFF
All plates can be simultaneously disconnected by using the general on/off sensor (1). All plate indicators (3) will turn off. If the heating zone turned off is hot, its indicator shows an H..
Pan detector
Induction cooking zones have a built-in pan detector. This way, the plate will stop working if there is no pan present or if the pan is not suitable.
The power indicator (3) will show a symbol to designate "there is no pan if, while the zone is on, no pan is detected or the pan is not suitable
If a pan is taken off the zone while it is running, the plate will automatically stop supplying energy and it will show the symbol for "there is no pan". When a pan is once again placed on the cooking zone, energy supply
will resume at the same power level previously selected.
If a pan is taken off the zone while it is running, the plate will automatically stop supplying energy and it will show the symbol for "there is no pan". When a pan is once again placed on the cooking zone, energy supply will resume at the same power level previously selected.
When finished, turn off the cooking zone by using the touch controls. Otherwise an undesired operation could occur if a pan is accidentally placed on the cooking zone during the three minutes. Avoid possible accidents!
Block Function
With the Block Function, you can block the other sensors, except for the on/off sensor (1), in order to avoid undesired operations. This function is useful as a childproof safety.
To activate this function, touch sensor (6) for at least one second. Once you have done so, the pilot (7) turns on indicating that the control panel is blocked. To deactivate the function, simply touch sensor (6) again.
If the on/off sensor (1) is used to turn off the appliance while the block function is activated, it won't be possible to turn the cooktop on again until it unblocks.
Silencer of the beep
When the hob is on, if one presses the touch key (+) (11) and the locking touch key (号) (6) simultaneously for three seconds, the beep that accompanies each action will be deactivated. The time indicator (12) will display "OF".
This deactivation will not be applied to all the functions, as for example the beep for on/off, the ending of the timer or the locking/unlocking of the touch keys always remain activated.
To once again activate all the beeps
that accompany each action, again simultaneously press the touch key (11) and the locking touch key (6) for three seconds. The time indicator (12) will display "On"
Stop&Go Function
This function puts the cooking process on pause. The timer will also be paused if it is activated.
Activating the Stop function.
Touch the Stop sensor (8) for one second. The pilot (9) lights up and the power indicators will show the symbol to indicate cooking has been paused.
Deactivating the Stop function
Touch Stop&Go sensor (8) again. The pilot (9) turns off and cooking resumes under the same power and timer settings that were established before the pause.
Power Function
This function supplies "extra" power to the plate, above the nominal value. Said power depends on the size of the plate, with the possibility of reaching the maximum value permitted by the generator.
1 Slide the finger above the corresponding cursor slider (2) until the power indicator (3) shows "9" and keep the finger pressed for one second, or touch directly on "P" and keep pressed the finger for one second.
2 The power level indicator (3) will show the symbol , and the plate will start to supply extra power. The Power function has a maximum duration specified in Table 1. After this time, the power level will automatically adjust to 9. A beep sounds.
On activating the Power function in one hotplate, it is possible that the performance of some of the others may be affected, reducing its power to
a lower level, in which case this will be displayed on its indicator (3).
Deactivation of Power Function, before its working time passes, can be done either by means of touching cursor "slider" modifying its power level or repeating step 3.
Timer Function (countdown clock)
This function facilitates cooking given that you don't have to be present: You can set a timer for a plate, and it will turn off once the desired time is up.
For these models, you can simultaneously program each plate for durations ranging from 1 to 90 minutes.
Setting a timer on a plate.
Once the power level is set on the desired zone, and while the decimal dot of the zone keeps on, the zone will be able to be timed.
To that end:
1 Touch sensor (10) or (11). Timer Indicator (12) will show "00" and corresponding zone indicator (3) will show the symbol blinking alternately with its current power level.
2 Immediately afterwards set a cooking time between 1 and 99 minutes, using the sensors (10) o () (11). With the first one the value will start at 60, whereas with the second it will start at 01. By keeping sensors (10) o () (11) pressed, the value will be restored to 00. When there is less than one minute left, the clock will begin to count down in seconds.
3. When the timer indicator (12) stops flashing, it will start to count down the time automatically. The indicator (3) relating to the timed hotplate will alternately display the selected power level and the symbol 七 .
Once the selected cooking time has elapsed, the heating zone being timed is turned off and the clock emits a
EN
series of beeps for several seconds. To turn off the audible signal, touch any sensor.The timer indicator (12) will display a flashing 00 beside of the decimal dot (4) of the selected zone. If the heating zone turned off is hot, its power indicator (3) will display alternately the H symbol and a " -".
If you wish to time another hotplate at the same time, repeat steps 1 to 3.
If one or more zones are already timed, the timer indicator (12) will show by default the shortest remaining time to finish, showing a "t" on the related zone. Rest of timed zones will show on their corresponding indicator zones the decimal dot blinking. When cursor "slider" of another timed zone is pressed, the timer will show the remaining time of that zone for a few seconds and its indicator will show its power level and the "t" alternately.
Changing the programmed time.
For modifying programmed time, cursor "slider" (2) of timed zone has to be pressed. Then it will be possible to read and modify the time.
Through sensors (10) and (11), you can modify the programmed time.
Disconnecting the clock
If you wish to stop the clock before the programmed time is up, this can be done at any time by simply adjusting its value to - .
1 Select the desired plate.
2 Adjust the value of the clock to "00" by using the sensor (10). The clock is cancelled. This can also be done more quickly by pushing the "sensors (10) and (11) at the same time.
Power Management function (depending on model)
Some models are equipped with a power limiting function (Power Management). This function allows the total power generated by the hob to be set to different values selected by the user. To do this, for the first minute after having connected the hob to the
power supply, it is possible to access the power limiting menu.
1 Press the () (11) touch key for three seconds. The letter PL will appear on the timer indicator (12)
2 Press the locking touch key (6). The different power values to which the hob can be limited will appear and these can be changed using the ()(11) and ( 0) sensors.
3 Once the value has been selected, once again press the locking touch key (6). The hob will be limited to the chosen power value.
If you want to change the value again, you must unplug the hob and plug it in again after a few seconds. Thus you will again be able to enter the power limiting menu.
Every time the power level of a hotplate is changed, the power limiter will calculate the total power the hob is generating. If you have reached the total power limit, the touch control will not allow you to increase the power level of that hotplate. The hob will beep and the power indicator (3) will blink at the level that cannot be exceeded. If you wish to exceed that value, you must lower the power of the other hotplates. Sometimes it will not be enough to lower another by a single level as this depends on the power of each hotplate and the level it is set at. It is possible that to raise the level of a large hotplate that of several smaller ones must be turned down.
If you use the quick switch-on at maximum power function and the said value is above the value set by the limit, the hotplate will be set to the maximum possible level. The hob will beep and the said power value will blink twice on the indicator (3).
Special functions: CHEF (depending on the model)
The Touch Control has special features that help the user to cook through the CHEF sensor (16). These functions are available depending on the model.
To activate a special feature on a zone:
1 First it should be selected; and then, the decimal point (4) will be active on the power indicator (3).
2 Now click on the CHEF sensor (16). The sequentially successive presses will go over all the CHEF functions available in each zone one by one. These functions will show the activation with the corresponding leds (17), (18), (19), (20) and (21).
If you want to cancel a special active function at any time, you should touch the "slider" cursor sensor (2) of the related zone to select it. The decimal point (4) of the power indicator (3) will light up. Then, touch again the "slider" (2) cursor to set a new power level or to power off the zone, or you can choose a different special function touching again on the CHEF sensor (16).
KEEP WARM FUNCTION (depending on the model)
This function automatically sets an appropriate power level to keep the cooked food hot.
To activate it, select the plate, and press on the CHEF sensor (16)
until the led (17) located on the icon / lights up. Once the function is activated, the symbol will appear on the power indicator (3).
You can override the function at any time by turning off the plate, by changing the power level or by choosing a different special function.
MELTING FUNCTION (depending on the model)
This function maintains a low temperature in the cooking zone. Ideal for defrosting food or for slowly melting other food types as chocolate, butter, etc.
To activate it, select the plate, and press on the CHEF sensor (16) until the led (18) located on the icon lights up.Once the function is activated, the symbol will appear on the power indicator (3).
You can override the function at
any time by turning off the plate, by changing the power level or by choosing a different special function.
Filled to over half its capacity at room temperature water (never use warmed or hot water).
SIMMERING FUNCTION (depending on the model)
Failure to comply with these conditions will distort the proper control of boiling.
This feature allows you to keep simmered.
WARNING: do not use this feature for a different cooking purpose other than boiling water. Never use oil, it may lead to overheat and generate a flame.
After the food is boiled, enable the plate by selecting it, and press the CHEF sensor (16) until the led (19) located on the icon / lights up. Once the function is activated, the symbol R will appear on the power indicator (3).
Activation of the function
You can override the function at any time by turning off the plate, by changing the power level or by choosing a different special function.
To activate the function, select the plate, and press the CHEF sensor (16) until the led (20) located on the icon / lights up.
QUICK BOILING FUNCTION (depending on the model)
Once the feature is activated, the sign R will appear on both the power indicator (3) and the timer indicator (12); a moving segment will appear, indicating that the cooking is under system's control.
This function enables the automatic boiling control, which is a great help for cooking pasta, rice, eggs, boil some food, etc. It is available only in zones where the /symbol appears.
When the system detects that it is about to start boiling, a first beep will be heard. Take this opportunity to prepare your food for boiling or baking as desired.
Conditions of the container
After 30 seconds, a second beep will be heard; if you have not already done so, it's time to pour the food in the pan.
For a proper operation of the Quick Boiling function, you need to use a container that meets the following preconditions:
After the second beep, the system will activate the timer and stopwatch for you so that you can control how long the food is to be boiled.
- Bottom size as close as possible to the diameter of the plate.
30 seconds after activating the stopwatch, a third beep will sound
to warn that from that moment on, the system will decrease the power supplied in order to maintain a gentle and continuous boil. The timer will remain active until the end of cooking.
If desired, you can disable the timer and set a time for the countdown and automatic shutdown of the plate (see section Timer Function).
Deactivation of the function
You can override the function at any time by turning off the plate, by changing the power level or by choosing a different special function.
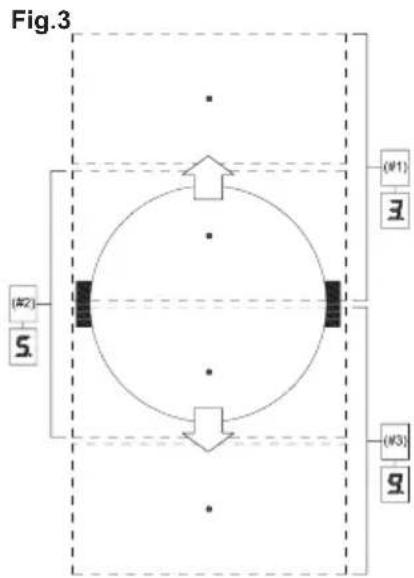
SLIDE COOKING FUNCTION (depending on the model)
This function allows to divide the flexible zone into three areas (see fig.3) and activates a predefined power configuration. It will allow slide the vessel from one area to another, to cook with the power assigned to each zone.
To activate it, you must first activate the "Flex Zone" function (see section "Flex Zone function").
After, press on the CHEF sensor (16), until the leds (21) located on the icon lights up. When doing so, the power indicators (3) will show three segments (see fig. 4) indicating that you can now place the vessel.
Once the vessel is placed, the power level will appear automatically in the power indicators (3): for zone #1, the power level is 3, for zone #2 the power level is 5 and for zone #3 the power level is 9 (see fig.3 and 5).

Fig. 6

Fig. 4
Fig. 5
To deactivate this function, you must activated zones. In case your model touch the "slider" cursor (2) in the has several zones with "Flex Zone", position "0". you can select the desired option
Flex Zone function (depending on the model)
Through this function, it is possible to enable two cooking zones work together, and to select a power level and to activate the timer function for both zones.
To activate this function, press the sensor 15).By doing so, the decimal points (4) of the linked plates will light up and the value "0" will be shown on their power indicators (3).
The clock timer indicator (12) will show three segments indicating the
After the "Flex Zone" is selected, you can assign the power by touching any of the "滑行器" cursors (2) of one of the linked zone. The power level and its variations are displayed simultaneously on the power indicators (3) of both zones.
To disable this feature, you should touch the sensor 日 / 日 again. Also, when the function is disabled, the levels of powers and functions assigned to the related zones are cleared.
Synchro Function (depending on the model)
Through this function, it is possible to achieve that two cooking zones indicated in the printing screen as "Synchro" work together and to select a power level and to activate the timer function for both zones
Press the sensor (14) to active this function. By doing so, the decimal points (4) of the linked plates will
light up and the value "0" will blink on their power indicators (3). The detection of the container will take place throughout the linked zone. You will have a few seconds to perform the next operation; otherwise, the function will be disabled automatically.
To disable this feature, you should touch the sensor (14) again. Also, when the function is disabled, the levels of powers and functions assigned to the related zones will be cleared.
Safety switch off function
If due to an error one or several heating zones do not switch off, the appliance will be automatically disconnected after a set amount of time (see table 1).
Table 1
| Selected power level | MAXIMUN OPERATING TIME (in hours) |
| 0 | 0 |
| 1 | 8 |
| 2 | 8 |
| 3 | 5 |
| 4 | 4 |
| 5 | 4 |
| 6 | 3 |
| 7 | 2 |
| 8 | 2 |
| 9 1 | |
| P | 10 or 5 minutes, readjusts to level 9 (depending on model) |
When the "safety switch off" function has been triggered, a 0is displayed if the glass surface temperature is not dangerous for the user or an H if there is a burn risk.

- Keep the control panel of the living areas clean and dry at all times.

In the event of operating procedures or incidents not mentioned in this manual, disconnect the balance and contact the TEKA technical service.
Suggestions and recommendations
- Use pots or pans with thick, completely flat bottoms.
- Do not slide pots and pans over the glass because they could scratch it.
- Although the glass can take knocks from large pots and pans without sharp edges, try not to knock it.
- To avoid damaging the ceramic glass surface, do not drag pots and pans over the glass and keep the undersides of them clean and in good condition.
- Recommended diameters of the pot bottom, (see "Technical Data Sheet" supplied with the product).

Try not to spill sugar or pro
ducts containing sugar on the glass as while the surface is hot these could damage it.
Cleaning and maintenance
To keep the appliance in good condition, clean it using suitable products and implements once it has cooled down. This will make the job easier and avoid the build-up of dirt. Never use harsh cleaning products or tools that could scratch the surface, or steam-operated equipment.
Light dirt not stuck to the surface can be cleaned using a damp cloth and a gentle detergent or warm soapy water. However, for deeper stains or grease use a special cleaner for ceramic hot plates and follow the instructions on the bottle. Dirt that is firmly stuck due to being burned repeatedly can be removed using a scraper with a blade.
Slight tinges of colour are caused by pots and pans with dry grease residue underneath or due to grease between the glass and the pot during cooking. These can be removed using a nickel scourer with water or a special cleaner for ceramic hot plates. Plastic objects, sugar or food containing a lot of sugar that have melted onto the surface must be removed immediately using a scraper.
Metallic sheens are caused by dragging metal pots and pans over the glass. These can be removed by cleaning thoroughly using a special cleaner for ceramic glass hot plates, although you may need to repeat the cleaning process several times.
Warning:
A pot or pan may become stuck to the glass due to a product having melted between them. Do not try to lift the pot while the heating zone is cold! This could break the glass.
Do not step on the glass or lean on it as it could break and cause injury. Do not use the glass as a surface for placing objects.
TEKA INDUSTRIAL S.A. reserves the
right to make changes to its manuals that it deems necessary or useful, without affecting the product's essential features.
Environmental considerations

product
or its packaging means that this product cannot be treated like ordinary household waste. This product must be taken to a recycling collection point for electrical and electronic appliances. By ensuring that this product is disposed of correctly, you will avoid harming the environment and public health, which could happen if this product is not handled properly. For more detailed information about recycling this product, please contact your local authority, household waste service or the store where you purchased the product.
The packaging materials used are environmentally friendly and can be recycled completely. Plastic components are marked >PE< , >LD< , EPS<, etc. Dispose of packaging materials, like household waste, in your local container.
Fulfillment with Energy Efficiency of the appliance: -Appliance has been tested according to standard EN 60350-2 and the obtained value, in Wh/Kg, is available in the appliance's rating plate.
Following advices will help you to save energy anytime you cook:
- Use the correct lid for each pot whenever is possible. Cooking without lid uses more energy.
- Use pans with flat bases and appropriate base diameters in order to match size of the cooking zone. Pan manufacturers usually provide top diameter of the pot that is always larger than base diameter.
- When water is used for cooking, use little quantities in order to preserve vitamins and minerals of vegetables and set the minimum power level that allows maintaining the cooking. High power level
EN
is unnecessary and a waste of energy.
- Use small pots with small quantities of food.
If something does not work
Before calling the technical service, perform the verifications described below.
The appliance does not work: Ensure that the power cable is plugged in.
The induction zones do not produce heat:
The container is not appropriate (it does not have a ferromagnetic bottom or is too small). Check that the bottom of the container attracts a magnet, or use a larger container.
A humming is heard when starting to cook in the induction zones:
With containers which are not very thick or not of one piece, the humming results from the transmission of energy directly to the bottom of the container. The humming is not a defect, but if you wish to avoid it anyway, reduce the power level slightly or use a container with a thicker bottom, and/or of one piece.
The touch control does not light up despite lighting, does not respond:
No heating zone has been selected. Be sure to select a heating zone before operating it.
There is humidity on the sensors, and/or your fingers are wet. Keep the touch control surface and/or your fingers clean and dry. The locking function is activated. Unlock the controls.
The sound of a fan is heard while cooking, which continues even after cooking has ended:
The induction zones have a fan to keep the electronics cool. This only operates when the electronic circuits get hot. It stops again when the circuits cool whether the hob is turned on or not.
U
The symbol will appear on the power indicator of a hotplate:
The induction system does not find a
pot or pan on a hotplate or it is of an unsuited type.
The hotplate will switch off and the message C81 or C82 will appear on the indicators:
Excessive temperature in the electronics or on the glass. Wait for a while for the electronics to cool down or remove the pot or pan so that the glass can cool.
C85 appears on the indicator of one of the hotplates:
The pot or pan used is of an unsuited type. Switch off the hob, switch it on again and try with another pot or pan.
The appliance switches off and the message C90 appears on the power indicators (3):
The touch control detects on/off (1) sensor is covered and doesn't allow switching on the cooktop. Remove the possible objects or liquids keeping the touch control surface, clean and dry until the message disappears.
The appliance switches off and the message C91 appears on the power indicators (3):
The touch control detects Stop&Go sensor (6) is covered and doesn't allow to handle the cooktop. Remove the possible objects or liquids keeping the touch control surface, clean and dry, then press twice Stop&Go (6) sensor for removing the message and return to normal operation.
I Pniv aTouvOeTe Tny eTia aTNOY KevtpiK Tpofoosia,
OaC TPOTEIVOUVE VA KLEIOETO
DIAKOTTN ANEVEpyoToinos KA
VA TEPiEvETe YI A TEPiTou 25
DEUTEPOAETTA TPIV ByaAETo PIG.
AutcO Xpovocnai TeiTai Yiati
ETITPENEITNV TAnpN EKΦOPTION
TOU NAEKTPOVIKOU KUKWATOS
KAI ETOI ATOKAEIE TNY TINbAVOTNTA
NAEKTPOTANGiaC aTTO TIG ETTAPEC
Tou pIs.
i DiatnpieTe To IIOToTIOINTIKo Eyyunongn to quAaLo TExvikovd Edoouevw maCi Me To Exyeipio Odyiw yia tn auvoIkn diapkeia Cwns Tou Ptoivoc. Z e auta Teplaamabovtai OnmavtiKec TExviKcS NAnpoopoeC.
H eotia oBnvei kai otic evdeieic epaavietai to nnuuca81 n C82:
YIePBoiKIn ΘepOkaia Oa Kukawuata n OTo KpuoTaAIO. NepiEvTe Aiyov Kpuoouv Ta Kukawata n
ByaTe To yapeipko okeuoc ia va mTopeoei va KpuwoTo KpuotaAio.
EneKtpnuecko CBbp3BaHe
Ipei Da CbpxKeTe NToTa KBM eNektpnueckata Mpeka, Ce yBepete, ye BOITaXbT NyeCTOTATA OTROBaprHa Te3n, NocOeHn Ha Tabenkata Ha IIOta, KOrTO Ce HAMnpa Ha DbHOTOMy, KaKTo n Ha FapAHCuOnHnna NICT, a Ako e npInoXmIo - n Ha DOkUMeHTA c TexHnueckTe XapaKTePnCTnKi, KOtTO Tp6Ba Da CbXpaHraBe 3aeDnO C HactoTo ynbTbaHe ppe3 ZeINNA nepNoD Ha ynotpeBa Ha To3n PnpdyKT.
EneKtpnueckoto Cbbp3BaHe Tpa6ba Da 6bde OcbuaceCTBeHo 4pe3 npekbcbau 3a BCnKn NOnHocn INN uenCeI, KbTeO eIOCTbHNO, Cbo6pa3HO ToKa, n C MmHmMaHNo 3 MM pa3CToRnne MExdy KOHTaKTHTe TOUKN. Toba Ue Ocnpyn npekbcaHe Ha 3axpAHBaHETo npn abapn n No3BOJRA Ba NOuchTaBHe Ha ILOTA.
YBepete ce, ye BXoHnKa6eJ He ce DOKOCBa DO KOpNyCa Ha INHyKUHOHHN IINTIIN KOpNyCa Ha cyphHata,AKO e MOHTIpaH B CbIOTO 3BEHO.
BhimaHne:
EneKtpnueckoto Cbbp3BaHe Tp6Ba Da e NODxOJa 3a3eMeHo, CbINaCHO TEkyuHte 3aKOHOBn H3NcKBaHHa, 3aOTo B npOTNBEN CnyaM MoKe Da ce CTnRhe Do HEn3npabHOCT Ha INHyKUHOHHN KOTJIOH.
Heobuayho BnCOKnte TOKOB NblH MOraT Da NOBpeJr KOHTPOHaTa CnCTema (KaKTo npn BCEKn dpyr eJeKtpnueckn ype).
IpnopbYBaMe Da He H3no3BaTe INdyKcNoHHn KOTIOH npu FyHKnra TnpoNTuHO NOCTBaHe npu npoHTuHnte
Фурн,поради Висока.Temперату, когTo ДocTURAТ Te3N BИДОBE ypeDi.
Camo ophiunannay Texhueckn cepbn3 ha TEKA MOxe da o6cnykBa nn nonpaBry ypeDa, BKNIOHTeJHO da noDmeHra 3axpaHbuaa Ka6en.
IpEdu Da H3KIOUHTe NLOTa OT KOHTaTa, Bn npenOpbYBaMe da H3KIOUHTe rnaBHH 6yTOH (KIOU) 3a H3KIOUHTaHe N Da H3uKaTe npu-6n3nteNo 25 cekHyDn npEdu Da H3BaDNTe OT KOHTaTa. To3n nHTepBaI e Heo6XODm, 3a Da No3BOJN PbJHO pa3TOBapBaHe Ha eNeKTPOHHaTabePnra H NO To3n Haun DAppeDOTbPaTH Bb3MOxHOCCTTA OT eNEKTPueckn WOK npu KOHTaTa.
i CbxpnaBaiTe rapaHnraTa NIN DOkymeHTa c TexHnueCKnte DaHHN 3aeHNO c yntBaHeTo C nHcTpyKuN ppe3 ueHn nepnoHa ynotpe6a Ha To3n npOdyKT. Te cbdpjXaT BaxKa TExHnuecka HOpmaun.
Ynotpe6a n noDdpbXka
Инструкции 3a notpe6nteЯ 3a ceH3OpHnI naHelen 3a ynpabJIeHne
PABOTHN EJEMEHTN (Φnr. 2)
①ΓnaBHeCeH3Op 3a BKN./n3Kn.
②ПьзrayHa Kypcopa 3a ynpabJIeHHe Ha MOUHOCTT.
③Индикатор на 3axpaHbaHeTo n/ INN OCTaTbUHaTа TOnJIuHa.
4 DecetnHa ToUka Ha HnDnKaTopa Ha 3axpaHbAHeTo n/nnOctaTbHATA TOnnHa.
5 DnpeKeTeH DoCTbN Do FyHKunraTa "MoHOCT".
6CeH3Op 3a aKtNBnpaHe 3a yHKnraTa,5nOKnpaHe"nn "CnnpaH nnyckaH".
⑦ Hndnkatop Ha nnnothata CBETnHa 3a akTnBnpaHa cyHKuY BLOKnpaHe*.
8CeH3Op 3a aKTHBnPaHe 3a yHKnTa ,CnPaHe n NyckaHe".
9 INHdkatop Ha nnoTHata CBETnHa 3a aKTHBnpaHa fynKcna "CnpaHe nnyckahe.
10 CeH3Op "MnHyc" 3a TaIMepa.
11 CeH3Op,IIIOc"3a TaIMepa.
12 INHДиKaTOp Ha TaIMepa.
13 DecetnHa ToUka Ha TaMepa*.
14 CeH3Op 3a aKTHBnPahe 3a yHKnIraTcNHXPOHn3npaHe"; (B 3aBNCIMOCT OT MoJeNa).
15 CeH3Op 3a aKTHBnpuHe 3a yHKuYrTa ,IbBkAba 30Ha";(B 3aBNCIMOCT OT MoJena).
16 Cen3op 3a aKtNBupaHe 3a yHKnraT a "rOToBaU"; (B 3aBNCUMOCTOTMOdeJa).
17HdkatopHaNIOHTa CBETnHa3aAKTNBnPaHaΦyHKnIy "NoIrpBaHe**(B3aBNCMOCOT MOdena).
18HnKatopHaNIOHTa CBETnHa 3aakTNBnpaHaΦyHKnPa Pa3mpa3BaHe*,(B3aBNCMOCT OTMoeJa).
19 HndkaTop Ha NnnotHaTa CBETnHa 3a AKTNBupaHa FyHKuN KbKpeHe**; (B 3aBNCmOcT OT MoDena).
20HnKatopHaNIOHTa CBETINHa 3aakTNBUPaHaΦyHKU8 ,BbP3O KInHe*;(B3abCmOCT OTMOeJa).
21HdkatopHa nnnothata CBettna 3a aKtubupaHa yHKnra,ToBeHe cnnb3BaHe*, (B 3aBNCIMOcT OT MOneJa).
*Bnuimama camo no BpeMe Ha pa6ota.
MaheBpnte ce n3BbPWBat c NMOUta Ha ceH3OpHnTe KnaBn. He e HxKHO
da ce ynpaxnBaTe cna Bbpxy
KeJaanCeH3OpEn KnaBnU, Camo
Tp6Ba Da ro DOKOCHe T C BbPxa
Ha npbCTa CN, 3a da aKTNbupaTe
KeJahata yHKun
BcKaO DeiCTBHe ce nOTbBykDaBa c 6nIkaHe.
N3noJ3BaIte KypCopHnna Nb3rau (2), 3a Da Hacponte CnIata Ha MoUHocCTTa (0-9), Nb3raKn npbcta cn HAd Hero. Nb3raHTo HADrCHO YBeJIuYBa cTOnHOCTTa, DOkATO Nb3raHTo HAJIBO HAJaIBA.
Bb3MOxHO e n dIpeKTHO da n36peTe XeHaHOTo HnBO Ha MOuHOCCTTa, NOCTaBryKn npbcta cn dIpeKTHO Bbpxy XeHaHATA TOUka Ha KypcOpHnA nnb3rau (2).
3a da n36epete nnot Ha Te3n MOeJIH, dIpeKTHo HATNCHETe KypcOpHna nnb3rau (2).
BKIIIOUBAHE HA YPEDA
1HaTnCHTe ceH3OpHnaKnBnOn ①(1)Ha-MAJIko 3a eHacekyHda.CeH3OpHnT nAHeI 3aynpaBHeHne ige Ce aKTINbupa, igece yye 6nKane INDnKaTOPuTe (3) ige CBETHaT, NOKa3BaNkn, "Ako HKO3OHa 3a RotBeHe e RopeUHa CbOTBeTHNa INDnKaTOP ige
Mura H n.
Ako He npednpneMeTe HkaKBO DeiCTBnE B pAMKeTe Ha CJIeBaIuTe 10 cekyHn, ceH3OpHnT nHeJ 3a ynpabIeHne Ie Ce N3KIOUH aBTOMaTHHO.
Korato ceH3OpHNrT KOHTpOIN 3a ynpabJIeHnE e aKTbIbPaH, MoKeTe da rpo pa3eHNHrTe NO BcAko BpeMe, HATNCKaIKN CEH3OpHNr 6yToH (1), DOpN Da e 3akJIOUeH (fynKuN 3a 3akJIIOUBaHe aKTbIbPaHa). Cen3OpHNrT 6yToH (1) BuHaHne c pInopNTET nped pa3eDNHraBaHe Ha ceH3OpHNr NaHEn 3a ynpabJIeHnE.
AKTUBUPAHE HA NIOYHTE
Cnei KaTO ceH3OpHnT nAhen 3a ynpabHeHne 6bDe aKTHBnPah Cbc CEH3Opa (1), BcKa INoya MoKe Da 6bDe BkIIOUeHa npN CneDbaHe Ha CNEHNTE CTbKN:
1 Pb3HETe npcta Hn DOKoCHTe KOrTO n da e no3uHa Ha eDnH OT KypcOpHHe,nnb3raun" (2). 3ohata e 6nla n3paHa n eDHOBpeMeHHO C TOBa HNBOTo HA MOUHOCCT ue e MeJxdy O n 9. CToHOCCTTa Ha MOUHOCCTTa Ie Ce NOKaKe Ha CbOTBETHn INdNKaTOp 3a MOUHOCCTTa n DeceTNHATA TOKA (4)Ie npoDbJnx Da CBETN B
BG
npoJbJxKeHneHa 10 cekyHnI.
2 N3non3BaIte KypcOpHnI IINb3raU (2), 3a nI36epTe HOBO HNBO Ha roTBeHe MExdy O n9.
rotbe He OTHOBo Ce Noctabn CnHnA, NOdaBaHeTo Ha eHeprna Ue Ce Bb306HObHa npeduHIO n36paHOTo HNO HA MOUHOCT.
Ta3n DeakTbuaun He ce OTHacrdo BCnukn yHKun, KaKTo Hnnp.6nncnHa 3a Bk./n3Kn., KpaTn Ha Taumepa nn 6JOKnPaheto/De6JOKPaheto Ha cEH3OpHnteKJNaBnBn BNHaN OCTaBat aKTUBHN.
IokaTo nnoTbTe e 36paH, c npytn Dymn Cbc CBeteUa DeceTuHa TOka (4), HNBOTO Ha MOuHOCT MOKe da 6bJe npomeHNO.
BpeMeTo 3a OTkpBaHe Ha TnraH e 3 MNHyTu. Ako B To3n nepNoD ot BpeMe He 6bJe NoCTaBeH TnraH nIIN TnraHbTe HENoDxOJaU, 30HaTa 3a RotBeHe Ue CE N3KIOuN.
3a Da akTbnpaTe OTHOBCnK6nHcHnN, KOnTO npDpyKaBaTBCKO DeIcTBNe, HATNCHeTe OTHOBOeHNOBpeMeHHo CeH3OpHnKNaBnU* (11) n ceH3OpHnKnaBnU 3a3aKnIOuBaHe (6) 3a TpN CeKyHn. INdkaTopbT 3a BpeMe (12) ueNoKaxe "On".
N3KJIIOUOBAHE HA NIO
N3no3Baikn KnaBnHa Ha ceH3OpHnna Ⅱb3ra(2),NOHXeTe HNBOTO HaMOuHOCTTa Do 0. IIOyata ue ce N3KJIIOHn.
Korato npknIOuHTe, n3KIOUcTe 30HaTa 3a RotBeHe, n3NOJ3BaIKn CEH3OpHNTe 6yTOHN 3a ynpabJIeHne. B npOTNBcCnyaB 6n MorNo da ce CTnRHe Do HexKeIaHO DeNCTBne, aKO NO HEBHMAMHe TnraH Ce NoCTABn Ha 3OHaTa 3a RotBeHe NO BpeMe Ha Te3n TpN MNHyTN. N36ARBAITE Bb3MOXHN HUNDeHTN!
Функпя
„СтонSAКТИВИРанe“
Korato nnoyata e n3kIouheha, cIMB0JbT H ue ce no8n Ha nHdkaTopa 3a MoUHOCTTa (3), aKO CTbkHehata NOBbpxHOCT Ha CboTBeTHata 3oHa 3a RotBeHe e TOnna, mA onachOCT OT n3rapHn. Korato Temnepatypata cnaDHe, nHdkaTopbT (3) ce n3kIOuBa (aKO nnoyata e pa3eINHeHa), INN C npYn dymn "ue CBETHe, aKO nNoyatae BCE OSe CBbp3Ana.
Функця „Блokиранe"
CФункиЯ,БлokираHe"MOKTe Da 6blOKnpaTe dpyrnte ceH3Opn, C n3KJIIOUcHne Ha ceH3Opa 3a BKN./n3Kn. ① (1),3a da n36erHeTe HeXeJaNHe DeiCTBnIy.Ta3nФункиЯ eNoJe3Ha 3a 6e30NaCHOCT Ha deuata.
Ta3nФyHKZI NOCTABNPOUCEHa roTBeHe Ha nay3a.TaIMepbT cbso ue 6bJe noCTABEN Ha nay3a,aKo e aKTINBIPAH.
N3KJIIOUOBAHE HA BCNUCKI NIOUY
Bcnqu nnou Moar da 6bdaT n3KnOueHn eHOBpeMeHHo cbc ceH3opa 3a Bk./n3Kn. (1). Bcnqu nHdkaTopn Ha nnota (3) ue ce n3KIOUat.AKO n3KIOUeHata HarpTa nloa e ropeua, INdkaTopbT nokaBa CmBOJa H.
3a da akTNBupate Ta3n fynKcun, HATNCHETe cEH3opa (6) NaManko 3a eHa cekyHda. Cnei KaTo HAnpaBte TOBa, DOnbHNHTeHHnTceH3Op (7) ue Ce BkIIOuH, yKa3BaKnUe naHeBt 3a npabNHeHne e 6nokupaH. 3a da DeakTNBupate fynKcunTa, npocTo HATNCHEte OTHOBO cEH3opa (6).
AknBupaHe Ha yHKunraT,CTon"
HaTnCHTe ceH3opa " (8) 3a eHa cekyHda. DonbHNHTeHNHnRT INHnKaTOP (9) CBETBa n HnDKaTOPnTe 3a MoUHOCT ue NOKaKAT CmBOna I, 3a Da yKaKaT, ye rotBeHeTo e NOCTABeHO Ha nay3a.
DeakTNBpuhe Ha yHKnraTa ,Cton".
HaTnchete OTHOBcH3opa Stop&Go (8).DOnbHnHTeHNHnTnHnKAtop(9)I3racBaNrotBeHeTo Ce Bb3o6HOBraPnCbUaTaMOuHocT N HAcTpoKn Ha TaMepa, KOnTO ca 6nn3aAden npedn nay3ata.
TeKTop 3a TnraH
INyKIOHHTe 30Hn 3a roTBeHe IMat BpadeH DeTekTop 3a TnraH. NnotbT Ie cnpe da pa6To, ako Hma TnraH INN aKO TnraHbT He e NOxOJaI.
Ako ceH3OpbT 3a BKn./n3Kn(1) e 6n n3noJ3BaH 3a n3KnIOyBaHe Ha ypeDa,doKATO yHKcIraTa ,BnOKpAe" e AKTNBpuHa, Hma da 6bDe Bt3MOxHO OTHOB Da BKNOHTe PNOAta,doKATO He Jde6NoKpate.
Функця „Мошноct"
HnDkaTOpbT 3a MoUHocT (3) 7e NOKaXe CmBON 3a Da yKaXe,Ye ,HMa TnraH, aKO, DOKaTo 3oHaTa e BKJIIOUeHo, He e OTKpNT TnraH nIi Toi He e C IooXoJxu pa3Mepn.
3aIyuHnteHa 6nncnHaHa
Korato nIObT e BkHoueH, aKO HAKoHaTNCHe eNHOBpeMeHHO CEH3OpHnKaIaBnU (11) u 3akJIOuBaunCeH3OpEn KJIaBnU (6) 3a Tpnc EkyHn, 6nIN CNrHaNT, CbNTCTBaUBCaKO DeiCTBne, ue Ce DeaAKTNbnpA. INdkaTopbT 3a BpeMe (12) Ue NOKaKe "OF".
Ta3nФyHKcIgIOCTBa"DOINbHHTeHLa"MOUHOCTHa IIOuataHaHOPMaHATA CTOHOCT. CnOmeHaTata MOUHOCT 3aBNCN OT pa3Mepa Ha NIOUaTc CB3MOXHOCT 3a DOCTnraHe Ha MaKcMaJIHATA cTOHOCT, NO3BOJeHa OT ReHepaTopa.
1Пьзhte npbctaHaCbOTBeTHnKypcopen nIb3rau (2),DOKATOHДИКATOPbT 3a MoUHOCCTTa(3) nokaxe "9" n 3aApbXTe
Ako TnraH e n3ne3HaJ OT 3oHaTa, DOKATO NnotbT pa60tn, ToI aBTOMaTuHNo Ie cnpe Da noJaBa eHeprna N Ie Ce NOKaXe CmBOnbT "HMa TnraH". Ako Bbpxy 3oHaTa 3a
npbcta HATNCHaT 3a CekyHda nn DOKOCHTe NpuKTHo P" n 3aDpBXTe HATNCHaT 3a eHa cekyHda.
2 INHdkaTOpbT 3a HNBOTo Ha MOUHOCTTa (3) ige noka3Ba CmBOnaPnIOyata 1e 3anoHe Da IOCTABnOblnHTenHa MOUHOCT.
Функцята „Мошноct" Има Мakсимална порьлжnteльноct, уka3ана в Табиca 1. Спд това Врeme НВOTO на мошноctтаботматиноcke сн actpon Ha 9. Биnkache.
Pn akTbnpaHe Ha cyHKnraTa 3a 3axpaHbaHe Ha eINH KOTIOH, Bb3MOxHO e da ce NOBnne Ha pa60taHa dpynte - HamaJIbaHe HA MOUHOCCTTA NM DO NO-HNCKO HNBO, KATO B TO3n CnyaT ToBa ue 6bde NOKa3aHo Ha INDnKaTopa (3).
DeaktnbnpaHTo Ha yHKnraTa MoohocT" npEn n3TuHa He pa6oTHOTo BpeMe,MOKe da ce ocBseCTBu nn C NOMOuTa Ha CeH3OpHna KycCop ,nB3raU, IpomeHn HNBOTo Ha MOHOCTTa nn Ype3 NOBtapHe Ha CTbnKa 3.
Ako n3noN3BaTe 6bp3nnaPpeBKnHouBaTeI 3a BKnHouBaHe HaMAKcIMaHbMoUHOCT N CnOMeHaTaCTOuHOCT e HAD 3aAdaDeHATACTOuHOCT, KOTNoHbT Ue Ce HAcTPOHa BB3MOxHO Hau-BuCOKOTO HBO.KOTNoHbT Ue u3daTe 3Byk 6nIn nCNOMeHaTata CToHOC Tue MInHe DBAΦnr.6
Ako nckate da OTMeHnTe CneuHa aKTHBHa FyHKnna NO BCaKO BpeMe, Tp6Ba Da DOKoCHete "Nb3raunCe" Kycpcope HcH3Op (2) Ha cBoTBHTnata 30Ha, 3a da ro n36peTe. DecetnuHata TOka (4) Ha INdkaTopa 3a MOUHOCT (3) ue CBtHe. CneT OBa HATNCHE Te OTHOBO ,nIb3raunCe" (2) KypCOP, 3a Da 3aJaTe HOBO HnBO Ha MOUHOCT Nn 3a Da N3KnIOUnTe 3OHATA, Nn MoKeTe Da n36peTe pa3nUHa CneuHa FyHKnna, DOKOCBAkN OTHOBCHEF CEH3Opa (16).
3a Da a kTbupate, n36epete
nOyata u HaTnche T CEF ceH30pa
(16), 0kato CBeToNDoBt (18),
pa3noJoxeh Ha NkOHata CBETHe. CneK kaTO cyHKuYraTa e
aKTbupaha, CNMBonbT R ige ce
IONBn HA INDkATopa 3a MOUHOCTTA
(3).
MoKeTe Da OTMeHnTe FyHKuTaNo BcKaKO BpeMe, N3KnIOUBaNk NIOUaTa, CmEHaNHBOTHO MOnCHOCTTA NIN N3bnpaKn pa3nnuHa CneuaJnHa
dyHKLJIA.
ФУHKUЯ SIMMERING (B 3aBnCmOcT OT moDeena)
Ta3nФyHKunBn no3BOJbA da BapnteЯCTneToHa cna6 orh.
Cne KaTo JCTHeTo 3aBpN, BKNIOUeTe nNoYata, N36bpaKn Y, NaTNCHe T CHEF ceH3opa (16), DoKaTo cBeToNDoBt (19), pa3noJoxKe H naKoHaTa, / CBeThe. Cne KaTo cyHKuYraTa e AKTNBpuHa, CMMBONbT R Iue Ce NoaBn Ha NHdNKaTopa 3a MoUHocTTa (3).
Moxete da OTMeHnte fHyKcIyraTn no BcRAKO BpeMe, n3KNIOvBaIKn IIOyata, CmEHnKN HIBOTO Ha MOUHOCTTa NnN 36uPAaIKn pa3NIuHa CneuaJIHa fHyKcIyra.
ФУHKUЯ QUICK BOILING (B 3aBcHMoCT OT MoeJa)
Ta3nФyHKcuaKtNbupa aBTOMATuHOTUynpabJeHne Ha 3aBpuHaTe, KoETO e OT rOJaMa NOMoI npI rOtBeHTo Ha nacta,OpN3, RaIca nT.H. Ha pa3nOJxHeHne e camo B 3OHHTe,B KOnTO Ce NoRBA/ CIMBOJbT.
CbctoHnHa cba
3a npabnHno fynKcnoHnpaHe Ha fynKuTAt iQuickBoiling Tp6Ba da n3non3BaTe cBd, KOITo OTROBapHa CneHNTE npEdBapNTENH yCIOBnA:
- Pa3MepbT Ha IbHOTo e Bb3MOxHO Hau-6n3O Do dHaMeTbpa Ha nNoyata.
- B3KANAK.
CbOTBcTbne Ha ypeHa Ha eHepnHaTa eEeKtNBHOCT:
-ycTpoNCTBOTO e TectBaHO 3a ekCnIooatauN B CbOTBeTCTBNE Cbc tAndapTa EN 60350-2n noJyHeHATA cToHOCTe oT6eJ3aHa Ha CTKepa Ha ypeDa CbC edHHuaTa Wh/kr.
Ako cneDbate nocoueHnte cBBeTN, ue cneCTnTe eHepn npn BcKO rotBeHe:
* N3noJ3BaIte npaBnHnKa nak 3a BcKa TeHdxKepa, KOraTo e Bb3MOxHO. FOTBeHeTO 6e3 KaNak BOIN DO n3pa3XoDbaHe Ha nobYe eHepnIy.
*N3noJ3BaIte TnraHc nNoCKa OCHOBau NODXODaU DNAmETbp, KOITO Da CbBnaDa C pa3Mepnte Ha rotBapckata 30Ha. Ipon3BOJNTeJIte Ha TnraHn 6nKHOBeHO npedNaTcBdoBe, PnKoTTO ROpHnT DNAmETbp Ha cBda e BnHaN No-rotJam OT DNAmETbpHa OCHOBATA.
* Ako n3noJ3BaTe BOa no BpeMe Ha rotBeHeTo, KOInueCTBaTa Tp86Ba
BG
Ja 6bJat MaJIKN, 3a Ja ce 3ana3rBHTAMHHTe H MNHepaJIHTe B3eIeHcyuHTe H da Ce 3aJaDeMHHMaJIHO HnBO Ha MOIOHOCT, KOEt Ja NpOdbPka TOTBeHETo.BnCOKo HnBO Ha MoIOHocT He eHeo6xOIMHO BOHN DO pa3XOD HaEheprn.
* N3IOJI3BaIYeMaJIKNTeHJKepeHc MaJIKO KOJIINueCTBO XpaHa.
Ako Heo He pa60Tu
PpeHJaIO3BbHnTeHaTexHHueckara cLyK6a, H3BbPwTe npOBepKHTe, OHCAHNNo-dOly.
YpeIbT He pa60Tu:
YBepeTe Ce, Ye Ka6eJIbT e BkIIOueH.
HnyKuOnHHte 30HN He npon3BExdAT TOnnHa:
CbIbT He e IIOxOJaU (HMa
epOMaHHTHO bHo HnE TBbpJe
MaJIbK).YBepTe ce,ue IbHOTo
Ha CbJa IprHBJInuHa MaHHT HnH
H3IOJIBaHTe IO-TOJAMCbI.
Korato 3anouheTe da rotBNTe,OT HnykuHnHTe 3OHn ce yyBa Jeko 6pbMueHe:
Pn CbIOBe, KOHTo He ca MHOrO
Ie6eHN Hn Ca CbCTaBEHr OT IOBueye
OT eHN KOMIOHEHT, 6pbMueHeTO
ce NOLyUaBA OIT PpeJaBaHETo Ha
eHepRHaNpeKTHO KbM DbHOTo Ha
Cbda. BpbMueHETo He eJeΦeKT, Ho
aKO TaKa Hn HAue HCKaTe Da ro
eJHMnHnPATE, HamaJIeTE JKeO HMBOTO
Ha MOuHOCTTa Hn H3IOJ3BaHTe CbD
CIO-De6eIO DbHO, H/IN CbCTaBEH
cAmO OT eINH KOMIOHEHT.
Ceh3oHTo ynpaBHeHne He CBETBa Nn BbNpeKn Ye CBeTBA He pearupa:
He en36paHa 30Ha 3a HaPraBaHe. YBepeTe Ce, Ye CTe H36paJIn 30Ha 3a HaPraBaHe IpeJn Da ce OINTaTe Ja pa6OHTe C Heia.
IMaBlaRa BbPxCy cEH3OpHr,/HJIN npbCTHTe BN ca MOKpn. POnDlbpxKaHr TOBbPxHOCTTa Ha ceH3OpHOTO ynpaJIeHNHe / HJIN npbCTHTe Cn YHCTN H CyXH.
3aKJIIOUbaaatayHKnue aKTHBnpaHa.OTKIOHcTeceH3OpHOTO ynpabJIeHHe.
Дokato roTbIte ce chyBa 3Byk OT BeHTnlaTop, KoTo npOdbJIkaBA
DOpN CneI KaTO npNKJIIOHnTe C rotBeHTo:
HnykuohnTe 30HN mAt BeHTnlaTOp, KOTo OXJaKda eKeKtpoHHkata.ToI ce BKLIOUBA, cAmO KOrATo eKeKtpoHHte BepuHc Harpert.Cnpa da pa60TH,Korato Te ce OXIAJIT, He3ABHCMO DaJIIN IIObTe E BKIOUeH HNI He.
U
CnMBoJIbT- 电ce nOBnHa HNDAKAtopa3aMOUHOCTTaH KOT-JOH:
HnyKHOHHaTcHCTMa He OTKpHBaTeHJKepa HIN THraH Bbpxy KOTIOHa, HIN TeHJKepara /THraHbT ca HenoXOJIuH.
Kotnohbt ce ce n3KnHou, a Ha HnDnKaTOpBt 1e ce noBbT cbo6- C81 nn C82:
IpeKOMepHa TeMIIepaTpaHa eJIeKtpoHNkata HIN CTbKlOTO. N3uaKaIteMaJIO eJIeKTPoHNkata Da ce OXlaDNH MxHETe TcHKePaTa HIN TnRaHa, 3a da CE OXlaDNCTbKlOTO.
C85 ce NOBBA Ha HNdkaTopa Ha HAKOJ OT KOTJOHNTe:
N3IOI3BaHaTa TeHKepa/TnraH ca HeIOxOJaUu. N3KIOHcTe nIOTA, BKIOHcTe rO OTHOBn ONHTaTe C npy-ra TEHKepa Hn TnraH.
YpeBt ce n3KIOUyBa HnHa HnHnKaTOpNTe Ha 3axpaHbAHeTo ce noka3Ba cbo6ueHne C90 (3):
CeH3OpHOTO ynpaBHeHne pa3n03Haba, ye ceH3OpbT 3a BKJ./N3KJI. (1) e IIOKPHT H He NIO3BOJIABa BKJHOUbaHe Ha rotBapcKnI NIOIT. OtCTpaHete IpeMeTHe HIN TeuHOCHTe, KOHTo BIn3AT BdoNPc C nobpXHOCTTa. IOnHCtete H NOCDyWte Do H3ue3BaHe Ha cbo6uHeneto.
YpeBt ce n3KIOUyBa HnHa HnHnKaTOpNTe Ha 3axpaHbAHeTo ce nokaBa cbo6ueHne C91 (3):
Cen30pHOTO ynpaBHe Hnpea3no3Haba, ye CEN30pBT 3a CnnpaH nIyckaH (6) e NOKPHT n He IIO3BOJBA pa6oTa Ha rotBapckn IIOIT. OTrpaHete eBEHTyaJIHNTe obekTHn IIN TeuHOCTn, JOKATO IOIbIbPxkTe IOBbPxHOCTTa HA CEN30pHnKoHTPOJnHCTa n Cyxa, CIE TOBA HaTNCHE TByKpaTHO CEH30pa 3a CnnpaH n IyckaH (6) 3a IpemaxBaHe Ha CbO6ueHHeTo n BpUHaNE KBM HopMaIHATA pa6oTa.
Teka Subsidiaries
Country Subsidiary Address City Phone
| AustriaKüppersbusch Austria | Eitnergasse, 13 | 1231 Wien | +43 18 668 022 |
| BelgiumKüppersbusch Belgium S.P.R.L. | Doomveld Industrie, Asse 3, No. 11 - Boite 7 | 1731 Zellik | +32 24 668 740 |
| BulgariaTeka Bulgaria EOOD | Blvd. "Tsarigradsko Shosse" 135 | 1784 Sofia | +359 29 768 330 |
| ChileTeka Chile S.A. | Avd El Retiro Parque los Maitenes, 1237. Parque Enea | Pudahuel, Santiago de Chile | + 56 24 386 000 |
| ChinaTeka International Trading (Shanghai) Co. Ltd. | No.1506, Shengyuan Henghua Bldg. No.200 Wending Rd. | Xuhui, Dist. 200030 Shanghai | +86 2 153 076 996 |
| Czech RepublicTeka CZ S.R.O. | V Holesovickách, 593 | 182 00 Praha 8 - Liben | +420 284 691 940 |
| EcuadorTeka Ecuador S.A. | Parque Ind. California 2, Via a Daule Km 12 | Guayaquil | +593 42 100 311 |
| GreeceTeka Hellas A.E. | Thesi Roupaki - Aspropyrgos | 193 00 Athens | +30 2 109 760 283 |
| HungaryTeka Magyarország Zrt. | Terv u. 92 | 9200 Mosonmagyaróvár | +36 96 574 500 |
| IndonesiaPT Teka Buana | Jalan Menteng Raya, Kantor Taman A9 Unit A3 | 12950 Jakarta | +62 215 762 272 |
| MalaysiaTeka Küchentechnik (Malaysia) Sdn Bhd | 10 Jalan Kartunis U1/47, Temasya Park, Off Glenmarie | 40150 Shah Alam, Selangor Darul Ehsan | +60 376 201 600 |
| MexlcoTeka Mexicana S.A. de C.V. | Blvd Manuel A. Camacho 126, Piso 3 Col. Chapultepec | 11000 Mexico D.F. | +52 5 551 330 493 |
| MoroccoTeka Maroc S.A. | 73, Bd. Slimane, Depôt 33, Route de Ain Sebaa | Casablanca | +212 22 674 462 |
| PeruTeka Kuchentechnik Perú S.A. | Av. El Polo 670 local A 201, CC El polo, Surco | Lima | +51 14 363 078 |
| PolandTeka Polska Sp. ZO.O. | ul. 3-go Maja 8 / A2 | 05-800 Pruszkow | +48 227 383 270 |
| PortugalTeka Portugal S.A. | Estrada da Mota - Apdo 533 | 3834-909 Ilhavo, Aveiro | +35 1 234 329 500 |
| RomaniaS.C. Teka Kuchentechnik Romania S.R.L. | Sevastopol str., no 24, 5th floor, of. 15 | 010992 Bucharest Sector 1 | +40 212 334 450 |
| Russia/PossyaTeka Rus LLC/OOO "Teka Pyc" | Neverovskogo 9, Office 417, 121170, Moscow, Russia | 121087 Рожец, москва | +74 956 450 064 |
| SingaporeTeka Singapore PTE Ltd | Clemenceau Avenue, 83, 01-33/34 UE Square | 239920 Singapore | +65 67 342 415 |
| SpainTeka Industrial, S.A. | C/ Cajo,17 | 39011 Santander | +34 942 355 050 |
| ThailandTeka (Thailand) Co. Ltd. | 364/8 Sri-Ayuttaya Road, Phayathai, Ratchatavee | 10400 Bangkok | +66 -26 424 888 |
| TurkeyTeka Teknik Mutfak Aletleri Sanayi VeUkraineTeka Ukraine LLC | Büyük dere Cad. 24/1386-e, Bozhenko Str .2nd floor,4th entrance | 80290 Mecidiyeköy, Istanbul03150 Kyiv | +90 2 122 883 134+380 444 960 680 |
| United Arab EmiratesTeka Middle East Fze | Building LOB 16, Office 417 | P.O. Box 18251 Dubai | +971 48 872 912 |
| United Arab EmiratesTeka Kuchentechnik U.A.E LLC | Bin Khedia Centre | P.O. Box 35142 Dubai | +971 42 833 047 |
| VenezuelaTeka Andina S.A. | Ctra. Petare-Santa Lucia, km 3 (El Limoncito) | 1070 Caracas | +58 2 122 912 821 |
| VietnamTEKA Vietnam Co., Ltd. | 803, FI 8th, Daiminh Convention Center, 77, Hoang Van | Thai, Tan Phu Ward, District 7, Ho Chi Minh | +84 854 160 646 |
TEKA

- Installation
- Electrical connection
- Warning:
- Use and Maintenance
- User instructions of the Touch Control
- HANDLING ELEMENTS (fig. 2)
- SWITCHING ON THE DEVICE
- ACTIVATING PLATES
- TURNING OFF A PLATE
- TURING ALL PLATES OFF
- Pan detector
- Block Function
- Silencer of the beep
- Stop&Go Function
- Activating the Stop function.
- Deactivating the Stop function
- Power Function
- Timer Function (countdown clock)
- Setting a timer on a plate.
- EN
- Changing the programmed time.
- Disconnecting the clock
- Power Management function (depending on model)
- Special functions: CHEF (depending on the model)
- KEEP WARM FUNCTION (depending on the model)
- MELTING FUNCTION (depending on the model)
- SIMMERING FUNCTION (depending on the model)
- Activation of the function
- QUICK BOILING FUNCTION (depending on the model)
- Conditions of the container
- Deactivation of the function
- SLIDE COOKING FUNCTION (depending on the model)
- Flex Zone function (depending on the model)
- Synchro Function (depending on the model)
- Safety switch off function
- Suggestions and recommendations
- Cleaning and maintenance
- Environmental considerations
- If something does not work
- The induction zones do not produce heat:
- A humming is heard when starting to cook in the induction zones:
- The touch control does not light up despite lighting, does not respond:
- The sound of a fan is heard while cooking, which continues even after cooking has ended:
- U
- The symbol will appear on the power indicator of a hotplate:
- The hotplate will switch off and the message C81 or C82 will appear on the indicators:
- C85 appears on the indicator of one of the hotplates:
- The appliance switches off and the message C90 appears on the power indicators (3):
- The appliance switches off and the message C91 appears on the power indicators (3):
- EneKtpnuecko CBbp3BaHe
- BhimaHne:
- PABOTHN EJEMEHTN (Φnr. 2)
- BKIIIOUBAHE HA YPEDA
- AKTUBUPAHE HA NIOYHTE
- BG
- N3KJIIOUOBAHE HA NIO
- Функпя
- Функця „Блokиранe"
- N3KJIIOUOBAHE HA BCNUCKI NIOUY
- AknBupaHe Ha yHKunraT,CTon"
- DeakTNBpuhe Ha yHKnraTa ,Cton".
- TeKTop 3a TnraH
- Функця „Мошноct"
- 3aIyuHnteHa 6nncnHaHa
- ФУHKUЯ SIMMERING (B 3aBnCmOcT OT moDeena)
- ФУHKUЯ QUICK BOILING (B 3aBcHMoCT OT MoeJa)
- CbctoHnHa cba
- - B3KANAK.
- Ako cneDbate nocoueHnte cBBeTN, ue cneCTnTe eHepn npn BcKO rotBeHe:
- Ako Heo He pa60Tu
- YpeIbT He pa60Tu:
- HnyKuOnHHte 30HN He npon3BExdAT TOnnHa:
- epOMaHHTHO bHo HnE TBbpJe
- Korato 3anouheTe da rotBNTe,OT HnykuHnHTe 3OHn ce yyBa Jeko 6pbMueHe:
- Ceh3oHTo ynpaBHeHne He CBETBa Nn BbNpeKn Ye CBeTBA He pearupa:
- Дokato roTbIte ce chyBa 3Byk OT BeHTnlaTop, KoTo npOdbJIkaBA
- DOpN CneI KaTO npNKJIIOHnTe C rotBeHTo:
- CnMBoJIbT- 电ce nOBnHa HNDAKAtopa3aMOUHOCTTaH KOT-JOH:
- Kotnohbt ce ce n3KnHou, a Ha HnDnKaTOpBt 1e ce noBbT cbo6- C81 nn C82:
- C85 ce NOBBA Ha HNdkaTopa Ha HAKOJ OT KOTJOHNTe:
- YpeBt ce n3KIOUyBa HnHa HnHnKaTOpNTe Ha 3axpaHbAHeTo ce noka3Ba cbo6ueHne C90 (3):
- YpeBt ce n3KIOUyBa HnHa HnHnKaTOpNTe Ha 3axpaHbAHeTo ce nokaBa cbo6ueHne C91 (3):
- Teka Subsidiaries
Brand : TEKA
Model : IB 6315
Category : Cooker