
CCD-TRV25 - Camcorder SONY - Free user manual and instructions
Find the device manual for free CCD-TRV25 SONY in PDF.


User questions about CCD-TRV25 SONY
0 question about this device. Answer the ones you know or ask your own.
Ask a new question about this device
Download the instructions for your Camcorder in PDF format for free! Find your manual CCD-TRV25 - SONY and take your electronic device back in hand. On this page are published all the documents necessary for the use of your device. CCD-TRV25 by SONY.
USER MANUAL CCD-TRV25 SONY
Video Camera Recorder
Operating Instructions
Before operating the unit, please read this manual thoroughly, and retain it for future reference.
Owner's Record
The model and serial numbers are located on the bottom. Record the serial number in the space provided below. Refer to these numbers whenever you call upon your Sony dealer regarding this product.
Model No. CCD-TRV Model No. AC-L
Serial No. Serial No.
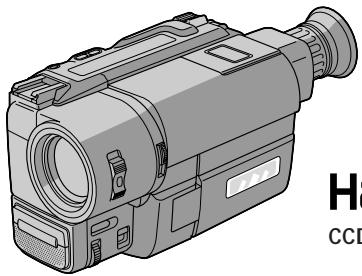
Handycam Vision ™
CCD-TRV65
video Hi8 XR
CCD-TRV65/TRV615 Hl8
Video8 XR
Congratulations on your purchase of this Sony Handycam Vision™ camcorder. With your Handycam Vision, you can capture life's precious moments with superior picture and sound quality. Your Handycam Vision is loaded with advanced features, but at the same time it is very easy to use. You will soon be producing home video that you can enjoy for years to come.
WARNING
To prevent fire or shock hazard, do not expose the unit to rain or moisture.

CAUTION
RISK OF ELECTRIC SHOCK DO NOT OPEN

CAUTION: TO REDUCE THE RISK OF ELECTRIC SHOCK,
DO NOT REMOVE COVER (OR BACK).
NO USER-SERVICEABLE PARTS INSIDE.
REFER SERVICING TO QUALIFIED SERVICE PERSONNEL.
This symbol is intended to alert the user to the presence of uninsulated "dangerous voltage" within the product's enclosure that may be of sufficient magnitude to constitute a risk of electric shock to persons.

This symbol is intended to alert the user to the presence of important operating and maintenance (servicing) instructions in the literature accompanying the appliance.
DISPOSAL OF LITHIUM ION BATTERY. LITHIUM ION BATTERY. DISPOSE OF PROPERLY.
You can return your unwanted lithium ion batteries to your nearest Sony Service Center or Factory Service Center.
Note: In some areas the disposal of lithium ion batteries in household or business trash may be prohibited.
For the Sony Service Center nearest you call 1-800-222-SONY (United States only)
For the Sony Factory Service Center nearest you call 416-499-SONY (Canada only)
Caution: Do not handle damaged or leaking lithium ion battery.
For the customers in the U.S.A.
CAUTION
You are cautioned that any changes or modifications not expressly approved in this manual could void your authority to operate this equipment.
Note:
This equipment has been tested and found to comply with the limits for a Class B digital device, pursuant to Part 15 of the FCC Rules. These limits are designed to provide reasonable protection against harmful interference in a residential installation. This equipment generates, uses, and can radiate radio frequency energy and, if not installed and used in accordance with the instructions, may cause harmful interference to radio communications. However, there is no guarantee that interference will not occur in a particular installation. If this equipment does cause harmful interference to radio or television reception, which can be determined by turning the equipment off and on, the user is encouraged to try to correct the interference by one or more of the following measures:
Reorient or relocate the receiving antenna.
Increase the separation between the equipment and receiver.
- Connect the equipment into an outlet on a circuit different from that to which the receiver is connected.
- Consult the dealer or an experienced radio/TV technician for help.
For the customers in CANADA
CAUTION
TO PREVENT ELECTRIC SHOCK, MATCH WIDE BLADE OF PLUG TO WIDE SLOT, FULLY INSERT.
Before you begin
Using this manual 4
Checking supplied accessories. 6
Getting started
Installing and charging the battery pack 7
Inserting a cassette 12
Basic operations
Camera recording 13
Using the zoom feature 15
Selecting the START/STOP mode 16
Shooting with the LCD screen.....17
Letting the subject monitor the shot (Mirror mode) 18
Hints for better shooting 19
Checking the recorded picture 21
Playing back a tape 22
Searching for the end of the picture ... 25
Advanced operations
Using alternative power sources 26
Using the house current 26
Changing the mode settings 29
- for camera recording -
Shooting with backlighting 34
Using the FADER function (CCD-TRV35/TRV65/TRV315/ TRV615 only) 35
Shooting in the dark (NightShot)
(CCD-TRV35/TRV65/TRV315/
TRV615 only) 37
Using the wide mode function. 38
Using the PROGRAM AE function .... 40
Focusing manually (CCD-TRV35/ TRV65/TRV315/TRV615 only)....42
Enjoying picture effect 44
Adjusting the exposure (CCD-TRV35/ TRV65/TRV315/TRV615 only)....46
Superimposing a title 48
Making your own titles 50
Recording with the date/time 51
Optimizing the recording condition . 52
Releasing the STEADY SHOT function (CCD-TRV25/TRV35/TRV65/TRV215/TRV315/TRV615 only).. 53
- for playback/editing -
Watching on a TV screen 54
Editing onto another tape 57
Recording from a VCR or TV (CCD-TRV65/TRV615 only) 58
Additional information
Changing the lithium battery in the camcorder 59
Resetting the date and time 61
Simple setting of clock by time difference 62
Usable cassettes and playback modes 63
Tips for using the battery pack 64
Maintenance information and precautions 67
Using your camcorder abroad 72
Trouble check 73
Self-diagnosis display 76
Specifications 77
Identifying the parts 79
Warning indicators 87
Index Back cover
The instructions in this manual are for the seven models listed below. Before you start reading this manual and operating the unit, check your model number by looking at the bottom of your camcorder. The CCD-TRV65 is the model used for illustration purposes. Otherwise, the model name is indicated in the illustrations. Any differences in operation are clearly indicated in the text, for example, "CCD-TRV65 only."
As you read through this manual, buttons and settings on the camcorder are shown in capital letters.
e.g. Set the POWER switch to CAMERA.
You can hear the beep sound to confirm your operation.
Types of differences
| CCD- | TRV15 | TRV25/TRV25 | TRV35/TRV35 | TRV65/TRV65 |
| System | # | # | # | Hi# |
| VIDEO/AUDIO IN* | — | — | — | ● |
| SVIDEO | — | — | — | ● |
| Optical zoom | 16x | 16x | 18x | 18x |
| Digital zoom | 64x | 64x | 72x | 72x |
| NightShot | — | — | ● | ● |
| Steady Shot | — | ● | ● | ● |
| LASER LINK | — | — | ● | ● |
| Fader function | — | — | ● | ● |
| Stripe | — | — | — | ● |
| Manual focus | — | — | ● | ● |
| Exposure | — | — | ● | ● |
| Audio | monaural | monaural | monaural | stereo |
- The models without VIDEO/AUDIO IN have CAMERA, OFF and PLAYER mode on the POWER switch.
Note on TV color systems
TV color systems differ from country to country. To view your recordings on a TV, you need an NTSC system-based TV.
Precaution on copyright
Television programs, films, video tapes, and other materials may be copyrighted. Unauthorized recording of such materials may be contrary to the provision of the copyright laws.
Precautions on camcorder care
- The LCD screen and/or the color viewfinder are manufactured using high-precision technology. However, there may be some tiny black points and/or bright points (red, blue or green in color) that constantly appear on the LCD screen and/or in the viewfinder. These points are normal in the manufacturing process and do not affect the recorded picture in any way. Over 99.99% are operational for effective use.
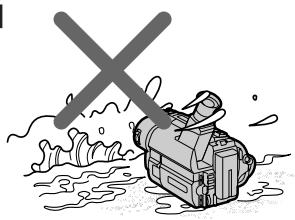
- Do not let the camcorder get wet. Keep the camcorder away from rain and sea water. Letting the camcorder get wet may cause the unit to malfunction, and sometimes this malfunction cannot be repaired [a].
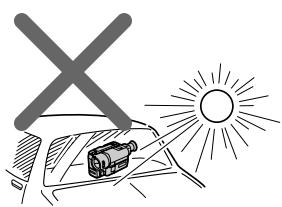
- Never leave the camcorder exposed to temperatures above 140^ (60^) , such as in a car parked in the sun or under direct sunlight [b].
[a]
[b]
Checking supplied accessories
Check that the following accessories are supplied with your camcorder.
| 1 | 2 | 3 |
| 4 | 5 | 6 |
1 Wireless Remote Commander (1) (p. 84)
2 AC-L10A/L10B/L10C AC power adaptor (1), Power cord (1) (p. 8, 26)
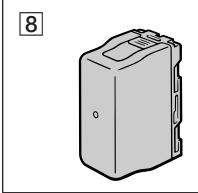
3 NP-F330 Battery pack (1) (p. 7, 26)
CR2025 Lithium Battery (1) (p. 59) The lithium battery is already installed in your camcorder.
Size AA (R6) battery for Remote Commander (2) (p. 85)
6 A/V connecting cable (1) (p. 54) *for stereo model
7 Shoulder strap (1) (p. 85)
8 Battery case (1) (p. 27) CCD-TRV15/TRV25/TRV35/TRV65 only
Contents of the recording cannot be compensated if recording or playback is not made due to a malfunction of the camcorder, video tape, etc.
Installing and charging the battery pack
Before using your camcorder, you first need to install and charge the battery pack. This camcorder operates only with the "InfoLITHIUM" battery.
"InfoLITHIUM" is a trademark of Sony Corporation.
Installing the battery pack
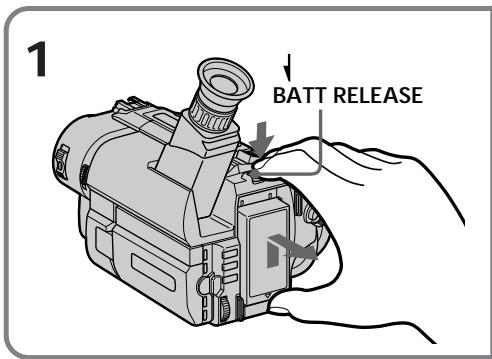
(1) While pressing BATT RELEASE, slide the battery terminal cover in the direction of the arrow.
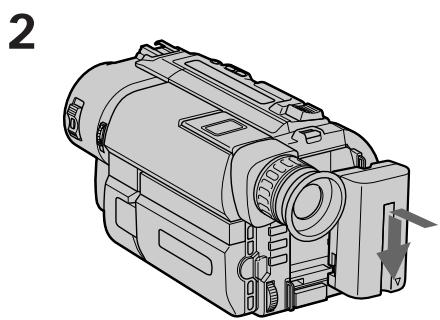
(2) Install the battery pack in the direction of the mark on the battery pack. Slide the battery pack down until it catches on the battery release lever and clicks. Attach the battery pack to the camcorder securely.
Note on the battery pack
Do not carry the camcorder by grasping the battery pack.
Charging the battery pack
Charge the battery pack on a flat surface without vibration. The battery pack is charged a little in the factory.
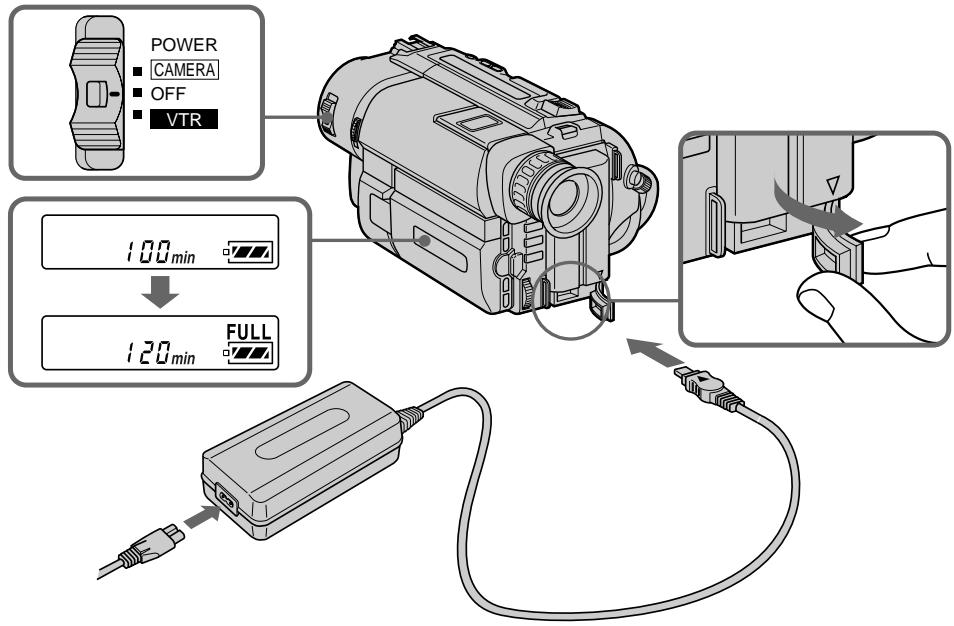
(1) Open the DC IN jack cover and connect the supplied AC power adaptor to the DC IN jack with the plug's mark up.
(2) Connect the power cord to the AC power adaptor.
(3) Connect the power cord to a wall outlet.
(4) Slide the POWER switch to OFF. Remaining battery time is indicated by the minutes on the display window. Charging begins.
When the remaining battery indicator becomes normal charge is completed. For full charge, which allows you to use the battery longer than usual, leave the battery pack attached for about 1 hour after normal charge is completed until FULL appears in the display window.
Before using the camcorder with the battery pack, unplug the AC power adaptor from the DC IN jack of the camcorder. You can also use the battery pack before it is completely charged.
Notes
- "-- -- min" appears in the display window until the camcorder calculates remaining battery time.
- Remaining battery time indication in the display window roughly indicates the recording time with the viewfinder. Use it as a guide. It may differ from the actual recording time.
Charging time
| Battery pack | NP-F330(supplied) | NP-F530/F550 | NP-F730/F730H/F750 | NP-F930/F950 |
| Charging time* (min.) | 150(90) | 210(150) | 300(240) | 390(330) |
The time required for a normal charge is indicated in parentheses.
- Approximate minutes to charge an empty battery pack using the supplied AC power adaptor. (Lower temperatures require a longer charging time.)
Battery life
Upper numbers are the time when recording with the viewfinder. Lower numbers are the time when recording with the LCD screen. Using both will further reduce recording time.
CCD-TRV15
| Battery pack | NP-F330 (supplied) | NP-F530 | NP-F550 | NP-F730 | NP-F730H /F750 | NP-F930 | NP-F950 |
| Continuous recording time* | 130 (115) | 225 (200) | 260 (230) | 450 (405) | 530 (480) | 710 (640) | 815 (730) |
| 100 (90) | 170 (155) | 205 (185) | 350 (310) | 425 (380) | 555 (500) | 650 (590) | |
| Typical recording time** | 65 (60) | 115 (105) | 135 (120) | 235 (210) | 280 (250) | 375 (335) | 430 (385) |
| 55 (45) | 90 (85) | 110 (100) | 190 (170) | 230 (205) | 305 (275) | 355 (320) | |
| Playing time on LCD | 100 (90) | 165 (150) | 200 (180) | 335 (300) | 410 (365) | 535 (480) | 630 (570) |
CCD-TRV25/TRV35/TRV215/TRV315
| Battery pack | NP-F330 (supplied) | NP-F530 | NP-F550 | NP-F730 | NP-F730H /F750 | NP-F930 | NP-F950 |
| Continuous recording time* | 125 (110) | 215 (190) | 250 (220) | 430 (385) | 510 (460) | 680 (610) | 780 (700) |
| 100 (90) | 165 (150) | 200 (180) | 335 (300) | 410 (365) | 535 (480) | 630 (570) | |
| Typical recording time** | 65 (55) | 110 (100) | 130 (115) | 225 (200) | 270 (240) | 360 (320) | 410 (370) |
| 55 (45) | 90 (80) | 110 (95) | 180 (165) | 225 (200) | 290 (260) | 345 (310) | |
| Playing time on LCD | 100 (90) | 165 (150) | 200 (180) | 335 (300) | 410 (365) | 535 (480) | 630 (570) |
CCD-TRV65/TRV615
| Battery pack | NP-F330 (supplied) | NP-F530 | NP-F550 | NP-F730 | NP-F730H /F750 | NP-F930 | NP-F950 |
| Continuous recording time* | 120 (105) | 205 (180) | 240 (210) | 410 (370) | 490 (440) | 650 (585) | 750 (675) |
| 95 (85) | 160 (145) | 195 (175) | 325 (290) | 395 (355) | 515 (465) | 610 (550) | |
| Typical recording time** | 60 (55) | 105 (95) | 125 (110) | 215 (195) | 255 (230) | 340 (310) | 395 (355) |
| 50 (45) | 85 (75) | 105 (95) | 175 (155) | 215 (195) | 280 (255) | 335 (300) | |
| Playing time on LCD | 95 (85) | 160 (145) | 195 (175) | 325 (290) | 395 (355) | 515 (465) | 610(550) |
Numbers in parentheses indicate the time when you use a normally charged battery. Battery life will be shorter if you use the camcorder in a cold environment.
- Approximate continuous recording time at 77^ F( 25^ C) .
** Approximate minutes when recording while you repeat recording start/stop, zooming and turning the power on/off. The actual battery life may be shorter.
Notes on remaining battery time indication during recording
- Remaining battery time is displayed in the viewfinder or on the LCD screen. However, the indication may not be displayed properly, depending on using conditions and circumstances.
- When you close the LCD panel and open it again, it takes about 1 minute for the correct remaining time to be displayed.
To remove the battery pack
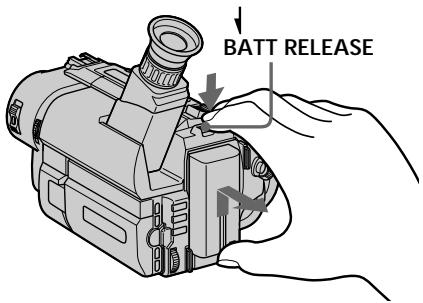
While pressing BATT RELEASE, slide the battery pack in the direction of the arrow.
You can look at the demonstration of the functions available with this camcorder (p. 32).
Make sure that the power source is installed. When you want to record in the Hi8 system, use Hi8 video cassette Hi8.(CCD-TRV65/TRV615 only)
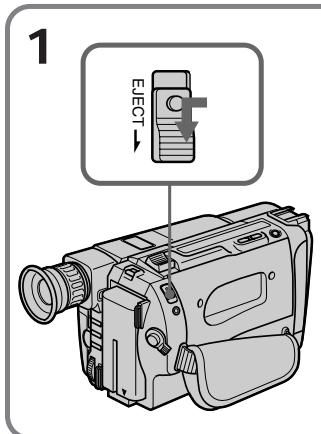
(1) While pressing the small blue button on the EJECT switch, slide it in the direction of the arrow. The cassette compartment automatically lifts up and opens.
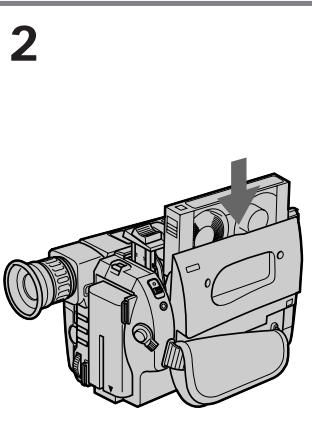
(2) Insert a cassette with the window facing out.
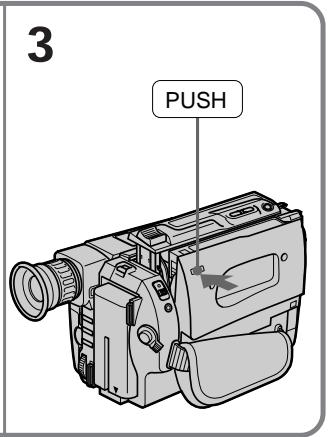
(3) Close the cassette compartment by pressing the "PUSH" mark on the cassette compartment. The cassette compartment automatically goes down.
To eject the cassette
While pressing the small blue button on the EJECT switch, slide it in the direction of the arrow.
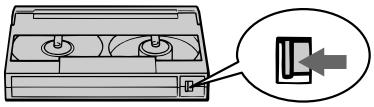
To prevent accidental erasure
Slide the tab on the cassette to expose the red mark. If you insert the cassette with the red mark exposed and close the cassette compartment, the beeps sound for a while. If you try to record with the red mark exposed, the 品 and indicators flash, and you cannot record.
To re-record on this tape, slide the tab back out covering the red mark.
Make sure that the power source is installed and a cassette is inserted and that the START/STOP MODE switch inside the LCD panel is set to . Before you record one-time events, you may want to make a trial recording to make sure that the camcorder is working correctly.
When you use the camcorder for the first time, power on it and reset the date and time to your time before you start recording (p. 61). The date is automatically recorded for 10 seconds after you start recording (AUTO DATE feature). This feature works only once a day.
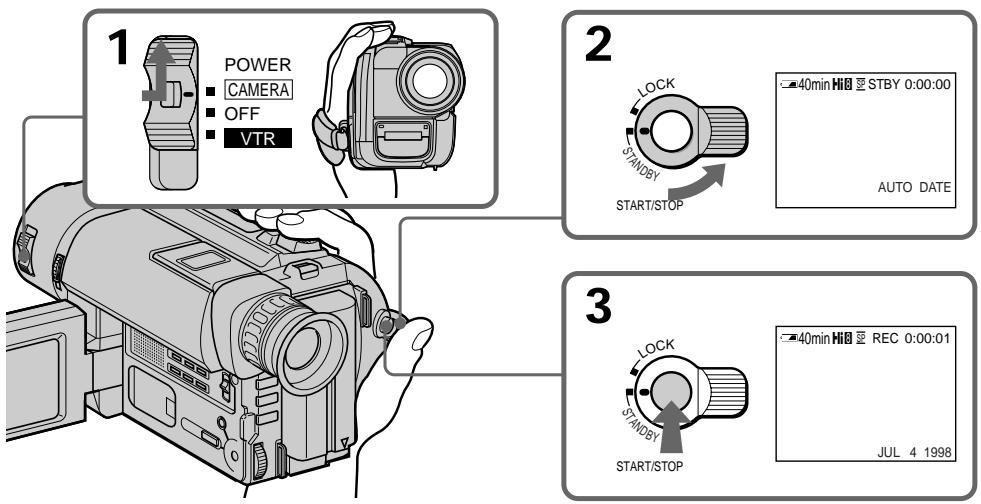
(1) While pressing the small green button on the POWER switch, set it to CAMERA.
(2) Turn STANDBY up to STANDBY.
(3) Press START/STOP. The camcorder starts recording. The "REC" indicator appears. The red lamp lights up in the viewfinder. The camera recording/battery lamp located on the front of the camcorder also lights up.
To stop recording momentarily [a]
Press START/STOP again. The "STBY" indicator appears in the viewfinder (Standby mode).
To finish recording [b]
Press START/STOP again. Turn STANDBY down to LOCK and set the POWER switch to OFF. Then, eject the cassette.
![SONY CCD-TRV25 - To finish recording [b] - 1](/content/2019/11/48493/images/0b52a5fc6a9134b154f7f810aec3ca873c68aa59bbb51080f5934737b8dc608a.jpg)
[a]
START/STOP
![SONY CCD-TRV25 - To finish recording [b] - 2](/content/2019/11/48493/images/26719ac0ae093620fb02da6ee27fb76688e1e5018606de1197a7ff0bf68bbe71.jpg)
![SONY CCD-TRV25 - To finish recording [b] - 3](/content/2019/11/48493/images/2bc6fea2c79942de0ff7cf5a7c56eb118a773a83931c9be9c372476dc4eefab7.jpg)
[b]
START/STOP
![SONY CCD-TRV25 - To finish recording [b] - 4](/content/2019/11/48493/images/35082ca60fcf4f57ee4144176ec31498ddba0958601ea77bb023de98556f7ba9.jpg)
START/STOP
Note
There is a little wear on the battery pack which is installed with the camcorder.
However, for getting remaining battery time indicated correctly, leave the battery pack installed after use.
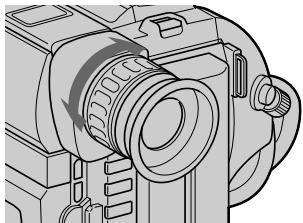
To focus the viewfinder lens
If you cannot see the indicators in the viewfinder clearly, or after someone else has used the camcorder, focus the viewfinder lens. Turn the viewfinder lens adjustment ring so that the indicators in the viewfinder come into sharp focus.
Note on Standby mode
If you leave the camcorder in Standby mode for 5 minutes while the cassette is inserted, the camcorder turns off automatically for saving battery power as well as for preventing the battery and tape from wearing down. To resume Standby mode, turn STANDBY down and up again. To start recording, press START/STOP.
Note on recording
When you record from the beginning of a tape, run the tape for about 15 seconds before starting the actual recording. This will ensure that you won't miss any start-up scenes when you play back the tape.
Notes on the tape counter
- The tape counter indicates the recording or playback time. Use it as a guide. There will be a time lag of several seconds from the actual time. To set the counter to zero, press COUNTER RESET.
- If the tape is recorded in SP and LP modes mixed, the tape counter shows incorrect recording time. When you intend to edit the tape using the tape counter as a guide, record in same (SP or LP) mode.
Note on the beep sound
The beep sounds when you operate the camcorder. Several beeps also sound as a warning of any unusual condition of the camcorder.
Note that the beep sound is not recorded on the tape. If you do not want to hear the beep sound, select "OFF" in the menu system.
Note on the AUTO DATE feature
The clock is set to East Coast Standard Time at the factory. You can reset the clock in the menu system. You can change the AUTO DATE settings by selecting ON or OFF in the menu system. The AUTO DATE feature shows the date automatically once a day. However, the date may automatically appear more than once a day when:
- you reset the date and time.
- you eject and insert the tape again.
- you stop recording within 10 seconds.
- you set AUTO DATE to OFF once and set it to ON again in the menu system.
Using the zoom feature
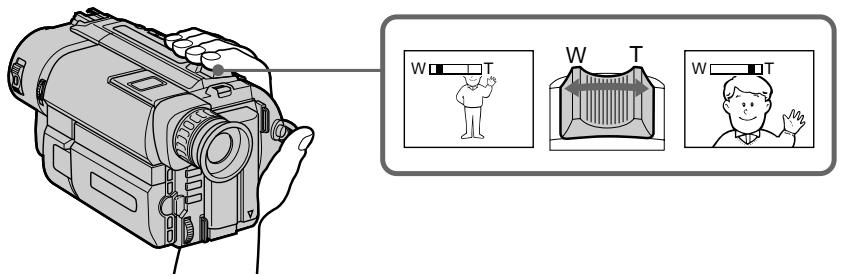
Zooming is a recording technique that lets you change the size of the subject in the scene.
For more professional-looking recordings, use the zoom function sparingly.
"T" side: for telephoto (subject appears closer)
"W" side: for wide-angle (subject appears farther away)
Zooming speed (Variable speed zooming)
Move the power zoom lever a little for a slower zoom, move it further for a faster zoom.
When you shoot a subject using a telephoto zoom
If you cannot get a sharp focus while in extreme telephoto zoom, move the power zoom lever to the "W" side until the focus is sharp. You can shoot a subject that is at least about 2 5/8 feet (about 80~cm ) away from the lens surface in the telephoto position, or about 1/2 inch (about 1cm ) away in the wide-angle position.
Notes on digital zoom
- More than 16x (CCD-TRV15/TRV25/TRV215) or 18x (CCD-TRV35/TRV65/TRV315/TRV615) zoom is performed digitally, and the picture quality deteriorates as you go toward the "T" side. If you do not want to use the digital zoom, set the D ZOOM function to OFF in the menu system.
- The right side [a] of the power zoom indicator shows the digital zooming zone, and the left side [b] shows the optical zooming zone. If you set the D ZOOM function to OFF, the [a] zone disappears.
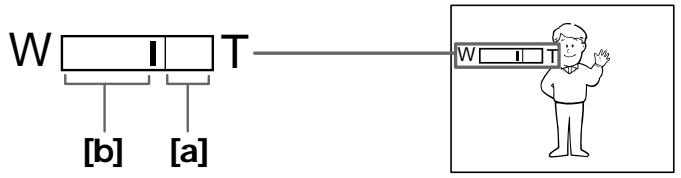
Selecting the START/STOP mode
Your camcorder has three modes. These modes enable you to take a series of quick shots resulting in a lively video.
(1) While pressing OPEN, open the LCD panel.
(2) Set START/STOP MODE to the desired mode.
: Recording starts when you press START/STOP, and stops when you press it again (normal mode).
ANTI GROUND SHOOTING : The camcorder records only while you press down START/STOP so that you can avoid recording unnecessary scenes. 5SEC: When you press START/STOP, the camcorder records for 5 seconds and then stops automatically.
(3) Turn STANDBY up to STANDBY and press START/STOP. Recording starts. If you selected 5SEC, the tape counter disappears and five dots appear. The dots disappear at a rate of one per second as illustrated below.
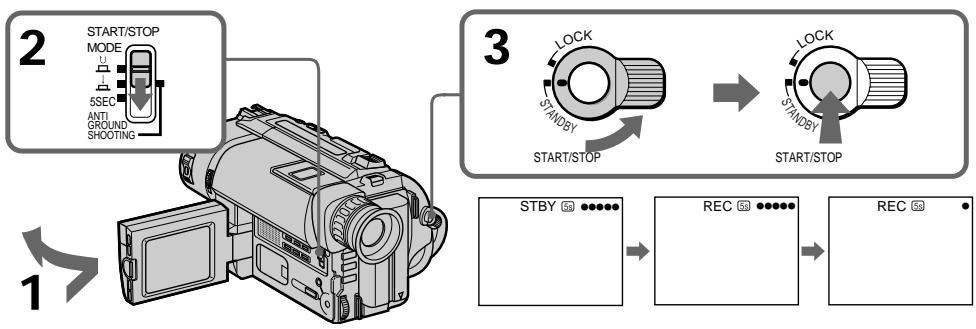
To extend the recording time in 5SEC mode
Press START/STOP again before all the dots disappear. Recording continues for about 5 seconds from the moment you press START/STOP.
Notes on START/STOP mode
- If you have turned off the indicators on the LCD screen, the dots do not appear.
- You cannot use FADER in 5SEC or mode.
Shooting with the LCD screen
You can also record the picture while looking at the LCD screen.
When using the LCD screen, the viewfinder turns off automatically. You cannot monitor the sound from the speaker during recording.
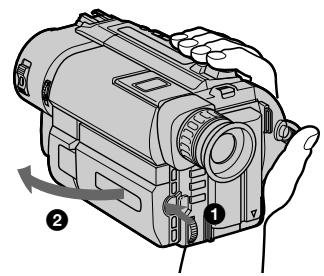
(1) While pressing OPEN, open the LCD panel.
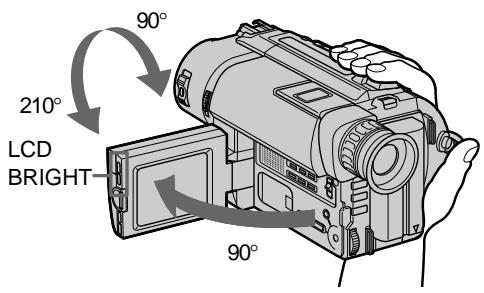
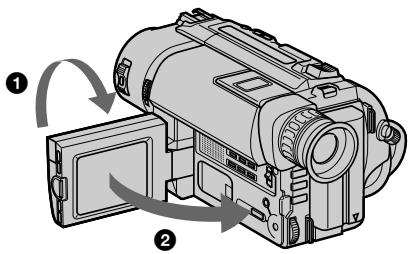
(2) Adjust the angle of the LCD panel.
The LCD panel moves about 90 degrees to this side and about 210 degrees to the other side.
To adjust the brightness of the LCD screen, press LCD BRIGHT.
- side: to brighten the LCD screen
- side: to dim the LCD screen
The battery life is longer when the LCD panel is closed. Use the viewfinder instead of the LCD screen to save the battery power.
1
2
Backlighting the LCD screen
If the LCD screen is insufficiently illuminated even after adjusting LCD BRIGHT, select LCD B. L. in the menu system and set to BRIGHT. You can select LCD B. L. only while using the battery pack as a power source.
Notes on the LCD panel
- When closing the LCD panel, turn it vertically until it clicks [a].
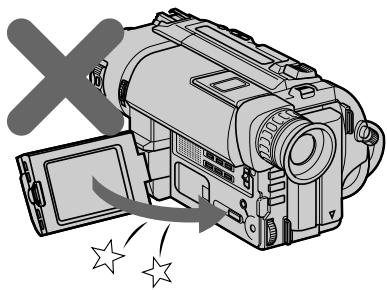
- When turning the LCD panel, turn it always vertically; otherwise, the camcorder body may be damaged or the LCD panel may not close properly [b].
- Close the LCD panel completely when not in use.
[a]
[b]
Letting the subject monitor the shot (Mirror mode)
You can turn the LCD panel over so that it faces the other way and you can let the subject monitor the shot while shooting with the viewfinder.
Turn the LCD panel vertically first until it clicks, then turn it over. The indicator appears on the LCD screen (Mirror mode) and the date and remaining tape indicators disappear.
To cancel mirror mode
Turn the LCD panel back toward the viewfinder.
Notes on mirror mode
- The picture on the LCD looks as a mirror-image while recording in mirror mode. The STBY indicator appears as and REC as . The other indicators may not appear in mirror mode.
- While recording in mirror mode, you cannot operate the following buttons: TITLE, DATE, TIME and MENU.
- The date appears in reverse when the AUTO DATE feature is turned on. When recorded, it will be normal.
For hand-held shots, you'll get better results by holding the camcorder according to the following suggestions:
- Hold the camcorder firmly and secure it with the grip strap so that you can easily manipulate the controls with your thumb.
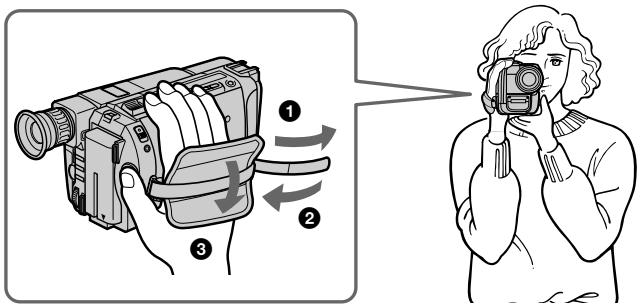
- Place your right elbow against your side.
- Place your left hand under the camcorder to support it. Be sure to not touch the built-in microphone.
- Place your eye firmly against the viewfinder eyecup.
- Use the viewfinder frame as a guide to determine the horizontal plane.
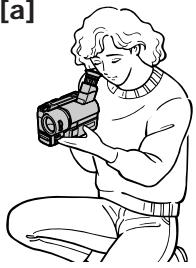
- You can also record in a low position to get an interesting angle. Lift the viewfinder up for recording from a low position [a].
- You can also record in a low position or even in a high position using the LCD panel [b].
- When you use the LCD screen outdoors in direct sunlight, the LCD screen may be difficult to see. If this happens, we recommend that you use the viewfinder.
[a]
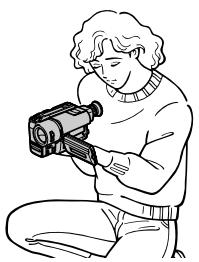
[b]
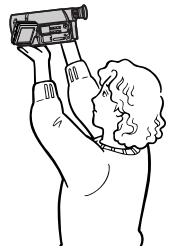
Place the camcorder on a flat surface or use a tripod
Try placing the camcorder on a table top or any other flat surface of suitable height. If you have a tripod for a still camera, you can also use it with the camcorder.
When attaching a non-Sony tripod, make sure that the length of the tripod screw is less than 9/32 inch (6.5mm) . Otherwise, you cannot attach the tripod securely and the screw may damage the camcorder.
Cautions on the viewfinder and the LCD
- Do not pick up the camcorder by the viewfinder or by the LCD panel [c].
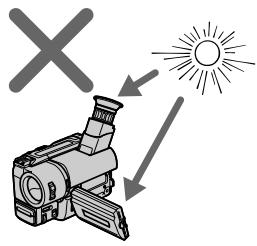
- Do not place the camcorder so as to point the viewfinder or the LCD screen toward the sun. The inside of the viewfinder may be damaged. Be careful when placing the camcorder under sunlight or by a window [d].
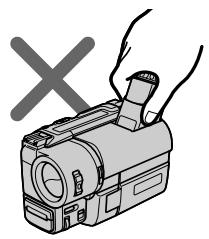
[c]
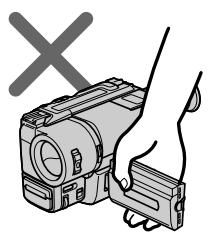
[d]
Checking the recorded picture
Using EDITSEARCH, you can review the last recorded scene or check the recorded picture in the viewfinder or on the LCD screen.
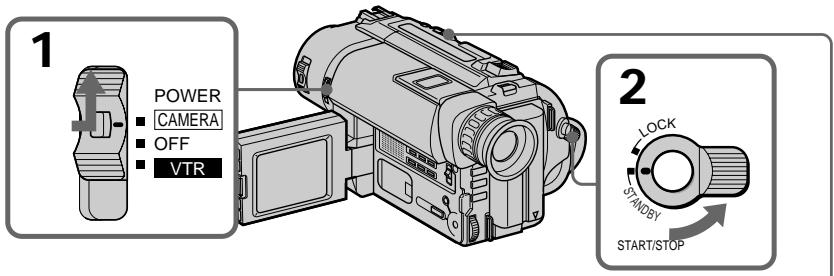
(1) While pressing the small green button on the POWER switch, set it to CAMERA.
(2) Turn STANDBY up to STANDBY.
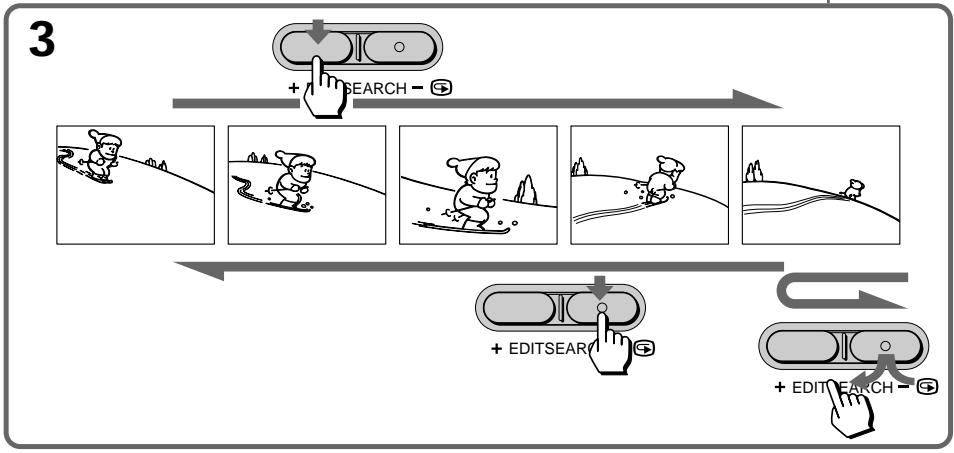
(3) Press the - (S) side of EDITSEARCH momentarily; the last few seconds of the recorded portion play back (Rec Review).
You can monitor the sound from the speaker, headphones (CCD-TRV65/TRV615 only) or an earphone (CCD-TRV15/TRV25/TRV35/TRV215/TRV315 only).
Hold down the - side of EDITSEARCH until the camcorder goes back to the scene you want. The last recorded portion is played back. To go forward, hold down the + side (Edit Search).
To stop playback
Release EDITSEARCH.
To go back to the last recorded point after edit search
Press END SEARCH. The last recorded point is played back for about 5 seconds (10 seconds in LP mode) and stops. Note that this function does not work once you eject the cassette after you recorded on the tape.
To begin re-recording
Press START/STOP. Re-recording begins from the point you released EDITSEARCH. Provided you do not eject the cassette, the transition between the last scene you recorded and the next scene you record will be smooth.
You can monitor the playback picture on the LCD screen.
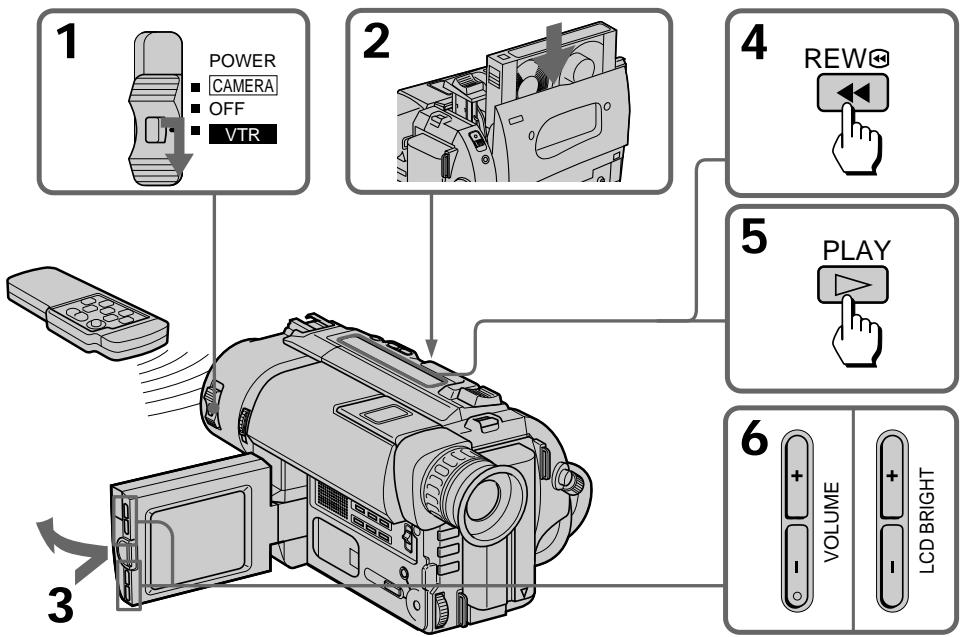
(1) While pressing the small green button on the POWER switch, set it to VTR (CCD-TRV65/TRV615) or PLAYER (CCD-TRV15/TRV25/TRV35/TRV215/TRV315). The video control buttons light up (CCD-TRV35/TRV65/TRV315/TRV615 only).
(2) Insert the recorded tape with the window facing out.
(3) While pressing OPEN, open the LCD panel. Adjust the angle of the LCD panel or the brightness of the LCD screen if necessary.
(4) Press to rewind the tape.
(5) Press to start playback.
(6) Adjust the volume using VOLUME and adjust the brightness of the LCD screen using LCD BRIGHT.
You can also monitor the picture on a TV screen, after connecting the camcorder to a TV or VCR.
To stop playback, press
To rewind the tape, press
To fast-forward the tape rapidly, press
When monitoring on the LCD screen
You can turn the LCD panel over and move back to the camcorder with the LCD screen facing out [a]. You can adjust the angle of the LCD screen by turning the LCD screen up to 15 degrees [b].
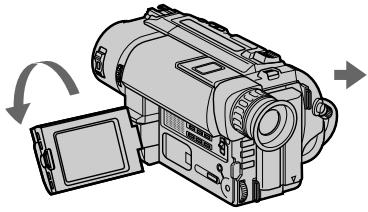
[a]
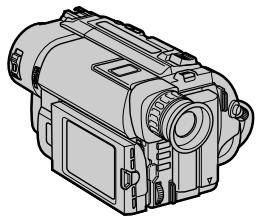
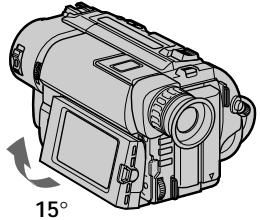
[b]
Using the remote commander
You can control playback using the supplied Remote Commander. Before using the Remote Commander, insert the size AA (R6) batteries.
Note on DISPLAY button
Press DISPLAY to display the screen indicators on the LCD screen. To erase the indicators, press DISPLAY again. If the POWER switch is set to CAMERA, you can erase the indicator by pressing DISPLAY.
Using headphones or an earphone
Connect headphones (not supplied) to the jack (CCD-TRV65/TRV615 only) or an.
earphone (not supplied) to the 念 jack (CCD-TRV15/TRV25/TRV35/TRV215/TRV315
only). You can adjust the volume using VOLUME. When you use headphones or an
earphone, the speaker on the camcorder is silent.
To view the playback picture in the viewfinder
Close the LCD panel. The viewfinder turns on automatically. When using the viewfinder, you can monitor sound only by using headphones or an earphone. To view on the LCD screen again, open the LCD panel. The viewfinder turns off automatically.
Note on the lens cover
The lens cover does not open when the POWER switch is set to VTR/PLAYER. Do not open the lens cover manually. It may cause malfunction.
Various playback modes
You can enjoy clear pictures on the LCD screen during still, slow and picture search. (Crystal-clear still/slow/picture search)
To view a still picture (playback pause)
Press || during playback. To resume playback, press || or
To locate a scene (picture search)
Keep pressing or during playback. To resume normal playback, release the button.
To monitor the high-speed picture while advancing the tape or rewinding (skip scan)
Keep pressing while rewinding or while advancing the tape. To resume normal playback, press .
To view the picture at 1/5 speed (slow playback)
Press on the Remote Commander during playback. To resume normal playback, press. If slow playback lasts for about 1 minute, it shifts to normal speed automatically.
To select the playback sound
- CCD-TRV65/TRV615 only
Change the "HiFi SOUND" mode setting in the menu system.
Notes on playback
- Noise may appear when you use the crystal-clear still/slow/picture search function to play back the tape recorded in LP mode.
- Streaks appear and the sound is muted in the various playback modes.
- When playback pause mode lasts for 5 minutes, the camcorder automatically enters stop mode.
- Horizontal noise appears at the center or top and bottom of the screen when you play back a tape in reverse. This is normal.
- You can play back the tapes recorded in the Hi8 video system on the standard 8 mm camcorder (CCD-TRV15/TRV25/TRV35/TRV215/TRV315 only).
Searching for the end of the picture
You can go to the end of the recorded portion after you record and play back the tape to make the transition between the last scene you recorded and the next scene smooth.
The tape starts rewinding or fast-forwarding and the last 5 seconds (10 seconds in LP mode) of the recorded portion play back. Then the tape stops at the end of the recorded picture (End Search).
Note that the End Search function does not work once you eject the cassette after you have recorded on the tape.
(1) While pressing OPEN, open the LCD panel.
(2) Press END SEARCH.
This function works when the POWER switch is set to either CAMERA or VTR/PLAYER.
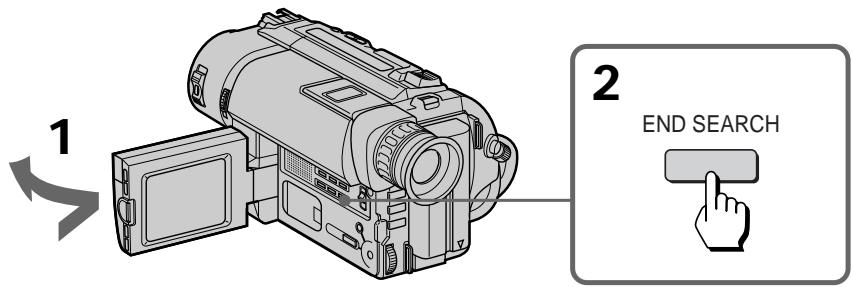
If you start recording after using END SEARCH
Occasionally, the transition between the last scene you recorded and the next scene may not be smooth.
Using alternative power sources
You can choose any of the following power sources for your camcorder: battery pack, house current, alkaline batteries (CCD-TRV15/TRV25/TRV35/TRV65 only) and 12/24 V car battery. Choose the appropriate power source depending on where you want to use your camcorder.
| Place | Power source | Accessory to be used |
| Indoors | House current | Supplied AC power adaptor |
| Outdoors | Battery pack | Battery pack NP-F330 (supplied), NP-F530, NP-F550, NP-F730, NP-F730H, NP-F750, NP-F930, NP-F950 |
| Size AA (LR6) | Supplied battery case (CCD-TRV15/TRV25/TRV35/TRV65 only) | |
| Alkaline battery | ||
| In the car | 12 V or 24 V car battery | Sony car battery charger DC-V515A |
Notes on power sources
- Disconnecting the power source or removing the battery pack during recording or playback may damage the inserted tape.
- The DC IN jack has power source priority. This means that the battery pack cannot supply any power if the power cord is connected to the DC IN jack, even when the power cord is not plugged into a wall outlet.
Using the house current
(1) Open the DC IN jack cover, and connect the AC power adaptor to the DC IN jack on the camcorder.
(2) Connect the power cord to the AC power adaptor.
(3) Connect the power cord to a wall outlet.
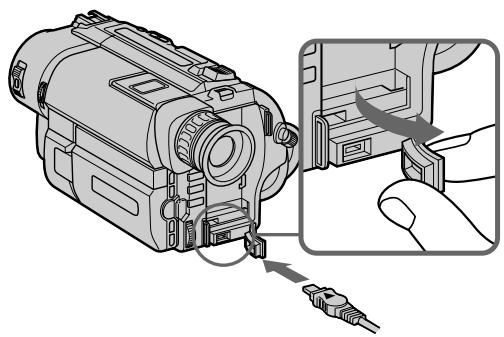
1
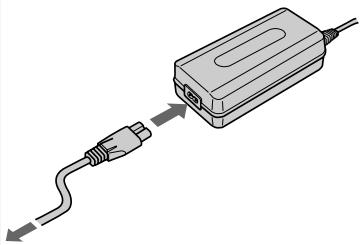
2,3
WARNING
The power cord must only be changed at a qualified service shop.
PRECAUTION
The set is not disconnected from the AC power source (house current) as long as it is connected to the wall outlet, even if the set itself has been turned off.
Note
Keep the AC power adaptor away from the camcorder if the picture is disturbed.
Using alkaline batteries
- CCD-TRV15/TRV25/TRV35/TRV65 only
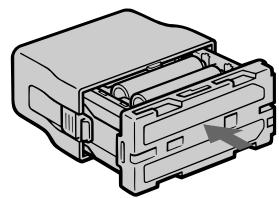
Use the battery case (supplied) and six size AA (LR6) Sony Alkaline batteries (not supplied).
(1) Remove the battery holder from the battery case.
(2) Insert six new alkaline batteries into the battery holder, following the marking on the holder to be sure the batteries are installed in the correct direction.
(3) Insert the battery holder with the alkaline batteries.
(4) Insert the battery case with the alkaline batteries to the battery mounting surface of the camcorder in the same way as the battery pack.
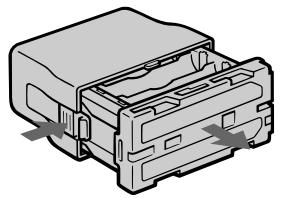
1
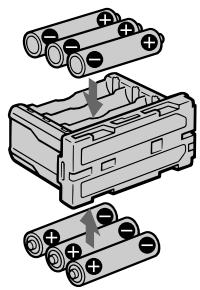
2
3
Battery life
Using alkaline batteries at 77^ (25^)
Upper numbers are the time when recording with the viewfinder. Lower numbers are the time when recording with the LCD screen.
When the battery case is installed with the camcorder, do not connect the AC power adaptor to the camcorder.
Notes
- You may not use the battery case in cold environment.
- The battery life may be shorter depending on the using environment.
- The above battery lives are estimates. The battery life may be shorter depending on the storage condition of the battery before being purchased and temperature.
To remove the battery case
The battery case is removed in the same way as the battery pack.
When you replace the batteries, be sure to remove the battery case from the camcorder to prevent malfunction.
Remove the battery case after using it.
Using a car battery
Use Sony DC-V515A car battery charger (not supplied). Connect the car battery cord to the cigarette lighter socket of a car (12 V or 24 V).
Refer to the operating instructions of your car battery charger.
To remove the car battery charger
The car battery charger is removed in the same way as the battery pack.

This mark indicates that this product is a genuine accessory for Sony video products.
When purchasing Sony video products, Sony recommends that you purchase accessories with this "GENUINE VIDEO ACCESSORIES" mark.
Changing the mode settings
You can change the mode settings in the menu system to further enjoy the features and functions of the camcorder.
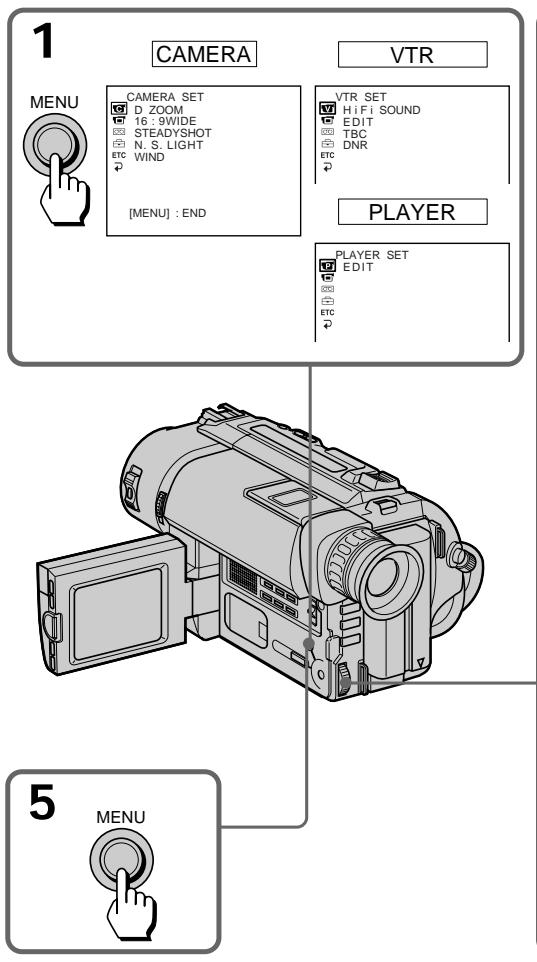
(1) Press MENU to display the menu.
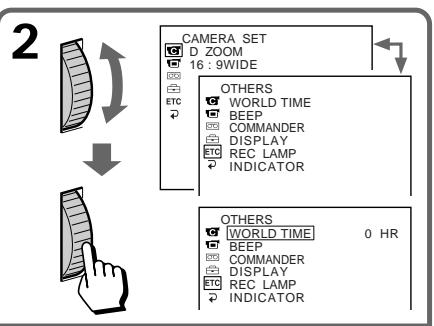
(2) Turn the control dial to select the desired icon in the left side of the menu, then press the dial.
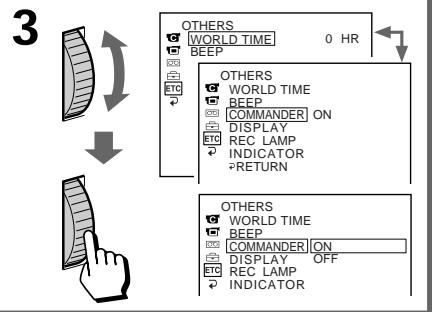
(3) Turn the control dial to select the desired item, then press the dial.
(4) Turn the control dial to select the desired mode, and press the dial. If you want to change the other modes, repeat steps 3 and 4. If you want to change the other items, select RETURN and press the dial, then repeat steps from 2 to 4.
(5) Press MENU or select icon to erase the menu display.
Note on the menu display
Depending on the model of your camcorder, the menu display may be different from that in this illustration.
Notes on changing the mode setting
- Menu items differ depending on the setting of the POWER switch to VTR/PLAYER or CAMERA.
- When you let the subject monitor the shot (mirror mode), the menu display does not appear.
Selecting the mode setting of each item
Items for both CAMERA and VTR/PLAYER modes
LCD B. L.*
- Normally select BRT NORMAL.
- Select BRIGHT when the LCD screen is dark.
When you select BRIGHT, battery life is about 10 percent shorter during recording.
When you use the power sources other than the battery pack, BRIGHT is automatically selected, and LCD B.L. is not displayed in the menu.
LCD COLOR*
Select this item to adjust the color on the LCD screen.
REC MODE\*
- Select SP when recording in SP (standard play) mode.
- Select LP when recording in LP (long play) mode.
When a tape recorded on this camcorder in LP mode is played back on other types of 8mm camcorders or VCRs, the playback quality may not be as good as that on this camcorder.
In PLAYER mode, this item is not displayed in the menu (CCD-TRV15/TRV25/TRV35/TRV215/TRV315 only).
REMAIN*
-
Select AUTO when you want to display the remaining tape bar
-
for about 8 seconds after the camcorder is turned on and calculates the remainder of the tape.
- for about 8 seconds after a cassette is inserted and the camcorder calculates the remainder of the tape.
- for about 8 seconds after is pressed in VTR/PLAYER mode.
- for about 8 seconds after DISPLAY is pressed to display the screen indicators.
-
for the period of tape rewinding, forwarding or picture search in VTR/PLAYER mode.
-
Select ON to always display the remaining tape indicator.
AUTO TV ON* (CCD-TRV35/TRV65/TRV315/TRV615 only)
You can use this feature only with Sony TVs.
- Select ON to turn on the TV automatically when using the LASER LINK function.
- Select OFF not to turn on the TV.
TV INPUT\* (CCD-TRV35/TRV65/TRV315/TRV615 only)
Select 1 or 2 or 3 of the video input on the TV which the IR receiver (not supplied) is connected to when using the LASER LINK function.
LTR SIZE\*
- Normally select NORMAL.
- Select 2x to display selected menu item by twice size of normal.
ETC BEEP\*
- Select ON so that beeps sound when you start/stop recording, etc.
- Select OFF when you do not want to hear the beep sound.
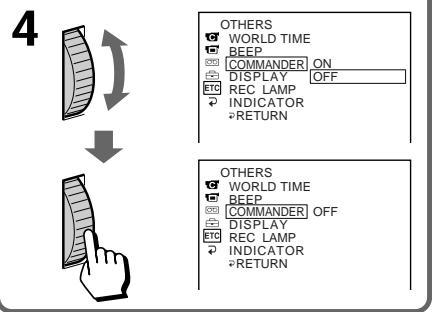
ETC COMMANDER
- Select ON when using the supplied Remote Commander for the camcorder.
- Select OFF when not using the Remote Commander.
ETC DISPLAY\*
- Normally select LCD. The display appears on the LCD screen.
- Select V-OUT/LCD to show the display both on the TV screen and LCD screen.
ETC INDICATOR\* (CCD-TRV65/TRV615 only)
- Select BL ON to light up the display window.
- Select BL OFF to turn off the back light of display window.
When you use the AC power adaptor as a power source, this item is not displayed in the menu.
Items for CAMERA mode only
D ZOOM\*
- Select ON to activate digital zooming.
- Select OFF to not use the digital zoom. The camcorder goes back to 16x (CCD-TRV15/TRV25/TRV215) or 18x (CCD-TRV35/TRV65/TRV315/TRV615) zoom.
16:9WIDE*
- Normally select OFF.
- Select CINEMA to record in CINEMA mode.
- Select 16:9FULL to record in 16:9FULL mode.
STEADYSHOT* (CCD-TRV25/TRV35/TRV65/TRV215/TRV315/TRV615 only)
- Normally select ON.
- Select OFF to release the Steady Shot function.
N.S.LIGHT* (CCD-TRV35/TRV65/TRV315/TRV615 only)
- Normally select ON.
- Select OFF to not use the NightShot Light function.
WIND (CCD-TRV65/TRV615 only)
- Select ON to reduce wind noise when recording in strong wind.
- Normally select OFF.
ORC TO SET*
Select this item to automatically adjust the recording condition to get the best possible recording.
If you have already performed this function, "ORC ON" is displayed.
CLOCK SET*
Reset the date or time.
AUTO DATE*
- Select ON to record the date for 10 seconds after recording has started.
- Select OFF to not record the date.
DEMO MODE\*
- Select ON to make the demonstration appear.
- Select OFF to deactivate the demonstration mode.
Notes on DEMO MODE
- DEMO MODE is set to STBY (Standby) at the factory and the demonstration starts about 10 minutes after you set the POWER switch to CAMERA without inserting a cassette.
Note that you cannot select STBY of DEMO MODE in the menu system.
- You cannot select DEMO MODE when a cassette is inserted in the camcorder.
- If you insert a cassette during the demonstration, the demonstration stops. You can start recording as usual. DEMO MODE automatically returns to STBY.
- When NIGHTSHOT is set to ON, "NIGHTSHOT" appears in the viewfinder or on the LCD screen and you cannot select DEMO MODE (CCD-TRV35/TRV65/TRV315/TRV615 only).
To look at the demonstration at once
Eject the cassette, if inserted. Select ON of DEMO MODE and erase the menu display. The demonstration will begin.
When you turn off the camcorder once, DEMO MODE automatically returns to STBY.
ETC WORLD TIME*
Select this item to set the clock by a time difference.
ETC REC LAMP*
- Select OFF when you do not want the camera recording/battery lamp at the front of the unit to light up.
- Normally select ON.
Items for VTR/PLAYER mode only
HiFi SOUND < STEREO/1/2> (CCD-TRV65/TRV615 only)
- Normally select STEREO.
- Select 1 or 2 to play back a dual sound track tape.
V / EDIT
- Select ON to minimize picture deterioration when editing.
- Normally select OFF.
TBC*
- Normally select ON, to correct for jitter.
- Select OFF to not correct for jitter. The picture may not be steady when played back.
Note on TBC setting
Set TBC to OFF when:
- Playing back a tape you have dubbed over.
- Playing back a tape on which you recorded the signal of a TV game or similar machine.
- The playback picture fluctuates.
DNR*
- Normally select ON to reduce picture noise.
- Select OFF if the picture has a lot of movement, causing a conspicuous afterimage.
The following settings work only during playback
EDIT, HiFi SOUND, TBC, and DNR.
- These settings are retained even when the battery is removed, as long as the lithium battery is in place.
When you shoot a subject with the light source behind the subject or a subject with a light background, use the BACK LIGHT function.
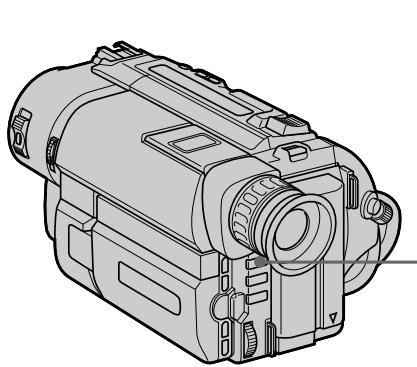
Press BACK LIGHT. The indicator appears in the viewfinder or on the LCD screen.
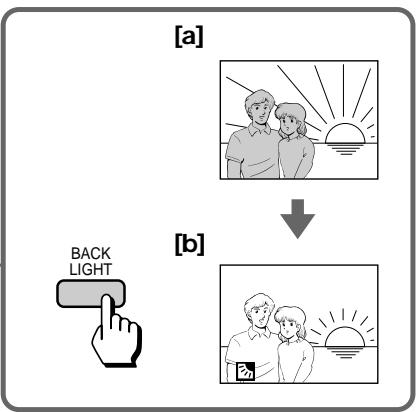
[a] Subject is too dark because of backlight.
[b] Subject becomes bright with backlight compensation.
After shooting
Be sure to release this adjustment condition by pressing BACK LIGHT again. The indicator disappears. Otherwise, the picture will be too bright under normal lighting condition.
This function is also effective under the following conditions:
- A subject with a light source nearby or a mirror reflecting light
- A white subject against a white background. Especially when you shoot a person wearing shiny clothes made of silk or synthetic fiber, his or her face tends to become dark if you do not use this function.
To make a fine adjustment
You can adjust the exposure manually. However, when you adjust the exposure manually, BACK LIGHT does not operate.
- CCD-TRV35/TRV65/TRV315/TRV615 only
Selecting the fader function
You can fade in or out to give your recording a professional appearance.
When the picture fades in, the sound gradually increases. When the picture fades out, the sound gradually decreases.
[a]
STBY
REC
FADER
M.FADER (mosaic)
STRIPE*
BOUNCE (FADE IN only)
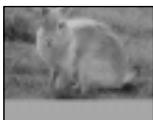
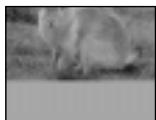
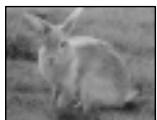

[b]
MONOTONE
When fading in, the picture gradually changes from black and white to color. When fading out, the picture gradually changes from color to black and white.
- CCD-TRV65/TRV615 only
Using the fader function
When fading in [a]
(1) While the camcorder is in Standby mode, press FADER until the desired fade indicator flashes.
(2) Press START/STOP to start recording. The fade indicator stops flashing.
When fading out [b]
(1) During recording, press FADER until the desired fade indicator flashes.
(2) Press START/STOP to stop recording. The fade indicator stops flashing, and then recording stops.
The fading mode selected last is indicated first of all.
![SONY CCD-TRV25 - When fading out [b] - 1](/content/2019/11/48493/images/d14f3ec484735a21642aacf874b35527e0fcc82236b5647a0e295a5538d305ea.jpg)
Note on the bounce function
When you use the following functions or D ZOOM is set to ON in the menu system,
"BOUNCE" indicator does not appear.
- Wide mode
- Functions using the PICTURE EFFECT button
- Functions using the PROGRAM AE button
To cancel the fader function
Before pressing START/STOP, press FADER until the indicator disappears.
When the date or time indicator or title is displayed
The date or time indicator and title do not fade in or fade out.
When the START/STOP MODE switch is set to 5SEC or
You cannot use the fader function.
Note on the fader function
While using the bounce function, you cannot use the following functions.
- Exposure
- Focus
- Zoom
- CCD-TRV35/TRV65/TRV315/TRV615 only
The NightShot function enables you to shoot a subject in a dark place. You can achieve a satisfactory recording of the ecology of nocturnal animals for observation with this function.
This function may record picture nearly in monochrome.
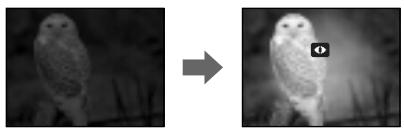
(1) While the camcorder is in Standby mode, slide NIGHTSHOT to ON.
(2) Press START/STOP to start recording.
and "NIGHTSHOT" indicators flash.
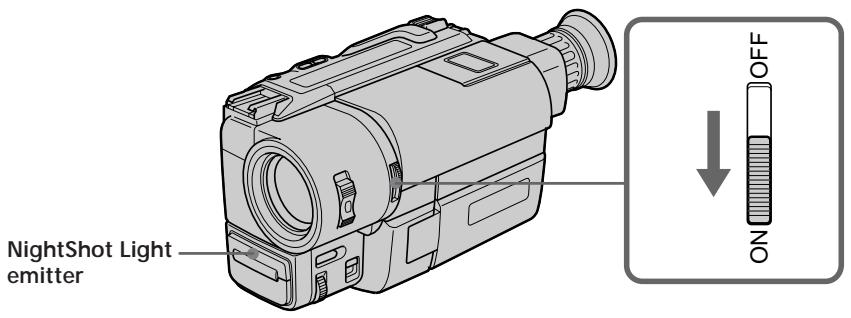
To cancel the NightShot function
Slide NIGHTSHOT to OFF.
Using the NightShot Light
When you set N.S.LIGHT to ON in the menu system, the picture will be more clear. NightShot Light rays are infrared and are therefore invisible. The maximum limit of NightShot Light is about 10 feet (about 3 meters).
Notes on the NightShot
- When you keep setting NIGHTSHOT to ON in normal recording, picture may be recorded in incorrect/unnatural color.
- If focusing is difficult with the autofocus mode when using the NightShot function, focus manually.
Selecting the desired mode
You can record a cinemalike picture (CINEMA) or a 16:9 wide picture to watch on the 16:9 wide-screen TV (16:9 FULL).
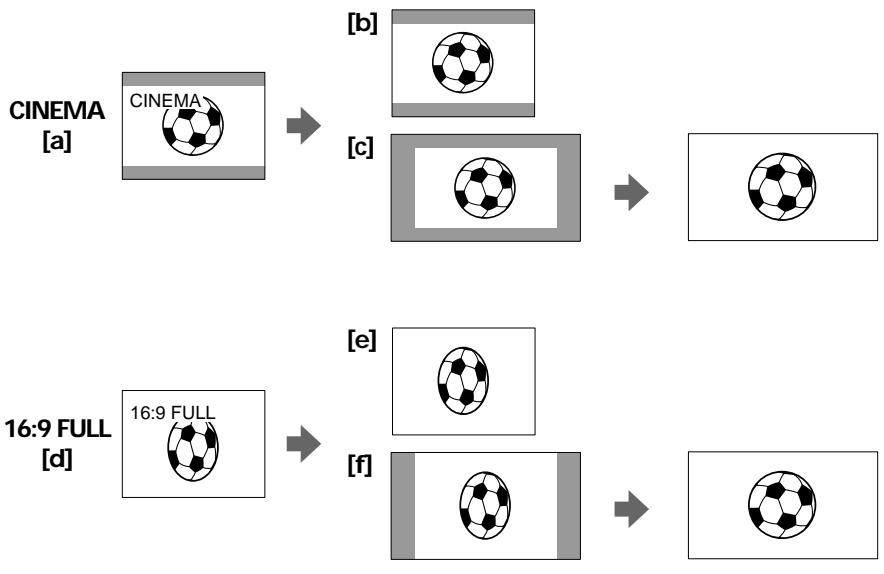
CINEMA
Black bands appear at the top and the bottom of the screen, and the viewfinder or LCD screen [a] and a normal TV screen [b] look wide. You can also watch the picture without black bands on a wide-screen TV [c].
16:9 FULL
The picture in the viewfinder or LCD screen [d] or on a normal TV [e] is horizontally compressed. You can watch the picture of normal images on a wide-screen TV [f].
Using the wide mode function
You can select the wide mode (OFF, CINEMA, 16:9FULL) in the menu system (p. 29).
To cancel wide mode
Select OFF in the menu system.
To watch the tape recorded in wide mode
To watch the tape recorded in CINEMA mode, set the screen mode of the wide-screen TV to zoom mode. To watch the tape recorded in 16:9 FULL mode, set it to full mode. For details, refer to the operating instructions of your TV.
Note that the picture recorded in 16:9 FULL mode looks compressed on a normal TV.
Notes on wide mode
- If wide mode is set to 16:9FULL, the Steady Shot function does not work and the indicator flashes (CCD-TRV25/TRV35/TRV65/TRV215/TRV315/TRV615 only).
- In wide mode, you cannot select the bounce function with FADER (CCD-TRV35/TRV65/TRV315/TRV615 only).
- When you record in 16:9 FULL mode, the date or time indicator will be widened on the wide-screen TV.
- If you dub a tape, the tape is copied in the same mode as the original recording.
- When recording, you cannot change the mode.
Selecting the best mode
You can select one of six PROGRAM AE (Auto Exposure) modes to suit your shooting situation, referring to the following.

Spotlight mode
For subjects in spotlight, such as at the theater or a formal event.
Soft Portrait mode
For zooming in on a still subject in telephoto mode, or for a subject behind an obstacle such as a screen. Creates a soft background for subjects such as people or flowers, and faithfully reproduces skin color.
Sports Lesson mode
For recording fast-moving subjects such as in tennis or golf games.
Beach & Ski mode
For people or faces in strong light or reflected light, such as at a beach in midsummer or on a ski slope.
Sunset & Moon mode
For recording subjects in dark environments such as sunsets, fireworks, neon signs, or general night views.
Landscape mode
For distant subjects such as mountains or when recording a subject behind an obstacle such as a window or screen.
Using the PROGRAM AE function
(1) Press PROGRAM AE.
(2) Turn the control dial to select the desired PROGRAM AE mode.
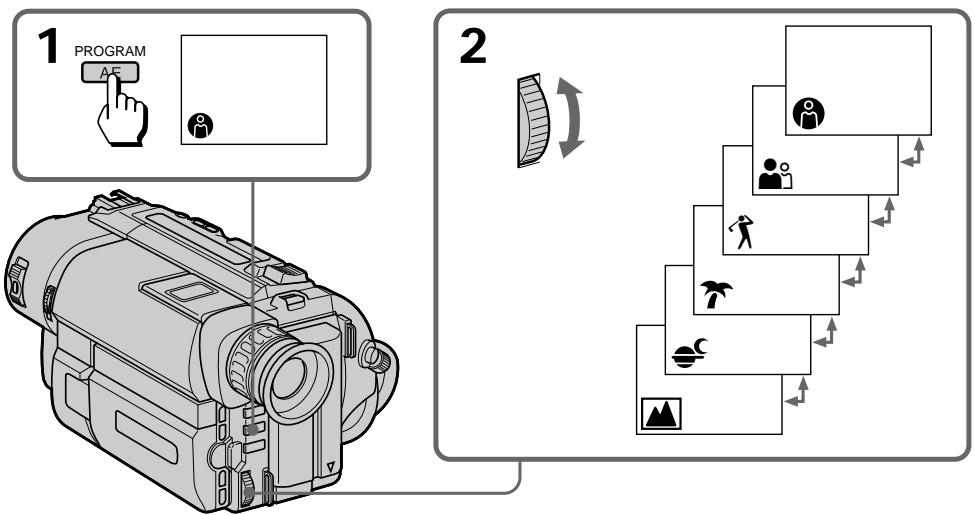
To turn off program AE
Press PROGRAM AE.
Notes on focus setting
- In the Spotlight, Sports lesson and Beach & Ski modes, you cannot take close-ups because the camcorder is set to focus only on subjects in the middle to far distance.
- In the Sunset & Moon and Landscape modes, the camcorder is set to focus only on distant subjects.
-
Flickering or changes in color may occur in the following modes if recording is carried out under a discharge tube such as a fluorescent lamp, sodium lamp or mercury lamp. If this happens, turn off program AE.
-
Soft Portrait mode
- Sports Lesson mode
- CCD-TRV35/TRV65/TRV315/TRV615 only
When to use manual focus
In the following cases you should obtain better results by adjusting the focus manually.
[a]
[b]
[c]
[d]
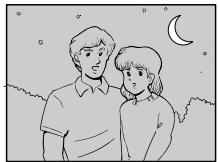
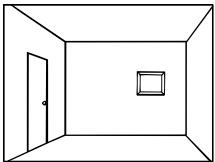
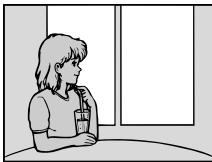
Insufficient light [a]
- Subjects with little contrast - walls, sky, etc. [b]
- Too much brightness behind the subject [c]
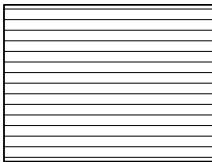
Horizontal stripes [d]
- Subjects through frosted glass
- Subjects beyond nets, etc.
- Bright subject or subject reflecting light
- Shooting a stationary subject when using a tripod
Focusing manually
When focusing manually, first focus in telephoto before recording, and then reset the shot length.
(1) Set FOCUS to MANUAL. The indicator appears in the viewfinder or on the LCD screen.
(2) Move the power zoom lever to the end of the "T" side in the optical zoom zone.
(3) Turn the NEAR/FAR dial to achieve a sharp focus.
(4) Set the desired shot length using the power zoom lever.
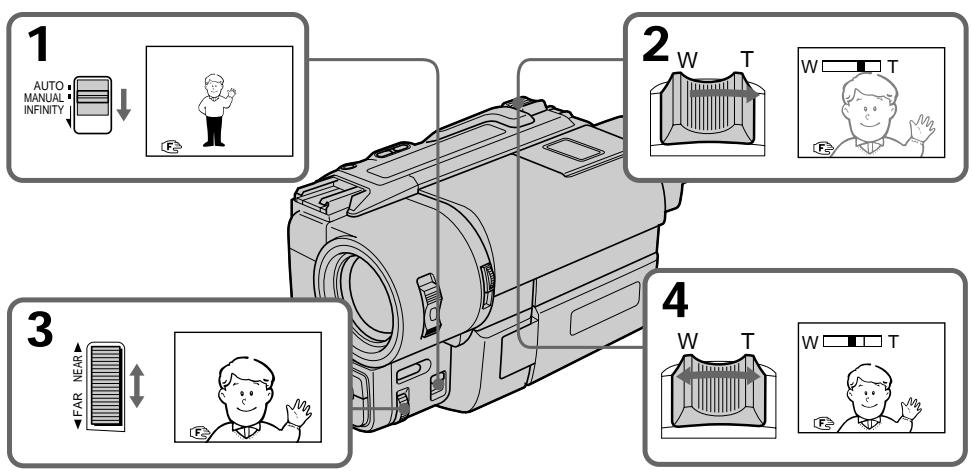
To return to autofocus mode
Set FOCUS to AUTO. The indicator in the viewfinder or on the LCD screen disappears.
Shooting in relatively dark places
Shoot at wide-angle after focusing in the telephoto position.
To record a very distant subject
Push FOCUS down to INFINITY. The lens focuses on the most distant subject while FOCUS is held down. When it is released, manual focus mode is resumed.
Use this function when shooting through a window or a screen, to focus on a most distant subject.
Note on manual focusing
The following indicators may appear:
when recording a very distant subject.
when the subject is too close to focus on.
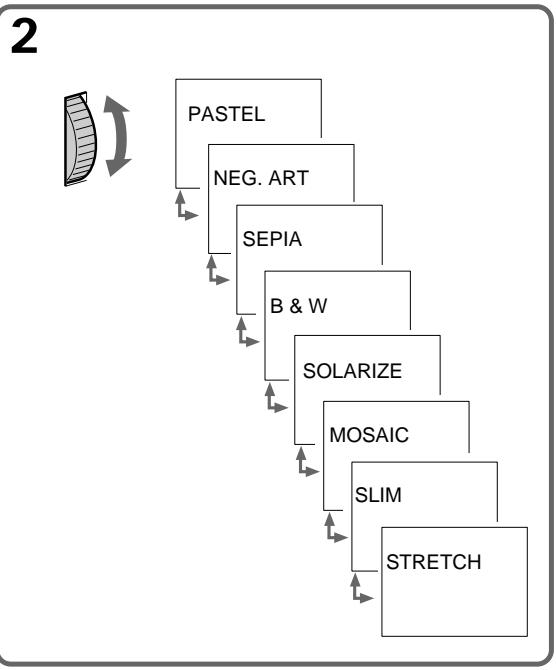
Selecting picture effect
You can make pictures like those of television with the Picture Effect function.
[a]
[b]
[c]
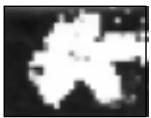
[d]
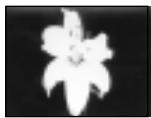
[e]
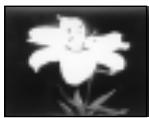
[f]
PASTEL [a]
The contrast of the picture is emphasized, and the picture looks like an animated cartoon.
NEG. ART [b]
The color and brightness of the picture is reversed.
SEPIA
The picture is sepia.
B&W
The picture is monochrome (black and white).
SOLARIZE [c]
The light intensity is more clear, and the picture looks like an illustration.
MOSAIC [d]
The picture is mosaic.
SLIM [e]
The picture expands vertically.
STRETCH [f]
The picture expands horizontally.
Using picture effect function
(1) Press PICTURE EFFECT.
(2) Turn the control dial to select the desired picture effect mode.
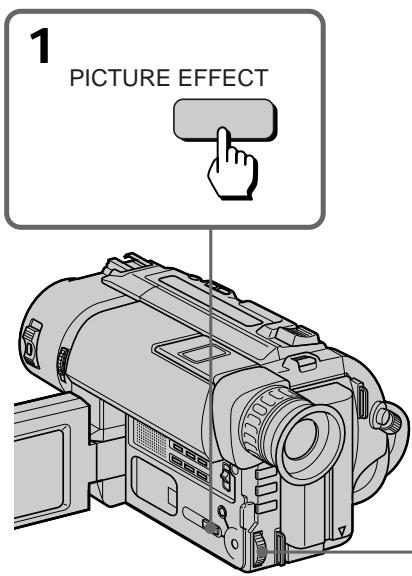
To turn off picture effect
Press PICTURE EFFECT. The indicator in the viewfinder or on the LCD screen goes out.
Note on the picture effect
When you turn the power off, the camcorder returns automatically to normal mode.
- CCD-TRV35/TRV65/TRV315/TRV615 only
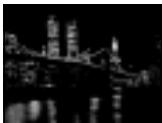
When to adjust the exposure
Adjust the exposure manually under the following cases.

[a]
[b]
[a]
The background is too bright (back lighting)
- Insufficient light: most of the picture is dark
[b]
- Bright subject and dark background
To record the darkness faithfully
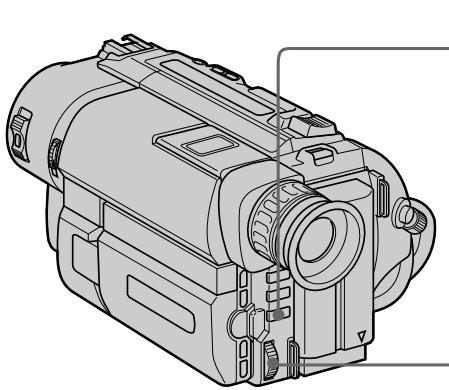
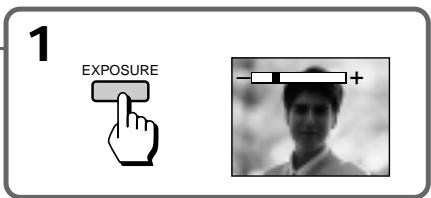
Adjusting the exposure
(1) Press EXPOSURE.
(2) Turn the control dial to adjust the brightness.
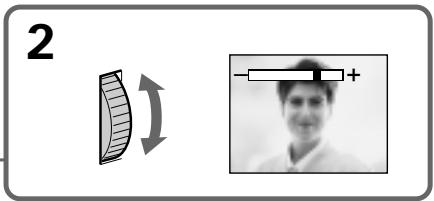
To return to automatic exposure mode
Press EXPOSURE again.
Shooting with the sun behind you
If the light source is behind your subject, or in the following situations, the subject will be recorded too dark.
- The subject is indoors and there is a window behind the subject.
- Bright light sources are included in the scene.
- When shooting a person wearing white or shiny clothes in front of a white background, the face will be recorded too dark.
Shooting in the dark
We recommend you to use a video light (not supplied). To get the best color, you must maintain a sufficient light level.
When you adjust the exposure manually
- BACK LIGHT does not work.
- If you change the PROGRAM AE mode, the camcorder automatically returns to automatic exposure mode.
Superimposing a title
You can select one of eight preset titles and two custom titles. You can also select the language, color, size and position of titles.
Superimposing titles
(1) Press TITLE to display the title menu.
(2) Turn the control dial to select , then press the dial.
(3) Turn the control dial to select the desired title, then press the dial. The titles are displayed in the language you selected.
(4) Turn the control dial to select the color, size, or position, then press the dial.
(5) Turn the control dial to select the desired item, then press the dial.
(6) Repeat step 4 and 5 until the title is arranged as desired.
(7) Press control dial again to complete the setting.
(8) When you want to stop recording the title, press TITLE.
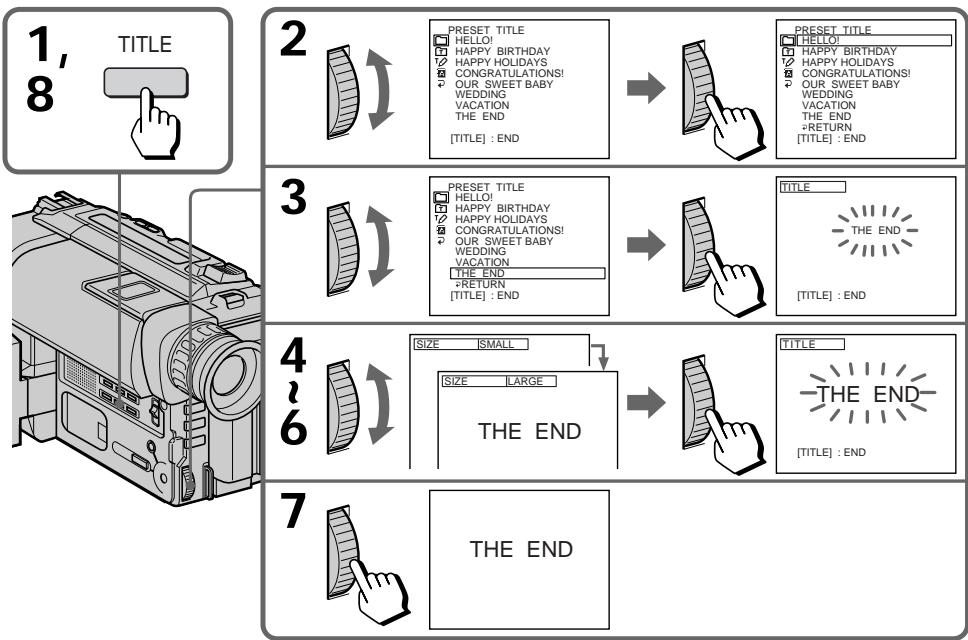
To superimpose the title from beginning
After step 7, press START/STOP to start recording.
To superimpose the title while you are recording
After pressing START/STOP to start recording, start from step 1. In this case, beep is not heard.
To select the language of preset title
When you want to select the language, select before step 2. Then select language and return to step 2.
To use the custom title
When you want to use the custom title, select in step 2.
Notes on superimposing a title
- If you have not given any custom title, “-- -- -- ...” appears on the display.
- The FADER function works while the title is displayed, however, the title does not fade (CCD-TRV35/TRV65/TRV315/TRV615 only).
- If you display the menu or title menu while superimposing a title, the title is not recorded while the menu or title menu is being displayed.
Title color changes as follows :
WHITE YELLOW VIOLET RED CYAN GREEN BLUE
Title size changes as follows :
SMALL LARGE
Title position changes as follows :
When you select the title size "SMALL", you can choose 9 positions. When you select the title size "LARGE" you can choose 8 positions.
Notes on the title
- Depending on size or position of the title, both of date and time or either of them is not displayed.
- If you input 13 characters or more for a LARGE title, the title is automatically reduced into a proper size after the position is set.
- When the title is displayed, LCD BRIGHT and VOLUME indicators do not appear.
Making your own titles
You can make up to two titles and store them in the camcorder. We recommend to set the POWER switch to VTR/PLAYER or eject the cassette before you begin. Your title can have up to 20 characters.
(1) Press TITLE to display the title menu.
(2) Turn the control dial to select , then press the dial.
(3) Turn the control dial to select the first line (CUSTOM1) or second line (CUSTOM2), then press the dial.
(4) Turn the control dial to select the column of the desired character, then press the dial.
(5) Turn the control dial to select the desired character, then press the dial.
(6) Repeat step 4 and 5 until you finish the title.
(7) For finishing the tilting work, turn the control dial to select SET, then press the dial.

1 TITLE

TITLE SET
CUSTOM1
CUSTOM1
中

TITLE SET
品
RETURN
2

TITLE SET
RETURN

TITLE SET
ABCDE
FGHIJ
KLMNG POGST
PQST UVWXY
Z& ?!
7

4 6
1

TITLE SET
ABCDE
FGHIJ
KLMNO ROBST
FORSTUVWXY
Z& ?!
TITLE] : END
2

TITLE SET
一
ABCDE
FGHIJ 6
KLMNO A BROT 1
PDRST AUYWXXI
27 ?!
3

TITLE SET
ABCDE
FGHJ
KLMNO
PQASUVWXY
Z& ?!
TITLE] : END
4

TITLE SET
S.
ABCDE.1
ABCDEGHLLJ
KLMNO
PQFST
UVWXY
∠& ?!
To edit a title you have stored
In step 3, select CUSTOM1 or CUSTOM2, depending on which title you want to edit, then change the title.
Note
You can not enter over 20 characters title.
If you take 5 minutes or longer to enter characters while a cassette is in the camcorder
The power goes off automatically. Characters you have entered remain. Turn STANDBY down once and then up again, then proceed from step 1.
To delete a title
In step 4, turn the control dial to select then press the dial. The last character is erased. Repeat this step until all characters are deleted.
Recording with the date/time
Before you start recording or during recording, press DATE or TIME. You can record the date or time displayed in the viewfinder or on the LCD screen with the picture.
Press DATE (or TIME), then press TIME (or DATE) to display the date and time together.
The clock is set to East Coast Standard time at the factory. You can reset the clock in the menu system.
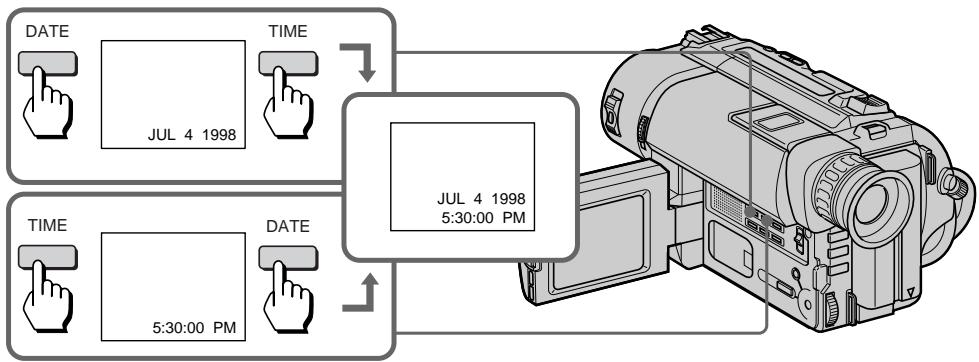
To stop recording with the date and/or time
Press DATE and/or TIME again. The date and/or time indicator disappears. The recording continues.
Optimizing the recording condition
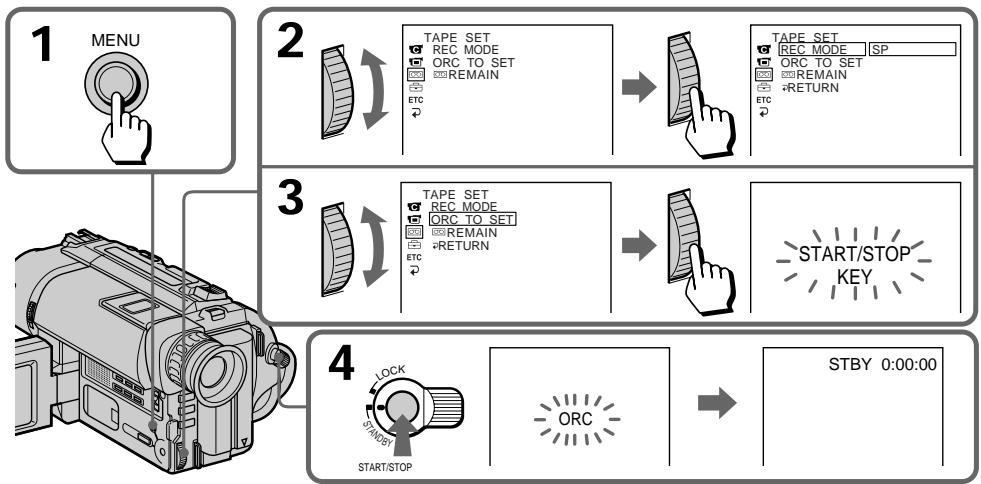
Use this feature to check the tape condition before recording, so that you can get the best possible picture (ORC).
(1) While the camcorder is in Standby mode, press MENU to display the menu.
(2) Turn the control dial to select l , then press the dial.
(3) Turn the control dial to select ORC TO SET, then press the dial. "START/STOP KEY" flashes.
(4) Press START/STOP.
The camcorder takes about 5 to 10 seconds to check the tape condition and then returns to Standby mode.
Each time you insert the cassette
Perform the above procedures.
Notes on the ORC function
- When you set ORC TO SET, the recording on the tape is erased for about 0.1 second so that the camcorder can check the tape condition. Be careful when you use a recorded tape. The 0.1 second blank is erased if you record from the point where you set ORC TO SET for more than 2 seconds, or if you record over the blank.
- You cannot use this function on a tape with the red mark on the cassette exposed.
- CCD-TRV25/TRV35/TRV65/TRV215/TRV315/TRV615 only
When the Steady Shot function is working, the camcorder compensates for camera-shake.
You can release the Steady Shot function when you do not need to use the Steady Shot function. The "Steady Shot" indicator appears in the viewfinder or on the LCD screen. Do not use the Steady Shot function when shooting a stationary object with a tripod. You can select ON or OFF in the menu system (p. 29).
To activate the Steady Shot function again
Set STEADYSHOT to ON in the menu system.
Notes on the Steady Shot function
- The Steady Shot function will not correct excessive camera-shake.
- When you set STEADYSHOT to ON or OFF in the menu system, the exposure may fluctuate.
- Steady Shot does not operate in 16:9 FULL mode. If you set STEADYSHOT to ON in the menu system, the indicator flashes.
Watching on a TV screen
Connect the camcorder to your TV or VCR to watch the playback picture on the TV screen. When monitoring the playback picture by connecting the camcorder to your TV, we recommend you to use house current for the power source.
While playing back on a TV screen, close the LCD panel. Otherwise, picture distortion may occur.
Connecting directly to a TV/VCR with Video/Audio input jacks
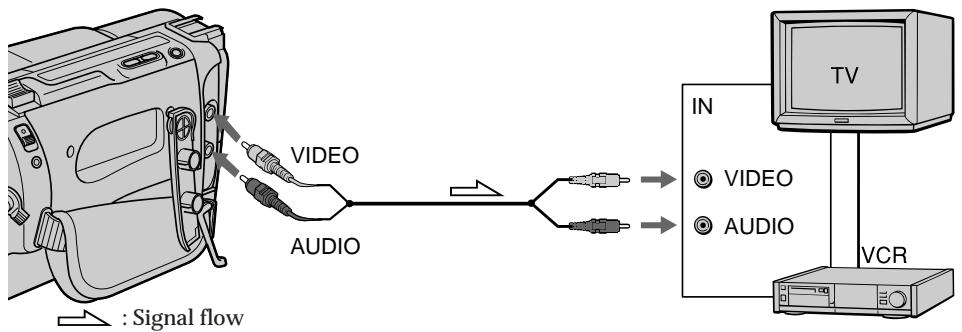
When connecting the A/V connecting cable, make sure you connect the plug to jacks of the same color.
Open the jack cover. With using the supplied A/V connecting cable, connect the camcorder to the LINE IN inputs on the TV or VCR connected to the TV. Set the TV/ VCR selector on the TV to VCR. When connecting to the VCR, set the input selector on the VCR to LINE.
CCD-TRV15/TRV25/TRV35/TRV215/TRV315
CCD-TRV65/TRV615
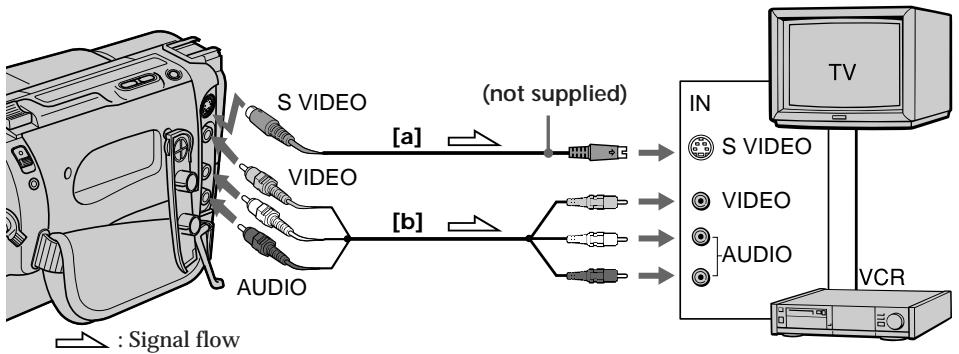
- CCD-TRV65/TRV615 only
If your TV or VCR has an S video jack, connect using the S video cable (not supplied) [a] to obtain a high quality picture. If you are going to connect the camcorder using the S video cable (not supplied) [a], you do not need to connect the yellow (video) plug of the A/V connecting cable [b].
If your TV or VCR is a monaural type
- CCD-TRV65/TRV615 only
Connect only the white plug for audio on both the camcorder and the TV or the VCR.
With this connection, the sound is monaural even in stereo model.
To connect to a TV or VCR without Video/Audio input jacks
Use an RFU-95UC RFU adaptor (not supplied).
Using the AV cordless IR receiver
-CCD-TRV35/TRV65/TRV315/TRV615 only
Once you connect the AV cordless IR receiver (not supplied) having the LASER LINK mark to your TV or VCR, you can easily view the picture on your TV. For details, refer to the operating instructions of the AV cordless IR receiver.
LASER LINK is a system which transmits and receives a picture and sound between video equipment having the 山 mark by using infrared rays.
LASER LINK is a trademark of Sony Corporation.
To play back on a TV
(1) After connecting your TV and AV cordless IR receiver, set the POWER switch on the AV cordless IR receiver to ON.
(2) Set the POWER switch on the camcorder to VTR/PLAYER.
(3) Turn the TV on and set the TV/VCR selector on the TV to VCR.
(4) Press LASER LINK. The lamp of the LASER LINK button lights up.
(5) Press on the camcorder to start playback.
(6) Point the LASER LINK emitter at the AV cordless IR receiver.
To cancel the LASER LINK function
Press LASER LINK.
If you use a Sony TV
-
You can turn on the TV automatically when you press the LASER LINK or button. To do so, set the AUTO TV ON to ON in the menu system and turn the TV's main switch on, then do either of the following;
-
Point the LASER LINK emitter towards the TV's remote sensor and press LASER LINK.
-
Turn on the LASER LINK button and press.
-
You can switch the video input of the TV automatically to the one which the AV cordless IR receiver is connected. To do so, set the AUTO TV ON to ON and the TV INPUT to the same video input (1,2,3) in the menu system. With some models, however the picture and sound may be disconnected momentarily when the video input is switched.
-
The above feature may not work with some TV models.
Note
When LASER LINK is activated (the LASER LINK button is lit), the camcorder consumes power. Press and turn off the LASER LINK button when it is not needed.
You can create your own video program by editing with any other 8 mm, Hi8 Hi8, VHS VHS, SWS S-VHS, WHSC VHSC, SWSC S-VHSC, Betamax or ED Beta ED Betamax VCR that has video/ audio inputs.
Before editing
Connect the camcorder to the VCR using the supplied A/V connecting cable. Set the input selector on the VCR to LINE, if available. Set EDIT to ON in the menu system (p. 29).
Starting editing
Turn down the volume of the camcorder while editing. Otherwise, picture distortion may occur.
(1) Insert a blank tape (or a tape you want to record over) into the VCR, and insert your recorded tape into the camcorder.
(2) Play back the recorded tape on the camcorder until you locate the point just before where you want to start editing, then press to set the camcorder in playback pause mode.
(3) On the VCR, locate the recording start point and set the VCR in recording pause mode.
(4) First press on the camcorder, and after a few seconds press on the VCR to start editing.
To edit more scenes
Repeat steps 2 to 4.
To superimpose the title while you are editing
You can superimpose the title while you are editing. Refer to "Superimposing a title" (p. 48).
To stop editing
Press on both the camcorder and the VCR.
Note on Fine Synchro Edit
If you connect a video deck that has the Fine Synchro Edit feature to the LANC jack of the camcorder, using a LANC cable (not supplied), the edit will be even more precise.
-CCD-TRV65/TRV615 only
You can record a tape from another VCR or a TV program from a TV that has video/ audio outputs. Connect the camcorder to the VCR or TV using the supplied A/V cable. Turn down the volume of the camcorder while editing. Otherwise, picture distortion may occur.
(1) While pressing the small green button on the POWER switch, set it to VTR.
(2) Set DISPLAY to LCD in the menu system. Then press REC and the button on the right together on the camcorder at the point where you want to start recording.
In recording and recording pause mode, S video and VIDEO/AUDIO jacks automatically work as input jacks.
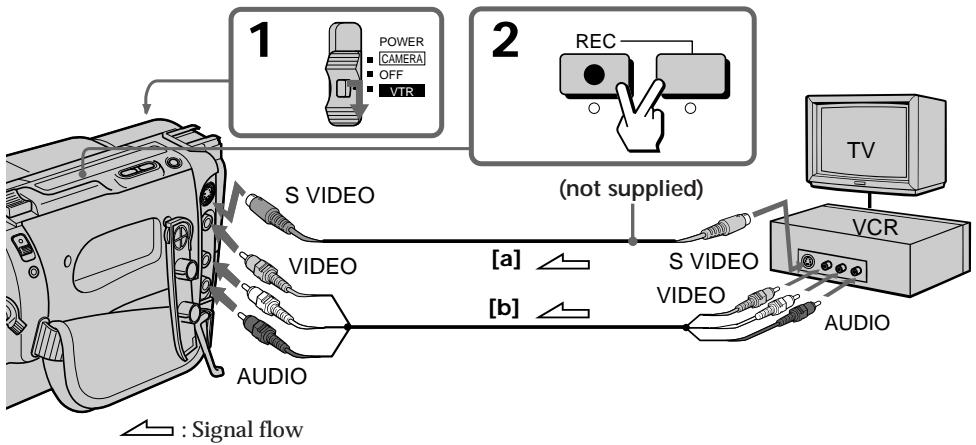
If your VCR or TV has an S video jack, connect using the S video cable (not supplied) [a] to obtain a high quality picture.
If your VCR or TV is a monaural type, connect only the white plug for audio on both the camcorder and the VCR or TV.
If your VCR or TV does not have an SVIDEO OUT jack, connect cable [b]. Do not connect the S video cable (not supplied) [a] to the camcorder.
To stop recording
Press ■.
Note on recording
You cannot record a picture that has a copyright control signal for copyright protection of software. "COPY INHIBIT" appears if you try to record such a picture.
Changing the lithium battery in the camcorder
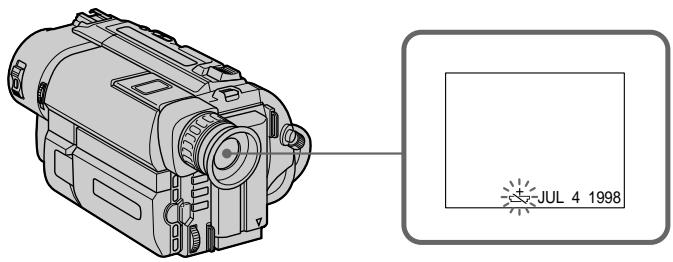
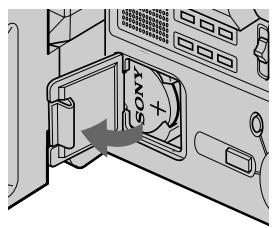
Your camcorder is supplied with a lithium battery installed. When the battery becomes weak or dead, the indicator flashes in the viewfinder for about 5 seconds when you set the POWER switch to CAMERA. In this case, replace the battery with a Sony CR2025 or Duracell DL-2025 lithium battery. Use of any other battery may present a risk of fire or explosion. Discard used batteries according to the manufacturer's instructions.
The lithium battery for the camcorder lasts for about 1 year under normal operation. (The lithium battery that comes installed at the factory may not last 1 year.)
Notes on lithium battery
- Keep the lithium battery out of the reach of children.
Should the battery be swallowed, immediately consult a doctor.
- Wipe the battery with a dry cloth to assure a good contact.
- Do not hold the battery with metallic tweezers, otherwise a short-circuit may occur.
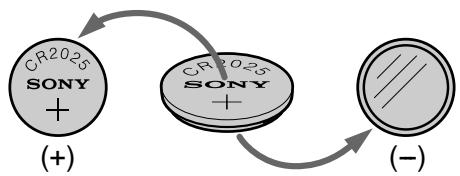
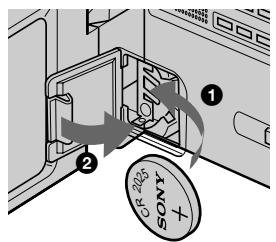
- Note that the lithium battery has a positive (+) and a negative (-) terminals as illustrated. Be sure to install the lithium battery so that terminals on the battery match the terminals on the camcorder.
WARNING
The battery may explode if mistreated. Do not recharge, disassemble, or dispose of in fire.
Changing the lithium battery
When replacing the lithium battery, keep the battery pack or other power source attached. Otherwise, you will need to reset the date, time and other items in the menu system retained by the lithium battery.
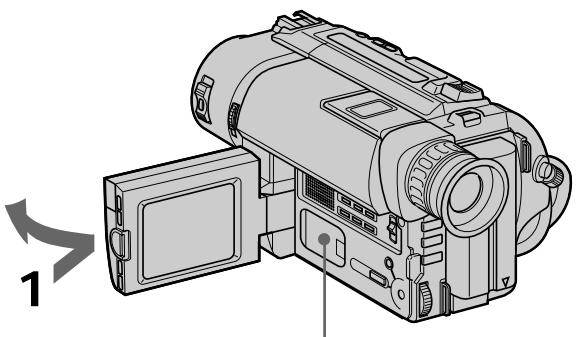
(1) Open the LCD panel and open the lid of the lithium battery compartment.
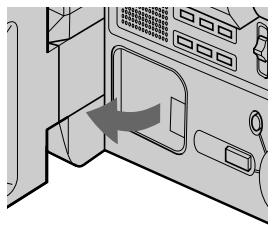
(2) Push the lithium battery down once and pull it out from the holder.
(3) Install the lithium battery with the positive (+) side facing out. Close the lid.
1
2
3
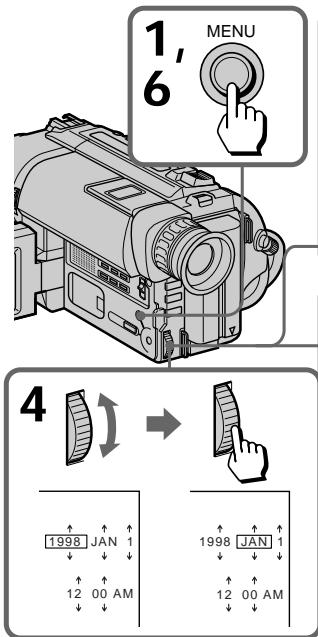
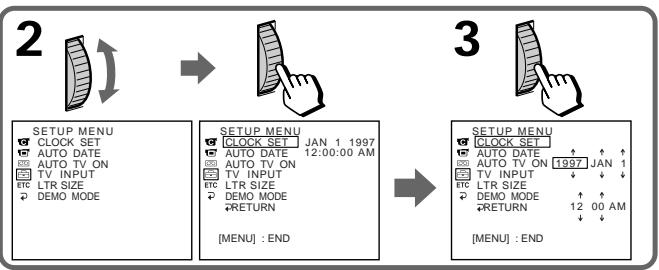
You can reset the date and time in the menu system.
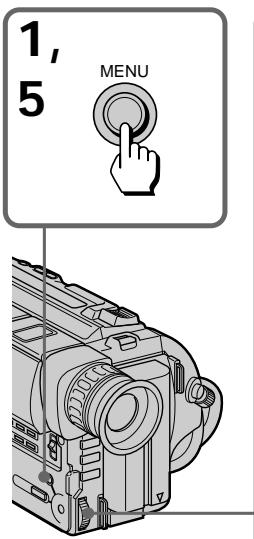
(1) While the camcorder is in Standby mode, press MENU to display the menu.
(2) Turn the control dial to select , then press the dial.
(3) Turn the control dial to select CLOCK SET, then press the dial.
(4) Turn the control dial to adjust the desired year, then press the dial.
(5) Set the month, day, hour and minute by turning the control dial and pressing the dial.
(6) Press MENU to erase the menu display.
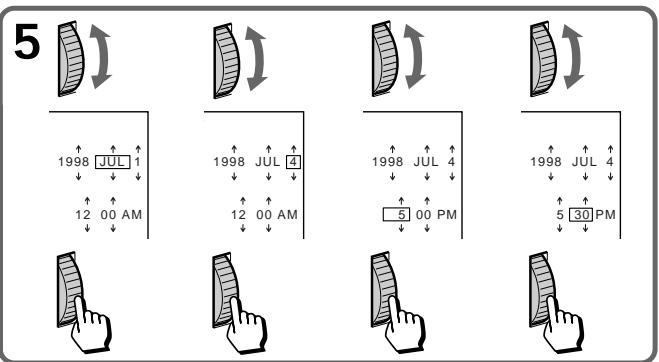
To correct the date and time setting
Repeat the above procedure.
To check the preset date and time
Press DATE to display the date indicator.
Press TIME to display the time indicator.
When you press the same button again, the indicator goes off.
The year changes as follows:

Note on the time indicator
The internal clock of this camcorder operates on a 12-hour cycle.
12:00 AM stands for midnight.
12:00 PM stands for noon.
Simple setting of clock by time difference
You can easily set the clock for a local time by a time difference in the menu system.
(1) While the camcorder is the standby mode, press MENU to display the menu.
(2) Turn the control dial to select ETC, then press the dial.
(3) Turn the control dial to select WORLD TIME, then press the dial.
(4) Turn the control dial to set a time difference, and press the dial. The hour of clock changes in relation to a time difference which you set.
(5) Press MENU to erase the menu display.
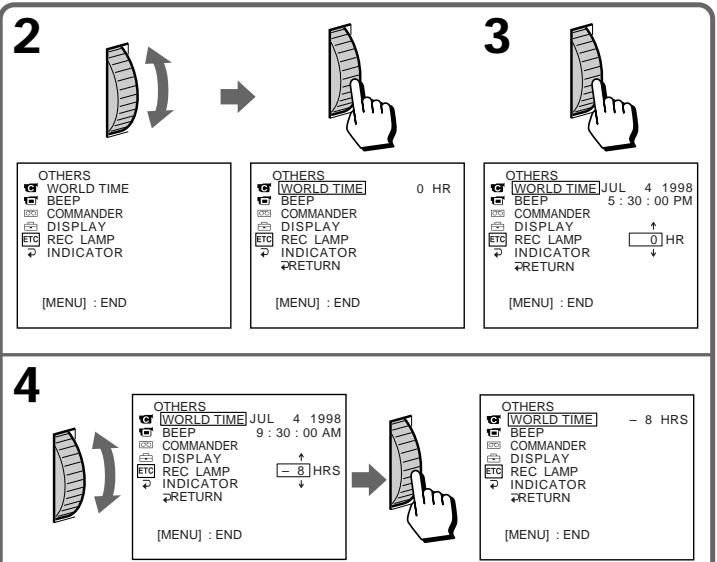
Note on WORLD TIME
If the time is not set, WORLD TIME does not work.
Selecting cassette types
- CCD-TRV65/TRV615 only
This Hi8 system is an extension of the standard 8mm system, and was developed to realize higher picture quality.
You can use either Hi8 or standard 8 mm video cassette for this camera. When you use a Hi8 video cassette, the recording is made in the Hi8 system. When you use a standard 8 mm video cassette, the recording is made in the standard 8 mm system. Standard 8 mm video cassette is incapable of recording in the Hi8 system.
If you intend to use a standard 8 mm video recorder/player to play back a video tape, you are required to use a standard 8 mm video cassette for recording.
What is video 8 XR/video Hi8 XR
"XR", that is an abbreviation of "Extended Resolution", represents the new type of 8 mm camcorder that has the property to realize more quality picture compared with the conventional camcorders including the Hi8 models. You can record and play back pictures more clearly in detail with the "XR" camcorder.
Video tape recorded by a camcorder having the "XR" function shows excellent picture quality at maximum when it is played back by the "XR" camcorder.
When video tape recorded by this "XR" camcorder is played back by a conventional 8/ Hi8 camcorder or when video tape recorded by a conventional 8/Hi8 camcorder is played back by this "XR" camcorder, the playback picture quality is in the normal quality of the 8/Hi8 camcorder.
When you play back
The playback mode (SP/LP) and system (Hi8/standard 8 mm) are selected automatically according to the format in which the tape has been recorded. The quality of the recorded picture in LP mode, however, will not be as good as that in SP mode.
Note on AFM HiFi stereo
- CCD-TRV65/TRV615 only
When you play back a tape, the sound will be in monaural if:
- You record the tape using this camcorder, then play it back on an AFM HiFi monaural video recorder/player.
- You record the tape on an AFM HiFi monaural video recorder, then play it back on this camcorder.
Foreign 8 mm video
Because the TV color systems differ from country to country, you may not be able to play back foreign pre-recorded tapes. Refer to the list of "Using your camcorder abroad" to check the TV color system of foreign countries.
Tips for using the battery pack
This section shows you how you can get the most out of your battery pack.
Preparing the battery pack
Always carry additional batteries
Have sufficient battery pack power to do 2 to 3 times as much recording as you have planned.
Battery life is shorter in a cold environment
Battery efficiency is decreased, and the battery will be used up more quickly, if you are recording in a cold environment.
To save battery power
Turn STANDBY down when not recording to save battery power.
A smooth transition between scenes can be made even if recording is stopped and started again. While you are positioning the subject, selecting an angle, or looking through the viewfinder lens or on the LCD screen, the lens moves automatically and the battery is used. The battery is also used when a tape is inserted or removed.
When to replace the battery pack
While you are using your camcorder, the remaining battery indicator decreases gradually as battery power is used up. Remaining time in minutes appears.

When the remaining battery indicator reaches the lowest point, the indicator may appear and start flashing in the viewfinder or on the LCD screen.
When the indicator changes from slow flashing to rapid flashing while you are recording, set the POWER switch to OFF on the camcorder and replace the battery pack. Leave the tape in the camcorder to obtain a smooth transition between scenes after the battery pack has been replaced.
Notes on the rechargeable battery pack
Caution
Never leave the battery pack in temperatures above 140^ (60^) , such as in a car parked in the sun or under direct sunlight.
The battery pack heats up
During charging or recording, the battery pack heats up. This is caused by energy that has been generated and a chemical change that has occurred inside the battery pack. This is not cause for concern and is normal.
Be sure to observe the following
- Keep the battery pack away from fire.
- Keep the battery pack dry.
- Do not open nor try to disassemble the battery pack.
- Do not expose the battery pack to any mechanical shock.
The life of the battery pack
If the battery indicator flashes rapidly just after turning on the camcorder with a fully charged battery pack, the battery pack should be replaced with a new fully charged one.
Charging temperature
You should charge batteries at temperatures from 50^ to 86^ (from 10^ to 30^ ). Lower temperatures require a longer charging time.
Notes on the "InfoLITHIUM" battery pack
What is "InfoLITHIUM"
The "InfoLITHIUM" is a lithium ion battery pack which can exchange data with compatible video equipment about its battery consumption. Sony recommends that you use the "InfoLITHIUM" battery pack with video equipment having the InfoLITHIUM mark.
When you use this battery pack with video equipment having the InfoLITHUM mark, the video equipment will indicate the remaining battery time in minutes*. However, if you use it with video equipment not having this mark, the remaining battery capacity will not be indicated in minutes.
"InfoLITHIUM" is a trademark of Sony Corporation.
- The indication may not be accurate depending on the condition and environment which the equipment is used under.
How the battery consumption is displayed
The power consumption of the camcorder changes depending on its use, such as how the autofocus is working.
While checking the condition of the camcorder, the "InfoLITHIUM" battery pack measures the battery consumption and calculates the remaining battery power. If the condition changed drastically, the remaining battery indication may suddenly decrease or increase by more than 2 minutes.
Even if 5 to 10 minutes is indicated as the battery remaining time on the LCD screen or in the viewfinder, the indicator may also flash under some condition.
To obtain more accurate remaining battery indication
Set the camcorder to recording standby mode and point towards a stationary object. Do not move the camcorder for 30 seconds or more.
- If the indication seems incorrect, recharge the battery pack fully (Full charge ^1 ). Note that if you have used the battery in a hot or cold environment for long time, or you have repeated charging many times, the battery pack may not be able to show the correct time even after being fully charged.
- After you have used the "InfoLITHIUM" battery pack with an equipment not having the H InfoLITHIUM mark, make sure that you use up the battery pack on the equipment having the H InfoLITHIUM mark and then recharge fully.
Why the remaining battery indication does not match the continuous recording time in the operating instructions
The recording time is affected by the environmental temperature and conditions. The recording time becomes very short in a cold environment. The continuous recording time in the operating instructions is measured under the condition of using a fully charged (or normal charged) battery pack in 77^ (25^) . As the environmental temperature and condition are different when you actually use the camcorder, the remaining battery time is not same as the continuous recording time in the operating instructions.
Notes on the battery case
- CCD-TRV15/TRV25/TRV35/TRV65 only
- Use only with alkaline batteries. You cannot use the battery case with manganese batteries or size AA (LR6) rechargeable NiCd batteries.
- Using with Sony alkaline batteries is preferable.
- Battery life is remarkably shorter in a cold environment (lower than 50^ / 10^ ).
- Keep the metal part clean. If it gets dirty, wipe it with a soft cloth.
- Do not disassemble or convert the battery case.
- Do not expose the battery case to any mechanical shock.
- During recording, the battery case heats up. This is not cause for concern.
- Prevent the electrode in the battery case from coming in contact with a metal object.
- If you will not use the battery case for a long time, detach the battery case from the camcorder and remove the batteries from the battery case.
Moisture condensation
If the camcorder is brought directly from a cold place to a warm place, moisture may condense inside the camcorder, on the surface of the tape, or on the lens. In this condition, the tape may stick to the head drum and be damaged or the unit may not operate correctly. To prevent possible damage under these circumstances, the camcorder is furnished with moisture sensors. Please, take the following precautions.
Inside the camcorder
If there is moisture inside the camcorder, the beep sounds and the indicator flashes. If this happens, none of the functions except cassette ejection will work. Open the cassette compartment, turn off the camcorder, and leave it about 1 hour. When indicator flashes at the same time, the cassette is inserted in the camcorder. Eject the cassette, turn off the camcorder, and leave also the cassette about 1 hour. The camcorder can be used again if the indicator does not appear when the power is turned on again.
On the lens
If moisture condenses on the lens, no indicator appears, but the picture becomes dim.
Turn off the power and do not use the camcorder for about 1 hour.
How to prevent moisture condensation
When bringing the camcorder from a cold place to a warm place, put the camcorder in a plastic bag and allow it to adapt to room conditions over a period of time.
(1) Be sure to tightly seal the plastic bag containing the camcorder.
(2) Remove the bag when the air temperature inside it has reached the temperature surrounding it (after about 1 hour).
Video head cleaning
To ensure normal recording and clear pictures, clean the video heads. When the indicator and "CLEANING CASSETTE" message appear one after another or playback pictures are "noisy" or hardly visible, the video heads may be dirty.
[a]
[b]
[a] Slightly dirty
[b] Very dirty
If this happens, clean the video heads with the Sony V8-25CLH/V8-25CLD cleaning cassette (not supplied). After checking the picture, if it is still "noisy," repeat the cleaning. (Do not repeat cleaning more than 5 times in one session.)
Caution
Do not use a commercially available wet-type cleaning cassette. It may damage the video heads.
Note
If the Sony V8-25CLH/V8-25CLD cleaning cassette is not available in your area, consult your nearest Sony dealer.
Removing dust from inside the viewfinder
(1) Remove the screw with a screwdriver (not supplied). Then, while sliding the RELEASE knob, turn the eyecup in the direction of the arrow and pull it out.
(2) Clean the surface with a commercially available blower.
1
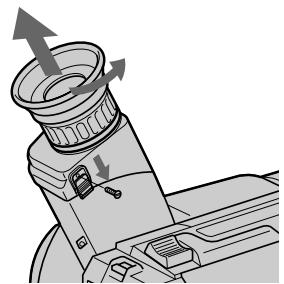
2
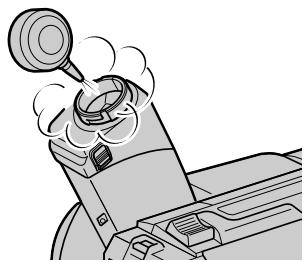
To reattach the eyecup
(1) Align the groove on the eyecup with the · mark on the barrel.
(2) Turn the eyecup in the direction of the arrow. Then replace the screw.
1
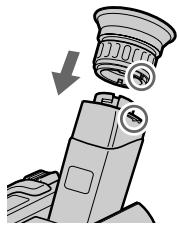
2
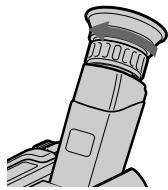
Caution
Do not remove any other screws. You may remove only the screw to remove the eyecup.
Precautions
Camcorder operation
- Operate the camcorder on 7.2V (battery pack) or 8.4V (AC power adaptor).
- For DC or AC operation, use the accessories recommended in this manual.
- Should any solid object or liquid get inside the casing, unplug the camcorder and have it checked by a Sony dealer before operating it any further.
- Avoid rough handling or mechanical shock. Be particularly careful of the lens.
- Keep the POWER switch setting to OFF when not using the camcorder.
- Do not wrap up the camcorder and operate it since heat may build up internally.
- Keep the camcorder away from strong magnetic fields or mechanical vibration.
- Do not push the LCD screen.
- If the camcorder is used in a cold place, a residual image may appear on the LCD screen. This is not a malfunction.
- While using the camcorder, the back of the LCD screen may heat up. This is not a malfunction.
On handling tapes
Do not insert anything in the small holes on the rear of the cassette. These holes are used to sense the type of tape, thickness of tape and if the recording tab is in or out.
Camcorder care
- When the camcorder is not to be used for a long time, remove the tape. Periodically turn on the power, operate the camera and player sections and play back a tape for about 3 minutes.
- If fingerprints or debris make the LCD screen dirty, we recommend using a LCD Cleaning Kit (not supplied) to clean the LCD screen.
- Clean the lens with a soft brush to remove dust. If there are fingerprints on it, remove them with a soft cloth.
- Clean the camcorder body with a dry soft cloth, or a soft cloth lightly moistened with a mild detergent solution. Do not use any type of solvent which may damage the finish.
- Do not let sand get into the camcorder. When you use the camcorder on a sandy beach or in a dusty place, protect it from the sand or dust. Sand or dust may cause the unit to malfunction, and sometimes this malfunction cannot be repaired.
AC power adaptor
- Unplug the unit from the wall outlet when not in use for a long time. To disconnect the power cord, pull it out by the plug. Never pull the power cord itself.
- Do not operate the unit with a damaged cord or if the unit has been dropped or damaged.
- Do not bend the power cord forcibly, or put a heavy object on it. This will damage the cord and may cause a fire or electrical shock.
- Be sure that nothing metallic comes into contact with the metal parts of the connecting plate. If this happens, a short may occur and the unit may be damaged.
- Always keep the metal contacts clean.
- Do not disassemble the unit.
- Do not apply mechanical shock or drop the unit.
- While the unit is in use, particularly during charging, keep it away from AM receivers and video equipment because it will disturb AM reception and video operation.
- The unit becomes warm while in use. This is normal.
-
Do not place the unit in locations that are:
-
Extremely hot or cold
Dusty or dirty - Very humid
Vibrating
Notes on dry batteries
To avoid possible damage from battery leakage or corrosion, observe the following.
- Be sure to insert the batteries in the correct direction.
- Dry batteries are not rechargeable.
- Do not use a combination of new and old batteries.
- Do not use different types of batteries.
- The batteries slowly discharge while not in use.
- Do not use a battery that is leaking.
If battery leakage occurred
- Wipe off the liquid in the battery case carefully before replacing the batteries.
- If you touch the liquid, wash it off with water.
- If the liquid get into your eyes, wash your eyes with a lot of water and then consult a doctor.
If any difficulty should arise, unplug the unit and contact your nearest Sony dealer.
Using your camcorder abroad
Each country or area has its own electric and TV color systems. Before using your camcorder abroad, check the following points.
Power sources
You can use your camcorder in any country or area with the supplied AC power adaptor within 100V to 240V AC, 50 / 60Hz . Use a commercially available AC plug adaptor [a], if necessary, depending on the design of the wall outlet [b].

Difference in color systems
This camcorder is an NTSC system based camcorder. If you want to view the playback picture on a TV, it must be an NTSC system based TV.
Check the following list.
NTSC system
Bahama Islands, Bolivia, Canada, Central America, Chile, Colombia, Ecuador, Jamaica, Japan, Korea, Mexico, Peru, Surinam, Taiwan, the Philippines, the U.S.A., Venezuela, etc.
PAL system
Australia, Austria, Belgium, China, Czech Republic, Denmark, Finland, Germany, Great Britain, Holland, Hong Kong, Italy, Kuwait, Malaysia, New Zealand, Norway, Portugal, Singapore, Slovak Republic, Spain, Sweden, Switzerland, Thailand, etc.
PAL-M system
Brazil
PAL-N system
Argentina, Paraguay, Uruguay
SECAM system
Bulgaria, France, Guyana, Hungary, Iran, Iraq, Monaco, Poland, Russia, Ukraine, etc.
If you run into any problem using the camcorder, use the following table to troubleshoot the problem. Should the difficulty persist, disconnect the power source and contact your Sony dealer or local authorized Sony service facility.
Camcorder
Power
| Symptom | Cause and/or Corrective Actions |
| The power is not on. | ·The battery pack is not installed. →Install the battery pack. (p. 7) ·The battery is dead. →Use a charged battery pack. (p. 8) ·The AC power adaptor is not connected to a wall outlet. →Connect the AC power adaptor to a wall outlet. (p. 26) |
| The power goes off. | ·While being operated in CAMERA mode, the camcorder has been in Standby mode for more than 5 minutes. →Turn STANDBY down once and then up again. (p. 13) ·The battery is dead. →Use a charged battery pack. (p. 8) |
| The battery pack is quickly discharged. | ·The camcorder does not operate when using a battery pack that is not an “InfoLITHIUM” battery pack. →Use an “InfoLITHIUM” battery pack. (p. 66) ·The ambient temperature is too low. (p. 64) ·The battery pack has not been charged fully. →Charge the battery pack again. (p. 8) ·The battery pack is completely dead, and cannot be recharged. →Use another battery pack. (p. 65) |
| While charging the battery pack, no indicator appears or the indicator flashes in the display window. | ·The AC power adaptor is disconnected. →Connect it firmly. ·Something is wrong with the battery pack. →Contact your Sony dealer or local authorized Sony service facility. |
| The camcorder turns on/off when using the accessory which is attached to the intelligent accessory shoe. (CCD-TRV65/TRV615 only) | ·The camcorder is working with the AC power adaptor. →Use the battery pack. |
Operation
| Symptom | Cause and/or Corrective Actions |
| START/STOP does not operate. | ·The tape is stuck to the drum. →Eject the tape. (p. 12) ·The tape has run out. →Rewind the tape or use a new one. (p. 22) ·The POWER switch is set to VTR/PLAYER. →Set it to CAMERA. (p. 13) ·The tab on the cassette is out (red). →Use a new tape or slide the tab. (p. 12) |
(to be continued)
| Symptom | Cause and/or Corrective Actions |
| Recording stops in a few seconds. | ·The START/STOP MODE switch is set to 5SEC or ↓ . →Set it to ↓ . (p. 16) |
| The cassette cannot be removed from the holder. | ·The battery is dead. →Use a charged battery pack or the AC power adaptor. (p. 8, 26) |
| □and ▲indicators flash and no function except for cassette ejection works. | ·Moisture condensation has occurred. →Remove the cassette and leave the camcorder for at least 1 hour. (p. 67) |
| The date or time indicator is flashing. | ·You pressed DATE and TIME together for more than 2 seconds. →The camcorder is not malfunctioning. You may start recording. Flashing will stop soon. ·The lithium battery is weak or dead. →Replace the lithium battery with a new one. (p. 59) |
| The tape does not move when a video control button is pressed. | ·The POWER switch is set to CAMERA or OFF. →Set it to VTR/PLAYER. ·The tape has run out. →Rewind the tape or use a new one. (p. 22) |
| The Steady Shot function does not activate. (CCD-TRV25/TRV35/TRV65/TRV215/TRV315/TRV615 only) | ·STEADYSHOT is set to OFF. →Set it to ON. (p. 53) ·The Steady Shot function does not work when the wide mode is set to 16:9 FULL. |
| The autofocus function does not work. (CCD-TRV35/TRV65/TRV315/TRV615 only) | ·FOCUS is set to MANUAL. →Set it to AUTO. (p. 43) ·Shooting conditions are not suitable for autofocus. →Set FOCUS to MANUAL to focus manually. (p. 43) |
| The fader function does not work. (CCD-TRV35/TRV65/TRV315/TRV615 only) | ·The START/STOP MODE switch is set to 5SEC or ↓ . →Set it to ↓ . (p. 16) |
| No sound or only a low sound is heard when playing back a tape. (CCD-TRV65/TRV615 only) | ·The stereo tape is played back with HiFi SOUND set to 1 or 2 in the menu system. →Set to STEREO in the menu system. (p. 33) |
| Excessive high-pitched sound is heard. (CCD-TRV65/TRV615 only) | ·The picture has been recorded with WIND set to ON in the menu system. →When there is no wind, set it to OFF. (p. 31) |
| The date or time indicator disappears. | ·Reset the date and time. (p. 61) |
Picture
| Symptom | Cause and/or Corrective Actions |
| The image on the viewfinder screen is not clear. | · The viewfinder lens is not adjusted. → Adjust the viewfinder lens. (p. 14) |
| A vertical band appears when a subject such as lights or a candle flame is shot against a dark background. | The contrast between the subject and background is too high. The camcorder is not malfunctioning. → Change locations. |
| A vertical band appears when shooting a very bright subject. | The camcorder is not malfunctioning. |
| The playback picture is not clear. | EDIT is set to ON in the menu system. → Set it to OFF. (p. 33) |
| The picture is “noisy”. | The video heads may be dirty. → Clean the heads using the Sony V8-25CLH/V8-25CLD cleaning cassette (not supplied). (p. 68) |
| The picture does not appear in the viewfinder. | The LCD panel is open. → Close the LCD panel. (p. 17) |
| An unknown picture is displayed in the viewfinder or on the LCD screen. | If 10 minutes elapse after you set the POWER switch to CAMERA without inserting a cassette, the camcorder automatically starts the demonstration or DEMO is set ON in the menu system. → Insert the cassette and the demonstration stops. You can deactivate the demonstration. (p. 32) |
| The picture does not appear on the LCD screen. | Incorporated fluorescent tube is worn out. → Please contact your nearest Sony dealer. |
| The five digit code appears. | The self-diagnosis function is activated. → Check the code and solve the problem. (p. 76) |
| Picture is recorded in incorrect/unnatural color. (CCD-TRV35/TRV65/TRV315/TRV615 only) | NIGHTSHOT is set to ON. → Set it to OFF. (p. 37) |
Others
| Symptom | Cause and/or Corrective Actions |
| The supplied Remote Commander does not work. | ·COMMANDER is set to OFF in the menu system. →Set it to ON. (p. 31) ·Something is blocking the infrared rays. →Remove the obstacle. ·The batteries are not inserted with the correct polarity. →Insert the batteries with the correct polarity. (p. 85) ·The batteries are dead. →Insert new ones. (p. 85) |
| The picture from a TV or VCR does not appear even when the camcorder is connected to outputs on the TV or VCR. (CCD-TRV65/TRV615 only) | ·DISPLAY is set to V-OUT/LCD in the menu system. →Set it to LCD. (p. 31) |
| The beep sounds for 5 seconds. | ·Moisture condensation has occurred. →Remove the cassette and leave the camcorder for at least 1 hour. (p. 67) ·Some troubles occur in your camcorder. →Remove the cassette and insert it again, then operate the camcorder. |
The camcorder has a self-diagnosis display.
This function displays the camcorder's condition with five digits (a combination of a letter and figures) in the viewfinder, on the LCD screen or in the display window. If this occurs, check the following code chart. The five-digit display informs you of the camcorder's current condition. The last two digits (indicated by ) will differ depending on the state of the camcorder.
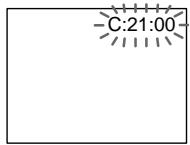
LCD screen
Self-diagnosis display
C:□□:□□
You can service the camcorder yourself.
E:□□:□□
Contact your Sony dealer or local authorized Sony facility.
| Five-digit display | Cause and/or Corrective Actions |
| C:21:□□ | ·Moisture condensation has occurred. →Remove the cassette and leave the camcorder for at least 1 hour. (p. 67) |
| C:22:□□ | ·The video heads are dirty. →Clean the heads using the Sony V8-25CLH/V8-25CLD cleaning cassette (not supplied). (p. 68) |
| C:23:□□ | ·You are using a battery pack that is not an “InfoLITHIUM” battery pack. →Use an “InfoLITHIUM” battery pack. (p. 66) |
| C:31:□□ | ·A servicable situation not malfunctioned above has occurred. |
| C:32:□□ | ·Remove the cassette and insert it again, then operate the camcorder. →Disconnect the power cord of the AC power adaptor or remove the battery pack. After reconnecting the power source, operate the camcorder. |
| E:61:□□ | ·A camcorder malfunction which you cannot service has occurred. |
| E:62:□□ | →Contact your Sony dealer or local authorized Sony service facility and inform them of the five digits. (example: E:61:10) |
If you are unable to resolve the problem, contact your Sony dealer or local authorized Sony service facility.
Video camera recorder
System
Video recording system
CCD-TRV65/TRV615:
4 rotary heads
(SP/LP independent heads)
Helical scanning FM system
Audio recording system
Rotary heads, FM system
Video signal
NTSC color, EIA standards
Usable cassette
8mm video format cassette
Recording / Playback time (using
120 min. cassette)
SP mode: 2 hours
LP mode: 4 hours
Fastforward/rewind time (using
120 min. cassette)
Approx. 5 min.
Image device
CCD (Charge Coupled Device)
Viewfinder
Electronic viewfinder
Monochrome
Lens
Combined power zoom lens
Filter diameter 1 7/16 in. (37 mm)
CCD-TRV15/TRV25/TRV215:
16 x (Optical), 64 x (Digital)
3/16 - 25/8 in. (4.1 - 65.6 mm)
3/16 - 8 in. (4.1 - 73.8 mm)
When converted to a 35mm still camera
CCD-TRV15:
1 9/16 - 24 7/8 in. (39.4 - 630 mm)
CCD-TRV25/TRV215:
178-293/4 in. (47.2 - 755mm)
CCD-TRV35/TRV65/TRV315/TRV615:
178-33 1/2 in. (47.2 - 850mm)
Color temperature
Auto
Minimum illumination
CCD-TRV15:0.4 lux (F 1.4)
CCD-TRV25/TRV35/TRV65/
TRV215/TRV315/TRV615:
0.7 lux (F 1.4)
0 lux (in NightShot mode)*
- Object invisible for the dark can be shot with infrared lighting.
Illumination range
CCD-TRV15:
0.4 lux to 100,000 lux
CCD-TRV25/TRV35/TRV65/
TRV215/TRV315/TRV615:
0.7 lux to 100,000 lux
Recommended illumination
More than 100 lux
LCD screen
Picture
2.5 inches measured diagonally
2 x 1 1/2 in. (50.3 x 37.4 mm)
On-screen display
TN LCD/TFT active matrix
method
Total dot number
61,380 (279× 220)
Input and output connectors
S video input/output
(CCD-TRV65/TRV615 only)
4-pin mini DIN
Luminance signal: 1 Vp-p, 75
ohms, unbalanced
Chrominance signal: 0.286 Vp-p,
75 ohms, unbalanced
Video input (CCD-TRV65/TRV615
only)/output
Phono jack, 1 Vp-p, 75 ohms, unbalanced
Audio input (CCD-TRV65/TRV615
only)/output
47 kilohms) impedance less than
2.2 kilohms
RFU DC OUT
Special minijack, DC 5V
Headphone jack (CCD-TRV65/
TRV615 only)
Stereo minijack ( 3.5mm)
Earphone jack (CCD-TRV15/
TRV25/TRV35/TRV215/TRV315
only)
Monaural minijack ( 3.5mm)
LANC control jack
Stereo mini-minijack ( 2.5mm)
MIC jack
Minijack, 0.388mV low impedance
with 2.5 to 3.0VDC output
impedance 6.8 kilohms ( 3.5mm)
Intelligent accessory shoe
(CCD-TRV65/TRV615 only)
8-pin connector
(to be continued)
General
Power requirements
7.2 V (battery pack)
8.4 V (AC power adaptor)
Average power consumption (when using the battery pack
During camera recording using LCD
CCD-TRV15:3.1 W
CCD-TRV25/TRV35/TRV215/
TRV315: 3.2 W
Operating temperature
32^ to 104^ (0^ to 40^)
Storage temperature
-4^ to +140^ (-20^ to +60^)
Dimensions (Approx.)
4 1/4 x 4 1/4 x 8 1/4 in.
(107× 107× 209mm) (w / h / d)
Mass (Approx.)
CCD-TRV15/TRV25/TRV215:1 lb
15 oz (890 g)
excluding the battery pack, lithium
battery, cassette and shoulder
wrap
2 lb 3 oz (1 kg)
including the battery pack NP
F330, lithium battery CR2025,
cassette and shoulder strap
Microphone
Supplied accessories
See page 6.
AC power adaptor
Power requirements
100-240VAC,50/60Hz
Power consumption
23 W
Output voltage
DC OUT: 8.4V 1.5 A in operating mode
Operating temperature
32^ to 104^ (0^ to 40^)
Storage temperature
-4^ to +140^ (-20^ to +60^)
Dimensions (Approx.)
5 × 19 / 16 × 21 / 2 in. (125 x 39 x 62
mm) (w / h / d) excluding
projecting parts
Mass (Approx.)
9.8 oz (280g) excluding power
cord
Design and specifications are
subject to change without notice.

1 EDITSEARCH button (p. 21)
2 LASER LINK button (CCD-TRV35/TRV65/TRV315/TRV615 only) (p. 56)
Intelligent accessory shoe (CCD-TRV65/TRV615 only) (p. 80) / Accessory shoe (CCD-TRV35/TRV315 only)
4 Lens cover
5 POWER switch (p. 13)
6 FOCUS switch (CCD-TRV35/TRV65/TRV315/TRV615 only) (p. 43)
NEAR/FAR dial (CCD-TRV35/TRV65/TRV315/TRV615 only) (p. 43)
Video control buttons (p. 22)
STOP (stop)
REW (rewind)
PLAY (playback)
FF (fastforward)
PAUSE (pause)
REC (recording) (CCD-TRV65/TRV615 only)
9 Power zoom lever (p. 15)
10 NIGHTSHOT switch (CCD-TRV35/TRV65/TRV315/TRV615 only) (p. 37)
11 Display window (p. 86)
12 FADER button (CCD-TRV35/TRV65/TRV315/TRV615 only) (p. 36)
Tripod receptacle (p. 20) Make sure that the length of the tripod screw is less than 9 / 32 inch (6.5mm) otherwise, you cannot attach the tripod securely and the screw may damage the camcorder.
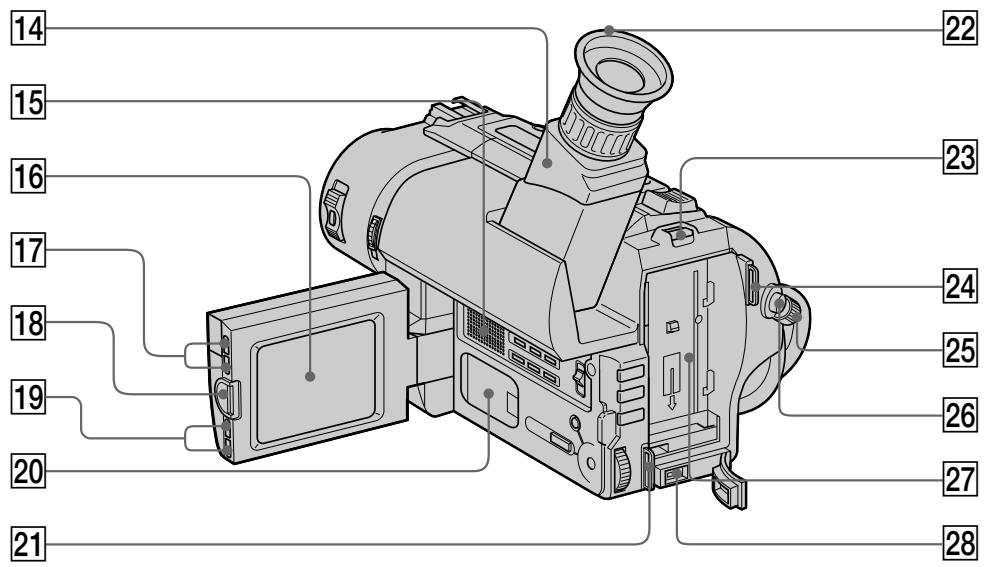
Viewfinder (p. 14)
15 Speaker (p. 23)
16 LCD screen (p. 17)
17 LCD BRIGHT buttons (p. 17)
18 OPEN button (p. 16)
19 VOLUME buttons (p. 22)
20 Lithium battery compartment (p. 60)
21 Hook for shoulder strap (p. 85)
22 Eyecup
23 BATT RELEASE lever (p. 7, 11)
24 Hook for shoulder strap (p. 85)
25 STANDBY switch (p. 13)
26 START/STOP button (p. 13)
27 Battery mounting surface
28 DC IN jack (p. 8, 26)
Note on the intelligent accessory shoe -CCD-TRV65/TRV615 only
Supplies power to optional accessories such as a video light or microphone. The intelligent accessory shoe is linked to the STANDBY switch, allowing you to turn on and off the power supplied by the shoe. Refer to the instruction manual of the accessory for further information. To connect an accessory, press down and push it to the end, and then tighten the screw. To remove an accessory, loosen the screw, and then press down and pull out the accessory.
If the camcorder does not work correctly with using the AC power adaptor, use the battery pack.
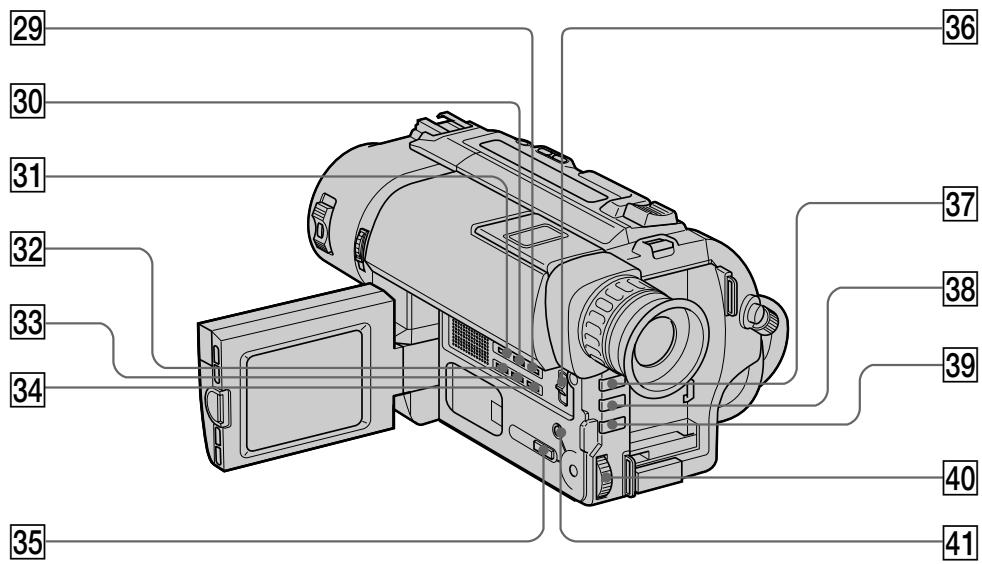
ouonnnn nn nnnnnnnn
29 COUNTER RESET button (p. 14)
30 TIME button (p. 51)
31 DATE button (p. 51)
32 DISPLAY button (p. 23)
33 TITLE button (p. 48)
34 END SEARCH button (p. 25)
35 PICTURE EFFECT button (p. 45)
36 START/STOP MODE switch (p. 16)
37 BACK LIGHT button (p. 34)
38 PROGRAM AE button (p. 41)
39 EXPOSURE button (CCD-TRV35/TRV65/TRV315/TRV615 only) (p. 46)
40 Control dial (p. 29)
41 MENU button (p. 29)
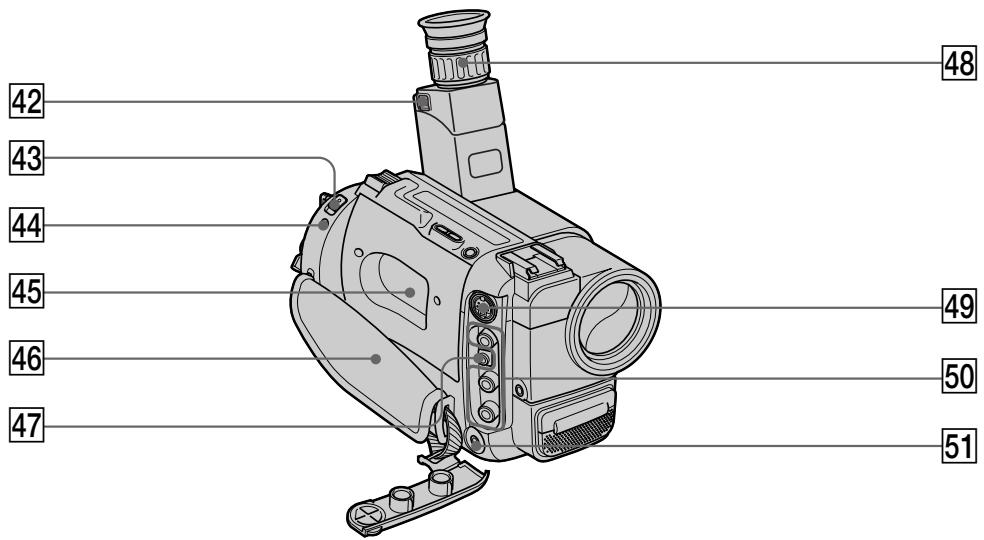
42 Eyecup RELEASE knob (p. 69)
43 EJECT switch (p. 12)
44 LANC control jack stands for Local Application Control Bus System. The control jack is used for controlling the tape transport of video equipment and peripherals connected to it. This jack has the same function as the jack indicated as CONTROL L or REMOTE.
45 Cassette compartment (p. 12)
46 Grip strap (p. 19)
47 RFU DC OUT (RFU adaptor DC output) jack (p. 55)
48 Viewfinder lens adjustment ring (p. 14)
49 SVIDEO jack (CCD-TRV65/TRV615 only) (p. 55)
VIDEO/AUDIO jacks (p. 54)
51 (headphones) jack (CCD-TRV65/TRV615 only) (p. 23) /② (earphone) jack (CCD-TRV15/TRV25/TRV35/TRV215/TRV315 only) (p. 23)
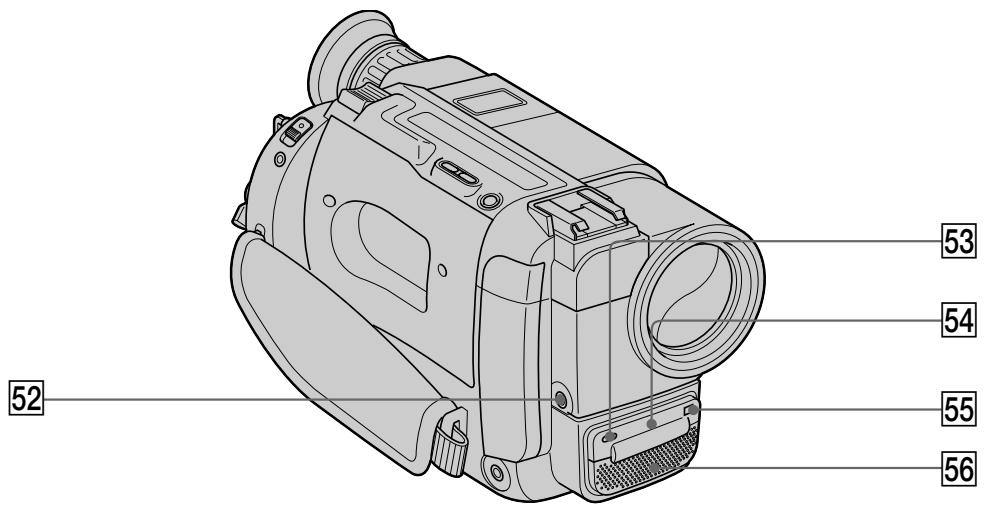
52 MIC jack (PLUG IN POWER)
Connect an external microphone (not supplied). This jack also accepts a "plug-in-power" microphone.
53 Camera recording/battery lamp (p. 13)
54 LASER LINK emitter (CCD-TRV35/
TRV65/TRV315/TRV615 only) (p. 56)/
NightShot Light emitter (CCD-TRV35/
TRV65/TRV315/TRV615 only) (p. 37)
55 Remote sensor (p. 84)
Aim the Remote Commander here for remote control.
56 Microphone
To watch the demonstration
You can start the demonstration by setting DEMO MODE in the menu system.
You can also start the demonstration by the following operation.
When NIGHTSHOT is set to ON, you cannot watch the demonstration (CCD-TRV35/ TRV65/TRV315/TRV615 only).
To enter demo mode
(1) Eject the cassette and set the POWER switch to VTR/PLAYER.
(2) Turn STANDBY up to STANDBY.
(3) While holding down set the POWER switch to CAMERA.
To exit demo mode
(1) Set the POWER switch to VTR/PLAYER.
(2) Turn STANDBY up to STANDBY.
(3) While holding down set the POWER switch to CAMERA.
Remote Commander
The buttons that have the same name on the Remote Commander as on the camcorder function identically.
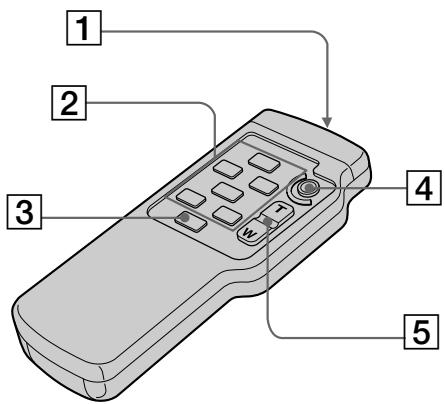
1 Transmitter
Point toward the remote sensor to control the camcorder after turning on the camcorder.
3 DISPLAY button (p. 23)
4 START/STOP button (p. 13)
5 Power zoom button (p. 15)
2 Video control buttons (p. 22)
Notes on the Remote Commander
- Keep the remote sensor away from strong light sources such as direct sunlight or illumination. Otherwise, the remote control may not be effective.
- Be sure that there is no obstacle between the remote sensor on the camcorder and the Remote Commander.
- This camcorder works in commander mode VTR 2. The commander modes (1, 2 and 3) are used to distinguish this camcorder from other Sony VCRs to avoid remote control misoperation. If you use another Sony VCR in commander mode VTR 2, we recommend you change the commander mode or cover the remote sensor of the VCR with black paper.
To prepare the Remote Commander
Insert two size AA (R6) batteries by matching the + and - on the batteries to the diagram inside the battery compartment.
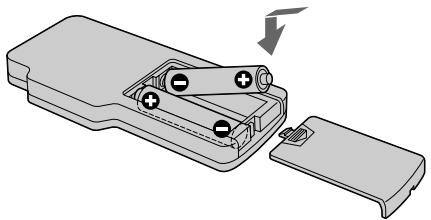
Note on battery life
The batteries for the Remote Commander last about 6 months under normal operation.
When the batteries become weak or dead, the Remote Commander does not work.
To avoid damage from possible battery leakage
Remove the batteries when you will not use the Remote Commander for a long time.
Attaching the shoulder strap
Attach the supplied shoulder strap to the hooks for the shoulder strap.
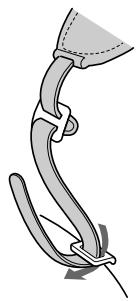
1
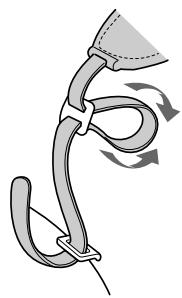
2
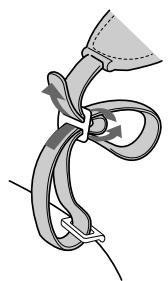
3
Operation indicators
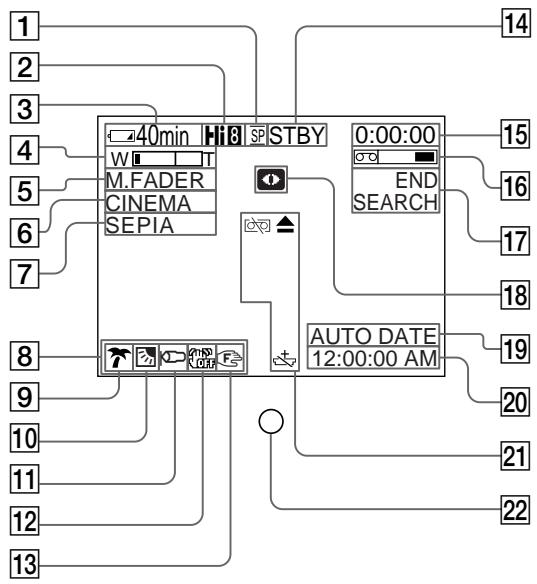
Viewfinder
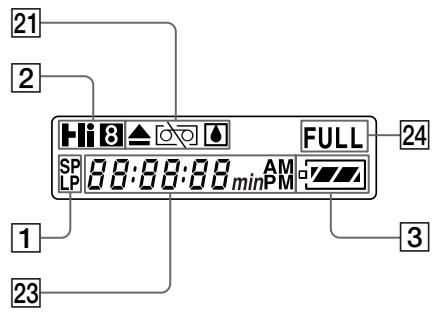
Display window
1 Recording mode indicator (p. 30)/ Mirror mode indicator (p. 18)
2 Playing back or recording in Hi8 format (CCD-TRV65/TRV615 only) (p. 63)
3 Remaining battery time indicator
4 Exposure indicator (CCD-TRV35/ TRV65/TRV315/TRV615 only) (p. 46)/ Zoom indicator (p. 15)
5 FADER indicator (CCD-TRV35/TRV65/TRV315/TRV615 only) (p. 36)
6 Wide mode indicator (p. 39)
7 PICTURE EFFECT indicator (p. 45)
8 LCD BRIGHT indicator (p. 17) / VOLUME indicator (p. 22)
9 PROGRAM AE indicator (p. 40)
10 Backlight indicator (p. 34)
11 WIND indicator (CCD-TRV65/TRV615 only) (p. 31)
12 Steady Shot off indicator (CCD-TRV25/TRV35/TRV65/TRV215/TRV315/TRV615 only) (p. 53)
13 Manual focusing (CCD-TRV35/TRV65/TRV315/TRV615 only) (p. 43)
14 Video control mode (p. 13)
15 Tape counter (p. 14)/Self-diagnosis functions indicator (p. 76)/5SEC mode indicator (p. 16)
16 Remaining tape indicator

17 END SEARCH indicator (p. 25)
18 NIGHTSHOT indicator (CCD-TRV35/ TRV65/TRV315/TRV615 only) (p. 37)
19 AUTO DATE indicator (p. 13)/Date indicator (p. 51)
20 Time indicator (p. 51)
21 Warning indicators (p. 87)
22 Recording lamp (p. 13)
23 Date or time indicator (p. 51)/Tape counter indicator (p. 14)/Self-diagnosis functions indicator (p. 76)/Remaining battery time indicator
24 FULL charge indicator (p. 8)
If indicators flash in the viewfinder or in the display window, check the following: ... : you can hear the beep sound when the BEEP is set to ON.
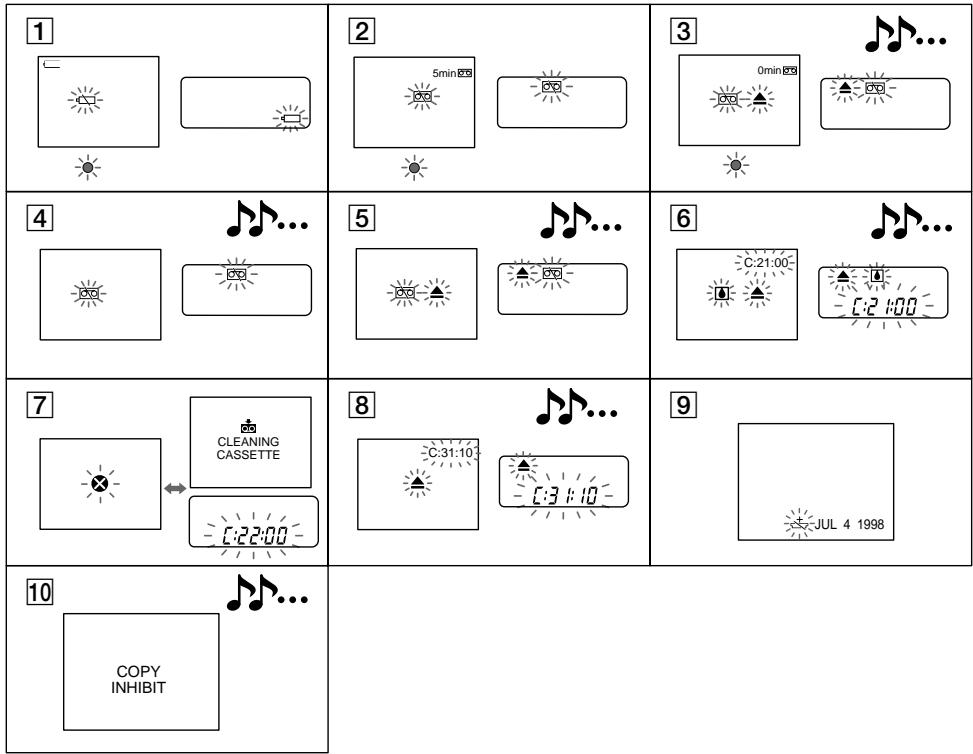
1 The battery is weak or dead. Slow flashing: The battery is weak. Fast flashing: The battery is dead.
The tape is near the end. The flashing is slow.
The tape has run out. The flashing becomes rapid.
4 No tape has been inserted.
5 The tab on the tape is out (red).
6 Moisture condensation has occurred.
The video heads may be contaminated.
Some other trouble has occurred. Use the self-diagnosis function (p. 76). If the display does not disappear contact your Sony dealer or local authorized Sony service facility.
9 The lithium battery is weak or is not installed.
10 You tried to record a picture that has a copyright control signal. (CCD-TRV65/TRV615 only) (P. 58)
Index
A,B
Adjusting viewfinder 14
AFM HiFi Sound 33,63
ANTI GROUND SHOOTING 16
Auto focus. 43
Backlight 34
Beep 14
C,D
Camera recording 13
Car battery 28
Charging battery 8
Cleaning video heads 68
Clock set 61
Connection 54
COUNTER RESET 14
DATE/TIME 51
DEMO. 32,83
Digital zoom 15
DISPLAY 23
DNR 33
E
EDIT 33
Editing 57
EDITSEARCH 21
END SEARCH 25
Exposure 46
F, G, H
FADER 35
House current 26
I, J, K, L
LANC 82
LASERLINK 56
Lithium battery 59
M, N
Manual focus 42
Menu system 29
MIC (microphone) jack 83
NIGHTSHOT 37
O, P
ORC 52
PICTURE EFFECT 44
Playback pause 24
Power sources 26
Power zoom. 15
PROGRAM AE. 40
Q,R
Rec review 21
Recording mode 30
Remote control jack (LANC) 82
Rewind 22
S
Self-diagnosis display 76
Shoulder strap 85
Skip scan 24
Standby mode 13
STEADY SHOT 53
T, U, V
Tape counter 14
TBC 33
Title 48
Tripod mounting 20
Trouble check 73
W,X,Y,Z
Watching on a TV 54
WIDE mode 38
WIND 31
WORLD TIME 62
Zoom 15