USER MANUAL CCD-TR640E SONY
Video Camera Recorder
Operating Instructions
Before operating the unit, please read this manual thoroughly, and retain it for future reference.
Congratulations on your purchase of this Sony Handycam® camcorder. With your Handycam you can capture life's precious moments with superior picture and sound quality.
Your Handycam is loaded with advanced features, but at the same time it is very easy to use. You will soon be producing home video that you can enjoy for years to come.
WARNING
To prevent fire or shock hazard, do not expose the unit to rain or moisture.
To avoid electrical shock, do not open the cabinet.
Refer servicing to qualified personnel only.
NOTICE ON THE SUPPLIED AC POWER ADAPTOR FOR CUSTOMERS IN THE UNITED KINGDOM
A moulded plug complying with BS1363 is fitted to this equipment for your safety and convenience.
Should the fuse in the plug supplied need to be replaced, a 5 AMP fuse approved by ASTA or BSI to BS1362 (i.e., marked with 艹 or mark) must be used.
If the plug supplied with this equipment has a detachable fuse cover, be sure to attach the fuse cover after you change the fuse. Never use the plug without the fuse cover. If you should lose the fuse cover, please contact your nearest Sony service station.
Pycckn
Добpo пожаловать!
Ioi3dpabnemBacCnpno6peTeHEmDaHHoB BnideokamepbHandycam@pnpmbiSony.C nmooubBoaew Bnideokamepb Handycam VisionBbcmoxete 3aneuatJeTbDoporneBaM MRHOBeHJXn3HNcPpeBOxCoNDbIMKaueCTBOM n3O6paXeHnN 3Byka.
BaHa BnDeokamepa Handycam Vision OChaueHa YCOBepWeHCTBOBaHHbIMN fYHKUAMN,HO BTO JKe BpEme ee OeyHeJLeKo IcNoIb3OBAtB. BCKope Bby6yTe Co3daBaTb CeMeHbIe BnDeOpPOrpaMMbl, KOToPbIMM MoKeTe HacnaXdAtpCBr NocneDyUOme rOdbI.
PNEyPPEKDEHNE
Using this manual. 5
Checking supplied accessories 7
Getting started
Installing and charging the battery pack 8
Inserting a cassette 13
Basic operations
Camera recording 14
Using the zoom feature 17
Selecting the START/STOP mode 19
Hints for better shooting 20
Checking the recorded picture 22
Connections for playback 24
Playing back a tape 26
Advanced operations
Using alternative power sources 31
Using the mains 32
Changing the mode settings 34
- for camera recording -
Shooting with backlighting 40
Using the FADER function (CCD-TR511E/ TR640E/TR840E/TR845E only) 41
Shooting in the dark (NightShot) (CCDTR511E/TR640E/TR840E/TR845E only) .... 44
Using the wide mode function 45
Using the PROGRAM AE function 47
Focusing manually (CCD-TR511E/TR640E/ TR840E/TR845E only) 49
Enjoying picture effect 51
Adjusting the exposure (CCD-TR511E/ TR640E/TR840E/TR845E only) 53
Superimposing a title 55
Making your own titles 57
Re-recording a picture in the middle of a recorded tape (CCD-TR845E only) 58
Recording with the date/time 60
Optimizing the recording condition 61
Releasing the STEADYSHOT function (CCDTR640E/TR840E/TR845E only) 62
- for playback/editing -
Searching the boundaries of recorded date (CCD-TR845E only) 63
Returning to a pre-registered position (CCD-TR845E only) 65
Locating the marking position (CCD-TR845E only) 66
Writing the RC time code on a recorded tape (CCD-TR845E only) 71
Editing onto another tape 73
Changing the lithium battery in the camcorder 74
Resetting the date and time. 76
Simple setting of clock by time difference 78
Usable cassettes and playback modes 79
Tips for using the battery pack. 81
Maintenance information and precautions..... 85
Using your camcorder abroad 91
Trouble check 92
Self-diagnosis display 98
Specifications 100
Identifying the parts. 104
Warning indicators 114
Index 115
Ipeed hauanom 3KcnIyataun
UcnoIb3OBAHne daHHoro pyKOBOdCTBa 5
PpOBepKa npnlaeraembix npHa,dIeJxHocTei... 7
Iodrotobka K 3KcnJyatauN
UcTaHObKa n 3apRJaKa 6aTapeHoro 6Ioka .... 8
BcTabka kaccetbl 13
OchOBhble onepaunn
3aHcB c nOoUb BnDeOKaMepbl 14
IcnoB3OBAHne cyHKnH Hae3da
Bndeokamepbl 17
Bb6op pexima START/STOP 19
CobetblIJIyUWei CbEMKn 20
PpOBepka 3aIncanHoro n3o6paXeHnra 22
CoeHHeHHI JI BOCnPOn3BeJeHHI 24
Bocnpoun3BeJeHne IeHTbI 26
YcoBepueHCTBOBaHHbIe Onpaun
IcnoIb3OBAHHe aIbTePhaTnBhBX IcTOUHNKOB nITaHnI 31
IcnoB3OBAHne 3eKtpnuecko cTeu 32
U3meHeHne yCTaHOBOK pexIMOB 34
-ДЯЗИСС NOMOUIBUNDEOKaMepbl -
CbeMa c 3aJHe IIOcBcTeKoI 40
IcnoB3OBAHne cyuHn FADER (ToJbKO CCD-TR511E/TR640E/TR840E/ TR845E) 41
CbEMKa B TEmhby xCNoBnAx (HouHaar CbEMKa) (ToJIbKO CCD-TR511E/TR640E/TR840E/ TR845E) 44
IcnoJIb3OBAHnE cyHKuIN uPOKoOpMaTHOrOpexkma 45
IcnoJIb3ObaHneФyHKqn PROGRAM AE.....47
Pуная Фокс neuropа (товko CCD-TR511E/ TR640E/TR840E/TR845E) 49
HacnaXdHeNt 306paKeHn ... 51
PeryunopBka 3Kcno3n(ToIbko CCD-TR511E/TR640E/TR840E/TR845E). 53
HaioxkeHne HaIpcn 55
Co3dHHe Baunx co6CTBeHHbIX HaDnncen... 57
Ipe3aIncb 306paXeHnB CpeDnHe 3aIncanHOnJIeHTbI (ToIbKO CCD-TR845E) 58
3aHnCb c daToB/BpeMeHem 60
OnTmuaaCocToHHa 3aHcN 61
OTKJIUOHeHneФyHKcIMN STEADYSHOT (ToJIbKO CCD-TR640E/TR840E/TR845E).... 62
-ДЯ BOCPON3BEdHRA/MONTAXA -
The instructions in this manual are for the six models listed below. Before you start reading this manual and operating the unit, check your model number by looking at the bottom of your camcorder. The CCD-TR845E is the model used for illustration purposes. Otherwise, the model name is indicated in the illustrations. Any differences in operation are clearly indicated in the text, for example, "CCD-TR845E only." As you read through this manual, buttons and settings on the camcorder are shown in capital letters.
e.g. Set the POWER switch to CAMERA. You can hear the beep sound to confirm your operation.
HnCTpyKunB D aHaHOM pyKOoDCTBe n3NoXeHbI
Jnla Wectn HxKepeuCneHbIX MoDeJe.
PiPeTem, KaK BBy hauHeTe YntaTb DaHooe
pyKOoDCTBO N 3KcNpyAtnpOBaTb Annapat,
PiOpBeRtomeP BaWei MoJeN, NoCMToPeb
Ha HxHHoO npHeB BaWei BnDeOkAmepbI.
MoJeB CCD-TR845E nCnoJIb3yETcB
HInIOCTpaTINbHbIX cEnJx.B IpOTUBHom Cnyae
haHMeHOBaHne MoJeN yKa3bIBaETcRa
pncyHKax. IIObIe pa3NIuN B pa6Ote Yetko
yKa3aHbI B TEKTe, KaK HanpIMep, "ToIbKO
CCD-TR845E".
KOrDa BBy 6yTeTe YnTaTB daHooe pyKOoDCTBO,
yUHTbBAIte, UTO KHNKn u YcTAHOBKn Ha
BnuDEOKaMEpe NOka3aHbI npONCHbIMn 6yKBAMn.
PiPM. UcTaHOBe BbIKNoUateJIb POWER B
noLOXeHne CAMERA.
BbM oKeTe CblShaTb 3ymMeHbN 3ByKOoB
cnrHaI dnn OndTbePckJeHnBaWe pa60TbI.
Types of differences
Tunbipa3JnHn
| CCD- | TR411E | TR412E | TR511E | TR640E | TR840E | TR845E |
| System/Cnstema | B | B | B | B | HiB | HiB |
| SVIDEO/SVIDEO | — | — | — | — | ● | ● |
| Optical zoom/OnTnueckn Tpahcφokatop | 16x | 16x | 18x | 18x | 18x | 18x |
| Digital zoom/Lndφroboi Tpahcφokatop | 32x1) | 64x2) | 72x3) | 72x3) | 72x3) | 72x |
| NightShot/Houhajc sbemka | — | — | ● | ● | ● | ● |
| Steady Shot/Vctoynbajc sbemka | — | — | — | ● | ● | ● |
| Remote sensor/DaTnuk DnCTaHcNHOH-noro ynpablenia | — | ● | ● | ● | ● | ● |
| Fader function/Функция рergunpoвки уровьи ИЗобрахеня | — | — | ● | ● | ● | ● |
| Stripe/Полосвание | — | — | — | — | ● | ● |
| Manual focus/Puzhna Фокусровka | — | — | ● | ● | ● | ● |
| Exposure/эк科研院所 | — | — | ● | ● | ● | ● |
| Auto date/АВтматческа дота | ● | ● | ● | ● | ● | — |
| Index/Индек | — | — | — | — | — | ● |
| RC time code/Bpemenhoj кoД RC | — | — | — | — | — | ● |
| Data code/KoД данны | — | — | — | — | — | ● |
| Audio/Aydinoosinhal | monauralMOHOFOHUNCECKM | monauralMOHOFOHUNCECKM | monauralMOHOFOHUNCECKM | monauralMOHOFOHUNCECKM | stereoSTepeofOHUNCECKM | stereo |
1) 160x in some areas
2) 200x in some areas
3) 220x in some areas
1) 160xВ HeKoTOpbIX OBJaCTIaX
200x B HeKoToPbIx 06NaCTaX
3)220x B HeKoToPbIx 06NaCTaX
Note on TV colour systems
TV colour systems differ from country to country. To view your recordings on a TV, you need a PAL system-based TV.
Precaution on copyright
Television programmes, films, video tapes, and other materials may be copyrighted.
Unauthorized recording of such materials may be contrary to the provision of the copyright laws.
Precautions on camcorder care
- Do not let the camcorder get wet. Keep the camcorder away from rain and sea water. Letting the camcorder get wet may cause the unit to malfunction, and sometimes this malfunction cannot be repaired [a].
- Never leave the camcorder exposed to temperatures above 60^ (140^) , such as in a car parked in the sun or under direct sunlight [b].
Приимechаим К системам CBETHORO TEJIБИДЕНЯ
CnCTeMbI ZBEITHOTo TEJIeBUNDEHIN OITNIUaIOTcB 3aBNCIMOCtN OT CTPaHbI.ДЯ npocMOTpa Baunx 3aIncEi NO TEJIeBUN3Opy Bam Heo6XoDIMO IcNoIb3OBaTb TEJIeBUN3Op, OCHOBaHHbI Ha CnCTeMe PAL.
Пре dioctepexeHne o6 aBTopcKom npaBe
TeIeBn3IOHbIe IpOgpaMMbl, KINHOJNbMbI, BnDEoJIeHTbI IN dpyrIe MaTePnaIbI MOyT 6bITb 3aUuIeHbI aBTOpCKM npabOM.
HenpaBOMOuHa 3aIncb TaKnx MaTePnaIaOB MoKeT IPOTuBOpEuyt b YcNobnM 3aKoHa o6 abTOPcKOM pBaBe.
IpeoctopoxknoTo no yxOdy 3a Bndeokamepo
- He no3BOLnIte BnIeOKaMepe DeNaTbCBAJxHnO.IpeoXpaHnIte BnIeOKaMepy OTdoXnI MOpCKoB Bobl. Ecnn BbI HAMOuTIe BnIeOKaMepy,TO 3TO MOKeT Bbl3BaTb HEnCnpaBHOCTb annapaTa, IN BHeKOTOpbIX CnyAraX 3Ta HeNcPpaBHOCTb HeNoDJIeXHT peMOHTy [a].
- HNKoRda He octaBnIe Te BnIeOKeAmepy B Mece T c Tempepatyoi CbIe 60°C (140°F), KaK HanpImep, B ABTOMoBuNe, OCTaHOBJEHHOM Ha CoNHcE NII NIOJ PnPmblIM CoNHeuBIMn Lyuamn [b].

[a]
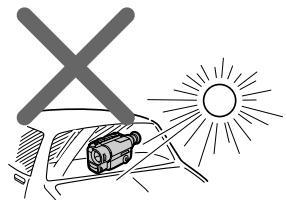
[b]
Check that the following accessories are supplied with your camcorder.
PpOBepbTe, TTO CNEyUOuNe npHaJdNExKHOCTn npnlaIaIOTcK BaSei BnuDeokampe.
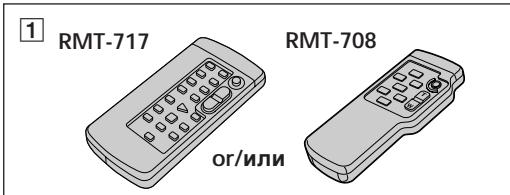

1 Wireless Remote Commander (1) (p. 108)
RMT-708: CCD-TR412E/TR511E/TR640E/TR840E
RMT-717: CCD-TR845E
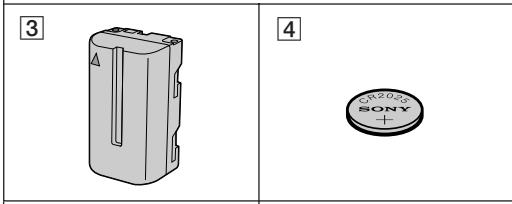
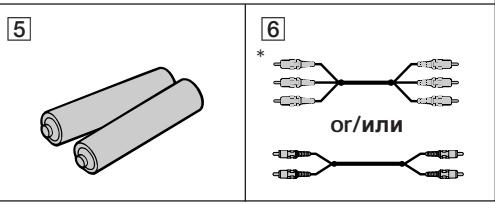
2 AC-L10A/L10B/L10C AC power adaptor (1), Mains lead (1) (p. 9, 32)
NP-F330 Battery pack (1) (p. 8, 31)
4 CR2025 Lithium Battery (1) (p. 74) The lithium battery is already installed in your camcorder.
5 R6 (size AA) battery for Remote Commander (2) (p. 109) CCD-TR412E/TR511E/TR640E/TR840E/ TR845E only
6 A/V connecting cable (1) (p. 24) *for stereo model
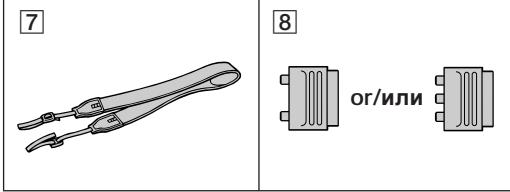
7 Shoulder strap (1) (p. 110)
21 pin adaptor (1) (p. 25)
Contents of the recording cannot be compensated if recording or playback is not made due to a malfunction of the camcorder, video tape, etc.
1 BeçnpoBODhbl nyIbT dmCTaHcNoHHoro ynpabJeHn (1) (ctp. 108) RMT-708: CCD-TR412E/TR511E/TR640E/ TR840E RMT-717: CCD-TR845E
2 CeTeBoAaAnTep nepem.ToKa AC-L10A/ L10B/L10C (1),CeTeBoI npoBoD (1) (cTp.9,32)
3Батуарейньий 6лok NP-F330 (1) (ctp.8,31)
4ЛNTeBaa 6aTapeKc CR2025 (1) (CTp.74)ЛNTeBa 6aTapeKa yKe yCTaHOBnHa B BaSei BnDeOkamepe.
5 BaTapeiKa R6 (pa3MePOM AA) IJn pyIbTa IInCTaHcOnHOrO ynpaBHeHn (2) (ctp.109) ToJIbKO CCD-TR412E/TR511E/TR640E/ TR840E/TR845E
6 CoeHNHTeJIbHbI Ka6JIb ayDnO/BnDeo (1) (cTp. 24) * Iy CTepeofoHueCKo MoJeTI
7Плевов pemehb(1)(cTp.110)
21-2018 21-2018 21-2018 21-2018 21-2018 21-2018 21-2018 21-2018 21-2018 21-2018 21-2018 21-2018 21-2018 21-
CoepKIMoe 3aIncn He moKeT 6bITb KOMneHcnpoBaHO,ecN 3aIncb NIN BOCpON3BeJeHne He BbIOJHaeTcBcJIeDCTBHe NOBpeJDeHnBUNDeOKaMepbl,BUNDeOJIeHTbl N.T.D.
Installing and charging the battery pack
YcTaHOBKa n 3apJaKa 6aTapeHoro 6Joka
Before using your camcorder, you first need to install and charge the battery pack.
This camcorder operates only with the "InfoLITHIUM" battery pack.
"InfoLITHIUM" is a trademark of Sony corporation.
Installing the battery pack
(1) While pressing BATT RELEASE, slide the battery terminal cover in the direction of the arrow.
(2) Install the battery pack in the direction of the mark on the battery pack. Slide the battery pack down until it catches on the battery release lever and clicks.
Attach the battery pack to the camcorder securely.
IpeepncnojboaHnem Bauee BndeokamepbBam HxJHo CnpBa 3apAaNTb uYCTaHOBt6batapeHb6lok.
Note on the battery pack
Do not carry the camcorder by grasping the battery pack.
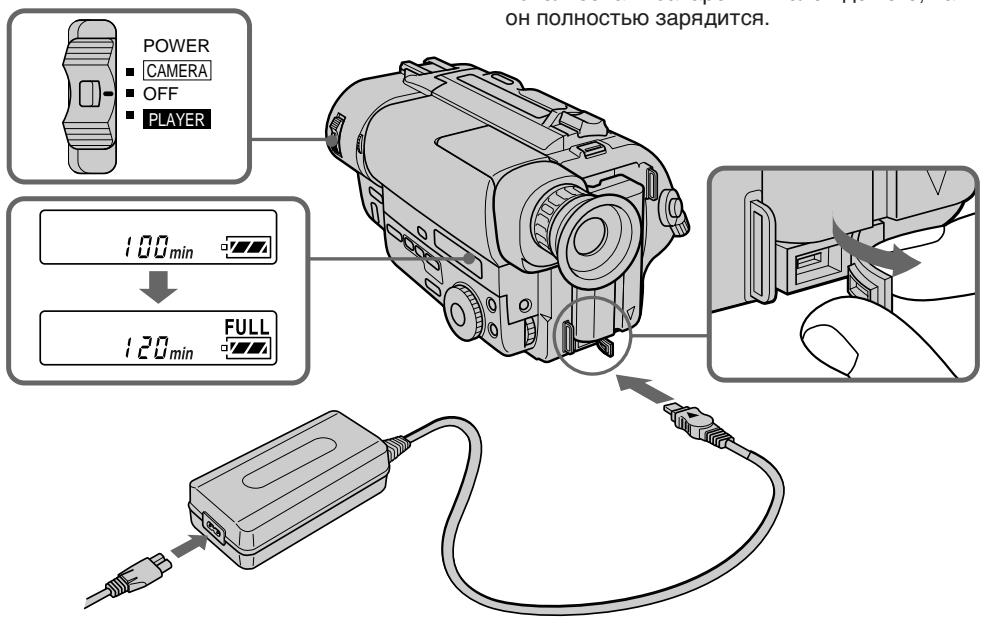
Charging the battery pack
Charge the battery pack on a flat surface without vibration. The battery pack is charged a little in the factory.
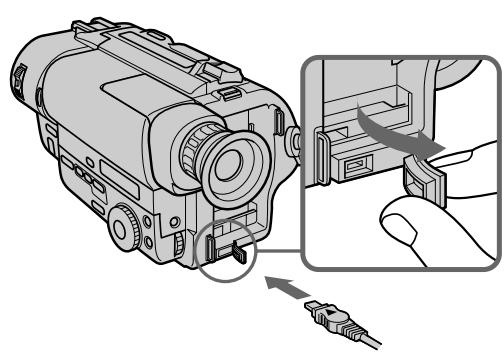
(1) Open the DC IN jack cover and connect the supplied AC power adaptor to the DC IN jack with the plug's mark up.
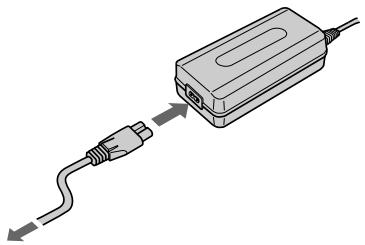
(2) Connect the mains lead to the AC power adaptor.
(3) Connect the mains lead to the mains.
(4) Slide the POWER switch to OFF. Remaining battery time is indicated by the minutes on the display window. Charging begins.
When the remaining battery indicator becomes normal charge is completed. For full charge, which allows you to use the battery longer than usual, leave the battery pack attached for about 1 hour after normal charge is completed until FULL appears in the display window.
Before using the camcorder with the battery pack, unplug the AC power adaptor from the DC IN jack of the camcorder. You can also use the battery pack before it is completely charged.
3apka 6aTaepHoro 6loKa
3apkaTe 6aTapeiHbI 6Iok Ha nIIOCKoI NOBepxHocTN, HeIOdBepXeHHoB Bn6paCm. BaTapeHbI 6Iok 3apXKeH HEMHOHa 3aBOe.
(1)ОткpoиTe KpbIshky rHe3da DC IN n
ноюсоeДИнHTe рпиlaeraМь сеТБоВ
адэтперпеменHOrO тOKA к rHe3dY DC IN
ТАК,ЧТо6бЛ MeТKa ▲на wTeKepe 6bla
pacnonoJxeha CBepxy.
(2)ПодсоeДинHTe ceTeBOI npOBoI K cTeBOMy aДaNTepy nepemEnHOrO TOKa.
(3)ПодсоeДинHTe cTeBOI npOBd K cTeN.
(4)Передвиньт Быкноуаел bPOWER
нложене OFF. Octabшeeс bPemя
Зрда 6атapestиного 6лoka 6удeт
ОTOбрахаТСВ B MИнТУАВ B OKОшke
Диспль.НaЧNETСЗ ряДka.
EcIn INDnKaTOp OCTaBWeOcR 3apJa
6bTaapeHOro 6JOKa 6yDet IMeTB BnID ,3TO
3NaHT, YTO 3aBepSeHa HOpMaJIbHaN 3apJDKa.
IINr NOnHOB 3apKn, KOTOPAR NO3BOJNEt
BAm IcNoJIb3OBA Tb 6bTaapeHbN b6Jok DOJIbSe,
Yem 06blHNO, OCTaBBTe 6bTaapeHbN b6JOK
PnpcoEOHHHeHbIM npImepHO Ha OdIN Yac
NoCNe 3aBePseHn HOpMaJIbHON 3apJKn, POKa
B OKOWKe DnCnpe He NoRBNTcN INDnKaun
FULL.
Ipeep nCNoJIb3OBAHnEM BnDEoKAMepbl OT 6aTaapeHOrO 6JIOKa OTcoEINHITe CETeBOI aAanTep nepemEHORo TOKa OT rHe3da DC IN Ha BVNeOaKepe. Bbl TaKKe MoKTe IcNoJIb3OBAtB 6aTaapeHnBi 6JOK Do TORO, KaK OH NJIHOCTbU 3aprAnTcR.
Notes
- The display shows "--- min" until the remaining battery time appears.
- Remaining battery time indication in the display window roughly indicates the recording time. Use it as a guide. It may differ from the actual recording time.
- If there is a slight difference in shape between the plug of mains lead and the terminal of AC power adaptor, it is ignorable for their mutual connection and power supply.
- Be sure to plug the mains lead deeply into the terminal of AC power adaptor so that it is firmly locked. If there is a gap between the plug of mains lead and the terminal of AC power adaptor, it does not affect the efficiency of the AC power adaptor.
Charging time
| Battery pack | Charging time* (min.) |
| NP-F330 (supplied) | 150 (90) |
| NP-F530/F550 | 210 (150) |
| NP-F730/F750 | 300 (240) |
| NP-F930/F950 | 390 (330) |
The time required for a normal charge is indicated in parentheses.
- Approximate minutes to charge an empty battery pack using the supplied AC power adaptor. (Lower temperatures require a longer charging time.)
Battery life
CCD-TR411E/TR412E/TR511E
| Battery pack | Continuous recording time* | Typical recording time** |
| NP-F330 (supplied) | 130 (115) | 65 (60) |
| NP-F530 | 225 (200) | 115 (105) |
| NP-F550 | 260 (230) | 135 (120) |
| NP-F730 | 450 (405) | 235 (210) |
| NP-F750 | 530 (480) | 280 (250) |
| NP-F930 | 710 (640) | 375 (335) |
| NP-F950 | 815 (730) | 430 (385) |
PpIMeuaHn
- "--- min" OTobpaxaetcHa Iucnnee, Noka He NOBNTcBpeMg OCTabweroCzapraDa 6bataeHoro 6noka.
-ИнданкациocstabшeroCByPemHn3apraDa 6aTaapeHOro 6IokaB OOKoUke DIncPneer npu6n3nteJIbHO NOKa3bIbAeT BPEM 3aNCSn B OKoUke DIncPneER. INcNoJb3yTe ee B KaueCTBe pyKOBODCTBa.3TO MOKe OTJIMuaTbCnOT PhAKTuYeCKOrO BYPemHn 3aNCSn.
- Ecnn cyuectByet He6oJbwoe pa3nUHne no
- fOpME MekyDy WTeTcEJIbHbIM pa3bEmOM CeTeBbIX pIOBOIDN rHe3dON CeTEBOO aHaNTepa
- nepEMeHOrO TOKA, TO 3TO He BInreT H Na H
- B3aMHoe CoEINHeHne N NOaCy PInTaHn.
- O63aTeIbHO BCTaBbTe pa3bEm cTeBOrO npoBOA rny60KO B rHe3do cTeBOrO aAnTepa nepemEHORo TOKa TaK, YTObI OH 6bln HaJExKHO 3aФNKcnpOBaH. EcnN ocTaetc4 3aOp MEXy pa3bEMOM cTeBOrO npoBOa n rHe3dOM cTeBOrO aAnTepa nepemEHORo TOKa, TO 3TO He BInaNET Ha 3ΦΦeKTUBHOCTb cTeBOrO aAnTepa nepemEHORo TOKa.
Bpema3aprakn
| Батуарейный 6лok | Вразуардк* (MHN.) |
| NP-F330 (прилагается) | 150 (90) |
| NP-F530/F550 | 210 (150) |
| NP-F730/F750 | 300 (240) |
| NP-F930/F950 | 390 (330) |
Yncna BCKo6kax yKa3bIbAIOB BPemn InHOpMaIbHo 3aprKn.
Numbers in parentheses indicate the time when you use a normally charged battery. Battery life will be shorter if you use the camcorder in a cold environment.
- Approximate continuous recording time at 25^ C( 77^ F) .
** Approximate minutes when recording while you repeat recording start/stop, zooming and turning the power on/off. The actual battery life may be shorter.
CCD-TR640E
Note on remaining battery time indication during recording
Remaining battery time is displayed in the viewfinder. However, the indication may not be displayed properly, depending on using conditions and circumstances.
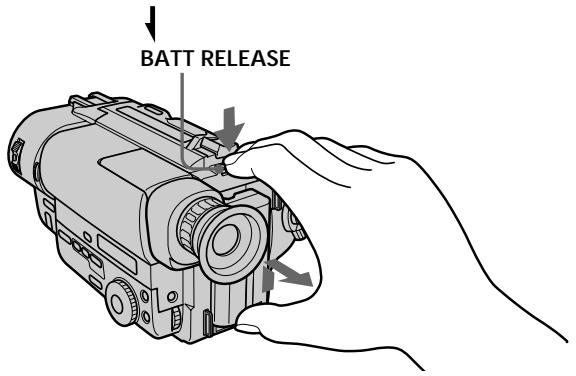
To remove the battery pack
While pressing BATT RELEASE, slide the battery pack in the direction of the arrow.
PpmeaHne KnHdkauuO octabweroCBApeMeH pa6oTbI 6aTaepHoro 6Joka BO BpeM 3aHncn.
OctaBueeecBpempa6oTb6aTaepHoro 6Ioka OTo6paXkaeTcB BnuOnckaTeJe.
Ondako,HINDKaIIMMOKETOTOBpaKaTbCS HENpABUNbHO B3aBNCIMOCTNOTUCNOBNI O6CTOATEJBCTNBIOJIb3OBAHNA.
ДлСНТИЗБАТЕЙНОВ6ЛOKA
Haxm BATT RELEASE, nepeBnhte 6aTapeHbI bLOK b HappaBHeHn cTpeKN.
You can look at the demonstration of the functions available with this camcorder (p. 38).
BbMOxKeI npocMOrpeTb demOHcTpaCnIO fynKcuN, IMeIoUnxCBA hAnuY daHHO BnuDeokaMepbl (ctp.38).
Make sure that the power source is installed.
When you want to record in the Hi8 system, use Hi8 video cassette Hi8 (CCD-TR840E/TR845E only).
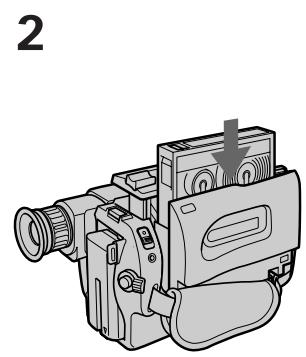
(1) While pressing the small blue button on the EJECT switch, slide it in the direction of the arrow. The cassette compartment automatically lifts up and opens.
(2) Insert a cassette with the window facing out.
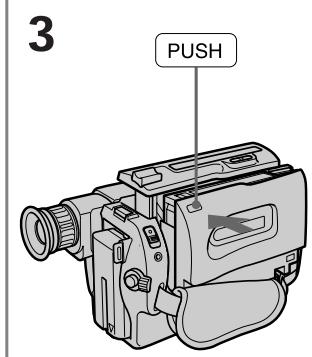
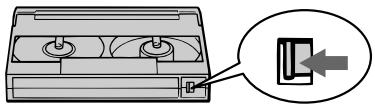
(3) Close the cassette compartment by pressing the "PUSH" mark on the cassette compartment. The cassette compartment automatically goes down.
Y6eIntecb, YTO ICTOCHNK NITAHN yCTaHOBnEh.
EcIn BbXOTnTe BbIIOJIHnTb 3aIncB CnCTeMe Hi8,To nCIOJIb3yIte Hi8-BnIdeOkaCCeTy Hi (ToIbKO CCD-TR840E/TR845E).
(1)HaxmamayMaIeHbkyIO CnHOIO KHOKNyHa BbIKUoateNe EJECT, cDvInbTe erO B HnPaBHeHn CTpeNk. KaccTeHbI OTCek ABTomaTHueCKN NOHmAEtCn OKPbIBaEtCn.
(2)BcTaBbTe KaccEtOkoIkom,ObpaueHHbIM hapyKy.
(3)3aKpOte KacCtHbI OTcEK NyTEM HaxaTna 3HaKa "PUSH" Ha KacCtHOM OTcKe. KacCtHbI OTcEK aBTOMaTHueCKn ONyCTuTcBHN3.
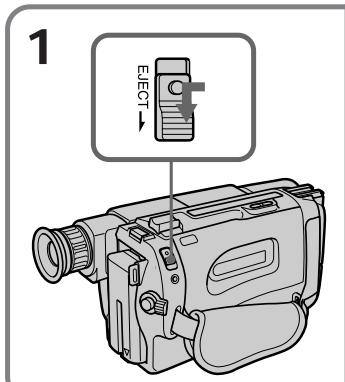
To eject the cassette
While pressing the small blue button on the EJECT switch, slide it in the direction of the arrow.
To prevent accidental erasure
Slide the tab on the cassette to expose the red mark. If you insert the cassette with the red mark exposed and close the cassette compartment, the beeps sound for a while. If you try to record with the red mark exposed, the and indicators flash, and you cannot record on the tape.
To re-record on this tape, slide the tab back out covering the red mark.
Cdbnble Te IeneToK Ha KaccTe, YTo6bI 6blNO BnHO KpaChyIO MeTKy. EcnBb BcTabNte KacceTy,Ha KOTOpO BnHa KpaChra MeTKa, n 3aKpOeT KaccTeHb OTcEK, 3ymMePbH b CIRHan 6yDet 3ByuTaB T TeHeHne HEKOtOpO BpEmeHn. EcnBb NnblTaTeEc BbINOLHNTb 3aNcB C BbICTabNeHHo KpaCHOI MeTKoI, TO INDkAToPbI n ▲ 6yUT MInrTaB B BvOnckaTeJe N Bi He CMOxTe Ipn03BecTn 3aNNCb Ha JeHTy.
Дя ВылОнHЕнЯ HOВО 3aПСИ HA TaKу JO leHTy CБИНьТе ЛЕпсТOK Ha3aД ДЯ 3aКрБИВАнЯ КраС"HОМ MEТКИ.
Camera recording
3a\Pncb c pOMo y BnDeOKaMepbl
Make sure that the power source is installed, a cassette is inserted and that the START/STOP MODE switch is set to . Before you record one-time events, you may want to make a trial recording to make sure that the camcorder is working correctly.
When you use the camcorder for the first time, power on it and reset the date and time to your time before you start recording (p. 76). The date is automatically recorded for 10 seconds after you start recording (AUTO DATE feature). This feature works only once a day. (CCD-TR411E/ TR412E/TR511E/TR640E/TR840E only)
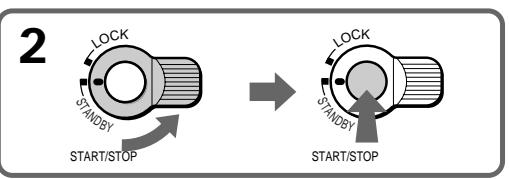
(1) While pressing the small green button on the POWER switch, set it to CAMERA.
(2) Turn STANDBY up to STANDBY.
(3) Press START/STOP. The camcorder starts recording. The "REC" indicator appears. The red lamp lights up in the viewfinder. The camera recording/battery lamp located on the front of the camcorder also lights up.
Y6eIntecb, cTO nCTOCHNK nTahnna YcTaHOBHeKacCeta BCTaBHeHa n nepeKluohateJb START/STOP MODE yCtAHOBHeN bNoLoXeHne u .PepeTe kak BbHauchHe t3anCb oDnapa3OBbIX co6bItn, Bbl MoXeTe 3axoTeb CdeNaTb npo6HyIO 3aNNcb dIy noDTBeRkDeHn, cTO BnDEOKamepa pa6oTaet npabInbHO.
Ecni BbI nCnOJIb3yeTe BnIeOKaMepy B nepBbI pa3,TO BKNIOHTe eeN yCTaHOBNTe DaTy IN BpemHa BaIe MeCTHoe BpemN pepeN haayalom 3aInci (cTp.76) DaT a ABTomAtuueckN 6ydt 3aInciBaTbcR B TeueHne 10 cekyn nocJe Haayana 3aInci (fYHKUAR AUTO DATE).
To stop recording momentarily [a]
Press START/STOP again. The "STBY" indicator appears in the viewfinder (Standby mode).
To finish recording [b]
Press START/STOP again. Turn STANDBY down to LOCK and set the POWER switch to OFF. Then, eject the cassette.
ДлвВременнов octaHOBKN 3aПСи [a]
Сноа нахмптЕ START/STOP.Инданкотop "STBY" NOВЛЯТСА ВИДОПСКАТЕ (peхим ROTOBHOCTH).
Длг Okончаня запси [b]
CHoBa HaxKMnTe START/STOP. NObepHnTe STANDBY BnI3 B noLoXeHne LOCK n yCtahOBnTe BbIKnIOuTaTeNb POWER B noLoXeHne OFF. 3aTeM BbITOnkHnTe Kaccety.
![SONY CCD-TR640E - Длг Okончаня запси [b] - 1](/content/2019/11/48430/images/715762876314ced75839c268643034d8d5160b87ff3ab9b3c5b44c6e1e813319.jpg)
[a]
![SONY CCD-TR640E - Длг Okончаня запси [b] - 2](/content/2019/11/48430/images/02addcbec019a9ea2910d878094589ab3d6c6021b51e55e7657c06bd73bd9297.jpg)
[b]
![SONY CCD-TR640E - Длг Okончаня запси [b] - 3](/content/2019/11/48430/images/d607f227adef2e86d49a38e29bc5fbc9b98b78a103ba58c4e088d64180c4213c.jpg)
Note
There is a little wear on the battery pack which is installed with camcorder. However, for getting remaining battery time indicated correctly, leave the battery pack installed after use.
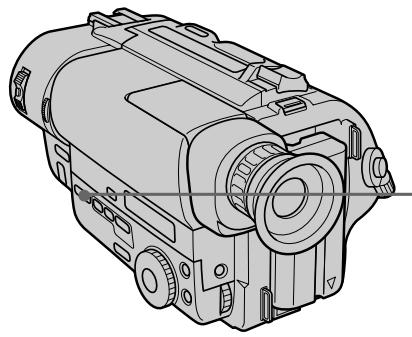
To focus the viewfinder lens
If you cannot see the indicators in the viewfinder clearly, or after someone else has used the camcorder, focus the viewfinder lens. Turn the viewfinder lens adjustment ring so that the indicators in the viewfinder come into sharp focus.
Ppmeuahne
Будет пюпсхдьн Heболшая pa3рядka 6baTepeHOrO 6IOKa, KOTOpbI yCTaHOBlen B BuDeokamepe. OdHaKO, ДЯ NOJUeyHЯ TOHORO nOKa3aHnB VpeMeHn OCTaBweroC3apJa 6baTepeHOrO 6IOKa OCTabbTe 6baTepeHbN 6IOK yCTaHOBlenHHm NocLe INcNoJIb3OBAHN.
EcIn Bbl He MoXeTe YeTko BnDteb INNdkaTopbl B BVIOONCKaTeIe NIN NocLe TOrO, KaK KTO-TO dpYrOu INCNoJIb3OBaI BNDeOKaMepy, BblONHInTe fOKcnpOBky ObEeKTHBa BVIOONCKaTeIa. IOBepHInTe KOJIbUo peRyIINpOBKn OBeKTHBa BVIOONCKaTeJIa, TaK, YTObIb INNdkaTopbl B BVIOONCKaTeJIe bbln YeTko cfoKycnpOBaHbl.

Note on Standby mode
If you leave the camcorder in Standby mode for 5 minutes while the cassette is inserted, the camcorder turns off automatically for saving battery power as well as for preventing the battery and tape from wearing down. To resume Standby mode, turn STANDBY down and up again. To start recording, press START/STOP.
Note on recording
When you record from the beginning of a tape, run the tape for about 15 seconds before starting the actual recording. This will ensure that you won't miss any start-up scenes when you play back the tape.
Notes on the tape counter
- The tape counter indicates the recording or playback time. Use it as a guide. There will be a time lag of several seconds from the actual time. To set the counter to zero, press COUNTER RESET.
- If the tape is recorded in SP and LP modes mixed, the tape counter shows incorrect recording time. When you intend to edit the tape using the tape counter as a guide, record in same (SP or LP) mode.
Note on the beep sound
The beep sounds when you operate the camcorder. Several beeps also sound as a warning of any unusual condition of the camcorder.
Note that the beep sound is not recorded on the tape. If you do not want to hear the beep sound, select "OFF" in the menu system.
PpmeaHne K pexmmy roTOBHOCTn
EcIn BbOCTabJIReTe BnDeOKaMepy BpeJIMe
rotOBHOctHa5MNHTpnpBCTabJIeHHoN
KacCETe, BnDEOKaMepa BblKJIIOuHTcR
ABOTMaTmUeCKn BcEJIAX KAKdIaN3KOHOMNI
3apJaBaTaapeHOrO 6NoKa, TAKINdI
PpeDToBpauSeHnI N3HocA 6TaapeHOrO 6NoKa
JeHTbl.ДЯBOcSTaHOBNeHnpeJXMa
rotOBHOctn NOBepHnTe STANDBY BHN3,a
3aTEM CHOBA BBepx.DJI NaHApA 3aInci
HaJMMte START/STOP.
PpimeyaHne K 3anncn
Korda BbHaunHaeTe 3aInncb OT hauana JeHTbl, nepemaTbIbaiTe JeHTy B TeueHne 15 ckynd nepei Hauanom fakTnuecko 3aIncn. 3To 6ydet rapaHTnpOBaTb, YTO Bb He npOnycTnte KaKnx-No 6HaJbHbX ppaarmTeob, KOrda 6yDeTe BOCpOn3BODnTB JeHTy.
PpmeaHnK CteTnKy JeHTbI
CyeTnK IeHbI yKa3bIbaeT BpeM 3aIncn nnBocpon3BeDenH.NcNoJIb3yIte erO KaueCTBe pyKOBoDCTBa.CuJeCTByETOTCTaBaHne IO BpeMeHN Ha HeCKoJIbKO CeKYNDOTΦakTnueCKOrO BpeMeHN.ДЯ YcTaHOBVcHTnKa Ha Hylb HaxmITe COUNTER RESET.
- EcInIeHTa 3anicaHa cYepeoBaanem pexmOB SP u LP,TO CteTnK IeHTb6yTe TnOKa3bIBaTB He npabNtBHOe BpEm 3annc. EcIn Bbl HamepeBaetc npOn3BOuNTb MOHTax JIeHTb C nCIOJIb3OBAHnEM CyeTnKa IeHTb B KaueCTBe yka3aTeJr, TO BblONHnTe 3anbc B ODHOM U TOM Xe peXnme (SP nn LP).
The clock is set at the factory to London time for United Kingdom and to Paris time for the other European countries. You can reset the clock in the menu system. You can change the AUTO DATE settings by selecting ON or OFF in the menu system. The AUTO DATE feature shows the date automatically once a day.
However, the date may automatically appear more than once a day when:
- you reset the date and time.
- you eject and insert the tape again.
- you stop recording within 10 seconds.
- you set AUTO DATE to OFF once and set it to ON again in the menu system.
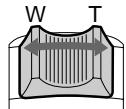
Using the zoom feature
Zooming is a recording technique that lets you change the size of the subject in the scene.
For more professional-looking recordings, use the zoom function sparingly.
"T" side: for telephoto (subject appears closer)
"W" side: for wide-angle (subject appears farther away)
PpimmeaHne K cyHKun AUTO DATE
-ToIbko CCD-TR411E/TR412E/TR511E/ TR640E/TR840E
YacbI yctaHOBHeHbHa 3aBOe Ha loHDOCKoe BpEMn Dnla MoTeNe CoeHNHeHHoro KoponeBCTBa nHa napXckOe BpEMn Dnla MoTeNe dpyrHex EBPOeNcKnx Ctpan. Bbl MOKeTe NepeyCTaHOBNTb YacbI BcnCTMe MeHIO.Bbl MOKeTe N3MeHNt b YCTaHOBKn AUTO DATE nyTem Bbl6opa ON nnn OFF B cnCTMe MeHIO.ФункцЯ AUTO DATE noka3bIbaet daty abTOMaTHueCKn OdIN pa3 B deHb. Odnako, daTa MOKeT aBTOMaTHueCKn NOBbTc6OJee OndHO rpa3a B DeHb, KOrda:
-BbI 3aHOBO yCTaHaBJIbAeTe DaTy I Bpemr.
-BbI BbITOKHynJIeHTy IN BCTaBnIn ee CHOBA.
-BbIOCTaHOBUNI 3aINcB INpeJenax 10 cekyHd.
-BbyyctaHOBNIINФуNKUIO AUTO DATE BCnCTeMe MeHIO Ha OFF, a 3aTEM CHOBa Ha ON.
IcnoJIb3OBAHneФyHKcHn Hae3da BnDEOKaMepbl
Hae3d BnIeOKaMepb IABJIeTcA TeXHnueckm npiemom 3aIncn, KOtOpb IIO3BOJnEe Bam n3MeHrTb pa3Mep o6BeKTa B KaJpe.ДЯ 6OJIee npoFeCCNoHaNbHO BVa Da 3aIncSe yMepeHNO nCNoB3yInTeФyHKUIO Hae3Ja BnIeOKaMepbl.
CTopoha "T":ДЯ TepeToO (o6bekt npu6blnkaeTcA)
CTopoHa"W":ДЯшИРOKOrOуглa cБЕмкn (obbeKT ydaJIaTeTcI)


Zooming speed (Variable speed zooming)
Move the power zoom lever a little for a slower zoom, move it further for a faster zoom.
When you shoot a subject using a telephoto zoom
If you cannot get a sharp focus while in extreme telephoto zoom, move the power zoom lever to the "W" side until the focus is sharp. You can shoot a subject that is at least about 80~cm (about 2 5/8 feet) away from the lens surface in the telephoto position, or about 1cm (about 1 / 2 inch) away in the wide-angle position.
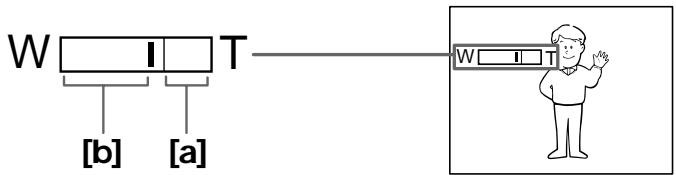
Notes on digital zoom
- More than 16x (CCD-TR411E/TR412E) or 18x (CCD-TR511E/TR640E/TR840E/TR845E) zoom is performed digitally, and the picture quality deteriorates as you go toward the "T" side. If you do not want to use the digital zoom, set the D ZOOM function to OFF in the menu system.
- The right side [a] of the power zoom indicator shows the digital zooming zone, and the left side [b] shows the optical zooming zone. If you set the D ZOOM function to OFF, the [a] zone disappears.
CkopoocTb Hae3da Bndeokamepbl (Hae3d c pa3JIuHNoI CKopoocTbU)
IpeBnHbTe pbyar npBOnHO TpaHcfoKaTopa HEMHOrO Iyra CpaBHtEnbHO MeJeHHoro Hae3da BInDeOKaMepbl; nepeBnHbTe ero eue DaJIbWe DnA Hae3da Ha BaBICOKO CKOPoCTN.
Korda Bbl chmaete o6bekt, nCnoIb3yHae3d B pexnme TeJefoTO
EcIn BbI He MoXeTe NOnyUHTb YeTkoNΦokCnPOBKn BO BpEMa KpaHrero Hae3da BpeXIme TeneΦOTO, NepemuaTte pbYar npNbOBDHO rTaHcΦOKatOpA BCTOPHy W" DoTex nop, noka BbI He NoLyuNTe YeTkoNΦokCnpOBKn. Bbl MoXeTe ChmMaTb ObEKT, KOTOpBI NO MeHbWeMpe Ha 80 cm Ydaien OT nobepxHoCTn OBeKtINBa BNoLOXeHN TeLEΦOTO, nn ydaJIeN pRb6JIi3ntelbHO Ha 1 cm BNoLOXeHN UIpOKOrYo rYla.
PpIMeuaHnK uΦpObMy TpaHcΦokaTopy
TpaHcΦoKaTOP 60Jee, Yem c 16-KpaTHbIM (CCD-TR411E/TR412E) nnn 18-KpaTHbIM (CCD-TR511E/TR640E/TR840E/TR845E) yBEnuHeHnEM CO3dAn B uΦpOBom nCIOJIHeHnI, n KaueCTBO I3O6paXeHn I yxUaTaETCn I Ome BaIeRo IDbXeHnBa CTOPOHy "T". EcnI Bbl He XOTnTe nCNoIb3OBAtB uΦpOBoT pAHOcΦoKaTOP, ycTaHOBtpe FynKcNIO D ZOOM B cIcTeMe MeHIO Ha OFF.
- Празвая сстора [a] Инданка_TOP рпвовдноу ТрансфокаTOPA NOKA3bIBAeT 3OHy zuфpoьоТрансфокаци, a Левая сстора [b] NOKa3bIBAeT 3OHy ONTINUeCKOД TpaHcФokaци. EcInи Bы уетановITE Функцию D ZOOM ha OFF, to 30ha [a] Incye3NET.
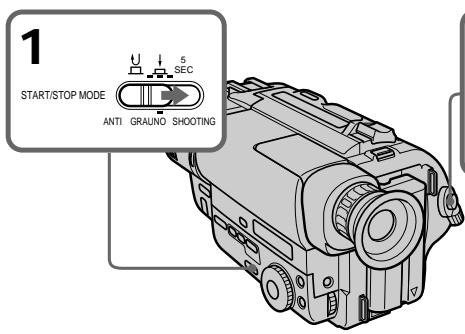
Selecting the START/STOP mode
Your camcorder has three modes. These modes enable you to take a series of quick shots resulting in a lively video.
(1) Set START/STOP MODE to the desired mode.
: Recording starts when you press START/STOP, and stops when you press it again (normal mode).
ANTI GROUND SHOOTING : The camcorder records only while you press down START/STOP so that you can avoid recording unnecessary scenes.
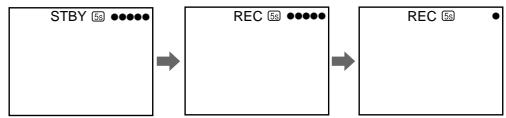
5SEC: When you press START/STOP, the camcorder records for 5 seconds and then stops automatically.
(2) Turn STANDBY up to STANDBY and press START/STOP. Recording starts.
If you selected 5SEC, the tape counter disappears and five dots appear. The dots disappear at a rate of one per second as illustrated below.
Bb6op pekma START/STOP
BaSha BnDeOkamepa NMeet TprpeKIma.3TnpexkmbI P03BOJAIOT Bam CnTb cepNIO KOpOTKnx KaIrpOB, CoZdaBaa B pe3yIbTaTe OXKNBHeHHYIO BnDeOpnporpaMMy.
(1)YctaHOBInTe nepeKJIIOuATEnb START/STOP MODE Ha xeJaEMbI peXm.
U:3aIncb haHnaeTcKorDa Bbl
hakmaeTe START/STOP n 3aKaHnBaetc
KorDa Bbl hakmaeTe 3Ty KhoNky ChOba
(HopMaJIbHbI pexnIM)
ANTI GROUND SHOOTING L:
BnuDeokamepa npOn3BOJNT 3aIncb TOnbKO
torda, KorDa Bbl depXnTE START/STOP B
hakatOM COCTOHN, taK, YTO Bbl MoKeTe
n36ExaTb 3aInci HEnyXhBix cueH.
5SEC:KorDa Bbl hakmaeTe START/STOP,
BnuDeokamepa npOn3BOJNT 3aIncb B TeueHne
5ceHyd, a 3aTeM OctaHaBnBaetc
ABTomATnueckn.
Ecnn Bbl Bb6paJIN 5SEC, cyeTnK JIeHTbl Icye3aet n IOABJIIOCTCn TpTb TOyek. ToOKN Icye3aOT CO CKOPoCTbIO NO OJHOJ 3a CeKYHny, KaK NaKa3aHO HNXe Ha pncyHke.
To extend the recording time in 5SEC mode
Press START/STOP again before all the dots disappear. Recording continues for about 5 seconds from the moment you press START/ STOP.
Note on START/STOP mode
You cannot use FADER in 5SEC or mode (CCD-TR511E/TR640E/TR840E/TR845E only).
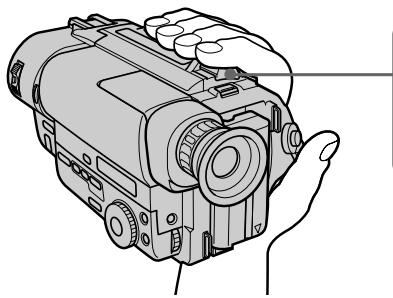
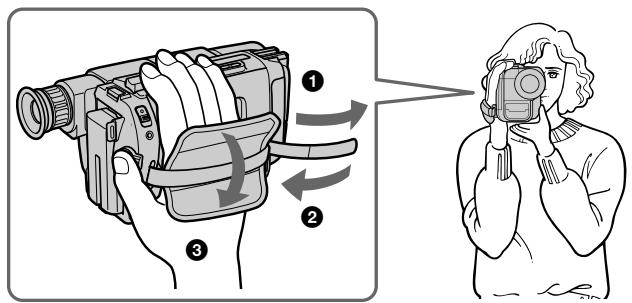
For hand-held shots, you will get better results by holding the camcorder according to the following suggestions:
- Hold the camcorder firmly and secure it with the grip strap so that you can easily manipulate the controls with your thumb [a].
- Place your right elbow against your side.
- Place your left hand under the camcorder to support it. Be sure to not touch the built-in microphone.
- Place your eye firmly against the viewfinder eyecup.
- Use the viewfinder frame as a guide to determine the horizontal plane.
- You can also record in a low position to get an interesting angle. Lift the viewfinder up for recording from a low position [b].
IJa KaIpOB npu yIepKaHm BnDeoKaMepbI Bykax Bbl nOlyuHTe IyUHne pe3yIbTaTbI,ecJIn 6yJeTe depKaTb BnDeoKaMepy B COOTBETCTBm CO cJeDyIOUMN peKOMeHdaCnAryMN:
-ДержпгБИдЕОКамеру КрENKOиЗakpenITE ee cnomоью ремEHORO 3axBaTаТК,чTOбы BblЯERKOMorINMaHnIyIInPOBaTb peryIaTOpAMNcnomoью60JIbIwOrO nalba[a].
-PacnoJoxnTe Baun JIOKtn no 6okam OT ce6r.
PacnooxnTe Bauy neByo pyky noBnBeokamepoI nn ee noDepkKn. Hb KoemCnyae He TporaiTe BCTpoHHb MmKpOfoH.
- Hanaekno npnKmTe Baw rna3 K okyIpy BUNOuCKaTeJI.
-ИспόньзутЕВиЗИРHyю pamKyВиДОИСКаТелЯВ КаЧecТBEpyKOBODCTBAДЯОпeДeLEHINRAROPИЗHTaJIbHOrOПlaHa.
- Bby TaKxpe MoKxTe 3aNcBbA Tb3 Hn3KOrO nOIOXeHn DnI NOnyChn INTepeCHOro yrna 3aNcN. IOnHmnte BnDOuCKaTeJI BBePx dnn 3aNcN n3 Hn3KOrO nOIOXeHn [b].
[a]

[b]
Place the camcorder on a flat surface or use a tripod
Try placing the camcorder on a table top or any other flat surface of suitable height. If you have a tripod for a still camera, you can also use it with the camcorder.
When attaching a non-Sony tripod, make sure that the length of the tripod screw is less than 6.5 mm (9/32 inch). Otherwise, you cannot attach the tripod securely and the screw may damage the camcorder.
Cautions on the viewfinder
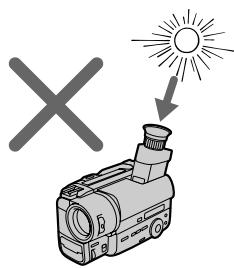
- Do not pick up the camcorder by the viewfinder [c].
- Do not place the camcorder so as to point the viewfinder toward the sun. The inside of the viewfinder may be damaged. Be careful when placing the camcorder under sunlight or by a window [d].

[c]
PacnoJaarTe BnDeokamepy Ha nNockoNobepxHocTn Hn NcNoIb3yIte TpeHoryNocTapaIteBpacnoJoxntBnDeokamepyCbepyHa cTone nnIIO6O dpyro nNoCKoNobepxHocTn NoXdoJusE BbICOTb.Ecn y BacEcTb TpeHora dIpafoaannapaTa, Bbl TaKxeMOxETe NcNoJIb3ObaTb eN dNn BnDeokamepbl.Pnp npKpeJIeHNm TpeHOrn He pIpMbI Sonyy6eINTeCb,yTO dNInHa BnHTa TpeHOrn MeHee 6,5MM.B npOTNBOM ClyuAe BnHT MoKeTNOBpeINb BHyTpeHHne Yactn BnDeokamepbl.
IpeoctopoxHocn K BIDOnckaTeJIIO
- He подимаи Te Bndeokamepy 3a BnDOnCKaTeJIb [c].
- He paCnoIoraiTe BnDeOkaMepy TaK, YTO6bl obBeKTHB 6bIIH HAnpAaBHeB I CToPOHy coNHa. BHyTpEHNHe yactn BnDoONcKaTeJr MOrTy 6bITb NOBpeXJeHb. ByIbTe OCTOpOXHb I np PaCNoIOXeHn BnDeOkaMepb I Nd CoNHcEm IIIN BO3JIe OKHa [d].
[d]
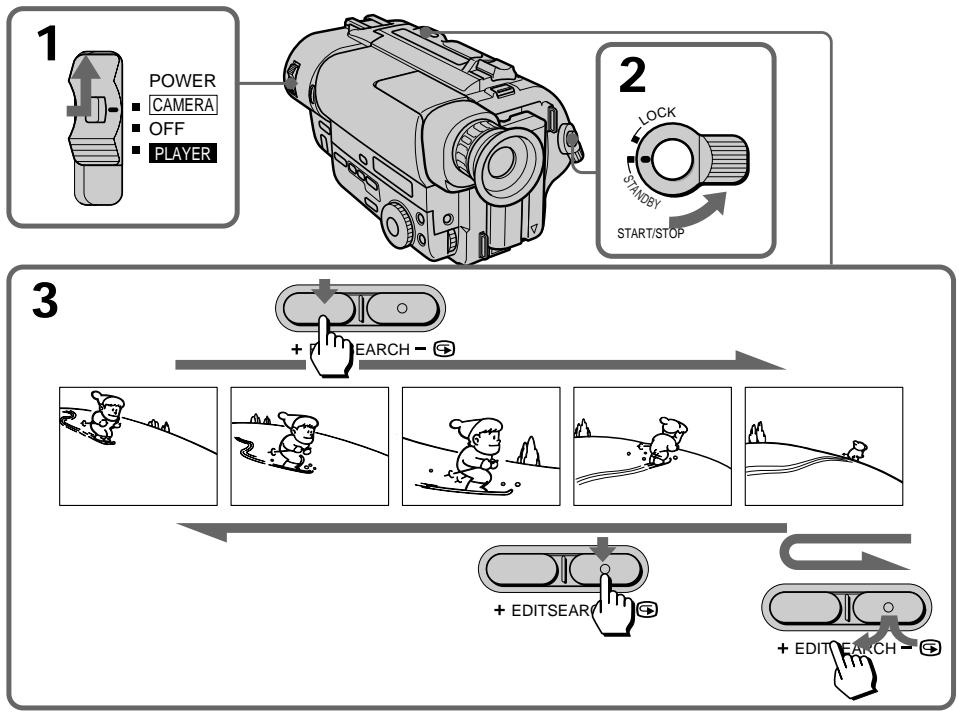
Using EDITSEARCH, you can review the last recorded scene or check the recorded picture in the viewfinder.
(1) While pressing the small green button on the POWER switch, set it to CAMERA.
(2) Turn STANDBY up to STANDBY.
(3) Press the - (⑤) side of EDITSEARCH momentarily; the last few seconds of the recorded portion play back (Rec Review). You can monitor the sound from the headphones (CCD-TR840E/TR845E only). Hold down the - side of EDITSEARCH until the camcorder goes back to the scene you want. The last recorded portion is played back. To go forward, hold down the + side (Edit Search).
IcnoIb3yI EDITSEARCH, Bbl moKeTe nepeCMoTpeTIOncJeHIOIO 3aIncaHHyo CcEHy IINI pOBePITb 3aIncaHHoe N3O6paXeHne B BuDOnCKaTeNe.
(1)HaximamajMaJIeHbKyIO 3eJIeHyIO KHOIky Ha BbIKIyOaTeNe POWER,yCTaHOBnTe ero B noIOxKeHne CAMERA.
(2)Повернite STANDBY Вьерх в положене STANDBY.
(3)Ha mRHOBHeHnHXaMnTe cToPOHy-() KhoIKNEDITSEARCH;noCneIhne HeCKoIbKOceyHd 3aIINcaHHoYacTb 6ydyT BocnpOIm3BeDeHbI (nepecMOrtp 3aIncu). Bbl MoKTe KOHTpOIMOBaTB 3ByK Upe3 roIOBhIe TelefoHbI (ToIbKOCCD-TR840E/ TR845E). DePKeTIe HaxaToHcTOPOHy-KHOIKN EDITSEARCHdoTexnop, noka BVideOKamepa He BepHEtcaK XeJnaEmoI cUHe. PocJeHNra 3aNCAHHa Yactb 6ydet BocnpOIm3BeDeHa.DJI npOdBnJKeHnBinepeI dEpxNTe HaXaToHcTOPOHy+(MOHTaXHbI nnck).
To stop playback
Release EDITSEARCH.
To begin re-recording
Press START/STOP. Re-recording begins from the point you released EDITSEARCH. Provided you do not eject the cassette, the transition between the last scene you recorded and the next scene you record will be smooth.
Длэ octaHOBKи BOCnpon3BeDEHnA
Otnyctnte EDITSEARCH.
ChobaДЯнlaHayajla3aHcN
HaJMeTe START/STOP.3aIncb HaunHaeTcAOTouKn, rIe Bbl OTnycTnINEDITSEARCH.Ipn ycNoBm, yTo Bbl HeBbIToJIkHeTe KacCeTy, nepexoM MeKdynocJeHneCseHo, KOtopyO Bbl 3aIncaIIn, nCleDyUSei CseHoN, KOtopyO Bbl 3aIncbIbaeTe,6yDet PJIabHbIM.
Connect the camcorder to your TV or VCR to watch the playback picture on the TV screen.
There are some ways to connect the camcorder to your TV. When monitoring the playback picture by connecting the camcorder to your TV, we recommend you to use mains for the power source.
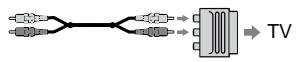
When connecting the A/V connecting cable, make sure you connect the plug to jacks of the same colour.
Open the jack cover. With using the supplied A/V connecting cable, connect the camcorder to the LINE IN inputs on the TV or VCR connected to the TV. Set the TV/VCR selector on the TV to VCR. When connecting to the VCR, set the input selector on the VCR to LINE.
CoeHHeHHIaBBOcnpOn3BeDeHnA
ПодсоeДиНTe BИdeokamepу K BaшeMy
TeLEBn3Opy Ил KBM Дпя npocmoTpa
BOcPOnI3ВОДIMOrO I3O6paKeHЯ 3kpaHé
TeLbN3Opa.CuSceCTByET HeCKoJIbKO MeToIOB
ДпЯ ПОдСоeДиHEnI BИdeokamepbl K BaшeMy
TeLEBn3Opy.ДпЯ npocmoTpa
BOcPOnI3ВОДIMOrO I3O6paKeHЯ рп
ПодСоeДиHEnI BИdeokamepbl K TeLEBn3Opy,
Мы peKOMeHdyem Bam IncNoJb3ObaTb
ЗЛЕКТprUeCKyU cetb B KaueCTBe NCTOCHNka
ПNTaHЯ.
IopcoeHHeHne npraMo K TeleBn3opy/KBM c BXoHbIMn rHe3dAmn ayDno/BnDeo
Ppi nooCoeDInHeHHn CoeHNHtEnbHoro Ka6enla ayuio/BnuJeO y6eDInTeCb, UTo BblnoCoeDInHReTe wTeKepeBk rHe3dAm OdnHaKOBOro cBeTa.
OtkpoTe KpbIuKry rHe3da. IOpCoeDInHITe BnDeOkamepy K BxHbIM rHe3dAM LINE IN ha TeJeBn3OpE nIN IOpCoeDInHemHOM K Hemy KBM C NcNoJIb3OBaHNEM pNJaRaEMORO coeDInHITeJIbHOrO Ka6eJra ayDIO/BnDeo.
YcTaHOBnTe CeNeKTop BxOdHbIX CnHaNoB Ha KBM B noLoXeHne LINE. Pp n oDcoEduHeHn K KBM yCtAHoBnTe CeNeKTop BxOdHbIX CnHaNoB Ha KBM B noLoXeHne LINE.
If your TV or VCR has an S video jack, connect using the S video connecting cable (not supplied) [a] to obtain a high quality picture. If you are going to connect the camcorder using the S video connecting cable (not supplied) [a], you do not need to connect the yellow (video) plug of the A/V connecting cable [b].
If your TV or VCR is a monaural type - CCD-TR840E/TR845E only
Connect only the white plug for audio on both the camcorder and the VCR or the TV. With this connection, the sound is monaural even on stereo model.
If your TV/VCR has a 21-pin connector (EUROCONNECTOR)
Use the supplied 21-pin adaptor.
-ToJbKO CCD-TR840E/TR845E
EcIn BaW TeLeBn3Op INKBM IMeET rHe3do S-BnDeo, NOcOeDnHnTe C NOMOuBHO coEHNHTeNbHorO Ka6eNrS-BnDEocnHaJIOB (He npUlaRaetc) [a] dIyNoJyehnBaBCOKOro KaueCTBa n3ObpaXeHn. EcIn Bbl NOcOeDnHReTe BNDeOkamepy c IcNoIb3OBAHnEM CoEHNHTeNbHorO Ka6eNrS-BnDEocnHaJIOB (He npUlaRaetc) [a], Bam He hYxHo NoCoeDnHnTb JeENTbI (BNDeo) pa3bEm coEHNHTeNbHorO Ka6eNraaydno/BnDeo [b].
EcIn BaW TeLeBn3Op nI KBM MOHOOHueCKO TnA
-ТолбкоCCD-TR840E/TR845E
IoioceHnHToJIbKO6JIbpa3bEmIaayiOnCnHAnOB INBUNDeOmaHnTocOHy INKBMnnTeNeBn3Opy.PnTaKOMcoEiHHeHm3Byk 6byETMOHOOHueCKOM,daXeecnIN DnCTepeoOHOHueCKoMoJeIN BnDeOKaMepbl.
EcIn B BaWeM TB/KBM nmeTeTc 21- TbipbKobbl pa3bem (EUROCONNECTOR)
IcnoB3yInTe npinaraembl 21-UTbIPbKObbl aanTep.


Use an RFU adaptor (not supplied).
Длп подсоeиненяк TeleБиЗур uN KBM 6e3 BXOДнБИХ rHe3d ayDnO/BnDEO
IcnoIb3yIe B4-anaTep (He npinaraetca).
Playing back a tape
Bocnpon3BedeHne JeHTbl
You can monitor the playback picture in the viewfinder. You can also monitor the picture on a TV screen, after connecting the camcorder to a TV or VCR.
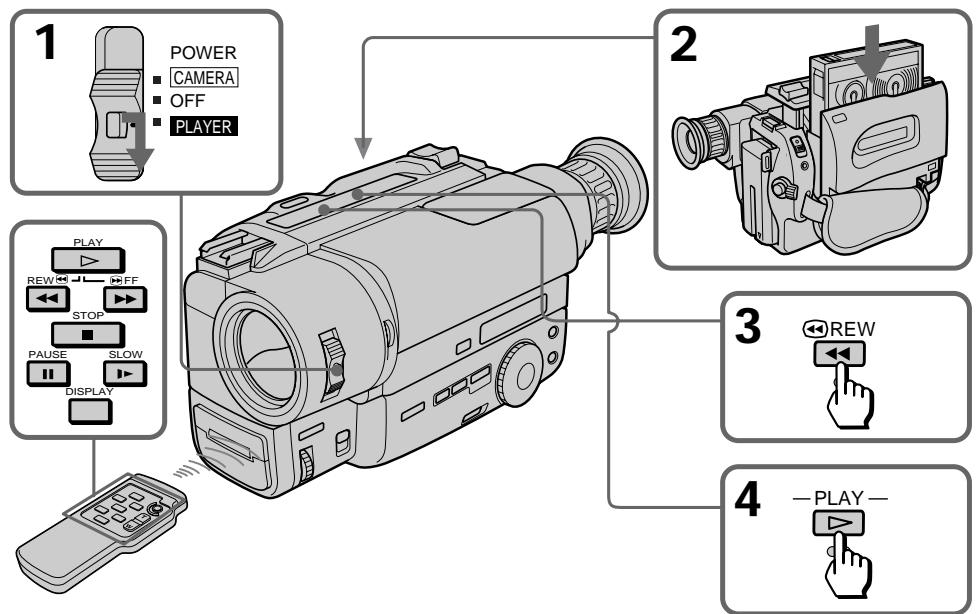
(1) While pressing the small green button on the POWER switch, set it to PLAYER. The video control buttons light up (CCD-TR511E/ TR640E/TR840E/TR845E only).
(2) Insert the recorded tape with the window facing out.
(3) Press to rewind the tape.
(4) Press to start playback.
BbMOKTeInpocMaTpNbBaTn3o6paXeHne B BuOnckaTeNe.BbMOKTe TaXKe InpocMOTpeTBn3o6paXeHneHa3kpaHe TeneBn3Opa nocLeNoDcoEduHEnn BNuDeOkamepbIK TeNeBn3Opynn KBM.
(1)Haximma ManeBkyu 3eJeHyo KhONky Ha BbIKIyOaTeNe POWER, yCTaHOBnTe erO B noLoXeHne PLAYER. BbICBeTcra pa6Oyne KhONKn BInDeOkaMepbl. (ToJIbKO CCD-TR511E/TR640E/TR840E/TR845E).
(2)BCTaBbTe 3aIncaHHyIOJeHTy OKOuKOM, 6paueHHbIM Hapxky.
(3)HaxmTe Для yckopehno nepemOTkn JIeHTbI Ha3a.d.
(4) HaxmTe ▷ДЯ NaHauJa BOCpnOu3BvEHeNIA.
To stop playback, press ■.
To rewind the tape, press
To fast-forward the tape rapidly, press
ДЯ OCTaHOBKn BOCnpon3BeDEHnHaXmITE
Дя усокорно поетмOTК leHTbI Ha3aD haxMITE
Using the remote commander
- CCD-TR412E/TR511E/TR640E/TR840E/TR845E only
You can control playback using the supplied Remote Commander. Before using the Remote Commander, insert the R6 (size AA) batteries.
To display the viewfinder screen indicators on the TV
Press DISPLAY on the Remote Commander. To erase the indicators, press DISPLAY again.
Using headphones
Connect headphones (not supplied) to the jack (CCD-TR840E/TR845E only).
Note on the lens cover
The lens cover does not open when the POWER switch is set to PLAYER. Do not open the lens cover manually. It may cause malfunction.
IcnoJIb3OBAHne nyIbTa
ДиctанционногуynpaBneHnA
-ToIbko CCD-TR412E/TR511E/TR640E/ TR840E/TR845E
BbMOxKTe ynpabJIbTB BOCpON3BeDenHEm C nOMOuIIO pNIIaRaEMOro NylbTa IINCTaHcUHOHoro ynpabJeHHa.IpeE INCNOJb3OBaHNMe nylbTa IINCTaHcUHOHoro ynpabJeHHaBCTaBBTe B Hero 6aTapeeKn R6 (pa3Mepom AA).
IcnoB3oBaHne roOBhbx TeJefoHOB
IoiocoeinHte roIOBhle TepeoHbI (He npnlaIaOTc) K rHe3dy (TolbKO CCD-TR840E/TR845E).
Various playback modes
To view a still picture (playback pause)
Press I during playback. To resume playback, press I or
To locate a scene (picture search)
Keep pressing or during playback. To resume normal playback, release the button.
To monitor the high-speed picture while advancing the tape or rewinding (skip scan)
Keep pressing while rewinding or while advancing the tape. To resume normal playback, press .
To view the picture at 1/5 speed (slow playback)
- CCD-TR412E/TR511E/TR640E/TR840E/TR845E only
Press on the Remote Commander during playback. To resume normal playback, press If slow playback lasts for about 1 minute, it shifts to normal speed automatically.
To view the picture at double speed - CCD-TR845E only
For double speed playback in the reverse direction, press then press x2 on the Remote Commander during playback. For double speed playback in the forward direction, press > / II , then press x2 during playback. To resume normal playback, press
Pa3nHbIepeXmblBocnpOn3BeJeHna
ДлгпрсмOTра HeNoBnKHOro n3O6pa-KeHnra (nay3a BocnpOn3BeDeHnra)
HaxmTe BO BpemBocpon3BeDeHn.ДЯ BOCCTaHOBLeHnBocpon3BeDeHn HaxmTe IJINI
Длгобарухженифразмента (ноиckизбрахжени)
ДерхитЕ нажатон KHONKy 一 一 Ил 一 > BO Время BOCPOn3BeDEHЯ. Дя BAOCCTaHOВЛEHЯ HOPMaJIbHOrO BOCPOn3BeDEHЯ OTNPyCTNe KHONKy.
Для KoHTpOЯ n3o6paJxehnHa BBICOKO CKOpocTи BO BpeMa YcKOpEHHO nepemOTkn JIeHtbl Bpepei IJIH Ha3aad (NONCK MeToDom nporoHa)
Держпту Нжатой кногку BO Врема
перемOTКЛЕHTыHAЗдИЛКногку BO
Врема перемOTКЛЕHTыВпец.ДЯ
BOСТСАНБLEНЯ HOPмAJьHORO
BOСПОН3BEDEнЯ НжмTE
ДлпюсмOTpaИЗбраженяHa1/5CKOPoCTn(3aMeДлeHHoeBOCppon3BeDeHne)
-ToIbKO CCD-TR412E/TR511E/TR640E/ TR840E/TR845E
HaKmTe Ha npIbTe DnCTaHnOHHo ynpaBHeHn BO Bpem BOCpn3BeDeHn. IyBocCTaHOBLeHn HOpMaJbHOrO BOCpn3BeHn HaxMTe .Ecnn 3aMeDnHoe BOCpn3BeHne npDoJXaeTc np6bn3nteJbHO B TeueHne 1 MNHybl, annapat nepeKlouHTcHa HopMaJbHyO CKoPoCTb aBTOMATUeCKn.
To view the picture frame-by-frame
Press / < or > / on the Remote Commander in playback pause mode. If you keep pressing the button, you can view the picture at 1/25 speed. To resume normal playback, press
To change the playback direction
Press / < on the Remote Commander for reverse direction or > / > on the Remote Commander for forward direction during playback. To resume normal playback, press
To select the playback sound
Change the "HiFi SOUND" mode setting in the menu system.
Notes on playback
- Noise may appear when you use the still/slow/picture search function to play back the tape recorded in LP mode.
- Streaks appear and the sound is muted in the various playback modes.
- When playback pause mode lasts for 5 minutes, the camcorder automatically enters stop mode. To resume playback, press .
Horizontal noise appears at the centre of the screen when you play back a tape in reverse if the RC time code or the Data Code is displayed on the screen. This is normal. (CCD-TR845E only)
- You can play back the tapes recorded in the Hi8 video system on the standard 8 mm camcorder (CCD-TR411E/TR412E/TR511E/TR640E only).
Displaying the date or time when you recorded - Data Code function
- CCD-TR845E only
Even if you did not record the date or time when you were recording, you can display the date or time when you recorded (Data Code) on the TV during playback or editing. The Data Code is also displayed in the viewfinder and the display window.
IaH3MeHeHHHaNPaBHeHH BocPon3BeDeHH
-ToIbkoCCD-TR845E
Haxmnte 一 / < 一 Ha npbTe dncTaHcnoHHO ynpabNeHnJa Bb6opa o6paTHo HnPaBLeHn nIi > / Ha npbTe dncTaHcnoHHO ynpabHeNJa Bb6opa HnPaBleHn BnepeD BOBpemBOCnpOn3BeDeHn.DnBaOCCTaHOBHeN HOpMaJIbHOBOCnpOn3BeDeHn HaxmTe ▲
PpimueaHnK BOCpon3BedeHHIO
ПомexmMoryT noBbIbC, KOrJa BblncnObl3yeTe cyHKcNIO cTOn-KaIpa/3amEJnHoro BOCpON3BeDEHnI/NoICKa n3o6paXeHnI pRn BOCpON3BeDEHnI JeHTbl, 3anicaHnoB PexIme LP.
“TaNyKn”NoBBAHOTcN3BYK 6ydetPnpIyueH Bpa3JIuHbIXpeXImaxBOCnpOn3eDEHn.
Ecnnpexumnay3bI BOCnpON3BeJeHnN npOJXmaTcB TteHHe 5 MmHT, BnDEOKaMePA ABTOMATUeCKn BOJET B peKIM OCTaHObA.ДЯ BOCCTAHOBJIeHnB OBCpON3BeJeHn HaxMNTe ▲
TOpn3oHTaIbHbIe NOMExNIOBnIOTcB UeHTpe 3KpaHa, KOrDa BBy BocpOn3BOJnte HETy B O6paTHOM HAnpAbNeHIn, ECIN BPeMeHHoKoR RC INI KOD DaHbIX OTo6paKaTeCNa Ha 3KpaHe.3To A8JIaETcH HOpMaJIbHbIM. (ToJIbKO CCD-TR845E)
BbMOKeTe BOCnPOIN3BOJ NTBJIeHTbl, 3aNcHnBHe B BInDEoCnCTMe Hi8 Ha cTaNdApTHoN BUNDeOKaMepe C 8-NEtToI (TOJIbKO CCD-TR411E/TR412E/TR511E/TR640E).
OTo6paXeHne DaTbI NJIIN BpeMeHN BaWei 3aPiNC -ФункцЯ Кoda daHHbIX
-ТолькоCCD-TR845E
Даже ecn Bbl He 3ancaJn DaTy nIn Bpemr, KOrJa Bbl BblOnJIHnIa3AncB, Bbl Moxete OTo6pa3ntb DaTy nN Bpemr, KOrJa BblOJIHnIacb 3AncB (KoD daHHbIX), Ha 3KpaHe TeLEBn3opa Bo BPemr BocPOn3BeDeHnI aMOnTaKa. Kod daHHbIX TaKxe OTo6paXaeTcB B BuONCKaTeNe I BOKOWKe DnCIIeJ.
To display the date or time when you recorded
Press DATE or TIME on the camcorder. To make the date or time disappear, press it again. To display the date and time when you recorded, press TIME (or DATE) after pressing DATE (or TIME). To make the date and time disappear, press DATE and TIME again.
To display simultaneously the date and time when you recorded
Press DATA CODE on the Remote Commander. To make the date and time disappear, press it again.
- A blank portion of the tape is being played back.
- The tape was recorded by a camcorder without the Data Code function.
- The tape was recorded by a camcorder without having date and time set.
- The tape is unreadable due to tape damage or noise.
- The tape is being played back in variable speed (Slow Playback, etc.).
- An index signal is marked, the RC time code is written, or PCM after recording is made on the tape.
Using alternative power sources
You can choose any of the following power sources for your camcorder: battery pack, mains, alkaline batteries and 12/24V car battery. Choose the appropriate power source depending on where you want to use your camcorder.
| Place | Power source | Accessory to be used |
| Indoors | Mains | Supplied AC power adaptor |
| Outdoors | Battery pack | Battery pack NP-F330 (supplied), NP-F530, NP-F550, NP-F730, NP-F750, NP-F930, NP-F950 |
| Size LR6 (AA) Alkaline battery | Sony battery case EBP-L7 |
| In the car | 12 V or 24 V car battery | Sony car battery charger DC-V515A |
Notes on power sources
- Disconnecting the power source or removing the battery pack during recording or playback may damage the inserted tape.
- The DC IN jack has power source priority. This means that the battery pack cannot supply any power if the mains lead is connected to the DC IN jack, even when the mains lead is not plugged into the mains.
YcoBepweHCTBOBaHHbIe Opeaun
IcnoJb3ObaHne aJIbTepeHaTMBhblIX NCTOCHNKOB NITaHnA
Bb mokeTe Bb6paTb IIO60 n3 cneIyOuNX
NCTOCHNKOB NITAHIN DnIe BaWei BNDeOKaMEpbI:
6batapeHbI 6bok 3JIeKTPnueckcyIO cETb,
ZIeOuHbIe 6batapeKn n 12/24 B aBTOMo-
6bNbHbI aKKymJrTOp. BbIePnte nOxDxOJaUIN
NCTOCHNK NITAHIN B 3ABNCMOCtN OT TORO, rIe
Bb XOTnTE NcNOlb3OBaTb BaSy BNDeOKaMEpy.
(1) Open the DC IN jack cover, and connect the AC power adaptor to the DC IN jack on the camcorder.
(2) Connect the mains lead to the AC power adaptor.
(3) Connect the mains lead to the mains.
IcnoJb3OBaHne 3JIeKTpNueCKoI cETn
(1)ОткрейTe Крьшуг He3da DC IN n noДcoeДиНITE ceTeВо aДanTpepenerMeHHoro ToKa K rHe3dy DC IN ha BnДeOKaMepe.
(2)ПоДсоeДинHTe ceTeBOI npOBoI K cTeBOMy aДaNTepу nEpemEHOro TOKa.
(3)ПодсоeДинITE сеTeBOI повOD K cetN.
1
2,3
WARNING
The mains lead must only be changed at a qualified service shop.
PRECAUTION
The set is not disconnected from the AC power source (mains) as long as it is connected to the mains, even if the set itself has been turned off.
Note
Keep the AC power adaptor away from the camcorder if the picture is disturbed.
PNEyPPEKDEHNE
Cetebon npoBOddoJIkeH 6bITb 3aMeHeH TOJIbKO B MacTepeCKo KBaIINΦuNpOBAHHORO 06cnyxNBAHnA.
ПЕДОCTЕРEXEHNE
AnnapaT He OTKIIOUaTeC T O NCTOChNk nITaHnI nepem. ToKa (3JIeKTPnueCeKo CEtN) Do TEX NOp, POKA OH NIOKIIuOeH K 3JIeKTPnueCeKo CETN, DaJKe ECJN cAm annapaT BbIKIoUeH.
PpimeyaHne
IepKnte cTeBoi aAnTep nepemEnHOro ToKa nOaIbIe OT BnDeOKaMepbl, ecnn 1306paXeHne coDepKNT nomexn.
Using a car battery
Use Sony DC-V515A car battery charger (not supplied). Connect the car battery cord to the cigarette lighter socket of a car (12V or 24V) Refer to the operating instructions of your car battery charger.
To remove the car battery charger
The car battery charger is removed in the same way as the battery pack.

This mark indicates that this product is a genuine accessory for Sony video products.
When purchasing Sony video products, Sony recommends that you purchase accessories with this "GENUINE VIDEO ACCESSORIES" mark.
IcnoJb3ObaHne aBTOMo6nIbHOro aKKymyIaTopa
IcnoB3yIte 3apnHbBvIpMaNTeIb aBTOMo6NlBHorO aKKymJrTopa Sony DC-V515A (He npnilaraetc).POncoEnHtpe Hhyp aBTOMo6NlBHorO aKKymJrTopa K rHe3dy cIrapTeHOro pKpnuBaTeIa bTOMo6NJIa (12 B nIin 24 B).ObpaTntecb K INCTpyKuIN no 3Kcnnyatau BaWero aBTOMo6NlBHorO 3apnHO BvIpMaNTeIa.
ДЯСТИЗЗAPДHOROBbIPRIMNTAЯВТOMOБиьHOrOaKKyMЛТopa
3apnBb BbIPmTeIb aBTOMoNBHORO aKKymyTota CHMaETc TaKIM Je 6pa30M, KaN 6bTapeHb 6JOK.

HaCToAni 3nak yKa3bIbAeT, YTO DaHHa IpoDyKuIN RAJIaETcnoDInHNo IpiHaNLeJXHO BUnDeOpOkykUIN Sony.
Ecnn BbI nokynapeTe BndeOpnokyuNIO Sony, TmBpeKOMeHnyeM, YTO6bI BbI nOKynaII npHaJdLeXHOCTN, NOMEeHHble 3HaKOM "GENUINE VIDEO ACCESSORIES".
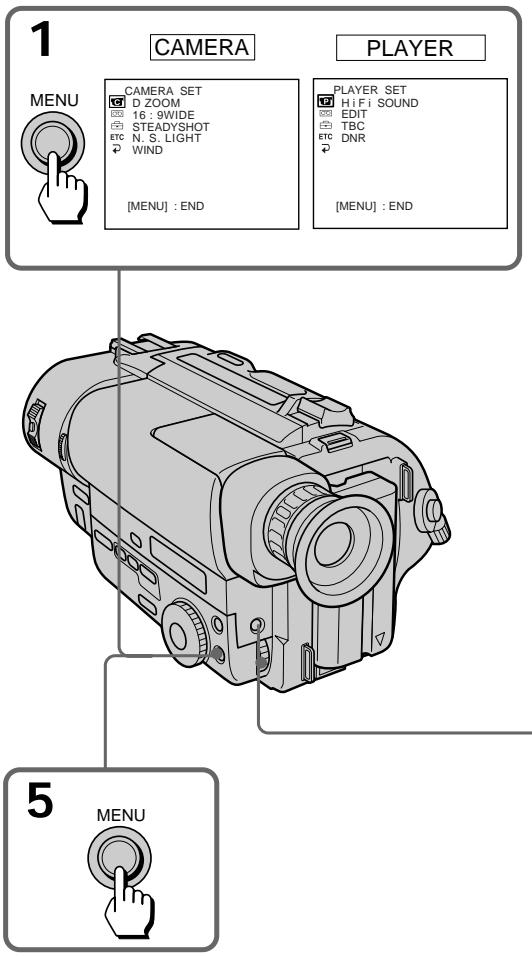
Changing the mode settings
You can change the mode settings in the menu system to further enjoy the features and functions of the camcorder.
(1) Press MENU to display the menu.
(2) Turn the control dial to select the desired icon in the left side of the menu, then press the dial.
(3) Turn the control dial to select the desired item, then press the dial.
(4) Turn the control dial to select the desired mode, then press the dial. If you want to change the other modes, repeat steps 3 and 4. If you want to change the other items, select RETURN and press the dial, then repeat steps from 2 to 4.
(5) Press MENU or select icon to erase the menu display.
BbMOKTeI3MeHHTb yCTaHOBKn peXIMOB BCNTeMe MeHIO IJI 60JIbIeO HAcJaXdEHH OOC6EHHOCTMn IN cyHKUJMMn BInDeOKaMEpbI.
(1)HaxmTe MEnU dIy OTo6paXeHHa MeHIO.
(2)NoBepHnTepeRyIuropOBOUHbI DnCK BbI6Opa NIKTOrpaMMbI CJIeBOB CTOpOHbMeHIO,a 3aTEM HAXKMTE DNCK.
(3)ПовернITE ретуларовчный ддь вьбора лжелаямоу устаховки,а затем нахимпerte дSCK.
(4)ПовернITEpeулinoPoBOUHbIДИСКДпЯВыбopaжelaemoropexIMa,a3aTeMHaxMNTeДИСК.EcNBIxOTHTeI3MeHnITbIpyrIepeXIMbI,NOBTOPIeIyHKtBi3I4EcnBIxOTHTeI3MeHnITbIpyrIeycTaHOBKnBb6epITe 一 RETURNHaXMMTEIINCK,a3aTeM NOBTOPIeIyHKtBi2-4.
(5)HaXMMTe MENU nIN BbI6epNTe NIKTOrpaMMy DnIaCTnpaHnA DnCnJIe MeHIO.

Depending on the model of your camcorder, the menu display may be different from that in this illustration.
Note on changing the mode setting
Menu items differ depending on the setting of the POWER switch to PLAYER or CAMERA.
Selecting the mode setting of each item
Items for both CAMERA and PLAYER modes
REMAIN*
COUNTER* (CCD-TR845E only)
- Normally select NORMAL.
- In PLAYER mode, select TIME CODE to display the RC time code in order to edit more precisely or to check the total time of the recorded part from the beginning of the tape. The RC time code indicates "hours, minutes, seconds, frames" in the form of "0:00:00:00". However, "frames" is not indicated in CAMERA mode.
PpIMeHHe K DnCnJIeO MeHIO
B 3aBnCmOcTn OT moJeN BaWei BnDeOkamepbI DnCnPeM MeHIO MoKET OTnUaTbcr OT ONCaHHO B DaHHo HNCTpyKcnn PNo 3KcPnyataa.
PpIMeuaHHe K n3MeHeHHIO yCTaHOBOK peKmOB
YCTaHOBKN MEHIO OTJNUaIOTc B 3aBNCIMOCtN OT HaxoKdEHHBbIKJIouyTaTeIa POWER B noJIoXeHHPLAYER nn CAMERA.
Bb6op pexmkaqdoynctaHOBKn
YctaHOBKn DnPa peXIMOB u CAMERA u PLAYER
REMAIN*
COUNTER* (Toько CCD-TR845E)
- O6bIuHOb BbIbIpaIte NORMAL.
BpexmePLAYERBbIbepnteTIMECODE
dIaOTobpaXeHnBpeMeHHoroKoJaRC B
ceJAXBbIIOJIHeHnB6OJeTOCHOROMHTaKa
JIINDnPbOBePKNo6UeROBpeMeHN
3aNcAHHOuCaTInOTHaJaLAJeHTbl.
BpeMeHHoR KO R yKa3bIbaeT"uaCbI,
MHyTb,CEkyHdbI,KaIpbI,BfOpMe
0:00:00:00".OdHaKO,"KaIpbI"He 6ydyT
nokaahbI BpexmeCAMERA.
LTR SIZE\*
- Normally select NORMAL.
- Select 2x to display selected menu item by twice size of normal.
ETC BEEP\*
- Select ON so that beeps sound when you start/stop recording, etc.
- Select OFF when you do not want to hear the beep sound.
ETC COMMANDERON/OFF ^* (CCD-TR412E/ TR511E/TR640E/TR840E/TR845E only)
- Select ON when using the supplied Remote Commander for the camcorder.
- Select OFF when not using the Remote Commander.
ETC INDICATOR\* (CCDTR840E/TR845E only)
- Select BL ON to light up the display window.
- Select BL OFF to turn off the back light of display window.
When you use the AC power adaptor as a power source, this item is not displayed in the menu.
Items for CAMERA mode only
D ZOOM*
- Select ON to activate digital zooming.
- Select OFF to not use the digital zoom. The camcorder goes back to 16x (CCD-TR411E/ TR412E) or 18x (CCD-TR511E/TR640E/ TR840E/TR845E) zoom.
16:9WIDE\*
- Normally select OFF.
- Select CINEMA to record in CINEMA mode.
- Select 16:9FULL to record in 16:9FULL mode.
STEADYSHOT\*ON/OFF>CCD-TR640E/ TR840E/TR845E only)
- Normally select ON.
- Select OFF to release the Steady Shot function.
LTR SIZE\*
- O6bIuHOb BbIbIpaIte NORMAL.
- BbIbePte 2x dnia oTo6paKeHnB bIbpaHHoYcTaHOBKn MeHIO B Dba pa3 6OJbSe HopMaJIbHoro pa3Mepa.
ETC BEEP\*
- BbI6epnTe ON, yTo6bI 3ymmepHbIe CnHaJIbI bByaJIn, KOrJa Bbl NaunHaeTe/ OCTaHaBJIINBaTe 3aIINCb I T.D.
- BbIbepnte OFF,ecnBbI He xoTnTe CblIaTb 3yMMepHbI 3ByKOBoCnHaJ.
ETC COMMANDER (ToIbko CCD-TR412E/TR511E/TR640E/TR840E/TR845E)
- Bb6npaTe ON npn nCnoB3oBaHnnpnlaeraMoro K BnDeOKaMepe NylTaIncTahuOHHO ynpabJeHn.
- BbIbEpnte OFF,ecnI npIbT nIcTaHcNIOHHOrO ynpaBJIeHnI He IcNoJIb3yETcR.
ETC INDICATOR\* (ToIbko CCD-TR840E/TR845E)
- BblbepnTe BL ON nIJI pOcBceHbAHNOKoWka dncnJe.
- BbIbepnte BL OFF ДЯ BbIKJIOUeHnna 3aДнeи NOCDBeTKn OKoшka DInCJIpeJ.
Korda Bby nCnOJb3yeTe cTeBoi aIaNTep nepemehHOro TOKa, daHHa yCTaHOBka He OTo6paXaeTcB MeHIO.
YCTAHOBKINTOJIbKOДЛЯpeXIMACAMERA
D ZOOM\*
- BbI6epnte ON dIa akTnBn3aunu cIuppoBoi TpaHcfoKaun.
- BbIbepnTe OFF npn HeuCnoJIb3ObaHnI cnΦpOBoT TpaHcΦokaun. BIndeokamepa Bo3BpaaTaetcK 16-KpaTHoN (CCD-TR411E/ TR412E) nnn 18-KpaTHoN (CCD-TR511E/ TR640E/TR840E/TR845E) TpaHcΦokaun.
16:9WIDE*
- Normally select ON.
- Select OFF to not use the NightShot Light function.
WINDON/OFF>CCD-TR840E/TR845E only)
- Select ON to reduce wind noise when recording in strong wind.
- Normally select OFF.
REC MODE*
- Select SP when recording in SP (standard play) mode.
- Select LP when recording in LP (long play) mode.
When a tape recorded on this camcorder in LP mode is played back on other types of 8mm camcorders or VCRs, the playback quality may not be as good as that on this camcorder.
ORC TO SET*
Select this item to automatically adjust the recording condition to get the best possible recording.
If you have already performed this function, "ORC ON" is displayed.
CLOCK SET\*
Reset the date or time.
AUTO DATE* (CCD-TR411E/ TR412E/TR511E/TR640E/TR840E only)
- Select ON to record the date for 10 seconds after recording has started.
- Select OFF to not record the date.
N.S.LIGHT\* (ToJbKO CCD-TR511E/TR640E/TR840E/TR845E)
- O6bIyHO BbIbIpaIaTe ON.
- BbIbepnTe OFF npn HeucnoJb3ObaHnn ΦyHKuIN OCBeueHnRA HOHOr CbEMKn.
WIND (ToIbKO CCD-TR840E/ TR845E)
KordaIeHTa,3aIncanHnaHa daHHoH BnDeokamepeB pexime LP,Bocppon3BoDntcHa dpynx TINax 8 MM BnDeokamep nn KBM, KaeeCTBO BOCppon3BeDEHnMAoKet 6bITb He TaKIM XOPOShM, KaK npN BOCppon3BeDEHnHa daHHoB NDeokamepe.
ORC TO SET*
BbIbePte DaHHyU yCTaHOBky dIa ABTomatueecko peYIpOBKn ycNobn 3aIncn DJIPOJyEHn PO BO3MOXHOCHTn HauNyUwe 3aIncn.
Ecnn Bby yke 3aJeIcTBoBaII N3Ty cyHKuIO,TO "ORC ON"6ydet OTo6paKeHo.
CLOCK SET*
BbIbeIpTe 3Tu yCTaHOBky IJIy nepeycTaHOBKn DaTbI INN BpemeHN.
AUTO DATE* (Tolbko CCD-TR411E/TR412E/TR511E/TR640E/TR840E)
- BbIbepnte ON dIa 3aIncn DaTbI B TeueHne 10 cekyHd nocJe hauana 3aIncn.
- BbIbepeTe OFF, YTO6bI data He 3aIIncbIbAlacb.
DEMO MODE\*
- Select ON to make the demonstration appear.
- Select OFF to deactivate the demonstration mode.
Notes on DEMO MODE
- DEMO MODE is set to STBY (Standby) at the factory and the demonstration starts about 10 minutes after you set the POWER switch to CAMERA without inserting a cassette. Note that you cannot select STBY of DEMO MODE in the menu system.
- You cannot select DEMO MODE when a cassette is inserted in the camcorder.
- If you insert a cassette during the demonstration, the demonstration stops. You can start recording as usual. DEMO MODE automatically returns to STBY.
- When NIGHTSHOT is set to ON, "NIGHTSHOT" appears in the viewfinder and the demonstration does not start. (CCDTR511E/TR640E/TR840E/TR845E only)
To look at the demonstration at once
Eject the cassette, if inserted. Select ON of DEMO MODE and erase the menu display. The demonstration will begin.
When you turn off the camcorder once, DEMO MODE automatically returns to STE
ETC WORLD TIME*
Select this item to set the clock by a time difference.
ETC REC LAMP\*
- Select OFF when you do not want the camera recording/battery lamp at the front of the unit to light up.
- Normally select ON.
DEMO MODE\*
BbI6epIT ON Ia nIorBJIeHnI demOHCTpaun.
- Bыберп Te OFF ДЯ OTKЛючЕня Функци N demOHCTpaци.
PpimechnK DEMO MODE
- DEMO MODE yctaHaBnBaetcHa 3aBoDeHa STBY (rotOBHocTb)и demoHcTaPuaNHaunHaeTc np6bnnteIbHoYepez10MnHyT nocJe yCTaHOBKn BblKnUoateJPAPOWER B noLoKeHne CAMERA 6e3BCTaBKn KaccTebl.3aMeTbTe, YTO Bbl He MoXeTe BblbnpaTbSTBY dIpeKIma DEMO MODE BCNTeMe MeHIO.
- Bbl He MoXeTe Bbl6paTb DEMO MODE, ecJN KaccTe BAcbJIeHa B VInDeOkamepy.
- EcIN Bbl BCTaBnTe Kaccety Bo Bpemr DeMOHcTpaun, To DeMOHcTpaun npeKpaUaetc. Bbl MoKeTe Haatb 3aIncb, KaK obuHNo. DEMO MODE abTomatnueckn Bo3paUaetc K STBY.
- EcnIyHKnIg NIGHTSHOT yctaHOBJIeHa BO BKIOUHeHHOE NOIOXKeHne ON, B BVIOONCKaTeJe IOARNTc HINdNKaCnIg "NIGHTSHOT" n DEMOHCTpaCnI HaHnHaTbCn He 6yJeT. (ToJbKO CCD-TR511E/TR640E/TR840E/TR845E)
- Normally select STEREO.
- Select 1 or 2 to play back a dual sound track tape.
EDIT
- Select ON to minimize picture deterioration when editing.
- Normally select OFF.
TBC* (CCD-TR840E/TR845E only)
- Normally select ON, to correct for jitter.
- Select OFF to not correct for jitter. The picture may not be steady when played back.
Note on TBC setting
Set TBC to OFF when:
- Playing back a tape you have dubbed over.
- Playing back a tape on which you recorded the signal of a TV game or similar machine.
- The playback picture fluctuates.
DNR*ON/OFF>CCD-TR840E/TR845E only)
- Normally select ON to reduce picture noise.
- Select OFF if the picture has a lot of movement, causing a conspicuous afterimage.
NTSC PB*
- Normally select ON PAL TV.
- Select NTSC 4.43 if your TV has the NTSC 4.43 mode when playing back a tape recorded in the NTSC colour system.
When you play back on a Multi System TV, select the best mode while watching the picture on the TV.
The following settings work only during playback
EDIT, HiFi SOUND, TBC and DNR.
- These settings are retained even when the battery is removed, as long as the lithium battery is in place.
YctaHOBKn TOpIbKO dIJIpeXIMa PLAYER HiFi SOUND (ToIbKO CCD-TR840E/TR845E)
- O6bIuHo BblbIpaIte STEREO.
BbIbepnte 1 nnn 2 nIa Bocnpoun3BepeHnJIeHTbIC DBOHOH 3ByKOBoDopOxKoN.
EDT
- BbIbepnTe ON dIa cBeDEnH NOMEX K MUNHMMy BO BpeM MOHTaJa.
- OБычно Быб的答案 OFF.
TBC* (ToIbko CCD-TR840E/ TR845E)
-Осычно ВьIBLEпа Te ON ДЯ Корpeкцидраханя.
- BbI6epnte OFF dIЯ OTMeHbI KOppeKcIMn.
N3O6paXeHne MOKeT 6bITb He yCTOnuHBbIM npn BocnpOn3BeDeHIN.
EDIT, HiFi SOUND, TBC v DNR.
*3TN yCTaHOBKn OCTaIOTcB CnJIe DaXke npi ChrTm6bataeHoro 6bOka Do TEX NOp, noka JNTneBa8bataeKa HaxoDITcHa MeCTe.
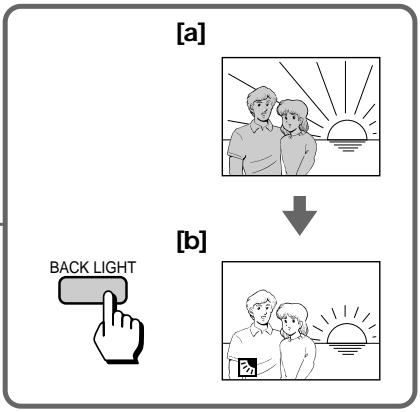
When you shoot a subject with the light source behind the subject or a subject with a light background, use the BACK LIGHT function.
Press BACK LIGHT. The indicator appears in the viewfinder.
Korda Bbl CHnmaeTe oBeKeT C nCTOuHnKOM CBeta no3aDi OBeKeTa nn OBeKeT Ha OCBeueHHom fOHe, nCNoJIb3yIte fYHKcNIO BACK LIGHT.
Haxmnte BACK LIGHT. INdkaTop NOBnAeTcB BnOuCKaTeJe.
[a] Subject is too dark because of backlight.
[b] Subject becomes bright with backlight compensation.
After shooting
Be sure to release this adjustment condition by pressing BACK LIGHT again. The indicator disappears. Otherwise, the picture will be too bright under normal lighting condition.
This function is also effective under the following conditions:
- A subject with a light source nearby or a mirror reflecting light.
- A white subject against a white background. Especially when you shoot a person wearing shiny clothes made of silk or synthetic fiber, his or her face tends to become dark if you do not use this function.
To make a fine adjustment
You can adjust the exposure manually. However, when you adjust the exposure manually, BACK LIGHT does not operate.
[a]ObbektBnTcCNIWKOMTeMHbIMn3-3a 3aDHeNoDCBETKn.
[b]ObbektCTaHOBITcAHPKIMC NOMOUsbIO KOMNEHCAuIN 3aDHeIPOIDCBETKN.
Pocle cbeMkn
He 3a6yIbTe OTKJIUChITb COCTOHRne 3ToI peRyIINpOBKn IyTem HaxKaTnB BACK LIGHT cHOba. INdIKaTOp cNcye3HET. B npOTNBOM Clyuae N3o6paXeHne 6yJeT CNIJKOM JRPKM B yCNOBnx HopMaJIbHOro OCBeueHnA.
DaHHaФyHKURABNAETC3ΦΦEKTUBHOBCJeDyIOxYcNOBnAX:
-ДЯобект,pacnoJoxeHHOro prdom c nCTOuHnKOM CBeta UNI 3epKaJOM OTPaKaUOUM CBET.
-BeIbI obBeKT Ha 6eIOM fOHe. OcObeHNO, KOrDa BBy cHimaTe YeJIOBeKa B 6JeCTaSeOdExKe I3 WELKa NIN CNHTeTNUeCKORO BOJOKHa, eRr NIN ee NIO MoKET CTaTB TEMhbIM, ecNl BBy He 6yDeTe NcNoJIb3OBaTb daHHUo cyHKUIO.
Selecting the fader function
You can fade in or out to give your recording a professional appearance.
When the picture fades in, the sound gradually increases. When the picture fades out, the sound gradually decreases.
-Только CCD-TR511E/TR640E/TR840E/ TR845E
Bb6opФyHKcNn BVeJeHn/ BbVeJeHn n306paXeHn
BbMOxTe PnlaBHO BBOIDt bIN BbIOIDtB n3o6paXeHne, npDabBa BaSe 3aIncn npOceCCNOHaJIbHbN BnD.
Ecnn n3o6paXeHne noCTeHnHO BBOHTcA, 3ByK nOCTeHnHO yBelenuBaETcA. Ecnn n3o6paXeHne noCTeHnHO BbIOHTcA, 3ByK nOCTeHnHO yMeHbShaETcA.

[a]
STBY
REC
FADER


M.FADER
(mosaic)/(m03aɪka)


STRIP


BOUNCE**
(FADE IN only)/ (ToIbko FADE IN)


[b]
STBY
REC
MONOTONE
When fading in, the picture gradually changes from black and white to colour.
When fading out, the picture gradually changes from colour to black and white.
- This function is CCD-TR840E/TR845E only.
** When D ZOOM in the menu system is set to ON, you cannot use this function.
MONOTONE
PnBBeDeHnN306paXeHneNoCTeHnHO n3MeHReTcO TcpeHo-6eNoToDcBeTHoro. PnBbBeDeHnN306paXeHneNoCTeHnHO n3MeHReTcO OtCBeTHoro Do cepHo-6eNoRo.
* DAnHaJ FyHKUIMeETcra TOnbko y CCD-TR840E/TR845E.
** KordaФункцmaD ZOOM B cncTeMe MeHIO yctaHOBnHa Ha ON, Bbl He cMOxKeTe IcnoJIb3OBAtB daHHyIOФунKUHO.
Using the fader function
When fading in [a]
(1) While the camcorder is in Standby mode, press FADER until the desired fade indicator flashes.
(2) Press START/STOP to start recording. The fade indicator stops flashing.
When fading out [b]
(1) During recording, press FADER until the desired fade indicator flashes.
(2) Press START/STOP to stop recording. The fade indicator stops flashing, and then recording stops.
The fading mode selected last is indicated first of all.
IcnoJIb3OBAHnE cyHKcun BBeDeHnBbIBeHeHn N306paXKeHn
Длв Вьедени ИЗобрахени [a]
(1)Korda Bnndeokamepa HaxoindTcB pexkme roTOBHOCTn HaxkmaTe FADER Do Tex nop, noka JeJaembI INHdNkaTop BBeDeHnra/ BbIVEeHnra He HauchET MInaTb.
(2)Haxmnte START/STOP nla hauaIa 3anncn. Hndnkatop BBeDeHnra/BbBedeHnna nepectaet MrrTaTb.
ДЯ ВыВеДени ИЗОБрахЕни [b]
(1)BoBpem3aHnncnaHaxmamTeFADErdoTex np, nokaKeJaembI INdkaTOp BBeDeHn/ BbIBeDeHnHeHaHTMraTb.
(2)HaxmTe START/STOP nIaOCTaHOBKn 3aIncn.IHnKaTOp BBeDeHn/BbIbEHeHn nepeCTaET MIRaTb N 3aIncb OCTaHaBnBaETcra.
PexIM BBeDeHnI/BbIBeEHnI, KOTOpbl 6blBbIpaH nocIeHNm, yKa3bIbAeTcI npexJdeBCero.
![SONY CCD-TR640E - ДЯ ВыВеДени ИЗОБрахЕни [b] - 1](/content/2019/11/48430/images/c2d5e639810f7fb435c59491c4536014c5f7cd4589c0ac92f3cd81e2b9ae0a74.jpg)
![SONY CCD-TR640E - ДЯ ВыВеДени ИЗОБрахЕни [b] - 2](/content/2019/11/48430/images/78d56cd196c66f30194d6a7686fe98a55151428d29274744d95abd97955a73df.jpg)
When you use the bounce function
Set D ZOOM to OFF in the menu system.
Note on the bounce function
When you use the following functions,
"BOUNCE" indicator does not appear.
- Wide mode
- Functions using the PICTURE EFFECT button
- Functions using the PROGRAM AE dial
Korda BblncnoIb3yeTe yHKcuHOp nepexoda
YctaHOBNTe D ZOOM Ha OFF B CnCTeMe MeHIO.
Ппмецнио entociteьн goyHKcnn nepexoda
Ecnn Bby nCnoIb3yeTe CneDyUOuNe cyHKnUm, nHnKaTOp "BOUNCE" He noBtca.
-ШиpopokocopmaThbpekIM
-ФункцисинльзованемКногп PICTURE EFFECT
-Функции NCIOЛьЗОвием ДИСКА PROGRAM ADE
To cancel the fader function
Before pressing START/STOP, press FADER until the indicator disappears.
When the date or time indicator and title are displayed
The date or time indicator and title do not fade in or fade out.
When the START/STOP MODE switch is set to 5SEC or
You cannot use the fader function.
Note on the fader function
While using the bounce function, you cannot use the following functions.
ДлЯ OTMeHbI Φункци BBeDEHnB bIbEeHnN 306paXeHnN
The NightShot function enables you to shoot a subject in a dark place. You can achieve a satisfactory recording of the ecology of nocturnal animals for observation with this function. This function may record picture nearly in monochrome.
-Только CCD-TR511E/TR640E/TR840E/ TR845E
Функцин Hoунов СьeMkn No3BOJnEe Bam npOn3BODInb Cbemky O6bEkTa B TemHOM MecTe. Bbl MoKte NeNoJyUnrT yD0BJNETBOpNTeBHyO 3aNcBxNtH HOnHbIX XINBOTbIX pN INCOnb3OBAHm DaHHOf FyHKuN.ДaHHa FyHKU MOKe TOCUSeCTBJIaR T3aNNb N3O6paKeHn6bn3KOro K MOHOxPOMHomY.


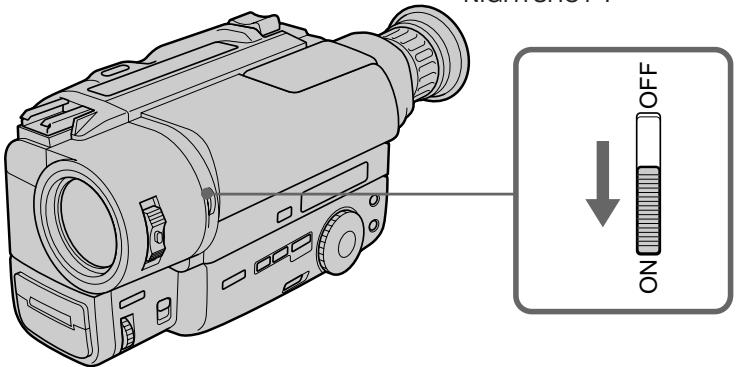
(1) While the camcorder is in Standby mode, slide NIGHTSHOT to ON.
(2) Press START/STOP to start recording. and "NIGHTSHOT" indicators flash.
(1)Korda Bndeokamepa haxoHITcBpejxme roTOBHOCTn nepeDbHbTe NIGHTSHOT B noJIOXeHne ON.
(2)Haxmnte START/STOP nla hauana 3aicnHaunyt mraatb nndkaTopby n "NIGHTSHOT".
To cancel the NightShot function
Slide NIGHTSHOT to OFF.
Using the NightShot light
When you set N.S.LIGHT to ON in the menu system, the picture will be more clear. NightShot Light rays are infrared and are therefore invisible. The maximum limit of NightShot light is about 3m
Notes on the NightShot
- When you keep setting NIGHTSHOT to ON in normal recording, picture may be recorded in incorrect/unnatural colour.
- If focusing is difficult with the autofocus mode when using the NightShot function, use manual focus.
ДЯ OTMeHbI ΦyHKUH HcHOn CbEmKn
IpeBnHbTe NIGHTSHOT B noJoxHe OFF.
IcnoJb3OBAHne JAmNbI HOnHO CbeMKn
KorandaФункциN.S.LIGHT yctaHOblHa ha ON B CINCTeMe MeHIO, n3O6paXeHne 6yJeT 60Jee YETKIM.
CBeTOBbIe LyuH HooHoB CbeEMKn RbJIaIOTc
HnFpAkapacbHMn LyuAMN I N03TOMy RbJIaIOTc
HeBnIMMbIM. MaKcImaJIbHbI npeDeI
OCBeUeHEn B pexkme HoUHOB CbeEMKn
COCTaJIraET 3 M.
PpIMeuaHnK HouHoN CbemKe
Korda Bby ocTabnare TE NIGHTSHOT B noJoxeHNN ON npn HopMaJIbHOJ 3aIncn, n3o6paXeHHe MOxet 6bITb 3aIncaHOB HEnpaBUNbHOM/HeecTeCTBeHHOM ZBeTe.
- EcIn pOKycuropOBka B aBTOMaTneCeKOM peXmme npn nCIOb3OBAHN yHKcN HOUHO CBemKn 3aTpPyDHeHa, BBINOJIHNTe φokycuropBky BpyHyIO.
Selecting the desired mode
You can record a cinemalike picture (CINEMA) or a 16:9 wide picture to watch on the 16:9 wide-screen TV (16:9 FULL).
Bb6op kejaemoro pekma
BbMOKeTe 3aINcBtBn06paXeHne KaK B KInHOteAtpe (CINEMA) nIin uNpOKoOpMaTHoe n3O6paXeHne 16:9 IpynpocMoTpa Ha uNpOKo3kpanHom TeNeBu3ope 16:9 (16:9 FULL).
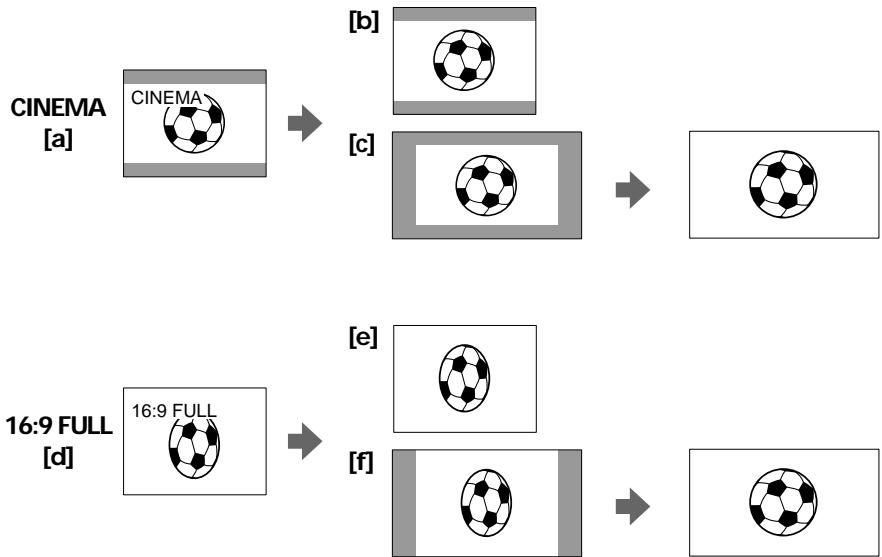
CINEMA
Black bands appear at the top and the bottom of the screen, and the viewfinder [a] and a normal TV screen [b] look wide. You can also watch the picture without black bands on a wide-screen TV [c].
16:9 FULL
The picture in the viewfinder [d] or on a normal TV [e] is horizontally compressed. You can watch the picture of normal images on a wide-screen TV [f].
CINEMA
UeHbIe nOIOcBi IoABJIaIOCTCBepxu i Cn3y 3KpaHa, IN BUNOINCKaTeNb [a] i HOpMaJIbHbI 3KpaH TeneBn3Opa BblrJIAIT WInPOKIMn [b]. Bbl TaKKe MoKeTe npocMOtpeTb N3O6paXeHne 6e3 UeHbIX nOIOc Ha WInPOKO3KpaHHOM TeJeBn3Ope [c].
16:9 FULL
You can select the wide mode (OFF, CINEMA, 16:9FULL) in the menu system (p. 34).
To cancel wide mode
Select OFF in the menu system.
To watch the tape recorded in wide mode
To watch the tape recorded in CINEMA mode, set the screen mode of the wide-screen TV to zoom mode. To watch the tape recorded in 16:9 FULL mode, set it to full mode. For details, refer to the operating instruction of your TV. Note that the picture recorded in 16:9 FULL mode looks compressed on a normal TV.
Notes on wide mode
- If wide mode is set to 16:9FULL, the Steady Shot function does not work and the indicator flashes (CCD-TR640E/TR840E/TR845E only).
- In wide mode, you cannot select the bounce function with FADER (CCD-TR511E/TR640E/ TR840E/TR845E only).
- When you record in 16:9 FULL mode, the date or time indicator will be widened on the wide-screen TV.
- If you dub a tape, the tape is copied in the same mode as the original recording.
- The wide mode is cancelled automatically 5 minutes after you remove the power source.
- When recording, you cannot change the mode.
IcnoJIb3OBAHneФyHKcIN shIpOKoΦopMaTHOro peXIma
BbMoKeTe Bb6paTb ⅢpOKoOpMaTHbI peKIM (OFF, CINEMA, 16:9FULL) B cncTeMe MeHIO (CTp. 34).
Длг OTMeHbI peKIma
BbIbepeTe OFF B cncTeMe MeHIO.
ДлпрсмOTpa ЛENTbl, 3aПИСанHоВ BshIpOKOфОрмATHOM peKIMe
Selecting the best mode
You can select one of six PROGRAM AE (Auto Exposure) modes to suit your shooting situation, referring to the following.
Bb6op HanJyUwero peKIma
BbMOxTe Bb6paTb N3 8eCTn peXIMOB PROGRAM AE (aBTOMaTHueCKo 3KcNo3uN), KOTOpBn IooXoDnT dIra CbEMKn B BaSei CNTyaCm, CBepAcb Co CneNyUOuMn ONICAHNrM.


Spotlight mode
For subjects in spotlight, such as at the theatre or a formal event.
Soft Portrait mode
For zooming in on a still subject in telephoto mode, or for a subject behind an obstacle such as a screen. Creates a soft background for subjects such as people or flowers, and faithfully reproduces skin colour.
Sports Lesson mode
For recording fast-moving subjects such as in tennis or golf games.
Beach & Ski mode
For people or faces in strong light or reflected light, such as at a beach in midsummer or on a ski slope.
Sunset & Moon mode
For recording subjects in dark environments such as sunsets, fireworks, neon signs, or general night views.
Landscape mode
For distant subjects such as mountains or when recording a subject behind an obstacle such as a window or screen.
Pexim npoxekTopHOro ocBeueHnA
ДязпсиобъктадрпoxkeTOpньIMOCBEseHnEM,KaK Hanpimep,BTeaTpEИнHaOФицальHomпиeme.
Turn the PROGRAM AE dial to select the desired PROGRAM AE mode.
To turn off program AE
Set the PROGRAM AE dial to the position.
Notes on focus setting
- In the Spotlight, Sports lesson and Beach & Ski modes, you cannot take close-ups because the camcorder is set to focus only on subjects in the middle to far distance.
- In the Sunset & Moon and Landscape modes, the camcorder is set to focus only on distant subjects.
ДЯ BBI KJIIOUeHHNЯФУHKUIN nporpaMMbI AE
YcTHOBNTe DnCK PROGRA AE B nIoJKeHne
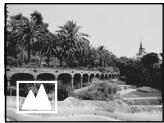
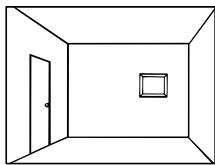
When to use manual focus
In the following cases you should obtain better results by adjusting the focus manually.
-ТолькоCCD-TR511E/TR640E/TR840E/ TR845E
Korda nCnoJb3OBA Tb pyHyu oKocynPoBky
B cneyuohux cnuyaax Bbl mokeTe nolynTb lyuine pe3yIbTaTb,OTpeYnpoBaB fokycinpOBky bpyHyIO.

[a]
[b]

[c]

[d]
Insufficient light [a]
- Subjects with little contrast - walls, sky, etc. [b]
- Too much brightness behind the subject [c]
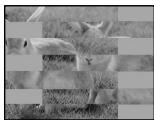
Horizontal stripes [d]
- Subjects through frosted glass
- Subjects beyond nets, etc.
- Bright subject or subject reflecting light
- Shooting a stationary subject when using a tripod
- HeioctatoHoe oCbeHne [a]
- ObbeKtbl C MaJIbIM KOHTpactOM -CTeHbl, He60 n T.D. [b]
CnIuKOM npKm oH 3a o6bEKTOM [c]
- Fopn3oHTaJIbHbIe IOnIOcbl [d]
CbeMka 6bekTOB Upe3 MaTnPOBaHHOe CTeKJIO
-ObbeKtbl3a CeTKoN T.D.
- Äpkn öbekt iinösbekt, OTPaKaIouni CBET
CbeMka HEnoDBNXHOrO 6bKeTc CnCNoJIb3OBaHHeM TpeHOrI
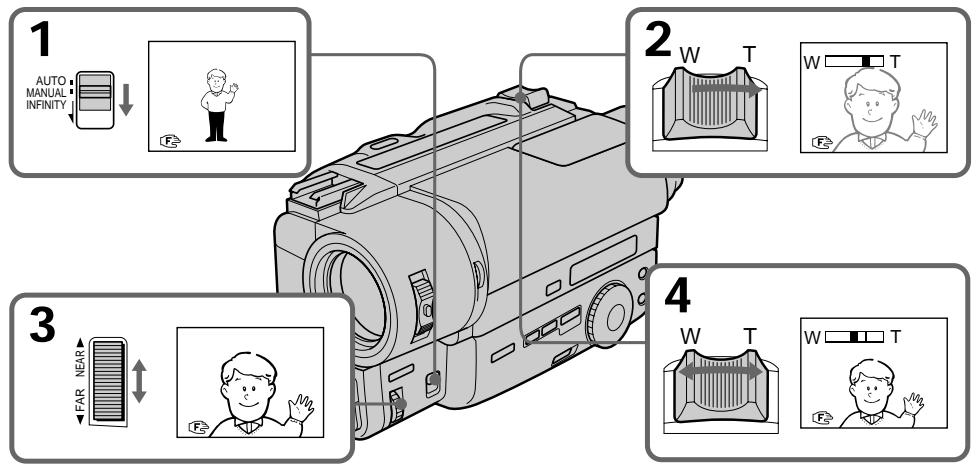
Focusing manually
When focusing manually, first focus in telephoto before recording, and then reset the shot length.
(1) Set FOCUS to MANUAL. The indicator appears in the viewfinder.
(2) Move the power zoom lever to the "T" side in the optical zoom zone until the lever reaches the end.
(3) Turn the NEAR/FAR dial to achieve a sharp focus.
(4) Set the desired shot length using the power zoom lever.
Pуная Фокс neuropа
PpHnOΦokcnpOBKe cNepBa BbIOnHnTeΦokcnpOBky B pexKmE TeleCTo TpeJ3aNcBIO, a 3aTEM yCTaHOBtpe paCtOHaHne CbeMKN.
(1)YcTaHOBnTeFOCUSHaMANUAL. HnDnKaTOp FIOBnAETCBAuONCKaTeNe.
(2)Перемаитpepbuhar npBODHORO
ТрансфокаTopaВСТОРОНТ no
ONТИЧЕCKо 3Оне Трансфокаци DoТexnoop,
ПОКа рьчаг He DoIДeT Do KOHua.
(3)ПовернITE ДИСК NEAR/FAR ДЯ ПОЛУЕНИЧЕТКО ФOKUCIPOBКИ.
(4)YcTaHOBInTe XeJaEMoe pacCTOHaHne CbEmKn C NcNoJIb3OBAHnEM pbIyara npINBOJHOr0 TpaHCΦOKaTopa.
To return to autofocus mode
Set FOCUS to AUTO. The indicator in the viewfinder disappears.
Shooting in relatively dark places
Shoot at wide-angle after focusing in the telephoto position.
To record a very distant subject
Push FOCUS down to INFINITY. The lens focuses on the most distant subject while FOCUS is held down. When it is released, manual focus mode is resumed.
Use this function when shooting through a window or a screen, to focus on a most distant subject.
Note on manual focusing
The following indicators may appear:
when recording a very distant subject.
when the subject is too close to focus on.
Selecting picture effect
You can make pictures like those of television with the Picture Effect function.
Bb6op 3ΦΦeKt a 3o6paXeHnA
Bb mokeTe cdeIaTb n3o6paXeHne nooxKmHa Te, yTO nepeJaOT nO TeLeBnDeHnO C nOMoubIO fynKuIN 3oFKeTob n3o6paXeHnI.

[a]

[b]

[c]
[d]

[e]

[f]
PASTEL [a]
The contrast of the picture is emphasized, and the picture looks like an animated cartoon.
NEG. ART [b]
The colour and brightness of the picture is reversed.
SEPIA
The picture is sepia.
B&W
The picture is monochrome (black and white).
SOLARIZE [c]
The light intensity is more clear, and the picture looks like an illustration.
MOSAIC [d]
The picture is mosaic.
SLIM [e]
The picture expands vertically.
STRETCH [f]
The picture expands horizontally.
PASTEL [a]
KohtpactHocbI n306paXeHnY ycJIINBaETC, n 1306paXeHne BblIaNT, KaK MyJbTInJINaCaIHa.
NEG. ART [b]
LBeT I npKocT bN3O6paXeHn 6yDyT HeRaTINBHBIMI.
SEPIA
IHTeHcNBocTb CBeta 6yDet 6oJee npKo, n3o6paXeHne 6yDet BbyIgJaTeTb, KaKnJIIOCTpauJr.
MOSAIC [d]
Using picture effect function
(1) Press PICTURE EFFECT.
(2) Turn the control dial to select the desired picture effect mode.
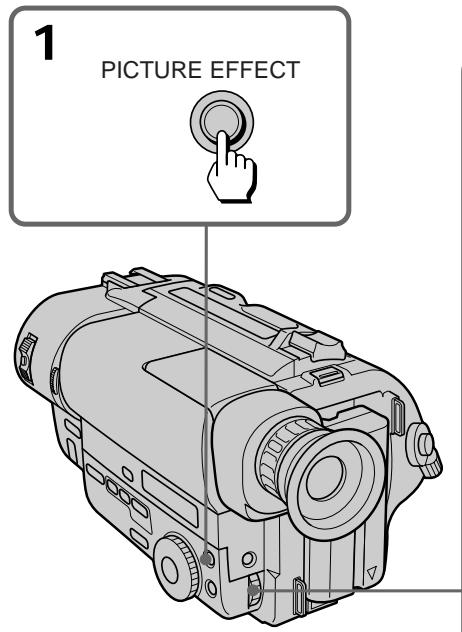
IcnoJb3OBAHneФyHKcIMN 3ΦΦeKTOB N306paXKeHnA
(1)HaXMMTe PICTURE EFFECT.
(2)ПовернITEperуларовныДиСКДпь Вьбopaжelaemoro ржимаэфekta n3o6paхеня.
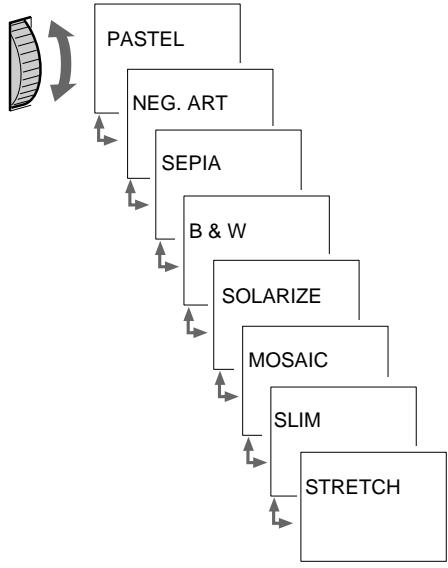
2
To turn off picture effect
Press PICTURE EFFECT. The indicator in the viewfinder goes out.
Note on the picture effect
When you turn the power off, the camcorder returns automatically to normal mode.
BbIKJIIOueHne 3ΦΦeKta n3O6paXeHNr
HaxmTe PICTURE EFFECT. INdkaTOp 3ΦΦeKta n3o6paJehnЯ nCye3HeT n3 BINOuCKaTeJIa.
PpmeaHne K 3ΦΦeKtAm n3o6paXeHnA
Korda BbI BbIKJIOUaTe NITaHne, BnDEOKaMepa aBTOMaTNUeCKN BO3BpaUaETcA K HopMaJIbHOMy peKIMy.
- CCD-TR511E/TR640E/TR840E/TR845E only
When to adjust the exposure
Adjust the exposure manually under the following cases.

[a]
[a]
- The background is too bright (back lighting)
- Insufficient light: most of the picture is dark
[b]
- Bright subject and dark background
To record the darkness faithfully
Adjusting the exposure
(1) Press EXPOSURE.
(2) Turn the control dial to adjust the brightness.
-Только CCD-TR511E/TR640E/TR840E/ TR845E
Korda Tpe6yeTcpeylnpoBaTb 3Kcno3nIO
Otperynpyte3Kcno3nIOBpyHyIO B cIeNyUxCnyaX.
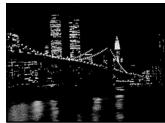
[b]
[a]
- ΦOH AByIeTcCnIIuKOM ApyKIM (3a,IHRA NOIDCBETKa)
- HeioctaToUHoe OCBeueHHe: 6OJIbuaJyacTb n3o6paXeHnTeMHa
[b]
-Rpkn npedmet Ha TEMHOM ohe
-ДяхорошейзаписВ Temhote
PerynipoBka 3Kcno3n
(1)HaXmTe EXPOSURE.
(2)ПовернITEperулpoBOчьнДИСКДПЯpeулpoBKNЯрКоТN.
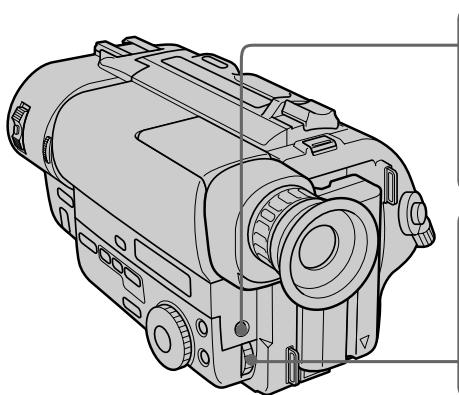
To return to automatic exposure mode
Press EXPOSURE again.

1
EXPOSURE
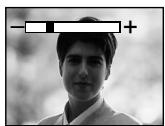

2

ДлЯ BO3BpaTа K peKIMy aBTOMaTHueCKOJ 3KcNo3nCmN
Choba Haxmnte EXPOSURE.
Shooting with the sun behind you
If the light source is behind your subject, or in the following situations, the subject will be recorded too dark.
- The subject is indoors and there is a window behind the subject.
- Bright light sources are included in the scene.
- When shooting a person wearing white or shiny clothes in front of a white background, the face will be recorded too dark.
Shooting in the dark
We recommend you to use a video light (not supplied). To get the best colour, you must maintain a sufficient light level.
When you adjust the exposure manually
- BACK LIGHT does not work.
- If you change the setting of PROGRAM AE mode, the camcorder automatically returns to automatic exposure mode.
CbeMa, KOrda coJHcE haoDHTcY Bac 3a cnHoi
EcIn nctouhNk OCBeueHn HaxoDntc y Bac 3a cnHoi nnB CneDyUOxuX ycNoBnx,6bEKT 6yDet 3anCaH CnIshKOM TemHbIM.
- ⓔБьektВиутPNOMeценИOKHO haxODITcR3aOBbEKTOM.
-Источник ярково освеценья поадaiOTВ kaqp.
Korda CHImaMaEcTc YeNoBek, HocuIyN 6eNyU INI 6JeCTAuyOdExky,Ha 6eIOM fOHe, IINIO MoKeT CTAb TEMHbIM.
CbeMkaBTeMbIXycJIOBnAX
Mby pekomeHnyem Bam nCnoJb3ObaTb BnDeofohapb (He npinaraeTc).ДЯ nOlyeHnHaNluyuIero uBeta Bbl DOnJXbI nOIIepKINBaTb DoCTaTOUHb IyPoBeHb OCBeueHn.
Korda Bby perynpye Te 3kno3nIO BpyHyIO
-ФункцЯ BACK LIGHT He pa6oTaE.
- EcIn Bbln3mehaTe yctahOBky peXIma PROGRAM AE, Bndeokamepa abTomatNueCKN BO3BpaaTcK peXIMy abTomatNueCKO 3KcNo3uIN.
You can select one of eight preset titles and two custom titles. You can also select the language, colour, size and position of titles.
Superimposing titles
(1) Press TITLE to display the title menu.
(2) Turn the control dial to select , then press the dial.
(3) Turn the control dial to select the desired title, then press the dial. The titles are displayed in the language you selected.
(4) Turn the control dial to select the colour, size, or position, then press the dial.
(5) Turn the control dial to select the desired item, then press the dial.
(6) Repeat step 4 and 5 until the title is arranged as desired.
(7) Press control dial again to complete the setting.
(8) When you want to stop recording the title, press TITLE.
BbMOxTe BbIbupaTb N3BOcBMN
PpeBaPnteJIbHO yCTaHOBJENHbIX HaJINCeN
DByX COB6CTBeHHbIX HaJINCeN. BblMOxTe
TaKKe BbIbupaTb Ra3bIK, ZBeT, pa3Mep N
NoJIOKeHHe HaJINCeN.
Hanoxehne haDnncen
(1)HaXMMTE TITLE dIy oTo6paXeHnMa MeHOn HaDnncEi.
(2)Повернente ретуларовныдпсдпь Вбра ,а 3атем нахмпerte дс.
(3)Повернitepeуларовьдпсдя BBIbopaHaДписn,a 3aTeM HaЖмITE peуларовчыдпс.HaДпсь OTo6paKaaeTcHa BBIbpaHOM BaMnЯЗIKE.
(4)ПовернITEpergunpoBOHbIMINCKДЯ Bbl6opaцBaTe,pa3MepaIINPOLOXKeHnA,a 3aTEM HaxmntepergunpoBOHbIMINCK.
(5)ПовернITE ретуларовны дик дяпьыбoga щенимого лемента,а 3атем нахмITE ретуларовны диck.
(6)Повторгийтункови 4и 5do Tex nop, noka He OTpergyniypeye HaDnncb no CBOemy XeHaHIO.
(7)HaXMMTe perynipoBOUHbI DnCK CHOBA IJIa3aBepSeHnYcTaHOBKn.
(8)Korda Bbl 3axOTnte 3aKOHnTB 3aINCb Haannci, HaxMnte TITLE.
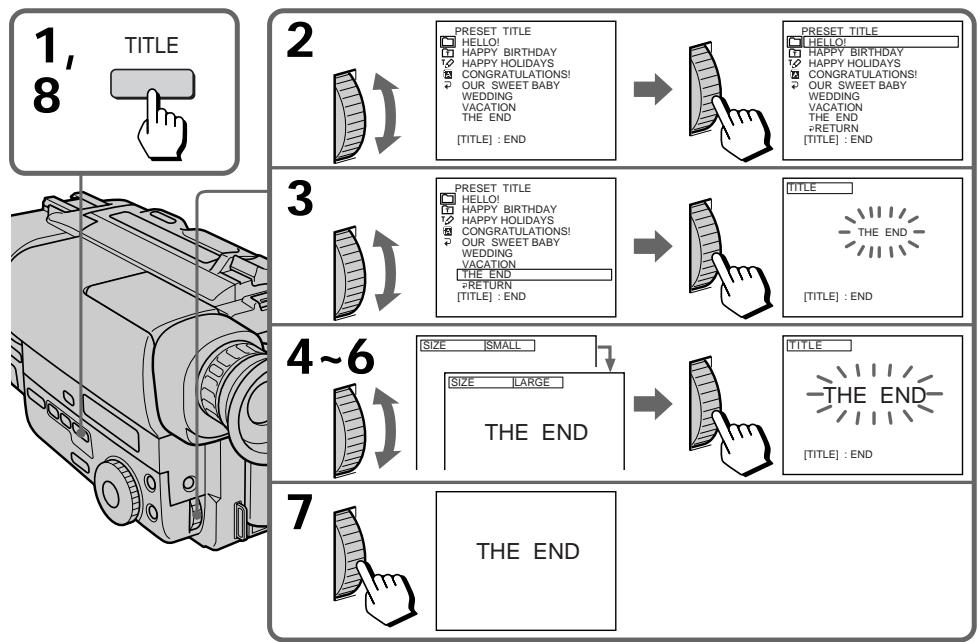
To superimpose the title from beginning
After step 7, press START/STOP to start recording.
To superimpose the title while you are recording
After pressing START/STOP to start recording, start from step 1. In this case, beep is not heard.
To select the language of preset title
When you want to select the language, select before step 2. Then select language and return to step 2.
To use the custom title
When you want to use the custom title, select in step 2.
Notes on superimposing a title
- If you have not given any custom title, "---..." appears on the display.
- The FADER function works while the title is displayed, however, the title does not fade (CCD-TR511E/TR640E/TR840E/TR845E only).
- If you display the menu or title menu while superimposing a title, the title is not recorded while the menu or title menu is being displayed.
Title colour changes as follows :
$$
\begin{array}{l} \mathrm {W H I T E} \leftrightarrow \mathrm {Y E L L O W} \leftrightarrow \mathrm {V I O L E T} \leftrightarrow \mathrm {R E D} \leftrightarrow \ \mathrm {C Y A N} \leftrightarrow \mathrm {G R E E N} \leftrightarrow \mathrm {B L U E} \ \end{array}
$$
Title size changes as follows :
$$
\mathrm {S M A L L} \leftrightarrow \mathrm {L A R G E}
$$
Title position changes as follows :
When you select the title size "SMALL", you can choose 9 positions. When you select the title size "LARGE" you can choose 8 positions.
Notes on the title
Depending on size or position of the title, both of date and time or either of them is not displayed.
- If you input 13 characters or more for a LARGE title, the title is automatically reduced into a proper size after the position is set.
Длг haIIOXeHnHaIINcN OT HaYaJa
You can make up to two titles and store them in the camcorder. We recommend to set the POWER switch to PLAYER or eject the cassette before you begin.
Your title can have up to 20 characters.
(1) Press TITLE to display the title menu.
(2) Turn the control dial to select , then press the dial.
(3) Turn the control dial to select the first line (CUSTOM1) or second line (CUSTOM2), then press the dial.
(4) Turn the control dial to select the column of the desired character, then press the dial.
(5) Turn the control dial to select the desired character, then press the dial.
(6) Repeat step 4 and 5 until you finish the title.
(7) For finishing the tilting work, turn the control dial to select SET, then press the dial.
BbMoKTe Co3daT bDe HaJnCn n CoXpaHnTb
Nx Bnamrtn BuJeOkamepbl. Mbl peKomeHnyem
yctahOBnTB BbIKNoCuTeNb POWER B
noLoKeHne PLAYER mInn BbToJIkHyt b Kaccety
nepeD hauanom.
BaawaHaDnncb MoKet NMeTb Do 203haKOB.
To edit a title you have stored
In step 3, select CUSTOM1 or CUSTOM2, depending on which title you want to edit, then change the title.
Note
You can not enter over 20 characters title.
If you take 5 minutes or longer to enter characters while a cassette is in the camcorder The power goes off automatically. Characters you have entered remain. Turn STANDBY down once and then up again, then proceed from step 1.
To delete a title
In step 4, turn the control dial to select [] then press the dial. The last character is erased. Repeat this step until all characters are deleted. Do not erase the title by selecting empty spaces. If you do so, a title full of empty spaces is stored.
BbI He MoXKeTe BBecTn 6OJIbIe, Yem 20 3HaKOB.
EcIn npoxoHT 5 MmHyT nHn 60Jee npn BBOe 3HaKOB B TO Bpem, KOrJa KaCCeta HaxoNTcB BVNeOkamepe
Питане ВьклioчNTca abTomatUcheKn. 3haKn, KOTopbIe Bbl BBeJIn, OcTaIOTcR B nAmTn. ПовернITE STANDBY OdnH pa3 BnH3, a 3aTeM cHOBa BBepx И NaHnTE CpyHKta 1.
ДЯ OTMeHbI HaDINCS
B nyHKTe 4 noBepHnTe nCK ynpaBHeHnA, YTO6bI Bbl6paTb [<], 3aTeM haxmnte dNc. IocneDnH 3nK 6yET cTePT. NOBToPnTE 3TO DeiCTBnE Do Tex nOp, noka He 6yUyt ydaJeHb BCE 3NaKn. He CTnPaTte HaanCb nyTeM Bbl6opa npo6eNoB. Ecnl Btak Ccenaete, To 6yET 3aONMeHa Haanncb, CoCTOaJua H3 Ondnx npo6eNoB.
Re-recording a picture in the middle of a recorded tape
Ipee3aIncs bN3O6paXeHnB CcepeINHe 3aIncaHHoJ JeHTbI
- CCD-TR845E only
You can insert a scene in the middle of a recorded tape by setting the starting and ending points. The previous recorded portion will be erased. When the RC time code appears, set COUNTER to NORMAL in the menu system to display the tape counter.
-ToIbKO CCD-TR845E
BbMOxKeTe BCTaBnTb CcEHy B cepeDInHe 3aNcAHHoJIeHTbl, yCTaHOBnB HauaJIbHyo I KOHeuHyTOUChI. PaHee 3aIMCaHnHa YAcTb 6ydet cTepta. KorJa NOrBJIeTcB BPeMeHHoI KoJ RC, yCTaHOBnTe COUNTER Ha NORMAL B CnCTeMeMeIO DnOToObpaXeHnCteTuKaNJIeHTbl.
(1) While the camcorder is in Standby mode, keep pressing the + (forward playback) or - (reverse playback) side of EDITSEARCH, and release the button where you want to end the insertion [b]. The camcorder enters Standby mode again.
(2) Press COUNTER RESET. The counter resets to zero.
(3) Keep pressing the - side of EDITSEARCH and release the button at the point where you want to start the insertion [a].
(4) Press ZERO MEM on the Remote Commander. The ZERO MEM indicator flashes.
(5) Press START/STOP to start recording. The recording stops automatically at the counter zero point.
(1)Korda Bvndeokamepa HaxoNTcBpeXnme roTOBHOCTN, DePKTne HaKaToON CTOPOHy + (BOcnpOn3BeDeHne BnpeEi) INI CTOPOHY - (O6paTHoe BOCpOn3BeDeHne) KONKN EDITSEARCH NOTNyCTNe KONKY BTOKe, rDe BbXoTnte 3akOHHTb BCTABky [b]. Bvndeokamepa ChObA BoJdET BpeXnM roTOBHOCTN.
(2)HaxmTe COUNTER RESET. Chetvnck6paibaeTcna Hnyb.
(3)Дерхитейнхаюстору - кондEDITSEARCHи OTпстейк HonkyВToKe,гдБыхотейну haачыв bctabky [a].
(4)Haxmnte ZERO MEM Ha nyIbTe DnCTaHcIOHHOrO ynpaBLeHn. INHdNkaTOp ZERO MEM 6ydt Mrtatb.
(5)Haxmnte START/STOP nHaayana 3aInncn. 3aInncb octaHOBNTc aBTOMaTHueCKn B HynEBoi TOUKe CHTuKa.

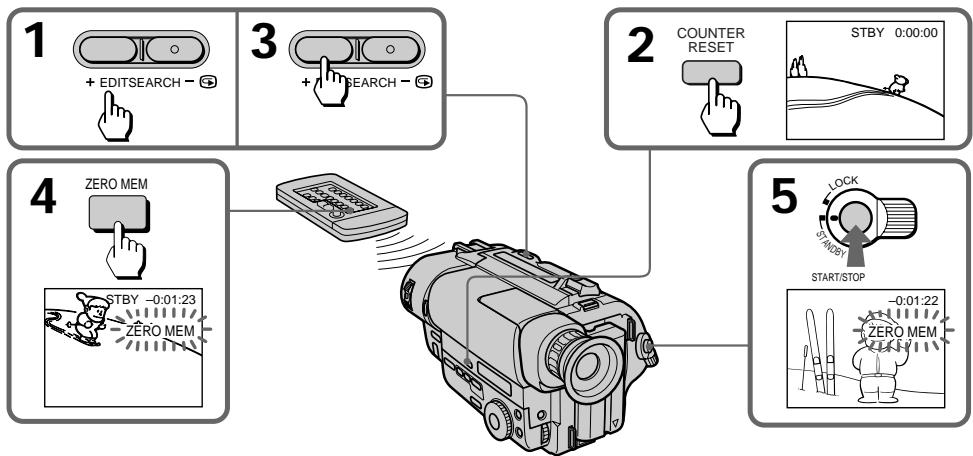
To change the end point
Press ZERO MEM to erase the ZERO MEM indicator, then repeat steps 2 to 5.
ДлЯИЗMEHEHNA KOHEYHOToUKN
HaxmTe ZERO MEM nIa CTnpAHn INndkaTopa ZERO MEM, a 3aTe mOBtopte nyHKtbi co 2 no 5.
Notes on re-recording
- The picture and the sound may be distorted at the end of the inserted portion when it is played back.
- If you re-record on the portion which contains non-recorded section, the zero memory function may not work correctly.
- When the START/STOP MODE switch is set to 5SEC or , you cannot use the zero memory function.
PpmeuHnKnepe3annc
-ИЗбражehи n 3ByK MOrγt 6bIb NcKaжehbl B KOHcE BCTaBJIeHHo YacTn npi ee BOCPpOu3BVeHIn.
- EcIn Bbl nepe3anncbIaBeTe yacTb IeHTbl, KOtopar coJepXnT He3anncahHbIe yactKn, To cyHKpIaONOMHaHn HyJI MOKeT pa60TaTb HnPaBnIbHo.
Korda nepeknioateIb START/STOP MODE yctaHOBJIEN B NOIOXeHne 5SEC nII, BbI He MOxTe IcNOJb3ObaTb cyHKUIO 3aONMHaHn HJIA.
Recording with the date/time
3aHncb c DaToi/BpeMeHem
Before you start recording or during recording, press DATE or TIME. You can record the date or time displayed in the viewfinder with the picture. Press DATE (or TIME), then press TIME (or DATE) to display the date and time together. The clock is already set at the factory, to London time for United Kingdom and to Paris time for the other European countries. You can reset the clock in the menu system.
Ipeud Haayolom 3aHcNn HaxMnte DATE nlin TIME.Bbl Moxete 3aHncbBaTb DaTy uIn BpEmr, OTo6paXaeMbIe BVIOUsckatene BMeCTe C n3o6paXeHneM. HaxMnte DATE (uIn TIME), a 3aTeM HaxMnte TIME (uIn DATE) dnn OTO6paXeHn DaTb I bPemHOn ODHOBpeMeHHO. YacbI yCTaHOBLeHb I ha 3aBOde Ha loHNDOCKoe BpEmr dnn MOpeJe CoeINHeHHoro KoponeBCTBa IHa napKcKoe BpEmr dnn MOpeJe dpyRnx EBpONeCKNX cTpaH. Bbl MOxete 3aHOBO yCTaHOBNTb YacbI B CnCTeMe MeHIO.
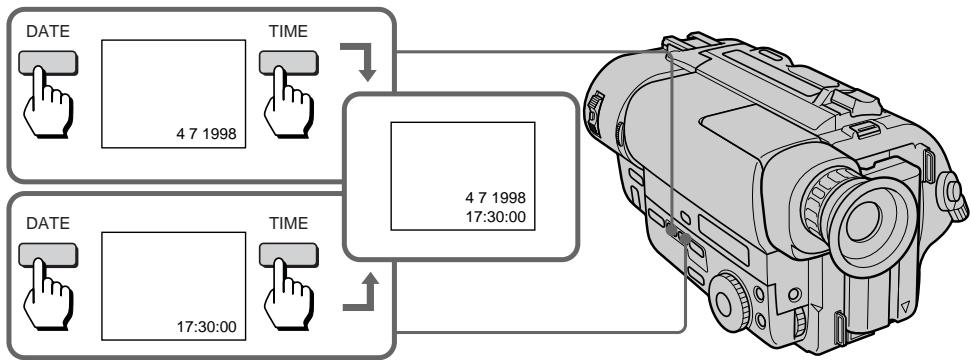
To stop recording with the date and/or time
Press DATE and/or TIME again. The date and/or time indicator disappears. The recording continues.
Длг octанова 3aHcN c daToH n/Inn BpeMeHem
Haxmnte DATE n/nn Time choba. NndkaTop daTbI n/nn BpeMeHH nCye3HeT. 3aInc6ydet npdoJxKeHa.
Optimizing the recording condition
ОптUMи3aцЯ COCTOЯня 3aПИСN
Use this feature to check the tape condition before recording, so that you can get the best possible picture (ORC).
(1) While the camcorder is in Standby mode, press MENU to display the menu.
(2) Turn the control dial to select 00 , then press the dial.
(3) Turn the control dial to select ORC TO SET, then press the dial. "START/STOP KEY" flashes.
(4) Press START/STOP. The camcorder takes about 5 seconds to check the tape condition and then returns to Standby mode.
IcnoIb3yIte DaHHyIO fYHKuHIO dI npOBepKn COCTOHaNJIeHTbI nepeI 3aINCbIO, TaK, YTO6bl BbI MOrII NOJyUHTb HauNyUwee no BO3MOxHocTn I3o6paXeHne (ORC).
(1)Korda Bndeokamepa 6ydt HaxoDntcB B pexkme roTOBHOCTN, haxmTe MEnU dIa OTobpaKeHHMaHIO.
(2)HaxmntepepynnpoBOHybI DNCK DnB Bbl6opa 00 ,a3aTeM Haxmnte DNCK.
(3)ПовернITE peRGyInpOBOHyB IINCKДЯ
Быбopa ORC TO SET, a 3aTeM naxmite
ДИСК.
"START/STOP KEY" 6удET mRatb.
(4)HaKmTe START/STOP. Bndeokampe Tpe6yeTcO kOJIo 5 cekyHd IJI pIOBepKn COCToHnI JeHTbI, a 3aTEM OHa BO3BpaaeTcB PexkM rTOOBHOCTN.
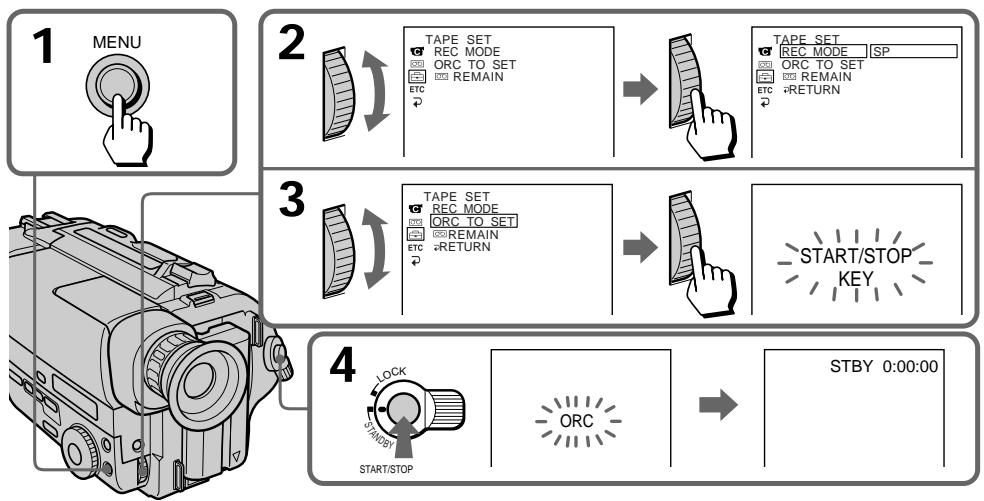
Each time you insert the cassette
Perform the above procedures.
Notes on the ORC function
- When you set ORC TO SET, the recording on the tape is erased for about 0.1 second so that the camcorder can check the tape condition. Be careful when you use a recorded tape. The 0.1 second blank is erased if you record from the point where you set ORC TO SET for more than 2 seconds, or if you record over the blank.
- You cannot use this function on a tape with the red mark on the cassette exposed.
KaKdbi pa3, KOrda Bbl BCTabLnarekaccety
BbInoHnIe BbIweOnncaHnyI npOeDpy.
PpMmeyHnKΦyHKcnn ORC
Korda Bby yctaHaBnBaTe ORC TO SET, 3aHnCb IeHTb CTnpaEtcHa 0,1 cekyHbI, TaK, YTO6b BYDcOkAmpa CMOrFa npOBepntb COCTOHNIE JeTb. BydTe octOpoxHbI, KORda BBy IcNoB3yeTe 3aNcAnHyIOJeHTy. 0,1- cekyHDbI pO6e Ncpe3aET, eCNI BBy HauHaeTe aNcBc OT TockN, rDe Bby yCTaHOBNI ORC TO SET 6oJee, cem Ha 2 cekyHdbI, INIe cPOn3BOJNTe 3aNcB nobEx pHeaNCaHHoYacTn.
- Bby He MoXeTe IcNoJIb3ObaTb DaHHyIO
ФункцИо C JIeHToI, ecIn Ha Kaccete
ВCTaBJIeHa KpaChaЯ MeTka.
- CCD-TR640E/TR840E/TR845E only
When the Steady Shot function is working, the camcorder compensates for camera-shake.
You can release the Steady Shot function when you do not need to use the Steady Shot function. The indicator lights up when you release the Steady Shot function. Do not use the Steady Shot function when shooting a stationary object with a tripod.
You can select ON or OFF in the menu system (p. 34).
To activate the Steady Shot function again
Set STEADYSHOT to ON in the menu system.
Notes on the Steady Shot function
- The Steady Shot function will not correct excessive camera-shake.
- When you set the STEADYSHOT function on or off in the menu system, the exposure may fluctuate.
- Steady Shot does not operate in 16:9 FULL mode. If you set STEADYSHOT to ON in the menu system, the indicator flashes.
-ToIbKO CCD-TR640E/TR840E/TR845E
Korda pa6oTaet fynkun yctOuHBOcBEmKn, BnDeOKaMepa OcyueCTBnaT KOMpeHcaUIO DpOkaHn BnDeOKaMepbl.
BbMOKTeOTKJIIOHTbФyHKUHO yCTOuHBOB CbEMKn, KOrDa BbI He HxJdaeTecb INcNoIb3OBaHNnФyHKUHO yCTOuHBOB CbEMKn. INdKaTop BBICBETNTC, KOrDa Bbl OTKlIOHTeФyHKUHO yCTOuHBOB CbEMKn.He IcNoIb3yIteФyHKUHO yCTOuHBOB CbEMKn npc CbEMKe HEnoDBNXHBIX OBeKTOB C NOMOUsIO TpeHOrn.
BbMOxKeTe BbIbpaTb ON nIN OFF B cNCTeMe MeHIO (CTp. 34).
ДляakTNBn3aциФункциУCTOИNBOI CbEMKN CHOBA
YCTAHOBITE STEADYSHOT Ha ON B CnCTeMe MEHIO.
PpmeaHnKfynKuynyctOuHBOBcEmKn
-Функциуctоивсьсьмн He OTkoppeKTupyeTчe3МерноДрожани BИдевамерbl.
-При BKЛIOЧЕн И BBIKЛIOЧЕн И ФУнКЦМ STEADYSHOT B CNTeMe MEHIO 3KСПОЗИЦМоЖET KОЛБаТСВ.
-ФункцусУСТОМУВО CBЕМК He pa6OtaeT BpeKIMe 16:9 FULL. EcIn Bby YcTaHOBnTe STEADYSHOT Ha ON B CnCTeMe MeHIO, INHДИKaTOP 6bYdET MmRaTb.
- CCD-TR845E only
You can search for the boundary between recording dates using the Data Code automatically recorded on the tape.
There are two modes:
- Searching for the beginning of a specific date, and playing back from there (Date Search)
- Searching for the beginning of all days, one after another, playing back about 10 seconds of each (Date Scan)
-ТолькоCCD-TR845E
BbMOxTe OcyuEcTBnTb NOnCK rpaHnC MExy 3aNcAHHbIMN DaTaMn C IcNoIb3OBAHHeM KoJa DaHHbIX, ABTOMaTHueCKN 3aNcCbIbAeMOrO HaJeHTe.
CyueCTByeT Dba peXmHa:
Each time you press DATE, the mode changes as follows:

We recommend you to connect the camcorder to your TV or VCR to view the picture on the TV screen. If the viewfinder indicators do not appear on the TV screen during operation, press DISPLAY on the Remote Commander.
To search for the beginning of a specific date
(1) Set the POWER switch to PLAYER. The video control buttons light up.
(2) Press DATE on the Remote Commander.
(3) When the current position is [b], press to search towards [a] or press to search towards [c].
Kakdbi pa3, KOrDa BbI haxmaeTe DATE, peXIM n3MeHaeTcCneDyUOUM o6pa30M:

Mby peKOMeHnyem Bam noDcoEduHnTb BIndeokamepy K BaWemy TeleBn3opy nN KBM dIpy npocmoTpa n3o6paxKeHHa 3kpaHe TLeBn3opa. Ecnn HnDnKaTOpbl BnOuCKaTeJI He NOBJIYOTcHa 3kpaHe TLeBn3opa BO BpeMa pa6Tobl, HxKMITE KhONKy DISPLAY Ha nyIbTe DnCTaHUnOHoro ynpabLeHHa.
Длг посян cala onpelelenhoI DaTbl
(1)Установпей Вькову сейь POWERВ NOLOжени PLAYER. Bысветаю Кногки BИдевочтюя.
(2)HaxMMTe DATE Ha nIyIbTe InCTaHcNIOHHOrO ynpablenia.
(3)EcIn TeKyuuee noJoxKeHne-[b]haxMnTe △Ia IONcKa B HappaBHeHn [a] nIIN haxMnTe △Ia IONcKa B HappaBHeHn [c].
To scan the beginning of all days
(1) Set the POWER switch to PLAYER.
(2) Press DATE on the Remote Commander twice.
(3) Press or . Date Scan starts.
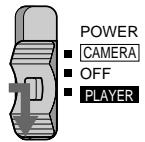
1

2
DATE SEARCH
DATE SCAN
To stop searching or scanning
Press one of the following buttons: DATE, ▶
or
To view pictures during searching or scanning Press and then press or
If you do Date Search or Date Scan during playback
While the camcorder is looking for the date, a fast forward or rewind picture is displayed. Some noise is inevitable.
If you have erased or rewritten the index signal
The point at which the date changes may be out of position by about 10 seconds of playback.
Notes on Date Search and Date Scan mode
- If a day's recording is not longer than 2 minutes, the camcorder may not accurately find its boundaries.
- Date Search and Date Scan do not function on a tape recorded by a camcorder without the Data Code function.
Длсканроваимн Начал BCex ДАT
(1) VcTaHOBnTe BbIKJIOHaTeJIb POWER B NOJOKeHne PLAYER.
(2)Двждынхмte DATE Ha nylte ДИСТаHионHOrO ynpaBHeHЯ.
(3)Haxmnte。CkaHnpoBaHneDat
HaHHaETc.
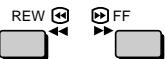
3

Длгocтанова noncka nkn ckaHnpobahnra
HaKMMTe OndHy n3 cIeIyUoIuX KHOIOK: DATE, ▶, , <nI.
ДлпnpocmoTRAи3obpaхeнь BO ВрмЯ NONCKAИNСКАнрOBAHIN
HaxmTe ▶, a 3aTeM HaxmTe <nI I
EcIn BbI BbINONHReTe NOCK DaTbI nnckaHIpOBaHne DaT BO BpEmBOcnpOn3BedeHn
Korda Bndeokama ocyueCTBnreT NOnCK DaTbI, n3o6paXeHne yckOpEHNo IpeMOTKn Bnpei nn Ha3aD 6ydt OTo6paXaTBcR. HeKoTopbIe nomexu 6yUyt npn 3tOM HeN36Exhbl.
EcnBbI cTnpaete nn nepe3anncbIbaTe HndekChbI CnHai
Touka, B KOtOpO npOnCxOaNT n3MeHeHne DaTbI, MOKeT n3MeHnT b CBOe nOToXeHne np6n3ntelbHo ha 10 cekynd BocnpOn3BeDeHnI.
Returning to a preregistered position
Bo3BpaT K ppeiBapuTeIbHo 3apeHnCTpnpoBaHHO n03nCm
- CCD-TR845E only
Using the Remote Commander, you can easily go back to the desired point on a tape after playback. Use the tape counter. If the RC time code appears, set COUNTER to NORMAL in the menu system to display the tape counter. We recommend you to connect the camcorder to your TV or VCR to view the picture on the TV screen. If the viewfinder indicators do not appear on the TV screen during operation, press DISPLAY on the Remote Commander.
(1) During playback, press COUNTER RESET at the point you later want to locate. The counter shows "0:00:00".
(2) Press when you want to stop playback.
(3) Press ZERO MEM on the Remote Commander. The ZERO MEM indicator flashes.
(4) Press to rewind or press to fast-forward the tape to the counter's zero point. The tape stops automatically when the counter reaches approximately zero.
- ToIbko CCD-TR845E
IcnoIb3yI npIbT dncTaHnHOHHoY npaBHeHn, Bbl moKeTe IerKO BepHyTcR K KeJnaEmo ToKe JeHTbl nocLe BOCpOn3BeDeHn. IcnoIb3yIte CteTnK JeHTbl. EcnI NOBnEeTCB BpeMeHHo KoD RC, ycTaHOBtE COUNTER Ha NORMAL B CnCTeMe MeHIO dIra OTo6paXeHn CteTnKaJeHTbl.
Mbl pekomehdyem Bam noDcoeHNHtB Bndeokamepy K Baewemy TebeN3opy nIN KBM dIpy npocmoTpa n3o6paxeHna 3kpane TeBeN3opa. Ecnn HndkaTopb BNDOnckaTeJe He NOBJIYOTcHa 3kpane TeBeN3opa BO BpeMa pa6Obl, hAnmTe KhONky DISPLAY Ha nyIbTe DnCTaHIOHOrO ynpabLeHn.
(1)BoBpMaBOcnpOn3BedeHnHaXMMTe COUNTERRESETBMecTe,KOTOpoeBbIXOTITENoTOM6hApyKnTb.CHeTnK6byDet noka3bBaTb“0:00:00”.
(2)Haxmnte .KoIa BbI 3axOTnte OCTaHOBNTb BOCnpon3BeDeHne.
(3)Haxmnte ZERO MEM Ha nyIbTe DnCTaHcIOHHO ynpaBJIeHn. INdIKaTOP ZERO MEM 6yDet MIRAtb.
(4)HaxmTe 一 yckopeHHo nepemOTkn JENTbI Ha3aJ INN dJy yCKopeHHo nepemOTkn JENTbIBpePeD do HynBoi TOKn CHTuKa. JeHTa OCTaHOBITcA BtOMaTnueckn, KOrDa ChETuK DoiJeT np6bn3nteJbHo do 0.
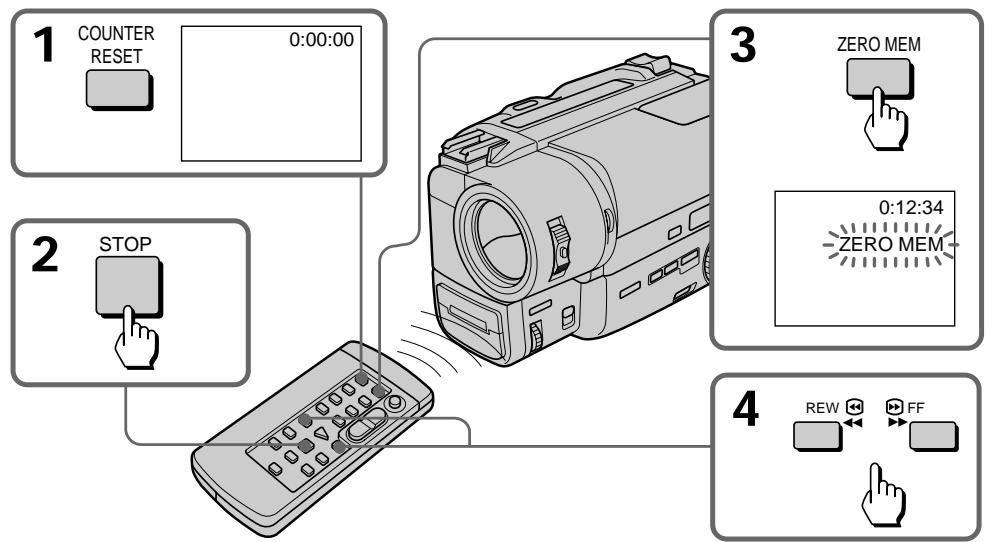
Notes on the tape counter
- Something must be recorded on the tape in order for the tape counter to function. Tape counter does not work on a blank tape.
- There may be a discrepancy of several seconds from the actual time.
Notes on ZERO MEM
- When you press ZERO MEM, the counter's zero point is memorized. Press ZERO MEM again before rewinding to cancel the memory.
- This function is cancelled automatically once the tape is rewound or advanced to the point you pre-registered.
- ZERO MEM does not function during recording or playing back.
PpmeaHnK CteTky JeHTbl
- YTO-NH6yDb D0JXHO 6bIb 3aIncAHO Ha JeHTe, YTO6bl CteTnK JeHbI cyHKUHOHPOBaI. CteTnK JeHbI He pa6oTaET npi He3aIncAHHOJeHTe.
- MoXeT 6bIb paCXoXJdeHne Ha HeCKoJIbKO cekyHd C fakTnueckm BpeMeHem.
Приимechanical ZERO MEM
Korda Bby haxmaeTe ZERO MEM, HyeBaTouka CteTuKa 3aONMHaeTc. Ipeep nepemotko Ha3aD CHOba HaxmTe ZERO MEM dnaCTnpaHn naMrtn.
Данная Функциг OTмehяетса abTomatИчecки,KOrДЯ ЛЕНТа пермотаetси habaIиЛВпeр徴doToчКи,KOTopyU Bby 3anOMHnII.
- ZERO MEM He cyHKUHOHpyeT BO BpeM 3aIINC nI IN BOCpOIN3BeDEHnA.
Locating the marking position
HaxoJdeHne OTMeueHHoN IO3nCnN
- CCD-TR845E only
You can locate the beginning of a desired programme easily by marking an index signal during recording or playback and searching for it later.
We recommend you to connect the camcorder to your TV or VCR to view the picture on the TV screen. If the viewfinder indicators do not appear on the TV screen during operation, press DISPLAY on the Remote Commander.
Marking an index signal
You can mark an index signal during recording or playback.
When marking at the beginning of recording or playback
Press INDEX MARK on the Remote Commander in recording standby or playback pause mode. The INDEX MARK indicator appears in the viewfinder with the MARK indicator flashing. When recording or playback starts, the MARK indicator stops flashing. This shows that the index signal is being marked. Then the INDEX MARK indicator will disappear.
-ToIbkoCCD-TR845E
Bb moKTe IerKo 6hApuykntb Haayano JekJaemoi nporpamMbI nyTEm 3aINcN INDeKCHORO CnHana BO BpeMg 3aINCn ININ BOCPON3BeDEHnI BblIOJIHeHn erO IOnCKa IOTOM.
Mby pekomeHnyem Bam noDcoeHNHTB BnEOKaMepy K BaWemy TeNeBn3Opy nnn KBM dIpy npocmoTpa n3o6paXeHnHa 3KpaHe TeteBn3Opa. Ecnn HnDnKaTOpb ByDOnckaTeJe He NOBJIYOTcH Na 3KpaHe TeteBn3Opa BO BpEm pa60tbl, hAnKMITE KHOJky DISPLAY Ha nyIbTe DnCTaHNoHHoro ynpabLeHn.
3aHcB HnKeKCHOro CnHaJa
BbMOKTe 3aIncat bHnDEkChbCnHAn BO Bpem3aIncn nnBOcnpOn3BeDeHn.
PnOTMeTKe B NaHaJIe 3aIncN IINBocIpOn3BeDeHn
HaxmTe INDEX MARK Ha npbTe
DnCTaHnOHHo rnpaBHeHn B pexMe
rTOBHOCTn nIi Na3bI BOCpON3BeDeHn.
INdkaTop INDEX MARK NOBnAeTcB
BnDOckTeC mraIOuIM INdkaTopOM
MARK.Korda 3anncb IIN BOCpON3BeDeHne
HaunHaetc, INdkaTop MARK nepeCaet
Mrtb.3TO NOKa3bIbaet Ha To, YTO INDEKCHbI
CnrHan 3anncn. 3aTeM INdkaTop INDEX
MARK nCue3aet.
When marking during recording or playback
Press INDEX MARK on the Remote Commander at the point you want to locate later.
Pn OTMeTke BO Bpem 3aHncn nn BocnpOn3BeDeHH
Haxmnte INDEX MARK Ha npIbTe
InCTaHIOHHOrO ynpAIBeHnB TOUKe, KOtOpyIO
Bby xOTnte NOTOM oHapyKuTb.
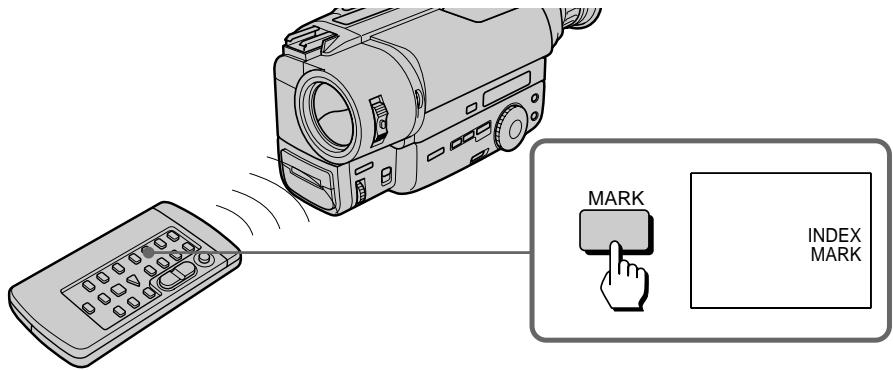
Notes on marking
- Make sure you mark index signals at more than two-minute intervals. Otherwise, you may not be able to search for them correctly.
- If you stop recording while the index signal is being marked (the INDEX MARK indicator lights in the viewfinder), the search may not be completed correctly.
- If you mark an index signal on the tape with the Data Code recorded, the Data Code will be erased at the point on which the index signal is marked. When playing back this tape, the camcorder keeps displaying the Data Code immediately before the erased one.
- A black band appears when you mark index signal during playback, and the sound cannot be heard. This does not affect the picture and sound that are already recorded.
- You cannot mark an index signal on a tape with the red mark on the cassette exposed.
- You cannot mark an index signal on an NTSC-recorded tape.
- You cannot mark the index signal during 5-second recording, recording only while pressing the START/STOP button, or during fade-out.
PpmeuHnK 3aHcN HHeKCHOro CnHaHa
BbIdoJXHbI O63aTeJIbHO 3aIncIbIbT HNeKChIe CnHaJIbICoJIeE, YcEM DByXMnHyTHbIMN INTEpBaIaMn. B npOTnbHom cIyae BbI He CMOKeTe HaxOdITb IN pIpaBnJIbHO.
- EcIn Bbl octaHOBnTe 3aIncb BO Bpemr 3aIncn
uNHeKCHOro CnHana (uNdNkaTOp INDEX
MARK cBeNTcB vBnOuCKaTeJe), nonck
moKeT 6bl T bblOnJIHeH He npabUJbHO.
- Ecni Bbl 3aNcBlaBeTe INHdeKChb CnRHaI HaJIeHTe C KODOM DaHHbIX, TO KOD DaHHbIX 6yDeT cTePT B TOUKe, B KOtOpOJ 3aINCaH INHdeKChb CnRHaI. PnI BOCPON3BeDeHm TaKOJI NeHTbI BVNeOKaMepa OTo6paxaET KOD DaHHbIX HEnocpeDCTBeHNO DO TORO, KOtOpB II bI cTePT.
- Yepnag noIoca noRbIeTcR, KOrda Bbl 3anncbIbaTe HndekChbI CnHaN BO Bpemr BOCPon3BeDeHnR, n 3BYK npocnyuBaTcR He 6yDet. 3TO He BInreT Ha 3Byk n N3obpaXeHne KOToPbIe yKe 3anicaHbl.
- Bby He MOKTe 3aIInCaTb INDeKChbI CnHaN Ha JeHTe, eCNI Ha KACCtE BnDHa KpaCha METka.
- Bby He MoXeTe 3aIncatb INHeKChbI CnHaN Ha JeHTe, 3aIncaHHoB CnCTeMe NTSC.
BbI He MoXKeTe 3aIncatb INHDeKChbI cHrHaN BO BpEm 5-CEkyHnHO 3aIncn, 3aIncn TOJbKO BO BpEm yDepxKnBaHn KhONKn START/STOP B HaxaTOM COCTOHN ININ BO BpeM BBBeJeHn I3o6paXeHn.
Scanning the beginning of each marking position - index scan
(1) Press INDEX on the Remote Commander during normal playback.
(2) Press or . The tape rewrites or advances rapidly and plays back for approximately 10 seconds from the point on which the index signal was marked. If you want to continue playback, press . When you do not press any button, the tape is automatically scanned to the next programme.
Сkaн积极作用 Начала Кождов OTмецьно ПОзци - ИндаКhoe SCaн积极作用
(1)HaxmnteINDEXHa npIbTe nIcTaHnOHHoro ynpaBHeHn BO BpeM HOpMaJIbHOBOCpOn3BeDeHn.
(2)HaxmTe 一 nIIN .JIeHTa yCKopenHo nepematbIbAeTcraHa3ad IINBnpeEd IN BOCnpOn3BOIDTCr np6bn3ntelbHO B TeueHne 10 cekyndOT kaxdoi TOckN, B KOtOpO bbl 3aIncan HnDEkChbI CnHnAL. EcIn Bbl XoTIte npoJnxITb BOCnpOn3BeDHeH,HaxmTe .EcIn Bbl He HaxmaeTe HNKAKoIKHONK, HaJeHTe aBTOMATnUeCKn OCyUeCTBnEETc PONCK CNeDuOuSe nnpOrpaMMbl.
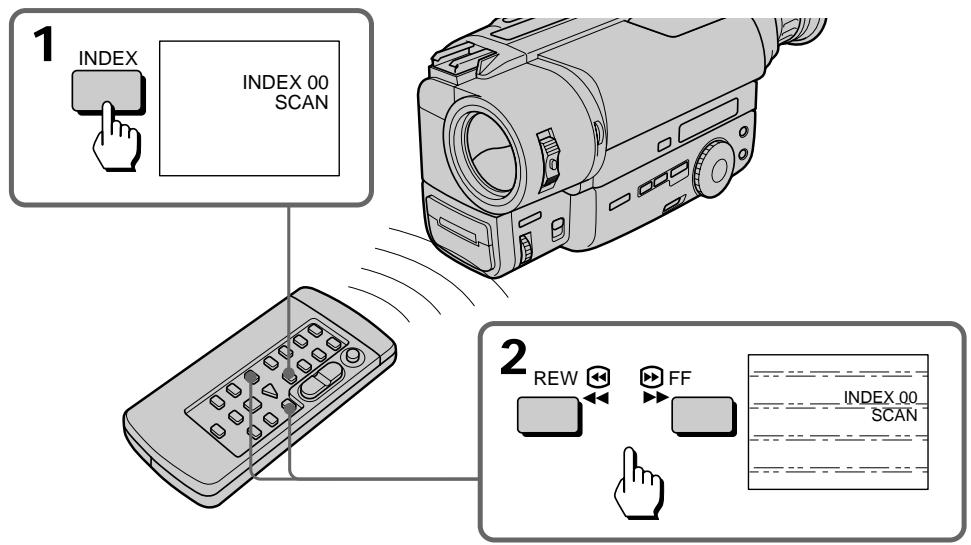
To cancel index scan mode
Press . Normal playback resumes.
Длг OTмны ржима Инд ekchoro ckaHnpOBaHHI
Haxmnte . HopMaJIbHOe BOCpON3BeJeHne 6yJET BOcCTaHOBNeHO.
Locating the desired marking position - index search
(1) Press INDEX on the Remote Commander during stop or playback mode.
(2) Press INDEX repeatedly until the index number of the desired programme is displayed in the viewfinder.
(3) Press or . Playback starts from the beginning of the desired programme.
[a] the current position
[b] the INDEX number
HaxoJdeHne XeJaemOn OTMeueHHoI N03nN - Hndekcbi NONCK
(1)HaxmnteINDEXHa npIbTe nIcTaHnOHnOуnpaBneHnBpeKIme OCTaHOBa IINBOCpOn3BeDeHn.
(2) HeoHokpaTHo haxmMaIte INDEX do tex nop, noka HnDeKChbI Homep xeJaemoi nporpaMMbI He OTo6pa3ntcB BnuDOnCKaTeIe.
(3)HaxmTeAIInB.BoCnpOn3BeJeHne HaHHeTcO T HaaJa XeJaEMoN npOrpaMMbl.
[a] Tekyüee noJoxKeHne
[b] INDieKcbH HOMep INDEX

To stop index search mode
Press ▷. Normal playback resumes.
Note on the index number
The index number (1, 2, etc.) indicates the distance from the point you are now viewing [a], regardless of the direction.
Erasing an index signal
(1)Locate the index signal to be erased using the index scan or index search function.
(2) Press ERASE on the Remote Commander within 2 to 10 seconds while the desired programme plays back. After the index signal is erased, the camcorder returns to index scan when you used index scan in step 1. When you used index search, normal playback resumes.
CtnpaHne HnDekChoro cnHana
(1)HaIInTe INHeKChb CnHan NoJIneKaun CTpaHnIO C nCnOJIb3ObaHmEΦyHKUIN HeKCHOrO cKaHnPobAHn INI INHeKCHOrO nONCKa.
(2)HaKmTe ERASE Ha npIbTe
ДиCTaHnIOHnHOуnpaBNeHnB IpeDeJax OT
2do 10ceyHd BO BpEmA BoCpOuN3BeDEHnA
KeJaemOpRpaMMbl. Пocne CTnpaHnA
INHeDekCHOrO CnHnHa JNuDeOkAmepa
BO3BpaUaTcR K peXkMBy INHeDekCHOrO
CKaHnPoBaHnI INI INHeDekCHOrO NOnCKa, B
3aBNCIMoCTn OT TORO, KOToPbI n3 HxN bIi
InCNoJIb3OBaH B nyHKeT 1.Пocne TORO, KaK
BBy InCNoJIb3OBaJIIn INHeDekChIb IOnCK,
HopMaJIbHoE BoCpOuN3BeDEHnE 6bydet
BOcCTaHOBNeHO.
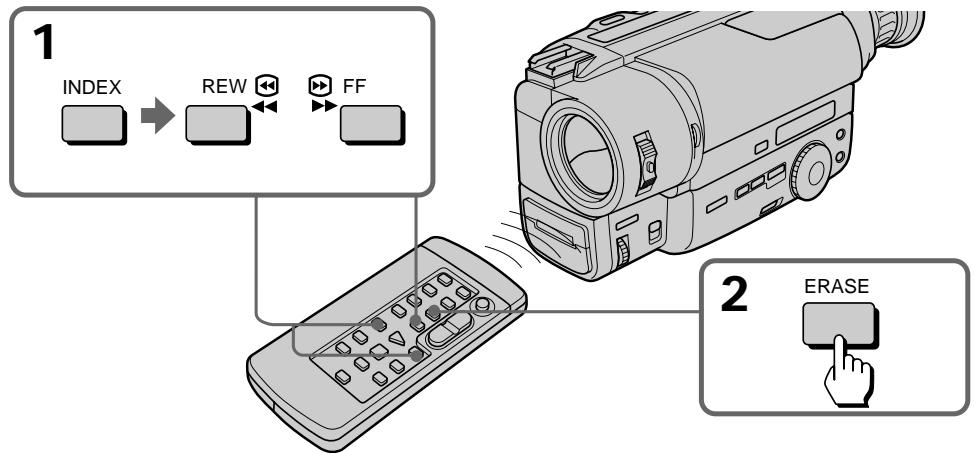
Notes on erasing
- Press ERASE more than 2 seconds after the playback of the desired programme begins.
- You cannot erase the index signal on a tape with the red mark on the cassette exposed.
- While the index signal is being erased, the sound cannot be heard and a black band appears at the bottom of the picture. This will not affect the recorded sound or picture.
- The camcorder can detect index signals marked with VCRs, but may not erase them. VCRs with an index function can detect index signals marked with this camcorder but may not erase them.
- An index signal may be erased when making PCM after recording on another VCR in the portion where the index signal is marked.
Note on Data Code
When an index signal is erased, the Data Code on the same portion of the tape is also erased.
PpimcHnKCTupAHIOHNEKCHORO CnHaJa
- Haxmnte ERASE 60Jee, Yem Ha 2 cekyHdbI nocne hauana Bocnpou3BedeHna JekaEMoN nporpamMbI.
BbI He MOKxETe CTepeTb INDekChbI CNrHaJI cJeHTb,ecnHa KaCCCTe BUnHa KpaChar METka.
BoBpemcTnpaHnIHNeKCHOrO CnHaJa3Byk npocnymbatbCe He MoXeT, N cepNaI NOoCA nOBnEeCBN3y 3No6paXeHn. 3To He 6yDeT BnITb Ha 3aNcaHHBe 3Byk IINn 3No6paXeHne.
Bndeokamepa moKet deTeKTnpoBaTb nHKeCHbIe cRHaJIb, 3aNcAHHBe Ha KBM, Ho He moKet ux CtepeTb. KBM c HndekChoi fYHKUeMoKet deTeKTpOBAbTa nHndekChIbe CnHaJIb, 3aNcAHHBe Ha daHHoH Bndeokamepe, Ho He moKet ux CtepeTb.
- INdekChbI CNHnAMoKET 6bITb CTePT npB BInONHeHN PCM nocNe 3aNcN Ha dpyrom KBM B aCaTn, rge INdEHKChb CNHnAe HbI 3aNcaH.
PpimueaHne K KoDy DaHHbIX
You can write the RC time code on a recorded tape. Use the Remote Commander.
Before you begin, we recommend to set COUNTER to TIME CODE in the menu system so that you can view the RC time code.
We recommend you to connect the camcorder to your TV or VCR to view the picture on the TV screen. If the viewfinder indicators do not appear on the TV screen during operation, press DISPLAY on the Remote Commander.
(1) While pressing the small green button on the POWER switch, set it to PLAYER.
(2) Rewind the tape to the beginning and set the camcorder to playback pause mode.
(3) Press TIME CODE WRITE on the Remote Commander. The TIME CODE WRITE indicator appears in the viewfinder with the WRITE indicator flashing.
(4) Press or to start playback. The WRITE indicator stops flashing and the RC time code writing starts from 0:00:00:00.
-ТолбкоCCD-TR845E
Bb MoXeTe 3aNtCaTb BpeMeHHO KoJ RC Ha 3aNtCaHHO JeHe. NcNoIb3yUte npbl TnCTaHIOHORO ynpabNeHa.
Ппeд Tem, каь Ви haunHe, Мь peKOMeHdyem yctaHOBtB COUNTER Ha TIME CODE B cNCTeMe MeHIO,Тak YTObI Bv MoRJIu BnIeTb BpeMeHNo KOD RC.
Mby peKomeHdyem Bam noDcoeHNHtB Bndeokamepy K BaWemy TeJeBn3Opy nN KBM dIЯ npocMOtra n3ObpaXeHnHa 3KpaHe TeteBn3Opa.Ecnn HnDkaTOpbI BnOncKaTee He noBbIaOTcH a 3KpaHe TeJeBn3Opa BO BpeMra pa60Tb, hakmte KhoNky DISPLAY Ha nyJIbTe DnCTaHnOHHOro ynpaBJIeHn.
(1)HaJIMaMaJIeHbKyIO 3eJIeHyo KhoNky Ha bIKIIOHaTe PEOWER, yCTaHOBnTe ero B noJoxHeHne PLAYER.
(2)Перемотайе Лentу назад на Наюи установпite ВидаоКамеру на реким пay3ы BOCPONIMЗБЕDEнИ.
(3)HaxmTe TIME CODE WRITE Ha npIbTe DnCTaHIOHOrO ynpaBNeHn. INdNkATOp TIME CODE WRITE noaBnAeTcB BnuOnckatete C MnaIaUoHm INdNkATOpOM WRITE.
(4)Haxmnte IINI II JnHaJana Bocnpom3BeDEHH. INdKaTOp WRIe nepeCTaET MIRaTb, N 3aNcB BpeMeHHoro KoJa RC HauHnaETc c 0:00:00:00.
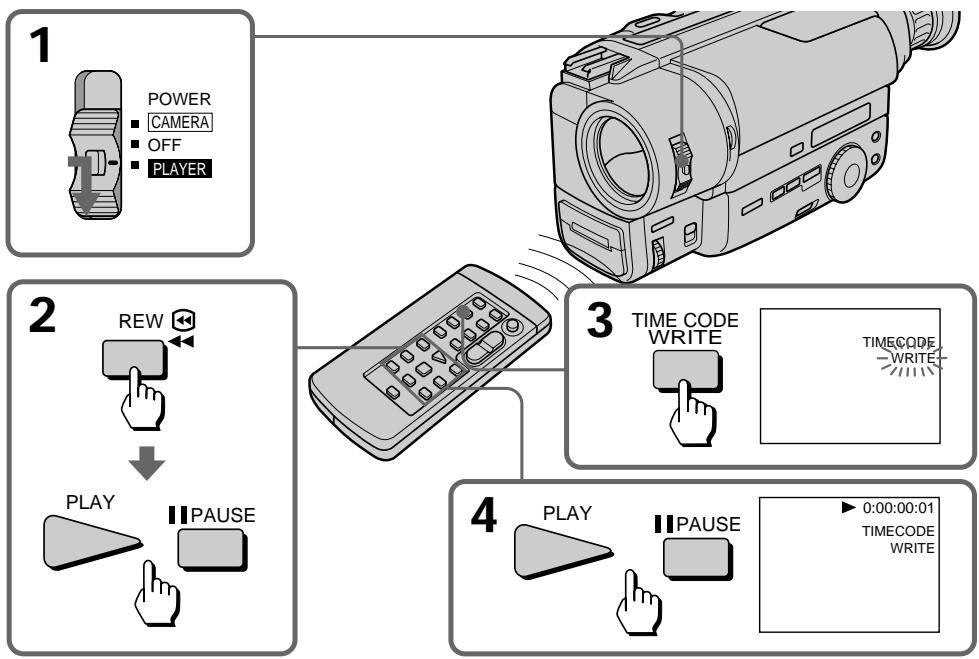
To stop writing the RC time code
Press (or any video control button).
ДлЯ OCTaHOBa 3aIncn BpeMeHHoro Koda RC
Haxmnte (nnn liobuy khoNky BndeokoHTpOJIa).
To write the RC time code from the end of the RC time code recorded portion
Rewind the tape to the portion on which the RC time code has been written and set the camcorder to playback pause mode. Then follow steps 3 and 4 above. The RC time code is written continuously.
Notes on writing the RC time code
- The RC time code writing stops when:
- you press TIME CODE WRITE again before starting playback.
- you press INDEX or DATE SEARCH before starting playback.
- you change from playback mode to another mode.
- When you are writing the RC time code from the middle of a tape without the time code written, writing starts several frames before the current picture.
- If you write the RC time code on a recorded tape, the Data Code is erased.
- You can mark the RC time code on a tape recorded both in LP mode and SP mode, the RC time code written in LP mode, however, may not be read correctly.
- You cannot mark the RC time code on an NTSC-recorded tape.
- You cannot mark the RC time code on a tape with the red mark on the cassette exposed.
- A black band appears when you mark the RC time code during playback, and the sound cannot be heard. This does not affect the picture and sound that are already recorded.
Note on ---indicator
The -----indicator appears during playback if:
- nothing is recorded.
- the RC time code is unreadable because of the damage of the tape or because of the noise.
- you recorded using another VCR without RC time code function.
ДлгздпсвремногкogaRCOT KOHцаЗпсанночадиСВремньIM KODOM RC
IpeMeToaTeJeHTyHa3aDo YoacTn,Ha KOTOpOb6bl3aIncanBpeMeHHoJ KoD RC,uCTaHOBtBeBIDeOKaMepyHapeKIMpay3bl BOCnpOn3BeDeHn.3aTeMcEpyte BbIweOpINcaHNbIMpyHKTaM3N4.BpeMeHHoJ KoDRC6bDet3aIncan6e3nepepbBa.
PpmeaHnK 3aHcBpeMeHHoro KoJa RC
3aIncb BpemehHoro Koda RC OTMeHReTc, KOrda:
-BbI haximaTe TIME CODE WRITE cHOBa Do HaçaJa BOCpOn3BédeHЯ.
-BbI haxmaeTe INDEX mIN DATE SEARCH Do NaUaNa BOCnPOn3BeDeHnR.
-BbI n3MeHHeTe peXIM BOCpOu3BeDeHnHa npyroI peXIM.
- Ecni Bbl 3aIncbIbaeTe BpeMeHHoN KoD RC c cepeDInhJI JeHTbl, Ha KOtOpO He 3aIncaH BpeMeHHoN KoD RC, 3aIncb BpeMeHHoro KoJa haueHeTcRa He HeckOblko KaIpOB paHbSe TeKyuIero n3o6paXeHn.
- Ecni Bbl 3aIncbIbAeTe BpeMeHHoK KoI RC Ha 3aIncaHHyIO JeHTy, TO KoI DaHHbIX CTnpaETc.
BbIMoKTe 3aHnCaTb BpeMeHHoN KO rC haJeHTy, 3aHnCaHnyIO B pexmE LP nBpeXmE SP, Ondako BpeMeHHoN KO rC,3aHnCaHnbl B pexmE LP, He MoXeT 6bITb CHTaH npaBnblHO.
- Bы He можete 3апсать Временй Кд RC. Na Лентe, 3aпсаннов B сnteMe NTSC.
- Bы He можete ZeanicaTb ВрemeHNoI KoI RC
Ha JIeHTe, ecIn Ha Kaccete BnDHa Kpacha
MeTKa.
- Yepnau noLoca nOBaTeC, KOrDa Bbl 3anncbIbaeTe BpeMeHHoKoD RC Bo BpeMa Bocpon3BeHEnu, N 3BYK npocnyuBaTbCHe 6yDet. TO He BInaET Ha 3Byk Nn3OpaKeHne KOToPbIe yke 3anicaHbl.
Примочаиме К Инданатopy ------
INdikkaTop --:---:--:-- NOBJIaTeC8O BPeMBOcnpoN3BeDeHnE,ecnI:
- HUYeO He 6bIIO 3aIncaHO.
Временков КОн RC He cHTbIbAeTcN 3-3a NOBpeKdEHNJIeHbI NII IN3-3a NOMEX.
BbI npO3BEN 3aAINc b CnIOJIb3OBaHHeM dpYrORo KBM 6e3 pfynKcN IN BpeMeHHOrO KoJa RC.
Editing onto another tape
Mонтajи ДугюЛeHTy
You can create your own video programme by editing with any other 8 mm, HiHi Hi8, VHS VHS, S-VHS, VHSC, S-VHSC or Betamax VCR that has video/ audio inputs.
Before editing
Connect the camcorder to the VCR using the supplied A/V connecting cable.
Set the input selector on the VCR to LINE, if available.
Set EDIT to ON in the menu system (p. 34).
Starting editing
(1) Insert a blank tape (or a tape you want to record over) into the VCR, and insert your recorded tape into the camcorder.
(2) Play back the recorded tape on the camcorder until you locate the point just before where you want to start editing, then press I to set the camcorder in playback pause mode.
(3) On the VCR, locate the recording start point and set the VCR in recording pause mode.
(4) First press on the camcorder, and after few seconds press of the VCR to start editing.
To edit more scenes
Repeat steps 2 to 4.
To superimpose the title while you are editing
You can superimpose the title while you are editing. Refer to "Superimpose a title" (p. 55).
To stop editing
Press on both the camcorder and the VCR.
Note on the DISPLAY function
If you have displayed the viewfinder screen indicators on the TV, erase the indicators by pressing DISPLAY on the Remote Commander so that they will not be superimposed on the edited tape.
Note on Fine Synchro Edit
If you connect a video deck that has the Fine Synchro Edit feature to the LANC jack of the camcorder, using a LANC cable (not supplied), the edit will be even more precise.
BbMOKeTe CO3dTaB BaUy Co6CTBeHHyu BnDeOpnpaMMy NytEm MOtTaKa C NOMOcIb DpyTOro KBM Tnna 8 MM, HiHi8,VHS,SVHS S-VHS,VHS,VHS,SVHS S-VHSnN Betamax,KOTopbIMeetBXOdbayDIO/BnDeo.
PpeM MoTaxKem
POndoeHnHTe BnDeoekamepy K KBM,ncnoJb3y npnilaraembl coeHNHTelbHbI Ka6JIb aydno/ BnDEo.
YctaHOBtCe CeIeKToP BxOJHbIX CnHaIOB Ha KBM BNoIOXeHne LINE,ecnTaKoe IMeETc.
YcTaHOBInTeEDITHaONBCINCTeMeMeHIO(CTp.34).
HaHHTe MOHTaX
(1)BCTaBbTe YnCTyIO JeHTy (NII NJIeHTy, KOTOpyo BBy XOTIte Nepe3aIncatb) B KBM n BCTaBbTe BaUy 3aIncanHHy IO JeHTy BnDeOKaMepy.
(2) Bocnpo3B0Dnte 3aHncaHHyIO JeHTy BVuDeokampe Do Tex Nop, noka Bby He o6hApxNte MeCtO HeMHOr paHbSe ToKn, OTKya Bby XOTNe Hauatb MoTaxk, a 3aTeMa HAXMITE I Dny yCTaHOBKn BuDeokampeHa peXIM Puy3b BoCpnpo3BeDeHIN.
(3)HaIInTe Ha KBM ToUky Haayana 3aIncn UyctahOBInTe KBMa peXIM npay3bI 3aIncn.
(4)Сперва НжмтЕ Ha BиDEOKaМepe, a 3aTeM Уретe HeCKoIbKO ceKHyN HaЖмТЕ Ha KBM ДЯнЧа мОТ taxa.
Длma mHTaKa dpyrnx cceH
IobTopnte nyHKtbo co 2 no 4.
BbMOxTe HaIOXHTb HaIINcB BO BpEm MoHTaxa.Cm. pa3dEe "HaIOxHHe HaIINcN (Ctp.55).
Дя OCTaHOBKMOHTaKa
Haxmnte nHa BnDeokamepe nHa KBM.
Changing the lithium battery in the camcorder
3aMeHa JIHTneBOB 6aTapeKn B BVndeOKaMepe
Your camcorder is supplied with a lithium battery installed. When the battery becomes weak or dead, the indicator flashes in the viewfinder for about 5 seconds when you set the POWER switch to CAMERA. In this case, replace the battery with a Sony CR2025 lithium battery. Use of any other battery may present a risk of fire or explosion. Discard used batteries according to the manufacturer's instructions.
The lithium battery for the camcorder lasts for about 1 year under normal operation. (The lithium battery that comes installed at the factory may not last 1 year.)
Baasa Bndeokamepa caba6keha yctahOBlenho Jntnebo 6batapeiKO. Ecn 6batapeika cTaHET cnaob nIIN NOHOCbIO pa3paNTcN, INDkaTOp 6ydt MfartB BVnDOICKaTeNE npn6bn3u- TeNbHO B TeueHne 5 cekynd, KOrda Bbl yCTaHOBtE bIKIOUaTeJIb POWER B noLoXeHne CAMERA.B TAKOM cnuyae 3ameHtbe 6batapeKy Ha JNTneBvO 6batapeKy Sony CR2025. NcnoJb3OBaHne KaKoHNbYdb dpyroB 6batapeKn MoKeT npedCTabJIb pNCK BOCIIaMeHEnHa NIn B3pbIBa. Bbl6pocTBe IcNoJIb3OBaHHU 6batapeKy B COOTBEtCTBnC Uyka3aHnMn 3rTOBHTeJIa. JNTneBOB 6bataeKn DnA BnDEOKaMEpbI xbataet np6Ibn3nteBHO Ha 1 roD npn HOPMaJIbHbIX YcNOBHX 3KcPnyatauIN. (JNTneBOB 6bataeKn, KOTopAR 6blNa yCTaHOBNeHa Ha 3aBODe, MoKeT He XBaNTb Ha 1 roD.)
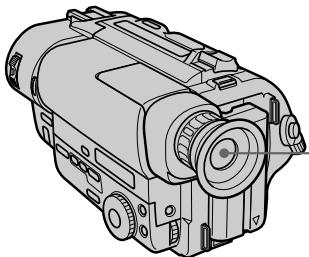
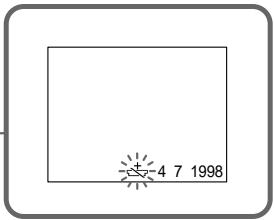
Notes on lithium battery
- Keep the lithium battery out of the reach of children.
Should the battery be swallowed, immediately consult a doctor.
- Wipe the battery with a dry cloth to assure a good contact.
- Do not hold the battery with metallic tweezers, otherwise a short-circuit may occur.
- Note that the lithium battery has a positive (+) and a negative (-) terminals as illustrated. Be sure to insert the lithium battery with the positive side facing out.
Примочаян К Литnevов батуейke
-ДерхитЕ Линьую 6атAPEйкУВ He DOCTYNHOMДЯDETeMecTe.
Ecni 6atapeika 6bila nporloeta, HemeJeHHO o6paTntecb K DOKTOpy.
-ПлотрипебатарейкусхонTKаньюддобесоченихоршeroКонтakta.
He 6epnte 6atapeky MeTalnueckmU mIuIaMn, IINJ Xe MOXe TnpOn3OITN KOPOTKoe 3aMbIkaHne.
- YUHTNE, YTO JIITNEBA 6aTapeiKa IMeET NOIOXNTeNbHbI (+) INOTpuCaTeNbHbI (-) NOIIOcbl, KAK NOKa3aHO Ha pncyHke.
06a3aTeNbHO BCTaBbTe JNTHeByo 6atapeKy TaK, YTObbl NOJoxNteMbHa CTOPoHa 6bIla ObaeHa HapKy.
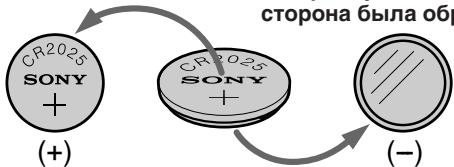
WARNING
The battery may explode if mistreated. Do not recharge, disassemble, or dispose of in fire.
PNEyPPEKDEHNE
PnHHePbAunbHOMobpaueHm6aTapeKamOKeT B3OpBaTbCn. He nepe3apKaTe, He pa3bnpaIte n He 6pocaTe 6aTapeKyB orOnb.
Changing the lithium battery
When replacing the lithium battery, keep the battery pack or other power source attached.
Otherwise, you will need to reset the date, time and other items in the menu system retained by the lithium battery.
(1) Open the lid of the lithium battery compartment.
(2)Push the lithium battery down once and pull it out from the holder.
(3) Install the lithium battery with the positive (+) side facing out. Close the lid.
3aMeHa JIITHeBOB 6aTapeKn
ПризамелNTиев6aTapeКnOCTabTe IOIDCOeINHHeHbIM 6aTapeHbI 6JOK INI INpyroN IcTOUHKn NITAHN. B IpOTNBOM Clyuae BamNoHaIOBntC ChOBA yCTaHABnBaT bAty, BpemN INdpYrNe yCTaHOBKn B CnCTeme MeHIO, XpaHmblE NOpeDCTBOM NTiEVBo6aTapeKn.
(1)ОткpoиTe Kpbiшky OТсeKa ЛnteВоь batapeiKN.
(2)Haxmnte 6aTapei Ky Bn3 n BbItaTe ee n3 depXaTeJI.
(3) YctaHOBInTe JNTHeByIO 6bTapeiKy
PONOXINTEbHOn (+) CTOpOH, ObaUeHHOn
HapyKy. 3aKpOInTe KpbIshKy.
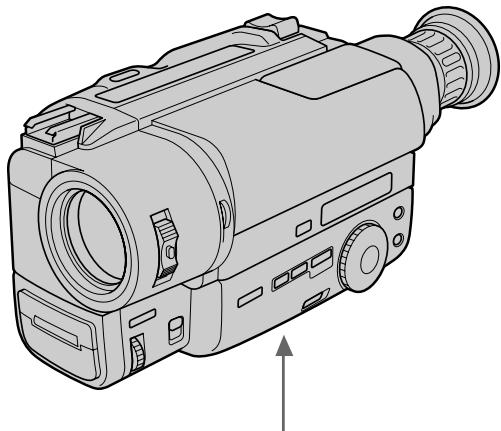
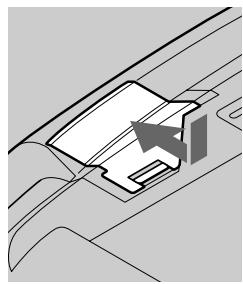
1
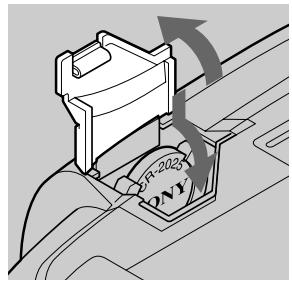
2
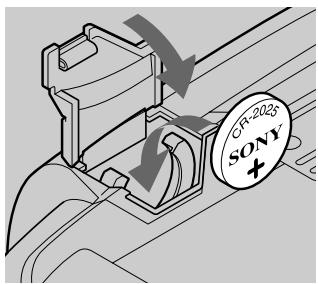
3
Resetting the date and time
YcTaHOBKa DaTbI IN BpeMeHN
You can reset the date and time in the menu system.
(1) While the camcorder is in Standby mode, press MENU to display the menu.
(2) Turn the control dial to select 三 , then press the dial.
(3) Turn the control dial to select CLOCK SET, then press the dial.
(4) Turn the control dial to adjust the desired year, then press the dial.
(5) Set the month, day, hour and minute by turning the control dial and pressing the dial.
(6) Press MENU to erase the menu display.
BbMOxTe yCTaHOBnTb DaTy n BpEmBa CNTeMe MeHIO.
(1)KorДа Видевокамера 6удETнхODITСВ ржIMе rOTOBHOCTN HaxMNTe MENU Дп OTOбраЖЕнЯ МEHIO.
(2)ПовернenteperуларовныДиСКДпьВыбopa,a3atemннхмnteДИСК
(3)Повернше ретуларовьдпсдлвбopa CLOCK SET, a 3aTe mн haXmte nck.
(4)ПовернITE ретуліровочьй діСК діЯ ретуліровкі кениамог ro'da,а 3atem NaЖмпTe ретуліровочьй діСК.
(5)YCTaHOBNTe MeCAU, DaTy, YacbI MmHyTbI, NOBOPaUNBa peryJnIPoBOUHbI DnCK, a 3aTEM HaxIma JnCK.
(6)HaxmTe MEnU dIaCTpaHnI dIcPJIeMeHIO.
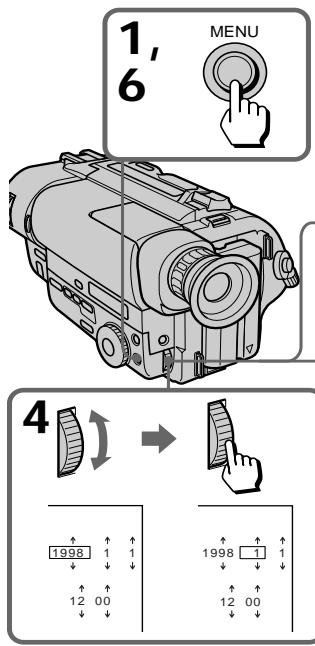
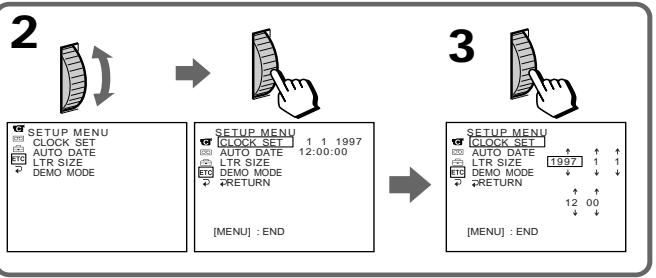
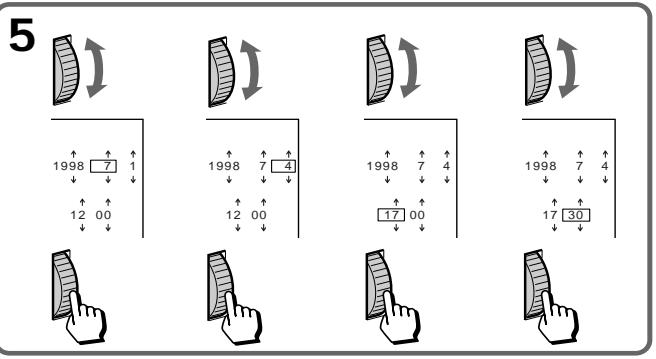
To correct the date and time setting
Repeat the above procedure.
To check the preset date and time
Press DATE to display the date indicator.
Press TIME to display the time indicator.
When you press the same button again, the indicator goes off.
The year changes as follows:

Note on the time indicator
The internal clock of this camcorder operates on a 24-hour cycle.
EcnBbCHOBa HaxMeTe Tye Ce camyIO KhoNky, INHdkaTOP nCye3HeT.
Tod n3mehreTc cIeDyUoM m6pa30m:

PpMueHne K HmKAtopy BpeMeHH
BcTpoEHHbIe Yacbl DaHHoB BnDeOKaMepbl pa60TaIOT B 24-YacOBOM ZKKe.
Simple setting of clock by time difference
Iprocta yctaHOBka yacob c nOMOupo pa3HnU BO BpeMeHN
You can easily set the clock for a local time by a time difference in the menu system.
(1) While the camcorder is the standby mode, press MENU to display the menu.
(2) Turn the control dial to select ETC, then press the dial.
(3) Turn the control dial to select WORLD TIME, then press the dial.
(4) Turn the control dial to set a time difference, and press the dial. The hour of clock changes in relation to a time difference which you set.
(5) Press MENU to erase the menu display.
BbMOxTeJeIeKo yCTaHOBnTb Yacbl Ha MeCTHoe BpeM C NOMOuPo pa3HnCbBo BpeMeHn B CNTeMe MeHIO.
(1)KorДа Видевокамера 6удETнхODITСВ ржIMе rOTOBHOCTN HaxMNTe MENU Дп OTOбраЖЕнЯ МEHIO.
(2)Повернente рergyларовныдпсдпь ВьбopaETC,a3aTeMнжмerteДСК.
(3)ПовернITEperiуларовныдпсдпь Вьбopa WORLD TIME, a 3aTeM haxmte дИСК.
(4)Повернite рergyларовьдясдяуctановкп ра3нць BOВремен,а 3aTeMHaxмITEДСК.Врем на уacaxизмEHITcB COOTBETCTBnC p3nueBOремEN, KOtopyU BblyctaHOBnI.
(5)HaxmTe MNU dIa CTpaHnIa IucnJIe MeHIO.
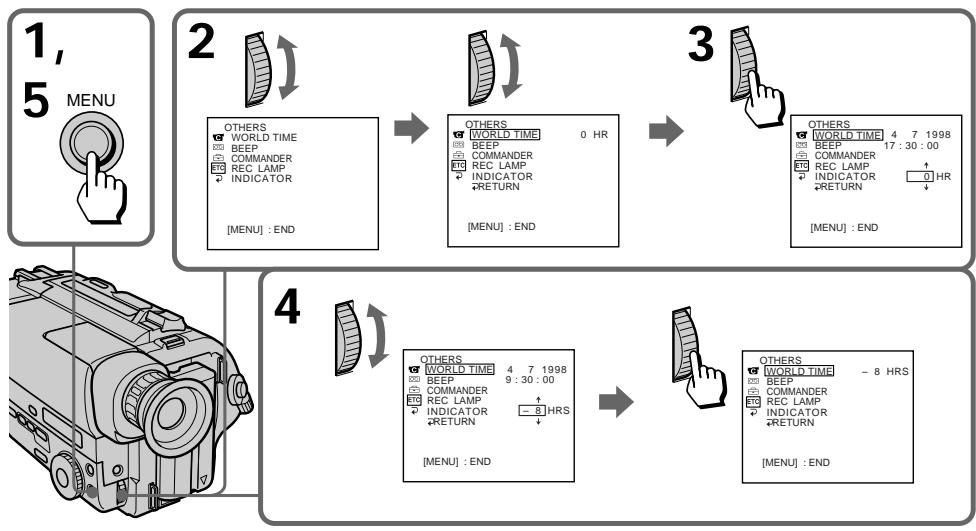
Note on WORLD TIME
If the time is not set, WORLD TIME does not work.
Selecting cassette types
- CCD-TR840E/TR845E only
This Hi8 system is an extension of the standard 8 mm system, and was developed to realize higher picture quality.
You can use either Hi8 or standard 8mm video cassette for this camera. When you use a Hi8 video cassette, the recording is made in the Hi8 system. When you use a standard 8mm video cassette, the recording is made in the standard 8 mm system. Standard 8mm video cassette is incapable of recording in the Hi8 system.
If you intend to use a standard 8mm video recorder/player to play back a video tape, you are required to use a standard 8mm video cassette for recording.
What is Video 8 XR/video Hi8 XR
"XR" is an abbreviation of "Extended
Resolution". The video Hi8 XR or video 8 XR camcorders is new type of 8mm camcorder with a picture quality superior to the conventional video Hi8 or video 8 camcorder respectively. You can record and play back pictures more clearly with the "XR" camcorder.
A video tape recorded by the "XR" camcorder gives excellent picture quality at maximum when it is played back on the "XR" camcorder.
When a video tape recorded by this "XR" camcorder is played back on a conventional 8/ Hi8 camcorder or when a video tape recorded on a conventional 8/Hi8 camcorder is played back on this "XR" camcorder, the playback picture has the normal quality of a 8/Hi8 camcorder.
Bb6op Tnna Kaccetbl
-ToIbkoCCD-TR840E/TR845E
3Ta CNTema Hi YBNAETC yCOBepseHCTBOBAHNEM CTAHAPTHOINCTEMBI 8 MM N 6blapa3pa60TanaI pypeaIn3aunn BbICOKORKaueCTBa N3O6paXeHn.
BbMOKTeIcNOb3OBAbI dIa 3ToI KaMepbl BnDeoKaccTebl Hi8 nnn Jxke cTaHndapThbIe BnDeoKaccTebl Ha 8-MM JeHte. B cnUyae IcNoIb3OBaHnB NDeoKaccET Hi-8 3aIncB BbIOJIbHReTcB CnCTeMe Hi-8. B cnUyae IcNoIb3OBaHnB NDeoKaccET Ha 8-MM JeHTe 3aIncB bIIOJIbHReTcB CnCTeMe 8 MM. CtaHndapThaB NDeoKaccTaHa 8-MM JeHte He MOXeT oBeCneHTb 3aIncB CnCTeMe Hi-8. EcIn Bb HamepeBaTeCb NcNoIb3OBaTb CTaNdApTHb BnDeoMaHnTOfOH/BnDeoONJIeep CnCTeMb 8 MM, TO cNeJyET NcNoIb3OBaTb DnA 3aIncs CTaNdApTHyIO BnDeoKaccTeHa 8-MM JeHTe.
YTO TakoE BnDeo 8 XR/BnDeo Hi8 XR
"XR" ABJIETCA COKpaJHem BbipaKeHnA "Extended Resolution" (NobblueHHa pa3peaioua cnooc6hOCTb).BIndeokamepbl Hi8 XR nII 8 XR npedctabJIOT c6o0 HOBBI TIN 8-MM BIndeokamepc KaueCTBO m36paKehnI, ppeBOxCIOJIM KaueCTBO n36paKehnI BIndeokamep o6bIuHO tCaHdapTa BIndeo Hi8 nII BIndeo 8 COOTBeTCTBEHNO. C NOMOUIBO BIndeokamepbl "XR" Bi MoKeTe BbIIOJHrTB 6OJIee YeTKne 3aIncb IN BOCpON3VeDeHne N36paKehnI. BIndeJeHNTa, 3aIncsHaHNa H BuDEOKaMepe "XR", OecneUBAET HaIyUeEe KaueCTBO n36paKehnI pR BOCpON3VeDeHn Ha BIndeOKaMepe "XR".
EcIn BnDeOJeHt, 3aNcsaHHyIO Ha DaHHoB BnDeOkamepe "XR", BocpnOn3BODntb Ha 06bIuHNo BnDeOkamepe 8/Hi8, IINJxpe, ecIn JeHTy, 3aNcsaHHyIO Ha 06bIuHNo BnDeOkamepe 8/Hi8, BOCpnOn3BODntb Ha BnDeOkamepe "XR", TO KaueCTBO BOCpnOn3BODnMOrO n3obpaXeHnR 6yDet COOTBeTCTBOBaTb KaueCTBy n3obpaXeHnR, 3aNcsaHHomy Ha BnDeOkamepe 8/ Hi8.
When you play back
The playback mode (SP/LP) and system (Hi8/ standard 8mm ) are selected automatically according to the format in which the tape has been recorded. The quality of the recorded picture in LP mode, however, will not be as good as that in SP mode.
Note on AFM HiFi stereo
- CCD-TR840E/TR845E only
When you play back a tape, the sound will be in monaural if:
- You record the tape using this camcorder, then play it back on an AFM HiFi monaural video recorder/player.
- You record the tape on an AFM HiFi monaural video recorder, then play it back on this camcorder.
Foreign 8 mm video
Because the TV colour systems differ from country to country, you may not be able to play back foreign pre-recorded tapes. Refer to the list of "Using your camcorder abroad" to check the TV colour system of foreign countries.
Playing back an NTSC-recorded tape
You can play back tapes recorded in the NTSC video system using the SP mode. If the tape is recorded in the AFM HiFi system, the AFM HiFi sound is reproduced (CCD-TR840E/TR845E only). However, note that the following will occur during playback of an NTSC-recorded tape.
- When playing back a tape on a TV screen, you may not get the original colour depending on the TV. When you play back on a Multi System TV, set NTSC PB to the desired mode in the menu system.
- During playback, a black band appears on the lower part of the viewfinder.
- You cannot play back a tape recorded in NTSC video system with LP mode neither on the viewfinder nor on a TV screen.
- If a tape has portions recorded in PAL and NTSC video systems, the tape counter reading is not correct. This discrepancy is due to the difference between the counting cycle of the two video systems.
- You cannot edit the NTSC-recorded tape onto another VCR.
Korda Bbl ocuueCTBJIeTe BocnpOn3BeJeHne
Pexim Bocnpo3BeDHeNn (SP/LP) n CnCTema (Hi8/8-MM cTaHdapT) BblbnpaIOTcA bOTMaTtueCckn B COOTBETCTBMn C fOpMaTOM, B KOTOpom 6bJa 3aIncaHa JeHtA. Ondako, KaeeCTBO n3OpaXeHnra, 3aIncaHnoro B pexime LP, He 6ydet TaKIM XopoShm, KaK npn 3aIncn B pexime SP.
HIOCTpaHHbIe 8-MM BnDeoJeHTbI
Tak KaC CNTeMbI ZBeTHORO TeLEBnDEHn
OTInuAIOrB 3aBNCIMoCTN OT CTpaHbI, TO
MOKeT 6bITb BBy He CMOKeTe BOCnPON3BOJnTB
INOCtPaHhBHe IpeDbAPInTeBHO 3aNcCaHbIe
JIeHTbI. CMOpTne IepueHb B pa3dene
"UcNoBb3OBAHne BaSeH BNeOkaMepbI 3a
rpaHmE"ДЯ npOBeRKn CNTeMbI ZBeTHORO
TeLEBnDEHn INOCtPaHHbIX TocyapCTB.
Bocnpoun3BeDeHne JeHTbI, 3aNcaHnoB CnCTeme NTSC
BbMOxTe BOCPON3BOOHTbJeHtbl, 3aNcAnHbIe BVnDeocnCTeme NTSC C nCNoJIb3OBaHNempeXmAsp.EcnnJeHTa 3aNcAnaB CnCTeMe AFM Hi-Fi,TO6yDet BOCPON3BOOHTbc3ByaHne AFM Hi-Fi (ToJbKO CCD-TR840E/TR845E).OdHaKo,6paTnte BHMaHHe Na To, YTO cNeIyoUee 6yDet npOnCXoIb TB BO BPEMa BOCPON3BeDeHnJeHTbl,3aNcAnHOb BV CnCTeMe NTSC.
-При ВOCПОИЗBEДENHиHAЗКранеТelenBИЗОРAbI MoKTe He ПОЛУЧТБ ПОДПИНь�цБТаВ 3aBICNMOCTNOTelenBИЗОр.ЕспиВbI BOCПОИЗBOДNTe ЛEHTу HAМЛБТСИССТЕMHOMTeLEBIV3Ope,yCTAHOBITNE NTSC PBHaJKeJaEMbI pEXIMB CINCTeMe MeHIO.
Bo BpemBocpon3BeHnuepeHnnoIoca nOBBLAeTcB HnxKHeuactn BuOnCKaTeJIa.
BbI He MoKeTe BOCPON3BOOHTbJIeHTbl, 3aHncaHbIe B CnCTeMe NTSC,BpeXmE LP Hn B BVIOUCKaTeJe, HN Ha 3KpaHe TeJeBn30pa.
- EcInIeHTa IMeET qAChN, 3aINcaHHbIe B BVdeOcNCTeM aPL nNTSC, NOKa3aHnB cHTyKna 6byT HENpaBnblhble. 3To paCXOXJdHHe I pONcXoDITn 13-3a pa3HnCbIMexdy paCteTOM BpeMeHN DByx BVdeOcNCTeM.
- Bby He MOXKeTe IpON3BOuNTb MOHTaX JeHtbl, 3aIncaHHO B CnCTeMe NTSC, Ha dpyroK KBM.
This section shows you how you can get the most out of your battery pack.
Preparing the battery pack
Always carry additional batteries
Have sufficient battery pack power to do 2 to 3 times as much recording as you have planned.
Battery life is shorter in a cold environment
Battery efficiency is decreased, and the battery will be used up more quickly, if you are recording in a cold environment.
To save battery power
Turn STANDBY down when not recording to save battery power.
A smooth transition between scenes can be made even if recording is stopped and started again.
While you are positioning the subject, selecting an angle, or looking through the viewfinder lens, the lens moves automatically and the battery is used. The battery is also used when a tape is inserted or removed.
When to replace the battery pack
While you are using your camcorder, the remaining battery indicator decreases gradually as battery power is used up. Remaining time in minutes appears.
DaHHb pa3denn oka3bIbaET, KaB BIMoKTeIpoNHyNTb Hn60bnJyO tdauy ot BaWero 6aTapeHoro 6loka
PoiroTobka 6aTapeHoro 6Joka
Bcerda Hocnte dOonHnTeIbHbIe 6aTaapeHbIe 6JOKN
ImeTe DocTaOuHbI 3apRd 6aTapeHOro
6loka Iyra BblOpHeHn 3aIncN B 2-3 pa3a
60lbIe, Yem Bbl 3aJIpaHnpOBaIN.
Cpok cnjx6bl 3apHa 6aTaapeHoro 6Ioka 6ydet Kopoue B XoIoDhbix ycNoBnIX
3aHb860606060606060606060606060606060606060606060606060606060606060606060606060606060606060606060606060606
ДляэКOHOMиЗapЯдбаТаpeHOrO 6Ioka
When the remaining battery indicator reaches the lowest point, the indicator may appear and start flashing in the viewfinder.
When the indicator changes from slow flashing to rapid flashing while you are recording, set the POWER switch to OFF on the camcorder and replace the battery pack. Leave the tape in the camcorder to obtain a smooth transition between scenes after the battery pack has been replaced.
Korda INHnKaTOp OCTaBweroC3apraDa 6batapeHoro 6Ioka IOCTnRaet HauHn3wei TOUKN, INHnKaTOp TIOBnReTCr N HauHnaET MIRatb B BuOnckaTeNe.
Korda INdkaTop 13MeHReT MeIeHHoe MIRaHHe Ha 6bICTpoe MIRaHHe BO BpeM 3aIINcN, ycTaHOBtE BkJIIOUChateJb POWER B noJIOKeHHe OFF Ha BVJeOKaMepe n 3aMeHnTe 6bTapeHbI b6lOk. OCTaBbTe IeHTy B BVJeOKaMepe dIЯ NOlyeHnI pIaNBHOrO nepexOJa MExJy CUEHAMn NocLe 3aMeHbI 6bTapeHoro 6Ioka.
Notes on the rechargeable battery pack
Caution
Never leave the battery pack in temperatures above 60^ (140^) , such as in a car parked in the sun or under direct sunlight.
The battery pack heats up
During charging or recording, the battery pack heats up. This is caused by energy that has been generated and a chemical change that has occurred inside the battery pack. This is not cause for concern and is normal.
Be sure to observe the following
- Keep the battery pack away from fire.
- Keep the battery pack dry.
- Do not open nor try to disassemble the battery pack.
- Do not expose the battery pack to any mechanical shock.
The life of the battery pack
If the battery indicator flashes rapidly just after turning on the camcorder with a fully charged battery pack, the battery pack should be replaced with a new fully charged one.
Charging temperature
You should charge batteries at temperatures from 10^ to 30^ (from 50^ to 86^ ). Lower temperatures require a longer charging time.
BatapeHbI 6JIOK HArpeBaetcA
Bo Bpem3apn nn 3annc 6aTapeHbim 6Iok HarpBaetc. 3TO Bb3BaHO rehepuyEmo 3Heprne n XmMueckmpeakunm, KOtOpbe npOxC0aT BHyTp n 6aTapeHoro 6Ioka. 3TO He doJxHo 6bTb npuHnO dnn 6ecnoKoCTba n ABJIETc HOPMaJIbHbIM.
063aTeNbHO co6IouaIte cIeDyUoee
XpaHnte 6aTapeHbI 6LoK nOdaJIbSe oT orHJ.
-XpaHnTe 6aTaapeHbI 6JOK cyxHM.
- He nbItaIteCb OTKpbITb nI npa3o6paTb 6aTaapeHbI 6nok.
- He noДвергай Te 6aтAPEйнь 6лok НИКаКИМ
MexaHnueCKIM yДapam.
Cpok cnyk6bl 6aTapeHoro 6loka
EcnnnHnDnKaTOp 6bTapeHOro 6NoKa Mmraet
6bICTpo Cpa3y NocLe BKNIOUeHnBUNDeOKaMepbl
C NOJIHOCTbIO 3apXeHHbIM 6bTapeHbIM
6bLOKOM, 6bTapeHbIM 6bOK DOnJxH 6bITb
3aMeHeH HObIM NOHOCbIO 3apXeHHbIM
6bTapeHbIM 6bOKOM.
Tempepatya 3apdKn
BbI DOnKbI 3apKaTb 6aTapeHbI 6NoK npi TemnepaType oT 10^ Do 30^ (oT 50^ Do 86^) .Bolee Hn3KaI TemnepaTypa Tpe6yet 6Olee IINTeBHorO BpemEH 3apKn.
Notes on the "InfoLITHIUM" battery pack
What is "InfoLITHIUM"
The "InfoLITHIUM" is a lithium ion battery pack which can exchange data with compatible video equipment about its battery consumption.
When you use this battery pack with video equipment having the ① InfoLITHIUM mark, the video equipment will indicate the remaining battery time in minutes*. However, if you use it with video equipment not having this mark, the remaining battery capacity will not be indicated in minutes.
"InfoLITHIUM" is a trademark of Sony Corporation.
- The indication may not be accurate depending on the condition and environment which the equipment is used under.
How the battery consumption is displayed
The power consumption of the camcorder changes depending on its use, such as how the autofocus is working.
While checking the condition of the camcorder, the "InfoLITHIUM" battery pack measures the battery consumption and calculates the remaining battery power. If the condition changed drastically, the remaining battery indication may suddenly decrease or increase by more than 2 minutes.
Even if 5 to 10 minutes is indicated as the battery remaining time in the viewfinder, the indicator may also flash under some condition.
Приимechаши К батарейнomy SFoky "InfoLITHIUM"
To obtain more accurate remaining battery indication
Set the camcorder to recording standby mode and point towards a stationary object. Do not move the camcorder for 30 seconds or more.
- If the indication seems incorrect, recharge the battery pack fully (Full charge*). Note that if you have used the battery in a hot or cold environment for long time, or you have repeated charging many times, the battery pack may not be able to show the correct time even after being fully charged.
After you have used the "InfoLITHIUM" battery pack with an equipment not having the
InfoLITHIUM mark, make sure that you use up the battery pack on the equipment having the
InfoLITHIUM mark and then recharge fully.
Why the remaining battery indication does not match the continuous recording time in the operating instructions
The recording time is affected by the environmental temperature and conditions. The recording time becomes very short in a cold environment. The continuous recording time in the operating instructions is measured under the condition of using a fully charged (or normal charged) battery pack in 25^ (77^) . As the environmental temperature and condition are different when you actually use the camcorder, the remaining battery time is not same as the continuous recording time in the operating instructions.
- Full charge: Charging until FULL appears in the display window.
Для получени 60лee Точнoi Индикачиoc octaBшeroCяapяда 6атAPEHoro 6bloka
UcTaHOBInTe BnDEOKaMepy Ha peKIM
rotOBHocTn 3aPiNCn HabeDInTe ee Ha
HeNoDBNXHbI ObBeKT. He DnRaiTe
BnDEOKaMepy B TeueHne 30 cekHy nll 6oJe.
- EcIn INHdNkaCnKa KKeTcH He npaBnIbHOi, 3aprAnTe 6bTaapeHbIb 6bOK NpHocTbO (NONHa 3aprJaKa 1)). IMeTe B BVdu, YTO ecIn BBy IcNoB3OBaIIb 6bTaapeHbIb 6bOK B XapKnx INX XOJOnDbIX OkpyKaIOuixycNobINx B TeueHne dInTeJIbHOro BpeMeHN, INI ecIn BBy NOBTopRn 3aprAky MHO rpa3, 6bTaapeHbIb 6bOK MoKeT He Noka3bIbAtb npaBnIbHoE BpeM aDaKe nocLe nOpHOI 3aprKn.
-ПослncnoIb3OBAHn6batapeHoro 6Ioka "InfoLITHIUM"cannapaTpyoKOToparHe IMeET 3HaKa(1)InoLITHIUM 06BaTeNbHO nCNoIb3yIte 3apArd 6batapeHoro 6Ioka Do KOHca cannapaTpyo,IMeIoUe 3HaK
InfoLITHIUM, a 3aTEM NOJIHOCTbIO 3apAIDTE eRO.
Почему Инданкашиocstabшerooc3apya6atapeinHoro 6loka HeCOOTBETCTByeT BpeMeHN HENpepbIBHOM3aHNCY, yKa3aHHOM B INHCTpyKcNIN NO3KcNPyatauNN
Ha BpeM 3aIncn BInraeT TempepaTypa OkpykaIoUeI cpeIbI n dpyrIe ycNoBria. BpeM 3aIncn CTAHOBNTc OueHb KOpOTKmB XOLONbIy xcNoBIAx BpeM HepepbIBHOI 3aIncN, yKa3aHHoe B INCTpykCnn IIO 3KcPnLyatauNN, n3MePaTeCn B YcNOBIAx NcPOnb3oBAHnI NOINOCtBu 3apJXeHHoro 6bTaapeHnOro 6Loka (nII HOPMaIbHO 3apJXeHHoro) npn Tempepatye 25^ (77^) TAK kak Tempepatya OKpykaIoSe CpeDbI n dpyrIe ycNoBria OTlnuaIoTCr OT peaJIbHbIX ycNoB INcNoJIb3OBaHnIBNDeOKaMepbl, TO BpeM OCTabWteOcR 3apJa 6bTaapeHHoro 6Loka 6bJeT He TaKIM, kak BpeM HepepbIHHO 3aIncN, yKa3aHHoe B INCTpykCnn IO 3KcPnLyatauNN.
Moisture condensation
If the camcorder is brought directly from a cold place to a warm place, moisture may condense inside the camcorder, on the surface of the tape, or on the lens. In this condition, the tape may stick to the head drum and be damaged or the unit may not operate correctly. To prevent possible damage under these circumstances, the camcorder is furnished with moisture sensors. Please, take the following precautions.
Inside the camcorder
If there is moisture inside the camcorder, the beep sounds and the indicator flashes. If this happens, none of the functions except cassette ejection will work. Open the cassette compartment, turn off the camcorder, and leave it about 1 hour. When indicator flashes at the same time, the cassette is inserted in the camcorder. Eject the cassette, turn off the camcorder, and leave also the cassette about 1 hour. The camcorder can be used again if the indicator does not appear when the power is turned on again.
On the lens
If moisture condenses on the lens, no indicator appears, but the picture becomes dim. Turn off the power and do not use the camcorder for about 1 hour.
How to prevent moisture condensation
When bringing the camcorder from a cold place to a warm place, put the camcorder in a plastic bag and allow it to adapt to room conditions over a period of time.
(1) Be sure to tightly seal the plastic bag containing the camcorder.
(2) Remove the bag when the air temperature inside it has reached the temperature surrounding it (after about 1 hour).
KoHdeHcaZyBlaRn
EcIn BnDeOkamepa npHecHa npAMo n3
XOJOnHO MeCTa B TeJIIOe MeCTO, Bnara MOKeT
CKOHJeHCnPOBaTbCRA BHyPn BnDeOkamepbl, Ha
NoBepxHocTN JeHTbI Nm HA ObBeKTHBE. B
TakOM COCTOHN IeHTA MOKeT npINlNHyTb K
6apabAHy rONOBKn I 6yDet NOBpeKdHeA, Nll
BnDeOkamepa He CMOKeT paBOTaTb pApBnIbHO.
DnI pPeDoTbPASeHn BO3MOXHOrO
NOBpeKdEHn BBnDu TAKNX OBCTOTeNbCTB,
BnDeOkamepa ChAbKeHa DaTtNkAmu Bnarn.
Co6JIoDaIte CneJeUoune PpeDocToPOxHoCTn.
BHyTpBn BndeOkamepbI
EcIn BHyTpBnDeOkAmpbI npOn3OuJa KOHdEHCaunBnAgn,To 6yDet 3ByuAtb 3ymMepHbI CnHrHaI, INHnDKaTOp 6yDet MMraTb. EcIn 3TO cnyuNocB, To HnKaKne yHKUIN, KpOME BblTaIKBaHN KACCETbl, He 6byt pa6oTatb. OTKpoTe KACCETbI OTCek, BbIKJIOChTE BnDEOkAmpy u OCTaBbTe ee np6bn3nteBHO ha 1 Yac.EcIn nHnDKaTOp 6yDet MmRaTb TO Xe camoe BpEm, TO 3NaHT KACCCTaBCTABNeHa BnDEOkAmpy. BbToLKnHe KACCte, BbIKJIOChTE BnDEOkAmpy u OCTaBbTe KACCctY np6bn3nteBHO ha 1 Yac.BnDEOkAmpa CHOBA MoXet 6bTb NcNoIb3ObaHa, ecIn INHnDKaTOp 6 He 6yDet NOBnTbcNocLe BKJIOChErN PNTAHN.
Ha obBeKTube
Ecni Bnara cKoHdEHCPOBaIacb Ha 06BeKTNBHe, HNkakne INndkaTOpbI NOBnTbcr He 6yDyT, Ho n3O6paXeHne CtaHET TycKnblM. BbIKJIOHTe NITaHne I He INoJIb3yIte BnDeokamepy np6bn3ntelbHO 1 cac.
Kak npedotbpatntb KOHdeHcaNIO BnaI
EcIn BnDeOkamepa npHecHa n3 XoJOnHoro MeCTa B TEnJIoe MeCTO,TO NIOXKeTBeBnDEOkamepy B NOIN3TNJeHObBI NaKET IN DaIte eI aAnTIpoBaTbCRA K KOMHaTHbIM ycNObNAM 3a HeKOTOpBI nepiOd BpeMeHN.
(1)O6a3aTeIbHo pIoTHO 3aKpoIte IOnIa3TuJIeHObBn paKeT,coIepXaIcN KaMepy.
(2)BbIbTe KaMepy, KOrJa TemNepaTpa BO3dYxa BHyTpNi NaKeTa DoCTnHET TemNepaTypbI OKpyKaIOUeRO BO3dYxa (Pn6JIIN3nTeNbHO Upe3 1 Yac).
Video head cleaning
To ensure normal recording and clear pictures, clean the video heads. When the × indicator and "CLEANING CASSETTE" message appear one after another or playback pictures are "noisy" or hardly visible, the video heads may be dirty.
OuNTka BundeOroJIOBOK
[a] Slightly dirty
[b] Very dirty
If this happens, clean the video heads with the Sony V8-25CLH/V8-25CLD cleaning cassette (not supplied). After checking the picture, if it is still "noisy," repeat the cleaning. (Do not repeat cleaning more than 5 times in one session.)
Caution
Do not use a commercially available wet-type cleaning cassette. It may damage the video heads.
Note
If the Sony V8-25CLH/V8-25CLD cleaning cassette is not available in your area, consult your nearest Sony dealer.
[a]Cnerka3arpa3HeHbI
[b]OueHb 3aqr3HeHbl
EcIn 3To Cnyntc, OChCTnTe BnDeorOIOBKn c nOMoUb OChCTnTeJbHOn Kaccetbl Sony V8-25CLH/V8-25CLD (He npinaraertc). Iocne npobepkn n3o6paKeHn, ecIn oHO BCE ue "3aUymJeHo", nobTopnTe OChCTky. (He nobTopraIte OChCTky 60nee 5 pa3 3a oDIn npneM.)
PpeoocepkEne
He nCnoJIb3yIte NMeIOUyIOcB IpoJaXe OuNCTnTeJbHyIO KAcCETy BnAaXHOrO TnPa. OHa MOKeT NOBpeDITb BnDeoROJOBKn.
PpmeaHne
EcInOnCnTHeNbHoiKacceTbI Sony V8-25CLH/V8-25CLD HeT B npOaJKe B BaSei oBnaCTn, npOKoHcyNbTpHyTeCb y BaJero 6bnKaiuero dInpepa Sony.
Removing dust from inside the viewfinder
(1) Remove the screw with a screwdriver (not supplied). Then, while sliding the RELEASE knob, turn the eyecup in the direction of the arrow and pull it out.
(2) Clean the surface with a commercially available blower.
YdaJIeHne nbIIN n3 BnDOnCKaTeJIa
(1) CHINMITE BINTC NOMOJIbO OTBepTKN (He npNJIraeTcR). 3aTeM cDVBIRa pyuKy RELEASE, NOBepHnTE OkyIrp B HappaJIeHNCTpeKN I BbITauNTe erO.
(2)OuHCTnTe NOBepxHOCTb C NOMOUsbIO MeUeINCB PpOdaKe BO3DyXoYBKn.
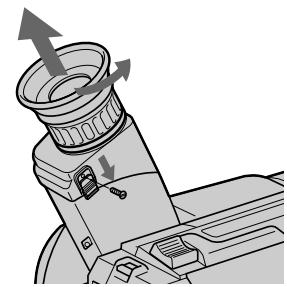
1
2
To reattach the eyecup
(1) Align the groove on the eyecup with the mark on the barrel.
(2) Turn the eyecup in the direction of the arrow. Then replace the screw.
Do not remove any other screws. You may remove only the screw to remove the eyecup.
PpeoocTepeXeHne
He chImaIte HnKaKnx DpyrNx BnHTOB. BblMOKeTe OTkpyTntb TOnbKO BnHT dJa CHaTnaOKyIpa.
Precautions
Camcorder operation
- Operate the camcorder on 7.2V (battery pack) or 8.4V (AC power adaptor).
- For DC or AC operation, use the accessories recommended in this manual.
- Should any solid object or liquid get inside the casing, unplug the camcorder and have it checked by a Sony dealer before operating it any further.
- Avoid rough handling or mechanical shock. Be particularly careful of the lens.
- Keep the POWER switch setting to OFF when not using the camcorder.
- Do not wrap up the camcorder and operate it since heat may build up internally.
- Keep the camcorder away from strong magnetic fields or mechanical vibration.
On handling tapes
Do not insert anything in the small holes on the rear of the cassette. These holes are used to sense the type of tape, thickness of tape and if the recording tab is in or out.
Camcorder care
- When the camcorder is not to be used for a long time, remove the tape. Periodically turn on the power, operate the camera and player sections and play back a tape for about 3 minutes.
- Clean the lens with a soft brush to remove dust. If there are fingerprints on it, remove them with a soft cloth.
- Clean the camcorder body with a dry soft cloth, or a soft cloth lightly moistened with a mild detergent solution. Do not use any type of solvent which may damage the finish.
Ppeoctopoxhoctn
3KcnnyatazaBnuDeokamepbI
3KcnpnyatpyuTe Bndeokamepy ot 7,2B (6aTaapeHbI bIoK) nIn 8,4B (ceTeBoi aadantep nepem. toka).
Длгэкплуataци NT NOCTОнHOrO TOKa ИппелеримHorO TOka ИспльзУнTe npинадлесховс, peKOMeHДоВаHHье B ДаHHOMpyKOBODCTBE.
- Ecni Kaokn-Hn6yNb TBepdbI npeDMETnJIN KnDkoCTb NopaJI N BkopnyC,TO BbIKNIOHTe BnDeOkamepy INpOBepbTe ee y DInape Sony nepe DaIbHeNee ee 3KcNpyataunei.
Избагаитгрубого образенья пл mханческux удан.Будът ocobehno OCTOPOKHbIC obteknBOM.
-ДеркитEBbIKNochateIb POWERB noJokHeHnOFF,KoIa BnJeOkamepa He nCNoJIb3yeTcra.
- He 3aBopauBaIte BnDeoKamepu n He
3KcPnLyaTnpuYTe ee B TaKOM COCTOHN, TAK
KaK MoKeT PpOn3OHTN BHyTpEHHee
NoBbIiHeHne TempepaTypbl.
-Держптевideokamepy noДальшо DT Cильных МагнIHьIx ПОлЕй ИИ MEXaHnueckoи Bn6paци.
OTHOCHTeJIbHO 6oBaIeHnCJeHTaMn
He BCTaBJIrTe HnUeRo B MaJIeHbKne OTBepCTNa Ha 3aJHNe CTOpOHe KAcCtBtI. 3TN OTBepCTNa IcNIOJIb3yIOTcI dI Na ONpeJeIeHn TIna JIeHTbl, TOJIuINHbI JeHTbl I HAJIuYn JIeNecTka 3aINCn.
Yxoid 3a Bndeokamepo
Korda Bndeokamepa He nCnoIb3yETcB TeueHne dInTeJIbHO BPemEH, ydaJIte IeHTy. IepnoDnueckn BKIOUaIte NITaHne, paobTaIte C cekuIMN KamepbI IN PIIeepa IN BOCpOIN3BOJNTe JIHTy np6JIIN3TEJbHO B TeueHne 3-X MNHyT.
- Oчиши Te obteKtNB c nOMOuBIO MrgKoN KnCTOChI dny ydaJIeHna rpa3n. EcIn nMHeOTcO TneTKn pIaNbceB Ha obteKtNBe, To ydaJInte INC nOMOuBIO MrgKO TkaHN.
OuHuaTe Kopnyc annapapaTc nOMoUbocxOy MArKo TKaHN NIM MArKo TkaHN, CJIeRka CMOueHHo pactBopOM yMepenHOrMoIOJero cpeICTBa.He IcNoJIb3yIte KaKnxJIIn6 TINOB pactBopITeJeN, KOtOpBle MOryTIOBpeDNTb OTDeJIky.
- Do not let sand get into the camcorder. When you use the camcorder on a sandy beach or in a dusty place, protect it from the sand or dust. Sand or dust may cause the unit to malfunction, and sometimes this malfunction cannot be repaired.
AC power adaptor
- Unplug the unit from the mains when not in use for a long time. To disconnect the mains lead, pull it out by the plug. Never pull the mains lead itself.
- Do not operate the unit with a damaged cord or if the unit has been dropped or damaged.
- Do not bend the mains lead forcibly, or put a heavy object on it. This will damage the cord and may cause a fire or electrical shock.
- Be sure that nothing metallic comes into contact with the metal parts of the connecting plate. If this happens, a short may occur and the unit may be damaged.
- Always keep the metal contacts clean.
- Do not disassemble the unit.
- Do not apply mechanical shock or drop the unit.
- While the unit is in use, particularly during charging, keep it away from AM receivers and video equipment because it will disturb AM reception and video operation.
- The unit becomes warm while in use. This is normal.
-
Do not place the unit in locations that are:
-
Extremely hot or cold
- Dusty or dirty
-
Very humid
Vibrating
-
He no3B0JnTe necky nonactb B BnDeokamepy. Korda Bby nCnObl3yeTe BnDeokamepy Ha necuHOM nIJIe NII B nbJIbHOM MeCTe, npedoxpahnIte ee OT necka n nbIIN. PecOK n PbIb MOrYT Bb3BaTb HncnPabHocTb annapaTa, n IHOrDa TakaA HncnPabHocTb MOKeT He nOdJIeKAtb peMOHTy.
Notes on dry batteries
To avoid possible damage from battery leakage or corrosion, observe the following.
- Be sure to insert the batteries in the correct direction.
- Dry batteries are not rechargeable.
- Do not use a combination of new and old batteries.
- Do not use different types of batteries.
- The batteries slowly discharge while not in use.
- Do not use a battery that is leaking.
If battery leakage occurred
- Wipe off the liquid in the battery case carefully before replacing the batteries.
- If you touch the liquid, wash it off with water.
- If the liquid get into your eyes, wash your eyes with a lot of water and then consult a doctor.
If any difficulty should arise, unplug the unit and contact your nearest Sony dealer.
Each country or area has its own electric and TV colour systems. Before using your camcorder abroad, check the following points.
Power sources
You can use your camcorder in any country or area with the supplied AC power adaptor within 100V to 240VAC , 50/60Hz .
Difference in colour systems
This camcorder is a PAL system based camcorder. If you want to view the playback picture on a TV, it must be a PAL system based TV.
Check the following list.
PAL system
Australia, Austria, Belgium, China, Czech Republic, Denmark, Finland, Germany, Great Britain, Holland, Hong Kong, Italy, Kuwait, Malaysia, New Zealand, Norway, Portugal, Singapore, Slovak Republic, Spain, Sweden, Switzerland, Thailand, etc.
PAL-M system
Brazil
PAL-N system
Argentina, Paraguay, Uruguay
NTSC system
Bahama Islands, Bolivia, Canada, Central America, Chile, Colombia, Ecuador, Jamaica, Japan, Korea, Mexico, Peru, Surinam, Taiwan, the Philippines, the U.S.A., Venezuela, etc.
SECAM system
Bulgaria, France, Guyana, Hungary, Iran, Iraq, Monaco, Poland, Russia, Ukraine, etc.
KaKdAa CTpaHa NIN ObIacTb IMeET CBOI CO6CTBHeHHbIe CNCTeMbI 3JIeKTPnueckOi CeTu IN CBETHORo TELeBnDEHn. IpeEd IcNoIb3OBAHNem BaSei BnDeOkamepbl 3a rpaHnuei PNOBepbTe CneDyUOuNe NYKtbl.
IcToUHnKn NITaHn
BbMOKeTe NcNoJIb3OBAbT BnIeOKaMepy BJIIO6oI cTpaHe IIN oBlaCTN C nOMOuIbI npIIaRaEMOrO cTeBOrO aAnTepa nepem. Toka B ppeJax ot 100 B do 240 B nepem. Toka, 50/ 60 T.
Pa3nnyB CnCTeMax UBeTHORo TeJeBnDeHn
Даннай видөкамер осноа на сnteme PAL.Есл BыхтITE npocmotpeTB BOCPON3BOdIMOE n3O6paЖeHne Ha TeJIeBn3Ope,TO 3TOДOLЖeH 6bITbTeJIeBn3Op, Oсноаньний на сnteme PAL.
PpOBeBpTe nO cIeIyIoUeMy IpeuHIO.
Cnctema PAL
Abctpann,ABCtpnA,Belbnn, BeIkoobpTaHn, FepMaHH, FollanHn, FOnkOH, DaHn, IVcnaHn, VtaHn, Ktai, KyBeiT, Mana3nH, HOBa 3eHaHn, HopBerHn, IopTyraHn, CInrAnyp, CNoBaucka Pecny6nka,TaIIaN,D,HINJIHN, Yewckar Pecny6nka, WBeuapn, WBeu nT.d.
Cnctema PAL-M
Бразния
Cnctema PAL-N
Aprentina, Naparbai, Upyrbai
Cnctema NTSC
Baramckne octpoBa, BoInBn, BeHecy3na, KaHaJa, Konym6n, Koper, MeKcnKa, Nepy, CypnAm, CLA, TaBaNb, FInnnPiNbI, LcHTpaIbHaar AmePnKa, YInn, 3KbaDop, RaMaJka, JnoHnI n T.D.
CucTeMa SECAM
Bolrnap, BeHrpna, RaHa, IpaK, IpaH, MoHako, Poblsha, Pocn, YkpanHa, PhaHua n T.D.
If you run into any problem using the camcorder, use the following table to troubleshoot the problem. Should the difficulty persist, disconnect the power source and contact your Sony dealer or local authorized Sony service facility.
Camcorder
Power
| Symptom | Cause and/or Corrective Actions |
| The power is not on. | ·The battery pack is not installed.
→Install the battery pack. (p. 8)
·The battery is dead.
→Use a charged battery pack. (p. 9)
·The AC power adaptor is not connected to the mains.
→Connect the AC power adaptor to the mains. (p. 32) |
| The power goes off. | ·While being operated in CAMERA mode, the camcorder has been in Standby mode for more than 5 minutes.
→Turn STANDBY down once and then up again. (p. 14)
·The battery is dead.
→Use a charged battery pack. (p. 9) |
| The battery pack is quickly discharged. | ·The camcorder does not operate when using a battery pack that is not an “InfoLITHIUM” battery pack.
→Use an “InfoLITHIUM” battery pack. (p. 83)
·The ambient temperature is too low. (p. 81)
·The battery pack has not been charged fully.
→Charge the battery pack again. (p. 9)
·The battery pack is completely dead, and cannot be recharged.
→Use another battery pack. (p. 82) |
| While charging the battery pack, no indicator appears or the indicator flashes in the display window. | ·The AC power adaptor is disconnected.
→Connect it firmly.
·Something is wrong with the battery pack.
→Contact your Sony dealer or local authorized Sony service facility. |
| The camcorder turns on/off when using the accessory which is attached to the intelligent accessory shoe. (CCD-TR840E/TR845E only) | ·The camcorder is working with the AC power adaptor.
→Use the battery pack. |
Operation
| Symptom | Cause and/or Corrective Actions |
| START/STOP does not operate. | ·The tape is stuck to the drum.
→Eject the tape. (p. 13)
·The tape has run out.
→Rewind the tape or use a new one. (p. 26)
·The POWER switch is set to PLAYER.
→Set it to CAMERA. (p. 14)
·The tab on the cassette is out (red).
→Use a new tape or slide the tab. (p. 13) |
| Recording stops in a few seconds. | ·The START/STOP MODE switch is set to 5SEC or ↓. →Set it to ↑. (p. 19) |
| The cassette cannot be removed from the holder. | ·The battery is dead. →Use a charged battery pack or the AC power adaptor. (p. 9, 32) |
| □and ▲indicators flash and no function except for cassette ejection works. | ·Moisture condensation has occurred. →Remove the cassette and leave the camcorder for at least 1 hour. (p. 85) |
| The date or time indicator is flashing. | ·You pressed DATE and TIME together for more than 2 seconds. →The camcorder is not malfunctioning. You may start recording. Flashing will stop soon. ·The lithium battery is weak or dead. →Replace the lithium battery with a new one. (p. 74) |
| The tape does not move when a video control button is pressed. | ·The POWER switch is set to CAMERA or OFF. →Set it to PLAYER. ·The tape has run out. →Rewind the tape or use a new one. (p. 26) |
| The Steady Shot function does not activate. (CCD-TR640E/TR840E/TR845E only) | ·STEADYSHOT is set to OFF. →Set STEADYSHOT to ON. (p. 62) ·The Steady Shot function does not work when the wide mode is set to 16:9 FULL. |
| The autofocusing function does not work. (CCD-TR511E/TR640E/TR840E/TR845E only) | ·FOCUS is set to MANUAL. →Set it to AUTO. (p. 50) ·Shooting conditions are not suitable for autofocus. →Set FOCUS to MANUAL to focus manually. (p. 50) |
| The fader function does not work. (CCD-TR511E/TR640E/TR840E/TR845E only) | ·The START/STOP MODE switch is set to 5SEC or ↓. →Set it to ↑. (p. 19) ·A title is displayed. →Stop superimposing the title. (p. 55) |
| No sound or only a low sound is heard when playing back a tape. (CCD-TR840E/TR845E only) | ·The stereo tape is played back with HiFi SOUND set to 1 or 2 in the menu system. →Set to STEREO in the menu system. (p. 34) |
| Excessive high-pitched sound is heard. (CCD-TR840E/TR845E only) | ·The picture has been recorded with WIND set to ON in the menu system. →When there is no wind, set it to OFF. (p. 34) |
| Data code becomes “---…”. (CCD-TR845E only) | ·You are playing back a portion of tape on which you wrote or erased the index signal. This is not a malfunction. (p. 72) |
| The date or time indicator disappears. | ·Reset the date and time. (p. 76) |
(to be continued)
Picture
| Symptom | Cause and/or Corrective Actions |
| The image on the viewfinder screen is not clear. | ·The viewfinder lens is not adjusted.
→Adjust the viewfinder lens. (p. 15) |
| A vertical band appears when a subject such as lights or a candle flame is shot against a dark background. | ·The contrast between the subject and background is too high.
The camcorder is not malfunctioning.
→Change locations. |
| A vertical band appears when shooting a very bright subject. | ·The camcorder is not malfunctioning. |
| The playback picture is not clear. | ·EDIT is set to ON in the menu system.
→Set it to OFF. (p. 34) |
| The picture is “noisy”. | ·The video heads may be dirty.
→Clean the heads using the Sony V8-25CLH/V8-25CLD cleaning cassette (not supplied). (p. 86) |
| An unknown picture is displayed in the viewfinder. | ·If 10 minutes elapse after you set the POWER switch to CAMERA without inserting a cassette, the camcorder automatically starts the demonstration or DEMO is set ON in the menu system.
→Insert the cassette and the demonstration stops.
You can deactivate the demonstration. (p. 34) |
| The five digit code appears. | ·The self-diagnosis function is activated.
→Check the code and solve the problem. (p. 98) |
Others
| Symptom | Cause and/or Corrective Actions |
| The supplied Remote Commander does not work. (CCD-TR412E/TR511E/TR640E/TR840E/TR845E only) | ·COMMANDER is set to OFF in the menu system.
→Set it to ON. (p. 34)
·Something is blocking the infrared rays.
→Remove the obstacle.
·The batteries are not inserted with the correct polarity.
→Insert the batteries with the correct polarity. (p. 109)
·The batteries are dead.
→Insert new ones. (p. 109) |
| The beep sounds for 5 seconds. | ·Moisture condensation has occurred.
→Remove the cassette and leave the camcorder for at least 1 hour. (p. 85)
·Some troubles occur in your camcorder.
→Remove the cassette and insert it again, then operate the camcorder. |
| Picture is recorded in incorrect/unnatural colour. (CCD-TR511E/TR640E/TR840E/TR845E only) | ·NIGHTSHOT is set to ON.
→Set it to OFF. (p. 44) |
| There is dust in the viewfinder. | ·Detach the eyecup and clean the viewfinder lens. (p. 87) |
Пюверka Нецправност
Ecni y Bac Bo3Nkna kakaan-1n6 npo6nema npu nCnoB3OBAHN Bndeokamepbl, BocnoB3yntecb cnedyuoue Ta6nuei Ira OtbickaHn uycTaPHeHn npo6nembl.
Ecni Tpydnoctn BCE eue octaOTc, TO OTCoeHNHTe NCTOHTNK nITaHnI K Bauemy dInepy Sony nn Ha MeTHO yNOLHOMOeHHope pEApnTne NO 6cnYKbAHnIO Sony.
Bvdeokamepa
Питане
The camcorder has a self-diagnosis display. This function displays the camcorder's condition with five digits (a combination of a letter and figures) in the viewfinder or in the display window. If this occurs, check the following code chart. The five-digit display informs you of the camcorder's current condition. The last two digits (indicated by ) will differ depending on the state of the camcorder.

Viewfinder
Self-diagnosis display
C:□□:□□
You can service the camcorder yourself.
E:□□:□□
Contact your Sony dealer or local authorized Sony facility.
| Five-digit display | Cause and/or Corrective Actions |
| C:21☐☐ | ·Moisture condensation has occurred.
→Remove the cassette and leave the camcorder for at least 1 hour. (p. 85) |
| C:22☐☐ | ·The video heads are dirty.
→Clean the heads using the Sony V8-25CLH/V8-25CLD cleaning cassette (not supplied). (p. 86) |
| C:23☐☐ | ·You are using a battery pack that is not an “InfoLITHIUM” battery pack.
→Use an “InfoLITHIUM” battery pack. (p. 83) |
| C:31☐☐ | ·A servicable situation not malfunctioned above has occurred. |
| C:32☐☐ | ·Remove the cassette and insert it again, then operate the camcorder.
→Disconnect the mains lead of the AC power adaptor or remove the battery pack. After reconnecting the power source, operate the camcorder. |
| E:61☐☐ | ·A camcorder malfunction which you cannot service has occurred. |
| E:62☐☐ | →Contact your Sony dealer or local authorized Sony service facility and inform them of the five digits. (example: E:61:10) |
If you are unable to resolve the problem, contact your Sony dealer or local authorized Sony service facility.
Bundeokamepa IMeet DnCnIeIcMoDnaHrOCTNIK.
DaanhaФyHKnIOn OTo6paKaet COCTOHNIE BInDeOKaMEpbIC NOMOUsIOIANTN3HaKOB (KOMbHauNcB6yKBbluIuOp) B BVIOONcKaTeNe IINBOKoWKe DnCnpeA.Ecnn3TO CnyHTC, npOBepbTe CneDuOuSyIOKOIOByU TOabNtu. PocLeDNHe DBe UOpPbI (yKa3aHHbIX KaK 6byT pa3NuaTbCBA3aBNCIMOCtNOT COCTOHNIA BInDeOKaMEpbI.

BudonckateIb
Dncnne cAmoNaHocTNK
C:□□:□□
BbI MOKTe BblOJIHNTb TEXHueCKoe 06cIyKINBaHne BnDeOKaMepbl CAMOCTOReTbHO.
-E:□□:□□
CBrXnTeBcBaUIM DnIePOM Sony IIN MeCTHbIM yONJHOMOeHHbIM npEpnIaTMeM Sony.
Video camera recorder
System
Video recording system
2 rotary heads
Helical scanning FM system
Audio recording system
Rotary heads, FM system
Video signal
PAL colour, CCIR standards
Usable cassette
8mm video format cassette
SP mode: 1 hour and 30 minutes
LP mode: 3 hours
Fastforward/rewind time (using 90 min. cassette)
Approx. 5 min.
Image device
CCD (Charge Coupled Device)
Viewfinder
Electronic viewfinder
Monochrome
Lens
Combined power zoom lens
Filter diameter 37mm (1 7/16 in.)
CCD-TR411E: 16× (Optical), 32× 1
(Digital)
CCD-TR412E: 16× (Optical), 64×^2)
(Digital)
CCD-TR511E/TR640E/TR840E:
18× (Optical), 72× 3 Digital)
CCD-TR845E: 18 × (Optical), 72 × (Digital)
1) 160 x in some areas
2) 200 x in some areas
3) 220x in some areas
Focal distance
CCD-TR411E/TR412E:
4.1 - 65.6 mm (3/16 - 2 5/8 in.)
CCD-TR511E/TR640E/TR840E/
TR845E:
4.1 - 73.8 mm (3/16 - 8 in.)
When converted to a 35mm still camera
CCD-TR411E/TR412E:
39.4 - 630 mm (1 9/16 - 24 7/8 in.)
CCD-TR511E:
39.4 - 709 mm (1 9/16 - 28 in.)
CCD-TR640E/TR840E/TR845E:
47.2 - 850 mm (1 7/8 - 33 1/2 in.)
Colour temperature
Auto
Minimum illumination*
CCD-TR411E/TR412E:
0.4 lux at F 1.4 (Visible minimum
low light 0.2 lux)
CCD-TR511E:
0.4 lux at F 1.4
CCD-TR640E/TR840E/TR845E:
0.7 lux at F 1.4
0 lux (in NIGHTSHOT mode)**
Illumination range
CCD-TR411E/TR412E/TR511E:
0.4 lux to 100,000 lux
CCD-TR640E/TR840E/TR845E:
0.7 lux to 100,000 lux
Recommended illumination
More than 100 lux
- Minimum illumination expresses the light level a camcorder requires to produce a picture. Visible minimum low light expresses the light level to produce a visible signal.
** Object invisible for the dark can be shot with infrared lighting.
S video output (CCD-TR840E/ TR845E only)
4-pin mini DIN
Luminance signal: 1 Vp-p, 75 ohms, unbalanced
Chrominance signal: 0.3 Vp-p, 75 ohms, unbalanced
Video output
Phono jack, 1 Vp-p, 75 ohms, unbalanced
Audio output
47 kilohms) impedance less than 2.2
kilohms
RFU DC OUT
Special minijack, DC 5V
Headphone jack (CCD-TR840E/ TR845E only)
Stereo minijack ( 3.5mm)
LANC control jack
Stereo mini-minijack ( 2.5mm)
MIC jack
Minijack, 0.388mV low impedance
with 2.5 to 3.0VDC output
impedance 6.8 kilohms (0 3.5 mm)
Intelligent accessory shoe (CCDTR840E/TR845E only)
8-pin connector
General
Power requirements
7.2 V (battery pack)
8.4 V (AC power adaptor)
Average power consumption (when using the battery pack
During camera recording
CCD-TR411E/TR412E/TR511E:
2.5 W
CCD-TR640E:2.6 W
CCD-TR840E/TR845E:2.7W
Operating temperature
0^ to 40^ (32^ to 104^)
Storage temperature
-20^ to +60^ (-4^ to +140^)
Dimensions (Approx.)
107× 107× 209mm
(41 / 4× 41 / 4× 81 / 4 in.) (w / h / d)
Mass (Approx.)
CCD-TR411E/TR412E:
790 g (1 lb 11 oz)
CCD-TR511E/TR640E/TR840E/
TR845E:
800 g (1 lb 12 oz)
excluding the battery pack, lithium battery, cassette and shoulder strap
CCD-TR411E/TR412E:
930 g (2 lb)
CCD-TR511E/TR640E/TR840E/
TR845E:
940 g (2 lb 1 oz)
including the battery pack NP-F330,
lithium battery CR2025, cassette
and shoulder strap
Microphone
Supplied accessories
See page 7.
AC power adaptor
Power requirements
100 - 240 V AC, 50/60 Hz
Power consumption
23W
Output voltage
DC OUT: 8.4V 1.5 A in operating mode
Operating temperature
0^ to 40^ (32^ to 104^)
Storage temperature
-20^ to +60^ (-4^ to +140^)
Dimensions (Approx.)
125× 39× 62mm (5× 19 / 16×
2 1/2 in.) (w/h/d) excluding
projecting parts
Mass (Approx.)
280g (9.8 oz)
excluding mains lead
Design and specifications are
subject to change without notice.
Bndeokamepa
Cnctema
CnCTema BnDeo3annc
2Bpaaioiuecra roJIOBKn
CnCTema UM hakIOHHOI
MexAHueeCKo pa3BepTKn
CnCTema aydn03annc
Bpaaiouiecra roIobkn, cncTeMa
BndeocnHa
LBeTobon CnHan PAL, cTaHapr CCIR
Ucnonb3yeMbIe KacceTbl
KacceTbI 8-MM BnDeoΦopMaTa
Hi 8 nnn 8-mm CtaHapr
Bpem3a#ncn/
BOcPnOu3BVeDEHnA (C nONoJIb3OBAHnEH 90 MnH. KACCETbl)
PexmmSP:1uacn30MmhyT
Pexim LP: 3 yaca
Bpem yckopenhno nepemotkn BnepeHa3a (c HcNoIb3OBAHnEM 90 MmK Kaccetbl)
Pn6Jm3.5MH
FopmipoBaTeIb n3o6paXeHnA
Dnana3OHOCBeseHHOCTN
CCD-TR411E/TR412E/TR511E:
OT0,4nkdo100000nK
CCD-TR640E/TR840E/TR845E:
OT0,7Jnkdo100000Jk
PekomeHdyemar OcbueeHHoCTb
Bonee 100 Jk
*MnHIMaIbHaA OCBeUeHHOCtB BbIpaXaET ypOBeHb OCBeUeHHOCTN, Tpe6yEmbIi BnuEOKaMepe DnI BOCpON3BVeDEHnI N3o6paXeHnI. BuDnMOe MnHIMaJIbHo Hn3Koe OCBeUeHHe NcIpaXaET ypOBeHb OCBeUeHHOCTN, Heo6xOdImbI DnI BOCpON3BVeDEHnBnDnOMOr CnHaHa.
^** Cběmky oběkτa, HebnuDnIMORO B TEMHOTe, MOXHO BvIOnJHrTb C NOMOùbI ONΦpαpkacHOrO OCBüSEHn.
BxOHNbIe N BbIXoHbIe rHe3da
BbIXoD S-BnIeOcHnHa (ToIbKO CCD-TR840E/TR845E)
4-ITbIPbKOBoe MmHnHne3do no DIN
CnHaJ npKoCTn:1B no DBoHOn amPntyde,75OM, HecMMepNHyb
CnHnauBHeTocn:0,3B no DBOHNO aMnIHTye,75OM HecmmMeTpHuHbI
BbIXoD BnIeOcHnHa
Фоногнзд,1Вп дьоин
amplitye,75Om,
нecmмтчнь
n
BbIXoA yDnOscnHaHa
8-ITbIPbKObBiy COeINHITeB
06ee
Tpe6oBaHnK nHTaHnIO
7,2B(6aTapeiHbIb6JIOK)
8,4 B (ceTeBoi aIaIaTep nepem. Toka)
CpeHnra nTope6IeMaM MoUHOCtB
Ppnilaraemblpe npHaJnlexKHOCTN
CM. cTp. 7.
CeteBoi aanTepe nepem. Toka
Tpe6oBaHnK nHTaHnIO
100-240BnepeM.ToKa,50/60T
Iotpe6JIaEma MoUHocTb 23BT
BbIXoHoe HaprJKeHne
DC OUT:8,4B,1,5A B pa6o7em pejIMe
Pa60aT emnepaTpa
OT 0^ C do 40^ C (oT 32^ F do 104^ F)
TemnepatypxpaHn
OT-20° C Φo +60° C (OT-4° F Φo 140° F)
Pa3mepbl (npn6n3.)
125× 39× 62MM ( / / ) ,He
BKJIIOUaY BbIcTyNaIOUne YactN
Macca (npn6nn3.)
280r,HeBkIIOUaCteBooUHyp
Kohctpykunia nTexnueckne xapaKtepcntnki MOyT 6bItb n3MeHeBb 6e3 yBeDomLeHnA
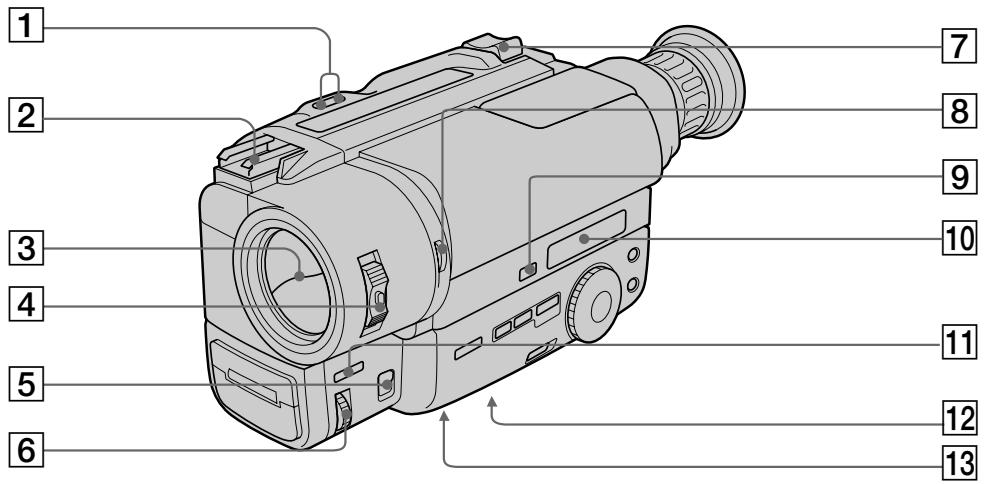
1 EDITSEARCH button (p. 22)
2 Intelligent accessory shoe (CCD-TR840E/ TR845E only) (p. 111)/Accessory shoe (CCD-TR511E/TR640E only)
Lens cover
4 POWER switch (p. 14)
FOCUS switch (CCD-TR511E/TR640E/ TR840E/TR845E only) (p. 50)
6 NEAR/FAR dial (CCD-TR511E/TR640E/ TR840E/TR845E only) (p. 50)
7 Power zoom lever (p. 17)
NIGHTSHOT switch (CCD-TR511E/TR640E/ TR840E/TR845E only) (p. 44)
9 COUNTER RESET button (p. 16)
10 Display window (p. 112)
11 FADER button (CCD-TR511E/TR640E/ TR840E/TR845E only) (p. 42)
12 Tripod receptacle (p. 21) Make sure that the length of the tripod screw is less than 6.5mm (9/32 inch) otherwise, you cannot attach the tripod securely and the screw may damage the camcorder.
13 Lithium battery compartment (p. 75)
1 Khonka EDITSEARCH (ctp. 22)
2Башмak Для установки BCNOMORAteNbHOrO obOpydoBaHnA (ToIbKO CCD-TR840E/TR845E) (ctp.111)/ДерЖATEЛь ДЯВ BCNOMORAteNbHbIX npинадлесноcte (ToIbKO CCD-TR511E/ TR640E)
3 Kpbiika o6beKtNbBa
4 BbIKIOaTeJB POWER (cTp. 14)
5 NipekeKIOUOaTeIbFOCUS(ToJIbKOCCD-TR511E/TR640E/TR840E/TR845E)(ctp.50)
6ДиCK NEAR/FAR (ToIbko CCD-TR511E/ TR640E/TR840E/TR845E) (ctp. 50)
7 Pbyar npuBODHoro TpaHcΦOKaTopa (ctp. 17)
8 BbIKHouaTeNb NIGHTSHOT (ToIbKO CCD-TR511E/TR640E/TR840E/TR845E) (ctp. 44)
9 Khonka COUNTER RESET (cTp. 16)
10Okowko DncnJIe (cTp. 112)
11 Khonka FADER (ToJIbKO CCD-TR511E/ TR640E/TR840E/TR845E) (cTp. 42)
12ДерхаельТрehorn(cTp.21)
Y6eHNTecb,чTOДПИнБВИНТТрehorNMeHee6,5MM.BIpoTINBOMClyaueBbI HeCMoxTeHaIepXHONoIDCOEEDHHITbTpeHOry,aBnHTMOKETNOBpeHITbBnDEOKaMepy.
13 OTeCek JInTbeB6aTapeiKn (CTp. 75)
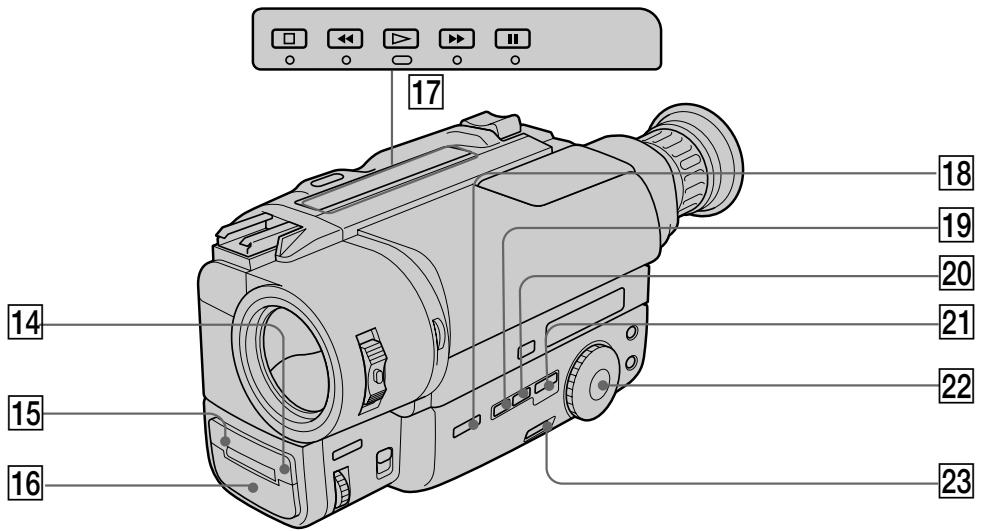
Remote sensor (CCD-TR412E/TR511E/ TR640E/TR840E/TR845E only) (p. 109) Aim the Remote Commander here for remote control.
15 Camera recording/battery lamp (p. 14)
16 Microphone
17 Video control buttons (p. 26)
STOP (stop)
REW (rewind)
PLAY (playback)
FF (fastforward)
II PAUSE (pause)
18 BACK LIGHT button (p. 40)
19 DATE button (p. 29, 60)
20 TIME button (p. 29, 60)
21 TITLE button (p. 55)
22 PROGRAM AE dial (p. 48)
23 START/STOP MODE switch (p. 19)
14ДиctaHNoHHbI DaTnK (ToJIbKO CCD-TR412E/TR511E/TR640E/TR840E/TR845E)(cTp.109)HaueJIbTe nIbT InCTaHNoHHoro ynpaBHeHnCIOda dIy IInCTaHNoHHoro KOHTpOJa.
15 Jlamnocka 3aHncn kamepoi/6aTapeu (cTp. 14)
16 MmKpoΦoH
[7] KhoNkBnDeoKoHtpOJIa (cTp. 26)
STOP (ocTaHOBka)
REW (yckopeHHa nepeMoTka Ha3a)
PLAY (Bocnpoun3BeDeneHne)
FF (yckopenhna nepemotka bnepei)
II PAUSE (nay3a)
18 Khonka BACK LIGHT (ctp. 40)
19 Khonka DATE (cTp. 29, 60)
20Khonka TIME (cTp. 29, 60)
21 Khonka TITLE (cTp. 55)
22 Khonka PROGRAM AE (cTp. 48)
23Переклочаюв START/STOP MODE (ст. 19)
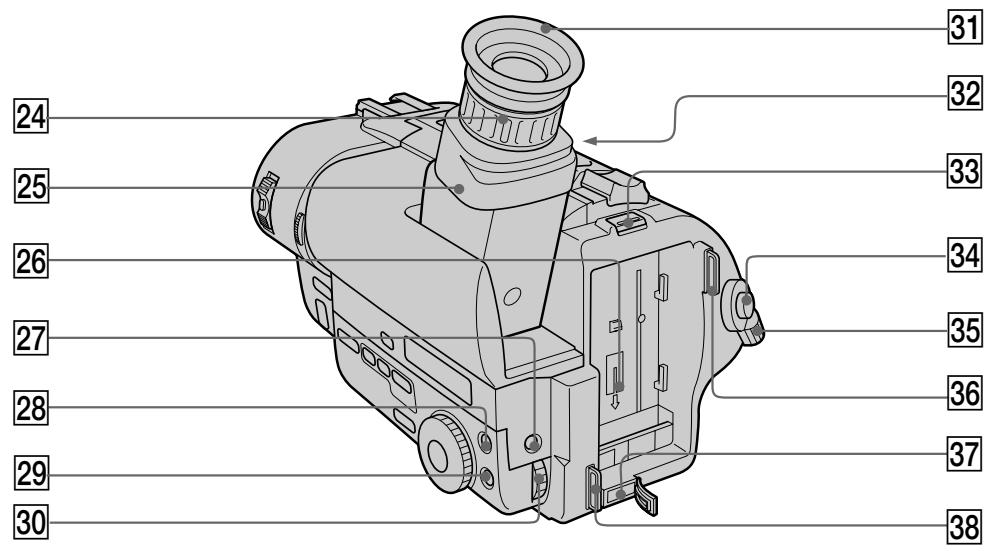
24 Viewfinder lens adjustment ring (p. 15)
25 Viewfinder (p. 15)
26 Battery mounting surface
27 EXPOSURE button (CCD-TR511E/TR640E/ TR840E/TR845E only) (p. 53)
28 PICTURE EFFECT button (p. 52)
29 MENU button (p. 34)
30 Control dial (p. 34)
31 Eyecup
32 Eyecup RELEASE knob (p. 87)
33 BATT RELEASE lever (p. 12)
34 START/STOP button (p. 14)
35 STANDBY switch (p. 14)
36 Hook for shoulder strap (p. 110)
37 DC IN jack (p. 9, 32)
38 Hook for shoulder strap (p. 110)
24 KoIbIpo peryIinopBkn OsbekTnBa BnDOnCKaTeN (cTp. 15)
[25] Bvnckateta (cTp. 15)
26Поверхинстуctановкибатариного 6лoka
27 Khonka EXPOSURE (TOLbKO CCD-TR511E/TR640E/TR840E/TR845E) (cTp. 53)
28 Khonka PICTURE EFFECT (cTp. 52)
29 Khonka MENU (cTp. 34)
30 PeryunpoBouHbI dNcK (ctp. 34)
31 Okylnp
32 Pука okулpa RELEASE (cTp.87)
33 Pbyar BATT RELEASE (ctp. 12)
34 Khonka START/STOP (cTp. 14)
35 IpekeJIIOUaTeIb STANDBY (cTp. 14)
36 Cko6a IJI nnIeueBOro peMHra (cTp. 110)
37 THe3do DC IN (ctp. 9, 32)
38 CkobaaIJIeueBOrOpemHr(cTp.110)
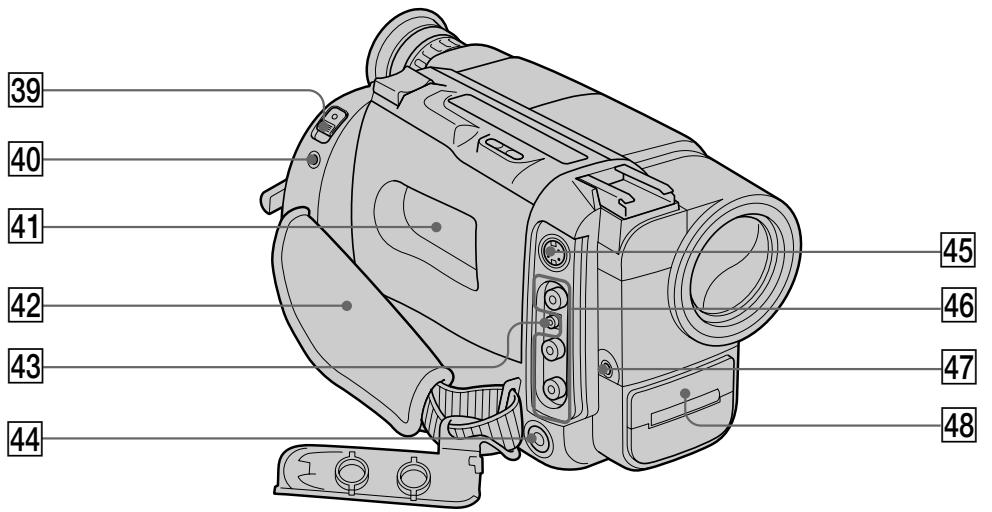
39 EJECT switch (p. 13)
40 LANC control jack
stands for Local Application Control Bus System. The control jack is used for controlling the tape transport of video equipment and peripherals connected to it. This jack has the same function as the jack indicated as CONTROL L or REMOTE.
Cassette compartment (p. 13)
42 Grip strap (p. 20)
43 RFU DC OUT (RFU adaptor DC output) jack (p. 25)
44 (headphones) jack (CCD-TR840E/ TR845E only) (p. 27)
45 SVIDEO OUT jack (CCD-TR840E/TR845E only) (p. 25)
46VIDEO/AUDIO OUT jacks (p.24)
47 MIC jack (PLUG IN POWER)
Connect an external microphone (not supplied). This jack also accepts a "plug-in-power" microphone.
48 NightShot Light emitter (CCD-TR511E/ TR640E/TR840E/TR845E only) (p. 44)
47 έHe3do MIC (PLUG IN POWER)
39 BbIKHouaTeNb EJECT (cTp. 13)
40 THe3do ynpaBneHnA LANC
O3Haayet CNTeMy KaHaJa MeCTHOro
ynpablenn. IHe3do ynpablenn.
NCJNOB3yeTcI JN KOTPOnla 3a
IepemseHem JeHTb BInDeooobOpyoDobAHn
I nepiFepinHbIx ycTPOCTB, NODKJIIOUeHHbIX
K HEMy. DaHHOe IHe3do IMeET TaKYo Xe
fYHKUNO, KaK pa3bEmbl, O603NaueHHbIe
kak CONTROL L nIIN REMOTE.
41 KaccetHbIOTcEK (cTp. 13)
42 PemehHoN 3axBaT (CTp. 20)
43 Геано RFU DC OUT (Выхов пост. Тока BЧ-адалтета) (ст. 25)
44「He3do(roJOBbIxTeJefoHOB)(TOJIbKO CCD-TR840E/TR845E)(ctp.27)
45 Геано SVIDEO OUT (Только ССТВ-TR840E/TR845E) (стр. 25)
46ГнeftаVIDEO/AUDIO OUT (cTp.24)
ДлЯ NOДСОЕДИЕННИВHESWHEROМКрофona(He npINaeraTcA).3TO rH3do dOnyckaetNOДКПIOUЧЕпМКрофona“CBbIKIQUHYeNTeNEM NITAHIN”.
48 3MnTTeP HocHOn CbemKn (ToIbKO CCD-TR511E/TR640E/TR840E/TR845E) (ctp. 44)
Remote Commander
- CCD-TR412E/TR511E/TR640E/TR840E/TR845E only
The buttons that have the same name on the Remote Commander as on the camcorder function identically.
RMT-717
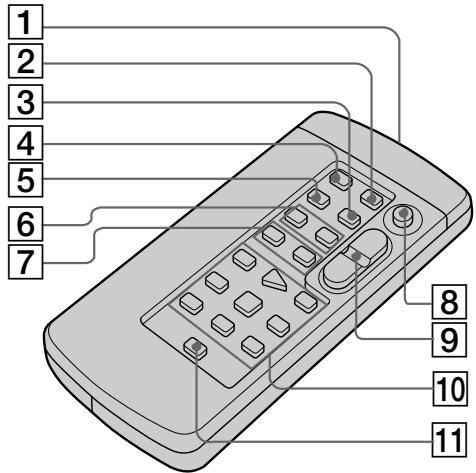
1 Transmitter
Point toward the remote sensor to control the camcorder after turning on the camcorder.
ZERO MEM button (p. 59, 65)
DATA CODE button (p. 30)
COUNTER RESET button (p. 16)
TIME CODE WRITE button (p. 71)
6 INDEX buttons
INDEX MARK button (p. 66)
INDEX ERASE button (p. 70)
7 DATE SEARCH button (p. 64)
INDEX SEARCH button (p. 69)
8 START/STOP button (p. 14)
9 Power zoom button (p. 17)
Video control buttons (p. 26)
11 DISPLAY button (p. 27)
Notes on the Remote Commander
- Keep the remote sensor away from strong light sources such as direct sunlight or illumination. Otherwise, the remote control may not be effective.
- Be sure that there is no obstacle between the remote sensor on the camcorder and the Remote Commander.
- This camcorder works in commander mode VTR 2. The commander modes (1, 2 and 3) are used to distinguish this camcorder from other Sony VCRs to avoid remote control misoperation. If you use another Sony VCR in commander mode VTR 2, we recommend you change the commander mode or cover the remote sensor of the VCR with black paper.
To prepare the Remote Commander
Insert two R6 (size AA) batteries by matching the + and - on the batteries to the diagram inside the battery compartment.
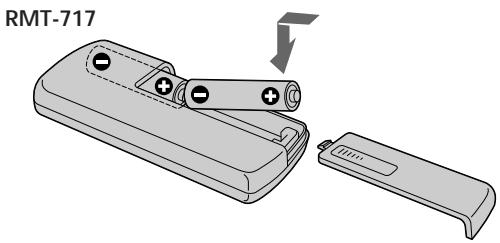
Note on battery life
The batteries for the Remote Commander last about 6 months under normal operation. When the batteries become weak or dead, the Remote Commander does not work.
To avoid damage from possible battery leakage
Remove the batteries when you will not use the Remote Commander for a long time.
PpmeaHnK npIbTy dNCTaHcNoHHoro ynpabJIeHn
-ДерхиTe ДиСТанCUHONHbIДaTчИК ПОДaЛБшeOT CnIbHbIX NCTOCHNKB OCBcEta, KaK HApPIMep,прмье COJIнeH NeuI INI INJIOMHaцЯ.В npOTuBHom cIyuae ДиСТанCUHOnHoeуnpaBHeHne MOKeT He DeiCTBOBaTb.
- Y6eIITecb, YTO MEXKdy INCTaHcUOHHBIM DaTtHKOM Ha BnDEOKaMEpe NpyJbTOM INCTaHcUOHHO ynpabLeHnH HeT npenrTCTBnI.
-Данная Вида ekamepa pa6oTaetВ pexkme nylbTa dinCTaHcOnHOrO ynpabLeHnra VTR2. Pexkmbi nylbTa dinCTaHcOnHOrO ynpabLeHnra (1,2и3) IncnoB3yOTcRdЯ OTInuHry DaHHoN BvIeokamepbI O TdpyrKX KBMФрMbI Sony BO n36ekaHne HnppaBnblHoN pa6oTbI dinCTaHcOnHOrO ynpabLHeNRA.Ecnn Bbl IncnoB3yeTe dpyroKBMФрMbI Sony, pa6oTaOUsnB pexkme VTR2, Mbl pekomehdyem BamИЗmehHTbpexkMnylbTa dinCTaHcOnHOrO ynpabLeHnra INJ 3akpbITb dinCTaHcOnHnHyI daTchK KBMчepHOh6ymarOJ.
ДлnoiodroTOBKn nylbTa ДиctahUHOHHORO ynpabJIeHnA
BcTaBbTe DBe 6aTapeiKn R6 (pa3MePOM AA) coRnacy 3HaKn + n - Ha 6aTapeiKax Co cxemoi BHyTpNi 6aTapeiHoro OTCeKa.
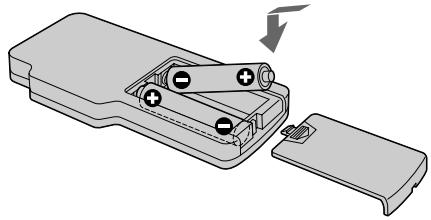
RMT-708
PpmeaHne K cpoK cyJx6bl 6aTapeek
BaTaapeek IЯ nIbTa DnCTaHcNIOHOrO ynpabLeHnX xBaTaet np6bn3ntelbHo Ha 6 MeCaueB pIn HOpMaJIbHbIX yCNoBnIX 3KcnPyatauM. Korda baTaapeKn CTaHT cIa6bIMn INI NOnHOCTbHO pa3pJdTcR, nIbT dNCTaHcNIOHOrO ynpabLeHn He 6yDet pa6oTaTb.
Bo n36exkanhe noBpeKdeneHn 13-3a BO3MOxHOyTeuKNn 36aTaapeek.
YdaJInte 6aTapeiKn, ecn BbI He 6yJeTe IcNoJIb3OBAt bIyIb T dIcTaHcIOHHO YypaBLeHnB TeYeHne IJInTeNbHO BpeMeHn.
Attaching the shoulder strap
Attach the supplied shoulder strap to the hooks for the shoulder strap.
PpKpeHJIeHne IJIeYeBOrO pEmH
PpNkpeNTe pnpIaeraembI pneyeBoi peMeHb KCKo6am IJnI pneyeBOrO pemH.

1
2
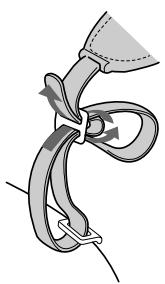
3
To watch the demonstration
You can start the demonstration by setting DEMO MODE in the menu system.
You can also start the demonstration by the following operation.
When NIGHTSHOT is set to ON, you cannot watch the demonstration (CCD-TR511E/ TR640E/TR840E/TR845E only).
To enter demo mode
(1)Eject the cassette and set the POWER switch to PLAYER.
(2) Turn STANDBY up to STANDBY.
(3) While holding down set the POWER switch to CAMERA.
To exit demo mode
(1) Set the POWER switch to PLAYER.
(2) Turn STANDBY up to STANDBY.
(3) While holding down set the POWER switch to CAMERA.
Note on the intelligent accessory shoe -CCD-TR840E/TR845E only
Supplies power to optional accessories such as a video light or microphone. The intelligent accessory shoe is linked to the STANDBY switch, allowing you to turn on and off the power supplied by the shoe. Refer to the instruction manual of the accessory for further information. To connect an accessory, press down and push it to the end, and then tighten the screw. To remove an accessory, loosen the screw, and then press down and pull out the accessory. If the camcorder does not work correctly with using the AC power adaptor, use the battery pack.
Operation indicators
Viewfinder/Budonckatelb
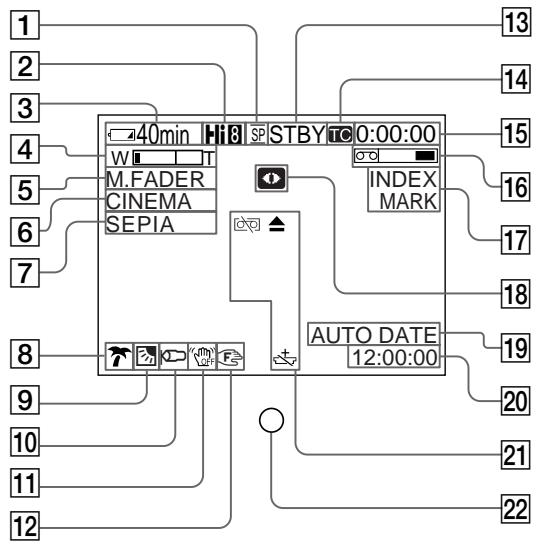
Pa60yne nHdkaTopbI
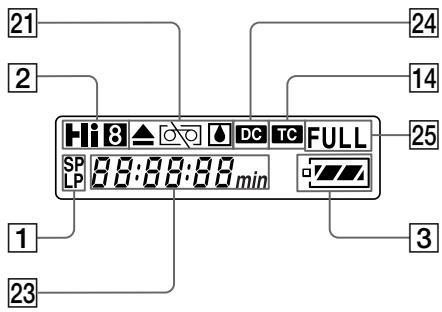
Display window/Okouko dinpner
1 Recording mode indicator (p. 37)
2 Playing back or recording in Hi8 format (CCD-TR840E/TR845E only) (p. 79)
Remaining battery time indicator

4 Exposure indicator (CCD-TR511E/TR640E/ TR840E/TR845E only) (p. 53)/Zoom indicator (p. 17)
5 FADER indicator (CCD-TR511E/TR640E/ TR840E/TR845E only) (p. 42)
6 Wide mode indicator (p. 46)
7 PICTURE EFFECT indicator (p. 52)
8 PROGRAM AE indicator (p. 48)
9 Backlight indicator (p. 40)
10 WIND indicator (CCD-TR840E/TR845E only) (p. 37)
11 SteadyShot off indicator (CCD-TR640E/ TR840E/TR845E only) (p. 62)
12 Manual focusing (CCD-TR511E/TR640E/ TR840E/TR845E only) (p. 49)
Video control mode (p. 14)
Time code indicator (CCD-TR845E only) (p. 71)
1 INdkaTop pa6oeryo pexnma (ctp. 37)
2 Bocnpon3BeDenHe nHn 3aHncb BΦopMaTe Hi8 (TOnbKO TR840E/TR845E) (ctp.79)
3 INdikatop octabweroocB BpeMeHn 3apja6batapeHoro 6loka

4Индикатор ЗКСОЗицIN(TолькоCCD-TR511E/TR640E/TR840E/TR845E)(ctp.53)/ИндикаторТрансфokатора(ctp.17)
5 INdikatop FADER (ToIbKO CCD-TR511E/ TR640E/TR840E/TR845E) (ctp. 42)
6 INHdNkATOp shpOKoΦopMaTHOro peKIma (ctp.46)
7 INHdNkatop PICTURE EFFECT (cTp. 52)
8 INdkaTop PROGRAM AE (ctp. 48)
9 INHdNkATOp 3aDHei NOcBETKn (CTp.40)
10 Иndикатop WIND (Toько CCD-TR840E/ TR845E) (ctp. 37)
11 HndkaTop yctoynboB cEmKn (TOJIbKO CCD-TR640E/TR840E/TR845E) (ctp. 62)
12Рунайфokс neuropьka(TobkoCCD-TR511E/TR640E/TR840E/TR845E)(ctp.50)
13 PexkIM BndeOKOHpOJIa (ctp. 14)
14 INdkaTop BpeMeHHoro Koka (TOJIbKO CCD-TR845E) (ctp. 71)
15 Tape counter (p. 16)/RC time code indicator (CCD-TR845E only) (p. 71)/Self-diagnosis functions indicator (p. 98)/5SEC mode indicator (p. 19)
16 Remaining tape indicator

17 Index indicator (p. 66)/Date search/Date scan indicator (p. 63)/TIME CODE WRITE indicator (p. 71)/ZERO MEM indicator (CCDTR845E only) (p. 65)
18 NIGHTSHOT indicator (CCD-TR511E/ TR640E/TR840E/TR845E only) (p. 44)
19 AUTO DATE indicator (CCD-TR411E/ TR412E/TR511E/TR640E/TR840E only) (p. 13)/Date indicator (p. 60)/Data Cord indicator (CCD-TR845E only) (p. 30)
20 Time indicator (p. 60)
21 Warning indicators (p. 114)
22 Recording lamp (p. 14)
23 Date or time indicator (p. 60)/ Tape counter indicator (p. 16)/ RC time code indicator (CCD-TR845E only) (p. 71)/Self-diagnosis functions indicator (p. 98)/Remaining battery time indicator
24 Data Code indicator (CCD-TR845E only) (p. 30)
25 FULL charge indicator (p. 9)

15 INHdkatop CteTnka JIeHTbI (ctp. 16)/BpeMeHHoro KoJa RC (ToJIbKO CCD-TR845E) (ctp. 71)/INHdkatop fYHKcIMncamOHaarHocTnKn (ctp. 99)/INHdkatoppeKIma 5SEC (ctp. 19)
16 INHdkaTop octBaWeeJcJIeHTbI
17ИнданkaTOP Инда ekchoro сгнана (ctp. 66)/ИнданkaTOP ПОпСКА ДАТБI (ctp. 63)/Сканировая Дды/ИнданkaTOP TIMECODEWRITE(ctp.71)/ИнданkaTOP ZEROMEM(Tольс KCD-TR845E)(ctp.65)
18ИндикaTop NIGHTSHOT(TOЛько CCD-TR511E/TR640E/TR840E/TR845E)(ctp.44)
19ИнданkaTop AUTO DATE (TOJbKO CCD-TR411E/TR412E/TR511E/TR640E/TR840E)(cTp.13)/ИнданkaTopДаы(IcTp.60)/ИнданkaTop Кда даньх(TOJBKO CCD-TR845E) (cTp.30)
20 INHdNKaTOP BpeMeHn (CTp. 60)
[21]Ппсдурждаюше ИнданkaTopbl (cTp. 114)
22 JIamnoyka 3aIncn (cTp.14)
23ИндикатОдТыIИиВрemeHn(cTp.60)/ИндикатОчЕтUnkaJIeHTbI(cTp.16)/ИндикатОВрemeHornoКOA RC(TOЛьКоCCD-TR845E)(cTp.71)/ИндикатОфункUnn(cTp.99)//ИндикатОВрemeHnOCTabUseOro3aPЯda6aTapeHoro6Loka
24Индикатор Кога даньх(Tолько CCD-TR845E) (ctp.30)
25Индикадут зард専 Full (ctp. 9)
If indicators flash in the viewfinder or in the display window, check the following:
you can hear the beep sound when the BEEP is set to ON.
EcInnDnKATOpblMraHOTnIn npdeynpeXdaOuIe coo6ueHnNPOBnHTcHa 3kpane KKD nIN BnuOnckatene,To npOBepbTe cneDuOuee:
BbMoKeTe CbIiTaB 3yMMepHbI 3ByKOBoCnHaI, KOrdaФyHKuIe BEEP yCTaHOBJeHa Ha ON BcNCTeMe MeHIO.
1 The battery is weak or dead. Slow flashing: The battery is weak. Fast flashing: The battery is dead.
The tape is near the end. The flashing is slow.
The tape has run out. The flashing becomes rapid.
4 No tape has been inserted.
The tab on the tape is out (red).
6 Moisture condensation has occurred.
The video heads may be contaminated.
Some other trouble has occurred. Use the self-diagnosis function (p. 98). If the display does not disappear contact your Sony dealer or local authorized Sony service facility.
The lithium battery is weak or is not installed.
1 BaTapeHbI 6JOK cJa6bI HnIN noJIHOCTbIO pa3PAXKeHHbIMeJIeHHoe MIRaHHe: BaTapeHbI 6JOK cJa6bI. BbICTpoE MIRaHHe: BaTapeHbI 6JOK noJIHOCTbIO pa3PAXKeHHbI.
2 JeHTa np6JIINXkaETcK KOHcy. MeJnEHoe MURAHne.
3 JeHTa 3aKOHUlnacb. MraHHe cTaHOBNTc6bICTpbIM.
4 JeHTa He BCTaBHeHa.
5 Ha kaccete HeT IeneCTKa (Kpachar Metka).
6 PpOn3oJNa KOHdEHaCaunBlaHn.
7BnDaeorOIOBKNBO3MOXHO3aRpa3HeHbI.
8 NMeetcKaKaH-Jn6oDpyraNpO6nema. UcnoIb3yIteФyHKUIO caMoJNaRHOCTKu (ctp.99). EcIn DInCnJIe He INCue3aET,TO CBAXITcB C BaAMm DInepom SONY ININ MeCTHBIM yNOJHMOChEHbIM ppeIpnTHeM.
9Литnevвая 6aTapeiKa cIa6aЯ nIи He yctaHOBJIeHa.
Index
A,B
Adjusting viewfinder 15
AFM HiFi Sound. 39, 80
ANTI GROUND SHOOTING 19
Auto focus. 50
Backlight 40
Beep 16
C, D
Camera recording 14
Car battery 32
Charging battery. 9
Cleaning video heads.. 86
Clock set 78
Connections for playback .... 24
COUNTER RESET 16
Data code 30
DATE/TIME 30
Date scan 63
Date search 63
DEMO 38,110
Digital zoom 18
DISPLAY 27
DNR 39
E
EDIT 39
Editing 73
EDITSEARCH 22
Exposure 53
F, G, H
FADER 41
I, J, K, L
Index 66
LANC 107
Lithium battery 74
M, N
Mains 31
Manual focus 49
Menu system 34
MIC (microphone) jack..... 107
NIGHTSHOT 44
O, P
ORC 61
PICTURE EFFECT 51
Playback pause 28
Power sources 31
Power zoom. 18
PROGRAM AE 47
Q,R
RC time code 71
Rec review 22
Recording mode 37
Remote control jack (LANC) 107
Reverse 28
Rewind 26
s
Self-diagnosis display 98
Shoulder strap 110
Skip scan 28
Standby mode 14
STEADY SHOT 62
T, U, V
Tape counter 16
TBC 39
Time code 35, 71
Title 55
Tripod mounting 21
Trouble check 92
W,X,Y,Z
WIDE mode 45
WIND 37
WORLD TIME 78
Zero memory 59, 65
Zoom 17
Aлфавиньи yka3aTeJB
A, B, B
ABTomatnueckaФokycuropbKa 50
ABTOMO6nIbHbIaKKymyIaTOp 32
BpeMeHHoN KoD 35,71
BpeMeHHoN KoD RC 71
Γ,Д,E,X,3
THe3DoIinCTaHcIOHnHOynpabLeHHa(LANC).....107
THe3doMIC(MnKpOΦoHHOe) 107
3aHnra noCDBETka 40
3aINscb c NOMOIOB BIndeOKamepbl 14
3aonmHaHne HyJ.. 59,65
3apnka 6aTaapeHoro 6Ioka 9
3ByuHne AFM Hi-Fi .... 39,80
3yMMepHbI 3ByKOBoI CnHnA1 16
U, K, JI, M
HnDeKcbi CnHaJ 66
IcToUHnKn nTaHnA 31
KoI daHHbIX 30
JIITnEBAa 6aTapeiKa .74
MONTAX 73
H,O
HaPiNcB 55
Hae3Bndeokamepb1 17
OuNTKa BnDeoRoiBOK .... 86
P
Pay3a BocnpoN3VeJeHn... 28
IpeecMoTp 3a\Pu\ncn 22
Плесьов ременb 110
Ponck DaTbI 63
Ponck MeToDom nporoHa ... 28
PnBODHO TpaHcΦokatop 18
IpoBepka HncnpaBHOCTe.92
PeBepCnpoBaHne 28
PerynipoBka BuidonckaTe15
PeknM rTOBHOCTn 14
Pekim 3aHncn 37
PekmWIDE 45
PuchnaФokycinpobka 49
C
CnCTema MeHIO 34
CkaHnpoBaHne daT 63
CoeHHeHnI BocPOn3BeDeHnI 24
CuetnK JENTbl 16
T, y
UckopeHHaJI nepeMoTka Ha3aI 26
YctaHOBKa Ha TpeHore 21
YcTaHOBka yacob 78
Φ-
LunpboTpaHcfoKaTOp.18
3Kcno3n. 53
3JIeKtpnuecka ceTb 31
A,B,C,D
ANTI GROUND SHOOTING 19
COUNTER RESET 16
DATE/TIME 30
DEMO 38,110
DISPLAY 27
DNR 39
E,F,G,H
EDIT 39
EDITSEARCH. 22
FADER 41
I, J, K, L
LANC 107
M, N, O, P
NIGHTSHOT 44
ORC 61
PICTURE EFFECT 51
PROGRAM AE 47
Q,R,S,T,U,V,W,X,Y,Z
STEADYSHOT 62
TBC 39
WIND 37
WORLD TIME 78

