
CCD-TR415E - Camcorder SONY - Free user manual and instructions
Find the device manual for free CCD-TR415E SONY in PDF.

User questions about CCD-TR415E SONY
0 question about this device. Answer the ones you know or ask your own.
Ask a new question about this device
Download the instructions for your Camcorder in PDF format for free! Find your manual CCD-TR415E - SONY and take your electronic device back in hand. On this page are published all the documents necessary for the use of your device. CCD-TR415E by SONY.
USER MANUAL CCD-TR415E SONY
Video Camera Recorder
Operating Instructions
Before operating the unit, please read this manual thoroughly, and retain it for future reference.
HnctpyKuaI NO 3KcnIyatauIN
Ipeed 3Kcnpnyatauene annapaTa BnHMaTeNbHO npOuyTte, noJaanycta, daHHoe pyKOBoDCTBO IN COxpaHnTe erO dJaIbHeMxCnpaBOK.

Handycam
CCD-TR713E
video Hi8
CCD- TR515E/TR713E Hl8
Video8XR
Congratulations on your purchase of this Sony Handycam® camcorder. With your Handycam you can capture life's precious moments with superior picture and sound quality.
Your Handycam is loaded with advanced features, but at the same time it is very easy to use. You will soon be producing home video that you can enjoy for years to come.
WARNING
To prevent fire or shock hazard, do not expose the unit to rain or moisture.
To avoid electrical shock, do not open the cabinet.
Refer servicing to qualified personnel only.
NOTICE ON THE SUPPLIED AC POWER ADAPTOR FOR CUSTOMERS IN THE UNITED KINGDOM
A moulded plug complying with BS1363 is fitted to this equipment for your safety and convenience.
Should the fuse in the plug supplied need to be replaced, a 5 AMP fuse approved by ASTA or BSI to BS1362 (i.e., marked with 念 or mark) must be used.
If the plug supplied with this equipment has a detachable fuse cover, be sure to attach the fuse cover after you change the fuse. Never use the plug without the fuse cover. If you should lose the fuse cover, please contact your nearest Sony service station.
Pysckii
Добpo пожаловать!
Ioi3dpaBnem BAc C npno6peTeHnem DaHHOB BnDoeokamepbi Handycam@ pnpMb i Sony. C nOmoIb Baaew BnDeokamepbi Handycam Vision BbI cMOXeTe 3aneuATJeTb DOpORne BaM MRHOBeHnJ Xn3Hn C npEBOxCoNDbIM KaHeCTBOM n3O6paxHnI n 3Byka.
BaHa BnDeOkaMepa Handycam Vision OChaueHa yCObepHEnCTBOBaHHbIMN fYHKUHM, HO B TO JKe BpEmA ee OueHb IeRKO nCNoIb3OBaTb. Bckope Bby6yndeTe co3DaBaTb CEmeHbIe BnDeOpnpaMMbl, KOToPbIMN MoKeTe HacJaXdTaBcraB NocJeDyIOuMe roDbI.
PNEyPPEXDEHNE
ДлпnpedotbpaшеньВОЗгораниИлп Опансостиэктpruceckoroудараobepraite aannapatOTdoЖЯиВlaГИ.
Bo n36eKaHne nopaxKeHn 3JIeKtpnuecknM TOKOM He OTKpbIbAte Kopnyc.
3a obcnyxnbAHnem o6paTaBcTolbKO K KBaInΦuIpuOBaHHOMy obcnyxNBauOeMy nepcoHany.

A946
Before you begin
Using this manual. 5
Checking supplied accessories 7
Getting started
Installing and charging the battery pack 8
Inserting a cassette 13
Basic operations
Camera recording 14
Using the zoom feature 17
Selecting the START/STOP mode 19
Hints for better shooting 20
Checking the recorded picture 22
Connections for playback 24
Playing back a tape 26
Advanced operations
Using alternative power sources 29
Using the mains 30
Changing the mode settings 31
- for camera recording
Shooting with backlighting 36
Using the FADER function 37
Shooting in the dark (NightShot) 40
Using the wide mode function 42
Using the PROGRAM AE function 44
Focusing manually 46
Enjoying picture effect 48
Adjusting the exposure 50
Superimposing a title 52
Making your own titles. 54
Recording with the date/time 56
Optimizing the recording condition 57
Using the built-in light (CCD-TR515E/TR713E only) 58
Releasing the STEADYSHOT function (CCDTR713E only) 61
- for playback/editing -
Editing onto another tape 62
Additional information
Changing the lithium battery in the camcorder 63
Resetting the date and time 65
Simple setting of clock by time difference 67
Usable cassettes and playback modes 68
Tips for using the battery pack. 70
Maintenance information and precautions..... 74
Using your camcorder abroad 80
Trouble check 81
Self-diagnosis display 87
Specifications 89
Identifying the parts 91
Warning indicators 100
Index 101
Ipeed hauanom 3Kcnnyataun
UcnoIb3OBAHne daHHoro pyKOBOcTba 5
IpoBepka npnlaeraembix npnaadJeXHocTei... 7
Iodrotobka K 3Kcnnyataun
UcTaHObKa n 3aprJaKa 6aTapeHoro 6Ioka.....8
BcTabka kaccetbl 13
OchOBhble onepaun
3aIncb c nOMOuBIO BnDeOKaMepbl 14
IcnoJIb3OBAHnE cyHKnH Hae3da
Bndeokamepbl 17
BbI6oppeXIma START/STOP 19
COBeTbI JnJyUWe CbeMkn 20
PpOBepka 3aIncanHoro n3o6paXeHnra 22
CoeHHeHHI JI BOCpOIN3BeDeHHI 24
Bocnpoun3BeJeHne IeHTbI 26
YcoBepueHCTBOBaHHbIe onepaun
UcnoJb3OBAHHe aJIbTePHaTUBHbIX NCTOCHNKOB
NITaHn 29
IcnoJIb3ObaHHe 3JneKtpnuecko cTeu 30
U3MeHeHne yCTaHOBOK peXIMOB 32
ONTMIM3aUNCOCTOHIN3aNNCn 57
IcnoJIb3OBAHHe BCTpoEHNo IIOcBcETKn (Kacaetca TOnIbKO MoJeNei CCD-TR515E/ TR713E) 58
OTKJIouHHe ΦyHKuIN STEADYSHOT (ToJIbKO CCD-TR713E) 61
-ДЯ BOCPON3BEdENHMAOTAXA-
MOnTaX Ha npuyyIeHtY 62
DOnonHnTeJbHa INΦopMaun
3aMeHaJIITHeB0I6aTapeKIN B VnDeokampe 63
YcTaHOBKa DaTbI IN BpeMeHN 65
IpoCTaYyCTaHOBka YacOB C NOMOUIbIO pa3HnUBo BO BpeMeHN 67
IcnoJb3yEmble KacceTbI npexKmbI BocnpOn3BeDeHn 68
CobetbI NO INcNoB3OBAHnIO 6aTapeHOro 6noka 70
Inhopmaunno yxody 3a annapatom npedoctopoxknoctn 74
IcnoJb3OBAHne BaSei BnDeokamepbl 3a rpaHnuei 80
PpOBepKa HEnCnpaBHOCTe 84
Iucnnei camoiaarHoctu 88
TexHnueckne xapaKTepeNCTnKn 90
Ono3haBHe uacte 91
PpeynpeKdaUoune HndkaTOpbl 100
AaBnHbI yKa3aTeIb 102
Using this manual
The instructions in this manual are for the four models listed below. Before you start reading this manual and operating the unit, check your model number by looking at the bottom of your camcorder. The CCD-TR713E is the model used for illustration purposes. Otherwise, the model name is indicated in the illustrations. Any differences in operation are clearly indicated in the text, for example, "CCD-TR713E only." As you read through this manual, buttons and settings on the camcorder are shown in capital letters.
e.g. Set the POWER switch to CAMERA. You can hear the beep sound to confirm your operation.
Types of differences
Tunbl pa3nnu
1) 220 × in some areas
2) 330 × in some areas
HCTyKcIMN B daHHOM pyKOBOdCTBe npedHa3NaueHbI dIa YeTbIpex HxKepeuCnEHNbIX MoJeIe. IpeTe TEM, KaB Bi haHuHe TcHTaTb DaHNoe pyKOBOdCTBOI 3KcPnPyaTnpOBaT bAnnapat, IpOBepeBte Homep BaWei MoJEnI, NocMOTpeB Ha HxKHOIO paHeB BaWei BnDeOkAmepbI. MoJeB CCD-TR713E IcNoB3yeTcB HIIIOCTpaTINbIX cIeJX.B nPTOBHOM Cnyae HaNMeHOBaHne moJeYka3bIABaTeCn Ha PcsyHKax. IIOb6e pa3JInuHb PAbaOte YeTKo yKa3aHbI B TEKCTe, KaH anPmEp, "ToIbKO CCD-TR713E". KorDa Bi BydeTe YHTaTb DaHNoe pyKOBOdCTBO, yHTbBAIte, YTO KHONK IN yCTaHOBKn HA BnDEOkAmepe NOKa3aHbI B TEKCTe IpnINCHbIMN 6yKBAMn. PtMpE. UcTaHOBtE BblIOUaTeIb POWER B noLoXeHne CAMERA. BBi MoKeTe CblsauT bZymMepHbI 3ByKOBoi CnHaj, NOITBepKdaIOUm BblONHeHne COOTBeTCTByIOSe OepaUIN.
1)220x B HeKOTopbix 6bactrx
2330x B HeKoTOpbIX O6JIaCTaX
Note on TV colour systems
TV colour systems differ from country to country. To view your recordings on a TV, you need a PAL system-based TV.
Precaution on copyright
Television programmes, films, video tapes, and other materials may be copyrighted.
Unauthorized recording of such materials may be contrary to the provision of the copyright laws.
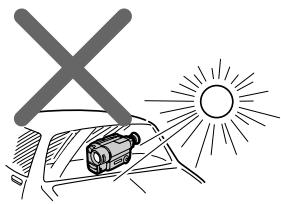
Precautions on camcorder care
- Do not let the camcorder get wet. Keep the camcorder away from rain and sea water. Letting the camcorder get wet may cause the unit to malfunction, and sometimes this malfunction cannot be repaired [a].
- Never leave the camcorder exposed to temperatures above 60^ (140^) , such as in a car parked in the sun or under direct sunlight [b].
Приимechаим К системам CBETHORO Телевideни
CnCTeMbI ZBEITHOTo TEJIeBUNDEHIN OITNIUaIOTcB 3aBNCIMOCtN OT CTPaHbI.ДЯ nPocMOTpa Baunx 3aIncEi NO TEJIeBUN3Opy Bam Heo6XoDIMO IcNoIb3OBaTb TEJIeBUN3Op, OCHOBaHHbI Ha CnCTeMe PAL.
Пре dioctepexeHne o6 aBtOpckom npaBe
TeIeBn3IOHbIe IpOgrpaMMbl, KINHOJNbMbI, BnDEoJeHTbI IN dpyrIe MaTePnaJIb MOrYT 6bITb 3aUuIeHbI aBTOpCKM npabOM.
HenpaBOMOuHa 3aIINc TaKnx MaTePnAnOB MoKeT IPOTuBOpEunb YcNobUm 3aKoHa 06 abTOPcKOM pApBe.
IpeoctopoxKHOCTn no yxOdy 3a Bndeokamepoi
- He DoNyckaIte HaMoKaHnB BuDeOkAmepbI. IpeDoXpaHraIte BuDeOkAmepy OT DoxJa NIM MOpCKoI BObl. EcIn Bbl HAMOHTe BuDeOkAmepy, To 3TO MoKet BblBaTb HEncPpABHOCTb annapaTa, IN B HeKOTOpbIX CnyuAnx 3Ta HeNCPpABHOCTb He NoDNeXnT peMOHTy [a].
- HNKoIa He OCTaBnIte BnIeOkaMepy B MeCTe C TeMnpaTpyo CBbIe 60°C (140°F), KaK HaNPmEp, B aBTOMoBnIe, OCTaBJIeHHOM Ha COJHcE NII NIOI pRMyIMN COJIHeYhbIMN LyuAMn [b].

[a]
[b]
Check that the following accessories are supplied with your camcorder.
1 Wireless Remote Commander (1) (p. 95) CCD-TR425E/TR515E/TR713E only
2 AC-L10A/L10B/L10C AC power adaptor (1), Mains lead (1) (p. 9, 30)
3 NP-F330 battery pack (1) (p. 8, 29)
4 CR2025 lithium battery (1) (p. 63) The lithium battery is already installed in your camcorder.
5 R6 (size AA) battery for Remote Commander (2) (p. 96) CCD-TR425E/TR515E/TR713E only
6 A/V connecting cable (1) (p. 24)
7 Shoulder strap (1) (p. 97)
21-pin adaptor (1) (p. 25)
Contents of the recording cannot be compensated if recording or playback is not made due to a malfunction of the camcorder, video tape, etc.
1 BeçnpoBóNDhI pyJbT dNCTaHcNoHHOуnpaBJeHn (1) (ctp. 95) ToJIbKO CCD-TR425E/TR515E/TR713E
2 CeTeBoi aadTep nepem. Toka AC-L10A/ L10B/L10C (1), CeTeBoi npoBoi (1) (cTp. 9, 30)
3 BaTapeHbIb 6Jok NP-F330 (1) (ctp.8,29)
4Литnevая 6aТаpeйka CR2025 (1) (cTp. 63)Литnevая 6aТарейka уcke yctaHOBNeHaВ Baшевидаеокамеpe.
5 BaTapeiKa R6 (pa3Mepom AA) IaIyIbTa IInCTaHcUOnHOrO ynpaBLeHnIy (2) (cTp. 96) ToIbko CCD-TR425E/TR515E/TR713E
6 CoeunHntBnbl Ka6bI ayDno/Bndeo (1) (cTp. 24)
7Плевов ремь (1) (cTp.97)
8 21-wTbIpbKOBbI aadantep (1) (ctp. 25)
CoepKmOe 3aIncn He moKeT 6bItb KOMneHcnpoBaHO,ecn 3aIncb nnBocpOn3BeJeHne He BbIOJIHaeTcBcNeIDCTBHe NOBpeXJedHnBnDEOKaMepbl,BuJeONeHTblN.T.D.
Getting started
Installing and charging the battery pack
Iodrotobka K 3KcnJyataun
YcTaHOBKa n 3apJaKa 6aTapeHoro 6Joka
Before using your camcorder, you first need to install and charge the battery pack.
This camcorder operates only with the "InfoLITHIUM" battery pack (L series)
"InfoLITHIUM" is a trademark of Sony corporation.
Installing the battery pack
Install the battery pack in the direction of the mark on the battery pack. Slide the battery pack down until it catches on the battery release lever and clicks.
Attach the battery pack to the camcorder securely.
IpeepncnojboaHnem Bauee BndeokamepbBam HxJHo CnpBa 3apAaNTb u yCTaHOBt6batapeHbI 6lok.
Note on the battery pack
Do not carry the camcorder by grasping the battery pack.
PpimueaHne K 6aTaapeHOMy 6Ioky
He hocnte Bnndeokamepy, depka ee 3a 6atapeHbI bJok.
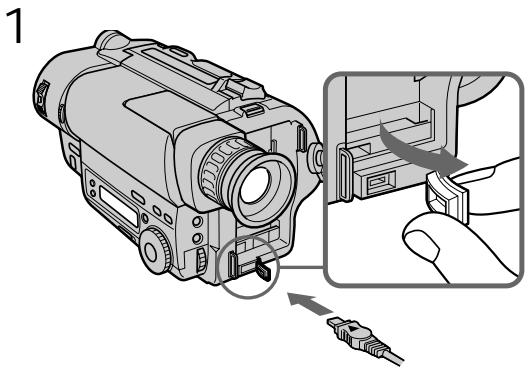
Charging the battery pack
Charge the battery pack on a flat surface without vibration. The battery pack is charged a little in the factory.
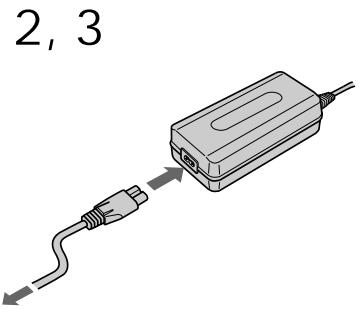
(1) Open the DC IN jack cover and connect the supplied AC power adaptor to the DC IN jack with the plug's mark up.
(2) Connect the mains lead to the AC power adaptor.
(3) Connect the mains lead to the mains.
(4) Slide the POWER switch to OFF. Remaining battery time is indicated by the minutes on the display window. Charging begins.
When the remaining battery indicator becomes normal charge is completed. For full charge, which allows you to use the battery longer than usual, leave the battery pack attached for about 1 hour after normal charge is completed until FULL appears in the display window.
Before using the camcorder with the battery pack, unplug the AC power adaptor from the DC IN jack of the camcorder. You can also use the battery pack before it is completely charged.
3apka 6aTapeHoro 6loKa
3apkaTe 6aTapeHbI 6Iok Ha IIIOCKoI NOBepxHocTN, HeIODBePKeHHoB Bn6paCm. BaTapeHbI 6Iok 3apXKeH HEMHOHa 3aBOe.
- "--- min" appears on the display until the camcorder calculates remaining battery time.
- Remaining battery time indication in the display window roughly indicates the recording time. Use it as a guide. It may differ from the actual recording time.
- If there is a slight difference in shape between the plug of mains lead and the terminal of AC power adaptor, it is ignorable for their mutual connection and power supply.
- Be sure to plug the mains lead deeply into the terminal of AC power adaptor so that it is firmly locked. If there is a gap between the plug of mains lead and the terminal of AC power adaptor, it does not affect the efficiency of the AC power adaptor.
Charging time
| Battery pack (NP-) | Charging time* (min.) |
| F330 (supplied) | 150 (90) |
| F530/F550 | 210 (150) |
| F730/F750 | 300 (240) |
| F930/F950 | 390 (330) |
The time required for a normal charge is indicated in parentheses.
- Approximate minutes to charge an empty battery pack using the supplied AC power adaptor. (Lower temperatures require a longer charging time.)
Battery life
CCD-TR415E/TR425E/TR515E
| Battery pack (NP-) | Continuous recording time* | Typical recording time** |
| F330 (supplied) | 130 (115) | 65 (60) |
| F530 | 225 (200) | 115 (105) |
| F550 | 260 (230) | 135 (120) |
| F730 | 450 (405) | 235 (210) |
| F750 | 530 (480) | 280 (250) |
| F930 | 710 (640) | 375 (335) |
| F950 | 815 (730) | 430 (385) |
PpmeaHn
```
--- min' OTObpaXaETcHa NdCnPee, NOKa He
NORBNTcB PEmo OCTaBWeOcR 3apJa
6aTapeHOrO 6boka.
- INДИКАЦИ OCTaBWeORO BpeMeHи 3apIda 6bapeHOro 6IOKaВ OkOuKe IcCnIe npIbIIN3ITeNbHO NOKa3bIbAeT BpeMg 3aIInCn. IVcNoIb3yTe ee B KaYeCTBe pyKOBODCTBa. 3To MoKet OTIMUATbcr Of qAKTNUeCKORO BpeMeHи 3aImCn.
EcnycyeT He6oIbwoe pa3nueHne no fOpme MeJy wTeNCJIbHbIM pa3beMOM CeTeBbIX npBOOIDN rHe3DmCteBOrO aHaNTepa NpeMeHHOrO TOKA,TO 3To HE BInreT Ha IN B3aMHoe CoEINHeHne I NOaCy PInTaHn.
- O6ra3aTeIbHO BCTaBbTe pa3bEm cTeBOrO npoBOda rny60KO B rHe3do cTeBOrO aAnTepa nepemEHORo TOKa TaK, YTObIo OH 6bl NaJExKHO 3aФNKcnpOBaH. EcnN OCTaETcR 3aOp MEXd y pa3bEMOM cTeBOrO npoBOda n rHe3dOM cTeBOrO aAnTepa nepemEHORo TOKa, TO 3To He BNIAeT Ha 3ΦΦeKTHIBHOCTb cTeBOrO aAnTepa nepemEHORo TOKa.
Bpema 3apnkn
| Батуейский БLOК (NP-) | В做什么 зардкн* (MHN.) |
| F330 (прилагается) | 150 (90) |
| F530/F550 | 210 (150) |
| F730/F750 | 300 (240) |
| F930/F950 | 390 (330) |
Yncna BCKo6kax yka3bIbaIOT BpEmn IInHOpMaIbHoN 3apRKn.
*PnIbIaHIOHTeBHO BpEMBaMHNyTaX DnA 3aprKn PNOHOCTbO pa3paJKeHHOro 6aTapeHOrO 6LOKa C HcNoIb3OBAHNem PnpIraaEMoro CeTeBO aAdntepa nepEmHOrO ToKa. (PnIbOone Hn3Knx TemNepaTypax NOTpe6ByTcR BoJeE DInIteBHO BpEM 3aprKn.)
Cpok cnjx6bl 3apHa 6aTapeHoro 6Ioka
CCD-TR415E/TR425E/TR515E
| Батуарейский 6лok (NP-) | Время нелорpbíвно запис* | Время Тлиочné запис** |
| F330 (priлагается) | 130 (115) | 65 (60) |
| F530 | 225 (200) | 115 (105) |
| F550 | 260 (230) | 135 (120) |
| F730 | 450 (405) | 235 (210) |
| F750 | 530 (480) | 280 (250) |
| F930 | 710 (640) | 375 (335) |
| F950 | 815 (730) | 430 (385) |
CCD-TR713E
| Battery pack (NP-) | Continuous recording time* | Typical recording time** |
| F330 (supplied) | 125 (110) | 65 (55) |
| F530 | 215 (190) | 110 (100) |
| F550 | 250 (220) | 130 (115) |
| F730 | 430 (385) | 225 (200) |
| F750 | 510 (460) | 270 (240) |
| F930 | 680 (610) | 360 (320) |
| F950 | 780 (700) | 410 (370) |
Numbers in parentheses indicate the time when you use a normally charged battery. Battery life will be shorter if you use the camcorder in a cold environment.
- Approximate continuous recording time at 25^ C( 77^ F) .
** Approximate minutes when recording while you repeat recording start/stop, zooming and turning the power on/off. The actual battery life may be shorter.
CCD-TR713E
| Батуарейньий 6лok (NP-) | Время нелPERTыВно Запис* | Время Тлиочné Запис** |
| NP-F330 (прилагается) | 125 (110) | 65 (55) |
| NP-F530 | 215 (190) | 110 (100) |
| NP-F550 | 250 (220) | 130 (115) |
| NP-F730 | 430 (385) | 225 (200) |
| NP-F750 | 510 (460) | 270 (240) |
| NP-F930 | 680 (610) | 360 (320) |
| NP-F950 | 780 (700) | 410 (370) |
Yncla BCKo6kax yka3bIaIOT BpEmr,KOrJa BblncnOJIb3yTe HOpMaJIbHO 3apRJKeHHbIb6TapeHbI 6NoK.
Cpok cnuyk6bl 3apraJa 6batapeHoro 6Ioka 6byet Kopoye,ecn BblncnoIb3yeTe BIndeOkamepy BXOIOJNbIX yCNOBIAx.
- Pπpδπιπειθυhoe Bνρεma ἡπρερβινΗού Σαπις πρη 25°C (77° F).
**Pn6Bn3nteIbHoe BpemB MmHytax Pn3aNcnc C NOBTOphbIM HaayJOM/OctaHOBKO3aNcN,peXNMOM rTOOBHOCTN,Hae3DOM BnDeOKaMepbl N BKIOUChENMe/BbIKIOUChENMe NITaHn.ΦakTnueckn cPoK cnLxkbbl 3apraDa 6aTaapeHoro 6Ioka MoKeT 6bTb KopoYe.
Note on remaining battery time indication during recording Remaining battery time is displayed in the viewfinder. However, the indication may not displayed properly, depending on using conditions and circumstances.
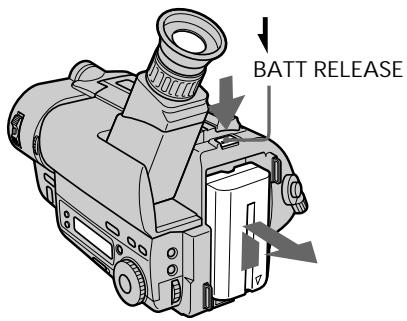
To remove the battery pack While pressing BATT RELEASE, slide the battery pack in the direction of the arrow.
PpmeaHne K HnKauuocn OCTabWeroC8 BpeMeH pa6oTbI 6aTaepHoro 6Joka BO BpeM 3aHncn.
OctaeeBpempa6atepHoro 6loka OTo6paKaetcB BVDOncKaTeIe. Ondako, INDnKauM MoKeT OTo6paKaTcH He npabInbHo B3aBNCmOCtN OT yCNOBn I 06CToAteJIbCT VBNCJb3OBaHn.
ДЯ CHATN6aTapeHoro 6Ioka Haximam BATT RELEASE, npeBnHbTe 6aTapeHbI 6IOK B HappaBHeHn CTpeKN.
You can look at the demonstration of the functions available with this camcorder (p. 34).
BbMOKTeI npocMOTpeT bEmOHcTpaCNI O fYHKsI, IMeIoXxCa B HaNIN y DaHHo BnDeOKaMepbl (CTp.34).
Make sure that the power source is installed.
When you want to record in the Hi8 system, use Hi8 video cassette Hi8 (CCD-TR515E/TR713E only).
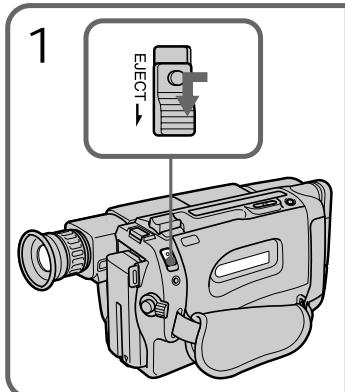
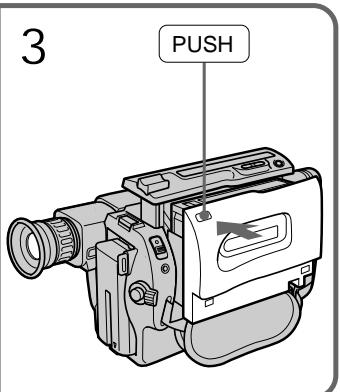
(1) While pressing the small blue button on the EJECT switch, slide it in the direction of the arrow. The cassette compartment automatically lifts up and opens.
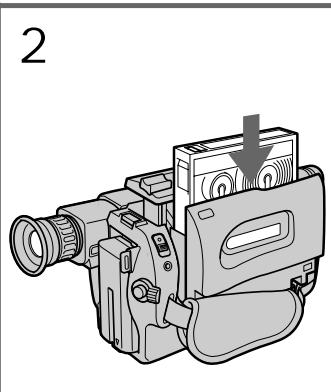
(2) Insert a cassette with the window facing out.
(3) Close the cassette compartment by pressing the "PUSH" mark on the cassette compartment. The cassette compartment automatically goes down.
Y6eIntecb, YTO ICTOCHNK NITaHNA yCTaHOBJIeN.
EcnBbXOTnTe BbIOnHnTb 3aINCb CnCTeMe Hi8,To nCNoJb3yIte Hi8-BnDeOkaCCety Hi (ToIbKO CCD-TR515E/TR713E).
(1)HaxmamagMaIeHbkyIO CnHIO KHOKNyHa BbIKIouateNe EJECT, cDvInhTe erO B HnpaBnEHH nCTpeNk. KaccetnBt OTCek ABToMaTnueCKn NDoHNMaETcN o OTKpbIbAeTcN.
(2)BcTaBbTe KacCeTy OKoUkOM, ObaueHHbIM hapyKy.
(3)3aKpOte KacceThbI OTCek NyTem HaxKaTnA 3HaKa "PUSH" Ha KaccetHom OTcKe. KaccetHbI OTCek aBTOMaTuYeCKN ONyCTNTCBHn3.
To eject the cassette
While pressing the small blue button on the EJECT switch, slide it in the direction of the arrow.
To prevent accidental erasure
Slide the tab on the cassette to expose the red mark. If you insert the cassette with the red mark exposed and close the cassette compartment, the beeps sound for a while. If you try to record with the red mark exposed, the and indicators flash, and you cannot record on the tape.
To re-record on this tape, slide the tab back out covering the red mark.
Make sure that the power source is installed, a cassette is inserted and that the START/STOP MODE switch is set to 山 . Before you record one-time events, you may want to make a trial recording to make sure that the camcorder is working correctly.
When you use the camcorder for the first time, power on it and reset the date and time to your time before you start recording (p. 65). The date is automatically recorded for 10 seconds after you start recording (AUTO DATE feature). This feature works only once a day.
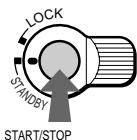
(1) While pressing the small green button on the POWER switch, set it to CAMERA.
(2) Turn STANDBY up to STANDBY.
(3) Press START/STOP. The camcorder starts recording. The "REC" indicator appears. The red lamp lights up in the viewfinder. The camera recording/battery lamp located on the front of the camcorder also lights up.
Y6eIHTecb, YTO NCTOCHNK NITaHnRA
yCTaHOBHeN,KaccTeBaCTaBHeHa n
nepeKluoyatelb START/STOP MODE
yCTaHOBHeN BNoLoXeHne u. IpeTe TM kaK
BbI NaHHeT 3aINCb Ondopa3OBbIX Co6bltn,Bbl
MOxete 3axoTeb CdeNaT np06HyO 3aNNcB dnn
noTBeRkDeHn, YTO BInDeOKamepa pa6oTaET
npabuNbHO.
Ecni BbI nCnOJIb3yeTe BnIeOKaMepy B nepBbI pa3,TO BKNIOHTe eeN yCTaHOBNTe DaTy IN BpemHa BaIe MeCTHoe BpemN pepeN haayalom 3aInci (cTp.65) DaT aABTOMaTNUeCKN 6yDeT 3aInciBaTbcR B TeueHne 10 cekyn nocJe Haayana 3aInci (fYHKUAR AUTO DATE).
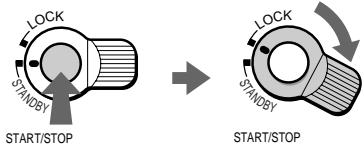
To stop recording momentarily [a] Press START/STOP again. The "STBY" indicator appears in the viewfinder (Standby mode).
To finish recording [b] Press START/STOP again. Turn STANDBY down to LOCK and set the POWER switch to OFF. Then, eject the cassette.
[a]

Note Be sure to remove the battery pack from the camcorder after using.
To focus the viewfinder lens If you cannot see the indicators in the viewfinder clearly, focus the viewfinder lens. Turn the viewfinder lens adjustment ring so that the indicators in the viewfinder come into sharp focus.
Длв Временно octaHOBKn 3anncn [a] Choba NaXMMTe START/STOP.ИнДиКаTOp "STBY" nOraBnIeTcR B BuDOnCKaTeNe (peXm roTOBHOCTn).
Длг Okончаньапси [b]
Сюва НжмпЕ START/STOP. Повернite STANDBY BИЗВ NOJOжени LCKи yctahOBITE BыIKJIQUЧаTeь POWER B NOJOжени OFF. 3aTeM BыТОЛКНпe KAccety.
[b]
Ппмочаимпо Okнани CBemKn He 3abyte OToCoeDHHt b6aTepeHbN bIok.
If you leave the camcorder in Standby mode for 5 minutes while the cassette is inserted, the camcorder turns off automatically for saving battery power as well as for preventing the battery and tape from wearing down. To resume Standby mode, turn STANDBY down and up again. To start recording, press START/STOP.
Note on recording
When you record from the beginning of a tape, run the tape for about 15 seconds before starting the actual recording. Passing the tape lead will ensure that you will not miss any start-up scenes when you play back the tape.
Notes on the tape counter
- The tape counter indicates the recording or playback time. Use it as a guide. There will be a time lag of several seconds from the actual time. To set the counter to zero, press COUNTER RESET.
- If the tape is recorded in SP and LP modes mixed, the tape counter shows incorrect recording time. When you intend to edit the tape using the tape counter as a guide, record in same (SP or LP) mode.
Note on the beep sound
The beep sounds when you operate the camcorder. Several beeps also sound as a warning of any unusual condition of the camcorder.
Note that the beep sound is not recorded on the tape. If you do not want to hear the beep sound, select "OFF" in the menu system.
PpmeaHne K pexmmy roTOBHOCTn
Ecni Bbl octabJnreTe Bndeokamepy B pexIme roTOBHOCTn Ha 5 MNHT npn BCTaBHeHHoN KacCeTe, BnDEOKaMepa BbIKIOHITcR aBTOMaTneCckn B CEJIAX KAK DnIe 3KOHOMm 3apJaDa bTaapeHoro 6NoKa, TAK nDnI npEoTbPaueHnna H3NoCa 6TaapeHoro 6NoKa IeHTbl.ДЯ BOcCTaHOBNeHnpeXIMa roTOBHOCTn NOBepHnITE STANDBY BHN3,a 3aTEM CHOBA BBEx.ДЯ NaHaJana 3aPnci haxMnte START/STOP.
PpmeaHne K 3anncn
Korda BbHaunHaeTe 3aInncb OT Haayana JeHTbl, nepemaTbIbaiTe IeHTy B Teey Hne 15 cekynpeed hauanom fakTnuecko 3aIncn.
Blaoradapnporohy Bnepeid haualbHorO OTe3ka IeHTb Bi CMOxete 6bItb yBepenbIB Tom, TTO npie ee BocpOn3BeDeHN Bbl He
0bHapuyknte OTCyTCTBne B 3aInncn KaKoJ-ni6o
n3 cambx nepbbix cUeh.
PpMMeaHnK CcETnky JeHTbl
CyeTnK JeHbI yKa3bIbae T BpeM 3aIncn nnBocpon3BeDeHn. NcNoJIb3yIte erO KaueCTBe pyKOBOdCTBa.CuJeCTByETOTCTaBaHne IIO BpeMeHn Ha HeCKoJIbKO cekyH,OTΦaKTInCeCKOrO BpeMeHn.ДЯ YcTaHOBKn CyeTHnKa Ha Hylb HaxmITe COUNTER RESET.
- EcIn IeHTa 3anicaHa cYepeoBaHnepeXmOB SP n LP,TO CyeTnK IeHTb6yETnOKa3bIBaTB He npabuBHe Bpem3aIncn. EcIn Bbl HamepeBaTeCb npOn3BODnTbMOHTax JIeHTb CNCIOJIb3OBAHnEM CyeTnKaJIeHTb B KaueCTBe yka3aTeJr, TO BblONHnTe3aNcB BOhOM n Tom Xe peXnme (SP nn LP).
The clock is set at the factory to London time for United Kingdom and to Paris time for the other European countries. You can reset the clock in the menu system. You can change the AUTO DATE settings by selecting ON or OFF in the menu system. The AUTO DATE feature shows the date automatically once a day.
However, the date may automatically appear more than once a day when:
- you reset the date and time.
- you eject and insert the tape again.
- you stop recording within 10 seconds.
- you set AUTO DATE to OFF once and set it to ON again in the menu system.
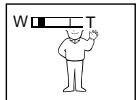
Using the zoom feature
Zooming is a recording technique that lets you change the size of the subject in the scene.
For more professional-looking recordings, use the zoom function sparingly.
"T" side: for telephoto (subject appears closer)
"W" side: for wide-angle (subject appears further away)
ПримочанneКФункциN AUTO DATE
YacbI yctaHOBHeHbHa 3aBOe Ha loHDoHcKoe BpemdmpoJMeNe CoepiHHeHoro KoponeBCTBa nHa napXckOe BpemdmpoJMeN dpynx EBpOeNCKNX cTpaH. Bbl MOKeTe nepeyCTaHOBNTb YcAbB CnCTMe MeHIO.Bbl MoKeTe n3MeHNt bYctaHOBKn AUTO DATE nyTem Bbl6opa ON nNN OFF BcnCTMe MeHIO.ФункцЯ AUTO DATE noka3bIbaet daTy abTomatueckOn Odn pa3 B deHb. Ondako, daTa MaOKeT aBTOMATueckn IOBNTc8 BoJIee OndHoro pa3aB DeHb, KOrda:
-BbI 3aHOBO yCTaHaBJIINBaTe DaTy I BpEmr.
-Bbl BbIToJKNHyNJ IeHTy N BCTaBNI ee CHOBA.
-BbIOCTaHOBUNI 3aNNcB INpeJEnax 10 cekyHd.
-BbyyctaHOBNIINФyHKUIO AUTO DATE BCNTeMe MeHIO Ha OFF, a 3aTEM CHOBa HA ON.
IcnoJIb3OBAHneФyHKcHn Hae3da BnDEOKaMepbl
Hae3d BnDEOKaMepb ABJRAETc TExNHueckIM npiEMOM 3aIncn, KOtOpB IIO3BOJAEr Bam n3MeHrTb pa3mep obBeKTa B KaJpe.ДЯ bOJIeepoceccnoHaJIbHO rBa 3aIncseyMpeHNO mCNoB3yInTeФyHKUIO Hae3Ja BnDEOKaMepb.CToPOHa "T":ДЯ TeleΦOTO (obBeKT npi6JInxKaETc)
CTopoHa"W":IINPOKOrOyrra cbeMkn (obbekt ydaanertc)


Zooming speed (Variable speed zooming)
Move the power zoom lever a little for a slower zoom, move it further for a faster zoom.
When you shoot a subject using a telephoto zoom
If you cannot get a sharp focus while in extreme telephoto zoom, move the power zoom lever to the "W" side until the focus is sharp. You can shoot a subject that is at least about 80~cm (about 2 5/8 feet) away from the lens surface in the telephoto position, or about 1cm (about 1/2 inch) away in the wide-angle position.
Notes on the digital zoom
- More than 18 × zoom is performed digitally, but the picture quality deteriorates as you move the lever toward the "T" side. If you do not want to use the digital zoom, set the D ZOOM function to OFF in the menu system.
- The right side [a] of the power zoom indicator shows the digital zooming zone, and the left side [b] shows the optical zooming zone. If you set the D ZOOM function to OFF, the [a] zone disappears.
CkopoocTb Hae3da Bnideokamepbl (Hae3d c pa3JIuHOn CKopoocTbU)
IpeBnHbTe pbyar npBODHO TpaHcfoKaTopa HEMHOrO IJI cpaBHNTeJbHO MeJeHHoro Hae3da BInDeOKaMepbl; nepeBnHbTe ero eJeDaJIbWe dJIra Hae3da Na BbICOKO CKOPoCTN.
Korda Bby chimaete o6bekt, nCnoJb3yHae3d B pexnme TeJefoTO
EcIn BbI He MoXeTe NOnyUHTb YeTkofΦokCnPOBKn BO BVPemKaHrero Hae3da BpeXIme TeneFTo, NepEmuaIte pbyar npuBOdHoro TpaHcΦokatOpa B CTOpOHy W" DoTex nop, noka BbI He NoLyHTe YeTkofΦokCupOBKn. Bbl MoXeTe ChmMaTb ObEKT, KOTOpB I IO MeHbWeMpe Ha 80 cm ydaJen OT nobepxHOCTn OsbekTINBa B NOLOXeHN TeLEFTo, INN ydaJen PnB6JIa3ntelbHo Ha 1 cm B NOLOXeHN WIPOKOTO YrJa.
PpMueHnK uFpOBMy TpaHcfoKaTopy
-ПосpeДСТВОМЦфpoBoT traHcФokaциocyusectBnIeTc8 Bolee Yeem 18-KpaTHoeyBeIuHHeN,пчЕм KaueCTBO n3O6paJxehnyUxyduaeTcno Mepe CMeueHnTRpaHcФokaTOpHOro peryIaTopa B CTOpOHY“T”.EcIn Bbl He XOTNe IcNoIb3ObaTbZlfpOBo TpaHcФokaTOp,ycTaHOBnTeФyHKnIO D ZOOM B cIcTeMe MeHIO Ha OFF.
-Праьастора[a]Индкатopa ппвоног�Трансфокатураязыгетону сифpoьовТрансфокаши,а Леваястора[b]покаstrybetону оптческов Трансфокаши.Есл Bы усановite Функю D ZOOM haOFF,to 30ha[a]Ис ue3net.

Selecting the START/STOP mode
Your camcorder has three modes. These modes enable you to take a series of quick shots resulting in a lively video.
(1) Set START/STOP MODE to the desired mode.
:Recording starts when you press START/STOP,and stops when you press it again (factory setting).
ANTI GROUND SHOOTING : The camcorder records only while you press down START/STOP so that you can avoid recording unnecessary scenes.
5SEC: When you press START/STOP, the camcorder records for 5 seconds and then stops automatically.
(2) Turn STANDBY up to STANDBY and press START/STOP.
Recording starts.
If you selected 5SEC, the tape counter disappears and five dots appear. The dots disappear at a rate of one per second as illustrated below.
Bb6op pexima START/STOP
Baasa Bndeokamepa nmeet Tprpekima.3tn peKIMbI N03BOJIAOT Bam cHrTb cepHIO KOPOTKnx KaIPOB, co3dABaB ape3yIbTaTe OXNBHeHHUo BnDeOpnporpaMMY.
(1)YcTaHOBInTe nepeKlnuOaTeNb START/STOP MODE Ha XeJaembI peXm.
3aIncb hauHnaeTcKorDa Bbl haxmaeTe START/STOP n 3akaHnBaetcK, KOrDa Bbl haxmaeTe 3Ty KHONKy ChOBA (3aBODcKa yctAHOBka). ANTI GROUND SHOOTING : Bndeokamepa npOn3BOJNT 3aIncb TOnbKO torda, KOrDa Bbl depXnTE START/STOP B haxkatom CoCToRnHn, TaK, YTO Bbl moKeTe N36ExaTb 3aInnc HeHyXhBX cUeH. 5SEC: KorDa Bbl haxmaeTe START/STOP, Bndeokamepa npOn3BOJNT 3aIncb B TeueHne 5ceyhd, a 3aTeM oCtHaBJIbAeTcR abTomatueckn.
To extend the recording time in 5SEC mode
Press START/STOP again before all the dots disappear. Recording continues for about 5 seconds from the moment you press START/ STOP.
Note on START/STOP mode
You cannot use the fader function in the 5SEC or ANTI GROUND SHOOTING mode.
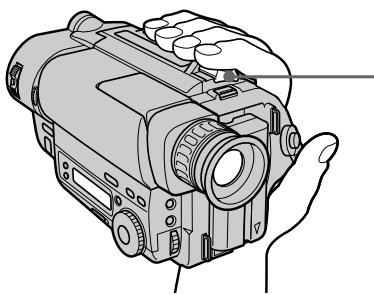
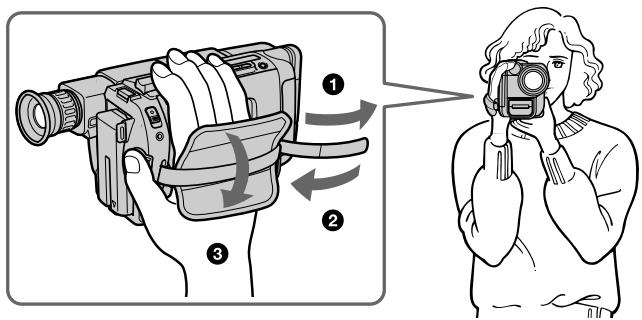
For hand-held shots, you will get better results by holding the camcorder according to the following suggestions:
- Hold the camcorder firmly and secure it with the grip strap so that you can easily manipulate the controls with your thumb [a].
- Place your right elbow against your side.
- Place your left hand under the camcorder to support it. Be sure to not touch the built-in microphone.
- Place your eye firmly against the viewfinder eyecup.
- Use the viewfinder frame as a guide to determine the horizontal plane.
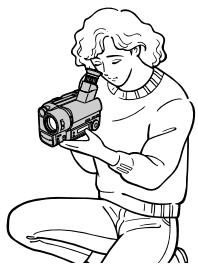
- You can also record in a low position to get an interesting angle. Lift the viewfinder up for recording from a low position [b].
Дякадов ри удөрхань вдөокамеры Вурах Bы пolyчITE lyшпе peşүлтаты, ecн 6удerte дөрхаь вдөокамеру COOTBETCTBи CO слсдуюшпpekomehdaцmaHIM:
-Держнту вдешокаму крении зашипеше сnomоью ремен Horo 3axBaTаТК,чтобыВылгко моглmaHnPyIupobatbperyЯлторамсnomоьюб0BJшoro палba[a].
- Ynpntecb npaBbIM JOKTEM B 60K.
PacnooxnTe Bauy neByo pyky noBndeokamepoIe ee noDepkKn. Hb KcemCnyae He TporaIte BCtpoEHbMmKpOphOH.
- NaDéχHo πριχΜιTe Bαù rλa3 K OKyιρу BùnòικKaTeJI.
-Испόлььзуйтевизирниюрамку вдюнскател в Каочеву рковороства дя ор dedению ratиэоталыного плана.
- Bby TaKxE MoKxTe 3aNcBbAtb N3 Hn3KOrO nOIOXeHnI DnI NOnyChnI INTepeCHOrO yrIa 3aNcN. IOnHmInTe BnOuCKaTeJIb BBepx dIa 3aNcN I3 Hn3KOrO nOIOXeHnI [b].
[a]
[b]
Place the camcorder on a flat surface or use a tripod
Try placing the camcorder on a table top or any other flat surface of suitable height. If you have a tripod for a still camera, you can also use it with the camcorder.
When attaching a non-Sony tripod, make sure that the length of the tripod screw is less than 6.5mm (9/32 inch). Otherwise, you cannot attach the tripod securely and the screw may damage the camcorder.
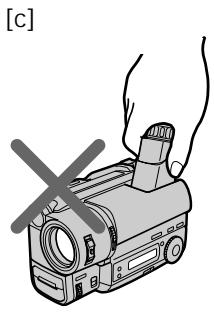
Cautions on the viewfinder
- Do not pick up the camcorder by the viewfinder [c].
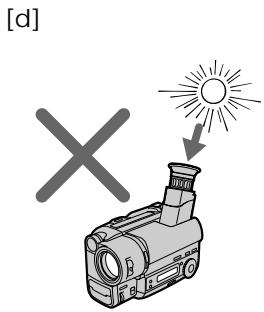
- Do not place the camcorder so as to point the viewfinder toward the sun. The inside of the viewfinder may be damaged. Be careful when placing the camcorder under sunlight or by a window [d].
PacnojaraTe BnDeokamepy Ha nNockoNobepxHoctn HIn NcNoIb3yIte TpeHoryIocapaTaeBpaccnoJoxntBnDeokamepycbepxyHa cTone nnIIO6O dpyroI nIOCKoNobepxHocTn PoXoJaueBbICOTb.Ecn y Bacectb TpeHora DnI foTOaannapata,Bbl TaKxeMOxETe NCnOJIb3ObaTb E n IIN BnDeokamepbl.Pnp npKpeJIeHN TpeHOrn He fIpMbl Sonyy6eINTe, YTO DNHa BnHTa TpeHOrn MeHee 6,5MM.B pOtnBHom ClyuAe BnHT MoKeTNOBpeINb BHyTpeHHne YaCTn BnDeokamepbl.
PpeoctopoxKHOCTK BNDONCKaTeJIIO
- He noДинмай Te Bndeokamepy 3a BnDOnCKaTeJIb [c].
- He paclonaraiTe BnDeokamepy TaK, YTO6bI BnOuCKaTeJIb 6bl HnpaBJeH B cTOpOHy coNHa. BHyTpEHNHe qactn BnOuCKaTeJIa MOrTy 6bl NOBpeXJdeHb.I BybTe oCtOpOXHbI npi paCNOJIOKeHn BnDeokAmepbI NOd coNHeM INI BO3Ne OKHa [d].
Using EDITSEARCH, you can review the last recorded scene or check the recorded picture in the viewfinder.
(1) While pressing the small green button on the POWER switch, set it to CAMERA.
(2) Turn STANDBY up to STANDBY.
(3) Press the - (S) side of EDITSEARCH momentarily; the last few seconds of the recorded portion play back (Rec Review). Hold down the - side of EDITSEARCH until the camcorder goes back to the scene you want. The last recorded portion is played back. To go forward, hold down the + side (Edit Search).
IcnoIb3yEDITSEARCH, Bbl moKeTe nepeCmToPeTb nocJeHIOU 3aIncaHHyo CcEHy IJIN pOBePnTb 3aIncaHHoe N3O6paXeHne B BVIONCKaTeJIe.
(1)Haximma MaJIeHbkyIO 3eIeHyIO KHOIky Ha BbIKIIOuATEJe POWER, yCTaHOBtE erO b noJoxKeHne CAMERA.
(2)Повернite STANDBY Вьерх в положене STANDBY.
(3)Ha mRHOBeHne haxmnte cToPOHy - () KhoIKN EDITSEARCH; nocJeHnne HeCKoJIbKO cekyHd 3aIINcaHHo YactN bdyT BOCpON3BeDeHbI (nepeCMOTp 3aIncu). Bbl MoXeTe KOHTPOINPOBaTb 3ByKYepe3 rOIOBhIE TelefoHbI. DePknTe HaxaToi CTOpOHy-KhoIKN EDITSEARCH Do Tex nop, noka BndeOKaMepa He BePHeTcK JKeJaEMo CSeHe. NocJeDNHra 3aIINcaHHa Yactb 6yDeT BOCpON3BeDeHa. IJna npOdBxKHeHn BpePeD ePknTe HaxaToi cToPOHy + (MOHTAXHbI IONCk).
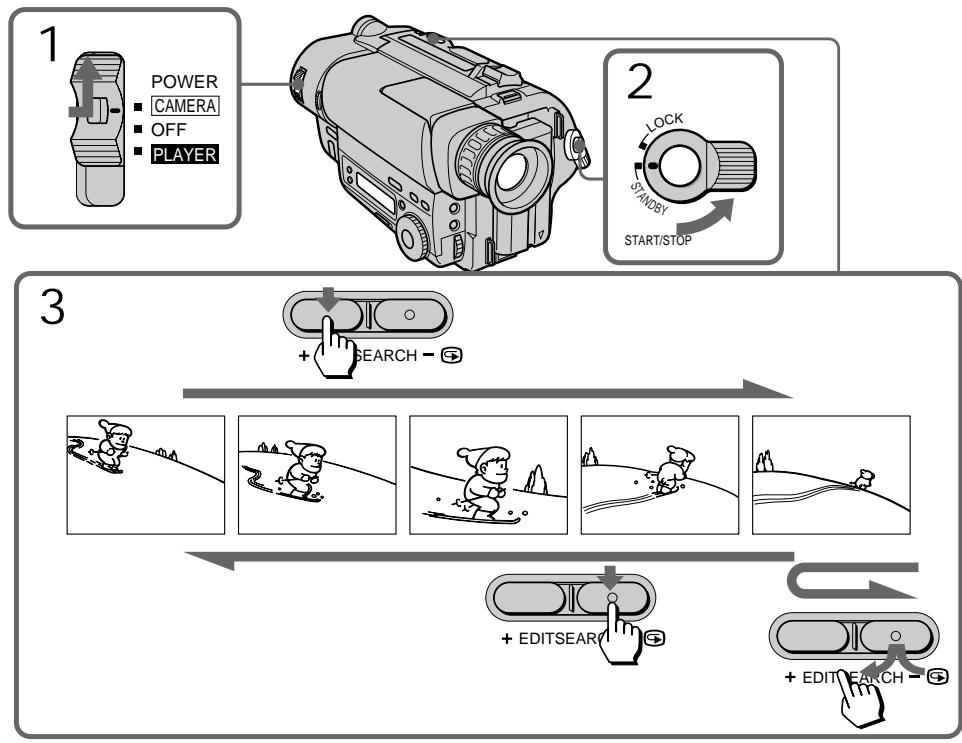
To stop playback Release EDITSEARCH.
To begin re-recording
Press START/STOP. Re-recording begins from the point you released EDITSEARCH. Provided you do not eject the cassette, the transition between the last scene you recorded and the next scene you record will be smooth.
ДлЯ OCTaHOBKи BOCnрОЗБeDEнгИ OТустite EDITSEARCH.
ChobaДЯнhaчалza3annch
HaKmTe START/STOP.3aIncB haHnHaetca ot ToUK, rIe Bbl OTnycTNI
EDITSEARCH.Ipr yCNoBn, YTO BbHe
BbToJkHeTe KaccTe, nepexoM MeKdy
noCleDneHcEHO, KOtopyO Bbl 3aNcAINI, n
cNe dyUoSe cueHO, KOtopy O Bbl 3aNcBlaBeTe,
6yDet PnabHbIM.
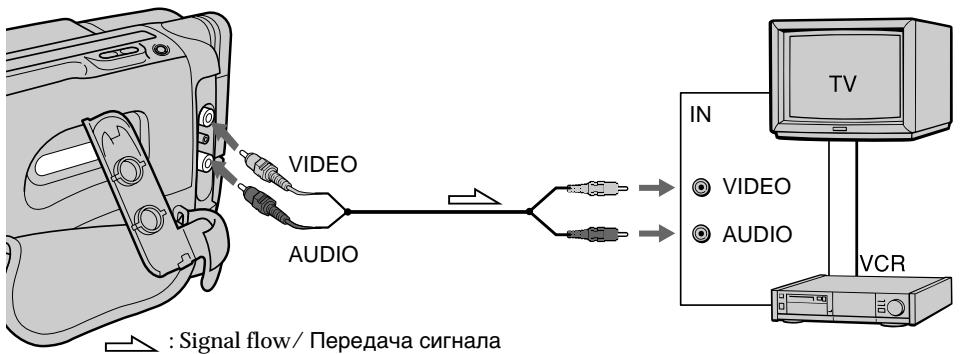
Connect the camcorder to your TV or VCR to watch the playback picture on the TV screen. There are some ways to connect the camcorder to your TV. When monitoring the playback picture by connecting the camcorder to your TV, we recommend you to use mains for the power source.
Connecting directly to a TV/VCR with Video/Audio input jacks
When connecting the A/V connecting cable, make sure you connect the plug to jacks of the same colour.
Open the jack cover. With using the supplied A/V connecting cable, connect the camcorder to the LINE IN inputs on the TV or VCR connected to the TV. Set the TV/VCR selector on the TV to VCR. When connecting to the VCR, set the input selector on the VCR to LINE.
ПоДсоeДиHITe BИdEOKaМЕpy K BaшeMy
TeLEBn3Opy Ил КBM ДЯ прСмOTpa
BOcPpON3ВОДIMOrO n3O6paJKeHЯ 3KpaHé
TeLEBn3Opa. CyIeCTByET HeCKoJIbKO MeToIOB
ДЯ ПОДСоeДиHEnI BИdEOKaMepbl K BaшeMy
TeLEBn3Opy. ДЯ прСmOTpa
BOcPpON3ВОДIMOrO n3O6paJKeHЯ рп
ПоДСоeДиHEnI BИdEOKaMepbl K TeLEBn3Opy
MbI peKOMeHdyem Bam IcNoIb3ObaTb
3JIeKTpUeCKyU O ceTb B KaUeCTBe NCTOCHNka
ПNTaHЯ.
IopcoeHHeHne npraMo K TeleBn3opy/KBM c BXoHbIMn rHe3dAmn ayDno/BndeO
Pn noCoeHHeHm CoeHHTeHbHO rKa6eJr ayuio/BuJeO y6eTeCb, YTO Bbl noCoeHnHreTe wTeKepeB K IHe3dAm OUnHaKOBOro CBeta.
OTkpOHTe KpbIshky rHe3da. IOnDCoeDHHTe BnDeOKaMepy K BXoNbHIM rHe3dAm LINE IN Ha TeLeBn3OpE nII NIOcOeDHHHom K Hemy KBM C nCIOJIb3OBAHnEM pINJaRaEMOrO COeDHNITeBHorO Ka6eI ayDnO/BnDeO.
YcTaHOBnTe CeNeKTop TV/VCR Ha TeLeBn3ope BNoLoXeHne VCR. PpN PoIcOeINHeHm K KBM yCtAHOBTe CeJeKTop BXoDhblxCnHaJIOB Ha KBM B NoLoXeHne LINE.
If your TV/VCR has a 21-pin connector (EUROCONNECTOR)
Use the supplied 21-pin adaptor.
EcInB BaWeM TB/KBM mMeTc8 21- WtbpbKobbl pa3bEm (EUROCONNECTOR) NcnoJb3yIe npnlaeraembl 21-wTbIpbKobbl aandTep.

To connect to a TV or VCR without Video/ Audio input jacks
Use a PAL type RFU adaptor (not supplied).
Длп посоeиненяк TeleBu3opy nKBM 6e3 BXOdHbIX rHe3d ayDnO/BnDeo
IcnoIb3yIte B4-aanTepe (He npunaraetca).
Using the AV cordless IR receiver — LASER LINK
- CCD-TR713E only
Once you connect the AV cordless IR receiver (not supplied) having the 4 LASER LINK mark to your TV or VCR, you can easily view the picture on your TV. For details, refer to the operating instruction of the AV cordless IR receiver.
LASER LINK is a system which transmits and receives a picture and sound between video equipment having the 4 mark by using infrared rays.
LASER LINK is a trademark of Sony Corporation.
To play back on a TV
(1) After connecting your TV and AV cordless IR receiver, set the POWER switch on the AV cordless IR receiver to ON.
(2) Set the POWER switch on the camcorder to PLAYER.
(3) Turn the TV on and set the TV/VCR selector on the TV to VCR.
(4) Press LASER LINK. The lamp of the LASER LINK button lights up.
(5) Press on the camcorder to start playback.
(6) Point the LASER LINK emitter at the AV cordless IR receiver.
To cancel the LASER LINK function Press LASER LINK.
Note
When LASER LINK is activated (the LASER LINK button is lit), the camcorder consumes power. Press and turn off the LASER LINK button when it is not needed.
IcnoJb3OBAHne 6ecnpoBOdHorO NK aydnOBuJeOpnpemHnka - LASER LINK
-ToIbKO CCD-TR713E
EcIn BbI NOcOeDHHTe 6ecnpoBOdHOn IK ayDNOBnDEOpnpEeMHNK (He npNlaeraTcra), ImeuIz3nK LAsER Link, K Baewemy TeJeBn3Opy nIK KBM, To Bc CMOxKeTe IerKo npocMaTpBaTb N3O6paXeHne Ha 3kpaHe BaWero TcEBn3Opa. CMOTpIte NoDpo6HoCTN BV pyKOBoDCtBe NO 3KcPnyaTaUm6bcnpoBOdHOro INK ayDNOBnDEOpnpEeMHnka.
LASERLINK RAIIIEETCnCTeMoI npEma n nepeaUHIO6paxEHHN 3BvKA MEXyD BVIDeoAannapatyo, IMEOUe3hAk L c NOMOuBIO INHΦpaKpaCbIx Lyueh.
You can monitor the playback picture in the viewfinder. You can also monitor the picture on a TV screen, after connecting the camcorder to a TV or VCR.
(1) While pressing the small green button on the POWER switch, set it to PLAYER.
(2) Insert the recorded tape with the window facing out.
(3) Press to rewind the tape.
(4) Press to start playback.
BbMOxTe NpOcMaTpuBaT N3o6paXeHne B BuOnckaTeNe. BbMOxTe TaXKe NpOCMOTpeTB N3o6paXeHne Ha 3kpaHe TeneBn3Opa nocne NpDcoEINHeHn BUNDeOKaMepbK TeneBn3Opy nn KBM.
(1)Haximma MaIeHbkyIO 3eJIeHyIO KhONKy Ha BbIKJIOUaTeNe POWER, yCTaHOBnTe erO B noLoXeHne PLAYER. BbICBeTcra pa6OuNe KhONKn BInDeOKaMepbl.
(2)BcTaBbTe 3aIncaHnHyIO JENTy OKoWKOM, 6bpaueHHbIM Hapxky.
(3)HaxmTe Для yckopeHHoN nepeMoTkn JIeHTbI Ha3a.I.
(4)HaXmTe ▶ДЯ NaHauana BocnpOn3BeDEHnA.
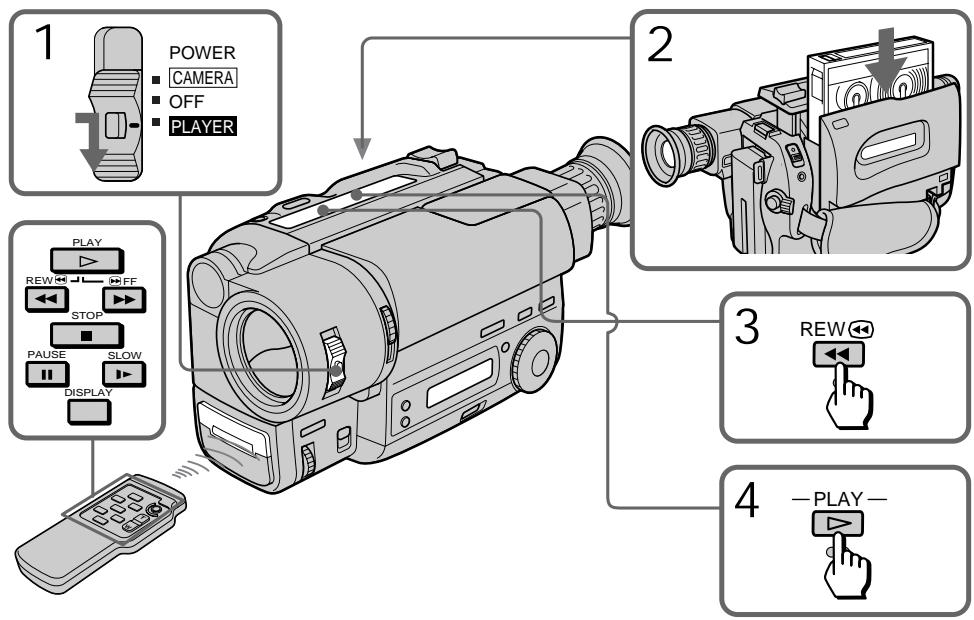
To stop playback, press ■.
To rewind the tape, press
To fast-forward the tape rapidly, press
ДлгocтановкиВOCпpon3БeDEнгЯHAЖMITE
Using the remote commander
- CCD-TR425E/TR515E/TR713E only
You can control playback using the supplied Remote Commander. Before using the Remote
Commander, insert the R6 (size AA) batteries.
To display the viewfinder screen indicators on the TV
- CCD-TR425E/TR515E/TR713E only
Press DISPLAY on the Remote Commander. To erase the indicators, press DISPLAY again.
Note on the lens cover
The lens cover does not open when the POWER switch is set to PLAYER. Do not open the lens cover manually. It may cause malfunction.
IcnoJIb3OBAHne nyIbTa
DnCTaHcNoHHOrO ynpabHeHnA
-ToIbKo CCD-TR425E/TR515E/TR713E
BbMOKTe ynpabJIbT BOCpON3BeDenHEm C NOMOJIbIO pIINJraeMOrO nyIbTa IcNtAHCUNHO YnpaBLeHnI. PepeI NCNoIb3OBAHNEM nyIbTa IcNtAHCUNHO YnpaBLeHnI BCTaBbTe B Hero 6aTaapeKeR R6 (pa3MePOM AA).
Длг OTобразмен ИндікТоров
BnOuCKaTeHa 3KpaHe TeIeBn3opa
-ToIbKO CCD-TR425E/TR515E/TR713E
HaxmTe KhoNky DISPLAY Ha nyIbTe DnCTaHcUHOHHo YnpaBHeHn.ДЯ CtnpaHn HnDnKaTOPOB CHOba HaxmTe DISPLAY.
Ппмециме К кршke объektва
KpbIka oBekTbBa He OTKpbIbAeTcR, KOrJa BbIKIOUaTeIb POWER yCTaHOBJIeN B noIOXeHne PLAYER. He OTKpbIbAte KpbIbKy oBbekTbBa BpyHyO. 3To MOKeT pINBeCTn K HEnCnpaBHOCTn.
Various playback modes
To view a still picture (playback pause)
Press I during playback. To resume playback, press I or
To locate a scene (picture search)
Keep pressing or during playback. To resume normal playback, release the button.
To monitor the high-speed picture while advancing the tape or rewinding (skip scan)
Keep pressing while rewinding or while advancing the tape. To resume normal playback, press .
To view the picture at 1/5 speed (slow playback)
- CCD-TR425E/TR515E/TR713E only
Press on the Remote Commander during playback. To resume normal playback, press
If slow playback lasts for about 1 minute, it shifts to normal speed automatically.
Notes on playback
- Noise may appear when you use the still/slow/picture search function to play back the tape recorded in LP mode.
- Streaks appear and the sound is muted in the various playback modes.
- When playback pause mode lasts for 5 minutes, the camcorder automatically enters stop mode. To resume playback, press .
Horizontal noise appears at the centre, or top and bottom of the screen when you play back a tape in reverse. This is normal. - You can play back the tapes recorded in the Hi8 video system on the standard 8 mm camcorder (CCD-TR415E/TR425E only).
Pa3nUHbIepeXmMbI BocnpOn3BeJeHnA
ДлгпрсмOTpa HeNoDbNxHOrO n3O6pa-JxHnra (nay3a BocnpOn3BeDeHnra)
Haxmte BO BpemB OBCPON3BeDenH.NIbBOcCTaHOBLeHnB OBCPON3BeDenHn Haxmte IJNII
ДлгобарухженяфрarmeHTa (nonck n3o6paxeHn)
ДерхитЕнжаToH KONKy«ИИN»BOВрema BOCPOn3BedeHIN.ДЯBOCCTaHOBJIeHIN HOpMaJIbHOrO BOCPOn3BeDEHIN OTNUCTte KONKy.
Для KoHTpOJIЯ n3o6paXeHЯ Ha BbICOKOJ cKOpOCTn BO BpeMryCkOpEHHOIpemOTKn JIeHTbl BnepeD IJIH Na3aad (NONCK MeTOdOM nporoHa)
ДерхиTe HaЖаToH KONKy △ BO ВрмЯ перemOTКЛ HeNTbI Ha3dДИЛ NKHONKу ▷ BO ВрмЯ перemOTКЛ HeNTbI BNepeД.ДЯ BOCCTAHOBJIeHnH HOPMaJIbHOrO BOcPOn3BeDEHnHaXmITE ▷.
ДлгпрсмOTраиЗбраженяHa1/5 CKOPOCTN(3aMeДлeHHoe BOCPpON3BeDEHne)
- ToIbko CCD-TR425E/TR515E/TR713E
HaKmTe Ha npIbTe DnCTaHcNIOHHo UnpaBHeHn BO BpEeM BOCpOu3BeDeHn. IIN BOCCTAHOBJIeHn HOPMaIbHOrO BOCpOu3BeHn HaxMeTe Ecn 3aMeJInHoe BOCpOu3BeHne npOJnxAeTc npi6n3nteIbHO B TeueHne 1 MNHybl, annapat NepeKJIouHTcHa HopMaIbHyO CKOpOCTb aBTOMaTNUeCKn.
Приимechи К Воспождевени.
ПомexmMoryt noBbIbC8, KOrda BblncnIb3yeTeФyHKuHcTOn-KaDa/3ameJHeHoro BOCpOu3BeHEn/HoNCKaN3O6paXeHnPrn BOCpOu3BeHEnJIeHTbl, 3aAncHHO B pexIme LP.
“TAnyUKNI NOBnIOTcN 3ByK 6yDeT npInIpySeH B pa3JIuHbIX pexImax BocnpOn3BeDeHnI.
Ecnnpexum nay3bl BOCpON3BeDenHn npOJXaeTcB TEeHne 5 MMHT, BInDEOKaMepa ABtOMaTNueCKn BOJET B pexum OCTaHOBa.ДЯ BOCCTaHOBNeHn BOCpON3BeDenHn HxKMNT
- Пи Воспpon3BeDEни B pexIMe peBepca B
ЧЕТpe, BERVxу ИИВиЗУ эКраHa
НОВЯВЕТСА РOPИЗOTAHЛБИЙ УМ. idential
HOPMaJIbHOe RAJIbNEHnE.
BbMOKeTe BOCPOn3BOJNTb PJIeHKn, 3aIINcAHbIe B VBaIOeOCTeMe Hi8 Ha cTaNdAPThO8-MnIMMeTPOBoB VBaEOKaMepe (ToIbKO dNCA-CD-TR415E/TR425E).
You can choose any of the following power sources for your camcorder: battery pack, mains and 12/24V car battery. Choose the appropriate power source depending on where you want to use your camcorder.
| Place | Power source | Accessory to be used |
| Indoors | Mains | Supplied AC power adaptor |
| Outdoors | Battery pack | Battery pack NP-F330 (supplied), NP-F530, NP-F550, NP-F730, NP-F750, NP-F930, NP-F950 |
| In the car | 12 V or 24 V car battery | Sony DC adaptor/ charger (not supplied) |
Notes on power sources
- Disconnecting the power source or removing the battery pack during recording or playback may damage the inserted tape.
- The DC IN jack has power source priority. This means that the battery pack cannot supply any power if the mains lead is connected to the DC IN jack, even when the mains lead is not plugged into the mains.
BbMoKeTe Bb6paTb IIO60 n3 cNeIyOuNX
NCTOCHNKOB NITaHnI dIra BaWei BNDeOKaMepebl:
6bTaapeHbI bNOK 3JIeKTPnueckcyIO cETb,
UeNoCHbIe 6bTaapeKn n 12/24 B aBTOMo-
6bNbHbI aKKymJnTOp. BbIbepnte nOdoJnI
NCTOCHNK NITaHnIB 3aBNCMnOcTn OT TORO, rJe
BbXOTnTE nCNOlb3ObaTb BaSy BNDeOKaMepy.
(1) Open the DC IN jack cover, and connect the AC power adaptor to the DC IN jack on the camcorder.
(2) Connect the mains lead to the AC power adaptor.
(3) Connect the mains lead to the mains.
IcnoJb3OBaHne 3JIeKTpueckoI cETn
(1)ОТкpoиTe KрblИчу ГеЗда DC IN n noДcoeДинITE ceTeВойаДАптep nepemEHORO ToKa K Гезdy DC IN ha BnДeOKaМepe.
(2)ПоДсоeДиНITE ceTeВОй К сTeВOMу aДаNTepу NepeMeHнOrTo TOKa.
(3)Подсоeннite сеTeвои повоД к сети.
WARNING
The mains lead must only be changed at a qualified service shop.
PRECAUTION
The set is not disconnected from the AC power source (mains) as long as it is connected to the mains, even if the set itself has been turned off.
Note
Keep the AC power adaptor away from the camcorder if the picture is disturbed.

This mark indicates that this product is a genuine accessory for Sony video products.
When purchasing Sony video products, Sony recommends that you purchase accessories with this "GENUINE VIDEO ACCESSORIES" mark.
PNEyPPEKDEHNE
Cetebon npoBODdoJKeH 6bITb 3aMeHeh TOnbKO B MaCTepCKO KBaIINΦnIuPObaHHoro 06cnyKbBaHna.
ПРЕДОCTЕРЖЕНЕ
Annapat He OTKIIOUaETCA O NTCTOuHnKa nITAHnI Nepem. TOKA (3JekTpueeCKoC eTn) Do tex np, noka OH NOdkIIOUeH K 3JekTpueeCKo Cetn, daxe ecIn Cam annapat BbIKIOUeH.
Ppmeuahne
ДерхиTe ceTeBoAаanTp nepemEHoro ToKa подальшOT BndeOKaMepbl, ecn иЗображени coDEpЖNT nomexn.

HaCToAun3nak yKa3bIbAeT, YTO daHHa IpoDyKUIN RAJIaETcnoDInHNo npHnAdJeXHoCTbIO BUnDeOpOkykUN Sony.
Ecnn Bbl nokynapeTe BndeOpnokyuNIO Sony, toMbI peKOMeHnyeM, TTObbl NOKyNAII npHaJnEJXHOCTN, NOMEeHHble 3HaKOM "GENUINEVIDEO ACCESSORIES".
Changing the mode settings
You can change the mode settings in the menu system to further enjoy the features and functions of the camcorder.
(1) Press MENU to display the menu.
(2) Turn the control dial to select the desired icon in the left side of the menu, then press the dial to set.
(3) Turn the control dial to select the desired item, then press the dial to set.
(4) Turn the control dial to select the desired mode, then press the dial to set. If you want to change the other modes, repeat steps 3 and 4. If you want to change the other items, select RETURN and press the dial, then repeat steps from 2 to 4.
(5) Press MENU or select icon to erase the menu display.
Bb mokeTe n3MeHrTb yCTaHOBKn peXmOB B CnCTeMe MeHIO dIa 60JIbWeO HacJaXdEHN OOC6eHHoCTaMn IN cyHKUaMn BnDeOKaMepebl.
(1)HaxmTe MEnU JIa OTo6paXeHHa MeHIO.
(2)Врацая рergyларовочьй дись, Вьберптуну КИКТормamy B Левий частMuHо, a 3aTeM haxKaTNem ДИСКAZаHAecnTe ee B namTb.
(3)Врацая ретуларовочьд ДИСК, ВИБЕРNTe HУЖТБΙΝΑРМЕΤΡ, a 3aTмЕнжАТиЕ MДССАЗЕСНTE erO B ПАМТБ.
(4)BpaaerpyunpoBOHbI nCK,Bbl6epnTe HxKnbI pexKIM, a 3aTEM hxaTne mcka 3aHeCITe erO B nAMrTB. EcNn Bbl xOTnTE n3MeHNtB dpyrne peXkMbI, NOBTopNTe npHKtB1 3 n 4. Ecnn Bbl xOTnTE n3MeHNtB dpyrne yctahOBKn Bbl6epnTe RETURN n HaxKMITE nCK, a 3aTEM noBTopNTe npHKtB1 2-4.
(5)HaxmTe MENU nBbI6epTe NIKTORpAMMy DnA CTnpaHn IAucJIeR MeHIO.
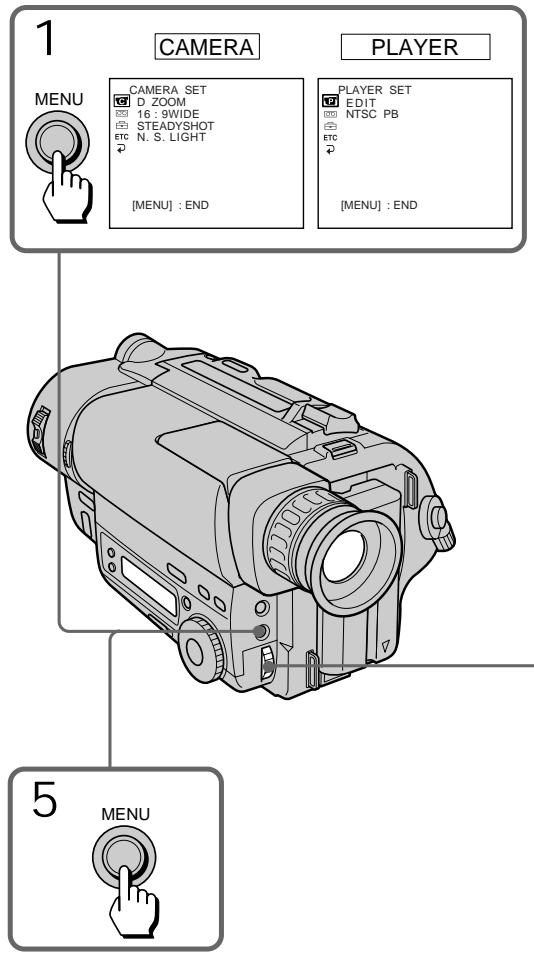

Note on the menu display
Depending on the model of your camcorder, the menu display may be different from that in this illustration.
Note on changing the mode setting
Menu items differ depending on the setting of the POWER switch to PLAYER or CAMERA.
Selecting the mode setting of each item
Items for both CAMERA and PLAYER modes
REMAIN*
-
Select AUTO when you want to display the remaining tape bar:
-
for about 8 seconds after the camcorder turns on and calculates the remainder of the tape.
- for about 8 seconds after a cassette is inserted and the camcorder calculates the remainder of the tape.
- for the period of tape rewinding, forwarding or picture search in PLAYER mode.
- for about 8 seconds after DISPLAY on the Remote Commander is pressed to display the screen indicator. (CCD-TR425E/ TR515E/TR713E only)
-
for about 8 seconds after PLAY is pressed in PLAYER mode.
-
Select ON to always display the remaining tape indicator.
LTR SIZE*
- Normally select NORMAL.
- Select 2x to display selected menu item by twice size of normal.
ETC BEEP*
- Select ON so that beeps sound when you start/stop recording, etc.
- Select OFF when you do not want to hear the beep sound.
PpmeuHne K dncJIeO MeHIO
B 3aBnCmOcTn OT MoJeN BaWei BnDeokampeI DnCnIeM MeHIO MOKeT OTnUHaTbcr OT ONnCaHHOrO B DaHHo INHCTpyKcIIIN PO kCnJIyatauIN.
BbI6oppeKImaKaJdoynycTaHOBKn
YctaHOBKn DnPa peXIMOB u CAMERA u PLAYER
REMAIN*
- BbIbepnTe AUTO, ecIn Bbl xOITne oTo6pa3nTb shkaJy ocTabweeCra JENTbl:
-πpɪbʌnɪ3nteɪbHo Ha 8 cEkyHd nocLe BkJIIOUyeHnB VIIDEOKaMepbl N BbluNCJIeHnOCTaTka JIHTbl. - np6Ibn3ntelbHo Ha 8 cekyHn nocJeYCTaHOBKn KACCEbI N BblNCJIeHnOCTaTKaJIeHTbl.
-на периod усокорно перemOTkn Лentы назад, впераши пося сизобрахени в ржиме PLAYER. - npi6Ibn3nteHbNo Ha 8 cekyHn nocJe haxaTna DISPLAY Ha nyIbTe DInCTaHcNHOHorO ynpaBHeHn dIa OTo6paXeHn INdNkAtopa Ha 3KpaHe. (ToIbko y moJelen CCD-TR425E/TR515E/ TR713E.)
- npn6bn3nteIbHo Ha 8 cekyHn nocne HaxkataH ▶ B pexmpeLAYER.
BbIbepnTe ON nIЯ noCToHHoro OTo6paXeHn INdkaTopa ocTaBWeieCJIeHTbl.
LTR SIZE*
- O6bIuHOb BbIbIpaIte NORMAL.
- BbIbepuTe 2x dnia oTo6paKeHnB bIbpaHHoYcTaHOBKn MeHIO B Dba pa3 60nbHeHopMaJIbHorO pa3Mepa.
ETC BEEP*
- BbIbepnTe ON, yTo6bI 3yMMepHbIe CnHaJIbI 3ByuJIn, KOrJa Bbl NaunHaeTe/ OCTaHaBnBaTe 3aNcB n T.D.
- BbIbepnte OFF,ecnBbI He XOTnTe CblIaTb 3yMMepHbI 3ByKOBOCnHaJ.
ETC COMMANDER
- Select ON when using the supplied Remote Commander for the camcorder.
- Select OFF when not using the Remote Commander.
Items for CAMERA mode only
D ZOOM*
- Select ON to activate digital zooming.
- Select OFF to prevent the deterioration of the picture quality. The camcorder goes back to optical zoom.
16:9WIDE*
- Normally select OFF.
- Select CINEMA to record in CINEMA mode.
- Select 16:9FULL to record in 16:9FULL mode.
STEADYSHOT*
- Normally select ON.
- Select OFF to release the SteadyShot function.
N.S.LIGHT*
- Normally select ON.
- Select OFF to not use the NightShot Light function.
REC MODE*
- Select SP when recording in SP (standard play) mode.
- Select LP when recording in LP (long play) mode.
When a tape recorded on this camcorder in LP mode is played back on other types of 8mm camcorders or VCRs, the playback quality may not be as good as that on this camcorder.
ETC COMMANDER (Tonbkoу mojelei CCD-TR425E/TR515E/TR713E
- Bb6upaTe ON npn nCnoB3ObaHnnpinaraemoro K BnDeOKaMepe npIbTaDnCTaHnOHHO ynpabJeHn.
- Bbl6epnTe OFF,ecnn nyIbT nIcTaHcNIOHHOrO ynpabJIeHnHe IcNOJIb3yEtC.
YctaHOBKn TOJIbKO JIЯ peKIma CAMERA
D ZOOM*
- BbIbePte ONДЯВКЛЮЧЕпяЦфpoBOI TpaHcФОkaUN.
- BbI6epnte OFF, uTo6bI u36ekaTb yUxDiEHHa KaueCTBa u3o6paXeHn. BuJeOKaMepa BHOBb nepexoNTB pexm oTNueckoTpahcfoKaun.
16:9WIDE*
Korda leHtA, 3aIncanHa Ha daHHoH BnDeokampeB pexime LP, BocpOn3BoDHTc H a Dpyrnx TINax 8 MM BnDeokamep uIn KBM, KaueCTBO BOCpOn3BeDEHnMA MoKeT 6bITb He TaKIM XOPOuHM, KaK npN BOCpOn3BeDEHn Ha daHHoB BnDeokampe.
ORC TO SET*
Select this item to automatically adjust the recording condition to get the best possible recording.
If you have already performed this function, "ORC ON" is displayed.
ORC stands for "Optimizing the Recording Condition."
CLOCK SET*
Reset the date or time.
AUTO DATE*
- Select ON to record the date for 10 seconds after recording has started.
- Select OFF to not record the date.
DEMO MODE\*
- Select ON to make the demonstration appear.
- Select OFF to deactivate the demonstration mode.
Notes on DEMO MODE
- DEMO MODE is set to STBY (Standby) at the factory and the demonstration starts about 10 minutes after you set the POWER switch to CAMERA without inserting a cassette.
Note that you cannot select STBY of DEMO MODE in the menu system. - You cannot select DEMO MODE when a cassette is inserted in the camcorder.
- If you insert a cassette during the demonstration, the demonstration stops. You can start recording as usual. DEMO MODE automatically returns to STBY.
- When NIGHTSHOT is set to ON, "NIGHTSHOT" appears in the viewfinder and the demonstration does not start.
To look at the demonstration at once
Eject the cassette, if inserted. Select ON of DEMO MODE and erase the menu display. The demonstration will begin.
When you turn off the camcorder once, DEMO MODE automatically returns to STBY.
ORC TO SET*
BbI6epnte daHHyU yCTaHOBky dIa ABTomatuecko peryIpOBKn ycNoBn 3aNcN dIra IOnyuHnIO BO3MOxHocTn HauNyUwe 3aNci.
Ecnn Bby yke 3aJeNCTBOBaII NTy cyHKcIIO,TO "ORC ON"6ydet oTo6paKeHo.
AHTIINCKoe cokpaueHne ORC 03Naaet "OTIMM3aun ycNoBn 3anncn
CLOCK SET*
BbI6epnte 3Tu yCTaHOBky dIy nepeycTaHOBKn DaTbI NIN BpemeHn.
AUTO DATE*
- BbIbepnte ON dIa 3aIncn DaTbI B TeYeHne 10 ceKyHd nocHe hauana 3aIncn.
- BbIbepnte OFF, YTo6bI dTaHe 3aHNCbIBaJIacb.
DEMO MODE\*
- BbIbepuT ON IaI noBJIeHnI DeMOHCTpaUIN.
- BbIbepnte OFF dIa OTKJIIOUeHn IyHKuIN demOHCTpaun.
Приимechanical DEMO MODE
- DEMO MODE ycTaHaBnIBaEtcHa 3aBoDeHa STBY (rotOBHocTb)и demOHCTpaZna HauHnaeTc np6bln3IteNbHO uepe3 10 MmHT nocLe yctAHOBKn BbIKNoCuTeNPA POWER B noLoXeHne CAMERA 6e3 BcTabKn KAcCtBt. 3aMetbTe,уTO Bbl He moKTe BbluPaTb STBYДЯ рexkima DEMO MODE B CnCTeMe MeHIO.
- Bbl He MoXkeTe Bbl6paTb DEMO MODE, ecIn KaccTeBaCTaBJIeHa B VnDeOkamepy.
- EcIN Bbl BCTaBnTe Kaccety Bo Bpemr demOHCTpaun, To demOHCTpaun npekpaaetc. Bbl MoKeTe Haatb 3aIncb, KaK obblHo. DEMO MODE ABTomatnueckn Bo3paauaetc K STBY.
- EcInФункцИ NIGHTSHOT yctaHOBJIeHa BO BKIIIOUHeHHOIPOJOKeHne ON, B BnIOuCKaTeJIe IONBHTcI INdNKaUZN "NIGHTSHOT" nДemonHCTpaUH naHHaTbC H e 6yJeT.
Select this item to set the clock by a time difference.
ETC REC LAMP*
- Select OFF when you do not want the camera recording/battery lamp at the front of the unit to light up.
- Normally select ON.
Items for PLAYER mode only
EDIT
- Select ON to minimize picture deterioration when editing.
- Normally select OFF.
The EDIT setting works only during playback.
NTSC PB*
- Normally select ON PAL TV.
- Select NTSC 4.43 if your TV has the NTSC 4.43 mode when playing back a tape recorded in the NTSC colour system.
When you play back on a Multi System TV, select the best mode while watching the picture on the TV.
- These settings are retained even when the battery pack is removed, as long as the lithium battery is in place.
ETC WORLD TIME*
Bb6epnte daHHyO fHyKcIIO dJIy yCTaHOBKn YacOB IO pa3Hnue BO BpeMeHi.
ETC REC LAMP*
- Bb6epnte OFF, ecn Bbl He xoTnte, yTo6bl 3aqrpaIacb lamnoqka 3aIncs KaMepo/ 6bataen Ha npeJeHne naHei annapaTa.
- OБынов ВьбираNTe ON.
UctaHOBKnToJbKOdIpeXmApLAYER
EDIT
When you shoot a subject with the light source behind the subject or a subject with a light background, use the BACK LIGHT function.
Press BACK LIGHT. The indicator appears in the viewfinder.
Korda Bbl CHnmaTe oBeKeT C nCTOuHnKOM CBeta no3aDi OBeKeTa nn ObeKeT Ha OCBeueHHom fOHe, nCNoJIb3yIe Te yHKnUHO BACK LIGHT.
Haxmnte BACK LIGHT. INHdkatop NOBBAETCBA BIDONCKaTeJe.


[a]


[b]
[a] Subject is too dark because of backlight.
[b] Subject becomes bright with backlight compensation.
After shooting
Be sure to release this adjustment condition by pressing BACK LIGHT again. The indicator disappears. Otherwise, the picture will be too bright under normal lighting condition.
This function is also effective under the following conditions:
- A subject with a light source nearby or a mirror reflecting light.
- A white subject against a white background. Especially when you shoot a person wearing shiny clothes made of silk or synthetic fiber, his or her face tends to become dark if you do not use this function.
To make a fine adjustment
You can adjust the exposure manually.
However, when you adjust the exposure manually, you cannot operate the BACK LIGHT function.
[a]ObbektBnTcCNIWKOMTeMHbIMn3-3a 3aDneNoCDBeTKI.
[b]O6bektCTaHOBNTcA RPKIM C NOMOuBoKOMNEHCAUIN 3aDHe NODCBETKN.
Pocle cbeMkn
He 3a6ydbTe OTKJIOUHTb COCTOHNe 3ToI peRyIINPOBKN IyTEM HaxKaTnB BACK LIGHT cHOba. INdNkATOp nCye3HET. B npOTNBOM Cnyae n3o6paXeHne 6yDet CNIJKOM AkrIM B yCNOBnX HopMaJIbHOOCBeueHnA.
DaHnHaФyHKURABnEeTc3ΦΦeKTHBHO B CNeDyUOxNycNOBnAX:
-Дяобект,pacnoJoxeHHoro pIdom c nCTOUYHKOM CBeta UNI 3epKaIOM, OTPaKaIOUIM CBET.
-BeIbI obBeKT Ha 6eIOM fOHe. OcObeHNO, KOrJa BBy CHImaTe YeJIOBeKa B 6JIeCTaIe OeJKe I3 WEnKa NIN CNHTeTNUeCKoRO BOJOKHa, erO INIe ee JNIO MOKET CTaTB TEMHbIM, ecIn BBy He 6yDeTe NcNoJB3OBaTb daHHyO cyHKUIO.
Дя Bыноленя ToHо рergylnpoBkn
Bb moKeTe OTpeYnIPOBaT bKcNo3nIIO BpyHyIO. Ondako npri pyHoi peYnIPOBKe 3KcNo3nIIN pYHKpIBAck LIGHT pa6oTaTb He 6yDet.
Selecting the fader function
You can fade in or out to give your recording a professional appearance.
When the picture fades in, the sound gradually increases. When the picture fades out, the sound gradually decreases.
BbI6OpФункци BBeDeHnA/ BbIBeDEHnI3O6paXeHnI (FADER)
BbMOxTe PnIaBHO BBOIDt bIIN BbIOIDt bI3O6paXeHne, npIaBaIa BaIe 3aIncn npOceCCNoHaJIbHbI BvI.
EcInnI3O6paXeHHe nocTepeHNO BBOIDTCa, 3ByK nocTepeHNo yBeJIuNbAeTc. EcIn
n306paXeHHe NOCTeEHNO BbIBOdNTcA, 3ByK NOCTeEHNO yMeHBsaETcA.

[a]
STBY
REC
FADER


M.FADER
(mosaic)/(Mo3aNka)


BOUNCE
(FADE IN only)/
(Tolbko FADE IN)


[b]
STBY
REC
MONOTONE
When fading in, the picture gradually changes from black and white to colour.
When fading out, the picture gradually changes from colour to black and white.
Note
When D ZOOM in the menu system is set to ON, you cannot use the BOUNCE function.
MONOTONE
PnBBeDeHn n3o6paXeHne noCTeHNO n3MeHReTcR OT YepHO-6eNoRo DO UBeTHoro. Pn BbBeDeHn n3o6paXeHne noCTeHNO n3MeHReTcR OT UBeTHoro DO UepHO-6eNoRo.
PpmeaHne
Korda yHKuR D ZOOM B CnCTeMe MeHO yCTaHOBJeHa HA ON, BbI He MoKeTe nCNoJIb3OBA Tb yHKuIO BOUNCE.
Using the fader function
When fading in [a]
(1) While the camcorder is in Standby mode, press FADER until the desired fade indicator flashes.
(2) Press START/STOP to start recording. The fade indicator stops flashing.
When fading out [b]
(1) During recording, press FADER until the desired fade indicator flashes.
(2) Press START/STOP to stop recording. The fade indicator stops flashing, and then recording stops.
The fading mode selected last is indicated first of all.
IcnoJIb3OBAHnE cyHKcun BBeDeHnBbIBeHeHn N306paXKeHn
ДлвВБЕДEHИЗOBРAXЕHIN[a]
(1)Korda Bnideokamepa HaxoDntcBpeXnme roTOBHOCTn HaxnMaTe FADER Do Tex nop, noka XeJaembI INHdNkATOp BBedeHnra/ BbIBeHnHa He HaHHT MInaTb.
(2)Haxmnte START/STOP nla hauana 3ainnc. INdikatop BBeDeHnBbBeDeHnnepeCTaET Mrratb.
ДлЯ ВьБеДеня ИЗОБрахЕня [b]
(1)BoBpem3aHmncnaHaxmamTeFADErdoTex np, nokaKeJaembI INdkaTOp BBeDeHn/ BblBeDeHnHe HaHTeMraTb.
(2)HaxmTe START/STOP nOCTaHOBKn 3aIncn. INdNKaTOp BVeDeHn/BbIEDeHn nepeCTaET MraTb N 3aIncb OCTaHaBnBaETc.
Pexm BBeDeHn/ByBBeEHn, KOTopbI 6blBbipan nocJeHnM, yKa3bIBaETc npexdeBCero.
![SONY CCD-TR415E - ДлЯ ВьБеДеня ИЗОБрахЕня [b] - 1](/content/2019/11/48410/images/bd5ea7d12942b7303dade0d7421e49bf4aa506857c5cddde8ea5458253b0dc30.jpg)
When you use the BOUNCE function Set D ZOOM to OFF in the menu system.
Note on the BOUNCE function
When you use the following functions,
"BOUNCE" indicator does not appear.
- Wide mode
- Functions using the PICTURE EFFECT button
- Functions using the PROGRAM AE dial
Korda Bby nCnoB3yeTe yHkcuHOp nepexoDa (BOUNCE)
YctaHOBNTEDZOOMHaOFFBCnCTeMe MeHIO.
Примechаиме OTHOCHTeJIbHOb Функцип nepexoga (BOUNCE)
EcnBbI nCnOJIb3yeTe CNeJyUOJIne FpyHKUIM, INHdkaTOp "BOUNCE" He noBHTcI.
To cancel the fader function Before pressing START/STOP, press FADER until the indicator disappears.
When the date or time indicator and title are displayed The date or time indicator and title do not fade in or fade out.
When the START/STOP MODE switch is set to 5SEC or ANTI GROUND SHOOTING You cannot use the fader function.
Note on the fader function
While using the BOUNCE function, you cannot use the following functions.
- Exposure
-Focus
-Zoom
ДЯ OTMeHbI ΦyHKcUN BBeDEHn/ BbIBeDEHn N3O6paxKeHn
Паран дам START/STOP naxmaite FADER do tex np, noka nHdkaTOp He nCye3HeT.
Korda oTo6paXaOTcHnDnKaTOp daTbI nnn BpeMeHH nHaDnncb
HINdkaTOp DaTbI NnBVPemEn HnAIDNCb He BBOJrTCr I He BbIBoJrTCr Bmecte C n3O6paXeHNEM.
Korda nepekeJIOUaTeIb START/STOP MODE yctaHOBJIeN B noJIOXeHne 5SEC mI ANTI GROUND SHOOTING
BbHe CMOXeTe NcNoJIb3OBAbT ΦyHKcIIO BBeDEHn/BBBeDEHn 13O6paJKeHn.
The NightShot function enables you to shoot a subject in a dark place. You can achieve a satisfactory recording of the ecology of nocturnal animals for observation with this function.
Функцун HOCHOn CbemKn NO3BOJnEeBam ПрON3BOJnTb CbEMky O6BeKTa B TEMHom MecTe. Вы можete ПОЛЧУNTb yDObJIeTBOPITeJIbHyO ЗАпсь КИЗHI NOfHbIX KINBOTHbIX ПИ ИСПОЛБЗОВАнNДAHнО ФунКциN.

NightShot light emitter/ N3JyataTeIb CBeta JIO HOUHOB CbEMKU
(1) While the camcorder is in Standby mode, slide NIGHTSHOT to ON.
(2) Press START/STOP to start recording. and "NIGHTSHOT" indicators flash.
(1)Korda Bnideokamaepa haxoDITcB pejHMe roTOBHOCTn, npeDeBnHbTe NIGHTSHOT B noJIOKeHne ON.
(2)Haxmnte START/STOP nla hauaia 3annci. NaHyT mraTb uNdkaTopbI u "NIGHTSHOT".
To cancel the NightShot function Slide NIGHTSHOT to OFF.
Using the NightShot light When you set N.S.LIGHT to ON in the menu system, the picture will be more clear. NightShot light rays are infrared and are therefore invisible. The maximum limit of NightShot light is about 3m (about 10 feet).
ДЯ OTMeHbI ΦyHKcH NHOH OcBEmKIN PepeDbInbTe NIGHTSHOT B noJIOxHeNc OFF.
NcnoJb3OBaHne JAmnbI HUHOH CbeMKn
KorJa 4yHKuN N.S.LIGHT yctahOBnHeHa Ha ON
B CInCTeMe MeHIO, I3O6paXeHne 6yDet 6oJeE
yETKIM.
CBeTOBbI YeuH HoCHo CBeMKn ABJIOTcR
HnΦpKaPacbHbIMn LyuAMn IIOtOMy ABJIOTcR
HeBuIMMbIMM. MakcMaJIbHbI ppeDeI
OCBeUeEHn B PexmE HoCHoH CbeMKn
COCTaBnAET 3 M.
Notes on the NightShot
- Do not use the NightShot function in bright places (ex. outdoors).
This may cause your camcorder to malfunction.
- The following functions are not operable when using the NightShot function.
-PROGRAM AE -Exposure - When you keep setting NIGHTSHOT to ON in normal recording, picture may be recorded in incorrect/unnatural colour.
- If focusing is difficult with the autofocus mode when using the NightShot function, use manual focus.
Selecting the desired mode
You can record a cinemalike picture (CINEMA) or a 16:9 wide picture to watch on the 16:9 wide-screen TV (16:9 FULL).
Bb6op kelaemoro pexima
BbMOKeTe 3aNNcBtB N3O6paXeHne KaK B KInHOteaTpe (CINEMA) IInI ShnPOKOΦopMaTHoe N3O6paXeHne 16:9ДЯ nPoCMoTpHa Na ShnPOKO3KaPaHHOM TeJeBu3ope 16:9 (16:9 FULL).
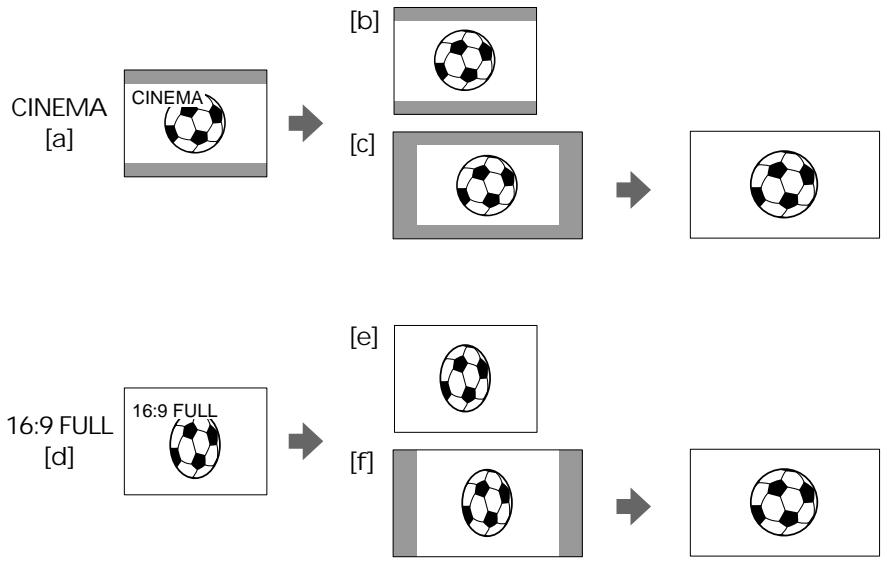
CINEMA
Black bands appear at the top and the bottom of the screen, and the viewfinder [a] and a normal TV screen [b] look wide. You can also watch the picture without black bands on a wide-screen TV [c].
16:9 FULL
The picture in the viewfinder [d] or on a normal TV [e] is horizontally compressed. You can watch the picture of normal images on a wide-screen TV [f].
CINEMA
UeHbIe nOIOcBi IIOABJIYIOCTCBepxu IN CHIN3y 3KpaHa, IN BUNDOINCKaTeNb [a] IN HOpMaJIbHbI 3KpaH TeneBn3Opa BblrIaIaTt UInpOKmN [b]. Bbl TaKKe MoKeTe npocMOTpTe N3o6paXeHne 6e3 UeHbIX nIOc Ha IINpOKo3KpaHHOM TeBn3ope [c].
16:9 FULL
I3o6paXeHne B BVIOUCKaTeNe [d] nIN Ha
OblyHom TeJIeBn3ope [e] cKaTo nO
rOpN3OHTaII.N. Bbl MoXeTe npOCMOTpEb
HOpMaJIbHOe I3o6paXeHne H aIIpOKo3KpaHHOM
TeJIeBn3ope [f].
Using the wide mode function
You can select the wide mode (OFF, CINEMA, 16:9FULL) in the menu system (p. 33).
To cancel wide mode Select OFF in the menu system.
To watch the tape recorded in wide mode
To watch the tape recorded in CINEMA mode, set the screen mode of the wide-screen TV to zoom mode. To watch the tape recorded in 16:9 FULL mode, set it to full mode. For details, refer to the operating instruction of your TV.
Note that the picture recorded in 16:9 FULL mode looks compressed on a normal TV.
Notes on wide mode
- If wide mode is set to 16:9FULL, the SteadyShot function does not work and the indicator flashes (CCD-TR713E only).
- In wide mode, you cannot select the BOUNCE function with FADER.
- When you record in 16:9 FULL mode, the date or time indicator will be widened on the wide-screen TV.
- If you dub a tape, the tape is copied in the same mode as the original recording.
- When recording, you cannot change the mode.
IcnoJb3OBaHneФyHKcHnI shpoKoΦopMaTHORo peXIma
Bb moKeTe Bbl6paTb shpOKoOpMaTHbI peKIM (OFF,CINEMA,16:9FULL) B cncTeMe MeHIO (cTp.33).
Длг OTMeHbI peKIma
Bb6epnte OFF B cncTeMe MeHIO.
Selecting the best mode
You can select one of six PROGRAM AE (Auto Exposure) modes to suit your shooting situation, referring to the following.
Bb6op HanJIyUweO peKIma
BbMOxTe Bb6paTb n3 ueCTn peXIMOB PROGRAM AE (aBtOMaTHueCKo 3KcNo3uN), TOT, KOTOpbI NOxOJNT dJa CbEMKn B BaSei cnTuAun, CBepraCb co CneDyUOuMn ONiCaHnAM.


Spotlight mode
For subjects in spotlight, such as at the theatre or a formal event.
Soft Portrait mode
For zooming in on a still subject in telephoto mode, or for a subject behind an obstacle such as a screen. Creates a soft background for subjects such as people or flowers, and faithfully reproduces skin colour.
Sports Lesson mode
For recording fast-moving subjects such as in tennis or golf games.
Beach & Ski mode
For people or faces in strong light or reflected light, such as at a beach in midsummer or on a ski slope.
Sunset & Moon mode
For recording subjects in dark environments such as sunsets, fireworks, neon signs, or general night views.
Landscape mode
For distant subjects such as mountains or when recording a subject behind an obstacle such as a window or screen.
Pexim npoxektophoro ocbeene
ДязпсиObьктЯпnpoxkeKTophIMOCBEseHnEM,KaK Hanpimep,BTeaTpEИнHaOФицаЛьНOMпиeme.
Turn the PROGRAM AE dial to select the desired PROGRAM AE mode.
Испобьзоваиме Функциng PROGRAM ADE
To turn off PROGRAM AE
Set the PROGRAM AE dial to the position.
Notes on focus setting
- In the Spotlight, Sports lesson and Beach & Ski modes, you cannot take close-ups because the camcorder is set to focus only on subjects in the middle to far distance.
- In the Sunset & Moon and Landscape modes, the camcorder is set to focus only on distant subjects.
Note on PROGRAM AE
Flickering or changes in colour may occur in the following modes if recording is carried out under a discharge tube such as a fluorescent lamp, sodium lamp or mercury lamp. If this happens, turn off PROGRAM AE.
- Soft Portrait mode
- Sports Lesson mode
Note
When using the NightShot function, the PROGRAM AE indicator flashes to indicate that it will not operate with this function.
ДЯ BBKJIIOUeHHNЯФУHKcIN PROGRAM AE
YCTHOBNTe DnCK PROGRAM AE B noJIOXeHne
When to use manual focus
In the following cases you should obtain better results by adjusting the focus manually.
Korda nCNoJIb3OBaTb pyHyIO φokycnpoBky
B cneyuoux cnyaax Bbl mojote noynuhtb lyuwe pe3ynbTaTbI,OTpepynnpoabB φokycnpobky bpyHyIO.

[a]
[b]

[c]

[d]
Insufficient light [a]
- Subjects with little contrast - walls, sky, etc. [b]
- Too much brightness behind the subject [c]
Horizontal stripes [d]
- Subjects through frosted glass
- Subjects beyond nets, etc.
- Bright subject or subject reflecting light
- Shooting a stationary subject when using a tripod
- HeNoctaToUHoe OcBeUeHne [a]
- 06bekTbIC MaJIbIM KOHTpactOM -CTeHbI, He6o n T.D. [b]
CnIshKOM npKm pOH 3a oBekrTOM [c] - Togn3oHTaIbHbIe nIoocbl [d]
Cbemka obbeKToB uepe3 MaTnpoBaHHoe CTeKJIO
-ObbeKtby3a cetKo n T.D.
-Яркий obbeekt uin obbekt,otpaxaiou cin CBET
CbeMka HnOaBnxHOro o6BeKta C nCNoJIb3OBAHHeM TpeHOrn
Focusing manually
When focusing manually, first focus in telephoto before recording, and then reset the shot length.
(1) Set FOCUS to MANUAL. The indicator appears in the viewfinder.
(2) Move the power zoom lever to the "T" side in the optical zoom zone until the lever reaches the end.
(3) Turn the NEAR/FAR dial to achieve a sharp focus.
(4) Set the desired shot length using the power zoom lever.
PyuHaФokycuPoBka
PpHnOfokcnpOBKe CnepBa BbIOnHaJIte
OokcnpOBky B pexmte TneCTO npeJ3aNcblO, a 3aTeM yCTaHOBtpe paCtOAHHe CbeMKn.
(1)Установпес FOCUS Ha MANUAL. Иndикатор NOВДЛЕТСВ ВИДОПСКАТЕ.
(2)Перемаитpepbivar npBvDHoro TpaHcfoKaTopaВ CTOpOHy “T" no ONtUeCKo 3OHe TpaHcfoKaauu Do TEX nOp, NOKa pbVAr He doNDeTdo KOHa.
(3)ПовернITE ДИСК NEAR/FAR ДЯ ПОЛУЧЕНИ
ЧETКО ФОКΥСЮВКИ.
(4)YcTaHOBInTe JKeJaEMoe pacCTOarHHe CbEmKn C NcIOnJIb3OBAHNem pbIyara IpINBOJHOr0 TpaHCpOKaTopa.
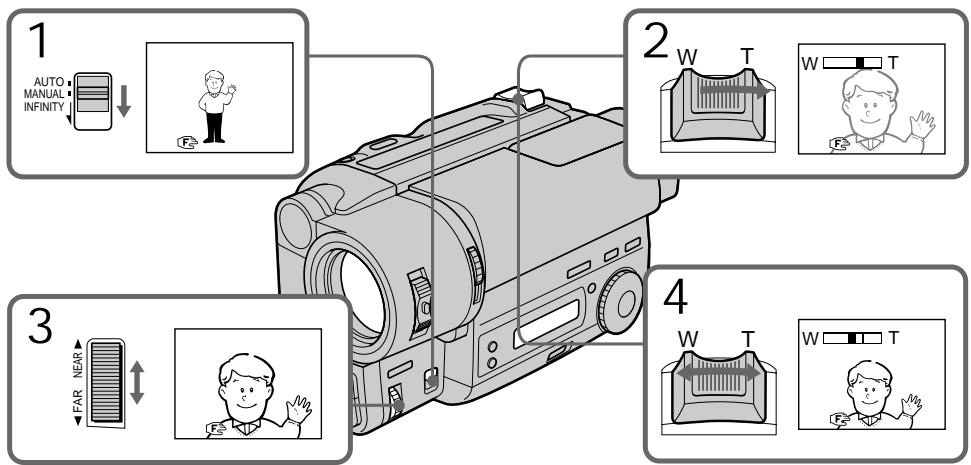
To return to autofocus mode Set FOCUS to AUTO. The indicator in the viewfinder disappears.
Shooting in relatively dark places Shoot at wide-angle after focusing in the telephoto position.
To record a very distant subject Push FOCUS down to INFINITY. The lens focuses on the most distant subject while FOCUS is held down. When it is released, manual focus mode is resumed.
Use this function when shooting through a window or a screen, to focus on a most distant subject.
Note on manual focusing
The following indicators may appear:
when recording a very distant subject.
when the subject is too close to focus on.
ДлЯ BOЗВрашени К ржиму abTomatн ueckо Фокс neuropobkn
YcTaHOBnTe FOCUS Ha AUTO. INHnKaTOp ICHe3HT N3 BnOuCKaTeJIa.
CbeMka B OTHOCHTeJIbHO TEMHOM MECTe
ПюиЗБОДИТЕ CBЕМКУВ NOLOЖЕHIN UПИРOKОуглЯ NOСЛЕ ВВИОЛНЕHINФOKUCИРOBКINВNOLOЖЕHIN TELEФOTO.
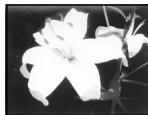
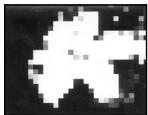
Selecting picture effect
You can digitally process images to obtain special effects like those in films or on the TV.
Bb6op 3ΦΦeKt a 3o6paXeHnA
Pn nomouu u npoboi oba6otkn 1306paXeHn Bbl moXeTe doCTnhy cneUcFekTa, aHaIOnuHoro TeM, KOToPbIe npIMehAOTcB KINHO HA TELeBnDeHN.

[a]

[b]
[c]
[d]

[e]

[f]
PASTEL [a]
The contrast of the picture is emphasized, and the picture looks like an animated cartoon.
NEG. ART [b]
The colour and brightness of the picture is reversed.
SEPIA
The picture is sepia.
B&W
The picture is monochrome (black and white).
SOLARIZE [c]
The light intensity is more clear, and the picture looks like an illustration.
MOSAIC [d]
The picture is mosaic.
SLIM [e]
The picture expands vertically.
STRETCH [f]
The picture expands horizontally.
PASTEL [a]
KoHTpactHocbI N3O6paXeHnY cynlinaeTcN, IN3O6paXeHne BblIaNT, KaK MyIbTnINIkaIaIa.
NEG. ART [b]
Lbetn npkoctb n3o6paXeHna 6dyTHeraTnBhbIMN.
SEPIA
Using picture effect function
(1) Press PICTURE EFFECT.
(2) Turn the control dial to select the desired picture effect mode.
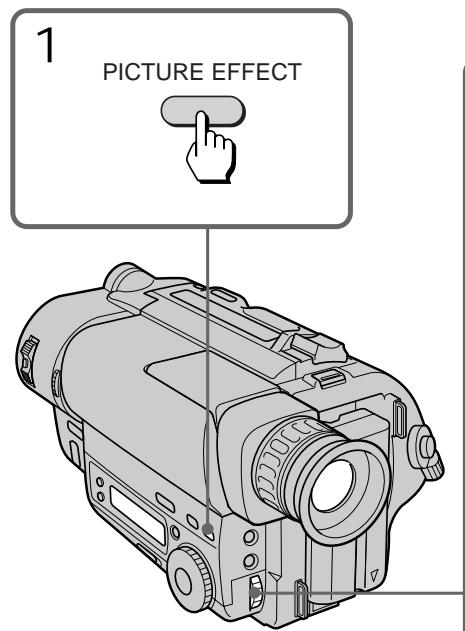
IcnoJb3ObaHneФyHKcHm 3ΦΦeKToB N3O6paXKeHnA
To turn off picture effect
Press PICTURE EFFECT. The indicator in the viewfinder goes out.
Note on the picture effect
When you turn the power off, the camcorder returns automatically to normal mode.
BbIKIIOUeHne 3ΦΦeKta n3o6paXeHnA
HaxmTe PICTURE EFFECT. INdkaTOp 3ΦΦeKta n3o6paJehnЯ nCye3HeT n3 BINOcKaTeIa.
PpimueaHne K 3ΦΦeKtAm 13o6paXeHHa
Korda BbI BbIKNoaTe NITaHne, BnDeOKaMepa aBTOMaTtueckn BO3BpaUaetcK HopMaJIbHOMy peXmMy.
When to adjust the exposure
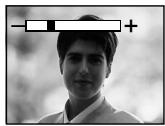
Adjust the exposure manually under the following cases.

[a]
[a]
- The background is too bright (back lighting)
- Insufficient light: most of the picture is dark
[b]
- Bright subject and dark background
To record the darkness faithfully
Adjusting the exposure
(1) Press EXPOSURE.
(2) Turn the control dial to adjust the brightness.
Korda tpe6yeTcpeyInpoBaTb 3Kcno3nciu
Otperynpyte3Kcno3nIOBpyHyIO B cIeNyUx CnyaX.

[b]
[a]
- ΦOH AByIeTcA CnIIuKOM ApyKIM (3a,IHra NOCDBeTKa)
- HeioctatouHoeOCBeueHHe:60JIbuaaYacTb n3o6paXeHn TEMHa
[b]
-Яркий пеДмет Ha TemHOM FOHE
-ДЯхорowe3aПСВТEMHOTe
PerynnpOBka 3KcNo3n
(1) HaxmTe EXPOSURE.
(2)ПовернITEperулpoBOчьнДиСКдпperuIpoBKNЯрКоТN.
1

EXPOSURE

2

To return to automatic exposure mode
Press EXPOSURE again.
Дя BO3BpaTа K peKIMy aBTOMaTHueCKOJ 3KcNo3nCmN
Choba HaxMMte EXPOSURE.
Shooting with the sun behind your subject If the light source is behind your subject, or in the following situations, the subject will be recorded too dark.
- The subject is indoors and there is a window behind the subject.
- Bright light sources are included in the scene.
- When shooting a person wearing white or shiny clothes in front of a white background, the face will be recorded too dark.
Shooting in the dark
We recommend you to use the built-in light (CCD-TR515E/TR713E only) or a video light (not supplied). To get the best colour, you must maintain a sufficient light level.
Note
Exposure cannot be adjusted when using the NightShot function.
When you adjust the exposure manually
- BACK LIGHT does not work.
- If you change the setting of PROGRAM AE mode, the camcorder automatically returns to automatic exposure mode.
CbeMa B ycIobnIx, KOrda coJIHcne haxoIITc3a BaAMM oBekTOM.
EcIn nctouhNk OCBeueHn HaxoDntc y Bac 3a cnHoi nnB CneDyUOxu YCNoBnx,Obekt 6ydet 3ancaH cnIshKOM TemHbIM.
-Obbekt BHTPN NOMEUHNA OKHO HaxoNTc3a Obbektom.
-Источник ярково освеценья подаюВ Кадр.
Korda cHnMaemaeTcyeNoBek,Hocaun 6eIyO nIn 6JeCTaUyO oJexNy,Ha 6eNOM fOHe,LIuO MoKeT CTaTb TEMhblM.
CbeMkaBTeMbIXycIOBnAX
Mby peKOMeHnyem Bam nCnOJIb3OBAtB BCTpoEHnyo IOcBETky (kacaeTcTToIbKO moJeIeCC-TR515E/TR713E) mIn BnIeOfoHapb (He npIinaeTc).ДЯ nOlyeHnHaIyUyIero UcBeTa Bbl DoJnxHbI nOdApKxNtBaTdoCTaTOuHbI ypOBeHb OCBeueHn.
PpmeuHne
BbI He moKTepeRyInpOBaTb KcNo3nUIO npnNCnOB3OBaHm FynKcMn HOHOr CbEmKn.
Korda Bby peryunpyeTe 3Kcno3nIOBpyuHyU
- ΦυκυνΑ BACK LIGHT He paδοτει.
- EcIn Bi n3MeHaeTe yctaHObky peKIma PROGRAM AE, Bndeokamepa abTomatUneCKN BO3BpaaTcR K peKIMy abTomatUneCKO 3KcNo3uIN.
You can select one of eight preset titles and two custom titles. You can also select the language, colour, size and position of titles.
Superimposing titles
(1) Press TITLE to display the title menu.
(2) Turn the control dial to select , then press the dial.
(3) Turn the control dial to select the desired title, then press the dial. The titles are displayed in the language you selected.
(4) Turn the control dial to select the colour, size, or position, then press the dial.
(5) Turn the control dial to select the desired item, then press the dial.
(6) Repeat steps 4 and 5 until the title is arranged as desired.
(7) Press control dial again to complete the setting.
(8) When you want to stop recording the title, press TITLE.
BbMOxTe BbIbupaTb N3BOcBMN
PpeBaPnteJIbHO yCTaHOBJIeHHbIX HaIINCeN I
DByX Co6CTBeHHbIX HaIINCeN. BblMOxTe
TaKKe BbIbupaTb Ra3bIK, CBET, pa3Mep N
NoIOXeHHe HaIINCeN.
HaJoxHe HaIncSei
(1)HaxmTe TITLEДЯ OTo6paXeHnMa MeHOnHaDnCen.
(2)ПовернITE рergyларовныд ддпь Вьбра ,а 3aTeM нахмITE днck.
(3)ПовернITEperулровочьдикдя BBбораHaДпси,аЗатмHaЖмITE perулровочьдиck.HaДпсь OTo6paKaaetcRaBaIbpaHOMBamЯ3bike.
(4)ПовернITEpeулноьчый дикдя BBбopaцета,размера пл похеня,а 3aTeMнжмITEpeулноьчый диck.
(5)ПовернITEperynipOBOчьиДИСКДЯ
БыбopaжelaemoroЗлем enta,a 3aTeM
навKMITEperynipOBOчьиДИСК.
(6)Повторгийтунковы 4и5doTexpop,noka He OTperулируне Надпсь по Своемжеланю.
(7)HaxmTe perynpoBOHyb IuCK CHOBAIJI 3aBepSeHryUcTaHOBKn.
(8)Kornda Bbl 3axOTnte 3aKOHnTB 3aINCb HauNcH, HauKMITE TITLE.
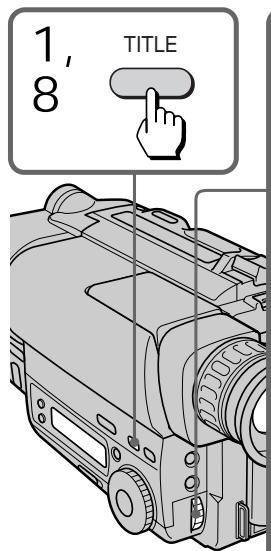
To superimpose the title from beginning
After step 7, press START/STOP to start recording.
To superimpose the title while you are recording
After pressing START/STOP to start recording, start from step 1. In this case, beep is not heard.
To select the language of preset title When you want to select the language, select before step 2. Then select language and return to step 2.
To use the custom title
When you want to use the custom title, select in step 2.
Notes on superimposing a title
- If you have not given any custom title, "---..." appears on the display.
- The FADER function works while the title is displayed, however, the title does not fade.
- If you display the menu or title menu while superimposing a title, the title is not recorded while the menu or title menu is being displayed.
Title colour changes as follows:
WHITE YELLOW VIOLET RED
CYAN GREEN BLUE
Title size changes as follows:
SMALL LARGE
Title position changes as follows:
When you select the title size "SMALL", you can choose 9 positions. When you select the title size "LARGE" you can choose 8 positions.
Notes on the title
- Depending on size or position of the title, both of the date and time or either of them is not displayed.
- If you input 13 characters or more for a LARGE title, the title is automatically reduced into a proper size after the position is set.
ДлгНал IOXeHн NaIINCSOT NaHaJa
PpmeuHnK HaLoXeHnHOaHnCn
- Ecln BbI He daJIH haIINc HNkAKORo Ha3BaHnA,Ha IINcIIe NOBHTC NHNKauNRA
-ФункиFADER BO Bpem OTo6paKeHnHa3BaHn pa60TaET,ODHaKO Ha3BaHne PJIaBHO He BBOINTcN He BbIOINTcR. - EcNn Bbl OTO6pa3nte DnCnIe MeHIO nIM MEHIO HADINCEBO BVPEM HAIOXeHNAHnCN,TO HADINCB He 6yDeT 3aINCbIBaTBcB BO BVPEM OTOBpaxEHnDnCnJIe MEHIO nIM MEHIO HADINCE.
ZBET HaDnncs E N3MeHReTc SJIeDyUoIIM 06pa30M:
WHITE YELLOW VIOLET RED
CYAN GREEN BLUE
Pa3mep HaDnncs E N3MeHReTc SJeDyUoIIM 06pa3OM:
SMALL LARGE
IonoXeHne Hnncn n3mehetcnaJeDyUoImO6pa30m:
Ecni BbBb6npaTe pa3Mep HaIncn "SMALL" To Bb MoXeTe Bb6nPaTb Ondo n3 9 IonoJehn. KorDa Bb Bb6npaTe pa3Mep HaIncn "LARGE", Bb MoXeT Bb6nPaTb n3 8 IonoJehn.
PpmeuHnKHaDnCm
B 3aBnCmOCTN oT pa3Mepa IIN NIOJoxEHHaBaHn DaTa I BpEMr IIN JxU To OdHO n3 HIXe HOTobpaXaeTc.
- Ecni BblBbenn 13 3naKOB nII 60nee dI py pa3mepa HauPncs LARGE, HauPncsb ABTOMaTnueckn yMeHbShaTaCg DOHaJIeKaUeRo pa3mepa Nocne Bbl6bpa NIOJoxEHH.
You can make up to two titles and store them in the camcorder. We recommend to set the POWER switch to PLAYER or eject the cassette before you begin.
Your title can have up to 20 characters.
(1) Press TITLE to display the title menu.
(2) Turn the control dial to select , then press the dial.
(3) Turn the control dial to select the first line (CUSTOM1) or second line (CUSTOM2), then press the dial.
(4) Turn the control dial to select the column of the desired character, then press the dial.
(5) Turn the control dial to select the desired character, then press the dial.
(6) Repeat steps 4 and 5 until you finish the title.
(7) For finishing the tilting work, turn the control dial to select SET, then press the dial.
BbMoKTeCo3daTb DBeHaJnCn COxpaHnTb
NxBnMaHTu BUnDeOkAmePb.MblpeKoMeHdyem
yctaHOBtB bIKNoUaTeNb POWER B
noLoXeHne PLAYER NIN BbToLkHytb Kaccety
nepeHaayanom.
BaawaHaDnncb MoKet NMeTb Do 203haKOB.
To edit a title you have stored In step 3, select CUSTOM1 or CUSTOM2, depending on which title you want to edit, then change the title.
Note You cannot enter over 20 characters title.
If you take 5 minutes or longer to enter characters while a cassette is in the camcorder The power goes off automatically. Characters you have entered remain. Turn STANDBY down once and then up again, then proceed from step 1.
To delete a title
In step 4, turn the control dial to select [] then press the dial. The last character is erased. Repeat this step until all characters are deleted.
BbI He moXeTe BBecTn 6oJIbIe, Yem 20 3HaKOB.
EcIn npoxoHT 5 MmHyT nHn 60Jee npn BBOe 3HaKOB B TO Bpemr, KOrJa KaCCeta HaxoNTcB BVNeOkamepe
Питане ВьклioчNTca abTomatuYeCKn. 3HaKN, KOtOpbIe Bbl BBeJIn, ocTaIOrCn B nAmTn. ПовернITE STANDBY OdnH pa3 Bn3, a 3aTeM CHOBA BBePx n Hauchnte C npHKta 1.
ДЯ OTMeHbI HaJIncn
B nyHKTe 4 noBepHnTe dNcK ynpaBHeHna, YTO6bl Bb6paTb [<], 3aTeM haxmnte dNcK. IocneJdHni 3NaK 6yDet cTePT. NOBToPnTe 3TO DeIcTBne Do Tex nOp, noka He 6yDyt ydaJIeHb BCE 3HaKn.
Before you start recording or during recording, press DATE or TIME. You can record the date or time displayed in the viewfinder with the picture. Press DATE (or TIME), then press TIME (or DATE) to display the date and time together. The clock is already set at the factory to London time for United Kingdom and to Paris time for the other European countries. You can reset the clock in the menu system.
Ipeud Haayolm 3aHcHn HaxMITE DATE nIIN TIME.Bbl MoXeTe 3aHcBbBaTb DaTy uNl BpEmr, OTo6paXaEMbIe B VNDOnckaTeNe,BMeCTe C n3O6paXeHneM.HaxMITE DATE (uNl TIME),a 3aTeM HaxMITE TIME (uNl DATE) dIra OTo6paXeHn DaTb Iu BpEmH OJHOBpEmHo. YacbI yCTaHOBJIeHbHa 3aBODe Ha JIoHDoHcKe BpEmr dIy moJeel CoeINHeHHoro KopoJIeBCTBa NHa napKxCKoe BpEmr dIra moJeel dpyrInx EBpONeIKcx cTpaH. Bbl MOXeTe 3aHOBO yCTaHOBITb YaCbI B CnCTeMe MeHIO.
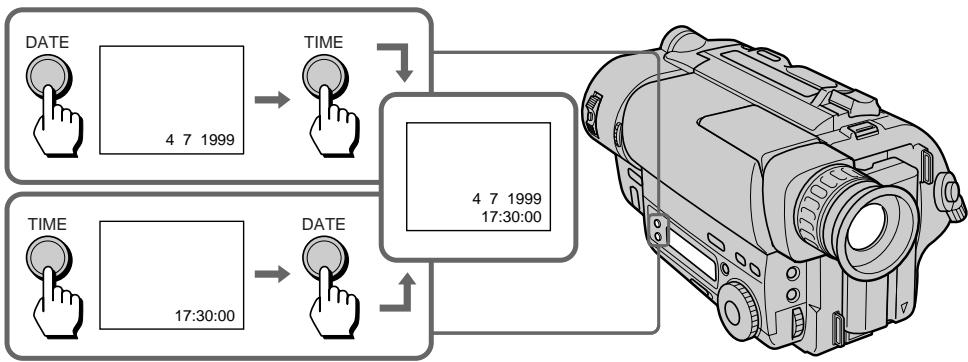
To stop recording with the date and/or time
Press DATE and/or TIME again. The date and/or time indicator disappears. The recording continues.
ДлЯ OCTанова 3aПиСи C DaToN n/nIbBpeMeHem
Haxmnte DATE n/nn Time choba. INnkaTop daTbI n/nn BpeMeHH nCye3HeT. 3aInc b6ydet npoDolKeHa.
Use this feature to check the tape condition before recording, so that you can get the best possible picture (ORC).
(1) While the camcorder is in Standby mode, press MENU to display the menu.
(2) Turn the control dial to select 00 , then press the dial.
(3) Turn the control dial to select ORC TO SET, then press the dial. "START/STOP KEY" flashes.
(4) Press START/STOP.
The camcorder takes about 5-10 seconds to check the tape condition and then returns to Standby mode.
IcnoIb3yIte DaHHyIO fYHKUIO dI npOBepKn COCTOHNJIeHTbI nepeI 3aINCbIO, TaK, YTO6bl Bbl MOrII NOJyUHTb HAnJyUWee no BO3MOXHOCTN N3o6paXKeHne (ORC).
(1)KorДа BnIeOKaMepa 6yIeT HaxOДNTcB bpeXIMe rOTOBHOCrN, haxMnte MENU dIra OTo6paXeHnI MeHIO.
(2)Haxmnte perynnpOboHybI nck IJIy Bbl6opa 00 ,a 3aTeM Haxmnte nck.
(3)ПовернITE peуларовьд ДЯ
Быбopa ORC TO SET, a 3aTeM нажмпт
ДИСК.
"START/STOP KEY" 6удт МгаТь.
(4)Haxmnte START/STOP. Bindeokampe Tpe6yetc okoI 5-10 CEkyHД ДЯ ПОВЕКИ COCTORHЯ JIeHTbI, a 3aTeM OHa BO3BpaaeTcR B pexIM rTOBOHOCtN.
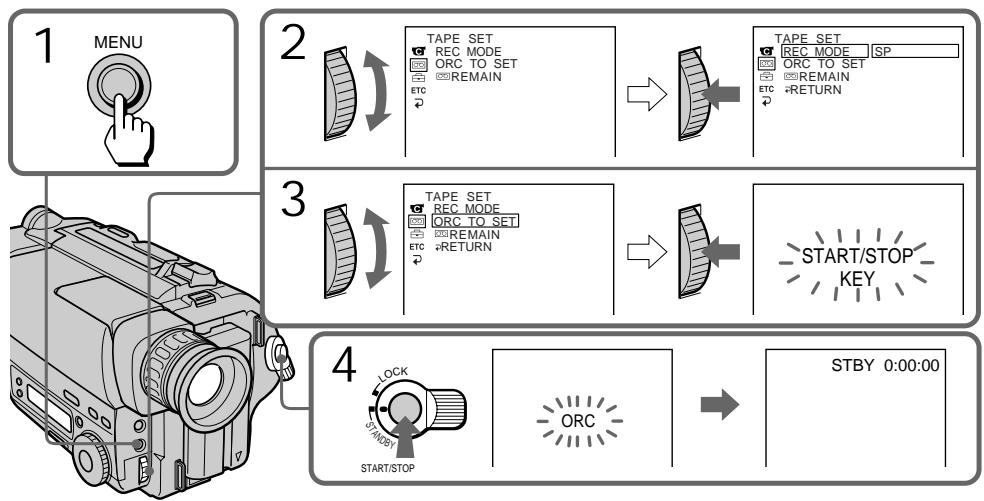
Each time you insert the cassette Perform the above procedures.
Notes on the ORC function
- When you set ORC TO SET, the recording on the tape is erased for about 0.1 second so that the camcorder can check the tape condition. Be careful when you use a recorded tape. The 0.1 second blank is erased if you record from the point where you set ORC TO SET for more than 2 seconds, or if you record over the blank.
- You cannot use this function on a tape with the red mark on the cassette exposed.
- ORC stands for "Optimizing the Recording Condition."
KaKdbi pa3, KOrda Bbl BCTaBnAte KaCCety
BbInonHnIe BbIeOnncaHnyo npOeDpy.
PpmeaHnKΦyHKmN ORC
Korda Bby yctaHaBnBaTe ORC TO SET, 3aNNc bIeHTb CTnpaETcH Ha 0,1 cekyHbI, TaK, YTObbl BInDeOKaMepa CMOrla npOBepntb COCTOHNIE NtHbI. ByDbTe oCTopoXHbI, KORda BBy IcNoJIb3yeTe 3aNcaHHyIO NeHTy. 0,1- cekyHdHbI pO6eINcHe3aET, ecNI BBy NaHnAeTe 3aNcb OT ToUKn, rDe Bbl yCTaHOBn ORC TO SET 6oJee, cem Ha 2 cekyHdbI, INI eCNI pON3BODInTe 3aNNb Nobepx He3aNCAHHo YacTn.
- Bby He MOXeTe IcNoJIb3ObaTb DaHHyIO
ФункцИС ЛЕNTоI, ecnHa KACCete
ВCTaBJIeHa KpacHЯ MeTKa.
- ANГлінckoe cokpaценie ORC 03начael "ONТIMUN3aцяУСЛВОИ 3aПИСN".
-CCD-TR515E/TR713E only
You can use the built-in light to suit your shooting situation. The recommended distance between the subject and camcorder is about 1.5m (5 feet).
While the camcorder is in Standby mode, slide LIGHT to ON. The built-in light turns on.
The built-in light turns on/off by turning on/off STANDBY.

To stop using the built-in light Slide LIGHT to OFF.
To turn on the built-in light automatically
Slide LIGHT to AUTO.
The built-in light automatically turns on and off according to the ambient brightness.
However, if the built-in light turns on for more than about 5 minutes, it automatically turns off. In this case, turn STANDBY down once and turn it up again.
Notes
- The battery pack is quickly discharging while the built-in light is turned on. Slide LIGHT to OFF when not in use.
- When you do not use the camcorder, slide LIGHT to OFF and remove the battery pack to avoid turning on the built-in light accidentally.
- When flickering occurs when you shoot white and bright subjects in AUTO mode, slide LIGHT to ON.
- The built-in light may turn on/off when you use the PROGRAM AE or BACK LIGHT function.
- When inserting or ejecting a cassette, the built-in light may be turned off.
-KacaeTcToJbKO MoJeIeCCD-TR515E/TR713E
Pn Heo6xOJIMOCTn Bbl MOXeTe BO Bpemr CbEMKn IcN0JIb3OBA Tb BCTPOEHNYIOIcBETKy. PeKOMeHyoEpeacTOHne MeKdy BUNeOKaMepOn I ObEKTOM CbEMKn COCTABJAreT OKoJo 1,5 M (5 cyTOB).
KoIa BuaeOkaMepa HaxoDITcB Pexnime roTOBHOCTN, nepeBeNeTe peKeJIOuTaJIb LIGHT (CBet) B noLoXeHne ON (BKn.).
BkIIOyAeTcNoCDBETka.
IIOcBcTka BkJIIOUaTeTCa/BbIKNIOUaTeTCa pIN BKJIIOUeHn/BBKIIIOUeHnФyHKmN FTOBHOCTN (STANDBY).

ДлЯ OCTaHOBKИ NcNoJIb3OBAHnB BCTPoeHHoN NOcCBETKn
IpeeBnHbTe LIGHT B noLoXeHne OFF.
ДЯ ABTOMATNUECKOTO BKJIIOUHENBACTPOEHHO NOCDBETKIN
CdBnHbTe nepeKluoyaTeIb LIGHT B noJIOxHeNHE AUTO.
BCTpoehHna NOcBeTka 6yDet ABTomuYeCKN BkIIOUaTbCn I BbIKIOHaTbCn B 3aBNCMOCNT O CObEueHHOCTN MecTa CbeEMKn.
Ondako ecnn BCTpoehnna NOcBeTka octaetca BKIQUeHNOHa NpOTRAKeHNb OJoe nTmHyT, Oha ABtOMaTHueCKN OTKIOUvaTeCB. TAKoIN CNYaUNOnyCTNepepeKlOuATeNB STANDBY BHN3 n TYT xeNoDHIMNTe EROBb
Приимейсаня
-ПиВКЛЮЧENHо NOДСВЕТKE ИДЕТБИCTРараздда AkKуМУЛТOPHOrO 6LoKa.ПОЗТOMY KOrДа Bы ee He ИСпОЛьЗуTe, yctahabIиBaIte NepeKJIQUyATElB LIGHTВ noLOJOKe He OFF.
HaBpemr, KOrda BbI He noJIb3yeTeCb BnEoKeAmepei, nepeBoJnte pepeKIOuChaTeNb LIGHTBnoIOxKeHne OFF nOToCEnHnIte aKKymyIaTOpHbI bO N6eKAnHe CnyaHnOBr BKIOUChENr NOcCBeTKn.
- Ecni npn cbeMe BaMn 6eBbix nIi npKnx o6bekTOB v pexime AUTO n3o6paXeHne MEPaET, nepeBeJnte nepeKliouaTeIb LIGHT B nOLOKeHne ON.
BCTpoEHnA NOCDBetKa MOXET BKJIUOaTbcra/ BbIKJIOuHaTcB pRn INCNOJIb3OBAHm FyHKUIM PROGRAM AE nIe BACK LIGHT.
BCTPOEHNAIOCDCBETKaMOKET BKNJIOUaTbCRA, KOrDa Bbl BCTabNaeTe NnN 3BNeKaete Kaccety.
CAUTION
Be careful not to touch the lighting section, because the plastic window and surrounding surfaces are hot while the light is on. It remains hot for a while after the light is turned off.
DANGER
Not to be handled by children.
Emits intense heat and light.
Use with caution to reduce the risk of fire or injury to persons.
Do not direct light at persons or materials from less than 1.22 meters (4 feet) during use and until cool.
Slide LIGHT to OFF when not in use.
Replacing the bulb
Use the Sony XB-3D halogen lamp (not supplied). The supplied halogen lamp is not on the market. Purchase the Sony XB-3D halogen lamp.
Remove the power source before replacing the bulb.
(1) While pushing the hole under the built-in light unit using a wire, remove the unit.
(2) Turn the bulb housing counterclockwise and detach from the built-in light unit.
(3) Replace the bulb using a dry cloth.
(4) Attach the bulb housing turning it clockwise, then replace the built-in light unit.
MEPbI INPEIOCTOPOXHOCTN
CTapaTecb He npKacatbcg KOCBteIbHomy 6loky, nockolky KOrdaNoDCBetka BkIIOUeHa, nlaCTmaccOBoE OKoWeuKO I NOBepxHOctb Kopnyca pAOM C Hm HarpeBaIOTc. OOn ocTaIoTc rOpRHMn Ha npotJXeHN eue KaKOrTo BpEmH NoCJIe BvIKLIOUeHN IOCBETKn.
BHIMAHHE!
TeTm He pa3peaetcnoIb3oBaTbcN oDCBETKo.
HHTeHCNBHO N3Jyaaet TepNo CBeT.
Pn3KcNpyataunu Co6JIOdaJe MepbI npedoctopoxhOCTn, YTObI CBecTN K MINHmMy ONaCHOCTb BO3ROPaHn IIN NOJUyeHn TpaBMbl.
Pn nCnoIb3OBAHnn I do octlbAHH naMnbl IOcBETKn He HaprabJnTe CBet Ha JIOJe nn dpyrne obBeKtbc pacctoHnmehee 1,22 M.
Korda noCDBeTka He nCnoB3yeTcna, nepeBoDnTe nepeKlOuChaTeIb LIGHT B noJIoXKeHne OFF.
CmeHaJaAMTbI
IcnoIb3yIte raIoreHnyIO lamny Sony XB-3D (He npinaraetca).BxoJaueB KOMPnEKeTauHo kamepbI raIoreHNOI lamNBI B OTKpbITOn npOdaXe HET,po3ToMpy npino6peTaTe raIoreHnyIaAMny Sony XB-3D.Ipeed 3aMeHOJ lamNBI OTKJIIOUHTe PNTAHne.
- When replacing the bulb, use only the Sony XB-3D halogen lamp (not supplied) to reduce the risk of fire.
- To prevent possible burn hazard, disconnect the power source before replacing and do not touch the bulb until the bulb becomes cool enough to handle (for about 30 minutes or more).
Note
To prevent the bulb from being smudged with finger prints, handle it with a dry cloth, etc. If the bulb is smudged, wipe it completely.
MEPbI INPEdoCTOPOXHOCTN
Buejx ymeHbEHHn OaCHOCTN Bo3rOpAHn HcNoJIb3yIe IJn 3aMeHbI ToIbKO raIoreHny lamny Sony XB-3D (He npilaraetc).
- YTO6bI npeDoTbpaTnTB BO3MOxHbIe OXoRn, nepei CmEHOJ lamNoOJK NTcOeDINHrNe ICTOuHk NITaHnI H Ne pNtPraBaNBaTecb K lamNoOKe NOKa OHa He OCTbIHET Do TEMnepaTypbl, pRn KOtOpOI ee MOxHO 6paTb BpyKn (pRnMepHO uepe3 30 nnn 6oJIee MNHyT).
Приимechanicals
YTo6bI He 3anaUkaTb IaMNoUcy OTneuAtkAmn naJIbueB, 6epntecb 3a Hee cyxOJ TpAnoUckOn nIy cHem-HbUdb IIOdoNBHM. EcIn IaMNoUka 3aPr3HnlaCb, npOTpNTe ee HaunCTO.
- CCD-TR713E only
When the SteadyShot function is working, the camcorder compensates for camera-shake.
You can release the SteadyShot function when you do not need to use the SteadyShot function
The indicator lights up when you release the SteadyShot function. You do not need to use the SteadyShot function when shooting a stationary object with a tripod.
You can select ON or OFF in the menu system (p. 33).
To activate the SteadyShot function again
Set STEADYSHOT to ON in the menu system.
Notes on the SteadyShot function
- The SteadyShot function will not correct excessive camera-shake.
- When you set the STEADYSHOT function on or off in the menu system, the exposure may fluctuate.
- SteadyShot does not operate in 16:9 FULL mode. If you set STEADYSHOT to ON in the menu system, the indicator flashes.
-ToIbKO CCD-TR713E
Korda pa6oTaet yHKnIyCTOuINBOCbEMKn, BnDeOKaMepa OcUeCTBJIeT KOMpeHcaNIO dpOkaHn BnDeOKaMepbl.
BbMOxKTeOTKNIOHTbFyHKUIO yCTOuINBOI CbEMKn, KOrDa Bb He HuxJaTeTcB INCnOLb3OBaHN FyHKUIN yCTOuINBOI CbEMKn.
HdkaTOp BBcBETnC, KOrda Bb OTKIOHTe yHKUIO yCTOuHBo CBemKn. Bam He HxKHO nCNoIb3ObAtb yHKUIO Steady Shot, KOrda Bbl BeTe CbEMky HenoDbHXHorO obBeKa TcpeHOrn.
BbMOKeTe BbIbpaTb ON mnn OFF B cncTeMe MeHIO (CTp. 33).
ДяВКЛЮЕнЯ Функции yctочвOB CBEMK CHOBA
YctaHOBtE STEADYSHOT Ha ON B CnCTeMe MEHIO.
PpimueaHnKfynkunyctOuHBOBcEmKn
Функцу yctOuHBOcBEmKn He OTkoppeKtnpyeT Upe3MepHOrO dpoXaHn BIndeOKaMepbl.
-ПиВКЛIOUeHIN N BbIKJIIOUeHINФункLIMSTEADYSHOTBcnteMe MeHIO 3KcI03nuaMOXkET KJIe6aTbCra.
-Функцус yctочнвов cbebkn He pa6oTaeT bpekime 16:9 FULL. EcnBBy ycTaHObnte STEADYSHOT ha ON BcnteMe MeHIO, INdNKaTop 6byet MraTb.
Editing onto another tape
Mонтajи ДугюЛeHTy
You can create your own video programme by editing with any other 8 mm, HiHi8, miniDV, DV, VHS VHS, SVS S-VHS, VHSVHSC, SVS S-VHSC or Betamax VCR that has video/ audio inputs.
Before editing
Connect the camcorder to the VCR using the supplied A/V connecting cable.
Set the input selector on the VCR to LINE, if available.
Set EDIT to ON in the menu system (p. 35).
Starting editing
(1) Insert a blank tape (or a tape you want to record over) into the VCR, and insert your recorded tape into the camcorder.
(2) Play back the recorded tape on the camcorder until you locate the point just before where you want to start editing, then press I to set the camcorder in playback pause mode.
(3) On the VCR, locate the recording start point and set the VCR in recording pause mode.
(4) First press on the camcorder, and after few seconds press of the VCR to start editing.
To edit more scenes
Repeat steps 2 to 4.
To superimpose the title while you are editing
You can superimpose the title while you are editing. Refer to "Superimposing a title" (p. 52).
To stop editing
Press on both the camcorder and the VCR.
Note on the DISPLAY function
-CCD-TR425E/TR515E/TR713E only
If you have displayed the viewfinder screen indicators on the TV, erase the indicators by pressing DISPLAY on the Remote Commander so that they will not be superimposed on the edited tape.
Note on Fine Synchro Edit
If you connect a video deck that has the Fine Synchro Edit feature to the LANC jack of the camcorder, using a LANC cable (not supplied), the edit will be even more precise.
BbMOKeTe CO3aTb BaUy Co6CTBeHHyu BnDeOpnpamMy NytEm MOThaJa C NOMOuB DpyrOro KBM Tnna 8 MM, HiHi8, Mini DV miniDV, DV,VHS,VHS S-VHS,WHS VHS,C WHS S-VHSC nI Betamax, KOTOpBIMeet BXoDbI ayDIO/BnDeO.
PpeM MoTataXeM
IoioceHnHTe BnDeoKamepy K KBM, nCnoJIb3y npnilaeraMbI coeHNHTeNbHbI Ka6eIb ayDIO/ BuJeO.
YctaHOBtCe cIeKTop BxOJHbIX CnHaIOB Ha KBM BNoIOXeHne LINE,ecIN TaKoe IMeETCA.
YctaHOBtEEDIT HaON BCNCTeMe MeHIO (CTp.35).
HaunTe MoTaxK
(1)BCTaBbTe YnCTyIO JeHTy (nnn JIeHTy, KOTOpyo Bbl XOTnTE nepe3anncatb) B KBM n BCTaBbTe Bauy 3anncahHyIO JeHTy BnDoeokamepy.
(2) Bocnpo3B0DnTe 3aHnCaHHyIO JeHTy BV duOeokamepe Do Tex nop, noka BbI He o6hApyKInTe MeCTO HeMHOro paHbSe ToCKN, OTKya BbXoTnTe HaHaTb MoTtAq, a 3aTeM HAKMITE I Dny yCTaHOBKn BuDeokamepbl Ha peXIM Puy3bI BOCnpo3BeDeHIN.
(3)HaIДиTe ha KBM TOnkU haUaHa 3anCn uYctaHOBInTe KBM Ha peXIM nay3bI 3anCn.
(4)CnepBa HaxMTe HbVAIDeOKaMepe,a 3aTem Ype3 HeckonbKcEkyHd HaxMTe Hb KBM dHa NaHaua MoHTaKa.
Длma MOHTaKa dpyrnx cueH
Nobtopne nyHKtbI co 2 no 4.
Your camcorder is supplied with a lithium battery installed. When the battery becomes weak or dead, the indicator flashes in the viewfinder for about 5 seconds when you set the POWER switch to CAMERA. In this case, replace the battery with a Sony CR2025 lithium battery. Use of any other battery may present a risk of fire or explosion. Discard used batteries according to the manufacturer's instructions.
The lithium battery for the camcorder lasts for about 1 year under normal operation. (The lithium battery that comes installed at the factory may not last 1 year.)
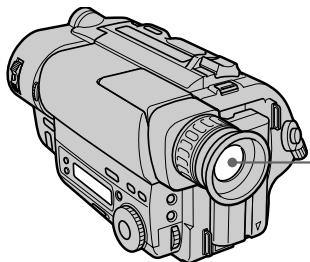
Notes on lithium battery
- Keep the lithium battery out of the reach of children.
Should the battery be swallowed, immediately consult a doctor.
- Wipe the battery with a dry cloth to assure a good contact.
- Do not hold the battery with metallic tweezers, otherwise a short-circuit may occur.
- Note that the lithium battery has a positive (+) and a negative (-) terminals as illustrated. Be sure to install the lithium battery so that terminals on the battery match the terminals on the camcorder.
Baasa Bnndeokamepa cahxkeha yctahOBlenHNOI NTneBOB 6batapeyko. Ecn 6batapeyka cTaHET Cnaob nIIN NOHOCbIO pa3pAHTCn, INDnKAtop 6byet MntaB B BNDONCKATeNE npN6n3nTeNbHO B TeueHne 5 cekynd, KOrda Bbl YCTaHOBtBE bIKIOUATEb POWER B NOLOXHeNE CAMERA.B TAKOM cnyuae 3ameHNTe 6batapeyKa H NtneBvO 6batapeKy Sony CR2025.NcNoJIb3OBaHne KaKoHN6yDb DpyroB 6batapeKn MoKeT npedCTABJbPNC BOCIIaMeHEnHa NlB3pB1Ba. BblPoBCte NcNoJIb3OBaHHyO 6batapeKy B COOTBETCBM C yka3AHmN N3ROTOBtEJa. JIInTEBOB 6batapeKn dN BnDEOKaMEpbXbATAe npN6n3nTbeHo Ha 1 roD npri HopMaJIbHbx ycN0BHX 3KcNpyaTuIN. (JIInTEBOB 6batapeKn, KOtpan 6blNa yCTAHOBNeHa Ha 3aBoDe, MoKeT He XBAITb Ha 1 roD.)
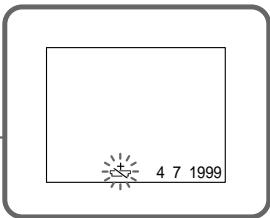
Примочаян К Литnevов Батуейke
-ДерхитЕ Лтуевую 6Бату佩専КУВ He DOCTYNHOM ДЯ DeTeн МсTe.
EcIn 6aTapeKka 6bIJa npOrnoYeHa, HemeJeHNO o6paTntecb K DoKTopy
- Плотрипешаху cyхон Тканью Ддобессеньяхоршero Контakта.
He bepitte 6batapeky MeTaNIMeCKIMU cnIaumu, nii Jx MoKET npOn3OHTN KOPOTKoe 3aMbIKAHne.
- UyTnte, YTO JIITNEBAJ 6aTapeiKa IMeET NOLOXNTeNBbI (+) NOTPUcATEbHbI (-) NOIIOcB, KaK NOKa3aHO Ha PNCYHKe. PnU yCTaHOBKe JIITNeBOI 6aTapei CneDInTe 3a TEM, YTObI NOJIAPHOCTb KOHTAKTOB 6aTapei COOTBETCTBOBANOJIAPHOCTN KOHTAKTOB BUNDeOKaMEpbI.
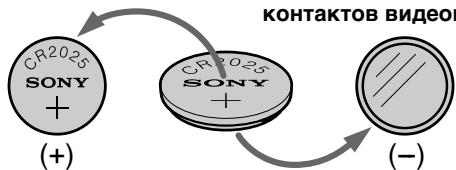
WARNING
The battery may explode if mistreated. Do not recharge, disassemble, or dispose of in fire.
PNEyPPEXDEHNE
PnHHe npabInbHOM 6paueHn 6aTapeKa MoKeT B3OpBaTbc. He nepe3apJaTe, He pa3bnpaTe n He 6pocAte 6aTapeKy B orOhb.
Changing the lithium battery
When replacing the lithium battery, keep the battery pack or other power source attached. Otherwise, you will need to reset the date, time and other items in the menu system retained by the lithium battery.
(1) Open the lid of the lithium battery compartment.
(2)Push the lithium battery down once and pull it out from the holder.
(3) Install the lithium battery with the positive (+) side facing out. Close the lid.
3aMeHa JIITHeBOB 6aTapeeKn
Pn3aMeHe IITneBOB 6aTapeKn, OCTabTe IOIDCOeINHHeHbIM 6aTapeHbI 6JOK INI INpyrO nCTOCHNK nHTAHN. B IpOTNBOM Clyuae Bam noHaDoBHTC CHOBaY cTaHABnBaT b DaTy, Bpemn IN DpyTne yCTaHOBKn B CNCTeMe MeHIO, XpaHmblE NocpeDCTBOM IITneBOB 6aTapeKn.
Resetting the date and time
YcTaHOBKa DaTbI N BpeMeHn
You can reset the date and time in the menu system.
(1) While the camcorder is in Standby mode, press MENU to display the menu.
(2) Turn the control dial to select , then press the dial.
(3) Turn the control dial to select CLOCK SET, then press the dial.
(4) Turn the control dial to adjust the desired year, then press the dial.
(5) Set the month, day, hour and minute by turning the control dial and pressing the dial.
(6) Press MENU to erase the menu display.
BbMOxTe yCTaHOBnTb DaTy N BpEmr B CNTeMe MeHIO.
To correct the date and time setting Repeat the above procedure.
To check the preset date and time Press DATE to display the date indicator. Press TIME to display the time indicator. When you press the same button again, the indicator goes off.
The year changes as follows:

Note on the time indicator
The internal clock of this camcorder operates on a 24-hour cycle.
EcnBbCHOBa HaxMeTe Ty Xe camyIO KHOkKy, INHdkaTOp Ncye3HeT.
Tod n3mehraTc sIeIyIOUIM o6pa30M:

PpIMeuaHne K INDnKaTOpy BpeMeHn
BcTpoEHHbIe YacBi DaHHoB BnDeOKaMepbI pa6OtaIOT B 24-YacOBOM UKKeIe.
Simple setting of clock by time difference
PpocTa yCTaHOBka yacob c NOMOuPo pa3HnUb BO BpeMeHN
You can easily set the clock for a local time by a time difference in the menu system.
(1) While the camcorder is the standby mode, press MENU to display the menu.
(2) Turn the control dial to select ETC, then press the dial.
(3) Turn the control dial to select WORLD TIME, then press the dial.
(4) Turn the control dial to set a time difference, and press the dial. The hour of clock changes in relation to a time difference which you set.
(5) Press MENU to erase the menu display.
Bb moKeTe JIeKo yCTaHOBnTb Yacbl Ha MeCTHoe BpEMC NOMOuBo pa3HnCbI BO BpEmHn B CNTcEMe MeHIO.
(1)KorДа Видевокамера 6удETнхODITСВ ржIMе rOTOBHOCTN HaxMNTe MENU ДЯ OTOбраЖЕнЯ МEHIO.
(2)Повернente рergyларовны дисдды Вьбopa ETC, a 3aTeM нажмerte дис.
(3)ПовернITE ретуларовны ди CBIBOPA WORLD TIME, a 3aTeM haxmnte dNCK.
(4)Повернite рergyларовьдясдяуctановки ра3нць BO Времен,а 3aTeMHaxmITEДСК.Врем на уacaxизмeнITcB COOTBETCTBnC p3nCeBO ВремEN, KOtopuy Bbl yctahOBnN.
(5)HaXMMTe MENU dIa CTnpaHnI DaIcPiJIe MeHIO.
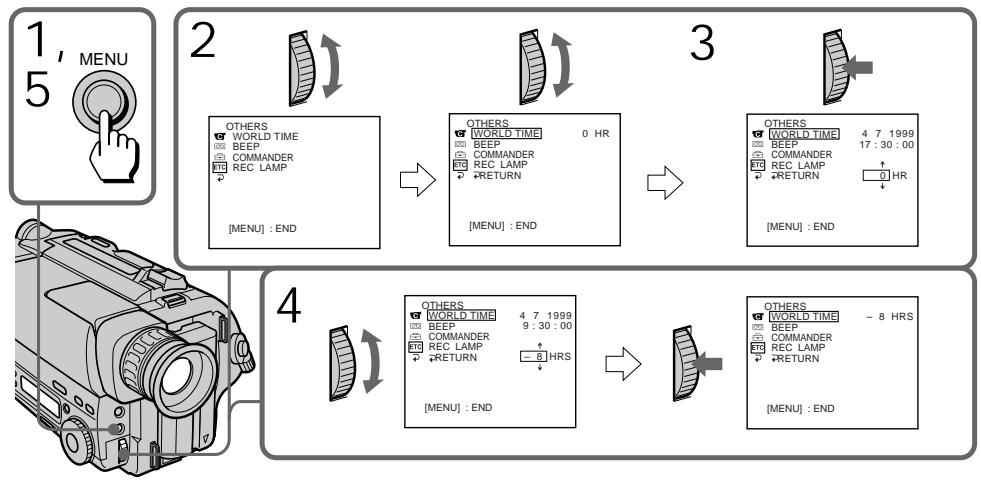
Note on WORLD TIME
If the time is not set, WORLD TIME does not work.
Selecting cassette types
- CCD-TR515E/TR713E only
This Hi8 system is an extension of the standard 8mm system, and was developed to realize higher picture quality.
You can use either Hi8 or standard 8mm video cassette for this camera. When you use a Hi8 video cassette, the recording is made in the Hi8 system. When you use a standard 8mm video cassette, the recording is made in the standard 8mm system. Standard 8mm video cassette is incapable of recording in the Hi8 system.
If you intend to use a standard 8mm video recorder/player to play back a video tape, you are required to use a standard 8mm video cassette for recording.
What is Video 8 XR
"XR" is an abbreviation of "Extended Resolution." The video 8 XR camcorder is new type of 8mm camcorder with a picture quality superior to the conventional video 8 camcorder respectively. You can record and play back pictures more clearly with the "XR" camcorder. A video tape recorded by the "XR" camcorder gives excellent picture quality at maximum when it is played back on the "XR" camcorder. When a video tape recorded by this "XR" camcorder is played back on a conventional 8 camcorder or when a video tape recorded on a conventional 8 camcorder is played back on this "XR" camcorder, the playback picture has the normal quality of an 8 camcorder.
Bb6op Tnna kaccetbl
-ToIbko CCD-TR515E/TR713E
3Ta CNTema Hi YBnEeTc yCOBepueHCTBOBaHNEM CTaHdAPTHOINCTeMbI 8 MM N 6blapa3pa6oTaHa IJN peaIn3aunbYbcOKOrKaueCTBa IN306paXeHNA.
BbMOKTe NcNoIb3OBAbДЯ 3ToI KaMepbl BnDeokaccBeTb Hi8 nIIJ Xe CtAndapThbIe BnDeokaccBeTb Ha 8-MM JIeHTe. B CJIyuae NcNoIb3OBAHnB Ndeokaccet Hi-8 3aIINCb BbInOnHaeTcB CnCTEme Hi-8. B CJIyuae NcNoIb3OBAHnB Ndeokaccet Ha 8-MM JIeHTe 3aINCb BbInOnHaeTcB CnCTEme 8 MM. CTAHandapThNa BnDeokaccTaHa 8-MM JIeHTe He MoKTe OBeCneuHb 3aINCb B CnCTEme Hi-8. EcNl Bb HAmpeBaTeCb NcNoIb3OBAbT b CTAndapThb NbDEOMarHHToΦOH/BnDeonJIeep CnCTEmbI 8 MM, TO CNeJdyET NcNoIb3OBAbT dIa 3aINcN CTaNdAPTHyIO BnDeokaccety Ha 8-MM JIeHTe.
4To Takoe Video 8 XR
XR - 3TO COKpaueHne OT TepMnHa "UnyuueHHoe pa3peueHne". BIndeOkamepa cnCTembl 8 XR 3TO HOBBI TIN 8-MM BVIndeOkamepblc KaueCTBOM n3o6paXeHn IyUwe Yem y OblyHNo KamepbI cnCTembl Video 8. Bbl MoKeTe 3aNNCbIbTaB IN BOCpON3BODHTn3o6paXeHn C 6OJIbWeJ qETKOCBJIO.
The playback mode (SP/LP) and system (Hi8/ standard 8mm ) are selected automatically according to the format in which the tape has been recorded. The quality of the recorded picture in LP mode, however, will not be as good as that in SP mode.
Foreign 8 mm video
Because the TV colour systems differ from country to country, you may not be able to play back foreign pre-recorded tapes. Refer to the list of "Using your camcorder abroad" to check the TV colour system of foreign countries.
Playing back an NTSC-recorded tape
You can play back tapes recorded in the NTSC video system using the SP mode. However, note that the following will occur during playback of an NTSC-recorded tape.
- When playing back a tape on a TV screen, you may not get the original colour depending on the TV. When you play back on a Multi System TV, set NTSC PB to the desired mode in the menu system.
- During playback, a black band appears on the lower part of the viewfinder.
- You cannot play back a tape recorded in NTSC video system with LP mode neither in the viewfinder nor on a TV screen.
- If a tape has portions recorded in PAL and NTSC video systems, the tape counter reading is not correct. This discrepancy is due to the difference between the counting cycle of the two video systems.
- You cannot edit the NTSC-recorded tape onto another VCR.
Korda Bbl ocuyecTBJareTe Bocnpo3BedeHne
PexIM BOCpOIN3BeDENHn (SP/LP) n CnCTema (Hi8/8-MM cTaNdapT) Bb6npaOTcA bTOMaTnueckn B COOTBETCTBm CΦOpMaTOM, B KToTOPom 6blJa 3aNcAnaHa JeHTa. OJHaKO, KaueCTBO N3o6paXeHn, 3aNcaHnHO B pexIme LP, He 6yDet TaKIM xopoUHM, Ka npi 3aNscn B pexIme SP.
HIOCTpaHHbIe 8-MM BnDeOJIeHTbl
Tak KaC CNTeMbI ZBETHORO TEBeBnDEHnO TOTNIAOTCBaBNCIMOCnOTCTpaHb,TO MoXKeT 6bITb BbHe CMOXeTe BOCpOn3BOJNTb INHOCTpaHHbIe PpeBapHTeBHO 3aNNCAHNbIe JeHTb.CMOTPte NpeYeHbB pa3dene "UcnoJIb3OBAHne BaWe BNDeOkamepbl 3a rpaHnE"ДЯ ПOBeRKn CNTeMbI ZBETHORO TELeBnDEHnINHOCTpaHHbIXrocyapCTB.
Bocnpoun3BeJeHne JeHTbI, 3aIncanHoB BCnCTeme NTSC
Bbl MoXeTe BOCpON3BOIDnTb JeHtbl, 3aNcAnHbIe B BuDEoCnCTeMe NTSC c IcNoJIb3OBAHnEM peKIma SP. OJHaKO, npMInTe BO BHMaHHe, YTO CNeJyUoSe MOKeT pOnCXoDnTb BO BPeMra BOCpON3BeDeHnI JIeHTbl, 3aNcAnHnO B CnCTeMe NTSC.
Пи ВOCрпОЗБVEDEнн Ha 3Кране TeLEВИЗОРа Bbl MoXeTe He ПОЛУЧТь NOДИМНье CBeTа B 3aBcIMMOCTn OT TELEВИЗОра.Есл NБ ВOCрпОЗБVOДNTe JIENTHa MyJIbTNCINCTeMHOM TELeBIMOPEyTaHOBITNE NTSC PB ha KeJaAeMbI peKIM B CInCTeMe MeHIO.
Bo BpemBocpon3BeDenHuepeHnnoCa nOBBLAETCRBHNKHeuactn BuOnCKaTeJIa.
- Bbl He MoXeTe BOCnpoN3BOOHTb JeHTbl, 3aIncaHhbIe B CnCTeMe NTSC B pexKmE LP, Hn B VIOINCKaTeNe, Hn Ha 3kpaHe TeNeBUN3opa.
- EcInIJIeHTa IMMeET qAChT, 3aINiCAHHbIe B INBJeOeONCTeMAX PAL n NTSC, NOKa3aHnI CteTtNkA 6bUyt HEnpabINlbHbIe. 3To pAcxOXJDeHHe IpnOCXODIT N3-3a pa3HnUbl MExdY paCteTOM BpeMeHn DByX BInDeoCNTeM.
- Bbl He MoXKeTe IpnO3BOuNTb MOHTax JeHtbl, 3aIncaHHoB BCnCTeMe NTSC, Ha dpyroKBM.
Tips for using the battery pack
CoBeTbI NO IcNoJIb3OBaHnIO 6aTapeiHOro 6Ioka
This section shows you how you can get the most out of your battery pack.
Preparing the battery pack
Always carry additional batteries Have sufficient battery pack power to do 2 to 3 times as much recording as you have planned.
Battery life is shorter in a cold environment
Battery efficiency is decreased, and the battery will be used up more quickly, if you are recording in a cold environment.
To save battery power
Turn STANDBY down when not recording to save battery power.
A smooth transition between scenes can be made even if recording is stopped and started again. While you are positioning the subject, selecting an angle, or looking through the viewfinder lens, the lens moves automatically and the battery is used. The battery is also used when a tape is inserted or removed.
Be sure and remove the battery pack after using the camcorder.
When to replace the battery pack
While you are using your camcorder, the remaining battery indicator decreases gradually as battery power is used up. Remaining time in minutes appears.
When the remaining battery indicator reaches the lowest point, the indicator may appear and start flashing in the viewfinder.
When the indicator changes from slow flashing to rapid flashing while you are recording, set the POWER switch to OFF on the camcorder and replace the battery pack. Leave the tape in the camcorder to obtain a smooth transition between scenes after the battery pack has been replaced.
Korda INDnKaTOp OCTaBweroCzapraDa 6batapeHoro 6noka IOCTnRaet HauHn3wei TOUKN, INDnKaTOp IOBnAeTCN HaunHaet MIRatb B VINOCKaTeNe.
Korda INdkaTop 13MeHReT MeJHeHOe MIRaHne Ha 6bICTpoe MIRaHne BO BpeM 3aIncn, ycTaHOBtte BbIKJIOuOaTeNb POWER B noJIOKeHne OFF Ha BVideOKaMepe n 3aMeHnte 6batapeHbI b6lOk. OcTabbTe IeHTy B BVideOKaMepe dna NOnUyeHn PInaBHoro nepexOda MeJxu CueHmN oocNe 3aMeHbI 6batapeHoro 6loka.
Notes on the rechargeable battery pack
Caution
Never leave the battery pack in temperatures above 60^ (140^) , such as in a car parked in the sun or under direct sunlight.
The battery pack heats up
During charging or recording, the battery pack heats up. This is caused by energy that has been generated and a chemical change that has occurred inside the battery pack. This is not cause for concern and is normal.
Be sure to observe the following
- Keep the battery pack away from fire.
- Keep the battery pack dry.
- Do not open nor try to disassemble the battery pack.
- Do not expose the battery pack to any mechanical shock.
The life of the battery pack
If the battery indicator flashes rapidly just after turning on the camcorder with a fully charged battery pack, the battery pack should be replaced with a new fully charged one.
Charging temperature
You should charge batteries at temperatures from 10^ to 30^ (from 50^ to 86^ ). Lower temperatures require a longer charging time.
Notes on the "InfoLITHIUM" battery pack
What is "InfoLITHIUM"
The "InfoLITHIUM" is a lithium ion battery pack which can exchange data with compatible video equipment about its battery consumption.
When you use this battery pack with video equipment having the ^InfoLITHIUM mark, the video equipment will indicate the remaining battery time in minutes*. However, if you use it with video equipment not having this mark, the remaining battery capacity will not be indicated in minutes.
"InfoLITHIUM" is a trademark of Sony Corporation.
- The indication may not be accurate depending on the condition and environment which the equipment is used under.
How the battery consumption is displayed
The power consumption of the camcorder changes depending on its use, such as how the autofocus is working.
While checking the condition of the camcorder, the "InfoLITHIUM" battery pack measures the battery consumption and calculates the remaining battery power. If the condition changed drastically, the remaining battery indication may suddenly decrease or increase by more than 2 minutes.
Even if 5 to 10 minutes is indicated as the battery remaining time in the viewfinder, the indicator may also flash under some condition.
To obtain more accurate remaining battery indication
Set the camcorder to recording standby mode and point towards a stationary object. Do not move the camcorder for 30 seconds or more.
- If the indication seems incorrect, recharge the battery pack fully (Full charge*). Note that if you have used the battery in a hot or cold environment for long time, or you have repeated charging many times, the battery pack may not be able to show the correct time even after being fully charged.
After you have used the "InfoLITHIUM" battery pack with an equipment not having the InfoLITHIUM mark, make sure that you use up the battery pack on the equipment having the InfoLITHIUM mark and then recharge fully.
Why the remaining battery indication does not match the continuous recording time in the operating instructions The recording time is affected by the environmental temperature and conditions. The recording time becomes very short in a cold environment. The continuous recording time in the operating instructions is measured under the condition of using a fully charged (or normal charged) battery pack in 25^ (77^) . As the environmental temperature and condition are different when you actually use the camcorder, the remaining battery time is not same as the continuous recording time in the operating instructions.
- Full charge: Charging until FULL appears in the display window.
Для получени 60лee точнoi индикачиocтавшeroсаразда батapeй Horo 6loka
YcTaHOBnTe BnDEOKaMepy Ha peKIM
rotOBHocTn 3aPiNCn HabeDnTe ee Ha
HeNoDBNXHbI ObBeKT. He DnRaJTe
BnDEOKaMepy B TeueHne 30 cekHy nIi 6oJee.
- Ecnn INHnDnKaUaJna KaKcTeTcH HnPaBnIbHOH, 3aprAnTe 6bTaapeHbIb 6bOK nOJIHoCTbIO (noHnAra 3apRJaKa'). IMeIte B BVdu, YTO ecnn BBy nCNoJIb3OBAuN bTaapeHbIb 6bOK B JApKnx nnXoNOdHbIX OKpyXaIOuxycNobnBx B TeCeHne dInTeJIbHOro BpeMeHi, nnE ccn BBy nobTopaII 3aprAnky MHO rpa3, 6bTaapeHbIb 6bOK moKET He Noka3bIBaTb npaBnIbHoe BpMa dJaKe nocLe nOJIHOH 3aprAnK.
-ПослncnoIb3OBAHn6bTapeHOro 6Ioka "InfoLITHIUM" c annapaTypoi, KoTopaH He IMeet 3HaKa (InToLITHIUM, O6Ba3aTeJIbHO IcNoIb3yIte 3apRd 6aTapeHOro 6Ioka Do KOHca c annapaTypoi, ImeIoUeJ 3HaK (InToLITHIUM, a 3aTEM NOnHOCTbIO 3apRdnte erO.
Iooemy HndnkaunocTaBweroOc3apra6batapeHoro 6loka He COOTBeTCTByeT BpemeHN HenpepbHBHO3aHNCy, yKa3aHHOM B INHCTpyKcN N O3Kcnnyatau
Ha Bpem 3aIncn BIneT TempepaTypa OkpykaIoUeI cpebl n dpyrne ycNoBn. Bpem 3aIncn CTAHOBNTc OyeHb KOpOTKmB XOIOhBx ycNoBnx. Bpem HnppepbIBHO 3aIncn, yKa3aHHoe B INCTpykUINo 3KcNPyatauun, n3MepAETcB YcNoBnx NCpONb3OBaHHo NJIHOCTbU 3apJKeHHORO 6bTaapeHHoro 6boka (nnn HopMaJIbHO 3apJKeHHORO) npn Tempepatye 25^ (77^) Tak KaK Tempepatya OkpykaIoUe cpebl I dpyrue ycNoBn OTIIuauOTcOT peaJIbHbIX ycNoBn ICNOJIb3OBaHHn BVDeOKaMePbI, TO Bpem OCTabWteOcR 3apJa 6bTaapeHHORO 6boka 6byet He TaKIM, KAc Bpem HnppepbIHOr 3aIncn, yKa3aHHoe B INCTpykUIN no 3KcNllyaTaun.
Moisture condensation
If the camcorder is brought directly from a cold place to a warm place, moisture may condense inside the camcorder, on the surface of the tape, or on the lens. In this condition, the tape may stick to the head drum and be damaged or the unit may not operate correctly. To prevent possible damage under these circumstances, the camcorder is furnished with moisture sensors. Please take the following precautions.
Inside the camcorder
If there is moisture inside the camcorder, the beep sounds and the indicator flashes. If this happens, none of the functions except cassette ejection will work. Open the cassette compartment, turn off the camcorder, and leave it about 1 hour. When indicator flashes at the same time, the cassette is inserted in the camcorder. Eject the cassette, turn off the camcorder, and leave also the cassette about 1 hour. The camcorder can be used again if the indicator does not appear when the power is turned on again.
On the lens
If moisture condenses on the lens, no indicator appears, but the picture becomes dim. Turn off the power and do not use the camcorder for about 1 hour.
How to prevent moisture condensation
When bringing the camcorder from a cold place to a warm place, put the camcorder in a plastic bag and allow it to adapt to room conditions over a period of time.
(1) Be sure to tightly seal the plastic bag containing the camcorder.
(2) Remove the bag when the air temperature inside it has reached the temperature surrounding it (after about 1 hour).
KoHdeHcaZyBlaRy
EcIn BnDeOkamepa npHecHa pRMO n3
XoJOnHO MeCTa B TeJIIOe MeCTO, BlaRa MoKET
CKOHJeHCINPOBaTbCBAHypn BnDeOkamepbl, Ha
NoBepxHOCTN JeHTbI NIM Ha oBeKtNBte. B
TakOM COCTOAHm IHeTA MOKeT npUINHHyTB K
6apabahy roJOBKn i 6yDet NOBpeKdHa, NIM
BnDeOkamepa He CMOKeT paBOTaTb npAunlbHo.
DnI pPeDTbPaSeHHra BO3MOXHOrO
NOBpeKdEHn BAUY TaIKx OBCTOTeNbCTB,
BnDeOkamepa ChAbGeHa DaTHNKAMn Bnarn.
CobJIoJaTe cJeDuOuNe ppeocToPOKHOCTn.
Bnytpn Bndeokamepbl
EcIn BHyTpBnDeOkamepbl npOn3oJna KOHdEHCaunBnA,To 6ydt 3ByuAtb 3ymMePbI CNHaJI, INHdkaTOp 6ydt MmraTb. EcIn 3TO cnylnocb, To HnKaKne yHKuN, KpOme BbITaIKBaHN KACCETb, He 6ydt pa60TaTb. OTKPOITE KACCETHbI OTCek, BbIKLIOHTe BnDEOkamepu I OCTabBe ee np6bn3ntelbHO Ha 1 Yac. EcIn INHdkaTOp 6ydt MNaTbB TO Ke camoe BpEmr, TO 3HaHT KACCtAE BCTABNeHa B NDeOkamepy. BbToIKNHe T KACCETy, BbIKIOHTe BnDeOkamepu I OCTabTe KACCETy np6bn3ntelbHO Ha 1 Yac. BnDeOkamepa CHOBA MoXet 6bITb INcNoB3OBAHa, ECIN INHdkaTOp He 6ydt NO8BnTbc NocJe BKJIOUeHH NITAHN.
Ha obBeKTube
Ecni Bnara cKoHdEHCIOBbIacb Ha 06BeKTNBHe, HNkakne INndaKATOpbI NOBnTbcr He 6yDyt, Ho n3O6paXeHne CtaHET TycKnblM. BbIKJIOHTe NITaHne I He INoJIb3yIte BnDeokamepy np6bn3nteJbHo 1 cac.
Kak npedotbpaTb KOHdEcaunBlaar
EcnBnDeOKamepa npHecHa n3 XoJOnHc MeCTa B TeJIIOE MeCTO,TO NIOXKeTBeNDeOKamepy B NOIN3TNIEHObI NaKET I DaIte eI aADNTnPOBaTbC8 K KOMHaTHbIM YcIOBnAM 3a HeKOTOpBI nepiOD BpEmEH.
(1)ОБЯЗATEЛБно ПЛТНо 3акpoиTe
ПОЛИЗТИЛЕНовьй пakET, coДержаши
Камеру.
(2)BbIbTe KaMepy, KOrJa TeMnepaTpa BO3dYxa BHyTpNi NaKeTa DoCTnHET TeMnepaTypbI OkpykaIoUeRo BO3dYxa (PpN6JIINrTeNbHO Uepe3 1 Yac).
Video head cleaning
To ensure normal recording and clear pictures, clean the video heads. When the indicator and "CLEANING CASSETTE" message appear one after another or playback pictures are "noisy" or hardly visible, the video heads may be dirty.
OuNTka BnDeorolOBOK
ДяобсесенуHopmaьнoiЗаиси ЧтКOrOи3OBpaжену OчишайTe ВиDEorONOBKN. KordaиИнДИкатop 念 I coo6шени“ CLEANING CASSETTE" NORBЛЯHTСОДно 3a ДPyгIM ИЛN BOCПОНБОДМоEи3OBpaжени6удET "3aшУМLEHнБIM"ИЛNТPyДНО ПЮСМATРИВаEMыM, ВиDEorONOBKN Habephoe 3aГРЗнEHbl.

[a]


[b]
[a] Slightly dirty
[b] Very dirty
If this happens, clean the video heads with the Sony V8-25CLD cleaning cassette (not supplied). After checking the picture, if it is still "noisy," repeat the cleaning. (Do not repeat cleaning more than 5 times in one session.)
Caution
Do not use a commercially available wet-type cleaning cassette. It may damage the video heads.
Note
If the Sony V8-25CLD cleaning cassette is not available in your area, consult your nearest Sony dealer.
[a] Cnerka 3aqrna3HeHbI
[b] OueHb 3aqr3HeHbl
Ecn 3TO Cnyntc, ONCTnTe BnDeoRONoBKn c NOMOsbIO ONUCTnTeJbHON KACCtebl Sony V8-25CLD (He npunaraetc).Pocne npOBepKn n306paXeHn, eCIn OHO BCE ue "3aUymEno", NOBtOpTe ONUCTky. (He nobToprNe ONUCTky 60nee 5 pa3 3a Odn npnem.)
PpeodoctepexeHne
He nCnoJIb3yIte NMeIOUyIOcB IpoJaXe OuNCTnTeJbHyIO KAcCETy BnaXHOrO TnPa. OHa MOKeT NOBPeDnTb BInDeoRrOBoKn.
PpimueaHne
EcniOnOuNCTnTeJIbHoN Kaccetbl Sony V8-25CLD HET B npOdaJxe B BaWei oBnaCTn, npOKoHcyIbTnpUyTecb y BaWero 6nJxaiJwero dInIepa Sony.
Removing dust from inside the viewfinder
(1) Remove the screw with a screwdriver (not supplied). Then, while sliding the RELEASE knob, turn the eyecup in the direction of the arrow and pull it out.
(2) Clean the surface with a blower sold on the market.
YdaJIeHne NbIIN 3BnDOnCKaTeJIA
(1) CHIMITE BINT C NOMO乙O TBePTKn (He npnilaraetc). 3aTeM, cDInra pyky RELEASE, nobepHnte okyIapB HnpaBneHn CTpeJIkn N BbITauNTe erO.
(2)OuHCTnTe NOBepXHOCTb C NOMOUIHIO mHeIOUeICBAPOdaKe BO3dyXoYbKN.
1
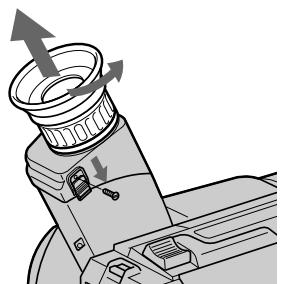
2
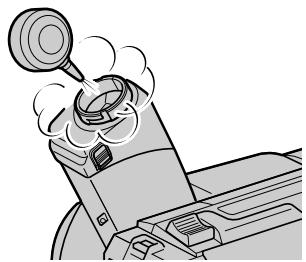
To reattach the eyecup
(1) Align the groove on the eyecup with the mark on the barrel.
(2) Turn the eyecup in the direction of the arrow. Then replace the screw.
Длгпрсоевнень Okулра
(1)CoBmecNTe KaHaBky Ha OKyIaPe c MeTKoI • Ha Kopnyce.
(2)ПовернITE okулар в наразвileнистрелк. 3aTe m yctahOBHT Ha MeCTO BnHT.
1
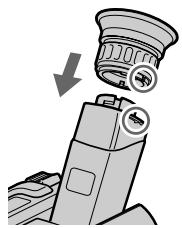
2

Caution
Do not remove any other screws. You may remove only the screw to remove the eyecup.
PpeoocTepeKHeHne
He chImaTe HnKaKnx DpyrNx BnHTOB. BblMOKeTe OTkpyTntb TOnbKO BnHT DnA CHATNOKoynpa.
Precautions
Camcorder operation
- Operate the camcorder on 7.2V (battery pack) or 8.4V (AC power adaptor).
- For DC or AC operation, use the accessories recommended in this manual.
- Should any solid object or liquid get inside the casing, unplug the camcorder and have it checked by a Sony dealer before operating it any further.
- Avoid rough handling or mechanical shock. Be particularly careful of the lens.
- Keep the POWER switch setting to OFF when not using the camcorder.
- Do not wrap up the camcorder and operate it since heat may build up internally.
- Keep the camcorder away from strong magnetic fields or mechanical vibration.
Built-in light
-
CCD-TR515E/TR713E only
-
Do not knock or jolt the built-in light while it is turned on as it may damage the bulb or shorten the life of the bulb.
- Do not leave the built-in light on while it is resting on or against something; it may cause a fire or damage the built-in light.
On handling tapes
Do not insert anything in the small holes on the rear of the cassette. These holes are used to sense the type of tape, thickness of tape and if the recording tab is in or out.
Camcorder care
- When the camcorder is not to be used for a long time, remove the tape. Periodically operate the camcorder both in the CAMERA and PLAYER modes and play back a tape for about 3 minutes.
- Clean the lens with a soft brush to remove dust. If there are fingerprints on it, remove them with a soft cloth.
- Clean the camcorder body with a dry soft cloth, or a soft cloth lightly moistened with a mild detergent solution. Do not use any type of solvent which may damage the finish.
Ppeoctopoxhoctn
3KcnIyataunBndeokamepbI
3Kcnpnyatnpyute BnDoeokamepy ot 7,2B (6aTaapeHnhb 6NoK) mN 8,4B (ceTeBoV aadTep nepem. Toka).
Длг Экплугатулг OT NOCTОУНHorO TOKA ИИп_REремEHORO TOKA ИСПОЛБЗУнTe
Принадлесховс, рекOMЕнДОВАнье В
ДаHHOMpyKOBODCTBE.
Ecnn Kaokn-HnbD TBepdbI ppeMeT nInn XkDOKcTB nponiB KOPNc,TO BbIKNoUHTBe BnDEOkamepy I npOBepbTe ee y Dnlepa Sony nepeJ daNbHeuwe ee kcnnyataune.
I36eBaIte rpybOro oBpaUeHnI mI INmexAHnuecknx yapOB.БyIbTe OcObeHNO octOpOXHblC ObEbKtNBOM.
-ДержITE BblknoaTeJIb POWERB noIokOeHnN OFF, KOrda BnuDeOkamepa He nCOnNoJIb3yeTcH.
He 3aBopaunBaIte BnDeoKamepy n He 3KcPnIyATnpYIte ee B TAKOM COCTOHN, TAK KaK MoXeT IpnON3OITN BHYTpEHHee NOBbIeHne TEMpePATypbl.
-Держнту Вида eckamepy Краьше OT Cильньх МагнHTьх полг Лим мexанческий Вибрази.
BcTpoeHHa IIOcbETKa
- KacaetcTToJbKO MoJeIeCCD-TR515E/TR713E
Korda6IokpoDCBETKNBKIOUeH,He IOOBpeRAteeroYdapaMUNINCBHOITPRACKe,POCKOJIbKY3TOMOKeTIPNBECTN KIOBPEXJDEHNOJaMnblNlNCOKpaueHIOcPokaee Cnyk6bl.
He octabJnTe NOcBcTky BkIIOueHHoN, KOrJa 6NoK NOcCBeTKu K YeMv-JIbO npICHOH NII ONIPAeTc H a YTO-JIbO, TAK KAK 30 MOKeT JPNBECTN K ERO BO3rOpaHIO NII NOBpeXdEHIO.
OTHOCHTeJIbHO O6paueHnC JIeHTaMn
He BCTaBnIte HnUero B MaJIeHbKne OTBepCTnHa 3aJdHcSTOpOHe KAcCtbl. 3TN OTBepCTnIcNOLb3yOTcI JnA ONPeJeLEHnI TnIa JeHTbl, TOJIuINbJI JeHTbl N HAJIuYNI JeNecTka 3aJNTbl 3aIncn.
- Do not let sand get into the camcorder. When you use the camcorder on a sandy beach or in a dusty place, protect it from the sand or dust with some protector such as Sony sports pack. Sand or dust may cause the unit to malfunction, and sometimes this malfunction cannot be repaired.
AC power adaptor
- Unplug the unit from the mains when not in use for a long time. To disconnect the mains lead, pull it out by the plug. Never pull the mains lead itself.
- Do not operate the unit with a damaged cord or if the unit has been dropped or damaged.
- Do not bend the mains lead forcibly, or put a heavy object on it. This will damage the cord and may cause a fire or electrical shock.
- Be sure that nothing metallic comes into contact with the metal parts of the connecting plate. If this happens, a short may occur and the unit may be damaged.
- Always keep the metal contacts clean.
- Do not disassemble the unit.
- Do not apply mechanical shock or drop the unit.
- While the unit is in use, particularly during charging, keep it away from AM receivers and video equipment because it will disturb AM reception and video operation.
- The unit becomes warm while in use. This is normal.
-
Do not place the unit in locations that are:
-
Extremely hot or cold
Dusty or dirty -
Very humid
Vibrating -
He no3B0JIyIe necky nonactb B BVideokamepy. Pn nCNoJb3ObaHn BVideokamepbHa neCyaHom nJaXe IIN B nbJbHOM MeTe npEdoxpaHnTe ee OT necka IN nbJIn, HapnpMep, pN pNOoU 3aunTHoro koxyxa Sony sports. NecOK nblb MoryT Bb3BaT HeNCnPabHocTb aPapaTa, INHOrda TaKaY HeNCnPabHocTb MoXe HE NOJIeXaTb peMOHTy.
Notes on dry batteries
- CCD-TR425E/TR515E/TR713E only
To avoid possible damage from battery leakage or corrosion, observe the following.
- Be sure to insert the batteries in the correct direction.
- Dry batteries are not rechargeable.
- Do not use a combination of new and old batteries.
- Do not use different types of batteries.
- The batteries slowly discharge while not in use.
- Do not use a battery that is leaking.
If battery leakage occurred
- Wipe off the liquid in the Remote Commander carefully before replacing the batteries.
- If you touch the liquid, wash it off with water.
- If the liquid get into your eyes, wash your eyes with a lot of water and then consult a doctor.
If any difficulty should arise, unplug the unit and contact your nearest Sony dealer.
Each country or area has its own electric and TV colour systems. Before using your camcorder abroad, check the following points.
Power sources
You can use your camcorder in any country or area with the supplied AC power adaptor within 100V to 240VAC , 50/60Hz .
Difference in colour systems
This camcorder is a PAL system based camcorder. If you want to view the playback picture on a TV, it must be a PAL system based TV.
Check the following list.
PAL system
Australia, Austria, Belgium, China, Czech Republic, Denmark, Finland, Germany, Great Britain, Holland, Hong Kong, Italy, Kuwait, Malaysia, New Zealand, Norway, Portugal, Singapore, Slovak Republic, Spain, Sweden, Switzerland, Thailand, etc.
PAL-M system
Brazil
PAL-N system
Argentina, Paraguay, Uruguay
NTSC system
Bahama Islands, Bolivia, Canada, Central America, Chile, Colombia, Ecuador, Jamaica, Japan, Korea, Mexico, Peru, Surinam, Taiwan, the Philippines, the U.S.A., Venezuela, etc.
SECAM system
Bulgaria, France, Guyana, Hungary, Iran, Iraq, Monaco, Poland, Russia, Ukraine, etc.
KaKaJa CTpaHa NJIbOlaCTb IMeET CBOI CO6CTBeHHbIe CNCTeMbI 3JIeKTPnueCKoI CETn I CBETHORo TEJebuJeHn.IpeEd IcNoIb3OBAHnEM BaSeB BnDeOkamepbl 3a rpaHnue IpnOBepbTe cneDuOuNe IyHKtbl.
IcToUHnKn NtTaHnA
BbMOxTe NcNoJIb3OBAbT BnIeOKaMepy B IIO60 CTpaHe NIN ObIaCTN C NOMOuBIO npIIaRaemoro CeTeBO r aanTepa nepem. Toka B npeJenax ot 100 B do 240 B nepem. Toka, 50/ 60 T.
Pa3nuaB CnCTeMaX ZBeTHoro TeIeBnDeHn
Даннай видөкамера оCHOваHa Ha CNTeMe PAL.Есл Bы XOTITE npOCMOTpeTb BOCPON3BOДМоE N3O6paЖeHne Ha TeJIeBn3Ope,TO 3TOДОЛжeHбБiTb TeJIeBn3Op, OCHOваHHьHa CNTeMe PAL.
PpOBeBpTe nO cIeMy nepeuHIO.
Cnctema PAL
Abctpann,AbctpnBebn,BeNko6pntanH,FepMaHH,TolnaHn,TOnkOH,DaHn,NcnaHn,NTaHn,Ktai, KybeiT,Mana3n,HOBa3eNaHn, HopBerHn,IopTyraHn,CInrAnyp,CNoBauckaPecnyblnka,TaHaHd,ΦHHnDn,YeSwckaPeCyblnka,WBeuapnr,WBeunT.
Cnctema PAL-M
Бразния
Cnctema PAL-N
Aprentina, Naparbai, Upyrbai
CucTeMa NTSC
Baramckne octpoBa, BoJInBn, BeHecy3na, KaHaJa, Konym6n, Kopa, MeKcnKa, Pepy, CypnAm, CLA, TaBaNb, FInnnPiNbI, LcHTpaJIbHaA MApriKa, YInI, 3KbAdop, RaMaIka, JnoHnI n T.I.
CucTeMa SECAM
Bolrnap, BeHrpna, FaiHa, IpaK, IpaH, MoHaKo, PJIbSha, PoCnHa, YkpanHa, PhaHua n T.D.
If you run into any problem using the camcorder, use the following table to troubleshoot the problem. Should the difficulty persist, disconnect the power source and contact your Sony dealer or local authorized Sony service facility.
Camcorder
Power
| Symptom | Cause and/or Corrective Actions |
| The power is not on. | ·The battery pack is not installed. →Install the battery pack. (p. 8) ·The battery is dead. →Use a charged battery pack. (p. 9) ·The AC power adaptor is not connected to the mains. →Connect the AC power adaptor to the mains. (p. 30) |
| The power goes off. | ·While being operated in CAMERA mode, the camcorder has been in Standby mode for more than 5 minutes. →Turn STANDBY down once and then up again. (p. 14) ·The battery is dead. →Use a charged battery pack. (p. 9) |
| The battery pack is quickly discharged. | ·The camcorder does not operate when using a battery pack that is not an “InfoLITHIUM” battery pack. →Use an “InfoLITHIUM” battery pack. (p. 72) ·The ambient temperature is too low. (p. 70) ·The battery pack has not been charged fully. →Charge the battery pack again. (p. 9) ·The battery pack is completely dead, and cannot be recharged. →Use another battery pack. (p. 71) |
| While charging the battery pack, no indicator appears or the indicator flashes in the display window. | ·The AC power adaptor is disconnected. →Connect it firmly. ·Something is wrong with the battery pack. →Contact your Sony dealer or local authorized Sony service facility. |
Operation
| Symptom | Cause and/or Corrective Actions |
| START/STOP does not operate. | ·The tape is stuck to the drum. →Eject the tape. (p. 13) ·The tape has run out. →Rewind the tape or use a new one. (p. 26) ·The POWER switch is set to PLAYER. →Set it to CAMERA. (p. 14) ·The tab on the cassette is out (red). →Use a new tape or slide the tab. (p. 13) |
(to be continued)
| Symptom | Cause and/or Corrective Actions |
| Recording stops in a few seconds. | ·The START/STOP MODE switch is set to 5SEC or ANTI GROUND SHOOTING ↓. →Set it to ↑. (p. 19) |
| The cassette cannot be removed from the holder. | ·The battery is dead. →Use a charged battery pack or the AC power adaptor. (p. 9, 30) |
| ■and▲indicators flash and no function except for cassette ejection works. | ·Moisture condensation has occurred. →Remove the cassette and leave the camcorder for at least 1 hour. (p. 74) |
| The date or time indicator is flashing. | ·You pressed DATE and TIME together for more than 2 seconds. →The camcorder is not malfunctioning. You may start recording. Flashing will stop soon. ·The lithium battery is weak or dead. →Replace the lithium battery with a new one. (p. 63) |
| The tape does not move when a video control button is pressed. | ·The POWER switch is set to CAMERA or OFF. →Set it to PLAYER. ·The tape has run out. →Rewind the tape or use a new one. (p. 26) |
| The SteadyShot function does not activate. (CCD-TR713E only) | ·STEADYSHOT is set to OFF in the menu system. →Set it to ON. (p. 61) ·The SteadyShot function does not work when the wide mode is set to 16:9 FULL. |
| The autofocusing function does not work. | ·FOCUS is set to MANUAL. →Set it to AUTO. (p. 47) ·Shooting conditions are not suitable for autofocus. →Set FOCUS to MANUAL to focus manually. (p. 47) |
| The fader function does not work. | ·The START/STOP MODE switch is set to 5SEC or ANTI GROUND SHOOTING ↓. →Set it to ↑. (p. 19) ·A title is displayed. →Stop superimposing the title. (p. 52) |
| The date or time indicator disappears. | ·Reset the date and time. (p. 65) |
| Exposure adjustment or the PROGRAM AE function does not work. | ·The NIGHTSHOT switch is set to ON. →Set it to OFF. |
Picture
| Symptom | Cause and/or Corrective Actions |
| The image on the viewfinder screen is not clear. | ·The viewfinder lens is not adjusted. →Adjust the viewfinder lens. (p. 15) |
| A vertical band appears when a subject such as lights or a candle flame is shot against a dark background. | ·The contrast between the subject and background is too high. The camcorder is not malfunctioning. →Change locations. |
| A vertical band appears when shooting a very bright subject. | ·The camcorder is not malfunctioning. |
| The playback picture is not clear. | ·EDIT is set to ON in the menu system. →Set it to OFF. (p. 35) |
| The picture is “noisy”. | ·The video heads may be dirty. →Clean the heads using the Sony V8-25CLD cleaning cassette (not supplied). (p. 75) |
| An unknown picture is displayed in the viewfinder. | ·If 10 minutes elapse after you set the POWER switch to CAMERA without inserting a cassette, the camcorder automatically starts the demonstration or DEMO MODE is set ON in the menu system. →Insert the cassette and the demonstration stops. You can deactivate the demonstration. (p. 34) |
| The five digit code appears. | ·The self-diagnosis function is activated. →Check the code and solve the problem. (p. 87) |
| Picture is recorded in incorrect/ unnatural colour. | ·The NIGHTSHOT switch is set to ON. →Set it to OFF. (p. 40) |
| Picture appears too bright, and the subject does not appear in the viewfinder. | ·The NIGHTSHOT switch is set to ON in a bright place. →Set it to OFF, or use the NightShot function in a dark place. (p. 40) |
| Others | |
| Symptom | Cause and/or Corrective Actions |
| The supplied Remote Commander does not work. (CCD-TR425E/ TR515E/TR713E only) | ·COMMANDER is set to OFF in the menu system. →Set it to ON. (p. 33) ·Something is blocking the infrared rays. →Remove the obstacle. ·The batteries are not inserted with the correct polarity. →Insert the batteries with the correct polarity. (p. 96) ·The batteries are dead. →Insert new ones. (p. 96) |
| The beep sounds for 5 seconds. | ·Moisture condensation has occurred. →Remove the cassette and leave the camcorder for at least 1 hour. (p. 74) ·Some troubles occurred in your camcorder. →Remove the cassette and insert it again, then operate the camcorder. |
| There is dust in the viewfinder. | ·Detach the eyecup and clean the viewfinder lens. (p. 76) |
Пюверka Нецпразвhoeн
Ecni y Bac Bo3Nkna kakaan-1n6o np6Iema npin nCnObn30BaHN BIneokamepbl, BocnoJb3yTecb cnedyuope Ta6nuei dny OtbckaHn uycTaheHn np6Iembl.
Ecni Tpydnoctn BCE eue octaIOTc, TO oTcoeHNHTe nCTOHTHK nITaHIN N o6paTntecb K BaIeMy dIJIepy Sony nn Ha MeCTHO yIOnHOMOeHHOE pEePnPIrTne I0 6cbNyKuBaHIno Sony.
Bvdeokamepa
Питане
| Признak | Причonaи u/nnla DeievCTBna no yctpahenko |
| He bKJIIOUaETcЯ ПИТаHme. | • He yuctaHOBlen 6bATEApeHbI 6bLOK. • YCTaHOBITE 6bATEApeHbI 6bLOK. (cTp. 8) • BatapeHbI 6bLOK nonHOCTbIpo pao3PraDIncI. • IcNoJIb3yIte 3apJXeHbI 6bATapeHbI 6bLOK. (cTp. 9) • CTeBOI aAdIaTep nepeM. Toka He nOJaCoEduHEn K 3JeKTPruCeCKoC sEtN. • PIoDcoEduHIne cTeTeBOI aAdIaTep nepeM. Toka K 3JeKTPruCeCKoC sEtN. (cTp. 30) |
| ПИТаHme bVbKIIIOuAeTcЯ. | • Пri pa6Ote B pexIME CAMERA B VdIeOKaMepa HaxOduINacB V peKIMe rOToBHOCTn 6bIee 5 MInHyT. • PioBepHIne STANDBY BHN3, a 3aTeM cHOba BVEpX. (cTp. 14) • BatapeHbI 6bLOK nonHOCTbIpo pao3PraDIncI. • IcNoJIb3yIte 3apJXeHbI 6bATapeHbI 6bLOK. (cTp. 9) |
| БaTapeHbI 6bLOK 6bICtPo pa3PraJxHaETcЯ. | • BvdeOkamepa He pa6Otaet pri nCIpNoIb3OboHm 6bATapeHbO 6bLOKa, KOToBpI He nBnIeTcI 6bATapeHbIM 6bLOKOM "InfoLITHIUM". • IcNoJIb3yIte 6bATapeHbI 6bLOK "InfoLITHIUM". (cTp. 72) • Tempepatypa OkpykaIOSeI cpeIb CInIbKOM HnI3KAp. (cTp. 70) • BatapeHbI 6bLOK 6bIIN 3apJXeHed He nOJaHocTbI. • ChOBA 3apJXeHbI 6bLOK. (cTp. 9) • BatapeHbI 6bLOK nonHOCTbIpo pao3PraDIncI and He moXeT 6bITb peEzapJXeHed. • IcNoJIb3yIte dpyroB 6bATapeHbI 6bLOK. (cTp. 71) |
| Во ВрЯ 3aRdKn 6bATapeHOrO 6bLOKa NIKAKO INIДNKAtop He noIaBIAETcЯ, Ил ИndiKAtop MIRaet В okOswKe DiSCnIe. | • OTCoeDiHINcIc SceTOB 6aAnTep nepeMeHHoRO TOKA. • PioDcoEduHIne erO NaDeXHo. •ЧTo-TO He nB nopRJaDE y 6bATapeHbO 6bLOKa. • CBaJXitcSeB c BaIIM dIinepom Sony uIIM MeCTbIM уПОЛHOMOueHbIM пeIdpnIaTneM NO TexHNUeCKOMy obScIyXIBaHIno Sony. |
Pa6ota
The camcorder has a self-diagnosis display. This function displays the camcorder's condition with five digits (a combination of a letter and figures) in the viewfinder or in the display window. If this occurs, check the following code chart. The five-digit display informs you of the camcorder's current condition. The last two digits (indicated by ) will differ depending on the state of the camcorder.
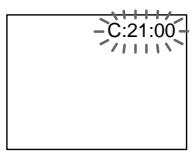
Viewfinder
Self-diagnosis display
C:□□:□□
You can service the camcorder yourself.
E:□□:□□
Contact your Sony dealer or local authorized Sony facility.
| Five-digit display | Cause and/or Corrective Actions |
| C:21☐☐ | ·Moisture condensation has occurred. →Remove the cassette and leave the camcorder for at least 1 hour. (p. 74) |
| C:22☐☐ | ·The video heads are dirty. →Clean the heads using the Sony V8-25CLD cleaning cassette (not supplied). (p. 75) |
| C:23☐☐ | ·You are using a battery pack that is not an “InfoLITHIUM” battery pack. →Use an “InfoLITHIUM” battery pack. (p. 72) |
| C:31☐☐ | ·A serviceable situation not mentioned above has occurred. |
| C:32☐☐ | ·Remove the cassette and insert it again, then operate the camcorder. →Disconnect the mains lead of the AC power adaptor or remove the battery pack. After reconnecting the power source, operate the camcorder. |
| E:61☐☐ | ·A camcorder malfunction which you cannot service has occurred. |
| E:62☐☐ | →Contact your Sony dealer or local authorized Sony service facility and inform them of the five digits. (example: E:61:10) |
If you are unable to resolve the problem, contact your Sony dealer or local authorized Sony service facility.
Bndeokamepa nmeet dncnnne
cAmOuaHrOCTnKn.
Video camera recorder
System
Video recording system
2 rotary heads
Helical scanning FM system
Audio recording system
Rotary heads, FM system
Video signal
PAL colour, CCIR standards
Usable cassette
8mm video format cassette
Hi8 or standard 8
Recording /Playback time (using
90 min. cassette)
SP mode: 1 hour and 30 minutes
LP mode: 3 hours
Fastforward/rewind time (using
90 min. cassette)
Approx. 5 min.
Image device
1/4 inch CCD (Charge Coupled
Device)
CCD-TR415E/TR425E/TR515E:
Approx. 320,000 pixels
(Effective: approx. 290,000 pixels)
CCD-TR713E: Approx.
380,000 pixels
(Effective: approx. 230,000 pixels)
Viewfinder
Electronic viewfinder
(Monochrome)
Lens
Combined power zoom lens
Filter diameter 37mm (1 7/16 in.)
CCD-TR415E: 18× (Optical),
36 × 1 (Digital)
CCD-TR425E/TR515E/TR713E:
18× (Optical), 72×^2 (Digital)
1) 220 × in some areas
2) 330 × in some areas
Focal distance
4.1 - 73.8 mm (3/16 - 8 in.)
When converted to a 35~mm still
camera
CCD-TR415E/TR425E/TR515E:
39.4 - 709 mm (1 9/16 - 28 in.)
CCD-TR713E:
47.2 - 850 mm (1 7/8 - 33 1/2 in.)
Colour temperature
Auto
Minimum illumination*
0.4 lux at F 1.4
0 lux (in NIGHTSHOT mode)**
Illumination range
0.4 lux to 100,000 lux
Recommended illumination
More than 100 lux
- Minimum illumination expresses the light level a camcorder requires to produce a picture.
Visible minimum low light expresses the light level to produce a visible signal.
** Object invisible for the dark can be shot with infrared lighting.
Input and output connectors
Video output
Phono jack, 1 Vp-p, 75 ohms,
unbalanced
Audio output
Monaural, Phone jack,
327mV (at output impedance
47 kilohms) impedance less than 2.2
kilohms
RFU DC OUT
Special minijack, DC 5V
LANC control jack
Stereo mini-minijack ( 2.5mm)
MIC jack
Minijack, 0.388mV low impedance with 2.5 to 3.0VDC , output
impedance 6.8 kilohms ( 3.5mm
Monaural type
General
Power requirements
7.2 V (battery pack)
8.4 V (AC power adaptor)
Average power consumption (when using the battery pack
During camera recording
CCD-TR415E/TR425E/TR515E: 2.5 W
CCD-TR713E:2.6 W
Operating temperature
0^ to 40^ (32^ to 104^)
Storage temperature
-20^ to +60^ (-4^ to +140^)
Dimensions (Approx.)
107× 107× 193mm
(4 1 / 4× 41 / 4× 75 / 8 in.) (w / h / d)
Mass (Approx.)
CCD-TR415E/TR425E/TR515E:
810 g (1 lb 12 oz)
CCD-TR713E: 820g (1 lb 12 oz)
excluding the battery pack, lithium
battery, cassette and shoulder strap
CCD-TR415E/TR425E/TR515E:
950 g (2 lb 1 oz)
CCD-TR713E: 960g (2 lb 1 oz)
including the battery pack NP-F330,
lithium battery CR2025, cassette and shoulder strap
Microphone
Monaural type
Supplied accessories
See page 7.
AC power adaptor
Power requirements
100-240VAC,50/60Hz
Power consumption
23 W
Output voltage
DC OUT: 8.4 V, 1.5 A in operating mode
Operating temperature
0^ to 40^ (32^ to 104^)
Storage temperature
-20^ to +60^ (-4^ to +140^)
Dimensions (Approx.)
125× 39× 62mm (5× 19 / 16×
2 1/2 in.) (w/h/d) excluding
projecting parts
Mass (Approx.)
280 g (9.8 oz)
excluding mains lead
Design and specifications are
subject to change without notice.
Bndeokamepa
CnCTema
CnCTema BnDeo3annc
2BpaaouuuecraTNOBKn
CnCTema YM HAKLOHNOI
MexAHnuecko pa3BepTKI
CnCTemaaydnno3anncn
Bpaaiouiecra roIOBkn, cncTeMa
BundeocnHaJ
LBeToBoi CnHnPal,CTaHndapT CCIR
Ucnonb3yemble kaccetbl
KacceTbI 8-MM BnDoeOpMaTa
Hi 8 nnn 8-MM cTaNdapt
Bpem3a#ncn/
Bocnpoun3BeDeHnA (c
NcnoJb30BaHnem 90 MnH.
kacceTbi)
Pekim SP: 1 yac n 30 MmhyT
Pexim LP: 3 yaca
Bpemy yckopenhno nepemotkn Bnpej/na3aJ
(c nCnoJIb3OBAHnEm 90 MnH.
Kaccetbl)
Pn6m3.5MH
FopMnpoBaTeB n3o6paXeHn
1/4 JIOIMOBBII PI3C (Pn6Op c 3aRIOBOO CB3bO)
CCD-TR415E/TR425E/TR515E:
3NeKeTPOHHb BnDOINCKaTeJIb MoHOxPOMATNueckn
ObekTNB
KOM6HnHnObaHHb O6bEKTNb C npINBOHbIM TpaHc0kaTopOM
Dnana3OHOCBeseHHoCTN
OT0,4do100000JK
PeKomeHdyemarocBueeHHoCTb
Bonee 100nk
MHNImaIbHaA OCEueHHOCTb BBypKaAeT yPoBeHb OCBeueHHOCTn, Tpe6yEmbIi BNDeOKaMepe DnB BOCnpOn3BeDEHn H3O6paXeEHn. BNIMMOE MNHMaJIbHo Hn3KOE OCBEueHHe BbIPaXaET yPoBEHb OCBeueHHOCTn, Heo6xoIMbI DnBocPOn3BeDEHn BNIMIMO CnTHana.
**Cbemky oBekta, HeBnIMORO b TEMHOTe, MOXHO BblONJHrTb C NOMOsbIO INHpKaPaChoro OCBUSEHN.
BxOhbIe N BbIXoHbIe rHe3da
BbIXoD BnIeOcMrhana
ΦOHOHRH3D0,1B NO DOBHOI amPHTyde,75 OM, HECNMMETPNHbY
BbIXoA yAnocnHaHa
MoHooHueckn,foHOHe3do 327MB (npBbXoDHOM NOHOM cOpiOTnbIeHH 60JIe 47 KOM) NOHoe COpiOTNbIeHMe MeHbIe 2,2KOM
RFU DC OUT
CnepaBhoE MmHHTHe3do, noCT. TOK 5 B
Tne3do ynpablenenLANC
CtepeofoHnueckoe MNHN MHNrHe3do (2,5 MM)
THe3oMIC
MnHrHe3do,0,388MBHn3Koe
ponHoe conpoTnBnEne npn2,5- 3,0BnoCT.ToKa,BbXoHoe
ponHoe conpoTnBnEne6,8kOM
( 3,5MM)
MOnofoHnueckm TIn
06uee
Tpe6oBaHnK nntaHnIO
CpeHnI npTe6nEma MOUHOCTb
(PnHcNoJIb3OBAHm6aTapeHOro 6loKa)
Bo Bpme3aapanicBndeokamepoC cnnoIb3ObaHmE
CCD-TR415E/TR425E/TR515E:
2,5 B
CCD-TR713E:2,6BT
Pa6oaytemnepaTypa
OT0°Cdo40°C (oT32°Fdo104°F)
TemnepatypxaheHH
OT-20° C dO +60° C (oT -4° F dO
140^)
Pa3mepbI (npn6bn3.)
107× 107× 193MM (W/B/Γ)
Mcca (npn6n3.)
CCD-TR415E/TR425E/TR515E:810r
CCD-TR713E:820r
Ne BKIOUOa 6aTapeHORo 6Ioka, IITHeBoi 6aTapeKu, KACCetbI IN PJIeHEBO rPemH
CCD-TR415E/TR425E/TR515E:950r
CCD-TR713E:960r
BkIIOUa8bTaapeHb6NOK NP
F330, nIITneBvIo 6aTapeiKy
CR2025, kaccety n pneyebo
pemeHb
MnKpOboh
MOnofoHueckoro Tnna
Ppnilaraemble npHnAdJeXHOCTN
CM. cTp. 7.
Cetebo aadantep
Nepem. Toka
Tpe6oBaHnK nHTaHnIO
100-240BnepeM.Toka,50/60T
Iotppe6JrEma MoHocTb
23BT
BbIXoDHOe HappXeHne
DC OUT:8,4B,1,5A B pa6o7em pejIMe
Pa6o7a TemnepaTpa
OToCdo40oC (oT32°Fdo
104^)
TemnepatypxaheHH
OT-20°Cdo+60°CC(oT-4°Fdo 140^)
Pa3mepbI (npn6bn3.)
125 x 39 x 62 MM (W/B/Γ), HE
BKVJIQUaY BbICTyauIOUne Yactn
Mcca (npn6n3.)
280r,HeBkIIOUaCteBoB uHyp
KoHCTpykUIN TeXnHuCeCKne
XapakTepeNCTIKMOryT6bItb
I3MeHeHbI 6e3 yBeDoMJIeHnA.
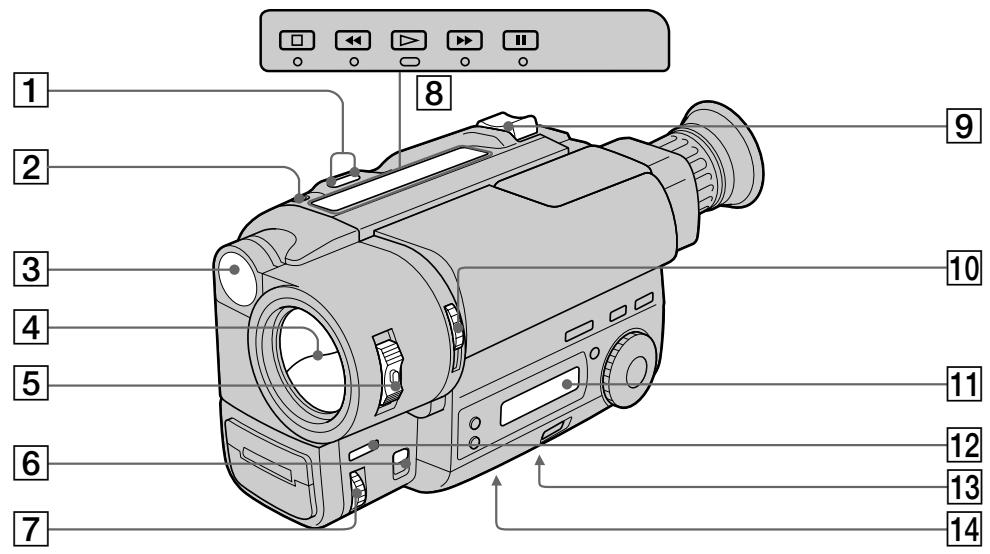
1 EDITSEARCH button (p. 22)
2 LASER LINK button (CCD-TR713E only) (p. 25)
Built-in light (CCD-TR515E/TR713E only) (p. 58)
4 Lens cover
5 POWER switch (p. 14)
6FOCUS switch (p. 47)
NEAR/FAR dial (p. 47)
Video control buttons (p. 26)
STOP (stop)
REW (rewind)
PLAY (playback)
FF (fastforward)
II PAUSE (pause)
9 Power zoom lever (p. 17)
10 NIGHTSHOT switch (p. 40)
11 Display window (p. 98)
12 FADER button (p. 38)
Tripod receptacle (p. 21) Make sure that the length of the tripod screw is less than 6.5mm (9/32 inch) otherwise, you cannot attach the tripod securely and the screw may damage the camcorder.
14 Lithium battery compartment (p. 64)
1 Khonka EDITSEARCH (ctp. 22)
2 KhoNka LASER LINK (TOJbKO CCD-TR713E) (cTp. 25)
3 BcTpoeHnA noDCBETka (ToIbKO CCD-TR515E/TR713E) (ctp. 58)
4 Kpbiika o6beKeTnBa
5 BbIKIOaTeJB POWER (cTp. 14)
6IpekeKJIIOuATEJbFOCUS(cTp.47)
7Диck NEAR/FAR (cTp.47)
8 Khonkn BndeokohtpoJ (ctp. 26)
STOP (ocTaHOBka)
REW (yckopeHHa npeMoTka Ha3a)
PLAY (Bocnpo3BeJeHne)
FF (yckopenhna nepemOTka Bnepei)
II PAUSE (nay3a)
9 Pbyar npBODHOro TpaHcfoKaTopa (ctp. 17)
10 BbIKHouateIb NIGHTSHOT (cTp. 40)
11OkoosKo DncnJeA (ctp.98)
12 KhoNka FADER (cTp. 38)
13ДерхаTeьТpeHOrn (cTp.21) Y6eIntecb,чTOДИнHa BInHa TpeHOrn MEHee 6,5 MM.B npOTuBHom Clyuae Bbl He cMOxKeTe HaJExKHO NOIDCOEINHtB TpeHOry,a BInT MOxKet NOBpeIHT BInDeOKaMepy.
14 OtceK JIHTeBc6aTapeiKn (CTp. 64)
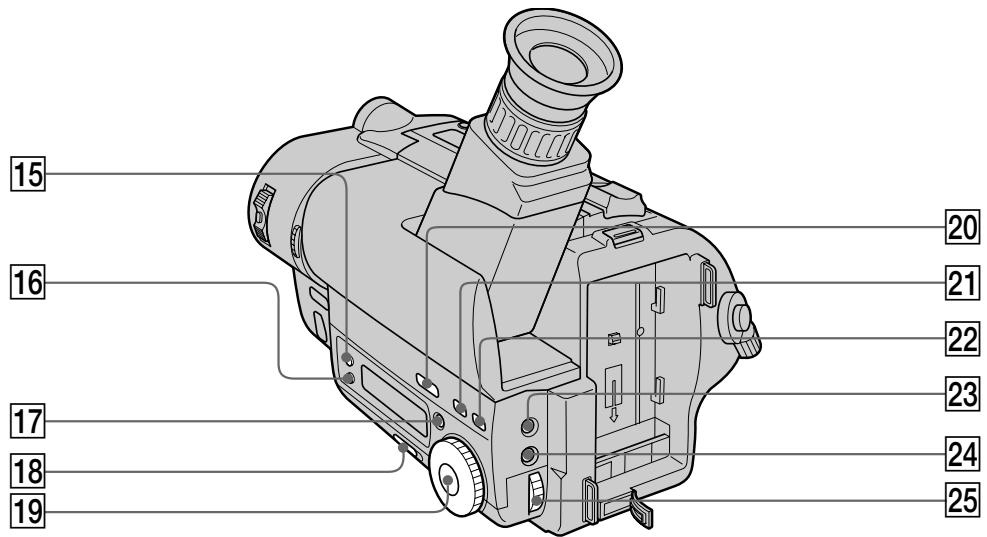
15 DATE button (p. 56)
TIME button (p. 56)
17 COUNTER RESET button (p. 16)
18 START/STOP MODE switch (p. 19)
19 PROGRAM AE dial (p. 45)
20 BACK LIGHT button (p. 36)
[21] TITLE button (p. 52)
22 PICTURE EFFECT button (p. 49)
23 EXPOSURE button (p. 50)
24 MENU button (p. 31)
25 Control dial (p. 31)
15 Khonka DATE (cTp. 56)
16Khonka TIME (ctp. 56)
17 Khonka COUNTER RESET (cTp. 16)
18Переклочателb START/STOP MODE (стр. 19)
19 Khonka PROGRAM AE (ctp. 45)
20 Khonka BACK LIGHT (cTp. 36)
21 Khonka TITLE (cTp. 52)
22 Khonka PICTURE EFFECT (cTp. 49)
23 Khonka EXPOSURE (cTp. 50)
24 Khonka MENU (cTp. 31)
25 PerynipoBOUHbI dNcK (ctp. 31)
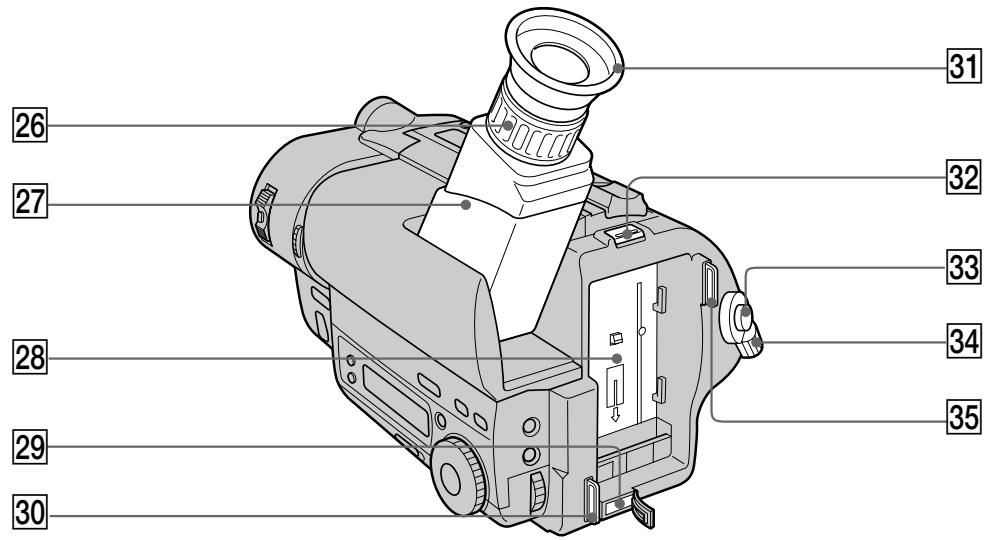
26 Viewfinder lens adjustment ring (p. 15)
Viewfinder (p. 15)
28 Battery mounting surface
29 DC IN jack (p. 9, 30)
30 Hook for shoulder strap (p. 97)
31 Eyecup
32 BATT RELEASE lever (p. 12)
33 START/STOP button (p. 14)
34 STANDBY switch (p. 14)
35 Hook for shoulder strap (p. 97)
26 Kolbpo perynupOBKn oBekTnBa BnDOnCKaTeN (cTp. 15)
27 BnDOnckaTeIb (ctp. 15)
28Поверхинстуcaновкибатаршого 6лoka
29 THe3do DC IN (ctp. 9, 30)
30 Cko6a dIy IneyeBOro pemHr (cTp. 97)
31 Okynap
32 Pbyar BATT RELEASE (cTp. 12)
33 Khonka START/STOP (ctp. 14)
34IpekeKJIIOUaTeJIb STANDBY (cTp.14)
35 Cko6aДЯплесувоpeMH(cTp.97)
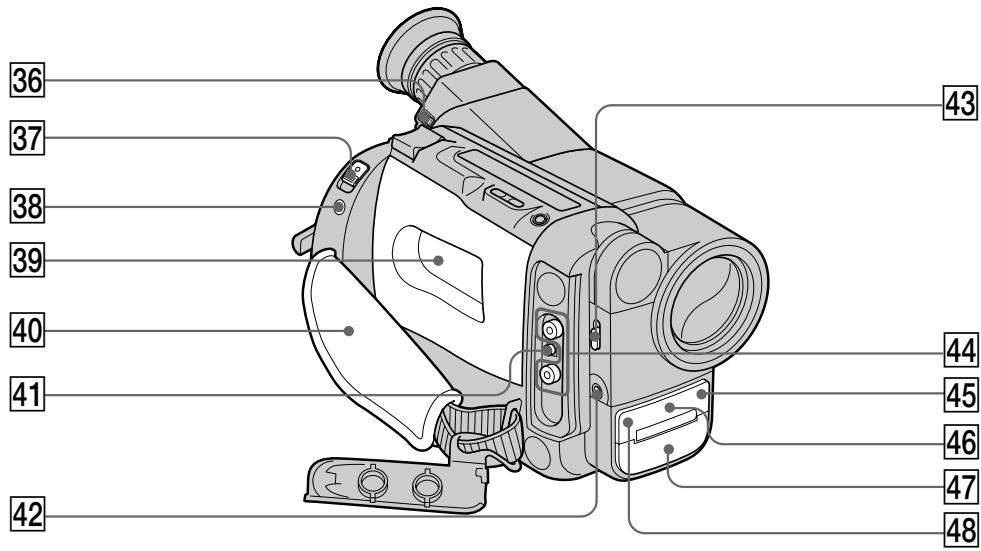
36 Eyecup RELEASE knob (p. 76)
37 EJECT switch (p. 13)
LANC control jack stands for Local Application Control Bus System. The control jack is used for controlling the tape transport of video equipment and peripherals connected to it. This jack has the same function as the jack indicated as CONTROL L or REMOTE.
39 Cassette compartment (p. 13)
40 Grip strap (p. 20)
41 RFU DC OUT (RFU adaptor DC output) jack (p. 25)
42 MIC jack (PLUG IN POWER) Connect an external microphone (not supplied). This jack also accepts a "plug-in-power" microphone.
43 LIGHT switch (CCD-TR515E/TR713E only) (p. 58)
44VIDEO/AUDIO OUT jacks (p.24)
45 Remote sensor (CCD-TR425E/TR515E/ TR713E only) (p.96) Aim the Remote Commander here for remote control.
46 LASER LINK emitter (CCD-TR713E only) (p.25)/NightShot light emitter (p. 40)
47 Microphone
48 Camera recording/battery lamp (p. 14)
36 Pука okулpa RELEASE (cтp. 76)
37 BbIKIOuOaTeIb EJECT (cTp.13)
38 THe3do ynpablenna LANC 03Haetae CNTeMy KaHaJa MeCTHOro ynpablenna. THe3do ynpablenna IcNoIb3yeTcra JnKHTpOra 3a nepemueHneM JeHTbI BnDeoOBOpyDoBaHn I nePnFepmHbIX YCTPOrCTB, PNOKJIuOeHHbIX K HeM.Y DaHnoe THe3do NMeet TaKyo Je cyHKnIO, KaK npa3bEmbl, O63NaUeHHbIe KaK CONTROL L nI rN REMOTE.
39 KaccetHbIOTcEK (ctp.13)
40 Pemehno3axBaT (ctp. 20)
41ГнeЗДо RFU DC OUT (BbIXoI NOcT. TOKa B4-aDAnTepe) (ctp. 25)
42 THe3Do MIC (PLUG IN POWER)
Дя подосянень Всшero МКрфога (ну рплагаeТС). 3TO THe3do ДolyнскаeТ NOdkЛЮчЕне МКрфога "C BыкЛЮчATElenМПТанЯ".
43ПepeKJIIOUaTeIbLIGHT(TOJIbKOу moJeIeI CCD-TR515E/TR713E)(cTp.58)
44ГнэздаVIDEO/AUDIO OUT (cTp.24)
45ДиctaHNoHHbIcHcOp(TOJIbKOcMOdeJIaMnCCD-TR425E/TR515E/TR713E)(cTp.96)ДЯOCUeCTBHeHЯФункиIMDCTaHNoHHOrOуnpaBHeHЯHaCeIbTeПДCUOda.
46 N3nyatelb LASER LINK (ToIbKO C MOJeBIO CCD-TR713E) (ctp.25)/ N3nyatelb CBetaДЯ HOHOM CBEMKU (ctp.40)
47 MmKpoΦoH
48 JAmnoUka 3aIncu Kamepoi/6atapen (ctp.14)
Remote Commander
- CCD-TR425E/TR515E/TR713E only
The buttons that have the same name on the Remote Commander as on the camcorder function identically.
1 Transmitter Point toward the remote sensor to control the camcorder after turning on the camcorder.
2 Video control buttons (p. 26)
3 DISPLAY button (p. 27)
4 START/STOP button (p. 14)
5 Power zoom button (p. 17)
1IpepaTuk HaueJIbTe B HnPaBHeHn DnCTaHcNoHHoro DaTUnKa IynpaBHeHn BnDeOkamepo nocJe ee BKJIOUeHn.
2 Khonkn BndeokohtpoJr (ctp. 26)
3 Khonka DISPLAY (cTp. 27)
4 Khonka START/STOP (ctp. 14)
5 KhoNka npBbOndHoro TpaHcΦokaTopa (ctp. 17)
Notes on the Remote Commander
- Keep the remote sensor away from strong light sources such as direct sunlight or illumination. Otherwise, the remote control may not be effective.
- Be sure that there is no obstacle between the remote sensor on the camcorder and the Remote Commander.
- This camcorder works in commander mode VTR 2. The commander modes (1, 2 and 3) are used to distinguish this camcorder from other Sony VCRs to avoid remote control misoperation. If you use another Sony VCR in commander mode VTR 2, we recommend you change the commander mode or cover the remote sensor of the VCR with black paper.
To prepare the Remote Commander Insert two R6 (size AA) batteries by matching the + and - on the batteries to the diagram inside the battery compartment.
PpIMeuaHnK npJbTy dNCTaHcNoHnHO ynpabJIeHn
-ДерхиTe ДиСТанCUHONHbIДaTчИК ПОДaЛБWe OT CnIbHbIX NCTOCHNKB CBeTA, KaK HApPIMep, npRMBie COJNeHcHbIe JyUH ININ INJIOMHaCnIg. BnpOTuBHom Cnyae DInCTaHcUNHHe ynpaBLeHne MOKeT He DeiCTBOBaTb.
- Y6eIITecb, YTO MEXKdy INCTaHcIOHHbIM DaTCHKOM Ha BnDEOKaMEpe NpyJbTOM INCTaHcIOHHORO ynpabJIeHnI Het IpePnATCTBnI.
-Данная Видаеокамер pa6oTaetВ рекимпуьтадистанционюуравлени VTR2.Рекимы пьыдистанционюуравлени(1,2и3)ирлььчOTсдя OTлчИданноьи ВидаеокамерыОдpyгх KBMФрмБоизбжанeнрравиьног pa6oТыДистанционюуравлени.ЕсиВыпспь3уete друroy KBMФрмБоуррав�и Врьп
pekomendуem Bam ИзmedHTb рекимпуьдистанционюуравлениЛИЗakpbTbДистанционьдатчк KBMчepнбуmarов.
ДлnoiodrotOBn nyIbTa ДиctahUHOHHorO ynpaBNeHn
BCTaBbTe DBe 6aTapeiKn R6 (pa3Mepom AA) corIacy 3nakn + n - Ha 6aTapeiKax co cxemoi BNYtpn 6aTapeiHoro OTCeKa.
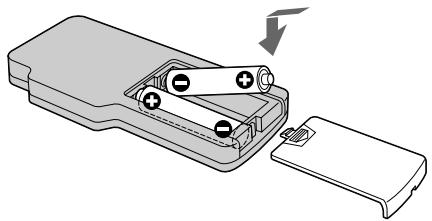
Note on battery life
The batteries for the Remote Commander last about 6 months under normal operation. When the batteries become weak or dead, the Remote Commander does not work.
To avoid damage from possible battery leakage
Remove the batteries when you will not use the Remote Commander for a long time.
PpmeaHne K cpoK cyxkb6b6aTaapeek Baatapeek InnaIyIbTa dNCTaHcUHOHOro ynpabHeHHX bAbaet npnbIm3ntelHo Ha 6 MeCAueB pIn HOpMaJIbHbIX ycNoBmIX kCnPyataun. Korda 6batapeK nCTaHT Cna6bIMn ININONHO pa3pJrTcR,nyIbT dNCTaHcUHOYnpabHeHH He 6ydet pa60TaTb.
Bo n36exkanhe noBpekdeHn 13-3a BO3MOxHOyTeuKn 13 6aTapeek.
YdaJInte 6bataeKn,ecnBbHe 6yTeTe NcNoIb3OBaTb NylbT dNCTaHcUHOHOro ynpaBLeHn B TeueHne dNITeNbHoro BpeMeHN.
Attaching the shoulder strap
Attach the supplied shoulder strap to the hooks for the shoulder strap.
PpKpeHne HnepeHOro pemHa
PpIrkpeIte pIpIaraeMbI pIeYeBOI peMeHb KCKo6am dIy pIeYeBOrO peMHJ.
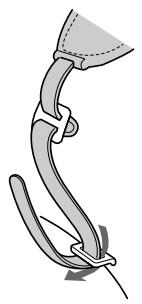
1
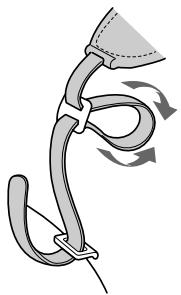
2
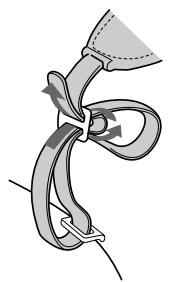
3
To watch the demonstration
You can start the demonstration by setting DEMO MODE in the menu system.
You can also start the demonstration by the following operation.
When NIGHTSHOT is set to ON, you cannot watch the demonstration.
To enter demo mode
(1) Eject the cassette and set the POWER switch to PLAYER.
(2) Turn STANDBY up to STANDBY.
(3) While holding down set the POWER switch to CAMERA.
To exit demo mode
(1) Set the POWER switch to PLAYER.
(2) Turn STANDBY up to STANDBY.
(3) While holding down set the POWER switch to CAMERA.
Ecnn HnDnkaun NIGHTSHOT yctaHOBneHa B noIooKeHne ON, Bbl He cMOxete Ha6JIIOdaTb demOHCTpaUIO.
Operation indicators
Viewfinder/Budonckatelb
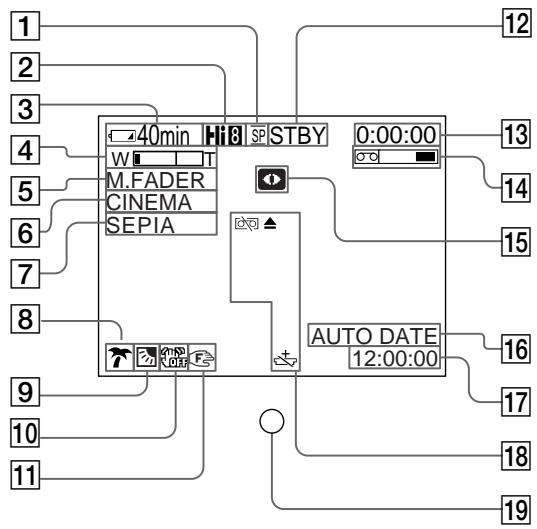
Pa60yne HndnkaTopbI
Display window/OKoosko DnCnneer
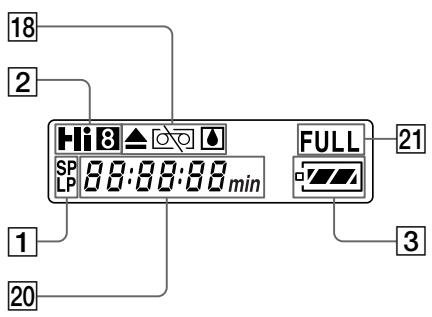
1 Recording mode indicator (p. 33)
2 Playing back or recording in Hi8 format (CCD-TR515E/TR713E only) (p. 68)
Remaining battery time indicator

4 Exposure indicator (p. 50)/Zoom indicator (p. 17)
5 FADER indicator (p. 38)
6 Wide mode indicator (p. 42)
7 PICTURE EFFECT indicator (p. 49)
8 PROGRAM AE indicator (p. 45)
9Backlight indicator (p. 36)
10 SteadyShot off indicator (CCD-TR713E only) (p. 61)
11 Manual focusing (p. 47)
1 INHdkaTop pa6oeryo pexnma (ctp. 33)
2 Bocpnon3BeDenHe Nm 3aHncb B cOpMaTe Hi8 (ToIbko CCD-TR515E/TR713E) (ctp. 68)
3 INdikatop octabweroocB BpeMeHn 3apra6baTapeHoro 6Ioka

4 INHdNkATOp 3KcNo3mU (cTp.50)/ INHdNkATOp TpaHcfoKaTopa(cTp.17)
5 INHdNKatop FADER (cTp. 38)
6ИнданkaTOp shnpokofopMaTHoro peKIMa (cTp.42)
7 INHdNkaTop PICTURE EFFECT (cTp. 49)
8 INdikatop PROGRAM AE (ctp. 45)
9 INHdNkATOp 3aDHei NOCDBETKn (ctp. 36)
10 INHdNKatOp yCTOuYNBoCbEMKn (TOJIbKO CCD-TR713E) (cTp. 61)
11 PyuHaa fokycnpoBka (cTp. 47)
12 Standby/Recording mode indicator (p. 14) / Video control mode indicator (p. 26)
13 Tape counter (p. 16)/Self-diagnosis functions indicator (p. 87)/5SEC mode indicator (p. 19)
14 Remaining tape indicator

15 NIGHTSHOT indicator (p. 40)
16 AUTO DATE indicator (p. 14)/Date indicator (p. 56)
Time indicator (p. 56)
Warning indicators (p. 100)
19 Recording lamp (p. 14)
20 Date or time indicator (p. 56)/
Tape counter (p. 16)/
Self-diagnosis functions indicator
(p. 87)/Remaining battery time indicator
21 FULL charge indicator (p. 9)
12Индикатoppeхимаrotobhocnpeхимa 3anncn(ctp.14)/peximabuDeOKOHtpoJIa (ctp.26)
13 HdNKaTOP cHTNKA JeHTbI (ctp. 16)/HdNKaTOP fYHKcnn CamoHaarHOCTNKn (ctp.87)/HdNKaTOP pexnma 5SEC (ctp. 19)
14 INdkaTop octaWeeJeHTbI

15ИнданкатOP NIGHTSHOT (ctp. 40)
16 INHdNKaTop AUTO DATE (ctp. 14)/ INHdNKaTop daTbI (ctp. 56)
17Индикатор Врemeи (cTp.56)
18Ппсдурждаюше Инданкоторы (ctp. 100)
19 JIamnocha 3aunnc (cTp. 14)
20 HdNkATOp DaTbI Nn BpeMeHn (cTp. 56)/ HdNkATOp CteTnKa JENTbI (cTp. 16)/ HdNkATOp fYHKcun CamOduaHocTnKn (cTp. 88)/HdNkATOp BpeMeHn OCTabUeOc3 3apJa 6aTaapeHoro 6loka
21Индикадут зардки FULL (ctp.9)
If indicators flash in the viewfinder or in the display window, check the following:
you can hear the beep sound when the BEEP is set to ON.
EcInnDnKAtOpbl MrraHOT nInn
npdeynpeXdaOnuie coo6ueHn noBnHOTcHa
3kpane KKD nIN BnuDoNcKaTeNe, To
npOBepbTe cneDuOuee:
BbMOKeTe CbIbTaB 3yMMepHbI 3ByKOBoCnHaN, KOrdaФyHKcIIBA BEEP yCTaHOBJIeHa Ha ON B CnCTeMe MeHIO.
| 1 | 2 | 3 | 4 | 5 | 6 | 7 | 8 | 9 | 10 |
1 The battery is weak or dead. Slow flashing: The battery is weak. Fast flashing: The battery is dead.
The tape is near the end. The flashing is slow.
The tape has run out. The flashing becomes rapid.
4 No tape has been inserted.
5 The tab on the tape is out (red).
6 Moisture condensation has occurred.
The video heads may be contaminated.
Some other trouble has occurred. Use the self-diagnosis function (p. 87). If the display does not disappear, contact your Sony dealer or local authorized Sony service facility.
The lithium battery is weak or is not installed.
1 BaTapeHbI 6JOK cJa6bI HnIN NOJIHOCTbIO pa3PAXKeHHbIMeJIeHHoe MIRaHHe: BaTapeHbI 6JOK cJa6bI. BbICrPoE MIRaHHe: BaTapeHbI 6JOK noJIHOCTbIO pa3PAXKeHHbI.
2 JeHTa np6JInxkaETcK KOHcy. MeJneHHoe MIRaHne.
3 JeHTa 3aKOHUInacb. MiraHHe cTaHOBNTc6bICTpbIM.
4 JeHTa He BCTAbJeHa.
5 Ha kaccete HET IeneCTka (Kpacna Metka).
6 PpOn3oUla KOHdeHcaua BlaH.
7 BndeorolOBKn BO3MOxHO 3aRpa3HeHbI.
8 NMeetcKaKaH-Jn6oDpyraNpObIema. UcNoIb3yIteФyHKUIO caMoJNaHOCHTKc (ctp.88). EcIn DInCnJIe He INCHe3aET,TO CBxIKTeCb C BaAMm DInepOM Sony INIM MeCTHBIM yNOJHMOChEHbIM ppeINPnTtEM.
9Литnevваябатеякacla6аину yctahOBNeHa.
Index
A, B
Adjusting viewfinder 15
ANTI GROUND SHOOTING 19
Auto focus. 47
Backlight 36
Beep 16
C, D
Camera recording 14
Car battery 29
Charging battery 9
Cleaning video heads. 75
Clock set 65
Connection 24
COUNTER RESET 16
DATE/TIME 56
DEMO MODE 34,97
Digital zoom 18
DISPLAY 27
E
EDIT 35
Editing 62
EDITSEARCH 22
Exposure 50
F, G, H, I, J, K
FADER 37
L
LANC 94
LASER LINK 25
Lithium battery 63
M, N
Mains 30
Manual focus 46
Menu system 31
MIC (microphone) jack 94
NIGHTSHOT 40
O, P, Q
ORC 57
PICTURE EFFECT 48
Playback pause 28
Power sources 29
Power zoom. 17
PROGRAM AE 44
R
Rec review 22
Recording mode 33
Remote control jack (LANC) 94
Rewind 26
S
Self-diagnosis display 87
Shoulder strap 97
Skip scan 28
Standby mode 15
STEADYSHOT 61
T, U, V
Tape counter 16
Title 52
Tripod mounting 21
Trouble check 81
W,X,Y,Z
WIDE mode 42
WORLD TIME 67
Zoom 17
AлфаВиТьИ yka3aTeЛb
A, B, B
ABTomatmecKaФokycuPobKa 50
ABTOMO6NJbHbI aKKyMylrTop 29
Γ,Д,E,X,3
THe3DoIIncTaHcIOHOHOrO ynpabLeHnRA (LANC) 99
THe3doMIC(MnKpOΦoHHOe) 94
3aDnHnNoDCBETka 36
3aHcB c NOMOIOB BIndeOKaMepbI 14
3apnka 6aTaapeHoro 6Ioka 9
3yMMepHbB 3ByKOBOcINHaN 16
U, K, JI, M
IcToHnKn nTaHn.. 29
KoI daHbIX 30
PnIBoDHOI TpaHcΦOKaTOp 17
Пюверka Heисправност
............ 81
PeBepcnpoBaHne 26
PergunpoBka BnOouckaTeJIa 15
PeknI rTOBHOCTN 14
Pekim 3anni 33
Pexim WIDE 42
PyuHaJΦokycuPoBka 46
C
CnCTema MeHIO 31
CoeHHeHnI DnBOCPOn3BeDeHnI 24
CuetnK JENTbl 16
T, y
YckopeHHaJIpeMeOTkaHa3aJ 26
YctaHOBka Ha TpeHore 21
YcTaHOBka YacOB 65
Φ-
LcnpoBOn TpaHcfoKaTOp 18
3Kcno3nua 50
3JIeKtpnuecka cetb 30
A,B,C,D
ANTI GROUND SHOOTING 19
COUNTER RESET 16
DATE/TIME 56
DEMO 34,97
DISPLAY 27
DNR 39
E,F,G,H
EDIT 35
EDITSEARCH. 22
FADER 37
I, J, K, L
LANC 94
LASERLINK 25
M, N, O, P
NIGHTSHOT 40
ORC 57
PICTURE EFFECT 48
PROGRAM AE 44
Q,R,S,T,U,V,W,X,Y,Z
STEADYSHOT 61
WORLD TIME 64
U3rOToBvTeJIb: CoHn KopnpoeiH
Ampec: 6-7-35 Kntaunharaba,
山HaraKa-Ky, Tokno 141-0001, JnoH
CTpana-mpon3Bountel:JnoHna