
RID 430 BV - Cooker ROSIERES - Free user manual and instructions
Find the device manual for free RID 430 BV ROSIERES in PDF.
| Product type | Built-in induction hob |
| Brand | Rosieres |
| Model | RID 430 BV |
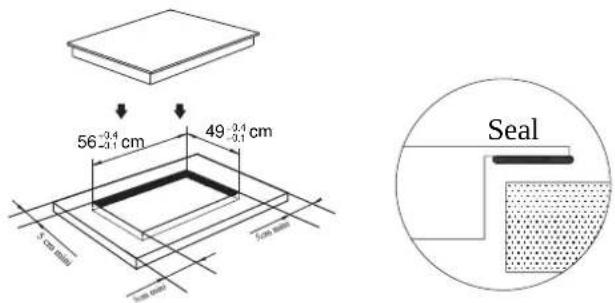
| Dimensions (W x D x H) | 590 x 520 x 55 mm |
| Cut-out dimensions (W x D) | 560 x 490 mm |
| Power supply | 220-240 V~ 50/60 Hz or 400 V 50/60 Hz |
| Total power | 7000 W |
| Number of cooking zones | 4 induction zones |
| Boost function | Yes, up to 3000 W per zone |
| Keep warm function | Yes, maximum duration 2 hours |
| Timer function | Yes, adjustable from 1 min to 9h59 |
| Memory function | Yes, record and playback cooking cycles |
| Child lock | Yes, Lock key |
| Automatic shut-off safety | Yes, depending on power level (1h to 8h) |
| Residual heat indicator | Yes, H symbol |
| Overheating protection | Yes |
| Surface material | Ceramic glass |
| Cleaning and maintenance | Specific product for ceramic glass and scraper |
| Electrical connection | By earthed power socket or omnipolar device |
| Installation | Recessed mounting with sealing gasket, min. 5 cm spacing from walls |
| Compatibility with pacemaker | Possible under medical recommendation |
Frequently Asked Questions - RID 430 BV ROSIERES
User questions about RID 430 BV ROSIERES
0 question about this device. Answer the ones you know or ask your own.
Ask a new question about this device
Download the instructions for your Cooker in PDF format for free! Find your manual RID 430 BV - ROSIERES and take your electronic device back in hand. On this page are published all the documents necessary for the use of your device. RID 430 BV by ROSIERES.
USER MANUAL RID 430 BV ROSIERES
INSTRUCTIONS FOR USE AND INSTALLATION GB
TABLES DE CUISSON
NOTICE D'EMPLOI ET D'INSTALLATION FR
IHCTPYKJIA3 EKCnIyATAU T A NIDKJIIOYEHH
BByOBAHOIINyKIOHOIOBEPXHI U
RID430B V
RID346BV
RID342B
By placing the CE C E mark on this product, we are confirming compliance to all relevant European safety, health and environmental requirements which are applicable in legislation for this product.
Safety Reminding and Maintenance:
- WARNING: The appliance and its accessible parts become hot during use. Care should be taken to avoid touching heating elements.
- Children under 8 Year of age must be kept away from the appliance unless they are continuously supervised.
- This appliance can be used by children aged from 8 years and above and persons with reduced physical, sensory or mental capabilities or lack of experience and knowledge if they have been given supervision or instruction concerning use of the appliance in a safe way and understand the hazards involved.
Children must not play with the appliance. - Cleaning and user maintenance shall not be made by children without supervision
- WARNING: Unattended cooking on a hob with fat or oil can be dangerous and may result in fire.
- NEVER try to extinguish a fire with water, but switch off the appliance and then cover flame e.g. with a lid or a fire blanket.
- WARNING: Danger of fire: do not store items on the cooking surfaces.
- WARNING: If the surface is cracked, switch off the appliance to avoid the possibility of electric shock.
-
Do not use a steam cleaner for cleaning operations
-
Metallic objects such as knives, forks, spoons and sauce pan lids must not be placed on the hob surface as they can get hot.
- Any spillage should be removed from the lid before opening.
- The hob surface must be allowed to cool down before closing the lid.
Safety Reminding and Maintenance:
- After use, switch off the hob element by its control. Do not rely on the pan detector.
- This appliance is not intended to be operated by means of an external timer or separate remote - control system.
- The means for disconnection must be incorporated in the fixed wiring in accordance with the wiring rules.
- The instructions state the type of cord to be used, taking into account the temperature of the rear surface of the appliance.
- If the supply cord is damaged, it must be replaced by the manufacturer, its service agent or similarly qualified persons in order to avoid a hazard.
- CAUTION: In order to avoid a hazard due to inadvertent resetting of the thermal cutout, this appliance must not be supplied through an external switching device, such as a timer, or connected to a circuit that is regularly switched on and off by the utility.
Warning: this appliance complies with current safety regulations and electromagnetic compatibility regulations. Nevertheless, people with a pacemaker should not use this appliance. It is impossible to guarantee that all such devices found on the market comply with current safety regulations and electromagnetic compatibility regulations, and that dangerous interference will not occur. It is also possible that people with other types of device, such as a hearing aid, could experience some discomfort.
GENERALWARNINGS
READ THE INSTRUCTIONS BOOKLET CAREFULLY TO MAKE THE MOST OF YOUR HOB.
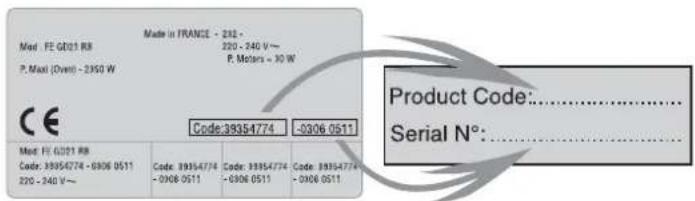
We recommend you keep the instructions for installation and use for later reference, and before installing the hob, note its serial number below in case you need to get help from the after sales service.
Identification plate
(located under the hob's bottom casing)
| COOKING HOB | RID430BV | RID342B/RID346BV |
| Cooking zones | 4 INDUCTION | 3 INDUCTION |
| Supply voltage | 220-240V~50/60 Hz400 V 50/60Hz | |
| Installed electric power (W) | 7000 | 7200 |
| Product size(d X w X h ) mm | 590 X 520 X 55 | |
| Building-in dimensions(AXB) | 560 X 490 | |
| A B | ||
We are constantly striving to improve product quality and as such may modify appliances to incorporate the latest technical improvements.
CE Induction hobs conform to European Directives 73/23/CEE and 89/336/CEE, replaced by 2006/95/EC and 2004/108/EC, and subsequent amendments.
INSTALLATION
Instalng a domestic apian can be a compled operation which if not carried out cctly, can seriously affect consumer safety. It is for this reason that the task should be undertaken by a professionall qualitied person who will carry it out in accordance with the technical regulations in force. In the event that this advice is ignored and the installation is carried out by an unqualified person, the manufacturer declines all responsibility for any technical failure of the product whether or not it results in damage to goods or injury to individuals.
BUILT-IN
The furniture in which your hob will be installed and all adjacent furniture, should be made from materials that can withstand high temperatures. In addition, all decorative laminates should be fixed with heat-resistant glue.
Installation:
- A watertight seal is supplied with the hob.
- It it important to fit the hob on a level supporting surface.
- Deformations caused by incorrect fitting can alter the specifications of the worktop and the performance of the hob.
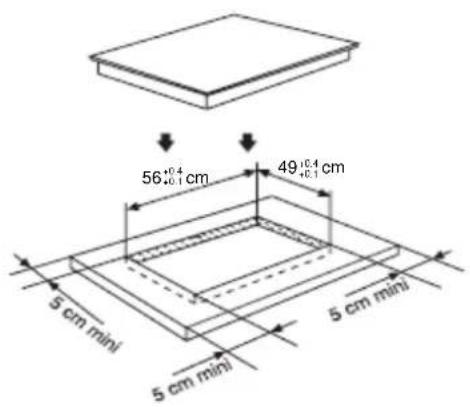
- Leave a gap of at least 5cm between the appliance and any neighbouring vertical surfaces.
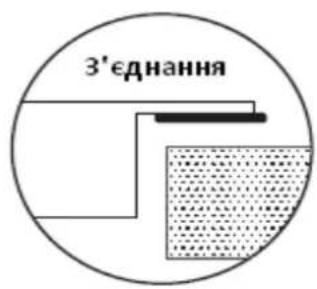
It is absolutely essential that the recess conforms with the dimensions indicated. - Cut a hole in the worktop of the dimension shown in the diagram below. A minimum of 50 mm space should be left around the hole.
The worktop should be at least 30mm thick and made of heat-resistant material. As shown in the Figure(1)
- You can not build the hob in above an oven with no fan, a dishwasher, fridge, freezer or washing machine.
It is essential that the induction hob is well ventilated and that the air intake and exit are not blocked. Make sure the hob is correctly installed as shown in Figure(2)
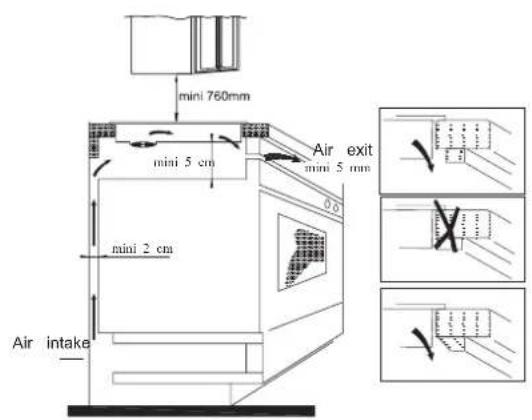
NB: For safety, the gap between the hob and any cupboard above it should be at least 760mm.
ELECTRICAL CONNECTION
"The installation must conform to the standard directives." The manufacturer declines all responsibility for any damage that may be caused by unsuitable or unreasonable use.
Warning :
- Always check before any electrical operation, the supply tension shown on the electricity meter, the adjustment of the circuit breaker, the continuity of the connection to earth to the installation and that the fuse is suitable.
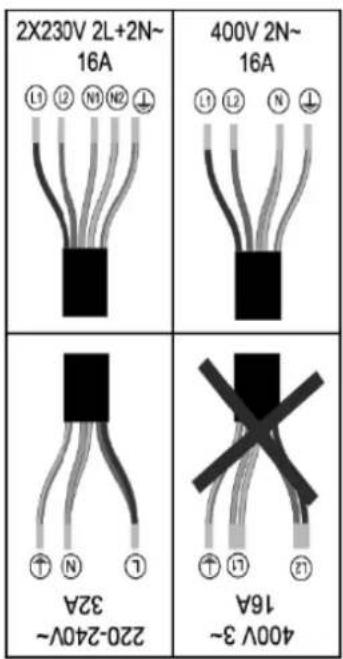
- The electrical connection to the installation should be made via a socket with a plug with earth, or via an omnipole cut-out switch with an opening gap of at least 3mm . If the appliance has a socket outlet, it must be installed so that the socket outlet is accessible.
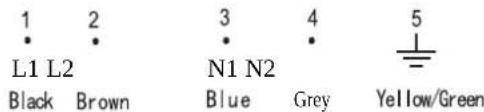
- The yellow/green wire of the power supply cable must be connected to the earth of both power supply and appliance terminals.
- The manufacturer cannot be held responsible for any accidents resulting from the use of an appliance which is not connected to earth, or with a faulty earth connection continuity.
- Any queries regarding the power supply cord should be referred to After Sales Service or a qualified technician.
- f the cable is damaged or to be replaced, the operation must be carried out the by sale agent with dedicated tools to avoid any accident.
Connection to power supply
The socket shall be connected in compliance with the relevant standard, to a single-pole circuit breaker. The method of connection is shown in Figure(3):

The cable must not be bent or compressed.
INDUCTION
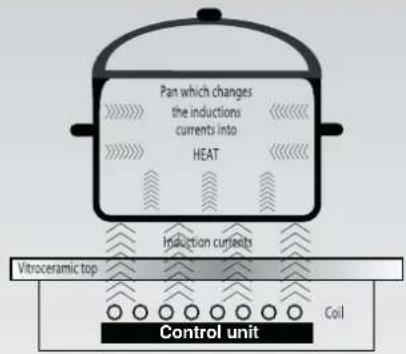
USE PROCEDURE
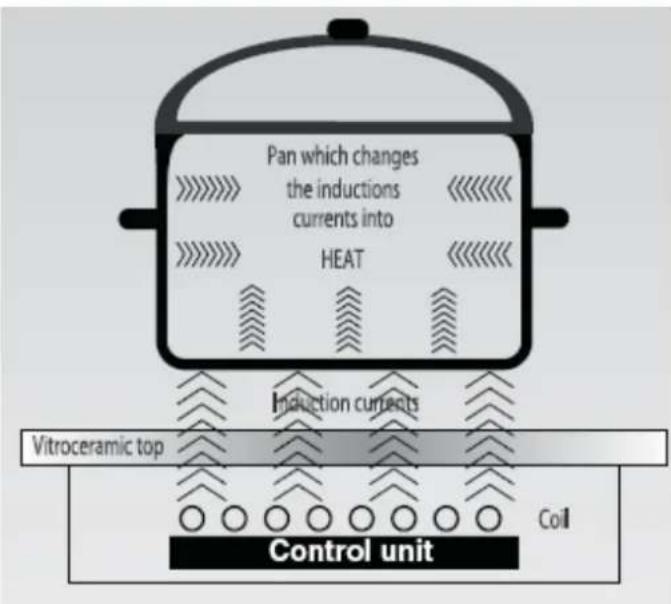
An electronic generator powers a coil located inside the appliance. This coil creates a magnetic field, so that when the pan is placed on the hob, it is permeated by the induction currents.
These currents make the pan into a real heat transmitter, while the glass ceramic hob remains cold.
This system is designed for use with magnetic-bottomed pans.
Put simply, induction technology has two main advantages :
- as heat is emitted only by the pan, heat is maintained at its maximum level and cooling takes place without any heat loss.
- Maximum fever and cooking takes place without any heat loss.
- There is no thermal inertia, as cooking automatically starts when the pan is placed on the hob and stops when it is removed.
A HIGH SAFETY APPLIANCE
Protection from over-Temperature
A sensor monitors the temperature in the cooking zones. When the temperature exceeds a safe level, the cooking zone is automatically switched off.
- Residual heat warning
When the hob has been operating for some time, there will be some residual heat. The letter "H" appears to warn you to keep away from it.
- Auto shutdown
Another safety feature of the induction hob is auto shutdown. This occurs whenever you forget to switch off a cooking zone. The default shutdown times are shown in the table below.
| Power level | The heating zone shut down automatically after |
| 1~5 | 8 hours |
| 6~10 | 4 hours |
| 11~14 | 2 hours |
| 15 | 1hours |
When the pan is removed from the cooking zone, it stops heating immediately and switches itself off after the buzzer sounded for one minute.
RE
the guidance of the doctor.
ma er shall use this product underThe pa
- Always use good quality cookware with perfectly flat and thick bases : using this type of cookware will prevent hot spots that cause food to stick. Thick metal pots and pans will provide an even distribution of heat.
- Ensure that the base of the pot or pan is dry : when filling pans with liquid or using one that has been stored in the refrigerator, ensure that the base of the pan is completely dry before placing it on the hob. This will help to avoid staining the hob.
- Use pans whose diameter is as large as the graphic of the zone selected. Using a pot a slightly wider energy will be used at its maximum efficiency. If you use smaller pot efficiency could be less than expected. Pot less than 140mm could be undetected by the hob.
The following information will help you select the pans best adapted to obtain good results.
| Induction zone | |
| Mark on kitchen utensils | On the label, check the mark which shows if the pan is compatible with induction. |
| Use magnetic pans (enamelled iron sheet, cast-iron ferritic stainless steel) apply a magnet on the bottom of the pan (it must stick). | |
| Stainless steel | Non detectable |
| Excepted stainless steel ferromagnetic. | |
| Aluminium | Non detectable |
| Cast-iron | Good performance |
| Enamelled steel | Good performance |
| Glass | Non detectable |
| Porcelain | Non detectable |
| Copper bottom | Non detectable |
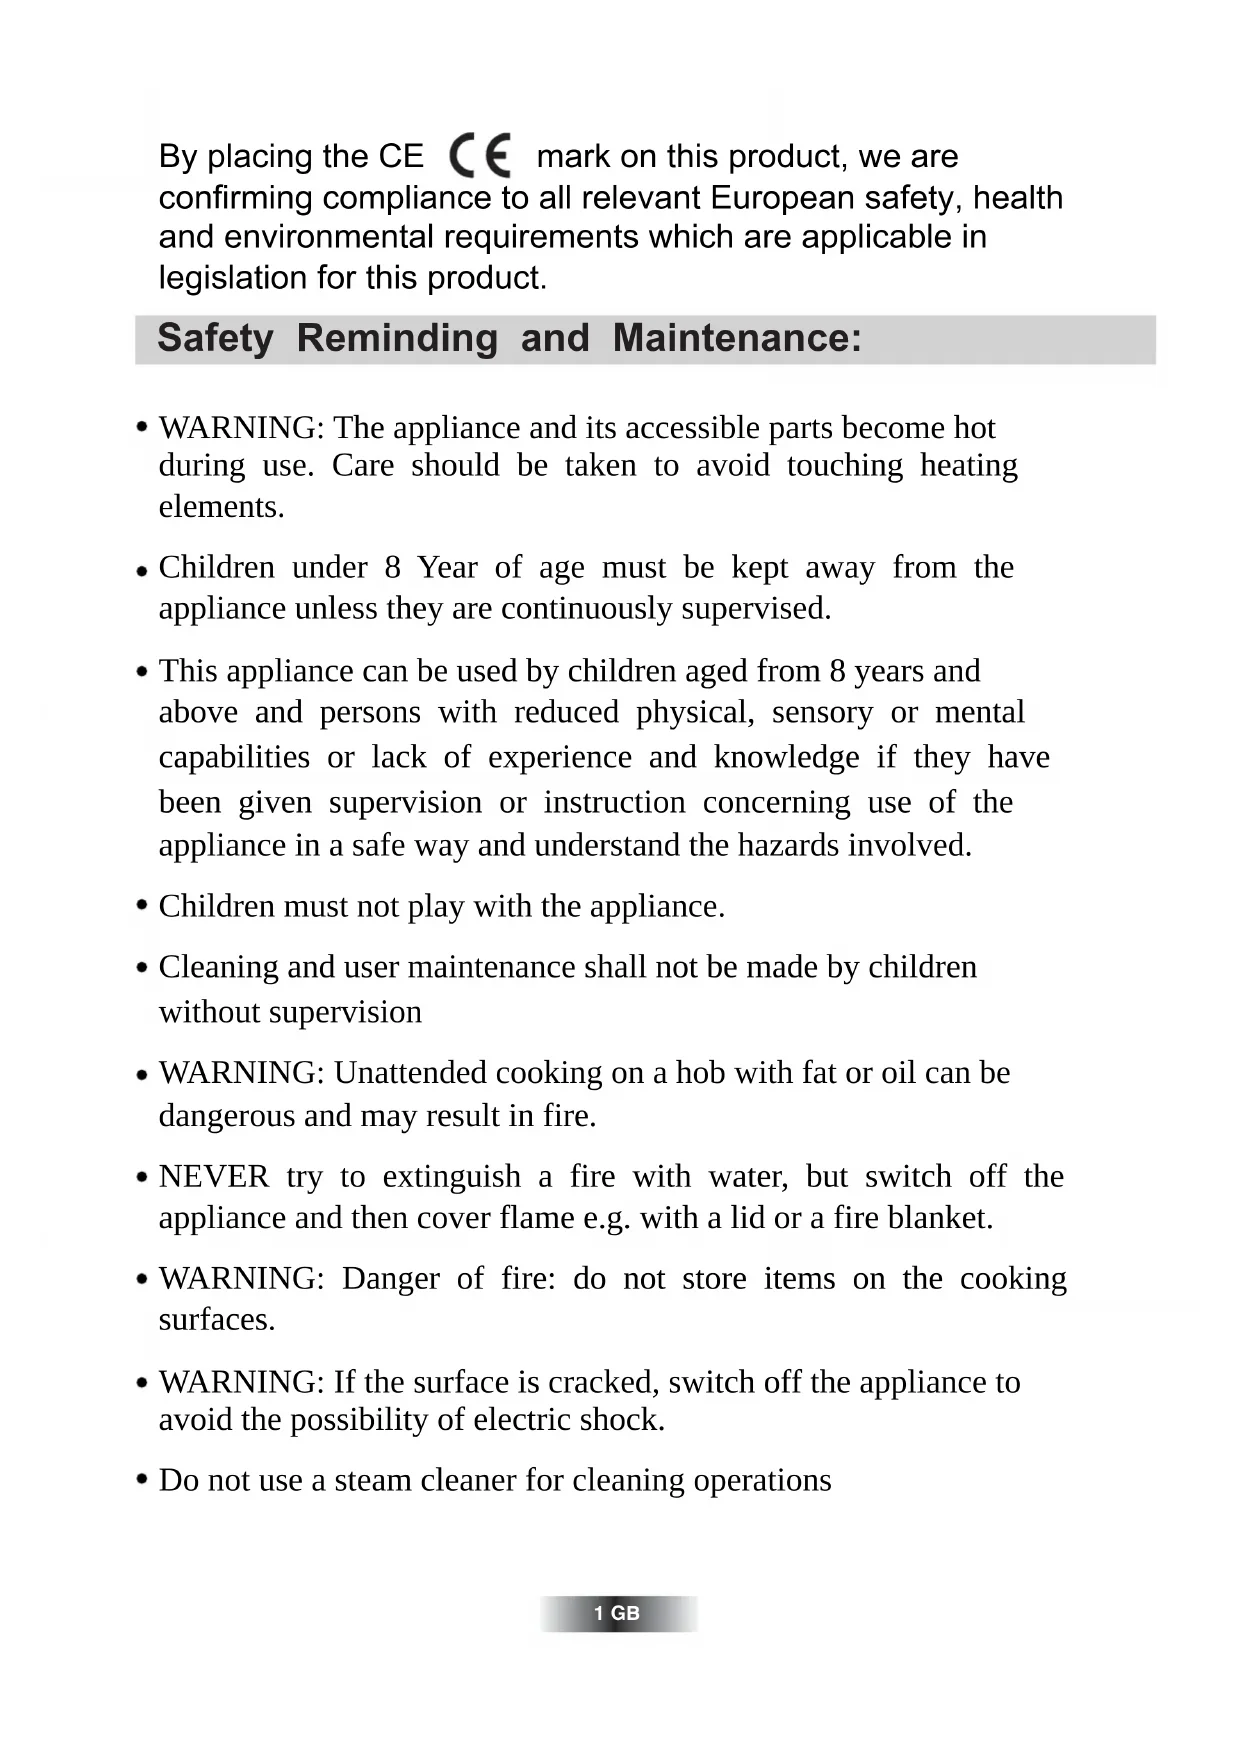
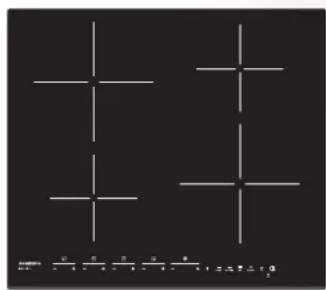
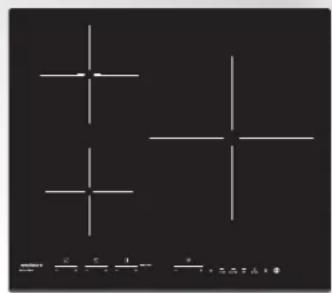
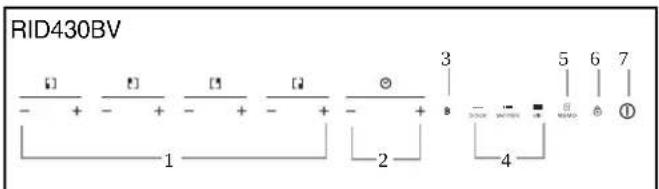
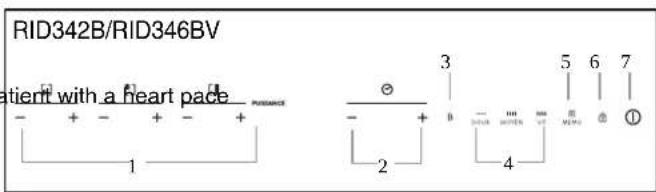
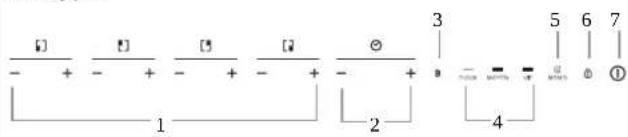
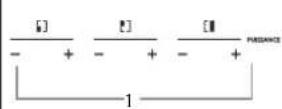
Schematic diagram of the control panel
HOB COOKWARE ADVICE
Using good quality cookware is critical for setting the best performance from your hob.

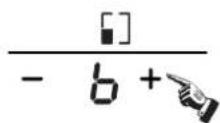
- Power regular key
- Timer regular key
- Booster
- Special function
- Memory
- Lock
- On/Off
Instructions for Use
When the power is switched on, the buzzendwithnce and all the indicators will come one second and then go out. The hob is imostandby mode place the pan in the centre of the cooking zone.
Operating instructions
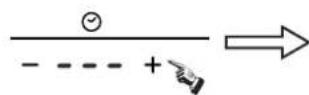
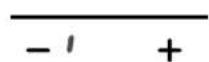
- Press the " key, all the indicators show "--".

Select the power level by pressing the "+" or "-" key for the relevant hotplate. To begin with the indicator shows "or" by pressing the "+" or "-" key. Adjust up or down by pressing the "+" or "-" key.

If you press the "+" and "-" keys simultaneously, the power setting returns to "and the cooking zone switches off.
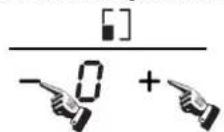
NB: When the " key is pressed, the induction hob returns to standby mode if no other operation is carried out within 1 minute.
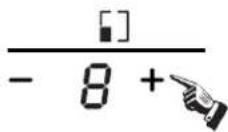
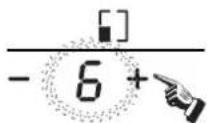
Boost function
Press the key, the power level indicator showing " "

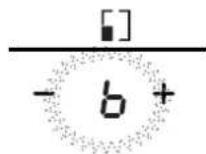
Warning:
- The boost function only operates for 5 minutes, after which the cooking zone will revert to its original setting.
- The boost function works on all cooking zones.
- As the boost function of the 1st cooking zone is activated, the 2nd cooking zone is limited under level 2 automatically, vice versa. As the boost function of the 3rd cooking zone is activated, the 4th cooking zone is limited under level 2 automatically, vice versa.
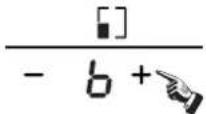
Cancelling the "BOOST" mode
Cancel the "Boost" mode by pressing the "+" or "-" key of the corresponding zone.
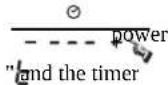
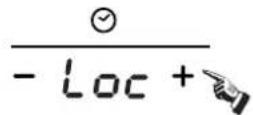
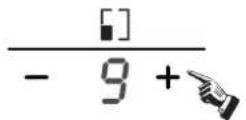
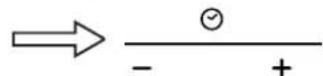
Timer function
If more than 1 zone is switched on :
activate the selected zone by pushing "+" or "-" key of that zone, the corresponding digits will be flashing.

then press the "+" or "-" timer key level indicator flashing and showing indicator flashes
To begin with the indicator shows" 0:8t the time by pressing the "+" or "-" key. After setting the time, you can select the power level of the cooking zone.
Then set the time for between 1 minute and 9 hours 59 minutes by pressing the "+" or "-" key.
Press the "+" key once increases the time by one minute; hold down the "+" key increases the time by 10 minutes; When the time exceeds 1 hour, hold down the "+" key increases the time by 30 minutes.
Press the "-" key once decreases the time by one minute; hold down the "-" key decreases the time by 10 minutes; When the time exceeds 2 hours, hold down the "-" key decreases the time by 30 minutes.
- You can set the power level during the timer mode.
If the timer is set on more than 1 zone:
Timer can be set on all 4 cooking zones. When you set the time for several cooking zones simultaneously, decimal dots of the relevant cooking zones are on.
On the timer display will be shown the timer than will expire first. The dot of the corresponding zone will be on but flashing.Once the countdown timer expires the corresponding zone will be switch off.Then it will be shown the new first expiring timer and the corresponding zone will have the dot flashing.
If the timer is set but not active on any zone, it will work simply as timer countdown.
Note:
- When the timer is 0 minute, the timer is cancelled.
- When time elapses, the relevant cooking zone is switched off.
- After setting the timer, the timing indicator has been flashing for 5 seconds, the set time will be automatically confirmed.
Instructions for Use
- In timer mode, pressing the "+" or "-" key of the timer simultaneously, timer setting returns to "0", time is cancelled.
Safety mode
To ensure the safety of children, the induction hob is fitted with an interlock device.
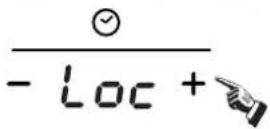
Lock:
In working mode, press the "hey, the hob then goes into the lock mode, timer will display " and the rest of the keys are disabled except the "

In standby mode, press the "lock" key, the hob then goes into the lock mode, the timer shows "L" and the rest of the keys are disabled. The timer shows "L" a while and then goes out.
If you press the key, " will be displayed for a while.
oUnlock:
Hold down the"Lock" key for 3 second, and the lock function will be deactivate.
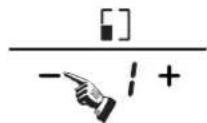
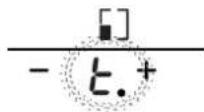
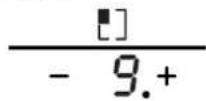
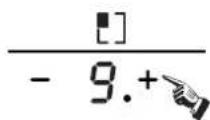
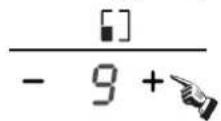
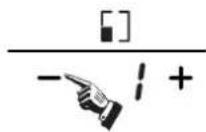
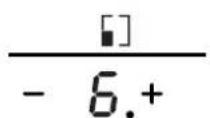
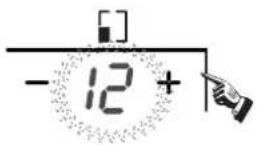
Keepwarmmode
This function will allow to keep the food warm for up to 2 hours.
Activate the selected zone by pushing the "-" or "+" button
$$ \frac {]}{- 9 + \lambda} $$
Press the " - " till when you reach the level between 0 and 1, you will see the keep warm level. "I "will appear under the area selected.
Cancelling the Keep warm mode
To exit for the keep warm function, set any other power level
Special function
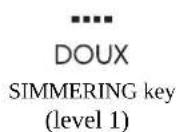
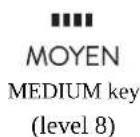
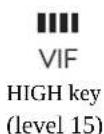
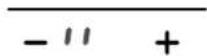
Ativate the selected zone by pushing "+" or "-"
press the SIMMERING key, the indicator will be show "11"

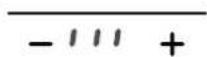
press the MEDIUM key, the indicator will be show " 111

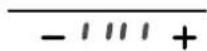
press the HIGH key, the indicator will be show "1111


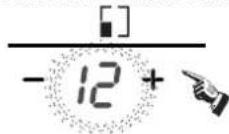
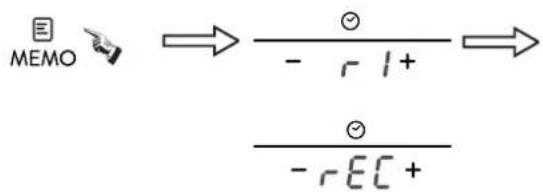
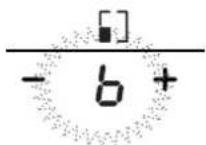
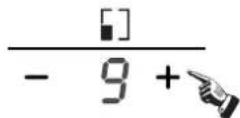
Memory function
You can use the memory function to store the power level settings and duration for one zone.

Recording
- Select the desired cooking zone by pressing the "+" or "-" key, with the power level indicator of that zone flashing.
press the" key, with the timer indictor showing " r0 "means no cooking cycle in memory". hold down the memory key for 3 seconds, with the timer indicator show "EC", recording is started.

the power level indicator showing " end power level alternately.

The maximum number of operations is 10 power level variations in 8 hours. Any power level variation lasting less than 15 seconds will not be recorded.
Stop recording
Press again the memory key, " will be no more display on the timer display and the cooking cycle will be stored


Instructions for Use
OR
Switch off the corresponding cooking zone by pressing "+" and "-" simultaneously or by setting the power level to 0, "rEC" will be no more display on the timer display and the cooking cycle will be stored.

OR
Remove the pan from the corresponding cooking zone. When the zone detects missing pan, then be no more display on the timer display and the cooking cycle will be stored
OR
Do more than 10 power level setting variations, " r^ will be no more display on
OR
switch off the hob,in that case the recording of the cooking cycle is automatically aborted.
OR
switch off the a recorded cooking zone before 15 second since the starting of the recording in that case the recording of the cooking cycle is automatically aborted.
Execute a recorded cooking cycle
Press the memory key, the timer indicator displays "r",key for 5 seconds, then displays"PLyThe zone corresponding at the recorded cooking cycle will switch on and starts performing the cycle.

If the corresponding zone was already on, the recorded cooking cycle will take the priority and be performed.
If during the execution of a recorded cooking cycle on the corresponding zone ^+ or - key, the recorded cooking cycle is aborted and normal managing is restored.anyway the stored cooking cycle is kept in memory.
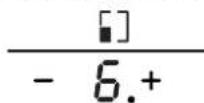
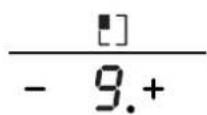
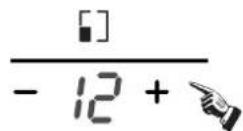
How to record one new cooking cycle if we have already recorded one:
Activate the cooking zone we want to record by pressing" ^+ " or"-
$$ \frac {[ ]}{- 1 2 + \lambda} $$
Hold down the" key for a while, and the " I will appear." means "cooking zone stored in memory".
Then the" r will be displayed, the recording of the cycle on the selected zone starts.
Note: It is recommended that the cooker hood suction is switched on few minutes prior to cooking and switched off few minutes after terminating cooking.
The maximum power of cooking zones is as follows:
| Heating zone | RID430BV | |
| Normal | Boost | |
| 1 | 1200 | 1500 |
| 2 | 2300 | 3000 |
| 3 | 1200 | 1500 |
| 4 | 2300 | 3000 |
| Heating zone | RID342B | |
| Normal | Boost | |
| 1 | 1200 | 1500 |
| 2 | 2300 | 2600 |
| 3 | 3000 | 4200 |
| Heating zone | RID346BV | |
| Normal | Boost | |
| 1 | 1200 | 1500 |
| 2 | 2300 | 2600 |
| 3 | 3000 | 4600 |
The above may vary according to the pan and the material it is made from
CLEANING AND MAINTENANCE
Before carrying out any maintenance work on the hob, allow it to cool down.
- Only products, (creams and scrapers) specifically designed for glass ceramic surfaces should be used. They are obtainable from hardware stores.
- Avoid spillages, as anything which falls on to the hob surface will quickly burn and will make cleaning more difficult.
- It is advisable to keep away from the hob all substances which are liable to melt, such as plastic items, sugar, or sugar-based products.
MAINTENANCE:
- Place a few drops of the specialised cleaning product on the hob surface.
- Rub any stubborn stains with a soft cloth or with slightly damp kitchen paper.
- Wipe with a soft cloth or dry kitchen paper until the surface is clean.
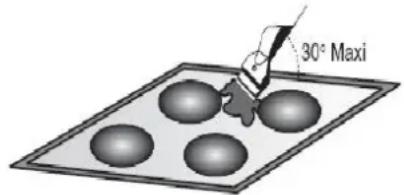
If there are still some stubborn stains:
- Place a few more drops of specialised cleaning fluid on the surface.
- Scrape with a scraper, holding it at an angle of 30^ to the hob, until the stains disappear.
- Wipe with a soft cloth or dry kitchen paper until the surface is clean.
- Repeat the operation if necessary.
A FEW HINTS:
Frequent cleaning leaves a protective layer which is essential to prevent scratches and wear. Make sure that the surface is clean before using the hob again. To remove marks left by water, use a few drops of white vinegar or lemon juice. Then wipe with absorbent paper and a few drops of specialised cleaning fluid. The glass ceramic surface will withstand scraping from flat-bottomed cooking vessels, however, it is always better to lift them when moving them from one zone to another.

Do not use a sponge which is too wet.
Never use a knife or a screwdriver.
A scraper with a razor blade will not damage the surface, as long as it is kept at an angle of 30^ .
Never leave a scraper with a razor blade within the reach of children.
Never use abrasive products or scouring powders.
AFTERCARE
Before calling out a Service Engineer please check the following:
that the plug is correctly inserted and fused;
If the fault cannot be identified:
switch off the appliance — do not tamper with it — call the Aftercare Service Centre. The appliance is supplied with a guarantee certificate that ensures that it will be repaired free of charge at the Service Centre.
PROBLEM SOLVING
The induction hob gives shorings out.
Normal. The cooking fan of the electronic components is on.
The induction hob gives a light whistling out.
- Normal. According to the working frequency of the inductors, a light whistling can occur when using several cooking zones on maximum power.
Cooking zones that do not maintain a rolling boil or a fast enough frying rate.
- You must use pans which are absolutely flat.
- Pan bottoms should closely match the diameter of the heat zone selected.
Foods cook slowly.
- Improper cookware being used. Pan bases should be flat, fairly heavy-weight and the same diameter as the heat zone selected.
Tiny scratches (may appear as cracks or abrasions) on the glass surface of the hob.
- Incorrect cleaning methods, cookware with rough bases, or coarse particles (salt or sand) trapped between the cookware and the surface of the hob.
Use recommended cleaning procedures, be sure cookware bases are clean before use and use cookware with smooth bases.
Metal markings (may appear as scratches).
- Do not slide aluminium cookware across the surface.
Use recommended cleaning procedure to remove marks. - Incorrect cleaning materials have been used, spillage or grease stains remain on the surface, use a razor scraper and recommended cleaning product.
Dark streaks or specks.
- Use a razor scraper and recommended cleaning product.
Areas of discoloration on cooktop.
- Marks from aluminium and copper pans as well as mineral deposits from water or food can be removed with the cleaning cream.
Hot sugar mixtures / plastic melted to the surface.
See the Glass Hob Cleaning section.
The hob is out of order, or some heat zones do not work.
- The shunt bars are not properly fitted on the terminal block. Check the connection is made in conformity with the instructions page 2.
The hob does not operate.
The control panel is locked. Press the "Locking" button to release.
The hob does not cut off
The control panel is locked. Press the "Locking" button to release.
Refer to the section, page 5.
The hob stops automatically
- The cooking zones stop automatically if they are left on for too long. Refer to the section, page 3.
Frequency of on/off operations for cooking zones
- The on-off cycles vary according to the required heat level:
- low level: short operating time,
- high level: long operating time.
This appliance is marked according to the European directive 2012/1E on Waste Electrical and Electronic Equipment (WEEE). By ensuring this product is disposed of correctly, you will help prevent potential negative consequences for the environment and human health, which could otherwise be caused by inappropriate waste handling of this product. The symbol on the product indicates that this product may not be treated as household waste.
Instead it shall be handed over to the applicable collection point for the recycling of electrical and electronic equipment Disposal must be carried out in accordance with local environmental regulations for waste disposal.
For more detailed information about treatment, recovery and recycling of this product, please contact your local city office, your household waste disposal service or the shop where you purchased the product.
- Power regular key
- Timer regular key
- Booster
- Special function
- Memory
- Lock
- On/Off
Ha naheI He noBHHo 6yTu TpiuHn, kAIO BOHN 3'ABNtBcR, BID'EnaHTe eNEKtpOKNBHeHn I 3BepHtBCr Do cepBichoro UeHTpy.
HnykuiHa nobepxHa npn3NaeHa Iy BnKOpNCTaHHI NwE B DOMaunHbomy roCnoapCTBI.
YcTaHOBky npnIady y kxyOHHy NOBExHIO Ta nIDKIIoueHHRA NOBHeH NPOBOuHTn TINbKn faxibeB bIDnoBIDHO KBaJIΦikaJl.
He 3aIiShaTe ditee 6e3 Hargy, kio BOHn 3hXoJrbc npuy 3 npaoIOOIO pINTOIO: BOH MoKyb OTpIMATOnIKN.
HikonHe po3muyTe npoxn HocyHa KOhOpkax.
IpekoHaTecb, 0o DeTani KOHOpOK yCTaHOBneHi npabnBHO.
IHykuiHbapnblHIOBepxHI He MoKHa BnKOpncTOByaTu NKpoOuyIOBepxHi. Foctpi npedmet MOKyTB 3aIIuHTn Ha HIN NOpPnnH.
DAnHH npnnaBnroToBHe BIDnoBIDHO Do BmOr cTahdaptIB 63neKn. Tm He MeHs, Mn HanoerInBO peKOMeHyEmo Oco6am, 00 MaOtB fi3uHbBaH, nCnxUHPi PO3nA, a6o TaKIM, 10 He MaOtB DOCTaTHb DOCBiDy, He KOpNCTyBaTNCr npnnaDM 6e3 Donomn DOCBiDyeHoI Oco6n a6o Ni II NnblHM HaJrdom. Taki X nopAa CTocYIObca I HenOBHONITHX dTei.
BByIOBYBAHH

-
YCTAHOBKY npnnay y pObouy NOBepxHTo Ta II niKIOUeHHNo eEKeTpOmepeXi NOBHeH npBOoHTN Nlne KBAJIΦIKOBaHm #axiBe.
-
OdoNoBaHm MaTepiAkyoHHnx Me6IIB, Kyu 6yde yCTaHOBHeHa BapuHbHa NOBepxHa, Ma6 BytN CTiIM Do BnInBy BucOKnx Tempeatyp 100gC), y
iHOMy pazi 03do6JIeHHa PO6Ooi NOBepxHi MOKe BtpaTIu KOpI a6o DeΦopMyBaTnca.
- FepMeTnHi nIOM6n NoCTaBIAOTbCpa30m 3 naHeJIIO.
IpepeyctaHOBkoIO:
IpepebHt b naHeB,cknaHOIO NOBepxHeIO Hn3y;
IpekeKaHaTeCe, 0cCKIO 3axnuehe;
3aikcyte nIomboDobkona naHeni;
IpekoHaTeCra,IO BOH 3aΦICOBaHI npabNbHO,06 HiOro He 3aTikano B wa;
Baxnbo, 06 naheb 6yna 3aikcobaHa Ha ODHomy pIBHi 3 onOpHOIO nobepxHeo.
NoKdoJxehnHaenei nia yac yctaHOBKn, MoKyTB BnHHTn Ha npOdyKTNBHCb ii po60tn.
3aHnTe BIDCTaHb, npHaHMMH, 5cm mix naHeJIIO Ta cyciDhbHOBepTknAbHO NOBepxHeIO;
B KpaBaxnlo, uo6 BiCTaHb BiNobida 3a3HaueHm npametpam;
BnpiKbTb OTbip y CTIbHnui, kN oka3aHo Ha MaJIIOHKy HIXKye. He MeHwe 50 MM, HABKOLO OTBOPy Mae by npocTip;
TcInbHnuaMa6bytnKaHaMeHne30MM
TOBUNHOIO, Ta TepMOCTIkoHO. Ra NOKa3aHO Ha ManIOHky 1.
Bn He MoXeTe B6yOBOByATn NaHEnb HAd PInTOO 6e3 BeHTnIaJIi, HAd NocyDoMnHOIO MaunHOIO, XoONHbHNKOM a60 npalboHO MauHNOHO.
DykeBaKJINBO3a6e3neuHTnHaJIeKHy BEHTNIAIIO.
IpekoHaTeC, 0o nHaEnb BCTaHOBHeHa npabInbHO, Ra ce noka3aHo Ha MaIOHky 2:
ПИДКIOЧЕНЯ DO ELEKTPOMEPEXI
Cn npntpi BidnoBidae DnpekTbam 89/336/EEC,73/23/EEC i HactynHM dOnOBHeHAMdo Hx.
12
L1
L2
3
N1
4
N2

JOBOTo-3eJIeHnI
YopHn KOpuHeBn CnHi
3anam'raTae: BiDcTaHb mix naHeJIIO Ta wafoIO haI Heo Mae 6yTu He MeHwe 760MM.
EneKtpnHne nDHaHH
《UcTaHOBKaMaBIDNoBIdaTnCTaHdapTHM DnpeKTHBaM》. BInpo6NHk He Hece BiDnoBidaNbHocTi 3a He npabNbHy UcTaHOBky, Hne HaneJKe BnKOpNCtAHHaHJI.
YB4A: Npeed BnKOpNCtAHm eEnktpnHoro npIaMy 3abJn nepeBiprTe HAnpy Ha IInhBnky, HactpoKy eEnktpnHoro BmNkaa, 3a3eMHeHH;
KobTO-3eHn npoBID ka6eHIO KINBHeHn NOBHeH 6yTH 3a3eMHeHn Rk BID dKepeNa XNBHeHn, TAK i BID tepMiHanib pncTPO. Bnpo6Hn H Me Moke HeCTN BiNObiDaIbHiCtB 3a 6yDb-aki HeuacHi BnnaKn B pe3yIbTati BNkopNCtAHn npnAdy, AKN He 3a3eMeHo. 3 6yDb-akmni NITaHHMa, 0do DKepeNa XNBHeHn 3BeptaTecra Do cepBicHnx ceHTPb.
KaKabIb nowkOJKeHO iNoro cIi3aMInHn, 3BeptaTeC3o KBaIiFikOBaHNx cneUlanictIB.
PiEHaHHaDdoJKepeLaKnBHeHH
Po3eKa NOBHHa 6yTN iNkIIOyeHa 3riH0 3 BiNobIHMN CTanAdpTaMn, B ODHONIOJIOCHN BIMNKaU. Cnoci6 iNkIOJeHHN NOKa3aHO Ha MaIIHOHky:
Ka6eIb He NOBHHen MaTH 3rHIB a6oYTnCKIB.
IHyKlIA
CnOciB BnKOpNCTAHH
EneKtpoHHn rHehepOp JHbEnHn 3hXoOHTbcBcepeHNi npNnaNy.
U KOTyUka CTBOPHO MarHIThe NOte, TAK 10, KOJI NaCTpyJIA
3hXoOHTbc Ha BORHI, BOHA npoHn3aHa IHdykUcIcO CTpyMIB.
Li CtpyM NpepaHbT TnIO TaKIM YHOM, IIO CTpBa HarpIbAc, a KacTpYJ3aIIuAeTbC XoIoHOIO.
Lc nctema npn3naeHa IJ KAcTpynb 3 MaHHTHM dHOM.
Poctiwe KaKyu, INdykuiHNI TeXHOIri MaHtB DBI OCHOBi nepeBaru: TaK TENlNO BnBiJIbHaTeBc TIlbKn KAcTpyeIO, TO BnKOpNCTOByETbcra NOro MAKCImaJIbHa KInbKiTb.
Hemae TepmaIbHOI Ihepu, TaK AK TeNIO BIBINbHReTcBcTIbKn KOJI KAcTpYJ3axOdITbcra Ha HarpIbAlbHi 30Hi, i 3yPiNHeTcBc KOJI KAcTpYJIO pMnHATn.
PINCTPIIIBNUEHOI B3NEKNI
3axucm biD nepeha2pieaHH
Cencnp peryioToB TemnepaTyH arpibalbHex 3OH. KOni TemnepaTypa nepeBnUye DonyctMy HOpMy, HarpipabHa 3OHa ABTomATNU HO BUMNkAeTbCA.
NonepdkeHHa 3auuKoo2o menna.
KoI NaHeB BnKOpNcOByeTbC npToTROM DeAkoR yacy, 3'YBaTbcra 3aIIuKOBe TEnIO. 3'YBaTbcra Iitepa H, 06 nonepdntn Bac npo ce. Aemomamuyhe BumkHeHH
Ie OINBn63neKn Bapnblhoi naHeni - ABO BmKHeHHBoHO cnpaobBye KOnn Bn 3a6yBaTe BmKHyn HarpiaBnHy 3ohy. 3a3amOBuyBaHHm nepioDnHicb BmKHeHHHaBeHo HnKHe B Ta6nui:
| Ровenvnotукhoefti | Конфорка Вимикадя авTomатчно пися |
| 1-5 8 roД. | |
| 6-10 4 roД. | |
| 11-14 2 roД. | |
| 15 | 1 roД. |
KaKpIIO np6paTn 30Hn HarpIBy BOHa ABToMaTHUHO BmNkaETbCn HarPiB, I nCnXBNHHORO 3BOHnKa ABToMaTHUHO BmNkaETbc
NOCyIДЯВAPINbHOI NOBEPXHI

NOCYДДЯВAPИЛБНОПВЕРХHI
BnKOpncTahHЯKICHOro nocydy, 3a6e3neuTb HaibIbW npOyKTNBHcTB BapNbHOI NOBepxHi.
3aBKnBnBnKOpNcOByTe NocyD BnCkoI Aokcti 3 IealbHo rAadkM Ta TOBCTHM DHom: BnKOpCTAHHr TAKORY nocydy nonepeJHaepnpopHHr CTpab. Tobci MeTaeBi KactpyI t cKOBopiKn 3a6e3neuyTOb pIBHomipHn po3noJtenla.
IpekoHaTec, 0o dno kactpyni nCKOBOpikn cyxe: nicra toro rK Bu hannPiHHy, uN diCTaII KAcTpyn3 XoJIOINbHnka, nepekoHaTec, 0o dno cyxe. Ue donomOKe yHNkHTn 3abpydHeHH naHJI.
BnKOpNCbOByTe KAcTpyI, dAmEtpr kNkX 3akPbBa BcO HarpBaIbHy 30Hy: po3Mp KAcTpyI MaE 6yTN He MeHsin HArpBaIbHa 30Ha. RaIO BOHA TPOxN 6Ibwa, To 6yde BnKOpNCbOByBatncA MAKCmAbHa KInbKiCTb Eheptii.
Hactynha hOpmaia donomoxe Bam o6paHn HainbIbW nIxOaIuN noCyD, dYr OTPMaHaONOTMMAJbHOro peyIbTaTy.
| Зona i Indукци | |
| Маркувань на кухоному приладд | Перевире, на etikketц, поначу, до посyd пidxхдь дя indукци. |
| Викорисовейte kastрул 3 магнітам (емальовае заліз, чавуна Феріntha нержавiouslyа саль), рinnіпійь магнід о дha kastрул (вога мae приллати) | |
| Нержавiouslyа саль He ВияВляЕТбя | |
| Прийн我不是 Нержавiouslyа Феромагніт ha cstы | |
| Алиомій He ВияВляЕТбя | |
| Чавун Хорosi рokaши | |
| Емальована саль Xорoti рokaши | |
| Скло He ВияВляЕТбя | |
| Порцелаян He ВияВляЕТбя | |
| Мідne дno He ВияВляЕТбя |
CXEMATUHA IIAIPTPAMA PAHEJI YNPABLIHHA
RID430BV
- Klaibiwa perylnoBaHHa notyHKHOCTI
- PeryioBaHHa cacy
- Bycrep
4.CneiJIaJIbHIyHKcIJI - Nam'Ятб
6.3aMOK
7.Bk/ BnK
RID342B/RID346BV

IHCTPYKJI3 BNIKOPNCTAHH


HaTNCHTb ① iBCiIHAnKaTopn NOKaKyTb (---)
06epitb pibeh HanpyrB iDnOBiDHOI 3OHN HATNCyBswn (加 + )
a6o(->HaNouATkyiHnKaTOp nok3ye « 8 » a6o
HanaHTyTe Ha 6InbIy a6o MeHuy nOryKHiCTb, HATCHyBm «+» a6o «-
Kuio Bn HATNCKaTe «+» a6o «-» OJHouacHo, iHnKaTOp nokae Hylb i NaHeIb abOTOMaTHUHO BMKHETbcR.
PpimrKa: PnHaTnCKaHHi Ha KhoNky, "①"
Bapnha naheNb nepexoDntb B pexm OikybaHna, Raio npotraom Dbox XBnnn He 6ynn BnKohai Hkiin Hni dii.
ФУHKUIIIДВИSEHHA NOTYKHHOCTI
HaTCHITb KHONKY

",iHdkKaTOp pIBHa
nokae «"b
ybara:
1.ФyHKiJIpiDnueHHeIeTINbKn npoTAROM5XBNHH, nicra yoro KOHOpKNOBepTaIObCdo CBORO nonepeHbOro HalaWtYBaHH.
2. Lya yHKua iE dna Bcie nane
3. Raio nIbNyetybcra yHKi npwo30Hn, fyHKci npyroT 30Hn ABTomauHO o6MeKyeTcBdo pIBn2,i HABnKn. Raio nIbNyetybcra yHKci npTeBoT 30Hn, yHKci yETBePTO 30Hn ABTomauHO o6MeKyeTcBdo pIBn2,i HABnKn.
BIIMHA FVHKIII PDBNUEHHIOTYXHOCTI
IooBbiMHHnFyHKUIOiDBNUEHHaTNCHTb(+) a6o(-)yBiINOBIDHI0Hi.
ФУHKUII TAIMEPY
Akuo BBimkHeHa 6InbH HIX OHa 30Ha:
Uo6akTbBATnNOTp6Hy30Hy HATNCHTb «+» a6o «-», 3aropTaBCa BiIOBIDHcMbOHN.
TOTIM HATINCHITb KONky TaIMepa «+» a6o «-» 3arOpHTbcra pIBeH notyXHOCTi i nOKaKe

3anam'raTae:
KoI TaMep BCTAHOBHeHO Ha 0 XB.,BIN ABTomATNuHO BUMNKAETbCra. KOni Yac 3aIKHcyTbcra, BiNIOBIDHa 3OHa BUMNKAETbCra. Iicra BCTAHOBHeHHa Cacy, IHnKaTOp 6yde 6nMaTn npotrrom 5 cek., a NOT IM ABtomATnuHO AKTNByTcRa.
KIO OHOaCHO HAuCKaTN, HAnuTyBaHHa Ccy BCTaHOBIOIObCnHa Hylb, Yac CKACOByETbcr.
CnoaTuHAnKatop 0:10" nokae, HanauTyte TaMep, HATNCyBUn «+» a6o «-». Nicra HanauTyBaHH TaMepy, Bn moKeTe o6paTH pBeHb NOTyKHOCTI ta3OHy npriOTyBaHH.
Notim Bnctabitb yac, BiD 1xB. do 9 roD. 59 XB., HATNCKAIOUY (艹 + 艹) a6o (艹 - 艹)
-Ⅲo6 36iibuHTn hac Ha ONDy XB. HATNCIb «+»; Ⅲo6 36iibuHTn hac Ha 10XB. HATNCIb «+» i 3aTpMaIte. KOI BCTAHOBJIeHn yac DOcRHe 1 roD, npOIOBxMyTe TpMaTn «+» i cac 6yde 36iibuSyBaTncb Ha 30 XB.
BIMoKeTe BCTaHOBtpiBeHb notyKHOCTi nID hAHAaHTyBaHHa TaMepa.
Akuo TaMep BCTAHOBIOEtbcra 6ilbH HIX Ha ONDy 3OHY:
Taimep MoxHa BCTaHOBbOAtn DnBcix OOTnpbox HarpBaIbHnx 3OH. RaKIO BN OJHOaCHO HaNaWTOByeTe DekiIbKa HarpBaIbHnx 3OH, BKOHH3OH3aOpRtbcr DecrKOBI dpo6n.
KtO TaMep BCTaHOBHeO, a Hja 30Ha He aKTHBOBaHa, TOniNe npocTo BiNik Yacy.
PEXIM B3NEKIN
J3a6e3neHHe 6e3eKn dIeN, naHb oBlaHaHa BHyTpIHIM 3AMKOM.
-БлOKувань
Ypo6oOmy pexmi haTCHiB knaBiuy ,BapnIbHa naHeIb nepeIe B pexm 6noKyBaHHa,Ha TaIMepi BNCBITbcra Loc a iHwi knaBiiwi 3abNOkyOTbcra, Kpim ①

PO35NOKYBAHH
HaHCHITb Ha knabiIy CNEUJIbHI FyHKUJI
npotromtpbOxCekyHa,inaHenebp03nokcycbc.
IiirpiB
DHaФyHKiJIdo3BONNTb 36epeTInCTpabyTeNIOO Do DBox roHn.
Aknbyte o6paHy 30Hy harpiBy hAtncHyBwn KhONky «-» a6o «+»
HaTnckaIe «-» DOKn He DoCgHHeTe pIBH MIX 0 Ta 1, nID o6paHOIO 3oHOIO 3arOpITbc8 3HaOk nIirp iy

BidmHa yHKuii nirdpiBy
Itnoro,io6 BiimHnФyHKiIO NiirpiBy,BBIMKHITb 6ydb-akni HwPiPBHeNnotxHOCTI.
DOUX KIn'arHHHa nobinbHomy borhi.(pbeHb1)
MOYEN CepeHra temnepatypa (pivb8)
VIF Bucoke harpisa (piseb 15)
AKnBMyTe 06paHy 3oHy HATnckaioHc 一 + 一 a6o (一)
DOUX


HaTnuchItb KIn'AtiHHa NobinbHOMy BORHI,
iHdkaTOpBid06pa3ntb


HATNCHTB《CepeHnTeMnepaTpya》,IHnKaTOp
BIDO6pa3ntb
111
VIF


HATNCHTb《BncokeHaarpiaHHa,iINKaTOp
BID06pa3ntb 111
ФУHKUIIПAM'RTI
Bn moKeTe BnKOpNCToByBaTHyHKciio nam'atI dIa 36epirAHHa npamaTpiB pIBH noTyXHoCTi o6paHOI 30HN.

MEMO
3A\PNC
Bn6epihtheo6xiny KOHOFOPky,HaTNCyBwn KONKy "+a60"-".
HaTnCHiB Mo, iHnKatop TaMepy nokaxe
O3hae, 0B nam'rTI He 3aikcoBaHO HIKX uKnIB npiroTyBaHHa, HATNCKaIe Ha 1o KnaBiW npTgrom 3 cek, KO
iHdkatop TaImepy nokae -E,3HaHTb 3annc po3noaBCA

IHnkaTOp noka3yepiBHeNOTyKHOCTi 0piBHeNOTyKHOCTi nonepeMHHO

MaKcHmAbha KInbKicTh onepaui - 10 pIBHe nOTyXHOCTi B Bapiaqix B 8 roDnH. Bydb-ka 3MiHa pIBHnOTyXHOCTI TpmbanictIO MeHwe 15 cekyn He 6yde 3anicaHa.
3YINHKA 3ANCY
HaTnCHiB 1e pa3 KhoNky naM'Ati, 3 ducnner 3HnKHe rE i uKn 6yde 36epexeHO.

ABO
BIMKHTb BiIDNOBHy 30Hy npriroTyBaHHaKi,HaTCHyBwKnlaBiuy ^ + ^ i-ODHOacHO,abO wJnxOM BCTAHOBneHHA
piBnnotyKHOCTiHa6E6inbwe He 6yde Bio6paKaTHcH a dncnneT TaMepa i uKn npiroTyBaHHia 6yde36epekeHo.

ABO
Pn6epitb kactpynIO 3 BiINOBiIDHOI 30Hn nprirotybaHH. PnBnBnEHHI BiccyTHOCTKacTpyni, -EC 6Inbwe He 6yde BiO6paKaTNCHa DnCnneI TaIMepa i uKn nprirotybaHH iXi 6yde 36epeXeHO. ABO
BcTaHOBIb pBeHb notyXHOCTi 6InbH HIX Ha 10, i -E C 6InbWe He 6yde BIO6paKaTHCb Ha dncnneI. ABO
Bumkhitb naheIb i Todi Bci HanaTsyBaHHa ABTomatHNO nepepybca. ABO
BIMKHTb 3OHy npiroTyBaHHaYepe3 15 cek. Picnna Nowatky 3ancy, i Todi Bci HanaWtByHnA BTOMATuHO nepepybcra. BIKOHAHHc LUKNYPINrOTyBAHHI KI
HaHCHITb KHONky nam'rTI npOTaROM 5 cek., Ha iHnKATopi TaIMepy 3'ABITbcra rI , notim 3'ABITbcra PLy BKnIOHTbcBaIDNOIBHa 3anporpamOBaHa 30Ha npriroTybaHHi po3noHTbcBnKOHaHHa Ukny.

RIO BIDNOIBHa 30Ha BKe BBIMKHeHa, 3aHcHm uKn 6yde npnopireTHM.
KIO npu BIKOHAHNI KNY HATNCHyTN 工 + 工 afo 工 - 工 TO 3anporpamOBAHNI npnHHaTbcaipo3noHHaTbcra 3BnuAHe npuroTyBaHH. Tm He MeHs 3anporpamOBAHNI 36epiraTbCBnAm'rti.
JHK 3anHcATn HOBNI pNROTyBaHHRAKIO MNB Xe OAnH 3anporpaMyBaJIH
AHTBHyTe 30hy npuroTybaHHra Ky Bn 6aKaTe 3anporpaMyBaTH, HATNCHbUN 已 + 已 a6o 已 - 已
HaTnCHiB yTpmyouH KNONK iHa dncnei 3'BAHTbcr r1
Oo O3Hauea 00 ha npuroTyBaHHa 36epexeHa B na'm'rti.
TOTIM Ha dncnne 3'ABNTbC R EC i po3noHETbcraanHC HOBOrO uKnly.

MaKcHmAlbHa notyXhIcTb 30H npnroTyBaHHa:
YHSEHHRA EKCINLYATAI
Ipeed BnKoHaHnM 6ydb-axnx po6it ha nahei, daTe i oxoJohTy.
CnD BnKOpncToBvBaTn TIlbKn npOdykuJIO (KpeM i Wkpe6Kn) npN3HaueHy dN KepaMiuHx NOBepxoHb.
YHnKaIePo3JIbB,AKIO Te IIO nonaDe Ha naHeIb WBNKO 3rOpNTb,Ye YcklaDHHTb HJH
BaxaHO TpMaTn noaI bI daH naHeli taKeYOBuHN, kI MoKytb po3nlaBntncra, taIK nIacTMaca, yKOp, Ta peOBOHn Ha yKpOBI oCHOBI.
Ekcnnyatauia
IdaaTe KInbKa kpanelb cneiaJbHoro MmOyoro 3ac06y Ha nobepxHIO naHJI.
3MoOiB CTIki NIAm M'RAKO TO KaHnHO, a6o BOIorHM KxOHHHM nanePOM.
IpoTnpaTe M'koTO kAnHOIO, aO cyxHm KxOHm nanePOM,doKn NOBepxHa He 6yde cyxoIO.
Kkuo 3aannnncra kicb cki narnn:
IdaTe 1eKeiNbka kpanelb cneuaJbHoro MMoHOro 3acO6y.
Noekpe6itb wke6kom niK yTOM 30 rpaDycB no nIaM,doKo BOHa He 3HnKHe.
IpoTnpaTe M'koIO kKaHHHO, a6o cyxHm KxOHnHm nanePOM,doKn noBepxHn He 6ynde uHcToIO.
Nobtopitb onepaui, kkuo Heo6xidno.
DAKINbKAIOPAD:
HacTa YnCTKa 3aIIIaMae 3axiChn Iap, kKm Heo6xIDHn Iyra 3anO6irAHnnoopnn H i3Hcy. NepeKoHaTeC, ao naHeB ncta nepeD NaCTynHM BnKOpNCTAHM. Uo6 no36yTncr po3BODIB npotpiB ykycom a60 NIMOHm COKOM. Notim npotptb cneiaJIbHM nOrlinHaOHm Naepom Ta CneiaJIbHM MIOUHm 3acOBm. CkIoKepaMHa NOBepXHa 3axuae BiD noOpnnH, ODAk, Kpaue nepecTaBn T KAcTpynl B OndH II 3OHn BInHy, YMM nepetaryBatn.
3anam'raTaine:
He BnKOpncTObyTe r6Ky,HaHaToBOnora.
HikonHe BNKOpncTOByTe HIXa6o BnKpyTKy.
Ckpe6ok 3Je30m He npn3BeDe do nowkoJkeHb nobepxHi, kso noor topmatn nd kyTom 30 rpaaycib.
Hikon He 3aIwauTe cKpe6ok 3 ne30m B MeKax DoCRAKHOCTi dTe.
Hikoli He BnKOpNCTOByTe a6pa3nBHi MaTepiAaN a6o nCtTni npOuKN.
UCYHEHHH HECNPABHOCTE
PEMOHT
IpeepBnKlnkOMMaCtpa nepeBipTe HacTynHe:
Yn npabInbHO BCTaBneHa BNlka B po3eTky. RaKIO HeHcnpabHicTB He MOXHa BN3HaunTn, TO BmHKITb npnaI 3 po3eTkn i 3bepHITbcr y cepBichn
UeHTp. PnIaI npOaEbca 3 rapaHtiHm cepTnphiKaTom, 0o O3Haay, 0o Bam Ioro BiDpeMOHTyIOB63KOHTOBHO.
PIUJEHHNPOBLEMN
IHykuiHa BapInbHa nobepxHn dae Ierkn CBnCT: HopMaJIbHO. BiIOBIOHO 3 po6oio yactotoio IHyKTopa, IERKn CBnCT MOKe BHHKNHYtn npn BnKOpNCtAHHI DEkiIbKOx 3OH npriOTyBaHn IIi Ha MAKcIMaJIbHi nOTyKHOctI.
CtapBn noBilbHO roTHyOCTbCa: BkOpNCTOByETbCe He nixoAun NoCyd. HIO KAcTpNi MaE 6yTu NLOCKM, He dyKe BaKMM, a diaMetp MaE BiNobiDaTH diametpy HaripBaIbHo30Hn.
3'8BIAIOCTMaIeHbKi NOdPAnHHN (TpiuHH): He npabnblHi MeToOnu HHeHH, nocyD i3 rpy6m dHom, a6o BeNkI qactKn Uky p6 o6ncky
notpannnmiknocydomi naHennIO.BukopncOByte peKOMeHDoBaHI MNUOci 3acO6N, uCTNI NOcYd i 3rJaDNM dHOM.
MeTaneBi MapkyBaHHa (MOxyt b 3'ABITnca NOpAHH). He TaHrHb aIOMHiEbn noCcyd no naHeni.
BnKOpncToByte peKomeHDoBaHi 3ac06n, 106 BnDaJIHTm MapkyBaHHa.
TemHi cmYr n a6o nnm: BnKOpncToBnyTe peKOMeHDoBaHI 3ac06n dIy HcHHeHHa.
3he6apBHeHHa naHeni: CniDn BiD anHomHieBnx abo MiHNx kactpynb, TaK cMoR aKi BAnHnn HAIIT, MoXHa BiNCHNTIN 3a DonOMOROIO
cneuaJIbHOro KpeMy.
Ha nanei po3nlaBvBC sykop a6o nlaCTmaca: NInBtbc B po3di《YuHENH
PAnelb BnIwla 3 naDy a6o DeaKi HarpibalbHI 30Hn He npauioToB. He npabInbHO nID'edHaHn TepMiHaBn 6LoK.
BapnIbHa noBepxHHe npaue: BapnIbHa naHEnb 3a6NoKOBaHa. HATncHITb KHOIpKy dJa po36NoKYBaHHA.
NaheIb ABTomATuHO BmNkaeTbca: 3OHa npiroTyBaHHA ABTomATuHO BmNkaeTbca, RaIO BOHa HADTO DOBRO npaioE.
3aTepeXeHH:Yci 3a3HaueHbIeU WkoDxHeHH CTocyIObca eTeTnHOro BnRnAly BapInbHOI NOBepXHi I He BnINBaHbHa II
fhykuiohybaHHa. Taki ykoDkeHHe hiIraHb rapaHTiHOMy o6cnyrobyBaHHIO.
YMOBN TAPAHTIHORO OBCJYROBYBAHHA
Tepmin iii rapahtiii cknae 12 micaub3 datn npodaKy.
Iiud rapaHTiHOro nepioy 6ydb-akn peMOHT MOKe 6yTH BkOHaHH Tbilkn KBaJIphiKOBAHM faxibcem cepbichoro ceHTpy.
Ipeed noaKom pemOHTy npnlaTpe6a BIDKIOUHTBID eEeKtpomepeki, 3HbWn 3anobHKnK a6o BnTfhywn uHyp JxNBLenH3 po3eKn. HnpoeciHe BtpuHaHH Ta peMOHT anapATy He6e3neHBI, BOHN MOKYb BnKNkAaTN BpaKeHH N EeKTPuHHM CTpyMOM Ta KOPOTke 3AMnKAHH; OTHE, He HAmaraTeCra YcHyTN HeCnpabHOCTcAmOTycknn. 3aInwTe 10po bocTy cneiaianctam a0pndCTABNHkAM cepBCHORO CEHTpy. RaOy o poBOTi AnapATy BnHNKIn RaICb He3NaHNI pO6LnMI, nepeBipTe 3a Donomoro HAcTyHINX IHCTpyKui, y3dTHi BuYnpatncs 3 HMM cami. BiNT CneiaJicTa i ABTopu3oBAHOro cpcBHCPO TOpHY NOBnEH M Bamr, RaIO 6yDe BCTAHOBLeHo, IO npnaD He npaOe che PHeNAeKHe nn He6dane BnOKpOcTAnHH. 36epiraTe IHCTpyKIO TAKIM YHNOH, 506 BOHA 3aBxJDN 6ylna nD pykoHO y paai Notpe6n; RaIO nepeDaBaTMme npnlaI IHwi Oco6i, nepeaTe TAKK I INCTpyKIO.
YMOBN:
CeptnphiKat
TapaTia DiIcH Ta TIlbKn npn HauBHO CTiCHORO TapaHTIHORO CePTNfKaTy.
TapaHTiHn cepTnphiKaT He diChn npn HABHOCTI B HbOMy NOMIOK, BUNpaBHeHne HEBIDNOBIDHOCTe.
B Ceptni KaTl MaIOb 6IITn 3aONBHeH NHyKTHn: HsBa Bnpo6y, MoeJIb, cepHmH Homep Bnp6y, dAa T npOaKy, nIINc npOabu, neaTb Toproo opranHaazii. Pn BiCyTHocTi dAa npOaKy TepMin rapaHTII abOMATNUHO BuNCHoETbcra 3 DaTn BuroTOBHeHH npCTpOIO.
TpaHcnpToyBaHHi 36epirAHn
Будб-якideфektn Bnpo6y, cnpuHHeH He6aIbIM TpaHcnpTyBaHHm i 36epiraHHM Bnpo6y, He niJraHOb 6eKoHTOBHOMy rapaHTiHOMy peMOHTY;
Be3KoWTOBHNrapaHTiHnpeMOHT He npOBoNTbcra, kIO DeΦeKT Bnpo6y BnKlnKaHH:
- Safety Reminding and Maintenance:
- GENERALWARNINGS
- INSTALLATION
- BUILT-IN
- Installation:
- ELECTRICAL CONNECTION
- Warning :
- Connection to power supply
- INDUCTION
- Put simply, induction technology has two main advantages :
- A HIGH SAFETY APPLIANCE
- Protection from over-Temperature
- - Residual heat warning
- - Auto shutdown
- Schematic diagram of the control panel
- HOB COOKWARE ADVICE
- Instructions for Use
- Operating instructions
- Boost function
- Warning:
- Cancelling the "BOOST" mode
- Timer function
- If the timer is set on more than 1 zone:
- Note:
- Safety mode
- Keepwarmmode
- Special function
- Memory function
- Recording
- Stop recording
- OR
- Execute a recorded cooking cycle
- How to record one new cooking cycle if we have already recorded one:
- CLEANING AND MAINTENANCE
- MAINTENANCE:
- If there are still some stubborn stains:
- A FEW HINTS:
- AFTERCARE
- Before calling out a Service Engineer please check the following:
- PROBLEM SOLVING
- The induction hob gives shorings out.
- Foods cook slowly.
- Tiny scratches (may appear as cracks or abrasions) on the glass surface of the hob.
- Metal markings (may appear as scratches).
- Dark streaks or specks.
- Areas of discoloration on cooktop.
- The hob does not operate.
- The hob does not cut off
- The hob stops automatically
- Frequency of on/off operations for cooking zones
- BByIOBYBAHH
- ПИДКIOЧЕНЯ DO ELEKTPOMEPEXI
- EneKtpnHne nDHaHH
- PiEHaHHaDdoJKepeLaKnBHeHH
- IHyKlIA
- CnOciB BnKOpNCTAHH
- PINCTPIIIBNUEHOI B3NEKNI
- NOCyIДЯВAPINbHOI NOBEPXHI
- NOCYДДЯВAPИЛБНОПВЕРХHI
- CXEMATUHA IIAIPTPAMA PAHEJI YNPABLIHHA
- IHCTPYKJI3 BNIKOPNCTAHH
- ФУHKUIIIДВИSEHHA NOTYKHHOCTI
- ybara:
- BIIMHA FVHKIII PDBNUEHHIOTYXHOCTI
- ФУHKUII TAIMEPY
- 3anam'raTae:
- Akuo TaMep BCTAHOBIOEtbcra 6ilbH HIX Ha ONDy 3OHY:
- PEXIM B3NEKIN
- -БлOKувань
- PO35NOKYBAHH
- IiirpiB
- BidmHa yHKuii nirdpiBy
- ФУHKUIIПAM'RTI
- 3A\PNC
- 3YINHKA 3ANCY
- ABO
- YHSEHHRA EKCINLYATAI
- DAKINbKAIOPAD:
- 3anam'raTaine:
- UCYHEHHH HECNPABHOCTE
- PEMOHT
- PIUJEHHNPOBLEMN
- YMOBN TAPAHTIHORO OBCJYROBYBAHHA
- Tepmin iii rapahtiii cknae 12 micaub3 datn npodaKy.
- YMOBN:
- CeptnphiKat
- TpaHcnpToyBaHHi 36epirAHn
Brand : ROSIERES
Model : RID 430 BV
Category : Cooker