
RIED 430 B - Cooker ROSIERES - Free user manual and instructions
Find the device manual for free RIED 430 B ROSIERES in PDF.
| Product type | Induction cooker |
| Brand | Rosieres |
| Model | RIED 430 B |
| Dimensions (W x D x H) | 590 x 520 x 55 mm |
| Built-in dimensions (W x D) | 560 x 490 mm |
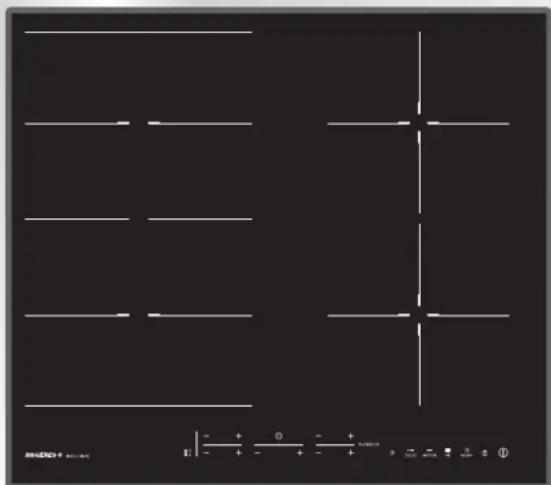
| Number of cooking zones | 4 induction zones |
| Flexible zone | Yes, usable as one or two independent zones |
| Total power | 7200 W |
| Electrical supply | 220-240V~ 50/60Hz / 400V~ 50/60Hz |
| Boost function | Yes, on all zones (5-minute duration) |
| Power per zone (normal/boost) | Zones 1,2,3,4: 1800W / 3000W; Flexible zone: 3000W / 4000W |
| Timer | Programmable from 1 minute to 9 hours 59 minutes |
| Memory function | Recording and execution of cooking cycles (up to 10 variations) |
| Child lock | Yes, with Lock key (hold for 3s to unlock) |
| Residual heat indicator | Yes ("H" indicator) |
| Automatic safety shut-off | Yes (based on power level: 1-5 → 8h, 6-10 → 4h, 11-14 → 2h, 15 → 1h) |
| Overheating protection | Yes (internal thermal sensor) |
| Cookware compatibility | Magnetic bases (cast iron, enameled steel, ferritic stainless steel); diameter ≥ 140 mm |
| Surface cleaning | Specific ceramic glass products and scraper (30° angle) |
| Power cord | Only replaceable by an approved professional |
Frequently Asked Questions - RIED 430 B ROSIERES
User questions about RIED 430 B ROSIERES
0 question about this device. Answer the ones you know or ask your own.
Ask a new question about this device
Download the instructions for your Cooker in PDF format for free! Find your manual RIED 430 B - ROSIERES and take your electronic device back in hand. On this page are published all the documents necessary for the use of your device. RIED 430 B by ROSIERES.
USER MANUAL RIED 430 B ROSIERES
INSTRUCTIONS FOR USE AND INSTALLATION
GB
TABLES DE CUISSON
NOTICE D'EMPLOI ET D'INSTALLATION
FR
IHCTPyKzIa 3 EKCnIyATAuT Ta IdKlIOUeHHa
BБУДОВАHOI INДУКЦИНоВЕРХИ
UR
MODEL: RIED430B
-
Power regular key
-
Memory
-
Timer regular key
-
Lock
-
Booster
-
On/Off
-
Special function
-
Flexible Area activation
Safety Reminding and Maintenance:
- A dedicated power protection air switch must be used.
- For indoor use only
- Never wash the induction cooker with water.
- Never have the ceramic cooker hob to work without food inside, otherwise its operational performance may be affected and danger may happen.
- Always open sealed containers, such as cans, before heating them, otherwise they may explode.
- When a cooking zone has been on a long time the surface remains hot for some time afterwards – so do not touch the ceramic surface.
- From time to time check that nothing (eg glass, paper, etc) is obstructing the air intake beneath the induction hob.
- Do not leave metallic objects such as knives, forks, spoons and lids on the hob as they may get hot.
- Never use the induction hob near another appliance which generates a high temperature, such as a gas cooker or a paraffin heater.
- Do not store detergents or flammable materials beneath the hob.
- If the surface of the hob is cracked, swith off the appliance to avoid the possibility of electric shocks.
- Do not place rough or uneven appliances, which may damage the ceramic surface.
- Clean the induction hob regularly to stop foreign objects from getting into the fan and preventing the appliance from working properly.
Safety Reminding and Maintenance:
- WARNING: The appliance and its accessible parts become hot during use. Care should be taken to avoid touching heating elements.
- Children under 8 Year of age must be kept away from the appliance unless they are continuously supervised.
- This appliance can be used by children aged from 8 years and above and persons with reduced physical, sensory or mental capabilities or lack of experience and knowledge if they have been given supervision or instruction concerning use of the appliance in a safe way and understand the hazards involved.
Children must not play with the appliance. - Cleaning and user maintenance shall not be made by children without supervision
- WARNING: Unattended cooking on a hob with fat or oil can be dangerous and may result in fire.
- NEVER try to extinguish a fire with water, but switch off the appliance and then cover flame e.g. with a lid or a fire blanket.
- WARNING: Danger of fire: do not store items on the cooking surfaces.
- Do not use a steam cleaner for cleaning operations
- After use, switch off the hob element by its control. Do not rely on the pan detector.
Safety Reminding and Maintenance:
- This appliance is not intended to be operated by means of an external timer or separate remote-control system.
- The means for disconnection must be incorporated in the fixed wiring in accordance with the wiring rules.
- The instructions state the type of cord to be used, taking into account the temperature of the rear surface of the appliance.
- If the supply cord is damaged, it must be replaced by the manufacturer, its service agent or similarly qualified persons in order to avoid a hazard.
- CAUTION: In order to avoid a hazard due to inadvertent resetting of the thermal cutout, this appliance must not be supplied through an external switching device, such as a timer, or connected to a circuit that is regularly switched on and off by the utility.
Warning: this appliance complies with current safety regulations and electromagnetic compatibility regulations. Nevertheless, people with a pacemaker should not use this appliance. It is impossible to guarantee that all such devices found on the market comply with current safety regulations and electromagnetic compatibility regulations, and that dangerous interference will not occur. It is also possible that people with other types of device, such as a hearing aid, could experience some discomfort.
READ THE INSTRUCTIONS BOOKLET CAREFULLY TO MAKE THE MOST OF YOUR HOB.
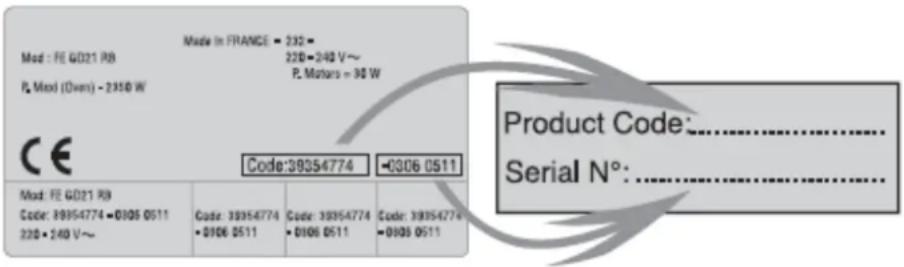
We recommend you keep the instructions for installation and use for later reference, and before installing the hob, note its serial number below in case you need to get help from the after sales service.
Identification plate
(located under the hob's bottom casing)

| COOKING HOB | RIED430B |
| Cooking zones | 4 INDUCTION |
| Supply voltage | 220-240V~ 50/60 Hz 400V 50/60Hz |
| Installed electric power (W) | 7200 |
| Product size( d X w X h ) mm | 590 X 520 X 55 |
| Building-in dimensions (AXB) | 560 X 490 |
| A B |
We are constantly striving to improve product quality and as such may modify appliances to incorporate the latest technical improvements.

Induction hobs conform to European Directives 73/23/CEE and 89/336/CEE, replaced by 2006/95/EC and 2004/108/EC.
and subsequent amendments.
INSTALLATION
Instalng a domestic apian can be a compled operation which if not carried out cctly, can seriously affect consumer safety. It is for this reason that the task should be undertaken by a professionall qualitied person who will carry it out in accordance with the technical regulations in force. In the event that this advice is ignored and the installation is carried out by an unqualified person, the manufacturer declines all responsibility for any technical failure of the product whether or not it results in damage to goods or injury to individuals.
BUILT-IN
The furniture in which your hob will be installed and all adjacent furniture, should be made from materials that can withstand high temperatures. In addition, all decorative laminates should be fixed with heat-resistant glue.
Installation:
- A watertight seal is supplied with the hob.
- It it important to fit the hob on a level supporting surface.
- Deformations caused by incorrect fitting can alter the specifications of the worktop and the performance of the hob.
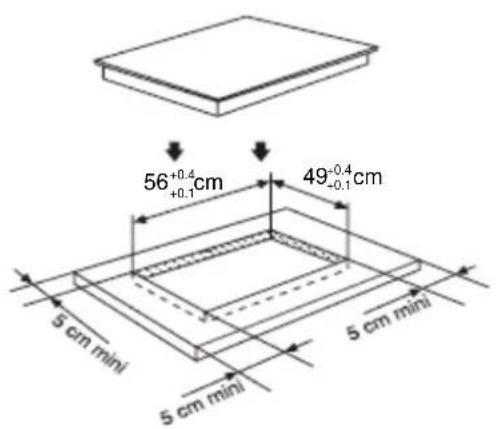
- Leave a gap of at least 5cm between the appliance and any neighbouring vertical surfaces.
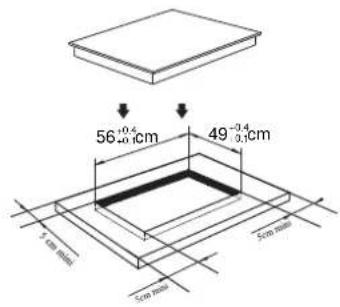
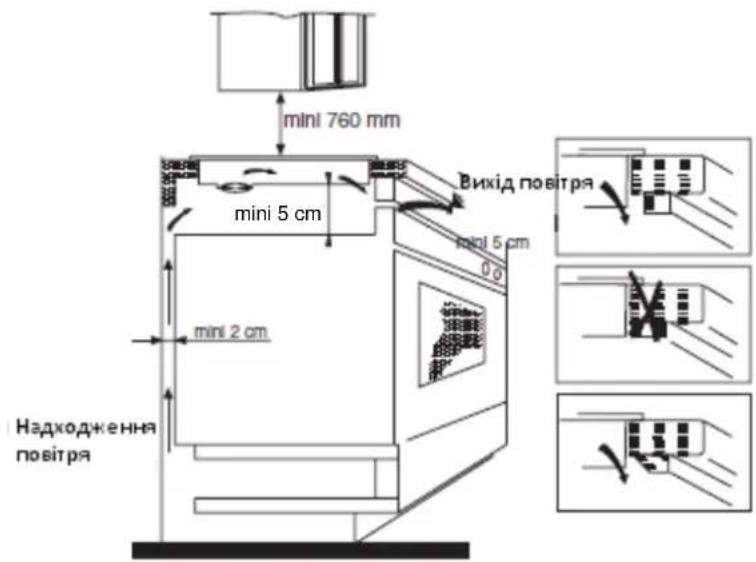
It is absolutely essential that the recess conforms with the dimensions indicated. - Cut a hole in the worktop of the dimension shown in the diagram below. A minimum of 50~mm space should be left around the hole.
The worktop should be at least 30mm thick and made of heat-resistant material. As shown in the Figure(1)

- You can not build the hob in above an oven with no fan, a dishwasher, fridge, freezer or washing machine.
It is essential that the induction hob is well ventilated and that the air intake and exit are not blocked.
Make sure the hob is correctly installed as shown in Figure(2)
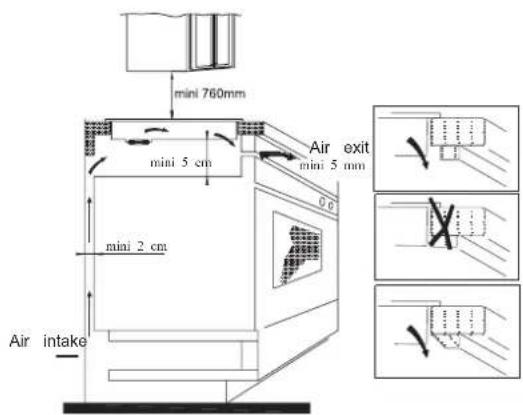
NB: For safety, the gap between the hob and any cupboard above it should be at least 760mm.
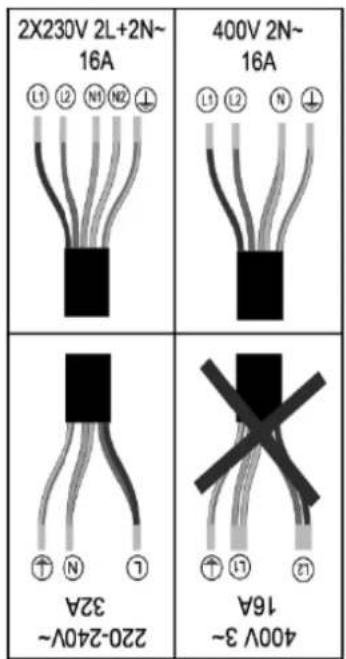
ELECTRICAL CONNECTION
"The installation must conform to the standard directives." The manufacturer declines all responsibility for any damage that may be caused by unsuitable or unreasonable use.
Warning :
- Always check before any electrical operation, the supply tension shown on the electricity meter, the adjustment of the circuit breaker, the continuity of the connection to earth to the installation and that the fuse is suitable.
- The electrical connection to the installation should be made via a socket with a plug with earth, or via an omnipole cut-out switch with an opening gap of at least 3mm . If the appliance has a socket outlet, it must be installed so that the socket outlet is accessible.
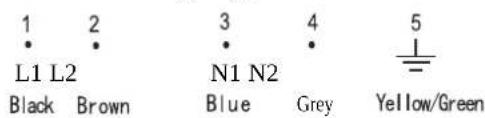
- The yellow/green wire of the power supply cable must be connected to the earth of both power supply and appliance terminals.
- The manufacturer cannot be held responsible for any accidents resulting from the use of an appliance which is not connected to earth, or with a faulty earth connection continuity.
- Any queries regarding the power supply cord should be referred to After Sales Service or a qualified technician.
- if the cable is damaged or to be replaced, the operation must be carried out by sale agent with dedicated tools to avoid any accident.
Connection to power supply
The socket shall be connected in compliance with the relevant standard, to a single-pole circuit breaker. The method of connection is shown in Figure(3):
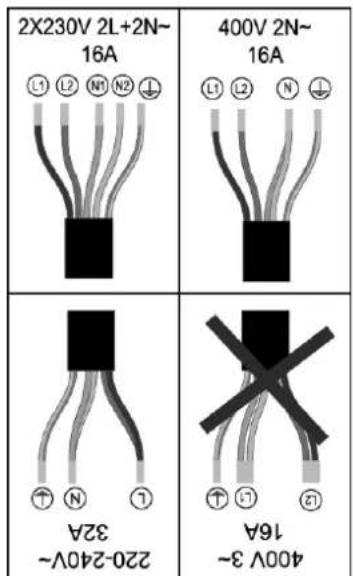
The cable must not be bent or compressed.
INDUCTION
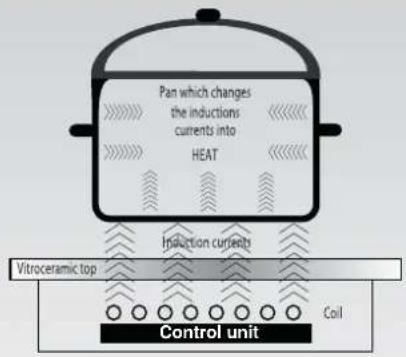
USE PROCEDURE
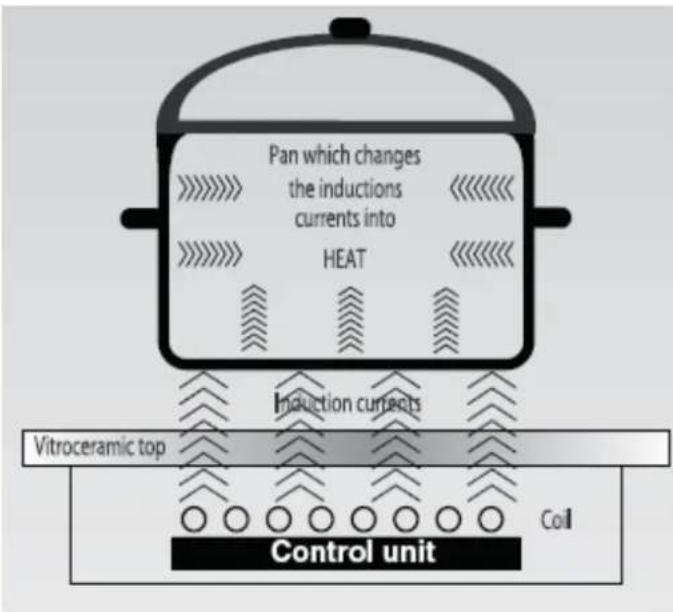
An electronic generator powers a coil located inside the appliance. This coil creates a magnetic field, so that when the pan is placed on the hob, it is permeated by the induction currents.
These currents make the pan into a real heat transmitter, while the glass ceramic hob remains cold.
This system is designed for use with magnetic-bottomed pans.
Put simply, induction technology has two main advantages :
as heat is emitted only by the pan, heat is maintained at its
maximum level and cooking takes place without any heat loss.
- There is no thermal inertia, as cooking automatically starts when the pan is placed on the hob and stops when it is removed.
A HIGH SAFETY APPLIANCE
Protection from over-Temperature
A sensor monitors the temperature in the cooking zones. When the temperature exceeds a safe level, the cooking zone is automatically switched off.
Residual heat warning
When the hob has been operating for some time, there will be some residual heat. The letter "H" appears to warn you to keep away from it.
- Auto shutdown
Another safety feature of the induction hob is auto shutdown. This occurs whenever you forget to switch off a cooking zone. The default shutdown times are shown in the table below.
| Power level | The heating zone shut down automatically after |
| 1~5 | 8 hours |
| 6~10 | 4 hours |
| 11~14 | 2 hours |
| 15 | 1hours |
When the pan is removed from the cooking zone, it stops heating immediately and switches itself off after the buzzer sounded for one minute.
RE
the guidance of the doctor.
maer shall use this product underThe paatien whi hae
- Power regular key
图图 - Booster
-
Special function
-
Memory
- Lock
- On/Off
- Flexible Area activation
HOB COOKWARE ADVICE
Using good quality cookware is critical for setting the best performance from your hob.

Instructions for Use
When the power is switched on, the bus and windance and all the indicators will come one second and then go out. The hob is almostly made place the pan in the centre of the cooking zone.
Operating instructions
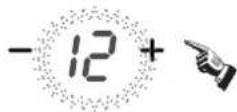
- Press the " key, all the indicators show "--".


Select the power level by pressing the "+" or "-" key for the relevant hotplate. To begin with the indicator shows "or" by pressing the "+" or "-" key. Adjust up or down by pressing the "+" or "-" key.
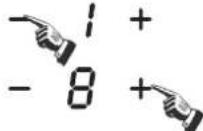
If you press the "+" and "-" keys simultaneously, the power setting returns to " and the cooking zone switches off.

NB: When the " key is pressed, the induction hob returns to standby mode if no other operation is carried out within 1 minute.
*Under normal working mode, at any power levels, the maximum total power of zone #1 and #2 is not higher than 3000W.
*Under normal working mode, at any power levels, the maximum total power of zone #3 and #4 is not higher than 3000W.
Boost function
Press the" key, the power level indicator showing " b

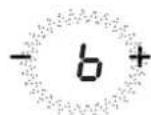
Warning:
- The boost function only operates for 5 minutes, after which the cooking zone will revert to its original setting.
- The boost function works on all cooking zones.
Cancelling the "BOOST" mode
Cancel the "Boost" mode by pressing the "+" or "-" key of the corresponding zone.

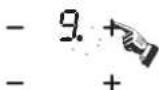
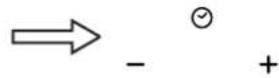
Timer function
If more than 1 zone is switched on :
activate the selected zone by pushing "+" or "-" key of that zone, the corresponding digits will be flashing.

then press the " + " or " - " timer key power level indicator flashing and showing " and the timer indicator flashes


To begin with the indicator shows" 0:1Get the time by pressing the "+" or "-" key. After setting the time, you can select the power level of the cooking zone.
Then set the time for between 1 minute and 9 hours 59 minutes by pressing the "+" or "-" key.
Press the "+" key once increases the time by one minute; hold down the "+" key increases the time by 10 minutes; When the time exceeds 1 hour, hold down the "+" key increases the time by 30 minutes.
Press the "-" key once decreases the time by one minute; hold down the "-" key decreases the time by 10 minutes; When the time exceeds 2 hours, hold down the "-" key decreases the time by 30 minutes.
- You can set the power level during the timer mode.
If the timer is set on more than 1 zone:
Timer can be set on all 4 cooking zones. When you set the time for several cooking zones simultaneously, decimal dots of the relevant cooking zones are on.
$$ \begin{array}{l} - 9. + \ - \text {E}. + \ \end{array} $$
On the timer display will be shown the timer than will expire first. The dot of the corresponding zone will be on but flashing.Once the countdown timer expires the corresponding zone will be switch off. Then it will be shown the new first expiring timer and the corresponding zone will have the dot flashing.
If the timer is set but not active on any zone, it will work simply as timer countdown.
Note:
- When the timer is 0 minute, the timer is cancelled.
- When time elapses, the relevant cooking zone is switched off.
- After setting the timer, the timing indicator has been flashing for 5 seconds, the set time will be automatically confirmed.
- In timer mode, pressing the "+" or "-" key of the timer simultaneously, timer setting returns to "0", time is cancelled.
Instructions for Use
Safety mode
To ensure the safety of children, the induction hob is fitted with an interlock device.
O Lock:
In working mode, press the " key, the hob then goes into the lock mode, timer will display " L and the rest of the keys are disabled except the " key.


In standby mode, press the "lock" key, the hob then goes into the lock mode, the timer shows "L and the rest of the keys are disabled. The timer shows "L a while and then goes out.
If you press the key, " Lo will be displayed for a while.
Unlock:
Hold down the"Lock" key for 3 second, and the lock function will be deactivate.
Special function

Ativate the selected zone by pushing "+" or "-"
Memory function
You can use the memory function to store the power level settings and duration for one zone.

Recording
press the" key, with the timer indictor showing " r0 "r0"means no cooking cycle in memory". hold down the memory key for 3 seconds, with the timer indicator show "rEC

Select the desired cooking zone by pressing the "+" or "-" key, with the power level indicator of that zone flashing, recording is started.
the power level indicator showing " and power level alternately.

The maximum number of operations is 10 power level variations in 8 hours. Any power level variation lasting less than 15 seconds will not be recorded.
Stop recording
Press again the memory key," will be no more display on the timer display and the cooking cycle will be stored

OR
Switch off the corresponding cooking zone by pressing "+" and "-" simultaneously or by setting the power level to 0, "rEC" will be no more display on the timer display and the cooking cycle will be stored.

OR
Remove the pan from the corresponding cooking zone. When the zone detects missing pan, then be no more display on the timer display and the cooking cycle will be stored
OR
Do more than 10 power level setting variations," nE C will be no more display on
OR
switch off the hob,in that case the recording of the cooking cycle is automatically aborted.
OR
switch off the a recorded cooking zone before 15 second since the starting of the recording in that case the recording of the cooking cycle is automatically aborted.
Instructions for Use
Execute a recorded cooking cycle
Press the memory key, the timer indicator displays "r", wait for 5 seconds, then displays "PL". The zone corresponding at the recorded cooking cycle will switch on and starts performing the cycle.

If the corresponding zone was already on, the recorded cooking cycle will take the priority and be performed.
If during the execution of a recorded cooking cycle on the corresponding zone ^ 十 + ^ 一 or - key, the recorded cooking cycle is aborted and normal managing is restored.anyway the stored cooking cycle is kept in memory.
How to record one new cooking cycle if we have already recorded one:
Hold down the" key for a while, and the " r" I will appear." means "cooking zone stored in memory".
Then the" r will be displayed,
Activate the cooking zone we want to record by pressing" ^+ " or "-", the recording of the cycle on the selected zone starts.
$$ - 1 2 + \sqrt {2} $$
As big zone
To activate the flexible area as a single big zone, simply press the dedicated keys.
A led will turn on to indicate the flexible area has been activated
The power setting works as any other normal area.
If the pot is moved from the front to the rear part (or viceversa), the flexible area detects automatically the new position, keeping the same power.
As two independent zones
To use the flexible area as two different zones with different power settings, press the dedicated keys.

If the flexible area is on, press the dedicated key to turn it off, before using as two different zones
Note: It is recommended that the cooker hood suction is switched on few minutes prior to cooking and switched off few minutes after terminating cooking.
The maximum power of cooking zones is as follows:
| Heating Zone | Normal | Boost |
| 1 | 1800 | 3000 |
| 2 | 1800 | 3000 |
| Flexible Area | 3000 | 4000 |
| 3 | 1800 | 3000 |
| 4 | 1800 | 3000 |
The above may vary according to the pan and the material it is made from
FLEXIBLE AREA
This area can be used as a single zone or as two different zones, accordingly to the cooking needs anytime.
Flexible area is made of two independent inductors that can be controlled separately. When working as a single zone, the part that is not covered by cookware is automatically switched off after one minute.
To grant a correct pan detection and a even heat distribution, the cookware should be correctly placed:
- In the front or rear side of the flexible zone when the cookware is smaller than 22cm
- Anywhere with bigger cookware
CLEANING AND MAINTENANCE
Before carrying out any maintenance work on the hob, allow it to cool down.
- Only products, (creams and scrapers) specifically designed for glass ceramic surfaces should be used. They are obtainable from hardware stores.
- Avoid spillages, as anything which falls on to the hob surface will quickly burn and will make cleaning more difficult.
- It is advisable to keep away from the hob all substances which are liable to melt, such as plastic items, sugar, or sugar-based products.
MAINTENANCE:
- Place a few drops of the specialised cleaning product on the hob surface.
- Rub any stubborn stains with a soft cloth or with slightly damp kitchen paper.
- Wipe with a soft cloth or dry kitchen paper until the surface is clean.
If there are still some stubborn stains:
- Place a few more drops of specialised cleaning fluid on the surface.
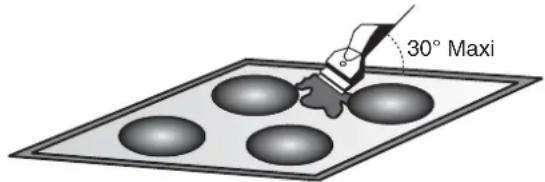
- Scrape with a scraper, holding it at an angle of 30^ to the hob, until the stains disappear.
- Wipe with a soft cloth or dry kitchen paper until the surface is clean.
- Repeat the operation if necessary.
A FEW HINTS:
Frequent cleaning leaves a protective layer which is essential to prevent scratches and wear. Make sure that the surface is clean before using the hob again. To remove marks left by water, use a few drops of white vinegar or lemon juice. Then wipe with absorbent paper and a few drops of specialised cleaning fluid. The glass ceramic surface will withstand scraping from flat-bottomed cooking vessels, however, it is always better to lift them when moving them from one zone to another.
NB:
Do not use a sponge which is too wet.
Never use a knife or a screwdriver.
A scraper with a razor blade will not damage the surface, as long as it is kept at an angle of 30^ .
Never leave a scraper with a razor blade within the reach of children.
Never use abrasive products or scouring powders.
AFTERCARE
Before calling out a Service Engineer please check the following:
that the plug is correctly inserted and fused; If the fault cannot be identified:
switch off the appliance — do not tamper with it — call the Aftercare Service Centre. The appliance is supplied with a guarantee certificate that ensures that it will be repaired free of charge at the Service Centre.
PROBLEM SOLVING
The induction hob gives shorings out.
Normal. The cooking fan of the electronic components is on.
The induction hob gives a light whistling out.
- Normal. According to the working frequency of the inductors, a light whistling can occur when using several cooking zones on maximum power.
Cooking zones that do not maintain a rolling boil or a fast enough frying rate.
- You must use pans which are absolutely flat.
- Pan bottoms should closely match the diameter of the heat zone selected.
Foods cook slowly.
- Improper cookware being used. Pan bases should be flat, fairly heavy-weight and the same diameter as the heat zone selected.
Tiny scratches (may appear as cracks or abrasions) on the glass surface of the hob.
Incorrect cleaning methods, cookware with rough bases, or coarse particles (salt or sand) trapped between the cookware and the surface of the hob.
- Use recommended cleaning procedures, be sure cookware bases are clean before use and use cookware with smooth bases.
Metal markings (may appear as scratches).
- Do not slide aluminium cookware across the surface. Use recommended cleaning procedure to remove marks.
- Incorrect cleaning materials have been used, spillage or grease stains remain on the surface, use a razor scraper and recommended cleaning product.
Dark streaks or specks.
- Use a razor scraper and recommended cleaning product.
Areas of discoloration on cooktop.
- Marks from aluminium and copper pans as well as mineral deposits from water or food can be removed with the cleaning cream.
Hot sugar mixtures / plastic melted to the surface.
See the Glass Hob Cleaning section.
The hob is out of order, or some heat zones do not work.
- The shunt bars are not properly fitted on the terminal block. Check the connection is made in conformity with the instructions page 2.
The hob does not operate.
The control panel is locked. Press the "Locking" button to release.
The hob does not cut off
- The control panel is locked. Press the "Locking" button to release. Refer to the section, page 5.
The hob stops automatically
- The cooking zones stop automatically if they are left on for too long. Refer to the section, page 3.
Frequency of on/off operations for cooking zones
- The on-off cycles vary according to the required heat level:
- low level: short operating time,
- high level: long operating time.
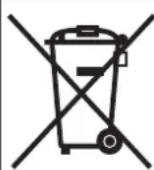
This appliance is marked according to the European directive 2002/96/EC on Waste Electrical and Electronic Equipment (WEEE). By ensuring this product is disposed of correctly, you will help prevent potential negative consequences for the environment and human health, which could otherwise be caused by inappropriate waste handling of this product. The symbol on the product indicates that this product may not be treated as household waste.

Instead it shall be handed over to the applicable collection point for the recycling of electrical and electronic equipment. Disposal must be carried out in accordance with local environmental regulations for waste disposal.
For more detailed information about treatment, recovery and recycling of this product, please contact your local city office, your household waste disposal service or the shop where you purchased the product.
Дякемо BAM 3A BИБIP ПОДуКцI ROSIERES!
3AΓΑΙβΗΠΟΙΟχΕΝΗ
Iy onTnMaHbHO BnKOpNCTaHH BaOoi BapInbHOi naHei, yBaJHo npouHTaTe daHy iHcTpkyIO. M peKoMeHdyEMo 36epertn 6yKeIe, dna noDaJIbXnx KOHCyIbTaU, a nepeD BcTaHOBLeHNrM 3aNNWITb cepiHn Homep Bnp6y, Ha BnAdoK, kIo Bo Bam 6yde nOtpi6he cepbiche o6cLyroByaHH.
IeHTnΦiKauiHa naHeB (Ta6bIuHka 3 OCHOBHM DaHUM npKpInHeHa Do HxKhBoRo KpaIO BapNlbHOI NOBepXHi.).

YBAFA:Le npctpi Bijnobidae cyaHm BnMOram npabn 63neKn. TaKoJIOBOMOdo BaWoR O Bioma, 0u ceN Bnip6 cepTnFikOBAHn 3riHOn 3 BnMOrAmn 63neKn opraHOM no cepTnFikAciPi nPOMCNOBoI npOdykuii DepeKaBHm KOMiTetom YkpaHIn 3 nHTaHbTexHrHO peryIIOBaHH Ta cNoXKBoI nonITKN depXABHa cnCTema cepTnFikAciU YkpCEHPO.
3AЯBAПОВIДПОВIDHICTb
Ha niDctabi npOTOKOly cepTnphiKauHnx Bnnpo6yBaHb N06-08/08 BiD 7.08.08, BuaHoro TOB «UkpaiHcbKa BJI BECHA», 49036, M. DiHinponeTpOBcbK, ByL. JelHiHrpadcbKa, 68, aTeCTa AkpeiHTauii N2H557 BiD 12.07.2007, BInCHOBky OC Ne1985 BiD 07.08.2008.

UeI cMbOHa Bnpo6i a6o Ha NOro ynaKOBuI No3Haue, 0o 3 Hm He MoKHa NoobDInTcA, kI iNObyTOBUM CmTTAM. 3aMictb Uboro Heo6xIdHO nobepHyTN Do BiIDNoBIDHoro NyHKTy 360py dInepepO6Kn eEKeTpHoro Ta eEeKtpOHHO 6bIaHaHHa. 3a63neuyOnn HalekHy nepepO6ky cboR O npO6y, BuOnomaraTe nonepeDHT noTeHuiHi HeratNBH HiKn dIra HABKOINHbOre cepedobnua Ta 3dopOB' IIOHN, Aki MOrn 6n BnHnKHyTN 3a YMOB HeHaLeXHORo nO3bAeHHBaBorO BnpO6y. 1o6 oTpMaTn DeTaJIbHIwY IHOpMaIio CTocOBHO nepepO6Kn bOro BnpO6y, 3BepHtcbrdo CBoro MicceBoro ophiCy, BaoiCny6n YtnlisaII a6o Do maraHa, De Bn npnd6aIu n eBnBip6.
3ACTEPEXKEHH
IyToro 06 yHnKHyTN TpaB, He niDnyckaTe dite, KOJI Bnpi6 BBIMKHeHO.
YBaXHo CnIkyNe 3a npiroToYBaHHaMaHa oIi abo Ha Hxpi, TOMy IIO BOH MoKyTb SwNko 3aropitna.
Obnactb ynpabinHH BapnibHOIO NOBepxHeIO dyke yTInBa, TOMy He cTaBte Ha Hei rapaip npedmet.
He cTaBTe Ha HarpBaIbHi 3OHN pIaCTNkoBN a6o aIOMiHIEBN nocyD.
NcIa KooHoro BnKOpNCtAHn npOtpaIte naHEnb, 0o6 3ao6iITn HAKOnuYeHNIO 6pyDu ta Knpy. Ako 0bo r He poBHTn, npn HactynHomBy BnKOpNCtAHHI 3aIIuIKn Knpy NoHyTb dIMiTn, cnpuHHaOHe npmHMn 3anax, He KaKyu BKe npo pn3NK 3aMaHn.
He 3aIiHaIe MeTaJIeBI npEIMTe, Taki K HOKi, BnDEIKN, IOKKn a6o KpUkN Ha 3OHi iHdyKci, TOMy IIO RaKIO BOHN 3aHaTTO BeNIki a60 3aHaTTO BaKki, BOHI MOKyTB HarPITcra.
Hikon He roTyte JxHa KepamuHi NOBepxHi, 3aBKn BIKOpncTOBy Te BiIDNoBIDn nocyD.
3aBxKnCTaTeKaCTpyIHOHa cepeDHy 3OHN HarpiBy.
He BnKOpncToBnyTe naHb Jk o6pO6Hy doWky.
HeTARHITb KxOHHN NOcUd nO nobepxHi.
Hecklaadai Te BaKni npedMeTN HaiaHEnIIO, KaIO BOHN BnAytb, To MoKyTb II NOOKoNTN.
He BnKOpncTObyIe BapnlbHy naHJIb B JAKoCTi po6OoI nobepxHi.
He BnKOpncToBnyTe noNui dIa 36epirAHHa 6yDa-Anx npEmdetib.
Ha naheI He noBHHo 6yTu TpiuH, kUO BOHn 3'ABTbC, BiEHaHTe eEeKtpoxnBHeH I 3BepHiTcBdo cepBicHO ceHTpy.
TEXHIUHIXAPAKTEPNCTUKN
IHCTPyKci 3 TEXHIKN BE3NEKN
YcTaHOBky npnady Ta Ioro nIckHHeHH No eEnKtpOmepeKi nobHN npOBoDHT NIIe KBAJIΦIOBAHm faxIBEu.
€ deRki enemeHTapHi npabnla 6e3neKn, aKi nixoAaTb dIy6yB-koI no6yTOBoi texHkN.
IHykuiHa NoBepxHa np3HaueHa dA BnKOpCTaHn IiWe B DoMaunbOmy roCnoapCTBI.
YcTaHOBky npuIady y kxyOHHy NOBepxHIO Ta nikKIOueHH NOBHN HnpOBdHTiNbKn faxibeCb BiNnOBIHOI KBAJIPIKaui.
He 3aHnwaTe dTee 6e3 Hargy, kUO BOHN 3HaXoJbTcBc npOy 3 npauIOHOIO pIIOTO:BOHN MOKyb OTPmuAtn OniK.
Hikon He po3miyute npoxhi nocyd Ha KOHOpkax.
IpekoHaTecb, 0o DeTani KOHOpOK yCTaHOBneHi npabnBHO.
IHykuiHi BapnblHi NOBepxHi He MOKHa BnKOpncTOBbATn RaPobOci NOBepxHi. FocTp ipeMeTn MoKyTB 3aHmHTn Ha Hi noDpaNNH.
DAnHn npInaB BnroTOBHeH BiNobIDHO Do BmOr cTahApTb 6e3neKn. Tm He MeHs, Mn HanoerNoB peKoMeHyEmO oc6am, 00 MaHtB fI3uHbBaH, nCnxHHi po3NaH, a60 TaKIM, 00 He MaOTb DocTaTHb OocBiy, He KopncTyBaTHcA npInaDM 6e3 Donomn DocBiyHeH o6b H a60 ni d II NnblHM HarlAOM. Taki JnopaAa CTocyOtbcra I HenOBHOniTHix diteH.
BbYIOBYAHH
-
YCTaHOBky npnlaIy ypo6oy nuOBepxHToTii niiKIOUeHHNo eNEkTpOmepeXi NOINHeH npBOODTN IwE KBAJIΦIKOBAHn faxIBEb.
-
OdoBbH MaTepiAkyoHHMe6IIB, Kyu 6yde yctaHOBeHa BapInbHaNOBepxH, Mae 6yTu CTIKM Do BnNBy BucOKnx Tempeatyp 100^ ,y IHOWMY pa3i 03do6leHH po6Ooi nobepxH MoKe BTPaTHTKoJIp a6o deOpmyBaTnC.
-
FepMeTnHi NlOM6n NoCTaBnHOTbcpa30m 3 naHeJIIO.
IpepaHOBOKIO:
IpepebepHtB nAHeNb, cKJIaHOIO NOBepxHeIO DO Hn3y;
IpekoHaTeCra,IO CKno 3axnuehe; 3afoKcyTe NLOm6b IOBkOJa naHeni;
IpekoHaTeC, 0o BOH 3aikcoBaHi npabInbHo, 06 HiOro He 3atikano B w4y; BaKInBO, 06 naHeB 6yla 3aikcoBaHa Ha ODHOMy pIBHI 3 onOpHOIO nobExHe.
NookKeHH naHeli niJ ac yctAHOBKn, MoKytB bIHyTu Ha npOdyKTbHICTb II po60tN.
3aIiTe BiDcTaHb, npHaHMMHi, 5cm mix naHeJIIO Ta cyciDhbO BepTKKaIbHOIO nobepxHeio;
B KpaBaxKnBO,io6 BiDCTaHbBiNobiDaIa 3a3HaueHm npaMeTpam;
BnpiKtIb OTbIp y CTInbHnCi, Ra NOKa3aHo Ha MaJIIOHky HnXyHe. He MeHwe 50 MM, HABKOHO TBOpy Ma6 ByTn npocTip;
TcIbHnuaMa6yTuKaHaMHeuE30MM TOBUNHO, Ta TepMoctiKOIO. KaNOKa3aHO Ha MaJIOnHKY 1.
Bn He MoKeTe B6yDoByaTn NaHeIb HAd nIInTOO 6e3 BeHTnJIaJI,HaN OncyDOnMnHO MauHNOHO, XoIoNJIbNHKOM a60 npalbHOu MaunHOIO.
DykeBaKJINBO3a6e3neuHTNaHeKHy BcHTnlaIIO.
IpekoHaTecra,io naHeBbCTaHOBeHa npabuNbHO,RAue NOKa3aHO Ha MaIOHky 2:

DAnHH npncptpi BiDnOBiDae DnpeKTHBam 89/336/EEC, 73/23/EEC i HactynHM DonOBHeHHM Do HNx.
1
2
3
4

L1
L2
N1
N 2
KOBTo-3eJIeHnI
HOpHn KOpHneBn CnHi
3anam'raTae: BiDcTaHb mK nAHeNIO Ta 7afoHO Ha Heo Mae 6yTN He MeHue 760MM.
EeKtpnHne nie'EdHaHH
«YCTAHOBKaMaBbIDNObiDaTnCTaHdApTHMmDInpeKTHBaM»
Bipo6HnK He Hece BiDnOBiJaNbHOcTi 3a He npabNbHy yCTaHOBky, Hn He NaIeXHe BnKOpNCaHHaNaHJI.
YB4A: Npeed BnKOpNCtAHHm eEKeTpNHO npIaMy 3abJn nepeBipIe HApIy Ha IInIbHKnKy, HAcTpoKy eEKeTpNHO BmNKaHa, 3aEMHeHH;
KOBTO-3eHn npoBID Ka6eIO KINBHeHH NOBHe H 6yT 3a3eMHeH
A BID DxKepeNa XNBHeHH, Ta I BID TepMiHaIB nPncpToIO. BnpObHnK
He MoKe HeCTN BiDIOBIAJbHcIb 3a 6yDb-ki HeuacHi BuJaKn B
pe3yIbTaTI BnKOpNCtAHn PnIaNy, AKN He 3a3eMHeHO. 3 6yDb-RAHMn
NITaHHAMn, ODO DxKepeNa XNBHeHH 3BeptaTeca Do cepBicHex
ueHTPiB.
Kaio Ka6eIb NowkdoKeHoi I Noro cIg 3amHnT, 3BeptaiTeec 30 KbaIiΦikOBaHnx CneuaianictB.
PiédHaHHdo dKepeLa KnBHeHH
Po3eKa NOBHHa 6yTu NiKIOUeHa 3rIHO 3 BiIOBIDHMn CTaHApTaM, B ODHONIOJIOCHN BIMNKaC. Cnoci6 NiKIOUeHHa NOKa3aHo Ha MaJIHOHKY:
Ka6eIb He noBHHen MaTH 3rHnIB a6o yTnCKIB.
IHyKlIa
CNOCIB BKNOPNCTAHH
EnkpoHHn rehepatop KMBeHHe 3hXoDHTBCB CBepeMHn npnaNy.
LKOTUka CTbOIOE MarHITHE NOIe, TAK IIO, KOJI KAcTpyJ
3hXoDHTBCa HA BORHI, BOHa npOH3aHa IHyKuJeIO CTpyMIB.
LI cTpym NepeDAIoTB TenIO TaKM YHOM, IO CTpaba HarpiBaetbcA, a
KAcTpyJ 3aIIWaeTcBx OJOHOHO.
Lc nctema npn3HaueHa IJI KActpyIb 3 MarHITHM dHOM.
Ipoctiwe kaxyu, iHykuiHNI TexHoNOrII MaOtB dBi OCHOBHI nepeBarn: Taek Teno BvBilbHaETcb TIlbKn KAcTpyNeo, To BnKOpNCTOByetbcr NOrO MAKcMmaJIbHa KiIbKiCTb.
Hemae TepmaIbHOi iHepuii, TaK KTeNIO BvBInbHaTcBcTINbKn KOJI KActpyIa3XoDHTbcHa HarpIbaIbHi 3OHI, I3ynHReTcKa KOJI KActpyIIO npHHn.
PINCTPIIIBNUEHOI 6E3NEKIN
3axucm bi nepehaepiaaHH
Cencop peryioTb TemnepaTypHarpibalbHnx 30H. KOni TemnepaTypa nepeBnueDonyctmMy HopMy, HarpibalbHa 3oHa aBTOMATNUBO BUNKAcTbCra.
NonepeoKeHH 3auuKoo0o menna.
KoI NaHEnb BnKOpNCTOByeTcR npOTaROM DeKaKO racy, 3'ABtbcr 3aIIuKOb TeNIO. 3'ABtbcr nItepa H, uO6 nonpeDHTB Bac np Oe. AbmomamUHe BumKHeHH
IeOdHnBn6E3neKnBapnlbHOi nanei -aTO BmKHeHH.BoHO cnpauboBye KOnn Bu 3a6yBaTe BmKHyn HarpiaBnHy 3ohy.
3a 3amOBuyBaHHm nepioDnHicTh BmKHeHH HaBeDeHO HxueB Ta6nui:
| Ровенnotукhoefti | Конфорка Вимикадоста авTomатчно пися |
| 1-5 8 roД. | |
| 6-10 4 roД. | |
| 11-14 2 roД. | |
| 15 | 1 roД. |
KcTpyI np6paTH 30Hn Harpby BOHa ABTomuHOBUMKaETbC HarpB, i nCIA XBNHHORO 3BOHnKa ABtomauHO BmukaeTbC
NOCyDДЯ BAPINbHOI NOBEPXHI

NOCYДЛВAPINJIbHOI NOBEPXHI
BukopncTahnraikicHoro nocydy,3a6e3neuHbHaibIbW npOyKTHBHCb BapnIbHOIO NOBepxHi.
3aBKnBn BnKOpNCToBnyTe NocyD BnCOKO JAKoCTi 3 IdeaIbHO rIaNkIM Ta TOBCTM dHOM: BnKOpNCtAHNr TaKOrO TnPy nocydy nonepedkae
npiropanha ctpab. Tobsti metaJIeBi kactpyIi Ta ckOBopiKn 3a6e3neuyOb pIBHomipHn po3noJIn Tennla.
IpekeohaiTeC, 10 dno kactpyi nn ckbopik cyxe: nclra toro rKn Bn hannPiHy, nn dctanl kactpyio 3 xolodnbHnka,
nepekoHaTeC, 10 dno cyxe. Lc donomOKe yHKnHyTn 3a6pydHeHH naHJI.
BnKOpncToByTe KacTpyni, diAmEtP kAnx 3akpnae BcHarPiBaIbHy 3OHy: po3Mip KacTpyni Ma6ytN He MeHwn Hix HarPiBaIbHa 3OHa.
KaO BOHA TPOXn 6ilbTa, To 6yde BnKOpNCTOBByBaTnca MaKcMaJIbHa KINbKiCtB eHeprii.
Hactynha iHopmauii donomokae Bam o6patn ha6ibw nixoanau nocyd, Iy OTPMaHHOnTMaHbHO pe3yIbTaTy.
TaMep MoKHa BCTaHOBbOaTn DnB BCix OOTnpbox HarpibaIbHnx 3OH. RaKIO Bn ODNoaCHO HaNaSTOByTe DeKInbKa HarpibaIbHnx 3OH, B KOHHI 3OH 3aropTbcn DecrKOBI np6n.
AkuTo TaMep BCTaHOBHeO, a HiaKa 30Ha He AKTINBOBaHa, To nide npocTo BiNik Yacy.
-БлOKуВань
Ypo6oMypeKMIHaTNCiTBKnabiy ,BapnIbHa naHJIb nepeJe BpeKIM 6NOKyBaHHa Ha TaIMePi BnCBiHTbcra Loc aIHwi KnaBiWi 3a6NOKyOTbcra, KpIM ①

PO36JOKYBAHH
HaHnchItb Ha KnaBiy CIELJIaJIbHI FyHKLIJ

npotaromtpbocxckyhdinahenpb03nokyctba
DOUX
Kun'arHHa na nobinbHomy BORH. (p8eBb 1)
1
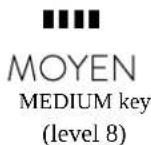
MOYEN
CepednTemnpaTypa(pibehs8)
1
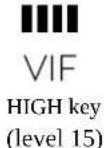
Bncoke harpiaaHa (pibeh 15)
VIF
AknByTe 6oPaHy 3OHy HAtnckAioHc 一 + 一 a60 一 - 一


HaTnCHb KIn'AtIHHe Ha NobiBhOMy BOrHi,
iHdkaTOp BiO6pa3ntb


HATNCHTB《CepeHnTeMnepaTpa》,iHdkaTOp
BIDIO6pa3nTb


HaTnCHITb《BncokeHarpiBaHHa》,iHdkaTOp
BiDio6pa3nTB 1
ФУHKUII NAM'RTI
Bn MoKeTe BnKOpNcTObyBaTn FyHKUIO nAM'rTI dA 36epiraHHa npaMeTpIB pIBHn oTyHXocTi 0bpaHOI 3OH.N. MEMO
3AINC
Bn6epiTb Heo6xHHy KOHΦOpy,HaTnCHyBwN KhoNky"++a0-"
HATNCHTb MEMO, iHdkatop TaImepy nokaxe 03haac, zoB naTti He 3aikcoBaHO HIAKnx uKnIB npiroTyBaHHa, HATNCKaIte Ha zu KnaBiuy npotrarom 3 cek, KOJIHdkatop TaImepy nokaxe -EC , 3HaHTb 3annc po3noayBCra.

IHKaTOp noka3ye pibeHb notyKHOCTi 0piBHe b notyKHOCTi nonepeMHHO.

MaKcImaIbHa KInbKicTb onepaui - 10 pIBHe nOTyXHocTi B Bapiaqax B 8 roDn. Byb-ka 3MiHa pIBHa notyKHOCTI TpBAnicTIO MeHwe 15 cekyn He 6yde 3anicaHa.
3YIMHKA 3ANCY
HaHCHiB 1e pa3 KhoNkY naM'rTi, 3 ducnner 3HnKHe rE C i uKn 6yde 36epexeHo.

ABO BIMKHTb BiINOBiHy 3OHy npHroTyBaHHaIK,HaTNCHyBmKnabIiy "+"i"-" OndHocHO, a6o WnaxOM BCTaHOBHeHH
piBnnoTsyKHOCTHa 6iNbwe He 6yde BIO6paKaTHCA Ha dncrnei TaMepa i uKn npuroTyBaHHia Kdynde 36epeXeHo.

AEO
Pn6epitb kactpyIIO 3 BiINOBiIDHOI 30HN npiroTyBaHH. PnBnBnEHHI BiCyTHOCTI kactpyni, rEC 6inbwe He 6yde BiO6paKaTNCaHa dncnneiT aHMepa i uKn npiroTyBaHH bki 6yde 36epeXeHo. ABO
BcTaHOBIb pIBeHb notyXHocTi 6InbW HIX Ha 10, i -EC 6InbWe He 6yde BIO6paXaTncb Ha duncnnei. ABO
Bumkhitb naheI b i ToDi Bci HanaWtyBaHHA ABTOMATUHO nepepeBytbcra.
AEO
BIMKHTb 3OHy npirotybaHHaYepe315 cek. nicna noatky 3ancy, i ToDi BcHanaWtYBaHHa ABTomaTHHO nepepybCBAHKOHHAURIKJy PnFOrTOyBAHHA DKI
HaTnCHtB KhONkny nam'rTi npOTAROM 5 cK, Ha iHdNkATOpi TaMepy 3'ABUTbCRA rI , notIM 3'ABUTbCRA PL y BKnIOHTBCBAIDNObiHa 3anporpamOBaHa 3OHa npriOTyBaHHra pO3noHTBCBAKOHAHNAIKNY.

RkioBIDNOBIDA 3OHa BKe BBIMKHeHa, 3anncAHn uKn 6yde npnopireTHM.
RkIO npn BuKoHahHI uKnNy HaTNCHTN 已 + 已 a60 己 - 己 ,TO 3anporpaMOBaHH uKn npnnHReTBcI p03nouHaetbcra
3BnuaiHe npuroTyBaHH. Tm He MeHs 3anporpaMOBaHH uKn 36epiraETcbrB na'rti.
Rk 3anHCaTH HOBn uKn npuroTyBaHH, kUo MM BKe OOnH 3anporpaMyBaHH:
AKTbByTe 3ohy npuroTyBaHH, kY Bu 6axaTe 3anporpaMyBaTH, HATNCHyBHN 已 + 已 a60 己 - 己

TOM HA dncnnei 3'ABNTbcra -E C i po3noHETbcra 3annc HOBO rKnny.

3MIHHA 3OHA
MaKcHMaJIbHa nOTyXHICTb 3OH npnroTyBaHHa:
| Зона нагпванья | Мо德尔: RIED430В | |
| Звачауна | Бусмер (пiodвушени по уж decorи) | |
| 1 3000 | 1800 | |
| 2 1800 | 3000 | |
| Flexible Area | 3000 4000 | |
| 3 | 1800 | 3000 |
| 4 | 1800 000 | 3 |
YHSEHHRA EKCnIyATAUIA
IpepeBnKoHaHHa6yDb-4kNx po6iHa naHei, daTe iOxoloHyTu.
CniD BnKOpncTObyBaTn TiIbKn npOdykciio (KpeMn i Wkpe6Kn) npN3HaueHy dny KepamHnx nobepxohb.
YnkaTe po3nBIB, ktoe 0 nonaHe n aHEnb WbUdko 3ropntb, ce ycklaADHTb YuueHH.
BaKaHO TpMaTn Noadani BiD nanei taKepeOBNH, kIK MOKytb po3nnabntncra, taKIK PAnactMaca, LykOp, Ta peOBOHN Ha LykPobBIOOCHOBI.
Ekcnnyatauaia
IodaiTe KInbKa KpanelcneiaJIbHOrO MNHOrO 3aco6y Ha nobepxHIO naHeni.
3MoOiB CTiKi NJIaM M'JAKIO TKaHnHO, a6o BOIOrHM KxOHnM nanePOM.
IpoTnpaTe M'koIO TKaHnHO, a6o cyxuM KxOHm nanepOM, dOKn NOBepxHr He 6yde cyxoIO.
KaOo 3aNNnncra KICb CTiKi PnAMN:
IdoaTe 1e KeinbKa Kpaneb CneuaianbHoro MIOOyTo 3acoby.
NooKpe6iB uKpe6kOM nI Kytom 30 rpaucib no nIaMI,doKN BOHa He 3HnKHe.
IpoTnapeMeM'AKOIO TKAHNHOIO, a6o cyxHm KxyOHHM nanePOM,doKIO nobepxHa He 6yde uncToIO.
NoTOpitb onepaio, kkuo Heo6xidHO.
DEKIIbKA IOPA:
HacTa YnKta 3aIinae 3axinchn Iap, Ayn Heo6xIDHH dIy 3anobirn Hnoipnn H 3Hocy. NepekoHaTecra, Oio naHeJI yHCTa nepeid NaCTynHm BnKOpncTahHrM. 06 no36ytnc np3BodIB npotpiY kycom a6o IIMOnHHM cokom. Ntim npotpiB cneiaJbHm nOrInhaOum naepom Ta CneiaJbHm MIOUHM 3acOBom. CklokepaMHa NoBepxHa 3axuae BId NOprnn, ODAK, Kpaue nepctabTu KActpyIbu OdHi zoHN B iHsy, YIM nepetaryBatn.
3anam'raTaIe:
He BnKOpncToBnyTe ry6Ky,kaHaTTo BOIora.
HikonHe BnKOpncToBMyTe Hix a6o BnKpyTky.
Ckpe6ok 3 ne3om He npnsBeDe do nowkoJxHb noBepxH, kso Ioro TpMaTn iIkyToM 30 rpaDyciB.
Hikon He 3aunwateckpe6ok 3 neoM B meKax docxHnOCTi dTe.
Hikoli Ne BnKOpncToBvIe a6pa3nBHi MaTepiAn a6o ChTayi nopOwKn.

UCYHEHHH HECNPABHOCTE
PEMOHT
IpepeBnKlnkOM MaNcTpa nepeBipTe HacTyHne:
Hn npabBbHO BCTaBHe BA B po3eKy. RaHcnpabHicb He MoKHa BN3HaHTN, To BMKnHb npuIa3 3po3eKN i 3BepHitbcy cepBicn HcHTp. Pnpia npoAeTbc3 rapaTHiHM Ceptnfikatom, 0o O3Haue, 0o Bam Noro BiDpeMOHTyHb 6e3KOHTOBHO.
PIUJEHNAIPOBNIEMN
IHykuiHa BapnIbHa NoBepxHg Dae IerKm CBnCT: HopMaIbHO. BiIDNoBIdHO 3 pOboHO qaTcTOIO IHyKTopa, IerKm CBnCT MoKe BUNKHYtn npu BNOpncTaHHi KeilbKOx 3OH npuroTyBaHHia KHa MaKcMmaHbHi nOTyKHoCTi.
CtapBn NobilbHO roTyIobc: BkOpncTObYeTbcra He nixoJxuHm NocyD. HIO KAcTpyni MaE 6yTu nnockm, He dyXe BaKkm, a diaMeTp MaE BiNobidAtn diAmetpy HarpiBaJIbHoI 30HN.
3'ABJIIObCa MaIeHbKi NOpPnHH (TpiuHH): He npabNJIbHi MeToDi NuaeHH, NoCy i 3 rpybM dHom, a6o BeIinKi cactKn uKy py a6o ncky notpannn MIX NocyDM i naHeJIIO. BkOpncTOByTe peKOMeHDoaHI MHOci 3aco6n, uCTNI NOcyi 3rAdkm dHom.
MetaIeBi MapkyBaHHn (MoKyb 3'ABNTncn NoDpAHHn). He TaHrHiB aIOMiHiEbn nocyd no naHeJI.
BnKopncTObyIte peKoMeHnDoBaHi 3ac06n, uOb BnDaJIInTu MapkyBaHHa.
TemHi cmYn a6o nIaMn: BnKOpNCTOBuYe peKoMeHDoBaHI 3acObI dIy NcUeHHra.
3He6apBleHnHa NaHei: CiiDn BiI aIIOHmHiEBNx a6o MiHNx KaCTpyIb, TaK cAmO I BaHrHn HaIIT, MoKHa BiHnCTHTN 3a DOnOMorIO cneiaJIbHorO Kpemy.
Ha nanei po3nnaBcra ykop a6o nlaactMaca: NbiBcB B po3di «UueneH
PanaIb BnIuHa 3 nay a6o dea KHarpiBaHbHi 30Hn He npauOIOb.: He npabInbHO nIeHaHH TePMHaBHN 6nok.
Bapnibha nobepxHa He npaioe: Bapnibha naheb 3a6lokoBaHa. Hatncihb kHONky dIra po36lokyBaHHa.
PanaBbATOMaTHNO BmNkAeTbC: 3OHa npriroTyBaHHABTOMaTHNO BmNkaetbc, RaIO BOHa HADTo DOBRO npauoE.
3actepexhen: Yci 3a3haeHBIuie ywkoJKeHHCTocyIbca eTeTuHoro BnIyBapnlbHOIOBepxHlHe BnIbHaOTb Ha II fHKiohyBaHH. Taki wkoJKeHH He niJaTb rapaHTiHOMy o6cIyROByBaHHIO.
Tepmin iii rapantiii cklae 12 micauiB 3 dat npodaxy.
Iiuc rapaHTiHoro nepioy 6yd-ayn peMOHT Moke 6ytu BHKoHaHm TIlbKn KBaIipikoBaHm faxibcem cepbcHOro cHTpy.
IpeaonrpoHn Tp6a BdkIOHTB iD eKtpomek, 3HBWn 3anobIKHK a6o BNTRhyBw nHyp KINbHe H3 po3eKn. HenpofeciHne BTPyAHn Ta peMOHT anapaty He63neHi, BOH moKyTB BKNKHaTN BpaKeHHN EeKTPuHm CTPMOM Ta KOPOTke 3AMNKAHn; OTke, He HamaraiTeC yCyHyTn HecnpabHocTi camOtJxKn. 3aIIuTte cio pOboty cneuaianCTam a6o npedctABHKam CepBicHor OHTpy. RaUy pOboTI anapaty BNHKnn RaICb He3NaHni PObLemn, nepeBipTe 3doNOMOrHO HAcTyNHx IHcTyKci, Y3dAHI Buynopatnc 3 HmN cami. BiNT cneiaJIcTA i3 ABTopn3OBaHORo cepBichoro ceHTpy NobHN 6Tu ONlaueHm Bamn, RaIO 6yDe BCTaHOBeNo, IO npuJa, He npauoe Upe3 HeHaaleKHe NHe6BaNe BHKOpNCaTHn. 36epiraTe IHcTpkyIO TakHM uHOM, 06 BOHA 3aBXn 6yNa niD pykoHO y pasi notpe6n; RaIO nepeDaBaTMme npnaIad inwiOco6i, nepedaTe takoH i INcTpyKIOHO.
YMOBN:
CeptnphiKat
TapaHTi DiiHa TaBKn npn HaeBHocTi DiiCHORo TapaHTiHoro CePTNkAky.
TapaHTiHn cepTHiKaT He DiIChn npn HauBHOCTI B HbOMy NOMINOK, BnnpaBHeH Neu HeBiNOBIDHOCTe.
B Ceptnikati Maotb 6itn 3anobHehi nyHKTN: Ha3Ba Bnpo6y, MoedIb, cepiHnn Homep Bnpo6y, data npodaxy, nIINc npoabua, neaTb ToproBoi opraHaiaui. PnBicCyTHOCTdAtn npodaKy TepmH rapaHTII ABOMATNUHO BUNCIOETcb 3 DaTn BuroTOBNEHH pncToPO.
TpaHcnpTyBaHHi 36epirAHn
Bydb-aki DeΦeKTH Bnpo6y, cnpuHHeH He6aJIbIM TpaHCnOpTyBaHHm i 36epiraHHM Bnpo6y, He niJIAraIb 6e3KoUToBHOmy rapaHTiHOMy peMOHTy;
YctaHObKa Ta ekcnlyatauia
BekoTobHn rapaHTiHn peMOHT He npOboDHTbC, Akuo DeeKt BnpOby BnklnKaHn:
- HenpaBnBnHm nikKIOeHHM Bnpo6y do dkepea eekTPO-, BOO-i raoNocTaAHH, a taKOH HeBIOHicb NapaMeTpB BnueBk3aHnx dkepe npametpam, 10 nped'RAHIObCb oob'3KOHMn DePkaHBMn CTanapTam Ta IHcpyKuieo 3 ekcnIyataui.
- Eknpnyatauig Bnpo6i, nkiKIOeHnx Do MepeX 220B 6e3 3aemHeHH, a TAKOX NIKIOeHx Do JIepeHa BOOnocTaAHN 6e3 OKpemoro KpaHy noaui BoHn Do Bnpo6y-e cyTTeBm npuyehn HCTpykii 3 eknpnyatau i Ta MoKe 6ytn ndaBOIO dHHTBn Bnp6y 3 rapaHtHoro 6cLyroByBaHH.
BnKOpNCTAHn npHnady He B BiNObiHocTi Do IHcTpkyu, a TaKoX HnPaBnIbHO eKcnIyatauieIO, 0o BnKInKaNo nOBy MExaHiHnx Ta iHux BnDIB DeΦeKtIB;
BnKOpncTAnHn BnO6y He B BiNobiDnOCTI 3 NOro npMm npn3NaeHHa m60 He B DomaHix notpe6ax. - Pn npuyehhi nIOM6yBaHHa Ta 3 iHux npuH, kki He 3aIeKaTb BiD 3aOda-Bnpo6Hnka.
He6aioi npn 36epirahhi, ekcnnyataui Ta TpaHcnpTybaHHI BlaCHNKOM, ToproBOIO a6o TpaHCnOpTHOIO opraHaiaucieIO. - Y BnnaKy BtpaTn rapaHrno TanoHa 6a ueKa, BnachNK no36abIeTBcR npaba Ha 6e3KOwTOBHe cepbcie O6cnyroByBaHH.
- Y pa3i niKIOUeHHaTexHikn He cepTnΦIKOBaHm cepBicHM cHTpOM, Bpi6 3Himaetbca 3 rapaHTII.
PemOHr
Be3KoHTOBHn rapaHTiHn peMOHT He npOBoDHTbcra, RaKIO Bnpi6:
Maé cnldn ctopoHHbO BtpyAHHa 60peMOHTy He ynoBHOaKeHmN Oco6am;
MaHe caHKIOHOBaHi fipMOIO 3MiHN KOHCTpyKuI abo HENpHiNHTHI KOMNNeKTyOci;
MaonkokHeHH, BnKlnKaH HenepaayBaHmN ABuamN i dIaMn CTnxi;
MaonokKeHHBnKnkaH, BnKOpntaHHMa HeTaHApTHMaTePiaIb i npctpoib;
Ma nokn Hnn Bnknkni nonaHaHm BcepeHy Bnpo6y ctoohix npedmetib, TBapn a60 komax;
HeMaε cepiHoro HOMepy a6o NOro HEmoKJIbBO BCTaHOBnT;
MaekomnIeKTHicTb nicra Ioro npoJaKy;
MaemexaHni noxKDxHeHH (cknHa Ta nactNKoBi Bnp6n);
TapaTia He po3noBcIOJyEToC H a po3xIDH MaTePiaI i akceCyapn.
BidnoibdaIbHcTb
ΦipMa He Hece BiIIOBiaJbHocTe 3a 36nTKn npuHHei Bam nn OTOuyOChm B 38'3ky 3 HeBiIOBiaHm BkOpncTaHHm npuaNy.
BBeHeHH Bnpo6y B EKcnlyatauio N Dopo6ky Mepex eJeKtpo-, BOO- i Ra3OnocTauaHHaN H aCymicHocti 3 Bnpobom He e 30HOIO BiDnOBiaIabHocTi FipMn N FipMoHO He OnilayETcbA.
B BnnaKky BnHnKHeHHy 6yIb-aknx npo6nem 3 Baunm npuHaOM, nepeTm Jk BnKnkaTu MaCtpa, nepeBipTe npaBnHicTh yctaHOBkn i yHKIOHyBaHH B BiNobiDnOcTi do IHCTpyKcII. OnNaTy BnKlnKy MaCtpa Bn 6yDeTe npoBOHTn 3a Cbi n paxyHok, kUo Bnpi6 6yB Bpo6oyomy cTahi a60 6yB HnPaBnBHo BCTaHOBHeHH, a60 HePpabInbHo BnKOpNCTOByBABc.
3a kicrbapaHTiHOro peMOHTy BiIOBiaIbHiCtHece 06cnyrobyuOa oprHaia (cynx6a cepbcvcy).
DODATKOBY IHOPMAUIO IIOO IPOO YKJII MAPKIN ROSIERES BN MOXETE OTPMATH HA CAHTI
WWW.ROSIERES.IN.UA, WWW.ROSIERES.FR
YH 3A TELEFOHOM TAPRAOJI LIHIIII
0443834425
0800501509
| CEPBIC ПIOДУКUД ROSIERES, OРТИHAЛБИЗ 3AZANACHI VACTINH, BIVPATHI MATEPIAJL, AKCECYAPIN | |||
| MistroСервicnsцентуЕразец | |||
| Алчевский | СЛС "Бунат-Сервис" | 94204,г. Альперск, у.л. Бенихко 76-75-15 | |
| Белая СZipковь ATЛАЛТ ППОС 09113, у.к. | ДИМЕСКÁ, 6 (04463) 6-75-15 | ||
| Белая СZipковь | КПП СZipиь-Mаст 89100 r. Беля СZipковь, у.л. Вокалы 5 | (0456)33-29-44 | |
| Белая СZipковь | СZipиь-СZipent"Вera" | 09100 Byu. Гордincько 2A | (04463)3-51-01 |
| Бердунск | Дека-CZipвс | 71112, r. Бердунск, у.л. Энгель 42 | (06153)4-32-31, 3-85-14 |
| Виннице | ВФ TOB „IHTEPCEPBC" | 21000, Byu. Калец 61A | (0432)69-95-73-69-91-93 |
| Виннице | КП "Fapант-СZipic" | 21027 р. Камонаг 42 | (0432)46-50-1, 46-64-18 |
| Виннице | СЛС „Спеслant" | 21021 r. Винни у . Рор 1 | (0432)57-91-91, 50-91-91 |
| Виннице | СЛС Skopмаг-СZipвс | 21030 Винни 20 | (0432)46-43-93, 46-82-13, 51-92-52, 51-92-54 |
| Денpopдзержинск | СЛС "Ростok" | 51934, Денpopдзержин 66, CLI "Ростok" | (0569)53-54-80, (067)363-29-29 |
| Денpopлетровск | СЛС "Евоглорей 8900, r. Денpopлетр 8900, r. Кра 20 A | 49000, r. Денpopлет 8900, r. Кра 20 A | (056)371-15-06 |
| Денpopлетровск | TOB „IHTEPCEPBC" | 49101, р. Т. Кір 59 | (0562)35-67-05, 31-29-57 |
| Донец | СЛС "ФОКSTРOT" | 83000 r. Донец, р. Денpopж 83000, r. Денpopж 83000, r. Денpopж 83000, r. ДENpopж 83000, r. ДENpopж 83000, r. ДENpopж 83000, r. ДENpopж 83000, r. ДENpopж 83000, r. ДENpopж 83000, r. ДENpopж 83000, r. ДENpopj 83000, r. ДENpopj 83000, r. ДENpopj 83000, r. ДENpopj 83000, r. ДENpopj 83000, r. ДENpopj 83000, r. ДENpopj 83000, r. ДENpopj 83000, r. ДENpopj 83000, r. ДENpopj 83000, r. ДENpopj 83000, r. ДENpopj 83000, r. ДENpopj 83000, r. ДENpopj 83000, r. ДENpopj | (062)345-41-23 |
| Делорий | TOB „HK-Цent" | 92100 Byu. Гал 5 | (0324)45-00-62 |
| Еваторий | TOB „HK-Цent" | 97401, р. Пек 67 | (06569)4-47-74 |
| Житомир | КAPTАЛ | 10001, у.л. Кісь 106 | (0412)41-27-97 |
| Житомир | Плфмст 8900 | r.Житомир, у.л. Yкра 2 | (0412)42-22-54 |
| Залорожь | "Альфатхо 8900 | 69002 Byu. Денpopж 830 | (061)212-03-03 |
| Залорожь | ЗФ OOO INTEPCEPВС | 69095, у.л. Гал 175 | (061)220-65-96, 787-50-51 |
| Залорожь | Мээст 8900, Залор 8900, Zalp Ma la 3 | 69006, Залор 8900, Zalp Ma la 3 | (061)270-40-94, (061)224-58-58 |
| Ива Фанковьск | "Бриз /ЛТД" | 76002, Byu. На 19A | (0342)75-07-77, 55-95-25 |
| Ива Фанковьск | ПЛКол 8900 | 76009 Byu. Мра 90 | (0342)78-30-00, 26-15-82 / (093)328-27-07 |
| Ива Фанковьск | ЧП Вол 8900 | 76491, r. Ива Фанков 8900, у.л. В� 8900, u.л. В� 8900, u.л. В� 8900, u.л. В� 8900, u.л. В� 8900, u.л. В� 8900, u.л. Wb 8900 | (0342)71-28-13 |
| Ива Фанковьск | СЛС „Еваш 8900 | 68600, Byu. Котов 8900, 59 | ((04841)6-34-53, 2-22-37 |
| Каманл. | СZip�-СZipent | 32300 Byu. Пшк 8900, 51 | (03849)3-24-88 |
| Кер ВОО INTEPCEPВС | СЛС Мер凯 8902, у.л. Плог 8902, у.л. Плог 8902, u.л. Плог 8902, u.л. Плог 8902, u.л. Плог 8902, u.л. Плог 8902, u.л. Плог 8902, u.л. Плог 8902, u.л. Плог 8902, u. 8902, u. 8902, u. 8902, u. 8902, u. 8902, u. 8902, u. 8902, u. 8902, u. 8902, u. 8902, u. 8902, u. | 98300, 98300, 98300, 98300, 98300, 98300, 98300, 98300, 98300, 98300, 98300, 98300, 98300, 98300, 98300, 9 88300, 98300, 98300, 98300, 98300, 98300, 98300, 98300, 98300, 98300, 98300, 98300, 98300, 98300, 98 98300, 98300, 98300, 98300, 98300, 98300, 98300, 98300, 98300, 98300, 98300, 98300, 98300, 98300, 9. 98300, 98300, 98300, 98300, 98300, 98300, 98300, 98300, 98300, 98300, 98300, 98300, 98300, 98300, 976 | (062)345-41-23 |
| Кер ВОО INTEPCEPВС | Ф.ЧП ФОКSTРOT. | 25006, r. Кір 8906, Kір 8906, R. Пек 8906, R. Пек 8906, R. Пек 8906, R. Пек 8906, R. Пек 8906, R. Пек 8906, R. Пек 8906, R. Пек 8906, R. Пек 8906, R. Пек 8906, R. Пек 8906, R. Пек 8906, R. Пек 8906, R. Пек 8906, R. Пек 8906, R. Пек 8906, R. Пек 8906, R. Пек 8906, R. Пек 976 | (0522)35-79-23 |
| Кер ВОО INTEPCEPВС | СЛС "Опто 8906 | 25006, r. Кір 8906, R. Пек 8906, R. Пек 8906, R. Пек 8906, R. Пек 8906, R. Пек 8906, R. Пек 8906, R. Пек 8906, R. Пек 8906, R. PIFKUMCINCHESKIN | (0522)24-96-47, 24-45-22, (098)369-50-01 |
| Кер ВОО INTEPCEPВС | СЛС "Опто 8906 | MD2009 Byu. Фер 8906, 4/6 | (0-0-373-22) 870536, 870837 |
| Кон� ВОО INTEPCEPВС | ЧП "Альпер 8906 | 41615, r. Кон� 8906, Cumck obl., р. Лем 8906, CUMKOBRAG, np-Т | (05447)6-13-56 |
| Кр Мер YUR | ЧП "Длар 8906, UY. | yur. Peroeв 8906, UY. | (05447)6-13-56 |
| Кр Мер YUR | СЛС EXCLUSIVE-SERVICE | 39600 r. Кр YUR, XaamemnOKa, 10 | (05366)780-235 |
| Кр Мер YUR | СЛС "ФОКSTРOT. | 50103, r. Кр YUR, Р. Вал 8906, 66 (Meilenko-blyTOMaTeNTHaNJa, 42 | (056)440-07-64 |
| Кр Мер YUR | СЛС "ФОКSTРOT. | 50027, np-Т. Fatarina 42 | (0564)74-61-03 |
| Кр Мер YUR | КрФ TOB „IHTEPCEPВIC" | 50064, Byu. Kocup 64-7 | (056)440-07-79, (056)440-01-19 |
| Луб YUR | Ф.ЛП К��ан 8906 | 37500 Byu. Радян 43 | (050)457-49-65 |
| Луганск | Луганск-СZipиь | 91000, Луган 8906, 16-7 | (у. Фуун 3, 136-6 ((0642) 49-54-50, 49-44-17, 49-3 |
| Луганск | СЛС "Мер YUR | yul. 16-7-у. LIMNINN, d.7 | (у. Фуун 3, 136-6 ((0642) 49-54-50, 49-44-17, 49-3 |
| Луч YUR | "Софл YUR" | 43006 Byu. Ctrya, 11 | (0332)77-10-23 |
| Луч YUR | СЛС "Ваш майст 8906 | 43005 р. rt. Плев 8906, 17-7 | (0332)77-10-23 |
| Льв YUR | ЛФ СЛ „TRAHC" | 79008, Byu. Вал 8906, 17-7 | (032)239-92-75, 297-55-88 |
| Льв YUR | СЛС "Мелли YUR" | 79040, Льв 8906, 17-7 | (032)267-07-10 |
| Льв YUR | TOB „POCIMINEKC" | 79034, Byu.TM. XeMELnBuNtOBOrig, 116 | (032)231-78-87 |
| Мakettingа | СЛС "Горди YUR" | Донец 8906, r. Мaketting 8906, r. Yel 8906, r. Yel 8906, r. Yel 8906, r. Yel 8906, r. Yel 8906, r. Yel 8906, r. Yel 8906, r. Yel 8906, r. Yel 8906, r. Yel 8906, r. Yel 8906, r. Yel 8906, r. Yel 8906, r. Yel 8906, r. Yel 8906, r. Yel 8906, r. Yel 8906, r. Yel 8906, r. Yal'nye, 116 | (062)327-51-23 |
| Мар�� YUR | СЛС "Догд YUR" | 87500 r. Мар YUR, 50-NET Okтб 42 | (0629)49-300-5, 49-300-5 |
| Мар�� YUR | СЛС "Мар YUR" | 87500, np-Т. Мар YUR, 50-NET Okтб 42 | (0629)41-06-60, 41-06-5 |
| Мужачев ACU "Таразов"Мужачев" | 89600,зakapnatcbskaобл.,м.Mужачев,byl.Бергіськаобізna,12 | (03131)2-33-33 | |
| Hикале� | MФ TOВ „IHTEPCEPBIC" | 54008,Внуtrіріквapt.пpoiәд,2 | (0512)58-06-47 |
| Hикале� | СПД ФОД Дадашев A.O. | 54050,Микалаib,ыл.Металурів,8 | (0512)25-23-35,59-24-05,(066)797-66-22 |
| Hикале� | СЛ "Нькалеев-Фокстот" | 54003, r. Мькалаев,пр. Ленина,177-A | (0512)55-29-04 |
| Hикале� | СЛ „IHTEPTEXHOCEPBIC" | 53210,ыл.Гагари,62a | (0512)22-24-88 |
| Hикале�ЧП Воронин 54001,ул.Бolyшай Морскан,30 (0512)35-97-99 | |||
| Hикалоь | ПП "IMnop'texhnoceBic" | 53210,ул.Гагари,62a | (05662)2-24-88 |
| HикалоьПП "Лікс" | 53213,Динрогетровькыобл.,M.Мыкалоь,ыл.Карla Плбкнextа 167 | (0566)65-00-89,(099)200-56-83,(093)918-39-62 | |
| Hobя Кховka | СЛ "Еlementно" | 74900ыл.Торьког,48 | (05549)7-83-98 |
| Одеса | ОФ СП ТРАHC СЕВИС | 65029,ул.Новостельский 7-E | (048)777-11-40 |
| Одеса | Фокстот-Сервис-Одесca,Плочадka 1 | 65029,ыл.Траимострни 7-E | (048)784-20-85,784-20-86 |
| Одеса | Фокстот-Сервис-Одесca,Плочадka 2 | 65029,ыл.Базарна,76 | (0482)37-21-92 |
| Павlorогд | Лотос (Интерсервис) | 51400,Павlorогд,ул.Шебунko,67 | (05632)6-15-54,6-23-42 |
| Павlorогд | ПгФ OOO ИНТЕСЕВИС | 51400,ул.Шебунko,67 | (05632)6-15-54,6-23-42 |
| Павlorогд | СЛ "Пинфок" | 51404 Павlorогд,ул.Диенровский,73Б | (05632)3-11-93 |
| Палтаба | Айkon-Сервic | 36000ыл.Жов'tөва,406 | (0532)50-67-89 |
| Палтаба | НBO „ПOMЕЛЕKTPOHIKA" | 34022,ыл.Прелетары,22 | (0532)57-21-66 |
| Палтаба | ПФ TOВ „IHTEPCEPBIC" | 36023,ыл.Каси,71A | ((0532)69-42-62,50-98-89 |
| Ровно | РADIOMACTEPCKA | 33000r. Ровно ул.ПOTTOВА 2 | (0362)22-68-19 |
| Ровно | ПП Стros | ыл.Калшевский,34 | (05448)2-17-48 |
| Севтол对象 | КAYФ | 99011ыл.Промс�лова,9 | (0692)45-60-72 |
| Севтол对象 | ООО ПАнOPAMAC-C | 99053,ул.Рudhev,7 | (0692)45-01-88 |
| Севтол对象 | СЛ ДИАDEMA | 99008,ул.Пожаров,26 | (0692)55-56-43,45-36-99 |
| Севогоданц | ПП "СДRT" | 93400,Луган'tьka obSL.,M.CeBERODOHEZK,ыл.МendelsoeBa,46 | (06452)4-49-62 |
| Севогоданц | CEBERODOHEZK | ||
| Севогоданц | РАДNOTEXHIMKA | 93400,ул.Маяковский,13 | (06452)4-30-30,(0645)70-28-16 |
| Симферогл对象 | НК-цentр | 95001ыл.Небраю,17/1 | (0652)54-47-71 |
| Симферогл对象 | PCSUФКстot | 95040,r.Симферогл,ул.Балackавский,68 | (0652)520-565 |
| Симферогл对象 | ЧИ.TAPAHT | 95051,ул.Пал�еньko,54 | (0652)52-15-08 |
| Симферогл对象 | АСЛ "Альбint" | 94000ыл.Кipova,15 | (06444)4-02-89 |
| Стуханов | САЛ "СIT-CSERVC" | 40030 Кошегатиньа 7 | (0542)781-013 |
| Стуханов | ПВКФ "CEPBICLEHTP" | 40000,Сул.Петрогамов,86/1 | (0524)660-300,650-340,655-510 |
| Стуханов | СЛ "Ситма-сервic" | Иnd.40024,r.Cyms,ул.Порokфы в. | (0542)36-50-58 |
| Тернол对象 | СЛ "Ренистор",п.Зл.ул. | 46000,Тернол,п.Зл.ул. | (0352)511247 |
| Тираслав | СЛ "Бриз-грул" | 3300Моюда,г.Tiracsinь,пep. | |
| Ужcropord | ТаOB Мчалену姆 | 88007,m.YJKropod,ыл.Тагашиа 101 | (031)266-12-97 |
| Фeoodyсma | ЧП Фоckсымсервс димлam | 49000,r. r.Фeoodyсma,ул.Баларна,4 | (06562)3-12-84 |
| Xарьков | PCSUФОКстOT-CEPBISC | 61125r.Харьков,ул.Вернадский,2 | (057)758-10-39,758-10-40 |
| Xарьков | СЛ HEO | 61052,ул.Косарсяа,43 | (057)763-09-12,763-02-89 |
| Xарьков | XФ СП.TRAHC SEBIC | 61072,ул.Иванов,24 | (057)714-24-72,58-85-63 |
| Xерcon | ООО"Ремontи Сервис" | 73027,r.Херcon,ул.Равочая 66 | (0552)48-58-88,48-50-00 |
| Xерcon | XФ TOB „IHTEPCEPBIC" | ул.Карбошев,28A | (0552)43-40-33 |
| Xмеленшкий | ОООТРТОТЛДТ | 28000,ул.Кунатов,18 | (0382)78-37-73 |
| Xмеленшкий | СЛ ПпINJOД" | 29016ыл.Львсьkeшоce,27 | (0382)66-46-16 |
| Xмеленшкий | Сервиснiiцentр | 29009,r.Хмеленшкii,пereyeLok | |
| "Радимонор" | Иллл'dom'mь的一个 | (0382)704-700,66-46-16 | |
| Червогорад | ТаOB "ПобухдадOTeХиka" | 80105ыл.Сokeлбсь,6 | (03249)2-25-63 |
| Червогор | "TEXHO-XOLOД" | 18000,Червог,ыл.Гromobа,146,оФ.102 | (0472)56-98-68 |
| Червогор | ЕВРAZИ-С | 18023,ул.Одесьа,8 | (0472)66-36-53 |
| Червогор | КВAPЛ | 18029,ул.30лет Победы,30 | (0472)540-124 |
| Червогор | ОООФИСHAТЕХИКA | 18000,r.Смелянский 118,оФ.105 | (0472)-63-84-01,63-66-66 |
| Червогор | СЛ CIPINCHNII CEENTP | 18005,r.Червог,ул.Каллишпа 115 | (0472)72-35-58 |
| Червогор | TOB "Фабрика понытогоTopebivc" | 18000,Червог,ыл.Льви,605 | (0472)383-124,(063)624-24-43 |
| Чернiroв | BEHA-CEPBISC | 14000,ул.Пюektнay,1 | (0462)60-15-85 |
| Чернiroв | ООЛЯPGOC | 14005,р.Т-Mira,180a | (0462)5-99-39,5-33-06 |
| Чернiroв | СЛ CIPОКстot | 14000,Чернiroв,Шебун�а 4 | (046)267-58-58 |
| Чернouveц | Фокстot Сервис | 58000,r.Чернoveцу obSL,ул.Рбоча 265 | (0372)58-43-01 |
| Шостka | КЛ ТД "БЕЕЗKA-CEPBISC" | 41100.r.Шостka,Смеляш� obSL,ул.Рбоча 4.5 | (05449)4-07-07 |
| Ялты | СЛ ,ABI-ЕLETEKTOPIHK" | 98600,ул.Жадановский,3 | (0654)38-60-18 |
| Ялты | TOB "Лікс-Дали" | 98600,ур.Kрим,м.Ялты,ыл.Держинького,15 | (0654)27-67-86,(095)066-85-56,(097)242-72-97 |
- Safety Reminding and Maintenance:
- INSTALLATION
- BUILT-IN
- Installation:
- ELECTRICAL CONNECTION
- Warning :
- Connection to power supply
- INDUCTION
- Put simply, induction technology has two main advantages :
- A HIGH SAFETY APPLIANCE
- Protection from over-Temperature
- Residual heat warning
- - Auto shutdown
- HOB COOKWARE ADVICE
- Instructions for Use
- Operating instructions
- Boost function
- Warning:
- Cancelling the "BOOST" mode
- Timer function
- If the timer is set on more than 1 zone:
- Note:
- Safety mode
- Special function
- Memory function
- Recording
- Stop recording
- Execute a recorded cooking cycle
- How to record one new cooking cycle if we have already recorded one:
- As big zone
- As two independent zones
- FLEXIBLE AREA
- CLEANING AND MAINTENANCE
- MAINTENANCE:
- If there are still some stubborn stains:
- A FEW HINTS:
- Do not use a sponge which is too wet.
- AFTERCARE
- Before calling out a Service Engineer please check the following:
- PROBLEM SOLVING
- The induction hob gives shorings out.
- The induction hob gives a light whistling out.
- Cooking zones that do not maintain a rolling boil or a fast enough frying rate.
- Foods cook slowly.
- Tiny scratches (may appear as cracks or abrasions) on the glass surface of the hob.
- Metal markings (may appear as scratches).
- Dark streaks or specks.
- Areas of discoloration on cooktop.
- Hot sugar mixtures / plastic melted to the surface.
- The hob is out of order, or some heat zones do not work.
- The hob does not operate.
- The hob does not cut off
- The hob stops automatically
- Frequency of on/off operations for cooking zones
- Дякемо BAM 3A BИБIP ПОДуКцI ROSIERES!
- 3AΓΑΙβΗΠΟΙΟχΕΝΗ
- 3AЯBAПОВIДПОВIDHICTb
- 3ACTEPEXKEHH
- TEXHIUHIXAPAKTEPNCTUKN
- IHCTPyKci 3 TEXHIKN BE3NEKN
- BbYIOBYAHH
- EeKtpnHne nie'EdHaHH
- PiédHaHHdo dKepeLa KnBHeHH
- CNOCIB BKNOPNCTAHH
- PINCTPIIIBNUEHOI 6E3NEKIN
- NOCyDДЯ BAPINbHOI NOBEPXHI
- NOCYДЛВAPINJIbHOI NOBEPXHI
- -БлOKуВань
- ФУHKUII NAM'RTI
- 3AINC
- 3MIHHA 3OHA
- YHSEHHRA EKCnIyATAUIA
- DEKIIbKA IOPA:
- 3anam'raTaIe:
- UCYHEHHH HECNPABHOCTE
- PEMOHT
- PIUJEHNAIPOBNIEMN
- YMOBN:
- CeptnphiKat
- TpaHcnpTyBaHHi 36epirAHn
- YctaHObKa Ta ekcnlyatauia
- PemOHr
- BidnoibdaIbHcTb
Brand : ROSIERES
Model : RIED 430 B
Category : Cooker