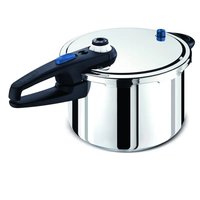
Secure 5 Neo P2534237 - Saucepan TEFAL - Free user manual and instructions
Find the device manual for free Secure 5 Neo P2534237 TEFAL in PDF.
User questions about Secure 5 Neo P2534237 TEFAL
0 question about this device. Answer the ones you know or ask your own.
Ask a new question about this device
Download the instructions for your Saucepan in PDF format for free! Find your manual Secure 5 Neo P2534237 - TEFAL and take your electronic device back in hand. On this page are published all the documents necessary for the use of your device. Secure 5 Neo P2534237 by TEFAL.
USER MANUAL Secure 5 Neo P2534237 TEFAL
November 2015. Ret.: NE219643. Realisation: Spain Geography
www.tefal.com
TOTAL S.A.S. - 21260 Selongey
FARCE
Tefal®
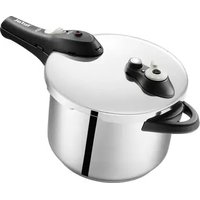
SECURE 5 NEO
natural_image
Close-up of a white ceramic pot with black handle and lid (no text or symbols visible)text_image
A B C D E F G (a) H I J* K* G (b) L M N OFremor non indiktoris intrainmedia - Befan met indiktori with an al. media - Mio jevemindrostrinabgeprenbijlbaipalas modellen - Befanigen Microbi et der Einkert und enthaltern - Gestelener indus: 1. Kreding, ind. Ind. Ibis modeller - Euktykori elkultura di klinu ma leih - Damplacammonmedagar lae ilta modeller - Ties modulam kredam seur - Cistil be indiklade anal- garne modell - Ecora m and i de nejans modell - Es apapens, ind. Ind. Ibis modell

fig. 1 fig. 2 fig. 3
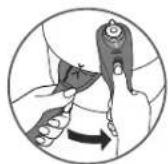
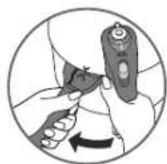

fig. 4 fig. 5*
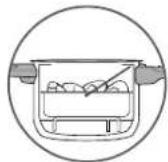
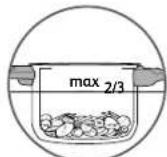
fig. 6
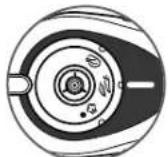
fig. 7 fig. 8 fig. 9
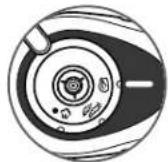
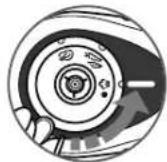
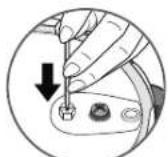
fig. 10
fig. 11 fig. 12

fiq. 13
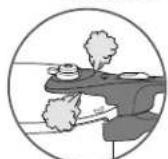
fig. 14 fig. 15
Panernon inclus dans certains modèles - Basket not included with certain models - Wandle endnivostietinbegrepenbij bepaalde modellen "Bel einigen Modellen ist der Einsatz nicht enthalten - Castello non induiso in certi modelli - Körpen inglar inte i visa modeller - Hönytyskori ei kuulu kaikkiin malahin - Dampindatsen mediflger ikke til visse modeller - Visse modeller har ikke damp kurny - Castillo no includo en algunos modelos - Cesto não incluido em alguns modelos - "Se opujuëvo muvtela dev nepiuqibavetoi to kaoléth.
PRÉCAUTIONS IMPORTANTES
natural_image
Diagram of a circular mechanical component with labeled point H (no text or symbols beyond label)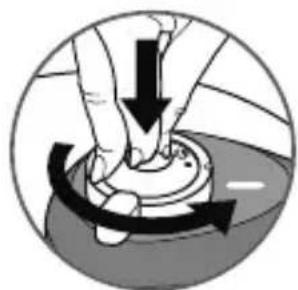
natural_image
Diagram showing hands using a mechanical device to move a circular component with directional arrows (no text or symbols)
natural_image
Illustration of hands holding a mechanical component with an upward arrow (no text or symbols)natural_image
Diagram of a human head and ear with a circular inset showing a ring and arrow, no text or symbols present.natural_image
Close-up of a hand using a tool to press or install a small component on a device (no text or symbols visible)FR
Pendant la cuisson
natural_image
Diagram of a kitchen sink with water spilling out, enclosed in a circular frame (no text or symbols)- Cas particulier :
natural_image
Diagram of a human head and ear with a circular dial and arrow indicating direction (no text or symbols)natural_image
Illustration of a hand turning a button into a terminal block (no text or symbols visible)natural_image
Close-up of a hand using a tool to press or adjust a component on a circular surface (no text or symbols visible)For your safety, this appliance complies with the applicable standards and regulations:
- Pressure Equipment Directive
- Materials in contact with food
- Environment
- This appliance is designed for domestic use. Any commercial use, inappropriate use or failure to comply with the instructions, the manufacturer accepts no responsibility and the guarantee will not apply.
- Take the time to read all the instructions and always refer to the 'User Guide'.
- As with any cooking appliance, be vigilant, especially if you use your pressure cooker in proximity to children.
- Do not place your pressure cooker in a hot oven.
- Always be very careful when moving your pressure cooker under pressure. Do not touch the hot surfaces. Use the handles and knobs. Use oven gloves when necessary.
- Check regularly that the pot handles are properly attached. Re-tighten them if necessary.
- Do not use your pressure cooker for any use other than that for which it was intended.
- Your pressure cooker cooks under pressure. Scalding injuries may result if it is used incorrectly. Ensure that the pressure cooker is properly closed before use. See section 'Closing'.
- Never open the pressure cooker by force. Make sure the internal pressure has been released. See section 'Safety'.
- Never use your pressure cooker without liquid as this will seriously damage it. Ensure that there is always enough liquid during cooking.
- Use a compatible heat source, in accordance with the instructions for use.
- Never use your pressure cooker for milk-based pudding recipes (such as rice pudding, semolina pudding, ...).
- Do not use coarse salt in your pressure cooker; add fine salt at the end of the cooking time.
- Do not fill your pressure cooker more than 2/3 full (maximum fill level).
- For foods that swell during cooking, such as rice, dried vegetables, stewed fruit, etc., do not fill your pressure cooker to more than half full. For certain soups made with pumpkins, courgettes, etc., leave your pressure cooker to cool for a few minutes, and then cool it under cold water. In the case of the 3L and 4L models, for soft or thick texture foods or those which expand during cooking, do not fill your product more than 1/3 full. At the end of the cooking time, wait 5 minutes before decompressing under running water.
- After cooking meats with a superficial skin (eg. beef tongue, etc.), which may swell under the effect of the pressure, do not pierce the meat while the skin has a swollen appearance; there is a risk that you may be scalded. Be sure to pierce the skin prior to cooking.
- In the case of soft or thick texture foods (split peas, rhubarb, etc.), the pressure cooker should be gently shaken before opening so that these foods do not spurt out.
- Check that the valves are not obstructed prior to each use. See section 'Before cooking'.
- Do not use your pressure cooker to fry with oil under pressure.
- Do not undertake any operation on the safety systems other than those featuring in the instructions for cleaning and maintenance.
- Only use original TEFAL parts corresponding to your model. In particular, use a TEFAL pot and lid.
- Alcohol vapours are inflammable. Bring to the boil for around 2 minutes before fitting the lid. Watch your device closely when cooking alcohol-based recipes.
- Do not use your pressure cooker for storing acid or salty foods before and after cooking as there is a risk that this may damage your pot.
- If during use you notice that any part of your pressure cooker is broken or cracked, do not attempt to open it under any circumstances; turn off the heat and leave on the hob to cool down completely before moving it or opening the lid. Do not use it again and take it to a TEFAL Approved Service Centre for repair.
RETAIN THESE INSTRUCTIONS
Descriptive diagram
A. Operating valve
B. Steam release outlet
C. Safety valve
D. Pressure indicator
E. Lid release button
F. Lid handle
G(a). Lid positioning mark
G(b). Lid-pot positioning mark
H. Operating valve positioning mark
I. Lid gasket
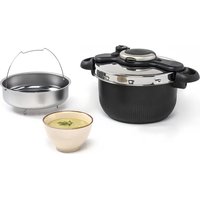
J. Steam basket*
K. Trivet*
L. Long pot handle
M. Pot
N. Short pot handle
- Maximum fill level mark
Characteristics
Pressure cooker bottom diameter – model references
| Capacity | Total Capacity** | Cooker diameter | Base diameter | STAINLESS STEEL model | Maximum safe pressure: |
| 4 L 4.7 L | 22 cm 15 cm | P25342 | 170 kPa (25 psi) | ||
| 6 L 6.7 L | 22 cm 15 cm | P25307 | 170 kPa (25 psi) | ||
| Set 4L + 6L | 4.7 L / 6.7 L | 22 cm | 15 cm | P25443 | 170 kPa(25 psi) |
| 7 L 7.7 L | 22 cm 15 cm | P25308 | 170 kPa(25 psi) | ||
| 8 L 8.7 L | 22 cm 15 cm | P25344 | 170 kPa(25 psi) |
** : Product capacity with the lid in position.
Technical information:
Maximum operating pressure: 80 kPa (12 psi)
Compatible heat sources
GAS

SEALED
PLATE
ELECTRIC

CERAMIC
HALOGEN

INDUCTION
[Non-Text]

ELECTRIC
COIL

- This pressure cooker is suitable for all heat sources, except Aga hobs but including induction.
- On an electric or induction hob, ensure that the diameter of the hot plate does not exceed that of the pressure cooker base.
- On a ceramic or halogen hob, ensure that the pressure cooker base is always clean and dry.
- On a gas hob, the flame must never exceed the diameter of the pressure cooker base.
- On all hobs, check that your pressure cooker is well centred.
- The following accessories are available for the pressure cooker:
| Accessory Reference number | |
| Lid gasket X9010101 | |
| Steam basket* 792185 | |
| Trivet* 792691 | |
- To change other parts, or for repairs, contact an Approved TEFAL Service Centre (please go to: www.tefal.com).
- Only use original TEFAL parts corresponding to your model.
Use
Opening
- Using your thumb, pull back on the lid release button (E) and hold it in the retracted position - Fig. 1.
- Holding the long handle of the pot (L) with one hand, turn the long handle of the lid (F) with the other hand in an anti-clockwise direction until open - Fig. 2.
- Then lift the lid.
- Do not open the pressure cooker until the unit has cooled and all internal pressure has been released. If the handles are difficult to push apart, this indicates that the cooker is still pressurised – do not force it open. Any pressure in the cooker can be hazardous.
Closing
When the appliance is closed but not in operation, it is normal for the lid to move slightly relative to the pot. This effect disappears when the product is pressurised.
- Place the lid horizontally onto the pot, aligning the lid positioning marks G(a) and G(b).
- Turn the lid in a clockwise direction until it stops - Fig. 3 until you hear the button click as it engages - Fig. 4.
If you are unable to turn the lid, ensure that the opening button (E) is properly retracted.
Minimum fill level
- Always put at least 25 cl/ 250 ml (2 cups) of liquid in the pressure cooker when in use
For steam cooking\*:
- The pot must contain at least 75 cl/ 750 ml (6 cups) of water.
- Place the basket* (J) on the trivet* (K) provided for this purpose - Fig. 5.
The food in the steam basket* must not touch the lid of the pressure cooker.
- Never fill your pressure cooker to more than two-thirds full (maximum fill mark) (O) - Fig. 6.
For certain foods:
- For foods that swell during cooking, such as rice, dried vegetables, stewed fruit, etc., do not fill your pressure cooker to more than half full.
- When cooking soups, we would advise you to carry out a rapid pressure release (see section 'Rapid pressure release').
Using the operating valve (A)
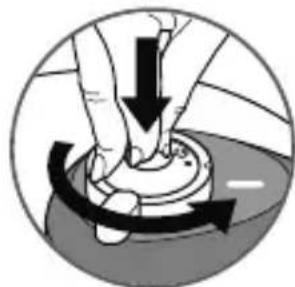
To fit the operating valve (A):
Caution, these operations must only be carried out when the product is cold and not in use.
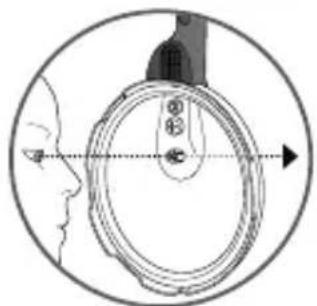
- Place the operating valve (A) in position, aligning the symbol ● on the valve with the positioning mark (H) as shown in the diagram opposite.
- Press down on the valve then turn it to the symbol or as shown in the diagram opposite.
To remove the operating valve:
Caution, these operations must only be carried out when the product is cold and not in use.
- Press down on the valve then turn it to align the symbol ● with the positioning mark (H) as shown in the drawing opposite.
- Remove the valve as shown in the drawing opposite.
To cook vegetables or delicate foods:
- Position the pictogram on the valve opposite the positioning mark (H) - Fig. 7.
- Pressure operates at 50kPa (7 psi / 7lbs pressure).
To cook meat or frozen foods:
- Position the pictogram on the valve opposite the positioning mark (H) - Fig. 8.
- Pressure operates at 80kPa (12 psi / 12lbs pressure).
To release the steam:
- Gradually turn the valve (A), adjusting the speed that the pressure is released by how far you open the valve,

natural_image
Diagram of a circular mechanical component with labeled parts (no text or symbols beyond 'H' label)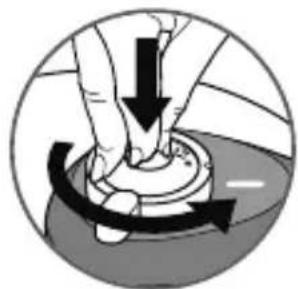
natural_image
Diagram showing hands rotating a mechanical component with directional arrows (no text or symbols)
natural_image
Illustration of hands holding a mechanical component with an upward arrow (no text or symbols)until it aligns opposite the mark with the symbol fig. 9, or place your pressure cooker under running water from the cold tap (section 'Rapid pressure release').
First use
It is normal for steam to be present near the pressure indicator (D) when the product begins operating.
- Place the basket trivet (K) in the bottom of the pot and place the basket (J) on top of it*.
- Fill the pot to two-thirds full with water (maximum fill mark (O)).
- Close the pressure cooker.
- Position the symbol opposite the positioning mark (H) - Fig. 8.
- Place the pressure cooker on a heat source, then set to maximum power.
- When steam begins to escape from the valve, turn down the heat source and leave for 20 min.
• After the 20 min is up, turn off your heat source. - Gradually turn the valve (A), adjusting the speed that the pressure is released by how far you open the valve, until it aligns opposite the symbol - fig. 9.
- When the pressure indicator (D) drops down, your pressure cooker is no longer under pressure.
- Open the pressure cooker - Fig. 1 - 2.
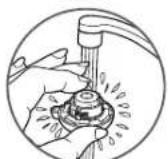
- Rinse the pressure cooker with water and dry it.
Before cooking
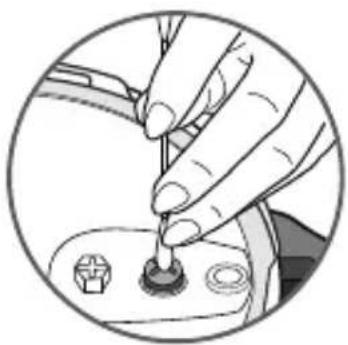
- Before each use, remove the valve (A) (see section 'Using the operating valve') and check visually and against the light that the steam release outlet (B) is not obstructed (See diagram opposite). If necessary, clean it with a toothpick - Fig. 10.
- Check that the safety valve ball (C) is mobile (see drawing opposite) and see section 'Cleaning and maintenance'.
natural_image
Diagram of a human head and eye with a circular target and arrow, no text or symbols present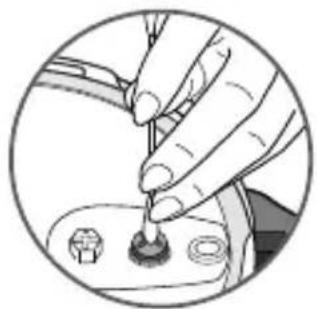
natural_image
Illustration of a hand using a tool to apply material to a small component (no text or symbols visible)- Add your ingredients and the liquid.
- Close the pressure cooker - Fig. 3 and ensure that it is properly closed - Fig. 4.
- Position or on the valve to the positioning mark H - Fig. 7 or 8.
- Place the pressure cooker on a heat source, then set it to maximum power.
EN
During cooking
The pressure indicator (D) prevents the pressure from rising in the pressure cooker if it is not properly closed.
- It is normal for steam to be present at the pressure indicator (D) when the product begins operating.
- When steam escapes continuously from the operating valve (A), with a steady "pschhht" sound, reduce the heat source until the valve (A) continues to whisper steadily.
- Leave for the cooking time indicated in the recipe.
- As soon as the cooking time is over, turn off the heat source.
End of cooking
To release the steam:
- Slow pressure release:
- This is used for stews, vegetables, meat joints and fish dishes.
- Gradually turn the valve (A), adjusting the speed that the pressure is released by how far you open the valve, until it aligns opposite the mark with the symbol 🌿 - fig. 9. When the pressure indicator (D) drops down again, your pressure cooker is no longer under pressure.
The pressure indicator (D) prevents the pressure cooker from being opened if it is still under pressure.
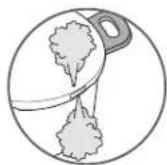
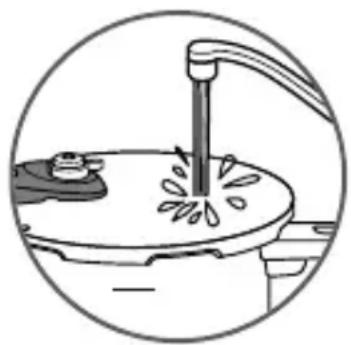
- Rapid pressure release:
- This is used for soups, rice, pasta, egg custards, cake and pudding mixes, recipes containing rice or pasta and recipe with a high liquid content.
- You may place your pressure cooker under a cold running tap to speed up decompression, see diagram opposite. When the pressure indicator (D) drops down, your pressure cooker is no longer under pressure.
- You may open your pressure cooker - Fig. 1 and 2.
If while releasing the steam, you notice any food or liquid start to spray out from the valve, return the operating valve (A) to ou mark- Fig. 7 or 8-, wait a minute and then slowly turn the operating valve again to the steam release position, ensuring nothing else spurts out.
natural_image
Diagram of a mechanical device with a lever and rotating components (no text or symbols)- Special case foods:
- When cooking special case foods (see cooking table) or dried vegetables, do not release the pressure; instead leave the cooker to stand at room temperature and wait for the pressure indicator (D) to drop before opening. Reduce the recommended cooking time slightly.
When moving your pressure cooker under pressure always take great care to move it without shaking it.
Cleaning and maintenance
Cleaning the pressure cooker
To ensure the correct operation of your pressure cooker, follow these cleaning and maintenance recommendations after each use:
- Wash the pressure cooker (pot and lid) after each use with warm water and washing-up liquid. Follow the same procedure for the basket*.
- Do not use bleach or chlorinated products.
- Do not overheat your pan when it is empty.
To clean the inside of the pot:
- Wash using a sponge and washing-up liquid.
- The appearance of stains in the bottom of the pot does not affect the quality of the metal at all. These are limescale deposits. To remove them, use a sponge with a little white vinegar.
To clean the outside of the pot:
- Wash using a sponge and washing-up liquid.
To clean the lid:
- Wash the lid under a stream of warm water with a sponge and washing-up liquid and rinse well.
To clean the lid gasket:
- After each use, clean the gasket (I) and its groove.
- To replace the gasket, please refer to - Fig. 11 - 12.
To clean the operating valve (A):
- Remove the operating valve (A), see section 'Using the operating valve'.
- Clean the operating valve (A) under the tap - Fig. 13.
Wash your pressure cooker after each use.
The browning and marks which may appear following extended use do not affect the operation of the pressure cooker.
Only the pot is dishwasher-safe.
To extend the lifespan of your pressure cooker, do not overheat the pot when it is empty.
It is essential to have your pressure cooker checked at a TEFAL Approved Service Centre after 10 years of use.
To clean the steam release outlet (B):
- Remove the valve (A).
- Visually inspect against the light that the steam release outlet is round and clear of debris. See drawing opposite. If necessary, clean it with a toothpick - Fig. 10.
To clean the safety valve (C):
- Clean the part of the safety valve on the inside of the lid by placing it under running water.
- Check its correct operation by lightly pressing down on the ball using a cotton bud, which must move freely. See drawing opposite.
To change the gasket of your pressure cooker:
- Change the gasket of your pressure cooker every year or if split or damaged.
• Always use an original TEFAL gasket corresponding to your model.
To store your pressure cooker:
- Place the lid upside-down on the pot.

natural_image
Diagram of a human head and face with a circular cross-section showing internal components (no text or labels)Never use a sharp or pointed object to carry out this operation.

natural_image
Close-up of hands using a tool to apply material to a small component (no text or symbols visible)Safety
Your pressure cooker is fitted with several safety devices:
- Closing safety:
- If the appliance is not properly closed, the pressure indicator (D) cannot rise and the pressure cooker cannot build pressure.
- Opening safety:
- If the pressure cooker is under pressure, the release button (E) cannot be operated. Never open the pressure cooker by force. Above all, do not interfere with the pressure indicator (D).
- Two safety devices against overpressure:
- First device: the safety valve (C) releases the pressure and steam escapes horizontally from the top of the lid - Fig.14
- Second device: the gasket (I) permits steam to escape vertically from the small hole located on the edge of the lid or along the side of the pot - Fig.15. Caution, this may extinguish the flame on a gas hob.
If one of the overpressure safety systems is triggered:
- Turn off the heat source.
- Leave the pressure cooker to cool completely.
- Open the pressure cooker.
- Check and clean the operating valve (A) - Fig.13, the steam release outlet (B) - Fig.10, the safety valve (C) and the gasket (I). See drawing opposite.

natural_image
Illustration of a hand using a tool to apply a button on a small electronic device (no text or symbols visible)Recommendations for use
1 - The steam is very hot when it leaves the pressure cooker, take care not to scald yourself. Use oven gloves if necessary.
2 - Once the pressure indicator has risen, you can no longer open your pressure cooker.
3 - As with any cooking appliance, ensure close supervision when using the pressure cooker near children.
4 - To move the pressure cooker, use the two pot handles.
5 - Never leave food standing in your pressure cooker.
6 - Never use bleach or products containing chlorine, as these may alter the quality of the material.
7 - Do not put the following in a dishwasher or leave them to soak in water: the gasket, lid, and operating valve.
8 - Change the gasket every year or if it is split or damaged.
9 - Only clean your pressure cooker when it is cold and empty.
10 - It is essential to have your pressure cooker checked in a TEFAL Approved Service Centre after 10 years of use.
Guarantee
- When used as recommended in these instructions, the pot of your new TEFAL pressure cooker is guaranteed for 10 years against:
- Any defect associated with the metal structure of your pot,
- Any premature deterioration of the base metal.
- All other parts of your pressure cooker are guaranteed against defects in workmanship or materials, for the period of guarantee defined in valid legislation in force in the country where the product was purchased from the date of purchase. For full details of the guarantee terms and conditions please refer to www.tefal.com
- This contractual guarantee shall be honoured upon presentation of the receipt or invoice showing the date of purchase.
These guarantees exclude:
- Damage resulting from failure to comply with important precautions, or negligent use, particularly:
- Knocks, dropping, use in the oven, etc.
- Putting the lid and the operating valve through a dishwasher.
- Only TEFAL Approved Service Centres are authorised to provide this guarantee service (please go to: www.tefal.com).
Australian – NZ warranty
COOKWARE, BAKEWARE AND PRESSURE COOKERS Limited Replacement Guarantee
Our goods come with guarantees that cannot be excluded under the Australian Consumer Law. You are entitled to a replacement or refund for a major failure and compensation for any other reasonably foreseeable loss or damage. You are also entitled to have the goods repaired or replaced if the goods fail to be of acceptable quality and the failure does not amount to a major failure. In addition to these statutory rights and any other rights and remedies you may have under the law, Groupe SEB Australia Pty Ltd (we or us) guarantees this Jamie Oliver by Tefal/Tefal/All-Clad/Moulinex product will be free of defects in material and craftsmanship including handles, body, knobs, lids and fixings for 12 months from the date of purchase. We also guarantee the non-stick coating of this Jamie Oliver by Tefal/Tefal/All-Clad/Moulinex product will be free of blistering or peeling for the life of the Jamie Oliver by Tefal/Tefal/All-Clad/Moulinex product. Should your Jamie Oliver by Tefal/Tefal/All-Clad/Moulinex product develop a defect during the guarantee period or the non-stick coating peel during the life of your Jamie Oliver by Tefal/Tefal/All-Clad/Moulinex product, you should return it, at your cost, to the retailer from which you purchased it from, together with your receipt as proof of purchase. The retailer will then forward your claim directly to us for processing. Alternatively, if the retailer is unable to help you, you may contact us directly at:
Groupe SEB Australia Pty Ltd, Customer Service Department, Unit 1, No 10 Hill Rd, Homebush NSW 2127 T: +61 2 9748 7944
If on receipt your Jamie Oliver by Tefal/Tefal/All-Clad/Moulinex product is found to be defective or the non-stick coating has peeled, we will, at our cost, replace or repair the product in our discretion. Only the defective part or accessory will be repaired or replaced. Packaging, instructions etc. will not be replaced unless faulty. This guarantee excludes defects caused by the Jamie Oliver by Tefal/Tefal/All-Clad/Moulinex product not being used in accordance with instructions, accidental damage (including overheating), misuse or being tampered with by unauthorised persons. It also does not apply if the Jamie Oliver by Tefal/Tefal/All-Clad/Moulinex product is used commercially and excludes consumable items (including accessories such as pressure regulators and safety devices), dishwasher effects and damages, stains, dents, discolouration, scratches or scuffs due to normal wear and tear, and your costs of claiming under the warranty.
TEFAL answers your questions
| Problems | Recommendations |
| If the pressure coo- ker has been heated under pressure wi- thout liquid inside: | Have your pressure cooker checked by a TEFAL Approved Service Centre. |
| If the pressure indi- cator has not risen and nothing escapes through the valve during cooking: | This is normal during the first few minutes.If the problem persists, check that:- The heat source is sufficiently high; if not, increase it.- The quantity of liquid in the pot is sufficient.- The operating valve is positioned to one of the symbols  or ☎ - fig. 7 or 8.- The lid is properly closed.- The gasket or the rim of the pot is not damaged. or ☎ - fig. 7 or 8.- The lid is properly closed.- The gasket or the rim of the pot is not damaged. |
| If the pressure indi- cator has risen and nothing is escaping through the valve during cooking: | This is normal during the first few minutes.If the problem persists, put the pressure cooker under cold running water until the pressure indicator drops down, see sections 'Rapid pressure release' and 'Special case', then open it.Clean the operating valve and the steam release outlet and check that the safety valve ball moves freely. |
| If steam leaks from around the lid, check: | That the lid is properly closed.The position of the gasket in the lid.The condition of the gasket; replace it if necessary.The cleanliness of the lid, the gasket and its groove in the lid, the safety valve and the operating valve.The condition of the rim of the pot. |
| If you are unable to open the lid: | Check that the pressure indicator is in the down position.If not, depressurise; if necessary, cool the pressure cooker under running water, see sections 'Rapid pressure release' and 'Special case'. |
| If the food is not cooked or is burned, check: | The cooking time.The power of the heat source.The correct position of the operating valve.The quantity of liquid. |
| If food is burned onto the pressure cooker: | Leave the interior of the pot to soak for some time before washing it.Never use bleach or products containing chlorine. |
| Cooking | FRESH Valve position | FROZEN Valve position | ||
| Artichokes whole | - steam** 18 min - | |||
| - immersion*** 15 min - | ||||
| Asparagus whole - immersion | 5 min - | |||
| Beetroot | peel after cooking | - steam 20 - 30 min - | ||
| Broccoli florets - steam 3 min | 3 min | |||
| Brussels sprouts whole - steam | 7 min 5 min - immersion | |||
| Carrots (special case food) | round slices | - steam | 7 min | 5 min |
| Cauliflower | florets | - immersion | 3 min | 4 min |
| Celery | 5-cm pieces | - steam 6 min - | ||
| - immersion | 10 min - | |||
| Courgettes | 2.5 cm slices | - steam | 6 min 30 | 9 min |
| - immersion 2 min - | ||||
| Endives | 2.5 cm slices | - steam | 12 min - | |
| Green beans | whole or sliced | - steam 8 min | 9 min | |
| Green cabbage | thinly sliced | - steam 6 min - | ||
| leaves | - steam 7 min - | |||
| Green lentils (dried vegetables) | - immersion | 10 min | - | |
| Leeks | 5.cm slices | - steam | 2 min 30 | - |
| Mushrooms | thinly sliced | - steam 1 min | 5 min | |
| whole - immersion | 1 min | 30 - | ||
| Peas | - steam | 1 min 30 | 4 min | |
| Potatoes (such as King Edward) | quartered | - steam | 12 min - | |
| quartered | - immersion 6 min - | |||
| Pumpkin (mashed) (special case food) | pieces | - immersion 8 min - | ||
| Rice (long grain white) | see note below | - immersion | 7 min | - |
| Semi-dried beans **** | - immersion | 20 min - | ||
| Spinach | - steam 5 min | 8 min | ||
| - immersion 3 min - | ||||
| Split peas (dried vegetables) | - immersion | 14 min | - | |
| Turnips | 2.5 cm cubes | - steam 7 min - | ||
| - immersion 6 min - | ||||
| Wheat (dried vegetables)**** | - immersion | 15 min | - |
** Food in the steam basket*
*** Food in the water
**** Not available in some countries
RICE: never fill pan more than half full including liquid as rice froths and boils up during cooking. Use 225 g rice and
1.75 litre water from a boiling kettle.
Meat and Fish
| FRESH Valve position | |
| Beef (1 kg topside) 32 min (medium)** | |
| Chicken (1.2 kg whole) 22 min | |
| Lamb (1.3 kg leg) 40 min (medium)** | |
| Monkfish (0.6 kg fillets) (special case food) 4 min | |
| Pork (1 kg roast) 28 min | |
| Salmon (4 steaks 0.6 kg) (special case food) 6 min | |
| Tuna (4 x 0.6 kg steaks) (special case food) 7 min |
**Cook for an additional 5 minutes for well done meat.
Golden rules when pressure cooking (for UK Consumers) For 6 Litre models only.
- The minimum quantity of liquid required for normal cooking is 250 ml ( 12 pint) for the first 14 hour cooking. For each additional 14 hour, or part of 14 hour, add a further 150 ml ( 14 pint) of liquid. For example, 45 minutes cooking requires 600 ml (1 pint) of liquid. Note: This is only a general guide. Certain foods, such as rice, pulses, steamed puddings and Christmas puddings may require extra water (see text below).
- When steaming foods in the basket use a minimum of 750 ml (1¼ pint) water in the cooker.
- Always use a liquid that gives off steam when boiled e.g. water stock, wine, beer, cider. Never use oil or fat. All pressure cooking requires some liquid.
- Whatever the size of pressure cooker, the maximum filling level when all the ingredients and liquid have been added are:
Solid foods e.g. vegetables, meat joints: no more than two-thirds full Liquids and cereals e.g. soups, stews, rice, cereal and pasta: no more than half full Pulses e.g. dried beans and dried peas: no more than one-third full
- When cooking pulses they swell up and tend to froth up. Use 1.2 litres (2 pints) water for every 450 ~g (1 lb) pre-soaked weight of pulses. Remember all dried peas and dried beans, must be soaked in boiling water for 1 hour before cooking. Drain, rinse thoroughly and cook in fresh water. Never eat uncooked beans or peas. Soaking is not necessary for red lentils. The high temperatures achieved in the pressure cooker ensure that any natural toxins in the pulses are destroyed. Canned beans and pulses can simply be drained and rinsed before adding to the pressure cooker.
- For steamed suet puddings, sponge puddings or Christmas puddings, a short pre-steaming time is best to enable the raising agent to activate and prevent a heavy, close texture. Extra liquid is required so use a minimum of 1 12 pint/900 ml of boiling water for a combined steaming and cooking time of up to 1 hour. For each additional 1 14 hour of cooking, or part of 1 14 hour, add a further 1 14 pint/150 ml of boiling water. Pre-steaming is done with the operating valve in the steam release position on a low heat for the required time. Then turn
the operating valve to either or, and increase the heat to bring to full pressure. Lower the heat and pressure cook for the required time.
- Pressure operates at 50kPa (7 psi / 7lbs pressure) and pressure at 80kPa (12 psi / 12lbs pressure).
- Never cook dumplings with the lid tightly closed, as they could rise up and block the safety devices. Cook the stew and at the end of cooking, release the steam and cook gently for about 10 - 15 minutes without the lid on.
- Pressure cooking times vary according to the size of individual pieces or thickness of the food, not the weight.
- To prevent discolouration of the interior, caused by mineral deposits in hard water areas, add a tablespoon of lemon juice or vinegar.
- Cooking containers must withstand temperatures of 130°C (250°F). Any covering on containers, e.g. foil, greaseproof paper or cling film, must be securely tied otherwise they could block the safety devices. Do not use plastic lids as they prevent steam from being in contact with the food. Also, they could distort and come off during cooking which could block the safety outlets.
- Accurate timing is essential when pressure cooking to prevent overcooking, especially with vegetables, fruit and fish.
Regulatory markings
| Marking Location | |
| Identification of manufacturer and commercial brand | Pot handle and lid handle |
| Year and batch of manufacture On the pot | |
| Model referenceMaximum safe pressure (PS)Maximum operating pressure (PF) | On the lid |
| Capacity Bottom of pot |
- Let's protect the environment!
① Your appliance contains many materials which can be recovered or recycled.
Leave it at a local civic waste collection point for processing.
BELANGRIJKE VOORZORGSMAATREGELEN
natural_image
Diagram of a mechanical component with labeled point H, showing concentric circular features and a curved handle (no text or symbols beyond label)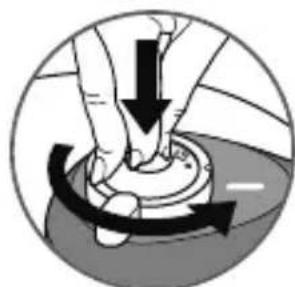
natural_image
Diagram showing hands rotating a mechanical component with directional arrows (no text or symbols)
natural_image
Close-up of hands holding a mechanical component with an upward arrow (no text or symbols visible)Eerste gebruik
natural_image
Diagram of a human head and face with a circular target-like object, showing alignment lines and measurement markers (no text or symbols)
natural_image
Close-up of a hand using a tool to press or install a small component on a circular surface (no text or symbols visible)Tijdens het koken
natural_image
Diagram of a mechanical device with a lever and rotating components, enclosed in a circular frame (no text or symbols)natural_image
Diagram of a human head and ear with a circular device, showing alignment lines and measurement markers (no text or symbols)
natural_image
Close-up of a hand turning a button on a vehicle's head panel (no text or symbols visible)Veiligheid
natural_image
Illustration of a hand turning a knob on a car's head (no text or symbols)Gebruiksadvies
text_image
Diagram illustrating three steps of a mechanical switch operation: wheel, press, and press mechanism with labeled component 'H'natural_image
Diagram of a human eye with a circular target and arrow, no text or symbols present
natural_image
Close-up of a hand using a tool to press or install a small component (no visible text or symbols)natural_image
Illustration of a hand washing a cup with a water droplet on the lid (no text or symbols)natural_image
Diagram of a human head and eye with a circular anatomical structure, showing alignment lines (no text or labels)natural_image
Close-up of a hand using a tool to press or install a button on a vehicle (no text or symbols visible)Sicherheit
natural_image
Illustration of a hand turning a button on a vehicle (no text or symbols visible)Tipps zum Gebrauch
natural_image
Diagram of a circular mechanical component with labeled point H (no text or symbols beyond label)
natural_image
Diagram showing hands operating a mechanical component with a curved arrow indicating rotation (no text or symbols)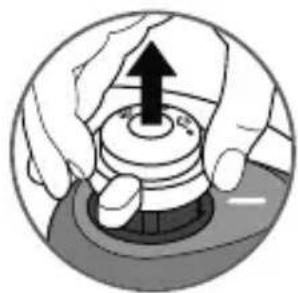
natural_image
Illustration of hands holding a mechanical component with an upward arrow (no text or symbols)natural_image
Diagram of a human head and face with a circular target-like object, showing alignment lines and components (no text or symbols)
natural_image
Close-up of a hand using a tool to press or adjust a small component on a circular surface (no text or symbols visible)natural_image
Simple line drawing of a kitchen sink with a handle and fan (no text or symbols)natural_image
Diagram of a human head and ear with a circular anatomical view showing a ring structure and alignment markers (no text or symbols)natural_image
Illustration of a hand turning a button on a vehicle (no text or symbols visible)Sicurezza
natural_image
Illustration of a hand using a tool to press or adjust a component on a control panel (no text or symbols visible)Consigli d'uso
natural_image
Diagram of a human head and eye with a circular target and arrow, no text or symbols present
natural_image
Close-up of a hand using a tool to press or install a small component (no visible text or symbols)natural_image
Diagram of a kitchen sink with a handle and water droplets, enclosed in a circular frame (no text or symbols)natural_image
Diagram of a human head and ear with a circular anatomical view showing a ring and alignment lines (no text or symbols)natural_image
Illustration of a hand turning a button into a terminal block (no text or symbols visible)
Säkerhet
natural_image
Close-up of a hand using a tool to press or install a small component on a mechanical part (no text or symbols visible)natural_image
Diagram of a circular mechanical component with labeled part H, showing concentric rings and a handle (no text or symbols beyond label)FI

natural_image
Illustration of hands using a mechanical switch to move a circular component (no text or symbols)
natural_image
Illustration of hands holding a mechanical component with an upward arrow (no text or symbols)natural_image
Diagram of a human head and ear with concentric rings and a pointer, no text or symbols present
natural_image
Illustration of a hand inserting a small component into a device (no text or symbols visible)natural_image
Simple line drawing of a mechanical device with a central shaft and water droplets (no text or symbols)natural_image
Diagram of a human head and face with a circular anatomical view showing internal structures (no text or labels)natural_image
Close-up of hands using a tool to press or install a button on a vehicle (no text or symbols visible)FI
Turvallisuus
natural_image
Illustration of a hand using a tool to apply material to a small component (no text or symbols visible)natural_image
Diagram of a mechanical component with labeled point H, showing concentric circular features and a curved base (no text or symbols beyond label)
natural_image
Diagram showing hands using a rotary knob to move a circular component, with no text or symbols present.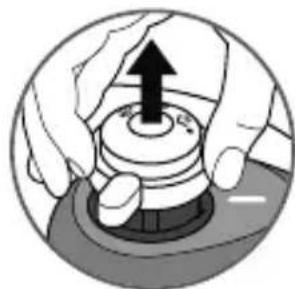
natural_image
Illustration of hands operating a mechanical device with an upward arrow (no text or symbols)Første ibrugtagning
Til at begynde med er det normalt, at trykindikatoren (D) viser damp.
natural_image
Diagram of a human head and ear with a magnified circular view showing measurement lines (no text or symbols)
natural_image
Illustration of a hand using a tool to press or adjust a component on a control panel (no text or symbols visible)Trykindikatoren (D) forhindrer, at trykket i trykkogeren stiger, hvis den ikke er ordentlig lukket.
natural_image
Illustration of a hand washing a cup with a water bottle (no text or symbols)Rengøring af sikkerhedsventil (C):
natural_image
Diagram of a human head and ear with a circular target and mechanical component, no text or symbols presentBrug aldrig skarpe eller spidse gens- tande til at rense med.
natural_image
Illustration of a hand turning a button into a terminal block (no text or symbols visible)DA
Sikkerhed
natural_image
Illustration of a hand using a tool to press or install a component on a small electronic device (no text or symbols visible)Anbefalinger for brug
natural_image
Diagram of a circular mechanical component with labeled part H, showing concentric rings and a handle (no text or symbols beyond label)

natural_image
Diagram showing hands operating a mechanical component with directional arrows indicating motion (no text or symbols)
natural_image
Illustration of hands holding a mechanical component with an upward arrow (no text or symbols)Det er normalt at det forekommer damp ved trykkindikatoren (D) när trykkokeren starter sin funksjon.
natural_image
Diagram of a human head and ear with a circular target and arrow, no text or symbols present
natural_image
Close-up of a hand using a tool to press or install a small component on a device (no visible text or symbols)natural_image
Illustration of a hand washing a cup with water spilling out (no text or symbols)natural_image
Diagram of a human head and ear with a circular anatomical view showing a ring and alignment markers (no text or labels)natural_image
Close-up of a hand using a tool to press or install a button on a device (no text or symbols visible)Sikkerhet
natural_image
Illustration of a hand turning a button on a vehicle (no text or symbols visible)Råd for bruk
natural_image
Circular mechanical component with concentric rings and a labeled section (H), no readable text or symbols present.
natural_image
Illustration of hands using a mechanical device to move a circular component with directional arrows (no text or symbols)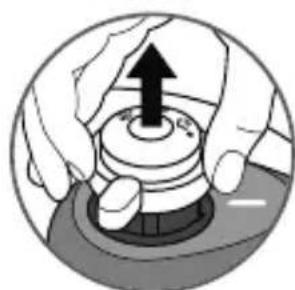
natural_image
Close-up of hands operating a mechanical device with an upward arrow (no text or symbols visible)natural_image
Diagram of a human head and ear with a circular target-like structure, showing alignment lines and measurement markers (no text or symbols)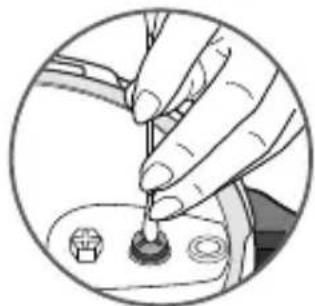
natural_image
Close-up of a hand using a tool to press or install a small component on a circular surface (no text or symbols visible)natural_image
Illustration of a kitchen sink with a water drop and a small container (no text or symbols)- Caso particular:
natural_image
Diagram of a human head and ear with a circular anatomical view showing internal organs (no text or labels)natural_image
Close-up of hands using a tool to adjust or install a component (no visible text or symbols)Seguridad
natural_image
Illustration of a hand turning a knob on a car intake manifold (no text or symbols)natural_image
Diagram of a circular mechanical component with labeled part H, showing internal structure without any text or symbols.
natural_image
Illustration of hands performing a circular mechanical operation with a curved arrow indicating rotation (no text or symbols)
natural_image
Illustration of hands holding a mechanical component with an upward arrow (no text or symbols)Primeira utilização
natural_image
Diagram of a human head and ear with a circular target-like structure, showing alignment lines (no text or symbols)
natural_image
Close-up of a hand pressing a button on a small electronic device (no text or symbols visible)natural_image
Illustration of a kitchen sink with a pipette and water droplets (no text or symbols)natural_image
Diagram of a human head and eye with a circular device, showing alignment lines and components (no text or symbols)natural_image
Close-up of a hand turning a button on a vehicle's head panel (no text or symbols visible)Segurança
natural_image
Illustration of a hand turning a button on a vehicle (no text or symbols visible)natural_image
Diagram of a circular mechanical component with labeled point H (no text or symbols beyond label)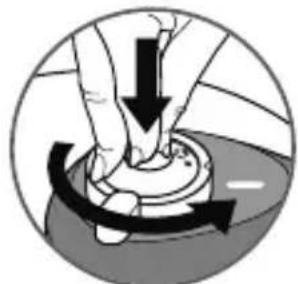
natural_image
Diagram showing hands performing a mechanical shift or rotation operation around a circular base (no text or symbols)
natural_image
Illustration of hands holding a mechanical component with an upward arrow (no text or symbols)natural_image
Diagram of a human head and ear with a circular dial and arrow indicating direction (no text or symbols)