
RDP-XA900IP - Docking speaker SONY - Free user manual and instructions
Find the device manual for free RDP-XA900IP SONY in PDF.

| Product type | Dock speaker |
| Brand | Sony |
| Model | RDP-XA900IP |
| Dimensions (W × H × D) | 600 × 200 × 201 mm |
| Weight | 7 kg |
| Power supply | 230 V AC, 50 Hz |
| Output power | Tweeters 25 W + 25 W, Woofers 25 W + 25 W, Subwoofer 50 W + 50 W (10 % THD) |
| Wireless connectivity | Wi-Fi 802.11 b/g, Bluetooth, AirPlay |
| Wired connectivity | Ethernet 10BASE-T/100BASE-TX, optical digital and analog audio inputs (3.5 mm mini-jack), composite video output |
| iPod/iPhone/iPad compatibility | iPod touch (2nd to 4th gen.), iPod nano (3rd to 6th gen.), iPod classic, iPhone 3G to 4S, iPad, iPad 2 |
| Main functions | iPod playback, AirPlay, Bluetooth, external audio inputs, D-Sappli app (equalizer, timers), software update |
| Speakers | Tweeters 20 mm × 2, Woofers 70 mm × 2, Subwoofer 135 mm × 1 |
| Accessories included | Remote control, AC power cord (×2), AirPlay setup guide, CR2025 lithium battery, warranty card |
| Care and cleaning | Wipe with a dry cloth. Do not use chemical products. Do not expose to water. |
| Safety | Do not obstruct ventilation openings. Do not expose to dripping or splashing. Unplug if abnormal. Keep lithium battery away from children. |
| General information | Manufactured by Sony Corporation, Japan. EU representative: Sony Deutschland GmbH. Recycle according to local regulations. |
Frequently Asked Questions - RDP-XA900IP SONY
User questions about RDP-XA900IP SONY
0 question about this device. Answer the ones you know or ask your own.
Ask a new question about this device
Download the instructions for your Docking speaker in PDF format for free! Find your manual RDP-XA900IP - SONY and take your electronic device back in hand. On this page are published all the documents necessary for the use of your device. RDP-XA900IP by SONY.
USER MANUAL RDP-XA900IP SONY
Personal Audio Docking System
Operating Instructions GB
Mode d'emploi FR
To reduce the risk of fire or electric shock, do not expose this apparatus to dripping or splashing, and do not place objects filled with liquids, such as vases, on the apparatus.
To reduce the risk of fire, do not cover the ventilation opening of the apparatus with newspapers, tablecloths, curtains, etc.
Do not place the naked flame sources such as lighted candles on the apparatus.
Do not install the appliance in a confined space, such as a bookcase or built-in cabinet.
As the main plug is used to disconnect the unit from the mains, connect the unit to an easily accessible AC outlet. Should you notice an abnormality in the unit, disconnect the main plug from the AC outlet immediately.
Do not expose batteries or apparatus with battery-installed to excessive heat such as sunshine, fire or the like.
Battery may explode if mistreated. Do not recharge, disassemble or dispose of in fire.
The unit is not disconnected from the mains as long as it is connected to the AC outlet, even if the unit itself has been turned off.
Keep the lithium battery out of the reach of children. Should the battery be swallowed, immediately consult a doctor.
CAUTION
Danger of explosion if battery is incorrectly replaced. Replace only with the same or equivalent type.
Replace the battery with a Sony CR2025 lithium battery.
Use of another battery may present a risk of fire or explosion.
Notice for customers: the following information is only applicable to equipment sold in countries applying EU directives.
The manufacturer of this product is Sony Corporation, 1-7-1 Konan Minato-ku Tokyo, 108-0075 Japan. The Authorized Representative for EMC and product safety is Sony Deutschland GmbH, Hedelfinger Strasse 61, 70327 Stuttgart, Germany. For any service or guarantee matters please refer to the addresses given in separate service or guarantee documents.

Disposal of Old Electrical & Electronic Equipment (Applicable in the European Union and other European countries with separate collection systems)
This symbol on the product or on its packaging indicates that this product shall not be treated as household waste. Instead it shall be handed over to the applicable collection point for the recycling of electrical and electronic equipment. By ensuring this product is disposed of correctly, you will help prevent potential negative consequences for the environment and human health, which could otherwise be caused by inappropriate waste handling of this product. The recycling of materials will help to conserve natural resources. For more detailed information about recycling of this product, please contact your local Civic Office, your household waste disposal service or the shop where you purchased the product.

Disposal of waste batteries (applicable in the European Union and other European countries with separate collection systems)
This symbol on the battery or on the packaging indicates that the battery provided with this product shall not be treated as household waste.
On certain batteries this symbol might be used in combination with a chemical symbol. The chemical symbols for mercury (Hg) or lead (Pb) are added if the battery contains more than 0.0005% mercury or 0.004% lead.
By ensuring these batteries are disposed of correctly, you will help prevent potentially negative consequences for the environment and human health which could otherwise be caused by inappropriate waste handling of the battery. The recycling of the materials will help to conserve natural resources.
In case of products that for safety, performance or data integrity reasons require a permanent connection with an incorporated battery, this battery should be replaced by qualified service staff only. To ensure that the battery will be treated properly, hand over the product at end-of-life to the applicable collection point for the recycling of electrical and electronic equipment.
For all other batteries, please view the section on how to remove the battery from the product safely. Hand the battery over to the applicable collection point for the recycling of waste batteries.
For more detailed information about recycling of this product or battery, please contact your local Civic Office, your household waste disposal service or the shop where you purchased the product.
Table of Contents
Overview of this Personal Audio Docking System
Guide to Parts and Controls 6
Main unit 6
Remote control 9
Getting Started
Preparing the Unit and the Remote Control 10 Connecting to an AC power source 10 Preparing the remote control 10 Turning on the unit 10
Connecting Your Network 11 Connecting to a Wi-Fi network 11 Connecting to a wired network 11 Option 3:Wi-Fi Connection using Access Point Scan 12
Enjoying the Audio Content
Listening to iPod 15
Listening with the "AirPlay" Function 17
Listening to Bluetooth Devices 18
Pairing with a Bluetooth device 18
Operating a Bluetooth device 18
Listening to Other Components 20
Updating the Software 20
Initializing the Unit 21
Additional Information
Troubleshooting 22
Specifications 26
Compatible iPod Models and Computers 27
System Requirements for the Computer for Setting up the "AirPlay" Function 28
Precautions 28
Overview of this Personal Audio Docking System
This unit enables you to enjoy sound from various sources.
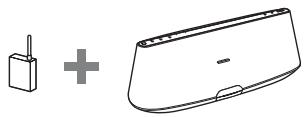
AirPlay
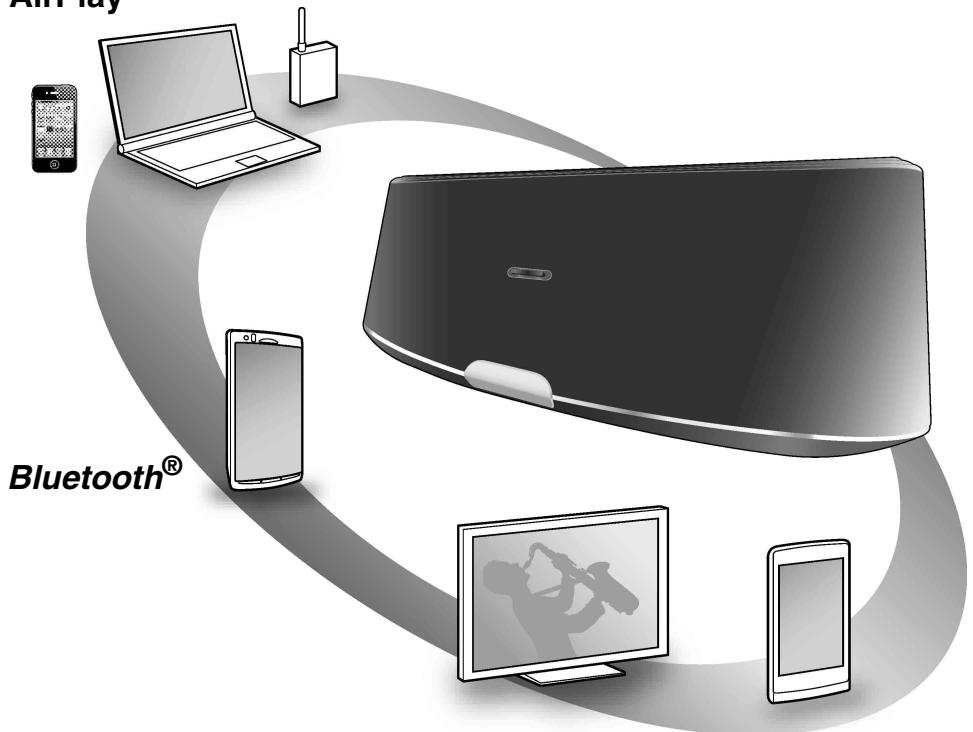
TV, etc.
Portable Audio Player, etc.
iPod
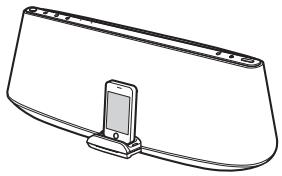
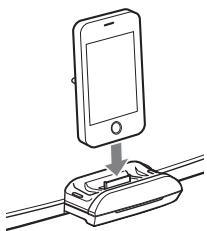
You can enjoy sound from an iPod, iPhone or iPad by setting it on the Docking Tray of this unit, while charging it at the same time (page 15).
AirPlay
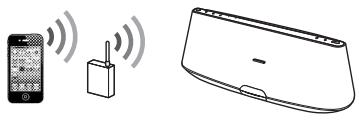
You can enjoy sound from an iPhone/iPod touch/iPad or iTunes with this unit anywhere in your home (page 17).
You will need to set your iPhone/iPod touch/iPad to a Wi-Fi network, and connect this unit to that network.
Bluetooth
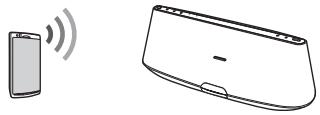
You can listen to sound from a Bluetooth device, such as a mobile phone, by wirelessly connecting it to this unit (page 18).
TV, etc.
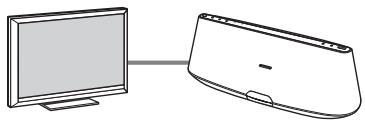
You can listen to sound from an optional component, such as a TV or CD player, by connecting it to the AUDIO IN (DIGITAL) terminal of this unit (page 20).
Portable Audio Player, etc.
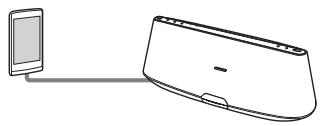
You can listen to sound from an optional component, such as a portable audio player, by connecting it to the AUDIO IN (ANALOG) terminal of this unit (page 20).
Guide to Parts and Controls
Main unit
Top/Front


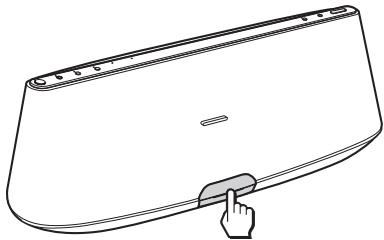
1 Docking Tray
Press the Docking Tray on the front of the unit to open or close it.
Set your iPod on the Docking Tray when you want to operate it on the tray or charge it (page 15).
2 Input Status indicator
Indicates the input status of the unit.
White (normal): The unit is in the "iPod"/AUDIO IN mode.
White (small): The unit is in the "AirPlay"/
Bluetooth mode and the connection is not established.
Green: The unit is in the "AirPlay" mode and the connection is established.
Blue: The unit is in the Bluetooth mode and the connection is established.
Flashes when the operation is started.
Flashes three times when the volume is set to minimum or maximum.
Remote sensor (inside)
4 I/ (On/Standby) button, indicator
Turns the unit on (page 10), or places in standby/network standby mode.
Indicates the power status of the unit.
Green (lit): The unit is turned on.
Green (flashing): The unit is being turned on.
Red: The unit is in the standby mode.
Amber: The unit is in the network standby mode.
Tips
-
When the unit is in the network standby mode and receives a command to playback on an "AirPlay" device, the unit turns on and starts playback automatically.
-
To switch the unit between the standby mode and network standby mode, press and hold the I/O button until the colour of the I/O indicator changes.
5 "iPod", AUDIO IN, BLUETOOTH - PAIRING buttons, indicators
Selects a source device (page 15, 18, 20).
Lights up amber (iPod or AUDIO IN) or blue (Bluetooth) according to a selected source.
The BLUETOOTH indicator shows Bluetooth connection status.
Blue (lit): Connection has been established.
Blue (flashing slowly): Connection is being established.
Blue (flashing quickly): Pairing mode is activated.
6 "AirPlay" indicator
Lights up green when the unit is in the "AirPlay" mode.
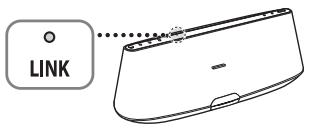
7LINKindicator
Indicates the connection status of the wired/Wi-Fi network.
Green (lit): Wi-Fi connection has been established.
Green (flashing): Wi-Fi connection is being established.
Amber (lit): Wired connection has been established.
Amber (flashing): Wired connection is being established.
Red (flashing): One of the following has occurred.
- This unit cannot find the wireless LAN router/access point.
- The security method/password selected for the wireless LAN router/access point is wrong.
- An error has occurred.
Not lit: The Wi-Fi network setting process is not finished.
8 UPDATE button, indicator
Press and hold to start updating the software of the unit (page 20).
Indicates the update status of the unit.
Green (lit): The unit can be updated.
Green (flashing): The unit is updating.
Not lit: The unit does not need updating.
9 II (Play/Pause) button
Starts playback of iPod or a Bluetooth device. Press repeatedly to pause/resume playback.
10 VOLUME +/- button
Adjusts the volume.
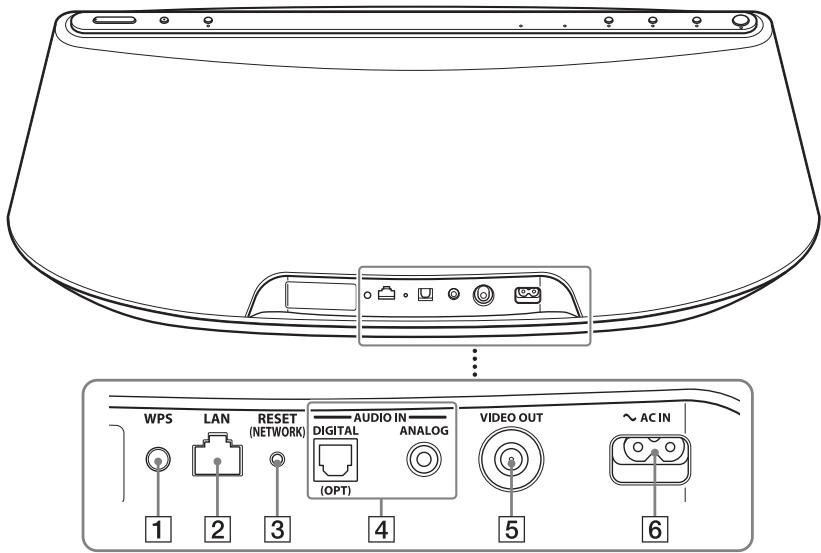
1 WPS button
Use to connect the unit to your Wi-Fi network, refer to the supplied "AirPlay via Wi-Fi Network Setup" for details.
LAN port
Connect a network (LAN) cable (not supplied, page 11).
3 RESET (NETWORK) button
Press and hold to reset the network settings (the I/ indicator starts flashing).
Use a thin object, such as a small pin.
Note
Settings other than network settings, including Bluetooth pairing information, are not reset.
4 AUDIO IN terminals
DIGITAL (OPT): Connect to the digital (optical) output jack of an external component (page 20).
ANALOG: Connect to the analog (stereo) output jack of an external component (page 20).
VIDEO OUT terminal
Use to display videos from the iPod on the Docking Tray (page 15).
6 AC IN terminal
Connect the supplied AC power cord (page 10).
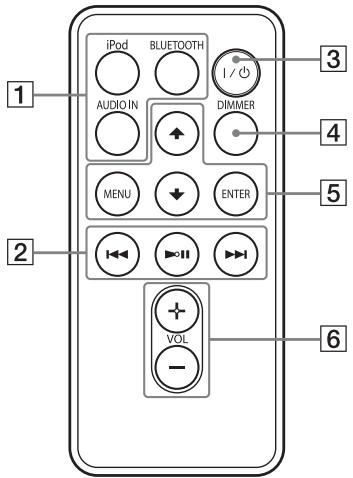
1 "iPod", AUDIO IN, BLUETOOTH buttons
Selects a source device (page 15, 18, 20).
2 II (Play/Pause) button
Starts playback of iPod or a Bluetooth device. Press repeatedly to pause/resume playback.
Forward) button
Go to the next track.
Press and hold to locate a desired point.
Backward) button
Go back to the previous track. During playback, this operation returns to the beginning of the current track. To go back to the previous track, press twice.
Press and hold to locate a desired point.
3 I/ (On/Standby) button
Turns the unit on (page 10), or places in standby/network standby mode.
4 DIMMER button
Changes the brightness of the Input Status indicator (bright/dark/off).
5 MENU button
Returns to the previous menu of the iPod on the Docking Tray.
ENTER button
Enters the selected menu item or begin playback.
(Up)/ (Down) button
Selects a menu item or track for playback.
6 VOL (Volume) +/- button
Adjusts the volume.
Getting Started
Preparing the Unit and the Remote Control
Connecting to an AC power source
1 Plug the connector of the AC power cord into the AC IN terminal on the unit.
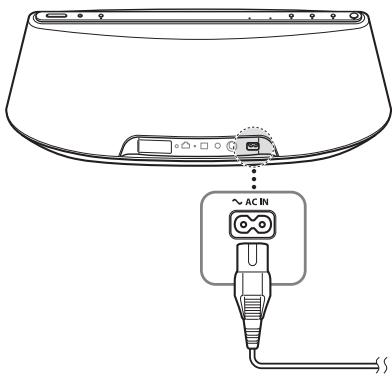
2 Plug the AC power cord to a wall outlet (the mains).
Preparing the remote control
Before using the remote control for the first time, remove the insulation film.
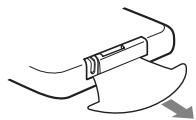
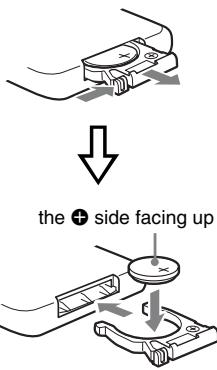
To replace the battery of the remote control
If the remote control stops working, replace the battery (CR2025) with a new one.
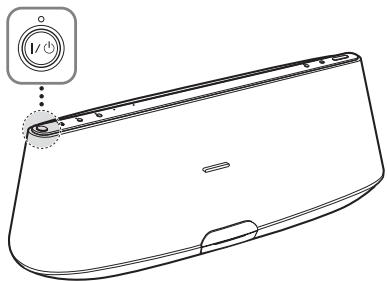
Turning on the unit
Press the I button
The l / 1 indicator starts flashing. You can operate the unit when the l / 1 indicator stops flashing and lights up green.
The LINK indicator also starts flashing. You can set up or use the "AirPlay" function when it stops flashing.
It may take a while for these indicators to stop flashing.
Note
After playback of the connected device has finished, if no operation is performed for about 20 minutes, the unit will automatically enter standby/network standby mode.
Connecting Your Network
See the following descriptions to determine the correct way to set up.
Connecting to a Wi-Fi network
Option 1: Wi-Fi Connection using WPS Push Button Configuration Method
Setup device: Wireless LAN router/access point
Refer to in the supplied "AirPlay via Wi-Fi Network Setup" for details.
Option 2: Wi-Fi Connection using D-Sappli*
Setup device: iPhone/iPod touch/iPad
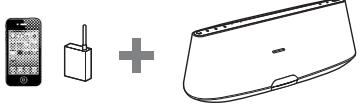
Refer to ⑧ in the supplied "AirPlay via Wi-Fi Network Setup" for details.
- For details on D-Sappli, see page 16.
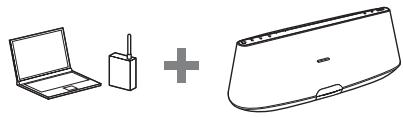
Option 3: Wi-Fi Connection using Access Point Scan (page 12)
Setup device: Mac or PC
Connecting to a wired network
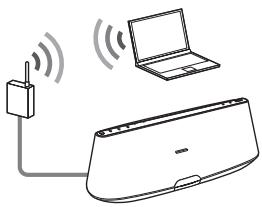
Option 4: Wired Connection
Connect the unit and a wireless LAN router/ access point by network (LAN) cable (not supplied). Then turn this unit on.
The LINK indicator lights up amber when the connection is established (about 90 seconds later).
Option 3: Wi-Fi Connection using Access Point Scan
1 Prepare for the following devices.
This unit
Mac or PC
- Wireless LAN router/access point
Network (LAN) cable (not supplied) if needed
2 Have your wireless network name (SSID) and Security Key (if applicable) available for reference.
SSID (Wireless Network Name)
Security Key (WEP or WPA key)
Refer to the operating instructions of the wireless LAN router/access point.
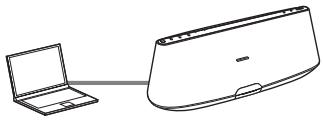
3 Connect the unit and the Mac or PC using a network (LAN) cable (not supplied). Then turn this unit on.
Wait for about 4 minutes until the LINK indicator lights up amber.
Tip
You can also perform this procedure wirelessly. See "To connect wirelessly" (page 13).
4 Access the [Sony Network Device Setting] screen.
For Mac
Start Safari and select [Bonjour] under [Bookmarks], then select [RDP-XA900iP].
For PC
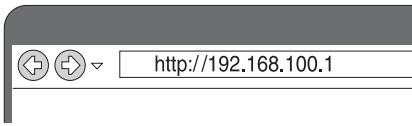
Start the browser and input either of the following URLs into the browser's address bar.
- When using a network (LAN) cable
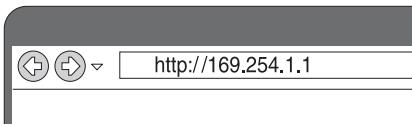
- When connecting wirelessly
5 Select the desired language when the [Language Setup] screen appears.
![SONY RDP-XA900IP - Select the desired language when the [Language Setup] screen appears. - 1](/content/2019/11/47898/images/122622df5098db99ceace2bcc150dea9f1603aa9693321a4ff9d32dbf3bf12d7.jpg)
6 Select [Network Settings] from the menu.
![SONY RDP-XA900IP - Select [Network Settings] from the menu. - 1](/content/2019/11/47898/images/7c9535fda28739310eb92e0d4f36891c20e86a60859aec9fbd0600cd1395b1b7.jpg)
7 Select the SSID of the wireless LAN router/access point, then input the Security Key (if applicable).
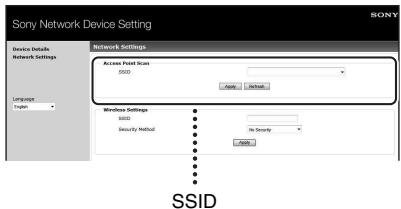
8 Select [Apply].
9 Disconnect the network (LAN) cable from the unit following the on-screen instructions.
The unit restarts automatically, then the LINK indicator lights up green when the connection is established.
To connect wirelessly
Note
Before starting this procedure, be aware that your Wi-Fi network will not be protected until the setting is complete. After the setting is complete, your Wi-Fi network will be protected again when you set a wireless LAN security.
1 Turn the unit on.
2 Press and hold the RESET (NETWORK) button on the rear of the unit with a thin object such as a small pin until the I/O indicator starts flashing.
3 Turn the unit on again. Then wait for about 70 seconds - 120 seconds until the LINK indicator turns off.
4 Connect the unit and a Mac or PC.
For Mac OS X
Turn on Mac. Click icon on the top of the screen. Turn on the Wi-Fi or AirPort. Then select [Open Network Preferences...]. Select [RDP-XA900iP_Setup] from the network list.
For Windows 7
Turn on PC. Click icon on the bottom of the screen. Select [RDP-XA900iP_Setup] from the network list.
For Windows Vista
Turn on PC. Click icon on the bottom of the screen. Click [Connect to a network].
Select [RDP-XA900iP_Setup] from the network list.
5 Perform steps 4 to 8 above. The unit restarts automatically, then the LINK indicator lights up green when the connection is established.
6 Reconnect the Mac or PC to your network.
Note
This procedure needs to be completed within 10 minutes. If you cannot complete, start over from step 2.
About the LINK indicator
| Lights up green. | |
| (Green) | The Wi-Fi network connection is established. |
| Flashes green. | |
| (Green) | This unit is in the process of connecting to the Wi-Fi network. Please wait. |
| Lights up amber. | |
| (Amber) | The wired network connection is established. |
| Flashes amber. | |
| (Amber) | This unit is in the process of connecting to the wired network. Please wait. |
| Flashes red ⇌ Lights up red | |
| (Red) | An error has occurred. Try again from the beginning, or adjust your network settings. |
| The indicator turns off. | |
| Nothing | No connection is established. |
Tips
- You can also connect the unit to your wireless or wired network by other methods including Manual Setup, WPS PIN, etc.
- You can set up Fixed IP, as required.
- You can set up a Proxy Server, as required.
When a problem occurs while you are making the network settings
Press and hold the RESET (NETWORK) button on the rear of the unit with a thin object such as a small pin (page 8).
Notes
- Once you press and hold the RESET (NETWORK) button, the network settings of the unit are reset.
- Settings other than network settings, including Bluetooth pairing information, are not reset.
Enjoying the Audio Content
Listening to iPod
1 Press the Docking Tray on the front of the unit to open it.
2 Set your iPod on the Docking Tray.
Tip
If a pop-up message appears on the display of the iPod, refer to "AirPlay via Wi-Fi Network Setup" or see "About D-Sappli" (page 16).
3 Press the "iPod" button.
4 Press the button.
The iPod begins to play back. You can operate the connected iPod via this unit or the iPod itself.
Notes
- Remove the case or cover from your iPod before setting in the Docking Tray if a good connection cannot be ensured.
-
When placing or removing the iPod, hold the iPod at the same angle as that of the connector of the Docking Tray. Do not twist or bend the iPod as it may damage the connector.
-
Do not carry the unit with an iPod set on the Docking Tray. Doing so may cause a malfunction.
- When placing or removing the iPod, hold the Docking Tray securely.
- Before disconnecting the iPod, pause playback.
- If the battery of your iPod is extremely low, charge it for a while before operation.
- Sony cannot accept responsibility in the event that data recorded to an iPod is lost or damaged when using an iPod connected to this unit.
- For details of environmental conditions for operating your iPod, check the website of Apple Inc.
To use the unit as a battery charger
You can use the unit as a battery charger. The charging status appears in the "iPod" display. For details, see the user's guide of your iPod.
To display videos from iPod
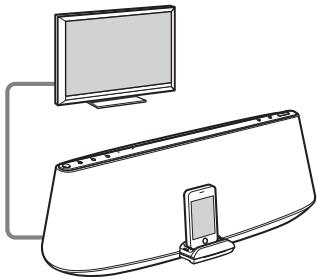
1 Remove your iPod from the Docking Tray.
2 Connect the VIDEO OUT terminal on the rear of the unit to the video in jack of a monitor by a composite video cable (not supplied).
3 Set your iPod on the Docking Tray.
4 Press the "iPod" button.
5 Press the button.
Note
Remove the iPod from the Docking Tray before you insert or remove a composite video cable (not supplied) from the VIDEO OUT terminal.
About D-Sappli
A dedicated dock app for iPod touch, iPhone, and iPad available at Apple App Store.
Search for "D-Sappli" and download the free app to find out more about the functions.
Features
D-Sappli can be used to connect the unit to your network. Refer to the supplied "AirPlay via Wi-Fi Network Setup" for details.
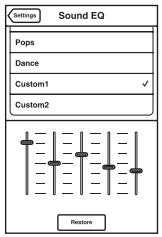
- The Sound EQ function allows you to create your own equalizer settings. You can select equalizer presets, or customize settings to your taste.
This function is available only when an iPhone, iPod touch or iPad is set on the Docking Tray.
D-Sappli includes three timer functions: Music Play Timer, Sleep Timer and Alarm.
The Music Play Timer allows you to play/pause desired music at a desired time. The Sleep Timer allows you to specify a time at which the music playback will stop. The Alarm includes a repeat function and snooze function. You can select iPod or a preset sound as the sound source. These three functions work in combination with the power supply of the unit.
D-Sappli also includes a clock display enlarge feature.
Notes
- If the App to link with this unit is not downloaded to your iPod, a pop-up message prompting you to download D-Sappli may appear repeatedly.
Deactivate the App's link function to stop the pop-up message.
-
To deactivate the App's link function, connect the AC power cord, then press the I/按钮 to turn on the unit. Remove your iPod from the Dock connector, and then press and hold the VOLUME - and buttons simultaneously for more than 2 seconds. (The indicator for iPod flashes rapidly when deactivated.)
-
To re-activate the App's link function, repeat the above steps. The indicator for iPod will flash slowly.
- When you remove the iPod from the Docking Tray, the Sound EQ function setting will return to the default.
- When the sound volume is high, the Sound EQ function may not be effective.
Listening with the "AirPlay" Function
1 Check that the unit and your iPhone, iPod touch, iPad or iTunes are connected to your network.
For details on how to connect the unit to the network, see page 11.
Tips
- Update the software of your iPhone, iPod touch or iPad to the latest version beforehand.
- For details on how to operate iPhone, iPod touch, iPad or iTunes, refer to the operating instructions or the help documentation of your device or software.
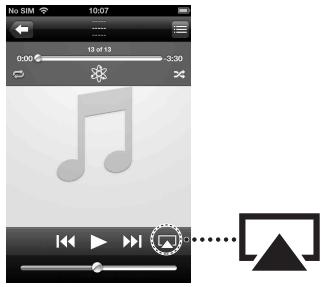
2 Tap.click on the icon at bottom right of the iPhone, iPod touch or iPad screen or iTunes window.
iPhone, iPod touch or iPad
iTunes
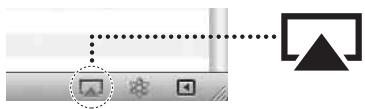
3 Select "RDP-XA900iP" on the "AirPlay" menu of iTunes or your iPhone, iPod touch or iPad.

iPhone, iPod touch or iPad
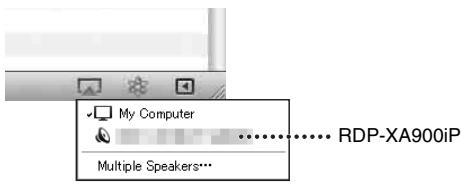
iTunes
4 Start playing back audio content on the iPhone, iPod touch, iPad or iTunes.
The unit starts playing back automatically.
Tip
If playback does not start, perform the process again from step 1.
To control "AirPlay" playback
You can use the VOLUME + / - button on the unit and the VOLUME + / - ,and buttons on the remote control. Operation from the unit and the remote control is active only when the unit is selected as the device for output.
When you use iTunes, set it to accept control from the unit and the remote control when you want to use the unit and the remote control to operate iTunes.
Listening to Bluetooth Devices
By using the Bluetooth connection, you can listen to the sound from a Bluetooth device such as a mobile phone or portable audio player with the unit wirelessly.
Bluetooth devices need to be "paired" with each other beforehand. Once Bluetooth devices are paired, there is no need for pairing again, unless pairing information is deleted.
Pairing with a Bluetooth device
You can register up to nine Bluetooth devices to be paired on the unit. If you register a 10th device, the least recently used information is deleted.
1 Keep a Bluetooth device and the unit within one meter of each other for this operation.
2 Press and hold the - PAIRING button on the unit.
When pairing starts, a double-beep sound will be heard and the Bluetooth indicator will flash quickly. Pairing mode of the unit is activated.
3 Perform the pairing procedure on the Bluetooth device to detect the unit.
A list of detected devices appears on the display of the Bluetooth device.
This unit is displayed as "RDP-XA900iP (Bluetooth)."
If "RDP-XA900iP (Bluetooth)" is not displayed, repeat from step 1.
4 Select "RDP-XA900iP (Bluetooth)" shown in the display of the Bluetooth device.
5 If Passcode* input is required on the display of the Bluetooth device, input "0000."
- Passcode may be called "Passkey," "PIN code," "PIN number," or "Password."
6 Start the Bluetooth connection from the Bluetooth device.
The unit memorises the device as the last connected device. Some Bluetooth devices may connect with the unit automatically when pairing is complete. The Bluetooth indicator lights up when the connection is made.
Tips
- For details on how to operate the device to be connected, refer to the operating instructions supplied with the device.
- To pair with other Bluetooth devices, repeat steps 1 to 5 for each device.
Notes
- Pairing mode is cancelled after about 5 minutes. If pairing mode is cancelled halfway, start over from step 1.
- When you try to pair the unit with your Bluetooth device for the first time, the pairing mode is activated as soon as you press the BLUETOOTH button. In this case, the pairing mode is not cancelled after about 5 minutes.
- Pairing information is deleted after repair, etc.
- Passcode of the unit is fixed as "0000." The unit cannot be paired with a Bluetooth device whose Passcode is not "0000."
Operating a Bluetooth device
The unit supports SCMS-T content protection. You can listen to a Bluetooth device that supports SCMS-T content protection.
Check the following before operating the unit.
- The Bluetooth function of a Bluetooth device is on.
- The pairing procedure is complete (page 18).
1 Press the BLUETOOTH button.
The BLUETOOTH indicator flashes slowly while the Bluetooth connection is being established.
2 Start the Bluetooth connection from the Bluetooth device.
The BLUETOOTH indicator lights up blue when the Bluetooth connection is established.
3 Start playback on the Bluetooth device.
4 Adjust the volume.
Set the volume of the Bluetooth device to a moderate level, and press the VOLUME + / - buttons on the unit.
Tips
- You can adjust the volume of the unit via a Bluetooth device supporting AVRCP (Audio Video Remote Control Profile) VOLUME UP/DOWN. For details, refer to the operating instructions supplied with the device.
- The volume of the unit may not be controllable, depending on the device.
Notes
- If the source device has a bass boost function or equaliser function, turn them off. If these functions are on, sound may be distorted.
-
In the following cases, you will need to make the Bluetooth connection again.
-
The power of the unit does not turn on.
- The power of the Bluetooth device does not turn on, or the Bluetooth function is off.
-
The Bluetooth connection is not established.
-
If more than one device paired with the unit is being played back, sound will be heard from just one of those devices.
To finish listening
Terminate the Bluetooth connection by any of the operations below.
- Operate the Bluetooth device to terminate the connection. For details, refer to the operating instructions supplied with the device.
-
Turn off the Bluetooth device.
-
Turn off the unit.
Listening to Other Components
You can enjoy the sound from an optional component, such as a TV or a portable digital music player. Be sure to turn off the power of each component before making any connections.
1 Firmly connect the line output jack of a TV (or other component) to either of the AUDIO IN terminals (DIGITAL (OPT) or ANALOG) on the rear of the unit, using a suitable audio connecting cable (not supplied).
2 Press the I button to turn on the unit.
3 Turn the connected component on.
4 Press the AUDIO IN button to select the source.
5 Operate the connected component.
Notes
- If each terminal is connected to a different component, and both are playing back, the unit will output sound from the component connected to the DIGITAL (OPT) terminal.
- When you use the ANALOG terminal and the volume is low, adjust the volume level on the connected equipment first. If the volume is still too low, adjust the volume level on the unit.
- The DIGITAL (OPT) terminal supports Linear PCM 2ch. signal only. Linear PCM multi-channel is not supported. You may need to change the sound setting of the connected component. If digital audio signals or other signals that this unit does not support are input, the AUDIO IN indicator flashes and sound is not output.
Updating the Software
When a new update is available, the UPDATE indicator lights up green while the unit is connected to the Internet.
1 Check that the UPDATE indicator lights up green.
2 Press and hold the UPDATE button on the top of the unit.
The unit beeps, then quits or stops all operations automatically and the update starts.
The UPDATE indicator flashes during the update. When the update has completed, the UPDATE indicator turns off.
Notes
- When an error occurred, the UPDATE indicator flashes quickly and all other indicators light up. Then the unit restarts automatically.
- You cannot operate the unit until updating has completed.
- It may take about 20 minutes to update the software. The time required depends on the size of the update content and type of Internet connection you are using.
- Do not disconnect the AC power cord during the update.
Initializing the Unit
You can initialize the unit. All settings of the unit are reset to the factory default settings when you initialize the unit.
1 Press the I/O button to turn on the unit.
2 Remove the iPod from the Docking Tray.
3 While holding down VOLUME -, hold down I/(). (Hold both buttons down for at least 5 seconds.)
After resetting, the I/ indicator flashes for 2 seconds.
Tip
You can reset only the network settings of the unit to the factory default settings using the RESET (NETWORK) button (page 8).
Additional Information
Troubleshooting
If you run into any problems using the unit, use the following checklist. Should any problem persist, consult your nearest Sony dealer.
General
The unit does not turn on.
- Make sure the AC power cord is connected correctly.
There is no sound.
- Adjust the volume.
There is noise.
- Make sure the unit is not in the vicinity of in-use portable phones, etc.
- If connecting the unit via a device with a built-in radio or tuner, broadcasts may not be received, or sensitivity may be reduced. Locate the unit farther away from the device and check whether you can listen to the broadcasts satisfactorily.
The unit does not turn off.
- The unit enters standby or network standby mode when you turn off the power. If you want to completely turn off the power, disconnect the AC power cord.
- If you turn the unit to standby mode immediately after turning on it, it may take a while for the unit to enter standby mode.
The unit turns on and starts playback automatically.
- When the unit is in the network standby mode and receives a command to playback on the "AirPlay" device, the unit turns on and starts playback automatically (page 6).
The unit turns off automatically.
- The unit enters the selected standby mode when it is idle for 20 minutes.
The I indicator flashes red.
- The unit is in protect mode.
- Disconnect and reconnect the AC power cord of the unit, then turn the unit on again. If the I/ indicator still flashes, consult your nearest Sony dealer.
This unit does not operate if you press the buttons of this unit or those of the remote control.
- Buttons do not work while initializing or starting up.
- Buttons do not work while you are updating the software.
- Buttons other than the I/O button do not work in the network standby or standby mode.
iPod
There is no sound.
- Make sure the iPod is playing back.
- Make sure the iPod is connected firmly.
- Update the unit and the iPod to use the latest software beforehand.
- Make sure the iPod is compatible.
- Make sure the function for iPod is selected.
Operation is not performed.
- Make sure the iPod is connected firmly.
The iPod does not charge.
- Make sure the iPod is connected firmly.
- Make sure the AC power cord is connected firmly.
Network
The browser screen does not appear.
- Check the proxy setting of the browser. This unit does not support proxies. Change the browser setting to one connecting this unit without a proxy.
WPS configuration method failed.
- You cannot connect to a network using WPS when the wireless LAN router/ access point is set to WEP (page 29). Set up the network using D-Sappli or Access Point Scan (page 11).
The unit cannot connect to the network. (The unit cannot be found or recognized by other devices that are on the home network.)
- Check that the wireless LAN router/access point is close to the unit.
- Move the unit and the wireless LAN router/access point closer to each other and perform the setup again.
- Make sure that the wireless LAN router/ access point is turned on.
- Turn the unit off and then on again, and reboot the wireless LAN router/access point.
Devices that use a 2.4 GHz frequency band such as microwave, Bluetooth or digital cordless device, may interrupt the communication. Move this unit away from such devices, or turn off the devices.
The unit cannot connect to the network via a Wi-Fi connection.
- Make sure a network (LAN) cable is not connected to the unit. The unit automatically tries to connect to the network over a wired LAN connection when a network (LAN) cable is connected to the unit.
- Confirm that the wireless LAN router/ access point setting is correct. For details on the wireless LAN router/access point setting, refer to the operating instructions of the wireless LAN router/access point.
Resetting the network settings of the unit (default network setting)
- Press and hold the RESET (NETWORK) button on the rear of the unit with a thin object such as a small pin (page 8).
AirPlay
The "AirPlay" icon or unit name does not appear on iPhone/iPod touch/ iPad or iTunes.
- Make sure the LINK indicator lights up green or amber. See "The unit cannot connect to the network. (The unit cannot be found or recognized by other devices that are on the home network.)" (page 23) if the LINK indicator turns off or lights up red.
- Check that this unit, your iPhone/iPod touch/iPad, Mac or PC are connected to the same network.
- Update the software version of the unit to the latest version (page 20).
- Check that your iPhone/iPod touch/iPad or iTunes has the latest software version.
- If the problem persists, reboot your iPhone/iPod touch/iPad or iTunes.
- Check your set-up of the firewall of the security software. Refer to the operating instructions or the help documentation of your device or software for details.
Audio content automatically changed/started/stopped.
- When the unit is turned on or in the network standby mode, it is under the control of an "AirPlay" device. If you want to reject requests from the "AirPlay" device, turn the unit to the standby mode by pressing and holding I/按钮 until the colour of the I/ indicator changes.
There is no sound.
-
Check that no other iPhone/iPod touch/iPad is set on this unit. If so, remove it from the network.
-
If the problem persists, reboot your iPhone/iPod touch/iPad or iTunes.
The sound is too loud.
- Loud sound may output from the unit if you set the volume too high via the iPhone, iPod touch, iPad or iTunes.
The sound is low.
- The volume level of the iPhone, iPod touch, iPad or iTunes might not link with the volume level of this unit. Adjust the volume by pressing the VOLUME +/- button of the unit or remote control.
The sound skips.
- The sound may skip depending on factors such as the network environment in which you use the Wi-Fi network.
- Wi-Fi networks are influenced by electromagnetic radiation emitted by microwave ovens and other devices. Move the unit away from these devices.
- The bandwidth of your Wi-Fi network may be too low. Move the unit and the wireless LAN router/access point closer to each other, without any obstacles between them.
This unit cannot be operated.
- Update the software version of the iPhone, iPod touch or iPad to the latest version.
- Update the software version of the unit to the latest version (page 20).
- Make sure another device is not streaming to the "AirPlay" compatible device at the same time.
Buttons such as I and I do not work.
- Make sure that the settings that allow iTunes to accept control from this unit are active.
- The unit is not selected as the remote speaker on the iPhone, iPod touch, iPad or iTunes. Select the unit as the network speaker.
It takes time for the "AirPlay" function to start.
- Use this unit in the network standby mode (page 6). This mode shortens the startup time when using the "AirPlay" function, but increases standby power consumption.
Bluetooth
There is no sound.
- Make sure this unit is not too far from the Bluetooth device, or this unit is not receiving interference from a Wi-Fi network, other 2.4 GHz wireless device, or microwave oven.
- Check that the Bluetooth connection is made properly between this unit and the Bluetooth device.
- Pair this unit and the Bluetooth device again.
- Keep the unit away from metal objects or surfaces.
- Make sure the unit is in the Bluetooth mode. Otherwise, press the BLUETOOTH button.
Sound skips or the correspondence distance is short.
- If a device that generates electromagnetic radiation, such as a Wi-Fi network, other Bluetooth device(s), or a microwave oven is nearby, move away from such sources.
- Remove any obstacle between this unit and Bluetooth device, or move away from the obstacle.
- Locate this unit and Bluetooth device as near as possible.
- Re-position this unit.
- Re-position the Bluetooth device.
Connecting cannot be done.
- Perform pairing again (page 18).
Pairing cannot be done.
-
Bring this unit and the Bluetooth device closer together.
-
Delete the unit from your Bluetooth device and perform pairing again (page 18).
AUDIO IN
There is no sound.
- Make sure the audio connecting cable (not supplied) is connected firmly.
- Make sure the AUDIO IN function is selected.
- If each terminal is connected to a different component, and both are playing back, the unit will output sound from the component connected to the DIGITAL (OPT) terminal.
- The DIGITAL (OPT) terminal supports linear PCM signal only. You may need to change the sound setting of the connected component.
The sound is low.
- Confirm the volume of the connected external component.
- Confirm the volume level on the unit.
VIDEO OUT
Videos are not displayed on "iPod" screen.
- Remove the iPod, then remove the composite video cable (not supplied). Then, set the iPod on the Docking Tray again.
- Check the video settings of the iPod.
Videos are not displayed on a monitor.
- Remove and reconnect the iPod from/to the unit that is connected to the monitor.
Remote control
The remote control does not function.
- Replace the battery in the remote control with a new one if it is weak.
- Make sure that you are pointing the remote control at the remote sensor on the unit.
- Remove any obstacles in the path of the remote control and the unit.
- Make sure the remote sensor is not exposed to strong light such as direct sunlight or fluorescent lamp light.
- Move closer to the unit when using the remote control.
Specifications
AUDIO POWER SPECIFICATIONS
POWER OUTPUT AND TOTAL HARMONIC DISTORTION:
Power Output (reference)
Tweeter 25W + 25W (at 10% harmonic distortion)
Woofer 25W + 25W (at 10% harmonic distortion)
Subwoofer 50W + 50W (at 10% harmonic distortion)
Section for iPod
DC out: 5V
MAX:2.1A
Section for Wireless LAN
Compatible standards
IEEE 802.11 b/g
(WEP 64 bit, WEP 128 bit,
WPA/WPA2-PSK (AES),
WPA/WPA2-PSK (TKIP))
Radio frequency
2.412 GHz - 2.472 GHz
(2.4 GHz ISM Band, 13 Channels)
Channel 1 - Channel 13
Section for Bluetooth
Output
Bluetooth Specification Power Class 2
Maximum communication range
Line of sight Approx. 10m^*1
Radio frequency
2.4 GHz band (2.4000 GHz - 2.4835 GHz)
Communication System
Bluetooth Specification Version 2.1 + EDR
(Enhanced Data Rate)
Compatible Bluetooth Profiles\*2
A2DP (Advanced Audio Distribution Profile)
AVRCP*3 (Audio Video Remote Control Profile)
Supported codec*4
SBC (Subband Codec)
Copy Management
SCMS-T
1 The actual range will vary depending on factors such as obstacles between devices, magnetic fields around a microwave oven, static electricity, reception sensitivity, aerial's performance, operating system, software application, etc.
2Bluetooth standard profiles indicate the purpose of Bluetooth communication between devices.
3Some operations may not be available due to different iPod models.
^4 Codec: Audio signal compression and conversion format
General
Speakers
Tweeter Approx. 20mm diameter × 2
Woofer Approx. 70~mm diameter × 2
Subwoofer Approx. 135mm diameter × 1
AUDIO IN
Max output level 1 Vp-p, unbalanced
Sync negative, load impedance 75
(Composite video out)
Network port
10BASE-T/100BASE-TX (Auto Polarity)
Power requirements
230 V AC, 50 Hz
Dimensions (w/h/d) (including projecting parts and controls)
Approx. 600mm× 200mm× 201mm
Mass
Approx. 7kg
Supplied accessories:
Remote control (1)
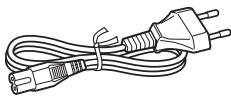
AC power cord (2)^*
Operating Instructions (this document) (3)
AirPlay via Wi-Fi Network Setup (2)
CR2025 lithium battery (1) (Pre-installed in the remote control for trial use)
Warranty card (1)
- For customers in the UK, Ireland, Malta, and Cyprus:
Use the AC power cord (A).
For safety reasons, the AC power cord (B) is not intended for the above countries/regions and shall therefore not be used there.
For customers in other countries/regions:
Use the AC power cord (B).
(A)
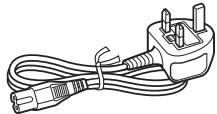
(B)
Design and specifications are subject to change without notice.
Compatible iPod Models and Computers
Compatible iPod models and computers are shown below.
Update the software of your iPod to the latest version before using it with this unit.
Compatible iPod Models for the Docking Tray
iPod touch (4th generation)
iPod touch (3rd generation)
iPod touch (2nd generation)
iPod nano (6th generation)*
iPod nano (5th generation)
iPod nano (4th generation)
iPod nano (3rd generation)
iPod classic
iPhone 4S
iPhone 4
iPhone 3GS
iPhone 3G
iPad 2
iPad
- The iPod nano (6th generation) cannot be controlled by the remote when "MENU," " ," " ," or "ENTER" is pressed.
Compatible iPod models and computers for the "AirPlay" function
iPod touch (4th generation)
iPod touch (3rd generation)
iPhone 4S
iPhone 4
iPhone 3GS
iPad 2
iPad
PC or Mac with iTunes 10.1 or later
System Requirements for the Computer for Setting up the "AirPlay" Function
- Compliant computer:
IBM PC/AT or compatible computers
Apple Mac
- Operating systems:
Windows 7 Ultimate
Windows 7 Professional
Windows 7 Home Premium
Windows 7 Home Basic
Windows 7 Starter
Windows Vista Ultimate
Windows Vista Business
Windows Vista Home Premium
Windows Vista Home Basic
Windows XP Professional (other than 64 bit)
Windows XP Home Edition
Mac OS X v10.7 Lion
Mac OS X v10.6 Snow Leopard
Mac OS X v10.5 Leopard
Mac OS X v10.4 Tiger
Mac OS X v10.3 Panther
Mac OS X v10.2 Jaguar
- Suitable browsers
Internet Explorer 7 or later
Safari (latest version at the time of Mac OS X v10.2 Jaguar being released, or later)
Precautions
- To disconnect the AC power cord, pull it out by the plug, not the cord.
- Since a strong magnet is used for the speaker, keep credit cards using magnetic coding or spring-wound watches, CRT-based TVs, or projectors, etc., away from the unit to prevent possible damage from the magnet.
- Do not leave the unit in a location near a heat source such as a radiator or airduct, or in a place subject to direct sunlight, excessive dust, mechanical vibration, or shock.
- Allow adequate air circulation to prevent internal heat build-up. Do not place the unit on a surface (a rug, a blanket, etc.) or near materials (a curtain) which might block the ventilation holes.
- Should any solid object or liquid fall into the unit, unplug the unit and have it checked by qualified personnel before operating it any further.
- Do not handle the unit with wet hands.
- Do not place the unit anywhere near water.
- Properly shielded and grounded cables and connectors must be used for connection to the wireless LAN router/access point in order to comply with the limit for EMC regulations.
- This unit supports security capabilities that comply with the Bluetooth standard to provide a secure connection when the Bluetooth wireless technology is used, but security may be insufficient, depending on the setting. Be careful when communicating using Bluetooth wireless technology.
- We do not take any responsibility for leakage of information during Bluetooth communication.
Notes on unit placement
-
When playing the unit at loud volume, the unit may move due to vibration, depending on where the unit is placed.
-
Check that the unit is placed where it will not fall down due to vibration.
NOTES ON LITHIUM BATTERY
- Wipe the battery with a dry cloth to assure a good contact.
- Be sure to observe the correct polarity when installing the battery.
- Do not hold the battery with metallic tweezers, otherwise a short-circuit may occur.
Note
- In the Operating Instructions, "iPod" is used as a general reference to functions on an iPod, iPhone or iPad, unless otherwise specified by the text or illustrations.
If you have any questions or problems concerning your unit, please consult your nearest Sony dealer.
If the TV picture or monitor display is magnetically distorted
This unit is not magnetically shielded, and the picture on nearby TV sets may become magnetically distorted. In this situation, turn off the TV, wait 15 to 30 minutes, and turn it back on. If there is no improvement, move the speakers farther away from the TV.
On copyrights
- AirPlay, the AirPlay logo, iPhone, iPod, iPod classic, iPod nano and iPod touch are trademarks of Apple Inc., registered in the U.S. and other countries. iPad is a trademark of Apple Inc.
- iTunes, Safari, Mac, and Mac OS X are trademarks of Apple Inc., registered in the U.S. and other countries.
- "Made for iPod," "Made for iPhone," and "Made for iPad" mean that an electronic accessory has been designed to connect specifically to iPod, iPhone, or iPad, respectively, and has been certified by the developer to meet Apple performance standards. Apple is not responsible for the
operation of this device or its compliance with safety and regulatory standards. Please note that the use of this accessory with iPod, iPhone, or iPad may affect wireless performance.
- The Bluetooth® word mark and logos are owned by the Bluetooth SIG, Inc. and any use of such marks by Sony Corporation is under license.
- Microsoft, Windows, Windows Vista, and Windows 7 are trademarks or registered trademarks of Microsoft Corporation in the United States and/or other countries.
- This product is protected by certain intellectual property rights of Microsoft Corporation. Use or distribution of such technology outside of this product is prohibited without a license from Microsoft or an authorized Microsoft subsidiary.
- 96 (WIFi) The Wi-Fi Logo is a certification mark of the Wi-Fi Alliance.
- The Wi-Fi Protected Setup™ Mark is a mark of the Wi-Fi Alliance.
- Other trademarks and trade names are those of their respective owners.
About wireless LAN security
Since communication via the wireless LAN function is established by radio waves, the wireless signal may be susceptible to interception. To protect wireless communication, this unit supports various security functions. Be sure to correctly configure the security settings in accordance with your network environment.
No Security
Although you can easily make settings, anyone can intercept wireless communication or intrude into your wireless network, even without any sophisticated tools. Keep in mind that there is a risk of unauthorized access or interception of data.
WEP
WEP applies security to communications to prevent outsiders from intercepting communications or intruding into your wireless network. WEP is a legacy security technology that enables older devices, which do not support TKIP/AES, to be connected.
WPA-PSK (TKIP), WPA2-PSK (TKIP)
TKIP is a security technology developed to correct for the deficiencies of WEP. TKIP assures a higher security level than WEP.
WPA-PSK (AES), WPA2-PSK (AES)
AES is a security technology that uses an advanced security method that is distinct from WEP and TKIP. AES assures a higher security level than WEP or TKIP.
WPA Suppliant
Copyright (c) 2003-2006, Jouni Malinen jkmaline@cc.hut.fi and contributors All Rights Reserved.
Redistribution and use in source and binary forms, with or without modification, are permitted provided that the following conditions are met:
1 Redistributions of source code must retain the above copyright notice, this list of conditions and the following disclaimer.
2 Redistributions in binary form must reproduce the above copyright notice, this list of conditions and the following disclaimer in the documentation and/or other materials provided with the distribution.
3 Neither the name(s) of the above-listed copyright holder(s) nor the names of its contributors may be used to endorse or promote products derived from this software without specific prior written permission.
THIS SOFTWARE IS PROVIDED BY THE Copyright Holders AND Contributors "AS IS" AND ANY EXPRESS OR IMPLIED WARRANTY, INCLUDING, BUT NOT LIMITED TO, THE IMPLIED WARRANTY OF MERCHANTABILITY AND FITNESS FOR A PARTICULAR PURPOSE ARE DISCLAIMED. IN NO EVENT SHALL THE COPYRIGHT OWNER OR CONTRIBUTORS BE LIABLE FOR ANY DIRECT, INDIRECT, INCIDENTAL,
SPECIAL, EXEMPLARY, OR CONSEQUENTIAL DAMAGES (INCLUDING, BUT NOT LIMITED TO, PROCEDURE OF SUBSTITUTE GOODS OR SERVICES; LOSS OF USE, DATA, OR PROFITS; OR BUSINESS INTERRUPTION) HOWEVER CAUSED AND ON ANY THEORY OF LIABILITY, WHETHER IN CONTRACT, STRICT LIABILITY, OR TORT (INCLUDING NEGLIGENCE OR OTHERWISE) ARISING IN ANY WAY OUT OF THE USE OF THIS SOFTWARE, EVEN IF ADVISED OF THE POSSIBILITY OF SUCH DAMAGE.
- The system names and product names indicated in this manual are generally the trademarks or registered trademarks of the manufacturer.
- In this manual, Microsoft Windows XP Home Edition and Microsoft Windows XP Professional are referred to as Windows XP.
- In this manual, Microsoft Windows Vista Home Basic, Microsoft Windows Vista Home Premium, Microsoft Windows Vista Business and Microsoft Windows Vista Ultimate are referred to as Windows Vista.
- In this manual, Microsoft Windows 7 Starter, Microsoft Windows 7 Home Basic, Microsoft Windows 7 Home Premium, Microsoft Windows 7 Professional, and Microsoft Windows 7 Ultimate, are referred to as Windows 7.
- ^TM and ^ marks are omitted in this manual.
END-USER LICENSE AGREEMENT FOR SONY SOFTWARE
You should carefully read the following agreement before using the SONY SOFTWARE (defined below). Using the SONY SOFTWARE indicates your acceptance of the agreement. If you do not agree with it, you are not authorized to use the SONY SOFTWARE.
IMPORTANT - READ CAREFULL: This End-User License Agreement ("EULA") is a legal agreement between you and Sony Corporation ("SONY"), the manufacturer of your Sony hardware device (the "PRODUCT") and the licensor of the SONY SOFTWARE. All Sony software and third party software (other than such software subject to its own separate license) included with your PRODUCT and any updates and upgrades thereto shall be referred to herein as the "SONY SOFTWARE". You may use the SONY SOFTWARE only with the PRODUCT.
By using the SONY SOFTWARE, you agree to be bound by the terms of this EULA. If you do not agree to the terms of this EULA, SONY is unwilling to license the SONY SOFTWARE to you. In such event, you should not use the SONY SOFTWARE.
SONY SOFTWARE LICENSE
The SONY SOFTWARE is protected by copyright laws and international copyright treaties, as well as other intellectual property laws and treaties. The SONY SOFTWARE is licensed, not sold.
GRANT OF LICENSE
All title, copyright and other rights in and to the SONY SOFTWARE are owned by SONY or its licensors. This EULA grants you the right to use the SONY SOFTWARE for personal use only.
DESCRIPTION OF REQUIREMENTS, RESTRICTIONS, RIGHTS AND LIMITATIONS
Limitations. You may not copy, modify, reverse engineer, decompile or disassemble the SONY SOFTWARE in whole or in part.
Separation of Components. The SONY SOFTWARE is licensed as a single product. Its component parts may not be separated.
Use on Single PRODUCT. The SONY SOFTWARE may only be used with a single PRODUCT.
Rental. You may not rent or lease the SONY SOFTWARE.
Software Transfer. You may permanently transfer all of your rights under this EULA only when the SONY SOFTWARE is transferred together with and as part of the PRODUCT, provided that you retain no copies, transfer all of the SONY SOFTWARE (including but not limited to all copies, component parts, media, instruction manuals, other printed materials, electronic documents, recovery disks and this EULA) and the recipient agrees to the terms of this EULA.
Termination. Without prejudice to any other rights, SONY may terminate this EULA if you fail to comply with the terms of this EULA. In such event, when requested by SONY, you must send the PRODUCT to an address designated by SONY, and SONY will send back the PRODUCT to you as soon as practicable after the SONY SOFTWARE has been deleted from the PRODUCT.
Confidentiality. You agree to keep confidential information contained in SONY SOFTWARE which is not publicly known and not to disclose such information to others without SONY's prior written approval.
HIGH RISK ACTIVITIES
The SONY SOFTWARE is not fault-tolerant and is not designed, manufactured or intended for use or resale as on-line control equipment in hazardous environments requiring fail-safe performance, such as in the operation of nuclear facilities, aircraft navigation or communication systems, air traffic control, direct life support machines or weapons systems, in which the failure of the SONY SOFTWARE could lead to death, personal injury or severe physical or environmental damage ("High Risk Activities"). SONY and its suppliers specifically claim any express or implied warranty of fitness for High Risk Activities.
EXCLUSION OF WARRANTY ON SONY SOFTWARE
You expressly acknowledge and agree that use of the SONY SOFTWARE is at your sole risk. The SONY SOFTWARE is provided "AS IS" and without warranty of any kind, and SONY, its vendors and SONY's licensors (for purposes of this SECTION only, collectively, "SONY") EXPRESSLY DISCLAIM ALL WARRANTY, EXPRESS OR IMPLIED, INCLUDING BUT NOT LIMITED TO THE IMPLIED WARRANTY OF MERCHANTABILITY AND FITNESS FOR A PARTICULAR PURPOSE. SONY DOES NOT WARRANTY THAT THE FUNCTIONS CONTAINED IN THE SONY SOFTWARE ARE FREE FROM ERRORS OR BUGS OR WILL MEET YOUR REQUIREMENT, AND SONY DOES NOT WARRANTY THAT THE OPERATION OF THE SONY SOFTWARE WILL BE CORRECTED. FURTHERMORE, SONY DOES NOT WARRANTY OR MAKE ANY REPRESENTATIONS REGARDING THE USE OR THE RESULTS OF THE USE OF THE SONY SOFTWARE IN TERMS OF ITS CORRECTNESS, ACCURACY, RELIABILITY OR OTHERWISE. NO ORAL OR WRITTEN INFORMATION OR ADVICE GIVEN BY SONY OR A SONY AUTHORIZED REPRESENTATIVE SHALL CREATE A WARRANTY OR IN ANY WAY INCREASE THE SCOPE OF THIS WARRANTY. SOME JURISDICTIONS DO NOT ALLOW THE EXCLUSION OF IMPLIED WARRANTY, IN WHICH CASE THE ABOVE EXCLUSION WOULD NOT APPLY TO YOU.
Without limiting any of the foregoing, it is specifically provided that the SONY SOFTWARE is not designed or intended for use on any product other than the PRODUCT. SONY provides no warranty that any product, software, content or data created by you or a third party will not be damaged by the SONY SOFTWARE.
LIMITATION OF LIABILITY
SONY, ITS SUPPLIERS AND SONY'S LICENSOR'S (for purposes of this SECTION ONLY, collectively, "SONY") SHALL NOT BE LIABLE FOR ANY INCIDENTAL OR CONSEQUENTIAL DAMAGES RELATING TO THE SONY SOFTWARE ARISING FROM OR BASED ON BREACH OF ANY EXPRESS OR IMPLIED WARRANTY, BREACH OF CONTRACT, NEGLIGENCE, STRICT LIABILITY OR ANY OTHER LEGAL THEORY. SUCH DAMAGES INCLUDE, BUT ARE NOT LIMITED TO, LOSS OF PROFITS, LOSS OF REVENUE, LOSS OF DATA, LOSS OF USE OF THE PRODUCT OR ANY ASSOCIATED EQUIPMENT, DOWN TIME AND USER'S TIME, REGARDLESS OF WHETHER SONY HAS BEEN ADVISED OF THE POSSIBILITY OF SUCH DAMAGES. IN ANY CASE, SONY'S ENTIRE LIABILITY TO YOU UNDER ANY PROVISION OF THIS EULA SHALL BE LIMITED TO THE AMOUNT ACTUALLY PAID ALLOCABLE TO THE SONY SOFTWARE.
EXPORTS
If you use or transfer the SONY SOFTWARE in or to a country other than your country of residence, you shall comply with applicable laws and regulations relating to exports, imports and customs.
GOVERNING LAW
This EULA shall be construed, governed, interpreted and applied in accordance with the laws of Japan, without regards to any conflict of laws provisions. Any dispute arising out of this EULA shall be subject to the exclusive venue and jurisdiction of the courts in Tokyo, Japan, and you and SONY hereby consent to the venue and jurisdiction of such courts. YOU AND SONY WAIVE THE RIGHT TO TRIAL BY JURY WITH RESPECT TO ANY MATTERS ASING UNDER OR RELATING TO THIS EULA.
SEVERABILITY
If any part of this EULA is held invalid or unenforceable, other parts will remain valid.
Should you have any questions in connection with this EULA or the limited warranty provided hereunder, you may contact SONY by writing to SONY at the designated contact address mentioned in the warranty card included in the product package.
AVERTISSEMENT
1 Touches iPod, AUDIO IN, BLUETOOTH
(WEP 64 bits, WEP 128 bits,
WPA/WPA2-PSK (AES),
WPA/WPA2-PSK (TKIP))
Fréquence radio
2,412 GHz - 2,472 GHz
Specification Bluetooth Power Class 2
Spcification Bluetooth version 2.1 + EDR
(Débit amélioré)
Profilis Bluetooth compatibles*2 A2DP (Advanced Audio Distribution Profile) AVRCP*3 (Audio Video Remote Control Profile)
Codes pris en charge*4 SBC (Subband Codec)
WPA-PSK (AES), WPA2-PSK (AES)
DESCRIPTION DES OBLIGATIONS, RESTRICTIONS, DROITS ET LIMITATIONS
Botones iPod, AUDIO IN, BLUETOOTH
Espere aproximadamente 4关键时刻 to be able to get the best idea of the color and ambar.

Sugerencia
Tambienouldellearacobesteprocedimiento de manerainalambrica.Consulte“Paraconectarsede manerainalambrica”(pagina13).
4 Acceda a la pantalla [Sony Network Device Setting].
Para Mac
(WEP 64 bits, WEP 128 bits,
WPA/WPA2-PSK (AES),
WPA/WPA2-PSK (TKIP))
Frecuencia de radio
2,412 GHz - 2,472 GHz
(banda ISM de 2,4 GHz, 13 canales)
Canal 1 - Canal 13
A2DP (Advanced Audio Distribution Profile)
AVRCP*3 (Audio Video Remote Control Profile)
WPA-PSK (AES), WPA2-PSK (AES)
©2012 Sony Corporation Printed in China
4-417-838-11(1)