USER MANUAL PNE25NSLKSS GE
Bottom Freezer Refrigerators
For more information on your refrigerator's operation, visit www.GEApliances.com or call 800.GECARES (800.432.2737). In Canada visit www.GEApliances.ca or call 800.561.3344.
WARNING
To reduce the risk of fire, explosion, electric shock, or injury when using your refrigerator, follow these basic safety precautions:
This refrigerator must be properly installed and located in accordance with the Installation Instructions before it is used.
Unplug the refrigerator before making repairs or cleaning. NOTE: Power to the refrigerator cannot be disconnected by any setting on the control panel. NOTE: Repairs must be performed by a qualified Service Professional.
Replace all parts and panels before operating.
Do not use an extension cord.
- Do not store or use gasoline or other flammable vapors and liquids in the vicinity of this or any other appliance.
- Do not store explosive substances such as aerosol cans with a flammable propellant in this appliance.
To prevent suffocation and entrapment hazards to children, remove the fresh food and freezer doors from any refrigerator before disposing of it or discontinuing its use.
To avoid serious injury or death, children should not stand on, or play in or with the appliance.
Children and persons with reduced physical, sensory or mental capabilities or lack of experience and knowledge can use this appliance only if they are supervised or have been given instructions on safe use and understand the hazards involved.
This appliance is intended to be used in household and similar applications such as: staff kitchen areas in shops, offices and other working environments; farm houses; by clients in hotels, motels, bed & breakfast and other residential environments; catering and similar non-retail applications.
- Connect to potable water supply only. A cold water supply is required for automatic icemaker operation. The water pressure must be between 40 and 120 psi (275-827 kilopascals).
CAUTION
To reduce the risk of injury when using your refrigerator, follow these basic safety precautions.
- Do not clean glass shelves or covers with warm water when they are cold. Glass shelves and covers may break if exposed to sudden temperature changes or impact, such as bumping or dropping. Tempered glass is designed to shatter into many small pieces if it breaks.
- Keep fingers out of the "pinch point" areas; clearances between the doors and between the doors and cabinet are necessarily small. Be careful closing doors when children are in the area.
-
Do not touch the cold surfaces in the freezer compartment when hands are damp or wet, skin may stick to these extremely cold surfaces.
-
Do not refreeze frozen foods which have thawed completely.
In refrigerators with automatic icemakers, avoid contact with the moving parts of the ejector mechanism, or with the heating element that releases the cubes. Do not place fingers or hands on the automatic ice making mechanism while the refrigerator is plugged in.
Use a sturdy glass when dispensing ice (on models with ice dispenser)
STATE OF CALIFORNIA PROPOSITION 65 WARNINGS:
WARNING
This product contains one or more chemicals known to the State of California to cause cancer and birth defects or other reproductive harm.
WARNING

Xplosion Hazard.
Keep flammable materials and vapors, such as gasoline, away from refrigerator. Failure to do so can result in fire, explosion, or death.
CONNECTING ELECTRICITY
WARNING

LECTRICAL SHOCK HAZARD
Plug into a grounded 3-prong outlet
Do not remove the ground prong
Do not use an adapter
Do not use an extension cord.
Failure to follow these instructions can result in death, fire, or electrical shock.
Do not, under any circumstances, cut or remove the third (ground) prong from the power cord. For personal safety, this appliance must be properly grounded.
The power cord of this appliance is equipped with a 3-prong (grounding) plug which mates with a standard 3-prong (grounding) wall outlet to minimize the possibility of electric shock hazard from this appliance.
Have the wall outlet and circuit checked by a qualified electrician to make sure the outlet is properly grounded.
Where a standard 2-prong wall outlet is encountered, it is your personal responsibility and obligation to have it replaced with a properly grounded 3-prong wall outlet. Do not use an adapter.
The refrigerator should always be plugged into its own individual electrical outlet which has a voltage rating that matches the rating plate.
A 115 Volt AC, 60Hz 15-or 20-amp fused, grounded electrical supply is required. This provides the best performance and also prevents overloading house wiring circuits which could cause a fire hazard from overheated wires.
Never unplug your refrigerator by pulling on the power cord. Always grip plug firmly and pull straight out from the outlet.
Immediately discontinue use of a damaged supply cord. If the supply cord is damaged, it must be replaced by a qualified service professional with an authorized service part from the manufacturer.
When moving the refrigerator away from the wall, be careful not to roll over or damage the power cord.
PROPER DISPOSAL OF YOUR OLD REFRIGERATOR
WARNING
SUFFOCATION AND ENTRAPMENT HAZARD
Failure to follow these disposal instructions can result in death or serious injury
IMPORTANT: Child entrapment and suffocation are not problems of the past. Junked or abandoned refrigerators are still dangerous even if they will sit for "just a few days." If you are getting rid of your old refrigerator, please follow the instructions below to help prevent accidents.
Before You Throw Away Your Old Appliance
Take off the fresh food and freezer doors.
- Leave the shelves in place so that children may not easily climb inside.
Refrigerant and Foam Disposal:
Disposal of appliance in accordance with Federal and Local Regulations. Flammable insulation material used requires special disposal procedures. Contact your local authorities for the environmentally safe disposal of your appliance.
GBE21D, GBE21A Internal Control
Note: Do not block air outlet by placing food items directly against it. Erratic temperatures may result.
| Knob Position Temperature Guide |
| Refrigerator Freezer |
| Coldest 34°F
(1.1°C) | Coldest -6°F
(-21.1°C) |
| Colder 37°F
(2.8°C) | Colder 0°F
(-17.8°C) |
| Cold 44°F
(6.7°C) | Cold 6°F
(-14.4°C) |
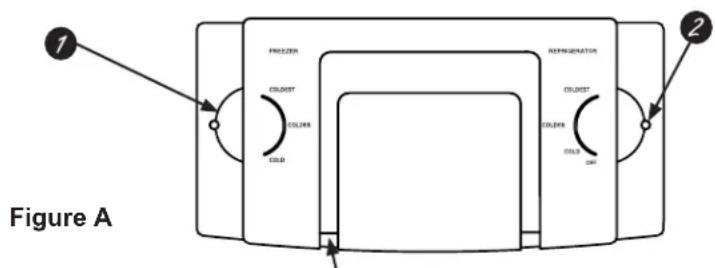
Freezer Compartment Temperature Control Adjust freezer compartment temperature. The freezer temperature is preset in the factory at the Colder position. Allow 24 hours for temperature to stabilize to the preset recommended setting.
2 Fresh Food Compartment Temperature Control
Adjust fresh food compartment temperature. The fresh food temperature is preset in the factory at the Colder position. Allow 24 hours for temperature to stabilize to the preset recommended setting.
NOTE: Power to the refrigerator cannot be disconnected by any setting on the control panel.
GDE21D, GDE21E, PDE21K, GDE25E, GNE21D, GNE21F, PNE21K, PNE21N, GWE19J, GNE25D, GNE25J, PNE25J, CNE25S, PNE25N, GNE27J, GNE27E

Top Control
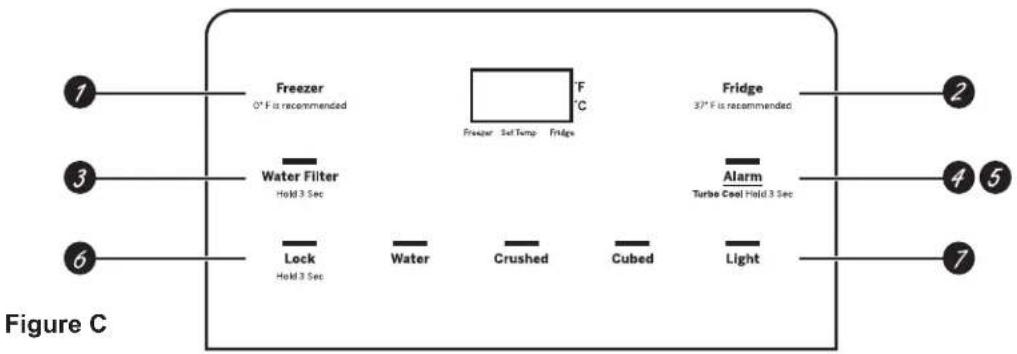
Freezer Compartment Temperature Control Adjust freezer compartment temperature. The freezer temperature is preset in the factory at 0^ (-17.8^) Allow 24 hours for temperature to stabilize to the preset recommended setting.
2 Fresh Food Compartment Temperature Control Adjust fresh food compartment temperature. The fresh food temperature is preset in the factory at 37^ (-2.8^) . Allow 24 hours for temperature to stabilize to the preset recommended setting.
Water Filter Press and hold 3 seconds to reset the Water Filter.
Turbo Cool To set the TurboCoolTM, press the Turbo Cool pad for 3 seconds. The display will show tc. TurboCool™ rapidly cools the refrigerator compartment in order to more quickly cool foods. Use TurboCool™ when adding a large amount of the food to the refrigerator compartment, putting away foods after they have been sitting out at room temperature, or when putting away warm leftovers. It can also be used if the refrigerator has been without power for an extended period.
NOTE: The refrigerator temperature cannot be changed during TurboCool™. The freezer temperature is not affected during TurboCool. When opening the refrigerator door during TurboCool™, the fans will continue to run if they have cycled on.
Door Alarm To set the alarm, press the Door Alarm pad. This alarm will sound if either door is open for more than 2 minutes. The beeping stops when you close the door.
NOTE: To put the refrigerator control in the OFF position, simultaneously touch the words Freezer and Fridge for 3 seconds. Power to the refrigerator cannot be disconnected by any setting on the control panel.
Changing ^ to ^ or ^ to F: Press and hold the "DOOR ALARM" and "FREEZER" buttons simultaneously for 5 seconds to set ^ to ^ or ^ to ^ .
Controls
GYE18J, PYE18H, GFE24J, PFE24J, CFE24S, PFE24H, GFE26J External Control
1 Freezer Compartment Temperature Control Adjust freezer compartment temperature. The freezer temperature is preset in the factory at 0^ (-17.8^) Allow 24 hours for temperature to stabilize to the preset recommended setting.
2 Fresh Food Compartment Temperature Control Adjust fresh food compartment temperature. The fresh food temperature is preset in the factory at 37^ (-2.8^) . Allow 24 hours for temperature to stabilize to the preset recommended setting.
Water Filter Press and hold 3 seconds to reset the Water Filter.
Turbo Cool To set the TurboCoolTM, press the Alarm pad for 3 seconds. The display will show tc. TurboCool™ rapidly cools the refrigerator compartment in order to more quickly cool foods. Use TurboCool™ when adding a large amount of the food to the refrigerator compartment, putting away foods after they have been sitting out at room temperature, or when putting away warm leftovers. It can also be used if the refrigerator has been without power for an extended period.
NOTE: The refrigerator temperature cannot be changed during TurboCool™. The freezer temperature is not affected during TurboCool. When opening the refrigerator door during TurboCool™, the fans will continue to run if they have cycled on.
Alarm Press the Alarm pad to toggle the door alarm between off and on. The alarm will sound if either door is left open for more than 2 minutes. The beeping stops when you close the door.
Lock Press and hold the Lock pad for 3 seconds to lock out ice and water dispenser and all other controls. Press and hold to unlock the controls.
LED dispenser Light Press the Light pad to turn your dispenser light on and off.
NOTE: To put the refrigerator control in the OFF position, simultaneously touch the words Freezer and Fridge for 3 seconds. Power to the refrigerator cannot be disconnected by any setting on the control panel.
Changing ^ to ^ C or ^ C to F: Press and hold the "FREEZER" and "ALARM" buttons simultaneously for 5 seconds to set ^ C to ^ or ^ to ^ C .
NOTE: The refrigerator is shipped with protective film covering the temperature controls. If this film was not removed during installation, remove it now.
Sabbath Modes (on some models)
Press and hold the "DOOR ALARM" and "WATER FILTER" buttons simultaneously for 5 seconds to enter/exit Sabbath Mode.
Press and hold the "LOCK" and "LIGHT" buttons simultaneously for 5 seconds to enter/exit Sabbath Mode.
Water & Ice Dispenser
(See Controls)

Press the glass gently against the dispenser cradle.
The spill shelf is not self-draining. To reduce water spotting, the shelf should be cleaned regularly.
If no water is dispensed when the refrigerator is first installed, there may be air in the water line system. Press the dispenser paddle for at least five minutes to remove trapped air from the water line and to fill the water system.
To flush out impurities in the water line, throw away the first six full glasses of water.
Internal Water Dispenser
(on some models)
The water dispenser is located on the left wall inside the refrigerator compartment.
To dispense water:
- Hold the glass against the recess.
- Push the water dispenser button.
- Hold the glass underneath the dispenser for 2-3 seconds after releasing the dispenser button. Water may continue to dispense after the button is released.
If no water is dispensed when the refrigerator is first installed, there may
be air in the water line system. Press the dispenser button for at least 5 minutes to remove trapped air from the water line and to fill the water system. During this process, the dispenser noise may be loud as the air is purged from the water line system. To flush out impurities in the water line, throw away the first 6 glassfuls of water.
NOTE: To avoid water deposits, the dispenser should be cleaned periodically by wiping with a clean cloth or sponge.
Automatic Icemaker (on some models)
Icemaker Kit IM4D is available for models that are icemaker-ready. For installation instructions see IM4D owner's manual found at www.GEApliances.com.
A newly installed refrigerator may take 12 to 24 hours to
Power
Switch
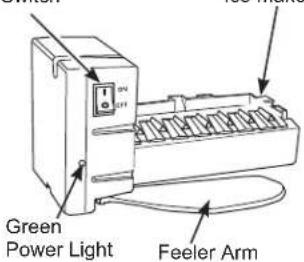
Ice maker
begin making ice.
The ice maker will produce seven cubes per cycle approximately 100-130 cubes in a 24-hour period, depending on freezer compartment temperature, room temperature, number of door openings and other use conditions.
Throw away the first few batches of ice to allow the water line to clear.
CAUTION
To minimize the risk of personal
injury, avoid contact with the moving parts of the ejector mechanism, or with the heating element that releases the cubes. Do not place fingers or hands on the automatic ice making mechanism while the refrigerator is plugged in.
Shelves and Bins
Not all features are on all models
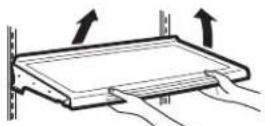
Lift up on the front and then up on the back to remove shelf.
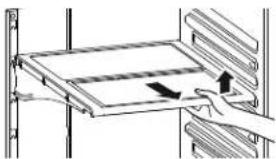
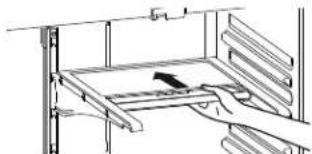
Quick Space Shelf (on some models) can retract to half its size for storage of tall items on the shelf below. Pull shelf out and up, slide shelf back until it stops to create half-shelf. Pull up and forward, then down to return to full shelf.
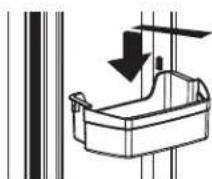
Adjustable door bins can be removed for cleaning.
Ice Bucket and Dispenser (on some models)
- Open the ice box door on inside of the left door.
- Pull up and out on the ice bucket in the left hand door to remove it from the compartment.
To replace the ice bucket, set it on the guide brackets and push until the ice bucket seats properly.
- If bucket cannot be replaced, rotate the ice bucket fork 1/4 turn clockwise.

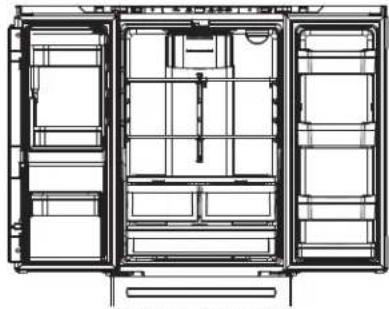
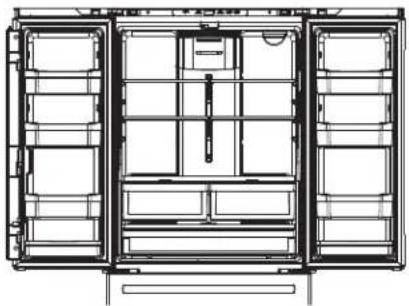
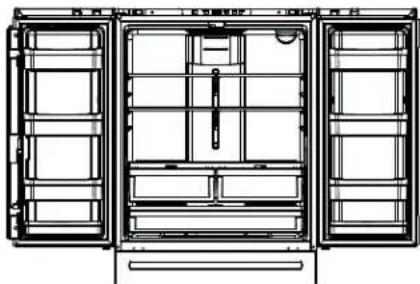
Refrigerator suggested assembly.
Shelves shown in the location for best energy efficiency.
GYE18J, PYE18H
18 cuft. Models
French Door with Freezer Drawer
GWE19J
19 cuft. Models
French Door with Freezer Drawer
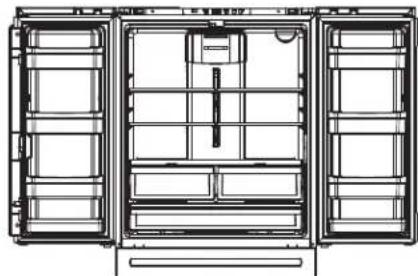
GNE21D, GNE21F,
PNE21K, PNE21N
21 cuft. Models
French Door with Freezer Drawer

GDE21D, GDE21E,
PDE21K, GDE25E
21, 25 cuft. Models
Single Door with Freezer
Drawer
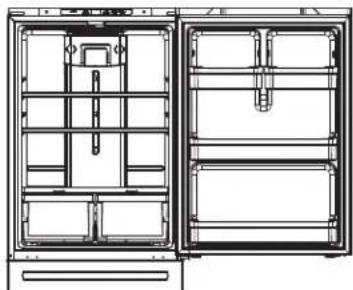
GBE21D, GBE21A
21 cuft. Models
Single Door with Freezer Door
GNE25D, GNE25J, PNE25J, CNE25S,
PNE25N, GNE27J
25, 27 cuft. Models
French Door with Freezer Drawer
Icemaker in the door is available for all 24 and 26 french door models.

GFE24J, PFE24J, CFE24S, PFE24H 24 cuft. Models
French Door with Freezer Drawer

GFE26J 26 cuft. Models
French Door with Freezer Drawer
NOTE: Do not block air outlet by placing food items directly against it. Erratic temperatures may result.

GNE27E
27 cuft. Models
French Door with Freezer Drawer
Clearances
Allow the following clearances for ease of installation, proper air circulation and plumbing and electrical connections.
Sides 1/8" (3 mm)
Top 1" (25 mm) Cabinet/Hinge Cover
Back 2^ (50 mm)
Water Line Installation
BEFORE YOU BEGIN
Recommended copper water supply kits are WX8X2, WX8X3 or WX8X4, depending on the amount of tubing you need. Approved plastic water supply lines are SmartConnect Refrigerator Tubing (WX08X10006, WX08X10015 and WX08X10025).
When connecting your refrigerator to a GE Appliances Reverse Osmosis Water System, the only approved installation is with a GE Appliances RVKit. For other reverse osmosis water systems, follow the manufacturer's recommendations.
If the water supply to the refrigerator is from a Reverse Osmosis Water Filtration System (RO) AND the refrigerator also has a water filter, use the refrigerator's filter bypass plug. Using the refrigerator's water filtration cartridge in conjunction with an RO water filter can result in hollow ice cubes. Some models do not come equipped with the filter bypass plug. To obtain a free bypass plug, call 800-GECARES. In Canada call 800.561.3344.
This water line installation is not warranted by the refrigerator or icemaker manufacturer. Follow these instructions carefully to minimize the risk of expensive water damage.
Water hammer (water banging in the pipes) in house plumbing can cause damage to refrigerator parts and lead to water leakage or flooding. Call a qualified plumber to correct water hammer before installing the water supply line to the refrigerator.
To prevent burns and product damage, do not hook up the water line to the hot water line.
Do not install the icemaker tubing in areas where temperatures fall below freezing.
When using any electrical device (such as a power drill) during installation, be sure the device is double insulated or grounded in a manner to prevent the hazard of electric shock, or is battery powered.
All installations must be in accordance with local plumbing code requirements.
WHAT YOU WILL NEED
- Copper or SmartConnect™ Refrigerator Tubing kit, 1/4'' outer diameter to connect the refrigerator to the water supply. If using copper, be sure both ends of the tubing are cut square.
To determine how much tubing you need: measure the distance from the water valve on the back of the refrigerator to the water supply pipe. Be sure there is sufficient extra tubing to allow the refrigerator to move out from the wall after installation.
SmartConnect™ Refrigerator Tubing Kits are available in the following lengths:
6^ (1.8 m) - WX08X10006
15^(4.6m) - WX08X10015
25^(7.6m) - WX08X10025
WARNING
Connect to potable water supply only.
A cold water supply is required for automatic icemaker operation. The water pressure must be between 40 and 120 psi (275-827 kilopascals)
Connecting to the House Water Line (Icemaker models only)
A cold water supply is required for automatic icemaker operation. If there is not a cold water supply, you will need to provide one. See Installing the Water Line section.
NOTES:
- Before making the connection to the refrigerator, be sure the refrigerator power cord is not plugged into the wall outlet.
- If your refrigerator does not have a water filter, we recommend installing one if your water supply has sand or particles that could clog the screen of the refrigerator's water valve. Install it in the water line near the refrigerator. If using SmartConnect™ Refrigerator Tubing Kit, you will need an additional tube (WX08X10002) to connect the filter. Do not cut plastic tube to install filter.
Before connecting the water line to the house, purge the house line for at least 2 minutes.
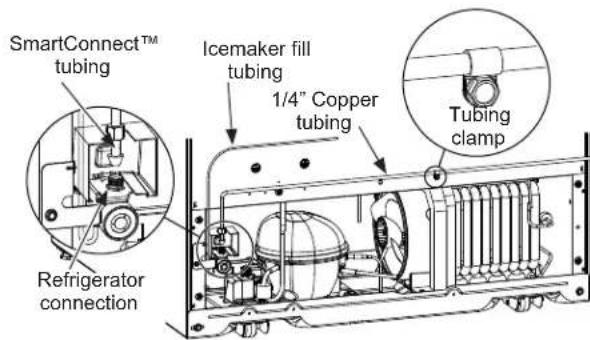
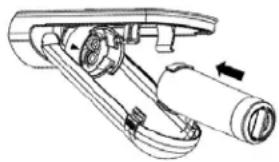
A. If you are using copper tubing, place a compression nut and ferrule (sleeve) onto the end of the tubing coming from the house cold water supply. If you are using the SmartConnect™ tubing, the nuts are already assembled to the tubing.
B. If you are using copper tubing, insert the end of the tubing into the refrigerator connection, at the back of the refrigerator, as far as possible. While holding the tubing, tighten the fitting.
If you are using SmartConnect™ tubing, insert the molded end of the tubing into the refrigerator connection, at the back of the refrigerator, and tighten the compression nut until it is hand tight. Then tighten one additional turn with a wrench. Over tightening may cause leaks.
C. Fasten the tubing into the clamp provided to hold it in position. You may need to pry open the clamp.
One of the illustrations below will look like the connection on your refrigerator.
WARNING
Connect to potable water supply only.
A cold water supply is required for automatic icemaker operation. The water pressure must be between 40 and 120 psi (275-827 kilopascals).
WARNING

LECTRIC SHOCK HAZARD
Attach tubing clamp using existing hole only. DO NOT drill into the refrigerator.
Icemaker-Ready Models
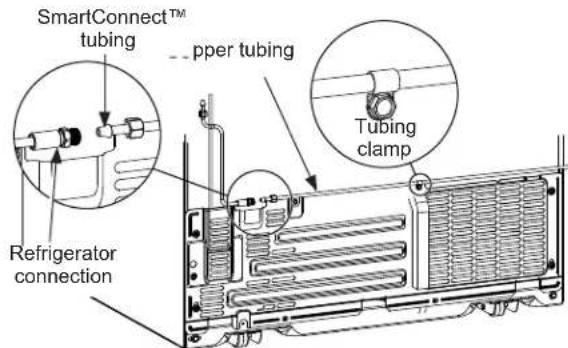
Icemaker-Installed Models
Cleaning
The stainless steel panels, door handles and trim.
Do not use appliance wax, polish, bleach, or other products containing chlorine on stainless steel.
Stainless steel can be cleaned with a commercially available stainless steel cleaner. A spray-on stainless steel cleaner works best.
Silver-accented plastic parts.
Wash parts with soap or other mild detergents. Wipe clean with a sponge, damp cloth or paper towel.
Do not use scouring pads, powdered cleaners, bleach or cleaners containing bleach because these products can scratch and weaken the paint finish.
Normal Operating Sounds
Should spill tray need cleaning use lime remover.
CAUTION
Do not clean glass shelves or covers
with warm water when they are cold. Glass shelves and covers may break if exposed to sudden temperature changes or impact such as bumping or dropping. Tempered glass is designed to shatter into many small pieces if it breaks.
Newer refrigerators sound different from older refrigerators. Modern refrigerators have more features and use newer technology.
Do you hear what I hear? These sounds are normal.
HUMMM... WHOOSH...
The new high efficiency compressor may run faster and longer than your old refrigerator and you may hear a high-pitched hum or pulsating sound while it is operating.
- You may hear a whooshing sound when the doors close. This is due to pressure equalizing within the refrigerator.
CLICKS,POPS, CRACKS and CHIRPS
- You may hear cracking or popping sounds when the refrigerator is first plugged in. This happens as the refrigerator cools to the correct temperature.
- Expansion and contraction of cooling coils during and after defrost can cause a cracking or popping sound.
- On models with an ice maker, after an ice making cycle, you may hear the ice cubes dropping into the ice bucket.
On models with a dispenser, during water dispense, you may hear the water lines move at initial dispense and after dispenser button is released.

- You may hear the fans spinning at high speeds. This happens when the refrigerator is first plugged in, when the doors are opened frequently or when a large amount of food is added to the refrigerator or freezer compartments. The fans are helping to maintain the correct temperatures.
The fans change speeds in order to provide optimal cooling and energy savings.

WATER SOUNDS
The flow of refrigerant through the freezer cooling coils may make a gurgling noise like boiling water.
Water dropping on the defrost heater can cause a sizzling, popping or buzzing sound during the defrost cycle.
A water dripping noise may occur during the defrost cycle as ice melts from the evaporator and flows into the drain pan.
Closing the door may cause a gurgling sound due to pressure equalization.
Save time and money! Review the charts on the following pages first and you may not need to call for service.
| Problem Possible Causes Wha to Do | |
| Refrigerator does not operate | Refrigeratorin defrost cycle. | Wait about 30 minutes for defrost cycle to end. |
| Either or both controls set to OFF. Set the controls to a lower temperature setting. |
| Refrigeratoris unplugged. Push the plug completely into the outlet. |
| The fuse is blown/circuit breaker is tripped. | Replace fuse or reset the breaker. |
| Refrigerator is in showroom mode. Unplug the refrigerator and plug it back in. |
| Vibration or rattling (slight vibration is normal) | Leveling legs need adjusting. See Level the refrigerator section of the Owner's Manual found at www.GEApliances.com. |
| Motor operates for long periods or cycles on and off frequently. (Modern refrigerators with more storage space and a larger freezer require more operating time. They start and stop often to maintain even temperatures.) | Normal when refrigerator is first plugged in. | Wait 24 hours for the refrigerator to completely cool down. |
| Often occurs when large amounts of food are placed in refrigerator. | This is normal. |
| Door left open. Check to see if package is holding door open. |
| Hot weather or frequent door openings. This is normal. |
| Temperature controls set at the coldest setting. | See Controls section of the Owner's Manual found at www.GEApliances.com. |
| Refrigerator or freezer compartment too warm | Temperature control not set cold enough. | See Controls section of the Owner's Manual found at www.GEApliances.com. |
| Warm weather or frequent door openings. | Set the temperature control one step colder. See Controls section of the Owner's Manual found at www.GEApliances.com. |
| Door left open. Check to see if package is holding door open. |
| Frost or ice crystals on frozen food (frost within package is normal) | Door left open. Check to see if package is holding door open. |
| Too frequent or too long door openings. This is normal. |
| Divider between refrigerator and freezer compartments feels warm | Automatic energy saver system circulates warm liquid around front edge of freezer compartment. | This helps prevent condensation on the outside. |
| Automatic icemaker does not work | Icemaker power switch is in the OFF position. | Set the power switch to the ON position. |
| Water supply turned off or not connected. | See Installing the Water Line section of the Owner's Manual found at www.GEApliances.com. |
| Freezer compartment too warm. | Wait 24 hours for the refrigerator to completely cool down. |
| Piled up cubes in the storage bin cause the icemaker to shut off. | Level cubes by hand. |
| Ice cubes stuck in icemaker. | Turn off the icemaker, remove cubes, and turn the icemaker back on. |
| Freezer cooling, fresh food not cooling | Normal, when refrigerator first plugged in or after extended power outage | Wait 24 hours for temperature in both compartments to reach selected temperatures. |
| Ice dispenser opens after closing freezer drawer (on some models) | Normal | The ice dispenser door may open after closing freezer door to allow access. |
| Ice cubes have odor/taste | Ice storage bin needs cleaning. | Empty and wash bin. Discard old cubes. |
| Food transmitting odor/taste to ice cubes. | Wrap foods well. |
| Interior of refrigerator needs cleaning. | See Care and Cleaning section of the Owner's Manual found at www.GEApliances.com. |
| Problem Possible Causes | What to Do | |
| Small or hollow cubes Water filterclogged. Replace filter cartridge with new carcase open. Check to see if package is holding door open. |
| Slow ice cube freezing Door lefopen. Check to see if package is holding door open. |
| Temperature control not set cold enough. See Controls section of the Owner's Manual found at www.GEApliances.com. |
| Frequent "buzzing sound" Icemaker power switch is in the I (on) position, but the water supply to the refrigerator has not been connected. | Set the power switch to the 0 (off) position. Keeping it in the I (on) position will damage the water valve. |
| Orange glow in the freezer Deastrother heater is on. This is normal. | |
| Water has poor taste/odor Water dispenser has not been used for a long time. | Dispense water until all water in system is replenished. |
| Water in first glass is warm | Normal when refrigerator is first installed. | Wait 24 hours for the refrigerator to completely cool down. |
| Water dispenser has not been used for a long time. | Dispense water until all water in system is replenished. |
| Water system has been drained. | Allow several hours for replenished supply to chill. |
| Water dispenser does not work | Water supply line turned off or not connected. | See Installing the water line section of the Owner's Manual found at www.GEApliances.com. |
| Water filter clogged. Replace filter cartridge or remove filter and install plug. |
| Air may be trapped in the water system. | Press the dispenser arm for at least two minutes. |
| Dispenser is LOCKED. | Press and hold the LOCK pad for 3 seconds. |
| Water spurting from dispenser | Newly-installed filter cartridge. | Run water from the dispenser for 3 minutes (about one and a half gallons). |
| Water is not dispensed but icemaker is working | Water in reservoir is frozen. | Call for service. |
| Refrigerator control setting is too cold. | Set to a warmer setting. |
| No water or ice cube production | Supply line or shutoff valve is clogged. | Call a plumber. |
| Water filter clogged. Replace filter cartridge or remove filter and install plug. |
| Refrigerator has odor | Foods transmitting odor to refrigerator. | Foods with strong odors should be tightly wrapped. Keep an open box of baking soda in the refrigerator; replace every three months. |
| Interior needs cleaning. | See Care and Cleaning section of the Owner's Manual found at www.GEApliances.com. |
| Moisture forms on outside of refrigerator | Not unusual during periods of high humidity. | Wipe surface dry. |
| Moisture collects inside (in humid weather, air carries moisture into refrigerator when doors are opened) | Too frequent or too long door openings. | This is normal. |
| Due to the higher humidity in the refrigerator, you may on occasion experience fog or small amounts of moisture in the refrigerator compartment. | This is normal and may come and go as different food loads and environmental conditions change. Wipe dry with a paper towel if desired. |
| Interior light does not work | No power at outlet. | Replace fuse or reset the breaker. |
| LED lights are out | Call Service - see Replacing the Lights section of the Owner's Manual found at www.GEApliances.com. |
| Hot air from bottom of refrigerator | Normal air flow cooling motor. In the refrigeration process, it is normal that heat be expelled in the area under the refrigerator. Some floor coverings are sensitive and will discolor at these normal and safe temperatures. | This is normal. |
Troubleshooting Tips... Before you call for service
| Problem Possible Causes | What to Do | |
| Refrigerator never shuts off but the temperatures are OK | Adaptive defrost keeps compressor running during door openings. | This is normal. The refrigerator will cycle off after the door remains closed for 2 hours. |
| Refrigerator is beeping Door is open. Close door. | | |
| Door not closing properly Door gasket on hinge side sticking or folding over. | Apply paraffin wax to the face of the gasket. | |
| Actual temperature not equal to Set temperature | Unit just plugged in. Allow 24 hours for system to stabilize. | |
| Door open for too long. Allow 24 hours for system to stabilize. | |
| Warm food added to refrigerator. Allow 24 hours for system to stabilize. | |
| Defrost cycle is in process. Allow 24 hours for system to stabilize. | |
| Door/drawer does not close by itself | Leveling legs need adjusting. See Level | the refrigerator section of the Owner's Manual found at www.GEApliances.com. |
| Freezer door/drawer pops open when refrigerator door is closed | This is normal if, after popping open, the freezer door/drawer closed on its own. | This indicates that there is a good seal on the freezer door/ drawer. If the freezer door/drawer does not automatically close after popping open, then see the Problem: Door/ drawer does not close by itself, above. |
| Food freezing in the refrigerator | Food too close to the air vent at the back of the refrigerator. | Move the food away from the air vent. |
| Refrigerator control is set too cold. Move | the refrigerator control to a warmer temperature setting one increment at a time. |
| Water is leaking from dispenser | Glass not being held under the dispenser long enough after button is released. | Hold the glass underneath the dispenser for 2-3 seconds after releasing the dispenser button. Water may continue to dispense after the button is released |
| Air may be present in the water line system, causing water to drip after being dispensed. | Dispense water for at least 2 minutes to remove air from system. |
| My display is showing tc | Turbo Cool function is activated. | See Controls section of the Owner's Manual found at www.GEApliances.com. |
| Water filter indicator light changed color | This is normal. | See Water Filter Cartridge - XWF section of the Owner's Manual found at www.GEApliances.com. |
| Water filter indicator light remains red even after replacing the water filter | Water filter indicator must be reset. | Press and hold the WATER FILTER pad for 3 seconds. See Water Filter Cartridge - XWF section of the Owner's Manual found at www.GEApliances.com. |
| Water filter indicator light is not lit | This is normal. The filter cartridge should be replaced when the replacement indicator light turns red. | See Water Filter Cartridge - XWF section of the Owner's Manual found at www.GEApliances.com. |
| Handle is loose / handle has a gap | Handle needs adjusting. | See Attach the Fresh Food Handle and Attach the Freezer Handle sections of the Owner's Manual found at www.GEApliances.com. |
| Refrigerator doors are not even (on French Door models only) | Doors need realigning. | See Level the Refrigerator Doors section of the Owner's Manual found at www.GEApliances.com. |
| Baskets stick or jam when opening or closing | Baskets are too full. | To open: remove some of the products from the basket when opened as far as possible. Readjust the products left in the basket and try to open the basket again. To close: readjust products in the basket or remove any product that is above the rim of the basket and close the basket. |
WATER FILTER CARTRIDGE
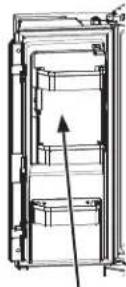
The water filter cartridge holder is located in the back upper-right corner of the fresh food refrigerator compartment.
WHEN TO REPLACE THE FILTER
If there is a replacement indicator light for the water filter cartridge on the dispenser, the red filter light will start blinking to tell you that you need to replace the filter soon.
- For external control models, the filter light will blink while you are dispensing until the filter is replaced.
- For top control models, the filter light will blink while the door is open until the filter is replaced.
For models that don't have the indicator light, the filter cartridge should be replaced every six months, or earlier if the flow of water to the dispenser or icemaker decreases.
REMOVING THE FILTER
If you are replacing the filter, first remove the previous one:
- Open the filter cartridge housing by squeezing the 2 front tabs and gently pulling down.
- Rotate the filter down.
- Gently grasp the filter and slowly turn it counterclockwise about a 1 / 4 turn. The filter should automatically release itself when you have rotated it far enough to the left. A small amount of water may drip down.
CAUTION
If air has been trapped in the system,
the filter cartridge may be ejected as it is removed. Use caution when removing.
FILTER BYPASS PLUG
To reduce the risk of property damage due to water leakage, you MUST use the filter bypass plug when a replacement filter cartridge is not available. Some models do not come equipped with the filter bypass plug. To obtain a free bypass plug, call 800-GECARES. In Canada, call 800.561.3344. The dispenser and icemaker will not operate without either the filter or bypass plug installed. The bypass plug is installed in the same way as a filter cartridge
INSTALLING THE FILTER IN A BOTTOM FREEZER REFRIGERATOR
- Open the filter cartridge housing by squeezing the 2 front tabs and gently pulling down.
- Line up the ports on the filter with the ports on the filter cartridge holder, and gently insert the filter.
- Slowly turn the filter to the right until it stops. DO NOT OVERTIGHTEN. As you turn the filter, it will automatically adjust itself into position. The filter will move about a 1/4 turn or 90 degrees, until the arrow on the filter aligns with the arrow on the filter cartridge holder.
- Slowly push the filter up into the clips.
- Close the filter cartridge housing by gently pushing the lid upwards until the tabs lock into place.
- Run water from the dispenser for 2 gallons or approximately 5 minutes to clear the system. Water may spurt out and air bubbles may be visible during this process. If water is not flowing, check to make sure the filter has been fully rotated to the right.
- Press and hold the WATER FILTER pad (only on select models) on the dispenser for three seconds.
Application Guidelines/Water Supply
| Service Flow 0.5 gpm | (1.89 lpm) |
| Water Supply Potable | Water |
| Water Pressure 25-120 psi (172-827 kPa) |
| Water Temperature 33°F-100°F (0.6°C-38°C) |
| Capacity 170 gallons | (643.5 liters) |
Sign-up for TEXT REMINDERS by texting REPLACE to 70543.
WARNING
To reduce the risk associated with choking, do not allow children under 3 years of age to have parts during the installation of this product. The disposable filter cartridge should be replaced every rated capacity, or sooner if a noticeable reduction in flow rate occurs.
For the maximum benefit of your filtration system, GE Appliances recommends the use of GE Appliances-branded filters only. Using GE Appliances-branded filters in GE Appliances and Hotpoint® refrigerators provides optimal performance and reliability. GE Appliances filters meet rigorous industry standards for safety and quality that are important for products that are filtering your water. GE Appliances has not qualified non-GE Appliances-branded filters for use in GE Appliances and Hotpoint refrigerators and there is no assurance that non-GE Appliances-branded filters meet GE Appliances standards for quality, performance and reliability.
If you have questions, or to order additional filter cartridges, visit our website at www.gewaterfilters.com or call GE Appliances Parts and Accessories, 877.959.8688. In Canada, call 800.661.1616.
XWF Water Filter Cartridge Limited Warranty
Contact us at www.geapplianceparts.com, or call 800.GE.CARES.
For the period of GE Appliances will replace
Thirty Days
From the date of the original purchase
Any part of the water filter cartridge which fails due to a defect in materials or workmanship during this limited thirty-day warranty.*
What GE Appliances will not cover:
Service trips to your home to teach you how to use the product.
Improper installation.
Failure of the product if it is abused, misused, used for other than the intended purpose or used commercially.
- Replacement of house fuses or resetting of circuit breakers.
- Damage to the product caused by accident, fire, floods, or acts of God.
- Incidental or consequential damage caused by possible defects with this appliance.
EXCLUSION OF IMPLIED WARRANTYES
Your sole and exclusive remedy is part exchange as provided in this Limited Warranty. Any implied warranties, including the implied warranties of merchantability or fitness for a particular purpose, are limited to six months or the shortest period allowed by law.
This warranty is extended to the original purchaser and any succeeding owner for products purchased for home use within the USA. In Alaska, the warranty excludes the cost of shipping or service calls to your home.
Some states do not allow the exclusion or limitation of incidental or consequential damages. This warranty gives you specific legal rights, and you may also have other rights which vary from state to state. To know what your legal rights are, consult your local or state consumer affairs office or your state's Attorney General.
For Purchases Made In Iowa: This form must be signed and dated by the buyer and seller prior to the consumption of this sale.
This form should be retained on file by the seller for a minimum of two years.
Buyer:
Name
Address
City State Zip
Signature Date
Seller:
Name
Address
City State Zip
Signature Date
*If your GE Appliances part fails because of a manufacturing defect within thirty days from the date of original purchase for use, we will give you a new or, at our option, a rebuilt part without charge. Return the defective part to the parts supplier from whom it was purchased together with a copy of the "proof of purchase" for the part. If the part is defective and shows no signs of abuse, it will be exchanged. The warranty does not cover the failure of parts which are damaged while in your possession, are abused, or have been installed improperly. It does not cover the cost of returning the part to the supplier from whom it was purchased nor does it cover the cost of labor to remove or install it to diagnose the fault. It does not cover parts used in products in commercial use except in the case of air conditioning equipment. In no event shall GE Appliances be liable for consequential damages. Warrantor: GE Appliances, a Haier company
System certified by IAPMO R&T against NSF/ANSI Standards 42, 53, 401 for the reduction of claims specified on the performance data sheet and at iapmort.org.
Actual performance may vary with local water conditions.
| Substance Tested for Reduction | Influent challenge concentration (mg/L) | Maximum permissible product water concentration (mg/L) | Avg % Reduction |
| Chlorine Taste and Odor 2.0 mg/L +/- 10% | N/A 96.9 | | |
| Chloramine Taste and Odor | 3.0 mg/L +/- 10% | 0.5 | 96.9 |
| Particulate, Class I | At least 10,000/mL | N/A | 91.4 |
| Cysts | 50,000/L | N/A | >99.99 |
| Lead | 0.15 | 0.01 98.85 | |
| Mercury | 0.006 | 0.002 96.3 | |
| Asbestos | 107 to 108 fibers/L | N/A | >99 |
| Toxaphene | 0.015 +/- 10% | 0.003 | 86.95 |
| VOC (Chloroform surrogate chemical) | 0.300 | 0.015 | 99.7 |
| Alachlor | 0.050 | 0.001 > 98 | |
| Atrazine | 0.100 | 0.003 | > 97 |
| Benzene | 0.081 | 0.001 > 99 | |
| Carbofuran | 0.190 | 0.001 > 99 | |
| carbon tetrachloride 0.078 | 0.0018 98 | | |
| chlorobenzene | 0.077 | 0.001 > 99 | |
| chloropicrin | 0.015 | 0.0002 | 99 |
| 2,4-D | 0.110 | 0.0017 98 | |
| dibromochloropropane (DBCP) | 0.052 | 0.00002 | > 99 |
| α-Dichlorobenzene | 0.08 | 0.001 | > 99 |
| p-Dichlorobenzene | 0.040 | 0.001 | > 98 |
| 1,2-dichloroethane | 0.088 | 0.0048 95 | |
| 1,1-dichloroethylene | 0.083 | 0.001 > 99 | |
| cis-1,2-dichloroethylene 0.170 | 0.0005 | > 99 | |
| trans-1,2-dichloroethylene | 0.086 | 0.001 > 99 | |
| 1,2-dichloropropane | 0.080 | 0.001 > 99 | |
| cis-1,3-dichloropropylene | 0.079 | 0.001 | > 99 |
| dinoseb | 0.170 | 0.0002 99 | |
| Endrin | 0.053 | 0.00059 99 | |
| Ethylbenzene | 0.088 | 0.001 > 99 | |
| ethylene dibromide (EDB) | 0.044 | 0.00002 | > 99 |
| bromochloroacetonitrile | 0.022 | 0.0005 98 | |
| dibromoacetonitrile | 0.024 | 0.0006 98 | |
| dichloroacetonitrile | 0.0096 | 0.0002 98 | |
| trichloroacetonitrile | 0.015 | 0.0003 98 | |
| 1,1-dichloro-2-propanone | 0.0072 | 0.0001 99 | |
| 1,1,1-trichloro-2-propanone | 0.0082 | 0.0003 | 96 |
| heptachlor (H-34, Heptox) | 0.025 | 0.00001 | >99 |
| heptachlor epoxide | 0.0107 | 0.0002 98 | |
| hexachlorobutadiene | 0.044 | 0.001 > 98 | |
| hexachlorocyclopentadiene | 0.060 | 0.000002 | > 99 |
| Lindane | 0.055 | 0.00001 | > 99 |
| methoxychlor | 0.050 | 0.0001 | > 99 |
| pentachlorophenol | 0.096 | 0.001 > 99 | |
| simazine | 0.120 | 0.004 > 97 | |
| Styrene | 0.150 | 0.0005 | > 99 |
| 1,1,2,2-tetrachloroethane | 0.081 | 0.001 > 99 | |
| Tetrachloroethylene | 0.081 | 0.001 > 99 | |
| Toluene | 0.078 | 0.001 > 99 | |
| 2,4,5-TP (silvex) | 0.270 | 0.0016 99 | |
| tribromoacetic acid | 0.042 | 0.001 > 98 | |
| 1,2,4-Trichlorobenzene | 0.160 | 0.0005 | > 99 |
| 1,1,1-trichloroethane | 0.084 | 0.0046 95 | |
| 1,1,2-trichloroethane | 0.150 | 0.0005 | > 99 |
| trichloroethylene | 0.180 | 0.0010 | > 99 |
| bromoform | 0.300 | 0.015 95 | |
| bromodichloromethane 0.300 | 0.015 | 95 | |
| chlorodibromomethane 0.300 | 0.015 | 95 | |
| xylenes | 0.070 | 0.001 >99 | |
| Meprobamate | 400 +/- 20% | 60 | 95.5 |
| Atenolol | 200 +/- 20% | 30 | 95.9 |
| Carbamazepine | 1400 +/- 20% | 200 98.6 | |
| DEET | 1400 +/- 20% | 200 98.6 | |
| Metolachlor | 1400 +/- 20% | 200 98.7 | |
| Trimethoprim | 140 +/- 20% | 20 | 96.1 |
| Linuron | 140 +/- 20% | 20 | 96.6 |
| TCEP | 5000 +/- 20% | 700 | 98.1 |
| TCPP | 5000 +/- 20% | 700 98.1 | |
| Phenytoin | 200 +/- 20% | 30 | 96 |
| Ibuprofen | 400 +/- 20% | 60 | 95.9 |
| Naproxen | 140 +/- 20% | 20 | 96.5 |
| Estrone | 140 +/- 20% | 20 | 97.1 |
| Bisphenol A | 2000 +/- 20% | 300 99.1 | |
| Nonyl phenol | 1400 +/- 20% | 200 | 97.3 |
Application Guidelines/Water Supply Parameters
Service Flow 0.5 gpm (1.89 pm)
Water Supply Potable Water
Water Pressure 25-120 psi (172-827 kPa)
Water Temperature 33^ - 100^ (0.6^ - 38^)
Capacity 170 gallons (643.5 liters)
It is essential that the manufacturer's recommended installation,
maintenance and filter replacement requirements be carried out for the
product to perform as advertised. See Installation Manual for Warranty
information.
Note: While the testing was performed under standard laboratory conditions, actual performance may vary.
Replacement Cartridge: XWF. For estimated costs of
replacement elements please call 1.877.959.8688 or visit our
website at www.gewaterfilters.com.
WARNING
To reduce the risk associated with
ingestion of contaminants:
- Do not use with water that is microbiologically unsafe or of unknown quality without adequate disinfection before and after the system. Systems certified for cyst reduction may be used on disinfected water that may contain filterable cysts.
NOTICE
To reduce the risk of water leakage or flooding, and to ensure optimal filter performance:
- Read and follow use instructions before installation and use of this system.
- Installation and use MUST comply with all state and local plumbing codes.
- Do not install if water pressure exceeds 120 psi (827 kPa). If your water pressure exceeds 80 psi (552 kPa), you must install a pressure-limiting valve. Contact a plumbing professional if you are uncertain how to check your water pressure.
- Do not install where water hammer conditions may occur. If water hammer conditions exist you must install a water hammer arrester. Contact a plumbing professional if you are uncertain how to check for this condition.
- Do not install on hot water supply lines. The maximum operating water temperature of this filter system is 100^ ( 38^ ).
- Protect filter from freezing. Drain filter when temperatures drop below 33^ (0.6^)
- Change the disposable filter cartridge every six months or sooner if you observe a noticeable reduction in water flow
- Failure to replace the disposable filter cartridge at recommended intervals may lead to reduced filter performance and cracks in the filter housing, causing water leakage or flooding.
- This System has been tested according to NSF/ANSI 42, 53 and 401 for the reduction of the substances listed below. The concentration of the indicated substances in water entering the system was reduced to a concentration less than or equal to the permissible limit for water leaving the system, as specified in NSF/ANSI 42, 53 and 401.

XWF System is certified by IAPMO R&T against NSF/ANSI Standards 42,53, and 401 for the reduction of claims specified on the performance data sheet and at iapmort.org.
GE Appliances Refrigerator Warranty
GEAppliances.com
For US Customers, all warranty service is provided by our Factory Service Centers, or an authorized Customer Care technician. To schedule service online, visit us at www.geappliances.com, or call GE Appliances at 800.GE.CARES (800.432.2737). Please have your serial number and your model number available when calling for service. In Canada, call 800.661.1616.
Servicing your refrigerator may require the use of the onboard data port for diagnostics. This gives a GE Appliances Factory Service technician the ability to quickly diagnose any issues with your appliance and helps GE Appliances improve its products by providing GE Appliances with information on your appliance. If you do not want your appliance data to be sent to GE Appliances, please advise your technician NOT to submit the data to GE Appliances at the time of service.
| For the Period of: GE Appliances Will Replace |
| One Year
From the date of the original purchase | Any part of the refrigerator which fails due to a defect in materials or workmanship.
During the limited one-year warranty, GE Appliances will also provide, free of charge, all labor and related service to replace the defective part. |
| Thirty Days
(Water filter, if included)
From the original purchase date of the refrigerator | Any part of the water filter cartridge which fails due to a defect in materials or workmanship. During this limited thirty-day warranty, GE Appliances will also provide, free of charge, a replacement water filter cartridge. |
| GE PROFILE™ AND GE CAFÉ™ MODELS |
| Five Years
From the date of the purchase | Any part of the sealed refrigerating system (the compressor, condenser, evaporator an all connecting tubing) which fails due to a defect in materials or workmanship.
During this limited five-year sealed refrigerating system warranty, GE Appliances will also provide, free of charge, all labor and related service to replace the defective part in the sealed refrigerating system. |
What GE Appliances Will Not Cover:
Service trips to your home to teach you how to use the product.
- Improper installation, delivery or maintenance.
Failure of the product if it is abused, misused, or used for other than the intended purpose or used commercially.
Loss of food due to spoilage.
- Replacement of house fuses or resetting of circuit breakers.
- Damage to finish, such as surface rust, tarnish, or small blemishes not reported within 48 hours of delivery.
- Replacement of the water filter cartridge, if included, due to water pressure that is outside the specified operating range or due to excessive sediment in the water supply.
- Replacement of the light bulbs, if included, or water filter cartridge, if included, other than as noted above.
- Damage to the product caused by accident, fire, floods or acts of God.
- Incidental or consequential damage caused by possible defects with this appliance.
Product not accessible to provide required service.
- Damage caused by a non-GE Appliances Brand water filter.
EXCLUSION OF IMPLIED WARRANTY
Your sole and exclusive remedy is product repair as provided in this Limited Warranty. Any implied warranties, including the implied warranties of merchantability or fitness for a particular purpose, are limited to one year or the shortest period allowed by law.
For US Customers: This warranty is extended to the original purchaser and any succeeding owner for products purchased for home use within the USA. If the product is located in an area where service by a GE Appliances Authorized Servicer is not available, you may be responsible for a trip charge or you may be required to bring the product to an Authorized GE Appliances Service location for service. In Alaska, the warranty excludes the cost of shipping or service calls to your home.
Some states do not allow the exclusion or limitation of incidental or consequential damages. This warranty gives you specific legal rights, and you may also have other rights which vary from state to state. To know what your legal rights are, consult your local or state consumer affairs office or your state's Attorney General.
Warrantor: GE Appliances, a Haier company
For Customers in Canada: This warranty is extended to the original purchaser and any succeeding owner for products purchased in Canada for home use within Canada. In-home warrant service will be provided in areas where it is available and deemed reasonable by Mabe to provide.
Warrantor Canada: MC Commercial, Burlington, Ontario, L7R 5B6
Panneau de commande supérieur GDE21D, GDE21E, PDE21K, GDE25E, GNE21D, GNE21F, PNE21K, PNE21N, GWE19J, GNE25D, GNE25J, PNE25J, CNE25S, PNE25N, GNE27J, GNE27E

Figure B
Garant: GE Appliances, a Haier company
Garant Canada: MC Commercial Inc., Burlington, Ontario, L7R 5B6

