
ICD-UX60 - Dictaphone SONY - Free user manual and instructions
Find the device manual for free ICD-UX60 SONY in PDF.

| Product Type | Dictaphone (IC recorder) |
| Brand | SONY |
| Model | ICD-UX60 |
| Power Source | 1 LR03 (AAA) alkaline battery or rechargeable NH-AAA (1.5 V / 1.2 V DC) |
| Main Functions | Recording, playback, erasing, clock setting, alarm, USB transfer |
| Memory | Internal memory (capacity not specified) |
| Audio Formats | MP3 (MPEG Layer-3 technology under license) |
| Microphone | Built-in microphone |
| Speaker | Built-in speaker (playback possible) |
| Connectivity | USB (attachment cable supplied), stereo headphone jack |
| Computer Compatibility | Windows Vista/XP/2000, Mac OS X (v10.2.8-v10.4) |
| Supplied Accessories | LR03 alkaline battery, stereo headphones, USB cable, case, CD-ROM with PDF manual |
| Maintenance and Cleaning | Soft cloth slightly dampened with water. Do not use alcohol, gasoline, or thinner. |
| Safety | Do not use while driving. Avoid heat, direct sunlight, excessive dust. Remove battery if liquid intrusion occurs. |
| Recycling | Product and batteries must be recycled in accordance with regulations (WEEE symbol). |
| Warranty and After-Sales Service | Contact your Sony dealer. Representative for EMC and safety: Sony Deutschland GmbH. |
Frequently Asked Questions - ICD-UX60 SONY
User questions about ICD-UX60 SONY
0 question about this device. Answer the ones you know or ask your own.
Ask a new question about this device
Download the instructions for your Dictaphone in PDF format for free! Find your manual ICD-UX60 - SONY and take your electronic device back in hand. On this page are published all the documents necessary for the use of your device. ICD-UX60 by SONY.
USER MANUAL ICD-UX60 SONY
This Quick Start Guide describes only basic operations, such as how to record, play back, or erase messages. The operating instructions explaining all the features and functions are supplied with the IC recorder as PDF files in 15 European languages stored on the supplied CD-ROM. Open the supplied CD-ROM on your computer, and find the language edition most convenient to you. The English edition of the operating instructions is supplied as a booklet as well.
For customers in Europe
Disposal of Old Electrical & Electronic Equipment (Applicable in the European Union and other European countries with separate collection systems)

This symbol on the product or on its packaging indicates that this product shall not be treated as household waste. Instead it shall be handed over to the applicable collection point for the recycling of electrical and electronic equipment. By ensuring this product is disposed of correctly, you
will help prevent potential negative consequences for the environment and human health, which could otherwise be caused by inappropriate waste handling of this product. The recycling of materials will help to conserve natural resources. For more detailed information about recycling of this product, please contact your local Civic Office, your household waste disposal service or the shop where you purchased the product.
Applicable accessories: Headphones, USB connection support cable
Disposal of waste batteries (applicable in the European Union and other European countries with separate collection systems)

This symbol on the battery or on the packaging indicates that the battery provided with this product shall not be treated as household waste. By ensuring these batteries are
disposed of correctly, you will help prevent potentially negative consequences for the environment and human health which could otherwise be caused by inappropriate waste handling of the battery. The recycling of the materials will help to conserve natural resources.
In case of products that for safety, performance or data integrity reasons require a permanent connection with an incorporated battery, this battery should be replaced by qualified service staff only. To ensure that the battery will be treated properly, hand over the product at end-of-life to the applicable collection point for the recycling of electrical and electronic equipment.
For all other batteries, please view the section on how to remove the battery from the product safely. Hand the battery over to the applicable collection point for the recycling of waste batteries.
For more detailed information about recycling of this product or battery, please contact your local Civic Office, your household waste disposal service or the shop where you purchased the product.
Notice for the customers in the countries applying EU Directives
The manufacturer of this product is Sony Corporation, 1-7-1 Konan, Minato-ku, Tokyo, Japan. The Authorized Representative for EMC and product safety is Sony Deutschland GmbH, Hedelfinger Strasse 61, 70327 Stuttgart, Germany. For any service or guarantee matters please refer to the addresses given in separate service or guarantee documents.
You are cautioned that any changes or modifications not expressly approved in this manual could void your authority to operate this equipment.
Table of Contents
Checking the contents of the package. 4
Getting Started
Step 1: Preparing a Power Source.....5
Step 2: Setting the Clock............5
Basic Operations
Recording Messages. 7
Playback/Erasing
Playing Back Messages. 8
Erasing Messages. 9
Utilizing Your Computer
Using the IC Recorder with Your Computer 11
Precautions. 13
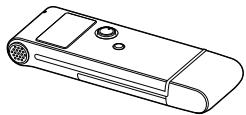
Checking the contents of the package
IC Recorder (1)
LR03 (size AAA) alkaline battery (1)

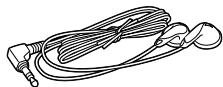
Stereo headphones (1)
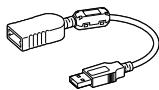
USB connection support cable (1)
Carrying pouch (1)
Step 1: Preparing a Power Source
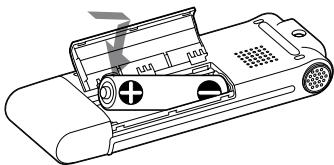
Inserting the battery
1 Slide and lift the battery compartment lid.
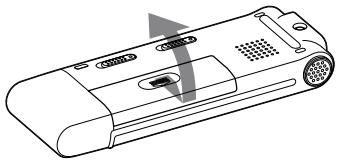
2 Insert one LR03 (size AAA) alkaline battery with correct polarity, and close the lid.
Step 2: Setting the Clock

You need to set the clock to use the alarm function or record the date and time.
Clock setting display appears when you insert battery for the first time, or when you insert a battery after the IC recorder has been without battery for a certain period of time. In this case, proceed from step 3.
1 Select "DATE & TIME" in the menu.
① Press and hold /MENU for more than one second. The menu mode will be displayed in the display window.
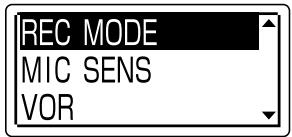
(2) Press the control key toward or to select "DETAIL MENU," and then press ENT.
③ Press the control key toward ▲ or ▼ to select "DATE & TIME," and then press ENT.
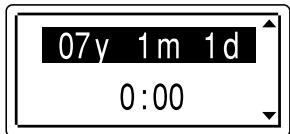
2 Press the control key toward or to select "07y1m1d," and then press ENT.
3 Press the control key toward or to set the year, month, day, hour, and minute in sequence, and then press ENT.
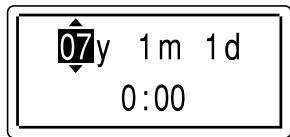
4 Press (stop) to return to the normal display.
Tip
Press /MENU to return to the previous operation.
Note
If you do not press ENT within one minute of entering the clock setting data, the clock setting mode is cancelled and the window will return to the normal display.
To display the current date and time
Press (stop) to display the current date and time.
07y 11m27d 15:30
Recording Messages
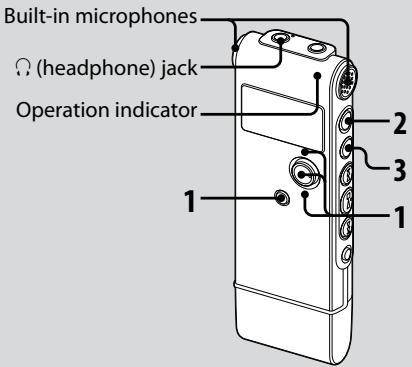
1 Select a folder.
① Press /MENU to display the folder selection window.
(2) Press the control key toward or to select the folder in which you want to record messages, and then press ENT.
2 Start recording.
① Press (record/pause) in the stop mode.
② Speak into the built-in microphone.
3 Press (stop) to stop recording.
The IC recorder stops at the beginning of the current recording.
Playing Back Messages
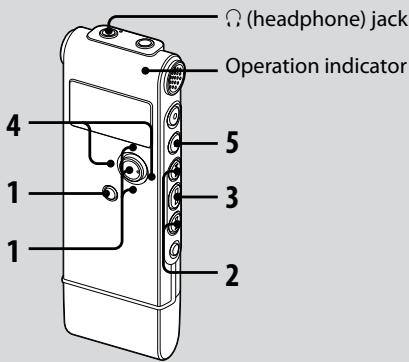
1 Select a folder.
① Press /MENU.
(2) Press the control key toward or to select the folder, and then press ENT.
2 Press I or to select the message you want to play.
3 Press to start playback.
4 Press the control key toward VOL + or VOL - to adjust the volume.
5 Press (stop) to stop playback.
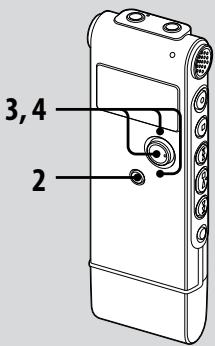
Erasing Messages
You can erase the recorded messages one by one or all messages in a folder at a time.
Note
Once a recording has been erased, you cannot retrieve it.
Erasing messages one by one
You can erase unwanted messages, retaining all other messages when the IC recorder is in the stop or playback mode. When a message is erased, the remaining messages will advance and be renumbered so that there will be no space between messages.
1 Select the message you want to erase.
2 Press and hold /MENU for more than one second to enter the menu mode.
The menu mode window will be displayed.
3 Press the control key toward or to select "ERASE A FILE," and then press ENT.
The message to be erased will be played back.
4 Press the control key toward or to select "EXECUTE," and then press ENT.
"ERASING ..." appears in the display window and the selected message will be erased.
Erasing all messages in a folder
1 Select the folder containing the messages you want to erase when the IC recorder is in the stop mode.
2 Press and hold /MENU for more than one second to enter the menu mode.
The menu mode window will be displayed.
3 Press the control key toward or to select "ERASE ALL," and then press ENT.
4 Press the control key toward or to select "EXECUTE," and then press ENT.
"ERASING ..." appears in the display window and all messages in the selected folder will be erased.
Utilizing Your Computer
Using the IC Recorder with Your Computer
System requirements
Operating systems:
Windows Vista® Home Basic
Windows Vista® Home Premium
Windows Vista® Business
Windows Vista® Ultimate
Windows® XP Home Edition Service Pack 2 or higher
Windows® XP Professional Service Pack 2 or higher
WindowsXP Media Center Edition
Service Pack 2 or higher
Windows XP Media Center Edition 2004
Service Pack 2 or higher
WindowsXP Media Center Edition 2005
Service Pack 2 or higher
Windows® 2000 Professional Service Pack 4 or higher
Mac OS X (v10.2.8-v10.4)
Pre-Installed
Note
64 bit OS is not supported.
Hardware environment:
- Port: USB port
Sound board: Sound cards compatible with any of the supported operating systems
Note
The following systems are not supported:
- Operating systems other than the ones indicated on the left
- Personally constructed computers or operating systems
- Upgraded operating systems
Multi-booT environment
Multi-monitor environment
When you are using Windows® 2000 Professional
Install the driver using "SonyRecorder Driver.exe" in the IC recorder.
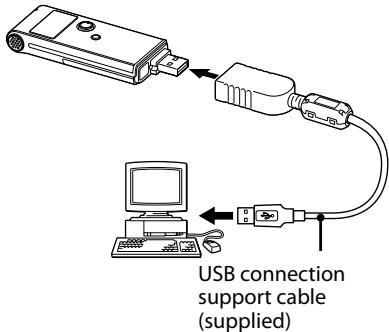
Connecting the IC recorder to your computer
You can transfer the IC recorder data onto your computer by connecting the IC recorder to the computer. Remove the USB cap from the IC recorder and then connect the IC recorder to the USB connector of your computer. The IC recorder is recognized by the computer as soon as the connection is made. While the IC recorder is connected to the computer, "CONNECTING" is displayed in the display window of the IC recorder.
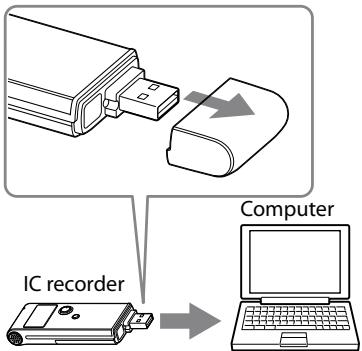
To USB connector

Tip
If the IC recorder cannot be connected to the USB connector of your computer directly, use the supplied USB connection support cable.
Notes
- If you connect more than two USB devices to your computer, normal operation will not be guaranteed.
- Use of this IC recorder with a USB hub or a USB connection support cable other than the supplied cable is not guaranteed.
- A malfunction may occur depending on the USB devices connected at the same time.
- Before connecting the IC recorder to the computer, make sure that the battery is inserted in the IC recorder.
- It is recommended that you disconnect the IC recorder from the computer when you are not using the IC recorder connected to the computer.
Disconnecting the IC recorder from your computer
Follow the procedures below; otherwise, data may be damaged.
1 Make sure that the operation indicator is not flashing.
2 Disconnect the IC recorder from the USB connector of the computer.
Precautions
On power
- Operate the unit only on 1.5V or 1.2V DC. Use one LR03 (size AAA) alkaline battery or one NH-AAA rechargeable battery.
On safety
- Do not operate the unit while driving, cycling or operating any motorized vehicle.
On handling
- Do not leave the unit in a location near heat sources, or in a place subject to direct sunlight, excessive dust or mechanical shock.
- Should any solid object or liquid fall into the unit, remove the battery and have the unit checked by qualified personnel before operating it any further.
On noise
- Noise may be heard when the unit is placed near an AC power source, a fluorescent lamp or a mobile phone during recording or playback.
- Noise may be recorded when an object, such as your finger, etc., rubs or scratches the unit during recording.
On maintenance
- To clean the exterior, use a soft cloth slightly moistened in water. Do not use alcohol, benzine or thinner.
If you have any questions or problems concerning your unit, please consult your nearest Sony dealer.
Backup recommendations
To avoid potential risk of data loss caused by accidental operation or malfunction of the IC recorder, we recommend that you save a backup copy of your recorded messages on a tape recorder or to a computer, etc.
Trademarks
- Microsoft, Windows and Windows Vista are registered trademarks or trademarks of the Microsoft Corporation in the United States and/or other countries.
- Apple, Macintosh and Mac OS are trademarks of Apple Inc., registered in the USA and other countries.
- Nuance, the Nuance logo, Dragon NaturallySpeaking, and RealSpeak are trademarks and/or registered trademarks of Nuance Communications, Inc., and/or its affiliates in the United States and/or other countries. © 2007 Nuance Communications, Inc. All rights reserved.
- MPEG Layer-3 audio coding technology and patents licensed from Fraunhofer IIS and Thomson.
All other trademarks and registered trademarks are trademarks or registered trademarks of their respective holders. Furthermore, "TM" and "®" are not mentioned in each case in this manual.
WindowsXP Media Center Edition 2005
© 2007 Nuance Communications, Inc.
- For customers in Europe
- Disposal of Old Electrical & Electronic Equipment (Applicable in the European Union and other European countries with separate collection systems)
- Disposal of waste batteries (applicable in the European Union and other European countries with separate collection systems)
- Notice for the customers in the countries applying EU Directives
- Table of Contents
- Getting Started
- Basic Operations
- Playback/Erasing
- Utilizing Your Computer
- Checking the contents of the package
- Step 1: Preparing a Power Source
- Inserting the battery
- Step 2: Setting the Clock
- Select "DATE & TIME" in the menu.
- Press the control key toward or to select "07y1m1d," and then press ENT.
- Press (stop) to return to the normal display.
- Tip
- Note
- To display the current date and time
- Recording Messages
- Select a folder.
- Start recording.
- Press (stop) to stop recording.
- Playing Back Messages
- Erasing Messages
- Erasing messages one by one
- Erasing all messages in a folder
- Using the IC Recorder with Your Computer
- System requirements
- Operating systems:
- Hardware environment:
- When you are using Windows® 2000 Professional
- Connecting the IC recorder to your computer
- Notes
- Disconnecting the IC recorder from your computer
- Precautions
- On power
- On safety
- On handling
- On noise
- On maintenance
- Backup recommendations
- Trademarks
Brand : SONY
Model : ICD-UX60
Category : Dictaphone