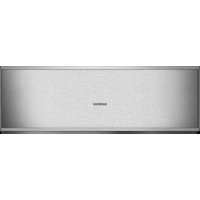
DV461710 - Vacuum packaging machines GAGGENAU - Free user manual and instructions
Find the device manual for free DV461710 GAGGENAU in PDF.

| Brand | Gaggenau |
| Model | DV461710 |
| Product Type | Vacuum sealing drawer |
| Category | Vacuum packaging appliances |
| Power supply | 120 V, 60 Hz |
| Maximum bag width | 240 mm |
| Suction levels | 3 (1, 2, 3) |
| Sealing levels | 2 (1, 2) |
| Chamber material | Stainless steel |
| Lid material | Glass |
| Control | Symbolic touch control |
| Drying function | Yes |
| Sous-vide cooking | Yes |
| Quick marinade | Yes |
| Included accessories | Spacer, external vacuum adapter, bottle stoppers, bottle adapter, hose, bags (180x280 mm and 240x350 mm) |
| Cleaning | Damp cloth, no high-pressure cleaner, no dishwasher for accessories |
| Automatic shut-off | After 10 minutes of inactivity |
| Spare parts available | Bags (BA080670, BA080680), handle (BA476510) |
| Customer service | CA8774424436 (toll-free) |
| Manual languages | FR, EN, ES |
Frequently Asked Questions - DV461710 GAGGENAU
User questions about DV461710 GAGGENAU
0 question about this device. Answer the ones you know or ask your own.
Ask a new question about this device
Download the instructions for your Vacuum packaging machines in PDF format for free! Find your manual DV461710 - GAGGENAU and take your electronic device back in hand. On this page are published all the documents necessary for the use of your device. DV461710 by GAGGENAU.
USER MANUAL DV461710 GAGGENAU
Use and care manual 2
Vacuum-sealing drawer
IMPORTANT SAFETY INSTRUCTIONS 3
Child Safety 4
State of California Proposition 65Warnings: 5
Causes of Damage 6
Getting to know the appliance 7
How does a vacuum-sealing drawer work? 7
Vacuum-sealingDrawer Assembly 7
Control Panel 7
Opening and Closing 8
Accessories 8
Turning the Appliance On and Off 9
Vacuum-sealing in a Bag 9
Appropriate Vacuum-sealing Bags 9
How to Proceed 10
Premature Heat-sealing 11
Canceling the Vacuum-sealing Process 11
Vacuum-sealing in a Container 12
Appropriate Vacuum-sealing Containers 12
Canceling the Vacuum-sealing Process 12
Carrying Out the Drying Process 13
Applications 13
Vacuum-sealing for Sous-vide Cooking 13
Vacuum-sealing Glass Bottles 14
Fast Marinating and Flavoring 14
Storage and Transportation 15
Recommended Settings 15
Cleaning and Maintenance 17
Before Calling for Service 18
Customer Service 20
Additional information on products, accessories, replacement parts and services can be found at www.gaggenau.com and in the online shop www.gaggenau.com/zz/store
Safety Definitions
WARNING
This indicates that death or serious injuries may occur as a result of non-observation of this warning.
CAUTION
This indicates that minor or moderate injuries may occur as a result of non-observation of this warning.
NOTICE
This indicates that damage to the appliance or property may occur as a result of non-compliance with this advisory.
Note: This alerts you to important information and/or tips.

IMPORTANT SAFETY INSTRUCTIONS
READ AND SAVE THESE INSTRUCTIONS
Read. these instructions carefully. Only then will you be able to operate your appliance safety and correctly. Keep the operating and installation instructions for later use.
Examine the appliance after unpacking it. In the event of transport damage, do not plug it in.
This appliance is intended for domestic use and the household environment only. Only use the appliance to vacuum-seal food in appropriate vacuum-sealing bags and vacuum-sealing containers and to heat-seal film.
Only operate this appliance in enclosed rooms.

WARNING
Risk of Burns!
The heat-sealing bar in the vacuumsealing compartment becomes extremely hot if the appliance is used over an extended period of time and there are long heat-sealing times. Never touch the hot heat-sealing bar. Keep children away from the appliance.

WARNING
Risk of electrical shock!
Moisture entering the appliance can cause an electrical shock. Don't use a high-pressure cleaner or steam cleaner.
Do not operate this appliance if it is not working properly, or if it has been damaged. Contact an authorized servicer.
To avoid electrical shock hazard, before servicing the appliance, switch power off at the service panel and lock the panel to prevent the power from being switched on accidentally.

WARNING
Risk of electric shock!
Incorrect repairs are dangerous.
Repairs may only be carried out by an authorized servicer. If the appliance is not functioning properly, unplug the power cord or switch off the fuse in the fuse box.
Contact Customer Support.

WARNING
Risk of Fire!
The heat-sealing bar in the vacuumsealing compartment becomes extremely hot. Flammable vapors may ignite. Do not vacuum-seal any flammable liquids in the vacuumsealing bag. Do not store any flammable materials or objects inside or near the appliance.

IMPORTANT SAFETY INSTRUCTIONS
READ AND SAVE THESE INSTRUCTIONS
WARNING
Risk of Injury!
The smallest cracks in the glass lid may result in it imploding when the vacuum is attached. Unplug the appliance from the power cord or switch off the circuit breaker in the fuse box. Call customer service.
WARNING
Risk of Injury!
During the vacuuming process, the vacuum-sealing compartment and the glass lid may become misshaped due to the high negative pressure. Screw-top jars, other hard containers, and rigid food that are vacuum-sealed in the compartment when the lid is closed must not come into contact with this lid. Otherwise, the protective layer on the glass will be damaged and the glass lid may break. Hard containers and rigid food must not protrude over a maximum height of 3^1/4 in (80mm)
WARNING
Risk of Injury!
Any misuse of the vacuum-sealing drawer may lead to injury. Do not attach any hoses that are connected to the appliance on any body part.
WARNING
Only use jars that are certified as vacuum safe.
Child Safety
When children become old enough to use the appliance, it is the responsibility of the parents or legal guardians to ensure that they are instructed in safe practices by qualified persons.
Do not allow anyone to climb, stand, lean, sit, or hang on any part of an appliance, especially a door, warming drawer, or storage drawer. This can damage the appliance, and the unit may tip over, potentially causing severe injury.
Do not allow children to use this appliance unless closely supervised by an adult. Children and pets should not be left alone or unattended in the area where the appliance is in use. They should never be allowed to play in its vicinity, whether or not the appliance is in use.
CAUTION
Items of interest to children should not be stored in an appliance, in cabinets above an appliance or on the backsplash. Children climbing on an appliance to reach items could be seriously injured.

IMPORTANT SAFETY INSTRUCTIONS
READ AND SAVE THESE INSTRUCTIONS
State of California Proposition 65
Warnings:

WARNING
This product can expose you to chemicals including vinyl chloride, which is known to the State of California to cause cancer and birth defects or other reproductive harm. For more information go to www.P65Warnings.ca.gov.
Causes of Damage
NOTICE
- Check the appliance for damage before each use. Pay close attention to the integrity of the glass lid.
- Do not operate the appliance if it appears to be damaged. Call customer service.
- Slowly open and close the glass lid.
- Do not place any objects on the glass lid. Do not use the appliance as a work surface or storage space. Ensure that no objects can fall onto the glass lid. To use it, pull the drawer out completely until it stops. Close the drawer completely if you are not using it.
- Before closing the glass lid, make sure that there is no debris in the vacuum-sealing compartment.
- Ensure that the seals are not damaged by pointed or sharp objects.
- Check that the seal on the glass lid is positioned correctly. Make sure that the seal's contact surface is clean and free from debris. Otherwise, this may impair the functionality of the appliance.
- Do not operate the appliance if the seal is defective. If you do so, this may damage the appliance. Call customer service.
- Observe the cleaning instructions.
- In the event of a power failure during the vacuum-sealing process, the vacuum in the vacuum-sealing compartment is preserved. Never attempt to use a tool to open the glass lid. Wait until the power supply has been re-established and restart the vacuum-sealing process.
-
Do not vacuum-seal food in its original packaging after you have opened it. Only use bags that are suitable for vacuum-sealing food.
-
In the vacuum, liquids start to heat at low temperatures. This produces steam and may cause the appliance to stop working.
-
Make sure that the food to be vacuum-sealed is at the lowest possible initial temperature - within the range of 36 - 46^ ( 1 - 8^ ) is best.
- Never vacuum-seal liquids in the vacuum-sealing bag at the maximum vacuum-sealing level.
- Recommendation: Vacuum-seal liquids in the vacuum-sealing bag at vacuum-sealing level 2.
- Carefully monitor the vacuum-sealing process. It is normal for some bubbles to form when vacuum-sealing liquids. Heat-seal the bag as soon as the bubble formation visibly increases.
- Tip: You can also vacuum-seal liquids in fixed, commercially available vacuum-sealing containers. Use vacuum-sealing level 3 for this. When vacuuming, do not use any plastic bottles or other vessels that contract during external vacuuming.
Getting to know the appliance
In the vacuum-sealing drawer, you can vacuum-seal food in suitable bags and containers. This chapter provides you with information about the assembly and basic functions of your appliance.
How does a vacuum-sealing drawer work?
During the vacuum-sealing process, air is pumped out of the vacuum-sealing compartment and the bag. This produces a high vacuum in the compartment. The higher the vacuum-sealing level, the less air remains in the compartment and the bag, and the higher the pressure difference to the environment.
If the selected vacuum-sealing level has been reached, the heat-sealing bar is pressed against the silicone bar on the glass lid. As a result, the bag is heat-sealed. After a short cooling time, air flows back into the compartment, creating a loud noise. During this process, the bag suddenly contracts and encloses the food. The drawer's glass lid then opens.
Different degrees of vacuum can be created with vacuumsealing levels 1 to 3. The degrees that are reached here vary depending on the application: When vacuum-sealing in a container, the degrees of vacuum are lower and therefore better suited for particular food. When the external vacuuming adapter is attached, the vacuum
sealing drawer automatically detects which mode has just been activated.
| Vacuum-sealing levels | 1 | 2 | 3 |
| Vacuum-sealing in a bag | 80 % | 95 % | 99 % |
| Vacuum-sealing contain-ers and bottles | 50 % | 75 % | 90 % |
Vacuum-sealing Printer Assembly
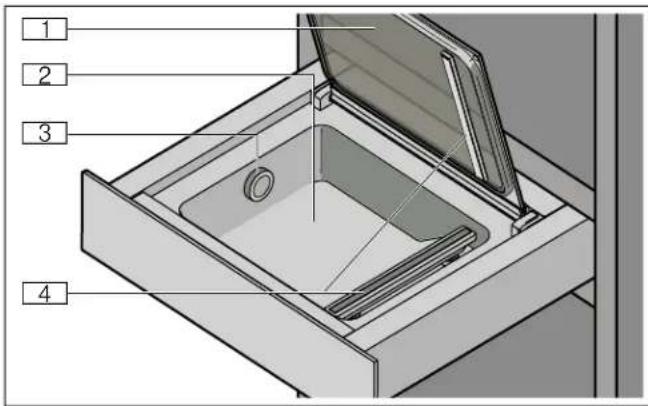
1Glass lid
2 Stainless steel vacuum-sealing compartment
3Airoutlet
4 Heat-sealing Bar
Control Panel

Symbol Explanation
1① Switch on/off Switch the appliance on and off
2 Vacuum-sealing Select the vacuum-sealing level level
3 Heat-sealing time Select a heat-sealing time
Heat-seal the vacuum-sealing bag early
4 Start Start the vacuum-sealing process
Stop Cancel the vacuum-sealing process
5 Dry Dry the pump
① Note Refer to the fault table
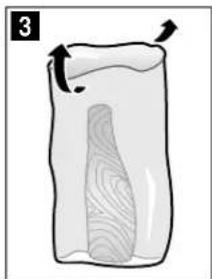
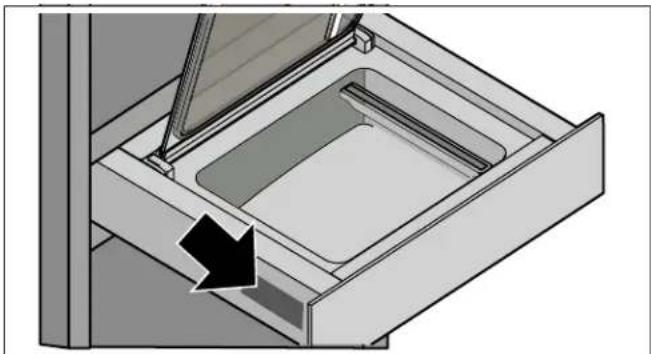
Opening and Closing
A section at the bottom of the appliance protrudes and this can be used as a handle for opening and closing.
Accessories
The following accessories are included with the vacuumsealing drawer.
| Vacuum-sealing platform The vacuum-sealing platform is used as a surface for flat food that is to be vacuum-sealed in the container. It can be opened. It contains the external vacuum-ing adapter, the bottle caps, the bottle adapter, and the vacuum hose. | |
| External vacuuming adapter The adapter is attached to the air outlet on the vacuum-sealing drawer to vacuum vacuum-sealing containers or bottles. | |
| Bottle caps Bottle caps are attached to bottles so that they can be vacu-umed and heat-sealed. | |
| Bottle adapter The bottle adapter is attached to the bottle caps so that they can be connected to the vac-um hose. | |
| Vacuum hose The vacuum hose connects the external vacuuming adapter to the vacuum-sealing container or the bottle cap. | |
| Vacuum-sealing Bags 180 x 280 mm (50 pcs) 240 x 350 mm (50 pcs) |
Special Accessories
You can purchase special accessories from customer service or from your specialty retailer:
| Accessories Specialty | retailer order number | Customer ser-vice order number |
| Vacuum-sealing bags, 7.1 inch x 11 inch (18 cm x 28 cm), 100 pcs | BA080670 00578813 | |
| Vacuum-sealing bags, 9.5 inch x 13.8 inch (24 cm x 35 cm), 100 pcs | BA080680 00578814 | |
| Handle, 23.62 inch (60 cm), stainless steel | BA476510 00478100 |
Only use the accessories as specified. The manufacturer is not responsible if accessories have been used incorrectly.
Turning the Appliance On and Off
Touch the ① symbol to turn the appliance on or off.
After approx. 10 minutes without any input, the appliance will automatically turn off.
Vacuum-sealing in a Bag
Vacuum-seal food in an appropriate vacuum-sealing bag in order to preserve the food for longer, marinate it, or prepare it for sous-vide cooking.
Appropriate Vacuum-sealing Bags
Use the original vacuum-sealing bags that are enclosed with the appliance or can be purchased as an accessory. These bags are suitable for a temperature range of -40^ - 212^ (-40^ - 100^) . This means that they can be used for storing food at low temperatures and also for cooking the vacuum-sealed food that is contained in the bags. The optimum heat-sealing time for this bag is level 2. The bags are microwaveable. Pierce the bag before you heat it up in the microwave.
Only use bags that are suitable for vacuum-sealing food. Commercially available products are different when it comes to the quality of the food, temperature resistance, material, and surface. Make sure that the bag is used only for the purpose for which it is intended.
The heat-sealing time for the vacuum-sealing bag always depends on the material from which it is made. In most cases, heat-sealing level 1 is sufficient for heat-sealing thin bags. Vacuum-sealing bags that are made from a thicker material require a longer heat-sealing time at heat-sealing level 2 or higher.
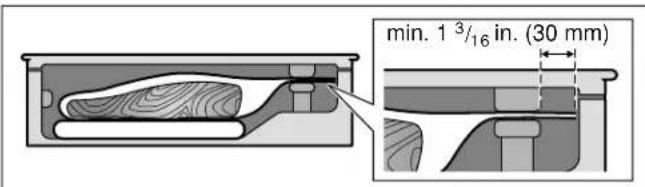
The length of the heat-sealing bar limits the size of the vacuum-sealing bag that can be used. You should therefore only use bags with a maximum width of 912 (240 mm).
en-us
Filling the Bag
Where possible, position the items of food in the vacuumsealing bag next to each other and not on top of each other.
To ensure a proper sealing seam, it is important that the edge of the bag is clean and dry. To ensure a proper seam during the heat-sealing process, it is important that there is no food residue around the seam on the edge of the bag. Before you fill the bag, you should therefore fold over its edge by approx. 114 (3 cm). Unfold the edge again once the bag has been filled.
To ensure that you can keep track of your bags and the food that is vacuum-sealed within them, we recommend that you make a note on the bag of the date of the vacuum-sealing along with the contents.
How to Proceed
-
Open the glass lid.
-
Place the vacuum-sealing bag in the compartment.
Note: Make sure that the food is at the lowest possible initial temperature - within the range of 34 - 46 °F (1 - 8 °C) is best.
- Make sure that the air outlet is not covered so that the pump can extract the air from the compartment.
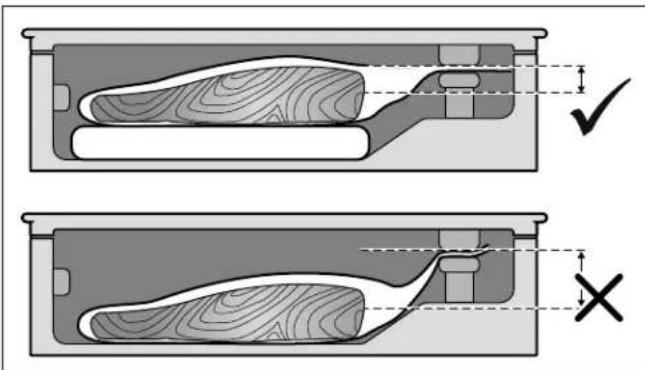
Make sure that the center of the bag and the ends of the bag lie flat on top of the heat-sealing bar. This ensures that the heat-sealing seam is properly closed.
Make sure that the open end of the bag protrudes over the heat-sealing bar by approx. 1^3 / 16 in (3cm) but that it is not resting on the lid seal.
- If required, use the vacuum-sealing platform so that the bag does not slip.
- Touch the symbol to select the vacuum-sealing level.
- Touch the symbol to select the heat-sealing time.
- Tightly close the glass lid and hold it there.
- Touch the symbol to start the vacuum-sealing process.
The vacuum-sealing process starts. The vacuum-sealing level indicators blink orange one after the other until the selected value has been reached.
The heat-sealing process starts. The vacuum-sealing level indicators blink orange one after the other until the selected level has been reached.
At the end of the process, the compartment is ventilated, and an acoustic signal sounds. You can now open the glass lid and remove the heat-sealed vacuum-sealing bag from the compartment.

WARNING
Risk of Burns!
The heat-sealing bar in the vacuum-sealing compartment becomes extremely hot if the appliance is used over an extended period of time and there are long heat-sealing times. Never touch the hot heat-sealing bar. Keep children away from the appliance.
Notes
- At the highest vacuum-sealing level, the process may last up to 2 minutes. After this time, the bag is heated and the vacuum-sealing level that is reached lights up.
- After vacuum-sealing, check the heat-sealing seam on the bag. Carefully try to pull the seam apart. If it comes apart, select a higher heat-sealing level and repeat the process. If the seam is deformed, it has become too hot. Select a lower heat-sealing level the next time or allow the appliance to cool.
- If you vacuum-seal food in bags several times in succession, the heat-sealing bar becomes increasingly hotter. This may impair the quality of the heat-sealing seam. After several vacuum-sealing processes, you should select a lower heat-sealing time or allow the appliance to cool for approx. 2 minutes between the processes.
Premature Heat-sealing
Use this function if you only want to pack your delicate food in a bag so that it is air-tight, without the contents sitting too tightly against the bag.
During the vacuuming process, touch the symbol to end the process and heat-seal the bag early.
The appliance displays the vacuum-sealing level until it is reached.
At the end of the process, the compartment is ventilated, and an acoustic signal sounds. You can now open the glass lid and remove the heat-sealed vacuum-sealing bag from the compartment.
Note: To heat-seal the bag, the vacuum-sealing drawer requires a specific vacuum level. If you touch the
symbol first, the vacuum-sealing drawer pumps air out of the compartment until this level has been reached. The bag is then heat-sealed.
Canceling the Vacuum-sealing Process
During the vacuuming process, touch the symbol to cancel the process.
The appliance displays the vacuum-sealing level until it is reached.
The bag is not heat-sealed. Slightly open the lid and ventilate the compartment. An acoustic signal sounds. You can now remove the vacuum-sealing bag from the compartment.
Vacuum-sealing in a Container
Vacuum-seal food in an appropriate vacuum-sealing container in order to preserve the food for longer.
Appropriate Vacuum-sealing Containers
Only use containers that are suitable for vacuum-sealing food. Commercially available products are different when it comes to the quality of the food and material.
The vacuum hose attached to this appliance has an internal diameter of 1/8 in. (3 mm). You may need an adapter for your container so that the hose fits. In many cases, these adapters are already included with the vacuum-sealing containers.
How to Proceed
- Open the glass lid.
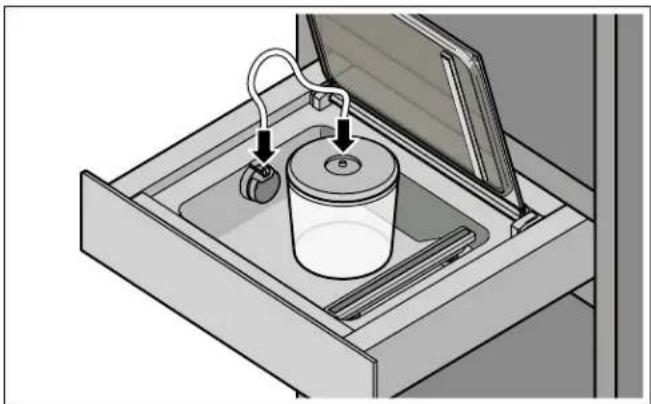
- Plug the vacuuming adapter into the air outlet.
- Secure the hose to the vacuuming adapter and vacuum-sealing container.
- Touch the symbol to select the vacuum-sealing level.
- Touch the symbol to start the vacuum-sealing process.
The vacuum-sealing process starts. The vacuum-sealing level indicators blink orange one after the other until the selected value has been reached.
The vacuum-sealing levels stop blinking as soon as the target value has been reached. The vacuum-sealing level that has been reached lights up and an acoustic signal sounds. You can now detach the hose from the container and the external vacuuming adapter.
Note: Cancel the vacuum-sealing process if large bubbles form.
Canceling the Vacuum-sealing Process
During the vacuuming process, touch the symbol to cancel the process.
The appliance displays the vacuum-sealing level until it is reached.
You can now detach the hose from the container and the external vacuuming adapter.
Carrying Out the Drying Process
When vacuum-sealing food, the smallest amount of water gets into the vacuum pump system. This effect occurs predominantly when you are vacuum-sealing liquids or extremely moist food. For this reason, the appliance comes with a drying function, which further removes any liquid that gathers in the pump.
If the symbol lights up in white, it is recommended that you carry out a drying process. However, at this point, you can continue to use the appliance as normal.
If the symbol lights up in red, you must carry out a drying process.
How to Proceed
- Tightly close the glass lid and hold it there.
- Touch the symbol.
The drying process starts and lasts between 5 and 20 minutes. During the procedure, the symbol blinks orange. You can close the vacuum-sealing drawer during the procedure.
At the end of the process, the compartment is ventilated, and an acoustic signal sounds. You can now open the glass lid.
Note: It may be the case that a single drying procedure is not sufficient. If, after one drying procedure, the symbols, in red and ① in orange, light up, there is still moisture in the pump system. Wait until the ① symbol no longer lights up and restart the drying process.
Applications
In this chapter, you will find out how you can use your vacuum-sealing drawer in different applications.
Vacuum-sealing for Sous-vide Cooking
You can use your vacuum-sealing drawer to prepare food for sous-vide cooking. Sous-vide cooking is a method of cooking "under a vacuum" at low temperatures between 125 - 200°F (50-95°C) and in 100% steam or in a water bath.
The vacuum-sealing drawer is used to heat-seal the food in a special air-tight, heat-resistant cooking bag.
WARNING
Health Risk!
Sous-vide cooking is a method of cooking at low temperatures. As a result, it is important that you always follow the application and safety instructions below:
- Only use high-quality, perfectly fresh food.
- Wash and disinfect your hands. Use disposable gloves or cooking/grill tongs.
Take extra care when preparing critical food, such as poultry, eggs, and fish.
Always thoroughly wash and/or peel fruit and vegetables.
Always keep work surfaces and cutting boards clean. Use different cutting boards for different types of food. - Maintain the cold chain. Make sure that you only interrupt it briefly to prepare the food, and then return the vacuum-sealed food to the refrigerator for storage before you cook it.
- Food is suitable for immediate consumption only. Once the food is cooked, consume it immediately. Do not store it after cooking - not even in the refrigerator. It is not suitable for reheating.
Vacuum-sealing Bags
Use the enclosed vacuum-sealing bags for sous-vide cooking. You can reorder the vacuum-sealing bags.
Do not cook food in the bag you bought it in (e.g. portions of fish). These bags are not suitable for sousvide cooking.
Where possible, position the items of food in the bag next to each other and not on top of each other.
en-us
Vacuum-sealing
Where possible, use the highest vacuum-sealing level to vacuum-seal the food. This is the only way to achieve even heat transfer and therefore the desired cooking result.
Before cooking the food, check whether the vacuum in the bag is intact. Make sure that:
There is no/hardly any air in the vacuum-sealed bag.
The seam is perfectly sealed.
There are no holes in the vacuum-sealed bag. Do not use the core temperature probe.
- Pieces of meat or fish that have been vacuum-sealed together are not pressed directly against one another.
- As much as possible, avoid piling up vegetables and desserts when vacuum-sealing them.
If in doubt, place the food into a new bag and vacuum seal it again.
Food should be vacuum-sealed at most one day before it is cooked. This is the only way to prevent the escape of gases from the food (e.g. from vegetables) which inhibit the transfer of heat, or to prevent the texture of the food from changing, and thus altering how it cooks.
Vacuum-sealing Glass Bottles
You can also use the vacuum-sealing drawer to vacuum and reseal glass bottles, e.g., bottles of cooking oil.
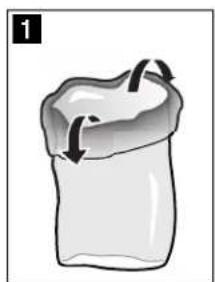
- Plug the vacuuming adapter into the air outlet. The outlet for the hose should point vertically upwards.
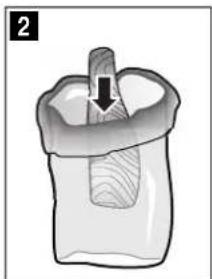
- Secure the bottle cap to the bottle opening. Push the bottle adapter onto the bottle cap.
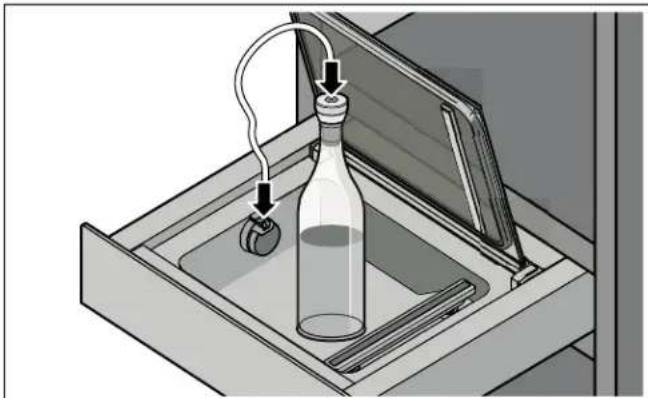
-
Secure the hose to the vacuuming adapter and the bottle adapter.
-
Touch the symbol to select the vacuum-sealing level.
Notes
- Always vacuum-seal bottles at the lowest level.
- Do not vacuum-seal any carbonated liquids, such as sparkling wine.
- Touch the symbol to start the vacuum-sealing process.
The vacuum-sealing process starts. The vacuum-sealing level indicators blink orange one after the other until the selected value has been reached.
The vacuum-sealing levels stop blinking as soon as the target value has been reached. The vacuum-sealing level that has been reached lights up and an acoustic signal sounds. You can now detach the hose from the bottle adapter and the external vacuuming adapter. You can now detach the bottle adapter from the bottle cap.
Fast Marinating and Flavoring
You can use your vacuum-sealing drawer to quickly add flavor to or marinate food such as meat, fruit, and vegetables. Marinating your food in the traditional way usually takes a long time and is not particularly intensive. When vacuum-sealing in a bag, the food's cell pores open and the marinade can be absorbed quickly. This produces a more intense taste in a shorter time.
Storage and Transportation
Extend the storage time for food. Thanks to the low-oxygen environment in the vacuum, freshly vacuum-sealed food remains edible for longer when it is stored correctly. Freezer burn is less likely to occur when the food has been frozen and vacuum-sealed.
Re-seal food in glass containers, such as jams and sauces. Vacuum-sealing significantly increases the storage time.
Notes
- You must make sure that the glass containers that are used are no taller than 3 1/8 in. (80 mm). Taller containers may damage the appliance's glass lid.
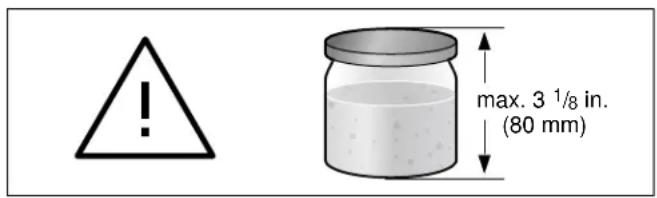
- Only use screw-top jars that are stable and intact.
- Only tighten the container by hand. The container is automatically sealed by the vacuum-sealing process.
Recommended Settings
When stored correctly, vacuum-sealed food stays fresh longer. At higher vacuum-sealing levels, the quality, appearance, and ingredients of the food are better preserved.
The following table provides you with recommendations for the vacuum-sealing levels for different foods. Observe the specific information on the recommended vacuum-sealing levels as well as on preparing the food.
- Not all jars or lids are suitable for being re-sealed under a vacuum. After the vacuuming process, check whether a vacuum has occurred: A lid that is curving inwards and can only be opened with a lot of force is an indication that the vacuuming process has worked. If the lid makes a "clicking" sound when it is pushed in and released and if it is easy to open, no vacuum has occurred. Repeat the vacuuming process or use more suitable screw-top jars.
Store food such as cheese, fish, or garlic without any unpleasant odors. The hermetic sealing that takes place during vacuum-sealing means that no unwanted odors can get out and the flavor cannot be absorbed by other food.
Sealed vacuum-sealing bags or vacuum-sealing containers are the ideal means of transport for liquid foods. They are easy to handle, leak-proof, and space-saving.
Notes
- Only use fresh food. Check the quality of the food before vacuum-sealing it.
Only vacuum-seal cold food - within a temperature range of 34 - 46 ^ F (1 - 8 ^ C ) is best. - Start at the lowest of the recommended vacuum-sealing levels.
- Check the quality of the food after you remove it from storage. Do not use any food that is of questionable quality.
| Recommended vacuum-sealing levels | Special instructions | |
| Food that is stored at room temperature, 68 - 73 °F (20 - 23 °C) | ||
| Baked goods 1, 2, 3 | ||
| Dry backed goods/Cookies 1 | ||
| Tea/Coffee 1, 2, 3 Store in a dark place | ||
| Rice/Pasta 2 Vacuum-seal in a container | ||
| Flour/Semolina 1 | ||
| Nuts without shell 3 Store in a dark place | ||
| Dried fruits 3 | ||
| Crackers/Chips 1, 2 Vacuum-seal in a container | ||
*Freeze the food laid out on a plate for approx. 1 hour to preserve its structure.
| Recommended vacuum-sealing levels | Special instructions | |
| Fresh food that has been frozen, 0 - 3 °F (-18 °C to -16 °C), or stored in a refrigerator, 37 - 45 °F (3 °C to 7 °C) | ||
| Fish 3 | ||
| Poultry 3 | ||
| Meat 3 | ||
| Whole sausage 3 | ||
| Sliced sausage 3 | ||
| Hard cheese 3 | ||
| Soft cheese 2 Vacuum-seal in a container | ||
| Vegetables 2 Peel and blanch beforehand | ||
| Washed salad greens 2 Vacuum-seal in a container | ||
| Herbs 1, 2 Vacuum-seal in a container | ||
| Fruit (hard) 3 | ||
| Fruit (soft) 2 Vacuum-seal in a container | ||
| Pre-frosting recommended* | ||
| *Freeze the food laid out on a plate for approx. 1 hour to preserve its structure. | ||
Cleaning and Maintenance
Only clean the appliance when it is turned off.
Ensure that the heat-sealing bar in the vacuum-sealing compartment has cooled down.
WARNING
Risk of Burns!
The heat-sealing bar in the vacuum-sealing compartment becomes extremely hot if the appliance is used over an extended period of time and there are long heat-sealing times. Never touch the hot heat-sealing bar. Keep children away from the appliance.
During cleaning, ensure that no water or other liquids get into the vacuum-sealing compartment or, in particular, into the vacuum pump's air outlet. Never spray the inside or outside of the appliance with water.
Do not use high-pressure cleaners or steam cleaners.
Only use natural cleaning agents, such as dish soap and water. Do not use any abrasive materials or cleaning agents that contain alcohol.
Clean the appliance using only a damp cloth.
Do not use any abrasive sponges that may scratch or any glass scrapers.
Note: Allow the appliance and accessory parts to fully dry after they have been cleaned.
Glass Front and Glass Lid
Clean the glass front and the glass lid with glass cleaner and a soft cloth.
Do not use any abrasive sponges that may scratch or any glass scrapers.
Stainless Steel Vacuum-sealing Compartment
Always remove flecks of limescale, grease, starch, and albumin (e.g., egg white) immediately. Corrosion can form under such flecks. Clean with water and some dish soap. Then dry the surface with a soft cloth.
Plastic Control Panel
Do not use any abrasive sponges that may scratch or any glass scrapers.
Heat-sealing Bar
Remove the remaining film from the heat-sealing bar.
Never use abrasive cleaning agents to clean the heat-sealing bar. Use a soft cloth.
The heat-sealing bar is not suitable for dishwashers.
Vacuum-sealing Platform
Rinse the vacuum-sealing platform by hand.
External vacuuming adapter, bottle adapter, and bottle caps
Rinse the adapters and bottle caps by hand. They are not suitable for dishwashers.
Vacuum Hose
Rinse the vacuum hose by hand. It is not suitable for dishwashers.
Before Calling for Service
Before calling customer service, consider the suggestions and instructions below:

CAUTION
Repairs should only be done by an authorized servicer.
Improper repair of your appliance may result in risk of severe physical injury or death.
Fault Error Causes Possible remedy
| The ① symbol will appear after a few seconds. | The vacuum cannot be created properly. | The glass lid has not been closed properly. | Open and close the glass lid again. When doing so, lightly press on the glass lid for the first few seconds. |
| The seal on the glass lid is not fitted properly or is malfunction-ing. | Check the seal. | ||
| The seal on the glass lid has mis-shaped. | Gently press the seal to straighten it out. | ||
| The lid on the external vacuum-sealing container has not been closed properly. | Check the position of the vacuum-sealing lid. Only use suitable vac-uum-sealing containers. | ||
| The external vacuum-sealing con- nection is not positioned cor- rectly on the vacuum-sealing chamber's air outlet. | Check the position of the external vacuum-sealing connection. | ||
| The ① symbol will appear after the pump has been running for 2 minutes. | It is taking too long to create a vacuum. Your selected vacuum-seal- ing level cannot be reached. | As the temperature rises, liquids begin to heat. At this point, the process of creating a vacuum stops. | Only vacuum-seal cold liquids. |
| If the vacuum-sealing chamber is wet, wipe it dry. | |||
| Heat-seal the vacuum-sealing bag early if large bubbles form. | |||
| Select a lower vacuum-sealing level. | |||
| The vacuum-sealing process will not start. The ▲ symbol does not appear even though the lid is closed. | The appliance is not detecting the lid. | The door switch on the glass lid is not working or is not being detected by the appliance. | Call Customer service. |
| If you try to operate the appliance several times in succession, the vac- uum-sealing process seems to run as normal but the bag is not heat- sealed. | The thermal switch on the heat- sealing transformer has been triggered. | Allow the appliance to cool for at least 10 minutes. Then try again. Allow the appliance to cool for at least 2 minutes between vacuum- sealing operations. | |
| The vacuum-sealing process is taking lon- ger and longer. | There is too much moisture in the pump system. | The appliance monitors the vac- uum-sealing as it progresses. If too much liquid is retained in the pump oil, the symbol will appear. Initiate drying. | |
| The pump system is extremely hot. | Allow the appliance to cool and then try again. | ||
| Fault Error Causes Possible remedy | |||
| After the drying procedure, the appliance displays the & and ① symbols. | One drying cycle alone was not sufficient. | Wait until the ① symbol is no longer lit up. Then start another drying cycle. | |
| The vacuum in the plastic bag is not retained. | The bag is bad. Sharp parts of the food (for example bones) may poke holes in the bag. | Check the bag for damage. Use a different bag if it is damaged. If the damage is caused by sharp-edged parts of the food, as far as possible, position these in the bag in such a way that they cannot damage the wall of the bag. | |
| The heat-sealed seam is bad. | The heat-sealing time you have selected is unsuitable for the plastic from which the bag is made. | Select a different heat-sealing time. | |
| There is liquid, grease or crumbs along the heat-sealed seam. The bag has creases along the heat-sealed seam. | Make sure that the bag is dry, that it has no creases, and that it is positioned fully on the heat-sealing bar. | ||
| Use a different bag. Fold over the edge of the bag by 1¼ in (3 cm) before you fill it. | |||
| The lid cannot be opened. | A slight vacuum has formed and it is holding the lid closed. | Do not use force or tools to open it. Initiate vacuum-sealing again and then cancel it immediately. | |
| Disconnect the appliance from the power supply. Wait 30 seconds and then start up the appliance again. | |||
| Touch the ① symbol for more than 5 seconds. The system is reset. | |||
Customer Service
If your appliance needs repairs, our Customer Service is there for you. We work hard to help solve problems quickly and without unnecessary service calls, getting your appliance back up and running correctly in the least amount of time possible.
When you call, please indicate the product number (E-Nr.) and serial number (FD-Nr.) so that we can support you in a qualified manner. You will find the type plate with these numbers at the inside of the appliance door. To avoid having to search for the information when you need it, you can enter your appliance data and the customer support telephone number here.
E-Nr. FD-Nr.
Customer Service
Please read the use and care manual provided with your appliance. Failure to do so may result in an error in using the appliance. This could result in a service call that instead of fixing a mechanical issue is only needed for customer education. Such calls are not covered by the appliance warranty.
Please find the contact data of all countries in the enclosed customer service list.
To book an engineer visit and product advice
USA 877 442 4436
toll-free
CANADA 877 442 4436
toll-free
You can rely on the manufacturer's expertise. Rest assured that the repair will be handled by trained service technicians who have the original replacement parts for your appliance.
Table des Matieres
1901 Main Street, Suite 600
Irvine, CA 92614
+1.877.442.4436
USA
www.gaggenau-usa.com
© 2017 BSH Home Appliances