
CI210510 - Coffee maker TEFAL - Free user manual and instructions
Find the device manual for free CI210510 TEFAL in PDF.
| Product type | Drip coffee maker with automatic programming |
| Brand | Tefal |
| Model | CI210510 |
| Capacity | 1 L (approx. 10 cups) |
| Dimensions (approx.) | 25 x 25 x 30 cm |
| Weight (approx.) | 2 kg |
| Power supply | 220-240 V, ~1000 W |
| Filter type | Paper filter #4 |
| Main functions | Auto shut-off after 2h, drip-stop, delay programming |
| Programming | Time and minutes setting, automatic programming (programmable models) |
| Carafe type | Glass carafe or thermal pot depending on model |
| Housing material | Plastic |
| Cleaning | Dishwasher-safe filter holder; wipe exterior with damp cloth |
| Descaling | Every 40 cycles with descaling agent or white vinegar |
| Safety | Filter holder locking, never immerse, auto shut-off |
| Included accessories | Measuring spoon, carafe (glass or thermal), filter holder |
| Warranty | Subject to regular descaling |
| Repairability | Authorized service center for any intervention |
| Country of origin | France |
| Repairability index | Not communicated |
Frequently Asked Questions - CI210510 TEFAL
User questions about CI210510 TEFAL
0 question about this device. Answer the ones you know or ask your own.
Ask a new question about this device
Download the instructions for your Coffee maker in PDF format for free! Find your manual CI210510 - TEFAL and take your electronic device back in hand. On this page are published all the documents necessary for the use of your device. CI210510 by TEFAL.
USER MANUAL CI210510 TEFAL
Français
Description
a Couvercle
b Réservoir
c Porte-filtre
d Plaque chauffante
natural_image
Symbol of a trash bin with crossed x- and y-axes, no text or labels presente On / off button or control panel
f Measuring spoon
g Jug or insulated pot (according to model)
Programmable models
h LCD screen
i On / off button
j AUTO button
k PRO button
I Programming indicator light (green)
m HR button
n MIN button
o On / off indicator light (red)
Safety recommendations
- Read the instructions for use carefully before using your appliance for the first time: the manufacturer does not accept responsibility for use that does not comply with the instructions.
- This appliance is not intended for use by persons (including children) with reduced physical, sensory or mental capacities, or lack of experience and knowledge, unless they have been given supervision or instruction concerning use of the appliance by a person responsible for their safety. Children should be supervised to ensure that they do not play with the appliance.
- Before plugging the appliance in, make sure that the power it uses corresponds to your electrical supply system and that the outlet is earthed.
Any error in the electrical connection will negate your guarantee.
- Your appliance is designed for domestic use only. Any commercial use, inappropriate use or failure to comply with the instructions, the manufacturer accepts no responsibility and the guarantee will not apply.
- Unplug the appliance when you have finished using it and when you clean it.
- Do not use the appliance if it is not working properly or if it has been damaged. If this occurs, contact an authorised service centre.
- All interventions other than cleaning and everyday maintenance by the customer must be performed by an authorised service centre.
- Do not use the appliance if the power cord or• Wait a few minutes before preparing another plug is damaged. The power cord must be pot of coffee. replaced by an authorised centre to prevent any danger. For the programmable model:
- Do not immerse the appliance, power cord or plug in water or any other liquid.
- Do not leave the power cord within reach of children.
- The power cord must never be close to or in contact with the hot parts of your appliance, near a source of heat or over a sharp edge.
- For your safety, only use the manufacturer's accessories and spare parts designed for your appliance.
- Do not pull on the cord to unplug the appliance.
- Do not use the jug or the insulated pot over a flame or on the hob of a cooker.
- Do not pour water into the appliance if it is still hot.
• Always close the lid (a) when running the coffee maker. - All appliances are subject to strict quality control procedures. These include actual usage tests on randomly selected appliances, which would explain any traces of use.
- Never place your jug or your insulated pot in microwave oven, in a dishwasher or on a cooking hob.
- Never put your hand inside the insulated pot.
- Do not use the jug or the insulated pot without their lid.
- Wait a few minutes before preparing another pot of coffee.
- Plug in the coffee maker; the LCD (h) screen displays 12:00.
- Press the "PRO" button for 3 seconds; the screen stops flashing and displays "set time".
- Press the "HR" button to set the hour. Holding down the button allows you to scroll through the number rapidly.
- Press the "MIN" button to set the minutes.
ce. Holding down the button allows you to scroll a through the numbers rapidly. - Validate the setting by pressing the "PRO" till button for 3 seconds once again.
- Press the red “💡” button; the red indicator light comes on and the coffee maker begins to run.
e. Press the “💡” button again to stop operation.
a Press the "PRO" button twice; the screen displays "set time". - Press the "HR" button to set the hour.
- Press the "MIN" button to set the minutes.
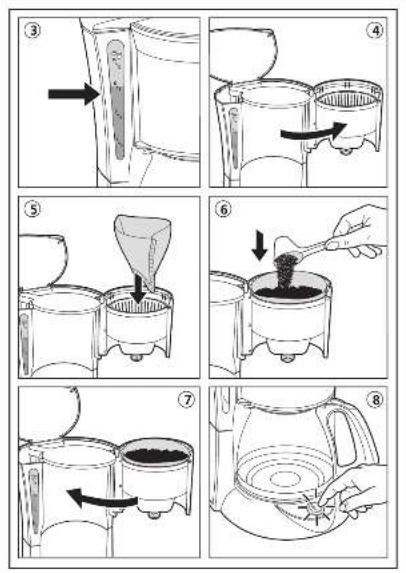
Before using for the first time
- Run the coffee maker for the first time without coffee, rinsing the circuit with 1 litre of water
Making coffee
(Follow illustrations 1 to 8)
- Use cold water only and a No. 4 paper filter. not use the insulated pot without its top.
- Do not exceed the maximum amount of water indicated on the water tank level indicator.
- This coffee maker is equipped with a drip-stop feature so that you can serve a cup of coffee before all the water has finished flowing through. Return the jug or the insulated pot to its base quickly to avoid spillage.
- For better heat preservation, rinse the insulated pot with hot water before use.
- The lid of the insulated pot must be locked securely in place toward the right to the stop prepare coffee and to keep it hot.
To serve coffee, press the lever on the lid of the insulated pot downwards.
For the programmable model:
Setting the time:
Operation in manual mode:
Operation in programming mode:
^1 Validate the setting by pressing the “PRO” button again. The screen displays the current time once more.
- Press the "AUTO" button to activate the programming. The green indicator light comes on.
At the programmed time, the red indicator light comes on and the coffee maker begins to run.
- Press the “💡” button to stop operation.
- You can cancel the programming at any time by pressing the "AUTO" button. The green Do indicator light goes out. Reactivate the programming by pressing the "AUTO" button again.
Remark on the two modes: The coffee maker automatically stops running after 2 hours if you have not stopped it at the end of the cycle with the “” button.
Cleaning
- To dispose of the used coffee grounds, remove the filter holder (c) from the coffee maker.
o. tOnplug the appliance. - Do not clean the appliance while hot.
e Clean with a damp cloth or sponge. - Never put the appliance in water or under running water.
- The filter holder can be washed in the dishwasher.
Descaling
- Descale your coffee maker after every 40 cycles.
You can use:
- a packet of limescale remover diluted in 2 large cups of water.
• or 2 cups of white vinegar. - Pour into the tank (b) and switch the coffee maker on (without coffee).
- Let the equivalent of one cup flow into the jug or the insulated pot (g), then switch off.
- Leave to act for one hour.
- Switch the coffee maker back on to run the rest of the liquid through.
- Rinse the coffee maker by running 1 litre of water through it 2 or 3 times.
The guarantee does not cover coffee makers that do not work properly or do not work at all because they have not been descaled.
Accessories
Insulated pot
Glass jug
Troubleshooting
- Check:
• that it is plugged in properly. - that the switch or the On / off button (red indicator light on) is in the "ON" position.
- that the filter holder is locked in place correctly.
- The water flow-through time is too long or makes too much noise:
• descale your coffee maker.
If your appliance still doesn't work please contact an authorised service centre.
natural_image
Symbol of a trash bin crossed with diagonal lines, no text or labels presentEnvironment protection first!
①Your appliance contains valuable materials which can be recovered or recycled.
Leave it at a local civic waste collection point.
HELPLINE:
If you have any product problems or queries, please contact our Customer Relations Team first for expert help and advice:
0845 602 1454 - UK
(01) 475 1947 – Ireland
Nederlands
Beschrijving
a Deksel
b Reservoir
c Filterhouder
d Warmhoudplaat
e Aan/uit-knop of display
f Maatschepje
natural_image
Symbol of a trash bin with crossed lines indicating no waste or discharge (no text or labels)natural_image
Symbol of a trash bin with crossed lines indicating no waste or discharge (no text or labels)natural_image
Pure electrical circuit lines without any symbolsnatural_image
Pure electrical circuit lines without any symbolsnatural_image
Simple line drawing of a trash bin with crossed lines indicating no waste or discharge (no text or symbols)I Lysindikator for programmering (grønn)
m HR-tast
n MIN-tast
o På/av-indikator (rød)