X91384MD02 - Basket AEG - Free user manual and instructions
Find the device manual for free X91384MD02 AEG in PDF.
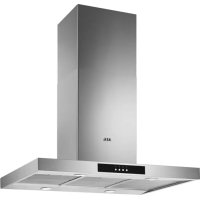
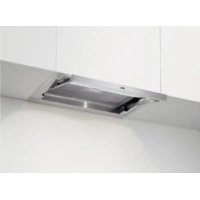
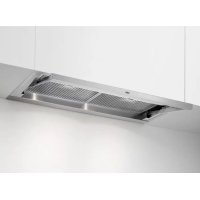
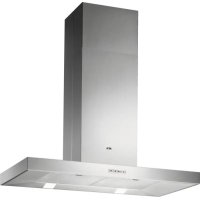
| Technical Features | AEG X91384MD02 kitchen hood, wall-mounted type, with LED lighting, aluminum grease filter. |
|---|---|
| Dimensions | Width: 90 cm, depth: 50 cm, height: 70 cm. |
| Airflow | Up to 700 m³/h for effective odor extraction. |
| Power Levels | 3 power levels + intensive mode. |
| Filtration | Dishwasher-safe washable charcoal and grease filters. |
| Usage | Operation in exhaust or recirculation mode depending on installation. |
| Maintenance | Filters to be cleaned regularly, maintenance of LED lighting. |
| Safety | Overheat protection, automatic shutdown in case of overheating. |
| Warranty | 2 years manufacturer warranty. |
| General Information | Complies with European standards, modern and elegant design. |
Frequently Asked Questions - X91384MD02 AEG
Download the instructions for your Basket in PDF format for free! Find your manual X91384MD02 - AEG and take your electronic device back in hand. On this page are published all the documents necessary for the use of your device. X91384MD02 by AEG.
USER MANUAL X91384MD02 AEG
Thank you for choosing this AEG product. We have created it to give you impeccable performance for many years, with innovative technologies that help
spend a few minutes reading to get the very best from it.
appliances looking spotless and working perfectly. Along with a wide range of accessories designed and built to the high quality standards you would expect, from specialist cookware to cutlery baskets, from bottle holders to delicate laundry bags… Visit the webshop at: www.aeg.com/shop ENVIRONMENT CONCERNS Recycle the materials with the symbol Put the packaging in applicable containersto recycle it. Help protect the environment and human health and to recycle waste of electricaland electronic appliances. Do not dispose appliances marked with the symbol with the household waste. Return the product to your local recycling
We recommend the use of original spare parts. When contacting Service, ensure that you have the following data available The information can be found on the rating plate. Model ___________________________ PNC ____________________________ Serial Number ____________________3 ENGLISH
1. RECOMMENDATIONS AND
SUGGESTIONS The Instructions for Use apply to several ver- sions of this appliance. Accordingly, you may
The manufacturer will not be held liable for any damages resulting from incorrect or improper installation. The minimum safety distance between the cooker top and the extractor hood is 650 mm (some models can be installed at a lower height, please refer to the paragraphs on work- ing dimensions and installation). Check that the mains voltage corresponds to
inside of the hood. For Class I appliances, check that the domestic power supply guarantees adequate earthing.
through a pipe of minimum diameter 120
possible. Do not connect the extractor hood to exhaust ducts carrying combustion fumes (boilers,
If the extractor is used in conjunction with non-electrical appliances (e.g. gas burning ap-
be guaranteed in the room in order to prevent
have an opening communicating directly with the open air in order to guarantee the entry of clean air. When the cooker hood is used in con- junction with appliances supplied with energy other than electric, the negative pressure in the room must not exceed 0,04 mbar to prevent fumes being drawn back into the room by the cooker hood. In the event of damage to the power cable, it must be replaced by the manufacturer or by the technical service department, in order to prevent any risks. Connect the hood to the mains through a two-pole switch having a contact gap of at least 3 mm.. If the instructions for installation for the gas hob
has to be taken into account. Regulations con-
The extractor hood has been designed ex- clusively for domestic use to eliminate kitchen smells. Never use the hood for purposes other than for which it has been designed.
when it is in operation.
bottom of the pan only, making sure that it does not engulf the sides. Deep fat fryers must be continuously monitored during use: overheated oil can burst into
This appliance is not intended for use by per- sons (including children) with reduced physical, sensory or mental capabilities, or lack of experi- ence and knowledge, unless they have been given supervision or instruction concerning use of the appliance by a person responsible for their safety. Children should be supervised to ensure that they do not play with the appliance. “ CAUTION: Accessible parts may become hot when used with cooking ap-pliances”.
Switch off or unplug the appliance from the mains supply before carrying out any mainte- nance work. Clean and/or replace the Filters after the speci-
- W not washable and cannot be regenerated, and must be replaced approximately every 4 months of operation, or more frequently with heavy usage. - Z every 2 months of operation, or more fre- quently for particularly heavy usage, and can be washed in a dishwasher. - Control lights, if present. Clean the hood using a damp cloth and a neutral liquid detergent.
AB CD FE A: Hood Functions On/Off. When the button is touched with the hood turned off, all functions light up (intensity 50%) and are enabled. When the button is touched with the hood in operation, all functions are turned off and disabled (Motor Off + Lights Off). B: Manages motor speed: 0-V1-V2-V3-V4-P. When the area is touched, the motor starts at the speed required. P = Intensive Speed, timed for 5 minutes, after which the system returns to the previous speed. When activated from Motor Off it returns to speed V1.When the required speed is touched, it will become brighter (intensity 100%) than the other functions (intensity 50%). C: Delay function. Touching this button activates automatic shutdown of the Motor, the Fans and the Lighting with a 10 minute delay. It can only be activated with the motor on, running at any speed except Intensive, and with the Sensor = Off. Enables / Disables the Remote Control Receiver. When this button is pressed and held for 4 seconds (Motor Off + Lights Off, in the absence of other alarms, the Led will light up for: 4 seconds to indicate that the Remote Control has been Activated 2 seconds to indicate that the Remote Control has been Deactivated. D: Sensor. In this mode the Hood operates automatically for a maximum of 5 hours, after which it switches the Motor off. The
Buttons B and C do not work. The function is disabled by pressing the Button or turning the hood off. E: Manages Lighting Intensity: 0-L1-L2-L3-LMax. When this area is touched, the Lights turn on at the required intensity. When the lighting intensity is touched, it will become brighter (intensity 100%) than the other functions (intensity 50%). F: Filter ResetResets the Filter Saturation alarm when the button is touched with the motor and lighting turned off. After 100 hours operation the Led lights up continuously to indicate saturation of the Metal Grease Filters. After 200 hours
saturation of the Activated Charcoal Filters. Enables/Disables the Activated Charcoal Filter Alarm. When this button is pressed and held for 4 seconds(Motor Off + Lights Off), in the absence of other alarms, the Led will light up for: 4 seconds to indicate the Activated Charcoal Filter Alarm has been activated 2 seconds to indicate the Activated Charcoal Filter Alarm has been deactivated. After connecting the hood to the mains, the commands are activated after 4seconds. When the Hood is switched off, none of the functions is displayed, and only the normal lettering on the control panel is visible. All the rest will light up (intensity 50%) when button A is touched. The controls are activated by touching the selected function, which will light up more brightly (intensity 100%) with respect to the other hood functions (intensity 50%). When no commands are given for at least 10 seconds, only the selected functions will be lighted (Intensity 100%) and all the rest will turn off (Intensity 50%). After 7 hours in operation, if no further commands are given the hood will switch off (Motor Off + Lights Off), from here you can touch for activated the function, and the next touch you can select the desired function.It is possible to activate one of the hood functions (Speed and Lighting) not just by touching the control
panel and sliding it towards the chosen5 ENGLISH function without lifting it off. If the motor and
all the command LEDs will remain on at 50%, and if no further commands are given in the next 10 seconds, then all the LEDs will be turned off with the exception of the “0” LEDs, which will remain on for a further 15 minutes.
5. HOOD OPTIONS IN SEN
SOR MODE When operating in Sensor mode, the type
Initially it is set to electric hob. To change the setting, proceed as follows: Turn the hood off using the hood on/off button Press and hold the Sensor button for
Remove power for 10 seconds and then reconnect it. The calibration procedure is carried out every time the type of hob is changed. Calibration procedure: every time the hood is turned on or the type of hob is changed, the sensor calibration procedure is run. During this time the hood must not be used for cooking or subjected to particularly intense smells, for example solvents or detergents. This process requires: 13 minutes if the electric hob has been
on the sensor button, if it has been pressed. Do not turn the motor on during calibration.
Warning: Do not spray directly on the grill
cleaning products but only clean with a cloth soaked in detergent. Avoid cleaning the grill alcohol or silicone products.
white LED lamp classed as 1M according to EN 60825-1: 1994 + A1:2002 + A2:2001
@439nm: 7µW. Do not look directly at the light through optical devices (binoculars, magnifying glasses…). For replacement contact technical support. (“To purchase contact technical support”).6 www.aeg.com
(Motore Off + Luci Off).