
MWL 20 BI - Microwave Oven TEKA - Free user manual and instructions
Find the device manual for free MWL 20 BI TEKA in PDF.
| Type of product | Built-in microwave oven |
| Brand | Teka |
| Model | MWL 20 BI |
| Overall dimensions (W x H x D) | 595 x 390 x 320 mm |
| Cavity dimensions (W x H x D) | 305 x 210 x 280 mm |
| Capacity | 18 L |
| Net weight | 18.6 kg |
| Power supply | 230 V ~ 50 Hz |
| Total power consumption | 2200 W |
| Microwave power | 800 W |
| Grill power | 1050 W |
| Microwave frequency | 2450 MHz |
| Microwave power levels | 5 (150 W, 290 W, 460 W, 650 W, 800 W) |
| Cooking functions | Microwave, Grill, Microwave + Grill (combined), Defrost |
| Control type | Rotary knobs (function and timer) |
| Timer | Up to 30 minutes with audible signal |
| Interior light | Oven lamp |
| Included accessories | Glass turntable, turntable support, metal rack |
| Cavity material | Enamelled stainless steel |
| Door type | Glass with safety seals |
| Safety | Child safety lock (not specified but standard), automatic stop when door opens, overheating protection |
| Cleaning and maintenance | Clean with damp cloth and mild detergent; do not use abrasive products or steam cleaner |
| Reparability | Repairs only by authorized technician; lamp and power cord to be replaced by after-sales service |
Frequently Asked Questions - MWL 20 BI TEKA
User questions about MWL 20 BI TEKA
0 question about this device. Answer the ones you know or ask your own.
Ask a new question about this device
Download the instructions for your Microwave Oven in PDF format for free! Find your manual MWL 20 BI - TEKA and take your electronic device back in hand. On this page are published all the documents necessary for the use of your device. MWL 20 BI by TEKA.
USER MANUAL MWL 20 BI TEKA
Instructions for Use EN
Mode d'Emploi FR
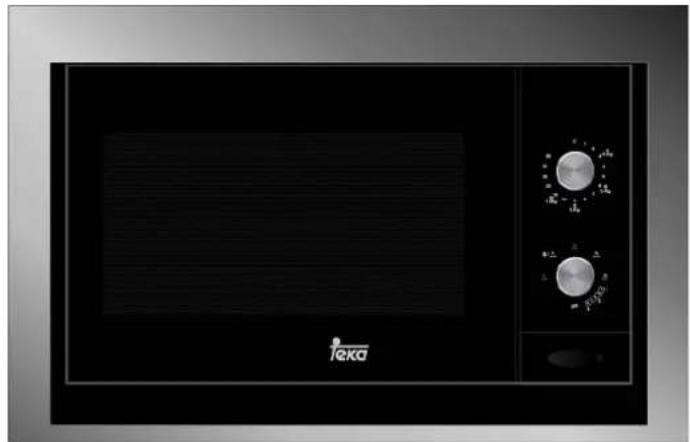
MWL 20 BI

Verehrter Kunde,
First of all, we would like to thank you for preferring our product. We are sure that this modern, functional and practical microwave oven, manufactured with the highest quality materials, will live up to your expectations.
Please read the instructions in this book carefully, as they will help you to get better results in using your microwave oven.
PLEASE KEEP THE DOCUMENTATION ON THIS PRODUCT FOR FUTURE REFERENCE.
Keep your instructions manual close at hand. If you give the appliance to another person, remember to give them the corresponding manual as well!
Tips on environmental protection
Eliminating the packaging

The packaging carries the Green Dot. Use the right bins when discarding all of the packaging materials, such as the cardboard, styrene and plastic films. This will ensure that the packaging materials are recycled.
Disposal of old electrical appliances
The European Directive 2002/96/EC on Waste Electrical and Electronic Equipment (WEEE), requires that old household electrical appliances must not be disposed of in the normal unsorted municipal waste stream. Old appliances must be collected separately in order to optimise the recovery and recycling of the materials they contain and reduce the impact on human health and the environment.
The crossed out "wheeled bin" symbol on the product reminds you of your obligation, that when you dispose of the appliance it must be separately collected.
Consumers should contact their local authority or retailer for information concerning the correct disposal of their old appliance.
Before you dispose of your appliance, remove the power cable, cut it and dispose of it.
Table of contents
Safety tips. 26
Installation instructions 28
Description of the appliance 29
Advantages of the microwave oven 30
Microwave oven operating mode 30
Why the food is heated 30
Instructions for use 31
Function: Microwave 31
Function: Grill 32
Function: Microwave + Grill 32
Operating time 32
During operation 33
Interrupting function 33
End of Function: 33
Defrosting 34
General tips for defrosting 35
Cooking with microwaves 36
Important tips! 37
Tables and suggestions - Cooking vegetables 38
Tables and suggestions - Cooking fish 38
Cooking with Grill 39
Tables and suggestions - Grill without microwave 40
Tables and tips - Microwave and grill. 41
What type of containers may be used? 42
Microwave function 42
Test the dishes 42
Grill function. 42
Combined function 42
Aluminium containers and foils 42
Lids 42
Table - dishware 43
Cleaning and care 44
Troubleshooting 45
Technical Features 46
Description of functions of buttons 46
Specifications 46
EN Safety tips
!
- Warning! In order to avoid any type of flame, only use the microwave when you are there to supervise. Very high power levels or very long cooking times may heat the food to excess and cause fires.
- If you see smoke or fire, keep the door closed, to put out the flames. Switch off the appliance and remove the plug from the socket.
- Warning! This appliance is not intended for use by persons (including children) with reduced physical, sensory or mental capabilities; or lack of experience and knowledge, unless they have been given supervision or instruction concerning use of the appliance by a person responsible for their safety.
- Warning! Children should be supervised to ensure that they do not play with the appliance.
- Warning! Considerable care is required when the grill is functioning. Keep children away from the appliance!
- Our appliances meet the necessary regulations and rules for technical equipment. However, these do not cover all the possible accident risks.
- When using inflammable materials, such as plastics or paper containers, to heat or cook foods, the cooking process must be monitored on a continuous basis, because of the risk of fire.
- Before using dishes or containers in the microwave, check if they are microwave-saving. Only use microwave-safe dishes.
-
The power cable should not touch damp, sharp-edged objects or the appliance when it is hot.
-
When connecting electrical appliances in the vicinity of the microwave, ensure that the power cables do not touch the microwave when it is hot and that they do not get caught in the oven door, in order to avoid damage and danger.
-
Pay attention to operating faults. The appliance may not be used in the following cases:
-
If the door does not close properly;
- If the door-hinges are damaged;
- If the contact surfaces between the door and the front are damaged;
- If the glass in the window is damaged;
- If there is often an electrical arch inside the oven, without the presence of any metallic object.
- The ventilation holes may not be covered.
Cleaning / maintenance:
- Before carrying out any maintenance or cleaning, remove the plug from the socket.
- Please remember the cleaning tips contained in the section "Cleaning and care".
- Do not use harsh abrasive cleaners or sharp metal scrapers to clean the oven door glass since they can scratch the surface, which may result in shattering of the glass.
- The contact surfaces (the front of the cavity and the inside of the door) must be kept quite clean in order to guarantee correct functioning. Clean the contact surfaces with a neutral detergent and a cloth that does not scratch or cause any type of friction.
- Warning: Never use the appliance if the contact surfaces are damaged. Only use the appliance again if it has been repaired by a technician from the Technical Support Service.
Safety tips
The following tips avoid damage to the appliance:
- Do not switch on the appliance without the turntable support and respective plate.
- Do not switch on the appliance when it is empty. This may result in overload, if there is no food inside.
- Only use microwave-safe dishes.
- Do not keep any inflammable object inside the oven, because it may go on fire when the oven is switched on.
- Eggs with shells and whole boiled eggs should not be heated in microwave ovens because they may explode.
- Do not heat pure alcohol or alcoholic drinks in the microwave.
THIS IS A FIRE HAZARD.
- Warning: do not heat liquids or other foods in closed containers, because they could easily explode.
Be careful when heating liquids!
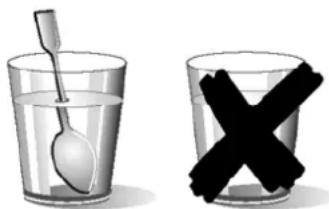
- When heating liquids (water, coffee, tea, milk, etc.), they may almost reach boiling point inside the appliance and if they are removed suddenly, may fly out of the container. This may cause injuries and burns!
- In order to avoid this type of situations, put a plastic spoon or glass rod in the container when heating liquids.
Be careful!
- When heating small amounts of food, it is very important not to select long periods of time or very high power levels, because the food may overheat or burn. For example, bread may burn after 3 minutes if a very high power level is selected.
- To toast, only use the grill function and supervise the oven at all times. If you are using the combined function (microwave and grill) to toast, the bread will go on fire in a very short period of time.
- Always heat baby food in jars or bottles without lids or teats. After heating the food, shake or stir it well to ensure that the heat is uniformly distributed. Check the temperature of the food before giving it to the child, Burning hazard!
In case of repair:
- iWarning - Microwaves! The outer protection should not be removed. Any repair or maintenance carried out by persons that have not been authorised by the manufacturer is dangerous.
- Warning: The light bulb may only be replaced by the Technical Support Service.
- If the power cable is damaged, only the Technical Support Service may replace it with one of the same characteristics, in order to avoid damage.
- Repairs and maintenance, especially of charged parts, may only be carried out by technicians that have been authorised by the manufacturer.
EN Installation instructions
Use the "open" button to open the door and remove all packaging materials. Then clean the inside and the accessories with a damp cloth and dry them. Do not use abrasive or strong-smelling products.
Ensure that the following parts are in good condition:
- Door and hinges
- Front of the microwave
- Inner and outer surfaces of the appliance
DO NOT USE THE APPLIANCE if you notice any kind of defect in the aforementioned parts. If this occurs, contact the Technical Support Service.
Place the appliance on a stable, flat surface.
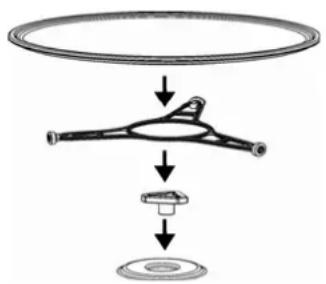
Fit the motor coupling in the centre of the microwave cavity and place the turntable support and the turntable plate on top until it clicks into position. Whenever the microwave is used, both the rotating plate and the respective base must be inside the oven and correctly positioned. The rotating plate turns clockwise and anti-clockwise.
Warning! The microwave oven may be wrapped in a protective film. Before switching it on for the first time, carefully remove this film, starting at the underside.
In order to ensure proper ventilation for the appliance, install the microwave in a kitchen unit with an opening on the top (see attached sheets).
Warning: after installing the microwave, it is necessary to guarantee access to the electrical socket.
During installation, ensure that the power cable does not come into contact with the back of the appliance, because the high temperatures may damage the cable.
If you are installing a microwave and a conventional oven in the same column, the microwave must not be placed under the oven, because of the formation of condensation.
The appliance must not be placed in the vicinity of heating elements, radios or television sets.
The appliance is equipped with a power cable and a plug for single phase current.
WARNING: The microwave MUST ONLY BE CONNECTED TO GROUNDED ELECTRICAL SOCKETS.
In case of fault, the manufacturer and the seller will not accept any responsibility if the installation instructions have not been properly followed.
Description of the appliance
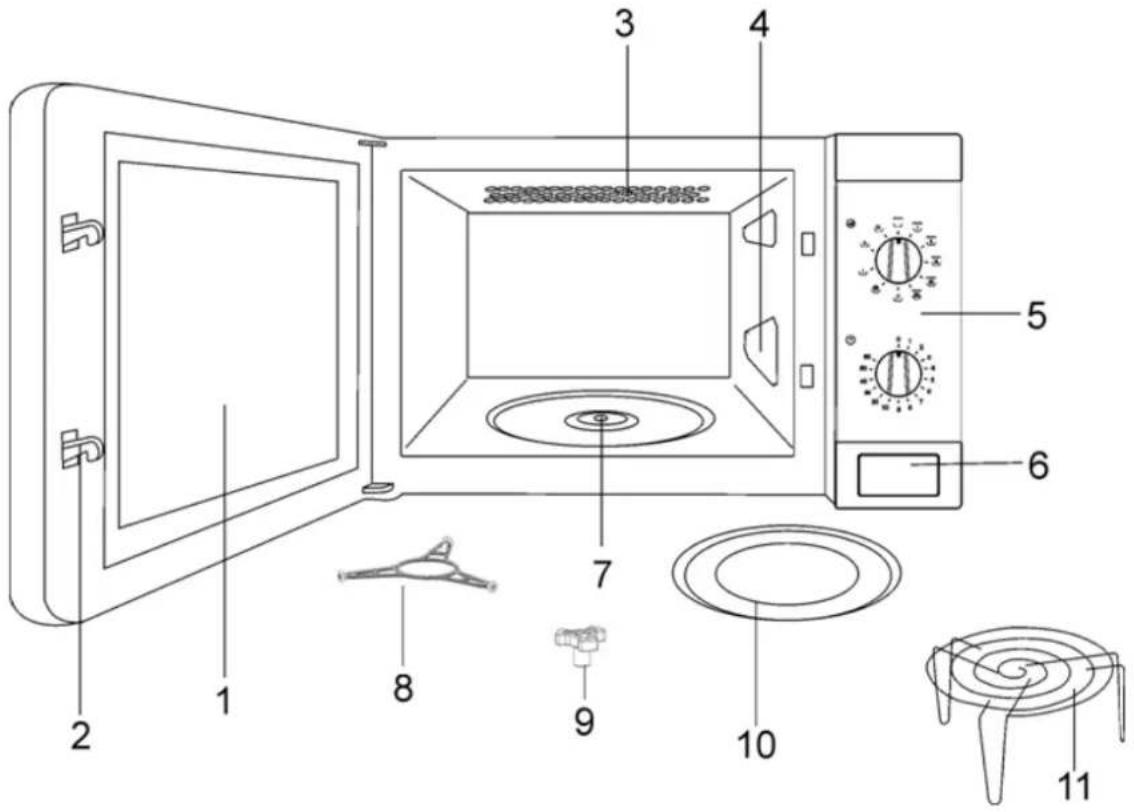
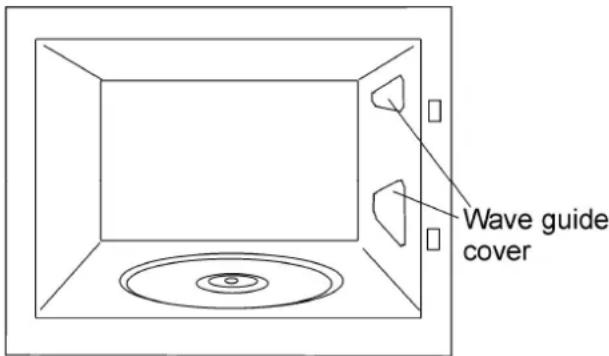
- Glass window on the door 6. Open button
2.Catch 7.Slot for the motor coupling - Quartz grill 8. Turtable support
- Mica covers 9. Motor coupling
-
Control panel 10. Rotating plate
-
Grille
EN
Advantages of the microwave oven
In a conventional cooker, the heat that is radiated through the resistances or gas burners slowly penetrates the foods from the outside in. Therefore, there is a great loss of energy in heating the air, the oven components and the containers holding the food.
In the microwave, the heat is generated by the foods themselves, i.e. the heat goes from the inside out. There is no loss of heat to the air, the walls of the cavity or the containers (as long as they are microwave-safe containers). This means that only the food is heated.
To sum up, microwave ovens have the following advantages:
- Savings in cooking time; in general, there is a 3/4 reduction in time compared to conventional cooking.
- Ultra fast defrosting of foods, thus reducing the danger of bacteria developing.
- Energy-saving.
- Conservation of the nutritional value of foods due to the reduction in cooking time.
Microwave oven operating mode
The microwave oven contains a high voltage valve called a Magnetron, which converts the electrical energy into microwave energy. These electromagnetic waves are channelled towards the inside of the oven by a wave guide and distributed using a metallic disperser or a rotating plate.
Inside the oven, the microwaves are propagated in all directions and reflected by the metallic walls, thus uniformly penetrating the foods.
Why the food is heated
Most foods contain water and the water molecules vibrate with the microwaves.
The friction between the molecules generates heat, which raises the temperature of the foods, defrosting or cooking them or keeping them hot.
Because heat is formed inside the foods:
- The foods may be cooked without any liquids or oils, or with very little of these;
- Defrosting, heating or cooking in the microwave oven is faster than in a conventional oven;
- The vitamins, minerals and nutritious substances are conserved;
- Neither the natural colour nor the aroma are altered.
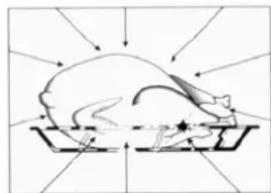
The microwaves go through porcelain, glass, cardboard or plastic, but not trough metal. For this reason, metallic containers or containers with metallic parts should not be used in the microwave oven.
Microwaves are reflected by metal...
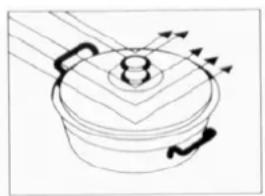
... they go through glass and porcelain...
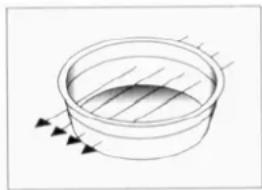
... and are absorbed by the foods.
Instructions for use
Warning! Never use the microwave when it is empty, i.e. when it does not contain any food.
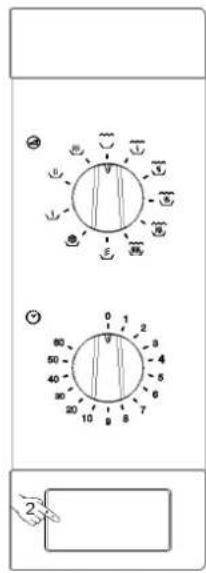
Look at the diagram and proceed as follows:
- Plug the appliance into an appropriate electrical socket (see tips on the last page).
- To open the door, press the OPEN BUTTON. The inside lighting of the microwave comes on.
- Place the container with the food on the plate or on the grille.
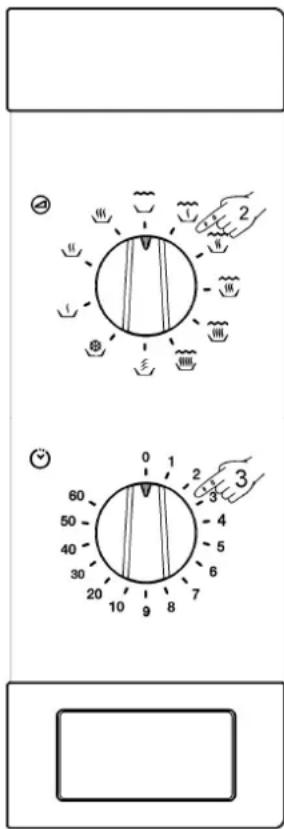
- Select the function and the cooking time, according to the description contained in the following sections.
- Close the door.
- The microwave starts to function.
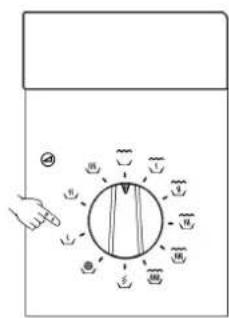
Function: Microwave
Set the function selector to the position that corresponds to the desired power level, according to the following table (See the Technical Features section).
| Position | Power level | Power | ||
| Maximum | 800 | W | ||
| Medium | 650 | W | ||
| Minimum | 460 | W | ||
| Defrost | 290 | W | ||
| Keep Warm 150 W | ||||
EN Instructions for use
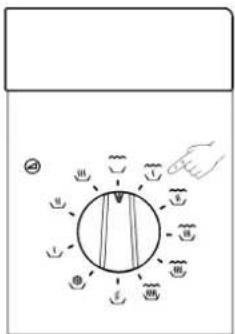
Function: Grill
Set the function selector to the appropriate position
The oven has a temperature limiting device that controls the electrical resistances, connecting and disconnecting them to keep the temperature within certain limits.
We recommend that the grille be used to bring the foods closer to the grill and thus obtain better results.
Function: Microwave + Grill
Set the function selector to the position that corresponds to the desired power level, according to the following table (See the Technical Features section).
| Position Power level Power | ||
| 5 | 800 | |
| 4 | 680 | |
| 3 | 530 | |
| 2 | 390 | |
| 1 | 240 | |
Operating time
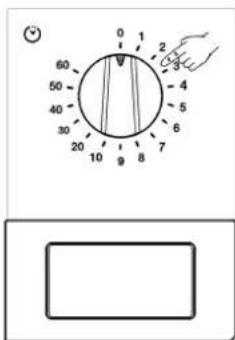
The desired operating time is selected by turning the timer button.
For times under 2 minutes, turn the timer button to a higher time and then go down to the desired time.
As long as the timer button reads other than zero, the oven light should be on.
When the operating time is over, the timer emits a beep and automatically disconnects the oven.

During operation...
It is possible to change the operating time, the power level or the function while the oven is functioning, by turning the respective control.
It is possible to open the door of the oven at any moment while the foods are being cooked. In this case:
- THE PRODUCTION OF MICROWAVES IS AUTOMATICALLY INTERRUPTED;
- The grill switches off, but remains very hot;
- The timer stops automatically, indicating the operating time that is left.
If you wish, you may:
- Move or turn the foods around to improve uniformity of the heating process;
- Select another function, placing the function selector in another position;
- Change the operating time that is left, by turning the Timer Button.
Close the door again. The oven starts to function.
Interrupting function
To interrupt the functioning of the microwave, turn the Timer Button to ZERO or open the door. If you wish to cancel the cooking process, turn the Timer Button to ZERO and close the door.
WARNING: When you finish using the oven, always turn the Timer Button to zero, because otherwise the oven will start to function when you close the door and may be damaged if it functions when empty.
End of Function:
When the set time has elapsed, the oven beeps and the Timer Button read ZERO.
EN Defrosting
The following table is a general guideline for the various defrosting and resting times required (to guarantee that the food reaches a uniform
temperature) according to the type and weight of the foods. It also contains the respective recommendations for defrosting different foods.
| Food | Weight | Defrosting Time | Resting time | Comment |
| Pieces of meat, veal, beef,pork | 100 g | 3-4 min | 5-10 min | Turn around 1 x |
| 200 g | 6-7 min | 5-10 min | Turn around 1 x | |
| 500 g | 14-15 min | 10-15 min | Turn around 2 x | |
| 700 g | 20-21 min | 20-25 min | Turn around 2 x | |
| 1000 g | 29-30 min | 25-30 min | Turn around 3 x | |
| 1500 g | 42-45 min | 30-35 min | Turn around 3 x | |
| Stewed meat | 500 g | 12-14 min | 10-15 min | Turn around 2 x |
| 1000 g | 24-25 min | 25-30 min | Turn around 3 x | |
| Minced meat | 100 g | 4-5 min | 5-6 min | Turn around 1 x |
| 300 g | 8-9 min | 8-10 min | Turn around 2 x | |
| 500 g | 12-14 min | 15-20 min | Turn around 2 x | |
| Sausage | 125 g | 3-4 min | 5-10 min | Turn around 1 x |
| 250 g | 8-9 min | 5-10 min | Turn around 1 x | |
| 500 g | 15-16 min | 10-15 min | Turn around 1 x | |
| Poultry, poultry parts | 200 g | 7-8 min | 5-10 min | Turn around 1 x |
| 500 g | 17-18 min | 10-15 min | Turn around 2 x | |
| Chicken | 1000 g | 34-35 min | 15-20 min | Turn around 2 x |
| 1200 g | 39-40 min | 15-20 min | Turn around 2 x | |
| 1500 g | 48-50 min | 15-20 min | Turn around 2 x | |
| Fish | 100 g | 3-4 min | 5-10 min | Turn around 1 x |
| 200 g | 6-7 min | 5-10 min | Turn around 1 x | |
| Trout | 200 g | 6-7 min | 5-10 min | Turn around 1 x |
| Shrimps | 100 g | 3-4 min | 5-10 min | Turn around 1 x |
| 500 g | 12-15 min | 10-15 min | Turn around 2 x | |
| Fruit | 200 g | 4-5 min | 5-8 min | Turn around 1 x |
| 300 g | 8-9 min | 10-15 min | Turn around 2 x | |
| 500 g | 12-14 min | 15-20 min | Turn around 3 x | |
| Bread | 100 g | 2-3 min | 2-3 min | Turn around 1 x |
| 200 g | 4-5 min | 5-6 min | Turn around 1 x | |
| 500 g | 10-12 min | 8-10 min | Turn around 2 x | |
| 800 g | 15-18 min | 15-20 min | Turn around 2 x | |
| Butter | 250 g | 8-10 min | 10-15 min | Turn around 1 x, keep covered |
| Cottage cheese | 250 g | 6-8 min | 5-10 min | Turn around 1 x, keep covered |
| Cream | 250 g | 7-8 min | 10-15 min | Remove the lid |
Defrosting
General tips for defrosting
- Only use microwave-safe dishes for defrosting (porcelain, glass, suitable plastic).
- The tables refer to defrosting of raw foods.
- The defrosting time depends on the quantity and the height of the food. When freezing foods, prepare for the defrosting process. Distribute the food in parts that match the size of the container.
- Distribute the food as well as possible inside the microwave. The thickest parts of the fish or the chicken legs should be placed on top. The most delicate parts may be protected using aluminium foil. Important: the aluminium foil should not come in contact with the walls of the cavity, as this could cause an electrical arch.
- The most dense parts should be turned around several times.
- Distribute the frozen food in the most uniform manner possible, because the thin, narrow parts defrost fast than the thickest parts at the top.
-
Foods that are rich in fats, such as butter, cottage cheese and cream, should not be entirely defrosted. If they are at room temperature, they will be ready to serve within a few minutes. In the case of deep-frozen cream, if there are little bits of ice, the cream should be whipped before eating.
-
Place poultry on a turn over plate so that the juices may drain more easily.
- Bread should be wrapped in a napkin so that it does not get too dry.
- Remove frozen foods from its packaging and do not forget to remove any metal clips. If the containers that are used to keep the foods in the freezer may also be used for heating and cooking, just remove the lid. Otherwise, place the foods in containers that are suitable for microwave ovens.
- The liquid that results in the defrosting process, particularly in the case of poultry, should be discarded and under no circumstances should it come in contact with other foods.
- Bear in mind that a resting period is required in defrosting function, so that the food is totally defrosted. This normally takes between 15 to 20 minutes.
EN Cooking with microwaves
Before using a container, check if it is suitable for using in a microwave oven (see: "What kind of containers may be used?").
Cut the food before starting to prepare it.
When heating liquids, use containers with a large neck, so that the steam may evaporate easily.
Prepare foods according to the tips and pay attention to the cooking times and power levels indicated in the tables.
Remember that the values given are merely a guideline and that they may vary depending on the initial state, temperature, humidity and type of food. We recommend that the times and power levels be adjusted to each situation. Depending on the food, the cooking time should be extended or shortened and the power level should be raised or reduced.
Cooking with microwaves...
-
The greater the quantity of food, the longer the cooking time. Remember the following rules:
-
Double the quantity - double the time
-
Half the quantity - half the time
-
The lower the temperature, the longer the cooking time.
- Liquid foods heat faster.
- Proper distribution of the food on the rotating plate facilitates uniform cooking. If the solid foods are placed on the outer part of the plate and the least solid in the middle of the plate, it will be possible to heat different kinds of food at the same time.
- The door of the appliance may be opened at any time. The appliance is automatically switched off. The microwave only continues to function if the door is closed.
- Foods that are covered require less cooking time and their characteristics are better preserved. The lid must allow the microwaves to pass through and should have little openings to allow the steam to come out.
Cooking with microwaves
Important tips!
- Eggs with shells and whole eggs should not be heated in microwave ovens as they may explode.
- Before heating or cooking foods with shells or skin (e.g., apples, tomatoes, potatoes, sausages) prick them with a fork so that they do not open up.
- When foods are prepared with very little humidity (e.g. defrosting bread, making popcorn, etc.), the humidity evaporates very fast. The appliance then functions with a vacuum and the food may be carbonised. This situation may cause damage to the appliance and to the container being used. Therefore, the oven should be set only for the necessary time and the cooking process should be supervised.
It is not possible to heat large quantities of oil (fry) in the microwave. - Do not heat liquids in airtight containers. Explosion hazard!
- Do not heat pure alcohol or alcoholic drinks in the microwave.
- Do not heat any kind of explosive material or liquid in the microwave.
-
Remove precooked foods from the packaging, because the latter is not always heat-resistant. Follow the manufacturer's instructions.
-
If there are various different containers, such as cups for example, place them uniformly on the rotating plate.
- Always heat baby bottles or jars of baby food without lids or teats. After heating, shake or stir it well to ensure that the heat is uniformly distributed. The temperature of the containers is considerably lower than that of the heated food. Check the temperature of the food before giving it to the child, to avoid burns.
- Plastic bags should not be closed with metal clips, but with plastic ones. The bag should be perforated several times so that the steam may come out easily.
- When heating or cooking foods, ensure that they reach a minimum temperature of 70^ .
- During the cooking process, water vapour may form on the glass window of the door and may drip down after a time. This is a normal situation and may even be significant if the room temperature is low. This does not represent a hazard for the safety of the appliance. After cooking, clean the water resulting from the condensation.
EN Cooking with microwaves
Tables and suggestions - Cooking vegetables
| Food | Quantity (g) | Added liquid | Power (Watt) | Position | Time (min.) | Resting time (min.) | Tips |
| Cauliflower | 500 | 1/8 l | 800 | 9-11 | 2-3 | Spread some butter on top. Cut in slices. | |
| Broccoli | 300 | 1/8 l | 800 | 6-8 | 2-3 | ||
| Mushrooms | 250 | - | 800 | 6-8 | 2-3 | ||
| Peas & carrots, frozen carrots | 300 | ½ cup | 800 | 7-9 | 2-3 | Cut in cubes or slices. | |
| 250 | 2-3 soup-spoonfuls | 800 | 8-10 | 2-3 | |||
| Potatoes | 250 | 2-3 soup-spoonfuls | 800 | 5-7 | 2-3 | Peel, cut in equal-sized parts. | |
| Peppers | 250 | - | 800 | 5-7 | 2-3 | Cut in pieces or slices. | |
| Leeks | 250 | ½ cup | 800 | 5-7 | 2-3 | ||
| Frozen Brussels sprouts | 300 | ½ cup | 800 | 6-8 | 2-3 | ||
| Cabbage | 250 | ½ | cup | 800 |
Tables and suggestions - Cooking fish
| Food | Quantity (g) | Power (Watt) | Position | Time (min.) | Resting time (min.) | Tips |
| Filletts of fish | 500 | 650 | 10-12 | 3 | Cook with the lid on. Turn them around when half the time has elapsed. | |
| Whole fish 800 | 800 | 3-5 | Cook with the lid on. Turn them around when half the time has elapsed. It may be necessary to cover the ends of the fish. | |||
| 460 | 10-12 | 2-3 |
Cooking with Grill
In order to get the best results from the grill, use the grille that is supplied along with the appliance.
Place the grille in such a position so that it does not come into contact with the metallic surfaces of the cavity, as there is the danger of an electrical arch being formed, which could damage the appliance.
IMPORTANT TIPS:
- When the microwave is being used for the first time, it produces some smoke and a smell, which occur because of the use of oils during the manufacture process.
- After the grill has been used for the first time, it is normal that the area with the holes that protects the grill resistances should start to deform slightly and turn a golden colour, due to the high temperatures.
-
The glass in the door reaches very high temperatures while the grill is being used. In order that the appliance be out of reach of children, it should be situated at a minimum height of 80~cm .
-
While the grill is operating, the walls of the cavity and the grille reach very high temperatures. The use of oven gloves is recommended.
- During a longer use of the grill, it is normal for the resistances to switch off on a temporary basis, due to the safety thermostat.
- Important: when the food is grilled or cooked in containers, it is important to check if the container is suitable or not. See the table on the types of dishes!
- When using the grill, the splashes of grease may reach the resistance and be burned. This is a normal situation and does not represent any operating fault.
- After each cooking process, clean the inside and the accessories, to prevent the dirt from sticking.
EN Cooking with Grill
Tables and suggestions - Grill without microwave
| Food | Quantity (g) | Time (min.) | Tips |
| Fish | |||
| Dorada | 800 | 18-24 | Spread a light layer of butter on the fish. |
| Sardine/red scorpion fish | 6-8 Units | 15-20 | When half the time has elapsed, turn them around. |
| Meat | |||
| Sausage | 6-8 Units | 22-26 | Prick with a fork half way through the cooking process and turn them around. |
| Frozen hamburger | 3 Units | 18-20 | |
| Entrecote (approx. 3 cm thick) | 400 | 25-30 | Half way through the process, spread a little oil or butter on it and turn it around. |
| Others | |||
| Toast | Supervise the brownitng process. | 1½-3 | |
| Grilled sandwiches | 2 Units 5-10 | Supervise the browning process. | |
Heat the grill for 2 minutes before use. If there is no reason not to do so, use the grille. The times that are indicated are merely indicative and they may vary depending on the composition and the quantity of food, as well as on the desired results. Fish and meat will taste best if they are coated in a little vegetable oil, herbs and spices and left to marinade for a few hours before being grilled. The salt should only be added after cooking on the grill.
Sausages will not open if they are picked with a fork before being grilled.
Half way through the grill process, supervise the cooking and if necessary, turn the food around or add a little more oil.
The grill is particularly suitable for preparing thin pieces of meat and fish. Thin pieces of meat need only be turned once, while larger pieces will need to be turned several times. In the case of fish, we recommend that the two ends of the fish be joined together, the mouth and the tail before placing on the grille.
Cooking with Grill
Tables and tips - Microwave and grill
The microwave with grill function is ideal for cooking fast and browning meat at the same time. It may also be used to prepare foods "au gratin".
The microwave and the grill function on an alternate basis. The microwaves cook and the grill browns the food.
| Dish | Quantity (g) | Type of container | Power (Watts) | Position | Time (min.) |
| Pasta "au gratin" | 500g | Low dish | 390 | 12-17 | |
| Potatoes "au gratin" | 800g | Low dish | 800 | 20-22 | |
| Lasagne | approx. 800 g | Low dish | 800 | 15-20 | |
| Cottage cheese "au gratin" | approx. 500 g | Low dish | 680 | 18-20 | |
| 2 fresh chicken drumsticks (on the grille) | 200 g each | Low dish | 530 | 8-10 | |
| Meat round | approx. 500 g | Tall, wide container | 680 | 17-19 | |
| Onion soup "au gratin" 2 200g cups Soup bowls 530 | 2-4 | ||||
Before using dishes and containers in the microwave, check that they are microwave-safe. Only use dishes that are microwave-safe.
The dishes used in the combined function must be suitable for both microwave and grill. See the table on the types of dishes to be used.
Remember that the values provided are merely indicative in nature and that they may vary depending on the initial state, the temperature, humidity and the type of food.
If the time is not sufficient to brown the food properly, set the grill function for 5 or 10 minutes more.
"Au gratin" dishes and poultry require between 3 and 5 minutes more cooking time, so that the temperature is distributed uniformly in the food.
If there are no instructions to the contrary, the rotating plate should be used in the cooking process.
The values indicated in the tables are valid for when the cavity is cold (no preheating required in advance).
EN What type of containers may be used?
Microwave function
In the microwave function, it is important to remember that the microwaves are reflected by metallic surfaces. Glass, porcelain, ceramic, plastic and paper will allow the microwaves to pass through.
Therefore, metallic pans and dishes for cooking or containers with metallic components or decorations may not be used in the microwave. Glassware and ceramic with metallic decorations or parts (e.g. lead glass) may not be used.
The ideal materials to be used for cooking in a microwave oven are refractory, heat-resistant glass, porcelain or ceramic. Very fine crystal and porcelain should only be used for a short time, to defrost or reheat foods that have already been cooked.
Test the dishes
Place the dish inside the oven at the maximum power level for 20 seconds. If it is cold or not very hot, it is suitable. However, if it gets very hot or causes an electrical arch, it is not suitable.
Hot foods transmit heat to the dish, which may become very hot. Therefore, always use a glove!
Grill function
In the case of the grill function, the dish must be resistant to temperatures of at least 250^ .
Plastic dishes are not suitable.
Combined function
In the combined function, the dishes that are used must be suitable for both microwave and grill cooking.
Aluminium containers and foils
Precooked foods in aluminium containers or wrapped in aluminium foil may be placed in the microwave oven if the following instructions are followed:
- Pay attention to the manufacturer's instructions that are printed on the packaging,
Aluminium containers should not be higher than 3cm and they should not come into contact with the walls of the cavity (minimum distance 3cm ). The aluminium lid should be removed. - Place the aluminium container directly on the rotating plate. If the grille is used, the container should be placed on a porcelain plate. Never put the container directly on the grille!
- The cooking time will be longer because the microwaves only enter the food from above. In case of doubt, only use microwave-safe dishes.
Aluminium foil may be used to reflect the microwaves during the defrosting process. Delicate foods, such as poultry or minced meat, may be protected from excessive heat by covering the respective ends. - Important: the aluminium foil must not come into contact with the walls of the cavity, as this could cause an electrical arch.
Lids
The use of glass or plastic lids or adherent film is recommended, for the following reasons:
- They prevent excessive evaporation (especially in very long cooking periods);
- The cooking process is faster;
- The food does not go dry;
- The aroma is preserved.
The lid should have holes to avoid any type of pressure from building up. Plastic bags should also have openings. Baby bottles and baby food jars and other similar containers must only be heated without the lid, as they might explode if it is left on.
The following table gives general guidelines on the type of dishes that are suitable for each situation.
What type of containers may be used?
Table - dishware
| Type of dish\Operating mode | Microwave | Grill | Microwave + Grill | |
| Defrost / heat | Cook | |||
| Glass and porcelain 1)Domestic, non fire-resistant, may be washed in dishwasher | yes | yes | no | |
| Glazed ceramicFire-resistant glass and porcelain | yes | yes | yes | yes |
| Ceramic, earthenware dishes unglazed glazed without metallic decorations | yes | yes | no | |
| Earthenware dishes glazed unglazed | yes no | yes no | no no | no no |
| Plastic dishes 2)heat-resistant up to 100°Cheat-resistant up to 250°C | yes yes | no yes | no no | no no |
| Plastic films 3)Cling film Cellophane Paper, cardboard, parchment 4) | no yes | no yes | no no | no no |
| yes | no | no | ||
| Metal Aluminium foil Aluminium containers 5)Accessories (grille) | yes no | no yes no | yes yes yes | no yes yes |
| no | no | yes | yes | |
-
No golden or silver edges and no lead glass.
-
Remember the manufacturer's tips!
-
Do not use metal clips to close the bags. Perforate the bags. Use films only to cover foods.
-
Do not use paper plates.
-
Only shallow aluminium containers without lids. The aluminium must not come into contact with the walls of the cavity.
EN Cleaning and care
BEFORE CLEANING the microwave,ENSURE THAT THE PLUG IS NOT IN THE SOCKET.
After using the appliance, let it cool off. Do not clean the appliance with abrasive cleaning products, scourers that will scratch the surface or sharp objects.
Outer surface:
- Clean the outer surface with a neutral detergent, lukewarm water and a damp cloth.
- Do not allow water to pass through the outer structure.
Inside:
- After each use, clean the inside walls with a damp cloth.
- Do not allow water to enter the ventilation holes of the microwave oven.
- If it has been some time since the last cleaning and the cavity of the microwave oven is dirty, put a glass of water on the tray and connect the microwave at maximum power for 4 minutes. The steam that is released will soften the dirt, which will be easy to clean with a soft cloth.
Important! The appliance should not be cleaned with steam cleaning machines. The steam may reach the charged parts and cause a short circuit.
The most soiled stainless steel surfaces may be cleaned using a non-abrasive cleaning product.
Then they should be rinsed with hot water and dried well.
- Clean accessories after each use. If they are very dirty, steep them first and then use a brush and a sponge. The accessories may be washed in the dishwasher. Ensure that the rotating plate and respective base are always clean.
Door, door-hinges and front of the appliance:
- These parts must always be clean, especially the contact surfaces between the door and the front of the appliance, so that there are no leaks.
- To clean, use a neutral detergent and lukewarm water. Dry with a soft cloth.
Mica covers:
Always keep the mica covers clean. Food remaining in the covers may deform it or produce sparks if they go on fire. Therefore, they should be cleaned on a regular basis, but abrasive cleaning products or sharp objects should not be used. Do not remove the covers, to avoid any risk.
Troubleshooting
The appliance does not function properly:
Is the power plug correctly inserted in the socket?
- Is the door properly closed? The door should make an audible click when it closes.
- Are there any foreign bodies between the door and the ring?
The foods do not heat up or they heat very slowly:
- Did you use a metallic dish by mistake?
- Did you select the right operating time and power level?
- Did you place a larger or colder amount of food than usual in the microwave?
The food is too hot, dry or burned:
- Did you select the right operating time and power level?
There are noises while the appliance is in operation:
- Is there an electrical arch inside the microwave?
Is the dish coming into contact with the walls of the cavity? - Are there loose skewers or spoons inside the microwave?
The inside lighting does not come on:
If all of the functions are operating correctly, the bulb is probably blown. You may continue to use the appliance.
- The light bulb may only be replaced by the Technical Support Service.
The power cable is damaged:
- The power cable must be replaced by the manufacturer, authorised agents or technicians that are qualified to perform this task, in order to avoid dangerous situations and because special tools are needed.
If any other type of fault is noticed, contact the Customer Support Service.
All repairs must be performed by specialised technicians.
EN Technical Features
Description of functions of buttons
| Symbol | Description | Power | Foods |
| Keep hot | 150W | Slow defrosting for delicate foods, keeping food hot | |
| Defrost | 290W | Cooking at low heat, boiling rice Fast defrosting | |
| Minimum | 460W | Melting butter Heating baby food | |
| Medium | 650W | Cooking vegetables and other foods Cooking and heating carefully, Heating and cooking small quantities Heating delicate foods | |
| Maximum | 800W | Cooking and heating liquids and other foods fast | |
| 1 | 240W | Browning toast | |
| 2 | 390W | Grilling poultry and meat | |
| 3 | 530W | Cooking meatloaves and “au gratin” dishes | |
| 4 | 680W | Preparing meat round | |
| 5 | 800W | Potatoes “au gratin” | |
| Grill | --- | Grill all sorts of foods |
Specifications
- AC voltage. See characteristics plate
- Fuse. 12A/250V
Power required 2200 W - Grill power. 1050 W
- Microwave output power. 800 W
- Microwave frequency. 2450 MHz
- Outer dimensions (W × A × D) 595 × 390 × 320 mm
Cavity dimensions (W× A× D) 305x210x280mm
Oven capacity. 181
Weight 18,6 kg
Cher Client,
Country Subsidiary Address City Phone
| AustriaKüppersbusch Austria | Eitnergasse, 13 | 1231 Wien | +43 18 668 022 |
| BelgiumKüppersbusch Belgium S.P.R.L. | Doomveld Industrie, Asse 3, No. 11 - Boite 7 | 1731 Zellik | +32 24 668 740 |
| BulgariaTeka Bulgaria EOOD | Blvd. "Tsarigradsko Shosse" 135 | 1784 Sofia | +359 29 768 330 |
| ChileTeka Chile S.A. | Avd El Retiro Parque los Maitenes, 1237. Parque Enea | Pudahuel, Santiago de Chile | + 56 24 386 000 |
| ChinaTeka International Trading (Shanghai) Co. Ltd. | 6/F. Datong Business Center, No. 369 Fixing Middle Rd. | 200025 Shanghai | +86 2 153 076 901 |
| Czech RepublicTeka CZ S.R.O. | V Holesovickách, 593 | 182 00 Praha 8 - Liben | +420 284 691 940 |
| DenmarkJuvél A/S | Københavnsvej 222 | DK-4600 Køge | +45 36 340 288 |
| EcuadorTeka Ecuador S.A. | Parque Ind. California 2, Via a Daule Km 12 | Guayaquil | +593 42 100 311 |
| GermanyTeka Kühentechnik GmbH | Sechsheldener Str. 122 | 35708 Haiger | +49 27 713 950 |
| Great BritainTeka Products Ltd. | 177 Milton Park | 0X14 4SE Milton, Abingdon | +44 1 235 861 916 |
| GreeceTeka Hellas A.E. | Thesi Roupaki - Aspropyrgos | 193 00 Athens | +30 2 109 760 283 |
| HungaryTeka Hungary Kft. | Bajcsy Zsilinszky u. 53 | 1065 Budapest | +36 13 542 110 |
| IndonesiaPT Teka Buana | Jalan Menteng Raya, Kantor Taman A9 Unit A3 | 12950 Jakarta | +62 215 762 272 |
| MalaysiaTeka Kühentechnik (Malaysia) Sdn Bhd | 10 Jalan Kartunis U1/47, Temasya Park, Off Glenmarie | 40150 Shah Alam, Selangor Darul Ehsan | +60 376 201 600 |
| MexicoTeka Mexicana S.A. de C.V. | Ferrocarril 200, Esquina Norte 29, Col. Moctezuma | 15500 Mexico D.F. | +52 5 551 330 493 |
| MoroccoTeka Maroc S.A. | 73, Bd. Slimane, Depôt 33, Route de Ain Sebaa | Casablanca | +212 22 674 462 |
| NetherlandsTeka B.V. | Wijkermeerstraat, 34 | 2131 HA Hoofddorp | + 31 235 656 480 |
| NorwayIntra, A.S | Storsand | 7563 Malvik | +47 73 980 100 |
| PolandTeka Polska Sp. ZO.O. | ul. 3-go Maja 8 / A2 | 05-800 Pruszków | +48 227 383 270 |
| PortugalTeka Portugal S.A. | Estrada da Mota - Apdo 533 | 3834-909 Ilhavo, Aveiro | +35 1 234 329 500 |
| RomaniaS.C. Teka Kühentechnik Romania S.R.L. | Sevastopol str., no 24, 5th floor, of. 15 | 010992 Bucharest Sector 1 | +40 212 334 450 |
| RussiaTeka Rus LLC | Barklaya str. 6, bld. 3, Barklay plaza center, office 402 | 121087 Moscow Å~™ Russia | +7 4 956 450 064 |
| SingaporeTeka Singapore PTE Ltd | Clemenceau Avenue, 83, 01-33/34 UE Square | 239920 Singapore | +65 67 342 415 |
| SpainTeka Industrial, S.A. | C/ Cajo,17 | 39011 Santander | +34 942 355 050 |
| SwedenIntra Möntorp AB | Säbyvägen, 8 | 734 93 Kolbäck | +46 22 040 300 |
| ThailandTeka (Thailand) Co. Ltd. | 364/8 Sri-Ayuttaya Road, Phayathai, Ratchatavee | 10400 Bangkok | +66 -26 424 888 |
| TurkeyTeka Teknik Mutfak Aletleri Sanayi Ve | Büyük dere Cad. 24/13 | 80290 Mecidiyeköy, Istanbul | +90 2 122 883 134 |
| UkraineTeka Ukraine LLC | 86-e, Bozhenko Str .2nd floor,4th entrance | 03150 Kyiv | +380 444 960 680 |
| United Arab EmiratesTeka Middle East Fze | Building LOB 16, Office 417 | P.O. Box 18251 Dubai | +971 48 872 912 |
| United Arab EmiratesTeka Kühentechnik U.A.E LLC | Bin Khedia Centre | P.O. Box 35142 Dubai | +971 42 833 047 |
| VenezuelaTeka Andina S.A. | Ctra. Petare-Santa Lucia, km 3 (El Limoncito) | 1070 Caracas | +58 2 122 912 821 |
| VietnamTEKA Vietnam Co., Ltd. | 803 Dai Minh Convention Tower, 8th Floor | 77 Hoang Van Thai, District 7, Ho Chi Minh | +84 854 160 646 |