
MZ-R4ST - MiniDisc Player SONY - Free user manual and instructions
Find the device manual for free MZ-R4ST SONY in PDF.

| Product Type | Portable MiniDisc Player/Recorder |
| Brand | Sony |
| Model | MZ-R4ST |
| Dimensions (L x W x H) | 130 x 80 x 30 mm |
| Weight | 300 g (with batteries) |
| Power | 2 AA batteries or 3 V AC adapter |
| Battery Life | Approximately 6 hours recording, 8 hours playback |
| Supported Formats | Standard MiniDisc (recording and playback) |
| Main Functions | Digital recording, playback, track editing, search |
| Audio Inputs | Stereo microphone, line input (mini-jack) |
| Audio Outputs | Stereo headphone jack, line output |
| Display | LCD liquid crystal display |
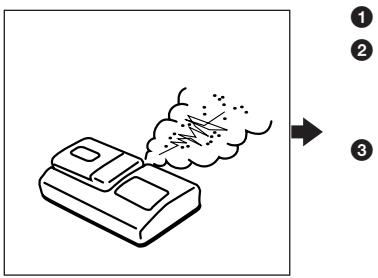
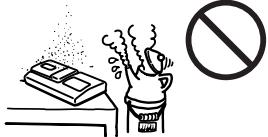
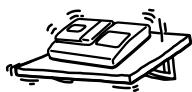
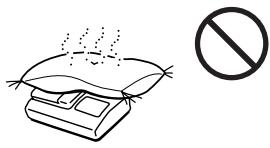
| Maintenance | Clean with a soft, dry cloth. Avoid moisture and shocks. |
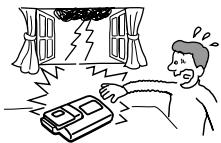
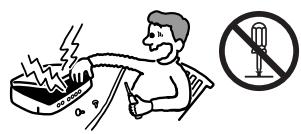
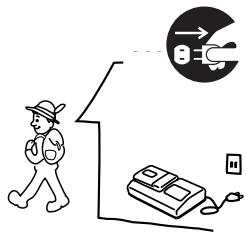
| Safety | Do not expose to water. Use recommended batteries. Disconnect if not used for a long period. |
| Parts and Repairability | Batteries, AC adapter, audio cables, remote control. Repair by an authorized technician. |
| Included Accessories | Headphones, connection cable, remote control, carrying case |
| General Information | Compact and lightweight device, ideal for on-the-go recording. User manual available for download. |
Frequently Asked Questions - MZ-R4ST SONY
User questions about MZ-R4ST SONY
0 question about this device. Answer the ones you know or ask your own.
Ask a new question about this device
Download the instructions for your MiniDisc Player in PDF format for free! Find your manual MZ-R4ST - SONY and take your electronic device back in hand. On this page are published all the documents necessary for the use of your device. MZ-R4ST by SONY.
USER MANUAL MZ-R4ST SONY
/Operating Instructions


MZ-R4ST
©1996 by Sony Corporation
141
6-7-35
(03)5448-3311
(052)232-2611
(06)539-5111
MD
BS
DAT
148
MD WALKMAN

42


6 9
1 1


6
10
12
14
14
...15
16
17
19
19
BASS BOOST 20
-AVLS 20
21
22
23
23
1 23
23
24
24
25
26

-CD 27
27
28
28
28
29
29
29
30
/ 31
32
33
34
37
38
40
41
43
45
Operating Instructions
Operating Instructions 52


100V


MD CD DAT
AC


27
(14
1
①
②
2
1
(2)
3
4
5
①
REC
2
CD
TOC EDIT


1

1
1
②
2
1
2
3
(1)
(2)


1)
1)


1)

2)
22

19
717 ECM-909A
ECM-
1
2

1
2
3 II
4


12 dB)
1 2
4
4 II

4
(14)
1
B
A
B

A
1
A
B
A
B
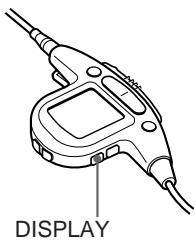
DISPLAY
1 DISPLAY
A B
A B
**
1
2
3
4 23
0
24
12
10

1 3
1
PLAY MODE

1)


2)
5
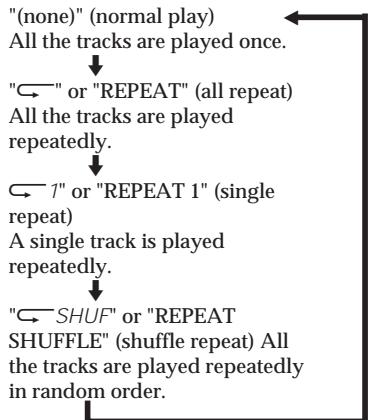
REPEAT
1 REPEAT1
SHUF REPEAT SHUFFLE


-AVLS
BASS BOOST
1
AVLS
1 1
2 1 2 2
1

1
1 DISPLAY
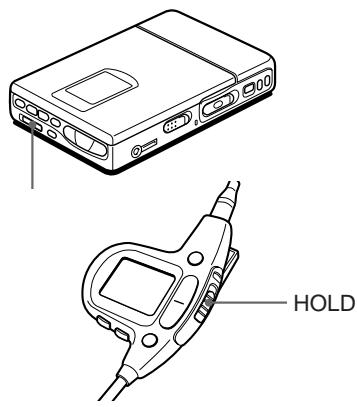

HOLD

2 1
1
TOCEDIT
24
1

1
1
Erase OK? Push Erase
1
/
All Erase? Push
Erase
2 1 /
TOC EDIT
BLANK DISC
1
Track Mark ON
1

2
00:00
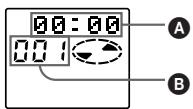
TRACK MARK

3
Track Mark OFF
2 1
:C 2

1
/
Move
No.003 No.003
2
3
200
1
/
1700
800

3
1
2

4
3
5
42 1


CD
DAT BS
LIP-12 (H)
3 2
BP-DM20
LIP-12 (H)
1
2
LIP-12 (H)
3

ON OFF
LIP-12 (H)
1
2
| 80% | 2.5 |
| 5 |
1
2

BP-DM20
| 4 | 6.5 | |
| LIP-12 (H) | ||
| 2 | 4 | |
| LR6 (SG) 2 | ||
| 2 | 3 | |
| BP-DM20 | ||
| 6 | 10.5 | |
| LIP-12 (H) | ||
| LR6 (SG) 2 | ||
| 6 | 9.5 | |
| LIP-12 (H) | ||
| BP-DM20 | ||
| * | ||
| ** | ||
| L 0 | ||
| BATT |
. ) 中
| HOLD | |||
| ( | HOLD | (22 | |
| HOLD | ) | ) | |
| ( | ) | ||
| (□ | Lo BATT | (30 | 2 |
| ) | |||
| (10 | ) | ||
| (31 | ) | ||
| DISC | ( BLANK | ||
| - | |||
| 1 | 30 | ||
| (19 ) | ||
| 1 | 1 | 1 |
| 1 | ||
| (29 ) | ||
| (27 28 ) | ||
| 27 28 | ||
| CD | CD | |
| CD | ||
| ( NO DIGITAL SIGNAL ) | ||
| ( DISC FULL ) | (15 ) | |
| ( P/B ONLY ) | ||
| 12 ( DISC FULL ) | ||
| 14 | 15 |
| Ω/ | |||
| / (20) | VOL | ||
| 2 (18) | |||
| --y--m--d | (17) | ||
| (17) | |||
DAT
| FULL | |||||
| (60) | 74 TR | 254 | |||
| TR FULL | 1 | ||||
| 254 | 1 | ||||
| ( ) | 12 | ||||
| 12 | |||||
| (60) | 74) | 2 | 2 | ||
| 2 | 6 | ||||
三 三
| ( ) | ||
| BLANK DISC (BLANK) | ( ) | |
| CONNECTION ERROR ( ) | ||
| DISC ERROR (ERROR) | ( ) | DISC ERROR |
| DISC FULL (FULL) | 12 ( ) | |
| EDIT BUSY (BUSY) | 2 3 | |
| HOLD ( ) | HOLD | |
| (22 ) | ||
| (LoBATT) | (29 32 ) | |
| MEMORY OVER (MEMORY) | ||
| NO DIGITAL SIGNAL ( ) | ||
| NO DISC (NoDISC) | ||
| NO MIC (NoMIC) | ||
| P/B ONLY (PbONLY) | ( ) | |
| PROTECTED DISC (SAVED) | ||
| PROTECTED TRACK (TrPROT) | ( ) | |
| SCMS NO COPY () | (SCMS) | (28) |
| SORRY (SORRY) | 1 | |
| TEMPERATURE OVER (TEMP) | ||
| TRACK FULL (TrFULL) | 254 | 254 |
8
( )
ATRAC (Adaptive TRansform Acoustic Coding) CD
(BS :32kHz, DAT:
48kHz
MD
(44.1kHz)
TOC EDIT
TOC Table Of Contents
MD
CD
TOC TOCEDIT
CD -0:03 0:00 MD
(SCMS)

20
14
11
13
14
19
10


11 13 19
11


11 13 19
12


20
13


30
14


11 13 19
15


11
16


24
17


11
18


10
19


12
20


17
1
6
19
2
7
3 REC DATE
16 21
HOLD
22
4 REMAIN
21
9 AVLS
)
DATE
5
16 21
12
1
2
3
4
5
6
7
8
9
10


19
12
11 13 19
11 13 19
11 13 19
11
11 13
11
11
12
13
14
15
16
17
18
19
20
21
22
23
Operating Instructions
Welcome!
Welcome to the world of the MiniDisc! Here are some of the capabilities and features you'll discover with the new MiniDisc Recorder.
- MiniDisc station — This model consists of a portable MD recorder and a detachable station. You can record programs in digital signals or label tracks by attaching the recorder to the station. You can also play MDs or record programs from the MIC jack only with the recorder.
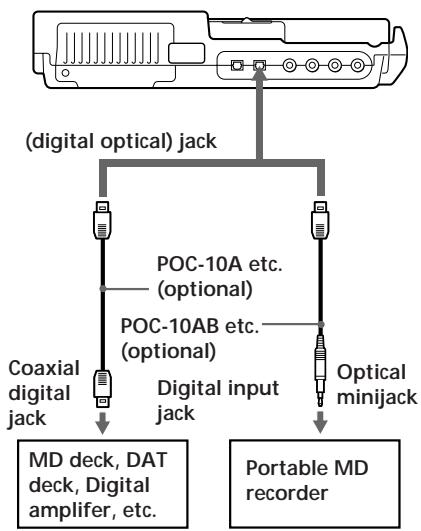
- Optical digital IN/OUT jack - Since the signal is transmitted in digital form, you can get high quality recordings.
- Sampling rate converter - This circuit enables you to record programs from digital equipment using other sampling rates, such as a BS tuner or DAT deck.
- Long recording with monaural sound — You can record up to 148 minutes on a disc using monaural recording.
- Easy editing with the station's LCD panel — You can label MDs easily using the 20 characters × 4 lines LCD panel and cursor keys on the station.
- Title samples — This model offers 42 samples of words and phrases that are frequently used for the title of a disc or track.
- "Kana" characters available — You can enter "Katakana" characters for a title of the disc or the track.
- Position pointer — The display shows you the current location on the disc.
- Date and time stamp function — The built-in clock allows you to record the date and time whenever you make a recording.
- Title function — You can see disc and track titles in the display while you are playing/recording an MD.
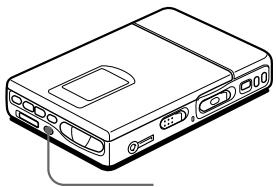
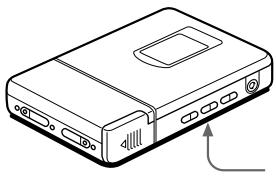
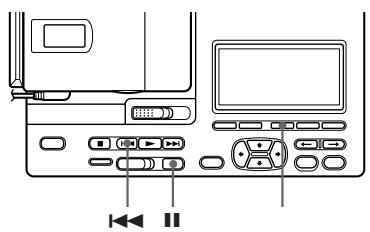
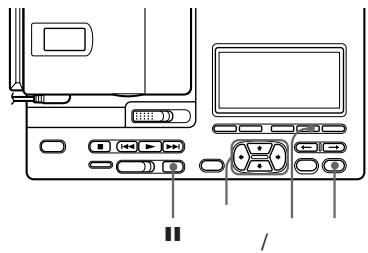
Looking at the controls
The numbers are keyed to the illustrations in the Japanese text (pages 45 to 51).
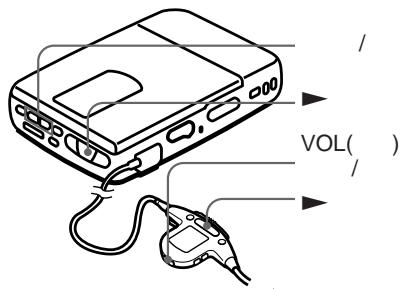
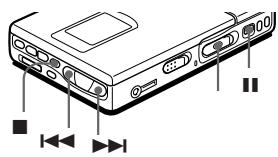
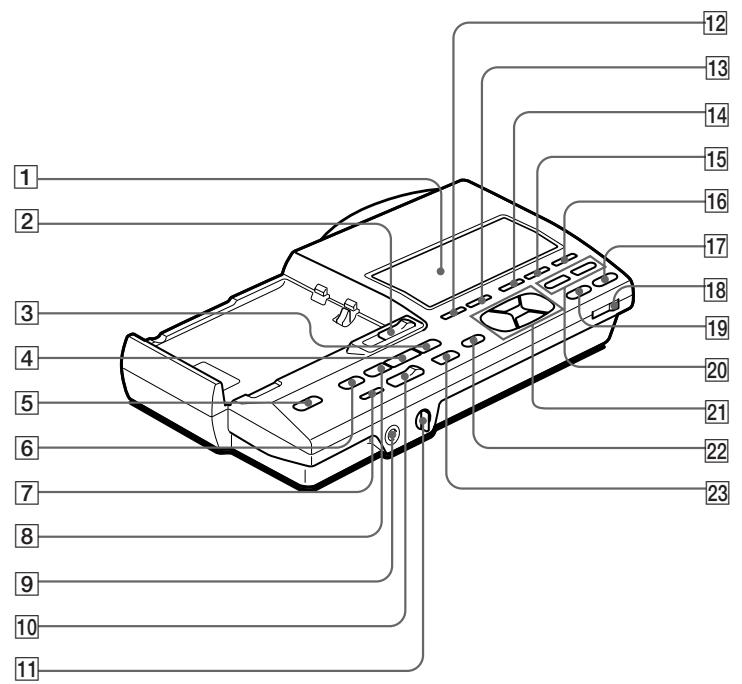
The recorder
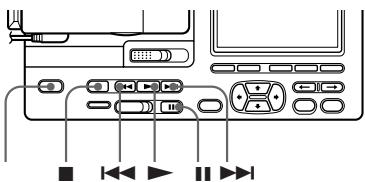
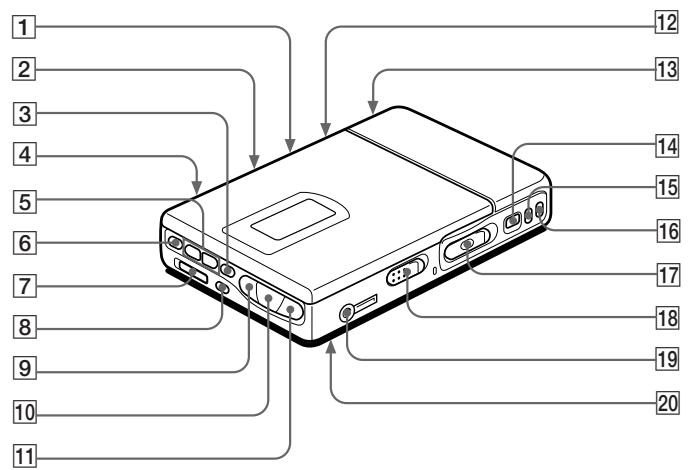
1
(AVLS=Automatic
Volume Limiter System) switch Slide to " "(ON) to limit the maximum volume.
2
(Mic sensibility) switch.
3
(stop) button
4
(mic plug
in power) jack
5
volume) - / + buttons
6
(mode) button
Each time you press here while playing an MD, the recorder plays the MD in a different play mode: normal play, all repeat, single repeat, or shuffle repeat. Press here while recording to select monaural recording.
7
(hold) switch
Slide to the controls of the recorder.
8
(display) button
Press to display the current play mode, the remaining time of the current track, the remaining time of the disc, or the recording date and time.
9
(1 search/AMS) button
1
▶ (play) button
1
( 1 (search/AMS) button
1.
(Bass boost) switch Select to emphasize bass sound.
1
Battery compartment
1
(pause) button
1
(end search) button (track mark) button
1
record) switch
1
(open) switch
1
/ (headphones/remote) jack
2
clock set) button (at the bottom)
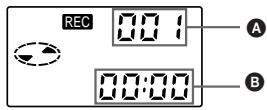
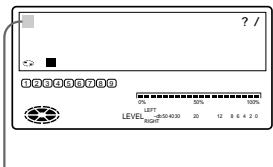
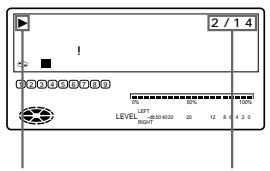
The display window of the recorder
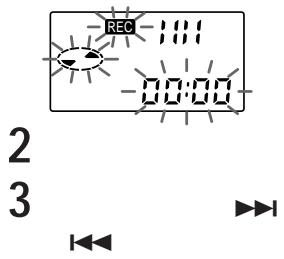
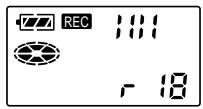
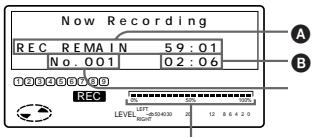
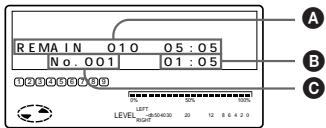
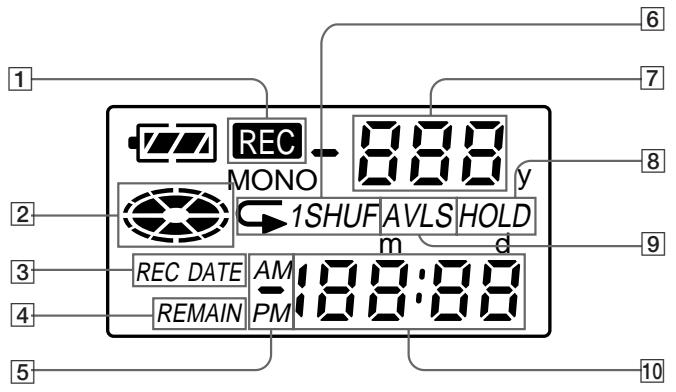
1 REC indication Lights up while recording. When flashing, the recorder is in record standby mode.
2 Disc indication Shows that the disc is rotating for recording, playing or ending an MD.
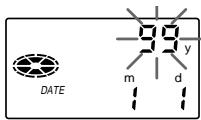
3 REC DATE (recorded/current date) indication Lights up along with the date and time the MD was recorded. When only "DATE" lights up, the current date and time are displayed.
4 REMAIN (remaining time/tracks) indication Lights up along with the remaining time of the track, remaining time of the MD, or remaining number of tracks.
5 AM/PM indication Lights up along with the time indication in the 12-hour system.
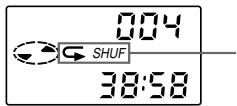
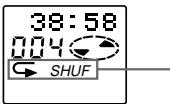
6 Play mode indication Shows the play mode of the MD. (all repeat): All tracks play repeatedly. 1(single repeat): One track pI repeatedly. SHUF(shuffle repeat): Tracks be repeated in rando order.
7 Track number indication Shows the track number current playing.
8 HOLD indication Lights up when the HOLD switch is set on.
9 AVLS indication Lights up when the switch is set on.
10 Time display Shows the elapsed time of the track being recorded or played.
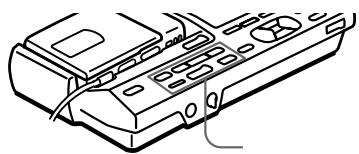
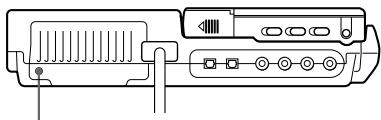
Front panel of the Station
1 Display window
2 (detach the recorder) switch
3 (search/AMS) button
4 (play) button
5 (power) switch
6 (stop) button
7 (end search) button
8 (search/AMS) button
9 Headphones jack for stereo plug
10 (record) switch
11 (volume) dial
Adjust the volume of HEADPHONE jack on the station, not the recorder.
12 (display) button
13 (mode) button
14 (track mark) button
15 / (move/insert) button
16 / (erase/delete) button
17 / (title/enter) button
18 (input) switch
19 (enter) button
20 / (position) buttons
21 Cuarsor buttons
22 // / (Katakana/
English/symbols/title samples) button
23 II (pause) button
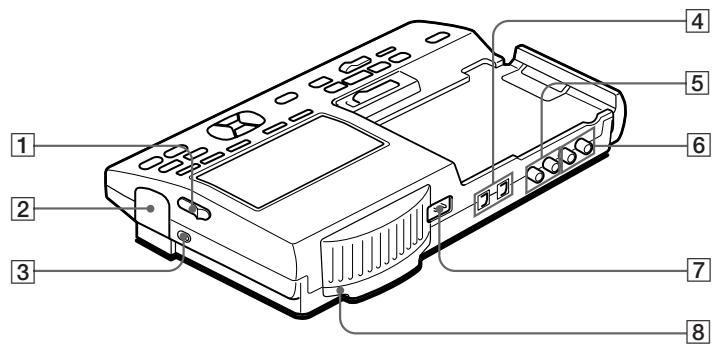
Back panel of the Station
1 (open the lid) switch
2 Rechargeable battery compartment
3 Charger lamp
Lights up while charging the rechargeable battery on the station.
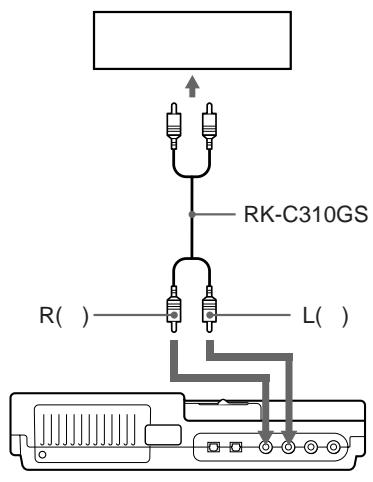
4 (optical/line in/out) jack
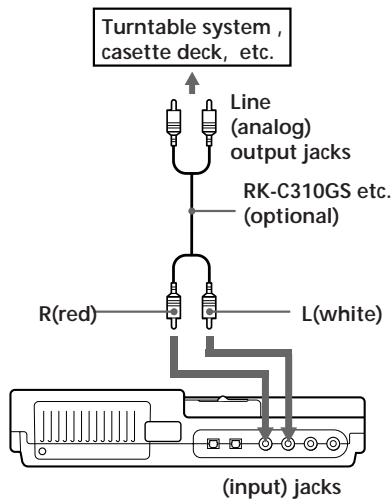
5 (line in) jack
6 (line out) jack
7 (DC input) jack
8 (clock set) button
The display window of the station
1 Character information display Displays the disc and track names, date, error messages, track numbers, etc.
Disc and track names appear only with MDs that have been electronically labeled.
2 Battery indication Shows battery condition. While charging the rechargeable battery, this indication shows the charging condition.
3 Disc indication Shows that the disc is rotating for recording, playing or editing an MD.
4 MONO (monaural) indication
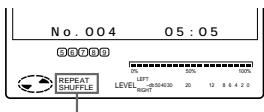
5 Play mode indication Shows the play mode of the MD.
(all repeat): All tracks play repeatedly.
1(single repeat): One track plays repeatedly.
SHUF(shuffle repeat): Tracks will be repeated in random order.
6 REC (record) indication Lights up while recording. When flashing, the recorder is in record standby mode.
7 Music calendar Display number of tracks recorded in MD, remaining tracks during shuffle play.
8 Position pointer Shows the current location on the MD. The point under recording or playing flashes. The recorded position lights up.
9 Peak level mater Shows the volume of the MD being
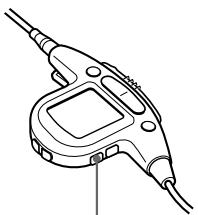
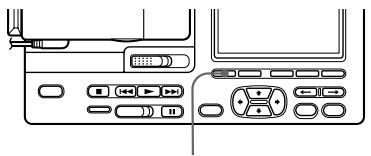
The headphones with a remote controller
1 TRACK MARK button
2 Display window
3 VOL (volume) + / - buttons When the AVLS switch is set on, you cannot increase the volume to the maximum. To increase the volume above the limited level, set the AVLS switch to off.
4 DISPLAY button Press to display the current play mode, the remaining time of the current track, the remaining time of the disc, or the recording date and time.
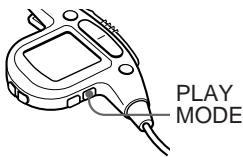
5 PLAY MODE button
6 Headphones Can be replaced with optional headphones.
7 (pause) button
8 HOLD switch Slide to lock the controls of the remote controller.
9 (play)/I/ (search, AMS) buttons Press to play. While playing, press the side to find the beginning of the current or preceding tracks or to search backward, or press the side to find the beginning of the succeeding tracks or to search forward.
10 (stop) button
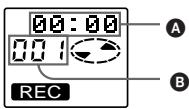
The display window of the remote controller
1 Character information display Displays the disc and track names, date, error messages, track numbers, etc.
2 Track number indication. Shows number of the track being recorded or played.
3 Play mode indication Shows the play mode of the MD.
4 REC (record) indication Lights up while recording. When flashing, the recorder is in record standby mode.
5 Battery indication Shows battery condition. While charging the rechargeable battery, this indication shows the charging condition.
6 Disc indication Shows that the disc is rotating for recording, playing or editing an MD.
MD recording
Recording an MD right away!
See the illustrations in the Japanese text (page 10 to 11).
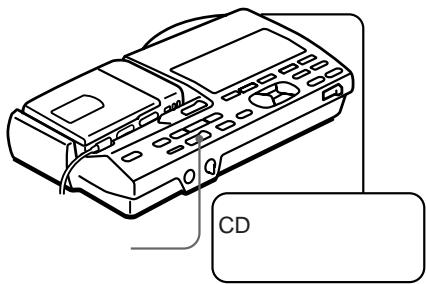
This section introduces how to record programs from input of the station. Refer to "Connecting to a stereo system" and make the necessary connections. If you want to record programs from (mic plug in power) jack of the recorder, see "Recording from a microphone".
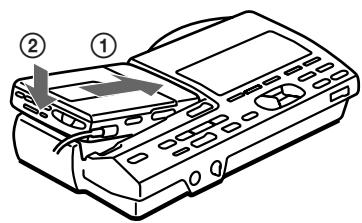
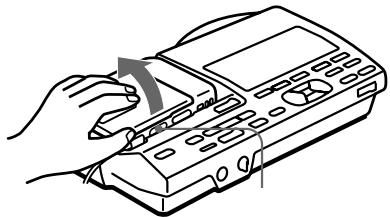
1 Attach the recorder to the station.
① Place the right side of the recorder.
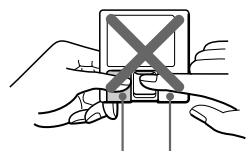
Push down until it clicks. Make sure to attach the recorder in the right way. Pushing with force may cause a malfunction.
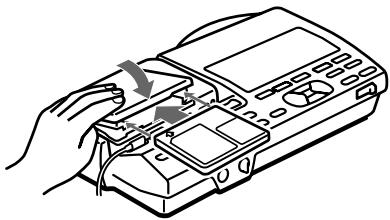
2 Insert a recordable MD.
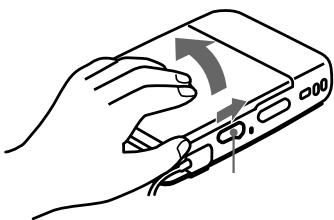
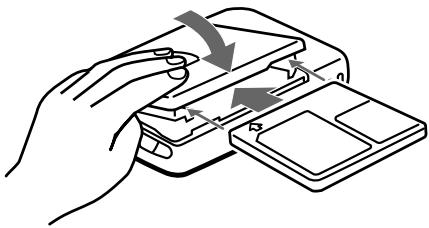
① Slide the (open) switch and open the lid.
② Insert a recordable MD with the label side facing up. and press the lid down to close.
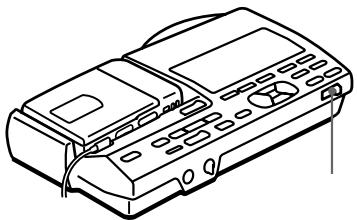
3 Select the input source.
Set (input select) switch to the connected input.
Select " to record signals from
(OPTICAL IN).
Select " " to record signals from (LINE IN).
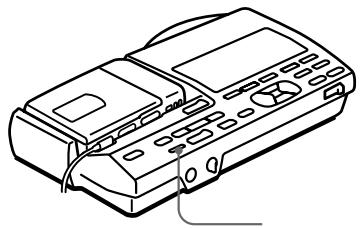
4 Select recording start point.
If you want to add a recording to the end of the previous recording, press (end search).
(If you want to start recording from the beginning, skip this step).
5 Start recording.
① Slide the (record) switch to the right while pressing its button.
"REC" lights up and recording starts.
② Play the sound source.
To stop recording, press
Do not move or jog the recorder or disconnect the power source while the "TOC EDIT" indication is flashing in the display.
| To | Press |
| Pause | ■* Press ■ again to resume recording. |
| Record over partway through the previous recording | ▶,▶or ↓← to find the start point of recording and press ■ to stop. Then slide the (record) switch. |
| Remove the MD | ■,then slide the (open) switch and open the lid.** |
| Turn power off | (Power) |
- A new track mark is added at the point where you pressed II, and the recording will be marked with the new track number when you resume recording.
** Once you open the lid, the point to start recording will change to the beginning of the first track. When recording on a recorded MD, check the point to start recording on the display.
If the recording does not start
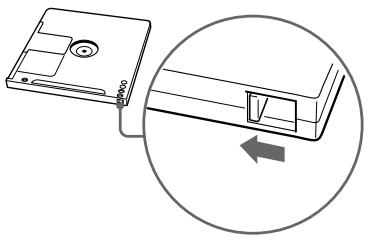
Make sure the MD is not record-protected. If the tab at the side of the MD is open, slide it back so the tab is visible.
MD playing
Playing an MD right away!
See the illustrations in the Japanese text (pages 12 to 13). The following explains how to play MDs on the recorder while detached from the station.
Before playing, insert the dry batteries or rechargeable battery into the recorder (see page 30).
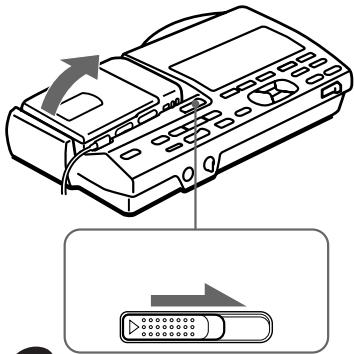
1 Detach the recorder from the station.
① Slide the
detach recorder) switch.
② Connect the remote controller-equipped headphones (supplied) to the / jack.
2 Insert an MD.
① Slide the (open) switch and open the lid.
② Insert an MD with the label side facing up, and press the lid down to close.
3 Start playing.
① Press
A short beep sounds in the headphones.
② Press the (volume) - / + buttons to adjust the volume. You can check the volume in the display.
To stop play, press
A long beep sounds in the headphones.
| To | Press (Beeps in the headphones) |
| Pause | ■(Continuous short beeps) Press again to resume play. |
| Find the beginning of the current track | ▲ once (Three short beeps) |
| Find the beginning of the next track | ▲ once (Two short beeps) |
| Go backwards while playing* | keep pressing▲ |
| Go forward while playing* | keep pressing▲ |
| Remove the MD | ■,then slide the (open) switch and open the lid.** |
- To go backwards or forward quickly without listening, press! and keep pressing !or▶.
** Once you open the lid, the point to start play will change to the beginning of the first track.
Tip
The recorder automatically switches to play the stereo or monaural sound according to the recorded sound.
If the playback does not start
Make sure the recorder is not locked. If it is locked, slide the (hold) switch in the opposite direction of the arrow.
About playing while attached to the station
See "Playing an MD on the station" (page 58)
Various ways of recording
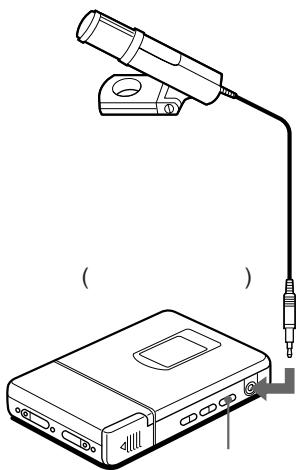
Recording from a microphone
See the illustration in the Japanese text (page14).
Connect a microphone to the (mic plug in power) jack. Use a stereo microphone ECM-909A, ECM717, etc., not supplied).
1 Select the input level with the (Mic sensibility) switch. Usually, set it to (high). When you record loud sound such as an live, set it to (low).
2 Insert a recordable MD. Slide the (open) switch to open the lid, insert a recordable MD, and close the lid.
3 Slide the (record) switch to the right while pressing its button. "REC" lights up and recording starts.
Note
You can record from a microphone attached to the station. Set the (input select) switch to "(analog)", and press the (record) button on the station.
Recording in monaural for double the normal recording time of an MD
See the illustration in the Japanese text (page 14).
Before recording, make connections to the sound source and the power source, and insert a recordable MD. You can operate in the same way on the station as on the recorder.
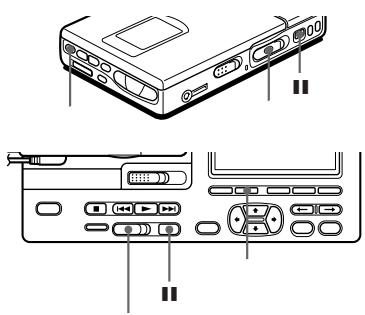
1 While pressing I, slide the (record) switch to the right. The recorder enters record standby mode.
2 Press the (mode) button. "Mono REC" appears in the display, and the recorder switches to monaural recording.
3 Press again to start recording.
4 Start the sound source.
Tips
- The recorder switches back to stereo recording when you press to stop recording.
- If you record in monaural from a stereo source using a digital cable, only the left channel sound of the source will be recorded.
- The MDs recorded in monaural can be played back only with an MD player/ recorder that has the monaural playing function.
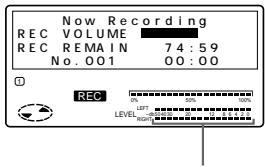
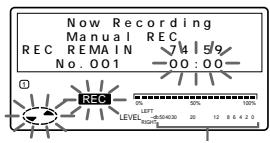
Adjusting the recording level (Manual recording)
See the illustration in the Japanese text (page15).
When you record with a microphone or analog input, the sound level is adjusted automatically. If necessary, you can set the level manually. You can operate in the same way on the station as on the recorder.
1 While holding down II, hold the (record) switch to the right for more than 2 seconds.
"ManualREC" appears, and the recorder enters record pause mode. To return to automatic control, while the recorder is in record pause mode, hold the (record) switch to the right for more than 2 seconds.
2 Play the source.
3 While observing the level meter in the display, adjust the recording level by pressing (+) or (-) .
Set the level to around 12 (-12dB) on the station or until 4 lines appear on the recorder.
4 Press II again to start recording.
Tips
- The recorder switches back to automatic control when you press to stop recording.
- The recording level should be adjusted while the recorder is in standby mode. You cannot adjust it while recording.
- Select the input level with the (Mic sensibility) switch if you record sound from (Mic) jack.
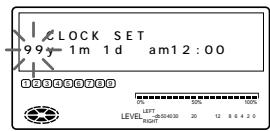
Setting the clock to stamp the recorded time
See the illustrations in the Japanese text (page17).
To stamp the date and time on the MD when you record, you need to set the clock. The recorder and the station each have a clock. The time of the recorder is copied to the clock of the station when you attach the recorder to the station.
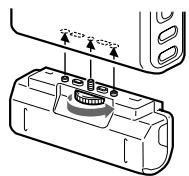
1 Press (clock set) button at the rear of the station with a pointed object. The digits of the year flash.
2 Enter the current year by pressing or To change the digits rapidly, keep pressing or
3 Press or CURSOR
The digit of the month flashes.
4 Repeat steps 2 and 3 to enter the current month, date, hour, and minute. After you press to set the minutes, the clock starts operating.
If you make a mistake while setting the clock
Press button and repeat the steps above. Press tto locate necessary digits to be changed.
To display the time in the 24-hour system
press (display) button while setting the clock. To change the clock to the 12-hour system, press (display) again.
Charging the built-in battery for the clock
After setting the clock, leave the recorder attached to the station for about 2 hours to charge the built-in battery for the clock. Once charged, the built-in battery will last for about a month without being connected to any of the power sources. The recorder will automatically charge the built-in battery while operating on the station, a rechargeable battery or dry batteries.
Various ways of playback
Playing an MD on the station
See the illustrations in the Japanese text (page 19).
| To | Press (Beeps in the headphones) |
| Pause | ■ (Continuous short beeps) Press ■ again to resume play. |
| Find the beginning of the current track | ■ once (Three short beeps) |
| Find the beginning of the next track | ■ once (Two short beeps) |
| Go backwards while playing* | keep pressing ■ |
| Go forward while playing* | keep pressing ▷■ |
| Remove the MD | ■ and open the lid.** |
- To go backwards or forward quickly without listening, press! and keep pressing !▶or▶.
** Once you open the lid, the point to start play will change to the beginning of the first track.
Notes
- Adjust the volume with VOL (volume) - / + button on the remote controller.
- The power turns off automatically when you leave the station for 5 minutes in the stop mode. Press (power) switch or button to turn on again.
Playing tracks repeatedly
See the illustrations in the Japanese text (page19).
Press the (mode) button while the recorder is playing an MD. Each time you press the (mode) button, the play mode indication changes as follows:
Editing recorded tracks
You can edit your recordings. Premastered MDs cannot be edited.
Notes
- When you press after erasing track marks, "TOC EDIT" flashes for about a second. Do not move or jog the recorder or disconnect the power source while the indication is flashing.
- You cannot erase track marks on an MD with the tab open for protection. Before erasing track marks, close the tab at the side of the MD
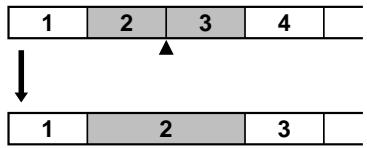
Erasing a track
See the illustrations in the Japanese text (page 23).
You can quickly erase a recorded track. Note that once a recording has been erased, you cannot retrieve it.
1 Play the track you want to erase.
2 Press the / (erase/delete) button while playing the track. "Erase OK? Push ERASE" appear in the display alternately, and the recorder plays the selected track repeatedly. Check the track number in the display. To cancel erasing, press ■.
3 Press the / (erase/delete) button again to erase the track. The track is erased from the MD and the remaining tracks are renumbered. The recorder starts to play the succeeding track. If you have erased the last track of the MD, the recorder pauses at the end of the preceding track.
To erase other tracks, repeat steps 1 to 3.
To erase a part of a track
Add track marks at the beginning and the end of the part you want to erase, then erase the part.
Erasing a whole disc
See the illustration in the Japanese text (page 23).
You can erase all the tracks on a disc at a time. Note that once a recording has been erased, you cannot retrieve it.
1 Play the MD you want to erase and check the contents of the disc.
2 Press to stop.
3 While pressing the / (erase/ delete) button, slide the (record) switch to the right. "All Erase?" and "Push Erase" appear in the display alternately. Make sure it is the right disc to be erased. To cancel erasing, press ■.
4 Press the / (erase/delete) button again. "TOC EDIT" flashes in the display. When erasing completes, "BLANK DISC" appears.
Insert a track mark
See the illustrations in the Japanese text (page 24).
You can insert a track mark into a track.
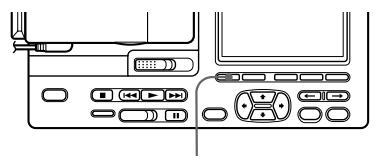
1 Press (track mark) button when the part that you want to insert the track mark is playing. "Track Mark ON" flashes in the display, succeeding tracks will be renumberd.
You can insert the track number while recording. Press (track mark) button while recording.
Erasing a track mark
See the illustrations in the Japanese text (page24).
When you record with analog (line) input, unnecessary track marks may be recorded. You can erase a track mark to combine the tracks before and after the track mark.
1 While the recorder is playing an MD, press to pause.
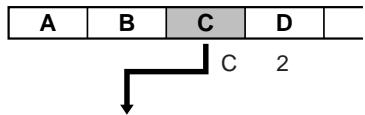
2 Find the track mark you want to erase by pressing or slightly. "00:00" flashes in the display.
3 Press the (track mark) button to erase the mark. The track mark is erased and the two tracks are combined. The number of the newly combined track will be that of the first track and the succeeding tracks will be renumbered.
To erase other marks, repeat 2 and 3.
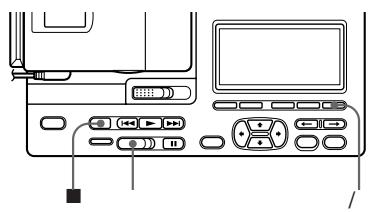
Moving recorded tracks
See the illustrations in the Japanese text (page 25).
You can change the order of the recorded tracks.
1 Play the track you want to move.
2 While playing the track you want move, press the / (move/ insert) button. The recorder plays the selected track repeatedly.
3 Press the CURSOR button to select the new track position.
4 Press the (title/enter) button again. Moving is completed and the recorder plays the moved track.
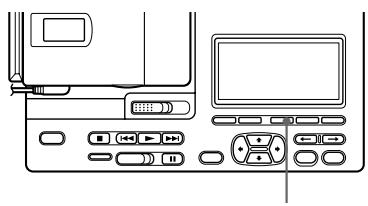
Labeling recordings
See the illustration in the Japanese text (page 26).
You can label the MDs and tracks you recorded with letters, numbers, and marks. Each label can be made up of up to 200 characters, and each MD can include up to 1700 character.
1 To label a track, play the track you want to label. To label an MD, insert the recordable MD you want to label. If an MD is already inserted, press to stop.
2 Press the (title/enter) button on the recorder. A set of characters appears on the display. To select a different set of characters, press the / / / (Katakana/English/symbols/title samples) button to change the display. Each time you press this button the display changes in the order of katakana characters, English letters, symbols, and title samples. When playing a track, the recorder plays the track repeatedly.
3 Press the CURSOR button to select a character. The CURSOR button moves the cursor up/down or right/left.
The / (position) button moves the cursor right or left.
Press the (enter) button to finalize your selection.
Press the / (move/insert) button for a space.
Press the / (erase/delete) button to delete a character.
Press to stop labeling.
- When you use Katakana, press the CURSOR / to change the display as follows:
4 Repeat step 3 until you have entered all the characters for the label.
5 Press the (title/enter) button to finish labeling.
To cancel labeling
Press ■.
To use the title samples
There are 42 samples available for the disc name or message.
Press the CURSOR / to change the pages.
Press the CURSOR / to move the
CURSOR (>) up or down.
Press the (enter) to enter the title
samples.
Hooking up
Set up for digital recording on the station
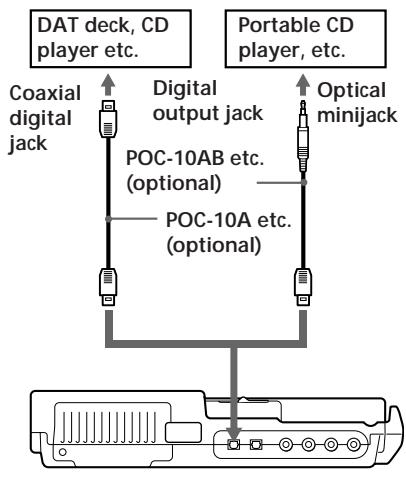
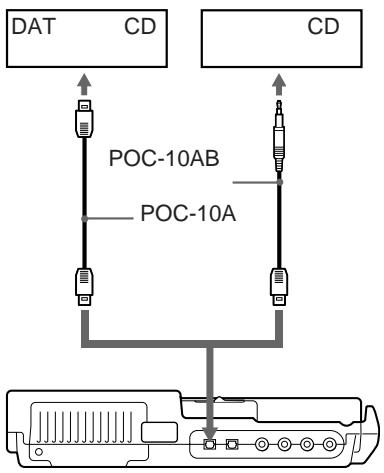
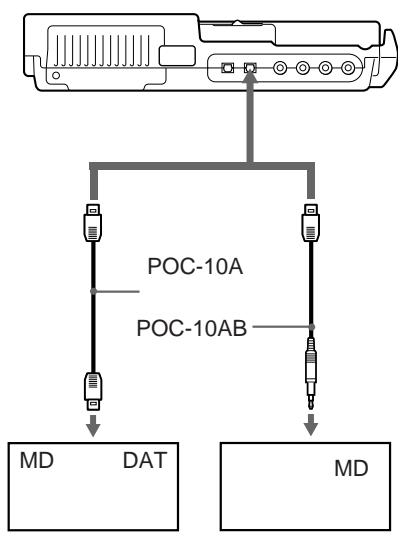
(digital optical input) jack
Set up for digital recording on the station.
Set up for digital out put from the station
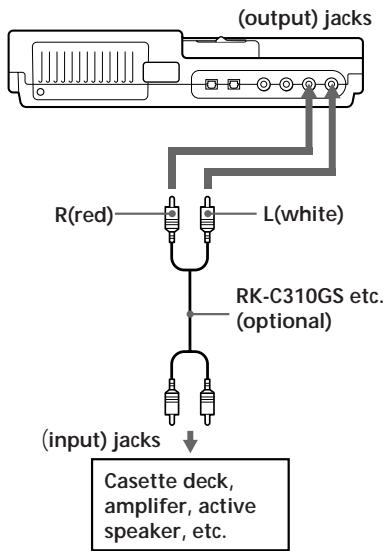
Set up for analog output from the station
Power sources
Using on house current
See the illustration in the Japanese text (page 29)
Using on a lithium ion rechargeable battery
See the illustrations in the Japanese text (page 30).
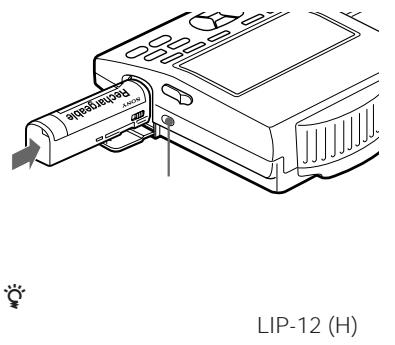
You can charge the LIP-12(H) lithium ion rechargeable battery (supplied) on the recorder.
1 Connect the station to an electrical outlet.
2 Insert the LIP-12(H) to the recorder and close the lid.
3 Attach the recorder to the station. The battery will charge whether the power is on or off.
To charge the battery on the station.
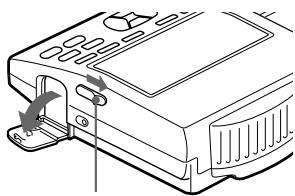
1 Slide the (open the lid) switch to open the lid.
2 Insert the battery and close the lid. When charging is completed, the charger lamp goes out.
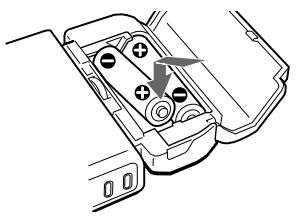
Using on dry batteries/nickel metal hydride rechargeable battery
See the illustrations in the Japanese text (page 31).
Before using a nickel metal hydride rechargeable battery, you must charge it.
1 Attach the supplied battery case.
2 Insert two LR6 (size AA) dry batteries or a nickel metal hydride rechargeable battery with the recommended battery charger (not supplied).
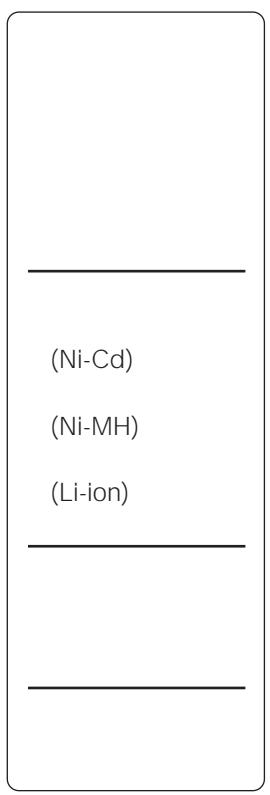
Battery life
| Batteries | Recording | Playback |
| LIP-12(H) lithium ion rechargeable battery | Approx. 4hours | Approx. 6.5hours |
| R6(size AA) Sony alkaline dry batteries LR6(SG)×2 | Approx. 2hours | Approx. 4hours |
| BP-DM20 nickel metal hydride rechargeable battery | Approx. 2hours | Approx. 3hours |
| LIP-12(H) +LR6(SG) ×2 | Approx. 6hours | Approx. 10.5hours |
| LIP-12(H) +BP-DM20 | Approx. 6hours | Approx. 9.5hours |
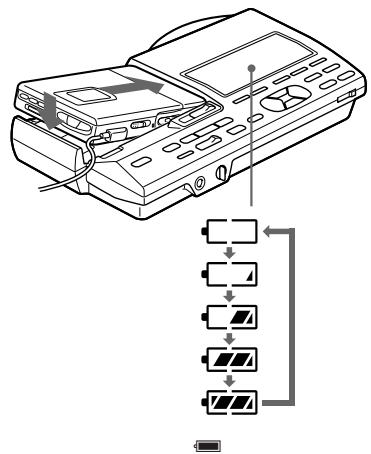
When to replace the batteries
When the dry batteries or rechargeable battery are weak, flashing or "Lo BATT" appears on display. Replace the dry batteries or charge the rechargeable battery.
Error messages
If the recorder cannot carry out an operation, error messages may flash in the display window as follows. The words in parentheses are the messages that appear on the display window of the headphone's remote commander.
BLANK DISC (BLANK):
You tried to play an MD with no recording on it.
The recorderis not connected to the station completely.
DISC ERROR (ERROR):
The recorder cannot read the MD (it is scratched or dirty). Reinsert the MD. If the same message still appears, replace the MD.
DISC FULL (FULL):
There is no more space on the MD (less than 12 seconds available).
EDIT BUSY (BUSY):
You tried to operate the recorder while it was accessing the recorded data.
Wait until the message goes out (in rare cases, it may take 2-3 minutes).
HOLD (HOLD):
You tried to operate the recorder with the (hold) switch slid in the direction of the arrow. Slide back the switch.
- (Lo BATT):
The rechargeable battery or dry batteries are weak. Charge the rechargeable battery or replace the dry batteries.
MEMORY OVER (MEMORY):
There is no more space for new data. The MD cannot be edited any further. Erase unnecessary tracks before editing.
NO DIGITAL SIGNAL (-):
The recorder could not detect digital input signals. Make sure that the source is connected firmly and that it has the same sampling frequency as the recorder (44.1kHz). When recording from a portable CD player, set it to pause mode and then start recording. If the message appears
while recording, press to end recording.
NO DISC (No DISC):
You tried to play or record with no disc in the recorder.
NO MIC (No MIC):
There is no sound source for recording.
P/B ONLY (Pb ONLY):
You tried to record or edit on a premastered MD (PB means playback).
PROTECTED DISC (SAVED):
You tried to record or edit on an MD with its tab in the record-protect position.
PROTECTED TRACK (Tr PROT):
You tried to record over or edit a track which has been protected from being recorded over.**
SCMS NO COPY (-):
You tried to make a copy from a disc that is protected by the Serial Copy Management System. You cannot make copies from a digitally connected source which was itself recorded using the digital connection. Use the analog connection instead.
SORRY (SORRY):
You tried to erase a track mark while playing the MD or at the beginning of the first track.
You tried to erase a track mark to combine tracks the recorder cannot combine.*
TEMPERATURE OVER (TEMP):
Heat has built up in the recorder. Wait until the recorder cools down.
TRACK FULL (Tr FULL):
You tried to enter more than 200 characters for track or disc name or, the characters entered in an MD are more than 1700.
- If you have recorded or erased many times on the same MD, the data of a single track may be scattered throughout the MD. When the data is scattered in groups of less than 12 seconds long, the recorder will not be able to combine the tracks.
**Track-protected MiniDiscs — Some MD recorders will let you protect individual tracks from being recorded over. This recorder, however, does not offer this feature.