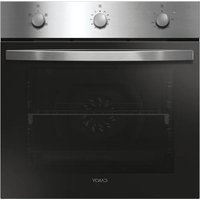
FCXE625VNX - Built-in oven CANDY - Free user manual and instructions
Find the device manual for free FCXE625VNX CANDY in PDF.

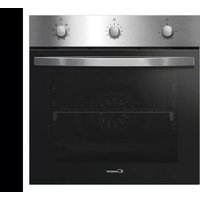
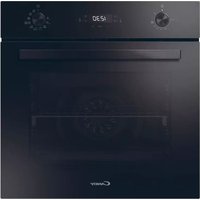
| Product type | Built-in oven |
| Brand | Candy |
| Model | FCXE625VNX |
| Power supply | 220-240 V ~, 50/60 Hz |
| Number of cooking modes | 11 |
| Cooking modes | Fan-assisted bottom heat, Bottom heat, Natural convection, Fan-assisted heat, Grill, Turbo grill, Rotisserie with fan, Defrosting, Steam mode, Pizza, Soft Cook |
| Lighting type | U-SEE (14 LEDs) |
| Clock | Sensitive touch control with timer, automatic shut-off timer |
| Child safety | Yes (control lock) |
| Rotisserie | Yes, with delayed shut-off at end of cooking |
| Cleaning | Manual (do not use steam cleaner) |
| Supplied accessories | Rack, drippings tray, rotisserie, pizza stone (depending on model) |
| Compliance | CE |
| Control type | Knobs + sensitive touch clock |
| Cavity material | Enamel |
Frequently Asked Questions - FCXE625VNX CANDY
User questions about FCXE625VNX CANDY
0 question about this device. Answer the ones you know or ask your own.
Ask a new question about this device
Download the instructions for your Built-in oven in PDF format for free! Find your manual FCXE625VNX - CANDY and take your electronic device back in hand. On this page are published all the documents necessary for the use of your device. FCXE625VNX by CANDY.
USER MANUAL FCXE625VNX CANDY
Safety Instructions....04
- General warnings....05
1.1 Declaration of compliance....05
1.2 Safety hints 05
1.3 Recommendations....05
1.4 Installation....05
1.5 Electrical connection 05
- Accessories....06
2.1 Oven equipment 06
2.2 Rotisserie 06
2.3 U-SEE 06
2.4 Removing and cleaning wire racks 06
-
Cleaning the oven....06
-
Description of the display....08
4.1 Before using the oven for the first time....08
4.2 Using the end of cooking timer 09
4.3 Setting The Correct Time....10
4.4 Use Of Touch Control Clock Programmer 10
4.5 How to use the oven 10
4.6 Cooking tips 10
- Service centre ....10
INDICE
IT
- Assistance technique 82
- Accessories (according To Model) 85
2.1 Uitrusting Van De Oven 85
WARNING: The appliance and its accessible parts become hot during use. Care should be taken to avoid touching heating elements.
- Children under 8 Year of age must be kept away from the appliance unless they are continuously supervised.
- This appliance can be used by children aged from 8 years and above and persons with reduced physical, sensory or mental capabilities or lack of experience and knowledge if they have been given supervision or instruction concerning use of the appliance in a safe way and understand the hazards involved.
• Children must not play with the appliance.
- Cleaning and user maintenance shall not be made by children without supervision.
- During use the appliance becomes hot. Care should be taken to avoid touching heating elements inside the oven.
WARNING: Accessible parts may become hot during use. Young children must be kept away.
- Do not use harsh abrasive cleaners or sharp metal scrapers to clean the oven door glass since they can scratch the surface, which may result in shattering of the glass.
- The oven must be switched off before removing the guard, after cleaning, the guard must be replaced in accordance with the instructions.
- Only use the temperature probe recommended for this oven.
- Do not use a steam cleaner for cleaning operations.
- WARNING: Avoid possibility of electric shock - ensure the appliance is switched off before replacing the lamp.
- The means for disconnection must be incorporated in the fixed wiring in accordance with the wiring rules.
- The instructions state the type of cord to be used, taking into account the temperature of the rear surface of the appliance.
- If the supply cord is damaged, it must be replaced by a special cord or assembly available from the manufacturer or its service agent.
- CAUTION: In order to avoid a hazard due to inadvertent resetting of the thermal cutout, this appliance must not be supplied through an external switching device, such as a timer, or connected to a circuit that is regularly switched on and off by the utility.
- CAUTION: Accessible parts may be hot when the grill is in use. Young children must be kept away.
- Excess spillage must be removed before cleaning.
- During self-cleaning pyrolytic operation the surfaces may get hotter than usual and children MUST be kept away.
1. GENERAL WARNINGS
Read the instructions carefully to make the most of your oven. We recommend you keep the instructions for installation and use for later reference, and before installing the oven, note its serial number in case you need to get help from the after-sales service.
When you have unpacked the oven, make sure that it has not been damaged in any way. If you have any doubts at all, do not to use it. Contact a professionally qualified person. Keep packing materials such as plastic bags, polystyrene, or nails out of the reach of children because they are dangerous to children.
The company shall not be liable if the instructions provided in this document are not complied with.
! NOTE: Functions, properties and accessories of ovens which are mentioned in this manual, can be change depending on oven models.
1.1 DECLARATION OF COMPLIANCE
This equipment, in the parts intended to come into contact with food, complies with the regulations laid down in EEC directives 89/109.
By placing the CE mark on this product, we are confirming compliance to all relevant European safety, health and environmental requirements which are applicable in legislation for this product.
1.2 SAFETY HINTS
•The oven must be used only for the purpose for which it was designed. It must only be used for cooking food. Any other use, e.g. as a form of heating, is an improper use of the oven and is therefore dangerous.
•The manufacturers cannot be held responsible for any damage caused by improper, incorrect or unreasonable use.
When using any electrical appliance you must follow a few basic rules.
- Do not pull on the power cable to remove the plug from the socket.
- Do not touch the oven with wet or damp hands or feet.
- Do not use the oven unless you are wearing something on your feet.
- It is not generally a good idea to use adapters, multiple sockets for several plugs or cable extensions.
- If the oven breaks down or develops a fault switch it off at the mains and do not touch it.
- If the cable is damaged it must be replaced promptly.
When replacing the cable, follow these instructions.
Remove the power cable and replace it with one of the H05VV-F type. The cable must be able to bear the electrical current required by the oven. Cable replacement must be carried out by properly qualified technicians.
The earthing cable (yellow-green) must be 10 mm longer than the power cable.
Use only an approved service centre for repairs and ensure that only original parts are used. If the above instructions are not adhered to the manufacturers cannot guarantee the safety of the oven.
•The oven you have just acquired has the described technical characteristics and you must not make any modifications to it.
- Do not store flammable products in the oven; they can catch fire if the oven comes on accidentally.
- Do not press on and do not let children sit on the oven door.
- Use kitchen oven gloves, when putting into or removing a dish from the oven.
1.3 RECOMMENDATIONS
• After each use of the oven, a minimum of cleaning will help keep the oven perfectly clean.
- Do not line the oven walls with aluminium foil or single-use protection available from stores. Aluminium foil or any other protection, in direct contact with the hot enamel, risks melting and deteriorating the enamel of the insides.
- In order to prevent excessive dirtying of your oven and the resulting strong smokey smells, we recommend not using the oven at very high temperature. It is better to extend the cooking time and lower the temperature a little.
Identification plate
• In addition to the
accessories supplied with the oven, we advise you only use dishes and baking moulds resistant
to very high Temperatures.

The manufacturers have no obligation to carry this out. If the assistance of the manufacturer is required to rectify faults arising from incorrect installation, this assistance is not covered by the guarantee.
The installation instructions for professionally qualified personnel must be followed. Incorrect installation may cause harm or injury to people, animals or belongings. The manufacturer cannot be held responsible for such harm or injury.
The kitchen unit in which the oven is to be fitted must be made of material resistant to temperatures of at least 70^ C.
The oven can be located high in a column or under a worktop.
Before fixing, you must ensure good ventilation in the oven space to allow proper circulation of the fresh air required for cooling and protecting the internal parts. Make the openings specified on last page according to the type of fitting.
1.5 ELECTRICAL CONNECTION
THE ELECTRICAL CONNECTION SHOULD BE CARRIED OUT BY AN APPROVED CONTRACTOR OR TECHNICIAN WITH SIMILAR QUALIFICATIONS.
The installation receiving the appliance must comply with the standard in force in the installation country.
The manufacturer does not accept any responsibility if this provision is not complied with.
Connection to the network must be by earthed socket outlet, or by means of a multipole circuit-breaker, in compliance with the installation country.
The installation must be protected by suitable fuses, and have wires with a large enough cross-section to supply the oven normally.
CONNECTION:
The oven is fitted with a power lead for connecting exclusively to a voltage of 220-240 V AC across the phases or across phase and neutral.
Connection must be carried out having first checked:
-the supply voltage indicated on the meter,
The lead protection wire (green/yellow) connected to the earth terminal of the oven must be connected to the earth terminal of the installation.
Caution:
- Have the earth continuity of the installation checked by an electrician before making the connection.
•The manufacturer will not be liable for any incident, or the possible consequences that may arise from the use of the oven not earthed, or connected to an earth with defective continuity.
NB: Do not forget that the oven may require after-sales service.
Also, locate the socket outlet so that the oven can be connected once it is removed from its space.
Power supply cable: If the power supply cable has to be changed, please have this done by the after-sales service or by someone with similar qualifications.
2. ACCESSORIES (According to model)
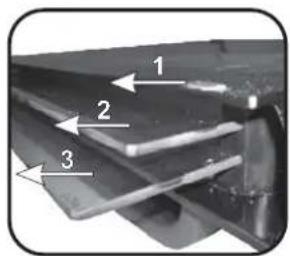
2.1 OVEN EQUIPMENT
It is necessary to do an initial cleaning of the equipment before the first use of each of them. Wash them with a sponge. Rinse and dry off.
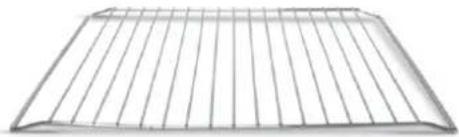
The shelf can take moulds and dishes.
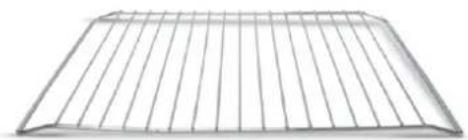
natural_image
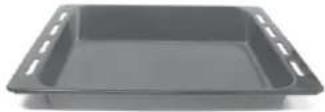
Metal wire mesh structure with radial grooves (no text or symbols)The drip tray catches the juices from grilled foods.


Never use he drip tray as a roasting tray as fat deposits can be quickly spread throughout the oven, which produces excess smoke.
Never place the drip tray directly on the oven bottom.
The pizza stone for a crisper pizza equipped according to the model with its stand and the pizza roller.
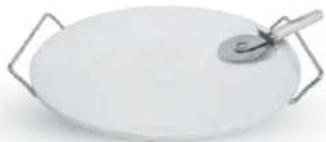
natural_image
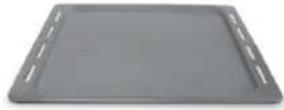
White oval plate with a metallic slice and metal handles, no text or symbols visibleThe pastry tray must be placed on the shelf. It is for cooking small pastries like choux, biscuits, meringues, etc...
Never place the pastry tray directly on the oven bottom.
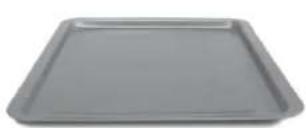
natural_image
Gray rectangular baking tray with rounded edges (no text or symbols visible)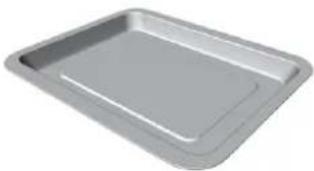
natural_image
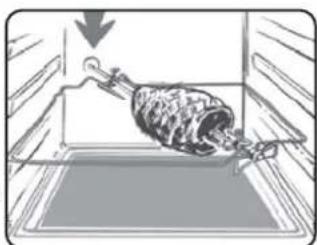
Exterior view of a gray rectangular baking tray (no text or symbols)2.2 ROTISSERIE
No pre-heating is required for rotisserie cooking.
Cooking with the door closed.
The energy consumption is 90-95% less than traditional system.
text_image
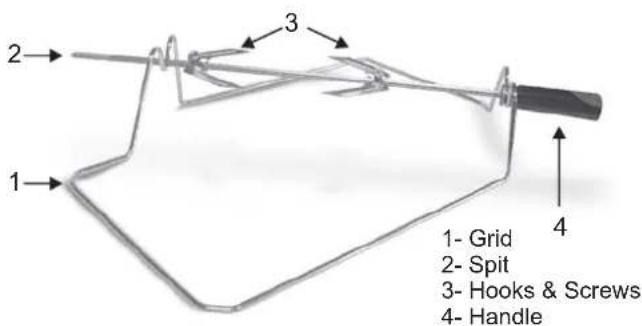
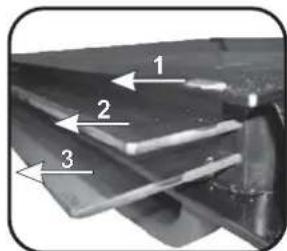
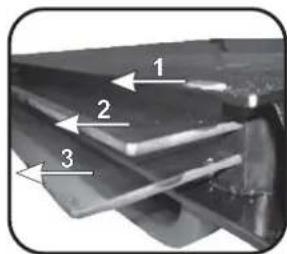
2 1 3 4 1- Grid 2- Spit 3- Hooks & Screws 4- HandleHOW TO USE TURNSPIT
- Unscrew the hooks
- Put the spit into the meat
- Fix the meat with the hooks
- Tighten the screws
- Insert the spit into the motor hole
- The handle
natural_image
Illustration of a meat skewer inside a tray, with an arrow indicating downward motion (no text or symbols)When the oven is in use, any unused accessories should be removed from the oven.
2.3 U·SEE
Is an illumination system which replaces the traditional « light bulb ». 14 LED lights are integrated within the door. These produce white high quality illumination which enables to view the inside of the oven with clarity without any shadows on all the shelves.
Advantages :
U.SEE System, besides providing excellent illumination inside the oven, lasts longer than the traditional light bulb its easier and to maintain and most of all saves energy.
- Optimum view
- Long life illumination
- Very low energy consumption, -95% in comparison with the traditional illumination High
"Appliance with white light LED of the 1M Class according to IEC 60825-1:1993+A1:1997+A2:2001 (equivalent to EN 60825-1:1994
+ A1: 2002 + A2: 2001); the maximum light power emitted λ459nm < 150uW.
Not observed directly with optical instruments. "
natural_image
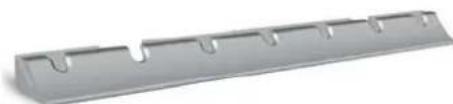
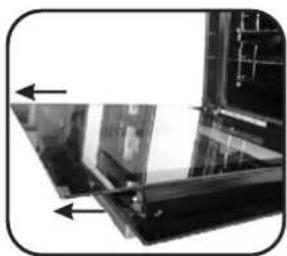
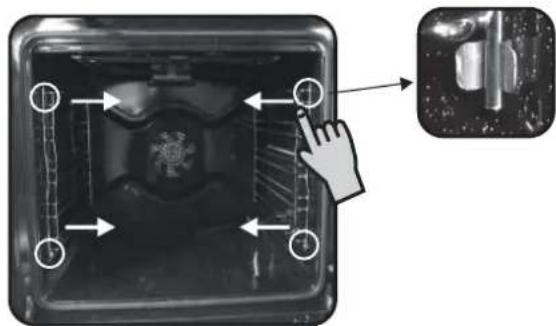
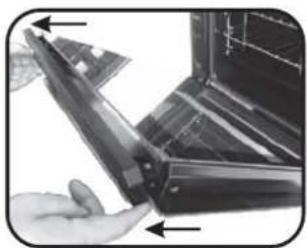
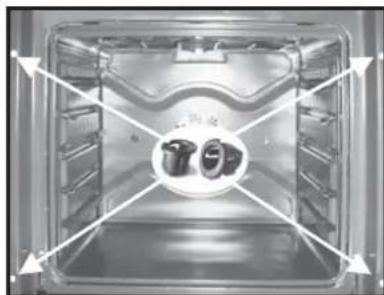
Metallic rectangular object with four recessed slots and a central hole, no visible text or symbols.2.4 REMOVING AND CLEANING WIRE RACKS
1- Remove the wire racks by pulling them in the direction of the arrows (see below)
2- To clean the wire racks either put them in the dishwasher or use a wet sponge, ensuring that they are dried afterwards.
3- After the cleaning process install the wire racks in reverse order.
text_image
Diagram showing a device interior with labeled components and an inset close-up of a mechanical component, likely illustrating a machining or cleaning process.3. CLEANING THE OVEN
- Wait for the oven to cool down before doing any cleaning by hand.
- Never clean your oven with abrasive cleaners, wire wool or sharp objects, or the enamel may be damaged beyond repair.
- Only use soapy water or bleach (ammonia) cleaners.
- Never line the oven sides with aluminium foil.
GLASS PARTS
We recommend you wipe clean the glass door with absorbent kitchen paper every time you use the oven. If the spattering is heavy, then you can clean with a well squeezed sponge and detergent, and rinse.
Do not use harsh abrasive cleaners or sharp metal scrapers to clean the oven door glass since they can scratch the surface, which may result in shattering of the glass.
OVEN DOOR SEAL
If this gets dirty, clean the oven seal with a slightly damp sponge.
ACCESSORIES
Clean them with a sponge soaked in soapy water. Rinse with clean water and dry off. Avoid abrasive cleaners.
DRIP TRAY
After grilling, remove the drip tray from the oven. Take care to pour the warm grease into a container. Wash and rinse the drip tray in hot water with a sponge soaked in washing up liquid.
If residues remain attached, soak them off in water and detergent.
It can also go in a dishwasher or be cleaned with a commercial oven cleaner.
Never place a soiled drip tray in the oven.
SELF-CLEANING OVEN WITH CATALYTIC
Special self-cleaning panels covered in a micro-porous coating are available as optional extras for all models. If they are fitted, the oven no longer needs to be cleaned by hand.
The fat that is splattered onto the sides of the oven during roasting is eliminated by the microporous coating which breaks the fat down by catalysis and transforms it into gas.
Excessive splattering may nevertheless block the pores and therefore hinder self-cleaning. The self-cleaning capacity may be restored by switching on the empty oven to maximum for about 10-20 minutes.
Do not use abrasive products, metal cleaning wads, sharp objects, rough cloths, or chemical products and detergents that may permanently damage the catalytic lining.
It is a good idea to use deep roasting trays to roast fatty foods such as joints of meat etc. and to put a tray underneath the grill to catch surplus fat. If the walls of the oven are so thickly coated in grease that the catalytic lining is no longer effective remove surplus grease with a soft cloth or sponge soaked in hot water.
The lining must be porous for self-cleaning to be effective.
N.B.: All catalytic linings currently on the market have a working life of about 300 hours. They should therefore be replaced after about 300 hours.
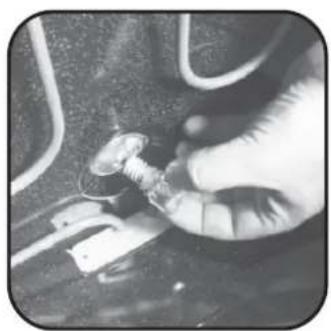
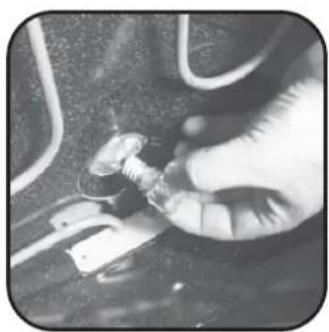
OVEN LIGHTING
Disconnect the power supply from the oven before cleaning or replacing the lamp.
The bulb and its cover are made of material resistant to high temperatures.
natural_image
Close-up of a hand holding a small screw or nut, with no visible text or symbols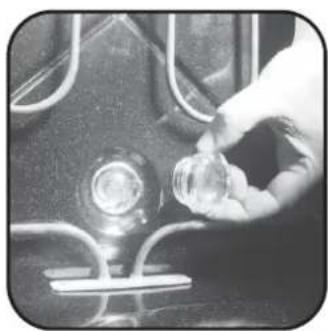
natural_image
Close-up of a hand adjusting a small glass component on a dark surface (no visible text or symbols)
natural_image
Close-up of a metallic mechanical component with curved and straight lines, no visible text or symbols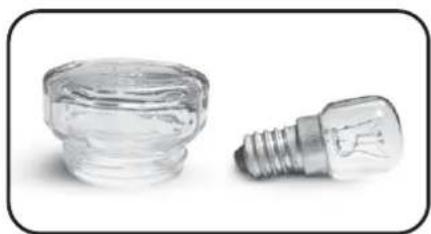
natural_image
Two transparent plastic components: a small jar and a light bulb, both with no visible text or symbols.Bulb characteristics:
230 V AC - 25W- E 14 base Temperature 300°C to change a defective bulb, just:
- Unscrew
•Unscrew
-Replace
the
the
glass
bulb,
cover,
10
•After replacing the defective bulb, screw back the protective glass cover.
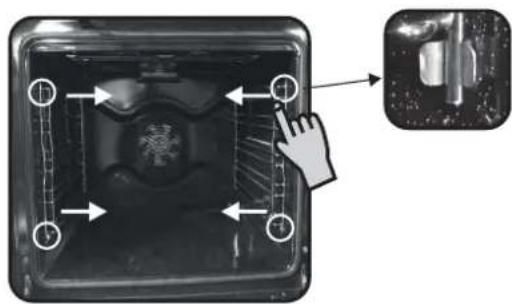
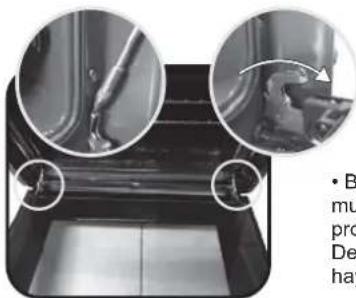
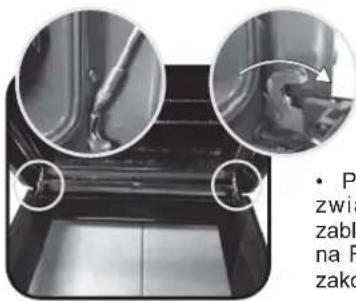
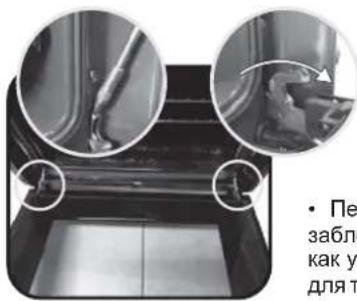
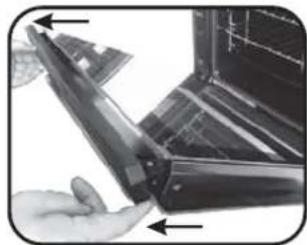
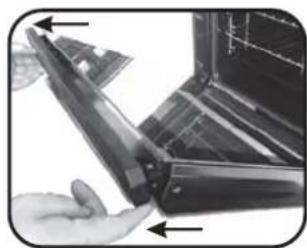
CLEANING THE DOOR GLASS
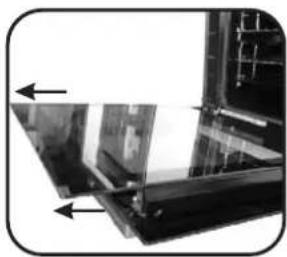
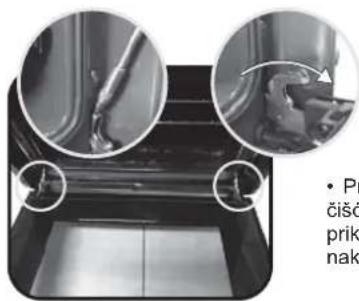
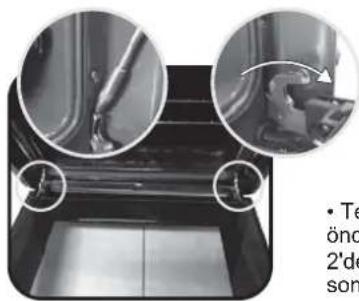
Internal door glass of this oven can be removed and cleaned. In order to clean the internal glass follow these instructions;
- Open the door of the oven. (Picture1)

natural_image
Interior view of a black oven with visible internal structure and ventilation duct (no text or symbols)Picture 1
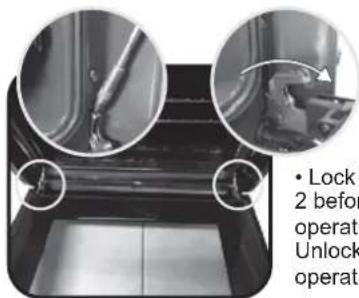
text_image
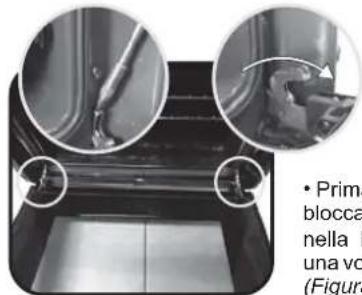
Lock 2 before operati Unlock operatiPicture 2
- Lock the hinges as shown in Picture 2 before starting the cleaning operation.
Unlock the hinges when the cleaning operation is finished. (Picture 2)
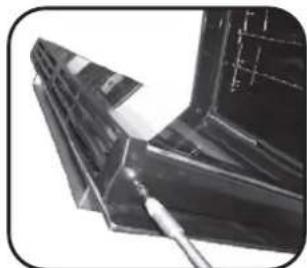
- Remove the screws as shown in Picture (Picture 3)
natural_image
Close-up of a metallic mechanical component with a tool inserted, no visible text or symbolsPicture 3
natural_image
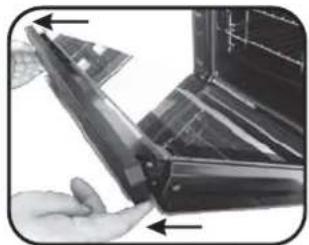
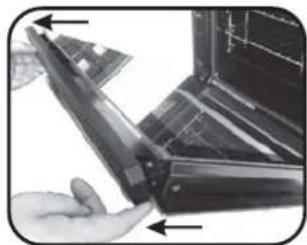
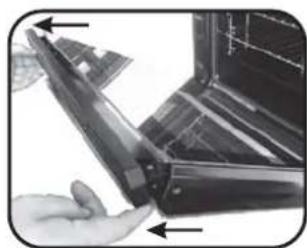
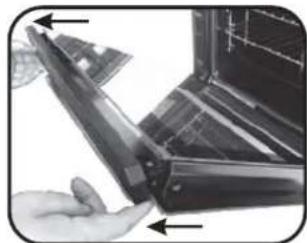
Close-up of a hand holding a mechanical component with arrows indicating direction (no visible text or symbols)Picture 4
- Remove the top metallic cover by pulling it upwards. (Picture 4
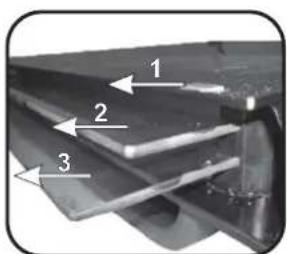
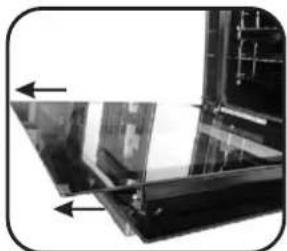
- Remove the glass by gently pulling it out of the door frame (Picture 5)
natural_image
Close-up of a mechanical component with two arrows pointing to specific areas (no visible text or symbols)Picture 5
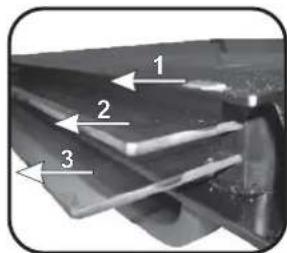
text_image
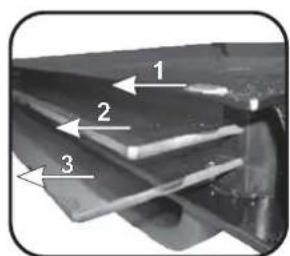
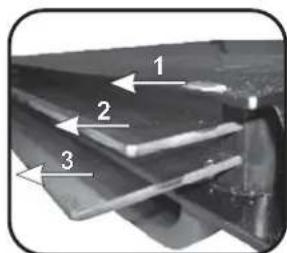
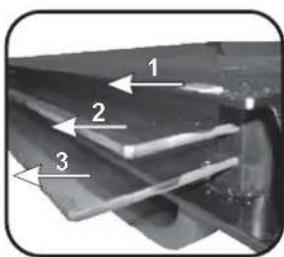
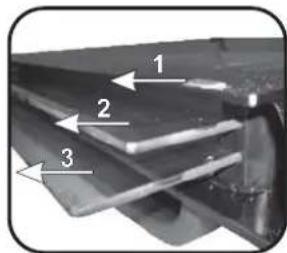
1 2 3Picture 6
• *For ovens, please Pyrolytic remove also 2^nd and 3 glasses. (Picture 6)
• After cleaning the glass re-assemble the parts in the reverse order of removal.
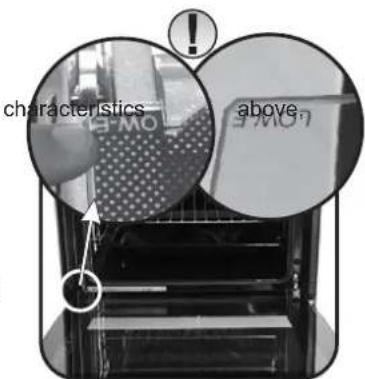
- ON ALL GLASES LOW-E sign must be properly readable and must be positioned on the left corner of the door, close to the left side hinge. In this way the printed surface of the 1^st glass will remain INSIDE the door.
text_image
characteristics abovePicture 7
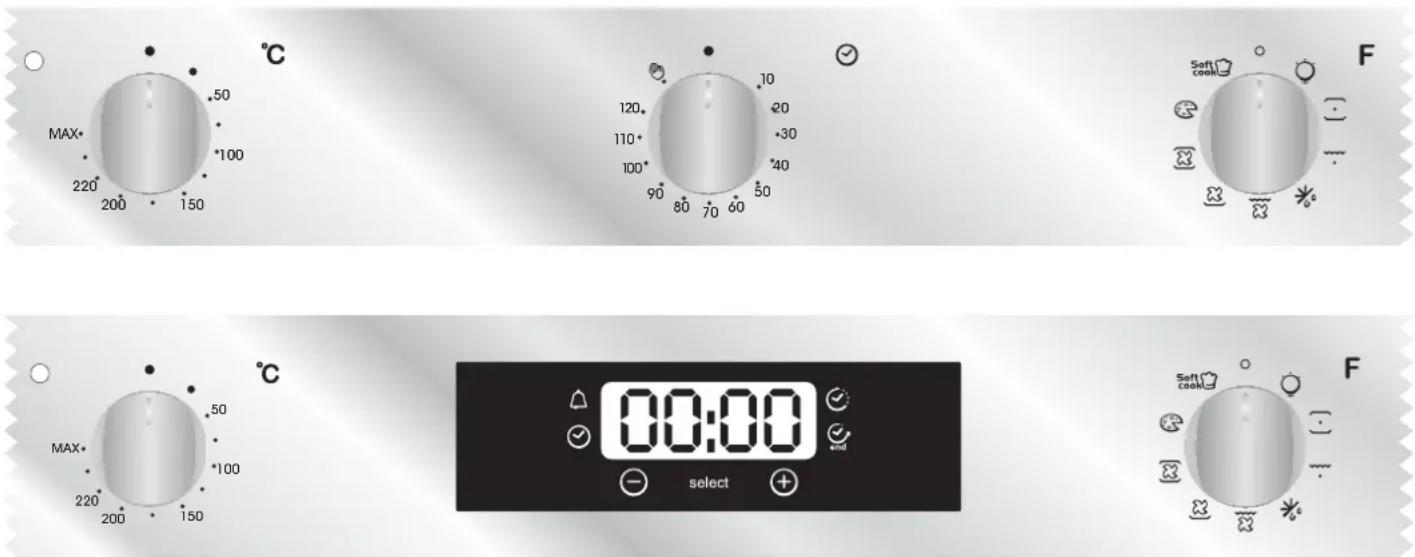
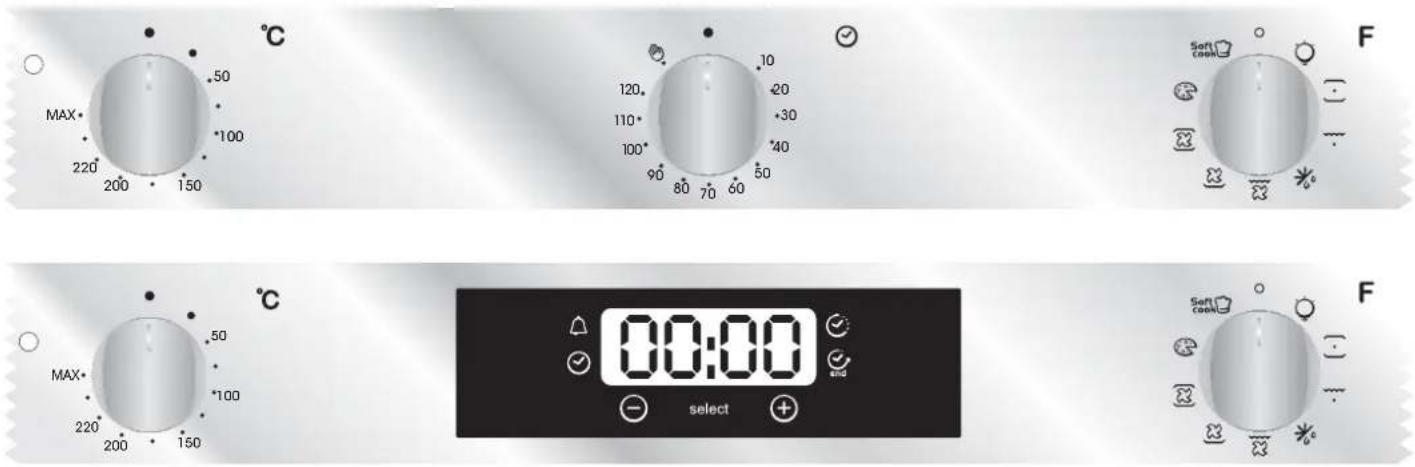
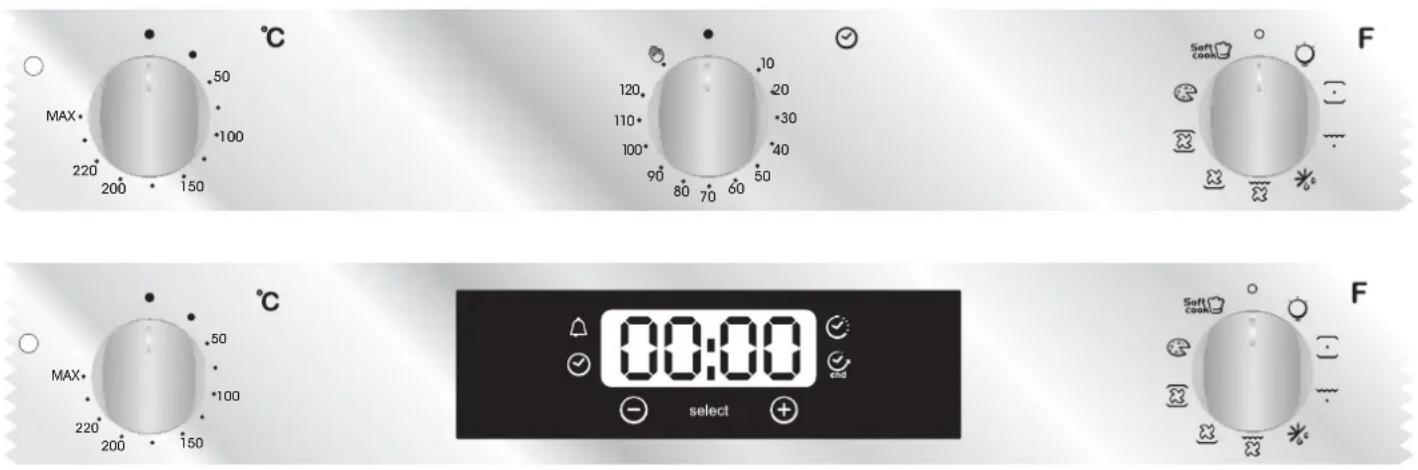
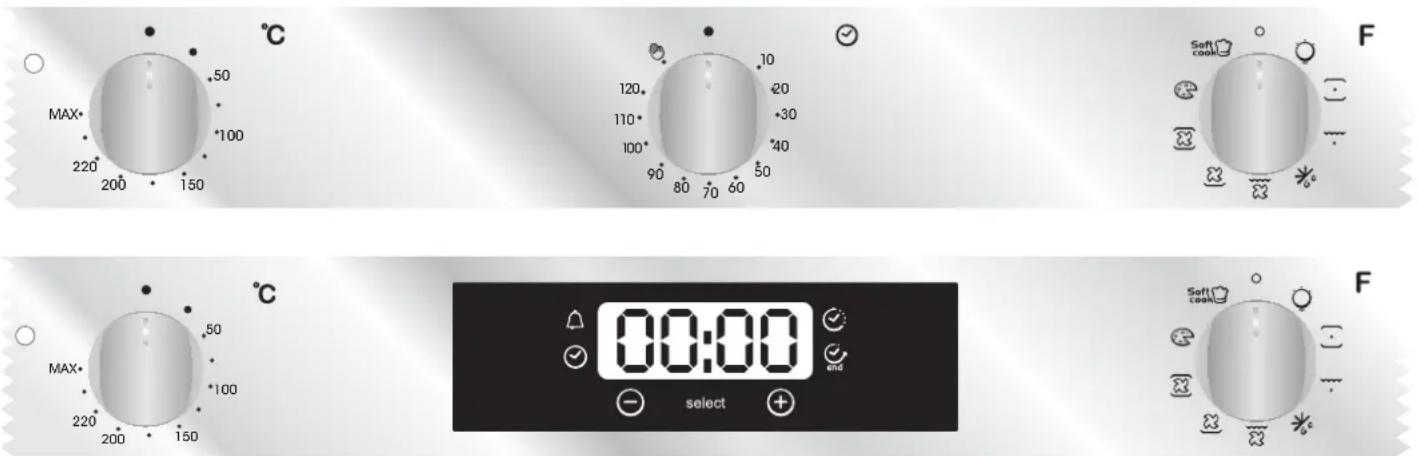
4. DESCRIPTION OF THE DISPLAY
4.1 BEFORE USING THE OVEN FOR THE FIRST TIME
• PRELIMINARY CLEANING
-Clean the oven before using for the first time:
-Wipe over external surfaces with a damp soft cloth.
-Wash all accessories and wipe inside the oven with a solution of hot water and washing up liquid.
-Set the empty oven to the maximum temperature and leave on for about 1 hour, this will remove any lingering smells of newness. Ensure that the room is well ventilated while this is being done.
• THINGS TO REMEMBER
Confirmation of operation on timer
Modification must be confirmed by pressing the button.
Stopping the oven:
This may be necessary if you have input an incorrect instruction. To stop the oven .... turn back the function selector knob to the Stop Position.
Child safety device:
To lock the oven controls, select the child safety device. Refer to the section entitled "Programming - The child safety device".
The cooling fan :
This protects the control panel and electronics from heat damage. It begins and then stops automatically even when the oven is switched off.
Oven lighting :
By turning to the light symbol, you can switch on the oven light when it is not in use.
When the oven is in use, the light stays on during all of the oven functions and when the door is opened.
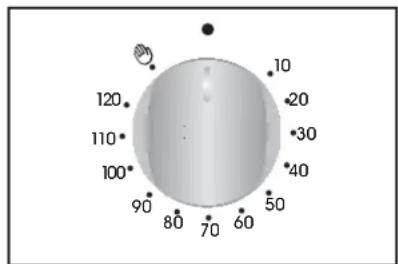
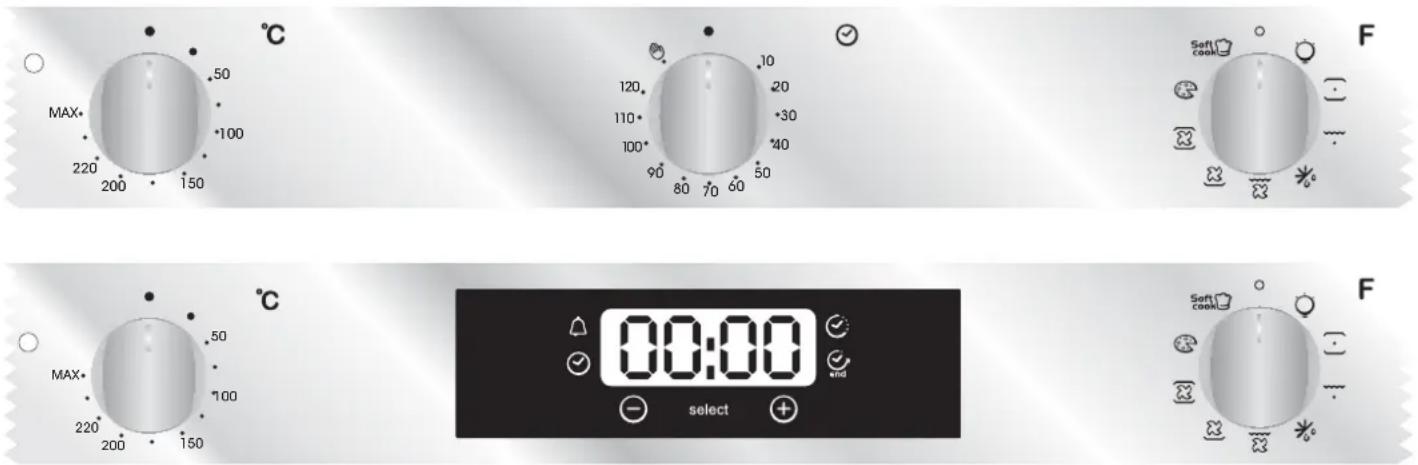
4.2 USING THE END OF COOKING TIMER
text_image
10 -20 30 40 50 60 70 80 90 100 110 120This control enables to set the desired cooking time (max. 120 min.) the oven will automatically switch off at the end of the set time.
The timer will count down from the set time return to the O position and switch off automatically.
For normal use of oven set the timer to the position.
To set the oven ensure the timer is not on the O position.
text_image
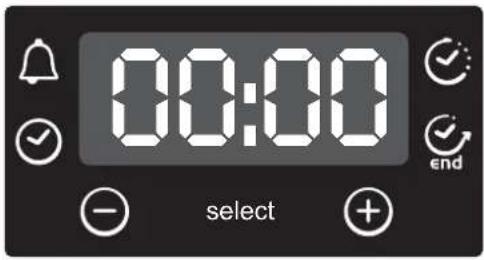
00:00 selectWARNING : the first operation to carry out after the oven has been installed or following the interruption of power supply (this is recognizable the display pulsating and showing 12:00) is setting the correct time. This is achieved as follows.
- Push the central button 4 times
- Set time with "-" "+" buttons.
- Release all buttons.
ATTENTION: The oven will only operate providing the clock is set.
4.4 USE OF TOUCH CONTROL CLOCK PROGRAMMER
| FUNCTION | HOW TO ACTIVATE IT | HOW TO SWITCH ITOFF | WHAT IT DOES WHAT | IT IS FOR |
| KEY LOCK | •Child Lock function is activated by touching Set (+) for a minimum of 5 seconds. From this moment on all other function are locked and the display will flash STOP and preset time intermittently. | •Child Lock function is deactivated by touching touchpad Set (+) again for a minimum of 5 seconds. From this moment on all functions are selectable again. | ||
MINUTE MINDER  | •Push the central button 1 times•Press the buttons "-" "+" to set the required time•Release all the buttons | •When the set time as elapsed an audible alarm is activated (this alarm will stop on its own, however it can be stopped immediately by pressing the button) SELECT. | •Sounds an alarm at the end of the set time.•During the process, the display shows the remaining time. | •Allows to use the oven as alarm clock (could be activated either with operating the oven or with out operating the oven) |
COOKING TIME  | •Push the central button 2 times•Press the buttons "-" or "+" to set the length of cooking required•Release all buttons•Set the cooking function with the oven function selector | •When the time is elapsed the oven will switch off automatically.Should you wish to stop cooking earlier either turn the function selector to 0, or set time to 0:00 (SELECT and "-" "+" buttons) | •It allows to preset the cooking time required for the recipe chosen.•To check how long is left to run press the SELECT button 2 Times.•To alter/change the preset time press SELECT and "-" "+" buttons. | •Push any button to stop the signal. Push the central button to return to the clock function |
END OF COOKING  | •Push the central button 3 times •Press the buttons "-" "+" to set the time at which you wish the oven to switch off•Release the buttons•Set the cooking function with the oven function selector | •At the time set, the oven will switch off. To switch off manually, turn the oven function selector to position O. | •Enables you to set the end of cooking time•To check the preset time push the central button 3 times•To modify the preset time press buttons SELECT + "-" "+" | •This function is typically used with "cooking time" function.For example if the dish has to be cooked for 45 minutes and needs to be ready by 12:30, simply select the required function, set the cooking time to 45 minutes and the end of cooking time to 12:30.•At the end of the cooking set time, the oven will switch off automatically and an audible alarm will ring.•Cooking will start automatically at 11:45 (12:30 minus 45 mins) and will continue until the pre-set end-of-cooking-time, when the oven will switch itself off automatically.WARNING.If the END of cooking is selected without setting the length of cooking time, the oven will start cooking immediately and it will stop at the END of cooking time set. |
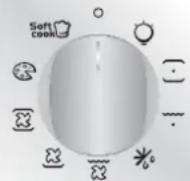
4.5 HOW TO USE THE OVEN
• COOKING MODE
All cooking should be carried out with the door closed.

BOTTOM + FAN - The combination of the bottom heating element and fan is ideal for fruit flans, tarts, quiches and pastries. It prevents food from becoming too dry and encourages bread dough to rise. Place the shelf in the bottom position in the oven.

BOTTOM - Using the lower element. Ideal for cooking all pastry based dishes. Use this for flans, quiches, tarts, pâté and any cooking that needs more heat from below.

BOTTOM + TOP - Both top and bottom heating elements are in use. This method is ideal for all traditional roasting and baking. When cooking red meat, roast beef, leg of lamb, game, bread or foil wrapped foods.

BOTTOM + TOP + FAN - Both top and bottom heating elements are used in conjunction with the fan, which circulates hot air throughout the oven. We recommend this method for poultry, pastries, fish and vegetables. By using this method better heat penetration is achieved and cooking and preheating times are also reduced. The fan cooking option allows you to cook different foods together at different positions in the oven all at the same time, providing even heat distribution but without the risk of mingling tastes and smells. When cooking different foods at the same time allow a further 10 minutes.

CIRCULAR HEATING ELEMENT + FAN - Air that has been heated is blown by the fan onto the different levels. It is ideal for cooking different types of food at the same time (e.g. Meet and fish) without mixing tastes and smell. It cooks very gently and is ideal for sponge cakes, pastries, etc.
GRILL - Using the top heating element. Success is guaranteed for mixed grills, kebabs and gratin dishes. The grill should be pre-heated to a high temperature for 5 minutes. White meats should always be placed at some distance from the grill element, the cooking time is slightly longer but the meat will be more succulent. Red meat and fish fillets can be placed directly onto the shelf with the drip tray placed beneath on lower shelf position.

GRILL + FAN - The top heating element is used in conjunction with the fan which circulates the hot air around the oven. Pre heating is recommended for red meats but is not necessary for white meats. Grilling is ideal for cooking thicker food items such as pork or poultry. Food to be grilled should be placed directly at the centre of the middle shelf.
By sliding the drip tray underneath the shelf it will ensure that any juices are collected. For best results always make sure that the food is not too close to the grill element and turn the food over half way through the cooking time.

ORILL + TURNSPIT + FAN - The advantage of using the top oven element at the same time as the fan and rotisserie is that the food is evenly cooked, preventing it from becoming dry and tasteless. The rotisserie is programmed to continue rotating for approximately five minutes after cooking, making full use of the residual oven heat. No pre-heating is required for rotisserie cooking.

DEFROST - When the dial is set to this position. The fan circulates hot air around the frozen food so that it defrosts in a few minutes without the protein content of the food being changed or altered.
The temperature is preset in 40^ C constant, no regulation is possible.

EEP WARM - This is recommended to reheat precooked foodstuff, positioning the shelf on the second level from top, or to defrost bread pizza or pastry by positioning the shelf on the lower level. The temperature is preset in 60°C constant, no regulation is possible.

RIZZA - With this function hot air circulated in the oven to ensure perfect result for dishes such as pizza or cake.

Soft cook - COOK - Soft cook is the function for the confectionery and the bread. Thanks to its reduced fan speed, this function increases oven internal damp. The increased damp creates the ideal conditions of cooking for those foods that need to maintain an elastic consistence while they are cooking (ex. cakes, bread, biscuits) avoiding surface breakages.
* Tested in accordance with the CENELEC EN 60350-1 used for definition of energy class.
4.6 COOKING TIPS
It is better not to salt meats until after cooking as salt encourages the meat to spatter fat. This will dirty the oven and make a lot of smoke.
Joints of white meat, pork, veal, lamb and fish can be put into the oven cold. The cooking time is longer than in a preheated oven, but it cooks through to the centre better as the heat has more time to penetrate the joint.
Correct preheating is the basis of successful red meat cookery.
GRILLS
• Before loading the grill:
Remove the meat from the refrigerator a few hours before grilling. Lay it on several layers of kitchen paper. This improves seizing, making it tastier and avoids it staying cold at the centre.
Add pepper and spices to the meat before grilling, but add any salt after cooking. This way it will seize better and stay juicy. Baste all the food to be cooked with a little oil. This is best done with a wide flat basting brush. Then sprinkle with more pepper and herbs (thyme, etc.).
• During cooking:
Never pierce the food during cooking even when you turn it. This lets the juice out and it becomes dry.
BAKING
Avoid using shiny tins, they reflect the heat and can spoil your cakes. If your cakes brown too quickly, cover them with greaseproof paper or aluminium foil.
Caution: The correct way to use foil is with the shiny side in towards the cake. If not the heat is reflected by the shiny surface and does not penetrate the food.
Avoid opening the door during the first 20 to 25 minutes of cooking:
Soufflés, brioches, sponge cakes, etc. will tend to fall. You can check if cakes are done by pricking the centre with a knife blade or metal knitting needle. If the blade comes out nice and dry, your cake is ready and you can stop cooking. If the blade comes out moist or with bits of cake attached, continue baking but slightly lower the thermostat so that it is finished off without burning.
5. SERVICE CENTRE
Before calling the Service Centre.
If the oven is not working, we recommend that:
- Check that, if the oven is properly plugged into the power supply.
If the cause of the fault cannot be detected:
- Disconnect the oven from the mains, do not touch the oven and call the after sales service.
Before calling the Service Centre remember to make a note of the serial number on the serial number specifications plate.
The oven is supplied with a guarantee certificate that ensures that it will be repaired free of charge by the Service Centre whilst under guarantee.
This appliance is marked according to the European directive 2012/19/EU on Waste Electrical and Electronic Equipment (WEEE). WEEE contains both polluting substances (which can cause negative consequences for the environment) and basic components (which can be reused). It is important to have WEEE subjected to specific treatments, in order to remove and dispose properly all pollutants, and recover and recycle all materials.
Individuals can play an important role in ensuring that WEEE does not become an environmental issue; it is essential to follow some basic rules:
- WEEE shall not be treated as household waste.
- WEEE shall be handed over to the relevant collection points managed by the municipality or by registered companies. In many countries, for large WEEE, home collection could be present.
- When you buy a new appliance, the old one may be returned to the retailer who has to collect it free of charge on a one-to-one basis, as long as the equipment is of equivalent type and has the same functions as the supplied equipment.
ENERGY SAVING AND RESPECTING THE ENVIRONMENT
Where possible, avoid pre-heating the oven and always try to fill it. Open the oven door as infrequently as possible, because heat from the cavity disperses every time it is opened. For a significant energy saving, switch off the oven between 5 and 10 minutes before the planned end of the cooking time, and use the residual heat that the oven continues to generate. Keep the seals clean and in order, to avoid any heat dispersal outside of the cavity. If you have an electric contract with an hourly tariff, the "delayed cooking" programme makes energy saving more simple, moving the cooking process to start at the reduced tariff time slot.
natural_image
Metal wire mesh structure with radial lines, no text or symbols visiblenatural_image
Two black plastic tray containers side by side, one upright and one flat (no text or symbols visible)natural_image
White oval plate with a metallic spatula resting on it, paired with two metal handles (no text or symbols visible)natural_image
Two gray rectangular baking trays, one plain and one with a cutout (no text or symbols visible)natural_image
Illustration of a rooster being cut down inside an oven (no text or symbols)natural_image
Metallic rectangular object with multiple recessed slots and a flat top edge (no text or symbols visible)natural_image
Interior view of an oven with a hand pointing to a component, showing internal structure and a close-up inset (no text or symbols)3. PULIZIA DEL FORNO 4. RISOLUZIONE DEI PROBLEMI
natural_image
Close-up of a hand holding a small metallic object with wires, no visible text or symbols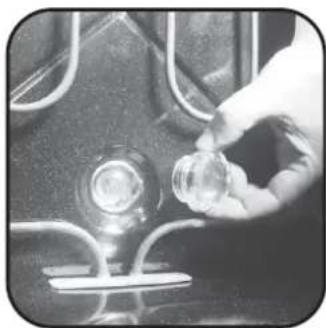
natural_image
Hand placing a small transparent object into a glass bulb on a dark surface (no text or symbols visible)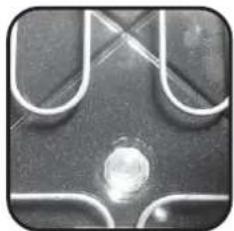
natural_image
Close-up of a metallic object with curved and rectangular features, possibly a component or fixture (no visible text or symbols)
natural_image
Two small glass objects: a cylindrical container and a standard light bulb, both without any visible text or symbols.natural_image
Interior view of a black oven with visible grilles and ventilation slots (no text or symbols)Figura 1
natural_image
Close-up of a metallic mechanical component with a tool inserted, no visible text or symbolsFigura 3

natural_image
Close-up of a hand holding a metal clip next to a device component (no visible text or symbols)Figura 4
natural_image
Close-up of a mechanical component with two arrows pointing to features (no visible text or symbols)Figura 5
text_image
1 2 3Figura 6
text_image
LOW-E LOW-EFigura 7
natural_image
Simple wire mesh structure with no text or symbolsnatural_image
White oval-shaped object with a metallic spoon resting on it, supported by two metal handles (no text or symbols visible)natural_image
Gray rectangular baking tray with rounded edges (no text or symbols visible)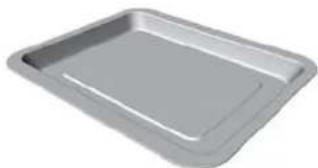
natural_image
Exterior view of a gray rectangular baking tray (no text or symbols)2.2 ASADOR (DEPENDE DEL MODELO)
natural_image
Illustration of a rooster inside a tray with an arrow indicating downward motion (no text or symbols)natural_image
Gray rectangular metal bracket with four recessed slots (no text or symbols)natural_image
Top-down view of a kitchen appliance with arrows indicating internal components and a close-up inset showing a hand interacting with the lid (no text or symbols)3. LIMPIEZA DEL HORNO
natural_image
Close-up of a hand holding a small electronic component, possibly a light bulb or sensor, with no visible text or symbols.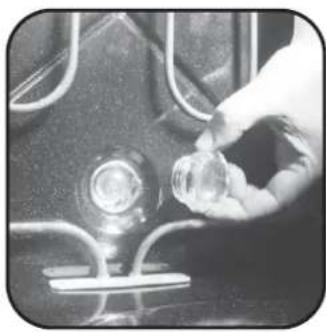
natural_image
Close-up of a hand holding a small transparent object near a car dashboard (no visible text or symbols)
natural_image
Close-up of a metallic mechanical component with curved and straight lines, no visible text or symbols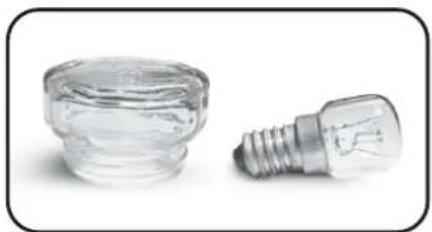
natural_image
Two small glass components: a cylindrical container and a standard light bulb, both without any visible text or symbols.natural_image
Interior view of a black oven with open door and ventilation grilles (no visible text or symbols)Figura 1
natural_image
Close-up of a mechanical component with two circular insets showing internal components (no visible text or symbols)natural_image
Close-up of a metallic bracket with a metal rod inserted, showing internal structure (no text or symbols visible)Figura 3
natural_image
Close-up of a hand inserting a plastic clip into a laptop (no visible text or symbols)Figura 4
natural_image
Close-up of a mechanical component with two arrows indicating direction (no visible text or symbols)Figura 5
text_image
1 2 3Figura 6
text_image
LOW-E LOW-EFigura 7
natural_image
Simple wire mesh structure with no text or symbolsnatural_image
White oval plate with a metallic spatula resting on its side, paired with two metal handles (no text or symbols visible)natural_image
Gray rectangular baking tray with rounded edges (no text or symbols visible)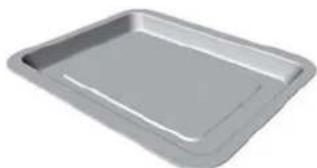
natural_image
Gray rectangular baking tray with a flat top (no text or symbols visible)2.2 ROŻEN (W ZALEŻNOŚCI OD MODELU)
natural_image
Illustration of a meat being cut with a knife, showing interior processing (no text or symbols)natural_image
Exterior view of a gray metal grate with slots and a central slot (no text or symbols)2.4 DEMONTAŻ I CZYSZCZENIE DRABINEK
natural_image
Close-up of a kitchen appliance with a hand pointing to a component, showing internal structure and part outline (no text or symbols)3. CZYSZCZENIE PIEKARNIKA
natural_image
Close-up of a hand holding a small electronic component with wires, no visible text or symbols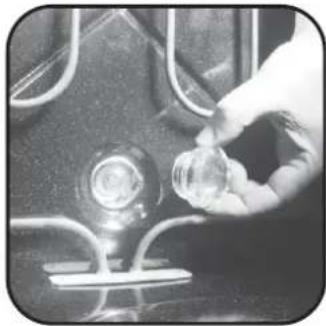
natural_image
Close-up of a hand holding a small transparent object near a circular device (no visible text or symbols)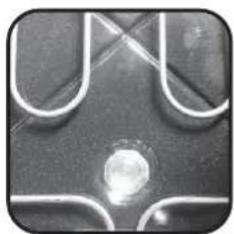
natural_image
Close-up of a metallic mechanical component with curved and straight lines, no visible text or symbols
natural_image
Two small glass objects: a cylindrical container and a standard light bulb, both without any visible text or symbols.natural_image
Interior view of a black oven with visible grating and ventilation slots (no text or symbols)Rys. 1
natural_image
Close-up of a mechanical component with two circular insets showing close-ups of a tool and a textured surface (no visible text or symbols)natural_image
Close-up of a metal bracket with a tool inserted, showing internal structure and grid lines (no text or symbols)Rys. 3

natural_image
Close-up of a hand holding a flexible electronic device with arrows indicating direction (no visible text or symbols)Rys. 4
natural_image
Close-up of a mechanical component with two arrows pointing to specific areas (no visible text or symbols)Rys. 5
text_image
1 2 3text_image
LOW-E LOW-ERys. 7
4. PANEL STEROWANIA
4.1 PRZED UŻYCIEM PIEKARNIKA PO RAZ PIERWSZY
natural_image
Metal wire mesh structure with radial slots, no text or symbols visiblenatural_image
White oval plate with a metallic spatula resting on it, paired with two metal handles (no text or symbols visible)natural_image
Gray rectangular baking tray with rounded edges (no text or symbols visible)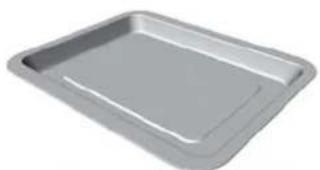
natural_image
Exterior view of a gray rectangular baking tray (no text or symbols)2.2 ROŽEN
natural_image
Illustration of a rooster inside an oven with a downward arrow indicating motion (no text or symbols)natural_image
Metallic rectangular object with four recessed slots and a notch, shown against a white background (no text or symbols)2.4 VYJMUTÍ A ČIŠTĚNÍ DRÁTĚNÝCH ÚROVNÍ ROŠTŮ
natural_image
Interior view of an oven with a hand pointing to a component, showing internal structure and part of a close-up (no text or symbols)3. ČIŠTĚNÍ TROUBY
natural_image
Close-up of a hand holding a small mechanical component, no visible text or symbols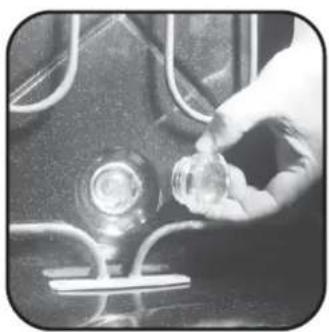
natural_image
Close-up of a hand holding a small transparent object near a glass bulb (no visible text or symbols)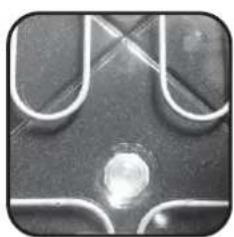
natural_image
Close-up of a metallic surface with curved and straight lines, featuring a central circular spot (no text or symbols visible)
natural_image
Two small glass objects: a cylindrical container and a standard light bulb, both without any visible text or symbols.Vlastnosti žárovky:
230 VAC - 25W- E 14 závit
Teplota 300°C
Pro výměnu žárovky:
natural_image
Close-up of a mechanical component with two circular insets showing internal components (no visible text or symbols)Obrázek 2

natural_image
Interior view of a black oven with open door and ventilation slots (no visible text or symbols)Obrázek 1
natural_image
Close-up of a hand holding a metal bracket with arrows indicating direction (no visible text or symbols)
natural_image
Close-up of a mechanical component with a tool inserted, showing no visible text or symbols.Obrázek 3
natural_image
Close-up of a mechanical component with two arrows pointing to specific areas (no visible text or symbols)Obrázek 5
text_image
LOW-E LOW-EObrázek 7
4. POPIS DISPLEJE
4.1 PŘED PRVNÍM POUŽITÍM TROUBY
• PRVNÍ ČIŠTĚNÍ
natural_image
Simple wire mesh structure with no text or symbolsnatural_image
White oval plate with a metal spatula resting on it, paired with two metal handles (no text or symbols visible)natural_image
Gray rectangular baking tray with rounded edges and a flat top (no text or symbols visible)
natural_image
3D rendering of a gray rectangular baking tray (no text or symbols)2.2 ВЕРТЕЛ
natural_image
Illustration of a meat skewer inside a pan, showing meat being lifted by a hook (no text or symbols)natural_image
Metallic rectangular object with evenly spaced notches and a flat base (no text or symbols visible)natural_image
Close-up of a dark rectangular appliance with internal components and directional arrows, next to an inset showing a close-up of a small cylindrical object (no text or symbols visible)3. ЧИСТКА ДУХОВКИ
natural_image
Close-up of a hand holding a small mechanical component (no visible text or symbols)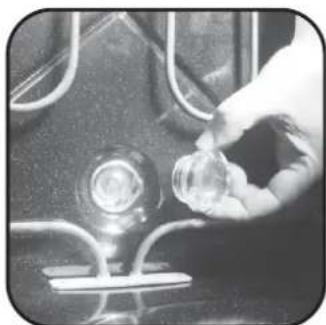
natural_image
Close-up of a hand holding a small transparent object near a glowing circular component (no visible text or symbols)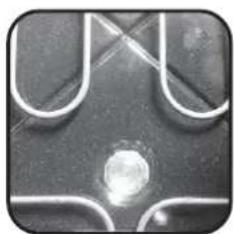
natural_image
Close-up of a metallic surface with curved and straight lines, featuring a central circular spot (no text or symbols visible)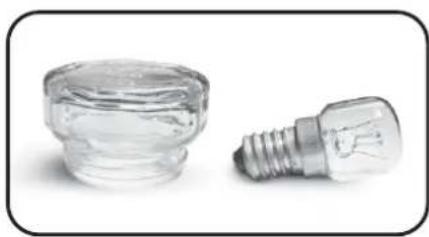
natural_image
Two small glass components: a cylindrical container and a standard incandescent light bulb, both without any text or symbols.natural_image
Interior view of a black oven with visible grating and ventilation duct (no text or symbols)Figure 1
natural_image
Close-up of mechanical components with circular insets showing close-ups of a tool and a component (no visible text or symbols)natural_image
Close-up of a metallic bracket with a tool inserted, showing internal structure and grid lines (no text or symbols visible)Figure 3
natural_image
Close-up of a hand holding a metal bracket with arrows indicating direction (no text or symbols visible)natural_image
Close-up of a mechanical component with two arrows pointing to features (no visible text or symbols)Figure 5
text_image
1 2 3text_image
LOW-E-MO LOW-E-MOFigure 7
4. ОПИСАНИЕ ДИСПЛЕЯ
text_image
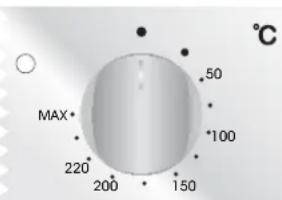
50 MAX* 220 200 150 100 °C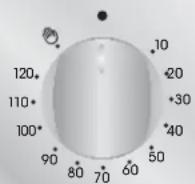
√

text_image
MAX 220° 200° 150° 50 100 °C
text_image
00:00 select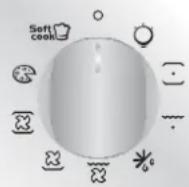
2. TEHNOLOGIJA PRO/EXP'R
2.1 OPREMA PEČICE (odvisno od modela)
natural_image
Metal wire mesh structure with vertical slats, no text or symbols visiblenatural_image
White oval plate with a metallic slice and metal handles, placed on two silver metal handles (no text or symbols visible)natural_image
Gray rectangular baking tray with rounded edges (no text or symbols visible)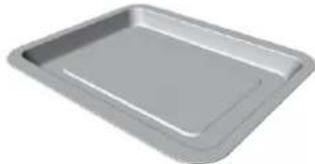
natural_image
Exterior view of a gray rectangular baking tray (no text or symbols)2.2 RAŽENJ
Pri peki na ražnju predgrevanje pečice ni potrebno.
Peka poteka pri zaprtih vratih pečice.
natural_image
Illustration of a meat being cut with a fork, showing interior processing (no text or symbols)natural_image
Metallic rectangular object with four recessed slots and a flat top edge (no text or symbols visible)2.4 SNEMANJE IN ČIŠČENJE ŽIČNIH VODIL
natural_image
Top-down view of a kitchen appliance with a hand pointing to a component, showing internal structure and part outline (no text or symbols)3. ČIŠČENJE PEČICE
natural_image
Close-up of a hand holding a small electronic component, possibly a light bulb or sensor, with no visible text or symbols.
natural_image
Close-up of a hand holding a small transparent object with a glowing bulb, next to a metallic fixture (no visible text or symbols)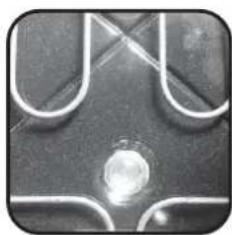
natural_image
Close-up of a metallic object with curved and straight lines, possibly a component or fixture (no visible text or symbols)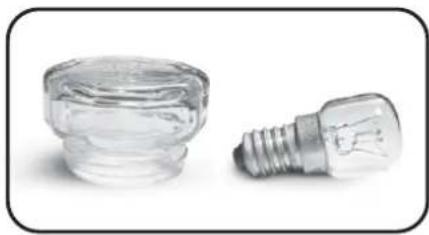
natural_image
Two small transparent plastic components: a cylindrical cap and a standard light bulb, both without any visible text or symbols.natural_image
Close-up of a mechanical component with two circular insets showing internal features (no visible text or symbols)slika 2

natural_image
Interior view of a black oven with open door and side panel (no visible text or symbols)slika 1
natural_image
Close-up of a metallic mechanical component with a tool inserted, no visible text or symbolsslika 3

natural_image
Close-up of a hand holding a metal bracket with arrows indicating direction (no text or symbols visible)slika 4
- Snemite zgornji kovinski pokrovček – potegnite ga navzgor (slika 4).
- Odstranite steklo – previdno ga izvlecite iz okvirja vrat (slika 5).
natural_image
Close-up of a mechanical component with two arrows pointing to specific areas (no visible text or symbols)slika 5

text_image
1 2 3slika 6
2. PRO/EXP'R TEHNOLOGIJA (ZAVISNO O MODELU)
2.1 OPREMA PEĆNICE (ZAVISNO O MODELU)
Prije prve uporabe očistite svu opremu isporučenu uz pećnicu. Operite vodom i spužvom, isperite i potpuno osušite.
Polica služi za držanje posuda i plitica za pečenje.
natural_image
Metal wire mesh structure with radial lines, no text or symbols visiblePlitica za sakupljanje masti i sokova hrane koja se peče na žaru.
natural_image
White oval plate with a metal spatula resting on it, paired with two metal handles (no text or symbols visible)Plitica za kolače i pecivo, mora biti postavljena na policu. Ova plitica služi za pečenje slastica, kolača, peciva i sl.
natural_image
Gray rectangular baking tray with rounded edges (no text or symbols visible)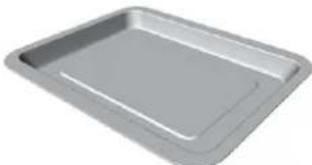
natural_image
Exterior view of a modern office building (no signage)2.2 RAŽANJ (ZAVISNO O MODELU PEĆNICE)
natural_image
Illustration of a meat skewer inside a rectangular opening, with a downward arrow indicating compression (no text or symbols)natural_image
Metallic rectangular object with four recessed slots and a flat top edge (no text or symbols visible)2.4 UKLANJANJE I ČIŠĆENJE REŠETKE
1- Uklonite rešetku povlačenjem u smjeru strelice na slici.
2- Očistite rešetku pranjem u perilici posuđa ili pomoću vlažne spužvice. Osušite rešetku.
3- Nakon čišćenja, vratite rešetku na njeno mjesto.
natural_image
Top-down view of a kitchen appliance with arrows indicating directional movement, showing internal components and a close-up inset (no text or symbols)3. CLEANING THE OVEN
- Prije ručnog čišćenja, pričekajte da se pećnica u potpunosti ohladi i isključite je iz električnog napajanja.
- Nikada nemojte čistiti pećnicu abrazivnim sredstvima, žičanom vunom ili oštrim predmetima jer će se emajl nepopravljivo oštetiti.
- Koristite isključivo vodu i deterdžent ili sredstva na bazi amonijaka.
•Nikada nemojte oblagati unutrašnje stranice pećnice aluminjskom folijom.
STAKLENI DIJELOVI
Savjetujemo da staklena vrata nakon svakog korištenja pećnice obrišete kuhinjskim papirom koji dobro upija. Ako su vrata jako prljava možete ih oprati pomoću spužve i odgovarajućeg deterdženta, isperite i dobro obrišite. *Nikada nemojte koristiti abrazivna sredstva i oštre predmete.
- Za čišćenje staklenih vrata pećnice nemojte koristiti gruba sredstva za čišćenje ili oštre metalne predmete, to može izazvati nepopravljiva oštećenja na staklu.
BRTVA VRATA
Ako je brtva prljava, operite je lagano vlažnom spužvom.
PRIBOR PEĆNICE
Pribor pećnice očistite spužvom i odgovarajućim deterdžentom, isperite čistom vodom i osušite. Izbjegavajte abrazivna sredstva za čišćenje.
PLITICA ZA SAKUPLJANJE MASTI
Nakon pečenja na žaru, izvadite pliticu za sakupljanje masti iz pećnice. Pazite da se vruća masnoća ohladi. Operite pliticu spužvom, odgovarajućim deterdžentom i vrućom vodom, isperite toplom vodom. Ako u plitici i nakon pranja ima ostataka masnoće, namačite je neko vrijeme u otopini vode i deterdženta. Pliticu možete oprati i u perilici za posuđe. Nikada ne stavljajte prljavu pliticu natrag u pećnicu. Ne stavljajte pliticu u pećnicu tijekom postupka pirolize.
SVJETLO PEĆNICE
Prije čišćenja ili zamjene žarulje isključite pećnicu iz električne mreže. Žarulja i njen poklopac izrađeni su od materijala koji su otporni na vrlo visoke temperature.
natural_image
Close-up of a hand holding a small metallic screw or nut, with no visible text or symbols.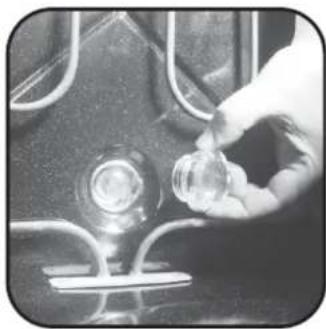
natural_image
Close-up of a hand holding a small transparent object over a glass bulb, with no visible text or symbols.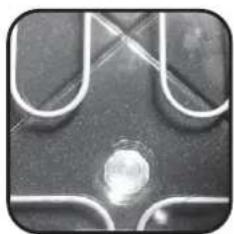
natural_image
Close-up of a metallic mechanical component with curved and flat surfaces, no visible text or symbols
natural_image
Two small glass components: a cylindrical container and a standard incandescent light bulb, both without any visible text or symbols.Karakteristike žarulje:
230 V AC - 25 W - E 14 baza, temperatura 300°C
natural_image
Interior view of a black oven with visible grilles and ventilation slots (no text or symbols)Slika 1
natural_image
Close-up of a mechanical component with two circular insets showing close-ups of a tool and a hand, no visible text or symbols.Slika 2
natural_image
Close-up of a mechanical component with a tool inserted, no visible text or symbolsSlika 3

natural_image
Close-up of a hand holding a metal bracket with arrows indicating movement (no text or symbols visible)Slika 4
- Odvojite gornji metalni pokrov povlačenjem prema gore. (Slika 4)
- Uklonite staklo nježnim izvlačenjem iz okvira vratiju. (Slika 5)
natural_image
Close-up of a mechanical component with two arrows pointing to features (no visible text or symbols)Slika 5
text_image
1 2 3Slika 6
natural_image
Metal wire mesh structure with radial grooves (no text or symbols)natural_image
White oval plate with a metallic spatula resting on it, paired with two metal handles (no text or symbols visible)natural_image
Gray rectangular baking tray with rounded edges (no text or symbols visible)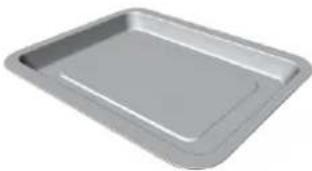
natural_image
Exterior view of a gray rectangular baking tray (no text or symbols)2.2 GRILLSPIEß (MODELLABHÄNGIG)
natural_image
Illustration of a rooster inside a tray, showing meat and meat cuts (no text or symbols)natural_image
Gray metal trough-shaped object with four notches, no visible text or symbolsnatural_image
Interior view of a kitchen appliance with a hand pointing to a component, showing internal structure and part details (no text or symbols)natural_image
Close-up of a hand holding a small electronic component, possibly a light bulb or sensor, with no visible text or symbols.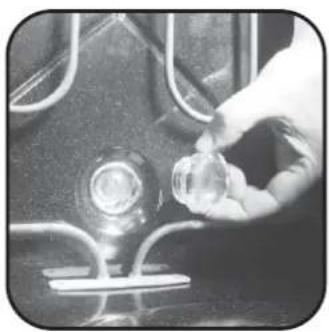
natural_image
Close-up of a hand adjusting a small glass component on a dark surface (no visible text or symbols)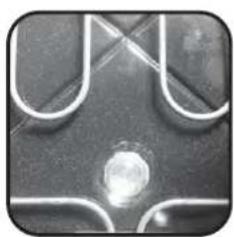
natural_image
Close-up of a metallic mechanical component with curved and flat surfaces, no visible text or symbols
natural_image
Two transparent plastic components: a cylindrical container and a standard light bulb (no text or symbols visible)natural_image
Close-up of mechanical components with circular insets highlighting features (no visible text or symbols)Abbildung 2

natural_image
Interior view of a black oven with open door and ventilation grilles (no visible text or symbols)Abbildung 1
natural_image
Close-up of a mechanical component with a tool inserted, showing no visible text or symbols.Abbildung 3
natural_image
Close-up of a hand holding a metal bracket with arrows indicating direction (no text or symbols visible)Abbildung 4
natural_image
Close-up of a mechanical component with arrows indicating direction (no visible text or symbols)Abbildung 5
text_image
1 2 3Abbildung 6
natural_image
Metal wire mesh structure with radial lines, no text or symbols visiblenatural_image
White oval-shaped object with a metallic spatula resting on it, paired with two metal handles (no text or symbols visible)natural_image
Gray rectangular baking tray with rounded edges and a flat top (no text or symbols visible)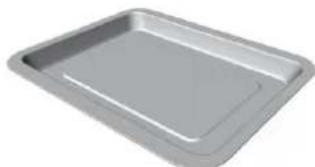
natural_image
Gray rectangular baking tray with rounded edges, no text or symbols visible2.2 \i\
natural_image
Illustration of a meat skewer inside a rectangular container with a downward arrow indicating compression (no text or symbols)natural_image
Gray rectangular object with four recessed slots and a central hole, resembling a metal grate or support structure (no text or symbols visible)2.4 YAN IZGARALARIN ÇIRARILMASI VE TEMİZLENMESİ
natural_image
Interior view of a kitchen appliance with a hand pointing to a component, showing no visible text or symbols.3. FIRIN TEMİZLENMESİ
natural_image
Close-up of a hand holding a small metallic object with wires, no visible text or symbols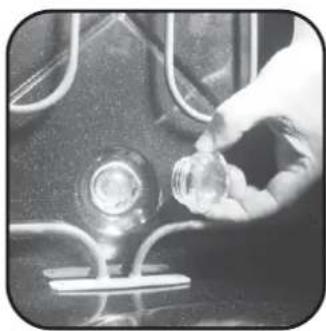
natural_image
Close-up of a hand holding a small object near a glass bottle, with no visible text or symbols.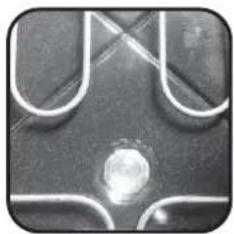
natural_image
Close-up of a metallic object with curved and straight lines, featuring a central circular spot (no text or symbols visible)
natural_image
Two small glass components: a cylindrical container and a standard incandescent light bulb, shown against a white background (no text or symbols visible)Ampul özellikleri:
natural_image
Black oven with open door and ventilation grilles (no visible text or symbols)Şekil 1
natural_image
Close-up of a mechanical component with two circular insets showing close-ups of a tool and a bracket (no visible text or symbols)Şekil 2
natural_image
Close-up of a mechanical component with a tool applying material to a surface (no visible text or symbols)Şekil 3
natural_image
Close-up of a hand holding a metal bracket with arrows indicating direction (no text or symbols visible)Şekli 4
natural_image
Close-up of a mechanical component with two arrows pointing to features (no visible text or symbols)Şekli 5
text_image
1 2 3Şekli 6
text_image
LOW-E-MO LOW-E-MOŞekil 7
4. EKRAN AÇIKLAMASI
4.1 FIRINI İLK KEZ KULANMADAN ÖNCE
- ÖN TEMİZLİK
2.1 EQUIPEMENT DU FOUR
natural_image
Metal wire mesh structure with radial grooves (no text or symbols)natural_image
White oval plate with a metallic slice and metal handles, no text or symbols visible.natural_image
Gray rectangular baking tray with rounded edges and a flat top (no text or symbols visible)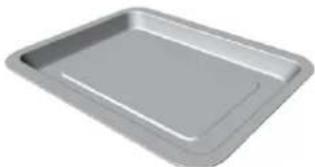
natural_image
Exterior view of a modern office building (no signage)2.2 TOURNEBROCHE
natural_image
Illustration of a meat skewer inside a pan, with an arrow indicating downward motion (no text or symbols)natural_image
Metallic rectangular object with four recessed slots and a central hole, shown against a white background (no text or symbols)2.4 RETRAIT ET NETTOYAGEDES GRILLES
natural_image
Top-down view of a dark rectangular appliance with internal components and directional arrows, showing a hand interacting with the lid (no text or symbols visible)3. ENTRETIEN GENERAL DU FOUR
natural_image
Close-up of a hand holding a small mechanical component, possibly a tool or fixture (no visible text or symbols)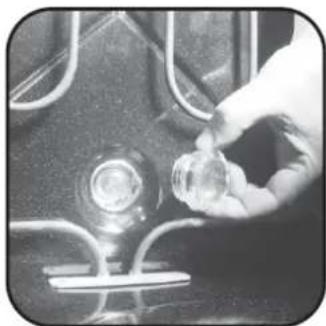
natural_image
Close-up of a hand holding a small transparent object near a glass bulb (no visible text or symbols)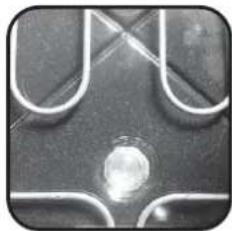
natural_image
Close-up of a metallic mechanical component with curved and flat surfaces (no visible text or symbols)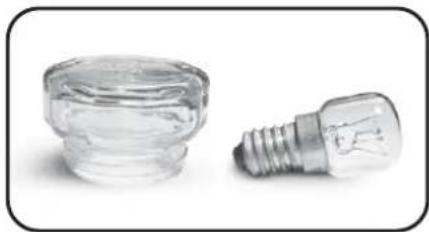
natural_image
Two small glass plastic components: a cylindrical container and a standard incandescent light bulb (no text or symbols visible)natural_image
Interior view of a black oven with visible grilles and ventilation slots (no text or symbols)Image 1
natural_image
Close-up of a metallic mechanical component with a tool inserted, no visible text or symbolsImage 3
natural_image
Close-up of a hand holding a metal bracket with arrows indicating movement (no text or symbols visible)Image 4
natural_image
Close-up of a mechanical component with two arrows pointing to features (no visible text or symbols)Image 5
text_image
LOW-E LOW-EImage 7
4. PRESENTATION DU TABLEAU DE BORD
4.1 CONSEILS AVANT LA PREMIERE UTILISATION
natural_image
Simple wire mesh structure with no text or symbolsnatural_image
White oval plate with a metallic spatula resting on its side, paired with two metal handles (no text or symbols visible)natural_image
Gray rectangular baking tray with rounded edges (no text or symbols visible)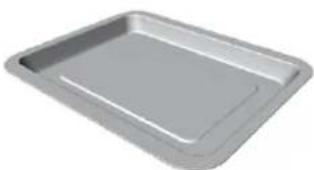
natural_image
Exterior view of a modern office building (no signage)2.2 HET DRAAISPIT
natural_image
Illustration of a meat being cut with a knife, showing interior processing (no text or symbols)natural_image
Metallic rectangular object with evenly spaced notches and a flat base (no text or symbols visible)2.4 VERWIJDEREN EN REINIGEN VAN DE ZIJLINGSE ROOSTERS
natural_image
Top-down view of a kitchen appliance with arrows indicating directional flow, next to an inset showing a hand pointing to a component (no text or symbols visible)3. ONDERHOUD VAN DE OVEN
natural_image
Close-up of a hand holding a small electronic component (no visible text or symbols)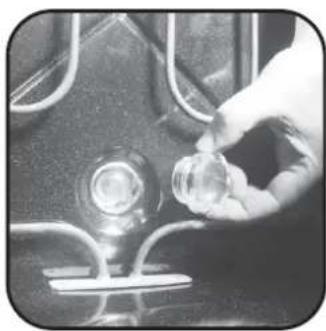
natural_image
Close-up of a hand holding a small transparent object near a glass bulb (no visible text or symbols)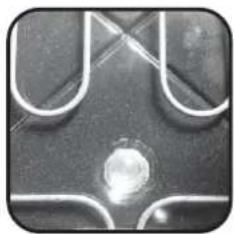
natural_image
Close-up of a metallic surface with curved and straight lines, featuring a central circular spot (no text or symbols visible)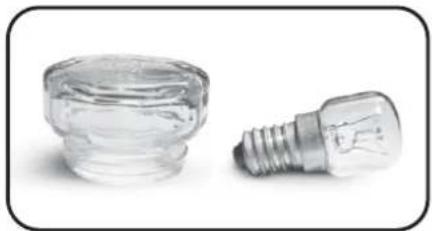
natural_image
Two small glass plastic components: a cylindrical container and a standard light bulb (no text or symbols visible)natural_image
Interior view of a black oven or oven with visible internal structure and ventilation grilles (no text or symbols)Figuur 2
natural_image
Close-up of a metallic mechanical component with a tool inserted, no visible text or symbolsFiguur 3
natural_image
Close-up of a hand opening a device into a tray, showing mechanical components and wiring (no text or symbols visible)Figuur 4
natural_image
Close-up of a mechanical component with two arrows pointing to features (no visible text or symbols)Figuur 5
text_image
1 2 3Figuur 6
text_image
LOW-E LOW-EFiguur 7
text_image
560 440 550 17 595 578 552 595 546 22 the furniture is equipped with aApplying torque more than needed to fix the screws can close the ventilation channels on both sides. Please be sure that, these ventilation channels are 2mm open after installation to furniture.
ATTENZIONE!
natural_image
Diagram of a door frame with a 2mm dimension label, showing interior structure without any text or symbols.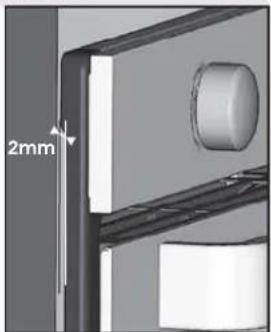
natural_image
3D mechanical assembly diagram showing a component with a 2mm dimension label (no readable text or symbols)RU Отверстие 500 x 45
GB Opening 500 x 10
IT Apertura 500 x 10
ES Apertura 500 x 10
PL Otwór 500 x 10
cz Otvor 500 x 10
RU Отверстие 500 x 10
natural_image
Technical diagram showing mechanical components with no visible text or symbolsTABLE / TOP
text_image
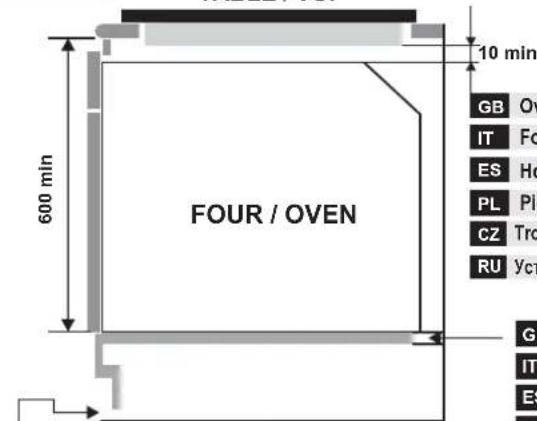
10 min 600 min FOUR / OVEN GB OV IT Fo ES Ho PL Plc CZ Tro RU Yct GI IT ESGB Opening 500 x 10
IT Apertura 560 x 45
ES Apertura 500 x 10
PL Otwór 500 x 10
cz Otvor 500 x 10
RU Отверстие 500 x 10
GB Oven fitted under worktop (dimensions mm)
IT Forno installato sotto il piano di lavoro
ES Horno colocado debajo de la encimera
PL Piekarnik umieszczony pod blatem.
CZ Trouba pod pracovní deskou
RU Установка духовки под рабочей поверхностью
GB Opening 560 x 45
IT Apertura 560 x 45
ES Apertura 560 x 45
PL Otwór 560 x 45
cz Otvor 560 x 45
RU Отверстие 560 x 45
natural_image
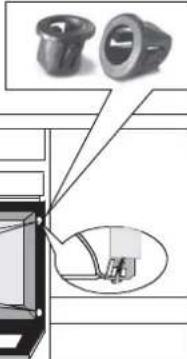
Interior view of an oven with a circular inset showing two shoes (no text or symbols visible)natural_image
Interior view of a refrigerator with 2mm door and side panel (no text or symbols)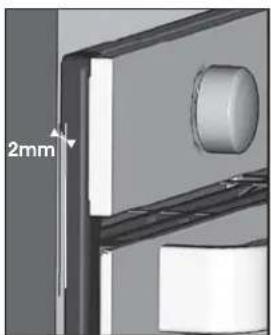
natural_image
Close-up of a mechanical component with a 2mm dimension label (no readable text or symbols)TABLE / TOP
text_image
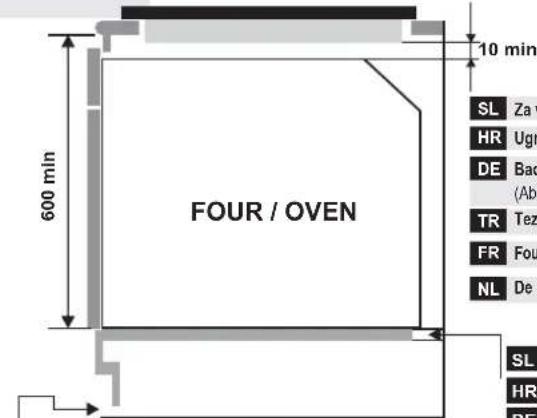
10 min 600 min FOUR / OVEN SL Za v HR Ugr DE Bac (Abr) TR Teze FR Fou NL De d SL HR DESL Odprtina 500 x 10
HR Otvor 500 x 10
DE Opening 500 x 10
TR Açıklık 500 x 10
FR Ouverture 500 x 10
NL Opening 500 x 10
SL Za vgradnjo pod delovni pult
HR Ugradnja pećnice u kuhinjsku radnu ploču
natural_image
Interior view of an oven with a circular inset showing two shoes (no text or symbols visible)GB
The manufacturer will not be responsible for any inaccuracy resulting from printing or transcript errors contained in this brochure. We reserve the right to carry out modifications to products as required, including the interests of consumption, without prejudice to the characteristics relating to safety or function.