
KXPRSA10EX - Cordless phone PANASONIC - Free user manual and instructions
Find the device manual for free KXPRSA10EX PANASONIC in PDF.
| Product type | Additional handset for digital cordless phone |
| Brand | Panasonic |
| Model | KX-PRSA10EX |
| Compatibility | Panasonic base units KX-PRS110/KX-PRS120, KX-PRW110/KX-PRW120 |
| Technology | Digital cordless (DECT) |
| Handset power supply | 2 rechargeable Ni-MH AAA (R03) batteries |
| Charger power supply | Panasonic PNLV233CE AC adaptor (230 V AC) |
| Charging time | Approx. 7 hours |
| Display language | Selectable (multilingual) |
| Base registration | Required before use; manual procedure via dedicated keys |
| Maintenance | Clean with a soft damp cloth; do not use benzene, thinner, or abrasive powder |
| Safety | Use only the supplied AC adaptor; do not expose to water; do not use near a gas leak |
| Spare parts | Rechargeable batteries (ref. in base manual), PNLV233CE AC adaptor |
| Included accessories | Charger, AC adaptor, 2 rechargeable batteries, handset cover |
| Consumer service | 08 92 35 05 05 (€0.34/min) |
Frequently Asked Questions - KXPRSA10EX PANASONIC
User questions about KXPRSA10EX PANASONIC
0 question about this device. Answer the ones you know or ask your own.
Ask a new question about this device
Download the instructions for your Cordless phone in PDF format for free! Find your manual KXPRSA10EX - PANASONIC and take your electronic device back in hand. On this page are published all the documents necessary for the use of your device. KXPRSA10EX by PANASONIC.
USER MANUAL KXPRSA10EX PANASONIC
AdditionalDigitalCordlessHandset
ModelNo.KX-PRSA10EX KX-PRWA10EX
natural_image
Illustration of two mobile phones with different screen designs (no text or symbols)KX-PRSA10KX-PRWA10
ThankyouforpurchasingaPanasonicproduct.
Thisunitisanadditionalhandsetcompatiblewiththefollowingseriesof PanasonicDigitalCordlessPhone:
-KX-PRS110/KX-PRS120(KX-PRSA10)
-KX-PRW110/KX-PRW120(KX-PRWA10)
(Thecorrespondingmodelsaresubjecttochangewithoutnotice.)
Youmustregisterthishandsetwithyourbaseunitbeforeitcanbeused. Thisinstallationmanualdescribesonlythestepsneededtoregisterand beginningthehandset.Pleasereadthebaseunit'soperatinginstructions forfurtherdetails.
Pleasereadthisinstallationmanualbeforeusingtheunitandsaveitfor futurereference.
Español
Norsk/
English/
Italiano
Suomi/
Deutsch/
Türkçe
Português/
Français/
Useful Information
Ελληνικά/
Nederlands/
Dansk
Svenska/
Installation
Accessory information
Supplied accessories
| Accessory item/Part number Quantity | |
| Charger 1 | |
| AC adaptor/PNLV233CE 1 | |
| Rechargeable batteries^*1 | 2 |
| Handset cover^*2 | 1 |
*1 Please read the base unit's operating instructions for replacement battery information.
*2 The handset cover comes attached to the handset.
Note:
- Please read the base unit's operating instructions for additional/replacement accessories.
- Please read "General information" of the base unit's operating instructions for information regarding R&TTE Directive.
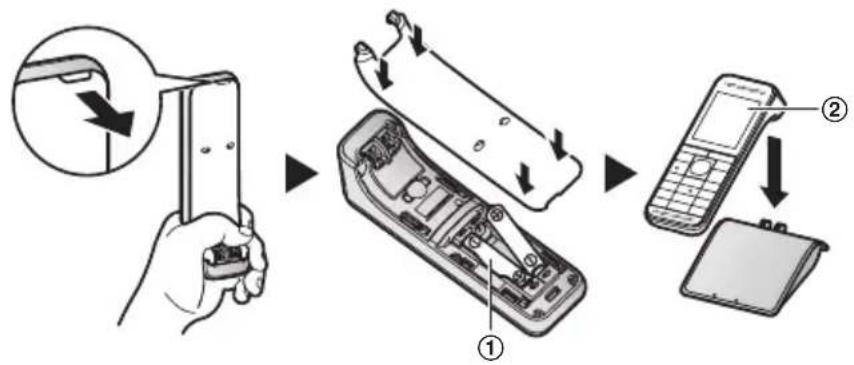
Setting up
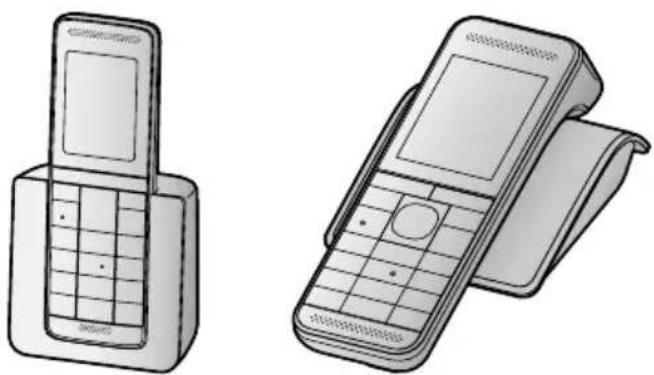
Connections
① Connect the AC adaptor plug to the unit until you hear a click.
② Connect the AC adaptor to the power outlet.
③ KX-PRSA10: Fasten the cord by hooking it.
■ KX-PRSA10 ■ KX-PRWA10
Note:
- Use only the supplied Panasonic AC adaptor PNLV233CE.
- The AC adaptor must remain connected at all times. (It is normal for the adaptor to feel warm during use.)
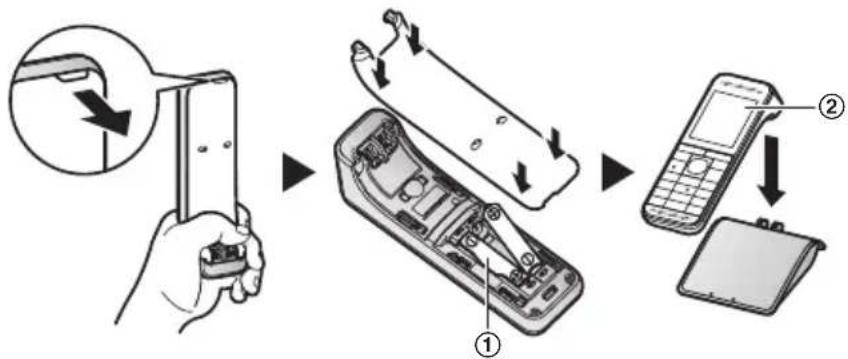
Battery installation/Battery charging
When the language selection is displayed after installing the batteries for the first time, you can select your desired language.
[◆]: Select your desired language. → [OK] → [─●]
Important:
- Use the supplied rechargeable batteries. For replacement, we recommend using the Panasonic rechargeable batteries noted in the base unit's operating instructions.
- USE ONLY rechargeable Ni-MH batteries AAA (R03) size (①).
- Do NOT use Alkaline/Manganese/Ni-Cd batteries.
- Confirm correct polarities (+, ⊕)
Charge for about 7 hours.
- Confirm "Charging" is displayed (②).
- When the batteries are fully charged, "Fully charged" is displayed.
Installation
KX-PRSA10

flowchart
graph TD
    A["Hand holding remote"] --> B["Switch"]
    B --> C["Device with circuit board"]
    C --> D["Mobile phone with keypad"]
    D --> E["Down arrow to device"]
KX-PRWA10

Note:
- The handset display may show "Please wait for 1 minute." when the handset is placed on the charger if it is not registered to the base unit.
- If the batteries are fully charged, but the operating time seems to be shorter, clean the battery ends (+), and the charge contacts with a dry cloth and charge again.
Display language
1 【Menu】(right soft key) #110
2 【◆】: Select your desired language. → [OK] → [→○]
Registering the handset to the base unit
Ensure that the handset is switched on. If it is not on, press and hold ⏻ ⏻] for few seconds to turn the handset on.
1 Handset:
Lift the handset and press [→●].
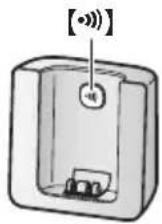
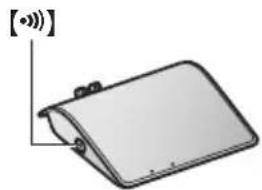
2 Base unit:
Press and hold [●●●] for about 5 seconds.
- If all registered handsets start ringing, press ⏻) again to stop, then repeat this step.
■ KX-PRSA10 ■ KX-PRWA10
natural_image
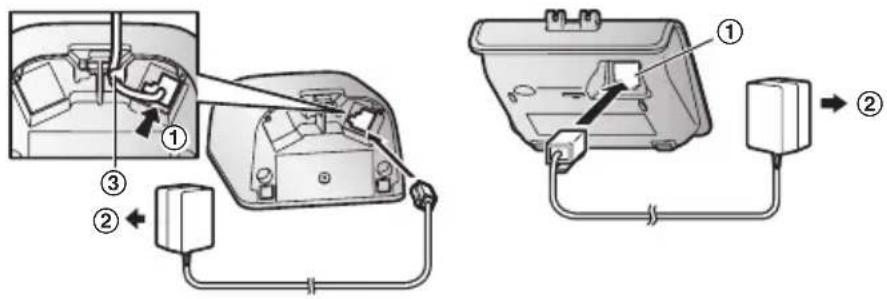
Illustration of a flat electronic device with a sensor icon and signal line indicator (no text or symbols on the device itself)3 Handset:
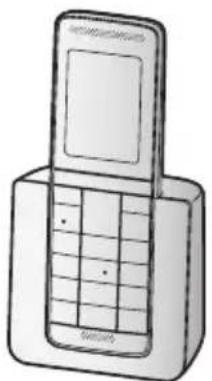
Place the handset on the base unit or charger.
- Continue the operation even when the handset display shows "Please wait for 1 minute.".
4 With the handset still on the base unit or charger, wait until a confirmation tone sounds and ⚡ is displayed.
Note:
- If an error tone sounds, or if y is displayed, register the handset according to the base unit's operating instructions.
For your safety
To prevent severe injury and loss of life/property, read this section carefully before using the product to ensure proper and safe operation of your product.
WARNING
Power connection
- Completely insert the AC adaptor/power plug into the power outlet. Failure to do so may cause electric shock and/or excessive heat resulting in a fire.
- Regularly remove any dust, etc. from the AC adaptor/power plug by pulling it from the power outlet, then wiping with a dry cloth. Accumulated dust may cause an insulation defect from moisture, etc. resulting in a fire.
Installation
- Unplug the product from power outlets if it emits smoke, an abnormal smell, or makes an unusual noise. These conditions can cause fire or electric shock. Confirm that smoke has stopped emitting and contact an authorised service centre.
Installation
- To prevent the risk of fire or electrical shock, do not expose the product to rain or any type of moisture.
- Do not place or use this product near automatically controlled devices such as automatic doors and fire alarms. Radio waves emitted from this product may cause such devices to malfunction resulting in an accident.
CAUTION
Installation and location
- The AC adaptor is used as the main disconnect device. Ensure that the AC outlet is installed near the product and is easily accessible.
Battery
- We recommend using the supplied batteries or additional/replacement batteries noted in the base unit's operating instructions for replacement battery information. USE ONLY rechargeable Ni-MH batteries AAA (R03) size.
- Do not mix old and new batteries.
- Do not open or mutilate the batteries. Released electrolyte from the batteries is corrosive and may cause burns or injury to the eyes or skin. The electrolyte is toxic and may be harmful if swallowed.
- Exercise care when handling the batteries. Do not allow conductive materials such as rings, bracelets, or keys to touch the batteries, otherwise a short circuit may cause the batteries and/or the conductive material to overheat and cause burns.
- Charge the batteries provided with or identified for use with this product only, in accordance with the instructions and limitations specified in this manual.
- Only use a compatible base unit (or charger) to charge the batteries. Do not tamper with the base unit (or charger). Failure to follow these instructions may cause the batteries to swell or explode.
Important safety instructions
When using your product, basic safety precautions should always be followed to reduce the risk of fire, electric shock, and injury to persons, including the following:
- Do not use this product near water for example, near a bathtub, washbowl, kitchen sink, or laundry tub, in a wet basement or near a swimming pool.
Installation
- Do not use the telephone to report a gas leak in the vicinity of the leak.
- Use only the power cord and batteries indicated in this manual. Do not dispose of batteries in a fire. They may explode. Check with local codes for possible special disposal instructions.
SAVE THESE INSTRUCTIONS
Other information
- Operating the product near electrical appliances may cause interference. Move away from the electrical appliances.
CAUTION: Risk of explosion if battery is replaced by an incorrect type. Dispose of used batteries according to the instructions.
Routine care
- Wipe the outer surface of the product with a soft moist cloth.
- Do not use benzine, thinner, or any abrasive powder.
Notice for product disposal, transfer, or return
- This product can store your private/confidential information. To protect your privacy/confidentiality, we recommend that you erase information such as phonebook or caller list entries from the memory before you dispose of, transfer, or return the product.
Information for Users on Collection and Disposal of Old Equipment and used Batteries
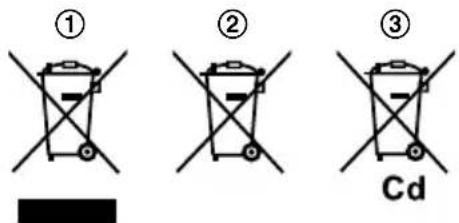
These symbols (①, ②, ③) on the products, packaging, and/or accompanying documents mean that used electrical and electronic products and batteries should not be mixed with general household waste.
For proper treatment, recovery and recycling of old products and used batteries, please take them to applicable collection points, in accordance with your national legislation and the Directives 2002/96/EC and 2006/66/EC.
By disposing of these products and batteries correctly, you will help to save valuable resources and prevent any potential negative effects on human health and the environment which could otherwise arise from inappropriate waste handling.
Installation
For more information about collection and recycling of old products and batteries, please contact your local municipality, your waste disposal service or the point of sale where you purchased the items.
Penalties may be applicable for incorrect disposal of this waste, in accordance with national legislation.
For business users in the European Union
If you wish to discard electrical and electronic equipment, please contact your dealer or supplier for further information.
Information on Disposal in other Countries outside the European Union
These symbols (①, ②, ③) are only valid in the European Union. If you wish to discard these items, please contact your local authorities or dealer and ask for the correct method of disposal.
Note for the battery symbol
This symbol (②) might be used in combination with a chemical symbol (③). In this case it complies with the requirement set by the Directive for the chemical involved.
Panasonic®
natural_image
Illustration of two mobile phones with different screen layouts (no text or symbols)KX-PRSA10 KX-PRWA10
Hinweis:
KX-PRWA10
Hinweis:
natural_image
Illustration of a flat electronic device with a sensor icon and signal line indicator (no text or symbols on the device itself)3 Mobilteil:
natural_image
Illustration of two mobile phones with different screen layouts (no text or symbols visible)KX-PRSA10 KX-PRWA10
Remarques :
KX-PRWA10

Remarques :
natural_image
Illustration of a flat electronic device with a sensor icon and signal line indicator (no text or symbols on the device itself)3 Combiné :
natural_image
Illustration of two mobile phones, one open and one closed, with no visible text or symbols.KX-PRSA10 KX-PRWA10
Opmerking:
KX-PRWA10

Opmerking:
natural_image
Illustration of a flat electronic device with a sensor icon and signal line indicator (no text or symbols on the device itself)3 Handset:
natural_image
Illustration of two mobile phones, one open and one closed, with no visible text or symbols.KX-PRSA10 KX-PRWA10
Anmärkning:
KX-PRWA10

Anmärkning:
natural_image
Illustration of a flat electronic device with a sensor icon and signal line indicator (no text or symbols on the device itself)3 Handenhet:
Placera handenheten på basenheten eller ladern.
natural_image
Illustration of two mobile phones, one open and one closed, with no visible text or symbols.KX-PRSA10 KX-PRWA10
Merk:
flowchart
graph TD
    A["Hand holding remote"] --> B["Internal Circuit Board"]
    B --> C["Mobile Phone with Internal Display"]
    C --> D["Inserting Phone"]
KX-PRWA10

Merk:
3 Händsett:
natural_image
Illustration of two mobile phones, one with a flip and the other with a scroll (no text or symbols)KX-PRSA10 KX-PRWA10
Huomaa:
flowchart
graph TD
    A["Hand holding remote"] --> B["Internal Circuit Board"]
    B --> C["Mobile Phone with Internal Display"]
    C --> D["Downward arrow to next screen"]
KX-PRWA10

Huomaa:
natural_image
Illustration of a flat electronic device with a sensor icon and signal line indicator (no text or symbols on the device itself)3 Luuri:
natural_image
Illustration of a mobile phone with a screen and keypad (no text or symbols)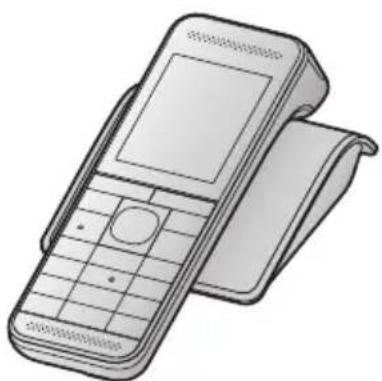
natural_image
Illustration of a mobile phone with a keypad and scroll (no text or symbols)KX-PRSA10 KX-PRWA10
Nota:
KX-PRWA10

Nota:
natural_image
Illustration of a flat electronic device with a sensor icon and signal line indicator (no text or symbols on the device itself)3 Terminal móvel:
natural_image
Illustration of two mobile phones, one open and one closed, with no visible text or symbols.KX-PRSA10 KX-PRWA10
Σημείωση:
flowchart
graph TD
    A["Hand holding remote"] --> B["Move to internal circuit"]
    B --> C["Insert from device"]
    C --> D["Mobile phone with labeled step ②"]
KX-PRWA10
Σημείωση:
natural_image
Illustration of a flat electronic device with a sensor icon and signal line indicator (no text or symbols on the device itself)3 Ακουστικό:
natural_image
Illustration of two mobile phones, one open and one closed, with no visible text or symbols.KX-PRSA10 KX-PRWA10
Bemærk:
- Brug kun den medfølgende Panasonic-lysnetadapter PNLV233CE.
flowchart
graph TD
    A["Hand holding remote"] --> B["Battery with internal circuit"]
    B --> C["Mobile phone with two buttons"]
    C --> D["Mobile phone with one button"]
KX-PRWA10

Bemærk:
3 Håndsæt:
natural_image
Illustration of a mobile phone with a screen and keypad (no text or symbols)
natural_image
Illustration of a mobile phone with a keypad and scroll (no text or symbols)KX-PRSA10 KX-PRWA10
Nota:
KX-PRWA10

Nota:
natural_image
Illustration of a flat electronic device with a sensor icon and signal line indicator (no text or symbols on the device itself)3 Unidad portátil:
natural_image
Illustration of two mobile phones, one open and one closed, with no visible text or symbols.KX-PRSA10 KX-PRWA10
Nota:
flowchart
graph TD
    A["Hand holding remote"] --> B["Circuit board"]
    B --> C["Mobile phone with ①"]
    B --> D["Mobile phone with ②"]
KX-PRWA10

Nota:
natural_image
Illustration of a flat electronic device with a sensor icon and signal line indicator (no text or symbols on the device itself)3 Portatile:
Model No. KX-PRSA10EXW
KX-PRWA10EXW
natural_image
Illustration of a mobile phone with a screen and keypad (no text or symbols)
natural_image
Illustration of a mobile phone with a keypad and screen (no text or symbols)KX-PRSA10 KX-PRWA10
Panasonic Testing Centre
Panasonic Marketing Europe GmbH
Winsbergring 15, 22525 Hamburg, Germany
Tel: +4940 8549 3555
Faks: +4940 8549 3540
Web: http://www.ptc.panasonic.eu
Not:
flowchart
graph TD
    A["Hand holding remote"] --> B["Battery with internal circuit"]
    B --> C["Mobile phone with two buttons"]
    C --> D["Mobile phone with one button"]
KX-PRWA10

Not:
1-62, 4-chome, Minoshima, Hakata-ku, Fukuoka 812-8531 Japan
Declaration of Conformity
021400
Document No. PCTP-130116-01
(Issuer's name & address)
Panasonic System Networks Co., Ltd.
Hakata-ku, Fukuoka, Japan
(Object of the declaration)
(Product) : Digital Enhanced Cordless Telephone
(Trade Name): Panasonic
(Model Nr.) Base unit - KX-PRS120, KX-PRS110,
Handset - KX-PRSA10
AC Adaptor - PNLV226E, PNLV226CE, PNLV233E, PNLV233CE
Charger Unit - PNLC1047
The object of the declaration described above is in conformity with the requirements of the following EU legislations and harmonized standards. For the RoHS Directive, this declaration of conformity is issued under the sole responsibility of the manufacturer.:
(Council Directive) : 1999/5/EC
(Council recommendation): 1999/519/EC
(Harmonized Standards) : EN 60950-1:2006 +A11:2009 +A1:2010 +A12:2011,
EN 301 406 V2.1.1, EN 301 489-1 V1.9.2
EN 301 489-6 V1.3.1, EN 50385:2002.
EN 50360:2001+A1:2012
(Council directive) : 2009/125/EC
(Implementing Measure for ErP Directive): Commission Regulation (EC) No.278/2009
(Council directive) : 2011/65/EU
(Harmonized Standards) : EN 50581:2012
The last two digits of the year in which the CE marking was affixed the first time: 13
Signed for and on behalf of :
Dr Kalunt
Printed Name : Makoto Kabumoto
Title : Senior Technical Regulation Manager
Date of issue : 24th May ,2013
Authorised Representative in EU:
Panasonic Testing Centre
Panasonic Marketing Europe GmbH
Winsbergring 15, 22525 Hamburg, Germany
(Date) : 18. April 2013
Kurulum
Panasonic
Panasonic System Networks Co., Ltd.
1-62, 4-chome, Minoshima, Hakata-ku, Fukuoka 812-8531 Japan
Hakata-ku, Fukuoka, Japan
(Beyannamenin Konusu)
(Ürün) : Sabit Hatlı Telefon
(Ticari Adi) : Panasonic
(Model Nr.) Ana birim - KX-PRS120, KX-PRS110.
Mobil cihaz - KX-PRSA10
AC adaptörü - PNLV226E, PNLV226CE, PNLV233E, PNLV233CE
Additional Information to DECLARATION OF CONFORMITY Registration No. 021400
Object of the declaration:
Product Name : Digital Enhanced Cordless Telephone
Trade Name : Panasonic
Model No(s) : KX-PRS120, KX-PRS110
Places of factory:
(1) KX-PRS120, KX-PRS110, KX-PRSA10, PNLC1047
Manufacturer: Panasonic System Networks Co., Ltd.
1-62, 4-chome Minoshima, Hakata-ku, Fukuoka, 812-8531, JAPAN
Factory: Panasonic System Networks Zhuhai Co., Ltd.
3 Pin Xi 8 Lu, Nanping Keji Gongye Yuan, Zhuhai, Guangdong, CHINA
(Company Stamp)
Panasonic
Panasonic Services Europe
a Division of
Panasonic Marketing Europe GmbH
Panasonic Testing Centre
Winsbergring 15
D-22525 Hamburg
www.panasonic-europe.com
(Signature) :
(Printed Name) :
(Date) :

Niels Erdmann
25.04.2013
Kurulum
Panasonic
UYGUNLUK BEYANINA
EK BİLGİ
1-62, 4-chome, Minoshima, Hakata-ku, Fukuoka 812-8531 Japan
Declaration of Conformity
021399
Document No. PCTP-130115-01
(Issuer's name & address)
Panasonic System Networks Co., Ltd.
Hakata-ku, Fukuoka, Japan
(Object of the declaration)
(Product) : Digital Enhanced Cordless Telephone
(Trade Name): Panasonic
(Model Nr.) Base unit - KX-PRW120, KX-PRW110,
Handset - KX-PRWA10
AC Adaptor - PNLV236E, PNLV236CE, PNLV233E, PNLV233CE
Charger Unit - PNLC1046
The object of the declaration described above is in conformity with the requirements of the following EU legislations and harmonized standards. For the RoHS Directive, this declaration of conformity is issued under the sole responsibility of the manufacturer.:
(Council Directive) : 1999/5/EC
(Council recommendation): 1999/519/EC
(Harmonized Standards) : EN 60950-1:2006 +A11:2009 +A1:2010 +A12:2011,
EN 301 406 V2.1.1, EN 300 328 V1.8.1, EN 301 489-1 V1.9.2
EN 301 489-6 V1.3.1, EN301 489-17 V2.2.1
EN 50385:2002, EN 50360:2001 + A1:2012
(Council directive) : 2009/125/EC
(Implementing Measure for ErP Directive): Commission Regulation (EC) No.278/2009
(Council directive) : 2011/65/EU
(Harmonized Standards) : EN 50581:2012
The last two digits of the year in which the CE marking was affixed the first time: 13
Signed for and on behalf of :
- Kalunt
Printed Name : Makoto Kabumoto
Title : Senior Technical Regulation Manager
Date of issue : 24th May,2013
Authorised Representative in
Panasonic Testing Centre
Panasonic Marketing Europe GmbH
Winsbergring 15, 22525 Hamburg, Germany
| (Signature) | : |
| (Printed name) | : |
| (Date) | : |
Kurulum
Panasonic
Panasonic System Networks Co., Ltd.
1-62, 4-chome, Minoshima, Hakata-ku, Fukuoka 812-8531 Japan
Hakata-ku, Fukuoka, Japan
(Beyannamenin Konusu)
(Ürün) : Sabit Hatlı Telefon
(Ticari Adi) : Panasonic
(Model Nr.) Ana birim - KX-PRW120, KX-PRW110,
Mobil cihaz - KX-PRWA10
AC adaptörü - PNLV236E, PNLV236CE, PNLV233E, PNLV233CE
Additional Information to DECLARATION OF CONFORMITY Registration No. 021399
Object of the declaration:
Product Name : Digital Enhanced Cordless Telephone
Trade Name : Panasonic
Model No(s) : KX-PRW120, KX-PRW110
Places of factory:
(1) KX-PRW120, KX-PRW110, KX-PRWA10, PNLC1046
Manufacturer: Panasonic System Networks Co., Ltd.
1-62, 4-chome Minoshima, Hakata-ku, Fukuoka, 812-8531, JAPAN
Factory: Panasonic System Networks Zhuhai Co., Ltd.
3 Pin Xi 8 Lu, Nanping Keji Gongye Yuan, Zhuhai, Guangdong, CHINA
(Company Stamp)
Panasonic
Panasonic Services Europe
a Division of
Panasonic Marketing Europe GmbH
Panasonic Testing Centre
Winsbergring 15
D-22525 Hamburg
www.panasonic-europe.com
(Signature) :


(Printed Name) :
Niels Erdmann
(Date) :
25.04.2013
Kurulum
Panasonic
UYGUNLUK BEYANINA
EK BİLGİ
Panasonic Switzerland
a branch of Panasonic
Panasonic Switzerland
a branch of Panasonic
1-62, 4-chome, Minoshima, Hakata-ku, Fukuoka 812-8531, Japan
Üretici Firma
Panasonic System Networks Zhuhai Co., Ltd.
3 Pin Xi 8 Lu, Nanping Keji Gongye Yuan, Zhuhai, Guangdong, China
© Panasonic System Networks Co., Ltd. 2013

*PNQX6060ZA*
PNQX6060ZA TT0513MG0 (E)

- ThankyouforpurchasingaPanasonicproduct.
- Installation
- Accessory information
- Note:
- Setting up
- Connections
- Battery installation/Battery charging
- Important:
- Charge for about 7 hours.
- Display language
- Registering the handset to the base unit
- Handset:
- Base unit:
- Handset:
- For your safety
- WARNING
- Power connection
- CAUTION
- Installation and location
- Battery
- Important safety instructions
- Other information
- Routine care
- Notice for product disposal, transfer, or return
- For business users in the European Union
- Information on Disposal in other Countries outside the European Union
- Note for the battery symbol
- Panasonic®
- Hinweis:
- Mobilteil:
- Remarques :
- Combiné :
- Opmerking:
- Anmärkning:
- Handenhet:
- Merk:
- Händsett:
- Huomaa:
- Luuri:
- Nota:
- Terminal móvel:
- Σημείωση:
- Ακουστικό:
- Bemærk:
- Håndsæt:
- Unidad portátil:
- Portatile:
- Not:
- Declaration of Conformity
- Kurulum
- Panasonic
- Additional Information to DECLARATION OF CONFORMITY Registration No. 021400
- UYGUNLUK BEYANINA
- EK BİLGİ
- Additional Information to DECLARATION OF CONFORMITY Registration No. 021399
Brand : PANASONIC
Model : KXPRSA10EX
Category : Cordless phone