
U484CH1 - Chopper ROTEL - Free user manual and instructions
Find the device manual for free U484CH1 ROTEL in PDF.
| Product type | Meat grinder |
| Brand | Rotel |
| Model | U484CH1 |
| Power supply | 220-240 V ~ 50/60 Hz (check the rating plate) |
| Main functions | Grinding meat, making kibbeh, making sausages |
| Included accessories | Worm screw, blade, perforated discs (fine, medium, coarse), hopper tray, pusher, kibbeh accessory, sausage accessory, fixing ring |
| Material of blades and discs | Stainless steel |
| Safety | Automatic shut-off in case of overheating (thermostat), reverse function (REV), unplug before cleaning |
| Maintenance and cleaning | Manual cleaning with hot water, do not put in dishwasher, lubricate with vegetable oil |
| Warranty | Manufacturer's warranty on material and manufacturing defects (subject to the conditions of the warranty card) |
Frequently Asked Questions - U484CH1 ROTEL
User questions about U484CH1 ROTEL
0 question about this device. Answer the ones you know or ask your own.
Ask a new question about this device
Download the instructions for your Chopper in PDF format for free! Find your manual U484CH1 - ROTEL and take your electronic device back in hand. On this page are published all the documents necessary for the use of your device. U484CH1 by ROTEL.
USER MANUAL U484CH1 ROTEL
- Body
-
ON(OFF) / SLOW/ REV (reverse switch)
-
Attachment button
- Tube inlet
- Food pusher
- Hopper plate
- Head tube
- Worm
- Cutting blade
- Cutting plate (fine)
- Cutting plate (medium)
- Cutting plate (coarse)
- Fixing ring
- Kebbe maker
- Sausage maker
TECHNISCHE DATEN
- Caracteristiques techniques
- Specifiche tecniche
Technical specifications
| 220-240 V | Nennspannung Tension nominale Tensione nominale Rated voltage |
| 50/60 Hz | Nennfrequenz Fréquence nominale Frequenza nominale Rated frequency |
| 500 W | Nenneingangsleistung Puisance d'entrée nominale Potenza nominale Rated input power |
Inhaltsverzeichnis / Table des matérières / Indice / Table of contents
Deutsch 6
- Safety instructions 30
Introduction 33
Assembly 33
Mincer 34
Making kebbe 34
Making sausages. 35
How to clean your appliance 36
Disposal 36
D/F/I/E 37
Garantie/Garantie/Garanzia/Warranty 37
Deutsch
SICHERHEITSHINWEISE
Please read all instructions before using the device.
- This appliance can be used by persons with reduced physical, sensory or mental capabilities or lack of experience and knowledge if they have been given supervision or instruction concerning use of the appliance in a safe way and understand the hazards involved.
- This appliance must not be used by children. The appliance and its connecting cable must be kept away from children.
The appliance must be disconnected from the mains during periods of no supervision and prior to assembling, disassembling or cleaning. - Keep these instructions for future reference.
-
Check if the voltage indicated on the appliance corresponds to the local mains voltage, before you connect the appliance.
-
Never use any accessories or parts from other manufacturers. Your guarantee will become invalid if such accessories or parts have been used.
- Do not use the appliance if the mains cord, the plug or other parts are damaged.
- If the power cord of this appliance is damaged, it must always be replaced by the manufacturer or an authorised service center, in order to avoid hazardous situations.
○ Thoroughly clean the parts that will come into contact with food, before you use the appliance for the first time. - Unplug the appliance immediately after use.
- Never use your finger or an object to push ingredients down the feed tube while the appliance is running. Only the pusher is to be used for this purpose.
- Never let the appliance run unattended.
- Switch the appliance off before detaching and installing any accessory.
- Wait until moving parts have stopped running before you remove the parts of the appliance.
- Never immerse the motor unit in water or any other liquid, or rinse it under the tap. Use only a damp cloth to clean the motor unit.
○ Do not attempt to grind bones, nuts or other hard items.
- Never reach into the cutter housing. Always use the pusher.
○ Mincers are fed with sinewless, boneless and fatless beef that has been cut into pieces approximately 20 mm x 20 mm x 60 mm. Do not use the appliance for more than 5 minutes consecutively. Leave the appliance to cool for 10 minutes before using again.
- If the appliance is locked, please press the reverse switch (REV). The meat locked in the cutter housing is unground, so the appliance can return to its usual state.
- This appliance is intended to be used in household and similar applications such as:
- Staff kitchen areas in shops, offices and other working environments:
- Farm houses;
- By clients in hotels, motels and other residential type environments;
- Bed and breakfast type environments.
INTRODUCTION
This appliance is equipped with a thermostat system. This system will automatically cut off the power supply to the appliance in case of overheating.
If your appliance suddenly stops running:
Pull the mains plug out of the socket.
- Press the switch to turn off the appliance.
- Let the appliance cool down for 60 minutes.
- Put the mains plug in the socket.
- Switch the appliance on again.
- Switch off the appliance and disconnect from supply before changing accessories or approaching parts that move in use.
If plugged in, the indictor light will be on.
○ CAUTION: In order to avoid a hazardous situation, this appliance must never be connected to a time switch.
ASSEMBLY
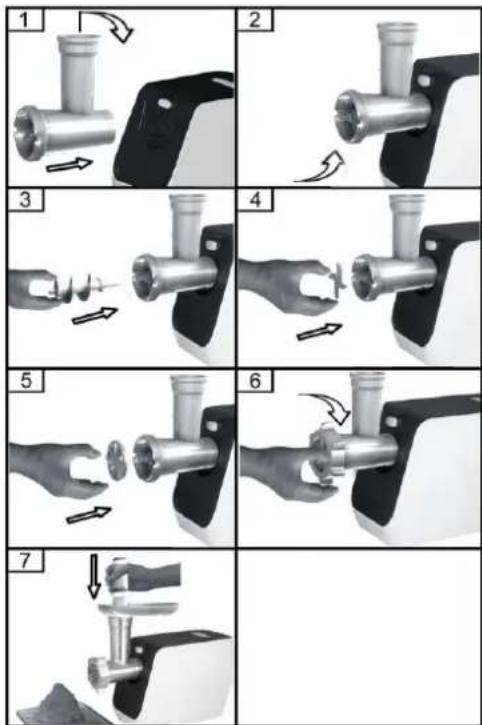
Hold the head and insert it into the inlet (when inserting please make sure the head is slanted as per arrow indicated on the top, see fig.1), then move the head anticlockwise so that the head clicks into position (fig.2).
Place the worm into the head, long end first, and turn to feed the screw slightly until it is set into the motor housing (fig.3).
- Place the cutting blade onto the worm shaft with the blade facing the front, as illustrated (fig.4). If it is not fitted properly, the meat will not be ground.
Place the desired cutting plate next to the cutting blade, fitting the protrusions into the slot (fig.5).
○ Support or press the center of the cutting plate with one finger then screw the fixing ring tight with the other hand (fig.6). Do not over-tighten.
- Place the hopper plate on the head and fix it into position.
oLocate the unit on a firm surface.
The air passage at the bottom and the side of the motor housing should be kept free and not blocked.
MINCER
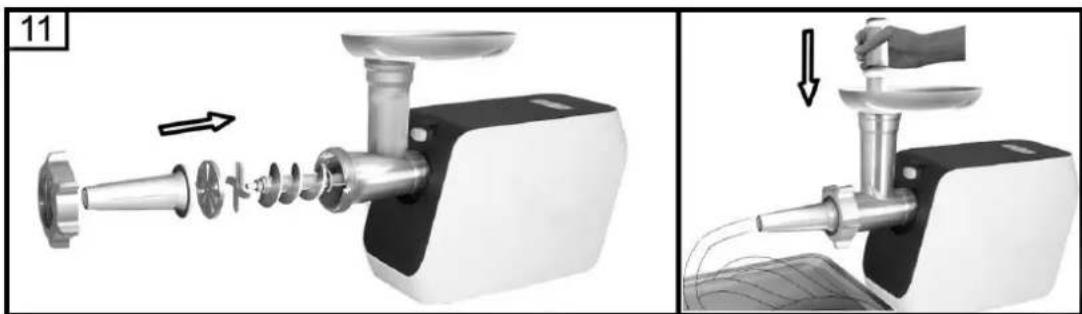
Insert the worm shaft into the cutter housing.
Place the cutter unit onto the worm shaft. The cutting edges should be at the front.
- Place the medium grinding disc or coarse grinding disc (depending on the consistency you prefer) onto the worm shaft.
Make sure the notches of the grinding disc fit onto the projections of the mincer head.
Turn the screw ring in the direction of the arrow on the cutter housing until it is properly fastened.
Attach the cutter housing to the motor unit.
Place the tray on the upright part of the cutter housing.
- Now the appliance is ready for mincing.
Cut the meat into 10cm-long, 2cm-thick strips. Remove bones, pieces of gristle and sinews as much as possible. Never use frozen meat!
Put the meat in the tray. Use the pusher to gently push the meat into the cutter housing.
For steak tartare, mince the meat with the medium grinding disc twice.
MAKING KEBBE
Kebbe is a traditional Middle Eastern dish made primarily of lamb and bulgur wheat which are minced together to form a paste. The mixture is extruded through the kebbe maker and cut into short lengths. The tubes can then be stuffed with a minced meat mixture, the ends pinched together and then deep fried.
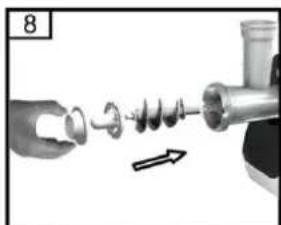
Insert the worm shaft into the cutter housing (fig.8).
Place the cone in the cutter housing.
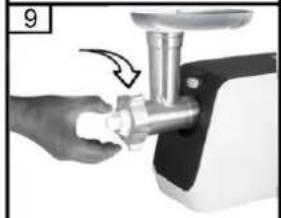
- Place the kebbe maker on the cutter housing and screw the ring on the cutter housing (fig.9).
Attach the cutter housing to the motor unit.
Place the tray on the upright part of the cutter housing.
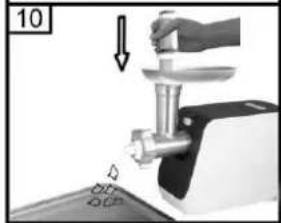
- Now the appliance is ready for making kebbe (fig.10).
Feed the prepared kebbe mixture through the kebbe maker. Cut the continuous hollow cylinder into the desired lengths and use as required.
MAKING SAUSAGES
Mince the meat
Insert the worm shaft into the cutter housing (fig. 11).
Place the separator in the cutter housing.
Place the sausage maker on the cutter housing and screw the ring on the cutter housing.
o Make sure the notches of the separator fit onto the projections of the mincer head.
Attach the cutter housing to the motor unit.
Place the tray on the upright part of the cutter housing.
- Now the appliance is ready for making sausages.
Put the ingredients in the tray. Use the pusher to gently push the meat into the cutter housing.
Put the sausage skin in lukewarm water for 10 minutes. Then slide the wet skin onto the sausage maker. Push the (seasoned) minced meat into the cutter housing. If the skin gets stuck onto the sausage maker, wet it with some water.
HOW TO CLEAN YOUR APPLIANCE
Meat left behind in the cutter housing may be removed from the inside of the appliance by passing a slice of bread through the cutter housing.
Before you clean the appliance, switch the appliance off and remove the plug from the socket.
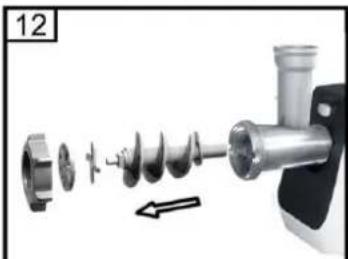
○ Remove the pusher and the hopper plate. Unscrew the fixing ring and remove all parts of the cutter housing (fig.12).
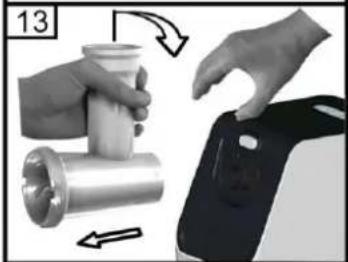
Press the release button and turn the whole cutter housing in the direction of the arrow. Remove the pusher and the tray (fig.13).
Do not clean the parts in the dishwasher!
- Wash all parts that have come into contact with meat in hot soapy water. Clean them immediately after use.
- Rinse them with clear hot water and dry them immediately.
We advise you to lubricate the cutter unit and the grinding discs with some vegetable oil.
DISPOSAL
For proper disposal, please return device to a retailer, a service agent or Rotel AG.
European Directive 2012/19/EC concerning Waste Electrical and Electronic Equipment (WEEE) states that household appliances should not be disposed of using the normal solid urban waste cycle. Exhausted appliances should be collected separately in order to optimise the cost of re-using and recycling materials comprising the machine, while preventing potential damage to public health and the environment. The crossed-out wheeled bin symbol appears on all products to remind owners of the obligations regarding separate waste collection. Owners should contact their local authorities or appliance dealers for further information concerning the correct disposal of household appliances.
This appliance conforms to the following EU directives:

2014/35/EU (Low Voltage Directive)
2014/30/EU (Electromagnetic Compatibility Directive)
D/F/I/E
- GARANTIE / GARANTIE / GARANZIA / WARRANTY
2JAHREGARANTIE
2 ANS DE GARANTIE
2 ANNI DI GARANZIA
2 YEARS WARRANTY
○ Warranty commitment
We commit ourselves to repair this device free of charge, should a failure occur within the period of warranty despite proper handling. We repair all defects caused by material or manufacturing faults. The guarantee will be fulfilled either by repairing the device or replacing the defective parts, according to our judgement. A warranty does not cover damages due to wearing parts, damages and defects caused by improper handling or maintenance (such as limescale and commercial use). It will only be granted if either the warranty card stating date of purchase, dealer's stamp and signature, or the purchase receipt is sent with the device to the relevant after-sales service (see address below). Devices shall be returned in their original packaging. Transport costs are to be borne by the purchaser. Remember to specify your address to your sending, as well as a short declaration about the failure, shall the defect not be obvious.
Servicestation:
Service après-venture: Rotel AG

Brand : ROTEL
Model : U484CH1
Category : Chopper