
IMC6272BK - Microwave Oven INVENTUM - Free user manual and instructions
Find the device manual for free IMC6272BK INVENTUM in PDF.

| Product type | Microwave oven |
| Brand | Inventum |
| Model | IMC6272BK |
| External dimensions (H x W x D) | 596 x 595 x 546 mm |
| Net weight | 45 kg |
| Capacity | 72 L |
| Connection voltage | 230 V ~50 Hz |
| Connected power | 2880 W |
| Microwave power | 800 W |
| Amperage | 16 A |
| Cooking functions | Microwave, hot air, conventional, single grill, double grill, pizza position, defrost, dough rising |
| Automatic programs | 13 programs (defrost, popcorn, gratin, etc.) |
| Oven levels | 5 |
| Child lock | Yes (activate/deactivate by pressing 3 seconds) |
| Included accessories | Cooking grid, baking tray, oven rack |
| Microwave-compatible materials | Glass, ceramic, heat-resistant plastic (no metal) |
| Cleaning | Damp cloth, warm water and mild detergent |
| Warranty | 2 years full, up to 5 years under conditions (registration) |
Frequently Asked Questions - IMC6272BK INVENTUM
User questions about IMC6272BK INVENTUM
0 question about this device. Answer the ones you know or ask your own.
Ask a new question about this device
Download the instructions for your Microwave Oven in PDF format for free! Find your manual IMC6272BK - INVENTUM and take your electronic device back in hand. On this page are published all the documents necessary for the use of your device. IMC6272BK by INVENTUM.
USER MANUAL IMC6272BK INVENTUM
- safety instructions page 20
- product description page 24
- prior to first use page 26
- setting the clock page 26
- using the oven page 27
- using the microwave mode page 28
- automatic programmes page 29
- child lock page 30
- cleaning and maintenance page 30
- breakdowns and solutions page 3
- installation instructions page 32
general terms and conditions of service and warranty page 66
Deutsch
1 safety instructions
- Carefully and fully read the instruction manual prior to using the appliance and carefully store the manual for future reference.
- Only use this appliance for the purposes described in the instruction manual. Do not use aggressive cleaning agents in this appliance. The appliance is only suitable for the preparation of food. The appliance is not suitable for industrial or laboratory use.
- Do not try to use the appliance with the door open. This could result in hazardous exposure to micro energy.
- Do not place any object between the door of the appliance. Make sure the door and sealing always remain clean.
- If the door or sealing has been damaged, do not use the oven until it has been repaired by an expert.
- Caution: Liquids and other foods may not be heated in closed tin cans, as they can explode due to the pressure.
- Repairs to electrical appliances should only be performed by skilled persons. It is dangerous to perform a repair whereby the base unit of the appliance must be opened. The base unit provides protection against exposure to micro energy.
- Keep the appliance out of reach of children. Children do not see the dangers when handling electrical appliances. Therefore, never allow children to work with electrical appliances without supervision. Keep the appliance and cord out of reach of children younger than 8 years of age.
- The appliance can be used by children of 8 years and older and persons with a limited physical, sensory or mental capacity or lack of experience or knowledge, provided they use the appliance under supervision or have been instructed about its safe use and understand the hazards involved.
Children are not allowed to play with the appliance. - The appliance may not be cleaned or maintained by children, unless this is done under supervision.
-
Only use materials that are suitable for use in the oven/microwave.
-
The appliance must be cleaned regularly. Remove any food residues.
- Keep an eye on the appliance when heating food in a plastic or paper container using the microwave mode. It could combust spontaneously.
- Do not use the microwave mode when there is nothing in the appliance. This could damage the appliance.
- In case of smoke, switch off the appliance and remove the plug from the socket. Keep the door closed to smother the flames.
- Do not overcook food.
- Do not use the inside of the appliance as storage space. Do not store any biscuits, bread, etc. in the appliance.
- Remove metal closing strips and metal grips of paper or plastic containers/bags before placing them in the appliance.
- Always install the appliance in accordance with the instructions.
- Eggs in their shells and hard-boiled eggs should not be heated using the microwave mode, as they could explode. Even after the appliance has been switched off.
- Never clean the appliance with a high pressure cleaner or steam cleaner.
- Do not place accessories of the appliance on the opened door.
- Never cover the oven bottom with aluminium foil. Aluminium foil stops the heat and may therefore lead to poor baking results. Moreover, the email of the oven bottom could get damaged.
- The oven has a fan that cools the oven mantle. When the oven is switched off, this fan could continue to run for some time.
- The contents of baby bottles and jars of baby food should be stirred or shaken prior to consumption. Check the temperature to prevent burns.
- Caution: Heating liquids could result in explosive boiling over of the liquid. Also after the appliance has been switched off. Be careful when removing the cup or container from the oven with microwave mode. Therefore, always place a plastic or ceramic spoon in the cup when heating.
- This appliance may only be fitted by a certified installer.
- Defective parts may only be replaced by original parts. Only for those parts will the manufacturer be able to guarantee that they meet the safety requirements.
-
Damage as a result of incorrect connection, incorrect fitting or incorrect use does not fall under the warranty.
-
If the connecting cable is damaged, it may only be replaced by the manufacturer, its service organisation or similarly qualified persons, in order to prevent hazardous situations.
- The electrical connection must meet national and local regulations.
- The socket and plug must always be within reach.
- The appliance may not be connected to the mains supply via a power strip or extension cord. If this is not observed, the safety of the appliance cannot be guaranteed.
- The appliance must always be earthed.
- Do not use the appliance if the plug, cord or appliance are damaged, or if the appliance no longer functions properly or if it is damaged in any other way. If this is the case, consult the shop or our technical service. Never replace the plug or cord yourself.
- Only use and store the appliance indoors.
- Do not use the appliance near water, a damp basement/garage or near a swimming pool.
- Avoid contact with hot surfaces when the appliance is switched on. The inside becomes hot!
- Never cover the ventilation holes.
- Never bend the power cord sharply or allow it to run across hot parts.
- Not keeping the appliance clean could lead to wear and tear which, in its turn, will have an effect on the life span and could result in dangerous situations.
- The appliance cannot be used with a timer or separate remote control.
- Only connect the appliance to alternate current, to an earthed wall socket, with a mains voltage that corresponds with the information provided on the information plate of the appliance.
- Do not leave the appliance unsupervised if the appliance is operational.
- Do not pull the cord and/or appliance to remove the plug from the wall socket. Never touch the appliance with wet or moist hands.
-
If you decide not to use the appliance any more due to a defect, we recommend cutting off the cord after removing the plug from the wall socket. Take the appliance to the waste processing department concerned of your municipality.
-
If the appliance does not function after it has been switched on, it is possible that the fuse or earth leakage circuit breaker has been activated in the electrical distribution box. The group can be overloaded or an earth leakage current may have occurred.
- Never submerge the appliance, cord or plug in water.
- This appliance is only suitable for household use. If the appliance is not used as intended, no compensation can be claimed in case of defects or accidents and the warranty will be invalidated.
-
Be careful with the following materials and make sure that they may be used in the appliance when using the microwave mode:
-
aluminium foil yes*
-paper yes
-cling film yes - aluminium container no
- microwave crockery yes
- heat resistant plastic yes
- unglazed pottery no
- metal cookware no
- ovenproof glass and ceramics yes
- normal glass yes
- metal closing strip no
- plate with metal decorative rim no
- mercury thermometer no
-closedjar no***
-bottle with narrow neck no - oven bag yes

Household appliances should not be added to regular household waste. Take the appliance to a special centre for separated waste collection of your municipality to have it recycled in a responsible manner and in accordance with government regulations.
- Use small pieces to prevent thinner sections of chicken, for example, from getting cooked too quickly.
** Use non-decorated kitchen paper to cover food and absorb fat.
Remove the cover and make sure the jar is not heated too long. The glass may burst.
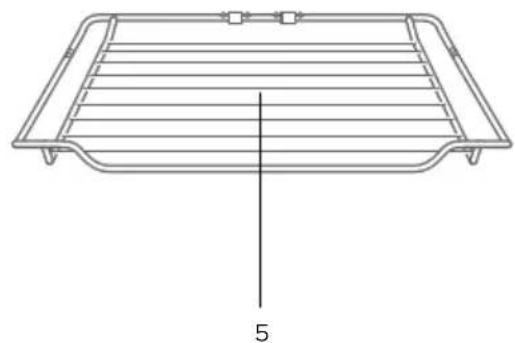
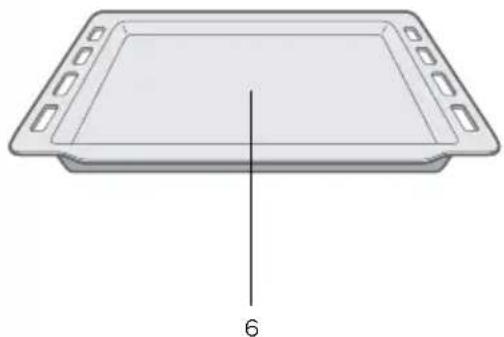
2 product description
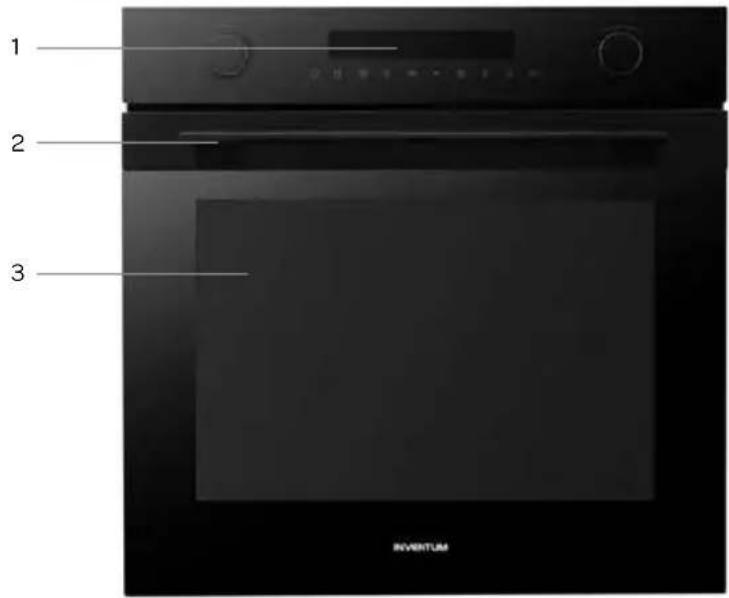
- Operating panel
- Door handle
- Door
- Insert levels (5)
- Oven rack
- Baking tray
Instructions:
- When using the microwave mode, always use the oven rack. For the best result, place the rack on the second insert level.
- Never place a baking tray directly on the bottom of the oven.
- Never use the baking tray when using the microwave mode.
- Never use the microwave mode when there is no food in the oven cavity.
24·English
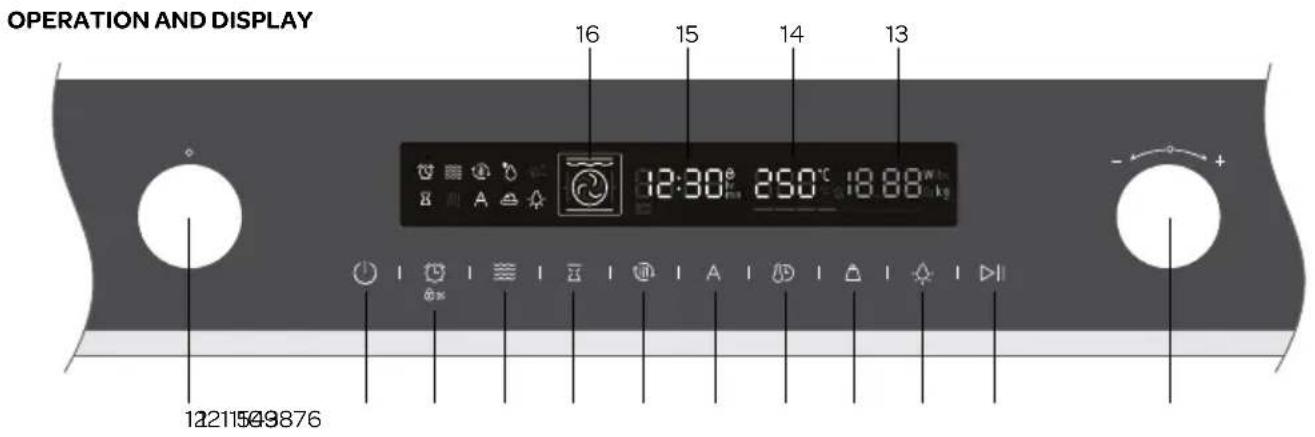
- MODE knob
- ON/OFF key
- Key for setting the kitchen timer as well as the child lock /
- Key for setting the microwave
- Key for setting the end of the preparation time (delayed start)
- Quick preheat key
7.Key for setting an automatic menu A - Key for setting the clock / preparation time and temperature
- Key for setting the weight
- On/off key for the oven lamp
- Start and pause
- Adjusting knob
- Microwave power display [W]
- Temperature display [ C]
- Time display
- Oven mode display
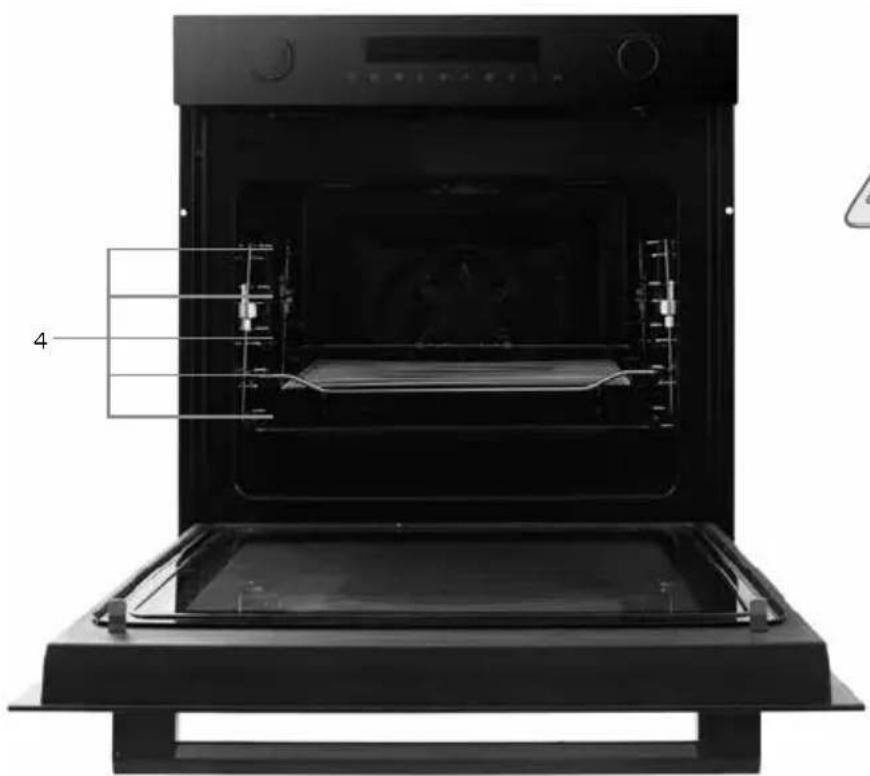
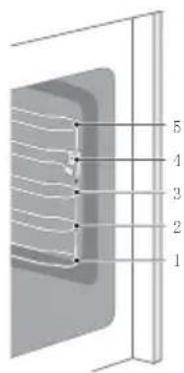
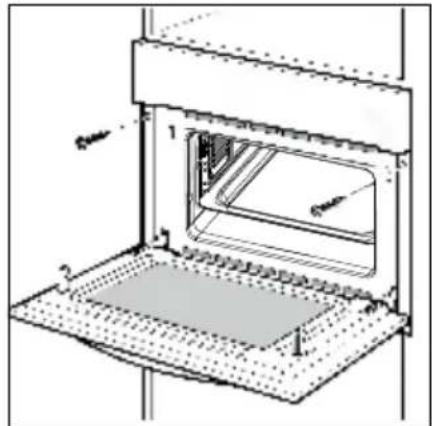
The oven has 5 insert levels - see drawing1.
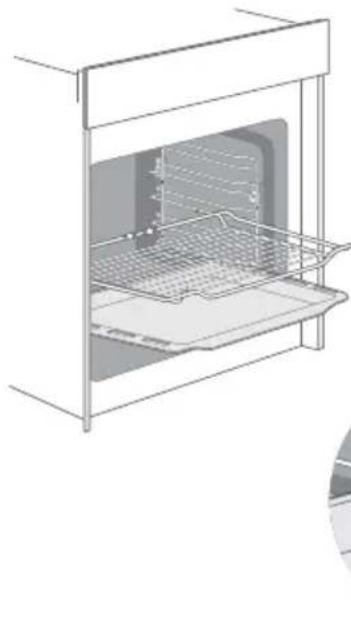
The accessories can be pulled halfway out of the oven, without tilting. You can safely remove the dish from the oven, the oven rack or baking tray will not fall out by accident.
Therefore, always make sure the accessory is placed in the oven correctly.
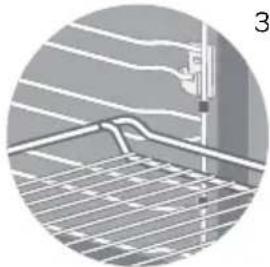
- Place the oven rack in the oven according to drawings 2 and 3 and pay special attention to the front and rear of the rack.
- Place the baking tray in the oven according to drawings 2 and 4 and pay special attention to the front and rear of the baking tray. Always fully slide the accessories into the oven, so that they do not make contact with the oven door.
1
2
3 prior to first use
Before using the microwave oven for the first time, please proceed as follows: carefully unpack the oven and remove all packaging material and any promotional stickers. Keep the packaging (plastic bags and cardboard) out of the reach of children. After unpacking the appliance, check it for external damage that may have occurred during transport. Check that the voltage corresponds with what is stated on the information plate. Prior to installing the appliance, observe the instructions in section 11.
Clean the appliance and all accessories with warm water and a mild cleaning agent. Properly rinse with water only and dry.
Heat the empty oven approximately 60 minutes to 250^ using the conventional mode to remove all remaining production residues, such as oil. In this way you prevent unpleasant odours from being generated when preparing food. Ensure sufficient ventilation of the room.
- Use the mode knob to select the conventional mode. The symbol lights up in the display when the hot air mode is selected.
- Turn the adjusting knob to change the temperature to 250^ .
- Press the CLOCK key and turn the adjusting knob to set the required time - 60 minutes.
- Press the START key to start the oven.
Allow the appliance to cool down and clean the interior once more with warm water and a mild cleaning agent. Properly rinse with water only and dry.
4 setting the clock
When you insert the plug of the appliance in the socket, the display shows 00:00 and a sound signal can be heard.
- Press the CLOCK key and turn the adjusting knob to the left or right to set the correct hour (24 hour clock).
- Press the CLOCK key once more to set the minutes.
- Press the CLOCK key to confirm the time, once the correct time has been set. The colon": "in the display flashes.
To adjust the time, press the CLOCK key
- Observe the above-mentioned steps to adjust the time.
setting the kitchen timer
The kitchen timer can be used to receive a sound signal when the set time has expired. The kitchen timer does not switch the oven on or off.
- Press the kitchen timer key to select the kitchen timer.
- Turn the adjusting knob to the left or right to set the number of hours (0-23).
- Press the kitchen timer key once more. The minute digits start to flash.
- Turn the adjusting knob to the left or right to set the number of minutes (0-59).
- Press the kitchen timer key once more to confirm the set time. The colon":in the display flashes and the timer starts to count down.
- Once the set time has expired, a sound signal sounds 10 times.
5
using the oven
There are several ways in which the oven can be used. How to select the required oven mode and temperature is explained below. The preparation time of the dish can also be set.
SWITCHING ON
Switch on the oven as follows:
- Select an oven mode by means of the mode knob, such as the double grill mode. Stop turning the position button when the symbol is visible in the display.
- Turn the adjusting knob to change the temperature to the required temperature.
- Press the CLOCK key to set the preparation time and turn the adjusting knob to select the correct time.
- Press the START key to start the oven.
SWITCHING OFF
To switch off the oven, press the ON/OFF key.
- Attention: If the cooking or baking process is interrupted by opening the door, press the START key once more to continue the process.
- Press the PAUSE key to pause the oven. Press the START key to continue the process.
It is always possible to adjust the preparation time. Press the CLOCK key and turn the adjusting knob to adjust the time. - It is always possible to adjust the temperature. Press the TEMPERATURE key and turn the adjusting knob to adjust the temperature.
MODES AND DISPLAY
| Oven mode Use | ||
| Conventional (heat from above + below) | The upper and lower heating elements are used to get perfect baking results, such as cake and puff pastry. Setting range: 30-250°C. | |
| Hot air | For baking at several levels (e.g. baking trays with cookies). The heat comes from the heating element at the rear. Setting range: 50-250°C. | |
| Conventional with fan | For baking at several levels (e.g. baking trays with cookies). The fan distributes the heat from the heating elements evenly in the oven cavity. Setting range: 50-250°C. | |
| Single grill | For grilling small quantities and for browning food. Place the food in the middle of the oven under the grill element. Setting range: 150-250°. | |
| Double grill + fan | Can be used to grill a layer of food, such as steaks, or to gratiné oven dishes. Setting range: 50-250°C. | |
| Double grill | For grilling large quantities of meat, steaks, cutlets, kebabs, etc. Setting range: 150-250°C. | |
| Pizza position | For pizzas and dishes that particularly require heat from below. The lower and rear heating elements are used. Setting range: 50-250°C. | |
| Heat from below | For extra browning of pizza bottoms, quiches and pies. The heat comes from the lower heating element. Setting range: 30-220°C. | |
| Defrosting | For slowly defrosting frozen food. | |
| Rising dough | To allow yeast dough and sourdough to rise. Setting range: 30-45°C. | |
quick preheat
When using the quick preheat mode, the oven reaches the set temperature very quickly.
Select an oven mode and press the quick preheat key. The symbol appears in the display.
In case of an oven mode that does not allow quick preheating, a beep will sound.
Quick preheat cannot be used for the following modes: automatic menus, defrosting and dough rising.
delayed start
Set the end time of the oven and the preparation time. The oven switches on automatically at the preset temperature and oven mode, to make sure the dish is ready at the end time set by you.
After setting the oven mode, temperature and preparation time, press the key for delayed start set the correct hour using the adjusting knob
- Press the key once more to set the minutes.
When setting is completed, press the key once more to confirm.
- Press the START key The symbol for delayed start flashes in the display and the oven starts automatically.
6 using the microwave mode
The oven can be used for microwave alone or microwave in combination with an oven mode.
Always use heat resistant oven dishes made of pottery, glass or plastic. These materials allow the microwaves to pass properly. Do not use oven dishes made of metal or with metal decorations.
| Microwave power Application | |
| 80 Watts Softening ice cream | |
| 240 Watts Softening butter, melting chocolate, defrosting | |
| 400 Watts Defrosting meat and vegetables | |
| 560 Watts Cooking rice and soup | |
| 800 Watts Heating, boiling water, chicken, fish and vegetables, heating drinks |
- Press the key to activate the microwave mode. The symbol appears in the display, as well as the default time of 1 minute and default power of 800 W.
- Press the key once more and turn the adjusting knob to adjust the microwave power.
- Press the CLOCK key and turn the adjusting knob to set the preparation time.
- Press the START key to start the microwave mode.
using the microwave in combination with an oven mode
- Press the key to activate the microwave mode.
- Turn the mode knob to select a combination position.
- Turn the adjusting knob to adjust the temperature.
- Press the CLOCK key and turn the adjusting knob to set the preparation time.
-
Press the key and turn the adjusting knob to adjust the microwave power.
-
This setting is also possible the other way around by first setting an oven mode and then the microwave power
- If an oven mode is selected that cannot be combined with the microwave, you will hear a beep sound.
| Microwave mode | Default power Default temperature | Temperature range | Time range | ||
| ≈ | Microwave | 800 W | - | - | 00:10-30:00 min |
| ≈+ | Microwave + hot air | 320 W | 160°C | 50 - 250°C | 00:01-01:30 hour |
| ≈+ | Microwave + double grill + fan | 320 W | 180°C | 50 - 250°C | 00:01-01:30 hour |
| ≈+ | Microwave + pizza position | 320 W | 180°C | 50 - 250°C | 00:01-01:30 hour |
Instruction: when using the microwave mode, always only use the oven rack. For the best result, place the rack in the second insert level.
7 automatic programmes
The oven has 13 automatic programmes, 3 defrosting and 10 baking programmes. You only need to select the programme and set the weight. The power, time and temperature are already set.
Do not preheat the oven when using an automatic programme.
Press the A key for the automatic programmes. The A lights up in the display and the first programme number appears, d01.
- Turn the mode knob to select the correct programme. One of the programmes from d01 to A10 appears in the display. As well as the temperature and weight.
- Press the WEIGHT key and turn the adjusting knob to select the correct weight.
Press the START key to start the oven.
- When the time has expired, a sound signal can be heard and the oven stops.
| Programme | Type of food Microwave Preheating | (min.) | Weight selection (kg) | |
| d01 Defrosting (meat) yes no 0.1-1.5 kg | ||||
| d02 Defrosting (poultry) yes no 0.1-1.5 kg | ||||
| d03 Defrosting (fish) yes no 0.1-1.0 kg | ||||
| A01 Popcorn yes no 0.1 kg | ||||
| A02 Potatoes au gratin yes no 0.5 kg | ||||
| A03 Cheese cake | no | no | - | |
| A04 Quiche lorraine | no | 10 min. | - | |
| A05 Meatloaf | no | no | 0.5 kg/1 kg | |
| A06 Cake | no | no | - | |
| A07 Flatbread | no | 8 min. | - | |
| A08 Apple pie | no | 7 min. | - | |
| A09 Fresh pizza on the baking tray | no | 8 min. | - | |
| A10 Apple pastry with crumble | no | no | - |
INSTRUCTIONS!
During preheating, the preparation time is paused and lights up in the display. After preheating, a sound signal can be heard and starts to flash. Place the dish.
Do not use the baking tray for the following programmes: d01, d02, d03, A01 and A02, because the microwave is used during these programmes.
Use food frozen to -18^ Try to freeze food as flat as possible, so that it can be defrosted faster later on.
Remove the packaging and weigh the food to be defrosted. This weight must be set in the defrost programme.
- When defrosting meat and poultry, moisture is released. Throw this moisture away when you turn over the food. Never use this moisture for anything else and do not allow it to make contact with other food.
- Place the food to be defrosted in a low oven dish that is suitable for use in a microwave oven.
- When defrosting meat (d01) and poultry (d02), a sound signal can be heard to indicate that the dish must be turned over.
- Allow the defrosted food to rest for another 10 to 30 minutes, so that the same temperature is reached throughout the dish. Large pieces of meat require more time than smaller pieces.
8 child lock
The child lock prevents unintended use of the oven by children or other persons. The oven keys cannot be used when the child lock is active.
Activating the child lock:
Press the key for 3 seconds. The symbol in the display indicates that the child lock is activated.
Deactivating the child lock:
Press the key for 3 seconds when the child lock is active. The symbol disappears. The child lock is deactivated.
9 cleaning and maintenance
Switch off the appliance if you want to clean it and allow it to cool down fully. The appliance should not be cleaned with a steam cleaner or high pressure cleaner.
Interior
Clean the interior of the appliance after each use. Use a damp cloth. For thorough cleaning you can use warm water to which a little washing-up liquid has been added. Thoroughly rinse off the cleaning agent residues. Thoroughly dry the interior with a cloth.
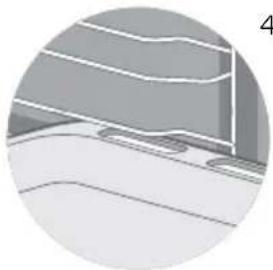
For easier cleaning of the interior of the oven, you can remove the guide rails from the oven.
- Remove the white clamping bushes.
- Lift the guide rail a little.
- Remove the guide rack.
Accessories
Loose accessories such as the oven rack and baking tray must be cleaned with warm water and washing-up liquid. Properly dry everything before using it again.
Exterior
Clean the exterior of the appliance with a damp cloth or sponge. If necessary, you can clean the exterior of the appliance by means of a mild detergent. Also properly clean the door and door rubber. Do not use glass cleaners or sharp objects.
Tips for cleaning
- Clean the oven after each use so that food residues are not ingrained.
- Splashes of fat can be easily removed while the appliance is still a little warm. Use warm water and a little washing-up liquid.
- Do not use aggressive abrasive cleaning agents or sharp objects to clean the oven and oven door.
- Odours, such as after baking fish, can be easily removed.
Add a few drops of lemon juice to a cup of water. Place a spoon, preferably plastic, in the cup to prevent a delayed boilover. Heat the water for 1 to 2 minutes at the highest position of the microwave mode.
10 breakdowns and solutions
| Breakdown Cause What to do | ||
| The oven does not function. No power supply | ply Check the fuse in the distribution | cabinet, replace a burnt fuse if necessary. |
| The plug is not in the socket. Properly | insert the plug in the socket. | |
| Power interruption Check that the lighting in the kitchen works. | ||
| The appliance does not function. In the display you can see | The child lock is set. Deactivate the child lock (see: section 8). | |
| 0:00 is shown in the display There has been a power interruption. | a power interruption. | Set the clock again. |
| The microwave mode cannot be activated. | It is possible that the door is not closed properly. | Check whether there is something between the door. |
| It takes longer than before, to heat food with the microwave mode. | The selected power is too low. Select | a higher microwave power. |
| The amount of food is more than usual. | Double the amount of food = almost double the heating time. | |
| The food was colder than usual. Stir the food while heating. | ||
| A particular mode or power cannot be set. | The temperature, power or combination position is not available for this setting. | Select settings within the range. |
11 installation instruction
- Safety during use is only guaranteed if the assembly has taken place in a technically correct way and in accordance with these installation instructions. The installer is liable for damage caused by incorrect assembly.
- The electrical connection may be carried out only by a qualified electrician. This person should be aware of the national and regional safety instructions with which the connection has to comply.
- The oven falls under protective class I and may only be used in combination with an earthed connection.
The manufacturer is not liable for unsuitable operation and possible damage caused by unsuitable electric installations.
- The oven must be connected to a permanent installation in which provisions for switching off are integrated, in accordance with the installation instructions.
Make sure that the power supply cable does not get jammed during installation or is running along sharp edges. It must be placed in such a way that no contact is made with hot parts of the oven. - The connection point, socket and/or plug must always be accessible.
- The kitchen furniture in which the appliance is built, must be heat resistant (>90^) . The same applies to the doors and fronts of the kitchen furniture.
- The kitchen furniture in which the appliance is built, must not have a back wall in position of the microwave.
- Check that the kitchen furniture in which the oven will be mounted is firmly attached. For example, by screwing it to the adjacent elements.
- In case of incorrect installation or connection, the warranty becomes invalid.
- Attention: any change to the appliance, including replacement of the power supply cable, must be performed by a certified installer.
OVERALL DIMENSIONS
The figures below show the dimensions of the recesses in mm.
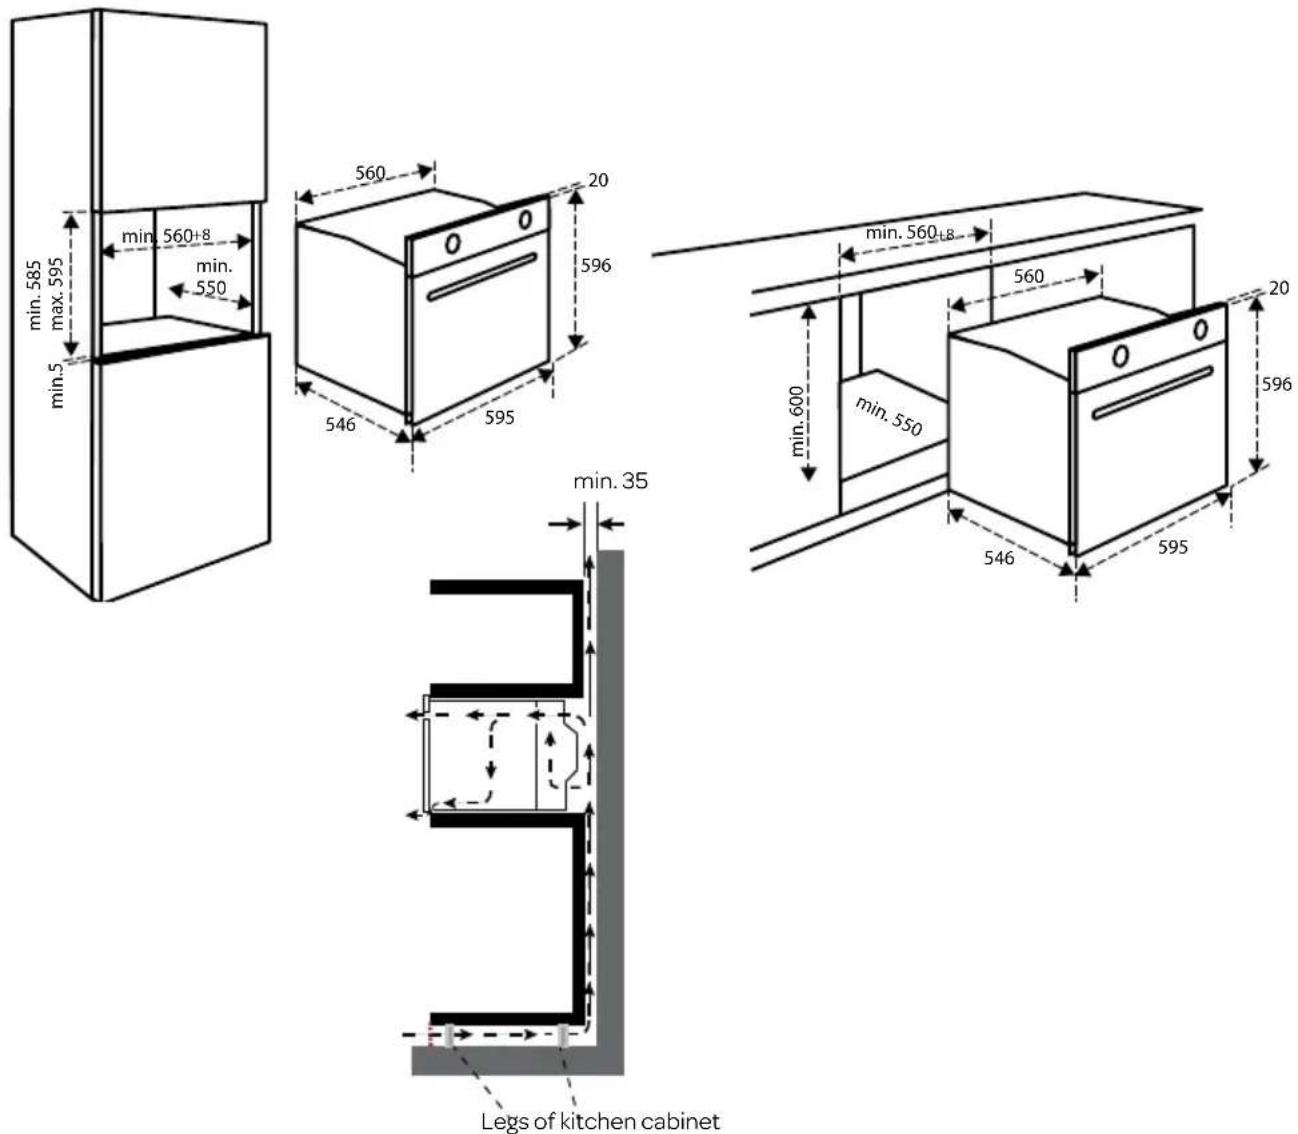
ELECTRICAL CONNECTION
The mains voltage must correspond with the voltage shown on the information plate in the appliance. In the meter cupboard, the groups must each be protected with a 16 Ampere fuse at least. The connection cable must have a core cross section of at least 2.5mm^2 and a length of 1.5m . If the cable is too short, you cannot connect the appliance and place it against the wall before you want to insert the plug in the socket.
BUILDING-IN THE OVEN
- Check that the kitchen furniture and recess meet the set requirements in relation to dimensions.
- Slide the oven in the kitchen furniture. Check that the base unit does not make contact with the walls of the kitchen furniture. Make sure there is a space of at least 2mm between the base unit and the walls of the kitchen furniture. Make sure the oven is in a central position between the walls of the kitchen furniture. Caution: make sure that the connection cable does not get jammed and does not lie on top of the appliance.
- Open the door of the appliance.
- Use the provided screws to fasten the appliance to the side walls of the kitchen furniture.
- The opening between the cabinet and the top of the oven should not be closed. This opening is needed for ventilation.
- Close the door of the appliance and insert the plug in the socket.
The oven is now ready for use.
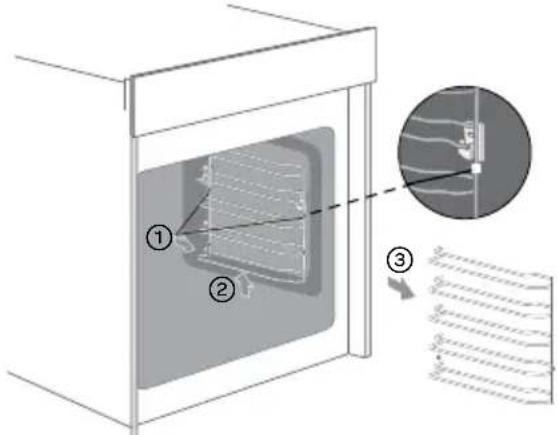
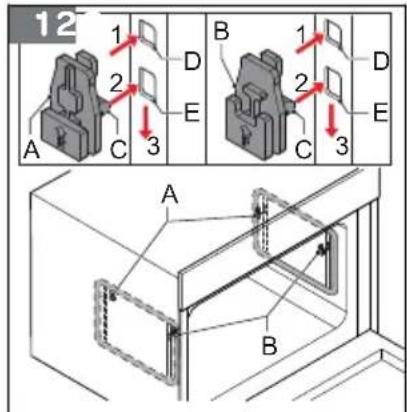
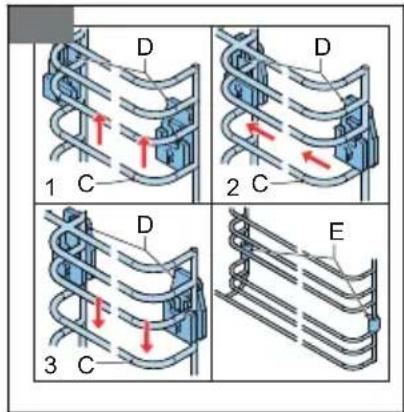
INSTALLING THE GUIDE RACKS
First install the hooks to which the guide racks will be attached later - fig. 1.
- Identify the hooks for the rear (A) and the front (B).
- Install the hook (C) in the top opening (D).
- Install the hook in the bottom opening (E).
- Push the hook down.
- Repeat the procedure for the other hooks.
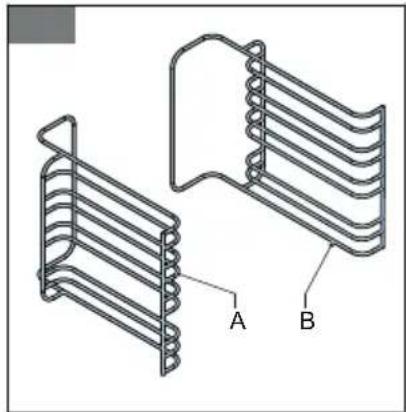
Install the guide racks - fig. 2 and 3.
Note: The procedure shows the installation for the guide rack of the right side of the appliance. The procedure for the left side is the same, however the hook are mirrored.
- Identify the guide racks for the left side (A) and the right side (B).
- Carefully push the guide rack (C) in the hook (D).
- Push the rack to the rear of the appliance.
- Push the rack down.
- Install the clamping bushes (E).
technical data
| Connection voltage 230 V -50Hz | |
| Connected load 2880W | |
| Microwave power 800W | |
| Ampere 16A | |
| Oven capacity 72 L | |
| External dimensions without handle 596 | x595 x 546 mm (HxWxD) |
| Nett weight 45 kg |
specifications techniques
general terms and conditions of service and warranty
We do not need to remind you of the importance of service. After all, we develop our products to a standard so that you can enjoy them for many years, without any concerns. If, nevertheless, there is a problem, we believe you are entitled to a solution straight away. Hence our products come with an exchange service, on top of the rights and claims you are entitled to by law. By exchanging a product or part, we save you time, effort and costs.
2-year full manufacturer's warranty
- Customers enjoy a 2-year full manufacturer's warranty on all Inventum products. Within this period, a faulty product or part will always be exchanged for a new model, free of charge. In order to claim under the 2-year full manufacturer's warranty, you can either return the product to the shop you bought it from or contact the Inventum costumer service department via the form at www.inventum.eu/service-aanvraag.
- The 2-year warranty period starts from the date the product is bought.
- In order to claim under the warranty, you must produce a copy of the original receipt.
- The warranty applies only to normal domestic use of Inventum products within the Netherlands.
5-year Inventum warranty
- Inventum offers a 5-year warranty on most large domestic appliances and a selection of small domestic appliances. This 5-year Inventum warranty consists of a 2-year full manufacturer's warranty, extended by a further 3-year warranty. The only thing you need to do to qualify for the 3-year extended warranty is to register the product within 45 days of purchase. You can read more about registering the product in the following paragraph.
- In accordance with the 5-year Inventum warranty provisions, a faulty product or part will always be exchanged for a new model during the first 2 years under the warranty. During the 3rd to 5th year under the warranty, you will only pay the costs of exchange. The current costs of exchange are listed at www.inventum.eu/omruilkosten.
- In order to claim under the 5-year Inventum warranty, you can either return the product to the shop you bought it from or contact the Inventum costumer service department via the form at www.inventum.eu/service-aanvraag.
- The 5-year warranty period starts from the date the product is bought.
- In order to claim under the warranty, you must produce a copy of the original receipt.
- The warranty applies only to normal domestic use of Inventum products within the Netherlands.
Product registration
- The 3-year extended warranty is easy to obtain, free of charge, by registering the product within 45 days of purchase, via the website www.inventum.eu/garantie-Registrarie. If you did not register the product within 45 days of purchase, you can still do so up to 2 years after the purchase date. However, there will be a charge. The one-off registration charge is € 89 for each separate product. Registration is possible only for products that are subject to the 5-year Inventum warranty. Whether the product qualifies for the 5-year Inventum warranty is stated in the product user manual and in the product information sheet, on Inventum's website.
- The warranty period always starts from the date the product is bought. If the product is registered for the extended warranty at a later date, the warranty period still starts from the original date of purchase.
- The 3-year extended warranty can only be applied for if you are in the possession of a copy of the original receipt and the Inventum 5-year warranty certificate.
Large domestic appliances
- Breakdowns or faults in large domestic appliances (separate and built-in white goods) can be registered via the form at www.inventum.eu/service-aanvraag, by calling the Inventum costumer service department or in the store where you bought the device. The telephone number of the costumer service department can be found at www.inventum.eu.
- In the event of breakdowns or faults in large domestic appliances, Inventum will have the option to have a service engineer inspect the faulty device onsite at the customer in the Netherlands and to carry out repairs, there and then. The Inventum customer service department can also decide to have the device exchanged.
- If you suffer a breakdown or fault in a large domestic appliance during the first 2 years from the date of purchase, Inventum will not charge any costs for the exchange, call-out or for parts and labour.
- If you registered the product as described before at www.inventum.eu/garantie-registry and you subsequently report a breakdown of a large domestic appliance in the 3rd to 5th year of the date of purchase, the 5-year Inventum warranty applies and the device will be repaired or exchanged, free of charge. In the event of a repair or exchange of the device, you only pay the costs of exchange. The current costs of exchange are listed at www.inventum.eu/omruilkosten. If you did not register the product, the 3-year extended warranty does not apply.
- When reporting a breakdown or fault, a service engineer will contact the customer within 1 working day in order to make an appointment. When the report is made in a weekend or during a public holiday, this will be the next working day.
-
If you report a breakdown or fault via the form at www.inventum.eu/service-aanvraag, you will be kept informed of the progress via mobile messages and e-mail.
-
The warranty period starts from the date the product is bought.
- In order to claim under the warranty, you must produce a copy of the original receipt and the Inventum 5-year warranty certificate.
- The warranty applies only to normal domestic use of Inventum products within the Netherlands.
Breakdowns or faults outside the warranty period
- Breakdowns or faults in small or large domestic appliances outside the warranty period, can be reported to the costumer services department via the form at www.inventum.eu/service-aanvraag or by calling the costumer services department.
- The costumer services department may ask you to send the product for inspection or repair. The costs of dispatch will be at your expense.
- The inspection to establish whether repair is possible involves a charge. You need to grant your permission for this, in advance.
- In the event of a large domestic appliance, Inventum, at your request, can send out a service engineer. In that case, you will be charged the call-out costs, as well as parts and labour.
- In the event of an instruction to repair, the repair costs must be paid in advance. In the event of a repair by a service engineer, the costs of the repair must be settled with the engineer onsite, preferably by means of PIN payment.
Warranty exclusions
- The following is excluded from the aforesaid warranties:
normal wear and tear;
- improper use or misuse;
insufficient maintenance;
- failure to comply with the operating and maintenance instructions;
- unprofessional installation or repairs by third parties or the customer himself;
- non-original parts used by the customer;
- use for commercial or business purposes;
- removal of the serial number and/or rating label.
-
In addition, the warranty does not apply to normal consumer goods, such as:
-
dough hooks, baking tins, (carbon) filters, etc.;
- batteries, bulbs, carbon filters, fat filters etc.;
external connection cables; -
glass accessories and glass parts such as oven doors;
and similar items. -
Transport damage not caused by Inventum is also excluded. Therefore, inspect your new device before starting to use it. If you detect any damage, you must report this to the store where you purchased the product within 5 working days, or to the Inventum customer service department via the form at www.inventum.eu/service-aanvraag. If transport damage is not reported within this period, Inventum does not accept any liability in this respect.
- The following are excluded from warranty and/or replacement: faults, loss of and damage to the device as a result of an event that is normally insured under the home contents insurance.
Important to know
- The replacement or repair of a faulty product, or a part thereof, does not lead to an extension of the original warranty period.
- Parts that have been replaced, packaging material and exchanged devices are taken back by the service engineer and become the property of Inventum.
- If a complaint is unfounded, all costs arising from it will be at the customer's expense.
- Following expiry of the warranty period, all costs of repair or replacement, including administration costs, dispatch and call-out charges, will be charged to the customer.
- Inventum cannot be held liable for damage as a result of devices built in incorrectly.
- Inventum cannot be held liable for damage caused by external events, unless this liability arises from mandatory statutory provisions.
- These warranty and service provisions are governed by Dutch law. Disputes will be settled exclusively by the competent Dutch court.
@ Instagram.com/inventum1908
f Facebook.com/jinventum1908
youtc.com/inventum1908
IMC6272BK/01.0821V