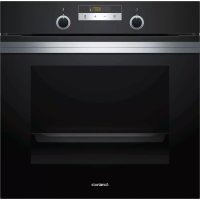
CX5BS606 - Other kitchen appliances CONSTRUCTA - Free user manual and instructions
Find the device manual for free CX5BS606 CONSTRUCTA in PDF.


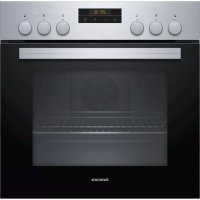
| Product Type | Ceramic hob |
| Brand | Constructa |
| Model | CX5BS606 |
| Number of cooking zones | 4 |
| Control type | Touch control |
| Main switch | Yes |
| Residual heat indicator | Yes (2 levels H/h) |
| Child safety lock | Manual and automatic |
| Automatic safety shut-off | Yes |
| Digital display | Yes |
| Cleaning | Ceramic glass and frame |
| Power supply | 230 V, 50 Hz |
| Estimated total power | Approx. 7.2 kW |
| Estimated dimensions (W x D x H) | 59 x 52 x 5 cm |
| Estimated weight | Approx. 8 kg |
| Protection class | I |
| Customer service | Yes (see instruction manual for numbers) |
| Basic settings | Yes (child lock, signals, etc.) |
| Energy saving function | Yes (integrated tips) |
Frequently Asked Questions - CX5BS606 CONSTRUCTA
User questions about CX5BS606 CONSTRUCTA
0 question about this device. Answer the ones you know or ask your own.
Ask a new question about this device
Download the instructions for your Other kitchen appliances in PDF format for free! Find your manual CX5BS606 - CONSTRUCTA and take your electronic device back in hand. On this page are published all the documents necessary for the use of your device. CX5BS606 by CONSTRUCTA.
USER MANUAL CX5BS606 CONSTRUCTA
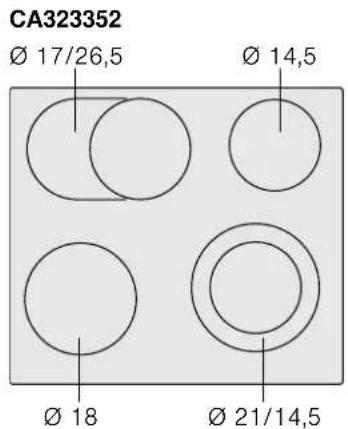
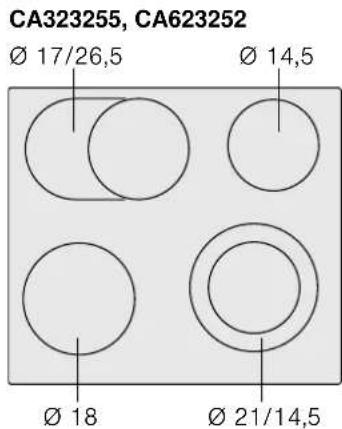
CA323352, CA323255, CA623252
Kochfeld
Table de cuisson
Hob
Kookplaat
Inhaltsverzeichnis

Störungen, was tun? 9
Important safety information 26
Causes of damage 27
Overview 27
Environmental protection 27
Energy-saving tips 27
Environmentally-friendly disposal 27
Getting to know your appliance 28
The control panel 28
The hotplates 28
Residual heat indicator. 28
忍 Operating the appliance 29
Switching the hob on and off 29
Setting a hotplate 29
Table of cooking times. 29
Childproof lock. 30
Switching the childproof lock on and off 30
Automatic childproof lock 30
Automatic safety cut-out. 30
Basic settings. 31
Changing the basic settings. 31
Cleaning 31
Ceramic 31
Hob surround. 31
Trouble shooting 32
E-report in the displays. 32
- flashes in the hotplate indicators 32
Customer service. 32
E number and FD number 32
Test dishes 33

Intended use
Read these instructions carefully. Please keep the instruction and installation manual, as well as the appliance certificate, in a safe place for later use or for subsequent owners.
Check the appliance for damage after unpacking it. Do not connect the appliance if it has been damaged in transport.
Only a licensed professional may connect appliances without plugs. Damage caused by incorrect connection is not covered under warranty.
This appliance is intended for private domestic use and the household environment only. The appliance must only be used for the preparation of food and beverages. The cooking process must be supervised. A short cooking process must be supervised without interruption. Only use the appliance in enclosed spaces.
This appliance is intended for use up to a maximum height of 2000 metres above sea level.
This appliance may be used by children over the age of 8 years old and by persons with reduced physical, sensory or mental capabilities or by persons with a lack of experience or knowledge if they are supervised or are instructed by a person responsible for their safety how to use the appliance safely and have understood the associated hazards.
Children must not play with, on, or around the appliance. Children must not clean the appliance or carry out general maintenance unless they are at least 15 years old and are being supervised.
Keep children below the age of 8 years old at a safe distance from the appliance and power cable.

Important safety information
Warning - Risk of fire!
Hot oil and fat can ignite very quickly. Never leave hot fat or oil unattended. Never use water to put out burning oil or fat. Switch off the hotplate. Extinguish flames carefully using a lid, fire blanket or something similar.
The hotplates become very hot. Never place combustible items on the hob. Never place objects on the hob.
The appliance gets hot. Do not keep combustible objects or aerosol cans in drawers directly underneath the hob.
The hob switches off automatically and can no longer be operated. It may switch on unintentionally at a later point. Switch off the circuit breaker in the fuse box. Contact the after-sales service.
- Do not use hob covers here. They can cause accidents, for example due to overheating, catching fire or materials shattering.
Warning - Risk of burns!
The hotplates and surrounding area (particularly the hob surround, if fitted) become very hot. Never touch the hot surfaces. Keep children at a safe distance.
The hotplate heats up but the display does not work. Switch off the circuit breaker in the fuse box. Contact the after-sales service.
It is only allowed to use safety devices, e.g. hob guards, which have been approved by ourselves. Unsuitable safety devices or hob guards may result in accidents.
Warning - Risk of electric shock!
Incorrect repairs are dangerous. Repairs may only be carried out and damaged power cables replaced by one of our trained after-sales technicians. If the appliance is defective, unplug the appliance from the mains or switch off the circuit breaker in the fuse box. Contact the after-sales service.
- Do not use any high-pressure cleaners or steam cleaners, which can result in an electric shock.
A defective appliance may cause electric shock. Never switch on a defective appliance. Unplug the appliance from the mains or switch off the circuit breaker in the fuse box. Contact the after-sales service.
- Cracks or fractures in the glass ceramic may cause electric shocks. Switch off the circuit breaker in the fuse box. Contact the after-sales service.
Warning - Risk of injury!
Saucepans may suddenly jump due to liquid between the pan base and the hotplate. Always keep the hotplate and saucepan bases dry.

Causes of damage
Caution!
- Rough pot and pan bases scratch the ceramic.
- Avoid boiling pots dry. This may cause damage.
- Never place hot pots or pans on the control panel, the display area or the surround. This may cause damage.
- Damage can occur if hard or pointed objects fall on the hob.
Aluminium foil and plastic containers melt on hot hotplates. Oven protective foil is not suitable for your hob.
Overview
You will find the most frequently caused damage in the following table.
| Damage Cause Measure | |
| Stains Boiled over food Remove boiled over food immedi-dately with a glass scraper. | |
| Unsuitable clean-ing agents | Only use cleaning agents that are suitable for glass ceramic. |
| Scratches Salt, sugar and sand | Do not use the hob as a work surface or storage space. |
| Rough pot and pan bases scratch the ceramic. | Check your cookware. |
| Discolouration Unsuitable cleaning agents | Only use cleaning agents that are suitable for glass ceramic. |
| Pan abrasion (e.g. aluminium) | Lift pots and pans when moving them. |
| Blisters Sugar, food with a high sugar con- tent | Remove boiled over food immedi-dately with a glass scraper. |

Environmental protection
In this section, you can find information about saving energy and disposing of the appliance.
Energy-saving tips
Always place suitable lids on saucepans. When cooking without a lid, considerably more energy is required. A glass lid means that you can see inside without having to lift the lid.
Use pots and pans with even bases. Uneven bases increase energy consumption.
The diameter of pot and pan bases should be the same size as the hotplate. In particular, small saucepans on the hotplate cause energy losses. Please note: cookware manufacturers often indicate the upper diameter of the saucepan. This is usually bigger than the diameter of the base of the pan.
Use a small saucepan for small quantities. A larger, less full saucepan requires a lot of energy.
Cook with only a little water. This will save energy. Vitamins and minerals in vegetables are preserved.
Always cover as large an area of the hotplate as possible with your saucepan.
Switch to a lower heat setting in good time.
- Select a suitable ongoing cooking setting. You will waste energy by using an ongoing cooking setting which is too high.
Use the residual heat of the hob. For longer cooking times, you can switch the hotplate off 5-10 minutes before the end of the cooking time.
Environmentally-friendly disposal
Dispose of packaging in an environmentally-friendly manner.
This appliance is labelled in accordance with European Directive 2012/19/EU concerning used electrical and electronic appliances (waste electrical and electronic equipment - WEEE). The guideline determines the framework for the return and recycling of used appliances as applicable throughout the EU.

Getting to know your appliance
The instruction manual is the same for various different hobs. You can find the hob dimensions in the overview of models. Page 2
The control panel
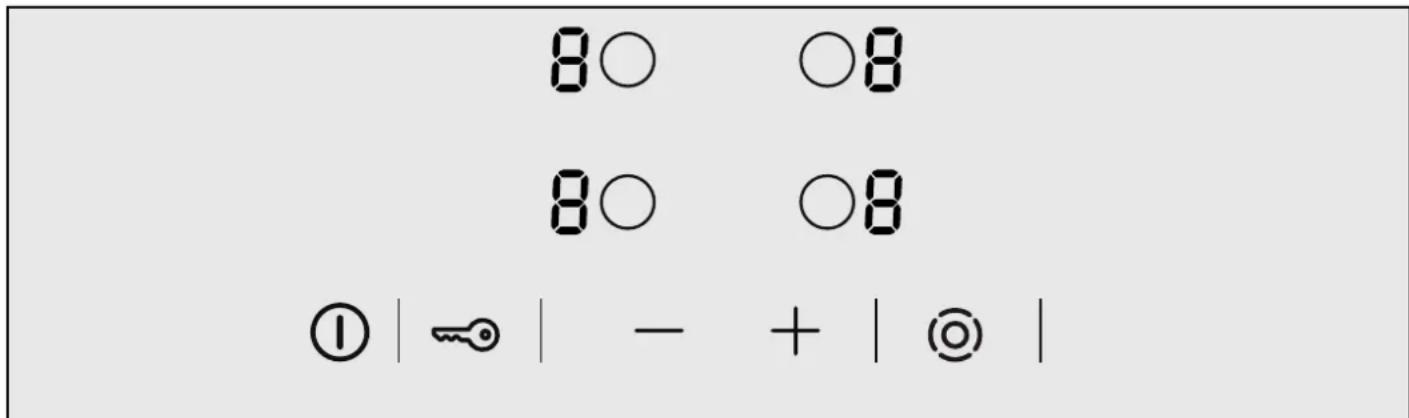
Displays
19
Heat settings
H/h
Residual heat
Touch controls
(1)
Main switch
Child safety lock
O
Hotplate selection
--
Control panel
Automatic zone control
Notes
- When you touch a symbol, the respective function is activated.
Always keep the controls dry. Moisture reduces their effectiveness. - Do not pull pans close to the displays and sensors. The electronics could overheat.
The hotplates
| Hotplate Activating and deactivating | |
| ○ Single-circuit hot-plate | |
| ◎ Dual-circuit hotplate | Select the hotplate and touch the ⊙ symbol |
| co Extended cooking zone | Select the hotplate and touch the ⊙ symbol |
| When the hotplate is activated: The corresponding display lights up Switching on the hotplate: The previously set size is automatically selected. | |
Notes
Any dark areas in the glow pattern of the hotplate are due to technical reasons. The function of the hotplate is not affected.
Hotplate temperature is regulated by the heat switching on and off. The heat may also switch on and off at the highest setting.
This ensures e.g.:
- sensitive components are protected from overheating
- the appliance is protected from electrical overload
-
better cooking results are achieved
-
With multi-circuit hotplates the heater elements of the inner filament circuits and the heater element of the activations may switch on and off at different times.
Residual heat indicator
The hob has a two-stage residual heat indicator for each hotplate.
If appears in the display the hob is still hot. It may be used, for example, to keep a small meal warm or to melt cooking chocolate. As the hotplate cools down further, the display changes to ±b . The display remains lit until the hotplate has cooled sufficiently.

Operating the appliance
In this section, you can find out how to set the hotplates. The table shows heat settings and cooking times for various meals.
Switching the hob on and off
The main switch is used to switch the hob on and off.
To switch on: Touch the ① symbol. An audible signal sounds. The indicator light above the main switch and the ② displays light up. The hob is ready for use.
To switch off: Touch the ① symbol until the display light above the main switch and the displays go out. All hotplates are switched off. The residual heat indicator remains on until the hotplates have cooled down sufficiently.
Notes
The hob will switch itself off automatically once all hotplates have been switched off for a while (10-60 seconds).
The settings remain stored for 4 seconds after the hob has been switched off. If you switch it on again during this time, the hob will operate using the previously stored settings.
Setting a hotplate
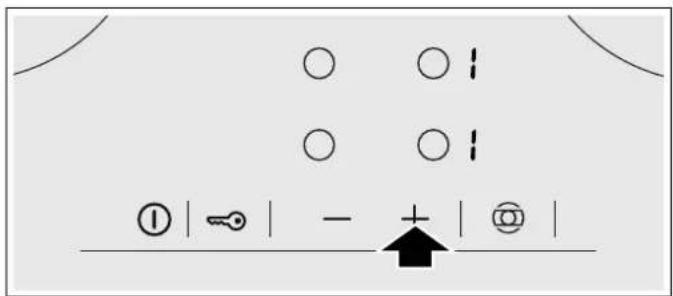
Use the ^+ and - symbols to set the desired heat setting.
Heat setting 1 = lowest setting
Heat setting 9 = highest setting
There is an intermediate setting between each heat setting. This is identified by a dot.
Setting the heat setting
The hob must be switched on.
- Touch the symbol to select the hotplate.
-
Touch the+ or - symbol within the next 10 seconds. The basic setting appears.
-
symbol: Heat setting 9
- symbol: Heat setting 4
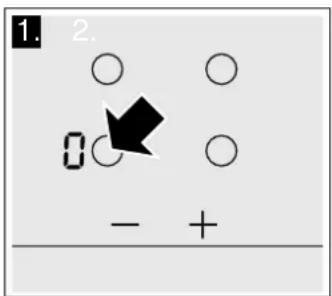
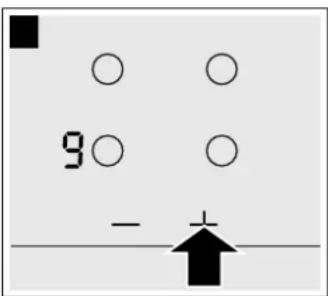
- To change the heat setting: Touch the + or - symbol until the desired heat setting appears.
Switching off the hotplate
There are 2 ways to switch off the hotplate:
- Briefly touch the symbol on the hotplate 2 × one after the other. appears in the heat setting display. After about 10 seconds, the residual heat indicator appears.
Use the symbol to select the hotplate. Touch + or - until 0 appears. After about 10 seconds, the residual heat indicator appears.
Note: The last selected hotplate remains activated. You can set the hotplate without selecting it again.
Table of cooking times
The following table provides some examples.
Cooking times and heat settings may vary depending on the type of food, its weight and quality. Deviations are therefore possible.
For bringing liquids to the boil, use heat setting 9.
Stir thick liquids occasionally.
Food that needs to be seared quickly or food which loses a lot of liquid during initial frying is best seared in several small portions.
Tips for energy-saving cooking can be found in the Environmental protection section. Page 27
| Ongoing cooking setting | Ongoing cooking time in minutes | |
| Melting | ||
| Chocolate coating 1-1.- | ||
| Butter, honey, gelatine 1-2.- | ||
| Heating and keeping warm | ||
| Stew (e.g. lentil stew) 1-2.- | ||
| Milk** | 1.-2. | - |
| Heating sausages in water** | 3-4.- | |
| Defrosting and heating | ||
| Frozen spinach | 2.-3. | 10-20 min |
| Frozen goulash | 2.-3. | 20-30 min |
| Poaching, simmering | ||
| Dumplings | 4.-5.* | 20-30 min |
| Fish | 4-5* | 10-15 min |
| White sauces, e.g. béchamel sauce | 1-2 3-6 min | |
| Whisked sauces, e.g. sauce Béarnaise, hollandaise | 3-4 8-12 min | |
| Boiling, steaming, braising | ||
| Rice (with double the quantity of water) | 2-3 15-30 min | |
| * Ongoing cooking without a lid** Without lid*** Turn frequently | ||
| Rice pudding 1.-2. 35-45 min | ||
| Unpeeled boiled potatoes 4-5 25-30 min | ||
| Boiled potatoes 4-5 15-25 min | ||
| Pasta, noodles 6-7* 6-10 min | ||
| Stew, soups | 3-4. 15-60 min | |
| Vegetables | 2-3. 10-20 min | |
| Frozen vegetables | 3-4. 10-20 min | |
| Cooking in a pressure cooker | 4-5 - | |
| Braising | ||
| Roulades | 4-5 50-60 min | |
| Pot roast | 4-5 60-100 min | |
| Goulash | 2-3. 50-60 min | |
| Frying with little oil** | ||
| Escalope, plain or breaded | 6-7 6-10 min | |
| Escalope, frozen | 6-7 8-12 min | |
| Chop, plain or breaded*** | 6-7 8-12 min | |
| Steak (3 cm thick) | 7-8 8-12 min | |
| Hamburger, rissoles (3 cm thick)*** | 4-5. 30-40 min | |
| Poultry breast (2 cm thick)*** | 5-6 10-20 min | |
| Poultry breast, frozen*** | 5-6 10-30 min | |
| Fish and fish fillet, plain | 5-6 8-20 min | |
| Fish and fish fillet, breaded | 6-7 8-20 min | |
| Fish and fish fillet,breaded and frozen, e.g. fish fingers | 6-7 8-12 min | |
| Scampi and prawns | 7-8 4-10 min | |
| Sautéing vegetables, fresh mush-rooms | 7-8 10-20 min | |
| Vegetables, meat in Asian-style strips | 7-8. 15-20 min | |
| Stir fry, frozen | 6-7 6-10 min | |
| Pancakes | 6-7 consecutively | |
| Omelette | 3-4. consecutively | |
| Fried eggs | 5-6 3-6 min | |
| Deep-fat frying (150-200 g per portion continuously in 1-2 litres oil**) | ||
| Frozen products, e.g. chips, chicken nuggets | 8-9 - | |
| Croquettes, frozen | 7-8 - | |
| Meat, e.g. chicken portions | 6-7 - | |
| Fish, breaded or battered | 5-6 - | |
| * Ongoing cooking without a lid | ||
| ** Without lid | ||
| *** Turn frequently | ||
| Ongoing cooking setting | Ongoing cooking time in minutes | |
| Vegetables, mushrooms, breaded or battered, tempura | 5-6 - | |
| Small baked items, e.g. ring doughnuts/jam-filled doughnuts, fruit in batter | 4-5 - | |
| * Ongoing cooking without a lid** Without lid*** Turn frequently | ||
Childproof lock
You can use the childproof lock to prevent children from switching on the hob.
Switching the childproof lock on and off
The hob must be switched off.
To switch on: Touch the symbol for approx. 4 seconds. The indicator light above the symbol lights up for 10 seconds. The hob is locked.
To switch off: Touch the symbol for approx. 4 seconds. The hob is unlocked.
Automatic childproof lock
This function automatically activates the childproof lock every time you switch the hob off.
Switching on and off
Find out how to switch the automatic childproof lock on and off in the Basic settings section. Page 31

Automatic safety cut-out
If a hotplate has been switched on for a long time without the setting being changed, the automatic time limit is activated.
The hotplate stops heating. FB and the H / h residual heat indicator flash alternately on the hotplate display. The display goes out when you touch any control. You can make new settings.
When the time limit is activated depends on the heat setting selected (1 to 10 hours).

Basic settings
Your appliance has various basic settings. You can adjust these settings to meet your own needs.
| Display Function | |
| c1 | Automatic child safety lock |
| 0 | Switched off.* |
| 1 | Switched on. |
| 2 | Manual and automatic child safety lock switched off. |
| c2 | Beeping sound |
| 0 | Confirmation signal and operation error signal are switched off (primary switch signal always remains). |
| 1 | Only the operation error signal is switched on. |
| 2 | Only the confirmation signal is switched on. |
| 3 | Confirmation signal and operation error signal switched on.* |
| c7 | Activating the heating elements |
| 0 | Switched off. |
| 1 | Switched on. |
| 2 | Last setting before the hotplate was switched off.* |
| c9 | Time for selecting the hotplate |
| 0 | Unlimited; the last selected hotplate can always be adjusted without having to select it again.* |
| 1 | Once you select a hotplate, you have 10 seconds to adjust it, after which you will have to select it again in order to be able to adjust it. |
| c0 | Reset the basic settings |
| 0 | Switched off.* |
| 1 | Switched on. |
| *Basic setting | |
Changing the basic settings
The hob must be switched off.
- Switch on the hob.
- Within the next 10 seconds, touch and hold the symbol for 4 seconds
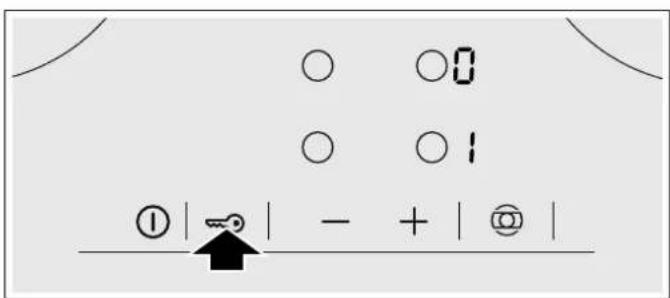
c and f flash alternately in the lower display and 0 lights up in the upper display.
- Touch the symbol repeatedly until the desired setting appears in the lower display.
- Touch the + or - symbol repeatedly until the desired setting appears in the upper display.
- Touch the symbol for 4 seconds. The setting is activated.
Switching off
To exit the basic setting, switch off the hob with the main switch and make new settings.

Cleaning
Suitable maintenance and cleaning products can be purchased from the after-sales service or in our e-Shop.
Ceramic
Clean the hob after each use. This will prevent spills from burning onto the ceramic.
Only clean the hob when it has cooled down sufficiently. Use only cleaning agents which are suitable for glass ceramic. Follow the cleaning instructions on the packaging.
Never use:
Undiluted washing-up liquid
Detergent intended for dishwashers
Scouring agents
Harsh cleaning agents such as oven spray or stain remover
Abrasive sponges
High-pressure cleaners or steam jet cleaners
Ground-in dirt can be best removed with a glass scraper, available from retailers. Please note the manufacturer's instructions.
You can also obtain a suitable glass scraper from our after-sales service or from the e-Shop.
Using special sponges to clean glass ceramic achieves great cleaning results.
Hob surround
To prevent damage to the hob surround, observe the following instructions:
Use only hot soapy water.
Wash new sponge cloths thoroughly before use.
Do not use any sharp or abrasive agents.
Do not use the glass scraper.

Trouble shooting
Faults often have simple explanations. Please read the notes in the table before calling the after-sales service. The electronics of your hob are underneath the control panel. For various reasons, the temperature in this area may rise sharply.
In order that the electronics do not overheat, the hotplates are switched off as and when necessary. The F2 , F4 , or F5 display appears alternately with the H or h residual heat indicator.
| Display Fault Measure | ||
| None The power supply has been disconnected. Check the household fuse for the appliance. Check whether there is a power cut by trying other electronic appliances. | ||
| All displays flash The touch control is wet or an object is resting on it. | Dry the control or remove the object. | |
| F2 | Several hotplates have been used over a pro-longed period at high power settings. To protect the electronics, the hotplate has been switched off. | Wait a while. Touch any touch control. When F2 goes out, the electronics have cooled down sufficiently. You can continue cooking. |
| F4 | Despite the switch-off by F2, the electronics have become hot again. All hotplates have therefore been switched off. | Wait a while. Touch any touch control. When F4 goes out, you can continue cooking. |
| FS and the heat setting flash alternately. An audible signal can be heard | Warning: There is a hot pan in the area of the control panel. There is a risk that the electronics will overheat. | Remove the pan. The fault display goes out shortly afterwards. You can continue cooking. |
| FS and audible signal | There is a hot pan in the area of the control panel. To protect the electronics, the hotplate has been switched off. | Remove the pan. Wait a while. Touch any control. When FS goes out, you can continue cooking. |
| FB | The hotplate was in operation for too long and has switched itself off. | You can switch the hotplate back on again immediately. |
| dE The hotplates do not heat up | Demo mode is switched on Switching off the demo mode: Disconnect the appliance for 30 seconds from the power supply (switch off the household fuse or the circuit breaker in the fuse box). Touch any touch control after 3 minutes. The demo mode is switched off. | |
E-report in the displays
When an error message with "E" appears in the display, e.g. E0111, switch the appliance off and on again.
If it was a one-off error, the display goes out. If the error message appears again, call the after-sales service and quote the exact error message.
- flashes in the hotplate indicators
If - flashes in the hotplate indicators when the appliance is connected to the mains or following a power cut, the electronics are malfunctioning. To acknowledge the fault, briefly cover the controls with your hand.

Customer service
Our after-sales service is there for you if your appliance needs to be repaired. We will always find an appropriate solution, also in order to avoid after-sales personnel having to make unnecessary visits.
E number and FD number
Please quote the E-number (product number) and the FD number (production number) of your appliance when contacting the after-sales service. The rating plate bearing these numbers can be found on the appliance certificate.
Please note that a visit from an after-sales service engineer is not free of charge in the event of misuse of the appliance, even during the warranty period.
Please find the contact data of all countries in the enclosed customer service list.
Rely on the professionalism of the manufacturer. You can therefore be sure that the repair is carried out by trained service technicians who carry original spare parts for your appliances.

Test dishes
This table has been produced for test institutes to facilitate the testing of our appliances.
The data in the table refers to our accessory cookware from Schulte Ufer (4-part induction pot set CZ9442X0) with the following dimensions:
Saucepan dia.16 cm, 1.2 litres, for 14.5 cm dia. single-circuit hotplate
Cooking pot dia. 16 cm, 1.7 litres, for 14.5 cm dia. single-circuit hotplate
Cooking pot dia. 22 cm, 4.2 litres, for 18 cm dia. or 17 cm dia. hotplate
Frying pan dia. 24 cm, for 18 cm dia. or 17 cm dia. hotplate
| Test dishes Heating up/bringing to boil Ongoing cooking | |||||
| Heat setting Cooking time (min:sec) Lid Ongoing cooking | Lid setting | ||||
| Melting chocolate | |||||
| Cookware: saucepan | |||||
| Chocolate couverture (e.g. Dr. Oetker dark choc-olate, 150 g) on 14.5 cm dia. hotplate | --- 1. No | ||||
| Heating and keeping lentil stew warm | |||||
| Cookware: cooking pot | |||||
| Lentil stew made to DIN 44550 | |||||
| Initial temperature 20°C | |||||
| Amount: 450 g for 14.5 cm dia. hotplate | 9 | approx. 2:00 without stirring | Yes | 1. | Yes |
| Amount: 800 g for 18 cm dia. or 17 cm dia. hotplate | 9 | approx. 2:00 without stirring | Yes | 1. | Yes |
| Lentil stew from the tin e.g lentils with Erasco sausages: | |||||
| Initial temperature 20°C | |||||
| Amount 500 g for 14.5 cm dia. hotplate | 9 | approx. 2:00 (Stir after approx. 1:30) | Yes | 1. | Yes |
| Amount: 1000 g for 18 cm dia. or 17 cm dia. hotplate | 9 | approx. 2:30 (Stir after approx. 1:30) | Yes | 1. | Yes |
| Simmering Béchamel sauce | |||||
| Cookware: saucepan | |||||
| Milk temperature: 7°C | |||||
| Recipe: 40 g butter, 40 g flour, 0.5 l milk (3.5% fat content) and one pinch of salt for 14.5 cm dia. hotplate | g2 | approx. 5:20 | No | 11,3 | No |
| 1 Melt the butter, stir in the flour and salt, and keep cooking the roux for 3 minutes | |||||
| 2 Add the milk to the roux and bring to the boil, stirring continuously | |||||
| 3 After the Béchamel sauce has come to the boil, keep cooking it at setting 1 for a further 2 minutes, stirring all the time | |||||
| Test dishes Heating up/bringing to boil Ongoing cooking | ||
| Heat setting Cooking time (min:sec) Lid Ongoing cooking setting Lid | ||
| Cooking rice pudding - Ongoing cooking with lid | ||
| Cookware: cooking pot | ||
| Milk temperature: 7°C | ||
| Recipe: 190 g round grain rice, 90 g sugar, 750 ml milk (3.5% fat content) and 1 g salt for 14.5 cm dia. hotplate | 9 approx. 6:45Heat the milk until it starts to rise up.Switch down to the ongoing cooking setting and add the rice, sugar and salt to the milkTotal cooking time (incl. bringing to boil) approx. 45 minutes | No 2 Yes |
| Stir the rice pudding after 10 minutes | ||
| Recipe: 250 g round grain rice, 120 g sugar, 1 l milk (3.5% fat content) and 1.5 g salt for 18 cm dia. or 17 cm dia. hotplate | 9 approx. 7:20Heat the milk until it starts to rise up.Switch down to the ongoing cooking setting and add the rice, sugar and salt to the milkTotal cooking time (incl. bringing to boil) approx. 45 minutes | No 2 Yes |
| Stir the rice pudding after 10 minutes | ||
| Cooking rice pudding - Ongoing cooking without lid | ||
| Cookware: cooking pot | ||
| Milk temperature: 7°C | ||
| Recipe: 190 g round grain rice, 90 g sugar, 750 ml milk (3.5% fat content) and 1 g salt for 14.5 cm dia. hotplate | 9 approx. 7:30Add rice, sugar and salt to the milk and heat the mixture up, stirring continuously. At a milk temperature of approx. 90°C switch down to the ongoing cooking setting.Simmer for approx. 50 minutes | No 2 No |
| Recipe: 250 g round grain rice, 120 g sugar, 1 l milk (3.5% fat content) and 1.5 g salt for 18 cm dia. or 17 cm dia. hotplate | 9 approx. 8:00Add rice, sugar and salt to the milk and heat the mixture up, stirring continuously. At a milk temperature of approx. 90°C switch down to the ongoing cooking setting.Simmer for approx. 50 minutes | No 2 No |
| Cooking rice | ||
| Cookware: cooking pot | ||
| Water temperature 20°C | ||
| Recipe acc. to DIN 44550: | ||
| 125 g long grain rice, 300 g water and a pinch of salt for 14.5 cm dia. hotplate | 9 approx. 2:48 Yes 2 Yes | |
| Recipe acc. to DIN 44550: | ||
| 250 g long grain rice, 600 g water and a pinch of salt for 18 cm dia. or 17 cm dia. hot-plate | 9 approx. 3:15 Yes 2. Yes | |
| Heat setting Cooking time (min:sec) Lid Ongoing cooking setting | Lid | |
| Frying pork loin chops | ||
| Cookware: frying pan | ||
| Initial temperature loin chops: 7°C | ||
| Amount: 3 loin chops (total weight approx. 300 g, about 1 cm thick) 15 g sunflower oil for 18 cm dia. or 17 cm dia. hotplate | 9 approx. 2:40 No 7 No | |
| Frying pancakes | ||
| Cookware: frying pan | ||
| Recipe acc. to DIN EN 60350-2 | ||
| Amount: 55 ml batter per pancake for 18 cm dia. or 17 cm dia. hotplate | 9 approx. 2:40 No 6 or 6. depending on browning level | No |
| Deep-fat frying frozen chips | ||
| Cookware: cooking pot | ||
| Amount: 1.8 kg sunflower oil, per portion: 200 g frozen chips (e.g. McCain 123 Original fries) for 18 cm dia. or 17 cm dia. hotplate | 9 Until oil temperature reaches 180 °C | No 9 No |
If the tests are carried out with an 18 cm dia. hotplate with a power rating of 1500W the boiling time is increased by approx. 20% and the ongoing cooking setting by one ongoing cooking setting.
Inhoudsopgave


- Inhaltsverzeichnis
- Intended use
- Important safety information
- Warning - Risk of fire!
- Warning - Risk of burns!
- Warning - Risk of electric shock!
- Warning - Risk of injury!
- Causes of damage
- Caution!
- Overview
- Environmental protection
- Energy-saving tips
- Environmentally-friendly disposal
- Getting to know your appliance
- The control panel
- Displays
- Touch controls
- Notes
- The hotplates
- Residual heat indicator
- Operating the appliance
- Switching the hob on and off
- Setting a hotplate
- Setting the heat setting
- Switching off the hotplate
- Table of cooking times
- Childproof lock
- Switching the childproof lock on and off
- Automatic childproof lock
- Switching on and off
- Automatic safety cut-out
- Basic settings
- Changing the basic settings
- Switching off
- Cleaning
- Ceramic
- Hob surround
- Trouble shooting
- E-report in the displays
- - flashes in the hotplate indicators
- Customer service
- E number and FD number
- Test dishes
- Inhoudsopgave
Brand : CONSTRUCTA
Model : CX5BS606
Category : Other kitchen appliances