
DAB47 - Radio DENVER - Free user manual and instructions
Find the device manual for free DAB47 DENVER in PDF.
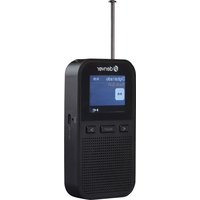
| Product type | DAB+ and FM digital radio |
| Brand | Denver |
| Model | DAB47 |
| Dimensions (approx.) | 200 x 120 x 60 mm |
| Weight (approx.) | 0.5 kg |
| Power supply | DC 6V 1200mA mains adapter (included) or 4 AA batteries (not included) |
| Power consumption | 6 V DC, 1.2 A max |
| DAB frequency range | 174 – 240 MHz |
| FM frequency range | 88 – 108 MHz |
| Number of presets | 10 (DAB and FM) |
| Main features | DAB+ and FM radio, dual alarm, sleep timer, auto and manual scan, station pruning, preset memory, LCD display, headphone output |
| Care and cleaning | Clean with a soft, dry cloth. Do not use abrasive products or solvents. |
| Safety | Do not expose to moisture, do not open the casing, use the supplied mains adapter, respect the battery polarities. |
| Spare parts and repairability | Contact Denver after-sales service. No spare parts available for self-service. |
| General information | Compliant with directive 2014/53/EU. Declaration of conformity available at www.denver-electronics.com. |
Frequently Asked Questions - DAB47 DENVER
User questions about DAB47 DENVER
0 question about this device. Answer the ones you know or ask your own.
Ask a new question about this device
Download the instructions for your Radio in PDF format for free! Find your manual DAB47 - DENVER and take your electronic device back in hand. On this page are published all the documents necessary for the use of your device. DAB47 by DENVER.
USER MANUAL DAB47 DENVER
denver-electronics.com
DAB+ FM RADIO
DAB-47
INSTRUCTION MANUAL
Please read this manual carefully before using, and keep it for future reference.
Content
English 2
Deutsche 7
Español 12
Français 17
Italiano 22
Nederlands 27
Portugues 32
Polski 37
Svenska 42
Suomalainen 47
Dansk 52
Norsk 57
Instructions Manual
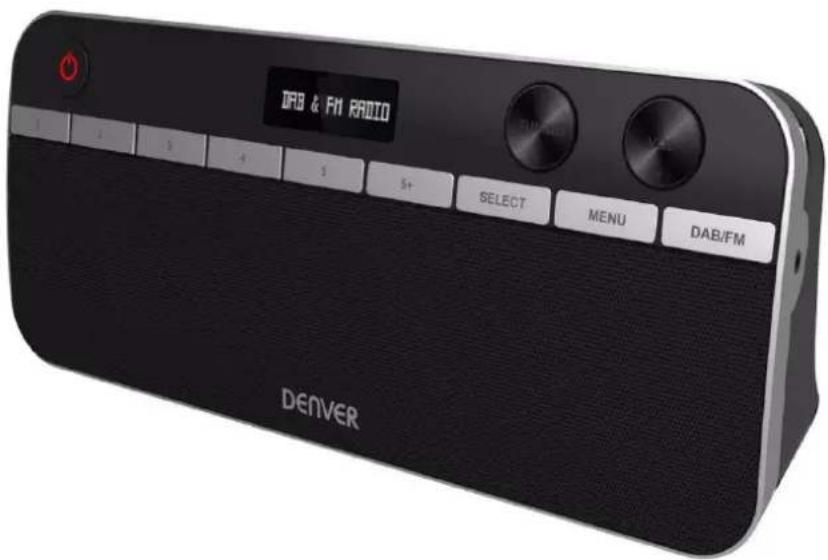
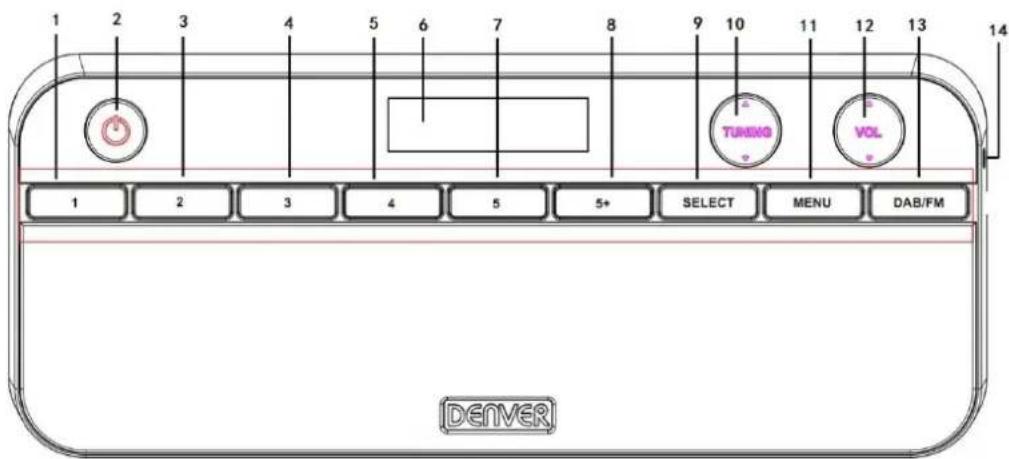
Product Overview
Front view
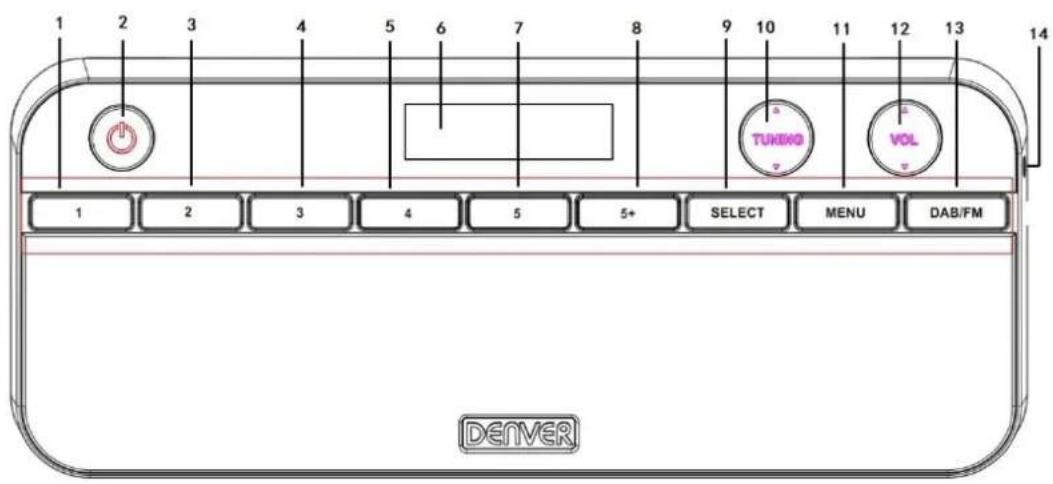
Back view
| 1 | “1” numeric button | 10 | TUNING button |
| 2 | Power button | 11 | MENU button |
| 3 | “2” numeric button | 12 | VOLUME button |
| 4 | “3” numeric button | 13 | DAB/FM button |
| 5 | “4” numeric button | 14 | Earphones jack |
| 6 | LCD display | 15 | Battery compartment |
| 7 | “5” numeric button | 16 | DC IN jack |
| 8 | Numeric button used for more than “5” | 17 | Telescopic antenna |
| 9 | SELECT button |
Use instructions
Power On/off
- Connect the power adaptor to the DC IN jack at the back of the unit, and connect the other end of the power adaptor to a mains outlet.
- Press the ⏻ button to turn ON the unit.
- Press the DAB/FM button to toggle between DAB and FM modes.
- To switch to standby mode, press the button again.
Battery power (optional).
Note: Before installing the batteries (not included), ensure that the unit is unplugged from the mains outlet.
Open the battery compartment, and insert 4 AA batteries (1.5 V, also known as LR-6) with correct polarities (+/-) as indicated, then replace the battery compartment until it clicks into place.
DAB radio
Store DAB radio stations automatically
- Press the DAB/FM button to select DAB mode.
- When switching to DAB mode for the first time, the unit performs a full scan and store all the available DAB radio stations.
- Once the scanning finishes, the unit broadcasts the first alphanumerically found station. Press the TUNING ▲/▼ button to select a DAB radio station, and press the SELECT button to confirm your selection.
Perform full DAB scan manually
To perform a full scan manually, in DAB mode, press and hold the MENU button to access the menu options, then press the TUNING ▲/▼ button to select “Full Scan”, and then press the SELECT button to start a full scan.
Prune DAB radio stations
You can remove the DAB stations from the station list that cannot be received in your area.
A DAB radio station which cannot be received in your area is listed with a '?' mark before a station name.
-
In DAB mode, press and hold the MENU button to access the menu options, then press the TUNING ▲/▼ button to select "PRUNE", and then press the SELECT button to confirm.
-
Then “Prune? Yes
” is displayed. Press the TUNING ▲/▼ button to select “ ”, then press the SELECT button to remove the current radio station from the station list.
Store DAB radio stations manually
You can store up to 10 DAB radio stations as favorite stations for instant access.
- Select a DAB radio station that you wish to preset.
- Press and hold the MENU button to access the menu options, then press the TUNING ▲/▼ button to select "Preset store", and then press the SELECT button to confirm.
- Press the TUNING ▲/▼ button to allocate a number from 1 to 10, then press the SELECT button to confirm. "Preset X saved" is displayed. "X" is a number allocated to the current radio station.
Select a preset DAB radio station
In DAB mode, press a numeric button to select a preset DAB radio station.
Note: To select a preset number 6-10, first press a numeric button from "1" to "5", then press the "5+" numeric button.
FM radio
- Press the DAB/FM button to select FM mode.
- When switching on FM radio for the first time, the unit starts at the beginning of the FM frequency range (87.50MHz). Otherwise, the last selected FM radio is broadcast.
- Press and hold the TUNING ▲/▼ button to tune to a FM radio station. To fine tune a frequency, press repeatedly the TUNING ▲/▼ button.
Set alarm
- Press and hold the MENU button to enter the "System" menu, then press the TUNING ▲/▼ button to scroll to "Alarm Setting", and then press the SELECT button to select "Alarm 1 Setting" or "Alarm 2 Setting".
- The hour digits flash. Press the TUNING ▲/▼ button to set the hour for you alarm, then press the SELECT button to confirm.
- The minute digits flash. Press the TUNING ▲/▼ button to set the minute for you alarm, then press the SELECT button to confirm.
- The time digits for alarm duration flash. Press the TUNING ▲/▼ button to select an alarm duration from 15, 30, 45, 60 or 90 minutes, then press the SELECT button to confirm.
- The alarm sound source flashes. Press the TUNING ▲/▼ button to select a sound source from Buzzer, DAB or FM radio, then press the SELECT button to confirm.
- “Daily” flashes in the display, press the TUNING ▲/▼ button to select a frequency from daily, Weekends, Weekdays or Once, then press the SELECT button to confirm.
Note: If you select "Once", you are prompted to set the date for your alarm. - Alarm Volume scrolls in the display. Press the TUNING ▲/▼ button to set the volume for your alarm, then press the SELECT button to confirm.
- “On” or “Off” flashes in the display. Press the TUNING ▲/▼ button to select “On”, then press the SELECT button to confirm.
Note: To deactivate the alarm, select "Off". - “Saved” is display. When an alarm is activated, in standby, a bell icon is displayed, together with “1” or “2” (based on Alarm 1 or Alarm 2 is set).
Switch off the alarm
You may switch off the alarm using one of the following ways.
- When the alarm sounds, press the ⏻ button to turn off the alarm. The alarm repeats for the next day.
- When the alarm sounds, press the SELECT button to repeat alarm at 9-minute interval.
- Follow the steps described in the "Alarm setting" section, and select "Off" in step 8 to deactivate the alarm.
Please notice - All products are subject to change without any notice. We take reservations for errors and omissions in the manual.
ALL RIGHTS RESERVED, COPYRIGHT DENVER ELECTRONICS A/S
DENVER®
www.denver-electronics.com


Electric and electronic equipment and included batteries contains materials, components and substances that can be hazardous to your health and the environment, if the waste material (discarded electric and electronic equipment and batteries) is not handled correctly.
Electric and electronic equipment and batteries is marked with the crossed out trash can symbol, seen above. This symbol signifies that electric and electronic equipment and batteries should not be disposed of with other household waste, but should be disposed of separately.
As the end user it is important that you submit your used batteries to the appropriate and designated facility. In this manner you make sure that the batteries are recycled in accordance with legislature and will not harm the environment.
All cities have established collection points, where electric and electronic equipment and batteries can either be submitted free of charge at recycling stations and other collection sites, or be collected from the households. Additional information is available at the technical department of your city.
Hereby, Inter Sales A/S declares that the radio equipment type DAB-47 is in compliance with Directive 2014/53/EU. The full text of the EU declaration of conformity is available at the following internet address: www.denver-electronics.com and then click the search ICON on topline of website. Write modelnumber: DAB-47.Now enter product page, and red direcve is found under downloads/other downloads
Operating Frequency Range: DAB:174 MHz to 240 MHz / FM: 88 MHz to 108 MHz Max Output Power: DC 6V 1200mA
DENVER ELECTRONICS A/S
Omega 5A, Soeften
DK-8382 Hinnerup
Denmark
www.facebook.com/denverelectronics
Bedienungsanleitung
Produktü bersicht
Ansicht von vorn
Ansicht von hinten

DAB:174 MHz to 240 MHz / FM: 88 MHz to 108 MHz


- DAB+ FM RADIO
- INSTRUCTION MANUAL
- Content
- Instructions Manual
- Product Overview
- Front view
- Use instructions
- Power On/off
- Battery power (optional).
- DAB radio
- Store DAB radio stations automatically
- Perform full DAB scan manually
- Prune DAB radio stations
- Store DAB radio stations manually
- Select a preset DAB radio station
- FM radio
- Set alarm
- Switch off the alarm
- DENVER®
- Bedienungsanleitung
- Produktü bersicht
- Ansicht von vorn
Brand : DENVER
Model : DAB47
Category : Radio