330200ICP - Vacuum Cleaner Aigostar - Free user manual and instructions
Find the device manual for free 330200ICP Aigostar in PDF.

User questions about 330200ICP Aigostar
0 question about this device. Answer the ones you know or ask your own.
Ask a new question about this device
Download the instructions for your Vacuum Cleaner in PDF format for free! Find your manual 330200ICP - Aigostar and take your electronic device back in hand. On this page are published all the documents necessary for the use of your device. 330200ICP by Aigostar.
USER MANUAL 330200ICP Aigostar
USING AND KEEP IT PROPERLY FOR FUTURE USE

AIGOTECH ONSYNK, S.L.
C/LOS TRANSPORTISTAS N.43 NUMANCIA
DE LA SAGRA 45230, TOLEDO, ESPANA
C.I.F.: B-85712198
HTTP://WWW.AIGOSTAR.COM
MADE IN P.R.C
CONTENT
GB 01-06
ES 07-12
PL 13-18
19-24
DE 25-30
NL 31-36
FR 37-42
PT 43-48

220-240V 50/60Hz 700W


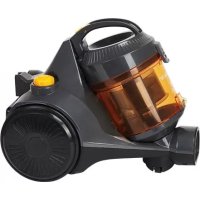
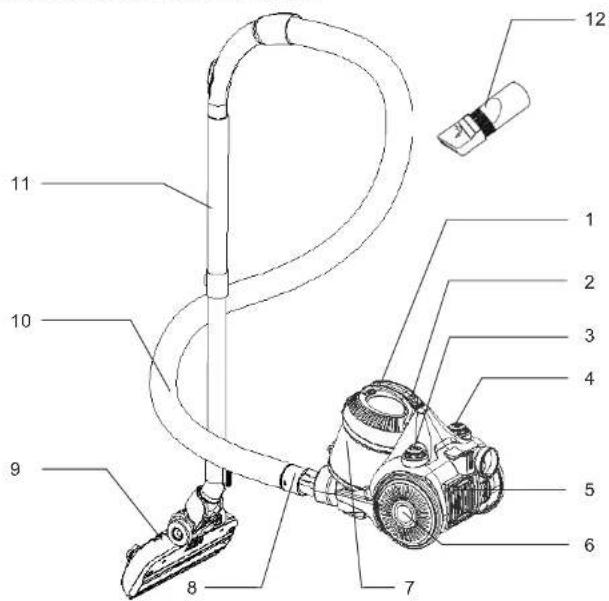
STRUCTURE OF THE PRODUCT
| 1 | Handle | 7 | Dust cup |
| 2 | Release button | 8 | Hose connector |
| 3 | Power button | 9 | Brush tool |
| 4 | Cord rewind button | 10 | Hose |
| 5 | Air Outlet Plate | 11 | Extending metal tube |
| 6 | Big wheel | 12 | Two in one brush |

SAFETY DIRECTION
- For the first operation, it is advisable to read the manual carefully before hand and keep it properly for future use.
2.Before the first operation, make sure the dust cup is properly installed.
3.Make sure the power supply is 220-240V 50Hz
4.Do not vacuum water and inflammable material
5.Do not vacuum burning material and ashes
6.Do not use the machine without a motor protection filter filled - Please change the dust cup/HEPA immediately when it is damaged.
8.Do not store or use the machine close to high temperature places 9.Do not let children use the machine in case of any danger - If abnormal noise, smell, smoke or any other failure or breakage was found during the operation, you should turn off the switch and unplug it. Then contact with your service center for repair. Do not repair it by yourself.
11.If the supply cord is damaged, it must be replaced by the manufactures or its service agent or a similarly qualified person in order to avoid a hazard
HOW TO USE
ASSEMBLY BEFORE USE
Fig.1 shows the connection of the hose and the vacuum cleaner.
Put the hose connector in front of the vacuum cleaner. Then insert it into the inlet hole and turn right. If you want to disassemble it, you can turn the hose connection left and then pull it out.
Fig.2 shows the connection of the hose and the extending metal tube:
Hold the flexural connector of the hose and put it into the bigger hole of the tube.
Fig.3 shows the connection of the tube and the brush tool:
Put the metal tube into the hole of the brush and rotate it to fasten them.
Fig.4 shows how to check the winding of the power cord.
You can pull the power cord out of the machine and stop it when you see the yellow mark. Make sure the red mark is not out. When your sweep is over, firstly turn off the power, pull the plug out of the socket, and then push the winding device button until the cord is completely in the machine.
Fig.5 shows the power button
Put the plug into the socket, push the power button to control the work of the machine.
GB
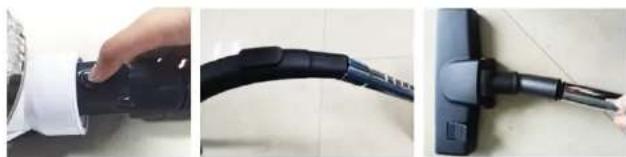
Fig.1 Fig.2 Fig.3
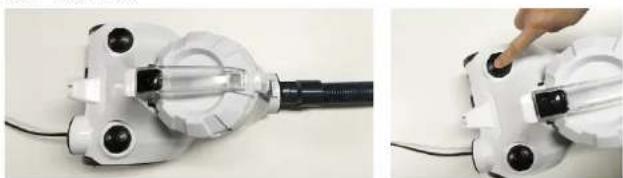
Fig.4 Fig.5
CLEANING OF THE DUST CHAMBER
The steps of the chamber cleaning:
1.As in Fig.6, hold the dust chamber and handle and push the release button.
2.As in Fig.7, take the dust chamber out of the machine.
- As in Fig.8, put the dust chamber onto the rubbish bin, push the release button to open the bottom of the dust chamber, and the dirt and dust will fall into the bin by themselves.
4.As in Fig.9, shut up the dust chamber for a circular use after your cleaning.
- If the dust in the chamber is over the MAX line and you feel the suction force is fallen down, please turn off the power and whirl the self-cleaning knob more than two circles, so you will find the suction power return to the prime level.

Fig.6 Fig.7
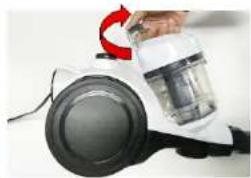
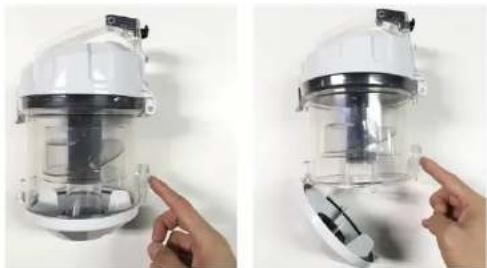
Fig.8 Fig.9
CLEANING OF THE DUST CHAMBER
HOW TO USE THE ATTACHMENTS:
- As in fig.10, you can use the compressed brush in the corner and the aperture.
- As in fig.11, open the other side with bristles of the compressed brush as the mark of an arrow to clean the sofa, the curtain and the dust on the ornaments.
- As in fig.12, tread on the pedal of the brush tool to let the bristles out, and you can clean the floor.
- As in fig.13, tread on the pedal of the brush tool again to put the bristles in, and you can clean the carpet.
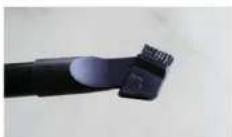
Fig.10 Fig.11
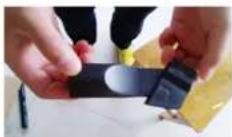
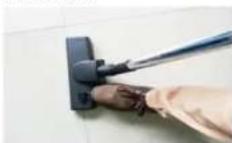
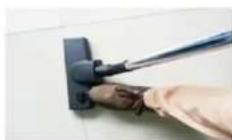
Fig.12 Fig.13
GB
MAINTENANCE
HOW TO MAINTAIN
- The filter should be cleaned twice a year, and when there is obvious dirt on the filter,
it is the time.
2.You must fix the filter properly before running the vacuum cleaner.
3.The filter can't be cleaned in the washing machine or baked by the blower.
4.It will reduce the suction power and damage the motor if you use the wet filter. - Steps for maintenance:
1) As in fig.14, press the outlet lock to open the outlet board.
2) As in fig.15, get out the outlet filter
3) As in fig.16, rotate the HEPA cover to separate it from the chamber cover
4) As in fig.17, get the HEPA cover
5) As in fig.18, If you have any hair winding removable cleaning.
6) As in fig.19, get the HEPA and wash it.
7) Wash the HEPA cover, the HEPA assembly, the outlet sponge and the dust chamber in the water without detergent and dry them before use.
8) Fix the HEPA assembly on the chamber cover and make sure three salient cubes should be stuck in the grooves of the dust chamber.
9) Rotate the HEPA assembly in the direction of the mark on the chamber cover.
10) Assemble the chamber cover assembly and the dust chamber according to the mark outside.
11)As in fig.20, hit the filter rack with your hand slightly.
12)Put the dust chamber assembly into the machine. And in this process, first you should make the chamber in the right position and then press the handle of the dust chamber, if there is a cluck it means the operation is successful.
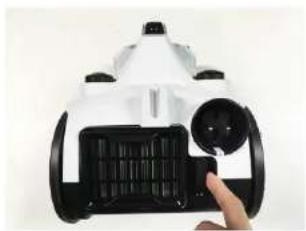
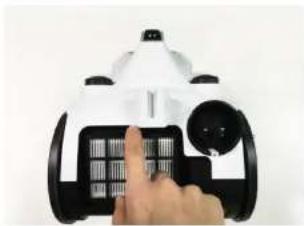
Fig.14 Fig.15
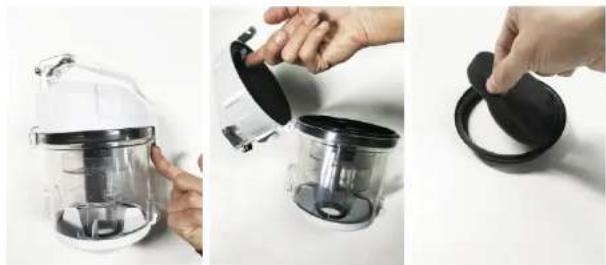
Fig.16 Fig.17 Fig.18
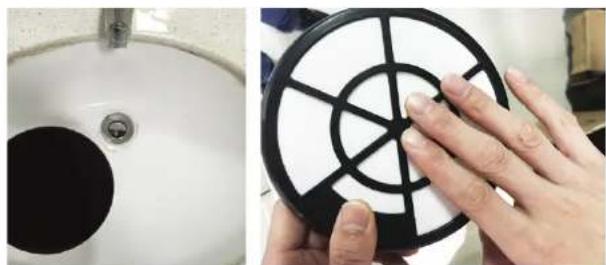
Fig.19 Fig.20
Correct Disposal of this product
This marking indicates that this product should not be disposed with other household wastes throughout the EU. To prevent possible harm to the environment or human health from uncontrolled waste disposal, recycle it responsibly to promote the sustainable reuse of material resources. To return your used device, please use the return and collection systems or contact the retailer where the product was purchased. They can take this product for environmental safe recycling.
WARRANTY: 2YEARS

220-240V 50/60Hz 700W


ESTRUCTURA DEL PRODUCTO

ES
Fig.1 Fig.2 Fig.3

Fig.4 Fig.5
LIMPIEZA DEL DEPOSITO DE POLVO

IT
Fig.1 Fig.2 Fig.3
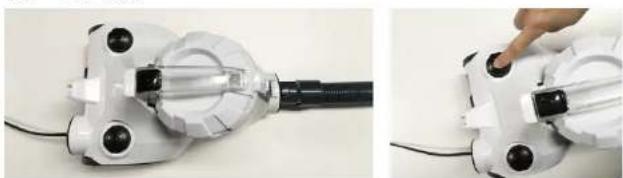
Fig.4 Fig.5