
T59TF6TN0 - Cooker NEFF - Free user manual and instructions
Find the device manual for free T59TF6TN0 NEFF in PDF.
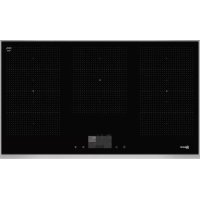



| Brand | Neff |
| Model | T59TF6TN0 |
| Product type | Cooker with hob and wireless temperature sensor |
| Intended use | Domestic, preparation of food and drinks, under supervision |
| Temperature sensor | Wireless, magnetic, CR2032 battery |
| Silicone patch | 5 patches included (ref. 00577921), attachment of sensor to pan |
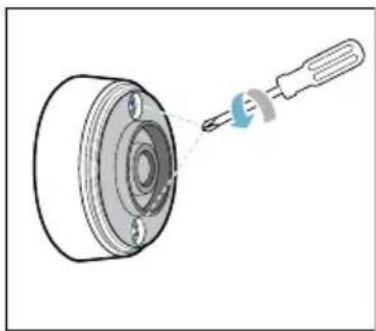
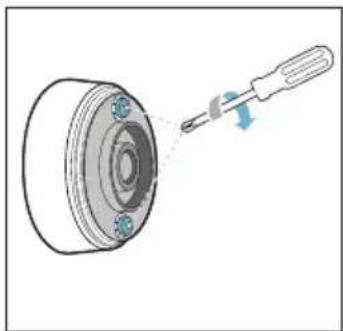
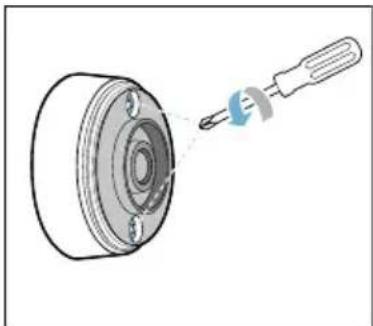
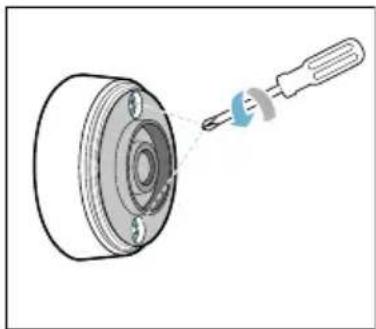
| Battery replacement | CR2032 battery, remove silicone cover, unscrew, observe polarity |
| Cleaning the sensor | Damp cloth, not dishwasher safe, do not immerse |
| Cleaning the silicone patch | Dishwasher safe, dry before attaching the sensor |
| Cleaning the sensor window | Soft cloth or cotton swab with glass cleaner, do not touch with fingers |
| Magnetic safety | Minimum distance 10 cm from electronic implants |
| Risk of injury | Remove the sensor after cooking, use gloves, do not heat the battery |
| Environmental protection | Compliant with WEEE 2012/19/EU, dispose of battery separately |
| Declaration of conformity | Compliant with Directive 1999/5/EC, Bluetooth® licensed |
| Additional information | www.neff-international.com, online shop www.neff-eshop.com |
Frequently Asked Questions - T59TF6TN0 NEFF
User questions about T59TF6TN0 NEFF
0 question about this device. Answer the ones you know or ask your own.
Ask a new question about this device
Download the instructions for your Cooker in PDF format for free! Find your manual T59TF6TN0 - NEFF and take your electronic device back in hand. On this page are published all the documents necessary for the use of your device. T59TF6TN0 by NEFF.
USER MANUAL T59TF6TN0 NEFF
Wireless Temperature Sensor
Z31PX10X0
de Gebrauchsanleitung. . . . . . . . 3 en Instruction manual ..... 9 fr Mode d'emploi....14 it Istruzioni per l'uso ..... 19 nl Gebruiksaanwijzing ..... 24 da Brugsanvisning....29 no Bruksveiledning .... 34 sv Bruksanvisning....39 fi Käyttöohje 44 es Instrucciones de uso ..... 49 pt Instruções de serviço.....55 el Οδηγίες χρήσης .... 60 tr Kullanma kılavuzu ..... 66 cs Návod k použití ..... 71 sk Návod na používanie ..... 76 hu Használati utasítás ..... 81 pl Instrukcja obsługi....86 ro Instructiuni de utilizare ..... 92 bg Ръководство 97 ru Правила пользования.....102 uk Інструкція з використання. . 108 sr Uputstva za upotrebu.....114 hr Upute za uporabu ..... 119 sl Navodila za uporabo.....124 sq Udhëzim për përdorim ..... 129 mk Упатство за употреба.....134
Table of Contents

Online shop: www.neff-eshop.com
For
Notes
Caution!
Read these instructions carefully. Please keep the instruction in a safe place for later use or for subsequent owners.

Environmental protection ..... 10
Environmentally-friendly disposal . . . 10

Wireless temperature sensor .. 11
Preparing and maintaining the wireless temperature sensor .... 11
Cleaning 13
Declaration of Conformity ..... 13
Additional information on products, accessories, replacement parts and services can be found at www.neff-international.com and in the online shop www.neff-eshop.com
Check the appliance after removing it from the packaging. If it has suffered any damage in transport, do not use the appliance, contact the Technical Assistance Service and provide written notification of the damage caused, otherwise you will lose your right to any type of compensation.
This appliance is intended for private domestic use and the household environment only. The appliance must only be used for the preparation of food and beverages. The cooking process must be supervised. A short cooking process must be supervised without interruption. Only use the appliance in enclosed spaces.
This appliance may be used by children over the age of 8 years old and by persons with reduced physical, sensory or mental capabilities or by persons with a lack of experience or knowledge if they are supervised or are instructed by a person responsible for
their safety how to use the appliance safely and have understood the associated hazards.
Children must not play with, on, or around the appliance.
Children must not clean the appliance or carry out general maintenance unless they are at least 8 years old and are being supervised.
When using the cooking functions, set the hotplate on which you have placed the saucepan with the temperature sensor.

Important safety information
Warning
Hazard due to magnetism!
The wireless temperature sensor is magnetic. The magnetic elements in it may damage electronic implants, e.g. pacemakers or insulin pumps. People fitted with electronic implants should therefore not carry the temperature sensor in their pockets and always keep it at least 10 cm away from their pacemaker or similar medical device.
Warning
Risk of injury!
■ The battery in the wireless temperature sensor may become damaged or explode if it gets too hot. Remove the sensor from the hob after cooking and do not store it near sources of heat. ■ The temperature sensor may be very hot when removing it from the saucepan. Wear oven gloves or use a tea towel to remove it.

Environmental protection
Environmentally-friendly disposal
Dispose of packaging in an environmentally-friendly manner.
This appliance is labelled in accordance with European Directive 2012/19/EU concerning used electrical and electronic appliances (waste electrical and electronic equipment - WEEE). The guideline determines the framework for the return and recycling of used appliances as applicable throughout the EU.
The wireless temperature sensor is battery-powered. Dispose of used batteries in an environmentally responsible manner.

Wireless temperature sensor
Additional information can be found in the detailed instruction manual for the hob in chapter "Cooking Assist Functions". Read it through carefully.
Preparing and maintaining the wireless temperature sensor
In this section, you will find the following information:
■ Adhering the silicone patch ■ Using the wireless temperature sensor ■ Changing the battery
You can obtain a temperature sensor and silicone patches from specialist retailers or through our technical after-sales service. Always quote the relevant reference number.
00577921 Set of 5 silicone patches
Z31PX10X0 Temperature sensor and set of 5 silicone patches
Adhering the silicone patch
The silicone patch attaches the temperature sensor to the cookware.
A silicone patch must be adhered when using a saucepan with the cooking functions for the first time.
Proceed as follows:
- The adhesion point on the saucepan must be free of grease. Clean the saucepan, dry it thoroughly and wipe the adhesion point with a degreasing agent such as spirit.
- Remove the protective film from the silicone patch. Adhere the silicone patch to the saucepan in the correct place using the enclosed template as a guide.
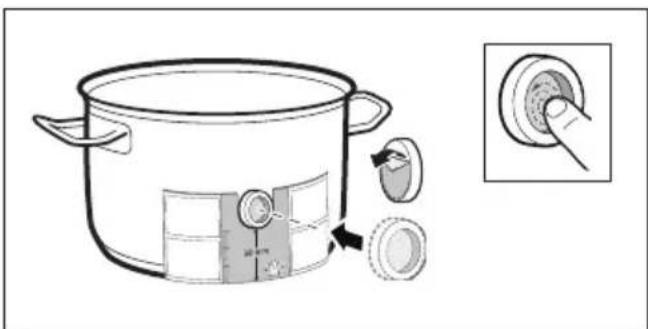
- Press the silicone patch down, including its inside surface. The adhesive requires 1 hour to fully harden. The cookware must not be used or cleaned during this time.
Notes
■ Cookware with the silicone patch must not be left to soak for long periods in soapy water. ■ If the silicone patch comes off, attach a new one.
Using the wireless temperature sensor
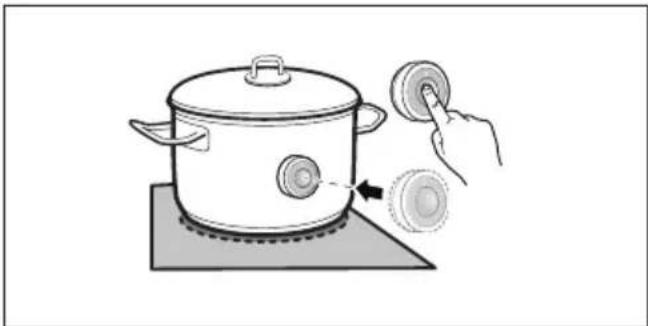
Attach the temperature sensor to the silicone patch and align it correctly.
Notes
■ Make sure that the silicone patch is completely dry before attaching the temperature sensor. ■ Position the cookware in such a way that the temperature sensor is pointing towards the outer side of the hob.
■ To prevent overheating, the temperature sensor must not be pointed towards another item of cookware that is hot. ■ Remove the temperature sensor from the saucepan after cooking. Store it in a clean, safe place away from sources of heat.
Changing the battery
If you press the wireless temperature sensor symbol and the LED does not light up, the battery is flat.
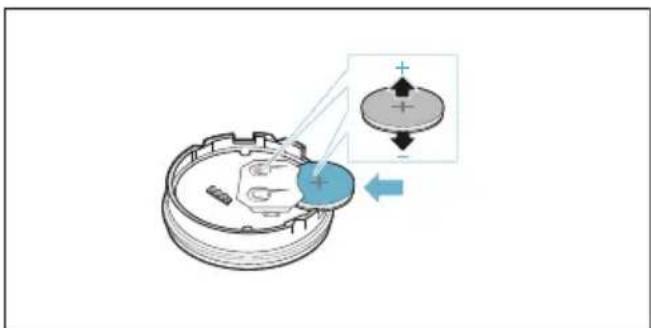
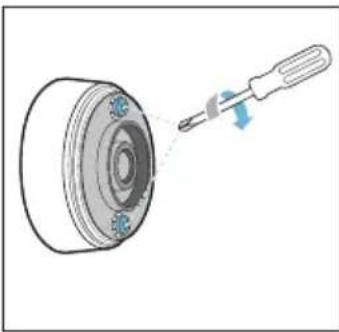
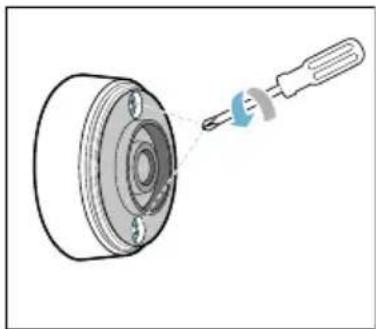
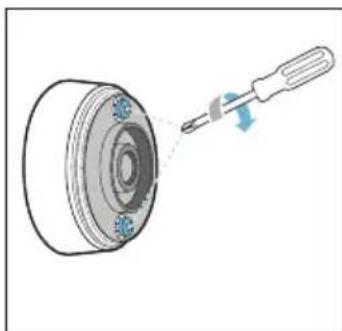
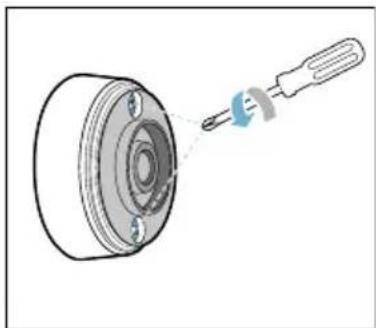
Changing the battery:
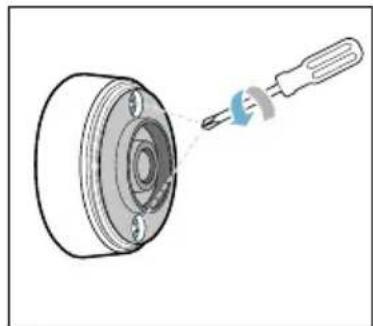
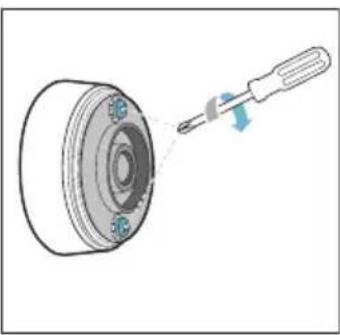
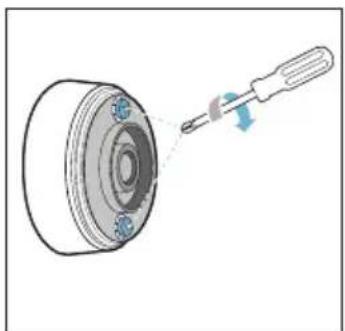
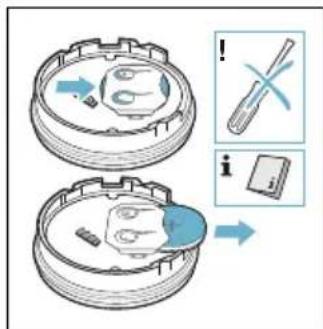
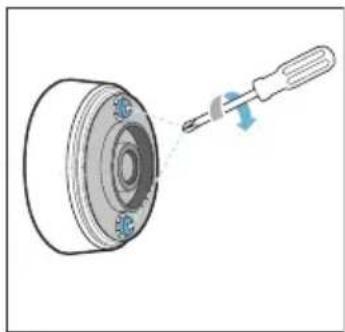
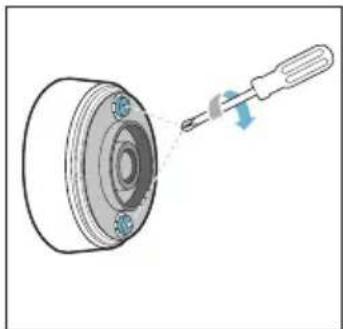
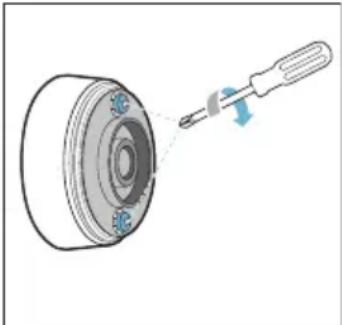
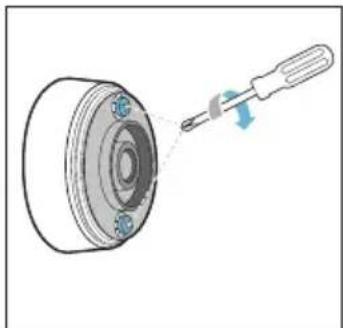
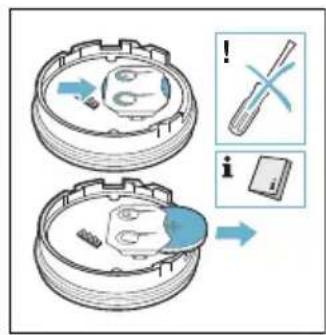
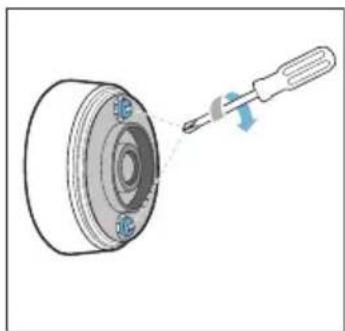
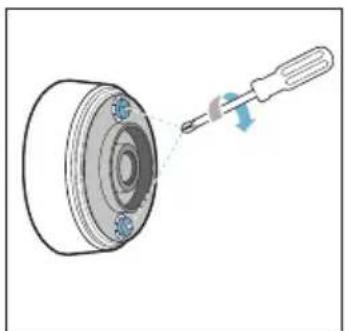
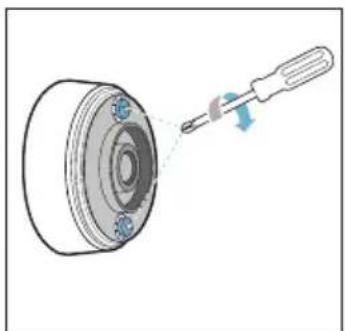
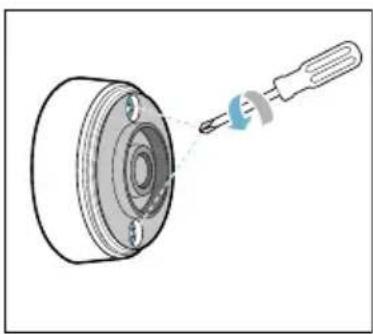
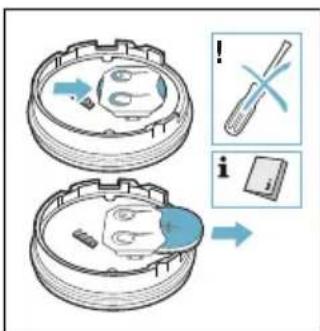
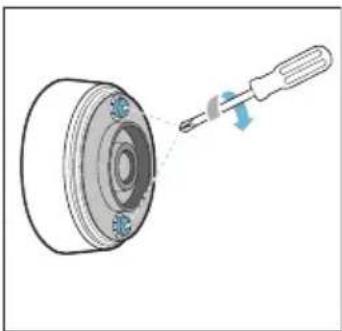
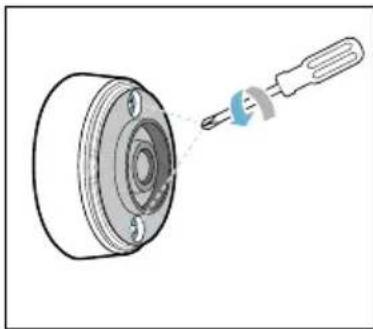
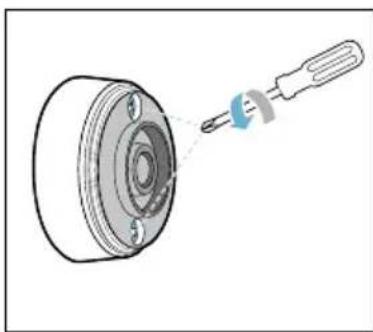
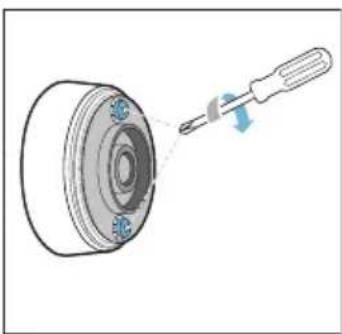
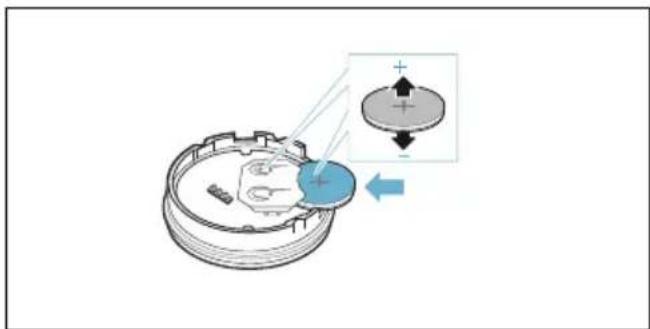
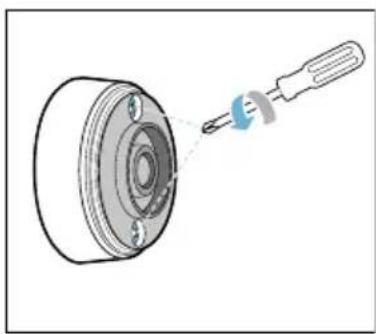
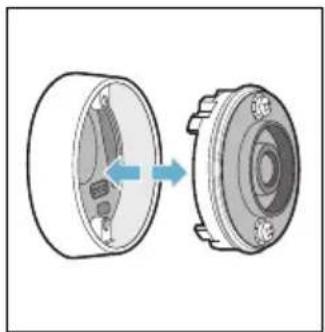
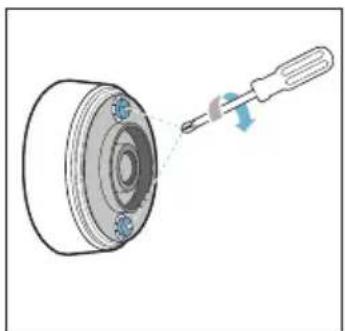
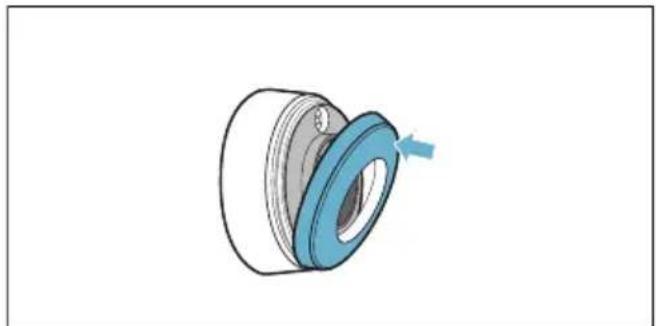
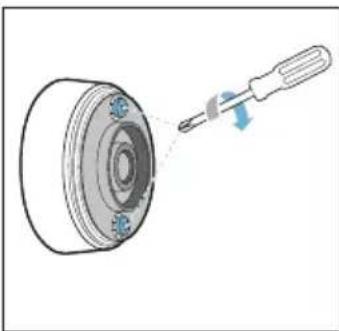
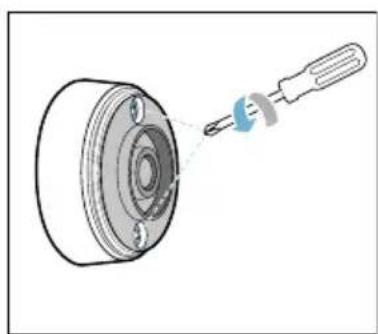
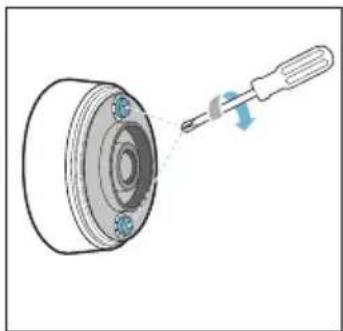
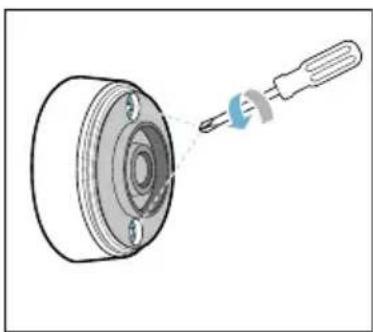
- Remove the silicone cover from the lower section of the casing. Unscrew the screws with a screwdriver.
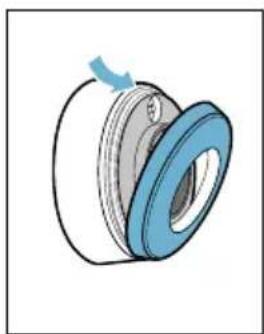
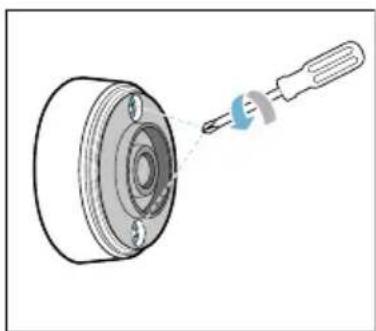
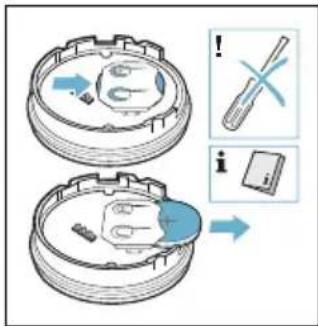
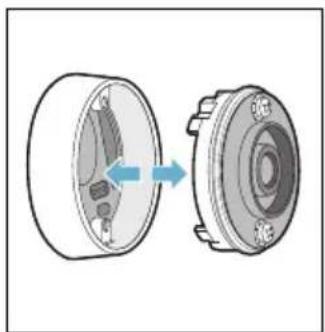
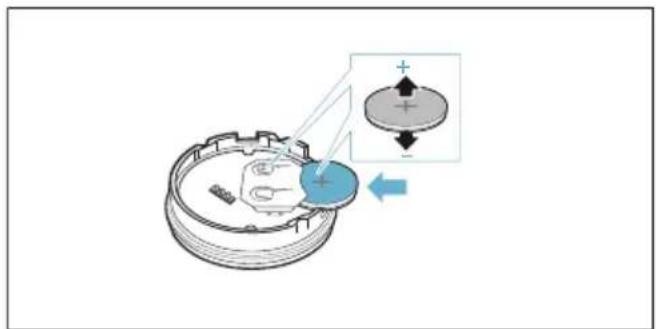
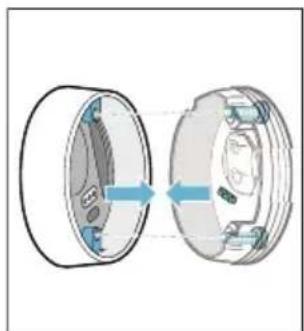
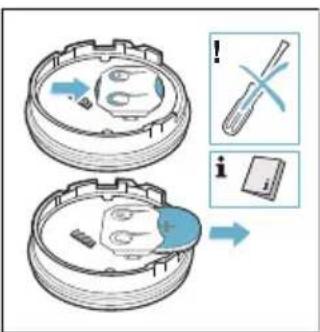
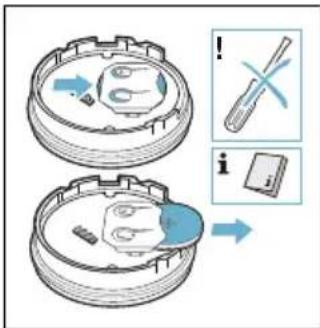
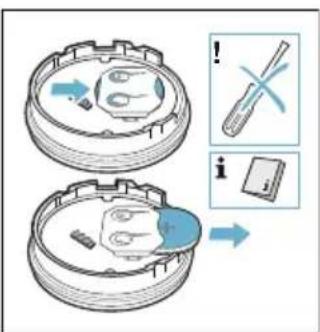
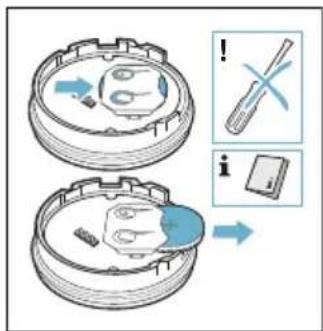
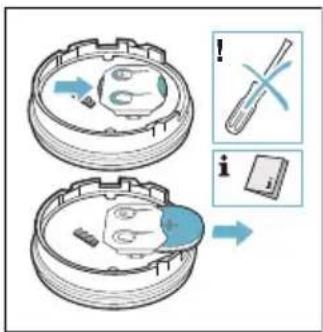
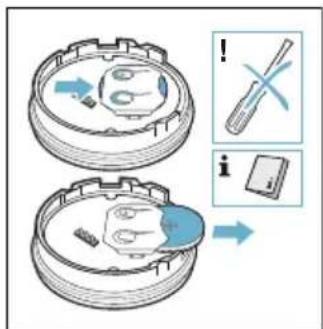
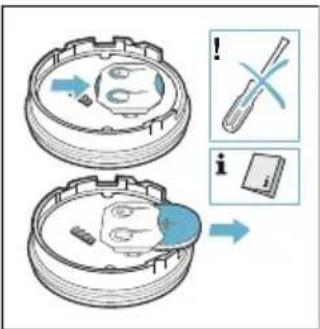
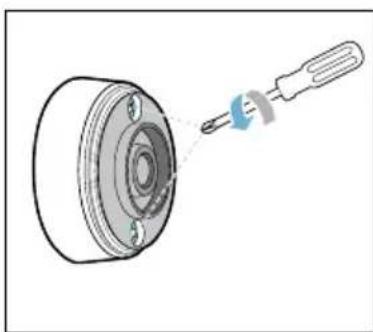
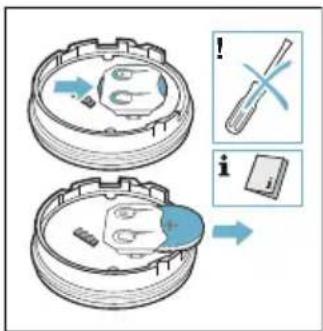
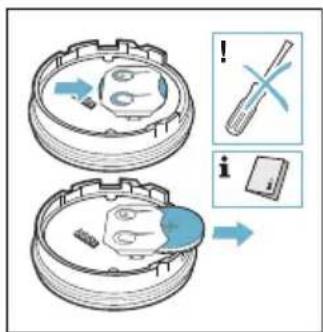
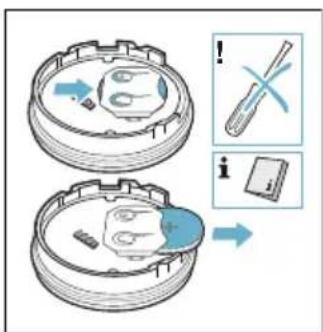
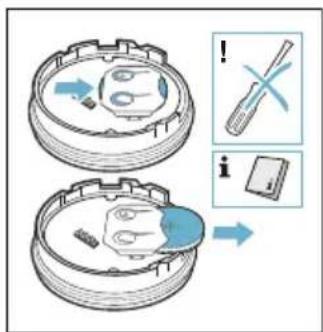
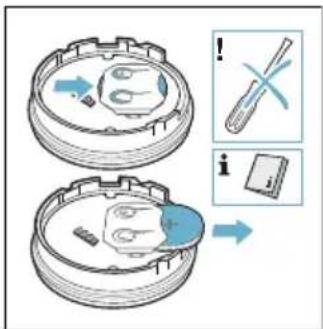
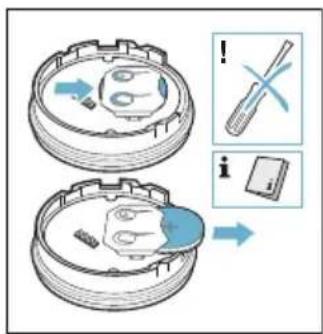
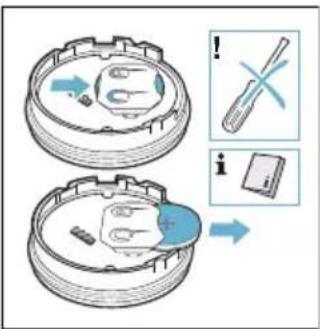
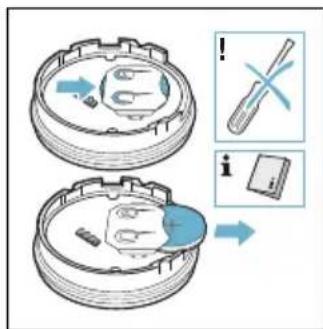
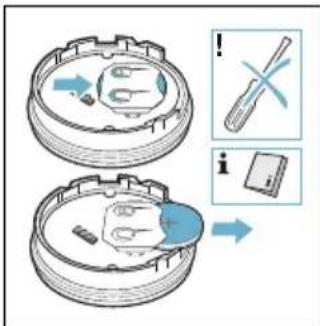
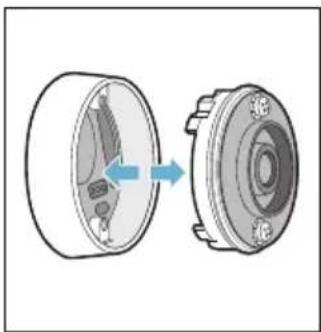
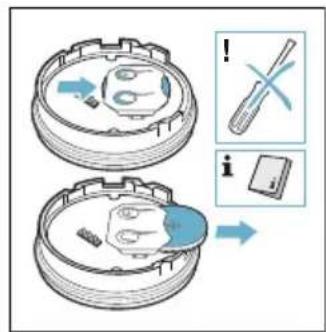
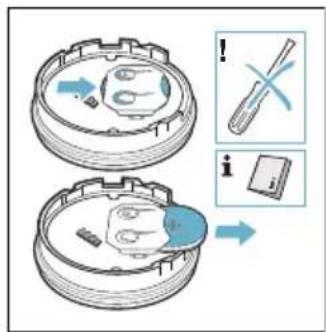
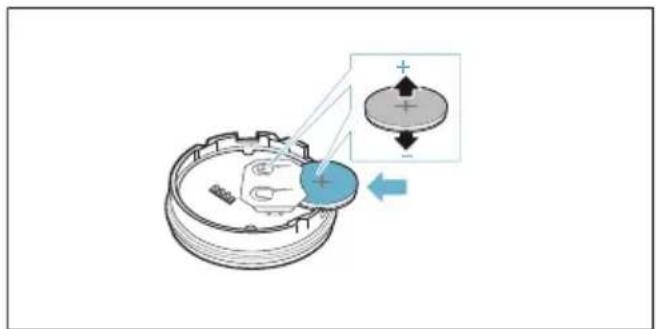
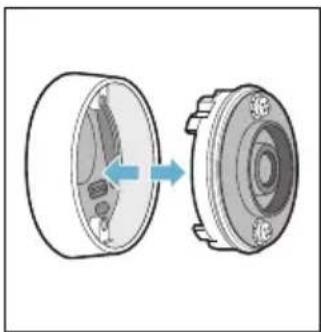
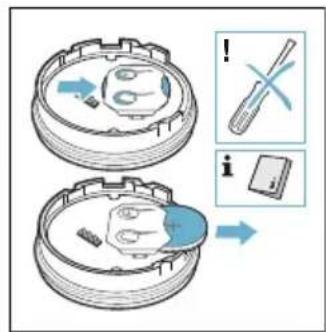
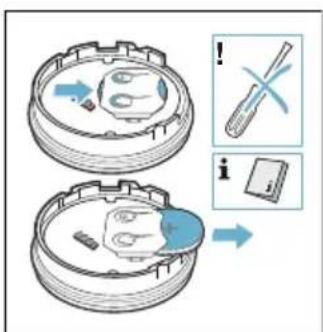
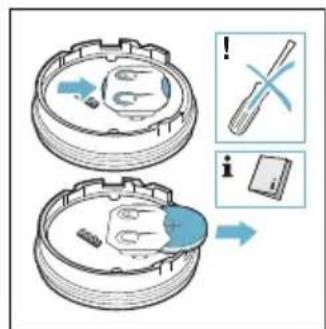
- Remove the upper section of the casing. Take the old batteries out. Put the new batteries in. Make sure that the polarity is correct.

Caution!
Do not use metal objects to remove the battery. Do not touch the contacts.
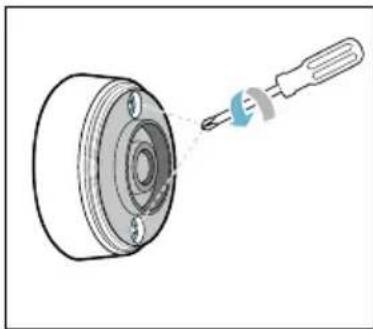
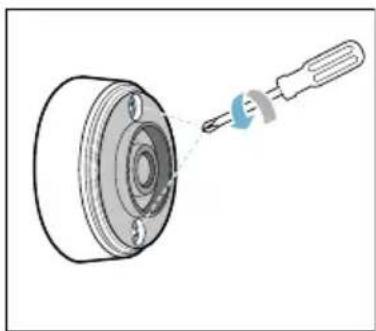
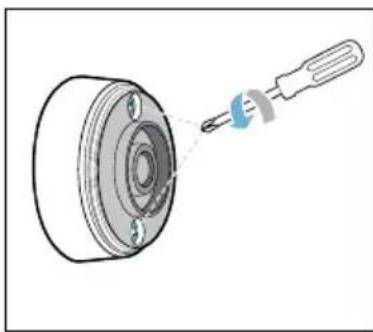
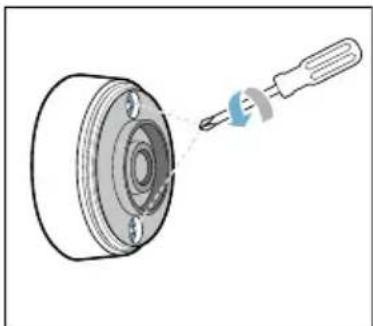
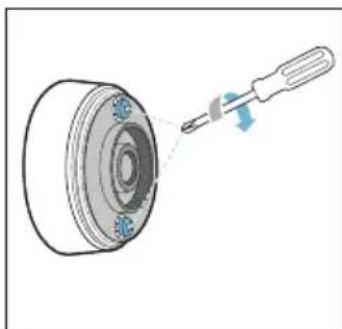
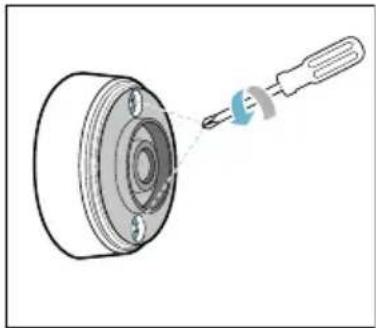
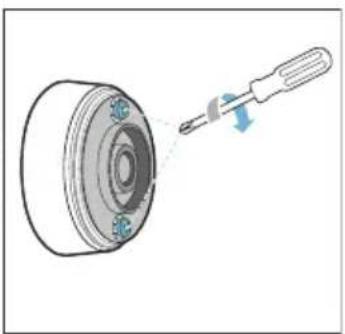
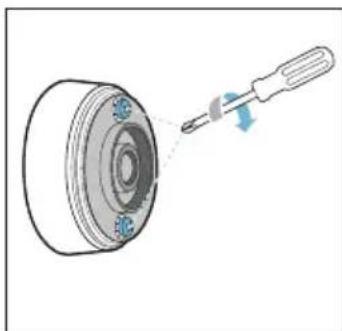
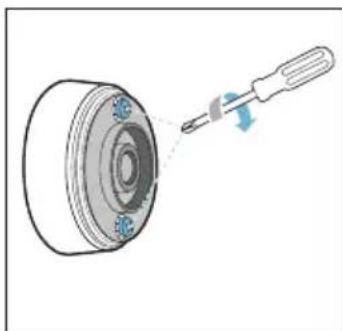
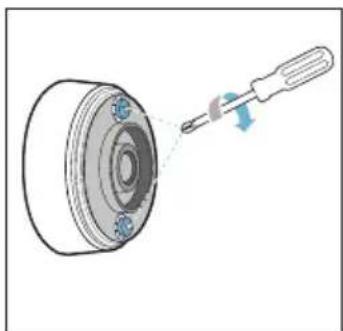
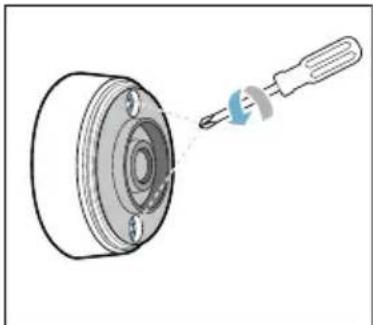
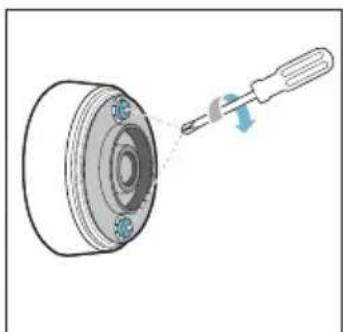
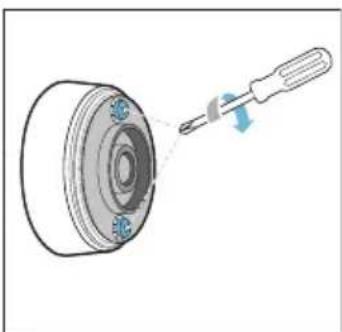
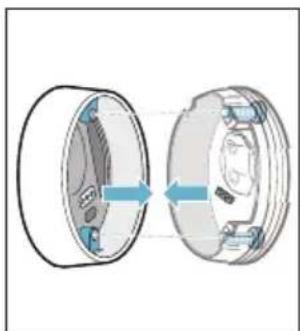
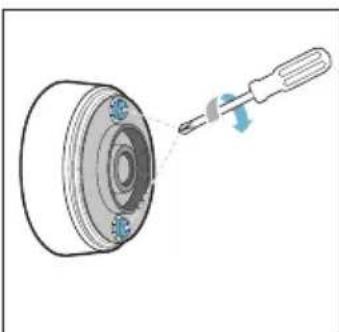
- Put the upper and lower sections of the casing back together. Make sure that the contact pins are aligned correctly.
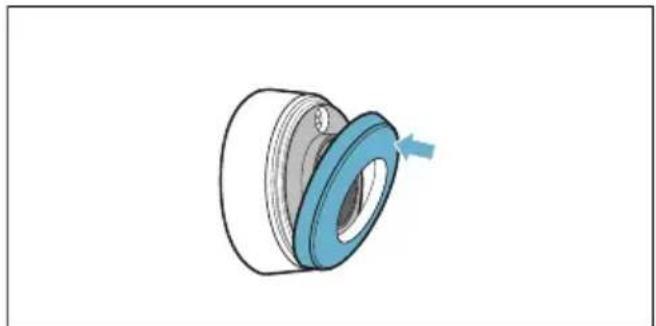
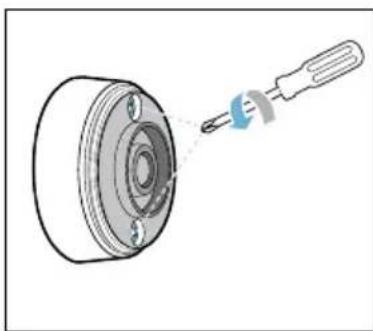
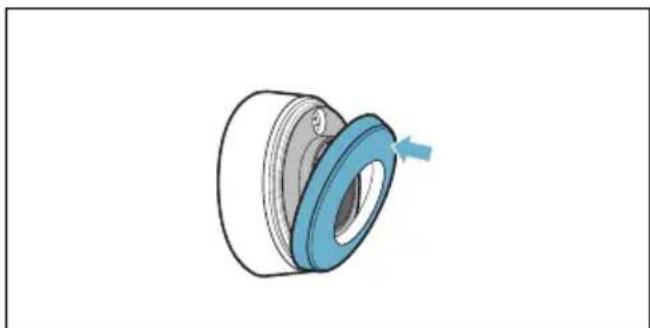
- Put the silicone cover back on the lower section of the temperature sensor casing.
Note: Only use premium-quality CR2032 batteries. These have an especially long service life.
Cleaning
Temperature sensor
Clean the temperature sensor with a damp cloth. Never clean it in the dishwasher. Do not immerse it in water or clean it under running water.
Remove the temperature sensor from the saucepan after cooking. Store it in a clean, safe place (such as in its packaging) away from sources of heat.
Silicone patch
Clean and dry before attaching to the temperature sensor. Dishwasher safe.
Note: Cookware with the silicone patch must not be left to soak for long periods in soapy water.
Temperature sensor window
The sensor window must always be clean and dry. Proceed as follows:
■ Remove dirt and oil splatters regularly. ■ Use a soft cloth or cotton buds and window cleaner for cleaning.
Notes
- Do not use abrasive cleaning agents such as scouring pads, scrubbing brushes or cream cleaners.
- Do not touch the sensor window with your fingers. This may make it dirty or scratch it.
Declaration of Conformity
Constructa-Neff Vertriebs-GmbH hereby declares that the appliance with wireless temperature sensor function meets the basic requirements and other relevant provisions of the Directive 1999/5/EG.
A detailed R&TTE Declaration of Conformity can be found online at www.neff-international.com on the product page for your appliance under "Additional documents".
The logos and the Bluetooth® brand are registered trademarks and property of Bluetooth SIG, Inc. These trademarks are used by Constructa-Neff Vertriebs-GmbH under licence. All other trademarks and brand names are owned by the respective companies.
Table of contents

Notes
Attention!
fr
www.neff-international.com and the eShop www.neff-eshop.com
Warnings
Attention!
www.neff-international.com and the online shop: www.neff-eshop.com

Instructions
Attention!
nl
Instructions
- Make sure the silicone patch is completely dry before placing the temperature sensor.
- Place the pot or pan so that the temperature sensor faces the outside of the cooking zone.
da
Caution!
Notes

Note!
Do not use metal objects when removing the battery. Do not touch the contacts.
Online shop: www.neff-eshop.com

Instructions
Note!
Notes
Caution!
Notes
Attention!
Online: www.neff-eshop.com
Advice
Attention!
Instructions
el
Caution!
Information
Caution!
www.neff-international.com
Warning

Caution!
Warning
Caution!
Instructions
Attention!
Tips
pl
Caution!
Indications
Attention!
Note
Attention!
Instructions
ru
Attention!
Instructions
uk
Attention!
Instructions
■ Make sure the silicone tape is completely dry before placing the temperature sensor. ■ Place the cooking vessel so that the temperature sensor points to the side outer surface of the hotplate.
■ The temperature sensor must not be directed towards another hot vessel to avoid overheating. After heat treatment, remove the temperature sensor from the pot. Store it in a clean, safe place, e.g., in the packaging, and away from heat sources.
Battery replacement
If the wireless temperature sensor symbol is pressed and the LED does not light up, the battery is discharged.
Battery replacement:

- Pull out the upper part of the housing. Remove the old battery. Insert the new battery. Pay attention to the polarity.
Caution!
To remove the battery, do not use metal objects. Do not touch the contacts.
- Reinsert the upper and lower parts of the housing. Make sure that the contact pins are correctly aligned.

- Replace the silicone cover on the lower part of the temperature sensor housing.
Note: Use high-quality CR2032 batteries. They last particularly long.
Cleaning
Temperature sensor
Clean the temperature sensor with a damp cloth. Never clean it in a dishwasher. Do not immerse it in water or clean it under running water.
After cooking, remove the temperature sensor from the pot. Store it in a clean, safe place, e.g., in the packaging, away from heat sources.
Silicone insert
Wash and dry before installing the temperature sensor. It can be washed in a dishwasher.
Note: Do not leave the pot with the silicone insert in detergent water for a long time.
Temperature sensor window
Notes
■ Make sure that the silicone pad is completely dry before placing the temperature sensor. ■ Place the cooking pot so that the temperature sensor points to the side outer surface of the cooking plate.
hr
- Pull the upper part of the housing. Remove the old battery. Insert the new battery. Pay attention to the polarity.
Caution!
Do not use metal objects to remove the battery. Do not touch the contacts.
- Place the silicone cover back on the lower part of the temperature sensor housing.
Note: Use only high-quality CR2032 batteries. They last particularly long.
Cleaning
Temperature sensor
Clean the temperature sensor with a damp cloth. Never wash it in a dishwasher. Do not immerse it in water or rinse it under running water.
Notes
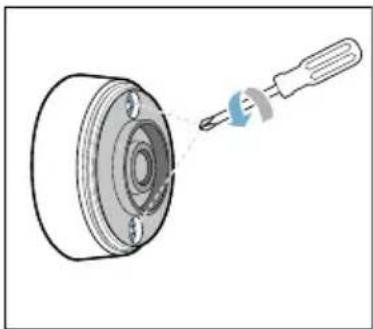
- Remove the upper part of the housing. Remove the old battery. Insert the new battery. Pay attention to the correct polarity.
Caution!

- Press the silicone cap, and the inner part.
Instructions
Caution!
Reminders
Attention!
Register your product online
www.neff-international.com


9001147551
960104(00)
de, en, fr, it, nl, da, no, sv, fi, es, pt, el, tr, cs, sk, hu, pl, ro, bg, ru, uk, sr, hr, sl, sq, mk
- TABLE OF CONTENTS
- NOTES
- CAUTION
- IMPORTANT SAFETY INFORMATION
- WARNING
- HAZARD DUE TO MAGNETISM
- RISK OF INJURY
- ENVIRONMENTAL PROTECTION
- ENVIRONMENTALLY-FRIENDLY DISPOSAL
- WIRELESS TEMPERATURE SENSOR
- PREPARING AND MAINTAINING THE WIRELESS TEMPERATURE SENSOR
- ADHERING THE SILICONE PATCH
- USING THE WIRELESS TEMPERATURE SENSOR
- CHANGING THE BATTERY
- CLEANING
- TEMPERATURE SENSOR
- SILICONE PATCH
- TEMPERATURE SENSOR WINDOW
- DECLARATION OF CONFORMITY
- ATTENTION
- FR
- WARNINGS
- INSTRUCTIONS
- NL
- DA
- NOTE
- ADVICE
- EL
- INFORMATION
- TIPS
- INDICATIONS
- UK
- BATTERY REPLACEMENT
- SILICONE INSERT
- HR
- REMINDERS
Brand : NEFF
Model : T59TF6TN0
Category : Cooker