SRU8008 - Universal remote PHILIPS - Free user manual and instructions
Find the device manual for free SRU8008 PHILIPS in PDF.
User questions about SRU8008 PHILIPS
0 question about this device. Answer the ones you know or ask your own.
Ask a new question about this device
Download the instructions for your Universal remote in PDF format for free! Find your manual SRU8008 - PHILIPS and take your electronic device back in hand. On this page are published all the documents necessary for the use of your device. SRU8008 by PHILIPS.
USER MANUAL SRU8008 PHILIPS
1.1 What's in the Box 4
1.2 Overview SRU8008 4
2 Getting Started 5
2.1 Prepare 5
2.2 Install 6
3 Using Your SRU8008 7
3.1 Selecting a Device 8
3.2 Selecting an Activity 8
3.3 Selecting More Functions 8
4 Getting the Most out of Your SRU8008 9
4.1 Devices 10
4.2 Activities 12
4.3 More Functions 14
4.4 System Settings 15
4.5 Language 16
5 Frequently Asked Questions 17
6 Need help? 18
1 Your Philips Prestigo SRU8008
Welcome to the growing family of owners of Philips products. The Philips Prestigo SRU8008 universal remote control has been designed to control your equipment. You can install up to 8 devices, and up to 8 activities.
Select a device and operate the device with the SRU8008's keys.
Select an activity and automatically start a sequence of key presses, for instance, to watch a DVD or listen to a CD.
Select more functions and assign more advanced functions to your remote control.
1.1 What's in the Box
The SRU8008
- Quick Start Guide
- Instructions for Use in diverse languages
- Philips Alkaline batteries
Philips recommends Philips Alkaline batteries.
1.2 Overview SRU8008
The image on page 2 gives you a main overview of the SRU8008. To prepare the SRU8008 for use, see 'Getting Started' on page 5.
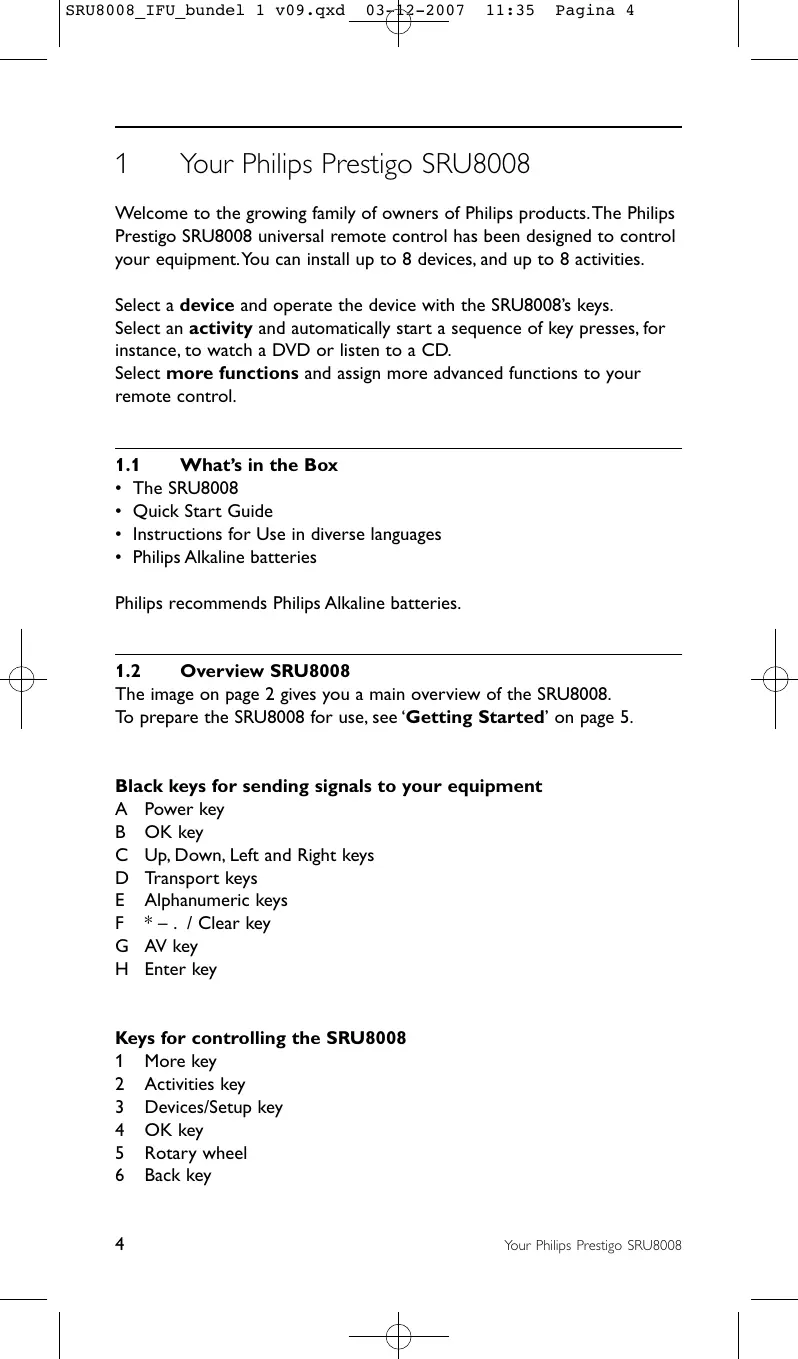
Black keys for sending signals to your equipment
A Power key
B OK key
C Up, Down, Left and Right keys
D Transport keys
E Alphanumeric keys
F *-. / Clear key
G AV key
H Enter key
Keys for controlling the SRU8008
1 More key
2 Activities key
3 Devices/Setup key
4 OK key
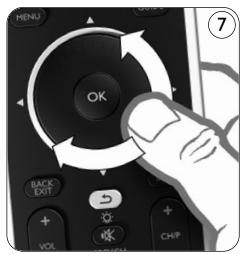
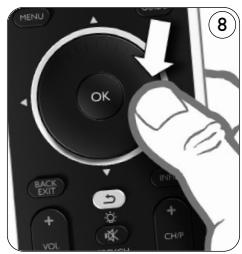
5 Rotary wheel
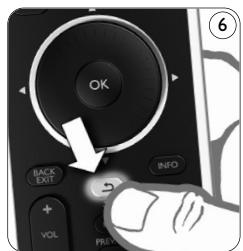
6 Back key
2 Getting Started
2.1 Prepare
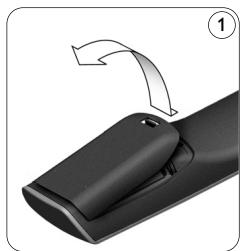
To insert the batteries in the SRU8008:
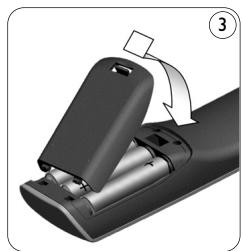
Press the latch down and lift the cover up. ①
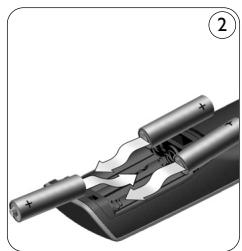
2 Place the three LR6 AA type alkaline batteries into the battery compartment, as shown. (2)
3 Position the cover and press firmly until you hear a click. ③


The SRU8008 displays the Philips logo for 3 seconds and continues with the Installation Wizard to guide you through the installation.
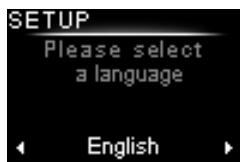
Installation wizard - Language selection
When the batteries are almost empty, the Battery Low icon blinks. This indicates a critical battery level. You can still operate the SRU8008 control for a short period.
Replace the batteries with new LR6 AA type alkaline batteries and follow the local regulations for disposal of the empty batteries.
Note
If the Battery Low icon blinks, you are not able to enter the Setup menu anymore.
2.2 Install
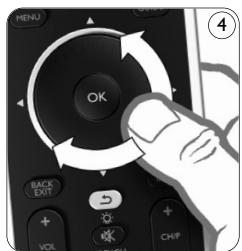
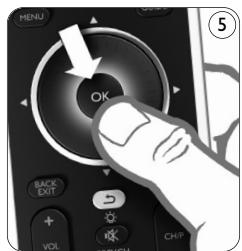
1 In the Installation Wizard, select your preferred language with the rotary wheel. 4
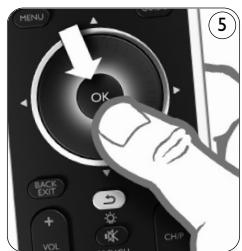
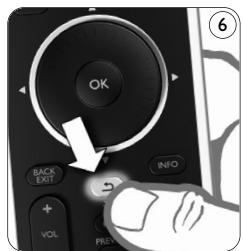
2 Press OK to confirm the selected language. 5 The SRU8008 guides you through the remainder of the setup process. You can always go back in the setup process to change a previous selection:
Press to go back to the previous screen. 6
3 Follow the instructions on the SRU8008 to add devices. You can add up to 8 devices to your SRU8008 from the following list.
| Device Name | Description |
| TV | Traditional and flat TVs |
| DVD | DVD player and recorder |
| DVDR | DVD player and recorder |
| VCR | Video Cassette player and recorder |
| SAT | Satellite set-top box with or without Hard Disk Drive (HDD) |
| DSS/DTT | Satellite set-top box with or without Hard Disk Drive (HDD) |
| Cable | Cable set-top box with or without Hard Disk Drive (HDD) |
| DVB-T/S | Digital Video Broadcast - Terrestrial (T) or Satellite (S) with or without Hard Disk Drive (HDD) |
| AMP | Amplifier |
| AudioSet | Receiver = Amplifier + Tuner |
| HTS | Home Theater System = Amplifier + DVD + Tuner + Surround Sound Speakers |
| Tuner | Radio Tuner |
| CD | CD player and recorder |
| MD | Mini Disk player and recorder |
| Tape | Audio Cassette Tape player and recorder |
| DVR | Digital Video Recorder = Analog TV Tuner + Hard Disk Drive (HDD) |
| Tivo | Digital Video Recorder = Analog TV Tuner + Hard Disk Drive (HDD) |
| DMR | Digital Media Receiver = device streaming media content from a PC to a TV or Audio Receiver |
| TV-DVD combo | TV with integrated DVD |
| TV-VCR combo | TV with integrated VCR |
| TV-VCR-DVD combo | TV with integrated DVD and VCR |
| DVD-VCR combo | DVD and VCR combination |
| DVDR-HDD combo | DVD recorder and Hard Disk Drive (HDD) combination |
| VCD, Laser Disk | Video Compact Disk, Laser Disk, Karaoke |
| Projector | Video Projector |
| Camera and Camcorder | Camera and Camcorder |
| PC | PC (infrared only) |
| Game | DVD player function of Game Console (Infrared only) |
| Satellite Radio | Satellite Radio Receiver |
| PVR/DVR | Personal Video Recorder / Hard disc Recorder |

Note
You can change the settings that you made during this initial installation or install more function afterwards via the Setup menu. See 'Getting the Most out of Your SRU8008' on page 9.
3 Using Your SRU8008
The SRU8008 has been designed to control your equipment with one remote control. Simply add your devices, your activities and your extra functions to start enjoying the SRU8008.
A device is a part of your equipment. As soon as you have installed your devices, you can control them with the keys on the SRU8008.
Devices can have extra functions in addition to the keys on the SRU8008. You can select more functions on the display.
An activity is a sequence of key presses you can install. For example, to watch a DVD you normally would have to:
- Turn on the TV;
- Turn on the DVD;
- Turn on the surround sound system;
- Select the right input on your TV and surround sound system;
- Press the Play button to start the DVD.
With an activity the SRU8008 executes all these steps with just one press.
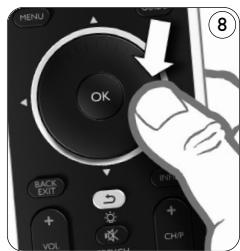
The rotary wheel is an easy-to-use, multifunctional control on your SRU8008:
- When turning the rotary wheel, you scroll through the different options on your remote control's display. ⑦
- When pushing the rotary wheel at the top, at the bottom, at the left or at the right ⑧ , you navigate through the onscreen menu of the device (TV, DVD, VCR, etc) you are controlling at that moment.
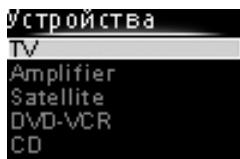
3.1 Selecting a Device
To select your installed devices:
Press DEVICES
2 Select a device with the rotary wheel and press OK to confirm.
The SRU8008 is set to operate the selected device. You can now control that device with the black keys on the SRU8008.

List of installed devices
To setup your devices, see 'Add a Device' on page 10.
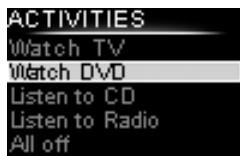
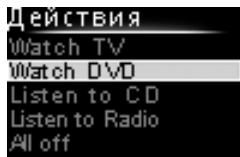
3.2 Selecting an Activity
To select your installed activities:
Press ACTIVITIES
2 Select an activity with the rotary wheel and press OK to confirm your choice.
The SRU8008 sends out a sequence of key presses for the selected activity.
The SRU8008 is set to operate the device you selected for this activity.
List of installed activities
To setup your activities, see 'Add an Activity' on page 13.
3.3 Selecting More Functions
Devices can have extra functions in addition to the keys on the SRU8008. To select more installed functions:
1 Press MORE.
2 Select a function with the rotary wheel and press OK to confirm your choice. The SRU8008 sends out the signal for the selected function.
To setup more functions for your devices, see 'Add a Function' on page 14.

List of installed functions
4 Getting the Most out of Your SRU8008
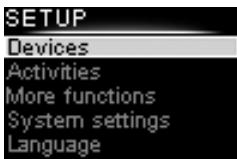
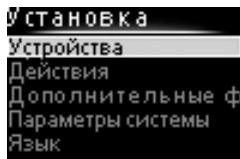
Via the Setup menu you have access to the various advanced features of the SRU8008.
To enter the Setup menu:
Press and hold SETUP DEVICES for 3 seconds.
Note
You cannot enter the Setup menu if the Battery Low icon blinks.
To navigate through the Setup menu:
- Select an option in the Setup menu with the rotary wheel and press OK to confirm your choice.
-or-
Press l to go back to the previous screen.
To exit the Setup menu:
Select Exit in the Setup menu and press OK.
-or-
Press DEVICES again.
The following table gives you an overview of the options in the Setup menu and the pages where you find more information about these options.
| Setup menu | Submenu | Description | Page |
| Devices | Add device | Adds a new device | 10 |
| Fix key | Fixes a key that is not working correctly | 11 | |
| Copy Volume | Copies the volume keys from one device to another | 12 | |
| Rename Device | Renames a device | 12 | |
| Delete Device | Deletes an installed device | 12 | |
| Activities | Add Activity | Adds a sequence of key presses to operate different devices with one press | 13 |
| Rename Activity | Renames an activity | 13 | |
| Delete Activity | Deletes an installed activity | 14 | |
| More Functions | Add Function | Adds an extra function by learning it from your original remote control | 14 |
| Rename Function | Renames a function | 14 | |
| Delete Function | Deletes an installed function | 14 | |
| System Settings | Backlight Time-Out | Changes the time-out of the backlight on the SRU8008 | 15 |
| Key Backlight | Turns the key backlight on or off | 15 | |
| Full Reset | Deletes all your personal settings on SRU8008 | 15 | |
| Language | Changes the language of the instructions on the SRU8008 | 16 | |
| Exit | Leave the Setup menu | 9 |
4.1 Devices
4.1.1 Add a Device
To operate your specific devices with the SRU8008, you have to add those devices. You can add up to 8 devices. For a list of all devices, see page 6.
Note
You can add a device more than once. A second TV will automatically be named TV2. You can enter a different name if your wish to. See 'Rename a Device' on page 12.
1 Go to Setup - Devices, select Add Device and press OK.
2 Select the device you want to add.
3 Follow the instructions on the SRU8008. The selected device is installed and added to the SRU8008.
You can now operate your device with the SRU8008:
Press DEVICES, select the device with the rotary wheel and press OK.
4.1.2 Fix a Key
If a key or extra function is not working properly with your device, you can first of all try to assign that key's signal to the SRU8008. In case that does not work, you can copy that key's signal from your original remote to the SRU8008.
Note
When you use the 'Fix a Key' option, new data overwrites the data that is currently stored for that key.
1 Go to Setup - Devices, select Fix a key and press OK.
2 Select the device for which you want to fix a key. The SRU8008 automatically checks if the brand of this device is known in its database.
3 If the brand of your device is known, press and hold the key for which you want to assign the signal. The SRU8008 sends out different signals to your device.
4 When the device reacts, immediately release the key and follow the instructions on the SRU8008. The key is assigned and fixed.
-or-
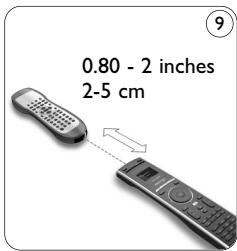
If the brand of your device is unknown or the device does not react to any of the signals, copy the key's signal from the original remote:
3 Confirm you have the original working remote ready.
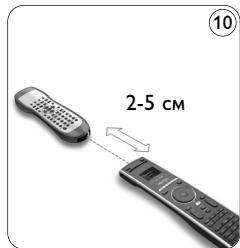
4 Position the SRU8008 and your original remote control as shown. ⑨
5 Select the key or extra function you want to fix.
6 To select extra functions:
1 Press MORE.
2 Select the function with the rotary wheel and press OK.
7 Follow the instructions on the SRU8008. The key is copied and fixed.
Note
All keys can be fixed except:
SETUP DEVICES
MORE ACTIVITIES DEVICES
4.1.3 Copy the Volume
After you add devices, the SRU8008 automatically copies the volume settings as follows:
- Video devices, like DVD, DVR, VCR and Satellite box, use the volume keys of the TV (provided that you have installed a TV).
- Audio devices, like CD, MD, Tape and Tuner, use the volume keys of the Amplifier or Receiver (provided that you have installed an Amplifier or Receiver).
You can change which volume keys are used, for instance when you want to use the volume keys of the Amplifier for the DVD.

Notes
- The Copy Volume function overwrites the default volume settings of the SRU8008.
- Previous volume settings you installed using Copy Volume or Fix a Key are gone.
- The volume settings are automatically deleted when you delete the volume source device.
To copy the volume settings:
1 Go to Setup - Devices, select Copy Volume and press OK.
2 Select the device you want to copy the volume keys from (e.g. TV or Amp).
3 Select the device you want to copy the volume keys to (e.g. DVD or SAT box).
4 Confirm you want to copy the volume keys from one device to the other.
The volume keys are copied.
4.1.4 Rename a Device
To rename a device:
1 Go to Setup - Devices, select Rename Device and press OK.
2 Enter the new label with the alphanumeric keys.

Note
You can delete characters with the Clear key and the left cursor.

Confirm the new label.
The device is renamed.
4.1.5 Delete a Device
To delete a device:
1 Go to Setup - Devices, select Delete Device and press OK.
2 Select the device you want to delete.
3 Confirm you want to delete the device.
The device is deleted.

Note
Keys of the deleted device that are used elsewhere, e.g. in an activity or the volume keys you copied, will be deleted as well.
Check the activities you installed and reinstall them if necessary.
See 'Add an Activity' on page 13.
Check the volume keys for your devices and reinstall them if necessary. See 'Copy the Volume' on page 12.
4.2 Activities
4.2.1 Add an Activity
You can add activities to the SRU8008. An activity consists of several key presses that the SRU8008 sends out with just one press.
By default the SRU8008 inserts a delay of 600ms between every key press to make sure your devices are responding correctly to the IR signals. You can overwrite this default delay.
- If one of your devices needs a longer delay before receiving the next IR signal, you can insert a delay of 1, 3, 5, 10 or 15 seconds.
- If an activity needs a long key press, e.g. turn up the volume, you can select the option Hold last key.
To add an activity:
1 Go to Setup - Activities, select Add Activity and press OK.
2 Select the label you want to use for the activity. -or-
Select Not in list to create a new label.
3 Follow the instructions on the SRU8008.
- Select a device with the rotary wheel, press OK and press a key to add it to the activity.
- Select 1, 3, 5, 10 or 15 seconds delay with the rotary wheel and press OK.
-or-
Select Hold last key with the rotary wheel and press OK.
4 Repeat step 3 to create another activity.
The activity is added to the SRU8008.
You can now run the activity with the SRU8008:
Press ACTIVITIES, select the activity with the rotary wheel and press OK.
4.2.2 Rename an Activity
To rename an activity:
1 Go to Setup - Activities, select Rename Activity and press OK.
2 Enter the text for the new label with the alphanumeric keys.

Note
You can delete characters with the Clear key and the left cursor.

Confirm the new label.
The activity is renamed.
4.2.3 Delete an Activity
To delete an activity:
1 Go to Setup - Activities, select Delete Activity and press OK.
2 Select the activity you want to delete.
3 Confirm you want to delete the activity.
The activity is deleted.
4.3 More Functions
4.3.1 Add a Function
To add more functions:
1 Go to Setup - More Functions, select Add Function and press OK.
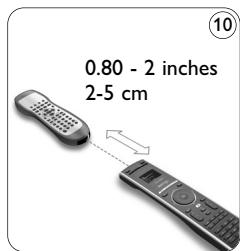
2 Position the SRU8008 and your original remote control as shown. 10
3 Select the device you want to add a function to.
4 Select the label you want to use for the extra function.
5 Follow the instructions on the SRU8008 to copy the function from your original remote. The function is added to the SRU8008.
4.3.2 Rename a Function
To rename an extra function:
1 Go to Setup - More Functions, select Rename Function and press OK.
2 Enter the text for the new label with the alphanumeric keys.
Note
You can delete characters with the Clear key and the left cursor.
3 Confirm the new label.
The function is renamed.
4.3.3 Delete a Function
To delete an extra function:
1 Go to Setup - More Functions, select Delete Function and press OK.
2 Select the device from which you want to delete a function.
3 Select the function you want to delete.
4 Confirm you want to delete the function.
The function is deleted.
4.4 System Settings
4.4.1 Backlight Time-Out
When you use the SRU8008, the backlight turns on. After 5 seconds it turns off again.
To change this time out:
1 Go to Setup - System Settings, select Backlight Time-Out and press OK.
2 Select the preferred backlight time-out with the rotary wheel: 3 seconds, 5 seconds, 10 seconds, 20 seconds.
3 Confirm the new time-out setting.
The backlight time-out is changed.
Note
The backlight time-out has an impact on the lifetime of the batteries, the longer the backlight stays on, the faster the batteries drain.
4.4.2 Key Backlight
To turn on and off the key backlight:
1 Go to Setup - System Settings, select Key Backlight and press OK.
2 Select On or Off with the rotary wheel.
3 Confirm the new key backlight setting.
The key backlight is turned on or off.
4.4.3 Full Reset
When resetting the SRU8008 completely, all installed devices, activities and other settings are deleted. After the reset, the SRU8008 needs to be installed again.
To reset the SRU8008:
1 Go to Setup - System Settings, select Full Reset and press OK
2 Select Yes with the rotary wheel and press OK
3 Press POWER to reconfirm.
The SRU8008 deletes all settings and restarts with the Installation Wizard. This can take up to one minute.
4.5 Language
To change the language of the SRU8008:
1 Go to Setup - Language and press OK.
2 Select the preferred language with the rotary wheel: English, Français, Deutsch, Espanol, Italiano, Nederlands, Ржсни.
3 Confirm the new language. The language used in the Setup menu is changed.
5 Frequently Asked Questions
Keys
Why are one or more keys not working with my device?
Not all functions are available in the database of the SRU8008 or the code behind the key is defect.
You can fix a key by copying the signal from your original remote.
See 'Fix a key' on page 11.
How do I operate the Up, Down, Left, Right cursor keys for the onscreen menu?
The rotary wheel is an easy-to-use, multifunctional control on your SRU8008:
- When turning the rotary wheel, you scroll through the different options on your remote control's display.
- When pushing the rotary wheel at the top, at the bottom, at the left or at the right, you navigate through the onscreen menu of the device (TV, DVD, VCR, etc) you are controlling at that moment.
How can I add extra functions to the SRU8008?
See 'Add a Function' on page 14.
Brand
Why can I not find the brand of my device in the SRU8008?
Not all brands are available in the database of the SRU8008. When your brand is not in the list:
- You can copy the keys from your original remote. See 'Fix a key' on page 11.
-Or-
- You can select Not in list to perform a full database search. The SRU8008 tests all available codes. This can take up to 25 minutes.
Activity
Can I go from one activity to another?
No, when an activity is selected you cannot select the same or another activity once more. You have to switch off all devices before selecting a new activity from the list.
Volume
Why are the volume keys not working properly?
After adding devices, the SRU8008 automatically copies the volume keys and Mute key, as follows:
- Video devices, like DVD, DVR, VCR and Satellite box, use the volume keys of the TV.
- Audio devices, like CD, DMR and Tuner, use the volume keys of the Amplifier or Receiver.
If you did not install the source device (TV, Amplifier or Receiver), the volume keys and the Mute key will not work. To define the volume keys:
- You can install the source device on the SRU8008. See 'Add a Device' on page 11. -Or-
- You can copy the volume keys of another source device. See 'Copy the Volume' on page 12.
Batteries
Why can I not enter the Setup menu?
When the battery level is too low, you cannot enter the Setup menu. Replace the batteries with new alkaline batteries.
Why does the SRU8008 not wake up anymore?
The battery level is too low. Replace the batteries with new alkaline batteries.
Do I loose my data when I replace the batteries?
No.Your data will be saved.
Can I use rechargeable batteries with my SRU8008?
Yes you certainly can. However, bear in mind that rechargeable batteries tend to drain faster than alkaline batteries.
6 Need help?
First of all, read this Instruction for Use carefully.
When you have additional questions about the usage, setup or warranty of the SRU8008, see www.philips.com/support.
For contact details, see www.philips.com/support.
Make sure the SRU8008 is at hand when you call our helpline so that our operators can help you determine whether it is working properly.
The model number of your Philips universal remote control is SRU8008. For the correct device codes for your remote, see www.philips.com/URC.
Date of purchase: /. / (day/month/year)
Table des matieres
Listen to CD Listen to Radio All off
Surround Sound Teletext
1.1 TO BxOaHT B KOMnAeKT 102
1.2 KpaTkn o63op npAybTa SRU8008 102
2 Hauaopo pa6oTbI 103
2.1 IoAroTOBka 103
2.2 Hacroka 104
3 Pa6ota c nyAbTom SRU8008 105
3.1 BbI6Op yCTpoiCTBa 106
3.2 BbI6op AeiCTBn 106
3.3 BbI6Op aONoAHnTeaHbIX yHKun 107
4 CaoXhIe yHkUIn nyABya SRU8008 107
4.1 UcTpoIcTbA 108
4.2 Aaropntmbi 112
4.3 113
4.4 IapametpbicnCTembl 114
4.5 115
5 115
6 Huykna nOmo? 117
1 Baш пуавт Philips Prestigo SRU8008
06p noXaOBAbT B Hauy 6oAbyIO cEmbIO NOb3OBaTeAE npOdyKm Philips! YHnBepcaAusbHbI NByT dNCTaHcUHOHOrO ynpBaHeHr Philips Prestigo SRU8008 6bI CneuaAIBHO pa3pa6oTaH dAry UnpBaEHHra BaUMM yCTpoiCTBaMn. Bbl MoKeTe yCTaHOBtB do 8 yCTpoiCTB a TAKKe do 8 aRopHTMOB.
Bb6epnte yctpoiCTBO u npabAaIte Hc n NOMOu bIO IyAba SRU8008. Bb6epnte aAroptm n ABtOMaTHueCKn 3aynCTne NOCAEDoBaTeABHOCTb hakatni pa3AnHbIX KAAbN,HaNPmEp, Ara TOrO, YTO6bl IpocMoTpeTB DVD nn PocaywaTb KOMNaKT-ANCK.
Bb6epnte OONOAHNTeAhbIe yHKUIMn 3aJaIte npAbyT OONOAHNTeAhbIe paCUnpeHHbIe cyHKUIN.
1.1 TO BxOANT B KOMIIaekt
- Pnyabr SRU8008
KpaTKoe pyKOBOACTBO NOa3OBaTeA - INHCTpykCnna NO NcnoAa3OBaHnIO Ha pa3AnuHbIX a3blkax
LueoHbIe 3AemEnTbI nITaHHa Philips Alkaline
KoMaHnHa Philips peKomeHApET NcnoAbaBaTb ueAoUHbIe 3aEmeHTbl nTuHnA Philips Alkaline.
1.2 KpaTkM o63Op npAybTa SRU8008
O63op MoAeAn SRU8008 npnBeaeh Ha pncyHke Ha ctp.2.
TTo6bI nOaTOrOBtB nyABT SRU8008 K pa6oTe, nepeiAnTe K pa3AeY
'Haayao pa6Otbl' HauaAo pa6Otbl Ha ctp.103.
YephblkHONKnAaOtnpaBKn KOMaHa Ha o6OpyAoBaHne
A Khonka Power
B KhoNka OK
C IepemeeHneBvBEx,BHn3,BpBaBO,BAeBO
D KhoPkn nepemeehenna
E AaabnTHo-UNpOBbIe KHOPIK
F Khonka *./ Clear
G KhoNka AV
H Khonka Enter
KhoNkynpaBaehra SRU8008
1 Khonka More
2 KhoNk DaeCTBn
3 Khonka Devices/Setup.
4 KhoNka OK
5 KoaeNko ynpabAeHnna
6 Khonka nepexoHa ha3aA
2 Hauaopo pa6oTbI
2.1 NoAroTobka
YTo6bI BCTaBtB 3AeMeHTbI NHTaHnB BpyABT SRU8008, BbyIOAnHInTe CaeMyouee:
1 HaxmTe h caTop n CHmTe KpbIshky. ①
2 UctaHOBInTe TprI IeAoUHbIX 3AEmeHTa Tnna LR6 AA B OTCek NITaHnI, KaK IOKa3aHO Ha PnCyHKe. ②
3 UcTaHOBInTe KpbIiKu I 3aΦnKcnpyTe ee Do ξeAka. ③
Ha AnCnAee NyAbaTa SRU8008 Ha 3 ceKyHAbI OTO6pa3ntc AOROTnKOMNaHm Philips, 3aTeM 3anyCTnTC MaCTep yCTaHOBKn (Installation Wizard), KOTOpBn NOMOKeT Bam npOBeCTn YCTaHOBky.

MaTeP yCTaHOBKn - Bb6Op RaBka
Korda 3AeMeHbI NHTAHn IouTH pa3pJxKeHbI, MIRaET NIKTOrpAMMa Battery Low (3AeMeHbI NHTAHn pa3pJxKeHbI) OHa O3NaayeT KpHTuYeckn yPoBeHb 3apJa 3AeMeHToB NHTAHn. Iocae ee NOBAAeHn Bbl CMOXeTe pa6OtaTb c IyABTom SRU8008 HENPOoAXHtAEbHOe BpeM. PekOMeHdyETc 3aMeHrTa bpa3pJxKeHHbI 3AeMeHbI HObIMN 3eAoYhbIMN 3AeMeHtAm TnPa LR6 AA N yTuAn3nPOBaTb pa3pJxHeHbI 3AeMeHbI B COOTBeTCTBn C MeCTHbIM 3aKOHOaTeAebCTBOM.
Ппимецане
Ecam MInraet NIKTOrpaMa Battery Low (3AeMeHtbl NITAHn pa3prJxHebl), Bbl He CMOKeTe BOiTn B pa3aEa Setup (YcTaHOBka) TaaBHoro MeHIO.
2.2 HacrtpoKa
1 Korda 3aNyctntcmaCTep yCTaHOBKn, c NOMOu bIO NOBOPOTHORO KOaecnKa BbIbepnte Raik. 4
2 HaKMTe OK AAN NOATBepXdeHn Bb6opa 3bika. ⑤ INCTpykunn Ha AnCpAee NyABTa SRU8008 nOMOryT Bam npOBecn npocecc HactpoiKn.
B AIO60mOMeHT MOXHO BepHyTbcy B yCTaHOBky IAA N3MeHeHHN Bbl6paHHbIX npaMeTpOB:
HaKMnTe KHNOKy 5AAR Bo3Bpata K ppebIaYuemy OKHy. 6

3 AAn O6abAeAHn yCTpOINCTB CaeAynHnCTpyKunm Ha SRU8008.K SRU8008 MoXHO AO6aBNt b Do 8 CTPOINCTB nCaceAyoIooero cIncka.
3 Pa6oTa c nyAbTom SRU8008
IyabT AnctaHnOHHO ynpaBHeNr SRU8008 6bIA cneuaAho
pa3pa6oTaH dA ynpaBHeNr BcEM BaHIM O6OpYIOBAHmE C NOMOuBO
OaHO rnybTA. IPOCTO aO6aBte YcTPOJCTBa, AAROPHTMbI, AIO6HMbie KaHaBl i DOnoAHInTeABHbIE YHKUN H NaCxAkDaIeTcb pa6ToOn C
nyAbTom SRU8008.
IoA CAOBOM yCTpoiCTBO' NOaPa3yMeBaetcyaactb Baawero
O6OpyOBOAHn. KaK ToaBko Bbl YCTaHOBHTe CBOH yCTPOICTBA, Bbl
CMoXkete ynpaBAArTb HmC NOMoUbIO NyTa SRU8008.
Baun yctpoiCTBa MOrYT HMeTb OOnoAHHTeAbHbIe 0yHKUIN, NOMMO Tex, KOtOpBle ynpaBAJOTcK AaBnUAMn PnABy SRU8008. AAn x yCTaHOBKn Bb6epnte Ha AnCpAee NyHKT More Functions (OOnoAHHTeAbHbIe 0yHKUIN).
AaropntM-3To 3aHaHHaI NocAeOBAteAbHocTb HaKaTn pa3AnHbIX KhoNok. HanPImep, YTo6bl NocMOTpeTB DVD, o6bHuHO Tpe6yETc BbIOAHHTb CaeAUYUUIne AeICTBn: BKAIOHTb TeAEBU3OP;
BKAHOHTb DVD- npOnrpbIbTaTeAb;
BKAIOHTb CNTemy O6bEMHOrO 3ByuHaHn Surround;
- BbICTaBtB HxKhB yPoBeHb BXoDHoro CnHaHa Ha TeAeBu3Ope n CnCTeme 0bemHoro 3ByaHn;
- HaxaTb KlaBnUy Play (BocnpOn3BeDeHne) Aa 3ayncKa DVD.
PpH NcIOA3OBAHN aIropNTMa pybT SRU8008 MoKet BblNOAHHTb BCE 3Tu DeEChTBn HAxKaTHem OADHOK KlaABnHn.
KoAecnKO ynpaBaeHnRABAreTcIPOCTbIM B INCIOAb3OBAHn, YHnBepcaabHbIM CpeAdCTBOM ynpaBaeHn SRU8008:
- Pn BpaueHn KOaecnKa ynpaBaeHna, npOnCxOaNt npOKpyTkapaaNHybIX onuHn Ha anCnAee nyTa Y. ⑦
- Пин Нжатин На Коасноуnpавеленя CBepx, Chn3y, cnpaBa ИИ Саевы Bblпетемшатесь по Краному MeHIO yctpoiCTBa, (TB, DVD, TeaenpncTaBKN I T.A.) KOTOpbIM Bbl уnpabAЯTe B 3TOT MOMENT. 8

3.1 BbI6Op yCtpoiCTBa
Bb6op yctaHOBAeHHoro yctpoHCTBa
1 HaMMnTE DEVICES
2 Bb6epnte yctpoiCTB c nOMoIbIO KOaecnka ynpabAeHnHaXMMTe OK AIA NOATBpeKdEHH. SRU8008 hactpoen dAy npabaehn Bbl6paHbIM yctpoiCTBOM.Tenepb ynpabAEHne 3TmM yctpoiCTBOM OcyueCTBaIeTcC nOMoIbIO Yephbx KHOIOK SRU8008.
CnHcOK yCTaHOBaeHHbIX yCTpOInCTB
O hactpoKe yctpoNCTB cm.B O6abAeHne yctpoNCTb Ha cTp. 108.
3.2 Bb6op AeIcTBnA
Bb6Op yCTaHOBAeHHOro DeIcTBnA:
1 HaMMTe ACTIVITIES
2 Bb6epnte DeiCTBnE C NOMOuBIO KOaecnKa ynpaBAeHnI HaXmTe OK AAn 3ayncKa DeiCTBnI. SRU8008 OTnpaBNT IocAeDoBaTeIbHoCTb KOMaHd AAN Bbl6paHHOrO DeiCTBnI. SRU8008 HAcTpoeH dAy UnpaBAeHnI Bbl6paHHbIM YcTPOiCTBOM AAN 3TOrO DeiCTBnI
CnHcOK yCTaHOBaeHHbIX
AeIcTBNI
Iopraok yctahOBKn AeienCTBn CM. B O6aBAeHne aAroptMa Ha cTp. 112.
3.3 BbI6Op AOnoAHnTeaHbIX ΦyHKU
Baun yctpoiCTBa MOrYT HMeTb DOIOANHTeAbHbIe 0yHKUHN, NOMMTOx, KOtOpBle ynpaBAJOTc KaABNAMn NyTa SRU8008.
Ara TOrO, 4TO6bl BbIbpaTb yCTaHOBaeHHbIe BAMN AOIOAHHTeMbHbIe _YHKUIN, BblNOAHHTeCAEDyIOoee:
1 HaMMTe MORE.
2 C nOMOJIIO NOBOPOTHOKOlaeNka Bbl6epHTe yHKUIO HauKMITE OK AIAI NOATBepKAEHnA.
IyBT SRU8008 OTnpaBNT KOMaHMy, COOTBeTcTBYIOyIO BbI6paHHoI yHKuIN.
AaYcTaHOBKn OIOOAHNTeaHbIx FyHKn CM. rABy'Ao6abAeHne FyHKn' Ha cTp. 113.

CnHcOK yCTaHOBaeHHbIX
fYHKsI
4 CaoXhBie yHKuN nyAa SRU8008
C NOMOJIbIO MEHIO Setup (YCTaHOBka) Bbl MoXeTe NOAUYHTb AOCTyN K pa3ANUHbIM CAOXHHbIM YHKUINM NyaTa SRU8008.
YTO6bI BOITN B MEHIO Setup (YCTaHOBka), BBINOAHHTe CAEyIOUee:
HaxMnte N yAepKnBaTeb TeueHne 3 cekyHa KlaBnUy

Ппимейанne
Ecam MInrae TNIKToPpMa 3AeMeHtbl NHTaHn pa3paXKeHbI (Battery Low), BbI He cMOKeTe BOITN MeHIO Setup (YcTaHOBka).
AnepexoMa MeKdy NyHKtAmM MeHIO Setup (YcTaHOBka), BbINOAHnTe CaeDyIOoee:
C NOMOUIIO NOBOPOTHO KOAECNKA BbI6epHTe NYHKT MeHIO Setup (YCTaHOBA) IN HAKMITE OK AAN IOADTBepKdEHHJ.
-NAHaxmTe KnOKy 5 AByo3BpaTa K npEabyuemy OKHy.
AЯ BbyXOaI3 MeHIO YCTAHOBka (Setup),BbINOAHHTe cAeAdyiooee:
BbI6epHTe NyHKT Exit (BbIITn I3 yCTaHOBKN) B MeHIO Setup - Main Menu (YCTaHOBka - ΓλaBHOE MeHIO) HαKMIte OK.
-ⅢH-Eue pa3 NaXMMTE
B npBaeHNoT Ta6Anue KpaTko OnncbIaIOCTc yHKUIN MeHIO Setup (YctaHOBA) n Yka3bIbAOCTc TpaHnUbi, Ha KOTopbIX BBI MOXeTe HauTHn DOIOAHHTeABHyIO NHOpMaUNIO 06 3TNx FyHKUINX.
Aa co3aHn HOBOr npabika Bb6epnte Not in list (Het BCnncke).
3 CLeaIyTe HNCTpyKUmaH Ha 3kpaHe.
C NOMOJIIO NOBOPOTHOK OAEChKa BBI6epHTe YCTpOHTBO, HAKMITE OK,a 3aTEM HAKMITE KlaABnUy,KOTOpYIO Heo6xoAnMo Do6abNTb B aAroPHTM.
C nOmoIbIO NOBOpOTHO KOIaecnKa Bbl6epNte 3aAepKky B1,3,5,10 nn 15 cekyHa Hn HaKMITE OK.
-AN
C NOMOUIIO NOBOPOTHO KOAeCNKa BbI6epnTe YHKUHO Hold last key (YApEKNBaTb NocAEADHO KlaABuSy) n HAKMITE OK.
4 Aa co3aHnA pyrto aAropntMa noBtOpnte 3. AaropntMdo6abAen B nyABT SRU8008.
Tenepb Bbl MoKeTe 3aIyCTnTb aIropHTM c NOMOu bIO npTa SRU8008:
Haxmnte ACTIVITIES, BbI6epnte aAroptm c nOmoaBIO NOBOPoTHoro KOaecnka Haxmnte OK.
4.2.2 IpeenMeHOBaHne aAlopHTMa
TTo6bI nepenMeHOBaTb aAropHTM, BbIOAnHIne CaeDyUoUee:
1 BoiAnTe B MeHIO Setup - Activities (YcTaHOBka - AaROpHTMbI), Bbl6epnTe pyHKT Rename Activity (PipeMeHOBaTb aROpHTM) Haxmnte OK.
2 BBeAnTe TeKCT HOBOrO npbIka C nOMoUbIO KlaBnU C 6yKBamn UnΦpaMn.
PnmeaHne
Bb MoKeTe CTnPaTb CmBOaIc NOMOuBIO KAAuBUN Clear (OuHCTnTb) IN KAaBUn Co CTpeAKoB BAEBO.
3 IoAaTBeApAnTe HOBoe Ha3BaHHe.
AaropTM nepeinemehoBaH.
4.2.3 YaaleHne aIropHTMa
YTo6bl ydaanHTb aarOpHTM, BblnoAHnTe CaeDyIOoee:
1 BoiAnTe B MeHIO Setup - Activities (YcTaHOBka - AAnOpHTmbl), BB6epnte pNHKT Delete Activity (YdaNTb aAnOpTM) nHaKMnTe OK
2 BbI6epHTe aAropHTM, KOtOpbI HxJH0 ydaunTb.
3 IoAaTbePAnTe,HTO XOTnTe ydaanTb 3TOT aIropntM. AaropntM ydaaeh.
4.3 AOnoAHnTeAhbHbIe YHKUH
4.3.1 Oo6aBaeHne fYHKnI
Ara TOrO, yTo6bl A06aBnTb AOnoAHnTeAhbHbIe FyHKUIN, BblnoAHnTe Caeayiooee:
1 BoiAHTe B MeHIO Setup - More Functions (YcTaHOBka - OIOAHTeAeBhIe fYHKU), BbI6epHTe NHyKT Add Function (O6aBtB fYHKUHO) HHaKMITE OK.
2 Pa3mecTnTe nYbT SRU8008 n BaW opuHaBbHbI nYbT, KaK POKa3aHO Ha pncyHke. ⑩
3 BbI6epHTe yCTpoHcTBO, AaKOTOPo Bbl XOHTte a06abNTb fHKUIO.
4 Bb6epnte 06o3HaueHHe, KOTope Bbl XOTnTe HcNoAa3ObaTb Aa AooBaAeHHoJyHKuH.
5 CkOnnpyTe yHKnCnC opnHaBHorO nyATo ynpaBHeHn yCTpoNcTBOM, CaeDy nHcTpyKnMa H a NcPiee nyATo SRU8008. ΦyHKnna D6abEHa B NyABTSRU8008.
4.3.2 IpeenMeHOBaHne yHKU
YTo6bI nepenMeHOBaTb dOnoAHHTeAHyIO yHKUIO, BblOAnHITcAeMyuiee:
1 BoaTe B MeHIO Setup - More Functions (YcTaHOBka - OIOAHTeAbHbIe T Rename Function (IpeemHeOBaTb yHK uH) n HaxMMTE OK.
2 BBeAnTe TeKCT HOBOrO rApbIka C NOMoUcIO KlaBnC 6yKBamN UnΦpaMn.
ПоДТВердУпЕ HOBOЕ HAЗBAHAЕ.Функция поевимеюваHA.
4.3.3 YdaaleHne fyuHKnui
YTO6bI ydaANTb DOIOAHTeABHyIO FOYHKUIO, BbINOAHNTe CaeDyOuee:
1 BoiAnTe B MeHIO Setup - More Functions (YCTaHOBka - OIOAHTeAeBhIbe fynKcN), BbI6epnte nyHKT Delete Function (YdaAHTb fynHKcNIO) n HaxMMTE OK.
2 BbI6epHTe yCTPOJCTBO, fYHKUIO AAR KOTOPORo Bbl XOTHTe YdaANTb.
3 Bb6epnte fhykunio, KOtopy BoX XOTNE ydaanTb.
4 IoAaTBepAnTe, yTo xOHTe ydaanTb 3Ty fynkuHIO. YHKnna ydaaHa.
4.4 NapaMetpbI cHcTeMbI
4.4.1 INHTepBaA OTKAOUeHNAHCnAeA
PnHNCIOAb3OBAHNnybTa SRU8008 BkAIOHaeTcnoaCBeTKa HcNae. Yepe3 5cekyHa OHa CHOba BbIKAOHaeTc.
YTo6bI N3MeHnTb INHTepBaA OTKAIOUeHnA, AHCnAe, BblNOAHInTe CaeDyIOoHee:
1 BoHAnTe B MeHIO Setup - System Settings (YcTaHOBka - IapametpbI CnCTeMbI), BbI6epnte NyHKT Backlight Time-out (INHTepBaA OTKIAOHeHNAICPae) IN HAXMnTe OK
2 C nOmoBbIO NOBOPOTHO K0AecNka Bbl6epnte npEAnoHTeABHbI INHTepBaA OTKluOeHnra: 3 cekyHbI, 5 cekyHa, 10cekyHd, 20cekyHa.
IIOATBepAnTe HOBBI INHTepBaA OTKIAOueHnIA INHTepBaA OTKIAOueHnA DCNIAe N3MeHeH.
Ппимецане
OT INTEPBala OTKAIOUeHINI NOACBeTKN DHCIIeA3BNCHT CPOK cAYX6bl 3AEMeHToB NITaHIny: Yem DOAbWe He OTKAIOUaETcra NODCBETKa, TEM 6bICTpee pa3PRAJTC3 AAEMeHtBI NITaHIny.
4.4.2 IoAcbTeKa KAAbHs
YTo6bI BKAIOUHTb HAN BBKIAOHTb NOACBETKy KAABN, BblNOAHInTe CaeAdyIOoee:
1 BoHAnTe B MeHIO Setup - System Settings (YcTaHOBka - IpaametpbI cNCTeMbI), BbI6epHTe NyHKT Key Backlight (PiOaCBETKa KlaBnU) n HaxMnTe OK.
2 C NOMOJIIO NOBOPOTHO KOAecnKa BbI6epHTe On (BkaIOHTb) HAI Off (BbIKAOHTb).
3 IoA TBePAnTe HOBbIe HAcTPOnK NoaCBETKn KaaBn. IooCBetKa KaanBn BkIoUOHea (BbIKIoUHeHa).
Ipoemy nyAbT SRU8008 He pa6oTaet?
CAnuKOM 6oAbaa pa3praKa 3aMeHToB nIHaH. 3aMeHInTe 3aMeHtbl nIHa HbBie 4eOauHbE 6aTapeH.
ByaT An ydaAeHbI MoN DaHHbI e npn 3aMeHe 3aEMeHTOB nHTaHn?
Het. BausaHhble coxpaHtca.
Mожно An И синоаь3OBaTb C pyaTOM SRU8008 NepeЗapЯeMbIe aKKyMyAaTopbi?
Aa, moKHO. OHaKO HMeTe B BVAny, yTo nepe3apJxJaemblie aKKMyAToptbI pa3pJxAOTc8 bicTpee, yEm o6bUHbIe IeAoUHbIe 6aTapeu.
6 HyxHa nOMoIb?
PpeKae Bcero, BHMaTeaBHO npOHTne NHeTpkyuNIO NO NCNoab3OBaHNO.
При ВОЗнКHOВЕнДОПОАНTEЧБИХ BОПСОВ OБ ИСПОАЗOBAHIN, yctahOBKe ИAN rapaHTи HA SRU8008, cM. www.philips.com/support.
CbeAeHnro o KOthakTax cm. B www.philips.com/support.
ПризвонкВсayкБуоаржКSRU8008doAxKeH6bITbnoPykoJ,чTo6blHaunOnepaTOpblMOrAnNOMOyBaMOnpeAeANTbPpaBnAbHOan pa6oTaetYcTpoiCTBO.
Homep MoDeAyn yHnBepcaaBHorO nyTa AY Philips - SRU8008.
Aor o6hApyKeHn npaBnAhoR KOa ABAwero nyaBta cm.
www.philips.com/URC.
Aata npno6peTeHnra: /. (UncAo/Mecu/roa)
Only for US - FCC Compliance
This device complies with Part 15 of the FCC Rules. Operation is subject to the following two conditions:
- This device may not cause harmful interference.
- This device must accept any interference received, including interference that may cause undesired operation.
This equipment has been tested and found to comply with the limits for a Class B digital device, pursuant to part 15 of the FCC rule and ICES 003 in Canada.
These limits are designed to provide reasonable protection against harmful interference in residential installations. This equipment generates, uses, and can radiate radio frequency energy and, if not installed and used in accordance with the instructions, may cause harmful interference to radio communications.
However, there is no guarantee that interference will not occur in a particular installation. If the equipment does cause harmful interference to radio or television reception, which can be determined by turning the equipment off and on, the user is encouraged to try to correct the interference by using one or more of the following measures:
- Reorient or relocate the receiving antenna.
- Increase the separation between the equipment and receiver.
- Connect the equipment into to an outlet on a different circuit from the receiver.
- Consult the dealer or an experienced radio/TV technician for help.
CAUTION:
User changes or modifications not expressly approved by the party responsible for compliance may void the user's authority to operate the equipment.
Only for US - One Year Limited Warranty
Philips warrants that this product shall be free from defects in material, workmanship and assembly, under normal use, in accordance with the specifications and warnings, for a period of one year from the date of purchase. This warranty extends only to the original purchaser of the product, and is not transferable. To exercise your rights under this warranty, you must provide proof of purchase in the form of an original sales receipt that shows the product name and the date of purchase.
For customer support or to obtain warranty service, please visit our website http://www.philips.com/welcome or call toll nr 919-573-7854. THERE ARE NO OTHER EXPRESS OR IMPLIED WARRANTY.
Philips' liability is limited to repair or, at its sole option, replacement of the product. Incidental, special and consequential damages are disclaimed where permitted by law. This warranty gives you specific legal rights. You may also have other rights that vary from state to state.
Only for Europe - WEEE Regulation
Dutch

Disposal of your old product
Your product is designed and manufactured with high quality materials and components, which can be recycled and reused.
When this crossed-out wheeled bin symbol is attached to a product it means the product is covered by the European Directive 2002/96/EC.
Please inform yourself about the local separate collection system for electrical and electronic products.
Please act according to your local rules and do not dispose of your old products with your normal household waste. The correct disposal of your old product will help prevent potential negative consequences for the environment and human health.
French

Only for Europe - Warranty
For warranty information and product support please visit http://www.philips.com/welcome.