
SRU8015 - Universal remote PHILIPS - Free user manual and instructions
Find the device manual for free SRU8015 PHILIPS in PDF.

| Product type | Universal remote control |
| Brand | PHILIPS |
| Model | SRU8015 |
| Power supply | 3 LR6 AA alkaline batteries (not included) |
| Number of controllable devices | Up to 15 |
| Number of favorites | Up to 100 channels with logos |
| Number of activities | Up to 15 |
| Display | Backlit color display |
| Backlit keys | Yes, adjustable |
| Learning function | Yes, to repair keys or add functions |
| Infrared range | Approximately 10 meters |
| Dimensions (approx.) | 200 x 50 x 30 mm |
| Weight (with batteries, approx.) | 150 g |
| Available languages | English, French, German, Spanish, Italian, Dutch |
| Warranty | 1 year |
| Maintenance and cleaning | Clean with a soft dry cloth. Do not use liquids. |
| Safety | Keep out of reach of children. Do not expose to humidity or heat sources. |
| General information | Compliant with WEEE directive. Recyclable. Support at www.philips.com/URC. |
Frequently Asked Questions - SRU8015 PHILIPS
User questions about SRU8015 PHILIPS
0 question about this device. Answer the ones you know or ask your own.
Ask a new question about this device
Download the instructions for your Universal remote in PDF format for free! Find your manual SRU8015 - PHILIPS and take your electronic device back in hand. On this page are published all the documents necessary for the use of your device. SRU8015 by PHILIPS.
USER MANUAL SRU8015 PHILIPS
1.1 What's in the Box 4
1.2 Overview SRU8015 4
1.3 Overview Main Menu 5
2 Getting Started 5
2.1 Prepare 5
2.2 Install 6
3 Using Your SRU8015 7
3.1 Selecting a Device or an Activity 8
3.2 Selecting a Favorite 8
3.3 Selecting More Functions 8
4 Getting the Most out of Your SRU8015 9
4.1 Devices 10
4.2 Activities 12
4.3 Favorites 13
4.4 More Functions 14
4.5 System Settings 15
4.6 Language 16
5 Frequently Asked Questions 17
6 Need help? 18
Only for US - FCC Compliancy 106
Only for Europe - WEEE Regulation 108
1 Your Philips Prestigo SRU8015
Welcome to the growing family of owners of Philips products. The Philips Prestigo SRU8015 universal remote control has been designed to control your equipment. You can install up to 15 devices, 100 favorite channels with their icons and up to 15 activities.
Select a device and operate the device with the SRU8015's keys.
Select an activity and automatically start a sequence of key presses, for instance, to watch a DVD or listen to a CD.
Select a favorite and immediately switch to your favorite channel.
1.1 What's in the Box
- The SRU8015
- Quick Start Guide
- Instructions for Use in diverse languages
• Philips Alkaline batteries
Philips recommends Philips Alkaline batteries.
1.2 Overview SRU8015
The image on page 2 gives you a main overview of the SRU8015.
To prepare the SRU8015 for use, see 'Getting Started' on page 5.
Black keys for sending signals to your equipment
A Power key
B Transport keys
C Alphanumeric keys
D * -. / Clear key
E AV key
F Enter key
Silver keys for controlling the SRU8015
1 More key
2 Favorites key
3 Home / Setup key
4 Rotary wheel
5 Check Mark key
1.3 Overview Main Menu
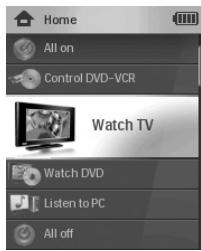
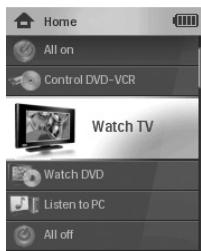
The Home menu is the starting point for using the SRU8015. You can control your devices and activities from the Home menu.
To select the different functions of the SRU8015, see 'Using Your SRU8015' on page 7.
ENGLISH
2 Getting Started
2.1 Prepare
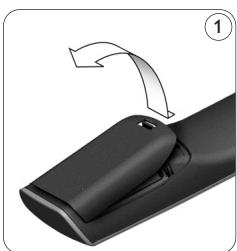
To insert the batteries in the SRU8015:
1 Press the cover inwards and lift it up. ①
2 Place the three LR6 AA type alkaline batteries into the battery compartment, as shown. ②
3 Position the cover and press firmly until you hear a click. ③
natural_image
Close-up of a black remote control with a curved arrow indicating rotation (no text or symbols)
natural_image
Diagram of a battery cell with internal structure and labeled terminals (no text or symbols)
natural_image
Close-up of a black remote control device with a white plastic clip and a white plastic clip, showing internal components (no text or symbols visible)The SRU8015 displays the Philips logo for 3 seconds and continues with the Installation Wizard to guide you through the installation.
When the batteries are almost empty, the Battery Low icon 📄 blinks. This indicates a critical battery level. You can still operate the SRU8015 control for a short period.
Replace the batteries with new LR6 AA type alkaline batteries and follow the local regulations for disposal of the empty batteries.
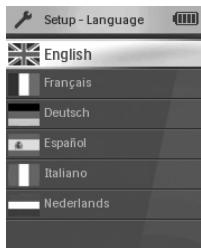
Installation Wizard - List of available languages
Note
If the Battery Low icon blinks, you are not able to enter the Setup - Main menu anymore.
2.2 Install
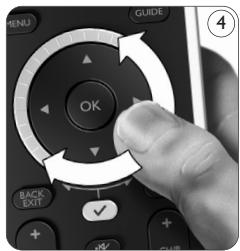
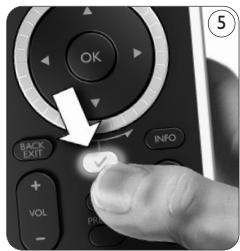
1 In the Installation Wizard, select your preferred language with the rotary wheel. ④
2 Press √ to confirm the selected language. ⑤
The SRU8015 guides you through the remainder of the setup process.
3 Follow the instructions on the SRU8015 to add devices. You can add any device from the following list.
| Device Name | Description |
| TV | Traditional and flat TVs |
| DVD | DVD player and recorder |
| DVDR | DVD player and recorder |
| VCR | Video Cassette player and recorder |
| SAT | Satellite set-top box with or without Hard Disk Drive (HDD) |
| DSS/DTT | Satellite set-top box with or without Hard Disk Drive (HDD) |
| Cable | Cable set-top box with or without Hard Disk Drive (HDD) |
| DVB-T/S | Digital Video Broadcast - Terrestrial (T) or Satellite (S) with or without Hard Disk Drive (HDD) |
| AMP | Amplifier |
| AudioSet | Receiver = Amplifier + Tuner |
| HTS | Home Theater System = Amplifier + DVD + Tuner + Surround Sound Speakers |
| Tuner | Radio Tuner |
| CD | CD player and recorder |
| MD | Mini Disk player and recorder |
| Tape | Audio Cassette Tape player and recorder |
| DVR | Digital Video Recorder = TV Tuner + Hard Disk Drive (HDD) |
| Tivo | Digital Video Recorder = TV Tuner + Hard Disk Drive (HDD) |
| DMR | Digital Media Receiver = device streaming media content from a PC to a TV or Audio Receiver |
| TV-DVD combo | TV with integrated DVD |
| TV-VCR combo | TV with integrated VCR |
| TV-VCR-DVD combo | TV with integrated DVD and VCR |
| DVD-VCR combo | DVD and VCR combination |
| DVDR-HDD combo | DVD recorder and Hard Disk Drive (HDD) combination |
| VCD, Laser Disk | Video Compact Disk, Laser Disk, Karaoke |
| Projector | Video Projector |
| PC | PC (infrared only) |
| Game | DVD player function of Game Console (Infrared only) |
| Satellite Radio | Satellite Radio Receiver |
| Lighting | Lighting, drapes and blinds (Infrared only) |
| HVAC & Fans | Heating Ventilation and Airconditioning (HVAC) and fans (Infrared only) |

Note
You can change the settings that you made during this initial installation or install more function afterwards via the Setup menu. See 'Getting the Most out of Your SRU8015' on page 9.
3 Using Your SRU8015
The SRU8015 has been designed to control your equipment with one remote control. Simply add your devices, your activities, your favorites and your extra functions to start enjoying the SRU8015.
A device is a part of your equipment. As soon as you have installed your devices, you can control them with the keys on the SRU8015. Devices can have extra functions in addition to the keys on the SRU8015. You can select more functions on the display.
An activity is a sequence of key presses you can install. For example, to watch a DVD you normally would have to:
- Turn on the TV;
- Turn on the DVD;
- Turn on the surround sound system;
- Select the right input on your TV and surround sound system;
- Press the Play button to start the DVD.
With an activity the SRU8015 executes all these steps with just one press.
The SRU8015's large color display allows you to recognize your favorites easily and switch to those channels quickly. You do not have to enter the channel number anymore since you can install favorites along with their logo.
3.1 Selecting a Device or an Activity
To select your installed devices and activities:
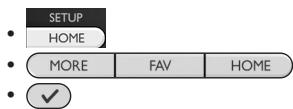
1 Press HOME.
2 Select a device or an activity with the rotary wheel.
The SRU8015 is set to operate the selected device. You can now control that device with the black keys on the SRU8015.
-or-
Select an activity with the rotary wheel and press √ to start the activity.
The SRU8015 sends out a sequence of key presses for the selected activity. The SRU8015 is set to operate the device you selected for this activity.
List of installed devices and activities
To setup your devices, see 'Add a Device' on page 10.
To setup your activities, see ‘Add an Activity’ on page 12.
3.2 Selecting a Favorite
To select your installed favorites:
1 Press FAV.
2 Select a favorite with the rotary wheel and press √ to confirm your choice.
The SRU8015 sends out a signal and switches to the selected channel.
To setup your favorites, see 'Add a Favorite' on page 13.

List of installed favorites
3.3 Selecting More Functions
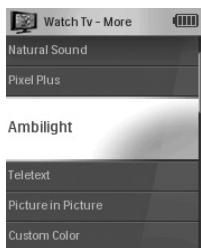
Devices can have extra functions in addition to the keys on the SRU8015.
To select more installed functions:
1 Press MORE.
2 Select a function with the rotary wheel and press √ to confirm your choice.
The SRU8015 sends out the signal for the selected function.
To setup more functions for your devices, see 'Add a Function' on page 14.
List of installed functions
4 Getting the Most out of Your SRU8015
Via the Setup menu you have access to the various advanced features of the SRU8015.
To enter the Setup menu:

Press and hold HOME for 3 seconds.

Note
You cannot enter the Setup menu if the Battery Low icon blinks.
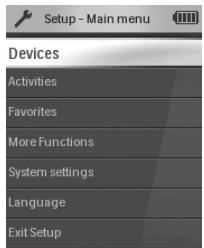
To navigate through the Setup menu:
■ Select an option in the Setup - Main menu with the rotary wheel and press √ to confirm your choice.
-or-
Select Back in the Setup submenus and press √.
To exit the Setup menu:
■ Select Exit Setup in the Setup - Main menu and press √.
-or-
Press HOME again.
The following table gives you an overview of the options in the Setup menu and the pages where you find more information about these options.
| Setup - Main menu | Submenu | Description | Page |
| Devices | Add Device | Adds a new device | 10 |
| Fix a Key | Fixes a key that is not working correctly by copying the signal form your original remote control | 10 | |
| Copy Volume | Copies the volume keys from one device to another device | 11 | |
| Rename Device | Renames a device | 12 | |
| Delete Device | Deletes an installed device | 12 | |
| Activities | Add Activity | Adds a sequence of key presses to operate different devices with one press | 12 |
| Rename Activity | Renames an activity | 13 | |
| Delete Activity | Deletes an installed activity | 13 | |
| Favorites | Add Favorite | Adds a new favorite | 13 |
| Rename Favorite | Renames a favorite | 14 | |
| Delete Favorite | Deletes a favorite | 14 | |
| More Functions | Add Function | Adds an extra function by learning it from your original remote control | 14 |
| Rename Function | Renames a function | 14 | |
| Delete Function | Deletes an installed function | 15 | |
| System Settings | Display Brightness | Changes the brightness of the display | 15 |
| Backlight Time-Out | Changes the time-out of the backlight on the SRU8015 | 15 | |
| Key Backlight | Turns the key backlight on or off | 15 | |
| Full Reset | Deletes all your personal settings on SRU8015 | 16 | |
| Language | Changes the language of the instructions on the SRU8015 | 16 | |
| Exit Setup | Leaves the Setup menu | 9 |
4.1 Devices
4.1.1 Add a Device
To operate your specific devices with the SRU8015, you have to add those devices. You can add up to 15 devices. For a list of devices, see page 6.
Note
You can add a device more than once. A second TV will automatically be named TV2. You can enter a different name if your wish to. See 'Rename a Device' on page 12.
1 Go to Setup - Devices, select Add Device and press √.
2 Select the device you want to add.
3 Follow the instructions on the SRU8015.
The selected device is installed and added to the SRU8015.
You can now operate your device with the SRU8015:
Press HOME, select the device with the rotary wheel and press √.
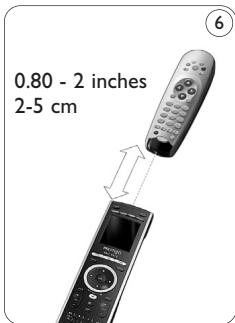
4.1.2 Fix a Key
If a key or extra function is not working properly with your device, you can copy that key's signal from your original remote to the SRU8015.
Warning
When you use the 'Fix a Key' option, new data overwrites the data that is currently stored for that key.
1 Go to Setup - Devices, select Fix a Key and press √.
2 Select the device for which you want to fix a key.
3 Confirm you have the original remote ready.
4 Position the SRU8015 and your original remote control as shown. ⑥
5 Select the key or extra function you want to fix.
To select extra functions:
1 Press MORE.
2 Select the function with the rotary wheel and press √.
6 Follow the instructions on the SRU8015.
The key is copied and fixed.
Note
All keys can be fixed except:
4.1.3 Copy the Volume
After you add devices, the SRU8015 automatically copies the volume settings as follows:
- Video devices, like DVD, DVDR, VCR and Satellite box, use the volume keys of the TV (provided that you have installed a TV).
- Audio devices, like CD, MD, Tape and Tuner, use the volume keys of the Amplifier or Receiver (provided that you have installed an Amplifier or Receiver).
You can change which volume keys are used, for instance when you want to use the volume keys of the Amplifier for the DVD.
Notes
- The Copy Volume function overwrites the default volume settings of the SRU8015.
- Previous volume settings you installed using Copy Volume or Fix a Key are gone.
- The volume settings are automatically deleted when you delete the volume source device.
To copy the volume settings:
1 Go to Setup - Devices, select Copy Volume and press √.
2 Select the device you want to copy the volume keys from (e.g. TV or Amp).
3 Select the device you want to copy the volume keys to (e.g. DVD or SAT box).
4 Confirm you want to copy the volume keys from one device to the other.
The volume keys are copied.
4.1.4 Rename a Device
To rename a device:
1 Go to Setup - Devices, select Rename Device and press √.
2 Enter the new label with the alphanumeric keys.
Note
You can delete characters with the Clear key and the left cursor.
3 Confirm the new label.
The device is renamed.
4.1.5 Delete a Device
To delete a device:
1 Go to Setup - Devices, select Delete Device and press √.
2 Select the device you want to delete.
3 Confirm you want to delete the device.
The device is deleted.
Note
Keys of the deleted device that are used elsewhere, e.g. in an activity or the volume keys you copied, will be deleted as well.
Check the activities you installed and reinstall them if necessary.
See 'Add an Activity' on page 12.
Check the volume keys for your devices and reinstall them if necessary. See 'Copy the Volume' on page 11.
4.2 Activities
4.2.1 Add an Activity
You can add activities to the SRU8015. An activity consists of several key presses that the SRU8015 sends out with just one press.
By default the SRU8015 inserts a delay of 600ms between every key press to make sure your devices are responding correctly to the IR signals. You can overwrite this default delay.
- If one of your devices needs a longer delay before receiving the next IR signal, you can insert a delay of 1, 3, 5 or 15 seconds.
- If an activity needs a long key press, e.g. turn up the volume, you can select the option hold last key.
To add an activity:
1 Go to Setup - Activities, select Add an Activity and press √.
2 Select the label you want to use for the activity.
-or-
Select Not in List to create a new label.
3 Follow the instructions on the SRU8015.
- Select a device with the rotary wheel, press √ and press a key to add it to the activity.
- Select 1, 3, 5 or 15 seconds delay with the rotary wheel and press √.
-or-
Select Hold Last Key with the rotary wheel and press √.
4 Repeat step 3 to create another activity.
The activity is added to the SRU8015.
You can now run the activity with the SRU8015:
Press HOME, select the activity with the rotary wheel and press √.
4.2.2 Rename an Activity
To rename an activity:
1 Go to Setup - Activities, select Rename Activity and press √.
2 Enter the text for the new label with the alphanumeric keys.
Note
You can delete characters with the Clear key and the left cursor.
3 Confirm the new label.
The activity is renamed.
4.2.3 Delete an Activity
To delete an activity:
1 Go to Setup - Activities, select Delete Activity and press √.
2 Select the activity you want to delete.
3 Confirm you want to delete the activity.
The activity is deleted.
4.3 Favorites
4.3.1 Add a Favorite
To add a favorite channel:
1 Go to Setup - Favorites, select Add Favorite and press √.
2 Select the favorite channel you want to add.
3 Follow the instructions on the SRU8015.
The selected channel is installed and added to the SRU8015.
You can now switch to your favorite channels with the SRU8015:
Press FAV, select the favorite channel with the rotary wheel and press √.
4.3.2 Rename a Favorite
To rename a favorite channel:
1 Go to Setup - Favorites, select Rename Favorite and press √.
2 Enter the text for the new label with the alphanumeric keys.
Note
You can delete characters with the Clear key and the left cursor.
3 Confirm the new label. The favorite is renamed.
4.3.3 Delete a Favorite
To delete a favorite channel:
1 Go to Setup - Favorites, select Delete Favorite and press √.
2 Select the favorite channel you want to delete.
3 Confirm you want to delete the favorite channel. The favorite channel is deleted.
4.4 More Functions
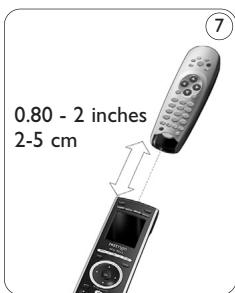
4.4.1 Add a Function
To add more functions:
1 Go to Setup - More Functions, select Add Function and press √.
2 Position the SRU8015 and your original remote control as shown. ⑦
3 Select the device you want to add a function to.
4 Select the label you want to use for the extra function.
5 Follow the instructions on the SRU8015 to copy the function from your original remote. The function is added to the SRU8015.
4.4.2 Rename a Function
To rename an extra function:
1 Go to Setup - More Functions, select Rename Function and press √.
2 Enter the text for the new label with the alphanumeric keys.
3 Confirm the new label. The function is renamed.
4.4.3 Delete a Function
To delete an extra function:
1 Go to Setup - More Functions, select Delete Function and press √.
2 Select the device from which you want to delete a function.
3 Select the function you want to delete.
4 Confirm you want to delete the function. The function is deleted.
4.5 System Settings
4.5.1 Display Brightness
To change the brightness of your display:
1 Go to Setup - System Settings, select Display Brightness and press √.
2 Select your preferred brightness with the rotary wheel: 20%, 40%, 60%, 80%, 100%.
Note
A preview of the selected brightness is shown as you turn the rotary wheel.
3 Confirm the new brightness setting. The brightness of the display is changed.
4.5.2 Backlight Time-Out
When you use the SRU8015, the backlight turns on. After 5 seconds it turns off again.
To change this time out:
1 Go to Setup - System Settings, select Backlight Time-Out and press √.
2 Select the preferred backlight time-out with the rotary wheel: 3 seconds, 5 seconds, 10 seconds, 20 seconds.
3 Confirm the new time-out setting. The backlight time-out is changed.
Note
The backlight time-out has an impact on the lifetime of the batteries, the longer the backlight stays on, the faster the batteries drain.
4.5.3 Key Backlight
To turn on and off the key backlight:
1 Go to Setup - System Settings, select Key Backlight and press √.
2 Select On or Off with the rotary wheel.
3 Confirm the new key backlight setting. The key backlight is turned on or off.
4.5.4 Full Reset
When resetting the SRU8015 completely, all installed devices, activities, favorites and other settings are deleted. After the reset, the SRU8015 needs to be installed again.
To reset the SRU8015:
1 Go to Setup - System Settings, select Full Reset and press √.
2 Select Yes with the rotary wheel and press √.
3 Press POWER to reconfirm.
The SRU8015 deletes all settings and restarts with the Installation Wizard. This can take up to one minute.
4.6 Language
To change the language of the SRU8015:
1 Go to Setup - Language and press √.
2 Select the preferred language with the rotary wheel: English, Français, Deutsch, Español, Italiano, Nederlands.
3 Confirm the new language.
The language used in the Setup - Main menu is changed.
5 Frequently Asked Questions
Keys
Why are one or more keys not working with my device?
Not all functions are available in the database of the SRU8015 or the code behind the key is defect.
You can fix a key by copying the signal from your original remote.
See 'Fix a Key' on page 10.
How can I add extra functions to the SRU8015?
See 'Add a Function' on page 14.
Brand
Why can I not find the brand of my device in the SRU8015?
Not all brands are available in the database of the SRU8015. When your brand is not in the list:
- You can copy the keys from your original remote. See 'Fix a Key' on page 11.
-Or- - You can select Not in list to perform a full database search.
The SRU8015 tests all available codes. This can take up to 25 minutes.
Volume
Why are the volume keys not working properly?
After adding devices, the SRU8015 automatically copies the volume keys and Mute key, as follows:
- Video devices, like DVD, DVDR, VCR and Satellite box, use the volume keys of the TV.
- Audio devices, like CD, DMR and Tuner, use the volume keys of the Amplifier or Receiver.
If you did not install the source device (TV, Amplifier or Receiver), the volume keys and the Mute key will not work. To define the volume keys:
- You can install the source device on the SRU8015. See 'Add a Device' on page 10.
-Or-
- You can copy the volume keys of another source device. See 'Copy the Volume' on page 11.
Batteries
Why can I not enter the Setup menu?
When the battery level is too low, you cannot enter the Setup menu. Replace the batteries with new alkaline batteries.
Why does the SRU8015 not wake up anymore?
The battery level is too low. Replace the batteries with new alkaline batteries.
Do I loose my data when I replace the batteries?
No. Your data will be saved.
Can I use rechargeable batteries with my SRU8015?
Yes you certainly can. However, bear in mind that rechargeable batteries tend to drain faster than alkaline batteries.
6 Need help?
First of all, read this Instruction for Use carefully.
When you have additional questions about the usage or setup of the SRU8015, see www.philips.com/URC.
For contact details, see www.philips.com/support.
For warranty information, see www.philips.com/guarantee.
Make sure the SRU8015 is at hand when you call our helpline so that our operators can help you determine whether it is working properly. The model number of your Philips universal remote control is SRU8015.
Date of purchase: ...../...../..... (day/month/year)
Table des matières
Only for US - FCC Compliancy 106
Only for Europe - WEEE Regulation 108

2 Première approche
2.1 Préparation
natural_image
Close-up of a black remote control handle with a curved arrow indicating rotation (no text or symbols)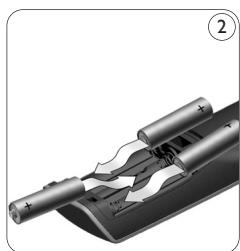
natural_image
Diagram of a battery cell with internal circuitry and labeled components (no text or symbols)
natural_image
Close-up of a black remote control device with a white plastic clip and a white plastic clip, showing internal components (no text or symbols visible)Only for US - FCC Compliancy 106
Only for Europe - WEEE Regulation 108
1 Ihre Philips Prestigo SRU8015
2 Erste Schritte
2.1 Vorbereiten
natural_image
Close-up of a black remote control device with a curved arrow indicating rotation (no text or symbols)
natural_image
Diagram of a battery cell with internal circuitry and external components (no text or symbols)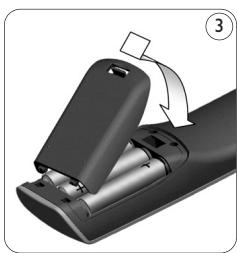
natural_image
Close-up of a black remote control device with a white plastic clip and a white paper clip, showing internal components (no text or symbols visible)Only for US - FCC Compliancy 106
Only for Europe - WEEE Regulation 108
1 Acerca de su Philips Prestigo SRU8015
2 Primeros pasos
natural_image
Close-up of a black remote control handle with a curved arrow indicating rotation (no text or symbols)
natural_image
Diagram of a battery cell with internal circuitry and labeled components (no text or symbols)
natural_image
Close-up of a black remote control device with a white plastic clip and a white plastic clip, showing internal components (no text or symbols visible)Only for US - FCC Compliancy 106
Only for Europe - WEEE Regulation 108
2 Inizio
2.1 Preparazione
Per inserire le batterie nell'SRU8015:
natural_image
Close-up of a black remote control handle with a curved arrow indicating rotation (no text or symbols)
natural_image
Diagram of a battery cell with internal circuitry and labeled components (no text or symbols)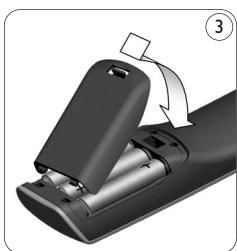
natural_image
Close-up of a black remote control device with a white scroll wheel and a white paper clip, showing a hand gesture (no text or symbols visible)
Only for US - FCC Compliancy 106
Only for Europe - WEEE Regulation 108
1 Jouw Philips Prestigo SRU8015
2 Aan de slag
2.1 Voorbereiding
natural_image
Close-up of a black remote control with a scroll wheel and scroll wheel (no text or symbols visible)
natural_image
Diagram of a battery cell with internal circuitry and labeled terminals (no text or symbols present)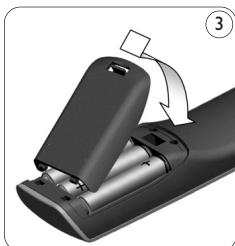
natural_image
Close-up of a black remote control device with a handle and scroll, showing internal components and a numbered arrow indicating motion (no text or symbols present)Only for US - FCC Compliancy
This device complies with Part 15 of the FCC Rules. Operation is subject to the following two conditions:
• This device should not cause harmful interference.
- This device must accept any interference received, including interference that may cause undesired operation.
This equipment has been tested and found to comply with the limits for a Class B digital device, pursuant to part 15 of the FCC rule and ICES 003 in Canada.
These limits are designed to provide reasonable protection against harmful interference in residential installations. This equipment generates, uses, and can radiate radio frequency energy and, if not installed and used in accordance with the instructions, may cause harmful interference to radio communications.
However, there is no guarantee that interference will not occur in a particular installation. If the equipment does cause harmful interference to radio or television reception, which can be determined by turning thee equipment off and on, the user is encouraged to try to correct the interference by using one or more of the following measures:
- Reorient or relocate the receiving antenna.
- Increase the separation between the equipment and receiver.
- Connect the equipment into to an outlet on a different circuit from the receiver.
- Consult the dealer or an experienced radio/TV technician for help.
CAUTION:
User changes or modifications not expressly approved by the party responsible for compliance may void the user's authority to operate the equipment.
Limited one year warranty
Warranty coverage begins the day you buy your product. For one year thereafter, a defective or inoperative product can be returned to the place of purchase and it will be replaced with a new or comparable product at no charge to you. You must have proof of purchase to exchange the product.
This warranty does not extend to the product if damaged or rendered defective because of misuse, accident, unauthorized repair, modification or other cause not within the control of Philips Consumer Electronics.
Replacement as provided under this warranty is the exclusive remedy for the consumer. Philips shall not be liable for any incidental or consequential damages for breach of any express or implied warranty on this product.
Except to the extent prohibited by applicable law, any implied warranty of merchantability for fitness for a particular purpose on this products is limited in duration to the duration of this warranty.
This warranty gives you specific legal rights. You may have other rights which vary from state/province to state/province.
Product specifications may change without prior notice.
Only for Europe - WEEE Regulation
Dutch

Disposal of your old product
Your product is designed and manufactured with high quality materials and components, which can be recycled and reused.
When this crossed-out wheeled bin symbol is attached to a product it means the product is covered by the European Directive 2002/96/EC.
Please inform yourself about the local separate collection system for electrical and electronic products.
Please act according to your local rules and do not dispose of your old products with your normal household waste. The correct disposal of your old product will help prevent potential negative consequences for the environment and human health.
Finnish

- Getting Started 5
- Using Your SRU8015 7
- Getting the Most out of Your SRU8015 9
- Frequently Asked Questions 17
- Need help? 18
- Your Philips Prestigo SRU8015
- What's in the Box
- Overview SRU8015
- Black keys for sending signals to your equipment
- Silver keys for controlling the SRU8015
- Overview Main Menu
- Getting Started
- Prepare
- Note
- Install
- Using Your SRU8015
- Selecting a Device or an Activity
- Selecting a Favorite
- Selecting More Functions
- Getting the Most out of Your SRU8015
- Devices
- Add a Device
- Fix a Key
- Warning
- Copy the Volume
- Notes
- Rename a Device
- Delete a Device
- Activities
- Add an Activity
- Rename an Activity
- Delete an Activity
- Favorites
- Add a Favorite
- Rename a Favorite
- Delete a Favorite
- More Functions
- Add a Function
- Rename a Function
- Delete a Function
- System Settings
- Display Brightness
- Backlight Time-Out
- Key Backlight
- Full Reset
- Language
- Frequently Asked Questions
- Keys
- Brand
- Volume
- Batteries
- Why can I not enter the Setup menu?
- Why does the SRU8015 not wake up anymore?
- Do I loose my data when I replace the batteries?
- Can I use rechargeable batteries with my SRU8015?
- Need help?
- Table des matières
- Première approche
- Préparation
- Ihre Philips Prestigo SRU8015
- Erste Schritte
- Vorbereiten
- Acerca de su Philips Prestigo SRU8015
- Primeros pasos
- Inizio
- Preparazione
- Jouw Philips Prestigo SRU8015
- Aan de slag
- Voorbereiding
- Only for US - FCC Compliancy
- CAUTION:
- Limited one year warranty
- Only for Europe - WEEE Regulation
- Disposal of your old product
Brand : PHILIPS
Model : SRU8015
Category : Universal remote