
Pro FX685E - Lawn mower BABYLISS - Free user manual and instructions
Find the device manual for free Pro FX685E BABYLISS in PDF.
| Product type | Professional hair clipper |
| Brand | BaByliss |
| Model | Pro FX685E |
| Cutting technology | V-Blade with V-cutting angle |
| Blade material | Japanese quality steel |
| Motor | Long-lasting and very powerful motor |
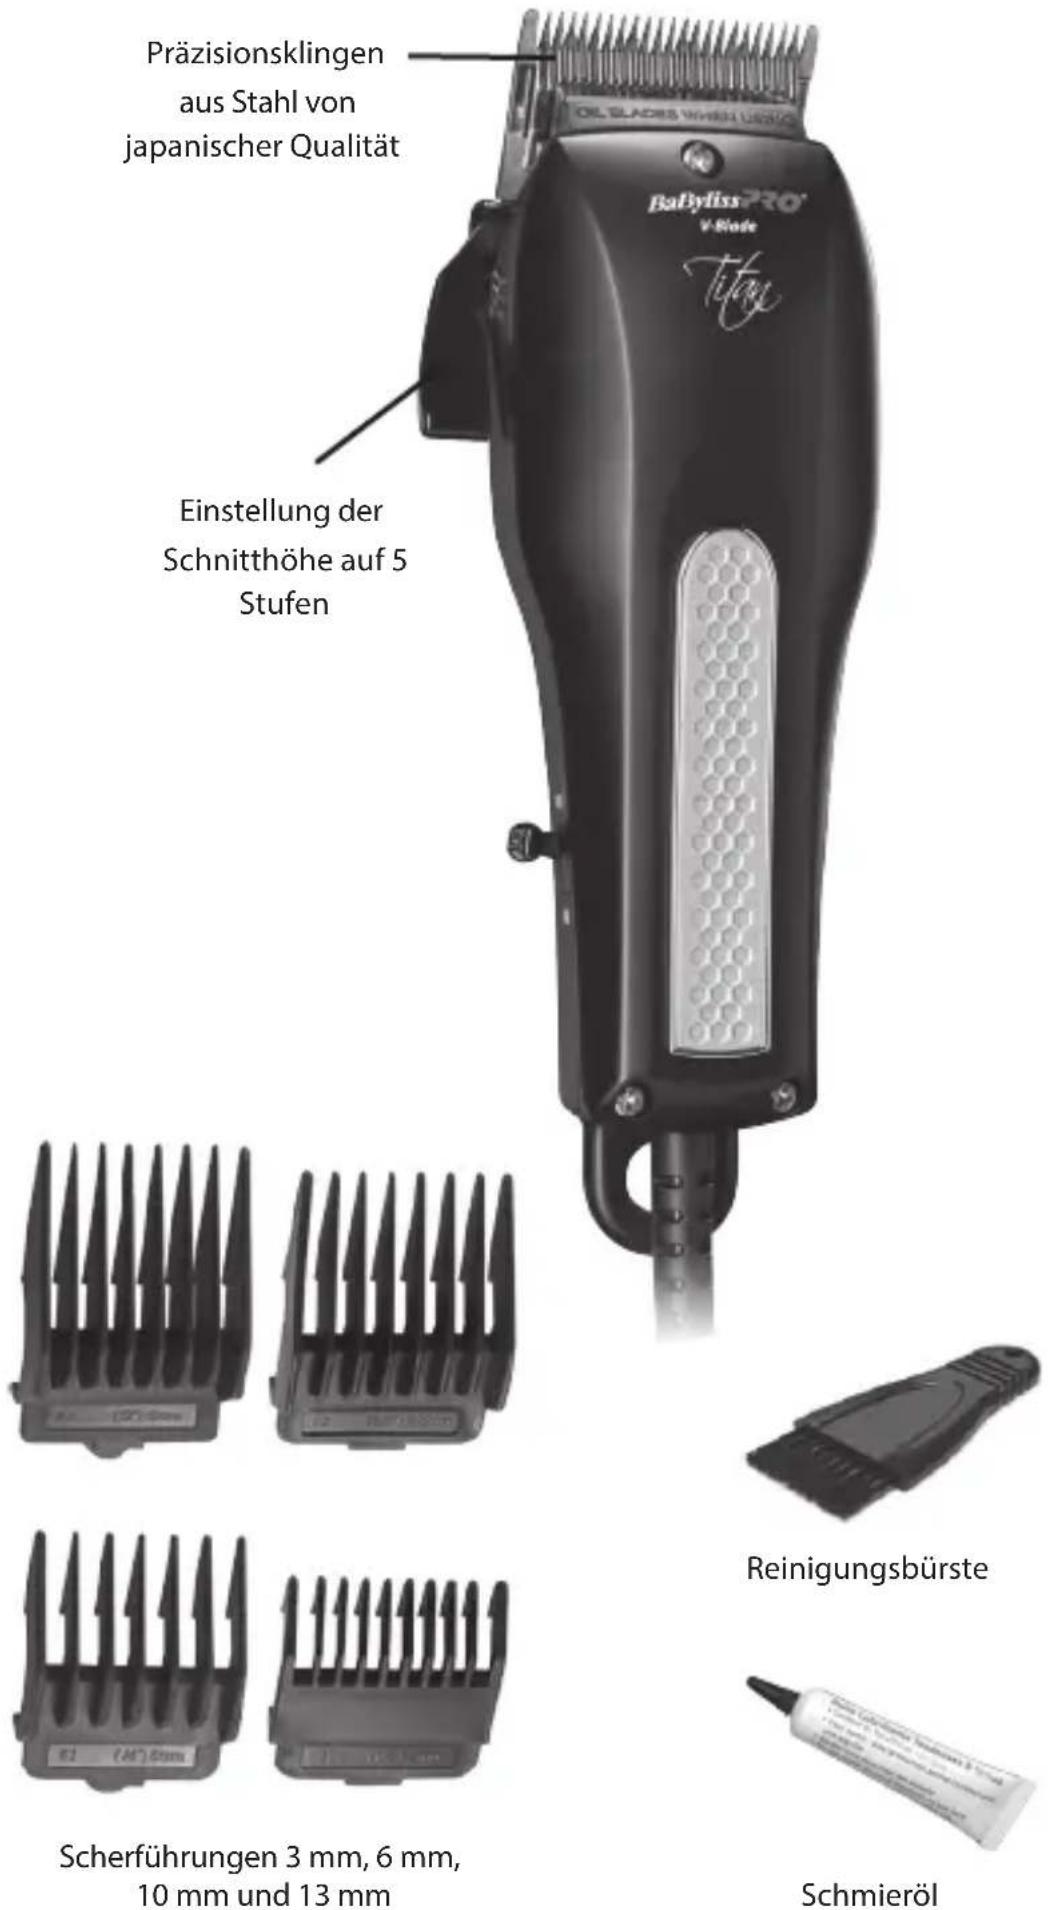
| Included cutting guides | 3 mm, 6 mm, 10 mm, 13 mm |
| Cutting height adjustment | 5 levels (via lever) |
| Control | On/off button I/0 |
| Power supply | Mains (power cable) |
| Input voltage | 100-240 V (automatic adjustment) |
| Included accessories | Lubricating oil, cleaning brush |
| Blade maintenance | Lubricate before each use; regular cleaning with brush |
| Blade replacement | FX685E model: removable blade set, alignment required (1mm offset) |
| Power adjustment | Accessible power and vibration adjustment screw |
| Break-in period | Required for motor (possible sound variation) |
| Warranty | Warranty subject to regular blade maintenance |
| Country of manufacture | Made in China (common estimate) |
Frequently Asked Questions - Pro FX685E BABYLISS
User questions about Pro FX685E BABYLISS
0 question about this device. Answer the ones you know or ask your own.
Ask a new question about this device
Download the instructions for your Lawn mower in PDF format for free! Find your manual Pro FX685E - BABYLISS and take your electronic device back in hand. On this page are published all the documents necessary for the use of your device. Pro FX685E by BABYLISS.
USER MANUAL Pro FX685E BABYLISS
EU DECLARATION OF CONFORMITY
We the undersigned, hereby certify the conformity of the following product:
Type of product : Hair clipper
Type number : T19c
Trademark : BaByliss / BaByliss PRO / Conair / CPL
With following characteristics : 230V~ 50Hz 10W
Country of origin : China
Within the essential requirements of the EU (CE) Directives:
2014/35/EU Low Voltage Directive
2014/30/EU ElectroMagnetic Compatibility Directive
2011/65/EC RoHS Directive
2009/125/EC Ecodesin Directives implemented by the Commission
Regulations (EC) No. 1275/2008 amended by (EU) No.
801/2013 and (EC) No. 278/2009 (where applicable)
2006/42/EC Machinery Directive
In accordance with the following standards
| LVD EN 60335-1 | 2012 | A11: 2014; AC: 2014 | |
| EN 60335-2-8 | 2015 | A1: 2016 | |
| (including EMF) | EN 62233 | 2008 | |
| Ecodesign | EN 50564 | 2011 | |
| EN 50563 | 2011 | ||
| EMC | EN 55014-1 | 2017 | |
| EN 55014-2 | 2015 | ||
| EN 61000-3-2 | 2014 | ||
| EN 61000-3-3 | 2013 | ||
CE mark first affixed: 09/2012
BABYLISS FACO S.P.R.L. (authorised by BABYLISS S.A.R.L. and Conair Group Ltd)
BaByliss FACO s.p.r.l.
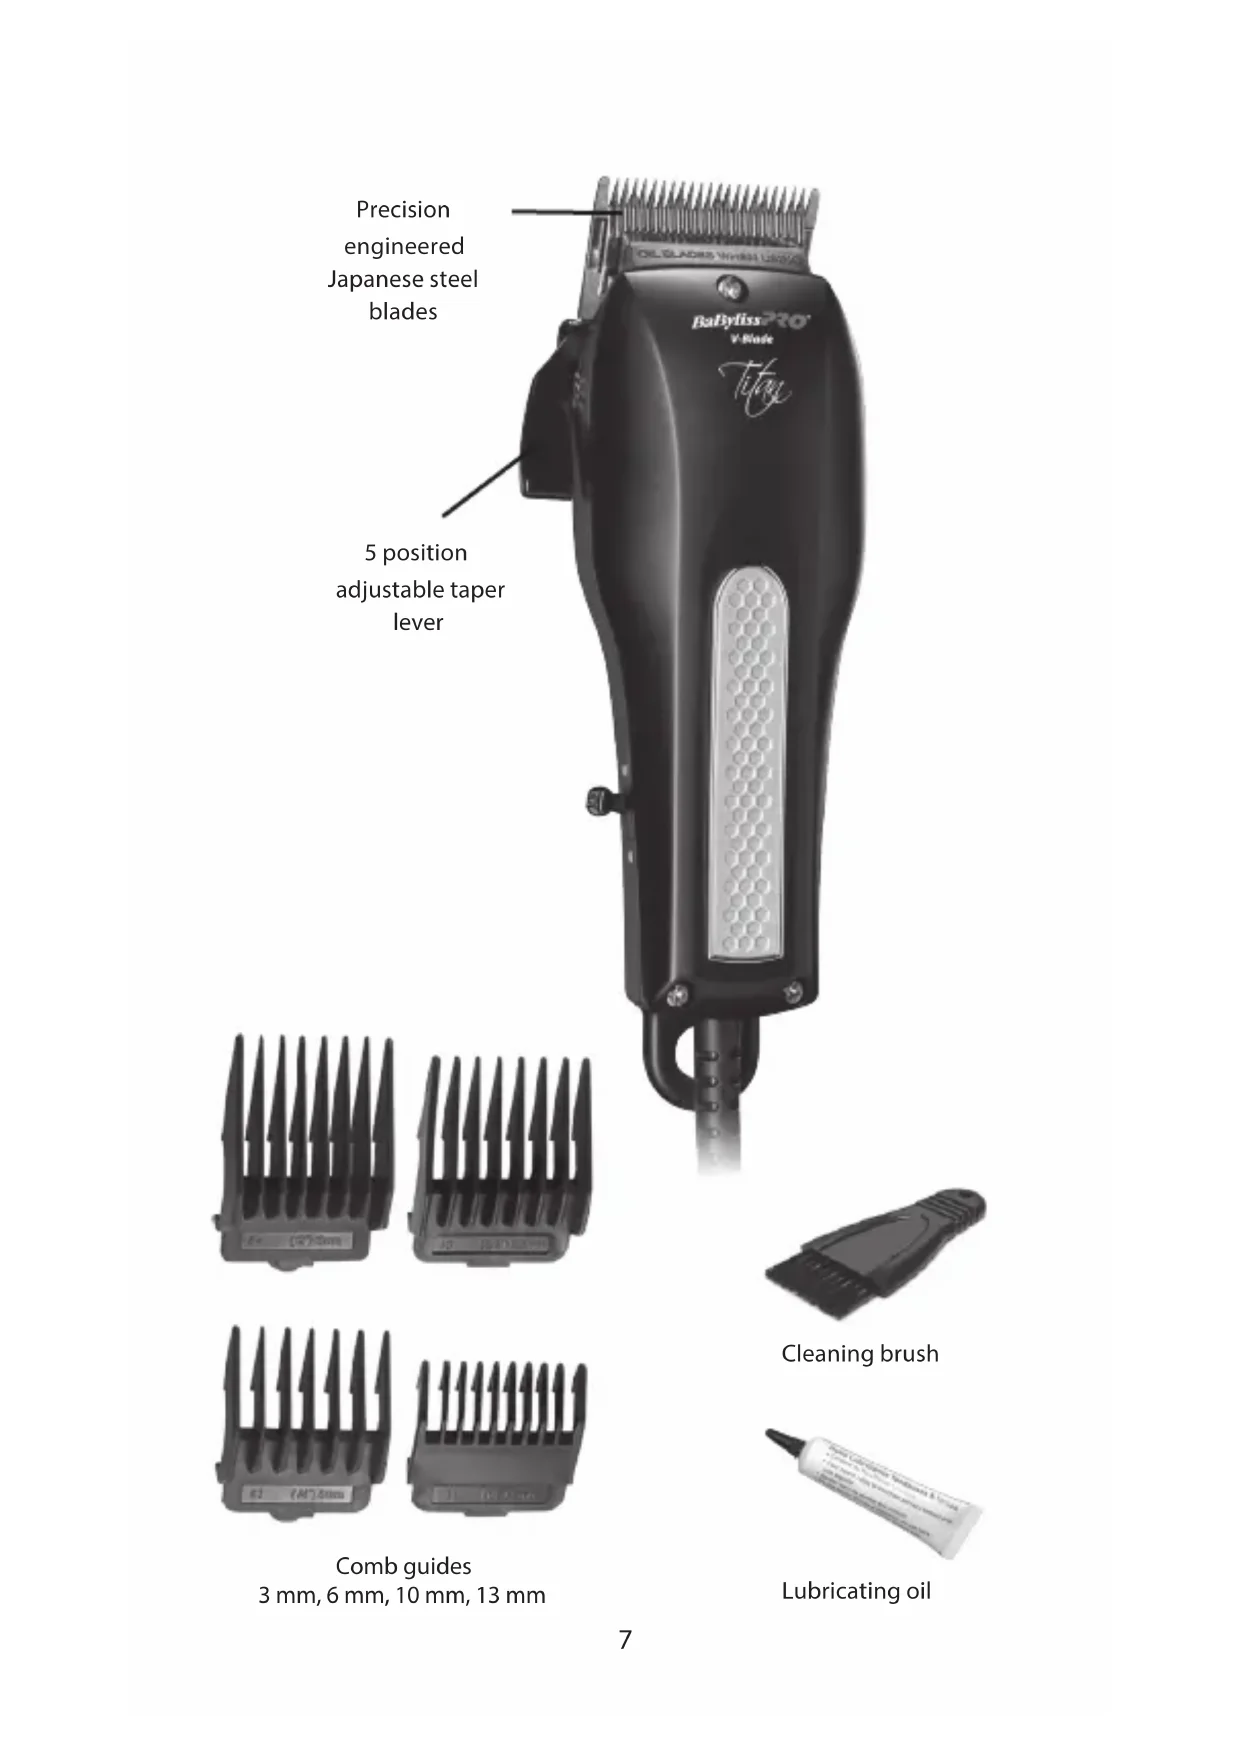
The BaBylissPRO V-Blade Clipper has precision engineered hardened Japanese steel blades that have a unique super sharp V cutting angle for smooth, effortless cutting. This, coupled with a high power long-life motor, delivers truly top performance making it the ultimate in hair clipping.
FEATURES
- Precision engineered Japanese steel blades
High power long-life motor - 3mm, 6mm, 10mm and 13mm comb guides
- 5 position adjustable taper lever
- On/off switch
Lubricating oil - Cleaning brush
OPERATINGINSTRUCTIONS
- Remove the plastic head guard protecting the blade.
- Plug the clipper into electrical outlet; operate on voltage specified for clipper. Push the on/off switch to the 'ON' position.
- Apply 2 to 3 drops of oil across the blades; wipe off any excess with a dry cloth.
- When finished cutting hair remove the trimmings from the blades using the cleaning brush. Wipe the housing with a dry cloth.
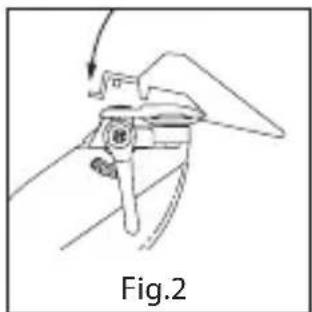
HOW TO USE COMB ATTACHMENTS
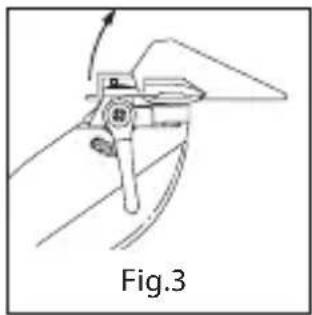
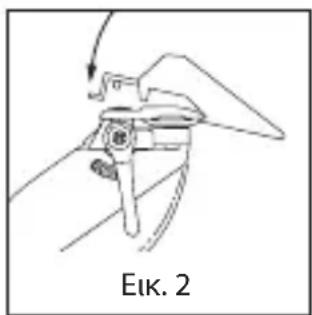
To use comb attachments, turn the clipper to the 'OFF' position.
- Attach combs by holding them teeth up then snapping onto the bottom of the clipper blade (figure 2).
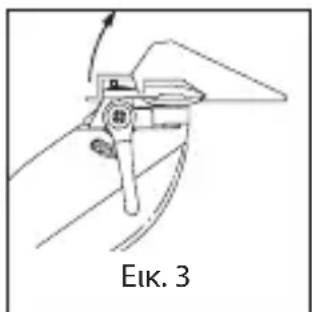
- To remove comb attachments, pull out and up (figure 3).
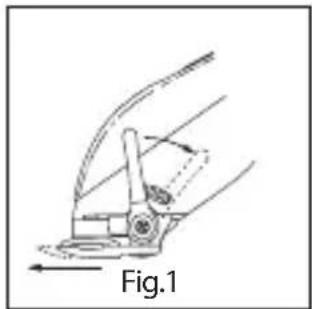
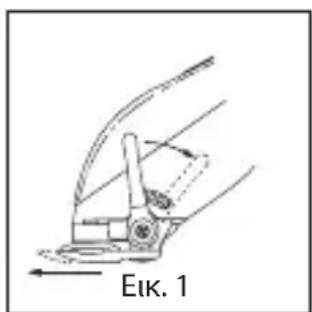
- The taper lever is positioned as shown in figure 1. You can hold the clipper in your hand and adjust the lever at the same time while you are clipping.
- The taper lever adjusts the close
ness of the cut; from a close cut with the taper lever in the up position - to a longer length cut with the taper lever in the down position.
- There are 5 different taper positions to choose from. To increase cutting length, slowly push lever down. To cut closer push the lever up (figure. 1).
- Because a different cutting edge is used in each setting, using the taper lever lengthens the life of your blades. Packed-in hair can slow down any clipper. To remove hair without removing blades, keep the clipper on, and quickly push the taper lever back and forth from close to longer cut several times. If you do this every time, especially after heavy hair cutting, the blades should remain free of hair.
- This quality hair cutting instrument has been manufactured with extreme care. It has been thoroughly tested and inspected before reaching the professional user. As with all precision instruments, there may be a period of "breaking in".
- If the speed of the motor varies, (as indicated in a change in sound or pitch), it may be an indication of a fluctuation in line voltage. Refer to the 'Power & Vibration Screw' section in this booklet for more information on how to maintain optimum performance.
- When the clipper is lubricated and adjusted in accordance with the instructions, it will deliver ample
power and speed for professional hair cutting requirements.
IMPORTANT Blades must be cleaned and oiled on a regular basis for proper functioning. Failure to regularly clean and oil the blades will void the warranty.
Always apply oil to the blades before use. This will ensure maximum cutting performance. With the clipper switched on, away from your body in a downward position, apply oil onto the top of the blade. Turn clipper off and wipe off excess oil with a soft dry cloth.
REPLACEMENT AND REMOVAL OF FX685E BLADE SET
To remove the blade: turn the clipper to the off position and unplug from mains supply.
To replace the blade after removal for cleaning, replacement, or because they are out of alignment:
- Place the moving blade onto the plastic oscillating head.
- Next, you must make sure that the two blades are properly aligned.
- Line up the non-moving blade with the two screw holes.
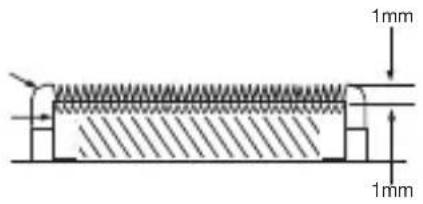
- Replace the original screws, and lightly tighten. Then align the two blades up, point to point, as per figure 4 below.
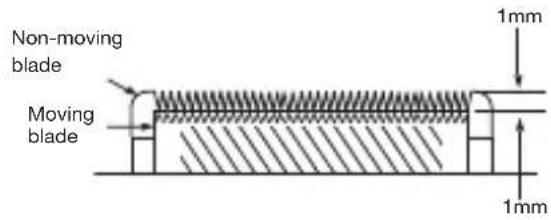
Fig. 4
- The top blade teeth (larger blade) should be 1mm above the bottom blade (smaller cutting blade). This is important so that the clipper does not cut too close, or come in contact with the skin as this may cause injury.
- The extreme left-hand tooth of the top non-moving blade must cover or be to the left of the first small tooth on the moving supply blade.
- Be sure to add a few drops of the oil included with the clipper to the blades before running.
IMPORTANT: You must tighten the screws after the blades have been aligned.
The power & vibration screw permits you to adjust the power of your clipper. You may find it necessary to adjust it to the power supply in your salon regularly to maintain an optimum performance.
DEUTSCH
FX685E
HAARSCHNEIDER V-BLADE PRECISION
MANUTENÇA OAS LÁMINAS
VEDLIKEHOLD AV KNIVENE
UTSKIFTING AV KNIVSETT PÅ FX685E
OAHHIEXPHSE TQN OAHGN KONH
- NaVTote va oβñvete tn ouokéun πριν tooθεtnoεte n βyáλεte evav odnyó kOπnç.
TooTheTne Tov odnyo konnc kpaTuwtaoc ta nawkai katoniv otepewovtac tov oTO xaunlotaepo epoC tnC kepaanc konnc (Eikova 2). - Iα va βγαλετε tov oδηγο κοπής, τραβηξετε tov προς τα εξω και προς τα πάνω (εικόνα 3).
MOXAOPSYOMIZHS TOYMHKOYE KONH
O c pUoTHmCtou nKouc KOnc Eivai tono0eTnuevoc onwc paivetai Otnv Eikova 1. Mnpoeite va aAaZe- TE TO mKOC KOINc EVW KOUPEUEOTE/ UpiEOTE.
MTo KLeiDi pUthetaonc Tou nKouc Konnc mnpeite va KoBete ta aalia TIO maKpia nTIO KovTa Onpwovtac anla to KLeiDi npoc Ta KaTow npoc Ta naVw.
Mnpoov va euiyoyu v nve (5) di afoepetikc baohidec koimuatoc.ia eva nio paakpu koyioo, npwTe to kai apya npoc ta katw. iva nio kovto koyioo, npwTe to kai idipoc ta naivw.
Hxnpon Tou kIeiou puOmuoc tou mKouc konnc 8eAiwvEi Tn diapkeia ZWC twv AINOWV, yati KaTe 0eON xpnoiooi E iia diaqopetikn ywvia konnc.
H Eupiotikn oac mnopeiv a nippauduvte tnv taunta av exouv maZeutei trixc, meoa otic aeidec. Ia va kaapioete tic aeidec xwpi caTc byaalete, kivote to klei di e ypnyopec kivnoic, ano navw npoc ta katw, noaec, opec.
Auro ta tic diatnpnoe ie apiotn kataoan, iiaitepa av xpoiooioite tnv Eupiotik npapa nolu ouxva.
H mynavn autn exi kataokvuaothe i e t n eyautepn npoooxn kai exi anoteleoei avtkeivc eoouc kai IeTTOePOUC eEyxou. Ownc oec oi oukeuec akpiieiac, to potep tn c mnpei va xpeiaetai povtapiqa.
Mia aλayn θεοnc n μia μεtaβoλn tnc taonc μπopeíva πpokaλεοεi anokλion tnc tauxntac, n oioia εκδηλωvetai με μia aλayn tou nyou. Δειτην πa
páypafo «Bida puθμionc tnc ioxuoc Ka tnc dovnong» tnc napouoac on- meiwnc yia nepioootepec nAnpoopoiec oxetiká eTov tpno anoktnonc kautepewv anotelεσumatwv επiodoonc.
H i'avon twv 5eipdwov oupwva tic odnyiec eaoaaizei ma apiotn ano0oon wc npoc tnv loxu kai tnv taxutnta kaohc kai enayyEmuatik aanotelsomuata.
NOAY SHMANTIKH HMEIOsH: Ei- vai aapaitnto va kathetaετe kai va λiaivete tic λenidec taktika wote etoi va εaopalizetai n kaln λietoupyia tnc ouokevnc. H μn εφapuoyn autwv twv odnyiw anotelεi akupwon tnc eyyunong.
SYNTHPHEH TQN AENIADON
AinaiveTcIe iDec npiv aio kaθexpon. Kati TeToIO tha Eaopalioi Tnv apiotn ano0oN KOsiμatoc.
'Exovtac tnv Eupiotikn oE aeitoupyia kai tv Nkepaan npoc ta katw, paia ano oac, pTe upeikec otayovec aiavtko laoi oEvaw upeoc twv eiiodw. 2noTE Tnv Eupiotikn kai okouniote to aloi nou nepiooeue i e eva maakok kai OTeyvo navi.
ANTIKATAZTAH TQN AENIADON TOY MONTEAOY FX685E
Tia va aphaipoeoTe Tnv KepaAln KOInc,
Obnote Tnv Eupiotikn Kai ByaTe Tnv
aTo pEuMa.
Tia va Tn 5e18a nai otn 0eon Tnc uotepa ano kaapioo, avikata- Otaon n aio kakn evapmuoy:
ToioeTnTe Tnv KivouuEvn 5eNiDa oTnv KepaAn aNo to taavteuOevo Paaotiko.
- Katóπiv βεβαiωθείte oτιοι δύo λεπίδες
- exouv ευθυγρμισθεί σωστά.
EuuypaumioTe Tnv kivoueyn Ieia tic duo onec nou npoopiOovta iia tic biδεc.
BαIe TIC βIDEc OTN θEon Touc KAI βIDω-OTε ελαφρωc. KatOniv EUθuypaμiOTe TIC Duo λεπIDec, σημεio πooc σημεio, σuμφωva μe Tnv πapakatw Eikóva 4.
YTO6bI yCTaHOBNTb Ha MeCTO Je3BnRA NO-CNE OUHCTKN, 3aMeHb IIN NIO pNUnHe HeTOuHOrO COBMeUeHN, NOcTyNaTe CNeDyUoUIM O6pa3OM:
- UCTaHOBnte NOdBnXHoe Je3Bne Ha
Пл actmacCOByIO Kone6NIOUcYIOcR - IOBky.
3aTeM y6eIntecb B TOM, UTO 06a ne3 -Bnra TOUHO BbIPaBHeHbl. - BbipabHnTe noBnXHoeJe3Bne no OTHOseHIO K DByM OTBepCTnM dIa BNHTOB.
- YCTaHOBnTe Ha MecTo BnHTbI OT MaMHNKn N CJIeRka 3axMnte nx. Pocne 3TOrO BblPOBnTe 06a Je3Bn, Wa3a WArOM, KaNn3o6paXeHo Ha cNeDy -IOUem dAnee pucynke 4.
Pevna Čepel
Pohybliva cepel
Pnc.4
3y6uKn BepxHero ne3Bn (6oJee shpOKoro)doJXhbl BbICTynatb Ha 1 MM Hnd 3y6uKamn HxHero ne3Bna (noDbNxoHoe ne3Bne, 6oJee y3Koe). 3TOT MOMENT NCKJIQUHTeNbHO BaJeh, TaK KaK OH NO3BOJReT MaunHke He O6pe3aTB BOLOcbl CnIuKOM KOpOTKO n He npNKacTbcra K KOKe, qTO6bl He npaHNTb ee.
3y6uk,paonoloxeHHbIcJeBOro Kpar BepxHrO HeNoDnXHOrO Je3BnA,doJKeH nepeKpbBaTb NIN BblCTynatb CneBa OT nepBOrO 3y6uKa NOdBnXHOrOJe3BnA.
He 3a6ydbTe HaHeCTn HeCKoNbKO Ka- neIb MacJa dIЯ CMa3Kn IpePeKKaKdIbIM NOpb3OBaHNeM MaUnHKoJ dJIa CTpNxKn.
OBPATNTE BHIMAHNE: nocne TOrO, KaK 6yDyT BbIpaBHeHbI Ne3BnR, Heo6XODIMO TtateNtBHO 3aTaNHTb BNHTbl.
BNUHT PEGYINPOBKN MOUHOCTN IN BUNPAUIN
DaHHbI BnHT npedHa3NaueH dIypeRy- InpOBKn MOUHOCTN MaunHKn, a CJIeIOBaTeNbHO, n ypOBH eE Bn6paCNI. KaKDbI NOB3OBaTeNb MoKeT OTpeRy - InpOBaTb 3TN napamETpbI NO CBOEmy XeJAHIO, a TAKKe B 3aBNCIMOCTN OT XapaKTepNCIK 3NeKTPnuYeCKORo TOKa B NapIKMaxepcKOM caIoHe, TaKIM O6 - pa3OM, YTO6bl NODepXINBaTb MaunHKy Ha ONTMaJIbHOM ypOBHe pON3BO-DNTeNbHOCTN.
MaunHka nla ctpnKKn
ПОНЗВОДИТЕЛ: BABYLISS SARL
99 ABeHIO ApnCTnIbpnAH
92120, MoHpyK, ΦpaHcπa
ΦaKc 33 (0) 146564752
CdelaHO B Kntae
