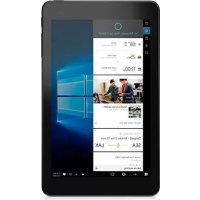
Venue 5855 - Tablet DELL - Free user manual and instructions
Find the device manual for free Venue 5855 DELL in PDF.


| Product type | Tablet |
| Brand and model | Dell Venue 5855 (Venue 8 Pro 5855) |
| Dimensions | 216 mm (height) x 130 mm (width) x 9.45 mm (depth) |
| Weight | 0.395 kg (Wi-Fi) / 0.405 kg (WWAN) |
| Display | 8-inch TFT LCD, WXGA (1280x800) or WUXGA (1920x1200) resolution, 400 nits brightness |
| Processor | Intel Cherry Trail-T Z8500 |
| RAM | 2 GB or 4 GB LPDDR3 |
| Internal storage | 32 GB or 64 GB eMMC |
| Wi-Fi connectivity | Dual-band 802.11b/g/n/ac |
| Bluetooth | Bluetooth 4.1 LE |
| Front camera | FHD fixed focus (1920x1080 video, 2.1 MP photo) |
| Rear camera | 5 MP autofocus (1920x1080 video, 2592x1944 photo) |
| Battery | Rechargeable, charging time 4 to 5 hours |
| Power | USB-C adapter 5V 2A (100-240V, 50-60Hz) |
| Ports | 1 USB Type-C (USB 3.0 and power), 1 headphone/microphone combo jack, 1 microSD card slot, 1 micro-SIM card slot |
| Operating system | Windows 8.1 or Windows 10 |
| Sensors | NFC (optional) |
| Care and cleaning | Clean with a soft, lint-free cloth dampened with water or screen cleaner |
| Safety | Read the safety information provided with the tablet before use |
Frequently Asked Questions - Venue 5855 DELL
User questions about Venue 5855 DELL
0 question about this device. Answer the ones you know or ask your own.
Ask a new question about this device
Download the instructions for your Tablet in PDF format for free! Find your manual Venue 5855 - DELL and take your electronic device back in hand. On this page are published all the documents necessary for the use of your device. Venue 5855 by DELL.
USER MANUAL Venue 5855 DELL
Regulatory Model: T03D
Regulatory Type: T03D001
Notes, cautions, and warnings

NOTE: A NOTE indicates important information that helps you make better use of your tablet.

CAUTION: A CAUTION indicates either potential damage to hardware or loss of data and tells you how to avoid the problem.

WARNING: A WARNING indicates a potential for property damage, personal injury, or death.
Copyright © 2015 Dell Inc. All rights reserved. This product is protected by U.S. and international copyright and intellectual property laws. Dell™ and the Dell logo are trademarks of Dell Inc. in the United States and/or other jurisdictions. All other marks and names mentioned herein may be trademarks of their respective companies.
Contents
Features 5
Setting up your tablet. 8
Charging the tablet. 8
Power and battery-charge status light behavior 9
Power and battery-charge status light icons. 10
Turning on your tablet. 10
Inserting a micro-SIM card. 11
Removing the micro-SIM card. 12
Inserting a microSD card. 13
Removing the microSD card. 14
Using headphones. 15
Using your tablet. 17
Turning off your tablet. 17
Using the power button on the Start screen. 17
Using the power button. 17
Turning off the screen. 17
Using the power button on the Start screen. 17
Using the power button. 17
Start screen. 17
Wi-Fi 18
Turning Wi-Fi on or off 18
Connecting to a network. 18
Mobile broadband setting. 18
Bluetooth 19
Turning Bluetooth on or off 19
Pairing with Bluetooth-enabled devices. 19
Screen orientation. 19
Locking or unlocking the screen orientation. 19
Adjusting screen brightness. 20
Auto adjust. 20
Synchronizing your tablet. 20
Restoring your operating system 21
Resetting your tablet 21
Gestures 21
Troubleshooting 24
Battery problem 24
Network problem 25
Touchscreen problem 26
System problem 26
EnteringBIOSsetupprogram. 28
With keyboard 28
Without keyboard 28
Specifications. 29
Getting help 33
Self-help resources. 33
Contacting Dell. 34
Locating your Service Tag and Express Service Code.... 35
Features

Feature
- Camera-status light Turns on when the front camera or rear camera is in use.
- Front camera Allows you to capture photos, and record videos.
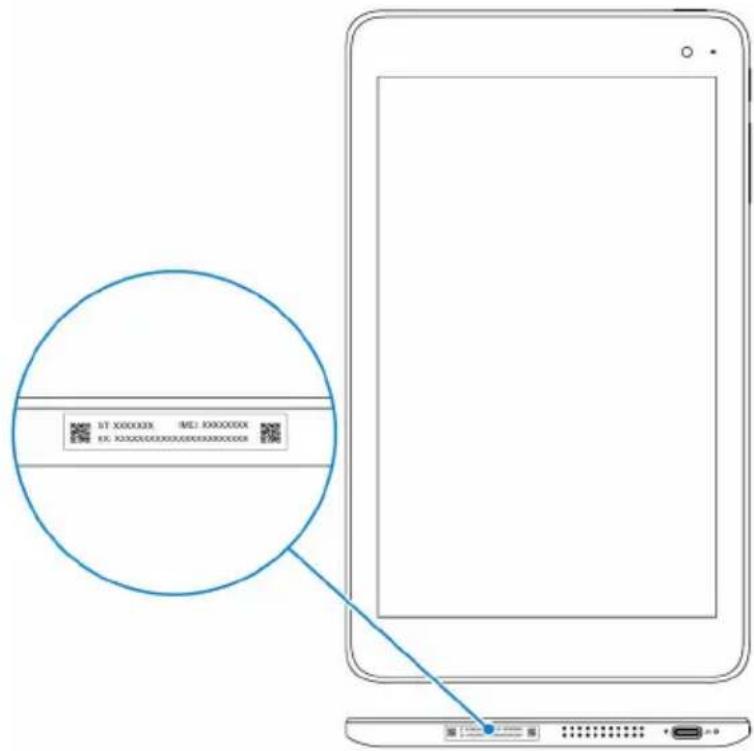
- Service Tag label Provides the Service Tag and Express Service Code needed when contacting Dell.
- Speaker Provide audio output.
- USB 3.0 and power-adapter port (USB-C)
Connect a power adapter to provide power to your tablet and charge the battery. Connect peripherals such as storage devices, printers, displays and
Feature
so on. Provides data transfer speeds up to 5 Gbps.

NOTE: You need to use converters (sold separately) to connect standard USB, HDMI, and DisplayPort devices.
- Power and battery-charge status light
Indicates the power-state and the battery-charging status of the tablet. - Micro-SIM card slot Insert a micro-SIM card to connect to a mobile broadband network.
- microSD card slot Insert a microSD card to expand the tablet's storage capacity. Your tablet supports a microSD card with capacity up to 128 GB.
- Microphone Provides sound input for audio recording, voice calls, and so on.
- Volume-control buttons (2) Press to increase or decrease the volume.
- Windows button
- Press to open the Windows Start screen.
- Press for quick access to the most recently used app or most recently used screen.
- NFC-sensor area (optional) Near Field Communication feature allows you to share files wirelessly with other NFC-compatible devices.
- Rear camera Allows you to capture photos, and record videos.
- Power button
- Press and hold for 2 seconds to turn on the tablet if it is turned off.
- Press to turn on the tablet if it is in sleep state.
- Press to put the tablet in sleep state if it is turned on.
Feature
- Headset port Connect a headphone, a microphone, or a headphone and microphone combo (headset).

WARNING: Before you begin any of the procedures in this section, read the safety information that shipped with your tablet. For additional best practices information, go to www.dell.com/ regulatory_compliance.
Charging the tablet
CAUTION: Charge the battery in an ambient temperature of 0^ to 35^ (32°F to 95°F).
CAUTION: Use only the supplied power adapter to charge your tablet. Using unauthorized power adapters or cables may severely damage your tablet.
NOTE: The battery may not be fully charged when you unpack your tablet.
1 Connect the power cable into the power adapter.
2 Connect the power adapter to the power-adapter port on the tablet.
3 Connect the power adapter to an electrical outlet and charge the tablet until the battery is fully charged.
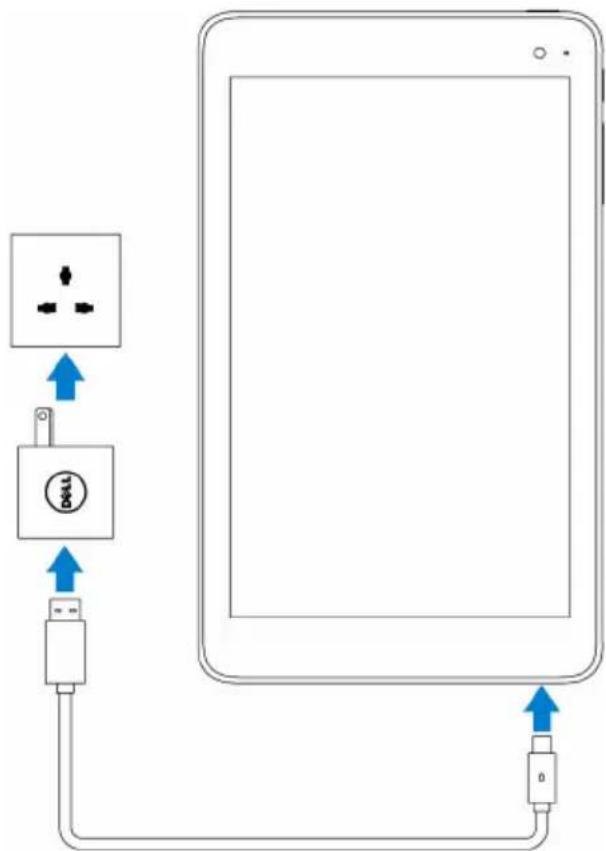

NOTE: A fully discharged battery takes about 4 to 5 hours to fully charge.
Power and battery-charge status light behavior
You can check the power and battery-charge status from the battery-charging status light or the battery icon displayed at the bottom of the Windows desktop:
Behavior
Description
Solid white Battery is getting charged.
Solid amber Battery charge is critically low and the tablet is off.

NOTE: If you try turning on the tablet when the battery charge is critically low and the battery is insufficiently charged, the Dell logo flashes on the screen, the battery-charging status light illuminates for 2 seconds, and then the tablet turns off.
Off Battery is not getting charged or battery is fully charged.
Power and battery-charge status light icons
Icon Description

Tablet is connected to a power supply and the battery is fully charged.

Tablet is connected to a power supply and the battery is getting charged.

Tablet is running on the battery power and the battery is discharging.

Tablet is running on the battery power and the battery charge is low.

Tablet is running on the battery power and the battery charge is critically low.
Turning on your tablet
When you turn on the tablet for the first time, you must finish Windows setup to start using your tablet. For more information, see the Quick Start Guide that shipped with your tablet.
1 Press and hold the power button for 2 seconds to turn on your tablet. The lock screen appears.
2 Swipe up from the bottom of the display to switch to the login screen select your account and enter your password to log in to Windows.

NOTE: If the login screen is not enabled, the Start screen appears when you swipe up on the lock screen.
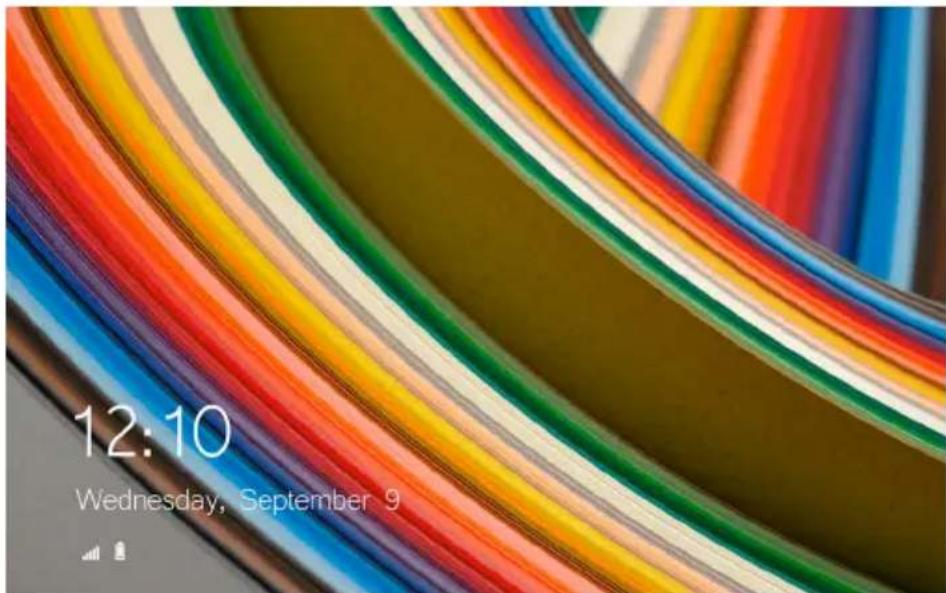
The tablet is ready for use when the Windows Start screen is displayed.
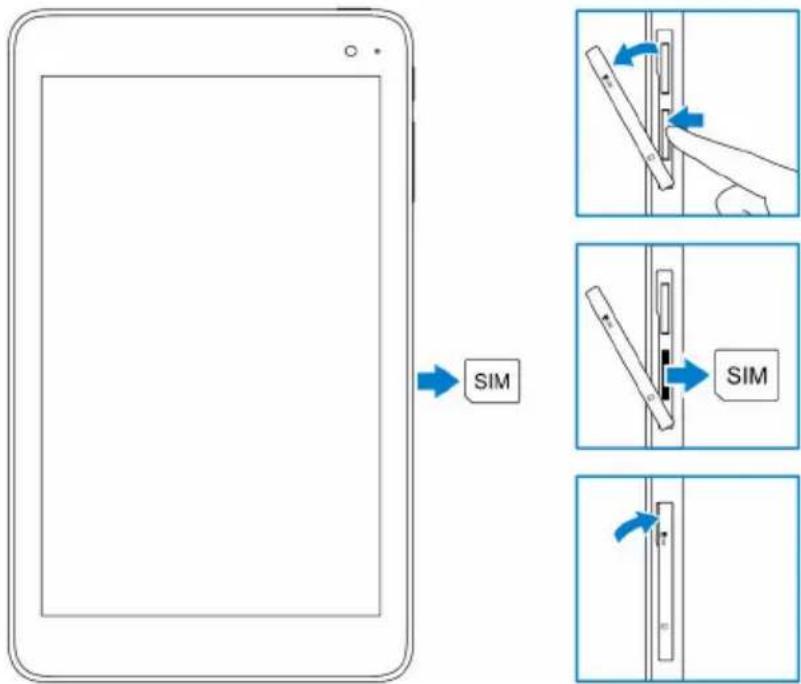
Inserting a micro-SIM card
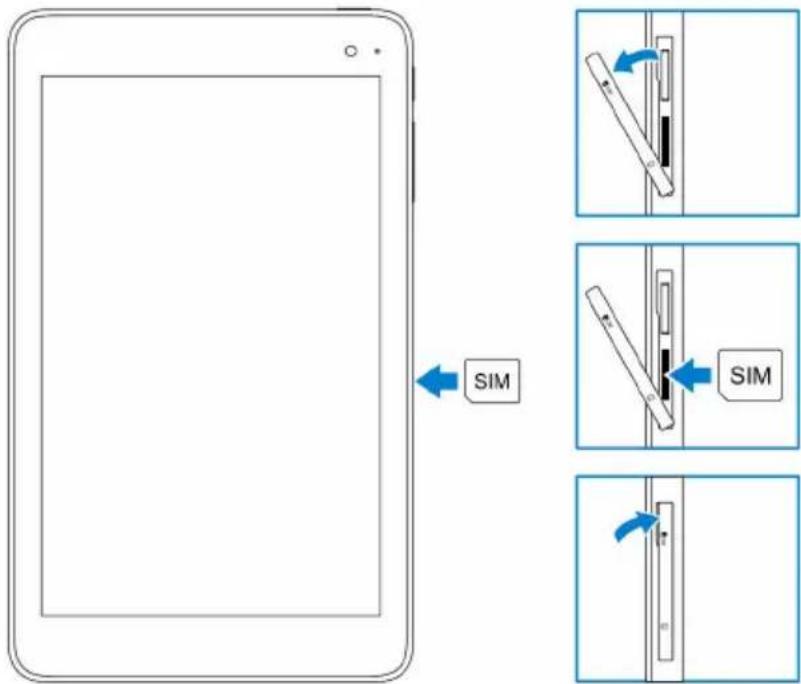
1 Open the slot cover and locate the micro-SIM card slot.

CAUTION: Ensure that the micro-SIM card is aligned as shown in the image.
2 Insert the micro-SIM card into the card slot until it locks into place.
3 Close the slot cover.
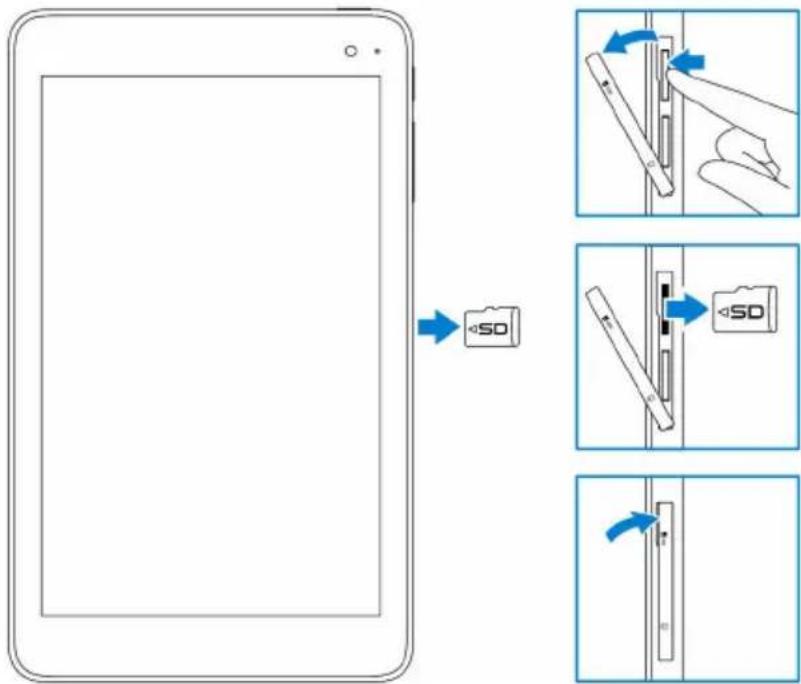
Removing the micro-SIM card

CAUTION: Removing the micro-SIM card while it is in use may cause data loss or result in application errors.
1 Open the slot cover.
2 Press the micro-SIM card inward and release it.
The micro-SIM card pops out.
3 Slide the micro-SIM card out of the slot.
4 Close the slot cover.
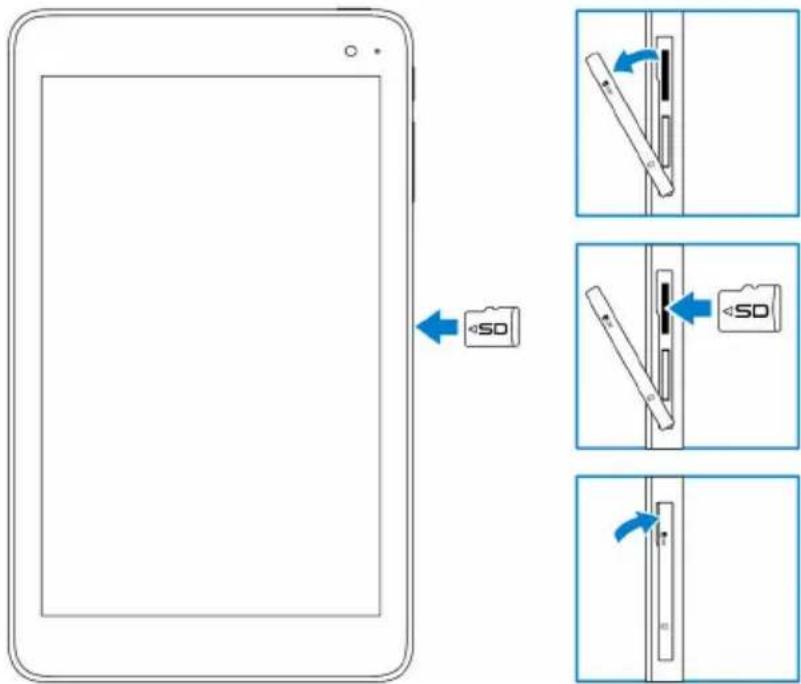
Inserting a microSD card

NOTE: Turn off your tablet before inserting the microSD card.
1 Open the slot cover and locate the microSD card slot.

CAUTION: Ensure that the microSD card is aligned as shown in the image.
2 Insert the microSD card into the card slot until it locks into place.
3 Close the slot cover.
Removing the microSD card

CAUTION: Removing the microSD card while it is in use may cause data loss or result in application errors.
1 In the notification area at the bottom-right corner of the Windows
desktop, tap (Safely Remove Hardware and Eject Media).

NOTE: If you do not see Safely Remove Hardware and Eject Media, tap Show hidden icons to display all icons in the notification area.
2 Tap Eject SD Memory Card. A message appears confirming that the
microSD card can be safely removed.

NOTE: If a warning message appears stating the microSD card cannot be removed, ensure all data transfers involving the microSD card are complete.
3 Open the slot cover.
4 Press the microSD card inward and release it.
The microSD card pops out.
5 Slide the microSD card out of the slot.
6 Close the slot cover.
Using headphones

WARNING: Listening to loud audio for an extended period of time can lead to hearing loss.
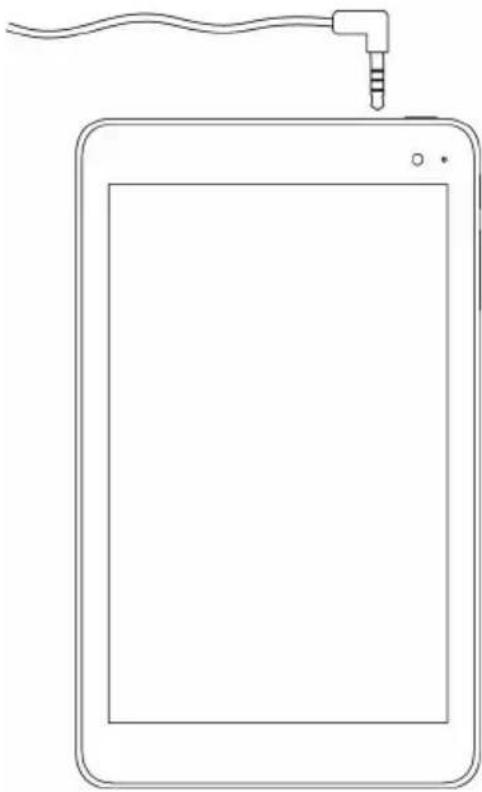
You can connect a headset, headphones, microphone, or other audio equipment to the headset port of your tablet.
1 Connect headphones to the headset port on the tablet.
2 Insert the earphones in your ears and adjust the volume to a comfortable level.

CAUTION: To prevent damaging your headphones when disconnecting it from the tablet, pull the connector and not the cable.

NOTE: When you connect an audio device to the headset port, the integrated speaker on your tablet is muted automatically.

NOTE: For detailed information on using Windows, see Getting help.
Turning off your tablet
Using the power button on the Start screen
1 Tap Start.
2 Tap the power button Shut down to turn off the tablet.
Using the power button
1 Press and hold the power button for at least 4 seconds.
2 Swipe down the shut-down confirmation screen to turn off the tablet.
Turning off the screen
Using the power button on the Start screen
1 Tap Start.
2 Tap the power button Sleep to turn off the screen.

NOTE: If your tablet is in a standby state, press the power button or Windows button to turn on the screen.
Using the power button
Press the power button to turn off the screen.
Start screen
The Start screen displays tiles that act as shortcuts to installed apps.

NOTE: You can disable or enable tablet mode using the icon in the Action center. You can also choose to automatically switch to PC mode when the tablet is docked. When in PC mode, the Start screen is replaced by the Start menu. To learn more about using Windows, see Getting help.
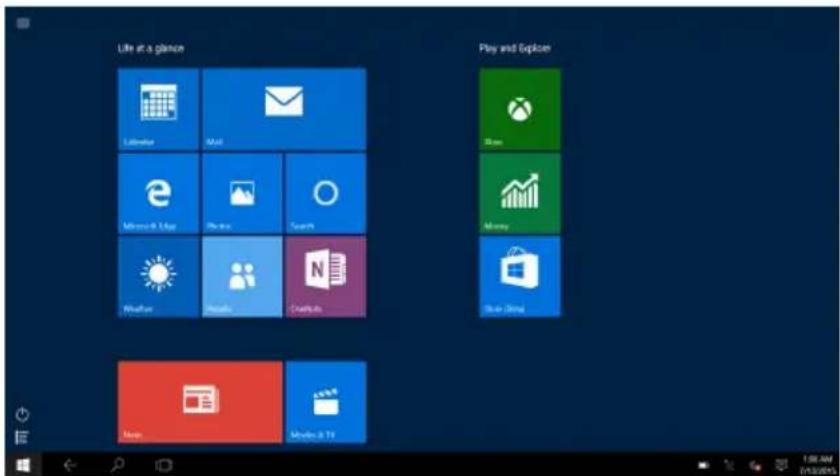
Tiles on your Start screen change and update in real time to show news and sports updates, weather updates, social-networking feeds, and so on.
You also can customize the Start screen by pinning your favorite apps as tiles, setting your favorite picture as a wallpaper, and so on.
Wi-Fi
Turning Wi-Fi on or off
1 Swipe-in from the right edge of the display to access the Action Center.
2 Tap to turn Wi-Fi on or off.
Connecting to a network
1 Tap Wi-Fi icon in the bottom-right corner of the screen.
2 In the list of available networks, tap the network you want to connect to, and then tap Connect.
Mobile broadband setting
1 Tap Network in the bottom-right corner of the screen.
2 Under Cellular tap your mobile broadband carrier and then tap Connect .
3 In the advanced options tap Connect.
Bluetooth
Turning Bluetooth on or off
1 Swipe-in from the right edge of the display to access the Action Center.
2 Tap Bluetooth to turn Bluetooth off or on.
Pairing with Bluetooth-enabled devices

NOTE: Bluetooth connection between your tablet and Apple devices are not supported.
1 Turn on Bluetooth. For more information, see Turning on/off Bluetooth.
2 Swipe-in from the right edge of the display to access the Action Center.
3 Press and hold Bluetooth 串 and then tap Go to settings.
4 From the list of devices, tap the device you want to pair with and tap Pair.
5 If needed, verify that the Bluetooth passcode that appears on both the tablet and the Bluetooth-enabled device are the same.
6 Confirm the pairing process on both the tablet and device.

NOTE: After a device is successfully paired with the tablet, it automatically connects with the tablet when Bluetooth is enabled on both tablet and device and they are in Bluetooth range.
Screen orientation
For optimal viewing experience, the screen orientation changes automatically to portrait or landscape depending on how you hold the tablet. You can disable automatic screen rotation and lock the screen in portrait or landscape mode.

NOTE: Some apps may not support automatic screen rotation and are designed to work only in one orientation.
Locking or unlocking the screen orientation
1 Swipe-in from the right edge of the display to access the Action Center.
2 Tap to lock or unlock the screen orientation.
Adjusting screen brightness
1 Swipe-in from the right edge of the display to access the Action Center.
2 Tap the brightness icon to adjust the screen brightness.
Auto adjust
To enable or disable automatic screen brightness adjustment:
1 Swipe-in from the right edge of the display to access the Action Center.
2 Tap All Settings System Display.
3 Use the Adjust my screen brightness automatically slider to enable or disable automatic-brightness adjustment.
NOTE: You can also use the Brightness level slider to adjust the brightness manually.
Synchronizing your tablet
When you use your Microsoft account to sign in to devices, the settings such as Windows and app settings and personal files are automatically synchronized.

NOTE: To synchronize, the devices must be connected to the internet. If you are using a local account, switch to a Microsoft account to enable
synchronization. On the Settings screen, tap Accounts On the Accounts screen, tap Manage my Microsoft Account to switch to your Microsoft account.
To customize the synchronizing settings:
1 Swipe-in from the right edge of the display to access the Action Center.
2 Tap All settings
3 On the Accounts screen, tap Sync your settings to see the options for synchronizing your data and settings.
Restoring your operating system
You may need to reinstall the operating system if your tablet is not responding, behaving unexpectedly, or has other software-related issues. You can choose to save your personal files while restoring or you can return the operating system in the state you received it from Dell.
Resetting your tablet

CAUTION: Back up all the required data before you proceed.
You can either reset your tablet to restore it to the state you received it or you can choose to retain your files.
1 Swipe-in from the right edge of the display to access the Action Center.
2 Tap All Settings Update and Security Recovery.
3 Under Reset this PC, tap Get started.
4 Choose either Keep my files or Remove everything.

NOTE: The option Keep my files removes apps and settings, but keeps your personal files. The option Remove everything removes all of your personal files, apps, and settings.
5 Follow the instructions on the screen.
Gestures
Gestures Functions
Touch
Tap gently on the display with your fingertip.
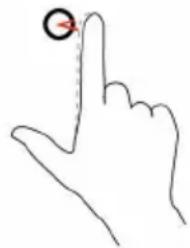
Touch and hold
- Select items on the screen including options, entries, images, and icons.
- Start applications.
- Touch buttons on the screen.
- Input text using the on-screen keyboard.
- Display detailed information about an item.
Gestures Functions
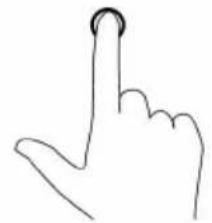
Touch and hold your finger on the display.
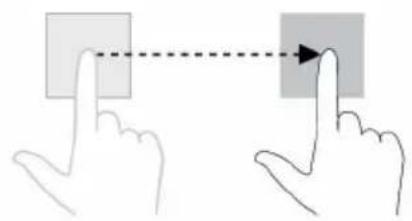
Drag
1 Touch and hold your finger on an item on the screen.
2 Keeping your finger in contact with the display, move your fingertip to the desired location.
3 Take your finger off the display to drop the item in the desired location.
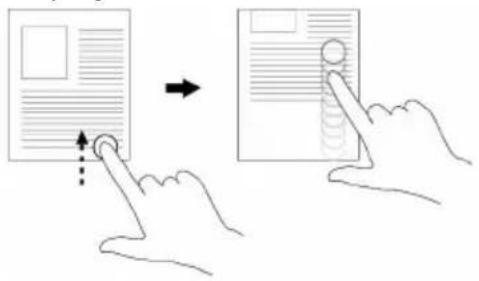
Swipe or slide
Move your finger in a vertical or horizontal direction on the display.
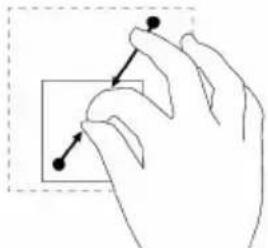
Zoom in
Touch the display with two fingers and then move the fingers apart.
- Open the context menu of an item to perform further actions.
Move items such as images and icons on the screen.
- Scroll through the Start screen, web pages, lists, entries, photos, contacts, and so on.
- Close an application (Swipe the application to the bottom of the display).
Enlarge the view of an image or web page.
Gestures Functions

Zoom out
Touch the display with two fingers and then move the fingers closer.
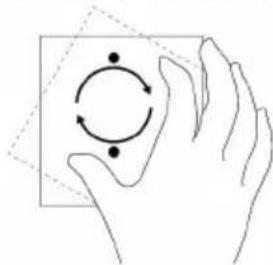
Rotate
Touch the display with two or more fingers and then move the fingers in a clockwise or counter-clockwise arc.
Reduce the view of an image or web page.
Rotate an object by 90 degrees.
Battery problem
Problems Possible causes Possible solutions
Battery does not charge The cable connections may be loose.
1 Check the cable, connectors, and power adapter to ensure proper connectivity.
2 Verify that the wall outlet is functioning by connecting another device.
The tablet's temperature is below 0^ (32^) or higher than 35^ (95^) .
Charge the battery in an ambient temperature between 0^ to 35^ (32^ to 95^)
The battery or power adapter is damaged.
Contact Dell. See Contacting Dell.
Battery does not charge when the battery charge is at 95% to 99%
The battery is in maintenance mode to prolong battery life.
- Let the battery drain until the battery charge drops below 95% .
- Restart the tablet. See Turning off your tablet and Turning on your tablet.
Battery drains quickly even when the tablet is in standby mode
If the tablet is not in the range of a network it can connect to, the tablet continues to try to locate a base station and drains the battery.
- Temporarily turn off the tablet.
- Move the tablet in range of a network it can connect to or temporarily turn off the wireless connection on your tablet.
- Disable Wi-Fi or mobile broadband
when not in range of any wireless networks.
- Enable airplane mode.
Battery charge values are not accurate
Battery is fully charged (battery charge is at 100% but the battery-charging status light is on
Battery charge jumps from 90% to 100% when the battery is charging
Move the tablet in range of a network it can connect to or temporarily turn off the wireless connection on your tablet.
-
Press and hold the power button for 10 seconds to forcefully turn off the tablet, and force the system to obtain a new reference point for the battery charge value (do not follow the regular Windows shutdown process).
-
Perform a full battery charge/ discharge cycle to recalibrate the battery charge value by charging the tablet until the battery is fully charged and run the battery power until the tablet shuts itself down.
Network problem
Problems
No wireless connection
Slow internet connections
Unable to pair with a Bluetooth device
Possible causes Possible solutions
-
Check if the wireless radio is on. See Wi-Fi.
-
Try to get closer to the wireless access point.
The signal strength is not strong enough.
Contact your internet service provider (ISP).
-
Ensure Bluetooth is enabled on both the tablet and the device you are trying to pair with.
-
Ensure they are within Bluetooth range.
Touchscreen problem
Problems Possible causes Possible solutions
Touchscreen responds slowly or improperly
The screen is dirty.
- A protective cover may prevent the tablet from recognizing your inputs.
- Moisten a soft, lint-free cloth with either water or a display cleaner, and wipe the surface of the tablet until it is clean. Do not allow water from the cloth to seep down to the tablet ports or buttons.
- Moisten a soft, lint-free cloth with either water or a display cleaner, and wipe the surface of the tablet until it is clean. Do not allow water from the cloth to seep down to the tablet ports or buttons.
System problem
Problems
Tablet does not turn on
Possible causes Possible solutions
The battery is completely discharged.
- Charge the tablet for at least 4 hours.
- Press and hold the power button for 2 seconds.
Tablet does not turn off Press and hold the
power button for 10 seconds to forcefully turn off the tablet.
Tablet locks up Press and hold the
Tablet is not responding or behaving unexpectedly
Tablet cannot boot into Windows
Software or feature is not working as expected
power button for 10 seconds to forcefully turn off the tablet.
- Restart the tablet. See Turning off your tablet and Turning on your tablet.
- Refresh the tablet. See Restoring your operating system.
Contact Dell's support service. Go to www.dell.com/ contactdell.
Software updates may have been downloaded in the background. Restart your tablet.
Entering BIOS setup program
With keyboard
1 Connect your tablet to the keyboard dock or connect a USB enabled keyboard to your tablet.
2 Press the power button to turn on your tablet.
3 When the Dell logo appears, press F2.
Without keyboard
1 Press the power button to turn on your tablet.
2 Press and hold the Volume Up button when the Dell logo appears on the screen.
3 When the F12 boot selection menu appears, select BIOS Setup using the Volume Up button.
4 Press the Volume Up button to enter BIOS setup program.
Specifications
| Dimensions and weight | |
| Height 216 mm (8.50 in) | |
| Width 130 mm (5.11 in) | |
| Depth 9.45 mm (0.37 in) | |
| Weight (maximum): WiFi 0.395 kg (0.87 lb) WWAN 0.405 kg (0.89 lb) | |
| System information | |
| Processor Intel Cherry Trail-T CPU Z8500 | |
| Operating system | • Windows 8.1 • Windows 10 |
| RAM LPDDR3 | |
| Storage | • 32 GB eMMC • 64 GB eMMC |
| Memory | |
| Type LPDDR3 | |
| Speed 1600 MHz | |
| Configurations supported 2 GB and 4GB | |
| Ports and connectors | |
| Audio One headset port (headphone and microphone combo) | |
| microSD card One microSD-card slot | |
| micro-SIM card One micro SIM-card slot | |
Ports and connectors
USB One USB Type C
Communications
Wi-Fi Dual-band 802.11b/g/n/ac
Bluetooth Bluetooth 4.1 LE
Display
| 8" WXGA 8" WUXGA | ||
| Type TFT LCD (Wide View Angle Technology) | TFT LCD (Wide View Angle Technology) | |
| Luminance (typical) 400 nits 400 nits | ||
| Dimensions: | ||
| Height (maximum) 184.90 mm (7.28 in) 184.90 mm (7.28 in) | ||
| Width (maximum) 114.90 mm (4.52 in) 114.90 mm (4.52 in) | ||
| Diagonal 203.20 mm (8 in) 203.20 mm (8 in) | ||
| Native resolution 800 x 1280 1200 x 1920 | ||
| Megapixels 1.0 | 2.3 | |
| Pixels per inch (PPI) 189 | 283 | |
| Contrast ratio (minimum) | 800:1 | 800:1 |
| Response time (maximum) | 30 ms | 30 ms |
| Refresh rate | 60 Hz | 60 Hz |
| Color depth | True 8 bits | True 8 bits |
| Camera | ||
| Webcam type Front-facing camera | Rear-facing camera | |
| Camera type | FHD fixed focus | 5 M auto focus |
Camera
| Sensor type CMOS sensor | CMOS sensor technology | |
| Resolution of motion video | Up to 1920 x 1080 (2.1 MP) | Up to 1920 x 1080 (2.1 MP) |
| Resolution of still image | Up to 1920 x 1080 (2.1 MP) | Up to 2592 x 1944 (5 MP) |
| Imaging rate Up to 30 frames per second | Up to 30 frames per second | |
Power adapter
Environmental requirements
| Input voltage 100 VAC-240 VAC |
| Input frequency 50 Hz-60 Hz |
| Input current 0.3 A |
| Output current 2.0 A |
| Rated output voltage 5.0 VDC |
| Temperature range: |
| Operating 0°C to 40°C (32°F to 104°F) |
| Storage -40°C to 70 °C (-40°F to 158°F) |
| Temperature range: |
| Operating 0°C to 35 °C (32°F to 95°F) |
| Non-operating -40°C to 65 °C (-40°F to 149°F) |
| Relative humidity (maximum): |
| Operating 10% to 90% (non-condensing) |
| Non-operating 5% to 95% (non-condensing) |
| Altitude (maximum, unpressurized): |
| Operating -15.20 m to 3048 m (-50 ft to 10,000 ft) |
Environmental requirements
Storage -15.20 m to 10,668 m (-50 ft to
35,000 ft)
Self-help resources
You can get information and help on Dell products and services using these self-help resources:
Information about Dell products and services
www.dell.com
Dell Help & Support app

Get started app

Help + Tips app

Accessing help In Windows search, type Help and
Support, and tap Enter.
Online help for operating system
www.dell.com/supportWindows
Troubleshooting information, user manuals, setup instructions, product specifications, technical help blogs, drivers, software updates, and so on
www.dell.com/support
Learn about your operating system, setting up and using your tablet, data backup, diagnostics, and so on.
See Me and My Dell at
www.dell.com/support/manuals.
To contact Dell for sales, technical assistance, or customer service issues:
1 Go to www.dell.com/contactdell.
2 Verify your country or region in the Choose a Country/Region drop-down list at the bottom of the page.
3 Select the appropriate service or support link based on your requirement or choose the method of contacting Dell that is convenient for you. Dell provides several online and telephone-based support and service options. Availability varies by country and product, and some services may not be available in your area.

NOTE: If you do not have an active internet connection, you can find contact information on your purchase invoice, packing slip, bill, or Dell product catalog.
Locating your Service Tag and Express Service Code
You must provide the Service Tag and Express Service Code of your tablet when contacting Dell for customer service or technical assistance.

NOTE: The telephone systems prompts you to enter the Express Service Code that helps in routing your call efficiently.
The Service Tag and Express Service Code for your tablet are located on a label at the bottom of the tablet.

- Notes, cautions, and warnings
- Contents
- Features 5
- Setting up your tablet. 8
- Using your tablet. 17
- Troubleshooting 24
- EnteringBIOSsetupprogram. 28
- Specifications. 29
- Getting help 33
- Contacting Dell. 34
- Locating your Service Tag and Express Service Code.... 35
- Features
- Feature
- Charging the tablet
- Power and battery-charge status light behavior
- Behavior
- Description
- Power and battery-charge status light icons
- Icon Description
- Turning on your tablet
- Inserting a micro-SIM card
- Removing the micro-SIM card
- Inserting a microSD card
- Removing the microSD card
- Using headphones
- Turning off your tablet
- Using the power button on the Start screen
- Using the power button
- Turning off the screen
- Start screen
- Wi-Fi
- Turning Wi-Fi on or off
- Connecting to a network
- Mobile broadband setting
- Bluetooth
- Turning Bluetooth on or off
- Pairing with Bluetooth-enabled devices
- Screen orientation
- Locking or unlocking the screen orientation
- Adjusting screen brightness
- Auto adjust
- Synchronizing your tablet
- Restoring your operating system
- Resetting your tablet
- Gestures
- Gestures Functions
- Touch
- Drag
- Swipe or slide
- Zoom in
- Zoom out
- Rotate
- Battery problem
- Problems Possible causes Possible solutions
- Network problem
- Problems
- Possible causes Possible solutions
- Touchscreen problem
- System problem
- Entering BIOS setup program
- With keyboard
- Without keyboard
- Specifications
- Ports and connectors
- Communications
- Display
- Environmental requirements
- Self-help resources
- Locating your Service Tag and Express Service Code
Brand : DELL
Model : Venue 5855
Category : Tablet