ZGU486NDTSS - Cooker Monogram - Free user manual and instructions
Find the device manual for free ZGU486NDTSS Monogram in PDF.

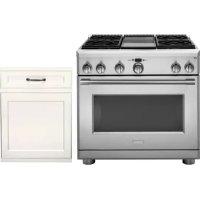
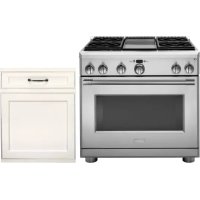
| Product type | Range |
| Dimensions | Width: 76 cm, Depth: 69 cm, Height: 91 cm |
| Cooking type | Gas |
| Number of burners | 5 burners |
| Oven | Natural convection |
| Oven capacity | 5.5 cubic feet |
| Oven features | Grill, Self-cleaning |
| Surface material | Stainless steel |
| Energy consumption | Energy class A |
| Safety | Automatic shut-off system, Oven lock |
| Maintenance | Easy cleaning with smooth surfaces |
| Included accessories | Grates, Baking tray |
| Warranty | 2 years |
Frequently Asked Questions - ZGU486NDTSS Monogram
Download the instructions for your Cooker in PDF format for free! Find your manual ZGU486NDTSS - Monogram and take your electronic device back in hand. On this page are published all the documents necessary for the use of your device. ZGU486NDTSS by Monogram.
USER MANUAL ZGU486NDTSS Monogram
MONOGRAM.COM2 49-2000664 Rev. 0 MODEL INFORMATION WRITE DOWN THE MODEL AND SERIAL NUMBERS You’ll find them on a label located behind the left burner knob or below the control panel. Use these numbers in any correspondence or service calls concerning your appliance. Please write these numbers here: Model Number Serial Number MODEL NUMBERS
ZGU366, ZGU364, ZGU486
Register your new appliance on-line at your convenience! Timely product registration will allow for enhanced communication and prompt service under the terms of your warranty, should the need arise. You may also mail in the pre-printed registration card included in the packing material. In the US: monogram.com/register. SCHEDULE SERVICE Expert Monogram repair service is only one step away from your door. To request service in the US, visit our website at monogram.com/contact REMOTE CONNECTIVITY For assistance with wireless network connectivity (for models with remote enable), visit our website at monogram.com/connect
PARTS AND ACCESSORIES
Individuals qualified to service their own appliances can have parts or accessories sent directly to their homes (VISA, MasterCard and Discover cards are accepted). Order on-line today 24 hours every day. In the US: monogram.com/use-and-care/parts Instructions contained in this manual cover procedures to be performed by any user. Other servicing generally should be referred to qualified service personnel. Caution must be exercised, since improper servicing may cause unsafe operation. CONTACT US If you are not satisfied with the service you receive from Monogram, contact us on our website with all the details including your phone number at monogram.com/contact.4 49-2000664 Rev. 0 WARNING Read all safety instructions before using the product. Failure to follow these instructions may result in fire, electrical shock, serious injury or death. WARNING
GENERAL SAFETY INSTRUCTIONS
Ŷ 8VHWKLVDSSOLDQFHIRULWVLQWHQGHGSXUSRVHDVdescribed in this owner’s manual.Ŷ +DYH\RXUUDQJHWRSLQVWDOOHGDQGSURSHUO\JURXQGHGby a qualified installer in accordance with the provided installation instructions. Any adjustment and service should be performed only by a qualified gas rangetop installer or service technician. Do not attempt to repair or replace any part of your rangetop unless it is specifically recommended in this manual.Ŷ <RXUUDQJHWRSLVVKLSSHGIURPWKHIDFWRU\VHWIRUuse with natural gas or propane (LP) gas. It can be converted for use with either. If required, these adjustments must be made by a qualified technician in accordance with the installation instructions and local codes. The agency performing this work assumes responsibility for the conversion.Ŷ +DYHWKHLQVWDOOHUVKRZ\RXWKHORFDWLRQRIWKHrangetop gas shut-off valve and how to turn it off if necessary.Ŷ 3OXJ\RXUUDQJHWRSLQWRDYROWJURXQGHGRXWOHWonly. Do not remove the round grounding prong from the plug. If in doubt about the grounding of the home electrical system, it is your responsibility and obligation to have an ungrounded outlet replaced with a properly grounded, three prong outlet in accordance with the National Electrical Code. Do not use an extension cord with this appliance.Ŷ %HIRUHSHUIRUPLQJDQ\VHUYLFHXQSOXJWKHUDQJHWRSor disconnect the power supply at the household distribution panel by removing the fuse or switching off the circuit breaker.Ŷ %HVXUHDOOSDFNLQJPDWHULDOVDUHUHPRYHGIURPWKHrangetop before operating to prevent ignition of these materials.Ŷ $YRLGVFUDWFKLQJRULPSDFWLQJJODVVGLVSOD\V'RLQJso may lead to glass breakage. Do not cook on a product with broken glass. Shock, fire, or cuts may occur.
READ ALL INSTRUCTIONS BEFORE USING THE APPLIANCE
READ AND SAVE THESE INSTRUCTIONS
WARNING If the information in this manual is not followed exactly, a fire or explosion may result, causing property damage, personal injury or death. - Do not store or use gasoline or other flammable vapors and liquids in the vicinity of this or any other appliance. - WHAT TO DO IF YOU SMELL GAS
- Installation and service must be performed by a qualified installer, service agency or the gas supplier. WARNING NEVER use this appliance as a space heater to heat or warm the room. Doing so may result in carbon monoxide poisoning.49-2000664 Rev. 0 5WARNING
GENERAL SAFETY INSTRUCTIONS
Ŷ 'RQRWOHDYHFKLOGUHQDORQHRUXQDWWHQGHGLQDQDUHDwhere an appliance is in use. They should never be allowed to climb, sit or stand on any part of the appliance.
CAUTION Do not store items of interest to children in cabinets above a rangetop - children climbing on the rangetop to reach items could be seriously injured.Ŷ 1HYHUEORFNWKHYHQWVDLURSHQLQJVRIWKHUDQJHWRSThey provide the air inlets and outlets that are necessary for the rangetop to operate properly with correct combustion. Air openings are located at the rear of the rangetop.Ŷ 8VHRQO\GU\SRWKROGHUV²PRLVWRUGDPSSRWKROGHUVon hot surfaces may result in burns from steam. Do not let pot holders touch surface burners or burner grate. Do not use a towel or other bulky cloth in place of pot holders.Ŷ 'RQRWWRXFKWKHKHDWLQJHOHPHQWV7KHVHVXUIDFHVmay be hot enough to burn even though they are dark in color. Other surfaces of the appliance may become hot enough to cause burns. Potentially hot surfaces include the burners, grates, high shelf surface.Ŷ 'RQRWKHDWXQRSHQHGIRRGFRQWDLQHUV3UHVVXUHcould build up and the container could burst, causing an injury.Ŷ &RRNIRRGWKRURXJKO\WRKHOSSURWHFWDJDLQVWfoodborne illness. Minimum safe food temperature recommendations can be found at IsItDoneYet.gov and fsis.usda.gov. Use a food thermometer to take food temperatures and check several locations.Ŷ 'RQRWDOORZDQ\RQHWRFOLPEVWDQGRUKDQJRQWKHrangetop. They could damage the appliance.Ŷ .HHSWKHYHQWLODWRUKRRGDQGJUHDVHILOWHUVFOHDQto maintain good venting and to avoid grease fires. Turn the ventilator OFF in case of a fire or when intentionally "flaming" liquor or other spirits on the rangetop. The blower if in operation, could spread the flames.
READ ALL INSTRUCTIONS BEFORE USING THE APPLIANCE
READ AND SAVE THESE INSTRUCTIONS
WARNING KEEP FLAMMABLE MATERIALS AWAY FROM THE RANGETOP Failure to do so may result in fire or personal injury.Ŷ 'RQRWVWRUHRUXVHIODPPDEOHPDWHULDOVWKHUDQJHWRSincluding paper, plastic, pot holders, linens, wall coverings, curtains, drapes and gasoline or other flammable vapors and liquids.Ŷ 1HYHUZHDUORRVHILWWLQJRUKDQJLQJJDUPHQWVZKLOHusing the appliance. These garments may ignite if they contact hot surfaces causing severe burns.Ŷ 'RQRWOHWFRRNLQJJUHDVHRURWKHUIODPPDEOHmaterials accumulate in or near the rangetop. Grease on the rangetop may ignite.6 49-2000664 Rev. 0
READ AND SAVE THESE INSTRUCTIONS
RANGETOP SAFETY INSTRUCTIONS
WARNING NEVER Operate the Top Surface Cooking Section of this Appliance Unattended.
- Failure to follow this warning statement could result in fire, explosion, or burn hazard that could cause property damage, personal injury, or death.
- If a fire should occur, keep away from the appliance and immediately call your fire department.
DO NOT ATTEMPT TO EXTINGUISH AN
OIL/GREASE FIRE WITH WATER. Ŷ 1HYHUOHDYHRLOXQDWWHQGHGZKLOHIU\LQJ,IDOORZHGWRheat beyond its smoking point, oil may ignite resulting in fire that may spread to surrounding cabinets. Use a deep fat thermometer whenever possible to monitor oil temperature.Ŷ 7RDYRLGRLOVSLOORYHUDQGILUHXVHWKHPLQLPXPamount of oil when using a shallow pan-frying and avoid cooking frozen foods with excessive amounts of ice.Ŷ 8VHSURSHUSDQVL]HDQGDYRLGSDQVWKDWDUHXQVWDEOHor easily tipped. Select cookware that is matched to the size of the burner. Burner flames should be adjusted so that they do not extend beyond the bottom of the pan. Excessive flame may be hazardous.Ŷ $OZD\VXVHWKH/,7(SRVLWLRQZKHQLJQLWLQJWKHWRSburners and make sure the burners have ignited.Ŷ :KHQXVLQJJODVVFHUDPLFFRRNZDUHPDNHVXUHLWis suitable for cooktop service; others may break because of sudden change in temperature.Ŷ 7RPLQLPL]HWKHSRVVLELOLW\RIEXUQVLJQLWLRQRIflammable materials and spillage, the handle of a container should be turned toward the center of the range without extending over nearby burners.Ŷ 'RQRWXVHDZRNZLWKDURXQGPHWDOVXSSRUWULQJThe ring may trap heat and block air to the burner resulting in a carbon monoxide hazard.Ŷ 'RQRWDWWHPSWWROLIWWKHFRRNWRS'RLQJVRPD\damage the gas tubing to the surface burners resulting in a gas leak and risk of fire.Ŷ 'RQRWXVHDOXPLQXPIRLOWRFRYHUWKHJUDWHVRUline any part of the cooktop. Doing so may result in carbon monoxide poisoning, overheating of the cooktop surfaces, or a potential fire hazard.WARNING IN THE EVENT OF A FIRE, TAKE THE FOLLOWING STEPS TO PREVENT INJURY AND FIRE SPREADING
Do not use water on grease fires. Never pick up a flaming pan. Turn the controls off. Smother a flaming pan on a surface unit by covering the pan completely with a well-fitting lid, cookie sheet or flat tray. Use a multi-purpose dry chemical or foam-type fire extinguisher. How to Remove Protective Shipping Film and Packaging Tape Carefully grasp a corner of the protective shipping film with your fingers and slowly peel it from the appliance surface. Do not use any sharp items to remove the film. Remove all of the film before using the appliance for the first time.To assure no damage is done to the finish of the product, the safest way to remove the adhesive from packaging tape on new appliances is an application of a household liquid dishwashing detergent. Apply with a soft cloth and allow to soak.NOTE: The adhesive must be removed from all parts. It cannot be removed if it is baked on.49-2000664 Rev. 0 7 FEATURES (Not all features are on all models. Appearance may vary.)
4 burners and griddle 6 gas burners Griddle Cover Feature Index Page 1 Griddle Cover (on some models) 7 2 Griddle Grease Trough (on some models) 7 3 Griddle (on some models) 10 4 Cooktop Burner Grates 14 5 Burner Location Indicator 7 6 Accent Lighting Control 7,8 7 Burner Control Knob with Lighted Bezel 8,12
28 49-2000664 Rev. 0
In the event of a power failure. The surface burners may be lit with a match. Using extreme caution, hold a lit match near the ports beneath the surface burner cap, then slowly turn the knob to the LITE position. Once lit, surface burners will continue to operate normally. SURFACE BURNERS Lighting a Surface Burner WARNING Burners should be operated only when covered by cookware. Burner flames not covered by cookware present a risk of fire or clothing ignition. Never let flames extend beyond the sides of the cookware. Failure to comply may result in serious injury.Make sure all burners are in their correct locations and fully assembled before attempting to operate any burner.Select a burner and find its control knob. Push the knob in and turn it to the LITE position.<RXZLOOKHDUDFOLFNLQJQRLVH²the sound of the electric spark igniting the burner. When one burner is turned to LITE, all burners will spark. Sparking will continue as long as the knob remains at LITE. Once gas is ignited, turn the knob to adjust the flame size.Automatic ReignitionThe burners on this range will automatically relight if the flame goes out. Using the Surface Burners NOTES:Ŷ 'RQRWRSHUDWHWKHEXUQHUIRUDQH[WHQGHGSHULRGRItime without cookware on the grate. The finish on the grate may discolor or chip without cookware to absorb the heat.Ŷ 'RQRWDWWHPSWWRGLVDVVHPEOHDQ\EXUQHUZKLOHDQRWKHUburner is on. Damage to the product may occur.Ŷ %HVXUHWKHEXUQHUVDQGJUDWHVDUHFRROEHIRUH\RXplace your hand, a pot holder or cleaning materials on them.Your rangetop has sealed gas burners that offer convenience, cleanability and flexibility for a wide range of cooking applications. Selecting a Flame Size Watch the flame, not the knob, as you adjust heat. When rapid heating is desired, the flame size should match the size of the cookware you are using. Flames larger than the bottom of the cookware will not heat faster and may be hazardous.These flames are too large for the potPush the control knob in and turn it to the LITE position.
ACCENT LIGHTING CONTROL
This button controls the LED accent lighting to the control panel. Custom color options for the knob and task lighting are available through the app. Ŷ/('$FFHQWOLJKW21Ŷ/('$FFHQWOLJKW21DQGNQREOLJKWV21Ŷ$OO2))49-2000664 Rev. 0 9
Dual-Flame Stacked Burners Dual-Flame Stacked burners on your range have two sets of flames stacked one on top of the other; the dual-flame burners have a lower (simmer) flame and a upper (main) flame. When a burner is turned on, the lower flame will always light and stay on. Simmering: The stacked burner design provides a wide range of heat settings with which to simmer. Depending on the type and quantity of food, and pan size, the flame can be adjusted to suit your specific need. Cooking: Settings from LO to MED will use both upper and lower flames. Use HI for larger diameter cookware. HI is intended to sear foods quickly and boil large quantities of water. Dual Stack burners are supplied with black enamel caps and brass inserts that sit in the center. The inserts may be removed depending on consumer preference. Lower FlameUpper FlameLower Flame TOP-OF-RANGE COOKWARE Aluminum: Medium-weight cookware is recommended because it heats quickly and evenly. Most foods brown evenly in an aluminum skillet. Use saucepans with tight- fitting lids when cooking with minimum amounts of water. Stainless Steel: This metal alone has poor heating properties and is usually combined with copper, aluminum or other metals for improved heat distribution. Combination metal skillets usually work satisfactorily if they are used with medium heat or as the manufacturer recommends. Cast-Iron: If heated slowly, most skillets will give satisfactory results. Enamelware: Under some conditions, the enamel of some cookware may melt. Follow the cookware manufacturer’s recommendations for cooking methods. Glass:7KHUHDUHWZRW\SHVRIJODVVFRRNZDUH²WKRVH for oven use only and those for top-of-range cooking (saucepans, coffee and teapots). Glass conducts heat very slowly. Heatproof Glass Ceramic: Can be used for either surface or oven cooking. It conducts heat very slowly and cools very slowly. Check the cookware manufacturer’s directions to be sure it can be used on gas ranges. Multi-Ring Burner Top View Of The Multi-Ring Burner Knob The Multi-Ring Burner has an inner and outer ring of flame. For large cookware, activate all rings by setting the burner between Hi and Med. For small cookware or low heating applications, only activate the inner rings by setting the burner between Lo and Sim. Multi-ring burners are supplied with both brass and black enamel caps, either can be used depending on consumer preference. SURFACE BURNERS (cont.) Types of Surface Burners Dual-Flame Stacked Burner: Use this burner for general cooking purposes. Size cookware appropriately to the flames. Multi-Ring Burner: Use this burner for large cookware or for simmering applications.10 49-2000664 Rev. 0
GRIDDLE SAFETY PRECAUTIONS, LEVELING (on some models) Remove the metal cover before turning the griddle on. The griddle assembly should not be removed for cleaning. Once the unit is in position, the griddle can be leveled. Remove the flue cover by lifting it straight up. Be careful not to scratch the surrounding stainless steel surfaces during removal of the flue cover. The two inner screws are clamping screws for securing the griddle in place. Loosen these two screws before leveling. Do not remove these two screws. The two outer screws are leveling screws. Do not remove these two screws. They can be turned to level the griddle or to provide a forward slope to help grease and oils to drain away from the food being cooked. After the first few uses, you will be able to judge the slope best suited for the foods you are cooking and personal preference. After leveling the griddle, tighten the clamping screws to secure griddle in place. Hand tighten screws; do not over- tighten. WARNING Fire Hazard
griddle and may result in fire. Ŷ 3ODFHDQGUHPRYHWKHJULGGOHRQO\ZKHQJULGGOHLVFRRODQGDOOVXUIDFHEXUQHUVDUHWXUQHG2)) Griddle flue cover Clamping screwsLeveling screws WOK COOKING The burner grates are uniquely designed to cook on either side. The flat side accommodates flat bottom cookware (stockpots, sauce pans, frying pans and flat bottom woks), while the wok side is designed to hold a wide variety of round bottom woks from 14" to 16" without the need for a separate ring. For easy access, a front burner location is recommended for wok cooking. The front left or right burner is recommended for wok
FRRNLQJRQƎDQGƎUDQJHVDQGOHIWIURQWRQ
ranges. WARNING Do not use a wok support ring. Placing the ring over the burner or grate may cause the burner to work improperly, resulting in carbon monoxide levels above allowable standards. This could be hazardous to your health. Wok Side Flat Side Peak49-2000664 Rev. 0 11
Clean the griddle thoroughly with hot soapy water before first use and after subsequent uses. The griddle surface is made of durable, highly polished Type 304 stainless steel backed by an aluminum plate for even heat distribution. Apply a light coating of cooking oil to the griddle surface to help prevent food from sticking. To heat the griddle, push in and turn the control knob to the desired temperature setting. The light on the bezel will glow to indicate that the thermostat control is working. The griddle is thermostatically controlled and can be set to maintain any temperature from 200ºF to 450ºF. Permit the griddle to preheat for 10 minutes before placing food on it. NOTE: Unlike the surface burners which use spark igniters, the griddle uses a Glo-Bar for ignition. Gas flows to the griddle burner and ignition occurs approximately 45 seconds after the control knob is turned to a set temperature.
RANGETOP EXTERIOR Do not use oven cleaners, abrasive cleansers, strong liquid cleansers, steel wool, plastic scouring pads, or cleaning powders on the cooktop surface. Clean with a mild soap DQGZDWHURUDVROXWLRQRIYLQHJDUDQGZDWHU5LQVH with clean water and dry with a soft cloth. When cleaning surfaces, make sure that they are at room temperature and not in direct sunlight. Spillage of marinades, fruit juices, tomato sauces and basting liquids containing acids may cause discoloration and should be wiped up as soon as hot surfaces cool, Then clean and rinse. Stainless Steel Do not use a steel wool pad; it will scratch the surface. To clean the stainless steel surface, use warm sudsy water or a stainless steel cleaner or polish. Always wipe the surface in the direction of the grain. Follow the cleaner instructions for cleaning the stainless steel surface. Cleaners with oxalic acid such as Bar Keepers Friend Soft Cleanser™ will remove surface rust, tarnish and small blemishes. Use only a liquid cleanser free of grit and rub in the direction of the brush lines with a damp, soft sponge. To inquire about purchasing cleaning products including stainless steel appliance cleaner or polish, see the Accessories and Consumer Support sections at the end of this manual.
CONTROL PANEL AND KNOBS
It’s a good idea to wipe the control panel after each use. Clean with mild soap and water or vinegar and water, rinse with clean water and polish dry with a soft cloth. Do not use abrasive cleansers, strong liquid cleansers, plastic scouring pads or oven cleaners on the control panel because they will damage the finish. For easier cleaning, the control knobs may be removed by pulling them directly outwards once the knobs are in the OFF position. Do not pull knobs up or down or hang objects on them. This can damage the gas valve shaft. See the Surface Burner section for a detailed view of these knobs. The knobs can be washed by hand with soap and water. When removing burner knobs, remember their location. The knobs are not interchangeable, these knobs must be placed in the same location after cleaning. See the Surface Burner section for a detailed view of these knobs. To replace knobs after cleaning, align the bottom of the knob with the matching clip orientation to the shaft inside the bezel. Push knob until completed seated. Use a soft, non abrasive cloth to clean the inside of the bezel. Do not remove diffuser film. Do not expose to moisture or it will damage lighting electronics. NOTE: The Mini Knob is not removable.
%HVXUHHOHFWULFDOSRZHULVRႇDQGDOOVXUIDFHVDUHFRROEHIRUHFOHDQLQJDQ\SDUWRIWKHUDQJH
GriddleFront Control Panel Flat Side Flat Side OFF OFF Burner Knobs49-2000664 Rev. 0 13
WITHOUT ALL BURNER PARTS IN PLACE. Surface burners should be cleaned routinely, especially after bad spillovers, which could clog the slots and holes in the burner heads. The electrode is located at the rear of each burner. Do not attempt to disassemble or clean around any burner while another burner is on. An electric shock may result. To remove the burner parts:
1. Turn all controls OFF before removing any burner parts.
2. When cool, you may lift off the burner grates, burner
caps and burner heads for easier cleaning. Do not remove the burner bases. NOTE: Be sure to replace the burners in the same location and orientation. Cleaning Lift off burner parts only when cool. Wash in hot, soapy water. To remove burned-on food, soak the burner heads in a solution of mild liquid detergent and hot water for 20–30 minutes. For more stubborn stains, use a plastic scouring pad or toothbrush. If the spill goes inside the burner head assembly, wash it under running water and shake to remove excess water. After Cleaning Before replacing the burner parts, shake out excess water and then dry them thoroughly. To replace the burner parts for Multi Ring: Align the burner head as shown. Pass the igniter through the opening in the burner head while ensuring the ignitor arrow is pointing toward the ignitor. Make sure the burner lies flat. Install the burner caps taking care to check that they lie flat on the burner head. Check burner operation to ensure uniform, blue flame around the burner. If there are yellow or uneven flames, immediately turn the burner off, let it cool, and readjust the burner and burner caps. To replace the burner parts for Dual Flame: Make sure that the burner parts are replaced in the correct location and orientation.
1. Replace the burner head on top of the burner base,
making sure that the hole in the burner head is properly aligned with the electrode in the burner base. A small gap between the base and head is normal.
2. Place the burner cap on top of the burner head. Make
sure that the burner cap is properly seated on the burner head. Burner Head Burner Base ElectrodeElectrodeBurner Cap Multi-Ring Burner Dual-Flame Stacked BurnerInner Burner Cap (Removable)Outer Burner Cap (Removable)Burner Head Ignitor ArrowIgnitorCooktop without burner installedFrontBurner in correct orientationFrontBurner correctly installedFrontBurner cap not properly seatedBurner cap properly seated14 49-2000664 Rev. 0
BURNER GRATES The enameled cast-iron burner grates should be cleaned regularly. Wash them in hot soapy water, rinse, and dry thoroughly. Although they are durable, the grates will gradually lose their shine, regardless of the best care you can give them. This is due to their continual exposure to high temperatures. Do not operate a burner for an extended period of time without cookware on the grate. The finish on the grate may chip without cookware to absorb the heat. For stability, the frames have rubber pads on each corner. During cleaning and use, be careful not to damage or snag rubber pads. Grates Frame Pads
SPARK IGNITER AND ELECTRODES
The electrode of the electronic ignition system is positioned at the rear of the burner base. When cleaning the cooktop, be careful not to snag the igniter with your cleaning cloth. Damage to the igniter could occur. Be careful not to push in a control knob while cleaning. It could cause the igniter to spark. Make sure that the white ceramic igniters on the cooktop are dry and clean. Clean the metal portion of the electrode with a soft cloth or emery board. Do not attempt to remove the electrode from the cooktop. Clean this metal part with an emery board. Do not clean this white ceramic part with an emery board. GREASE TROUGH (on some models) Grease from the griddle will drain into the enameled cast- iron grease trough at the front of the range. Ensure grease trough is pushed underneath the griddle lip in order to catch grease while cooking. Once the trough has cooled, it may be lifted out for easier cleaning. To remove the cool grease trough from the griddle, slide it toward the front and lift up. Do not allow grease to accumulate in the grease trough as it can be a fire hazard. Clean the grease trough as soon as they are cool. The grease trough can be cleaned by hand with hot soapy water or in the dishwasher. Wipe any spillage in the trough basin with a soft cloth. GRIDDLE (on some models) Thoroughly clean the griddle of grease and food particles, using a square-edged metal spatula, while it is still hot. Wipe the griddle with a dry, heavy, coarse cloth to remove any remaining residue and food particles. If the griddle is cleaned with anything other than a dry, heavy, coarse cloth, it will need to be reseasoned. Never flood the hot griddle with cold water. This could cause the griddle to crack or warp. NOTE: It is normal for the stainless steel griddle to discolor to a yellow-brown color after use. Grease trough49-2000664 Rev. 0 15 Save time and money! Review the charts on the following pages first and you may not need to call for service. TROUBLESHOOTING TIPS Problem Possible Cause What To Do Burners do not light Plug on range is not completely inserted in the electrical outlet. Make sure electrical plug is plugged into a live, properly grounded outlet. Gas supply not connected or turned on. See the Installation Instructions that came with your range. A fuse in your home may be blown or the circuit breaker tripped. Replace the fuse or reset the circuit breaker. Burner parts not replaced correctly. See the Care and Cleaning of the range section. Burner slots near the electrode may be clogged. Remove the burners and clean them. Check the electrode area for burned-on food or grease. See the Care and Cleaning of the range section. Food residue on electrode Lightly polish flat tip of electrode with nail file or sandpaper until shiny. Top burners do not burn evenly Improper burner assembly. Make sure the burner caps are seated correctly. See the Care and Cleaning of the range section. Burner slots on the side of the burner may be clogged. Remove the burners for cleaning. See the Care and Cleaning of the range section. Burner flames are very large or yellow Improper air to gas ratio. If range is connected to Propane gas, contact the technician who installed your range or made the conversion.16 49-2000664 Rev. 0
Ŷ6HUYLFHWULSVWR\RXUKRPHWRWHDFK\RXKRZWRXVH
the product. Ŷ'LVFRORUDWLRQRIWKHJULGGOHSODWH Ŷ&KLSSLQJRISRUFHODLQHQDPHOJUDWHV Ŷ5HSODFHPHQWRIKRXVHIXVHVRUUHVHWWLQJRIFLUFXLW breakers. Ŷ,QFLGHQWDORUFRQVHTXHQWLDOGDPDJHFDXVHGE\ possible defects with this appliance. Ŷ'DPDJHDIWHUGHOLYHU\ Ŷ'DPDJHWRWKHSURGXFWFDXVHGE\DFFLGHQWILUHIORRGV or acts of God. Ŷ3URGXFWGDPDJHRUIDLOXUHRIWKHSURGXFWLILWLV abused, misused, used for other than the intended purpose, or used commercially. Ŷ,PSURSHULQVWDOODWLRQGHOLYHU\RUPDLQWHQDQFH If you have an installation problem, contact your dealer or installer. You are responsible for providing adequate electrical, gas, exhausting and other connecting facilities as described in the Installation Instructions provided with the product. Ŷ3URGXFWQRWDFFHVVLEOHWRSURYLGHUHTXLUHGVHUYLFH
MONOGRAM LIMITED WARRANTY
Monogram.com All warranty service is provided by our Factory Service Centers, or an authorized Customer Care
technician. To schedule service online, visit us at monogram.com/contact. In Canada, visit monogram.ca.
EXCLUSION OF IMPLIED WARRANTIES
Your sole and exclusive remedy is product repair as provided in this Limited Warranty. Any implied warranties, including the implied warranties of merchantability or fitness for a particular purpose, are limited to one year or the shortest period allowed by law. This limited warranty is extended to the original purchaser and any succeeding owner for products purchased for home use within the USA. If the product is located in an area where service by an Authorized Servicer is not available, you may be responsible for a trip charge or you may be required to bring the product to an Authorized Service location. In Alaska, the limited warranty excludes the cost of shipping or service calls to your home. Some states do not allow the exclusion or limitation of incidental or consequential damages. This limited warranty gives you specific legal rights, and you may also have other rights which vary from state to state. To know what your legal rights are, consult your local or state consumer affairs office or your state’s Attorney General. Warrantor: GE Appliances, a Haier company Louisville KY,40225 For the period of Monogram Appliances will replace Limited two-year warranty For two years from date of original purchase, we will provide, free of charge, parts and service labor in your home to repair or replace any part of the appliance that fails because of a manufacturing defect. Limited five-year warranty For five years from the date of original purchase, we will provide, free of charge, replacement gas surface burners if they fail in normal household use. (The grill and griddle are not included.) You pay for the service trip to your home and all service labor charges. What Monogram will not cover: Staple your receipt here. Proof of the original purchase date is needed to obtain service under the warranty. Servicing your appliance may require the use of the onboard data port for diagnostics. This gives a Monogram Factory Service technician the ability to quickly diagnose any issues with your appliance and helps Monogram improve its products by providing Monogram with information on your appliance. If you do not want your appliance data to be sent to Monogram, please advise your technician NOT to submit the data to Monogram at the time of service.49-2000664 Rev. 0 17 NOTES49-2000664 Rev. 0 12-20 GEA Printed in the MexicoMANUEL D’UTILISATION 91 cm (36 po) et 121 cm (48 po) Table de cuisson professionnelle FRANÇAIS MONOGRAM.COM2 49-2000664 Rev. 0