
C24GA6 - Steam cleaner Vulcan - Free user manual and instructions
Find the device manual for free C24GA6 Vulcan in PDF.
| Product type | Gas Convection Steamer |
| Model | C24GA6 |
| Number of compartments | 2 |
| Capacity (64 mm pans) | 6 pans (3 per compartment) |
| Heat input | 125,000 BTU/h |
| Electrical supply | 120 V, 60 Hz, 1 phase, 3 A |
| Minimum circuit protection | 15 A |
| Gas connection | 3/4 in NPT |
| Natural gas pressure | 7 to 10.5 in WC |
| Propane gas pressure | 11 to 13 in WC |
| Water pressure required | 20 to 60 psig |
| Timer | 0 to 60 minutes, manual alarm shutoff |
| Indicator lights | Ready (green), Cooking (red) |
| Material | Stainless steel |
| Recommended maintenance | Daily generator blowdown, door gasket cleaning, annual descaling |
Frequently Asked Questions - C24GA6 Vulcan
User questions about C24GA6 Vulcan
0 question about this device. Answer the ones you know or ask your own.
Ask a new question about this device
Download the instructions for your Steam cleaner in PDF format for free! Find your manual C24GA6 - Vulcan and take your electronic device back in hand. On this page are published all the documents necessary for the use of your device. C24GA6 by Vulcan.
USER MANUAL C24GA6 Vulcan
For additional information on Vulcan or to locate an authorized parts and service provider in your area, visit our website at www.vulcanequipment.com
IMPORTANT FOR YOUR SAFETY
THIS MANUAL HAS BEEN PREPARED FOR PERSONNEL QUALIFIED TO INSTALL THIS EQUIPMENT, WHO SHOULD PERFORM THE INITIAL FIELD START-UP AND ADJUSTMENTS OF THE EQUIPMENT COVERED BY THIS MANUAL.
POST IN A PROMINENT LOCATION THE INSTRUCTIONS TO BE FOLLOWED IN THE EVENT THE SMELL OF GAS IS DETECTED. THIS INFORMATION CAN BE OBTAINED FROM THE LOCAL GAS SUPPLIER, IN THE EVENT OF A POWER FILURE, DO NOT ATTEMPT TO OPERATE THIS DEVICE.
IMPORTANT
IN THE EVENT A GAS ODDR IS DETECTED, SHUT DOWN UNITS AT MAIN SHUTOFF VALVE AND CONTACT THE LOCAL GASCOMPANYORGASSUPPLIERFORSERVICE.
FOR YOUR SAFETY
DO NOT STORE OR USE GASOLINE OR OTHER FLammable VAPORS OR LIQUIDS IN THE VICINITY OF THIS OR ANY OTHER APPLIANCE.
WARNING Improper installation, adjustment, adjustment, alteration, service or maintenance can cause property damage, injury or death. Read the installation, operating and maintenance instructions thoroughly before installing or servicing this equipment.
IN THE EVENT OF A POWER FAILURE, DO NOT ATTEMPT TO OPERATE THIS DEVICE.
CONTENTS
GENERAL 4
UNPACKING 4
INSTALLATION 4
INSTALLATION CODES AND STANDARDS 4
LOCATION-GAS STEAMERS 5
LEVELING AND ANCHORING 5
PLUMBING CONNECTIONS 5
Water Requirements 5
Water Treatment 5
Water Supply Connection 5
Filter System 5
Drain Connection 6
GAS SUPPLY CONNECTIONS 6
Gas Connection Data 8
Testing the Gas Supply System 9
FLUE GAS EXHAUST 9
ELECTRICAL CONNECTIONS 9
STARTUP 10
OPERATION 11
LIGHTING AND SHUTDOWN INSTRUCTIONS 11
Lighting 11
Shutdown 11
COMPARTMENT CONTROLS 11
STARTUP PROCEDURE 12
PREHEATING 12
OPERATING 12
STEAMING 12
EXTENDED SHUTDOWN 12
STAINLESS STEEL EQUIPMENT CARE AND LEANING 13
CLEANING 14
Cooking Compartment Drain 14
Draining Generator 14
Compartments 14
Door Gaskets 14
LEAVE COMPARTMENT DOOR OPEN 15
GUIDELINES FOR MAINTAINING STAINLESS STEEL SURFACES 15
MAINTENANCE 16
Water Treatment System 16
Scale Related Maintenance. 16
Draining Generator 16
Flue. 16
COOKING CHART 17
TROUBLESHOOTING 20
SERVICE AND PARTS INFORMATION 21
INTRODUCTION
GENERAL
Vulcan convection steamers are produced with quality workmanship and material. Proper installation, usage and maintenance will result in many years of satisfactory performance.
It is suggested that you thoroughly read this entire manual and carefully follow all of the instructions provided.
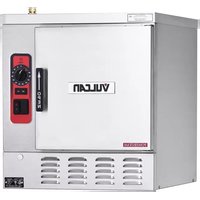
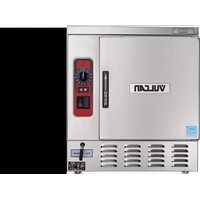
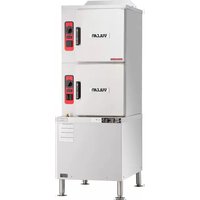
Model C24GA6 can accommodate three 2^1 / 2 deep (64 mm) steam pans per compartment. Model C24GA10 can accommodate five _2^ deep (64 mm) steam pans per compartment.
The C24GA6 and C24GA10 gas-fired convection steamers are designed for cooking vegetables, eggs and other foods, in commercial kitchens. Each compartment has a 0 to 60 minute timer. (The buzzer requires manual shutoff.) The steamers are equipped with a cabinet base for floor installation.
| C24GA6 C | 24GA10 | |
| Compartments 2 | 2 | |
| Total Number of 21/2" (64 mm) Deep Pans | 6 | 10 |
| Gas Rating 125,000 BTU/hr. | 125,000 BTU/hr. | |
UNPACKING
This steamer was inspected and tested before leaving the factory. The transportation company assumes full responsibility for safe delivery upon acceptance of the shipment.
Immediately after unpacking, check for possible shipping damage. If steamer damage is found, save the packaging material and contact the carrier within 5 days of delivery.
INSTALLATION
For Installation, see the Installation section in the Service Manual.
Before installing, verify that the type of gas (natural or propane) and the electrical supply required agree with the specifications on the data plate located on the left edge of the tabletop. If the supply and equipment requirements do not agree, do not proceed with the installation. Contact your dealer or Vulcan immediately.
INSTALLATION CODES AND STANDARDS
The Vulcan steamer must be installed in accordance with:
In the United States of America:
- Local Codes and State Codes
- National Fuel Gas Code, ANSI-Z223.1/ NFPA #54 (latest edition). Copies may be obtained from The American Gas Association Accredited Standards Committee Z223, @ 400 N. Capital St. NW, Washington, DC 20001, or the Secretary Standards Council, NFPA, 1 Batterymarch Park Quincy, MA 02169-7471.
- NFPA Standard # 96 Vapor Removal from Cooking Equipment, latest edition, available from the National Fire Protection Association, Batterymarch Park, Quincy, MA 02269.
- In the Commonwealth of Massachusetts all gas appliances vented through a ventilation hood or exhaust system equipped with a damper or with a power means of exhaust shall comply with 248 CMR.
In Canada:
- Local codes.
- CAN/CSA-B149.1 Natural Gas Installation (latest edition).
- CAN/CSA-B149.2 Propane Installation Code (latest edition), available from the Canadian Gas Association, 178 Rexdale Blvd., Etobicoke, Ontario, Canada M9W 1R3.
LOCATION - GAS STEAMERS
The equipment area must be kept free and clear of combustible substances.
The recommended clearance for proper operation is 36^ (914 mm) at the front. The required clearance from combustible or noncombustible construction is 0^ at the sides and back. The recommended clearance for service access is 18^ (457 mm) at the sides and 6^ (152 mm) from the back.
Make sure there is an adequate supply of air in the room to replace air taken out by the ventilating system. If you have any questions, contact the ventilation system installer.
An exhaust system should be located directly above the steamer to exhaust steam, flue exhaust and heat generated by the steamer.
Do not locate the steamer directly over a drain.
LEVELING AND ANCHORING
Position the steamer in its final installed location. Place a level on the horizontal area of the cabinet. Adjust the feet to level the steamer in both the left-to-right and front-to-rear directions.
Steamers should be elevated in the front just enough, about 1/16'' to 1/8'' (2 to 3 mm), to provide proper draining. Do this by rotating the adjustable feet in the proper direction 1 to 1/2 turns after leveling. Check drainage in the steamer compartments by pouring a small amount of water in the compartment. All the water should drain.
The feet have holes in the flanges for anchor bolts.
PLUMBING CONNECTIONS
WARNING Plumbing connections must comply with applicable sanitary, safety and plumbing codes.
Water Requirements
Proper water quality can improve the taste of the food prepared in the steamer, reduce liming in
the steam generator and extend equipment life. Local water conditions vary from one location to another. Ask your municipal water supplier for details about your local water supply prior to installation. Presence of sediment, silica, excess chlorides or other dissolved solids may lead to a recommendation for alternate form(s) of water treatment. Test the water with the test strip included with the steamer. Other factors affecting steam generation are iron content, amount of chloridation and dissolved gases.
Water Treatment
A local water treatment specialist should be consulted before installation of steam generating equipment.
| Supply Pressure 20 | psig flowing - 60 psig static |
| Hardness* less than | 3 grains |
| Silica less than 13 ppm | |
| Total Chlorine less than 0.5 ppm | |
| PH range 7 - 8 | |
| Undissolved Solids less than 5 microns | |
| *17.1 ppm - 1 grain of hardness | |
If the water supply fails to meet these standards, it will be necessary to install a water conditioner on the generator water feed. The use of strainers or filters will not remove minerals from the water.
Water Supply Connection
Connect the treated cold water supply line to the 3/4'' (19 mm) (male hose thread) inlet. Connect the untreated cold water supply line to the 3/4'' (19 mm) (male hose thread) inlet marked Untreated WATER.
Note: Do not over tighten water connections. Over tightening the hose connections will damage the water valve. Turn hose connection by hand till snug and then tighten with pliers 2/3 of a turn. Check for leaks.
Note: If water lines move during water fill valve operation then a water hammer arrestors must be added.
A water filter system is recommended for the water supply line going to the treated water inlet. Follow the recommendations for use and installation instructions shipped with the water filter. If a water filter is not installed, the steam generator warranty may be limited.
A manual shutoff valve must be provided in a convenient location near the steamer.
Filter System
If you decide to not install a scale reducing filter system design for steam equipment or use another manufacturer's system other than recommended by Vulcan, please use these guidelines.
- If you are going to delime the unit with a deliming agent recommended for a pressure steam boiler and stainless steel generators and you are on city or treated well water, you still must have a carbon block filter installed and maintained. Carbon block filters remove the chlorine and chloramines disinfectants from the water. Chlorine and chloramines will erode the boiler or steam generator and will result in a vessel failure which is not covered under warranty.
Water feed lines to the steamer must be flushed before final connection. Particles in the water could build up in the water and steam valves or clog tubing and components that maintain the water level and pressure in the boiler or steam generator. If the water supply is not free of sediment or cloudy after several minutes of flushing, a sediment filter must be installed before use.
If you have purchased water filter system from Vulcan, please follow the At the time of installation you must register your steamer at www.vulcanequipment.com or use the reply card supplied with your unit. You will need to register your steamer at each filter change to insure your standard and extended warranty is maintained.
Drain Connection
The 1 12 NPT threaded fitting on the condenser box must be extended a minimum of 12" (305 mm) - maximum of 72" (1829 mm) away from steamer base, to an open air gap type drain. Do not reduce the 1 12 NPT drain piping throughout its length. Provide a suitable floor sink with a minimum depth of 12" (305 mm). The floor sink is NOT to be directly under the steamer and should be at a distance so that steam vapors will not enter the steamer from underneath. The drain should slope down away from the steamer 1 14 for every foot of drain pipe length. The drain pipe should be either iron or copper. DO NOT use PVC pipe; PVC pipe may lose its rigidity or glue may fail.
In order to avoid any back pressure in the steamer, do not connect solidly to any drain connection.
Temperatures in the generator can briefly reach as high as 212^ (100^) . Local codes may require that the temperature of drain water be no greater than 140^ (60^) . At the end of the day, when purging the generators, some provision for lowering the water temperature must be provided by the user or installer to meet this code requirement.
GAS SUPPLY CONNECTIONS
All gas supply connections and any pipe joint compound used must be resistant to the action of propane gas. A 3/4 NPT minimum inside diameter gas supply line is required. If quick disconnect devices are used, make sure it is sized properly for data plate BTU/hr. rating. Refer to quick connect supplier's data sheet.
Codes require that a manual gas shutoff valve be installed in the gas line ahead of the steamer.
The gas line must be capable of delivering gas to the generator without excessive pressure drop at the minimum rate specified on the rating plate.
Gas Input: 34 NPT
Natural: 7" _ 10.5" W.C.
Propane: 11" _ 13" W.C.
Inadequate gas supply could result in burner noise and poor burner performance.
Refer to the instruction manual supplied with the machine for INSTALLATION CODES AND STANDARDS and GAS CONNECTION information.
Refer to the Service Manual for a view of the Blower assembly set up for combustion issues.
The proper sizing and installation of the gas connection is important for the machine to operate within its design specifications. In some installations, the gas supply may not be sufficient enough to allow all the gas equipment to operate properly at peak loads; or when other equipment with a high BTU/hr. input requirement is operating. The connection to the machine becomes even more important in this type of location.
Flexible gas connectors with quick disconnect or swivel fittings (when used) and gas connectors beyond the length necessary will reduce the BTU/hr. flow capacity to the machine.
Note: Do not use corrugated stainless steel tubing for commercial gas equipment supply connections.
Note: A straight gas connection is the ideal condition for the rated BTU/hr. flow capacity of the connector. If a straight connection is not possible and a flexible gas connector is used, do not twist, kink or excessively flex the connector beyond a U shape. Flexing the gas connector as described will restrict gas flow or may damage the connector.
Changing a flexible gas connector may raise the BTU/hr. flow capacity enough to allow the machine to operate within its design specifications. (i.e. Removing the quick disconnect fitting, installing a shorter gas connector or installing a larger diameter gas connector.)
An alternative may be to move the equipment to a different gas supply location in the kitchen. (i.e. Closer to the main supply into the kitchen or away from other equipment with high BTU/hr. input requirements.)


Figure 1
The generator is equipped with a factory preset pressure regulator. Natural gas pressure regulators are preset for 7.0'' W.C. (0.62kPa) . Propane gas pressure regulators are preset for 11'' W.C. (2.46kPa) . No further adjustment should be required. Check gas pressures with a manometer at time of installation to verify that they agree with the pressures specified.
Gas Connection Data
| FLEXIBLE GAS CONNECTORS BTU/HR. FLOW CAPACITY2 | ||||||||
| LENGTH3 | LENGTH4 | |||||||
| End Fittings - (1) Quick Disconnect & (1) Threaded | End Fittings - Both Threaded | |||||||
| ID 36" 48' | 60" 72" 36" | 48" 60" 72" | ||||||
| ½" 77,000 | 68,000 60,000 | 55,000 | 20,000 | 106,000 | 33,000 | 36,000 | ||
| ¾" 218,000 | 180,000 | 139,000 | 256,000 | 225,000 | 198,000 | 175,000 | ||
| 1" 37,.000 | 334,000 | 29,000 | 279,000 | 512,000 | 397,000 | 350,000 | ||
| 1¼" 615,000 | 541,000 | 476,000 | 419,000 | 946,000 | 833,000 | 645,000 | ||
| 1. Flow rating BTU/hr. 0.64 SP. GR @ 0.5 inch W.C. pressure drop. | ||||||||
| 2. BTU/hr. flow capacities are based on Dormont Mfg. Co. Supr-Safe gas line connectors and are provided for reference. Additional quick disconnect fittings, swivels, or manual shut off valves will reduce the BTU/hr. flow capacities listed in this table. If other flexible gas connectors are used, check the manufacturer's specifications for BTU/hr. flow capacities. Super-Safe is a registered trademark of the Dormont Manufacture Company. | ||||||||
| 3. The maximum length for a flexible gas connector is 72" per National Fuel Code standards. | ||||||||
| BLACK IRON PIPE BTU/HR. FLOW CAPACITY,2,3 | ||||||
| Natural Gas | Nominal Inside Diameter of Pipe | |||||
| Pipe Length | 1/2" | 3/4" | 1" | 11/4" | 11/2" | 2" |
| 15' | 76,000 | 172,000 | 345,000 | 750,000 | 1,220,000 | 2,480,000 |
| 30' | 52,000 | 120,00 | 241,000 | 535,000 | 850,000 | 1,780,000 |
| 45' | 43,000 | 99,000 | 199,000 | 435,000 | 700,000 | 1,475,000 |
| 60' | 38,000 | 86,000 | 173,000 | 380,000 | 610,000 | 1,290,000 |
| 75' | 77,000 | 155,000 | 345,000 | 545,000 | 1,120,000 | |
| 90' | 70,000 | 141,000 | 310,000 | 490,000 | 1,000,000 | |
| 1. Flow rating BTU/hr. 0.64 SP. GR @ 0.3 inch W.C. pressure drop. | ||||||
| 2. BTU/hr. flow capacities are based on Schedule 40 pipe, include a tolerance for pressure losses in gas piping systems are provided for reference. | ||||||
| 3. Count each 90° elbow as 3' of gas pipe for the purpose of calculating total pipe length. | ||||||
WARNING Prior to lighting, check all joints in the gas supply line for leaks. Use soap and water solution. Do not use an open flame.
A. Check all joints prior to the gas valve (solenoid) before lighting unit.
B. Check all joints beyond gas valve (solenoid) after unit is lit.
After piping has been checked for leaks, all piping receiving gas should be fully purged to remove air.
Testing the Gas Supply System
When the gas supply pressure exceeds 1/2 psig (3.45 kPa), the steamer and its individual manual gas shutoff valve must be disconnected from the gas supply piping system.
When the gas supply pressure is 12 psig (3.45 kPa) or less, the steamer should be isolated from the gas supply system by closing its individual manual gas shutoff valve.
FLUE GAS EXHAUST
DO NOT obstruct the flow of flue gases from the flue located on the rear of the steamer. It is recommended that the flue gases be vented to the outside of the building through a ventilation system installed by qualified personnel.
Information on the construction and installation of ventilating hoods may be obtained from Vapor Removal from Cooking Equipment, NFPA-96 (latest edition) available from the National Fire Protection Association, Batterymarch Park, Quincy, MA 02269.
ELECTRICAL CONNECTIONS
WARNING Appliances equipped with a flexible electric supply cord are provided with a three-prong grounding plug. It is imperative that this plug be connected into a properly grounded threeprong receptacle. If the receptacle is not the proper grounding type, contact an electrician. Do not remove the grounding prong from this plug.
WARNING Electrical and grounding connections must comply with the applicable portions of the national electrical code and/or other local electrical codes.
Refer to the data plate located on the left edge of the tabletop and the electrical diagram located behind the front panel on the base.
ELECTRICAL DATA
| Volts 120 | |
| Hertz (Hz) 60 | |
| Phase 1 | |
| Machine Amps 3 | |
| Minimum Circuit Ampacity, Maximum Protective Device AMPS | 15 |
STARTUP
WARNING The steamer and its parts are hot. Use care when operating, cleaning or servicing the steamer.
WARNING The cooking compartment contains live steam. Stay clear while opening door.
Once the steamer is installed and all mechanical connections have been made, thoroughly test the steamer before operation.
- Check that proper water, drain, electrical and gas connections have been made.
- Turn on manual gas valve.
- Press power switch to the on position. After approximately 20 minutes the ready light should come on, indicating that generator has reached operating pressure.
-
With the door closed the ready light comes on. Set the timer to the 5-minute position. Open the door and observe that no steam is entering the compartment and the ready and cooking lights are off.
-
Close the compartment door. The cooking light should now be lit and steam should be heard entering the compartment.
- Check the drain line to be sure that water from the cold water condenser is flowing through the drain line.
- Open the compartment door and observe that steam supply to the compartment stops, and that the ready light and cooking light turn off.
- Close the compartment door and let the cooking cycle finish. When the timer returns to the 0 position, a buzzer will sound, signaling the end of the cooking cycle and the cooking light goes off. To silence the buzzer, turn the dial timer to the OFF position.
- Complete the above steps for each cooking compartment.
- To shutdown the steamer, press the power switch to the off position and close the manual gas shutoff valve. Leave the compartment doors slightly open to allow the inside to dry out.
OPERATION
WARNING The steamer and its parts are hot. Use care when operating, cleaning or servicing the steamer.
WARNING The cooking compartment contains live steam. Stay clear when opening the door.
LIGHTING AND SHUTDOWN INSTRUCTIONS
Lighting
- Turn manual gas shutoff valve to on position.
- Press power switch on. Steam will generate in 20 minutes.
- Ready light will light when compartment is ready for cooking.
- Load food and set timer to proper cook time. Door must be closed.
Shutdown
- Press power switch off.
- Wait 5 minutes before relighting the appliance (if required).
- Turn manual gas shutoff valve to off position.
- Do not unplug or turn off power supply for at least 20 minutes after power switch is turned off.
- Leave compartment door sightly open.
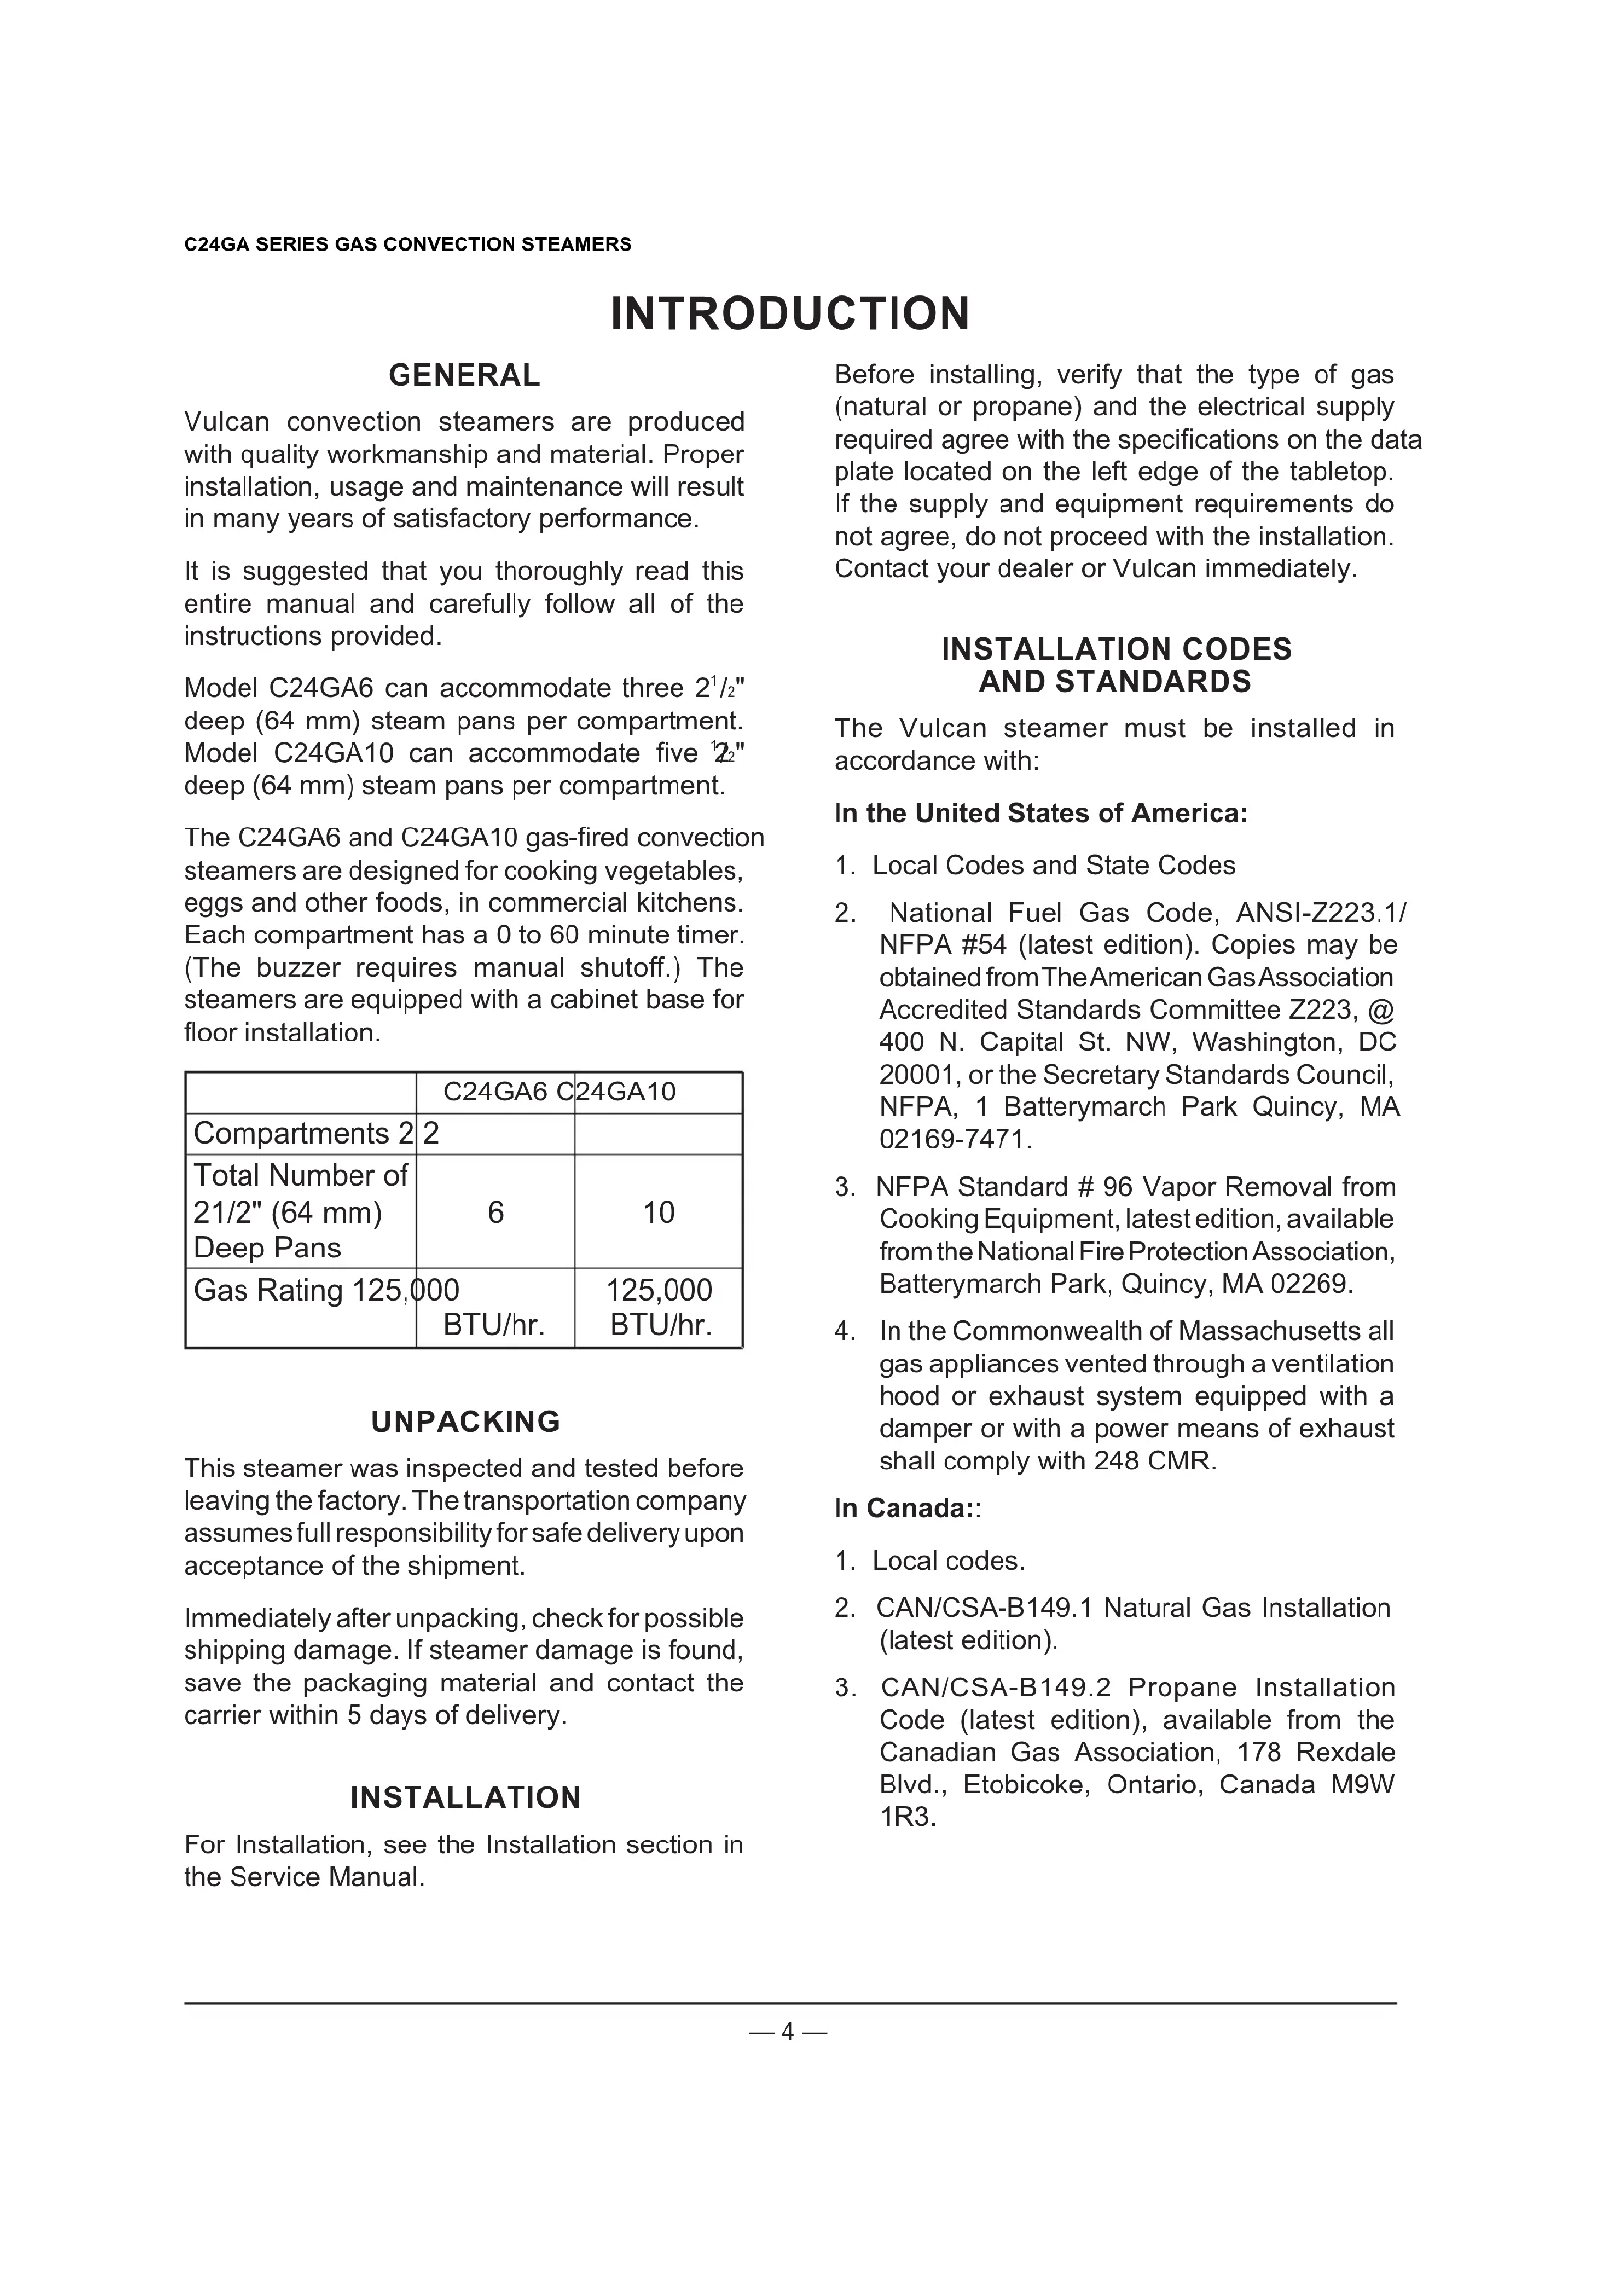
COMPARTMENT CONTROLS
The upper section of the steamer consists of two cooking compartments. Each compartment functions independently with its own controls (See Figure 2) and is a separate, sealed steam chamber during the cooking operation.
WARNING The steamer and its parts are hot. Use care when operating, cleaning or servicing the steamer.
Compartment Controls and Indicators
| ITEM FUNCTION | |
| Ready Light (Green) | Indicates the steamer is ready for the cooking cycle |
| Cooking Light (Red) | Indicates the steamer is in the cooking phase |
| Timer Set the desired cooking time. Timer range is 0-60 minutes or constant. Turn to the OFF position to silence buzzer. | |
Figure 2 Cabinet Controls
Refer to Steam Cooking with Vulcan Kettles and Steamers for suggested cooking times. Also refer to the Suggested Cooking Guideline in this manual. Size, weight, pan loading and product quality will affect cooking times and should be adjusted to your own requirements.
STARTUP PROCEDURE
- Open manual gas shutoff valve and ensure the steamer doors are closed.
- Press power switch to the on position.
- If Ready light fails to turn on in 20 minutes, press power switch off and back on to reset ignition system.
PREHEATING
Preheat the cooking cavity when the steamer is first used for the day or whenever the compartment is cold. Keep the door closed during the preheat cycle.
- When the green ready light comes on, set the timer to 10 minutes to preheat the compartment.
The red cooking light is lit. - When the buzzer sounds, turn the timer to the OFF position. The steamer is ready to cook.
OPERATING
- With the compartment(s) preheated and the green ready light on, place pans of food into the cooking compartment(s) and shut the door(s).
- Turn the timer(s) to the desired cooking time.
The cooking cycle will begin.
- The cooking cycle and time may be interrupted at any time by opening the door. Close the door to resume cooking.
3. The buzzer will sound when the cooking cycle ends and steam has stopped entering the cooking compartment(s).
- Turn the timer(s) to the OFF position to silence the buzzer(s); remove the cooked food.
The red cooking light will go off and the green ready light will come on to indicate the steamer is ready for the next cooking cycle.
STEAMING
Each steaming compartment has its own controls.
With the READY light lit, the steamer is ready for use.
- Open the compartment door.
- Place pans of food to be cooked into the compartment and shut the door.
- Set the timer to the desired cooking time. Steaming begins.
- The cooking cycle may be interrupted at any time by opening the compartment door. Resume cooking by closing the door.
- When the buzzersounds, the timed steaming cycle has finished. Steaming stops, the cooking light goes off. To silence the buzzer, turn the timer OFF.
EXTENDED SHUTDOWN
To shut down for an extended period:
- Press power switch to OFF.
- Turn manual gas shutoff valve to off.
- Clean the compartment(s).
- After 20 minutes unplug steamer.
- Leave the compartment door slightly open when the steamer is not in use. When the compartment is idle, never latch the door and apply pressure to the door gasket. Leaving the gasket under pressure can cause permanent deformation and reduce gasket life.
STAINLESS STEEL EQUIPMENT CARE AND LEANING
(Supplied courtesy of NAFEM. For more information, visit their web site at www.nafem.org)
Contrary to popular belief, stainless steels ARE susceptible to rusting.
Corrosion on metals is everywhere. It is recognized quickly on iron and steel as unsightly yellow/orange rust. Such metals are called "active" because they actively corrode in a natural environment when their atoms combine with oxygen to form rust.
Stainless steels are passive metals because they contain other metals, like chromium, nickel and manganese that stabilize the atoms. 400 series stainless steels are called ferritic, contain chromium, and are magnetic; 300 series stainless steels are called austenitic, contain chromium and nickel; and 200 series stainless, also austenitic, contains manganese, nitrogen and carbon. Austenitic types of stainless are not magnetic, and generally provide greater resistance to corrosion than ferritic types.
With 12-30 percent chromium, an invisible passive film covers the steel's surface acting as a shield against corrosion. As long as the film is intact and not broken or contaminated, the metal is passive and stain-less. If the passive film of stainless steel has been broken, equipment starts to corrode. At its end, it rusts.
Enemies of Stainless Steel
There are three basic things which can break down stainless steel's passivity layer and allow corrosion to occur.
- Mechanical abrasion
- Deposits and water
- Chlorides
Mechanical abrasion means those things that will scratch a steel surface. Steel pads, wire brushes and scrapers are prime examples.
Water comes out of the faucet in varying degrees of hardness. Depending on what part of the country you live in, you may have hard or soft water. Hard water may leave spots, and when heated leave deposits behind that if left to sit, will break down the passive layer and rust stainless steel. Other deposits from food preparation and service must be properly removed.
Chlorides are found nearly everywhere. They are in water, food and table salt. One of the worst chloride perpetrators can come from household and industrial cleaners.
So what does all this mean? Don't Despair!
Here are a few steps that can help prevent stainless steel rust.
1. Use the proper tools.
When cleaning stainless steel products, use non-abrasive tools. Soft cloths and plastic scouring pads will not harm steel's passive layer. Stainless steel pads also can be used but the scrubbing motion must be in the direction of the manufacturers' polishing marks.
2. Clean with the polish lines.
Some stainless steel comes with visible polishing lines or "grain." When visible lines are present, always scrub in a motion parallel to the lines. When the grain cannot be seen, play it safe and use a soft cloth or plastic scouring pad.
- Use alkaline, alkaline chlorinated or non-chloride containing cleaners.
While many traditional cleaners are loaded with chlorides, the industry is providing an ever-increasing choice of nonchloride cleaners. If you are not sure of chloride content in the cleaner used, contact your cleaner supplier. If your present cleaner contains chlorides, ask your supplier if they have an alternative. Avoid cleaners containing quaternary salts; it also can attack stainless steel and cause pitting and rusting.
- Treat your water.
Though this is not always practical, softening hard water can do much to reduce deposits. There are certain filters that can be installed to remove distasteful and corrosive elements. To insure proper water treatment, call a treatment specialist.
5. Keep your food equipment clean.
Use alkaline, alkaline chlorinated or non-chloride cleaners at recommended strength. Clean frequently to avoid buildup of hard, stubborn stains. If you boil water in stainless steel equipment, remember the single most likely cause of damage is chlorides in the water. Heating cleaners that contain chlorides have a similar effect.
6. Rinse, rinse, rinse.
If chlorinated cleaners are used, rinse and wipe equipment and supplies dry immediately. The sooner you wipe off standing water, especially when it contains cleaning agents, the better. After wiping equipment down, allow it to air dry; oxygen helps maintain the stainless steel's passivity film.
- Never use hydrochloric acid (murlatic acid) on stainless steel.
- Regularly restore/passivate stainless steel.
| Job Cleaning Agent Comments | |
| Routine cleaning Soap, ammonia, detergent, Medallion | Apply with soft cloth or sponge. |
| Fingerprints and smears | Arcal 20, Lac-O-Nu Ecoshine |
| Stubborn stains and discoloration | Cameo, Talc, Zud, First Impression |
| Grease and fatty acids, blood, burnt-on foods | Easy-off, DeGrease It Oven Aid |
| Grease and Oil Any good commercial detergent | Apply with soft cloth or sponge. |
| Restoration/ Passivation | Benefit, Super Sheen |
Review
- Stainless steels rust when passivity (film-shield) breaks down as a result of scrapes, scratches, deposits and chlorides.
- Stainless steel rust starts with pits and cracks.
- Use the proper tools. Do not use steel pads, wire brushes or scrapers to clean stainless steel.
- Use non-chlorinated cleaners at recommended concentrations. Use only chloride free cleaners.
- Soften your water. Use filters and softeners whenever possible.
- Wipe off cleaning agent(s) and standing water as soon as possible. Prolonged contact causes eventual problems.
To learn more about chloride-stress corrosion and how to prevent it, contact the equipment manufacturer or cleaning materials supplier.
Developed by Packer Engineering, Naperville, Ill., an independent testing laboratory.
CLEANING
WARNING Disconnect the electrical power to the machine and follow lockout/ tagout procedures before cleaning.
Cooking Compartment Drain
Keep compartment drains running freely. Inspect compartment drains daily for blockage. Remove any particles or debris from the perforated strainer daily (or more often if needed).
After cooking greasy foods or seafood, close the doors and operate each compartment for 25 to 30 minutes to flush any residual grease and oils down the compartment drain. Make a solution of warm water and non-chloride/chlorine/bleach based detergent and pour 1 / 2 gallon (1.9 liters) of it down each compartment drain. Rinse by pouring 1 / 2 gallon (1.9 liters) of hot water down each compartment drain.
Draining Generator
To prevent malfunction of controls and clogging, it is essential to drain the generator every day. This will flush out any accumulated minerals from the feed water. It will also aid in preventing internal scale buildup which would interfere with proper generator operation. Failure to drain the generator every day will void the steamer warranty. The presence of minerals in suspension is indicated by a murky or milky condition in the first portion of the water drained.
WARNING The water being drained is hot and under pressure. Use care when cleaning or servicing the generator.
After the generator has been in operation, turn the unit off with the power switch located on bottom cooking cavity to drain the generator. The generator will drain for approximately 15 minutes, removing sediment, scale and lime buildup in the generator.
Compartments
Wash the inside of the compartment with a solution of warm water and non-chloride detergent. Rinse with warm water.
Once a week, thoroughly clean the exposed surfaces (sides, front, door and top) with a damp cloth and polish with a clean cloth. To remove discolorations, use a nonabrasive cleaner.
Door Gaskets
Clean the gasket sealing surface of the compartment door daily to remove food acids for maximum gasket life. Do not use any solvents or sharp instruments. Wash with a cloth moistened in a solution of mild detergent and warm water. Rinse with a fresh cloth moistened with warm water to remove all traces of detergent.
Wipe dry with a clean cloth. Never apply food oils or petroleum lubricants directly to the door gasket. Petroleum-based solvents and lubricants will reduce gasket life.
LEAVECOMPARTMENTDOOR OPEN
Leave the compartment door slightly open when the steamer is not in use. When the compartment is idle, never latch the door and apply pressure to the door gasket. Leaving the gasket under pressure can cause permanent deformation and reduce gasket life.
GUIDELINES FOR MAINTAINING STAINLESS STEEL SURFACES
There are four things that will break down stainless steel and allow corrosion to develop: 1) abrasion, 2) deposits, 3) water and 4) chlorides.
Avoid rubbing with steel pads, wire brushes or scrapers that can leave iron deposits on stainless steel. Instead, use plastic scouring pads or soft cloths. For stubborn stains, use products such as Cameo™, talc or Zud First Impression™. Always rub parallel to the polish lines or with the grain.
Hard water will leave deposits that promote rust on stainless steel. Treated water from softeners or certain filters can eliminate these mineral deposits. Other deposits from food or lubrication must be properly removed by cleaning. Use mild detergent and non-chloride/chlorine/bleach based cleaners. Rinse thoroughly and wipe dry. Where appropriate, apply a polish recommended for stainless steel (such as Benefit™ or Super Sheen™) for extra protection and luster.
MAINTENANCE
WARNING The steamer and its parts are hot. Use care when operating, cleaning or servicing the steamer.
Water Treatment System
A water treatment system is recommended for steamers. Refer to your supplier's manual for normal maintenance procedures for proper scale-free operation recommendations.
Scale Related Maintenance
Periodic maintenance is necessary to keep your generator clean and efficient. Initially, after three months of steamer usage, it is recommended that you have your Vulcan authorized service inspect the generator. Local water conditions and steamer usage will determine the frequency that this service must be repeated; however, a minimum recommendation is once a year. This maintenance is not covered by warranty.
Draining Generator
At least once daily, turn the unit off with the power switch located on bottom cooking cavity, to drain the generator
Note: DO NOT remove the electric supply or the unit will not drain.
Door Gaskets
If the door gasket is leaking due to a nick or cut, it must be replaced. Damage to the gasket sealing surface will cause steam leakage.
Flue
Annually (at minimum), when the steamer is cool, check the flue and clear any obstructions.
COOKING CHART
The following table lists suggested cooking times and weights. These times, which will vary depending on initial product temperature, size, shape, etc., are approximate and should be adjusted to suit your operation.
PRODUCTS TO BE COoked IN SOLID PANS
| PRODUCT TIME (Minutes) WEIGHT PER PAN | ||
| Eggs, Scrambled 12 8 doz. | ||
| Rice, Long Grain (Cover with 4 cups water/lb.) 25 | 2 lbs. | |
| Pasta (Place perforated pan inside solid pan, cover with cold water) Spaghetti - Regular/Vermicelli Macaroni - Shells/Elbows Noodles - 1/2" Wide Lasagna Noodles | 12 to 15 15 to 18 12 to 15 15 to 18 | 4 lbs. 4 lbs. 4 lbs. 4 lbs. 4 lbs. |
| Frozen Casseroles, Lasagna 35 Full Pan | ||
| Meat Loaf, 3-5 Lb. Each 40 15 lbs. | ||
| Beef Ground Chuck Sliced as Purchased | 20 to 25 35 to 40 | 10 lbs. 10 lbs. |
| Shrimp, Frozen, 10 Shrimp per Lb. 5 4 lbs. | ||
| Beans Baked Refried | 9 9 | 10 lb. Can 10 lb. Can |
| Canned Vegetables Prunes, Dried | 6 15 | 10 lb. Can |
PRODUCTS TO BE COoked IN PERFORATED PANS
| PRODUCT TIME (Minutes) | WEIGHT PER PAN | |
| Clams | ||
| Frozen | 10 to 12 | 3 dozen |
| Fresh | 10 to 12 | 3 dozen |
| King Crab, Frozen | ||
| Claws | 4 | 2-1/2 lbs. |
| Legs | 4 to 6 | 2-1/2 lbs. |
| Lobster Tail, Frozen 6 10 lbs. | ||
| Lobster, Live, 10" - 12" | 5 | 4 Per Pan |
| Salmon Fillets, Frozen, 8 Oz Ea | 5 | 7-1/2 lbs. |
| Scallops, Fresh | 4 | 3 lbs. |
| Scrod Fillets, Fresh 3.5 4 lbs. | ||
| Eggs | ||
| Hard Cooked | 15 | 4 doz. |
| Soft Cooked | 9 to 10 | 4 doz. |
| Soft Yoke for Caesar Salad | 6 to 8 | 4 doz. |
| Chicken — Breasts, Legs, Thighs 20 15 lbs. | ||
| Turkey | ||
| Frozen Breasts (2) | 90 | 6 to 7 lbs. Ea. |
| Cut Lengthwise | 95 | 20 to 25 lbs. Ea. |
| Corned Beef 40 to 75 6 to 8 | ||
| Hot Dogs and Wieners 3 80 to 100 Count | ||
| Asparagus Spears | ||
| Frozen | 10 to 12 | 3 Dozen |
| Fresh | 5 | 5 lbs. |
| Beans | ||
| Green 2" Cut, Frozen/Fresh | 6 | 5 lbs. |
| Lima, Frozen | 8 | 5 lbs. |
| Baby Lima, Frozen | 5 | 5 lbs. |
| Broccoli | ||
| Spears, Frozen | 8 | 5 lbs. |
| Spears, Fresh | 6 | 5 lbs. |
| Flowerettes, Frozen | 6 | 5 lbs. |
| Brussel Sprouts, Frozen 6 | 5 lbs. | |
| Cabbage, Fresh, 1/6 Cut | 8 | 5 lbs. |
PRODUCTS TO BE COoked IN PERFORATED PANS
| PRODUCT TIME (Minutes) | WEIGHT PER PAN | |
| Carrots Baby Whole, Frozen Crinkle Cut, Frozen Sliced, Fresh | 8 7 to 8 11 | 7 lbs. 4 lbs. 9 lbs. |
| Cauliflower, Flowerettes Frozen Fresh | 6 7 to 8 | 4 lbs. 5 lbs. |
| Celery, 1" Diagonal Cut 7 5 lbs. | ||
| Corn Yellow Whole Kernel, Frozen Cobbettes, Frozen Corn-On-Cob, Fresh | 5 8 16 to 18 10 to 12 16 to 18 | 5 lbs. 27 Ears 80 Ears 18 Ears 54 Ears |
| Peas, Green 6 5 lbs. | ||
| Potatoes, Whole Russet 55 10 lbs. | ||
| Spinach Chopped, Frozen Defrosted Fresh Cut | 17 5 3 | 6 lbs. 6 lbs. 2 lbs. |
| Squash, Acorn Halves 25 10 Halves | ||
| Zucchini, Slices 8 10 lbs. | ||
| Frozen Mixed Vegetables 6 to 7 | 10 lbs. | |
| Fruit, Blanch for Peeling Grapefruit Oranges | 3 3 | |
| Pineapple, Whole for Cutting | 4 |
COOKING HINTS
Where possible, spread food out evenly in pans. Do not allow food to protrude above pans, since this will interfere with steam circulation between pans in the compartment.
Always preheat compartments for satisfactory results.
When time does not allow for defrosting of frozen vegetables, such as loose-pack peas, corn, diced carrots, etc., they may be cooked at once provided just half of the suggested portions in the cooking chart are used.
TROUBLESHOOTING
| SYMPTOMS POSSIBLE | CAUSES REMEDY | |
| Unit not steaming Gas supply | is offPower cord is unpluggedPower switch is offWater supply is offBurner control goes into 100% lockout | Turn on gas supplyPlug in power cord.Press power switch onTurn on water supplyShut off the power, wait 5 minutes, then turn power back on to restart ignition.If symptom persists, contact your Authorized Vulcan Servicer. |
| Door leaks Damaged door gasket | High Water Pressure | Check door gasket for damage.Verify water pressure is between 20-60 psi.Verify drain plumbing.If symptom persists, contact your Authorized Vulcan Servicer. |
| Plugged drain or screen Clear compa-mertment cavity screen.If symptom persists, contact your Authorized Vulcan Servicer. | ||
| Water accumulates in compartment | Drain cloggedNot leveled properly | Unclog drain.Level per instructions in this manual.High water pressure drain installation. |
| Water not being supplied to generator | Water supply valve is offWater pressure lowWater filter is plugged | Turn valve on.Check water supply pressure.Refer to water filter manual.If symptom persists, contact your Authorized Vulcan Servicer. |
| Steam is exiting from under unit | Generator pressure is too high Contact your Authorized Vulcan Servicer. | |
SERVICE AND PARTS INFORMATION
To obtain service and parts information concerning this model, contact the Authorized Vulcan Servicer in your area. Refer to our website, www.vulcanequipment.com for a complete listing of Authorized Service and Parts depots.
When calling for service, the following information (located on your machine data plate) must be available:
Model Number
Serial Number
MANUEL D'INSTALLATION ET D'UTILISATION
3600 NORTH POINT BLVD. BALTIMORE, MD 21222
RENSEIGNEMENTS SUR L'ENTRETIEN ET LES PIECES
RACCORDEMENT AU GAZ 6

- IMPORTANT FOR YOUR SAFETY
- IMPORTANT
- FOR YOUR SAFETY
- CONTENTS
- INTRODUCTION
- GENERAL
- UNPACKING
- INSTALLATION
- INSTALLATION CODES AND STANDARDS
- In the United States of America:
- In Canada:
- LOCATION - GAS STEAMERS
- LEVELING AND ANCHORING
- PLUMBING CONNECTIONS
- Water Requirements
- Water Treatment
- Water Supply Connection
- Filter System
- Drain Connection
- GAS SUPPLY CONNECTIONS
- Gas Connection Data
- Testing the Gas Supply System
- FLUE GAS EXHAUST
- ELECTRICAL CONNECTIONS
- STARTUP
- OPERATION
- LIGHTING AND SHUTDOWN INSTRUCTIONS
- Lighting
- Shutdown
- COMPARTMENT CONTROLS
- STARTUP PROCEDURE
- PREHEATING
- OPERATING
- STEAMING
- EXTENDED SHUTDOWN
- STAINLESS STEEL EQUIPMENT CARE AND LEANING
- Enemies of Stainless Steel
- So what does all this mean? Don't Despair!
- Use the proper tools.
- Clean with the polish lines.
- Keep your food equipment clean.
- Rinse, rinse, rinse.
- Review
- CLEANING
- Cooking Compartment Drain
- Draining Generator
- Compartments
- Door Gaskets
- LEAVECOMPARTMENTDOOR OPEN
- GUIDELINES FOR MAINTAINING STAINLESS STEEL SURFACES
- MAINTENANCE
- Water Treatment System
- Scale Related Maintenance
- Flue
- COOKING CHART
- COOKING HINTS
- TROUBLESHOOTING
- SERVICE AND PARTS INFORMATION
- MANUEL D'INSTALLATION ET D'UTILISATION
- RENSEIGNEMENTS SUR L'ENTRETIEN ET LES PIECES
Brand : Vulcan
Model : C24GA6
Category : Steam cleaner