
25490 - Croque monsieur clip HAMILTON BEACH - Free user manual and instructions
Find the device manual for free 25490 HAMILTON BEACH in PDF.

| Product Type | Breakfast sandwich maker / grill |
| Brand | Hamilton Beach |
| Model | 25490 |
| Power supply | 120 V, 60 Hz |
| Plug type | Polarized plug (one blade wider) |
| Capacity | 2 sandwiches at a time |
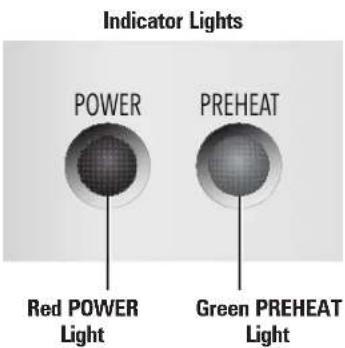
| Main functions | Cooking breakfast sandwiches, removable nonstick plates, adjustable timer in 30-second increments, preheat (green) and power (red) indicator lights |
| Cooking plates | Removable, nonstick, dishwasher safe (top rack only, no SANI cycle) |
| Rings | Removable, dishwasher safe or wash in hot soapy water |
| Material | Plastic and metal (nonstick plates) |
| Handles | Heat insulated for safe handling |
| Safety | Hot surfaces, do not immerse, do not use metal utensils, unplug before cleaning, do not leave unattended |
| Maintenance | Wipe plates with a soapy cloth, rinse and dry; rings are dishwasher safe (except SANI cycle) or hand wash |
| Approximate dimensions | 30 x 25 x 12 cm (not provided, estimate) |
| Approximate weight | 2.5 kg (not provided, estimate) |
| Color | Black/white (not specified, estimate) |
| Warranty | 5 years in Canada, 1 year in the US (material and workmanship defects) |
| Customer service / spare parts | Canada: 1-800-267-2826; United States: 1-800-851-8900 |
| Repairability | Spare parts available (rings, plates); do not return to store, contact customer service |
| Use | Household only |
Frequently Asked Questions - 25490 HAMILTON BEACH
User questions about 25490 HAMILTON BEACH
0 question about this device. Answer the ones you know or ask your own.
Ask a new question about this device
Download the instructions for your Croque monsieur clip in PDF format for free! Find your manual 25490 - HAMILTON BEACH and take your electronic device back in hand. On this page are published all the documents necessary for the use of your device. 25490 by HAMILTON BEACH.
USER MANUAL 25490 HAMILTON BEACH
Visit www.hamiltonbeach.com for our complete line of products and Use and Care Guides - as well as delicious recipes, tips, and to register your product online!
Questions? Please call us - our friendly associates are ready to help. USA:1.800.851.8900
When using electrical appliances, basic safety precautions should always be followed to reduce the risk of fire, electric shock, and/or injury to persons, including the following:
- Read all instructions.
- This appliance is not intended for use by persons (including children) with reduced physical, sensory, or mental capabilities, or lack of experience and knowledge, unless they are closely supervised and instructed concerning use of the appliance by a person responsible for their safety.
- Close supervision is necessary when any appliance is used by or near children. Children should be supervised to ensure that they do not play with the appliance.
- Do not touch hot surfaces. Use handles or knobs.
- To protect against risk of electrical shock, do not immerse cord, plug, or cooking unit in water or other liquid.
- Unplug from outlet when not in use and before cleaning. Allow to cool before putting on or taking off parts and before cleaning.
-
Do not operate any appliance with a damaged cord or plug, or after the appliance malfunctions or has been dropped or damaged in any manner. Call our toll-free customer service number for information on examination, repair, or adjustment.
-
The use of accessory attachments not recommended by the appliance manufacturer may cause injuries.
- Do not use outdoors.
- Do not let cord hang over edge of table or counter or touch hot surfaces, including the stove.
- Do not place on or near a hot gas or electric burner, or in a heated oven.
- Extreme caution must be used when moving an appliance containing hot oil or other hot liquids.
- Do not use appliance for other than intended use.
- Do not use appliance unattended.
- During use, provide 4 to 6 inches air space above, behind, and on both sides for air circulation.
- Never remove the food with any kind of cutting device or other metallic kitchen utensil.
- Always allow the appliance to cool before putting it away, and never wrap the cord around the appliance while it is still hot.
SAVE THESE INSTRUCTIONS!
Other Consumer Safety Information
This product is intended for household use only.
WARNING! Shock Hazard: This product is provided with either a polarized (one wide blade) or grounded (3-prong) plug to reduce the risk of electric shock. The plug fits only one way into a polarized or grounded outlet. Do not defeat the safety purpose of the plug by modifying the plug in any way or by using an adapter. If the plug does not fit fully into the outlet, reverse the plug. If it still does not fit, have an electrician replace the outlet. The length of the cord used on this appliance was selected to reduce the hazards of becoming tangled in or tripping over a longer cord. If a longer cord is necessary, an approved extension 2
cord may be used. The electrical rating of the extension cord must be equal to or greater than the rating of the appliance. If the appliance is of the grounding type, the extension cord should be a grounding-type, 3-wire cord. Care must be taken to arrange the extension cord so that it will not drape over the countertop or tabletop where it can be pulled on by children or accidentally tripped over.
To avoid an electrical circuit overload, do not use another highwattage appliance on the same circuit with this appliance.
If using an extension cord, it should be connected to the unit's power cord before it is plugged into the outlet. In the case of a power failure, the same procedure should be followed.
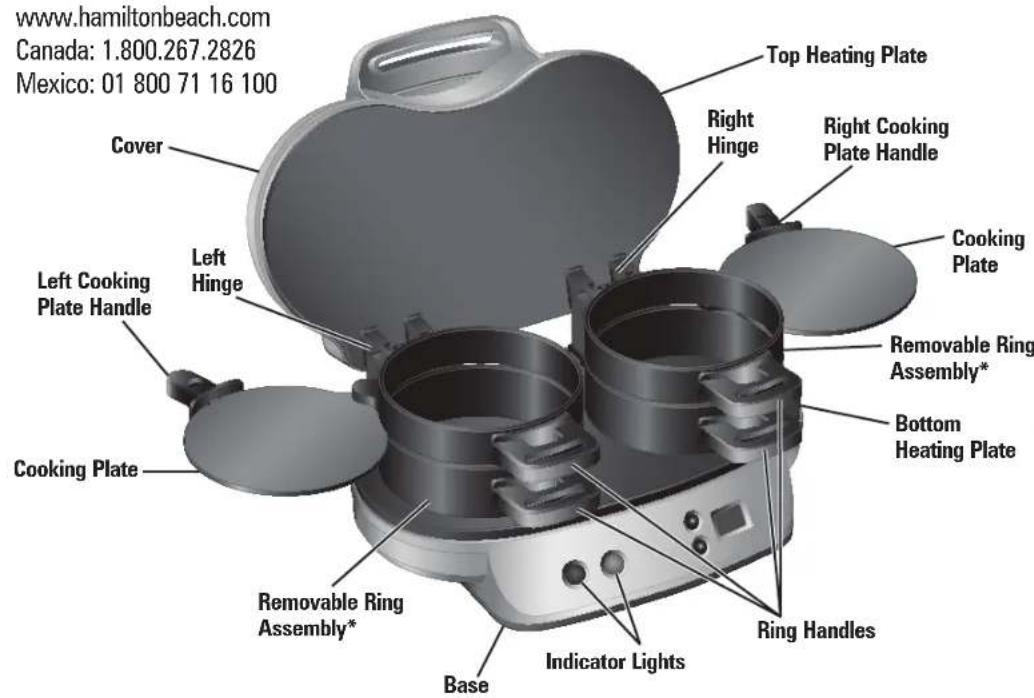
Parts and Features
*To order parts:
US: 1.800.851.8900
www.hamiltonbeach.com
Canada: 1.800.267.2826
Mexico: 01 800 71 16 100
BEFORE FIRST USE: Lift cover to remove each ring assembly. Wash both rings in dishwasher or in hot, soapy water. Rinse and dry. Wipe top and bottom heating plates with a damp, soapy cloth. Remove soap with a damp cloth; dry thoroughly. Spray rings with nonstick cooking spray or wipe or brush with vegetable oil.
How to Use
This sandwich maker makes one or two sandwiches at the same time.
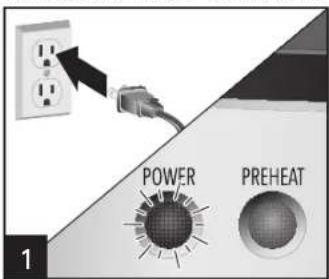
Plug cord into wall outlet. The red POWER light will glow. Lightly spray rings with nonstick cooking spray if necessary.
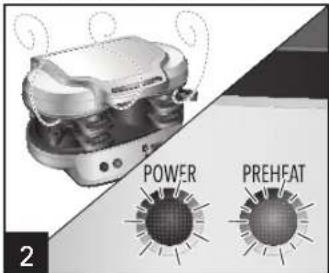
Let unit preheat with cover closed and cooking plates rotated in between rings.
WARNING Burn Hazard.
Always use an oven mitt to protect hand when opening cover. Hot surfaces and escaping steam can burn.
NOTE: Green PREHEAT light will come on when unit is heated to the correct temperature and will cycle on and off during cooking. It is NOT an indicator when sandwich is ready. Red POWER light stays on.

Use handles to lift cover, top rings, and cooking plates.
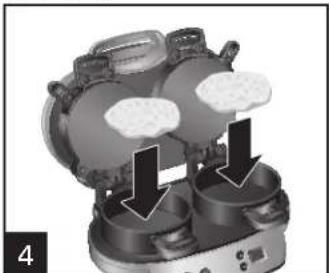
Place bottom half of bread (such as an English muffin, small bagel, or biscuit) onto bottom plates.

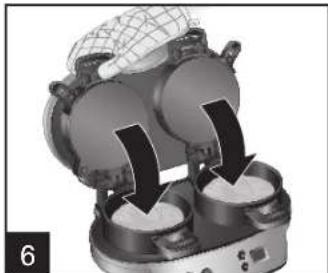
Top bread with ingredients such as precooked meats, vegetables, and cheese. Do not overfill breakfast sandwich maker. Overfilling will cause food to spill over rings and get stuck in the hinges. Move top rings and cooking plates down. Make sure cooking plates are rotated securely to back of rings as far as they will go to prevent leaking of egg.
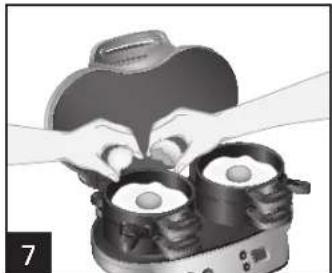
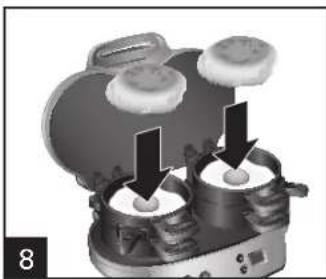
Crack an egg onto each cooking plate. Pierce yolk with a fork or toothpick. (You can use a whole large egg, egg white, or a scrambled egg.)
How to Use (cont.)
IF YOU LIVE IN A HIGH-ALTITUDE AREA:
The Extension service will have detailed information about cooking for your area. To locate the Cooperative Extension service in your county, please visit: http://www.csrees.usda.gov/Extension/.
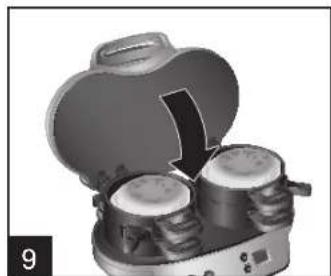


Top with the other half of bread. Close cover. Cook sandwiches for 4 to 5 minutes. NOTE: Do not push lid all the way down when loaded with ingredients or when using jumbo eggs. Lid may rise as scrambled eggs cook.
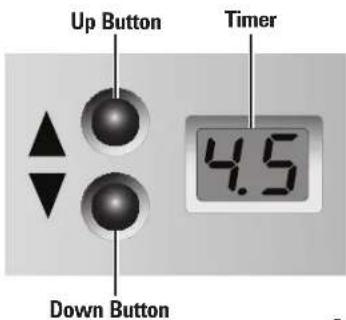
Press the up or down button to the desired time in half-minute (0.5) increments. If the up or down button has not been pressed in 5 seconds, the timer will start. When there is less than 1 minute remaining, the timer switches to seconds and continues to count down.
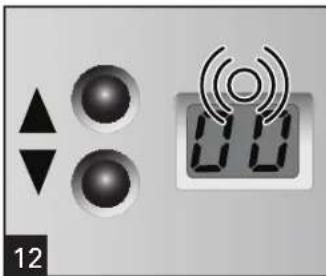

The timer will beep when the time is up. This unit does not turn off automatically at the beep.
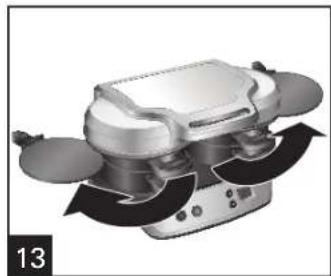
When finished cooking, rotate cooking plate handles out until they stop.
Using an oven mitt, lift ring assemblies and cover by holding bottom ring handles to open. Some sandwiches are easier to remove if rings are lifted individually.
How to Use (cont.)
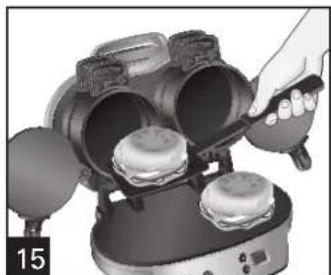
Remove breakfast sandwiches with plastic or wooden utensil. Never use metal.
Always wait 2 minutes between cooking sandwiches to ensure the breakfast sandwich maker is heated to the correct temperature.
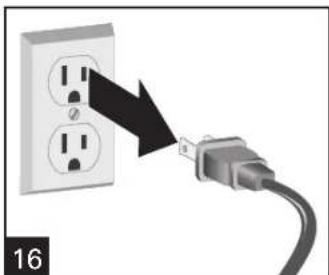
Unplug when through cooking. Let cool.
TIPS:
Get your ingredients together before cooking your sandwiches.
Always keep cover closed with rings and cooking plates in place when preheating.
- Check to make sure the cooking plates are in place before preheating and when adding food.
Care and Cleaning
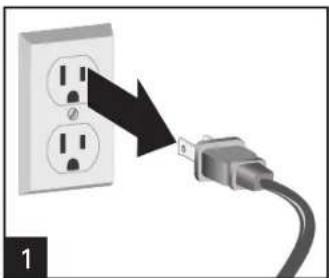
Unplug unit when through cooking. Let cool.
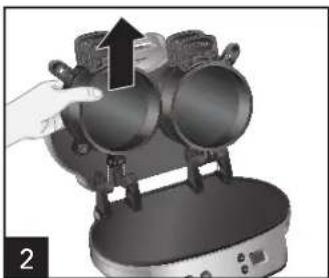
To remove ring assemblies for cleaning, hold bottom ring handles to open, and then lift straight up.
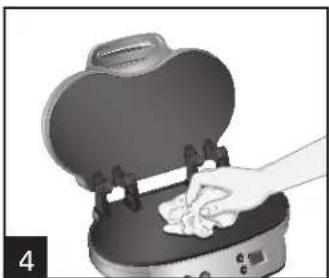
Wipe top and bottom heating plates with a damp, soapy cloth. Remove soap with a damp cloth; dry thoroughly.
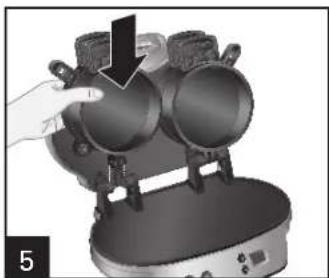
To replace ring assemblies, align hinges to the base, taller ring on the bottom, with the cooking plate handles facing out, and lower.
WARNING Electrical Shock Hazard.
Disconnect power before cleaning. Do not immerse cord, plug, or base in any liquid.

Do not use steel wool, scouring pads, or abrasive cleansers on any part of the unit. Never use sharp or pointed objects for cleaning.

DO NOT use the "SANI" setting when washing in the dishwasher. "SANI" cycle temperatures could damage your product.
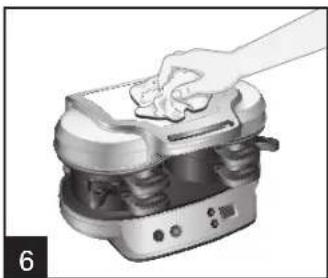
Wipe outside of unit with a damp, soapy cloth.
NOTE: If ring assemblies are not correctly replaced, the cover won't close properly.
Troubleshooting
PROBLEM PROBABLE CAUSE/SOLUTION
| Low, poor, or slow heating. | ·Breakfast sandwich maker wasn't preheated until PREHEAT light was illuminated. Green PREHEAT light will come on in about 5 to 7 minutes indicating unit is heated to the correct temperature. Light will cycle on and off during cooking and does not indicate sandwiches are ready. ·Allow 2 minutes between making sandwiches for breakfast sandwich maker to heat to the correct temperature. ·Overfilled. Reduce amount of ingredients in your sandwiches. ·Unit needs to be preheated with the cover closed with rings and cooking plates in place. ·Make sure cooking plates are rotated securely to back of rings as far as they will go, to prevent leaking of eggs, and cover is closed when preheating. |
| Eggs undercooked, bread not done. | ·Extra large eggs, frozen, or very cold ingredients may lengthen cooking time. Add additional cooking time. |
| Eggs overcooked. | ·Cooking time is about 5 minutes. Cooking time may vary if you are using small eggs, scrambled eggs, or egg whites. Reduce cooking time for future recipes. |
| Ingredients stick to rings or nonstick cooking plates. | ·Use a plastic or wooden utensil to loosen any baked-on ingredients. Lightly spray with nonstick cooking spray before preheating for next use. |
| Eggs leak out of rings. | ·Unit is overfilled. Only use large eggs and reduce amount or size of ingredients. Do not press down on the cover. ·Cooking plates may not have been in the correct position. Make sure cooking plates are rotated securely to back of rings as far as they will go to prevent leaking of egg. ·Used very thin purchased egg whites. Use fresh egg whites or try a different brand of egg whites. ·Make sure unit is properly preheated. |
| Cover rises when cooking my sandwiches. | ·The air whisked into large scrambled eggs may cause the cover to rise while the eggs are cooking. Do not press down on the cover. |
| Bread too brown. | ·Higher fat contents and sugars may cause breads to darken. Cook eggs for several minutes without top bread and cover down. Also have ingredients ready to assemble so bottom bread does not cook a lot longer than top indgredients. Then add bread to finish cooking your sandwiches. |
Recipes
Egg, Ham, and Cheese Breakfast Sandwich
2 English muffins, split
2 slices American cheese
2 slices precooked Canadian bacon or ham
2 large eggs
Directions
- Preheat Dual Breakfast Sandwich Maker until green PREHEAT light comes on. Lift cover, top rings, and cooking plates.
- Place half of muffin, split-side up, in each bottom ring of Dual Breakfast Sandwich Maker. Top with cheese and Canadian bacon.
- Lower cooking plates and top rings. Add an egg to each cooking plate. Pierce yolks with a fork or toothpick.
- Top with remaining muffin halves, split-side down.
- Close cover. Cook 4 to 5 minutes. Rotate cooking plate handles out until they stop. Lift cover and rings and carefully remove sandwiches with plastic spatula.
Serves: 2
Pancakes and Sausage Sandwich
4 (4-inch) frozen pancakes
2 precooked thin sausage patties
2 large eggs
Maple syrup
Directions
- Preheat Dual Breakfast Sandwich Maker until green PREHEAT light comes on. Lift cover, top rings, and cooking plates.
- Place one frozen pancake in each bottom ring of Dual Breakfast Sandwich Maker. Top with sausage.
- Lower cooking plates and top rings. Add an egg to each cooking plate. Pierce yolks with a fork or toothpick.
- Top with remaining pancakes.
- Close cover. Cook 4 to 5 minutes. Rotate cooking plate handles out until they stop. Lift cover and rings and carefully remove sandwiches with plastic spatula. Serve with syrup.
Serves: 2
Recipes (cont.)
Cheddar, Apple, Bacon, and Egg Croissant Sandwich
2 small croissants, halved
4 Tablespoons (59 ml) shredded Cheddar cheese
8 thin slices Granny Smith apple
2 slices precooked bacon, cut in half
2 large eggs
Directions
- Preheat Dual Breakfast Sandwich Maker until green PREHEAT light comes on. Lift cover, top rings, and cooking plates.
- Place half of croissant, cut-side up, in each bottom ring of Dual Breakfast Sandwich Maker. Top with cheese, apple slices, and bacon.
- Lower cooking plates and top rings. Add an egg to each cooking plate. Pierce yolks with a fork or toothpick.
- Top with remaining croissant halves, cut-side down.
- Close cover. Cook 4 to 5 minutes. Rotate cooking plate handles out until they stop. Lift cover and rings and carefully remove sandwiches with plastic spatula.
Serves: 2
Southwestern Breakfast Muffin
2 whole wheat English muffins, split
2 slices Monterey Jack cheese
6 thin slices avocado
2 large egg whites
2 Tablespoons (30 ml) salsa
Directions
- Preheat Dual Breakfast Sandwich Maker until green PREHEAT light comes on. Lift cover, top rings, and cooking plates.
- Place half of muffin, split-side up, in each bottom ring of Dual Breakfast Sandwich Maker. Top with cheese and avocado.
- Lower cooking plates and top rings. Add egg white to each cooking plate.
- Top with remaining muffin halves, split-side down.
- Close cover. Cook 4 to 5 minutes. Rotate cooking plate handles out until they stop. Lift cover and rings and carefully remove sandwiches with plastic spatula. Serve with salsa.
Serves: 2
Recipes (cont.)
Cheesy Egg and Sausage Bagel
2 small bagels, halved
2 slices Jarlsberg cheese
2 precooked thin sausage patties
2 thin slices red pepper ring
2 large eggs
Directions
- Preheat Dual Breakfast Sandwich Maker until green PREHEAT light comes on. Lift cover, top rings, and cooking plates.
- Place half of bagel, split-side up, in each bottom ring of Dual Breakfast Sandwich Maker. Top with cheese, sausage, and red pepper ring.
- Lower cooking plates and top rings. Add an egg to each cooking plate. Pierce yolks with a fork or toothpick.
- Top with remaining bagel halves, split-side down.
- Close cover. Cook 4 to 5 minutes. Rotate cooking plate handles out until they stop. Lift cover and rings and carefully remove sandwiches with plastic spatula.
Serves: 2
Herb Goat Cheese,Spinach,and Tomato Egg Muffin
2 whole wheat English muffins, split
2 Tablespoons (30ml) herb goat cheese
2 thin slices tomato
8 spinach leaves
2 thin slices red pepper ring
2 large eggs white
Directions
- Preheat Dual Breakfast Sandwich Maker until green PREHEAT light comes on. Spread goat cheese over bottom half of muffins. Lift cover, top rings, and cooking plates.
- Place halves of muffin, goat cheese side up, in bottom of Dual Breakfast Sandwich Maker. Top with tomato, spinach, and red pepper ring.
- Lower cooking plates and top rings. Add egg white to each cooking plate.
- Top with remaining muffin halves, split-side down.
- Close cover. Cook 4 to 5 minutes. Rotate cooking plate handles out until they stop. Lift cover and rings and carefully remove sandwiches with plastic spatula.
Serves: 2
Limited Warranty
This warranty applies to products purchased and used in the U.S. and Canada. This is the only express warranty for this product and is in lieu of any other warranty or condition.
This product is warranted to be free from defects in material and workmanship for a period of five (5) years from the date of original purchase in Canada and one (1) year from the date of original purchase in the U.S. During this period, your exclusive remedy is repair or replacement of this product or any component found to be defective, at our option; however, you are responsible for all costs associated with returning the product to us and our returning a product or component under this warranty to you. If the product or component is no longer available, we will replace with a similar one of equal or greater value.
This warranty does not cover glass, filters, wear from normal use, use not in conformity with the printed directions, or damage to the product resulting from accident, alteration, abuse, or misuse. This warranty extends only to the original consumer purchaser or gift recipient. Keep the original sales receipt, as proof of purchase is required to make a warranty claim. This warranty is void if the product is used for other than single-family household use or subjected to any voltage and waveform other than as specified on the rating label (e.g., 120V 60Hz ).
We exclude all claims for special, incidental, and consequential damages caused by breach of express or implied warranty. All liability is limited to the amount of the purchase price. Every implied warranty, including any statutory warranty or condition of merchantability or fitness for a particular purpose, is disclaimed except to the extent prohibited by law, in which case such warranty or condition is limited to the duration of this written warranty. This warranty gives you specific legal rights. You may have other legal rights that vary depending on where you live. Some states or provinces do not allow limitations on implied warranties or special, incidental, or consequential damages, so the foregoing limitations may not apply to you.
To make a warranty claim, do not return this appliance to the store. Please call 1.800.851.8900 in the U.S. or 1.800.267.2826 in Canada or visit hamiltonbeach.com in the U.S. or hamiltonbeach.ca in Canada. For faster service, locate the model, type, and series numbers on your appliance.
PRECAUTIONS IMPORTANTES
PROBLEM CAUSE POSSIBLE/SOLUTION
PROBLEM CAUSE POSSIBLE/SOLUTION
Mixcoac MEXICO 03910 D.F.
Tel: 01 55 5563 8723 • Fax: 01 55 5615 1856
Nuevo Leon
FERNANDO SEPULVEDA REFACIONES
Ruperto Martinez No.238 Ote.
Centro MONTERRE, 64000 N.L
Tel: 01 81 8343 6700 • Fax: 01 81 8344 0486
Jalisco
SERVICIOS DE MANTENIMIENTO CASTILLO
Garibaldi No. 1450
Ladrón de Guevara
GUADALAJARA 44660 Jal.
Tel: 01 33 3825 3480 • Fax: 01 33 3826 1914
Chihuahua
- SAVE THESE INSTRUCTIONS!
- Other Consumer Safety Information
- This product is intended for household use only.
- Parts and Features
- How to Use
- WARNING Burn Hazard.
- How to Use (cont.)
- IF YOU LIVE IN A HIGH-ALTITUDE AREA:
- TIPS:
- Care and Cleaning
- WARNING Electrical Shock Hazard.
- Troubleshooting
- PROBLEM PROBABLE CAUSE/SOLUTION
- Recipes
- Egg, Ham, and Cheese Breakfast Sandwich
- Directions
- Serves: 2
- Pancakes and Sausage Sandwich
- Recipes (cont.)
- Cheddar, Apple, Bacon, and Egg Croissant Sandwich
- Southwestern Breakfast Muffin
- Cheesy Egg and Sausage Bagel
- Herb Goat Cheese,Spinach,and Tomato Egg Muffin
- Limited Warranty
- PRECAUTIONS IMPORTANTES
- PROBLEM CAUSE POSSIBLE/SOLUTION
- Nuevo Leon
- Jalisco
- Chihuahua
Brand : HAMILTON BEACH
Model : 25490
Category : Croque monsieur clip