PCWA 1240 - Waffle Maker PROFICOOK - Free user manual and instructions
Find the device manual for free PCWA 1240 PROFICOOK in PDF.

| Brand | ProfiCook |
| Model | PCWA 1240 |
| Product type | Waffle maker |
| Net weight | 1.8 kg |
| Power supply | 220–240 V~, 50/60 Hz |
| Power consumption | 1000 W |
| Protection class | I |
| Plate coating | Non-stick |
| Temperature control | Yes, gradual |
| Indicator lights | Power indicator (red) and temperature indicator (green) |
| Handle | Insulated handle |
| Number of waffles per batch | 1 waffle |
| Power cable length | Approx. 80 cm |
| Maintenance | Clean plates with a soft sponge and soapy water, do not immerse |
| Safety | Manual shutdown by unplugging, do not use near flammable materials |
| Storage | Cable winding underneath |
| Warranty | 2 years (subject to manufacturer's conditions) |
| Spare parts | Not available separately |
Frequently Asked Questions - PCWA 1240 PROFICOOK
User questions about PCWA 1240 PROFICOOK
0 question about this device. Answer the ones you know or ask your own.
Ask a new question about this device
Download the instructions for your Waffle Maker in PDF format for free! Find your manual PCWA 1240 - PROFICOOK and take your electronic device back in hand. On this page are published all the documents necessary for the use of your device. PCWA 1240 by PROFICOOK.
USER MANUAL PCWA 1240 PROFICOOK
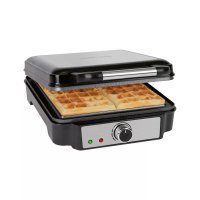
natural_image
Black and white photo of a PROFI 100K cooking grater with control knob and two indicator lights (red and green) on the side (no text or symbols on device body)Waffelautomat PC-WA 1240
Be sure to read the separately enclosed safety instructions first.
Instruction Manual
Thank you for choosing our product. We hope you will enjoy using the appliance.
Read the instruction manual and the separately enclosed safety instructions very carefully before using this appliance. Keep these documents, including the warranty certificate, receipt and, if possible, the box with the inner packaging in a safe place. If you pass the appliance on to a third party, always include all the relevant documents.
Symbols in this Instruction Manual
Important information for your safety is specially marked. It is essential to comply with these instructions in order to avoid accidents and prevent damage to the appliance:

WARNING:
This warns you of dangers to your health and indicates possible injury risks.

CAUTION:
This refers to possible hazards to the appliance or other objects.
Content
Overview of the Components ....3
Unpacking the Appliance 7
Overview of the Components 7
Warnings for the Use of the Appliance 7
Putting the Appliance into Operation 7
Notes for Use....7
Using the Appliance 8
Recipe Suggestion....8
Cleaning 8
Storage....8
Troubleshooting 9
Technical Data....9
Disposal....9
Unpacking the Appliance
- Remove the appliance from its packaging.
- Remove all packaging material, such as foils, filling material, cable ties and cardboard packaging.
- Check the appliance for possible transport damage to avoid hazards. Do not operate a damaged appliance. Return it to the dealer immediately.
Overview of the Components
1 Lid handle
2 Mains cable
3 Green control lamp (baking temperature)
4 Red control lamp (mains lamp)
5 Temperature control knob
6 Baking plates
Warnings for the Use of the Appliance

WARNING: Risk of Burns!
Watch out for steam escaping during the baking process and when opening the baking surfaces.

CAUTION:
Caution rising heat! Never use the appliance near or under curtains or other flammable materials! Make sure there is enough free space!
Putting the Appliance into Operation
Electrical Connection
- Check that the mains voltage you intend to use matches that of the appliance. You will find the information on the type plate.
- Unwind the mains cable completely.
Non-stick Coating
Before you prepare the first waffles for consumption:
- Clean the housing and baking surfaces with a damp cloth.
- Lightly grease the baking surfaces before first use.
- Operate the appliance with the baking surfaces closed for approx. 10 minutes (see "Using the Appliance").
- Slight smoke and odours are normal during this process. Ensure that there is sufficient ventilation.
- Do not eat the first waffles!
- Unplug the appliance from the mains and let it cool down.
- After the appliance has cooled down, wipe the baking surfaces with kitchen paper.
Notes for Use
- Keep the baking surfaces closed during the heating-up period.
-
When the heating phase is finished, the green control lamp goes out.
-
The red control lamp remains on as long as the mains plug is plugged into the socket.
- The green control lamp switches on and off during the baking process. This indicates that the appliance is heating to maintain the baking temperature.
- The baking surfaces should always be closed during baking breaks.
Using the Appliance
- Insert the mains plug into a properly installed earthed socket. The red control lamp lights up.
- Set the temperature control to maximum to heat up the appliance.

-
Open the lid and pour the batter into the centre of the baking surface.
-
To get even waffles, you can spread the batter a little. Only pour in enough batter to cover the lower baking surface.
-
The filling process should be done quickly, otherwise the waffles will not brown evenly.
-
Use the handle to gently close the lid. Hold the lid down briefly.
-
Use the control knob to set the desired baking temperature.
- The baking process takes approx. 2 – 3 minutes. This may vary depending on the consistency of the batter.
-
If the waffles become too dark, turn the control knob to a lower setting.
-
Remove the finished waffles with a wooden fork or similar.
- Place the finished waffles on a serving dish or plate to cool.
- If necessary, lightly grease the baking surfaces again after each baking process.
Ending Operation
If you want to stop or interrupt the operation, pull the mains plug out of the socket. The red control lamp goes out.
Recipe Suggestion
Beat 5 egg yolks, 5 tbsp hot water, 100 g sugar and 1 grated lemon zest until foamy and stir in a mixture of 12 tsp baking powder and 150 g flour. Beat 5 egg whites until stiff and fold into the batter.
You can sprinkle the finished waffles with a little icing sugar if you like.
You can find more recipes in recipe books or on the Internet. You can also use baking mixes.
Cleaning

WARNING:
- Always unplug the appliance from the mains before cleaning. Wait until the appliance has cooled down.
- Do not immerse the appliance in water! It could cause an electric shock or fire.

CAUTION:
- Do not use a wire brush or other abrasive objects.
- Do not use harsh or abrasive cleaners.
Baking Surfaces
- Remove food residues while still warm with a damp cloth or paper towel.
- Wash the baking surfaces with a soft sponge and soapy water, wipe with clear water and dry thoroughly with a soft cloth. After drying, apply a thin film of cooking oil to the surface.
Housing
Clean the housing after use with a slightly damp cloth.
Storage
- Clean the appliance as described and allow it to dry completely.
- We recommend storing the appliance in its original packaging if you do not intend to use it for a long period of time.
• Always store the appliance out of the reach of children in a well-ventilated and dry place.
Winding up the Mains Cable
You can wind up the mains cable at the bottom part.
Troubleshooting
| Fault Possible Cause Remedy | ||
| The red control lamp does not light up. | The appliance has no power supply. Check the power socket with another appliance. | |
| The appliance is defective. Contact our service department or a specialist. | ||
| The appliance does not bake. | The temperature control is set to minimum. | Set the temperature control to a higher setting. |
| The waffles turn brown differently. | The lid does not fit properly because too little batter has been poured in. | Properly measure and distribute the amount of dough. |
| The batter has overflowed. You have poured in too much batter. | ||
| The waffles have become too light. | The set temperature is too low. Select a higher control setting. | |
| The waffles have become too dark. | The set temperature is too high. Select a lower control setting. | |
Technical Data
Model: PC-WA 1240
Power supply: 220 - 240 V\~, 50 / 60 Hz
Power consumption: 1000 W
Protection class: I
Net weight: .... approx. 1.8 kg
The right to make technical and design modifications in the course of continuous product development remains reserved.
This appliance has been tested according to all applicable, current CE directives and built according to the latest safety regulations.
Disposal
Meaning of the "Dustbin" Symbol
Protect our environment: do not dispose of electrical equipment in the domestic waste.
Please return any electrical equipment that you will no longer use to the collection points provided for their disposal.
This helps avoid the potential effects of incorrect disposal on the environment and human health.
This will contribute to the recycling and other forms of re-utilisation of electrical and electronic equipment.
Information concerning where the equipment can be disposed of can be obtained from your local authority. Your dealer and contractual partner is also obliged to take back the old appliance free of charge.
BELANGRIJK:
CTC Clatronic Sp. z o.o
Ul. Brzeska 1
45-960 Opole