
S7CD - Shredder Renkforce - Free user manual and instructions
Find the device manual for free S7CD Renkforce in PDF.
| Product Type | Paper Shredder |
| Brand | Renkforce |
| Model | S7CD |
| Cut Type | Strip Cut |
| Slot Width (paper) | 220 mm |
| Cut Size | 7 mm |
| Cutting Speed | 2.8 m/min |
| Maximum Sheet Capacity | Up to 7 sheets (70 g/m²) |
| Operating Duration | 2 minutes continuously, then 60 minutes rest |
| Noise Level | 57 dB (approx.) |
| Security Level | 1 (DIN 32757) |
| Dimensions (W × H × D) | 339 × 297 × 182 mm |
| Weight | 2.2 kg |
| Power Supply | 220-240 V AC, 50 Hz, 0.7 A |
| Main Functions | Automatic start/stop, release function (REV), overheat protection |
| Package Contents | Shredder, paper bin, CD/credit card bin, instruction manual |
| Maintenance | Clean with a dry cloth; lubricate blades after about 200 cycles with special oil |
| Safety | Automatic shutdown in case of overheating; do not insert metal objects; keep away from children |
| Repairability | No user-serviceable parts; contact a specialist |
Frequently Asked Questions - S7CD Renkforce
User questions about S7CD Renkforce
0 question about this device. Answer the ones you know or ask your own.
Ask a new question about this device
Download the instructions for your Shredder in PDF format for free! Find your manual S7CD - Renkforce and take your electronic device back in hand. On this page are published all the documents necessary for the use of your device. S7CD by Renkforce.
USER MANUAL S7CD Renkforce
This product is only suitable for shredding paper, CDs, DVDs and credit cards. The product features an automatic start/stop function, reverse function, release function, and overheat protection. Power is supplied via wall socket (220 - 240 V/AC, 50 Hz).
It is intended for indoor use only. Do not use it outdoors. Contact with moisture, e.g. in bathrooms, must be avoided under all circumstances.
For safety and approval purposes (CE), you must not rebuild and/or modify this product. If you use the product for purposes other than those described above, the product may be damaged. In addition, improper use can cause hazards such as short circuiting, fire, electric shock etc. Read the instructions carefully and keep product available to third parties only together with its operating instructions.
This product complies with the statutory national and European requirements. All company names and product names are trademarks of their respective owners. All rights reserved.
Delivery content
Shredder
Separate collection bin for CDs/credit cards
-
Paper collection bin
-
Operating instructions
Up-to-date Operating instructions:
- Open www.conrad.com/downloads in a browser or scan the displayed QR code.
- Select document type and language and enter the item number into the search field. After submitting the query you can download displayed records.

Description of symbols
The symbol with the flash in a triangle indicates a risk to your health, e.g. from electric shock.
The symbol with an exclamation point indicates special risks associated with handling, operation or use.
The "arrow" symbol indicates special remarks and notes for operation.
This symbol reminds you to read the operating instructions accompanying this product.

In order to avoid injury and product damage, do not leave the product unattended when children or pets are present in the near proximity.

Do not reach into the input slot.

Persons with long hair must make sure to maintain sufficient distance from the input slot.

Keep ties, scarfs and loose clothing away from the input slot.

Do not use any spray bottles/cans in the direct vicinity of the product.

Do not insert any paper clips or other metallic objects into the input slot.

Keep jewelry such as long necklaces or bracelets away from the input slot.
Safety instructions
Read the operating instructions carefully and especially observe the safety information. If you do not follow the safety instructions and information on proper handling in this manual, we assume no liability for any resulting personal injury or damage to property. Such cases will invalidate the warranty/guarantee.
The product is not a toy. Keep it out of the reach of children and pets.
- Do not leave packaging material lying around carelessly. These may become dangerous playing material for children.
- Protect the product from extreme temperatures, direct sunlight, strong jolts, high humidity, moisture, flammable gases, vapors and solvents.
- Do not place the product under any mechanical stress.
- If it is no longer possible to operate the product safely, take it out of operation and protect it from any accidental use. Safe operation can no longer be guaranteed if the product:
- is visibly damaged,
- is no longer working properly,
-
has been stored for extended periods in poor ambient conditions or
has been subjected to any serious transport-related stresses. -
Please handle the product carefully. Jolts, impacts or a fall even from a low height can damage the product.
-
The mains outlet must be located near to the device and be easily accessible.
Never pull the mains plug from the socket by pulling at the cable. Always pull it from the mains socket using the intended grips. -
Unplug the mains plug from the mains socket if you do not use the device for an extended period of time.
- For safety reasons, always unplug the device in case of a thunderstorm.
- Make sure that the mains cable is not squeezed, bent, damaged by sharp edges or put under mechanical stress. Avoid excessive thermal stress on the mains cable from extreme heat or cold. Do not modify the mains cable. Otherwise the mains cable may be damaged. A damaged mains cable can cause a deadly electric shock.
- Do not touch the mains cable if it is damaged. First, power down the respective mains socket (e.g. via the respective circuit breaker) and then carefully pull the mains plug from the mains socket. Never use the product if the mains cable is damaged.
- To prevent risks, damaged power cables may only be replaced by the manufacturer, a professional workshop appointed by the manufacturer, or a similarly qualified person.
- Never plug in or unplug the mains plug when your hands are wet.
- Never use the product immediately after it has been brought from a cold room into a warm one. The condensation generated could destroy the product. Always allow the product to reach room temperature before use. This may take several hours.
- Never pour liquids over electric devices and never place objects near the device. If liquid or an object enters the interior of the device nevertheless, first power down the respective socket (e.g. switch off circuit breaker) and then pull the mains plug from the mains socket. Do not operate the product anymore afterwards, but take it to a specialist workshop.
- The use of electrical devices must be supervised by tri schools, training centers, hobby and do-it-yourself workshops.
- In industrial facilities, heed all applicable accident prevention regulations for electrical installations and equipment of the institutions of the industrial sector.
- Consult an expert when in doubt about operation, safety or connection of the device.
- Maintenance, modifications and repairs are to be performed exclusively by an expert or at a qualified shop.
- If you have questions which remain unanswered by these operating instructions, contact our technical support service or other technical personnel.
Operating elements
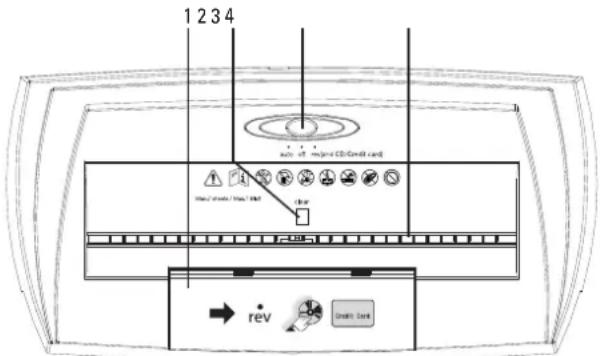
1 Input slot for credit cards/CDs/DVDs
2 CLEAR button (release function)
3 AUTO/OFF/REV selection switch
4 Paper input slot
Operation

Do not reach into the input slot.
Do not insert any paper clips or other metallic objects into the input slot.
Persons with long hair must make sure to maintain sufficient distance from the input slot.
Keep ties, scarfs, loose clothing and long chains or bracelets away from the input slot.
Do not use any spray bottles/cans in the direct vicinity of the product.
Do not let the product run continuously for more than 2 minutes in order to avoid overheating the motor.
If the collection container is full before 2 minutes have elapsed, turn the product off. Empty the collection container before continuing use.
Allow the product to rest for at least 60 minutes before continuing use.
a) Installation
- Unpack all parts and remove any existing films.
- Attach the small collection container for credit cards/CDs/DVDs to the holders on the front of the big collection container.
- Place the cutting unit on the big collection container. Observe the recesses in the collection container. The cutting unit must perfectly lock into the recesses on the collection container. The input slot for credit cards/CDs/DVDs (1) must be positioned exactly on top of the small collection container. Make sure not to squeeze your fingers between the collection container and the cutting unit and not to jam the mains cable.
b) Positioning and connection
- Place the product on a stable, even, nonslip surface.
- Make sure the AUTO / OFF / REV selection switch (3) is at OFF position in the center.
- Connect the power plug to an appropriate power outlet.
c) Shredding paper

Insert a maximum of 7 pieces of paper (size DIN A4) with a maximum grammage of 70g / m^2 into the input slot at the same time.
Do not shred self-stick notes or paper with residual adhesives.
- Slide the AUTO / OFF / REV selection switch to AUTO position on the left.
- Then carefully insert the paper into the input slot (4). The paper is pulled in automatically and shredded. When shredding paper that is smaller than the maximum input slot width, always feed the paper in the center of the paper input slot.
- When finished, slide the AUTO / OFF / REV selection switch to OFF position in the center.
d) Shredding credit cards, CDs/DVDs

Only shred one credit card/CD/DVD at a time.
- Slide the AUTO/OFF/REV selection switch to REV position on the left.
- Open the cover of the credit card/CD input slot (1).
- Carefully insert one single credit card or CD/DVD into the input slot. The credit card or CD/DVD will be pulled in and shredded automatically. Make sure to insert credit cards with the wide side first, in order to shred the magnetic strip.
- When finished, slide the AUTO / OFF / REV selection switch to OFF position in the center. Close the cover of the input slot.
e) Removing a paper jam
The product features an overheat protection mechanism that is triggered in case of continuous operation of more than 2 minutes and in case the maximum amount of paper (7 sheets/each 70g / m^2 ) has been exceeded. In such a case the paper input slot will be jammed.
When having used the product continuously for more than 2 minutes, leave the product to cool down for at least 60 minutes until next use.
If the overheat protection mechanism has been triggered or paper is jammed, proceed as follows:
- Slide the AUTO / OFF / REV selection switch to OFF position and disconnect the mains plug from the wall socket.
Pull and remove the excess paper from the top of the shredder. - Connect the mains plug to the wall socket.
- Slide the AUTO/OFF/REV selection switch to REV position to the right.
- The shredding unit now runs in the opposite direction and pushes the jammed paper back out. Slide the AUTO / OFF / REV selection switch to OFF position. Remove the excess paper. Keep your hand and fingers away from the input slot in order to avoid injury.
If the paper jam cannot be removed completely, follow the instructions in chapter "d) Release function".
- Slide the AUTO/OFF/REV selection switch to AUTO position on the left, in order to continue shredding.
f) Release function
Shredding fibrous paper can cause the cutting unit to soil heavily or to jam. In such a case, slide the AUTO / OFF / REV selection switch to REV (reverse) position for 2 to 3 seconds and then to AUTO position. Press the CLEAR button (2) for 2 to 3 seconds. Repeat these steps 2 to 3 times in order to remove any residue paper from the cutting unit.
Troubleshooting
| Problem Cause Solution | ||
| In AUTO mode, the shredding unit runs without interruption. | The collection container is full. Paper in the shredding unit is not drawn in. | Set the selection switch to OFF position and disconnect the mains plug from the wall socket. Empty the container. |
| Some bits of paper are left in the shredding unit after shredding. | The bits of paper are stuck between the blades. | Set the selection switch to REV. |
| The automatic paper feed is not working after the shredding unit was run in REV mode. | Some bits of paper are blocking the automatic feed. | |
| The automatic paper feed stops even though there is paper in the input slot. | The paper was inserted into the input slot at a slant. | Insert the paper into the input slot straightly. |
| The paper is too soft, too thin, damp or too crinkled. | Fold, dry or smoothen the paper. | |
| The product is not working even though there are no bits of paper left in the shredding unit. | The motor is overheated. | Let the product cool down for at least 60 minutes before using it again. |
Maintenance and cleaning

Caution! The cutting knives are very sharp. Risk of injury.
- Turn off the product and disconnect it from the power outlet before cleaning.
- Never submerge the product in water.
- There are no components located inside the product you need to maintain. Never open/dismantle the product.
Empty the collection container regularly. - Under no circumstances use aggressive cleanings agents, cleaning alcohol or other chemical solutions since these can penetrate the housing or impair functionality.
- To clean the product, a dry, soft and clean cloth is sufficient. Do not apply too much pressure to the housing as this may cause scratch marks.
- From time to time (after approx. 200 shredding procedures), use a special, nonflammable shredding oil in order to lubricate the cutting tools. Spraying bottles and special oilpaper are available in specialist shops.
Disposal
Electronic devices are recyclable waste and must not be disposed of in the household waste.
At the end of its service life, dispose of the product in accordance with applicable regulatory guidelines.
You thus fulfill your statutory obligations and contribute to the protection of the environment.
Technical data
Operating voltage/current. 220 - 240 V/AC, 50 Hz, 0.7 A
Protection class
Type of cutting. Strip cut
Input slot width. 220 mm (paper)
Cutting size 7 mm (paper)
Cutting speed. 2.8 m/min
Amount of sheets max. 7 (at 70g / m^2
Container capacity (paper) 13
Operating time. 2 min ON / 60 min OFF
Noise level.. .≤74 dB
Safety level. 1 (DIN 32757)
Cable length.. approx. 1.4 m
Operating/storage conditions.0 to +35^ 20-85% RH
Dimensions (W× H× D) 339x297x182mm
Weight. 2.2 kg
Mode d'emploi
Volume du recipient (papier) 13
d) Creditcards/CD's/DVD's versnipperen
