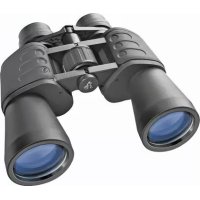
Hunter 20x50 - Binoculars BRESSER - Free user manual and instructions
Find the device manual for free Hunter 20x50 BRESSER in PDF.



| Brand | BRESSER |
| Model | Hunter 20x50 |
| Category | Binoculars |
| Prism type | Porro (P), roof (R) or compact (C) depending on model |
| Magnification | 20x |
| Objective lens diameter | 50 mm |
| Focusing | Central focusing wheel |
| Diopter adjustment | Yes, on the right eyepiece (diopter ring) |
| Adjustable interpupillary distance | Yes, by folding at the central hinge |
| Eyecups | Twist-up or rubber depending on equipment |
| Suitable for eyeglass wearers | Yes, foldable eyecups |
| Tripod mountable | Possible via adapter (art. 19-16000 or 19-16500) for P and R models |
| Tripod thread | Yes, DIN thread |
| Lens cleaning | Microfiber cloth, eyeglass cleaning liquid |
| Maximum storage temperature | 60 °C |
| Safety | Do not look at the sun, risk of blindness; keep out of reach of children; do not leave in direct sunlight (fire risk) |
| Warranty | 2 years standard, extension possible with online registration |
| After-sales service | BRESSER France, Parc d'activités de Nicopolis, 260 rue des Romarins, 83170 Brignoles, info@bresser.fr |
| Repairability | Do not disassemble, contact the dealer or customer service |
Frequently Asked Questions - Hunter 20x50 BRESSER
User questions about Hunter 20x50 BRESSER
0 question about this device. Answer the ones you know or ask your own.
Ask a new question about this device
Download the instructions for your Binoculars in PDF format for free! Find your manual Hunter 20x50 - BRESSER and take your electronic device back in hand. On this page are published all the documents necessary for the use of your device. Hunter 20x50 by BRESSER.
USER MANUAL Hunter 20x50 BRESSER
This instruction manual was created for various models in our series of binoculars. Pages 2-7 present the relevant features in pictures. Depending on the model you have purchased, this chapter of the manual covers the binoculars in full or in part. As a result, please pay attention to the letters (P, R or C) to make sure that a chapter applies to your model.
Please read this manual carefully and completely before using the binoculars.
Your
BRESSER Team
P = Porro prism model · R = Roof prism model · C = Compact model
General Safety Informations!
RISK of physical injury!
Never look through this device directly at or near the sun. There is a risk of BLINDING YOURSELF!
Children should only use this device under supervision. Keep packaging materials (plastic bags, rubber bands, etc.) away from children. There is a risk of SUFFOCATION.
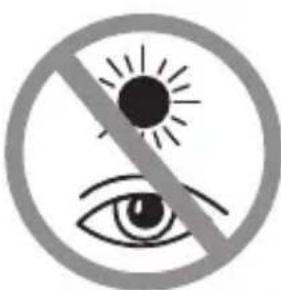
Fire/Burning RISK!
Never subject the device - especially the lenses - to direct sunlight. Light ray concentration can cause fires and/or burns.
RISK of material damage!
Never take the device apart. Please consult your dealer if there are any defects. The dealer will contact our service centre and send the device in for repair if needed.
Do not subject the device to temperatures exceeding 60^
BINOCULARS
List of Parts
1 Centre axle
a Twist-up eyecups or
2b Rubber eyecups
Diopetre adjustment
Body of the binoculars
5 Lens tube
Central focussing wheel
Eyepiece
8 Objective lens
Threaded tripod connection
10 Image circle with correctly set eye distance
Eyepieces for spectacle wearers
Depending on the model, your binoculars are equipped with either twist-up eyecups (2a) or rubber eyecups (2b). Since there is a larger distance between the binocular eyepiece and the pupil for those wearing glasses, both eyecup varieties can be adjusted individually.
Twist-up Eyecups (2a)
Screw in the twist-up eyecups (2a) to use the
binoculars while wearing glasses. If you are not wearing glasses, unscrew the eyecups to achieve the required distance from the pupils. OR
Rubber Eyecups (2b)
To use the binoculars while wearing glasses, turn the rubber eyecups (2b) towards the sides and down. If you are not wearing glasses, leave the eyecups in the upright position to achieve the required distance from the pupils.
Adjusting the eyepiece distance P R C
The distance between the eyes differs between individuals. To achieve perfect interaction between your eyes and the eyepieces of your binoculars set the angle at the centre of the binoculars (1) so that you see a circular image (10). Note this setting for later use.
Adjusting the focus
Look through your binoculars with your right eye closed. Now adjust the image for your left eye using the centre wheel (6) until it is sharp and
clear. Close your left eye and adjust the image for your right eye using the dioptre ring (3) until it too is sharp and clear.
Mounting the binoculars on a tripod P R
Your binoculars have a threaded tripod connection (9) built in. The required tripod adapter is available as an optional accessory (Art. No. 19-16000 or 19-16500). With this accessory, you are able to mount your binoculars on a tripod with a DIN mounting thread (e.g. Art. No. 49-22100).
TIPS on cleaning
Lenses (eyepieces and/or object lenses) should be cleaned with a soft, lint-free cloth (e.g. microfibre) only. Do not use excessive pressure - this may scratch the lens.
Dampen the cleaning cloth with a spectacle cleaning fluid and use it on very dirty lenses.
Protect the device against dirt and dust. Leave it to dry properly after use at room temperature. Then put the dust caps on and store the device in the case provided.
Chere cliente, cher client,
Kataaoyoc EApntnauwv
Kevtpikoc aEvovac KIAIaw
a IepioTpEoEvα KαλuμαTaα oΦθαλuωv
b Eλασικα καλύματα oφθαλμων
3 PuθμiδiπTρας
4 KIAIOW
5 AvTIkeIeVIKoS oKoS
6 Kevtpiko koupi (puOmuon Eukpiviaoc)
7 PpoooO00Aiooc 0aKoc
8 AvTIKεIμεVIKóS φαKóS
Onn yia Tn ouvdoen Tpiioa
10 Kukao, o8 ootα puθμiαevn απoσaon μαTiou
PpooofoaIoi aKoi yia aTOua nou oopouv yuaia PRC
Avaoya eTo EKoTcE moTeAo To TnAekotio oac eivai EeonlaOevo eite μe πepotpeoEvX KAuμaTa OoθaUw (2a) eTE μe EAAOTiKaAulμaTa OoθaUw (2b). ENiδn yia oouc fopouv yuaia uTApxI KaTα Kavovx eYaaUTepn aNoTacon eTaeTu
TPOOOOxAIOU TOnAeKoTIou KAI TnC KOpN TOU OI Dua TUNOI KAUUMATWV MAITOW MTOPOUV vpuOIOuV Exwpiota.
IepiOtpEfoEvKALuMuAto ofoaamov (2a)
Tia vKaIOATEe mE yuaia OTO TnAeokotio,
Biodote Ta IepiOtpEfoEvKALumuata
ofoaamow (2a).Avdeltaopateyuaia,
EeibowTe ta KALumuatao ofoaamw, wotv a
eITeuytheta i n aiaitouevn anoTaoTns kOpnc
twv ofoaamw.
He donyckaia Te harpebaHna npnbopa do BbICOKo TemnepaTpybl!
BNIHOKNI
IpeueHb KOMnoHeHToB
1 LcHTpaJIbHaI Oc b6HOKJIA
a HABINHnBaIOuIeCn OkyIpybI
b Pe3nHOBbie OkyIpaI
3 MexaHn3M dnoONTpnueCKo HABOdkn
Kopnyc 6nHOKJIA
5 Ty6yc 6bEeKTHBa
6 ΚeHTpaJIbHbI npHBOD (yCTaHOBka Ha pe3KoCTb)
Okyjap
8 尼H3a 06bekTnBa
9 Pe3b6a dny yctaHOBKn Ha 7TaTnB
10 OTo6paKaIouaI OkpyKHOCTb npn npaBnIbHo HAcTpoEHOn rna3Hoi 6a3e
Okynap dny noIb3OBaTeNeB Ouch P R C
B 3aBnCmOCTn OT MoDenn 6HOKlb OCHaaetcra INoo HABINHuaHOuMnscr OkyIpaMn (2a), INoo pe3nHObIMn OkyIpaMn (2b).Tak KaK y noJIb30Ba -TeJe B Ouykax pacCToRHe MExdY OkyIpaMn 6HOKnI 3paUkamn yBeInueHo, oBa HABINHuaIOxxCsR OkyIpaMOrT perynipOBatbcra NO OTdeJIbHOCTn.
HaBnHcyBaIOuIeCeOkyIpaIy (2a)
EcIn Bbl CMOTpHte uepe3 6HHOKlb B Ouykax, BKpyTHe HABINHcHBaIOUeC8 OkyIpaB (2a). EcIn Bbl He HocHTe OUY, BbIKpyTHe HABINHcHBaIOUeC8 OkyIpaB dJI oBeCneueHn Heo6xoDMIMO pacCTOHHN Do 3paKOB.
NIN
Pe3nHOBbIe OKyIaRbI (2b)
EcIn BbI cMOtpnte uepe3 6HOKJIb B OUKKax, OTBepHnTe pe3HHOBblte OKyIpaI (2b) c6Oky BHN3. EcIn Bbl He Hocnte OUYKN, OCTaBbTe OKyIpaI BBePTHKaIbHOM NIOJKeHNN dJa oBeCneueHnHeo6xOdMOro paCCTOraHn DO 3paUkOB.
HactpoJaTla3HO6a3blPRC
PacctoHne MeJdy rna3amn ABJREcHnDnBnDaIbHbIM dIa KaKDoRo YeNoBeka. DIn oBeCneueHn IDeaIbHoro cOrlaocBaHnra rna3 COKyIpaMn 6HHOKn erO HeoXoDnMo cOrHyTbOTHOCTeNbHO zENTpaIbHoN OcN (1) TaKIM o6pa3OM, UTO6bl Chepe3 Hero 6bla BnHa OTo6paKaHOUaA OKpyKHOCTb (10). 3anOMHnte HAcTpOrydI NcNOb3OBaHnR B 6dyuem.
YcTaHOBka Ha pe3KoCTb PR C
IocmOTpnte uepe3 6HOKnb n 3akpoTe npabBn rna3. Otperynpyte n3o6paKeHne dny IeBoro rna3a c NOMOuTo ueHTpaNbHorO npBODa (6). 3akpoTe neBn rna3 n otperynpyte pe3KoCTb n3o6paKeHnA dny npABoro rna3a C NOMOuBIO dnontnHoro Koblua (3).
yCTaHOBka 6HHOKJI HA WtTaTHB P R
Ha 6nHokJe HmEeTcpe3b6a dIy yCTaHOBKn Ha 5tATNB (9). Heo6xOdImbI dJI 3TOr oIaNTep 5tATNBA NOCTaBnRETC B KaueCTBe OIuIN ((NO no KataIory 19-16000 nII 19-16500). C ero noMoUbIO MOXHO yCTaHABnBaTb 6nHOKNb Ha 5tATNB c npncOeDInHtIELbHo pe3b6oB DIN (hAnp., No no KataIory 49-22100).
YKA3AHN no nctke
HcnoIb3yIte dna qnCTKn IINH3 (OKyIpaI n/IIIO bEKTNBI) TOIbKO MArKyO caΦeTKY H3 HEKHaHO MaTePnAa (HaNPmEp, MInKpOBOJOKHO). He HaXMaIte Ha caΦeTKy CInuKOM CInbHO, YTO6bl NCKIHOHTB BepoARTHOCTb O6pa3OBAHNA Uapann HA IINH3ax.
Дя удаленя 6олee сиьньix 3aря3нeн CMочnte yистяшую calфety B JxndKoCTn Дя ChSTkn OчКOB n npOTpIte LInH3bl C He6OJIbshm YcnilneM.
3aunuane npnbop ot nbinn n Bnarn! Nocne HcnoIb30BaHnra - B OCOeHHOCTn npn BbICOKoBnJHOCTN BO3dyxa - NOpeKHTe npnbop HeKOtOpoe Bpemn pni KOMHaTHOH TemnepaType, UTObI DaTb NCnapntbcra OCTaToHOBnare. HaDeHbTe Pblne3aunTHbIe KOJIpaKn I NOMeCTNTe npnbop BCymky, BXODAUYIO B KOMPJIeKT NoCTabKn.
DE Garantie & Service
GB Warranty & Service
The regular guarantee period is 2 years and begins on the day of purchase. To benefit from an extended voluntary guarantee period as stated on the gift box, registration on our website is required.
You can consult the full guarantee terms as well as information on extending the gua
rantee period and details of our services at www.bresser.de/warranty_terms.

- General Safety Informations!
- RISK of physical injury!
- Fire/Burning RISK!
- RISK of material damage!
- BINOCULARS
- List of Parts
- Eyepieces for spectacle wearers
- Twist-up Eyecups (2a)
- Rubber Eyecups (2b)
- Adjusting the eyepiece distance P R C
- Adjusting the focus
- Mounting the binoculars on a tripod P R
- TIPS on cleaning
- Chere cliente, cher client,
- Kataaoyoc EApntnauwv
- PpooofoaIoi aKoi yia aTOua nou oopouv yuaia PRC
- BNIHOKNI
- IpeueHb KOMnoHeHToB
- Okynap dny noIb3OBaTeNeB Ouch P R C
- HaBnHcyBaIOuIeCeOkyIpaIy (2a)
- NIN
- Pe3nHOBbIe OKyIaRbI (2b)
- HactpoJaTla3HO6a3blPRC
- YcTaHOBka Ha pe3KoCTb PR C
- yCTaHOBka 6HHOKJI HA WtTaTHB P R
- YKA3AHN no nctke
- DE Garantie & Service
- GB Warranty & Service
Brand : BRESSER
Model : Hunter 20x50
Category : Binoculars