15PT2966 - TV PHILIPS - Free user manual and instructions
Find the device manual for free 15PT2966 PHILIPS in PDF.

User questions about 15PT2966 PHILIPS
0 question about this device. Answer the ones you know or ask your own.
Ask a new question about this device
Download the instructions for your TV in PDF format for free! Find your manual 15PT2966 - PHILIPS and take your electronic device back in hand. On this page are published all the documents necessary for the use of your device. 15PT2966 by PHILIPS.
USER MANUAL 15PT2966 PHILIPS
29PT5306/5506, 29PT5507/5606
MODEL:
PROD.NO :
GB Please note the reference numbers for your TV set located on the packaging or on the back of the set.
FR Veuillez noter les refrences de votre téléviseur situées sur l'emballage ou au dos de I'appareil.
NL Let op de referenties van uw tevisietoestel die op de verpakking of op de awhilekant van het toestel staan.
DE Notieren Sie Referenznummern Ihres Fernsehgeräts, die sich auf der Verpackung bzw. auf der Rückseite des Geräts befinden.
IT Notare i riferimenti del vostro tevisore situati sull'imballaggio o sul retro dell'apparecchio.
DK Bemark de oplysninger om dit TV, der findes pa kassen eller bagsiden af TV-apparatet.
NO Noter deg referansen for TV-apparatet, som du finner på emballasjen eller på baksiden av apparatet.
SU Notera de uppgifter om er TV som Återfinns på kartongen eller baksidan av TV-apparaten.
SF Lue myos television myyntipakkaufsessa tai television takana olevat merkinnät.
ES Anote las referencias de su teovisor que se
encuentran en el embalaje o en la parte
trasera del aparato.
PT Anote as referencia do seu tevisorTRS localizadas na embalagem ou na parte de do aparelho.
GR Σημειωτε TIG ΕODγΙΕς χρήσις ΣΤΟ Σλεόραοπς ΣΑς Σου βρίακονται ΣΤΟ Σιακε μασία ἡ ΣΤΟ πίω μέρος ΣΤΟ συακεύπες
TR Ambalajin uzerinde ya da aletin arkasinda bulunan referanslar i baska bir yere not edin.
HU Kérjuk vegye figyembe az On televiziójának a hátoldalan és a csomagoláson felTÜntetét katalógguszámokat.
RU 3aIIuIte Homep MoJeIN BaUero TeJIeBn3Opa, KOTOpbI yKa3aH Ha yPaKoBOuHOJ KOp6Ke IIn Ha 3aJHe CTOpOHe aannapata.
PL Prosimy o zanotowanie oznaczen telewizora umieszczonych na opakowaniu lub tylnej czeci urzadzenia.
CZ Poznamenejte si typové udaje Vaseho televizoru umisténé na obalu nebo na zadni straně prístroje.
SK Poznačte si typové udaje Vášho televízora nachadžajúce sa na obale alebo na zadnej strane prístroja.
Remote control keys
GB For detail explanation of the remote control's function and safety page, please refer to page 3.
FR Pour les instructions détaillées sur la fonction de télécommande et les pages d'informations relatives à la sécurité, veuillez vous reporter à la page 3.
NL Zie pagina 3 voor meer informatie over de functies van de afstandsbediening en de veiligheidsinformatie.
DE Eine detailierte Beschreibung der Funktionen der Fernbedienung sowie Sicherheitshinweise finden Sie auf Seite 3.
IT Per istruzioni dettagiate sulle funzioni del telecomando e la sicurezza andare a pagina 3.
DK Yderligere ophysninger om fjernbetjeningens Funktion og sikkerhed finder du pa side 3.
NO For detailjert forklaring av fjernkontrollens funksjoner og sikkerhetsside, se side 3.
SU Mer information om fjarrkontrollens Funktion och sakerhetssidan finns på sedan 3.
SF Lisatietoja kaukosaatimen toiminnasta ja turvallisuusasioista saat sivulta 3.
ES Para explicaciones más detalladas de la función de control remoto y la párgina de seguridad, dirijase a la párgina 3.
PT Para obter explicacoes detallhadas sobre as funcoes do controlo remoto e da网页 de seguranca, consulte a pagina 3.
GR Tia aenittopeic e nteynnoeis Tns aeitoupyiac Tou nIaeXepiOtnpiou kai tn oeiia etpaoaaleiac ovatpexiTe otn eia 3.
TR Uzaktan kumandanin islevi ve givenvlik sayfasile ilgili ayrintili aciklama icin 3. sayfaya bakin.
HU A távkapcsoló funkcióival és aBiztonsági oldallakapcsolatos részletes tudnivalókat a 3. oldalon olvashatja.
RU Iopnp6Hoe OONcaHHe Ha3HaueHnI PylbTa INCTaHcIOHNOY npaBNeHn INHOpMaIIO NTO TexHnke 6e3ONaCHOCTN CMOTpnte Ha cTpaHnCe 3.
PL Szczegółowy opis faktcji pilota i informacja o bezpieczestewie znajduja sie na stronie 3.
CZ Podrobné používání funkce dálkového ovladače a bezpečnostné poukny najdete na strě 3.
SK Detailné vysvetlenie funkcii dial'kového ovládača a o informácie bezpečnosti najdete na strane 3.
Introduction
Thank you for purchasing this television set.
This handbook has been designed to help you install and operate your TV set.
We would strongly recommend that you read it thoroughly.
We hope our technology meets entirely with your satisfaction.
Note: Specification and information subject to change without notice.
Table of Contents
Installation
Installing your television set 2
The keys on the TV set 2
Remote control keys 3
Safety information 3
Quick installation 4
Program sort 4
Program name 4
Manual store 5
Other settings in the Install menu 5
Operation
Using the radio (only available on certain versions) 5
Picture settings 6
Sound adjustments 6
Feature settings 6
Timer function 7
TV lock 7
Teletext 8
Peripherals
Video recorder 9
Other equipment 9
Amplifier 9
Side connections 9
To select connected equipment 9
Practical information
Tips 10
Safety Information: Electric, Magnetic and Electromagnetic Fields 10
Glossary 11


m = 311 ;
Recycling
This packaging of this set can be recovered or recycled. Apply to the local authorities in order to minimise environmental waste.
Disposal of your old product.
Your product is designed and manufactured with high quality materials and components, which can be recycled and reused.
When this crossed-out wheeled bin symbol is attached to a product it means the product is covered by the European Directive 2002/96/EC. Please inform yourself about the local separate collection system for electrical and electronic products.
Please act according to your local rules and do not dispose of your old products with your normal household waste. The correct disposal of your old product will help prevent potential negative consequences for the environment and human health.
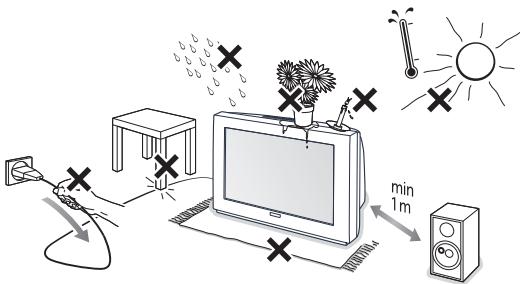
Installing your television set
Positioning the television set
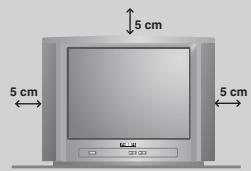
Place your TV on a solid, stable surface, leaving a space of at least 5cm around the appliance. To avoid accidents, do not put anything on the set such as a cloth or cover, a container full of liquid (vase) or a heat source (lamp). The set must not be exposed to water.
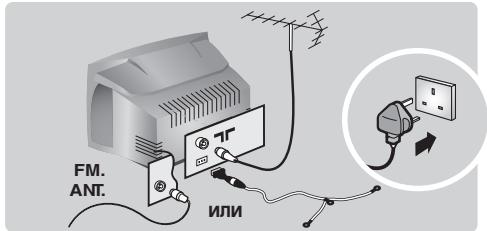
Connections
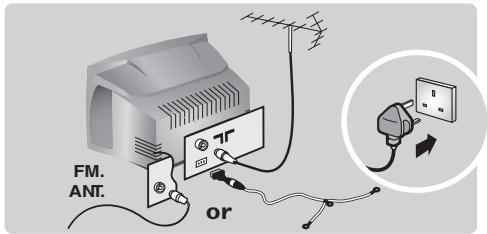
- Insert the aerial plug into the socket at the rear of the set.
- For the versions equipped with a radio: insert the radio aerial socket into the FM ANT socket using the adapter supplied. If you are using an indoor aerial, reception may be difficult in certain conditions. You can improve reception by rotating the aerial. If the reception remains poor, you will need to use an external aerial.
- Insert the mains plug into a wall socket (220-240V / 50 Hz).
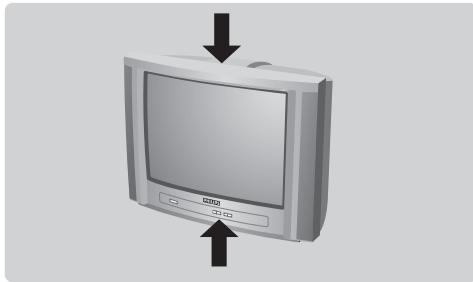
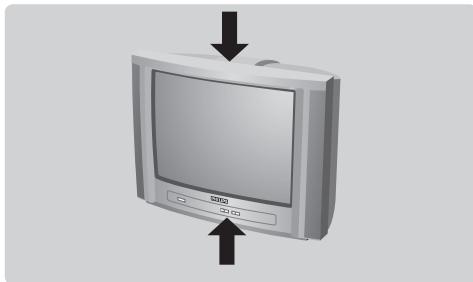
The keys on the TV set
The television set has 4 keys which are located on the front or the top of the set depending on the model.
Remote control

Insert the two R6-type batteries (supplied) making sure that they are the right way round. Check that the mode selector is set to TV. The batteries supplied with this appliance do not contain mercury or nickel cadmium. If you have access to a recycling facility, please do not discard your used batteries (if in doubt, consult your dealer). When the batteries are replaced, use the same type.
Switching on

To switch on the set, press the on/off key. A red indicator comes on and the screen lights up. Go straight to the chapter Quick installation on page 4.
If the television remains in standby mode, press P^ on the remote control.
The indicator will flash when you use the remote control.
The VOLUME - + (- +) keys are used to adjust sound levels. The PROGRAM - + (- P + or - +) keys are used to select the required programmes. To access the menus, simultaneously hold down the and + keys. The PROGRAM - + keys may then be used to select an adjustment and the - + keys to make that adjustment.
To exit from the menus, hold down the 2 - and + keys.
Note: when the Child Lock function is activated, these keys are unavailable (refer to Features menu on page 7).
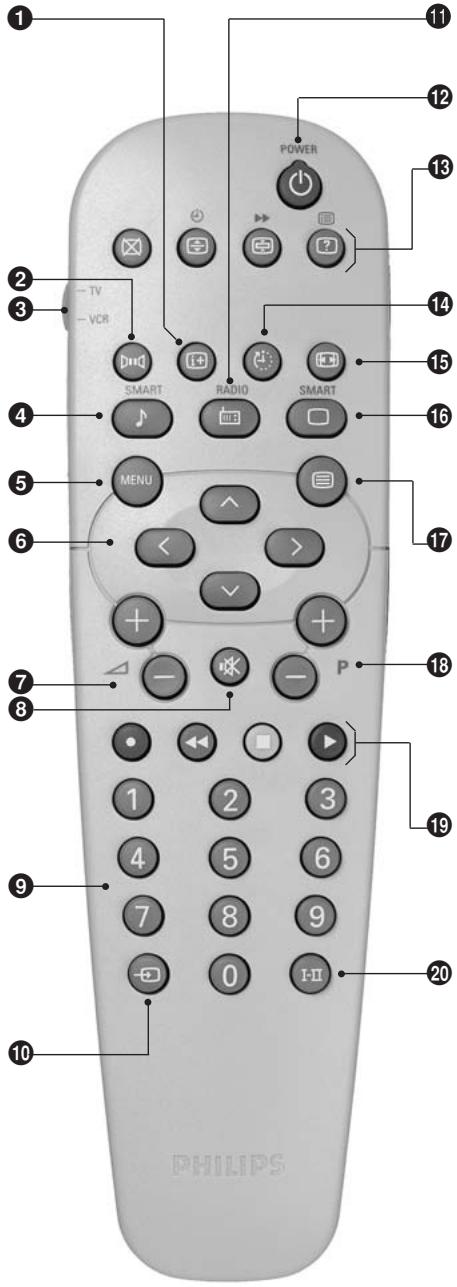
Remote control keys
1 Screen information / permanent no.
To display / clear the program number, name (if it exists), time, audio mode and time remaining for the sleep feature. Press the key for 5 seconds to activate permanent display of the number. This key is also used to exit from the menu.
2 Surround Sound (only available on certain versions) To activate / deactivate the surround sound effect. In stereo, this gives the impression that the speakers are further apart. For models equipped with Virtual Dolby Surround*, you can experience Dolby Surround Pro Logic sound effects. In mono, a stereo spatial effect is simulated.
VCR key**
4 Pre-set sound
Used to access a series of stored settings: Speech, Music, Theatre and return to Personal.
5 Menu
To call up or exit the menus.
6 Cursor/Format
These 4 keys are used to navigate through the menus. The keys are used to enlarge or compress the picture vertically.
Volume
To adjust the sound level
Mute
To mute or restore the sound.
Number keys
Direct access to the programmes. For a 2 digit program, enter the 2nd digit before the dash disappears.
Selection of EXT socket
Press several times to select EXT1,EXT2,S-VHS and AV.
Radio /TV mode
To switch the TV set to radio or TV mode (for versions equipped with radio).
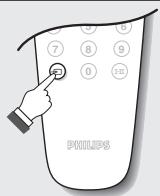
12 Standby
Lets you place the TV set on standby. To turn on the TV, press P , , to (or ).
Teletext keys (p. 8), VCR keys (p.11) and list of radio stations (p.5)
Sleep
To select an automatic standby after a preset time (from 0 to 240 minutes).
16:9 modes (p. 9)
16 Pre-set image
Used to access a series of stored settings: Rich, Natural, Soft, Multimedia and return to Personal.
Teletext keys (p.8)
18 Program selection
To access the next or previous programme. The number, (name) and sound mode are displayed for a few moments.
For some programs, the title of the program will be displayed at the bottom of the screen.
Teletext keys (p.8)
or VCR keys ** (p.11)
Sound mode
Used to force programmes in Stereo to Mono or, for bilingual programs, to choose between Dual I or Dual II. For TV sets equipped for Nicam reception, depending on the programmes, you can force the Stereo Nicam sound to Mono or select between Nicam Dual I, Nicam Dual II and Mono.
The Mono indication is red when in forced position.
- "Dolby" and the double-D symbols DQ are trademarks of the Dolby Laboratories Licensing Corporation.
Manufactured under license of Dolby Laboratories Licensing Corporation.
** VCR key
The remote control lets you control the main functions of the VCR.
Press and hold down the VCR key located on the side of the remote control, then press one of the keys to access
theVCR functions: (MEN) P - +
The remote control is compatible with all VCRs using the RC5 standard.
Safety Information
Plug the TV into a 220V - 240V AC, 50 Hz supply.
- Disconnect mains plug when :
the red light below the TV screen is flashing continuously.
- a bright white line is displayed across the screen.
- there is a lightning storm.
the set is left unattended for a prolonged period of time.
Cleaning the TV screen. Never use abrasive cleaning agents. Use a slight damp chamois leather or soft cloth.
- No naked flame sources, such as lighted candles, should be placed on top of the TV or in the vicinity.
- Do not place your TV set under direct sunlight or heat.
- Do not cover or block the TV as it could lead to overheating.
- Leave at least 5cm around each side of TV set to allow for proper ventilation.
- Avoid placing your set (e.g. near the window) where it is likely to be exposed to rain or water.
- Battery Usage CAUTION - To prevent battery leakage that may result in bodily injury, property damage, or damage to the unit:
- Install all batteries correctly, with + and - aligned as marked on the unit.
- Do not mix batteries (old and new or carbon and alkaline, etc.).
- Remove batteries when the unit is not used for a long time.
Useful Tips
- Do not leave your set on standby mode for a prolonged period of time. Switch off set to allow it to be demagnetised. A demagnetised set supports good picture quality.
- Do not shift or move the set around when it is switched on. Unevenness in colour in some parts of the screen may occur.
- Never attempt to repair a defective TV yourself. Always consult a skilled service personnel.
Quick installation
When you turn on the TV set for the first time, a menu is displayed on screen. This menu prompts you to select the country and language for the menus:
Select Country
Country

Language
Espanol
Syenska
English
Dansk
Nederlandss
If the menu is not displayed, press and hold down the and + keys on the TV set for 5 seconds to display the menu.
Use the keys on the remote control to select your country and validate with. If your country does not appear in the list, select choice"..."
Next select your language using the keys and validate with > .
The search starts automatically. All the available TV programmes and radio stations * will be stored. This operation takes a few minutes. The display shows the progress of the search and the number of programs found. At the end of the search, the menu disappears.
To exit or interrupt the search, press (MEN) If no programme is found, consult the possible solutions p. 10.
If the transmitter or cable network sends the automatic sort signal, the programs will be numbered correctly. In this case, the installation is complete.
If this is not the case, you need to use the Sort menu to number the programs correctly. Some transmitters or cable networks broadcast their own sort parameters (region, language, etc.). In this case, indicate your choice using the keys and validate with .
- Only on versions equipped with a radio.
Program sort
Press key (MEN). The Main menu is displayed on the screen.
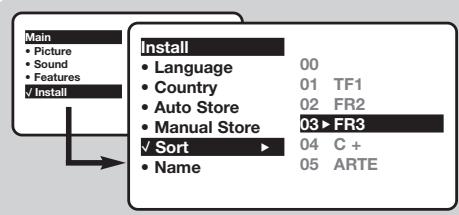
With the cursor, select the Install menu followed by the Sort menu.
3 Select the programme you want to move using the keys and press
4 Then use the keys to select the new number and validate with .
Repeat steps 3 and 4 for each program you wish to renumber.
6 To quit the menus, press
Program name
If required, you can give a name to the programmes and external connectors. Note: on installation, the programs are named automatically when an identification signal is sent.
1 Press the (Menu) key.
With the cursor, select the Install menu, then Name
Use the keys to select the programme to name or rename.
Use the keys to move around the name display area (5 characters) and the keys to select the characters.
When the name has been entered, use the key to exit. The name is stored.
6 Repeat steps 3 to 5 for each programme you wish to name.
To quit the menus, press
Manual store
This menu is used to store the programmes one at a time.
1 Press the (MEN) key.
With the cursor, select the Install menu then Manual store:
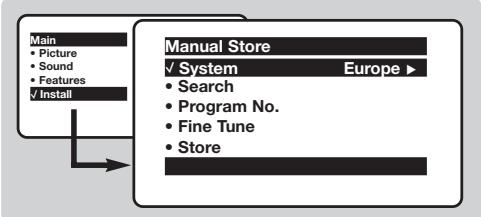
System: select Europe (automatic detection*) or Western Europe (BG standard), Eastern Europe (DK standard), United Kingdom (I standard) or France (LL' standard).
- Except for France (LL' standard), you must select choice France.
4 Search: press > . The search starts. Once a programme is found, the scanning stops and its name is displayed (when available). Go to the next step. If you know the frequency of the required programme, this can be entered directly using the 0 to 9 keys. If no picture is found, consult the possible solutions (p. 10).
Program No.: enter the required number with the or 0 to keys.
6 Fine Tune: if the reception is not satisfactory, adjust using the keys.
7 Store: press 2 . The program is stored.
Repeat steps 4 to 8 for each programme to store.
9 To quit the menus, press +
Other settings in the Install menu
Press the (MEN) key and select the Install menu:
2 Language: to change the display language for the menus.
3 Country: to select your country (GB for Great Britain).
This setting is used for the search, automatic programme sort and teletext display. If your country does not appear in the list, select "...
Auto Store: to start automatic search for all programmes available in your region. If the transmitter or cable network sends the
automatic sort signal, the programmes will be numbered correctly. If this is not the case, you need to use the Sort menu to renumber the programmes (see p. 4).
Some transmitters or cable networks broadcast their own sort parameters (region, language, etc.). In this case, indicate your choice using the keys and validate with . To quit or interrupt the search, press . If no picture is found, consult the possible solutions (p. 10).
To quit the menus, press
Using the radio (only available on certain versions)
Choice of TV or radio mode
Press the key on the remote control to switch the TV set to either TV or radio mode. In radio mode, the number, station name (if available), frequency and sound mode are displayed on the screen. To enter the station names, use the Name menu (p. 4)
Program selection
Use the ① 9 or -P + keys to select the FM stations (from 1 to 40).
List of radio stations
Press the key to display the list of radio stations radio. Use the 心 keys to change station and the key to exit.
Using the radio menus
Use the (MENU) key to access the specific radio setting.
Search for radio stations
If you used the quick installation, all available FM stations have already been stored. To start a new search, use the Install :Auto Store menu (for a complete search) or Manual Store (for a station by station search). The Sort and Name menus let you sort or name the radio stations. Operation of these menus is the same as for the TV menus.
Screensaver
Use the 值 key to activate/deactivate the radio screenshotaver.
Picture settings
Press (MEN) then .The Picture menu is displayed:
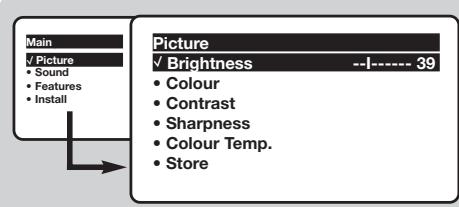
Use the keys to select a setting and the ×× keys to adjust.
Note: during the picture adjustment, only the selected line remains displayed. Press to display the menu again.
3 Once the adjustments have been made, select Store and press > to store them. Press 加 to exit.
Description of the adjustments:
- Brightness: this changes picture brilliance.
Colour: this changes the intensity of the colour. - Contrast: this changes the difference between the light and dark tones.
- Sharpness: this changes the picture definition.
- Colour Temp.: this changes the colour rendering: Cold (bluer), Normal (balanced) or Warm (redder).
- Store: to store the picture adjustments and settings (as well as the settings for Contrast + and NR in the Features menu).
Sound adjustments
Press (MEN), select Sound () and press. The Sound menu is displayed:
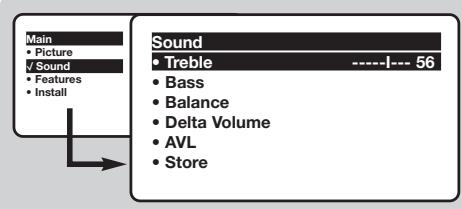
Use the keys to select a setting and the keys to adjust.
3 Once the adjustments have been made, select Store and press to store these changes.
4 To quit the menus, press
Description of the settings:
- Treble: this alters the high frequency sounds.
- Bass: this alters the low frequency sounds.
Balance: this balances the sound on the left and right speakers. - DeltaVolume*: this is used to compensate any volume discrepancies between the different programs or EXT sockets. This setting is available for programs 0 to 40 and the EXT sockets.
- AVL* (Automatic Volume Leveller): this is used to limit increases in sound, especially on program change or advertising slots.
- Store: this is used to store the sound settings.
- Only available on certain versions.
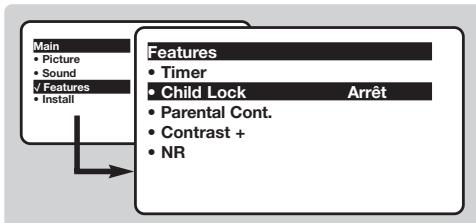
Feature settings
Press (MEND), select Features () and press. > You can adjust:
Timer, Child Lock and Parental Cont.: see next page
Contrast+: automatic adjustment of the picture contrast which permanently sets the darkest part of the picture to black.
4 NR: attenuates picture noise (snow) in difficult reception conditions.
Caution: to store the Contrast + and NR settings, use the Store choice in the Picture menu.
5 To quit the menus, press + .
Timer function (only available on certain versions)
This menu lets you use the TV set as an alarm.
1 Press the (MEN) key.
With the cursor, select the Options menu then Timer :
3 Sleep: to select an automatic standby period.
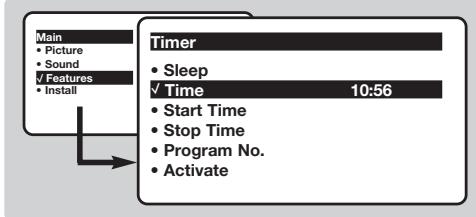
This setting is also available via the key on the remote control.
Time: enter the current time.
Note: the time is updated automatically each time the TV set is switched on via the teletext information on programme 1. If this programme does not have teletext, the update will not take place.
3 Start Time: enter the start time.
Stop Time: enter the standby time.
Program No.: enter the number of the programme for the wake-up alarm. For models equipped with a radio, you can select an FM station by using the keys (the 09 keys are only used to select TV programs).
Activate: the settings include:
- Once for a single alarm,
- Daily for each day,
- Stop to cancel.
Press to put the TV set in standby. It will automatically come on at the time programmed. If you leave the TV set on, it will just change programmes at the time entered (and will go to standby mode at the Stop Time).
By combining the TV lock and Timer functions, you can restrict the period during which the TV set is used, for example by your children.
TV lock (only available on certain versions)
You can block certain programs or inhibit use of the TV set completely by locking the keys.
Child lock
1 Press (MEN).
2 With the cursor, select the Options menu and position Child Lock to On.
3 Turn off the TV set and hide the remote control. The TV set cannot be used (except via the remote control).
4 To cancel: position Child Lock to Off.
Parental control
1 Press the (MEN) key, select the Features menu then Parental Cont.:
2 You must enter your secret access code.
The first time you enter this, enter code 0711 twice and then enter your new code choice. The menu is displayed.
3 Parental Cont.: Use the keys to select the TV programme required and validate with . The symbol will be displayed opposite the programmes or sockets that are locked. From now on, to view a locked programme, you must enter your secret code, otherwise the screen will stay blank.
The access to the Install menu is also locked. Caution, for encrypted programs using an external decoder, you must lock the corresponding EXT socket.
4 Change code: this allows you to enter a new 4 digit code. Confirm your new code by entering it a second time.
If you have forgotten your secret code, enter the universal code 0711 twice.
Unlock all: this is used to unlock all locked programmes.
Lock All: this is used to lock all the TV programmes and EXT connectors.
Press the key to quit.
Teletext
Teletext is an information system broadcast by certain channels which can be consulted like a newspaper. It also offers access to subtitles for viewers with hearing problems or who are not familiar with the transmission language (cable networks, satellite channels, etc.).

| Press: | You will obtain: | |
| Teletext call | This is used to call teletext, change to transparent mode and then exit. The summary appears with a list of items that can be accessed. Each item has a corresponding 3 digit page number. If the channel selected does not broadcast teletext, the indication 100 will be displayed and the screen will remain blank (in this case, exit teletext and select another channel). | |
| Selecting a page | Enter the number of the page required using the ① to ⑨ or ⓷ P + keys, ⓽√. Example: page 120, enter ① ② ⑩. The number is displayed top left, the counter turns and then the page is displayed. Repeat this operation to view another page. If the counter continues to search, this means that the page is not transmitted. Select another number. | |
| Direct access to the items | Coloured areas are displayed at the bottom of the screen. The 4 coloured keys are used to access the items or corresponding pages. The coloured areas flash when the item or the page is not yet available. | |
| Contents | This returns you to the contents page (usually page 100). | |
| Temporary stop | This is used to temporarily disable or activate the teletext display. | |
| Enlarge a page | This allows you to display the top or bottom part of the page and then return to normal size. | |
| Stop sub-page acquisition | Certain pages contain sub-pages which are automatically displayed successively. This key is used to stop or resume sub-page acquisition. The indication ⓹ appears top left. | |
| Hidden information | To display or hide the concealed information (games solutions). | |
| Favourite pages | For teletext programs 0 to 40, you can store 4 favourite pages which can then be accessed directly using the coloured keys (red, green, yellow, blue). 1 Press the ⓺ key to change to favourite pages mode. 2 Display the teletext page that you want to store. 3 Press the coloured key of your choice for 3 seconds. The page is now stored. 4 Repeat the operation with the other coloured keys. 5 You can now consult teletext and your favourite pages will appear in colour at the bottom of the screen. To retrieve the standard items, press ⓹. To clear everything, press ⓹ for 5 seconds. | |
Connecting peripheral equipment
Depending on the versions, the TV set will be equipped with 1 or 2 SCART connectors EXT1 and EXT2 located on the rear. The EXT1 socket has audio, CVBS/RGB inputs and audio, CVBS outputs. The EXT2 socket (if available) has audio, CVBS/S-VHS inputs and audio, CVBS outputs.
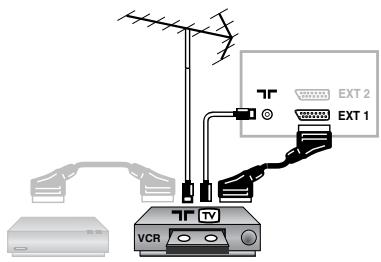
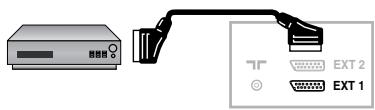
Video recorder
Carry out the connections shown opposite, using a good quality euroconnector cable.
If your video recorder does not have a euroconnector socket, the only connection possible is via the aerial cable. You will therefore need to tune in your video recorder's test signal and assign it programme number 0 (refer to manual store, p_6).
To reproduce the video recorder picture, press ①.
Video recorder with decoder
Connect the decoder to the second euroconnector socket of the video recorder. You will then be able to record scrambled transmissions.
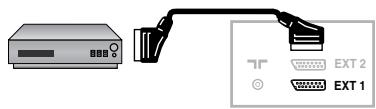
Other equipment
Satellite receiver, decoder, CDV, games, etc.
For TV sets with 2 SCART connectors, preferably connect the equipment delivering RGB signals (digital decoders, DVD players, games consoles, etc.) to EXT1 and the equipment delivering S-VHS signals (S-VHS and Hi-8VCRs) to EXT2.
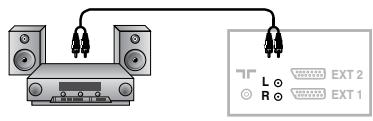
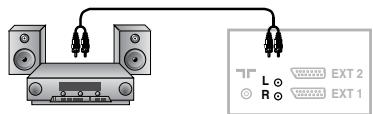
Amplifier (only available on certain versions)
To connect to a hi-fi system, use an audio connection cable and connect the "L" and "R" outputs on the TV set to the "AUDIO IN" "L" and "R" input on your hi-fi amplifier.

Front panel connectors (only available on certain versions)
Depending on the versions, the connectors are located on the front (sometimes under a flap) or on the right-hand side of the TV set. Make the connections as shown opposite.With the key, select AV.
For a monophonic device, connect the audio signal to the AUDIO L input. Use the key to reproduce the sound on the left and right speakers of the TV set.
Headphones
When headphones are connected, the sound on the TV set will be cut. The P keys are used to adjust the volume level.
The headache impedance must be between 32 and 600 Ohms.
To select connected equipment
Press the key to select EXT1 and on the versions with 2 scarts, EXT2, S-VHS2 (S-VHS signals from the EXT2 socket) and AV for the side connections (if available).
Most equipment (decoder, video recorder) carnes out the switching itself.
Tips
Poor reception
The proximity of mountains or high buildings may be responsible for ghost pictures, echoing or shadows. In this case, try manually adjusting your picture: see Fine Tuning (p.5) or modify the orientation of the outside aerial.
Does your antenna enable you to receive broadcasts in this frequency range (UHF or VHF band)?
In the event of difficult reception (snowy picture) switch the NR on the Options menu to ON. (p.6).
No picture
If the television does not switch on, please press the standby key (located on the remote control) twice.
Have you connected the aerial socket properly? Have you chosen the right system? (p. 5).
Poorly connected euroconnector cables or aerial sockets are often the cause of picture or sound problems (sometimes the connectors can become half disconnected if the TV set is moved or turned). Check all connections.
Peripheral equipment gives a black and white picture
You have not selected the right socket with the key: S-VHS2 instead of EXT2.
To play a video cassette, check that it has been recorded under the same standard (PAL, SECAM, NTSC) which can be replayed by the video recorder.
The remote control no longer works.
Check that the mode selector on the side of the remote control is set to TV.
No sound
If on certain channels you receive a picture but no sound, this means that you do not have the correct TV system. Modify the System setting (p. 5).
Teletext
Are certain characters not displayed correctly? Check that the Country setting has been positioned correctly (p.5).
Remote control
The TV set does not react to the remote control; the indicator on the set no longer flashes when you use the remote control?
Replace the batteries.
Standby
When you switch the TV set on it remains in standby mode and the indication Locked is displayed when you use the keys on the TV set? The Child Lock function is switched On (p. 7). If the set receives no signal for 15 mins, it automatically goes into standby mode. In standby mode, your TV consumes less than 5W depending on model. In order to be more environmentally friendly, please use the on/off (power) switch to turn the set off completely.
Still no results?
If your TV set breaks down, never attempt to repair it yourself: contact your dealer's after-sales service.
Cleaning the set
Only use a clean, soft and lint-free cloth to clean the screen and the casing of your set. Do not use alcohol-based or solvent-based products.
Safety Information: Electric, Magnetic and Electromagnetic Fields ("EMF")
- Philips Royal Electronics manufactures and sells many products targeted at consumers, which, like any electronic apparatus, in general have the ability to emit and receive electro magnetic signals.
- One of Philips' leading Business Principles is to take all necessary health and safety measures for our products, to comply with all applicable legal requirements and to stay well within the EMF standards applicable at the time of producing the products.
- Philips is committed to develop, produce and market products that cause no adverse health effects.
- Philips confirms that if its products are handled properly for their intended use, they are safe to use according to scientific evidence available today.
- Philips plays an active role in the development of international EMF and safety standards, enabling Philips to anticipate further developments in standardization for early integration in its products.
Glossary
RGB Signals: These are 3 Red, Green and Blue video signals which directly drive the red, green and blue emitters in the cathode ray tube. Using these signals provides better picture quality.
S-VHS Signals: These are 2 separate Y/C video signals from the S-VHS and Hi-8 recording standards. The luminance signals Y (black and white) and chrominance signals C (colour) are recorded separately on the tape. This provides better picture quality than with standard video (VHS and 8 mm) where the Y/C signals are combined to provide only one video signal.
NICAM sound: Process by which digital sound can be transmitted.
System: Television pictures are not broadcast in the same way in all countries. There are different standards: BG, DK, I, and L L'. The SYSTEM setting (p. 6) is used to select these different standards. This is not to be confused with PAL or SECAM colour coding. Pal is used in most countries in Europe, Secam in France, Russia and most African countries. The United States and Japan use a different system called NTSC. The inputs EXT1 and EXT2 are used to read NTSC coded recordings.
16:9: Refers to the ration between the length and height of the screen. Wide screen televisions have a ration of 16/9, conventional screen TV sets have a ration of 4/3.
Introduction

m = 311 ;
Used to access a series of stored settings: Rich, Natural, Soft, Multimedia and return to Personal.

m = 311 ;
IcnoJIb3OBAHnE paIIOnpnEMnKa 5
HacrpoKa n3o6paXeHnA 6
HacrpoKa 3ByKa .6
HacrpoKa xapaKTepeNtuk 6
Функциа 6удильнka 7
Бл_OKировka TeileBn3opa 7
TeTetekct 8
Pepnpepnnaannapatya
IopKnloueHne nepupeepnHO annapatypb 9
BndeomarHHToΦOH 9
Дугай симпатура 9
IopknioueHn c6oky 9
YcnilnteIb 9
IpaKTHueckaMHOpMaun
Cobetbl 10
CbeHnnoT TeXnKe 6e3oNaChocIn: ΘeKtpnueckne, MaHHTbIe n 3JeKtpomarHnTHbIe noJ (EMF) 10
CnoBapb 11


Yka3aHnI IO yTmIINaUIn
Ynakobka 3TOrO n3dJIeIy npEJaHa3HaueHa IJy NOBtorpHoi nepepa60Kn.
ObaHTecb B MeCTHbI yIOnHOMOeHHbI opraHbI IJI IOnUyeHn INΦOpMaun O KoppeKTHOM YHNUTOKeHN.
YCTaHOBnTB TeneBn3Op Ha npOCHyIO n
YCTOuHbByIO NOBepxHocTb, ppeDyCMOTpeB
CBo6OJHOe IPOcTpaHCTBO He MeHee 5 CM BOKpyr
TeneBn3Opa. He HakpbBaTb erO (caPcTeKoI,
CKaTePbTO u T. n.), He CTaBnTB Ha Hero
IpeMeTb, HAnONHeHHbIe JIKKOCTbIO (Ba3b) NII
BVdJIeNIOUne TeTIO (JaMbl), UTo6bl N36EkaTb
OnaChOCTeIN NII NOBpeXKeHEn. He DOnyckTaB
IOnaDaHn8 Ib3ROB BObl HA TeneBn3Op.
②Поdkлоченье
BCTaBnTbФnIky aHTeHHb IB pa3bEm TpacnoIOXKeHHb C 3aJHeN CTOpOHb TeNEBu3opa.
Длma moDEnei,обopydOBaHHbIX paIIOIpnEMHnKAMN:BCTaBbTe 5TbIpb aHTeHHbI paIIOIpnEMHnKa B rHe3do FM ANT, nCnoJIb3yI pyI 3TOrO npINaRaembI nepexoHNk.Пи IcNoIb3OBAHmB BVHTpeHNe aHTeHHbI pIneM, B HeKOToPbIX cIpyaX, MoKeT b6tB 3atpydHeN. Bbl MoKeTe yIyUuNTb erO, BpaUaJ aHTeHHy. Ecn KaueCTBO pInema He yIyUuNTcR, Heo6xOIMO nepeiTu Ha HApYxHyio aHTeHHy.
- BkIIOHTe IHHyp NITaHnB Cetb (220-240 B /50T).
3Пульт Дистанционноунразьени

Bctabntb o6e noctabnlembc annapaTOM 6atapeyn Tnna R6, B COOTBETCTBnC yka3aHHbIM HnnpaBHeHem yCTaHOBKn. YOcTOBepbTeCb, yTO celenkTop pexmua yCTaHOBHeB nnoJKeHne TV.
BatapeKn, noCTaBHeHbIe BMeCTe c aannapatom, He coepKaT Hn pTuN, Hn KaMnH, Hn HKeJI B 3aOte o6 oxpAne OKpyKaIoUe Cpebl. Ipocb6a He bblpaBtB Otpa6oTbAWe batapeKn, anCIOJb3OBaTb IMeIOUneCER BAwEM pacnpraKeHN cpeDCTBa INx C6opa dInr yTuIN3aUN (ObpatNTbcR K BAwEmy PPOdABuY).
BkJIIOueHne

HaKaTb Ha KnaBnUy BkN./BbIK.ДЯ
BKnIOueHnIeTeBn3Opa.3aRopaETc
KpaChbI CBTOBOu INHnKATOp,ИЗКран
3aKnIraETc.Obpatntecb HENOCpeDCTBeHNo
K rJaBe 6bICTpo yCTaHOBKN Ha CJIeNyIOSeIe
CTpaHnIe.Ecnn TEJEBN3Op HaxOJTcB
DExKyPHOM COCTOHRn,HaKaTb Ha KNaBnUy
P nylbTa dNCTaHcNoHHOrO ynpabJeHnI.
PpI nCnOJIb3OBAHN pYbTa dNCTaHcNoHHOrO
ynpabHeHnCBTOBOHnHdNKATOp MInaet.
KnaBnIe TeneBn3opa
TeJIeBn3Op IMeET 4 KnaBnSi, KOtOpbIe HaxoJATcJINo Ho NapeJeHNe CTeHKe, IIn6O Ha
BepxHe napanen, B 3aBncmocn OT moJeIe. KnaBnuVOLUME-+(-+)no3BOJIoT peyunipobat ypoBeHb 3Byka.KnaBnuIN PROGRAM-+(-P+nIn-n+) no3BOJIoT BBiupapb nporpamMbI.ДяdoCTynKa MeHIO dePkaTb HaxKaTbIMN KnaBnuIN -n +3aTeM KnaBnuIN PROGRAM-+no3BOJIoT BBiopaTb HacTpOky,a KnaBnuIN -+ npOn3BecTN HAcTpOky.DJIa BixOJa n3 MeHIO dePkaTb HaxKaTbIMN KnaBnuIN -n +PnpmeuHne:ecnФyHKuIN BLOKIPOBKA aKtNBipOBaHa,3Tu KnaBnuIN He JeicCTBYIOT (cm.cTp.7).
KhoIkn nyIbTa nIcTaHnOHHoro ynpaBneHna
HΦopMaJn, BbOJDmHa 3Kpah / nocToHHn ne : Cnyjxit dNn HmIgKaun / c6pOca NmIkaun HoMePA kAnla, ero ImeHN (eciIN OHO IMeETC),BpeMeHN, pexkIMa 3ByKAu nOctaTKa BpeMeHN To TaMEpy. HaxMITE uYepKJBaITe HaxatOI KhONKY B TeeyHne 5 CeyHd Ira BKNIOueHn NoctoHHN IHmIkaUNn HomePA.
0kpykaouo 6bEmhB3ByK (mEeTcra TOnbko Ha HeKOToBxMoJen)
Ibn KIOUeHn/OTKnIOUeHn3O4eKaT0kpykaioero
6bEMHO rOyauHn. B CtepeoOHcckOM pEXnme
co3aTeC TBeuATneHn, YTO rPOMKOrOBopTeIN
pacnoIOKeHb Dpyr OT dpyra Ha bONbux pacCToHNHX
Yem Ha cAmom DeJe. B MoJeHn, IMeOuXn fYHKnIO
Virtual Dolby Surround", co3aTeC TdFekKT TLbONb
rPOMKOrOBopTeIN CNCTMebl Dolby Surround Pro Logic.
B ctepeoOHcckOM pEXnme Co3aTeC
ncBEO3O4eFkO6bEMHO CTEpeoOHcckOro 3ByaHn.
3 Khonka BnneomarHnTofoHa
4 PnPdBapntbHaN HAcTPOKnA 3BykA PtOBoRr TOnyUnHb DocTy N KPeXIMy PnPdBapntbHoH HAcTPOKnI HeCKoJIbKx NpaMaTePbO 3BykA: PeY, My3bKx, TeTp n BepyTcB n P6ximn PepcoHaBHaN HAcTPOKnA.
MeHIO
Cnyknt nIy Bb3OBA MeHIO nn BbIXOda n3 MeHIO.
Kypocp /Opomat 3TN4 KHOKNI NO3BOJNIOCTO CUYUCECTBnTb NpeEXOJ Mekdy pa3NJHbIMOn ONUJIaMm MEHIO.KHOKN (C) NO3BOJNIOrP tacuiprtb IIN cyjkatb NIO6paKeHne no BETpTKaJIaN.
7 POMKOCTb
Cnyxnt dna Hactpoyn ypOBn 3Byka.
OTKIOUeHne 3Byka
Cnyknt dIra OTKIOUeHn IIN BKIOUeHn 3Byka.
1 ΚιφροBBIE KONKN
Сυжат Ддя Н�ОрсЕДСТВЕННО ВКПОЧЕНИ KAHAJOB.
Ддя ВКЛЮECHENKA HANANA, HOMEP KOTOPORO COCTOINT I3
ДБУX ΣИФР, Heo6XODIMMO 06abABT BTOPYU ΣИФPy Do
ИССЕЗDEHOBEN YEeTы.
10 BbOOp BHEUHmX yCTPOUICTB EXT (BHELIH.): HaxIMaIte MHOrOkaPatoH a 3Tу KhoNkIy dIra BbOpaEXT,EXT2,S-VHS nAV.
1 PeKIM paIIO/TB
Позьога不是一个可以打TelenBIOOPМжду ржимамп радию NB(ДЯ морд)обчрданьх радионриЕмьUM yctpoICTBOM).
12 PeknOxuHaHn
ПOTBOЛNET peBEOBNTb TENEB3Oр b pEKIM OXIDANIA.ДИВКЛЮЧЕНТENEB3Oрa n3peKIMa OXIDANIAнжIMITE NaP (一 + ) 60-9(UNI)
15 KhoNk TeneTeKCTa (Ctp. 8), KHONK BnDEOMarHnTOΦoHa (Ctp.11) n Cnncok padnoctAchun (Ctp. 5)
Cnab CnyKtI DnA BvBOpa nepNoA BpEmeH (OT 0 do 240 MNYT), NO IcTeHmN KOToPOr TEOEbn3Op ABOMTUNCKEN PEPXOJNTB DpEKM OZkDAnH.
15 PeXKIMbl 16:9 (CTp. 9)
16 PnpBaPntBnHae Na3O6paXeHnna Pn3oBnAeT NOnyUInb DOCTyn K HeCKoNbKmnpBaPntBHO YcTaHOBNeHHbIM npaMeTpamNa3O6paXeHnna: HacblueHHeO, EctcTeBHeHoe, MArKeO, MyIbTmEtna IN BepHyTcB RpeXmippecohAhnBaHae Na3O6paXeHnna
17 Khonkn Teletekcta (ctp.8)
18 BbI6Op kaHaNoB
CnykHTIaNEpeXOdaKIPeBbUdEmyNnCneDyUoEmy KaHany.Pn3TOMHa3KpaHeHaHECKOBkoMTHOBEHNIPOBBAETCRNHNiKaHNAIpeXIMMA. INaHEKOTOpbIXKaHANOBHaBaHnepePaUNoRbJIaTeTCB HINKHeYuactNcPbAa.
19 Khonkn Teletekcta (ctp.8)
NIN KHOKN BUNDeOMaHnToΦoHa ** (CTp.11)
20 PeXm3Byka
PtoBONaRt yCnINbT cTepeOnepeDaY B peKIMMe Mono nIN, pIN pIneME DByB3HbX PePeDAy, Bb6pAte PBekIM Dual I NINu Dual II. DnI TeNEBn3OpOB, O6OpYDoBaHNbX npEeMhBM YCTPOIcTBOM NcAm, Bbl MOKeTe, B 3ABNCMOCTN OT PnINHMaEMo NpeDAy, yCNiNTB3bYkN Nicam Stereo B peKIMMe MoNo nIN cDenaTb Bb6Op MekJy peKIMMaN NiCam Dual I, Ncam Dual II n Mono. HApNcB Mono (MoHO) MeHaR TcBET Ha KpaChB b peKIMe yCInENHOrO 3bYaKa.
*DolbyN CmBONI BoiHoro -D D -3TO TobapHbE 3nAkn KOMTaNl Dolby Laboratories Licensing Corporation. N3rOToBNeHO nIO mUeH3NI KOMTaNl Dolby Laboratories Licensing Corporation.
** KhoNka BnDeomarHHTofoHa
IyIbT IcCTaHIOHOHO ynpabHeHnIOB0ReT ynpaBJIaTb OCHOBHmIM FyHKUHMn BUnDEOMarHNTOcHoHa. YpeJxBaBn HNaKATOM IOJIPOKeHH NKOHTy VCR, KOTOPa paCIOJIOKeHa Ha 6oKOBoi CTOpOE pIyIbTa IcCTaHIOUHO r npaBJeHnA, HAKMTE OJHOBPeMeHO HA OJHyN3 KOHIOK, yKa3aHHbIX HnHexe, dJIY BKNIOUeHnE FyHKUHMn BUnDEOMarHNTOcHoHa: (4) (1) (2) (3)
IynbT nCTaHOnHHoro ynpabneHn CO BcEMn BnDEOMarHToOpOHAMn, nCnONb3yUoUMn CTaHapr RC5.
CbeDEnHnI NO TexHnKe 6e3ONaCHoCTn
BkIIOUHTe TELeBn3Op B po3eTky 220-240 B nepemehHoro Toka, 50 T.
OTKIIouaIte BUNKy OT cETN, KOrda :
KpaChbI INHnKaTOp HNKe 3KpaHa TeNeBn3Opa RopNT NOCToRHHO;
- nonepek 3kpaHa OToOpaxKaetc npKa eJnHn;
HaunHaeTc rpo3a;
TeJIeBn3Op He Oydt NcNOJb3OBAtbcra B TeUeHne IpOIOJKNTEJbHO BpEmEH.
UbIaXHHeH 3AMeUe IINMFRK TKAHbU.
Ha TeJIeBn3Op IJIN PAnOM C HIM HeIb3r CTaBtB NCTOCHNIOTKpbITOrO OTHRA, HApPIMep 3aXkEHHbIe CBeHn.
TeNEBIOHOrOp IOnJekHO NpEBRgATbCBA 8O3dEeCTBnIO pIraMbIX COnHeHbIX PuChy INIM TENNA OT IMEKOJIeGORO OTONJIbHOrO O6OpYDoBaHN.
- He kpbIbIaTe TEJIeBIaO PI He 3aKpIbAIte erO BeHTNIALIOHIIe OTEBcTIA, TAK KAK 3TO MOKET PnIBECTI K neperpey yctPOCTBa.
-Длгнадлесь ВERTINIун HeOxOIMO OCTaBnTb 3a3Opbl KaK MInHmym 5 cM cKaJdoI CTopoHbI TeJIeBn3opa.
y E yctahabnBaiTe TE NbeBnOep (HanPIMeP y OKHa), rge OH MOKET IONACTb IOI DOXKB nI CyueCTeYET BoNlSua BEPOrTHOCb IONADAHIN B Hero BIAJm.
PNEUYPIEJEHHEI NO kcnnyataa 6atapen -n Ianepeotbauehne ytekn n 6bapean, B p3ybltate KOTOP0B3MOKHHTEeChleBIOPEJNEXHnMATEpAMLbHyUeepo NByBxO UYCTPOXHTBAI CTPON:
BCTabnIte BCE 6aTapeINpabInbHO,co6IIOJAnIIOJIpaHIOCTb,yKa3aHHyIO 3HaKaAMN+I-B yCTPOINCTBe;
He IcnoJIb3yIte COBMeCTHO CTapIe IN HOBIIe OaTapeIN IIN yrOJIbHbIe IN UIeIOUHbIe;
I3BnEKeTe 6aTapeN,ecnYcTpoIcTBo He 6yIeT NcNoJIb3OBaTbcra B TeueHHe IINTEJIbHO BPeMeHn.
CbeHnnoTexnke 6e3oNaCHOCTN
He octabJIHTe yCTPOIcTB O B PEXIME OXJDAHIN B TEHEHNE JINITEbHO BPEMEHN. OTKIOUaJIte yCTPOIcTBO pIoHOCTbIO, YTObI OHO pa3MaHnHTuNIOCb. Pa3MaHnHuEHoe yCTPOIcTBO oBeCeHnBaet XOpOJIe KaueCTBO N3o6paeHNI.
HepepeBnIaTe He nepeHOCITE paOtaIOUe yCTPOCTBO. 3TO MOKET PIMBECTN K HEPABHOMEHOCTN LBTOB B HEKOTOpBX OJIaCTHX kpaHa.
3aIpeuTaTcA cMoCTOrTeBIOHPOrBaTH MeNpOraBbH TeJeBnOp. Heo6xoIMo BCeTa oBaPauTaBcK KBAJIeMnIpOraBHaHm CIEUINJNTCTAM CepBICbXb LEHTPoB.
БыICTранасторикa
BndeomarHHTOΦoH n DeKoIpyUoIe yCTpoIcTBO
IopKIOUHTe JeKOJep K BTOPOMy pa3bemy "peHTeJIb" BUNeOMaHnHToΦOHa. BBy CMOXeTe 3aINcBbAtb KOINPOBaHHbIe nepeaun.
Дугай annapatypa
(cnyTHNKOBbI pIneMHNk,JeKOepe,BuDeoDnCK, 3JIeKTPoHHbI eIrpbI...)
B TeIeBn3opax,ObOpyIOBaHbIX 2 pa3bEmAmN IJI BHeUHnx yCTpOInCTB,pa3bEMEXT1 npEHa3NaueH,KaK npaBnIO,IJI pOdkJIOUeHHy UcTPOInCTB,BbIpa6aTbBAIOuXs CnRHaJI BV RVB (UnfpoBoI JeKOJeP,IIeepbI DVD,IrPoBHe IpncTaBKn n np.),ap3bEmblEXT2IJI NODKJIIOUeHHy UcTPOInCTB, BbIpa6aTbBAIOuXs CnRHaJI S-VHS(BnuDeOMaHHToΦoHbI φopMaTOB S-VHS u Hi-8 n np.).
YcHnntb (ToJIbKO Ha HeKOTOpbIX MoJeIax)
Длп подкюецни систем HiFi, Incрлььзовать coeINHITeIbHbI shHyp aydno n coeINHITb pa3beMbI "L" n "R" TeIeBn3opa co BxOdAmn "AUDIO IN" "L" n "R" yCInIteIa.
IyblT InCTaHcNHOHOrO ynpabNeHnA He pa6oTaet?
HndkaTop TeIeBn3opa He Mmraet npnNCIOb3OBaHN NpIbTa DnCTaHcUOnHOynpaBHeN? 3aMeHnte 6aTapeKn.
Dexyphoe coCToHne
Korda npn BkIIOUeHn N TeJIeBn3Opa OH OCTaETCBAJEXyPHOM COCTOHN, H Na 3KpaHe NOBIIIEcT HADINCb 3auNTa,3TO O3Haayet, YTO yHKuN 3Amok OT Deten 3aDeiCTBOBaHn (CTp.7).EcIn TELeBn3Op He NOnyAAET CnHaja B TeueHne 15 MNHyT, OH aBTOMATUeCKn IepexoINT B dExkyPhoe COCTOHN.BpeXIMe OxNiJaHn BaW TB NOTpe6JIHET MeHee 5 BATT (B 3aBNCIMOCtN OT MoDen).ДЯ BoONE DpyXeCTBeHHORO u ⅡAJaIeO OTHoWeHn K OKpyXaIOSeI cpeE, NOXaIyIcTA, NOIb3IITcB KHOPIKOI BKIIIOUeHn/ByIKIIOUeHn CETn IJIa NOLHOrO BbIKIIOUeHn annapaTa.
Be responsible Respect copyrights
Specifications are subject to change without notice.
Trademarks are the property of Koninklijke Philips Electronics N.V. or their respective owners.
2005 © Koninklijke Philips Electronics N.V. All rights reserved.