
SmartSleep HH1600 - Wellness device PHILIPS - Free user manual and instructions
Find the device manual for free SmartSleep HH1600 PHILIPS in PDF.

| Product type | Wellness device (sleep biofeedback) |
| Brand | Philips |
| Model | SmartSleep HH1600 |
| Dimensions (L x W x H) | 60 mm x 130 mm x 75 mm |
| Weight | Approx. 110 g |
| Power supply | Built-in rechargeable lithium-ion battery; 100-240 V AC, 50/60 Hz, 0.18 A mains charger |
| Battery life | One night per charge (full charge in 2-3 hours) |
| Main functions | Reduction of daytime sleepiness through audio stimulation during deep sleep; monitoring via SleepMapper app (iOS/Android); Bluetooth for synchronization |
| Included accessories | SmartSleep headband, SmartSleep sensors (30), USB cable and charger, quick start guide |
| Sensors | Front sensor (cleanable) and adhesive SmartSleep sensor (single-use, up to 3 nights) |
| Connectivity | Bluetooth 2.4 GHz (GFSK, DQPSK, 8DPSK); SleepMapper app |
| Maintenance and cleaning | Front sensor: wash with mild soapy water; headband: pre-moistened wipes; do not immerse in water |
| Safety | Do not use if damaged; avoid contact with liquids; do not open or disassemble; do not expose lithium-ion battery to temperatures above 60°C |
| Spare parts and repairability | SmartSleep sensors (sold separately); no user-serviceable parts |
| Operating conditions | Temperature: +5 to +35°C (operation); humidity 15-85% non-condensing |
| Warranty | 2 years (defects in materials or workmanship) |
| Reset | Press and hold the power button for 15 seconds (USB cable connected) to reset |
Frequently Asked Questions - SmartSleep HH1600 PHILIPS
User questions about SmartSleep HH1600 PHILIPS
0 question about this device. Answer the ones you know or ask your own.
Ask a new question about this device
Download the instructions for your Wellness device in PDF format for free! Find your manual SmartSleep HH1600 - PHILIPS and take your electronic device back in hand. On this page are published all the documents necessary for the use of your device. SmartSleep HH1600 by PHILIPS.
USER MANUAL SmartSleep HH1600 PHILIPS
SmartSleep is a biofeedback device intended to reduce daytime sleepiness associated with short sleep duration in adults who do not get enough sleep due to lifestyle. It may be used in the home environment and is indicated for single consumer use.
Note
SmartSleep does not work for everyone. Because it functions by providing tones during your deep sleep phase, if you are not naturally reaching your deep sleep phase, or are not staying in that phase very long, SmartSleep may not increase your slow wave activity. It also may work for you on some nights but not others because of variability in sleep patterns. Things that can impact your deep sleep duration include age, alcohol, certain medications, or sleep disorders. To determine if SmartSleep is delivering tones while you sleep, check your SleepMapper mobile app metrics. If you find that SmartSleep is not delivering tones, please call Philips Customer Care at 1-844-669-9935.
Use the checklist below to help determine if SmartSleep is right for you.
• I am 18 years or older.
• I typically fall asleep within 30 minutes of trying to fall asleep.
- I typically sleep at least five (5) hours, but less than seven (7) hours a night on work or school nights.
• I have not been diagnosed with a sleep disorder (e.g., sleep apnea, insomnia).
- I don't regularly wake up during the night and have trouble falling back asleep (>30 minutes).
- I do not regularly use medications or alcohol to help me fall or stay asleep.
- I do not have hearing impairment preventing me from hearing 80 decibels.
A person's slow wave amplitude naturally reduces with age. SmartSleep will not be effective if you have low amplitude slow waves which occurs after age 50. SmartSleep is recommended for people age 50 and under.
Warnings
- Never operate the device if any parts are damaged or if it is not working properly. Periodically inspect the cables for damage or signs of wear. Discontinue use and replace the USB cable and charger if damaged.
- If you notice any unexplained changes in the performance of the device, discontinue use and contact Philips Customer Care for support.
- Do not open, disassemble, or modify the device. There are no user serviceable components in the SmartSleep device.
- Keep device dry.
- Do not reach for a corded device that has fallen into water. Unplug immediately from the power outlet.
- Use device only in a dry condition. Do not use while bathing or in a shower.
- Do not place or store the device where liquids may spill on it. Do not place or drop the device into water or other liquid.
-
After cleaning or if the device gets wet, allow the device and forehead sensor to air dry completely before use.
-
Unplug this device before cleaning.
• Always attach the USB cable and charger to the device first, then to a power outlet. - Do not use SmartSleep if your room temperature is warmer than 35°C (95°F). If you wear SmartSleep in excessively warm environments, the device may cause irritation or injury to your skin.
- The battery used in this device may present a fire or chemical burn hazard if mistreated. Do not disassemble, expose to temperatures above 60°C (140°F), or incinerate.
- Portable and mobile RF communications equipment can affect Medical Electrical Equipment.
- While charging or using the device, do not place it on top of or next to any other electrical equipment as it may affect performance of the device or equipment.
- This device is considered medical electrical equipment and needs to be used in accordance with the EMC information provided in this manual.
- Only use the USB cable and charger provided with your device. Use of a USB cable and charger not approved by Philips may cause overheating, damage to the device, increased emissions or decreased immunity, or affect EMC performance and should be avoided.
- Do not stop any of your prescribed medicines while using the device.
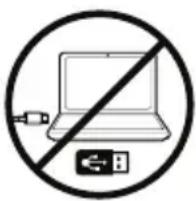
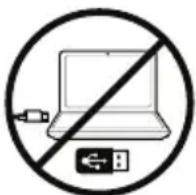
- When charging, always ensure that the USB cable and charger is securely connected to both an AC outlet and the device's power inlet to prevent arcing. Do not use extension cords with this device, and do not connect to a computer to charge the device as it may cause damage.
- Keep the USB cable and charger away from heated surfaces.
- Never drop or insert any object into any opening.
- The device is not designed to work as indicated when the USB cable is connected. The USB cable is only to be used for charging.
- Do not use the device in the presence of a flammable anesthetic mixture in combination with oxygen or air, in the presence of nitrous oxide, or in an oxygen-enriched environment.
- Do not use if there is any skin irritation, inflammation, or redness.
- SmartSleep sensors may pose a choking hazard. Do not let children handle the sensors.
- Children should be supervised to ensure they do not play with the device.
- Close supervision is required when this device is used by, on, or near children, or persons with limited physical, sensory, or mental capabilities or invalids.
Cautions
- Do not use or store this device outside of the specified environmental conditions listed in this manual.
- This device contains a lithium ion battery. It is important to dispose of this device in a safe manner in accordance with local regulations.
- If you do not intend to use the device for several weeks, it is important that you fully charge the device before storing.
-
Condensation may damage the device. If the device has been exposed to either very hot or very cold temperatures, allow it to adjust to room temperature (operating temperature) before using the device. Do not operate the device outside of the operating temperature range shown in the Specifications section later in this manual.
-
Do not submerge the headband in water. This will damage the internal electrical components and speakers.
- Reseal the sensor pouch after opening to keep the remaining sensors from drying out.
Refer to page 14 for the Symbols Glossary.
Package Contents
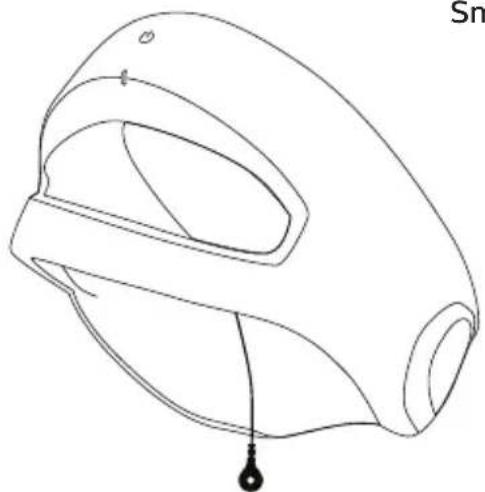
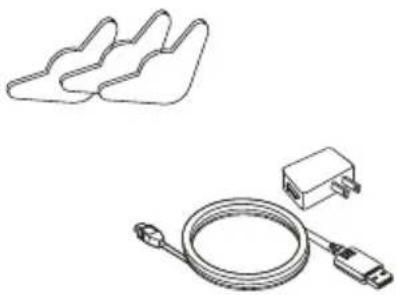
The SmartSleep device consists of the components listed below.
SmartSleep Sensors (30)
natural_image
Line drawing of a mechanical component with a labeled droplet (no text or symbols present)SmartSleep Headband
natural_image
Technical line drawing of a device with three plastic components and a USB cable (no text or symbols)USB Cable and Charger

natural_image
Two overlapping blank sheets with no text or symbolsUser Manual and Quick Start Guide
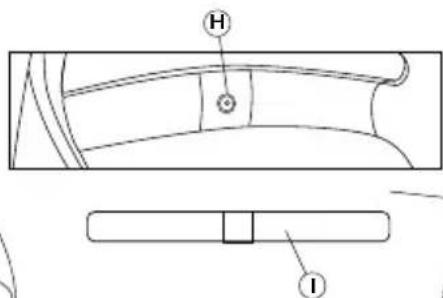
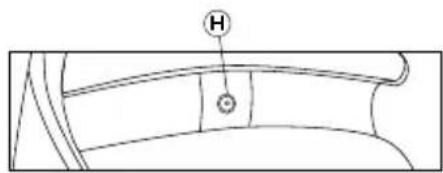
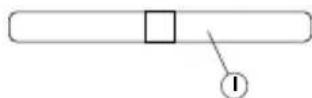
SmartSleep Headband and Sensors
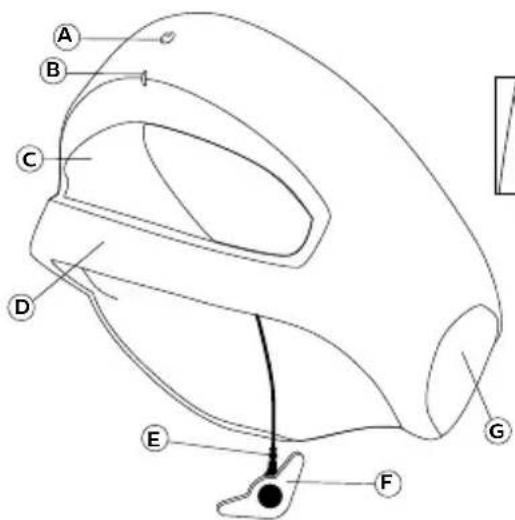
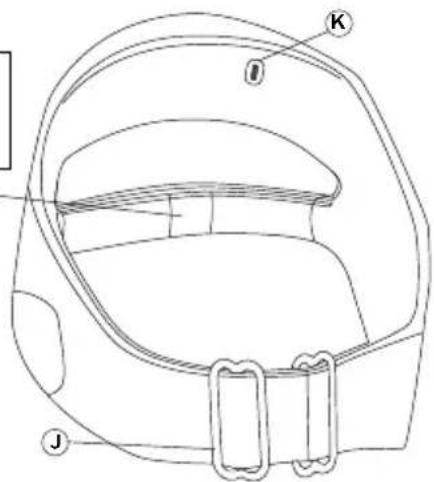
| Letter | Device Feature Letter Device Feature | |
| A Power | Button G Speaker | |
| B Status | Indicator Light H Forehead Sensor Connector | |
| C Inner | Lining I Forehead Sensor | |
| D Forehead | Sensor Band J Adjustability Slider | |
| E Smart | Sleep Sensor Connector K Charging Port | |
| F | SmartSleep Sensor |
First Time Setup
Read all provided instructions for use before proceeding.
- Remove the SmartSleep headband, USB cable, and charger from the box. The SmartSleep device will arrive partially charged, but not charged enough for the first night of use.
- Connect the USB cable to the charging port on the device and the charger. Then, plug the charger in to a wall outlet to charge for 2-3 hours. The indicator light will display a pulsing orange light while charging and change to solid green when charging is complete. The status indicator light will turn off and the device will enter power-save mode 30 minutes after charging is complete.
Note
When charging the device, make sure the USB cable and charger are easily accessible. The power button cannot be used to turn the device off while it is charging. Unplugging the charger from the wall outlet is the only way to turn the device off during charging.
Caution
Do not connect to a computer to charge the device as it may cause damage.
Using the optional mobile application:
- Download the SleepMapper application from the App Store or Google Play.

SleepMapper Icon
- Follow the instructions on your screen to complete your registration.
- While the device is still plugged in and charging, follow the instructions in the application to pair your device. Your SmartSleep device will be automatically detected by the app.
Notes
The status indicator light will turn off 30 minutes after charging is complete. If this happens, press the headband power button for 1 second to “wake” it before syncing.
Make sure Bluetooth ^® is turned on on your phone.
- After the headband has finished charging, remove the USB cable and charger before each use.
Nightly Use
- Wash your face and the area behind your right ear with mild soap and water. Dry completely.
- Visually inspect the headband prior to use for any damage.
- Remove a SmartSleep Sensor from its pouch. Reseal the pouch to keep the remaining sensors from drying out.
Note
The gel in the middle of the SmartSleep Sensor is very important to its function. If the gel comes dislodged, discard the sensor and start again with a new one.
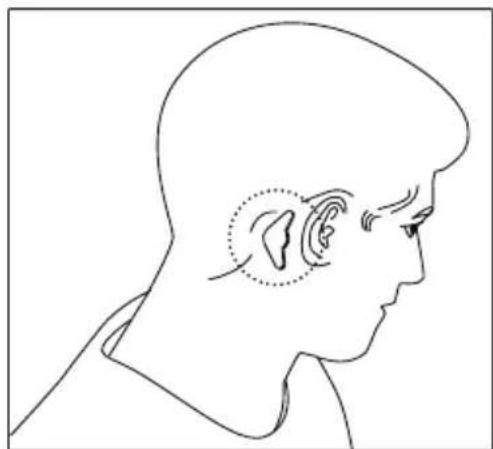
- Move your hair away from the area behind your right ear. There should be no hair between your skin and the sensor.
- Place the SmartSleep Sensor on the bone behind your right ear.
Comfort tip
Place the sensor close to the hairline.
natural_image
Side profile illustration of a human head in profile showing ear anatomy (no text or labels)- Place the SmartSleep headband on your head so that the forehead sensor is straight across your forehead.
- If you have long hair, pull the SmartSleep headband over your head until it is around your neck and under your hair. Then, pull it up onto your head like a headband. This helps move your hair away from behind your ear.

natural_image
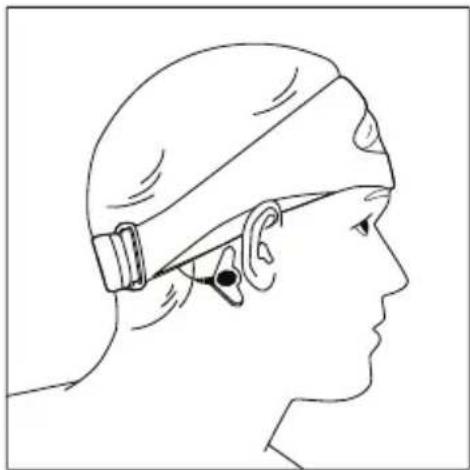
Line drawing of a person wearing a cap and turtleneck (no text or symbols)- Snap the SmartSleep Sensor connector onto the SmartSleep Sensor behind your right ear.
natural_image
Side profile illustration of a person wearing a headband and ear cap (no text or symbols)- Cover your ears with the fabric headband.

natural_image
Line drawing of a person saluting, wearing a cap and shirt (no text or symbols)-
Position the movable integrated speakers so that they rest over your ears.
-
Adjust the sliders in the back so that the headband fits snugly, but comfortably, on your head. It should not feel "tight" on your head.

natural_image
Line drawing of two hands performing a medical or therapeutic procedure on a patient's head (no text or symbols present)-
Check that the forehead sensor band is positioned across your lower forehead, and is not touching your eyebrows or hairline. There should be no hair between your skin and the sensor. You can also put a dab of water on your forehead under the forehead sensor to help it connect.
-
Turn on the device by pressing the power button for 1 second. This will enable the start of your sleep session.

natural_image
Line drawing of a person wearing a cap and shirt, holding their head in hand (no text or symbols)Note
Especially when seasons are changing, and the air tends to be dryer, it may be more of a challenge to get your headband connected to use at night. Put a dab of water on your forehead under the forehead sensor to help it connect.
Headband Set Up
After pushing the power button for 1 second, the headband will start to beep. The headband will continue to beep, and the status indicator light will display a solid orange light. This is indicating that you do not yet have a connection set up between the headband and sensors. The headband should stop beeping before you to go sleep.
The headband may take 15-30 seconds to set up the connection to the sensors. If the beeping does not stop and the indicator light does not turn green after this time, ensure that there is no hair trapped between your skin and the sensors, and try putting a dab of water on your forehead under the forehead sensor to help it connect. The headband will continue trying to set up until you either make a connection with the sensors, run out of battery, or turn it off. Consult the troubleshooting guide if you cannot set up the headband.
Once your headband sets up successfully, it will stop beeping, and the status indicator light will turn green. You are ready to sleep!
What to Expect
- After headband set up, the green light will stay on for 1 minute, then turn off. The headband is still working and connected.
- How to check that the headband is still working and connected: Press the power button for 1 second and view the indicator light in a mirror or hear the beeping.
- The headband and app are not connected during use.
The headband and app do not communicate with each other during the night. Your phone could be turned off completely and the headband would still function normally. The Bluetooth on the headband will not be functioning until you remove it and sync your data in the morning.
• During sleep, you will not notice the tones.
The volume of the tones are specifically calibrated to you, and will play more quietly if they are disturbing your sleep. You should not expect to hear or notice sounds during sleep.
- If you get up in the middle of the night, no action is required.
The device will continue to function normally. Simply, go back to sleep when you are ready.
In the Morning
- Unsnap the SmartSleep Sensor connector from behind your ear and lift the headband off of your head.
- Remove the SmartSleep Sensor from behind your ear. If the gel is still present and the sensor is still sticking well, you can place the sensor back on the card and reseal the pouch. Otherwise, discard it.
- Connect the USB cable to the charging port on the device and the charger. Then, plug the charger in to a wall outlet.
Notes
This step is important. It ends your sleep session so that you can sync your sleep data with the app, and ensures that the headband is charged and ready to use for the next night.
You should charge your headband after each sleep session.
Caution
Do not connect to a computer to charge the device as it may cause damage.
Viewing your Sleep Data
Note
The status indicator light will turn off 30 minutes after charging is complete. If this happens, press the headband power button for 1 second to “wake” it before syncing.
- To view your sleep data, press the power button on the headband for 1 second. Then, open the mobile application on your phone.
- Press the “sync” button on your phone screen to begin the data syncing. You must be within Bluetooth range of your headband in order to sync.
If you miss syncing in the morning, your data will be saved and can sync with your app the next time you have the device on and the app open at the same time.
Care and Maintenance
Cleaning
Caution
Do not submerge the headband in water. This will damage the internal electrical components and speakers.
Weekly
Ensure the device is turned off and is not connected to the USB cable and charger before cleaning.
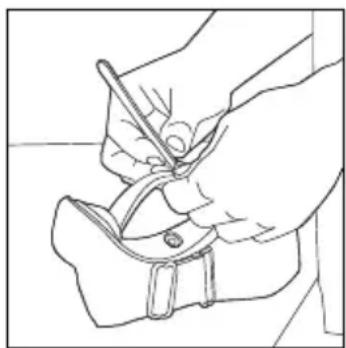
- Forehead Sensor Cleaning
a. Remove the forehead sensor from the forehead sensor band by untucking the ends and unsnapping it from the band.
natural_image
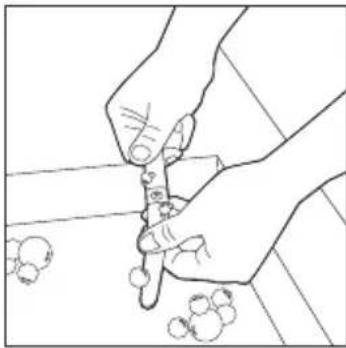
Line drawing of a hand holding a tool over a piece of scissors (no text or symbols)b. Submerge the forehead sensor into a solution of dish soap and water. A soft bristled brush may be used.
natural_image
Line drawing of hands using a tool to cut or apply small objects on a surface (no text or symbols)c. Rinse thoroughly.
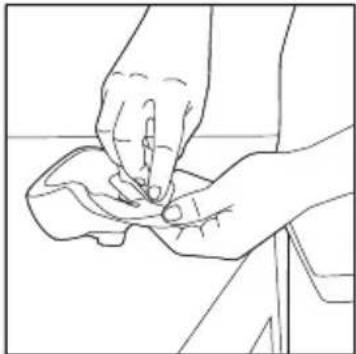
- SmartSleep Headband Cleaning
Using 3 pre-moistened facial/makeup remover towelettes, clean the wipeable inner lining. Use a minimum of 3 towelettes to ensure fabric is cleaned.
natural_image
Line drawing of two hands performing a manual task on a piece of material (no text or symbols)-
Visually inspect the forehead sensor and the SmartSleep headband for cleanliness. Repeat the cleaning steps as necessary until visibly clean. A soft bristled brush may be used.
-
Allow the forehead sensor and the SmartSleep headband to air dry before next use.
Note
Do not place fabric parts into a washing machine, dishwasher, hairdryer, or clothes dryer.
Caution
Any deviation from these instructions may impact the performance of the device.
Component Replacement:
Replacement parts and accessories may be purchased on our website: www.philips.com/store.
Do not use each SmartSleep Sensor more than 3 nights because it could affect device performance. The SmartSleep Sensor is considered a disposable component and should be replaced at least every 3 nights.
Note
The gel in the middle of the SmartSleep Sensor is very important to its function. If the gel becomes dislodged, discard the sensor and use a new one.
Routine Service
There are no user serviceable components in the SmartSleep device.
Device Firmware Version
To check your device's current firmware version and update if necessary:
- Open SleepMapper on your mobile device.
- Navigate to the “My devices” screen by opening the “... More” tab, selecting “My devices” (SmartSleep), and selecting the “My devices” screen.
- If an update for your device is available, it will be indicated on the "My devices" screen.
- To update your device, select "SmartSleep update." Then, click the "Update" button.
SmartSleep - Headband Controls
Short press (1 second): Turns on the device or “wakes” it during a sleep session.
Extended press (3 seconds): Turns off the device.
Factory Reset: A factory reset will delete all existing data. With the USB cable and charger connected, press and hold the power button for 15 seconds. The indicator light will begin to flash green indicating the factory reset has completed.
Audio and Visual Device Indicators
Charging Indicators
When the headband is connected to the USB cable and charger, and the charger is plugged into a wall outlet, the headband will display one of the following indicators:
Indicator Light Meaning
| Pulsing orange Headband is charging. | |
| Double pulsing orange He | headband battery is below the critical battery level. Continue charging. Syncing cannot occur at this time. |
| Rapid flashing orange He | adband is connected to an unapproved charger. Use the charger supplied with your device. |
| Solid green Headband is fully charged. | |
| Light is off while headband is plugged in | Headband has been fully charged for at least 30 minutes and has gone into “power-save mode.” |
To check the power status of the headband when it is not connected to the USB cable and charger, press the power button for 1 second. The headband will display one of the following indicators during the button press:
Indicator Light Meaning
| Solid orange Battery is not fully charged. |
| Solid green Battery is fully charged. |
| Double pulsing orange Headband battery is below the critical battery level. Charge immediately. Syncing cannot occur at this time. |
Battery status can also be checked while the headband is turned on using the mobile app by opening the “Control” tab, pressing “My SmartSleep”, and viewing the Battery level.
Headband Connection Indicators
To check the status of the headband connection to the sensors while wearing the headband, press and release the power button. The headband will display one of the following indicators:
Indicator Light Audio Meaning
| Solid orange Continuous beeping Sensors are not making contact. | ||
| Solid green | Beeping stops | Sensors are making contact. |
Troubleshooting Guide
| Problem Solution | |
| Unable to sync the headband with the app. | Check that Bluetooth is turned on on your phone. |
| Ensure that your phone and headband are in close range to enable the Bluetooth to connect. | |
| Turn the headband off (3 second press) and back on (1 second press). | |
| Try a factory reset. With the USB cable and charger connected, press and hold the power button for 15 seconds. The indicator light will begin to flash green indicating the factory reset has completed. | |
| Headband does not turn on when power button is pressed. | Ensure that the headband is charged by plugging it in to the wall outlet. The status indicator light will display a solid green light if it is fully charged. |
| Cannot achieve successful connection for use. | Put a dab of water on your forehead under the forehead sensor to help it connect. |
| Ensure that the device is fully charged and powered on. | |
| Check that the SmartSleep Sensor is placed on the bone behind the right ear and that no hair is underneath it. Check that the sensor connector is snapped to the sensor. | |
| Check that the sensor band is placed across the middle of your forehead and that there is no hair underneath it. | |
| Headband indicator light pulses green and orange. | A device error has occurred. If the green/orange pulsing light is displayed for longer than 5 seconds, press the power button to clear the error. If the green/orange pulsing light continues, contact customer care for support. |
If you are not able to resolve your problem using this troubleshooting guide, or if you require assistance setting up, using, or maintaining your device contact Philips Customer Care for support.
Customer Care
For assistance, visit our website: www.philips.com/support or call toll free 1-844-669-9935. Online information is available 24 hours a day, 7 days a week.
Disposal
Dispose of the device and accessories in accordance with local regulations. It is recommended to factory reset your device before disposal.
- This product contains a rechargeable lithium-ion battery, which must be disposed of properly.
- Contact your local town or city officials for battery disposal information. You can also call 1-800-822-8837 or visit www.call2recycle.org for battery drop-off locations.
- For assistance, visit our website: www.philips.com/support or call 1-844-669-9935.
- Your product is designed and manufactured with high quality materials and components, which can be recycled and reused. For recycling information, please contact your local waste management facilities or visit www.recycle.philips.com.
Symbols Glossary
| Symbol | Definition Symbol Definition | ||
 | Power Button |  | Headband size indicator. Will appear as M for medium or L for large. |
 | Consult instructions for use. Class II | (Double Insulated) | |
 | Bluetooth symbol Type BF Applied Part | ||
 | Complies with Part 15 of the FCC rules. | Detachable battery charger | |
| IP22 | Drip Proof Equipment Protection against ingress of solid foreign objects ≥ 12.5 mm diameter. Protection against ingress of water with harmful effects dripping (15° tilted). |  | USB connector |
 | AC Power | ||
 | DC Power |
Refer to http://www.symbols.philips.com for more information.
Electromagnetic fields (EMF)
This headband complies with all applicable standards and regulations regarding exposure to electromagnetic fields.
Specifications
Dimensions: 2.36" L x 5.12" W x 2.95" H (60 mm L x 130 mm W x 75 mm H)
Weight: Approximately 3.88 oz (110 g)
The expected useful life of the headband and battery is 2 years. The expected useful life of the SmartSleep sensors is up to 3 uses.
Classifications and Standards Compliance
Classifications
| Type of Protection Against Electric Shock | Class II Equipment/Internally powered |
| Degree of Protection Against Electric Shock | Type BF Applied part |
| Degree of protection against harmful ingress of water | Device: IP22, Drip ProofCharger: IP20First characteristic numeral - 2 - Protection against ingress of solid foreign objects ≥ 12.5 mm diameter.Explanation: Protected against access to hazardous parts with a finger and protected against solid foreign objects of 12.5 mm diameter and greater.Second characteristic numeral - 2- Protection against ingress of water with harmful effects dripping (15° tilted).Explanation: Protected against vertically falling water drops when enclosure tilted up to 15°. |
Mode of Operation Continuous operation
- Not suitable for use in the presence of a flammable anesthetic mixture in combination with oxygen or air, in the presence of nitrous oxide, or in an oxygen-enriched environment.
Standards Compliance
ETL Classified

Intertek
5010469
Conforms to:
• AAMI STD ES60601-1
• IEC STDS 60601-1-6, 60601-1-11, & 62304
Certified to:
• CSA STD C22.2 # 60601-1
The SmartSleep device is designed to conform to the following standards:
- IEC 60601-1 Medical Electrical Equipment – Part 1: General Requirements for Basic Safety and Essential Performance
- IEC 60601-1-2 Medical Electrical Equipment – Part 1-2: General Requirements for Basic Safety and Essential Performance – Collateral Standard: Electromagnetic Disturbances – Requirements and Tests
- IEC 60601-1-11 Medical Electrical Equipment – Part 1-11: General Requirements for Basic Safety and Essential Performance – Collateral Standard: Requirements for Medical Electrical Equipment and Medical Electrical Systems Used in the Home Healthcare Environment
- IEC 60601-1-6 Medical Electrical Equipment – Part 1-6: General Requirements for Basic Safety and Essential Performance – Collateral Standard: Usability
- IEC 62366-1 Medical Devices – Part 1: Application of Usability Engineering to Medical Devices
- IEC 62304 Medical Device Software – Software Life Cycle Processes
Power Requirements
Input: 100-240 VAC, 50/60 Hz, 0.18 A
Output: 5.0 VDC, 1.0 A
Note
The USB cable and charger are part of the Medical Electrical Equipment.
Radio Specifications
Operating Frequency Range: 2.400 - 2.4835 GHz
Typical Output Power: 2.5 dBm
Maximum Output Power: 4.0 dBm
Temperature and Storage Information
| Operation Charging Storage and Transport | |||
| Temperature: 41°F to 95°F(+5°C to +35°C) | 50°F to 104°F(+10°C to +40°C) | -4°F to 140°F(-20°C to +60°C) | |
| Humidity: 15% to 85% RHnon-condensing | 15% to 85% RHnon-condensing | 15% to 85% RHnon-condensing | |
| Atmospheric Pressure: 101.3 to 76.7 kPa(0 - 7500 feet) | 101.3 to 76.7 kPa(0 - 7500 feet) | 101.3 to 76.7 kPa(0 - 7500 feet) | |
Additional Notices
- The Bluetooth® word mark and logos are registered trademarks owned by Bluetooth SIG, Inc. and any use of such marks by Philips Respironics is under license. Other trademarks and trade names are those of their respective owners.
- The SmartSleep device data is encrypted at rest and in transit with strong industry standard encryption.
- This device contains a FCC/IC certified Bluetooth radio module (located on the main board). FCC ID: WAP2005 IC: 7922A-2005
- This Class B digital apparatus complies with Canadian ICES-003. HMN: SmartSleep. PMN and HVIN: HH1600/02 and HH1600/03.
- Use of non-original manufacturer-approved accessories may violate your local RF exposure guidelines and should be avoided.
- This device complies with part 15 of the FCC Rules. Operation is subject to the following two conditions: (1) This device may not cause harmful interference, and (2) this device must accept any interference received, including interference that may cause undesired operation. This equipment has been tested and found to comply with the limits for a Class B digital device, pursuant to Part 15 of the FCC Rules. These limits are designed to provide reasonable protection against harmful interference in a residential installation. This equipment generates, uses, and can radiate radio frequency energy and, if not installed and used in accordance with the instructions, may cause harmful interference to radio communications. However, there is no guarantee that interference will not occur in a particular installation. If this equipment does cause harmful interference to radio, TV reception, or other devices which can be determined by turning the equipment on and off, the user is encouraged to try to correct the interference by one or more of the following measures:
— Reorient or relocate the receiving antenna (on the radio, TV, or other device).
— Increase the separation between the equipment and receiver.
— Connect the equipment into an outlet on a circuit different from that to which the receiver is connected.
— Consult the dealer of the device for help.
- Any changes or modifications made to the device that are not expressly approved by
Respironics may void the user's authority to operate the equipment.
EMC Information
Guidance and Manufacturer's Declaration - Electromagnetic Emissions - This device is intended for use in the electromagnetic environment specified below. The user of this device should make sure it is used in such an environment.
| EMISSIONS TEST | COMPLIANCE | ELECTROMAGNETIC ENVIRONMENT - GUIDANCE |
| RF emissionsCISPR 11 Group 1 | The device uses RF energy only for its internal function. Therefore, its RF emissions are very low and are not likely to cause any interference in nearby electronic equipment. | |
| RF emissionsCISPR 11 | Class B | The device is suitable for use in all establishments, including domestic establishments and those directly connected to the public low-voltage charger network. |
| Harmonic emissionsIEC 61000-3-2 | Class A | |
| Voltage fluctuations/Flicker emissionsIEC 61000-3-3 | Complies | |
| Emission of Radio Frequency EnergyRTCA/DO-160GSection 21 | Category M This device is suitable for use onboard commercial airplanes inside passenger cabin. | |
Guidance and Manufacturer's Declaration - Electromagnetic Immunity - This device is intended for use in the electromagnetic environment specified below. The user of this device should make sure it is used in such an environment.
| IMMUNITY TEST IEC 60601-1-2TEST LEVEL | COMPLIANCE LEVEL | ELECTROMAGNETIC ENVIRONMENT -GUIDANCE | |
| Electrostatic Discharge (ESD)IEC 61000-4-2 | ±8kV contact±2kV, ±4kV, ±8kV, & ±15kV air | ±8kV contact±2kV, ±4kV, ±8kV, & ±15kV air | Floors should be wood, concrete or ceramic tile. If floors are covered with synthetic material, the relative humidity should be at least 30 % |
| Electrical Fast Transient/BurstIEC 61000-4-4 | ±2kV for powers supply lines±1 kV for input-output lines | ±2KV for Power Supply LinesNA - Device does not have user I/O lines that are longer than 3 m in length. | Mains power quality should be that of a typical home or hospital environment. |
| SurgeIEC 61000-4-5 | ±1 kV Line to Line±2 KV Line to Ground | ±1 kV Line to Line NA - The device is a Class II device and does not connect to earth ground. | Mains power quality should be that of a typical home or hospital environment. |
| Voltage dips, short interruptions and voltage variations on charger input linesIEC 61000-4-11 | 0% U_T 0.5 cycle, 45 deg inc0% U_T 1 cycle70% U_T 25 cycles (30 cycles if US)0% U_T 5 sec | 0% U_T 0.5 cycle, 45 deg inc0% U_T 1 cycle70% U_T 25 cycles (30 cycles if US)0% U_T 5 sec | Mains power quality should be that of a typical home or hospital environment.If the user of the device required continued operation during power mains interruptions, it is recommended that the device be powered from an uninterruptible power supply or battery. |
| Power Frequency (50/60 Hz)Magnetic FieldIEC 61000-4-8 | 30 A/m 30 A/m P | Power frequency magnetic fields shouldbe at levels characteristic of a typical location in a typical home or hospital environment. | |
| Note: U_T is the AC mains voltage prior to application of the test level. | |||
Guidance and Manufacturer's Declaration - Electromagnetic Immunity - This device is intended for use in the electromagnetic environment specified below. The user of this device should make sure it is used in such an environment.
| IMMUNITY TEST IEC 60601-1-2 TEST LEVEL | COMPLIANCE LEVEL | ELECTROMAGNETIC ENVIRONMENT - GUIDANCE | |
| Conducted RF IEC 61000-4-6 | 3V150 kHz to 80 MHz | 3 V | Portable and mobile RF communications equipment (including peripherals such as antenna cables and external antennas) should be used no closer to any part of the device, including cables specified by the manufacturer, than the recommended separation distance. Otherwise, degradation of the performance of this equipment could result. |
| 6V in ISM & amateur radio bands between 150 kHz and 80 MHz | 6 V | ||
| Radiated RF IEC 61000-4-3 | 10 V/m80 MHz to 2.7 GHzUp to 28 V/m in telecommunication bands as specified in clause 8.10 of IEC 60601-1-2:2014 | 10 V/m | Recommended separation distance: Minimum 30 cm (12 inches)Interference may occur in the vicinity of equipment marked with the following symbol: |
| 28 V/m | |||
Full Two-Year Warranty
Philips North America LLC (USA) warrant this new product against defects in materials or workmanship for a period of two years from the date of purchase, and agree to repair or replace any defective product without charge.
IMPORTANT: This warranty does not cover damage resulting from accident, misuse or abuse, lack of reasonable care, or the affixing of any attachment not provided with the product or loss of parts or subjecting the product to any but the specified voltage or batteries.*
NO RESPONSIBILITY IS ASSUMED FOR ANY SPECIAL, INCIDENTAL OR CONSEQUENTIAL DAMAGES.
In order to obtain warranty service, go to www.philips.com/support for assistance. It is suggested that for your protection you return shipments of product by insured mail, insurance prepaid. Damage occurring during shipment is not covered by this warranty.
NOTE: No other warranty, written or oral, is authorized by Philips North America LLC.
This warranty gives you specific legal rights, and you may also have other rights which vary from state to state, province to province or country to country. Some states do not allow the exclusion or limitation of incidental or consequential damages, so the above exclusion and limitations may not apply to you.
* Read enclosed instructions carefully.
PHILIPS and Philips shield are registered trademarks of Koninklijke Philips N.V. ©
1001 Murry Ridge Lane Murrysville, Pennsylvania 15668-8550
Usage préconisé
natural_image
Line drawing of a mechanical component with a labeled droplet (no text or symbols on the diagram itself)natural_image
Line drawing of a USB cable with a small rectangular component beside it (no text or symbols)natural_image
Two overlapping blank paper sheets with no text or symbolsManuel de

Attention
natural_image
Side profile illustration of a human head in profile showing ear anatomy (no text or labels)natural_image
Line drawing of a person wearing a cap and turtleneck (no text or symbols)natural_image
Side profile illustration of a person wearing a headband and ear cap (no text or symbols)natural_image
Line drawing of a person adjusting their face with hands near the ear (no text or symbols)natural_image
Line drawing of two hands performing a medical or therapeutic procedure on a patient's head (no text or symbols present)natural_image
Line drawing of a person wearing a cap and shirt, holding their head (no text or symbols)Remarque
natural_image
Line drawing of a hand holding a tool, no text or symbols presentnatural_image
Line drawing of two hands using a tool to cut or apply small objects on a surface (no text or symbols)c. Rincez abondamment.
natural_image
Line drawing of two hands performing a massage or hand massage technique on a wrist (no text or symbols)Sortie : 5,0 VCC, 1,0 A
Remarque
1001 Murry Ridge Lane Murrysville, Pennsylvania 15668-8550

Manufactured for:
Respironics Inc.
1001 Murry Ridge Lane
Murrysville, PA 15668 USA

REF 1128493
1128493 R09
ZL 02/11/2019
- Note
- Warnings
- Cautions
- Package Contents
- SmartSleep Headband and Sensors
- First Time Setup
- Caution
- SleepMapper Icon
- Notes
- Nightly Use
- Comfort tip
- Headband Set Up
- What to Expect
- In the Morning
- Viewing your Sleep Data
- Care and Maintenance
- Cleaning
- Weekly
- Component Replacement:
- Routine Service
- Device Firmware Version
- SmartSleep - Headband Controls
- Audio and Visual Device Indicators
- Charging Indicators
- Headband Connection Indicators
- Customer Care
- Disposal
- Electromagnetic fields (EMF)
- Specifications
- Classifications and Standards Compliance
- Standards Compliance
- Power Requirements
- Radio Specifications
- Additional Notices
- EMC Information
- Full Two-Year Warranty
- Usage préconisé
- Attention
- Remarque
Brand : PHILIPS
Model : SmartSleep HH1600
Category : Wellness device