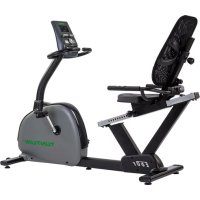
E60R - Exercise bike TUNTURI - Free user manual and instructions
Find the device manual for free E60R TUNTURI in PDF.


| Product type | Exercise bike |
| Brand | Tunturi |
| Model | E60R |
| Dimensions (L x W x H) | 171 x 117 x 70 cm |
| Weight | 60 kg |
| Maximum user weight | 135 kg |
| Power supply | 230 V / 115 V, 50/60 Hz |
| Resistance | Electromagnetic, 1-42 Nm |
| Training programs | Quick Start, Manual, Target HR, Watt Control, 10 preset programs (P1-P10), T-RideTM, Own Training (custom), Fitness Test |
| Heart rate measurement | Hand grip sensors and chest strap (wireless) |
| Display | Digital display with graphic zoom |
| Displays | Time, distance, energy (kcal), effort, pedal speed (RPM), heart rate, speed, resistance |
| Number of registrable users | 8 |
| Adjustments | Seat (forward/backward), backrest (recline), handlebars (height and angle), display (tilt) |
| Fitness test function | Yes (submaximal, requires chest strap) |
| Maintenance and cleaning | Wipe with a soft, absorbent cloth after use. Do not use detergent. Regularly check the tightness of screws and nuts. |
| Safety | Automatic shut-off after 5 minutes of inactivity. Power cord not replaceable. Indoor use only. Do not use with extension cords. |
| Spare parts and repairability | Spare parts available through the dealer. Refer to the list at the end of the manual. Only replace with listed parts. |
| General information | Compliant with CE and EN 957 standards (Class HA). Operating temperature: 10°C to 35°C. Max humidity: 90%. |
Frequently Asked Questions - E60R TUNTURI
User questions about E60R TUNTURI
0 question about this device. Answer the ones you know or ask your own.
Ask a new question about this device
Download the instructions for your Exercise bike in PDF format for free! Find your manual E60R - TUNTURI and take your electronic device back in hand. On this page are published all the documents necessary for the use of your device. E60R by TUNTURI.
USER MANUAL E60R TUNTURI
IMPORTANT SAFETY INSTRUCTIONS 2
ASSEMBLY
EXERCISING
CONSOLE
Your choice shows that you really want to invest in your well being and condition; it also shows you really value high quality and style. With Tunturi Fitness Equipment, you've chosen a high quality, safe and motivating product as your training partner. Whatever your goal in training, we are certain this is the training equipment to get you there. You'll find information about using your exercise equipment and what makes for efficient training at Tunturi's website at www.tunturi.com.
IMPORTANT SAFETY INSTRUCTIONS
Read this guide through carefully before assembling, using or servicing your fitness equipment. Please keep the guide somewhere safe; it will provide you now and in the future with the information you need to use and maintain your equipment. Always follow these instructions with care.
NOTE ABOUT YOUR HEALTH
- Before you start any training, consult a physician to check your state of health.
- If you experience nausea, dizziness or other abnormal symptoms while exercising, stop your workout at once and consult a physician.
- To avoid muscular pain and strain, begin each workout by warming up and end it by cooling down (slow pedaling at low resistance). Don't forget to stretch at the end of the workout.
NOTE ABOUT THE EXERCISING ENVIRONMENT
• The equipment is not to be used outdoors.
- Place the equipment on a firm, level surface. Place the equipment on a protective base to avoid any damages to the floor beneath the equipment.
- Make sure that the exercising environment has adequate ventilation. To avoid catching cold, do not exercise in a draughty place.
- In training, the equipment tolerates an environment measuring +10°C to +35°C. The equipment can be stored in temperatures ranging between -15°C and +40°C. Air humidity in the training or storage environment must never exceed 90%.
NOTE ABOUT USING THE EQUIPMENT
- If children are allowed to use the equipment, they should be supervised and taught to use the equipment properly, keeping in mind the child's physical and mental development and their personality.
-
Before you start using the equipment, make sure that it functions correctly in every way. Do not use faulty equipment.
-
Press the keys with the tip of the finger; your nails may damage the key membrane.
- Never lean on the interface.
- Never remove the side covers. Do not step on the frame casing.
- Only one person may use the equipment at a time.
- Hold the handlebar for support when getting on or off the equipment.
- Wear appropriate 3 clothing and shoes when exercising.
- Protect 4 the meter from sunlight and always dry the surface of the meter if there are any drops of sweat on it. 9
• Information on warranty terms can be found in the warranty booklet included with the product. - Please note that the warranty does not cover damage due to shipping or negligence of adjustment or maintenance instructions described in this manual.
- The equipment must not be used by persons weighing over 135 kg.
- Make sure the equipment is unplugged before carrying out any assembly or maintenance procedures.
- Do not attempt any servicing or adjustments other than those described in this guide. Everything else must be left to someone familiar with the maintenance of electromechanical equipments and authorised under the laws of the country in question to carry out maintenance and repair work.

DANGER! Do not modify the plug provided with the
product - if it will not fit the outlet, have a proper outlet installed by a qualified electrician.
NOTE ABOUT SAFETY FOR UNITS WITH ELECTRICAL POWER
Before connecting the equipment to a power source, make sure that the local voltage matches that indicated on the type plate: the equipment operates at either 230 V or 115 V (North American version).

NOTE! Do not use extension wires when connecting the equipment to the power source. Always switch off the power and unplug the equipment from the electrical outlet immediately after using!
To reduce the risk of burns, fire, electric shock or injury to persons:
- The equipment should never be left unattended when plugged in. Unplug the equipment from the outlet when not in use, before carrying out any maintenance or repair procedures, and before moving the unit.
- Do not operate the equipment under a blanket or other combustive material. Excessive heating can occur and cause fire, electric shock or injury to persons.
- Do not connect the equipment to a power source, or operate the equipment if there is any sort of damage to the power cord or the unit itself.
- Do not connect the equipment to a power source or operate the equipment outdoors or in damp locations.
- Keep the power cord away from hot objects.
- Do not route the power cord beneath a carpet or place any objects on the cord. Also make sure that the power cord does not run underneath the equipment.
- Do not alter (for example lengthen) the cord between the transformer and the unit.
ASSEMBLING THE EQUIPMENT
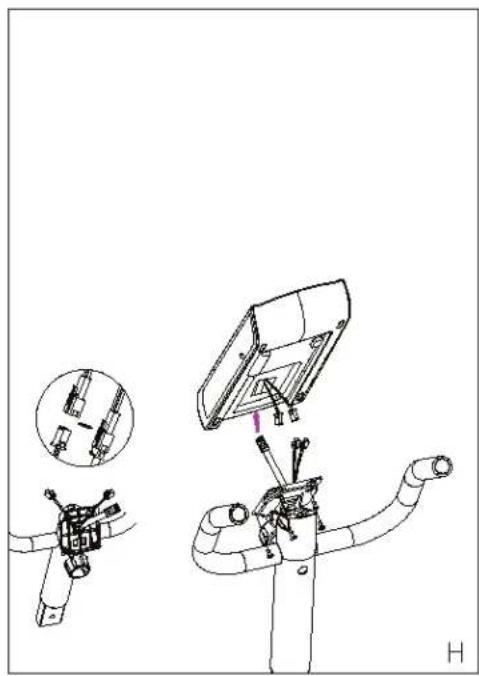
Start by unpacking the equipment. The detailed assembly instructions can be found at the back of this guide. Follow the instructions in given order.
Before assembly, check the contents of the package. If a part is missing, please contact your dealer with the model, equipment serial no. and spare part no. of the missing part. You'll find a spare part list at the back of this guide. The hardware kit contents are marked with * in the spare parts list. The directions left, right, front and back are defined as seen from the exercising position. Keep the assembly tools, as you may need them e.g. for adjusting the equipment. Note that two people are needed for the assembly.
The packaging includes a silicate bag for absorbing moisture during storage and transportation. Please dispose of the bag once you have unpacked the equipment. Allow at least 100 cm of clearance around the equipment. We also recommend opening the package and assembling the product on a protective base.
SAVE THIS INSTRUCTION MANUAL
ADJUSTMENTS
CORRECT EXERCISE POSITION
In order to find a suitable exercise position, you can adjust the distance of the seat from the pedals. Always make sure before beginning exercising that your exercise position is correct.
- Place your feet on the pedals.
- Lift the locking handle upwards (located on the right hand side, just below your seat) and move the seat to desired position. Release the knob when the distance is correct; the seat will click into position.
- Push the seat to a suitable distance; the ball of your foot should reach the pedal when your leg is almost fully extended and when the pedal is at its furthermost position from the seat. Check the suitability of the distance by pedalling anti-clockwise.
- You can select the height of the backrest to suit your own preferences as follows:
- Go behind the equipment.
- Pull the backrest height adjustment knob outwards so that the backrest can be moved freely.
- Select the desired height.
- Release the knob when the height is correct; the backrest will click into position.

NOTE! Always make sure that the locking knob is overly fastened before starting to exercise!
HANDLEBAR SETUP
Loosen the locking screws on the front of the handlebar support and find the right angle at which to position the handlebar. Tighten the locking screws.

NOTE! Always make sure that the locking knob is overly fastened before starting to exercise!
CONSOLE INCLINATION ADJUSTMENT
Set the inclination of the meter so that it corresponds to your height and exercise position.
ADJUSTMENT OF SUPPORT FEET
If the equipment is not stable, adjust the adjustment screws below the support feet as necessary.
EXERCISING
Working out with this device is excellent aerobic exercise, the principle being that the exercise should be suitably light, but of long duration. Aerobic exercise is based on improving the body's maximum oxygen uptake, which in turn improves endurance and fitness. The ability of the body to burn fat as a fuel is directly dependent on its oxygen-uptake capacity. Aerobic exercise should be above all pleasant. You should work up a light sweat but you should not get out of breath during the workout.
You should exercise at least three times a week, 30 minutes at a time, to reach a basic fitness level. Maintaining this level requires a few exercise sessions each week. Once the basic condition has been reached, it is easily improved, simply by increasing the number of exercise sessions. You should start slowly at a low pedalling speed and low resistance, because for an overweight person strenuous exercise may subject the heart and circulatory system to excessive strain. As fitness improves, resistance and pedaling speed can be increased gradually.
HEART RATE
No matter what your goal, you'll get the best results by training at the right level of effort, and the best measure is your own heart rate.
HAND GRIP PULSE MEASUREMENT
Pulse is measured by sensors in the handlebars. Pulse is measured when the user of F30R is touching both sensors simultaneously. Reliable pulse measurement requires that the skin is constantly touching the sensors and that the skin is slightly moist. Too dry or too moist skin weakens the reliability of hand pulse measurement.
TELEM ETRIC HEART RATE MEASUREMENT
The most reliable heart rate measurement is achieved with a telemetric device, in which the electrodes of the transmitter fastened to the chest transmit the pulses from the heart to the console by means of an electromagnetic field.

NOTE! If you are fitted with a pacemaker, please suit a physician before using a heart rate transmitter
If you want to measure your heart rate this way during your workout, moisten the grooved electrodes on the transmitter belt with water. Fasten the transmitter just below the chest with the elastic belt, firmly enough so that the electrodes remain in contact with the skin while exercising, but not so tight that normal breathing is prevented. If you wear the transmitter and belt over a light shirt, moisten the shirt slightly at the points where the electrodes touch the shirt. The transmitter automatically transmits the heart rate reading to the console up to a distance of about 1 m. If the electrode surfaces are not moist, the heart-rate reading will not appear on the display. If the electrodes are dry, they must be moistened again. Allow the electrodes warm up properly to ensure accurate heart rate measurement. If there are several telemetric heart rate measurement devices next to each other, the distance between them should be at least 1.5 m. Similarly, if there is only one receiver and several transmitters in use, only one person with a transmitter should be within transmission range. The transmitter is
switched to an active state only when it is being used for measurement. Sweat and other moisture can, however, keep the transmitter in an active state and waste battery energy. Therefore it is important to dry the electrodes carefully after use.
When selecting training attire, please note that some fibers used in clothes (e.g. polyester, polyamide) create static electricity, which may prevent reliable heart rate measurement. Please note that a mobile phone, television and other electrical appliances form an electromagnetic field around them, which will cause problems in heart rate measurement.
HEART RATE IN TRAINING
First find your maximum heart rate i.e. where the rate doesn't increase with added effort. If you don't know your maximum heart rate, please use the following formula as a guide:
220 - AGE
The formula gives an average value; the maximum varies from person to person. The maximum heart-rate diminishes on average by one point per year. If you belong to a risk group, ask a doctor to measure your maximum heart rate for you.
We have defined three different heart-rate zones to help you with targeted training.
BEGINNER: 50-60 % of maximum heart-rate.
Also suitable for weight-watchers, convalescents and those who haven't exercised for a long time.
Three sessions a week of at least a half-hour each is recommended. Regular exercise considerably improves beginners' respiratory and circulatory performance and you will quickly feel your improvement.
TRAINER: 60-70 % of maximum heart-rate
Perfect for improving and maintaining fitness.
Even reasonable effort develops the heart and lungs effectively, training for a minimum of 30 minutes at least three times a week. To improve your condition still further, increase either frequency or effort, but not both at the same time!
ACTIVE TRAINER: 70-80 % of maximum heart-rate
Exercise at this level suits only the fittest and presupposes long-endurance workouts.
CONSOLE
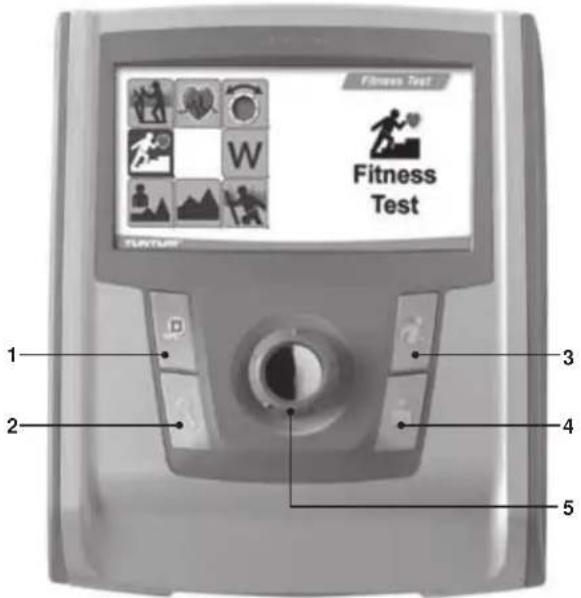
KEYS
1. BACK/STOP
Use the BACK/STOP button to navigate back towards the main menu. During training, you can stop or pause your training session by pressing the BACK/STOP button.
2. ZOOM
Focusing the graphical profile display during training. Presses ZOOM to increase the size of the displayed profile image (two-, four-, eight- or sixteen fold). Pressing the key five times restores the profile image to its original size.
3. TRAINING
Use the TRAINING button to open the TRAINING menu. The TRAINING menu includes the following training programmes: QUICK START, MANUAL, TARGET HR, WATTT CONTROL, PROGRAMMES, T-RIDETM, OWN TRAINING and FITNESS TEST.
4. USER
Press the USER button to open the USER menu. The USER menu includes the following functions: SELECT/CHANGE USER, CREATE USER, , EDIT USER, DELETE USER, SETTINGS and USER LOG.
5. SELECTION DIAL
The selection dial functions in two ways:
-
Rotating the dial. By rotating the dial clockwise, you can scroll the menus downwards or to the right, and increase values or resistance. By rotating the dial anti-clockwise, you can scroll the menus upwards or to the left, and decrease values or resistance.
-
Pressing the dial. By pressing the dial, you can accept the selection you made when rotating the dial. During training, you can accept the function displayed at the bottom centre of the display.
DISPLAY
During training, you can see the following training values on the left side of the display: time, distance, energy consumption, effort, RPM, heart rate and speed.
- To activate the meter, connect the device to a power source, and then press any key or start pedalling. The meter will now display the TRAINING menu. If you do not press a key, or pedal for more than 5 minutes, the meter automatically switches off.
- The values in a workout that has been interrupted are saved in the memory of the user interface for 5 minutes, after which they are reset. You can restart the interrupted exercise by pedalling within 5 minutes.
- On the display, you can see advice messages. They are preceded by the letter i on a white background. You can remove the messages from the display by pressing the selection dial.
USER MENU
You can access the USER menu by pressing the USER button. We recommend that you choose a user code and save your personal details: these details are needed e.g. for a more accurate estimation of your energy consumption. At the same time, you can set the units to be displayed and check the total training values. If you select a username, you can save your training session and display your personal heart rate levels in different colours when training according to your heart rate. Once you have created a username or started to use an existing username, you can see it at the top right corner of the display. You can also exercise without a username. If you do this, a username will not be shown on the top right of the display, and the default settings (40 years, 70 kg, male) will be used for your training session. You can save user data for up to 8 different users.

IMPORTANT! If you wish to view your personal training sessions saved on the USER LOG, always remember to select your own username. You can also start using a username in the middle of your training session by pressing the USER button and then selecting your own username. Your training session will not be interrupted. After selecting your username, you can return to the training data by pressing the BACK/STOP button.

IMPORTANT! If you want to save your training session, you must select a username.
SELECT/ CHANGE USER
Once you have created a username for yourself, select it at the beginning of your training session by choosing SELECT/CHANGE USER and confirm it using the selection dial.
CREATE USER
To create a user:
- Press the USER button. The USER menu appears.
- Select CREATE USER by rotating the selection dial. Confirm your selection by pressing the selection dial.
- Enter your name. Move from one letter to another by rotating the selection dial. Confirm the selected letter by pressing the selection dial. Once you have entered your name, select OK and press the selection dial.
- Select the units you wish to use. Metric (kg, km, kcal) or the corresponding imperial units Imperial (lbs, miles, kcal). Make your selection by rotating the selection dial, and confirm by pressing the dial. You will automatically be taken to the next setting.
- Select the target display for the set values. COUNT DOWN
shows the values as they decrease from your target toward zero. COUNT UP shows the values as they increase toward your target. Confirm your selection by pressing the selection dial. You will be taken to the next setting.
-
Set your gender by rotating the selection dial. Confirm your selection.
-
Set your age. Confirm your selection.
- Set your height. Confirm your selection.
- Set your weight. Confirm your selection.
- Set your maximum heart rate. The meter calculates your estimated maximum heart rate using the formula 220 - age. If you know your exact maximum heart rate, you can adjust the estimated maximum heart rate given by the meter.
- Set your anaerobic threshold. The equipment uses your maximum heart rate to calculate an estimate of your threshold heart rate (80% of your maximum heart rate). If you know your exact anaerobic threshold heart rate, you can adjust the estimate given by the meter.
- Set the aerobic threshold. The equipment uses your maximum heart rate to calculate an estimate of your threshold heart rate (60% of your maximum heart rate). If you know your exact aerobic threshold heart rate, you can adjust the estimate given by the meter.

IMPORTANT! The meter can store up to 8
usernames at a time.
EDIT USER
By selecting EDIT USER you can edit your user data.
DELETE USER
By selecting DELETE USER you can delete users. Activate the username you want to delete and then select DELETE USER. Confirm the selection by pressing the selection dial.
SETTINGS
By selecting SETTINGS you can update the meter firmware version, adjust the display contrast, see the cycle's total values and turn the button sounds on or off.
USER LOG
By selecting the USER LOG you can view the training data of the selected user. You can view either the last training session data or a summary of all the user's sessions. Exit the training data by pressing BACK/STOP.
TRAINING MENU
You can access the TRAINING menu by pressing the TRAINING button. From the TRAINING menu, you can select one of the following training sessions by pressing the selection dial:
QUICK START
This programme allows you to start the MANUAL programme without using user settings.
- Select QUICK START. Confirm the selection by pressing the selection dial and start your training session by pedalling.
- You can increase or decrease the resistance (1-42 Nm) using the selection dial.
- To stop the training session, press the BACK/STOP button. You can then stop the session by selecting EXIT, save the session to the memory by selecting SAVE AND EXIT or continue your training session by selecting CONTINUE.
MANUAL
Allows you to set your effort level with the selection dial during the workout.
- Select MANUAL.
- Using the selection dial, choose your target value for the session: time, distance or energy consumption. Confirm your selection by pressing the selection dial.
- Set the target value for the session using the selection dial: set time (10-180 minutes), distance (3-100 km) or energy consumption (50-2000 kcal). Confirm your selection by pressing the selection dial.
- Start your training session by pedalling. You can increase or decrease the resistance (1-42 Nm) using the selection dial. During training, you can display resistance or heart rate using the selection dial.
- Once the target value has been achieved, the meter gives an audio signal. You can continue with your exercise if you wish.
- To stop the training session, press the BACK/STOP button. You can then stop the session by selecting EXIT, save the session to the memory by selecting SAVE AND EXIT or continue your training session by selecting CONTINUE.
TARGET HR
This programme allows you to preset your pulse level, i.e. the resistance is regulated so that your pulse remains at the requested level. If the pulse tends to rise, resistance is reduced automatically and vice versa. The set value can be changed also during the workout. The programme requires measurement of heart rate.
- Select your TARGET HR.
- Set the heart rate level (80-220) for the training session using the selection dial. Confirm your selection by pressing the selection dial.
- Using the selection dial, choose your target duration for the session measured in time, distance or energy consumption. Confirm your selection by pressing the selection dial.
- Set the target value for the session using the selection dial: set time (10-180 minutes), distance (3-100 km) or energy consumption (50-2000 kcal). Confirm your selection by pressing the selection dial.
- Start your training session by pedalling. Using the selection dial, you can change the heart rate level (80-220). During training, you can display resistance or heart rate using the selection dial.
- Once the target value has been achieved, the meter gives an audio signal. You can continue with your exercise if you wish.
- To stop the training session, press the BACK/STOP button. You can then stop the session by selecting EXIT, save the session to the memory by selecting SAVE AND EXIT or continue your training session by selecting CONTINUE.
WATT CONTROL
By selecting the WATT CONTROL programme, you can set the desired effort value in Watts, i.e. pedalling effort will be independent of pedal rotations. The set effort value can also be changed during the workout.
- Select WATT CONTROL.
- Set the effort level (20-440 Watt) of your training session using the selection dial. Confirm your selection by pressing the selection dial.
- Using the selection dial, choose your target duration for the session measured in time, distance or energy consumption. Confirm your selection by pressing the selection dial.
- Set the target value for the session using the selection dial: set time (10-180 minutes), distance (3-100 km) or energy consumption (50 - 2000 kcal). Confirm your selection by pressing the selection dial.
- Start your training session by pedalling. You can increase
or decrease the resistance
(20-440 Watt) using the selection dial. During training, you can display effort or heart rate using the selection dial.
6. Once the target value has been achieved, the meter gives an audio signal. You can continue with your exercise if you wish.
7. To stop the training session, press the BACK/STOP button. You can then stop the session by selecting EXIT, save the session to the memory by selecting SAVE AND EXIT or continue your training session by selecting CONTINUE.
PROGRAMMES
This programme contains ready-made training profiles. The programme changes automatically the intensity level during your workout. The display shows the profile and the changes, and the intensity can be manually adjusted.
- Select PROGRAMMES.
- Select a programme (1-10) using the selection dial. Profi les P1-P5 are Watt control programmes and P6-P10 are target heart rate programmes requiring heart rate measurement. Confirm your selection by pressing the selection dial.
- Using the selection dial, choose your target duration for the session measured in time or distance. Confirm your selection by pressing the selection dial.
- Set the target value for the session using the selection dial: time (10-180 minutes) or distance (3-100 km). Confirm your selection by pressing the selection dial.
- Start the programme by pedalling. You can increase or decrease the resistance using the selection dial. During training, you can display effort or heart rate using the selection dial. The heart rate display requires heart rate measurement.
- Once the target value has been achieved, the meter gives an audio signal. You can continue with your exercise if you wish.
- To stop the training session, press the BACK/STOP button. You can then stop the session by selecting EXIT, save the session to the memory by selecting SAVE AND EXIT or continue your training session by selecting CONTINUE.
P1-P5: WATT CONTROL PROGRAM MES
PROFILE P1. 3-peak effort profile for the improvement of oxygen uptake capacity. With relatively low yet long lasting peaks, this profile is suitable for beginners. With default setting, max. Watt value is 125, average Watt value is 98.
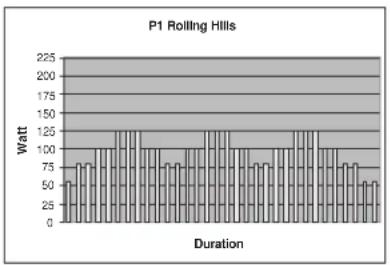
bar
P1 Rolling Hills | Duration | Power (Watt) | |---|---| | 1 | 80 | | 2 | 90 | | 3 | 100 | | 4 | 125 | | 5 | 125 | | 6 | 100 | | 7 | 80 | | 8 | 80 | | 9 | 125 | | 10 | 125 | | 11 | 100 | | 12 | 100 | | 13 | 80 | | 14 | 80 | | 15 | 125 | | 16 | 125 | | 17 | 100 | | 18 | 80 | | 19 | 80 | | 20 | 125 | | 21 | 125 | | 22 | 100 | | 23 | 80 | | 24 | 80 | | 25 | 60 | | 26 | 60 | | 27 | 60 | | 28 | 60 | | 29 | 60 | | 30 | 60 |PROFILE P2. 3-peak effort profile for the improvement of oxygen uptake capacity. With peaks relatively short in duration, this profile is suitable for beginners. With default setting, max. Watt value is 150, average Watt value is 102.
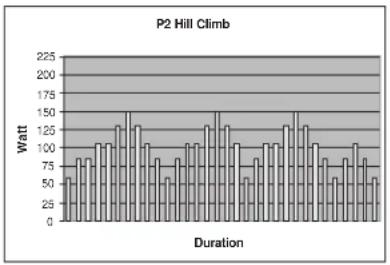
bar
P2 Hill Climb | Duration | Power (Watt) | |---|---| | 1 | 80 | | 2 | 90 | | 3 | 100 | | 4 | 110 | | 5 | 120 | | 6 | 130 | | 7 | 140 | | 8 | 150 | | 9 | 140 | | 10 | 130 | | 11 | 120 | | 12 | 110 | | 13 | 100 | | 14 | 90 | | 15 | 80 | | 16 | 70 | | 17 | 60 | | 18 | 50 | | 19 | 40 | | 20 | 30 | | 21 | 20 | | 22 | 10 | | 23 | 5 | | 24 | 0 | | 25 | 10 | | 26 | 20 | | 27 | 30 | | 28 | 40 | | 29 | 50 | | 30 | 60 | | 31 | 70 | | 32 | 80 | | 33 | 90 | | 34 | 100 | | 35 | 110 | | 36 | 120 | | 37 | 130 | | 38 | 140 | | 39 | 150 | | 40 | 140 | | 41 | 130 | | 42 | 120 | | 43 | 110 | | 44 | 100 | | 45 | 90 | | 46 | 80 | | 47 | 70 | | 48 | 60 | | 49 | 50 | | 50 | 40 | | 51 | 30 | | 52 | 20 | | 53 | 10 | | 54 | 5 | | 55 | 0 | | 56 | 10 | | 57 | 20 | | 58 | 30 | | 59 | 40 | | 60 | 50 | | 61 | 60 | | 62 | 70 | | 63 | 80 | | 64 | 90 | | 65 | 100 | | 66 | 110 | | 67 | 120 | | 68 | 130 | | 69 | 140 | | 70 | 150 | | 71 | 140 | | 72 | 130 | | 73 | 120 | | 74 | 110 | | 75 | 100 | | 76 | 90 | | 77 | 80 | | 78 | 70 | | 79 | 60 | | 80 | 50 | | 81 | 40 | | 82 | 30 | | 83 | 20 | | 84 | 10 | | 85 | 5 | | 86 | 0 | | 87 | -5 | | 88 | -10 | | 89 | -15 | | 90 | -20 | | 91 | -25 | | 92 | -30 | | 93 | -35 | | 94 | -40 | | 95 | -45 | | 96 | -50 | | 97 | -55 | | 98 | -60 | | 99 | -65 | | Note: The actual values may vary due to the random nature of the data generation. The provided values are just an example.PROFILE P3. Multi-peak effort profile for the improvement of explosive strength. Peaks are relatively short in duration, and the level of effort varies irregularly. This profile is suitable for all fitness levels. With default setting, max. Watt value is 150, average Watt value is 117.

bar
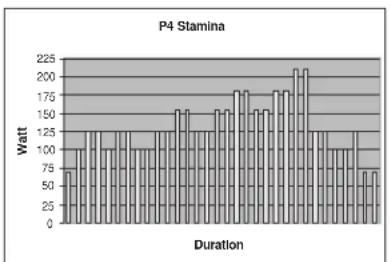
P3 Cross Country | Duration | Power (Watt) | |---|---| | 1 | 75 | | 2 | 100 | | 3 | 125 | | 4 | 100 | | 5 | 125 | | 6 | 100 | | 7 | 125 | | 8 | 100 | | 9 | 125 | | 10 | 100 | | 11 | 125 | | 12 | 100 | | 13 | 125 | | 14 | 100 | | 15 | 125 | | 16 | 100 | | 17 | 125 | | 18 | 100 | | 19 | 125 | | 20 | 100 | | 21 | 125 | | 22 | 100 | | 23 | 125 | | 24 | 100 | | 25 | 125 | | 26 | 100 | | 27 | 125 | | 28 | 100 | | 29 | 125 | | 30 | 100 | | 31 | 125 | | 32 | 100 | | 33 | 125 | | 34 | 100 | | 35 | 125 | | 36 | 100 | | 37 | 125 | | 38 | 100 | | 39 | 125 | | 40 | 100 | | 41 | 125 | | 42 | 100 | | 43 | 125 | | 44 | 100 | | 45 | 125 | | 46 | 100 | | 47 | 125 | | 48 | 100 | | 49 | 125 | | 50 | 100 | | 51 | 125 | | 52 | 100 | | 53 | 125 | | 54 | 100 | | 55 | 125 | | 56 | 100 | | 57 | 125 | | 58 | 100 | | 59 | 125 | | 60 | 100 | | 61 | 125 | | 62 | 100 | | 63 | 125 | | 64 | 100 | | 65 | 125 | | 66 | 100 | | 67 | 125 | | 68 | 100 | | 69 | 125 | | 70 | 100 | | 71 | 125 | | 72 | 100 | | 73 | 125 | | 74 | 100 | | 75 | 125 | | 76 | 100 | | 77 | 125 | | 78 | 100 | | 79 | 125 | | 80 | 100 | | 81 | 125 | | 82 | 100 | | 83 | 125 | | 84 | 100 | | 85 | 125 | | 86 | 100 | | 87 | 125 | | 88 | 100 | | 89 | 125 | | 90 | 100 | | 91 | 125 | | 92 | 100 | | 93 | 125 | | 94 | 100 | | 95 | 125 | | 96 | 100 | | 97 | 125 | | 98 | 100 | | 99 | 125 | | P3 Cross Country Duration The chart displays the power consumption in Watts for each duration. The values are labeled on the bars. There is no additional data series or categories present in the image.PROFILE P4. Uphill effort profile for the improvement of endurance fitness. Peaks are relatively long-lasting, increasing in intensity until the closing phase of the profile. This profile is specifically suitable for the physically fit. With default setting, max. Watt value is 210, average Watt value is 133.
bar
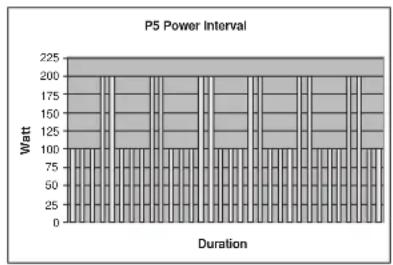
P4 Stamina | Duration | Power (Watt) | |---|---| | 1 | 75 | | 2 | 100 | | 3 | 125 | | 4 | 100 | | 5 | 125 | | 6 | 100 | | 7 | 100 | | 8 | 100 | | 9 | 125 | | 10 | 125 | | 11 | 150 | | 12 | 125 | | 13 | 125 | | 14 | 150 | | 15 | 175 | | 16 | 175 | | 17 | 150 | | 18 | 175 | | 19 | 175 | | 20 | 200 | | 21 | 200 | | 22 | 125 | | 23 | 100 | | 24 | 100 | | 25 | 125 | | 26 | 125 | | 27 | 75 |PROFILE P5. Interval effort profile with regular changes and a clear difference between peaks and the basic level of effort. The default values are preset to an average effort of 138 Watt and a maximum effort of 200 Watt. Please note that this profile allows you to separately adjust the peaks and the basic level of effort.
bar
| Duration | Power Interval (Watt) | | -------- | --------------------- | | 0 | 100 | | 10 | 125 | | 20 | 150 | | 30 | 175 | | 40 | 200 | | 50 | 225 |P6-P10: HEART RATE CONTROL PROGRAM MES
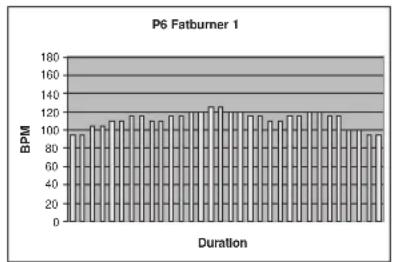
PROFILE P6. 3-peak heart rate profile for the improvement of oxygen uptake capacity. With relatively long-lasting peaks, this profile is suitable for beginners. With default setting, max. HR value is 125, average HR is 112.
bar
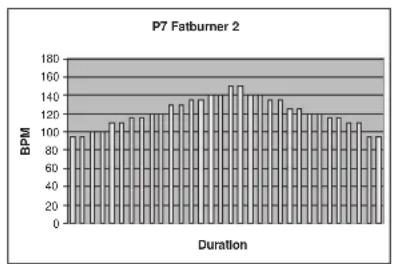
P6 Fatburner 1 | Duration | BPM | |---|---| | 1 | 90 | | 2 | 95 | | 3 | 100 | | 4 | 105 | | 5 | 110 | | 6 | 115 | | 7 | 120 | | 8 | 125 | | 9 | 130 | | 10 | 135 | | 11 | 140 | | 12 | 145 | | 13 | 150 | | 14 | 155 | | 15 | 160 | | 16 | 165 | | 17 | 170 | | 18 | 175 | | 19 | 180 | | 20 | 185 | | 21 | 190 | | 22 | 195 | | 23 | 200 | | 24 | 205 | | 25 | 210 | | 26 | 215 | | 27 | 220 | | 28 | 225 | | 29 | 230 | | 30 | 235 | | 31 | 240 | | 32 | 245 | | 33 | 250 | | 34 | 255 | | 35 | 260 | | 36 | 265 | | 37 | 270 | | 38 | 275 | | 39 | 280 | | 40 | 285 | | 41 | 290 | | 42 | 295 | | 43 | 300 | | 44 | 305 | | 45 | 310 | | 46 | 315 | | 47 | 320 | | 48 | 325 | | 49 | 330 | | 50 | 335 | | 51 | 340 | | 52 | 345 | | 53 | 350 | | 54 | 355 | | 55 | 360 | | 56 | 365 | | 57 | 370 | | 58 | 375 | | 59 | 380 | | 60 | 385 | | 61 | 390 | | 62 | 395 | | 63 | 400 | | 64 | 405 | | 65 | 410 | | 66 | 415 | | 67 | 420 | | 68 | 425 | | 69 | 430 | | 70 | 435 | | 71 | 440 | | 72 | 445 | | 73 | 450 | | 74 | 455 | | 75 | 460 | | 76 | 465 | | 77 | 470 | | 78 | 475 | | 79 | 480 | | 80 | 485 | | 81 | 490 | | 82 | 495 | | 83 | 500 | | 84 | 505 | | 85 | 510 | | 86 | 515 | | 87 | 520 | | 88 | 525 | | 89 | 530 | | 90 | 535 | | 91 | 540 | | 92 | 545 | | 93 | 550 | | 94 | 555 | | 95 | 560 | | 96 | 565 | | 97 | 570 | | 98 | 575 | | 99 | 580 | | ... (Repeated) | ... (Repeated)PROFILE P7. Uphill heart rate profile where the heart rate increases steadily until the midpoint of the profile, steadily decreasing thereafter. This profile is suitable for beginners. With default setting, max. HR value is 150, average HR is 121.
bar
P7 Fatburner 2 | Duration | BPM | |---|---| | 1 | 90 | | 2 | 95 | | 3 | 100 | | 4 | 105 | | 5 | 110 | | 6 | 115 | | 7 | 120 | | 8 | 125 | | 9 | 130 | | 10 | 135 | | 11 | 140 | | 12 | 145 | | 13 | 150 | | 14 | 155 | | 15 | 160 | | 16 | 155 | | 17 | 150 | | 18 | 145 | | 19 | 140 | | 20 | 135 | | 21 | 130 | | 22 | 125 | | 23 | 120 | | 24 | 115 | | 25 | 110 | | 26 | 105 | | 27 | 100 | | 28 | 95 | | 29 | 90 | | 30 | 85 | | 31 | 80 | | 32 | 75 | | 33 | 70 | | 34 | 65 | | 35 | 60 | | 36 | 55 | | 37 | 50 | | 38 | 45 | | 39 | 40 | | 40 | 35 | | 41 | 30 | | 42 | 25 | | 43 | 20 | | 44 | 15 | | 45 | 10 | | 46 | 5 | | 47 | 0 | | 48 | -5 | | 49 | -10 | | 50 | -15 | | 51 | -20 | | 52 | -25 | | 53 | -30 | | 54 | -35 | | 55 | -40 | | 56 | -45 | | 57 | -50 | | 58 | -55 | | 59 | -60 | | 60 | -65 | | 61 | -70 | | 62 | -75 | | 63 | -80 | | 64 | -85 | | 65 | -90 | | 66 | -95 | | 67 | -100 | | 68 | -105 | | 69 | -110 | | 70 | -115 | | 71 | -120 | | 72 | -125 | | 73 | -130 | | 74 | -135 | | 75 | -140 | | 76 | -145 | | 77 | -150 | | 78 | -155 | | 79 | -160 | | 80 | -165 | | 81 | -170 | | 82 | -175 | | 83 | -180 | | 84 | -185 | | 85 | -190 | | 86 | -195 | | 87 | -200 | | 88 | -205 | | 89 | -210 | | 90 | -215 | | 91 | -220 | | 92 | -225 | | 93 | -230 | | 94 | -235 | | 95 | -240 | | 96 | -245 | | 97 | -250 | | 98 | -255 | | 99 | -260 | | 100 | -265 |PROFILE P8. 3-peak heart rate profile for the improvement of endurance fitness. Peaks are relatively long lasting, but the heart rate level remains fairly constant throughout. This profile is suitable for all fitness levels. With default setting, max. HR value is 140, average HR is 120.
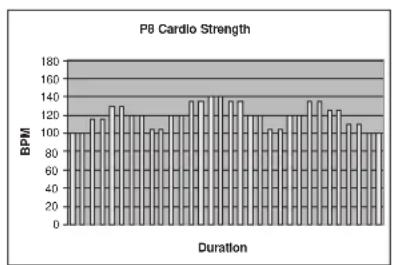
bar
P8 Cardio Strength | Duration | BPM | |---|---| | 1 | 95 | | 2 | 105 | | 3 | 115 | | 4 | 125 | | 5 | 130 | | 6 | 120 | | 7 | 110 | | 8 | 105 | | 9 | 100 | | 10 | 105 | | 11 | 110 | | 12 | 120 | | 13 | 130 | | 14 | 135 | | 15 | 140 | | 16 | 145 | | 17 | 140 | | 18 | 135 | | 19 | 130 | | 20 | 120 | | 21 | 110 | | 22 | 105 | | 23 | 100 | | 24 | 95 | | 25 | 90 | | 26 | 95 | | 27 | 100 | | 28 | 105 | | 29 | 110 | | 30 | 115 | | 31 | 120 | | 32 | 125 | | 33 | 130 | | 34 | 135 | | 35 | 140 | | 36 | 145 | | 37 | 150 | | 38 | 145 | | 39 | 140 | | 40 | 135 | | 41 | 130 | | 42 | 125 | | 43 | 120 | | 44 | 115 | | 45 | 110 | | 46 | 105 | | 47 | 100 | | 48 | 95 | | 49 | 90 | | 50 | 95 | BPMPROFILE P9. Uphill heart rate profile for the improvement of endurance fitness. Peaks are relatively long-lasting, increasing in intensity until the closing phase of the profile. This profile is specifically suitable for the physically fit. With default setting, max. HR value is 170, average HR is 131.
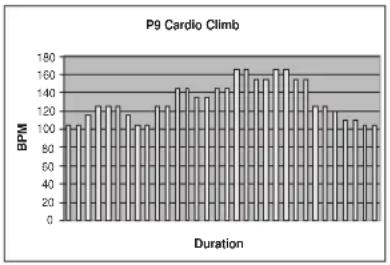
bar
P9 Cardio Climb | Duration | BPM | |---|---| | 1 | 100 | | 2 | 105 | | 3 | 110 | | 4 | 115 | | 5 | 120 | | 6 | 125 | | 7 | 130 | | 8 | 135 | | 9 | 140 | | 10 | 145 | | 11 | 150 | | 12 | 155 | | 13 | 160 | | 14 | 165 | | 15 | 170 | | 16 | 175 | | 17 | 180 | | 18 | 175 | | 19 | 170 | | 20 | 165 | | 21 | 160 | | 22 | 155 | | 23 | 150 | | 24 | 145 | | 25 | 140 | | 26 | 135 | | 27 | 130 | | 28 | 125 | | 29 | 120 | | 30 | 115 | | 31 | 110 | | 32 | 105 | | 33 | 100 | | 34 | 95 | | 35 | 90 | | 36 | 85 | | 37 | 80 | | 38 | 75 | | 39 | 70 | | 40 | 65 | | 41 | 60 | | 42 | 55 | | 43 | 50 | | 44 | 45 | | 45 | 40 | | 46 | 35 | | 47 | 30 | | 48 | 25 | | 49 | 20 | | 50 | 15 | | 51 | 10 | | 52 | 5 | | 53 | 0 | | 54 | -5 | | 55 | -10 | | 56 | -15 | | 57 | -20 | | 58 | -25 | | 59 | -30 | | 60 | -35 | | 61 | -40 | | 62 | -45 | | 63 | -50 | | 64 | -55 | | 65 | -60 | | 66 | -65 | | 67 | -70 | | 68 | -75 | | 69 | -80 | | 70 | -85 | | 71 | -90 | | 72 | -95 | | 73 | -100 | | 74 | -105 | | 75 | -110 | | 76 | -115 | | 77 | -120 | | 78 | -125 | | 79 | -130 | | 80 | -135 | | 81 | -140 | | 82 | -145 | | 83 | -150 | | 84 | -155 | | 85 | -160 | | 86 | -165 | | 87 | -170 | | 88 | -175 | | 89 | -180 | | 90 | -175 | | 91 | -170 | | 92 | -165 | | 93 | -160 | | 94 | -155 | | 95 | -150 | | 96 | -145 | | 97 | -140 | | 98 | -135 | | 99 | -130 | | 100 | -125 |PROFILE P10. 3-peak heart rate profile for the improvement of oxygen uptake capacity. Peaks are relatively long-lasting, with each followed by a steady recovery period. This profile is specifically suitable for the physically fit. With default setting, max. HR value is 160, average HR is 133.
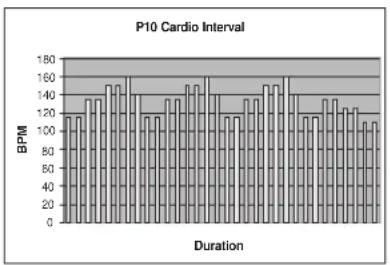
bar
P10 Cardio Interval | Duration | BPM | |---|---| | 1 | 120 | | 2 | 135 | | 3 | 140 | | 4 | 150 | | 5 | 160 | | 6 | 145 | | 7 | 130 | | 8 | 125 | | 9 | 135 | | 10 | 140 | | 11 | 150 | | 12 | 160 | | 13 | 145 | | 14 | 130 | | 15 | 125 | | 16 | 135 | | 17 | 140 | | 18 | 150 | | 19 | 160 | | 20 | 145 | | 21 | 130 | | 22 | 125 | | 23 | 135 | | 24 | 140 | | 25 | 150 | | 26 | 160 | | 27 | 145 | | 28 | 130 | | 29 | 125 | | 30 | 135 | | 31 | 140 | | 32 | 150 | | 33 | 160 | | 34 | 145 | | 35 | 130 | | 36 | 125 | | 37 | 135 | | 38 | 140 | | 39 | 150 | | 40 | 160 | | 41 | 145 | | 42 | 130 | | 43 | 125 | | 44 | 135 | | 45 | 140 | | 46 | 150 | | 47 | 160 | | 48 | 145 | | 49 | 130 | | 50 | 125 | | 51 | 135 | | 52 | 140 | | 53 | 150 | | 54 | 160 | | 55 | 145 | | 56 | 130 | | 57 | 125 | | 58 | 135 | | 59 | 140 | | 60 | 150 | | 61 | 160 | | 62 | 145 | | 63 | 130 | | 64 | 125 | | 65 | 135 | | 66 | 140 | | 67 | 150 | | 68 | 160 | | 69 | 145 | | 70 | 130 | | 71 | 125 | | 72 | 135 | | 73 | 140 | | 74 | 150 | | 75 | 160 | | 76 | 145 | | 77 | 130 | | 78 | 125 | | 79 | 135 | | 80 | 140 | | 81 | 150 | | 82 | 160 | | 83 | 145 | | 84 | 130 | | 85 | 125 | | 86 | 135 | | 87 | 140 | | 88 | 150 | | 89 | 160 | | 90 | 145 | | 91 | 130 | | 92 | 125 | | 93 | 135 | | 94 | 140 | | 95 | 150 | | 96 | 160 | | 97 | 145 | | 98 | 130 | | 99 | 125 | |T-RIDE™
T-RIDETM TRAINING simulates riding a bike on a natural terrain. During training, you can change gears using the selection dial and watch the altitude profile.
- Select T-RIDETM.
- Select the terrain and confirm your selection.
- Set the starting point for the session using the selection dial.
- Set the ending point for the session using the selection dial.
- Start your training session by pedalling. You can change gears (1–6) using the selection dial. During training, you can display altitude profile or heart rate using the selection dial. The heart rate display requires heart rate measurement.
- Once you have completed the route, the meter beeps and the training session ends.
- To stop the training session, press the BACK/STOP button. You can then stop the session by selecting EXIT, save the session to the memory by selecting SAVE AND EXIT or continue your training session by selecting CONTINUE.
OWN TRAINING
You can create and save up to 20 training programmes on the meter.
SAVING A PROGRAMME
- End your training session by pressing BACK/STOP.
- Select SAVE AND EXIT and confirm your selection.
- Enter a name for the training session and confirm it using the selection dial.

IMPORTANT! You can only save programmes that longer than 10 minutes.

IMPORTANT! To save a training session you will need to select a username.
USING SAVED PROGRAMMES
- Select OWN TRAINING.
- Select a training session from the list.
-
Select the desired execution method:
a. Replay = repeat a previously saved exercise.
b. Edit = edit the duration of a previously saved exercise before you start. -
Confirm your selection by pressing the selection dial.
a. Replay = start pedalling to begin the exercise. You can adjust the effort level with the selection dial.
b. Edit = select the duration of the exercise with the selection dial (set the time to 10-180 minutes). Start pedalling to begin the exercise. You can adjust the effort level with the selection dial.
- To stop the training session, press the BACK/STOP button. You can then stop the session by selecting EXIT, save the session to the memory by selecting SAVE AND EXIT or continue your training session by selecting CONTINUE.
FITNESS TEST
The meter uses a multi-step fitness test. The test begins at a low level of effort, which increases steadily in accordance with the selected test type. A multi-step test is a safe and reliable, sub maximal means of measuring a person's physical fitness level. The test continues until the test subject has achieved his or her individual target heart rate (85% of maximum heart rate).
The test requires the use of a heart rate belt: the meter monitors changes in the heart rate throughout the test, using the data to calculate an estimate of the tested person's maximum oxygen uptake capacity. The maximum oxygen uptake capacity is the best measure of a person's physical fitness level. After the test, the meter gives versatile information on your fitness level: a description and a numerical value (ml/kg/min).
PREPARING FOR THE TEST
- Make sure that the data associated with your username is updated – the meter uses the user data as a basis for the fitness test.
- Select FITNESS TEST.
- Using the selection dial, select the most suitable fitness category for you:
a. Inactive = no regular exercise, poor physical condition
b. Active = regular exercise, average or good physical condition
c. Athletic = active training, good or excellent physical condition
- The display shows the appropriate test type for each fitness category:
a. Step time = duration of different effort levels in the test
b. First step = initial effort level
c. Step power = effort level of steps (in Watts), the test features several steps
- Confirm your selection by pressing the selection dial.
- If necessary, you can adjust your target heart rate value using the selection dial. Confirm your settings using the selection dial.
- The display informs you that you can stop the test once you reach the target heart rate for the test. Start the test by pressing the selection dial.
PERFORMING THE TEST
- The display shows the selected test step type. Start pedalling to begin the test. A red diagram that updates as you progress in the test represents your heart rate. A discontinuous line in red indicates your target heart rate.
- Once the target heart rate level has been achieved, the meter gives an audio signal and displays a message.
We recommend that you end the test here, unless you are relatively fit. If you have set your target heart rate correctly (that is, if you have calculated your maximum heart rate accurately enough), continuing the test beyond this point will not increase the accuracy of the result. If you overestimate your maximum heart rate, your fitness level will be overestimated. Similarly, if you underestimate your maximum heart rate, your fitness level will be underestimated.
- To stop the test once you reach the target heart rate level, press the BACK/STOP button or stop pedalling. The meter will now switch to the test result display:
| MEN / MAXIMAL OXYGEN UPTAKE (VO2MAX)1 = VERY POOR - 7 = EXCELLENT | ||||||||
| AGE 1 | 2 | 3 | 4 | 5 | 6 | 7 | ||
| 18-19 | <33 | 33- | 38 | 39-44 | 45-51 | 52-57 | 58-63 | >63 |
| 20-24 | <32 | 32- | 37 | 38-43 | 44-50 | 51-56 | 57-62 | >62 |
| 25-29 | <31 | 31- | 35 | 36-42 | 43-48 | 49-53 | 54-59 | >59 |
| 30-34 | <29 | 29- | 34 | 35-40 | 41-45 | 46-51 | 52-56 | >56 |
| 35-39 | <28 | 28- | 32 | 33-38 | 39-43 | 44-48 | 49-54 | >54 |
| 40-44 | <26 | 26- | 31 | 32-35 | 36-41 | 42-46 | 47-51 | >51 |
| 45-49 | <25 | 25- | 29 | 30-34 | 35-39 | 40-43 | 44-48 | >48 |
| 50-54 | <24 | 24- | 27 | 28-32 | 33-36 | 37-41 | 42-46 | >46 |
| 55-59 | <22 | 22- | 26 | 27-30 | 31-34 | 35-39 | 40-43 | >43 |
| 60-65 | <21 | 21- | 24 | 25-28 | 29-32 | 33-36 | 37-40 | >40 |
WOMEN / MAXIMAL OXYGEN UPTAKE (VO2MAX) 1 = VERY POOR - 7 = EXCELLENT
| A | G | E | 1 | 2 | 3 | 4 | 5 |
| 18-19 | <28 28-32 | 33-37 | 38-42 | 43-47 | 48-52 >52 | ||
| 20-24 | <27 27-31 | 32-36 | 37-41 | 42-46 | 47-51 >51 | ||
| 25-29 | <26 26-30 | 31-35 | 36-40 | 41-44 | 45-49 >49 | ||
| 30-34 | <25 25-29 | 30-33 | 34-37 | 38-42 | 43-46 >46 | ||
| 35-39 | <24 24-27 | 28-31 | 32-35 | 36-40 | 41-44 >44 | ||
| 40-44 | <22 22-25 | 26-29 | 30-33 | 34-37 | 38-41 >41 | ||
| 45-49 | <21 21-23 | 24-27 | 28-31 | 32-35 | 36-38 >38 | ||
| 50-54 | <19 19-22 | 23-25 | 26-29 | 30-32 | 33-36 >36 | ||
| 55-59 | <18 18-20 | 21-23 | 24-27 | 28-30 | 31-33 >33 | ||
| 60-65 | <16 16-18 | 19-21 | 22-24 | 25-27 | 28-30 >30 |
M AINTENANCE
The equipment requires very little maintenance. Check, however, from time-to-time that all screws and nuts are tight.
- After exercising, clean the equipment with a soft, absorbent cloth. Do not use solvents.
- Never remove the equipment's protective casing.
- The electromagnetic brake is based on electromagnetic resistance; resistance level is electronically measured and shown as Watt reading on the display. Due to the measurement system, your Tunturi ergometer need not be re-calibrated when assembled, serviced and used according to this Owner's Manual.
M ALFUNCTIONS
Despite continuous quality control, defects and malfunctions caused by individual components may occur in the equipment. In most cases it's unnecessary to take the whole device in for repair, as it's usually sufficient to replace the defective part.
If the equipment does not function properly during use, contact your Tunturi dealer/supplier immediately. Always give the model and serial number of your equipment. Please state also the nature of the problem, conditions of use and purchase date. Please check the Tunturi Warranty booklet.
If you require spare parts, always give the model, serial number of your equipment and the spare part number for the part you need. The spare part list is at the back of this manual. Use only spare parts mentioned in the spare part list.
TRANSPORT AND STORAGE
Please follow these instructions when carrying and moving the cycle about, because lifting it incorrectly may strain your back or risk other accidents:

NOTE! Always switch the power off and unplug the er cord before you start moving the equipment nd!
Stand behind the equipment. Grip the seat with one hand and the handlebar with the other, and set your foot on the rear support. Tilt the equipment so that it rests on its transport wheels. Wheel the equipment to move it, on these transport wheels. Lower the equipment while holding on to the handlebar and remain behind the equipment all the time.

NOTE! Transport the equipment with caution over seven surfaces, for example over a step. The equipment is'd never be transported upstairs using the wheels over steps, instead it must be carried. We recommend that use a protective base when transporting the equipment.
To prevent the equipment malfunctioning, store in a dry place with as little temperature variation as possible and protected from dust.
TECHNICAL SPECIFICATIONS
| Length | 171 | cm |
| Width | 70 | cm |
| Height | 117 | cm |
| Weight | 60 | kg |
This product meets the requirements of the EU's EMC Directives on electromagnetic compatibility (89/336/EEC) and electrical equipment designed for use within certain voltage limits (73/23/EEC). This product therefore carries the CE label.
This product meets EN precision and safety standards (Class HA, EN-957, parts 1 and 5).
Due to our continuous policy of product development, Tunturi reserves the right to change specifications without notice.

NOTE! The instructions must be followed carefully in assembly, use and maintenance of your equipment.
The warranty does not cover damage due to negligence of the assembly, adjustment and maintenance instructions described herein. Changes or modifications not expressly approved by Tunturi will void the user's authority to operate the equipment!
WE WISH YOU MANY ENJOYABLE TRAINING SESSIONS WITH YOUR NEW TUNTURI TRAINING PARTNER!
DEUTSCH
INHALT
MONTAGE
EINSTELLUNGEN
TRAINIEREN MIT TUNTURI 12
COCKPIT
BETRIEB DES COCKPITS 14
WARTUNG
BETRIEBSSTÖRUNGEN
MIT HANDGRIFFSENSOREN
FUNKTIONSTASTEN
1. BACK/STOP
bar
P1 Rolling Hills | Duration | Power (Watt) | |---|---| | 1 | 80 | | 2 | 95 | | 3 | 100 | | 4 | 120 | | 5 | 125 | | 6 | 100 | | 7 | 90 | | 8 | 85 | | 9 | 100 | | 10 | 120 | | 11 | 125 | | 12 | 100 | | 13 | 95 | | 14 | 85 | | 15 | 100 | | 16 | 120 | | 17 | 125 | | 18 | 100 | | 19 | 95 | | 20 | 85 | | 21 | 100 | | 22 | 120 | | 23 | 125 | | 24 | 100 | | 25 | 95 | | 26 | 85 | | 27 | 100 | | 28 | 120 | | 29 | 125 | | 30 | 100 | | 31 | 95 | | 32 | 85 | | 33 | 100 | | 34 | 120 | | 35 | 125 | | 36 | 100 | | 37 | 95 | | 38 | 85 | | 39 | 100 | | 40 | 120 | | 41 | 125 | | 42 | 100 | | 43 | 95 | | 44 | 85 | | 45 | 100 | | 46 | 120 | | 47 | 125 | | 48 | 100 | | 49 | 95 | | 50 | 85 | | 51 | 100 | | 52 | 120 | | 53 | 125 | | 54 | 100 | | 55 | 95 | | 56 | 85 | | 57 | 100 | | 58 | 120 | | 59 | 125 | | 60 | 100 | | 61 | 95 | | 62 | 85 | | 63 | 100 | | 64 | 120 | | 65 | 125 | | 66 | 100 | | 67 | 95 | | 68 | 85 | | 69 | 100 | | 70 | 120 | | 71 | 125 | | 72 | 100 | | 73 | 95 | | 74 | 85 | | 75 | 100 | | 76 | 120 | | 77 | 125 | | 78 | 100 | | 79 | 95 | | 80 | 85 | | 81 | 100 | | 82 | 120 | | 83 | 125 | | 84 | 100 | | 85 | 95 | | 86 | 85 | | 87 | 100 | | 88 | 120 | | 89 | 125 | | 90 | 100 | | 91 | 95 | | 92 | 85 | | 93 | 100 | | 94 | 120 | | 95 | 125 | | 96 | 100 | | 97 | 95 | | 98 | 85 | | 99 | 100 | | Total: Average (Total) = (Total + Total) * (Average + Total) * (Average + Total). The values are estimated based on the sum of these values. The 'Duration' column indicates the duration of the total. The 'Watt' column indicates the power output in Watts. There is no additional data series or multiple series present in the chart. Legend: Single series represented by a single bar. Values are explicitly labeled on the chart.bar
P3 Cross Country | Duration | Power (Watt) | |---|---| | 1 | 75 | | 2 | 90 | | 3 | 100 | | 4 | 110 | | 5 | 120 | | 6 | 130 | | 7 | 140 | | 8 | 150 | | 9 | 160 | | 10 | 170 | | 11 | 180 | | 12 | 190 | | 13 | 200 | | 14 | 210 | | 15 | 220 | | 16 | 230 | | 17 | 240 | | 18 | 250 | | 19 | 260 | | 20 | 270 | | 21 | 280 | | 22 | 290 | | 23 | 300 | | 24 | 310 | | 25 | 320 | | 26 | 330 | | 27 | 340 | | 28 | 350 | | 29 | 360 | | 30 | 370 | | 31 | 380 | | 32 | 390 | | 33 | 400 | | 34 | 410 | | 35 | 420 | | 36 | 430 | | 37 | 440 | | 38 | 450 | | 39 | 460 | | 40 | 470 | | 41 | 480 | | 42 | 490 | | 43 | 500 | | 44 | 510 | | 45 | 520 | | 46 | 530 | | 47 | 540 | | 48 | 550 | | 49 | 560 | | 50 | 570 | | 51 | 580 | | 52 | 590 | | 53 | 600 | | 54 | 610 | | 55 | 620 | | 56 | 630 | | 57 | 640 | | 58 | 650 | | 59 | 660 | | 60 | 670 | | 61 | 680 | | 62 | 690 | | 63 | 700 | | 64 | 710 | | 65 | 720 | | 66 | 730 | | 67 | 740 | | 68 | 750 | | 69 | 760 | | 70 | 770 | | 71 | 780 | | 72 | 790 | | 73 | 800 | | 74 | 810 | | 75 | 820 | | 76 | 830 | | 77 | 840 | | 78 | 850 | | 79 | 860 | | 80 | 870 | | 81 | 880 | | 82 | 890 | | 83 | 900 | | 84 | 910 | | 85 | 920 | | 86 | 930 | | 87 | 940 | | 88 | 950 | | 89 | 960 | | 90 | 970 | | 91 | 980 | | 92 | 990 | | 93 | 1000 | | 94 | -1010 | | 95 | -1020 | | 96 | -1030 | | 97 | -1040 | | 98 | -1050 | | 99 | -1060 | | - The data is a time series from the beginning of the year. The values are estimated based on the provided data and are not explicitly provided in the code. There is only one data series represented by the bars for each duration. The values are estimated based on the provided data and are estimated based on the provided data. There is no additional data series present in this image. The values are estimated based on the provided data and are estimated based on the provided data. There is no trend or variation in the data series. The values are estimated based on the provided data and are estimated based on the provided data. There is no variation in the data series. The values are estimated based on the provided data and are estimated based on the provided data. There is an error bar indicating variability in the data series. The actual values may vary depending on the specific data series. The chart type is a bar chart.1 = SEHR SCHLECHT, 7 = SEHR GUT
| ALTER | 1 | 2 | 3 | 4 | 5 | 6 | 7 | ||||||||
| 18-19 | <28 | 28- | 32 | 33-37 | 38-42 | 43-47 | 48-52 | >52 | |||||||
| 20-24 | <27 | 27- | 31 | 32-36 | 37-41 | 42-46 | 47-51 | >51 | |||||||
| 25-29 | <26 | 26- | 30 | 31-35 | 36-40 | 41-44 | 45-49 | >49 | |||||||
| 30-34 | <25 | 25- | 29 | 30-33 | 34-37 | 38-42 | 43-46 | >46 | |||||||
| 35-39 | <24 | 24- | 27 | 28-31 | 32-35 | 36-40 | 41-44 | >44 | |||||||
| 40-44 | <22 | 22- | 25 | 26-29 | 30-33 | 34-37 | 38-41 | >41 | |||||||
| 45-49 | <21 | 21- | 23 | 24-27 | 28-31 | 32-35 | 36-38 | >38 | |||||||
| 50-54 | <19 | 19- | 22 | 23-25 | 26-29 | 30-32 | 33-36 | >36 | |||||||
| 55-59 | <18 | 18- | 20 | 21-23 | 24-27 | 28-30 | 31-33 | >33 | |||||||
| 60-65 | <16 | 16- | 18 | 19-21 | 22-24 | 25-27 | 28-30 | >30 |
WARTUNG
1. BACK/STOP (RETOUR/STOP)
MANUAL (MODE MANUEL)
TOETSEN
1. BACK/STOP
bar
P6 Cardio Strength | Duration | BPM | |---|---| | 1 | 100 | | 2 | 105 | | 3 | 110 | | 4 | 115 | | 5 | 120 | | 6 | 125 | | 7 | 130 | | 8 | 135 | | 9 | 140 | | 10 | 145 | | 11 | 150 | | 12 | 155 | | 13 | 160 | | 14 | 165 | | 15 | 170 | | 16 | 175 | | 17 | 180 | | 18 | 175 | | 19 | 170 | | 20 | 165 | | 21 | 160 | | 22 | 155 | | 23 | 150 | | 24 | 145 | | 25 | 140 | | 26 | 135 | | 27 | 130 | | 28 | 125 | | 29 | 120 | | 30 | 115 | | 31 | 110 | | 32 | 105 | | 33 | 100 | | 34 | 95 | | 35 | 90 | | 36 | 85 | | 37 | 80 | | 38 | 75 | | 39 | 70 | | 40 | 65 | | 41 | 60 | | 42 | 55 | | 43 | 50 | | 44 | 45 | | 45 | 40 | | 46 | 35 | | 47 | 30 | | 48 | 25 | | 49 | 20 | | 50 | 15 | | 51 | 10 | | 52 | 5 | | 53 | 0 | The chart displays the values of P6 Cardio Strength at various durations. The x-axis represents the duration (in minutes), and the y-axis represents the corresponding P6 Cardio Strength (BPM). There is no additional data series in this image. The chart is labeled 'Duration' on the x-axis.EEN PROGRAMMA OPSLAAN
TASTI FUNZIONE
1. BACK/STOP
bar
P8 Cardio Strength | Duration | BPM | |---|---| | 1 | 100 | | 2 | 105 | | 3 | 110 | | 4 | 115 | | 5 | 120 | | 6 | 125 | | 7 | 130 | | 8 | 135 | | 9 | 140 | | 10 | 145 | | 11 | 150 | | 12 | 155 | | 13 | 160 | | 14 | 165 | | 15 | 170 | | 16 | 175 | | 17 | 180 | | 18 | 175 | | 19 | 170 | | 20 | 165 | | 21 | 160 | | 22 | 155 | | 23 | 150 | | 24 | 145 | | 25 | 140 | | 26 | 135 | | 27 | 130 | | 28 | 125 | | 29 | 120 | | 30 | 115 | | 31 | 110 | | 32 | 105 | | 33 | 100 | | 34 | 95 | | 35 | 90 | | 36 | 85 | | 37 | 80 | | 38 | 75 | | 39 | 70 | | 40 | 65 | | 41 | 60 | | 42 | 55 | | 43 | 50 | | 44 | 45 | | 45 | 40 | | 46 | 35 | | 47 | 30 | | 48 | 25 | | 49 | 20 | | 50 | 15 | | 51 | 10 | | 52 | 5 | | 53 | 0 | The chart displays the values of P8 Cardio Strength at various durations. The x-axis represents the duration in minutes, and the y-axis represents the measured cardio strength in BPM. There is no label for the data series. The chart is labeled 'Duration' but contains only one data point.TECLAS DE FUNCIÓN
1. BACK/STOP
TRANSPORT OCH FÖRVARING 63
TEKNISKA DATA 63
72
58
VÄLKOMMEN TILL TUNTURIS TRÄNINGSVÄRLD!
FUNKTIONSTANGENTER
1. BAKÄT/STOPP
bar
P9 Cardio Climb | Duration | BPM | |---|---| | 1 | 100 | | 2 | 105 | | 3 | 110 | | 4 | 115 | | 5 | 120 | | 6 | 125 | | 7 | 130 | | 8 | 135 | | 9 | 140 | | 10 | 145 | | 11 | 150 | | 12 | 155 | | 13 | 160 | | 14 | 165 | | 15 | 170 | | 16 | 175 | | 17 | 180 | | 18 | 175 | | 19 | 170 | | 20 | 165 | | 21 | 160 | | 22 | 155 | | 23 | 150 | | 24 | 145 | | 25 | 140 | | 26 | 135 | | 27 | 130 | | 28 | 125 | | 29 | 120 | | 30 | 115 | | 31 | 110 | | 32 | 105 | | 33 | 100 | The chart displays a series of BPM values over a duration range from approximately 1 to 30. The data is presented in a single column format with no additional categories or trends. The title 'P9 Cardio Climb' is explicitly labeled above the chart.TRANSPORT OCH FÖRVARING
PAINIKKEET
1. PALAA/LOPETA
QUICK START, TARGET HR, MANUAL, WATT CONTROL,
T-RIDE, PRESET PROGRAMS, OWN TRAININGS ja FITNESS TEST.
4. KÄYTTÄJÄ
KÄYTTÄJÄ-painikkeella avaat KÄYTTÄJÄ-valikon.
natural_image
Technical line drawing of a mechanical device with no visible text or symbols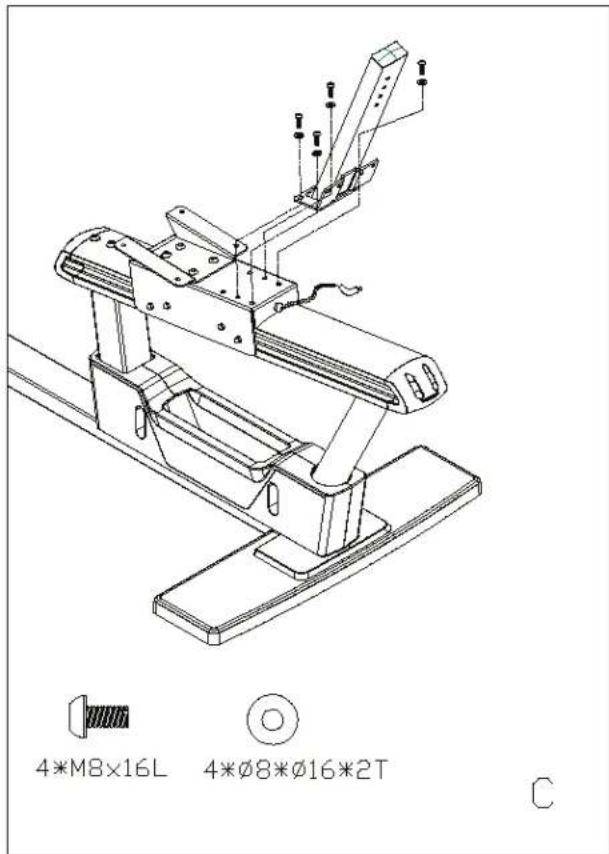
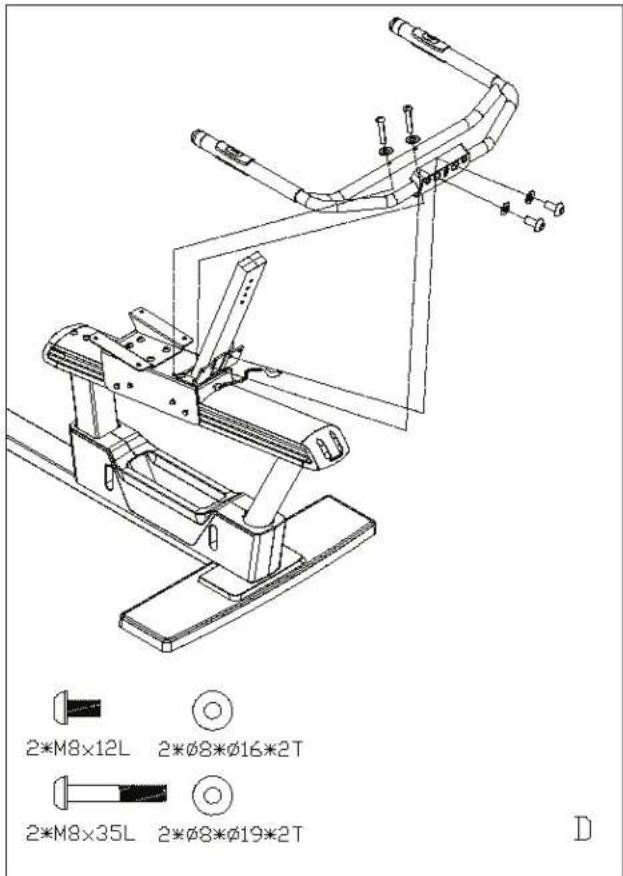
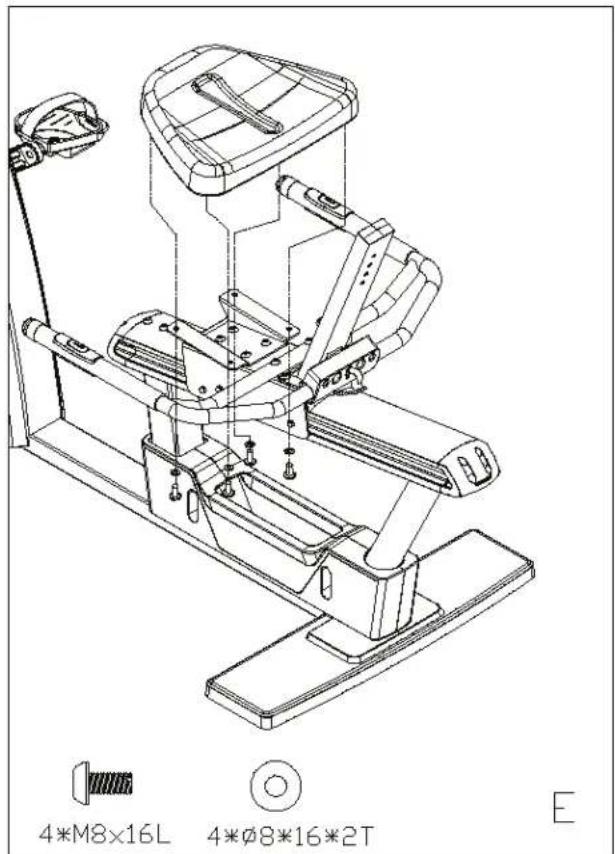
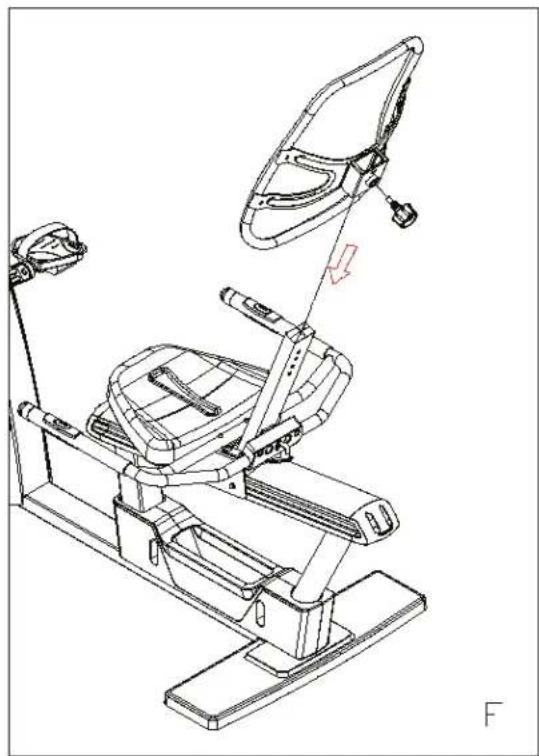
natural_image
Technical line drawing of a stationary exercise chair with overhead mirror and seat (no text or symbols)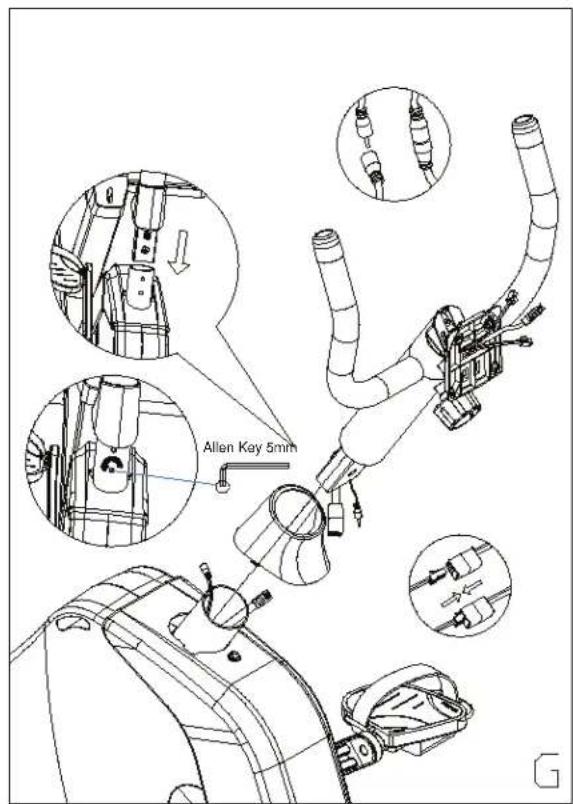
natural_image
Technical line drawing of a mechanical assembly with three views: top view, side view, and bottom view (no text or symbols)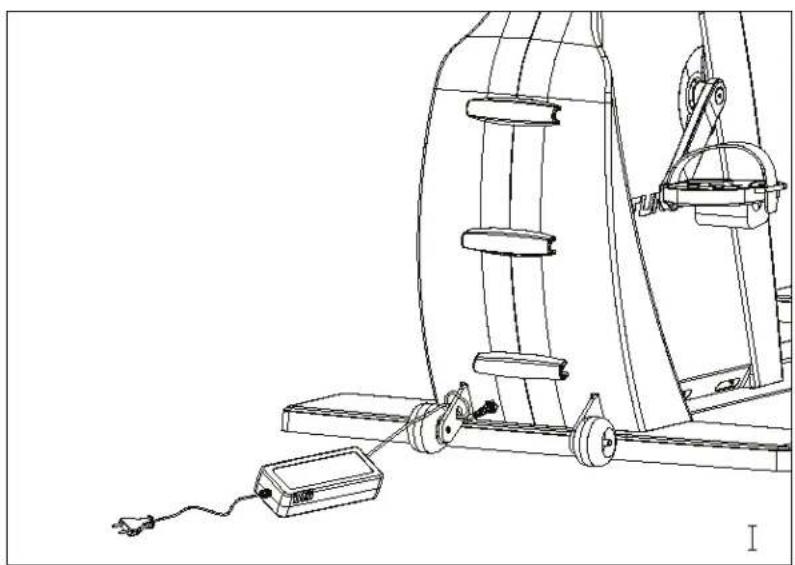
natural_image
Technical line drawing of a mechanical device with pulleys and a power supply (no text or symbols)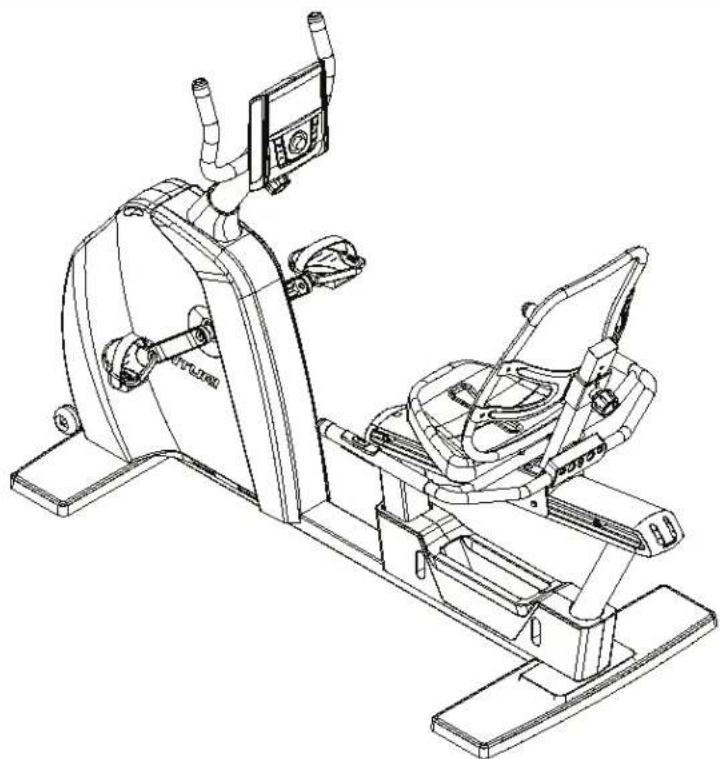
natural_image
Line drawing of a stationary exercise machine with control panel and display (no text or symbols)
PARTS LIST
| 1 Meter 1 | 65 Sensor + wire (incl. part 39,106,118) 1 | |||
| 2 M5x10 DIN 7985 Screw 4 | 66 Snap locking 2 | |||
| 4 Handlebar tightener 1 | 67 Sleeve 2 | |||
| 5 Meter socket seat (incl. part 12-15) 1 | 68 Transportation wheel 2 | |||
| 6 Handle bar post 1 | 69 Meter cable (lower) 1 | |||
| 7 Hand pulse wire (upper) 1 | 70 Hand pulse wire (middle 1) 1 | |||
| 8 Meter cable, upper (incl. part 69) 1 | 71 ø4,2x50 DIN 7981 Screw 3 | |||
| 9 Front handle bar assmby (incl. part 10,11) 1 | 72 Screw 4 | |||
| 10 Foam grip 2 | 73 Plug 4 | |||
| 11 End plug of handle bar 4 | 74 KB 40x14 WN1412 Screw 12 | |||
| 12 Meter socket seat 1 | 75 M5 DIN 125 Flat washer 12 | |||
| 13 M6x46 DIN 912 Screw 1 | 76 El. magnet 1 | |||
| 14 Bushing 2 | 77 EMS flywheel holder 1 | |||
| 15 M6 DIN 985 Nylon nut 1 | 78 Fixing piece 3 | |||
| 16 M8x70 DIN 603 Carriage bolt 1 | 79 M5xP0,8x80L Screw 3 | |||
| 17 Bushing 1 | 80 5 DIN 125 A Flat washer 6 | |||
| 18 Locking nknob 1 | 81 M10xP1,5x20L Screw 4 | |||
| 19 Foot plate 2 | 82 10 DIN 127 Spring washer 4 | |||
| 20 Front & rear foot cover 2 | 83 M5 DIN 934 Screw nut 6 | |||
| 21 Adjusting cushion 4 | 84 EMS flywheel compl. (incl. 54-56,86-90,92) 1 | |||
| 22 Washer for adjusting cushion 4 | 85 Pulley axle 1 | |||
| 23 M8x16 ISO 7380 Screw 24 | 86 Rail end fixed board 1 | |||
| 24 Plastic bushing 1 | 87 ø18/25x1t DIN 988 Flat washer 2 | |||
| 25 M5x14 DIN 7985 Screw 27 | 88 Bearing house 2 | |||
| 26 ø8/16x2t DIN 125 Flat washer 31 | 89 6003 RS Bearing 3 | |||
| 27 Rear support tube 1 | 90 Washer 2 | |||
| 28 Alloy seat rail 1 | 91 Front cover 1 | |||
| 29 Hand pulse wire (middle 2) 1 | 92 One-way bearing set 1 | |||
| 30 Rail fixed plate 1 | 93 Side cover end plug 3 | |||
| 31 Lift handle 2 | 94 Front post cover 1 | |||
| 32 Seat slider 1 | 95 Belt tightener frame + ass set (incl. part 96-104) 1 | |||
| 33 Seat base 1 | 96 Spring 1 | |||
| 34 Spring washer 4 | 97 Screw 1 | |||
| 35 Backrest adjusting rail 1 | 98 Pulley for belt tighener 1 | |||
| 36 Seat height locking knob 1 | 99 M8 DIN 985 Nylon nut 1 | |||
| 37 M5x10 DIN 7985 Screw 2 | 100 ø10/13.5x1t DIN 7603 Flat washer 2 | |||
| 38 M8xP1,25x12L ISO 7380 Screw 2 | 101 Curve washer 1 | |||
| 39 Sensor base 1 | 102 Flat washer 1 | |||
| 40 M8x16 ISO 7380 Screw 2 | 103 ø8/16x1t DIN 125 Flat washer 1 | |||
| 41 M5x25 DIN 7985 Screw 4 | 104 Screw nut 1 | |||
| 42 Seat handlebar 1 | 105 M5x20 DIN 7985 Screw 8 | |||
| 43 Foam grip 2 | 106 Screw 1 | |||
| 44 M6 DIN125 Flat washer 2 | 107 Screw 4 | |||
| 45 Hand pulse set + wire set (incl. part 7,29,47,70) 4 | 108 Rear support tube cover 1 | |||
| 46 Seat handle bar cover 1 | 109 Screw 2 | |||
| 47 Handle pulse wire 1 | 110L Storage box (l) 1 | |||
| 48 Seat 1 | 110RStorage box (r) 1 | |||
| 49 Mesh backrest 1 | 111L Side cover (l) (incl. part 120) 1 | |||
| 50 LR Pedal (r+1) 1 | 111RSide cover (r) 1 | |||
| 51 Drive pulley 1 | 112 M4x10 DIN 7985 Screw 2 | |||
| 52 Crank screw 2 | 113 8 DIN 137 Semi-circuit washer 2 | |||
| 53R Crank (r) with plug 1 | 114 End cap of backrest support tube 1 | |||
| 53L Crank (l) with plug 1 | 115 M6 DIN 985 Nylon nut 1 | |||
| 54 ø18/25x0,3t DIN 988 Flat waher 5 | 116 Spring 1 | |||
| 55 6203 ZZ Bearing 3 | 117 ø3,5x13 DIN 7504-N Screw 2 | |||
| 56 17 DIN 471A Retaining clip 3 | 118 Sensor fixing plate 1 | |||
| 57 Belt 1 | 119 Transformer 26V, EU 1 | |||
| 58 Screw 3 | 120 DC wire 1 | |||
| 59 Drive pulley axle 1 | 121 Screw 3 | |||
| 60 ø17,5x25x0,3t Curve washer 2 | 122 Locking nut 1 | |||
| 61 Frame 1 | 123 M6 DIN125 Flat washer 1 | |||
| 62 Control board 1 | 124 Screw 1 | |||
| 63 Isolated column 3 | 125 Control handle (incl. sleeve) 1 | |||
| 64 M4x20 DIN 7985 Screw 1 | 126 Locking bar cover 1 | |||
| 127 Screw 4 | ||||
| 128 Backrest supporting plate 1 | ||||
| 129 Locking bar compl. (incl. part 115,116,122-125) 1 | ||||
| - Hardware Kit | ||||
| - Owner'S Manual | ||||
| - Warranty Booklet | ||||
| - Label Set | ||||
Benelux
Accell Fitness Benelux
Koningsbeltweg 51
1329 AE ALMERE
The Netherlands
Tel: +31 36 5460050
Fax: + 31 36 5460055
Scandinavia
Accell Fitness Scandinavia
Varusmestarintie 26
20361 TURKU
Finland
Tel: +358 10 2733 200
Fax: +358 2513 313
Germany
Accell Fitness United Kingdom
Boland House
Nottingham South Industrial Estate
Ruddington Lane
Wilford
Nottingham NG11 7EP
United Kingdom
Tel: +44 115 9822844
Fax: +44 115 9817784
North America
Accell Fitness North America Inc.
130 Hayward Ave, Suite 2
N2C 2E4
Kitchener, ON Canada
Tel. 1-888-388-6887
Fax: 1-519-576-2521
www.accellfi tness.com
www.tunturi.com

- IMPORTANT SAFETY INSTRUCTIONS
- NOTE ABOUT YOUR HEALTH
- NOTE ABOUT THE EXERCISING ENVIRONMENT
- NOTE ABOUT USING THE EQUIPMENT
- NOTE ABOUT SAFETY FOR UNITS WITH ELECTRICAL POWER
- ASSEMBLING THE EQUIPMENT
- ADJUSTMENTS
- CORRECT EXERCISE POSITION
- HANDLEBAR SETUP
- CONSOLE INCLINATION ADJUSTMENT
- ADJUSTMENT OF SUPPORT FEET
- EXERCISING
- HEART RATE
- HAND GRIP PULSE MEASUREMENT
- TELEM ETRIC HEART RATE MEASUREMENT
- HEART RATE IN TRAINING
- BEGINNER: 50-60 % of maximum heart-rate.
- TRAINER: 60-70 % of maximum heart-rate
- ACTIVE TRAINER: 70-80 % of maximum heart-rate
- CONSOLE
- BACK/STOP
- ZOOM
- TRAINING
- USER
- SELECTION DIAL
- DISPLAY
- USER MENU
- SELECT/ CHANGE USER
- CREATE USER
- EDIT USER
- DELETE USER
- SETTINGS
- USER LOG
- TRAINING MENU
- QUICK START
- MANUAL
- TARGET HR
- WATT CONTROL
- PROGRAMMES
- P1-P5: WATT CONTROL PROGRAM MES
- P6-P10: HEART RATE CONTROL PROGRAM MES
- T-RIDE™
- OWN TRAINING
- SAVING A PROGRAMME
- USING SAVED PROGRAMMES
- FITNESS TEST
- PREPARING FOR THE TEST
- PERFORMING THE TEST
- M AINTENANCE
- M ALFUNCTIONS
- TRANSPORT AND STORAGE
- TECHNICAL SPECIFICATIONS
- DEUTSCH
- INHALT
- MIT HANDGRIFFSENSOREN
- FUNKTIONSTASTEN
- WARTUNG
- BACK/STOP (RETOUR/STOP)
- MANUAL (MODE MANUEL)
- TOETSEN
- EEN PROGRAMMA OPSLAAN
- TASTI FUNZIONE
- VÄLKOMMEN TILL TUNTURIS TRÄNINGSVÄRLD!
- FUNKTIONSTANGENTER
- BAKÄT/STOPP
- TRANSPORT OCH FÖRVARING
- PAINIKKEET
- PALAA/LOPETA
- KÄYTTÄJÄ
- Benelux
- Scandinavia
- Germany
- North America
Brand : TUNTURI
Model : E60R
Category : Exercise bike