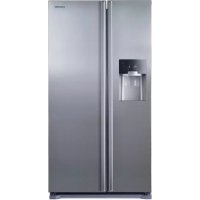
RS7568THCSR - Fridge SAMSUNG - Free user manual and instructions
Find the device manual for free RS7568THCSR SAMSUNG in PDF.


Frequently Asked Questions - RS7568THCSR SAMSUNG
User questions about RS7568THCSR SAMSUNG
0 question about this device. Answer the ones you know or ask your own.
Ask a new question about this device
Download the instructions for your Fridge in PDF format for free! Find your manual RS7568THCSR - SAMSUNG and take your electronic device back in hand. On this page are published all the documents necessary for the use of your device. RS7568THCSR by SAMSUNG.
USER MANUAL RS7568THCSR SAMSUNG
Refrigerator user manual
imagine the possibilities
Thank you for purchasing this Samsung product.
Free Standing Appliance
SAMSUNG
contents
SAFETY INFORMATION 2
- Before operating the appliance, please read this manual thoroughly and retain it at a safe place near the appliance for your future reference.
- Use this appliance only for its intended purpose as described in this instruction manual. This appliance is not intended for use by persons (including children) with reduced physical, sensory or mental capabilities, or lack of experience and knowledge, unless they have been given supervision or instruction concerning use
of the appliance by a person responsible for their safety.
- This appliance can be used by children aged from 8 years and above and persons with reduced physical, sensory or mental capabilities or lack of experience and knowledge if they have been given supervision or instruction concerning use of the appliance in a safe way and understand the hazards involved. Children shall not play with the appliance. Cleaning and user maintenance shall not be made by children without supervision.
English - 2
- Warnings and Important Safety Instructions in this manual do not cover all possible conditions and situations that may occur. It is your responsibility to use common sense, caution, and care when installing, maintaining, and operating your appliance.
- Because these following operating instructions cover various models, the characteristics of your refrigerator may differ slightly from those described in this manual and not all warning signs may be applicable. If you have any questions or concerns, contact your nearest service center or find help and information online at www.samsung.com.
Important safety symbols and precautions :
 | Hazards or unsafe practices that may result in severe personal injury or death. |
 | Hazards or unsafe practices that may result in minor personal injury or property damage. |



text_image
Vertical sequence of icons representing technical or operational symbols, including crossed, hand, star, and pencil.
text_image
Vertical sequence of icons representing technical or operational symbols, including crossed, hand, star, and pencil.
text_image
Vertical sequence of icons representing technical or operational symbols, including crossed, hand, star, and pencil.
text_image
Vertical sequence of icons representing technical or operational symbols, including crossed, hand, star, and pencil.
text_image
Vertical sequence of icons representing technical or operational symbols, including crossed, hand, star, and pencil.
text_image
Vertical sequence of icons representing technical or operational symbols, including crossed, hand, star, and pencil.
text_image
Vertical sequence of icons representing technical or operational symbols, including crossed, hand, star, and pencil.
text_image
Vertical sequence of icons representing technical or operational symbols, including crossed, hand, star, and pencil.
text_image
Vertical sequence of icons representing technical or operational symbols, including crossed, hand, star, and pencil.
text_image
Vertical sequence of icons representing technical or operational symbols, including crossed, hand, star, and pencil.
text_image
Vertical sequence of icons representing technical or operational symbols, including crossed, hand, star, and pencil./
text_image
Vertical sequence of icons representing technical or operational symbols, including crossed, hand, star, and pencil.
text_image
Vertical sequence of icons representing technical or operational symbols, including crossed, hand, star, and pencil.
text_image
Vertical sequence of icons representing technical or operational symbols, including crossed, hand, star, and pencil.
text_image
Vertical sequence of icons representing technical or operational symbols, including crossed, hand, star, and pencil.
text_image
Vertical sequence of icons representing technical or operational symbols, including crossed, hand, star, and pencil.
text_image
Vertical sequence of icons representing technical or operational symbols, including crossed, hand, star, and pencil.
text_image
Vertical toolbar with icons for tools, functions, and applications in Chinese
text_image
Row of eight icons including crossed-out, signal, gear, power plug, star, gear switch, and crossed-out tool
text_image
Vertical sequence of icons representing technical or operational symbols, including crossed, hand, star, and pencil.
text_image
Vertical toolbar with icons for tools, functions, and applications in Chinese
text_image
Vertical sequence of icons representing technical or operational symbols, including crossed, hand, star, and pencil.
text_image
Vertical sequence of icons representing technical or operational symbols, including crossed, hand, star, and pencil.
These warning signs are here to prevent injury to you and others.
Please follow them carefully.
After reading this section, keep it in a safe place for future reference.

SEVERE WARNING SIGNS FOR TRANSPORTATION AND SITE

- When transporting and installing the appliance, care should be taken to ensure that no parts of the refrigerating circuit are damaged.
- Refrigerant leaking from the pipe work could ignite or cause an eye injury. If a leak is detected, avoid any naked flames or potential sources of ignition and air the room in which the appliance is standing for several minutes.
- In order to avoid the creation of a fl ammable gas-air mixture if a leak in the refrigerating circuit occurs, the size of the room in which the appliance may be sited depends on the amount of refrigerant used.
- Never start up an appliance showing any signs of damage. If in doubt, consult your dealer. The room where the refrigerator will be sited must
English - 4
be 1 m ^3 in size for every 8 g of R600a refrigerant inside the appliance.
The amount of refrigerant in your particular appliance is shown on the identification plate inside the appliance.

SEVERE WARNING SIGNS FOR INSTALLATION

- Do not install the refrigerator in a damp place or place where it may come in contact with water.
- Deteriorated insulation of electrical parts may cause an electric shock or fire.
- Do not place this refrigerator in direct sunlight or expose to the heat from stoves, room heaters or other appliance.
- Do not plug several appliances into the same multiple power board. The refrigerator should always be plugged into its own individual electrical which has a voltage rating
that matched the rating plate.
- This provides the best performance and also prevents overloading house wiring circuits, which could cause a fire hazard from overheated wires.
- If the wall socket is loose, do not insert the power plug.
- There is a risk of electric shock of fire.
- Do not use a cord that shows cracks or abrasion damage along its length or at either end.
- Do not bend the power cord excessively or place heavy articles on it.
- Do not use aerosols near the refrigerator.
- Aerosols used near the refrigerator may cause an explosion or fire.

- This refrigerator must be properly installed and located in accordance with the manual before it is used.
- Connect the power plug in proper position with the cord
hanging down.
- If you connect the power plug upside down, wire can get cut off and cause fire or electric shock.
- Make sure that the power plug is not squashed or damaged by the back of the refrigerator.
- When moving the refrigerator, be careful not to roll over or damage the power cord.
- This constitutes a fire hazard.
- The appliance must be positioned so that the plug is accessible after installation.

• The refrigerator must be grounded.
- You must ground the refrigerator to prevent any power leakages or electric shocks caused by current leakage from the refrigerator.
- Never use gas pipes, telephone lines or other potential lightening rods as ground.
- Improper use of the ground plug can result in electric shock.

- If the power cord is damaged, have it replaced immediately by the manufacturer or its service agent.
- The fuse on the refrigerator must be changed by a qualified technician or service company. - Failing to do so may result in electric shock or personal injury.

CAUTION SIGNS FOR INSTALLATION

- Keep ventilation opening in the appliance enclosure or mounting structure clear of obstruction.
- Allow the appliance to stand for 2 hours after installation.
WARNING
SEVERE WARNING SIGNS FOR USING

- Do not insert the power plug with wet hands.
- Do not store articles on the top of the appliance.
- When you open or close the door, the articles may fall and cause personal injury and/or material damage.
- Do not put items filled with water on the refrigerator.
- If spilled, there is a risk of fire or electric shock.
- Do not let children hang on the door.
- Failure to do so may cause serious personal injury.
- Do not leave the doors of the refrigerator open while the refrigerator is unattended and do not let children enter inside of the refrigerator.
- There is a risk of children entrapment and serious personal injury because of low temperature.
- Never put fingers or other objects into the dispenser hole.
- Failure to do so may cause personal injury or material damage.
- Do not store volatile or fl ammable substances such as benzene, thinner, alcohol, ether or LP gas in the refrigerator.
- The storage of any of such products may cause explosions.

- Do not store low temperature-sensitive pharmaceuticals products, scientific materials or other low temperature-sensitive products in the refrigerator.
- Products that require strict temperature controls must not be stored in the refrigerator.
- Do not place or use electrical appliance inside the refrigerator, unless they are of a type recommended by the manufacturer.
- Do not use a hair dryer to dry the inside of the refrigerator. Do not place a lighted candle in the refrigerator for removing bad odors.
- This may result in electric shock or fire.
- Do not touch the inside walls of the freezer or products stored in the freezer with wet hands.
- This may cause frostbite.
- Do not use mechanical devices or any other means to accelerate the defrosting process, other than those recommended by the manufacturer.
- Do not damage the refrigerant circuit.

- This product is intended only for the storage of food in a domestic environment.
- Bottles should be stored tightly together so that they do not fall out.
- If a gas leak is detected, avoid any naked flames or potential sources of ignition and air the room in which the appliance is standing for several minutes.
- Use only the LED Lamps provided by manufacturer or service agents.
• Children should be supervised to ensure that they do not play with and/or
climb into the appliance.

- Do not disassemble or repair the refrigerator by yourself.
- You run risk of causing a fire, malfunction and/or personal injury.
In case of malfunction, please contact your service agents.

- If the appliance generates a strange noise, a burning or smell or smoke, unplug the power plug immediately and contact your nearest service center.
- Failing to do so may result in electric or fire hazards. Keep ventilation opening in the appliance enclosure or mounting structure clear of obstruction.
- If you experience diffi culty when changing the light, contact service agents.
-
If the products equipped with LED Lamp, do not disassemble Lamp Cover and LED Lamp by yourself.
-
Please contact your service agents.
- If any dust or water is in refrigerator, pull out power plug and contact your Samsung Electronics service center.
- There is a risk of fire.

CAUTION SIGNS FOR USING

• To get best performance of product,
- Do not place foods too closely in front of the vents at the rear of the appliance as it can obstruct free air circulation in the refrigerator compartment.
- Wrap the food up properly or place it in airtight containers before put it into the refrigerator.
- Do not place carbonated or fizzy drinks in the freezer compartment. Do not put bottles or glass containers in the freezer.
- When the contents freeze, the glass may break and
cause personal injury and property damage.
- Do not change the functionality of or modify the refrigerator.
- Changes or modifi cations may result in personal injury and/or property damage. Any changes or modifi cations performed by a 3 rd party on this completed appliance is neither covered under Samsung warranty service, nor is Samsung responsible for safety issues and damages that result from 3 rd party modifi cations.
- Do not block air holes.
- If the air holes are blocked, especially with a plastic bag, the refrigerator can be over cooled. If this cooling period lasts too long, the water filter may break and cause water leakage.
- Do not put any newly introduced food for freezing near to already food.
- Please observe maximum storage times and expiry dates of frozen goods.
- Fill water tank, ice tray, water cubes only with
potable water.
- Use only the ice maker provided with the refrigerator.
- The water supply to this refrigerator must only be installed/connected by a suitably qualified person and connect to a potable water supply only.
- In order to operate the ice maker properly, water pressure of 138 \~ 862 kPa(19.9 \~ 125.1 psi) is required.

CAUTION SIGNS FOR CLEANING AND MAINTENANCE

- Do not directly spray water inside or outside the refrigerator.
- There is a risk of fire or electric shock.
- Do not spray infl ammable gas near the refrigerator.
- There is a risk of explosion or fire.
- Do not spray cleaning products directly on the
display.
- Printed letters on the display may come off.
- Remove any foreign matter or dust from the power plug pins.
But do not use a wet or damp cloth when cleaning the plug, remove any foreign material or dust from the power plug pins.
- Otherwise there is a risk of fire or electric shock.
- Never put fingers or other objects into the dispenser hole and ice chute.
- It may cause personal injury or material damage.

- Unplug the refrigerator before cleaning and performing maintenance.

SEVERE WARNING SIGNS FOR DISPOSAL

- Ensure that none of the pipes on the back of the appliance are damaged prior to disposal.
- R600a or R134a is used as a refrigerant.
Check the compressor label on the rear of the appliance or the rating label inside the refrigerator to see which refrigerant is used for your refrigerator.
When this product contains fl ammable gas (Refrigerant R600a), contact your local authority in regard to safe disposal of this product.
Cyclopentane is used as a insulation blowing gas.
The gases in insulation material require special disposal procedure.
Please contact your local authorities in regard to the environmentally safe disposal of this product.
Ensure that none of the pipes on the back of the appliances are damaged prior to disposal.
The pipes shall be broke in the open space.
- If the appliance contains isobutane refrigerant (R600a), a natural gas with high environmental compatibility that is, however, also combustible.
When transporting and installing the appliance, care should be taken to ensure that no parts of the refrigerating circuit are damaged.
- When disposing of this product or other refrigerators, remove the door/door seals, door latch so that small children or animals cannot become trapped inside.
Leave the shelves in place so that children may not easily climb inside.
Children should be supervised to ensure that they do not play with the old appliance.
- Please dispose of the packaging material for this product in an environmentally friendly manner.

ADDITIONAL TIPS FOR PROPER USAGE
- In the event of a power failure, call the local office of your Electricity Company and ask how long it is going to last.
- Most power failures that are corrected within an hour or two will not affect your refrigerator temperatures. However, you should minimize the number of door openings while the power is off.
- Should the power failure last more than 2 hours, remove all ice in the Ice Bucket.
- Should the power failure last more than 24 hours, remove all frozen food.
- If keys are provided with the refrigerator, the keys should be kept out of the reach of children and not in vicinity of the appliance.
- The appliance might not operate consistently (possibility of temperature becoming too warm in refrigerator) when sited for an extended period of
time below the cold end of the range of temperature for which the refrigerating appliance is designed.
- Do not store food which spoils easily at low temperature, such as bananas, melons.
- Your appliance is frost free, which means there is no need to manually defrost your appliance, as this will be carried out automatically.
- Temperature rising during the defrost can comply with ISO requirement. But if you want to prevent an undue rise in the temperature of the frozen food while defrosting the appliance, please wrap the frozen food in several layers of newspaper.
- Any increase in temperature of frozen food during defrosting can shorten its storage life.
Saving Energy Tips
- Install the appliance in a cool, dry room with adequate ventilation.
Ensure that it is not exposed to direct sunlight and never put it near a direct source of heat (radiator, for example).
- Never block any vents or grilles on the appliance.
- Allow warm food to cool down before placing it in the appliance.
- Put frozen food in the refrigerator to thaw.
You can then use the low temperatures of the frozen products to cool food in the refrigerator.
- Do not keep the door of the appliance open for too long when putting food in or taking food out.
The shorter time for which the door is open, the less ice will form in the freezer.
- Clean the rear of the refrigerator regularly.
Dust increases energy consumption.
- Do not set temperature colder than necessary.
- Ensure sufficient air exhaust
at the refrigerator base and at the back wall of the refrigerator.
Do not cover air vent openings.
- Allow clearance to the right, left, back and top when installing.
This will help reduce power consumption and keep your energy bills lower.
- For the most efficient use of energy, please keep the all inner fittings such as baskets, drawers, shelves on the position supplied by manufacturer.
setting up your side-by-side refrigerator
GETTING READY TO INSTALL THE REFRIGERATOR
Congratulations on the purchase of your Samsung Side-By-Side Refrigerator. We hope you will enjoy the many state-of-the-art features and effi ciencies that this new appliance has to offer.
Selecting the best location for the refrigerator
- Select a location with easy access to the water supply.
- Select a location without direct exposure to sunlight.
- Select a location with level (or nearly level) flooring.
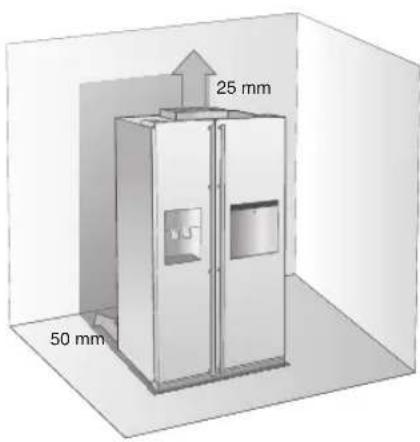
- Select a location with enough space for the refrigerator doors to open easily.
- Overall space required in use. Refer to drawing and dimension as below.
- Please ensure that appliance can be moved freely in the event of maintenance & service.
text_image
25 mm 50 mm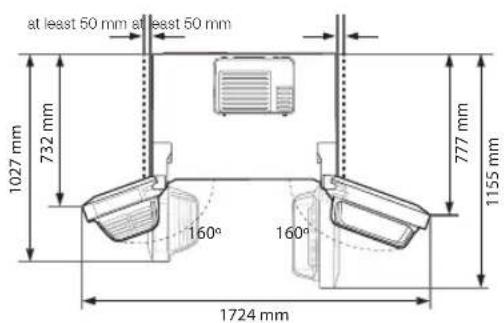
text_image
at least 50 mm at least 50 mm 1027 mm 732 mm 160° 160° 777 mm 1155 mm 1724 mm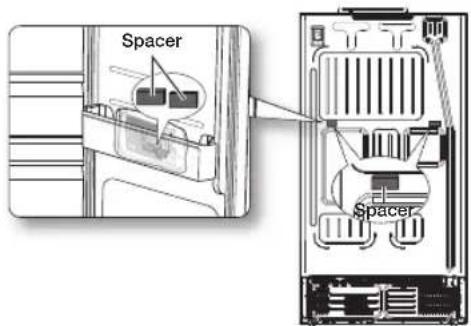
text_image
Spacer Spacer
Spacer(gray block) installation For better performance, please certainly fix the spacer on the rear of unit when installing the refrigerator. It is improving refrigerator performance.
Assembly Method
- Take out packed spacer from the lowest guard of the fridge.
- Check assembly location at the rear of Refrigerator like picture
- Locate spacer assembly location and put spacer on the rear plate of Refrigerator.
When moving your refrigerator
To prevent floor damage be sure the front levelling legs are in the up position (above the floor).
Refer to ‘Levelling the refrigerator’ in the manual (at page 19).
To protect the fi nish of the flooring, place the protection sheet such as packing carton under the refrigerator.
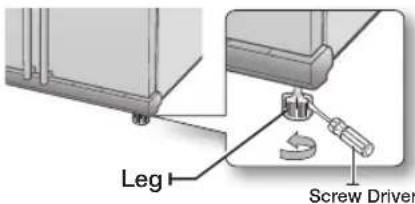
text_image
Leg Screw DriverCAUTION
When installing, servicing or cleaning behind the refrigerator, be sure to pull the unit straight out and push back in straight after finishing.
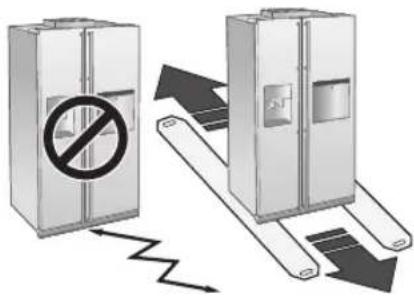
text_image
Diagram showing two refrigerators with a prohibition symbol and downward arrows indicating movement or safety, likely illustrating a hazard or hazard in refrigerator safety.English - 15
text_image
SETTING UPREMOVING THE REFRIGERATOR DOORS
If your entrance won't allow the refrigerator to pass easily through it, you can remove the doors.
1. Removing the Front Leg Cover
First, open both the freezer and refrigerator doors, and then take off the front leg cover by removing the three screws counter-clockwise.
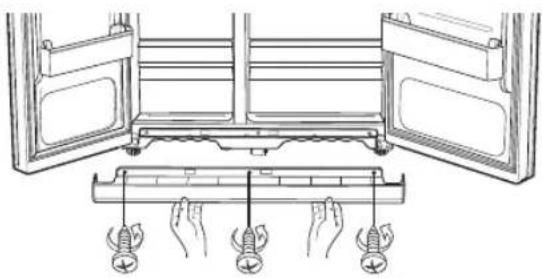
natural_image
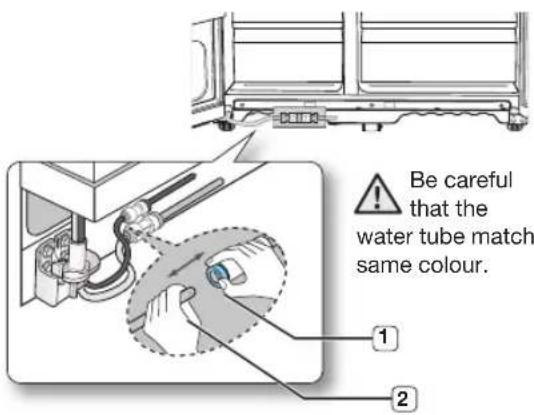
Technical line drawing of a door frame with two doors open and three hands holding screwdrivers (no text or symbols)Separating the Water Supply Line from the Refrigerator
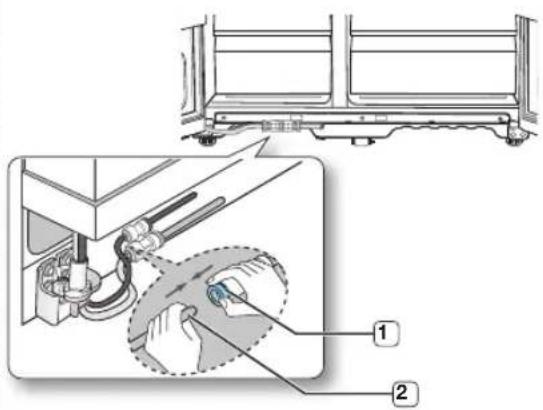
- Remove the water line by pressing the coupler 1 and pulling the water line 2 away.
text_image
Be careful that the water tube match same colour. 1 22. Removing the freezer door
A few things to mention first.
• Make sure that you lift the door straight up so the hinges are not bent or broken.
- Be careful not to pinch the water tubing and wire harness on the door.
- Place doors on a protected surface to prevent scratching or damage.
- With the Freezer door closed, remove the upper hinge cover ① using a screwdriver, and then disconnect the wires by gently pulling them apart ②.
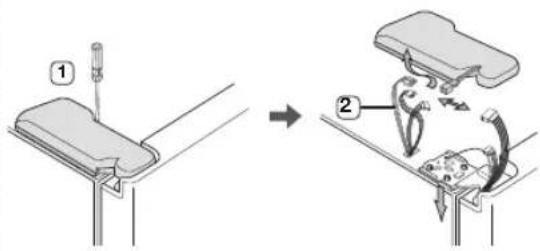
text_image
Diagram illustrating a mechanical assembly process with labeled parts and directional arrows indicating motion or movement.- Remove hinge screws 3 by turning counterclockwise, and take off the upper hinge 4. Be careful that the door does not fall on you as you are removing it.
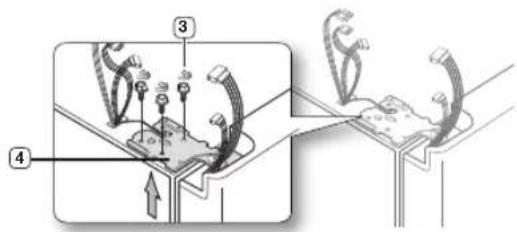
text_image
Diagram illustrating a mechanical or fluidic process with labeled components and directional arrows indicating flow or movement.- Next, remove the door from the lower hinge 5 by carefully lifting the door straight up 6

text_image
Technical diagram showing mechanical assembly with numbered components, likely illustrating a valve or clamp mechanism.Be careful not to pinch the water tubing and wire harness on the door.
- Remove the lower hinge 7 from the bracket 8 by gently lifting the lower hinge upwards.

text_image
7 8Removing the Fridge Door
- With the door closed, remove the upper hinge cover 1 using a screwdriver.
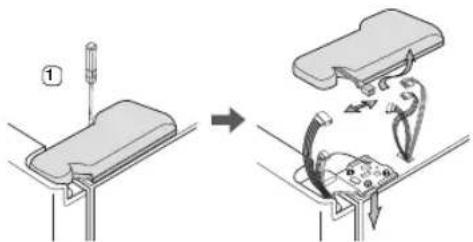
text_image
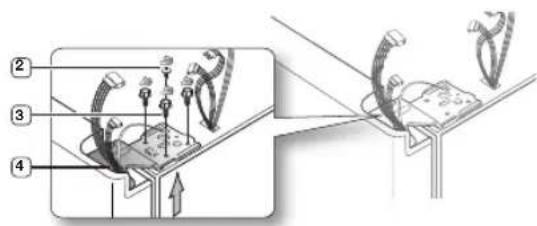
Diagram illustrating a mechanical assembly process with labeled components and directional arrows indicating motion or movement.- Remove hinge screws ② and the ground screw ③ by turning counter-clockwise, and take off the upper hinge ④. Be careful that the door does not fall on you as you are removing it
text_image
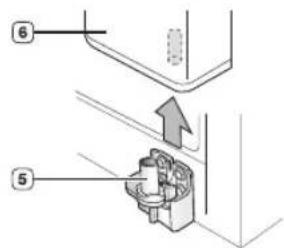
Technical diagram showing mechanical assembly steps with numbered components and directional arrows indicating motion or movement.- Remove the door from the lower hinge 5 by lifting the door straight up 6.
text_image
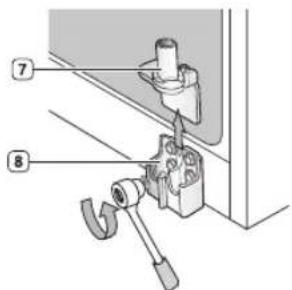
Technical diagram showing mechanical assembly with numbered components and an upward arrow indicating motion or force- Remove the lower hinge 7 from the bracket 8 by gently lifting the lower hinge upwards.
text_image
Technical diagram showing mechanical assembly with numbered components labeled 7 and 8REATTACHING THE REFRIGERATOR DOORS
Once you have safely placed your refrigerator where you plan for it to stay, it is time to put the doors back on.
Reattaching the Freezer Door
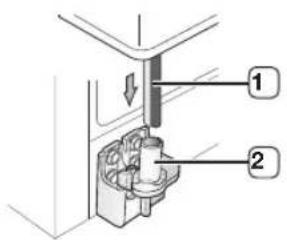
- Replace the freezer door by inserting the water line ① back into the lower corner of the door and then into the hole on the lower hinge ②. Gently pull the water line back down so that it runs straight, with no kinks or bends.
text_image
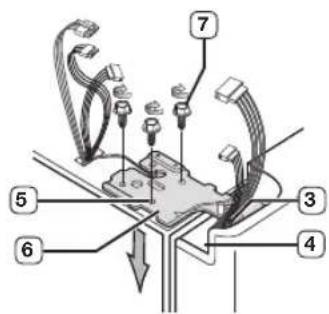
Technical diagram showing a mechanical assembly with labeled parts 1 and 2- Insert the upper hinge shaft 3 into the hole on the corner of the freezer door 4. Make sure the hinge is level between the upper hinge hole 5 and the hole of the cabinet 6 and reattach the hinge screws 7 by turning in a clockwise direction.
text_image
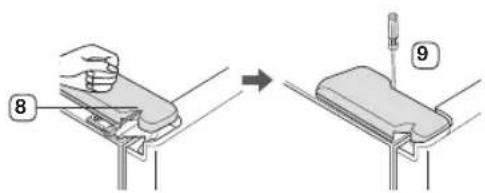
Diagram of a mechanical or electrical component with numbered parts labeled 3 through 7, showing connections and assembly.- Place the front part of the upper hinge cover 8 on the front of the upper hinge 9 and reattach with the screw.
text_image
Diagram showing a hand holding a device with labeled parts 8 and 9, illustrating a process to switch or adjust the device.Reattaching the Fridge Door
- Insert the lower hinge ① back into the lower hinge bracket ②

text_image
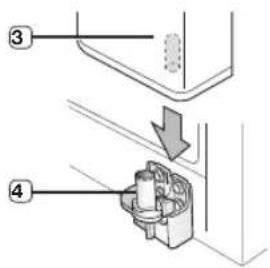
Technical diagram showing mechanical assembly with labeled parts 1 and 2, including a pipe fitting and adjustment mechanism.- Fit the hole in the corner of the fridge door 3 over the lower hinge 4.
text_image
Technical diagram showing mechanical assembly with labeled parts 3 and 4, including a downward arrow indicating motion or force.- Insert the upper hinge shaft into the hole on the hinge 6. Make sure the hinge is level between the upper hinge hole and the hole on the top of the cabinet 8. Then, reattach hinge screws and the ground screw by turning it in a clock wise direction.

text_image
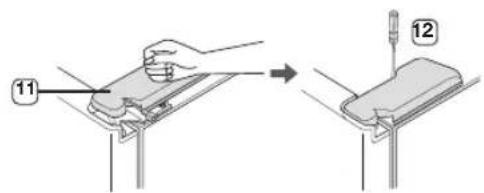
Diagram of a device with numbered components, likely illustrating a mechanical or electrical assembly.- Place the front part of the upper hinge cover 11 on the front of the upper hinge 12 and reattach it with the screw.
text_image
Diagram showing a hand holding a component labeled 11 before and after assembly, with parts 12 and numbered annotations.Reattaching the Water Supply Line
- Insert the water line 2 into the coupler 1
text_image
Technical diagram showing mechanical assembly with labeled parts, including a zoomed-in view of a component being inserted.-
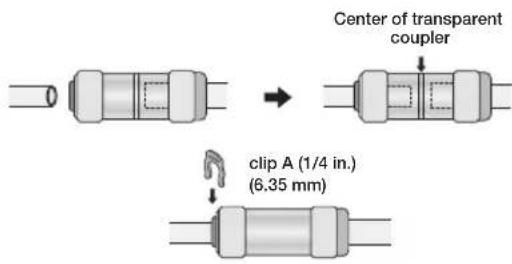
The Water Line must be fully Inserted to the center of transparent coupler to prevent water leakage from the dispenser.
-
Insert the 2 clips in the install pack and check that each clip holds the line firmly.
text_image
Center of transparent coupler clip A (1/4 in.) (6.35 mm)
Do not cut the water line.
Gently separate it from the coupler.
Reattaching the Front Leg Cover

Before attaching the cover, check water connector for leakage.
Replace the front leg cover by turning the three screws clockwise, as shown in the figure.
Now that the doors are back on the refrigerator, you will want to make sure the refrigerator is level so you can then make fi nal adjustments. If the refrigerator is not level, it will not be possible to get the doors perfectly even.
The front of the refrigerator is also adjustable.
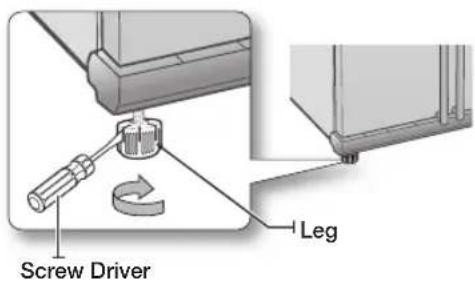
When the Freezer door is lower than the fridge
Insert a fl at-blade screwdriver into a notch on the Leg, turn it clockwise or counter clockwise to level the freezer.
text_image
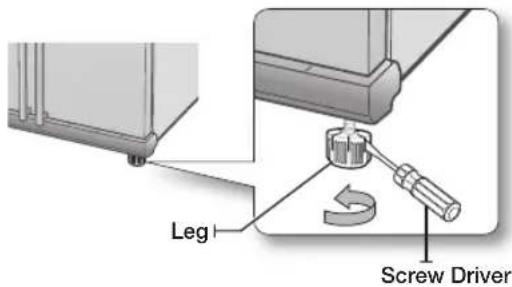
Screw Driver LegWhen the Freezer door is higher than the fridge
Insert a fl at-blade screwdriver into a notch on the Leg, turn it clockwise or counter clockwise to level the fridge.
text_image
Leg Screw DriverRefer to the next section for the best way to make very minor adjustments to the doors.
MAKING MINOR ADJUSTMENTS TO THE DOORS
Remember, a level refrigerator is necessary for getting the doors perfectly even. If you need help, review the previous section on levelling the refrigerator.
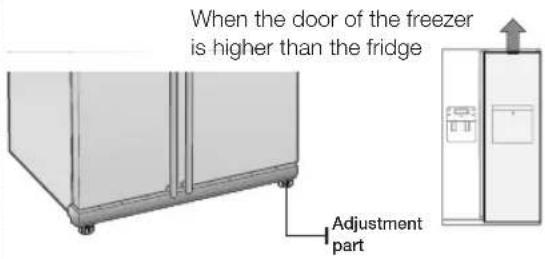
text_image
When the door of the freezer is higher than the fridge Adjustment partIn the process for adjusting both the doors is the same. Open the doors and adjust them, one at a time, as follows:
- Unscrew the nut 1 from the lower hinge until it reaches the upper end of the bolt 2
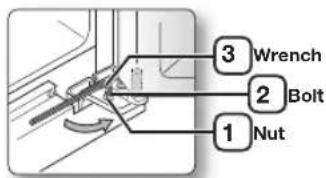
text_image
3 Wrench 2 Bolt 1 NutWhen you release the nut 1 make sure that you use the Allen wrench provided 3 to loosen the bolt 2 in a counter-clockwise direction. You should then be able to unscrew the nut 1 with your fingers.
- Adjust the height difference between the doors by turning the bolt 2 clockwise or counter clockwise
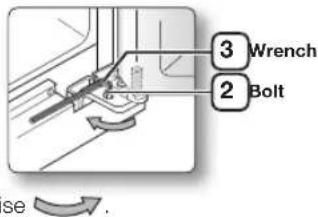
text_image
3 Wrench 2 Bolt seWhen you turn clockwise, the door will move up.
- After adjusting the doors, turn the nut 1 clockwise until it reaches the lower end of the bolt, then tighten the bolt ag the nut in place 1

text_image
3 Wrench 2 Bolt 1 Nut pain with the wrench 3 to fix xIf you do not secure the nut firmly, the bolt may release.
CHECKING THE WATER DISPENSER LINE (OPTIONAL)
A water dispenser is just one of the helpful features on your new Samsung refrigerator. To help promote better health, the Samsung water filter removes unwanted particles from your water. However, it does not sterilize or destroy microorganisms. You will need to purchase a water purifying system to do that. In order for the icemaker to operate properly, water pressure of 138\~862 kPa is required. Under normal conditions, a 170 cc paper cup can be filled in 10 seconds. If the refrigerator is installed in an area with low water pressure (below 138 kPa), you can install a booster pump to compensate for the low pressure. Make sure the water storage tank inside the refrigerator is properly filled. To do this, press the water dispenser lever until the water runs from the water outlet. When using the Water Dispenser, Slight noises can be generated from supplying water.

Water Line installation Kits are included. You can find it in one of the freezer drawers.
USING THE ICE MAKER (OPTIONAL)
(RS77\*, RS54H\*, RS76\*) To Remove the Ice Bucket
- Hold the handle as shown in figure1.
- Slightly pull up the bottom part.
- Take out the ice bucket slowly.
To Refi t The Ice Bucket
- Assemble it in the reverse order of disassembly.
- Push the bucket in firmly until you hear a clicking sound.
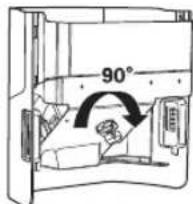
- When the bucket does not fit into its place, turn the gear handle on its back by 90 degrees and reinstall it again as shown in figure 2.
Normal Operation
- Any sounds you hear when the ice maker dumps ice into the bucket are part of normal operation.
- Not dispensing ice for long periods may cause ice clumps in the ice bucket. Remove the remaining ice and empty the bucket.
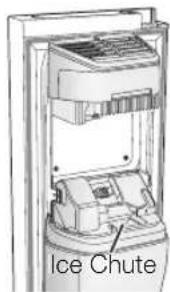
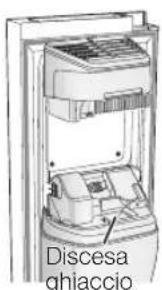
- When ice does not come out, Check for any ice stuck in the chute and remove it.
- The first batch of ice cubes may be small due to air in the pipe after connection, any air will be purged during normal use.
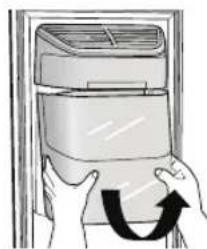
natural_image
Illustration of hands installing or adjusting a device into a container (no text or symbols visible)Figure1
text_image
90°Figure2
text_image
Ice Chute
- When ICE OFF blinks on the display panel, reinsert the bucket and/or make sure it's installed properly.
- When the door is open, the ice and water dispenser do not work.
- If you close the door hard, it may cause water spilling over the ice maker.
- To prevent dropping the ice bucket, use both hands when removing it.
- To prevent injury, be sure to clean up any ice or water that may have dropped on the floor.
- Do not let children hang on the ice dispenser or on the bucket. They may get hurt.
- Be sure not to put your hand or any object into the ice chute.
It may cause personal injury or damage mechanical parts.
Check the amount of water supplied to the ice tray.
(RS7547\* / RS755\* / RS756\* / RS757\*)
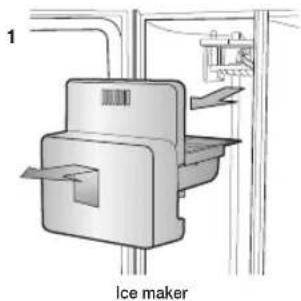
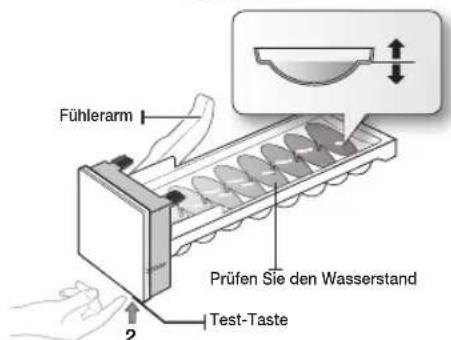
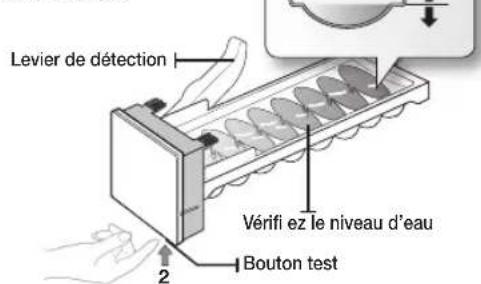
- Lift up the icemaker cover and gently pull out.
- When you press the Test button for 3 seconds, the ice cube container is filled with water from the water supply tap. Check to make sure the amount of water is correct (see the illustration below).
If the water level is too low, the ice cubes will be small. This is a water pressure problem from with in the main water pipes, not the refrigerator.
text_image
1 Ice maker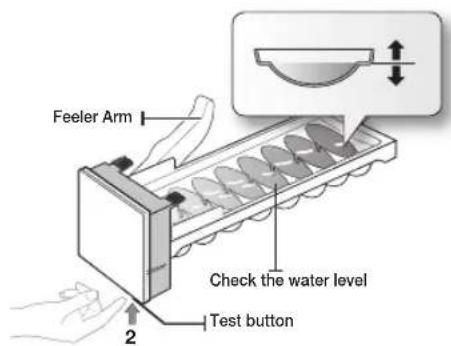
text_image
Feeler Arm Check the water level Test button 2English - 20
INSTALLING THE WATER DISPENSER LINE
For Interior model
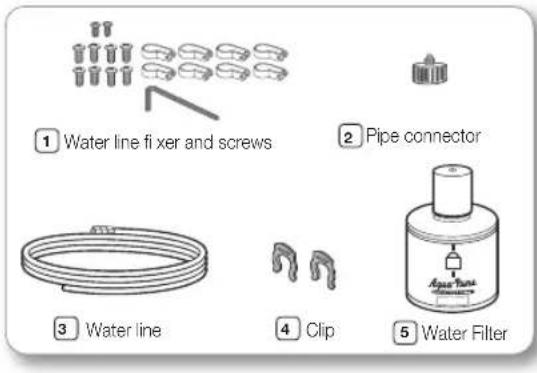
Parts for water line Installation
text_image
① Water line fixer and screws ② Pipe connector ③ Water line ④ Clip ⑤ Water FilterConnecting to the water supply line
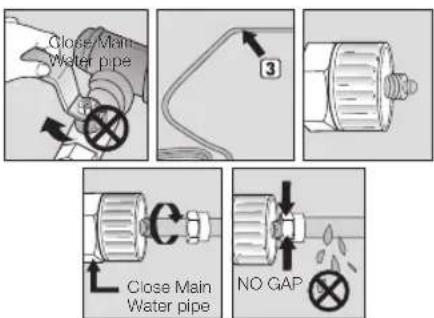
- first, shut off the main water supply line.
- locate the nearest cold, drinking water line.
- follow the Water line Installation Instructions in the installation kit.
CAUTION
The water line must be connected to the cold water pipe. If it is connected to the hot water pipe, it may cause the purifier to malfunction.
text_image
Close Main Water pipe 3 Close Main Water pipe NO GAP- After connecting the water supply to the water filter, turn your main water supply back on and dispense about 1 L to clear and prime the water filter.
Connecting the water line to the refrigerator
- Remove the dust cap from the water line on the rear of the unit and fit a compression nut from the install kit.
-
Remove the water pipe from the install kit and fi t a compression nut to one end.
-
Join the two pipes together using the compression joint from the install kit ensuring that the joint is water tight.
- Join the other end of the install pipe to the main water supply and turn on the water to check for leaks.
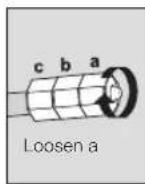
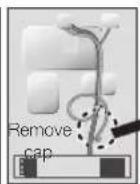
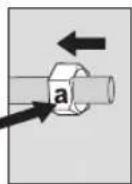
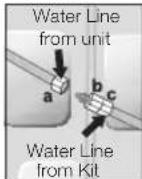
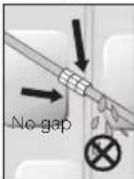
Only connect the water line to a drinkable water source. If you have to repair or disassemble the water line, cut off 6.5mm of the plastic tubing to make sure you get a snug, leak-free connection.
CAUTION Before being used, the leakage in these places should be examined
- Samsung Warranty does not cover WATER LINE INSTALLATION.
- The cost of connection to a water supply is at the customer expense, unless included in the delivery charge (refer to the delivery agreement with the seller)
- Please contact Plumber or Authorized Installer for the installation if needed.
- If Water leakage occurs due to improper installation, Please contact installer.
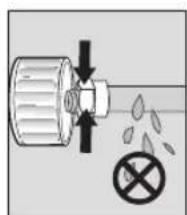
natural_image
Diagram of a mechanical valve or pump with directional arrows and a prohibition symbol (no text or labels)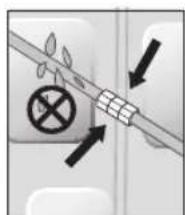
text_image
Diagram showing a mechanical or electrical component with directional arrows and a cross symbol, likely indicating movement or force.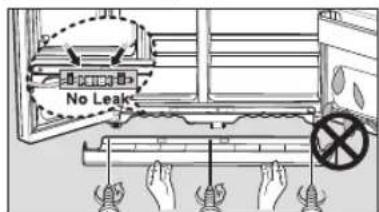
text_image
No LeakRemove any residual matter inside the purifi er. (Model with the coolselect zone)
- Turn ON the main water supply.
- Run water through the dispenser until the water runs clear (approximate 3 liter).

The initial dark discoloration of water and ice is normal
INSTALLING THE WATER DISPENSER LINE
For Exterior model
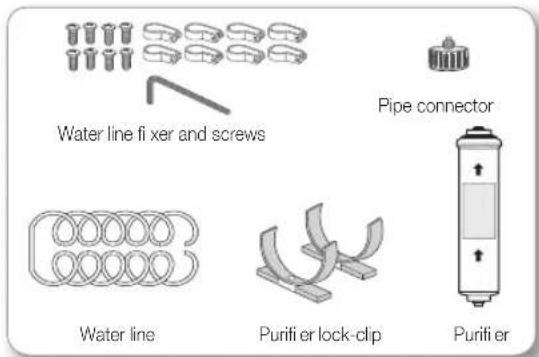
Parts for water line Installation
text_image
Water line fixer and screws Pipe connector Water line Purifier lock-clip PurifierConnecting to the water supply line
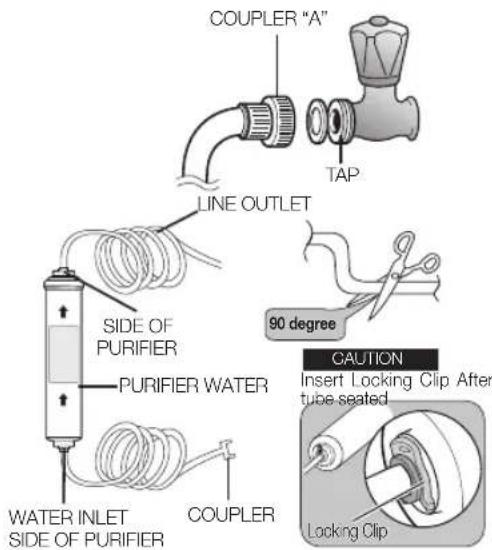
Connect the water pipe with coupler and tap.
- Close the main water tap.
- Connect coupler "A" to the tap.
CAUTION
The water line must be connected to the cold water pipe. If it is connected to the hot water pipe, it may cause the purifi er to malfunction.
WARRANTY INFORMATION
This water line installation is not covered by the refrigerator or ice maker manufacturer's warranty. Follow these instructions carefully to minimise the risk of expensive water damage.
Note:
If the coupler does not fit on the current tap, go the nearest authorized service dealer and purchase the right couplers fittings.
select the location where the purifi er is to install. (Model with the purifi er)
- If you wish to reassemble the water inlet and outlet sides of the purifi er during purifi er installation, see the reference illustration.
- Cut the water line attached to the purifi er to the appropriate place after measuring the distance between the purifi er and the cold water tap.
text_image
COUPLER "A" TAP LINE OUTLET SIDE OF PURIFIER PURIFIER WATER 90 degree CAUTION Insert Locking Clip After tube seated WATER INLET SIDE OF PURIFIER COUPLER Locking ClipRemove any residual matter inside the purifi er. (Model with the purifi er)
- Open the main water tap to check whether water is running through the water tube on the water inlet side of the purifier.
- If water does not come out through the line, check whether the tap is open.
- Leave the tap open until clean water is running out and any residual matter that built up during manufacturing has been removed.
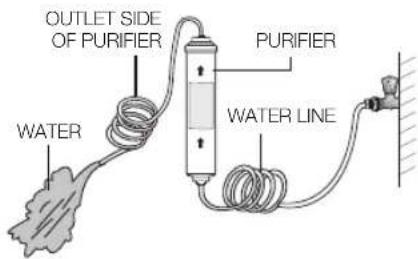
text_image
OUTLET SIDE OF PURIFIER PURIFIER WATER LINE WATER
The initial dark discoloration of water and ice is normal
Attach the purifi er lock-clip.
- Hold the purifi er lock-clip in the appropriate position (under the sink for example) and fi x it tightly into place where to screw.
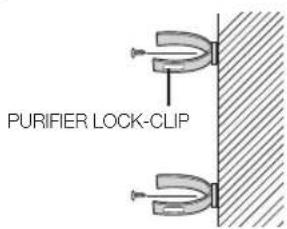
text_image
PURIFIER LOCK-CLIP
Do not fix the purifier on the refrigerator or rear of refrigerator, it may cause material damage.
Secure the purifier in position.
- Fix the purifier in position, as shown in the figure on the right.
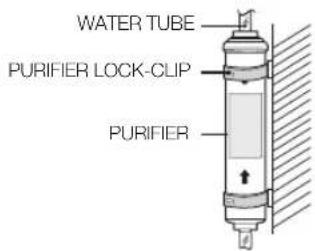
text_image
WATER TUBE PURIFIER LOCK-CLIP PURIFIERConnect the water line to the refrigerator.
- Remove the compressor cover of the refrigerator.
- Connect the water line to the valve, as shown in the figure.
- When connected, check if there is any leakage. If any, repeat the connection.
- Reattach the compressor cover of the refrigerator.
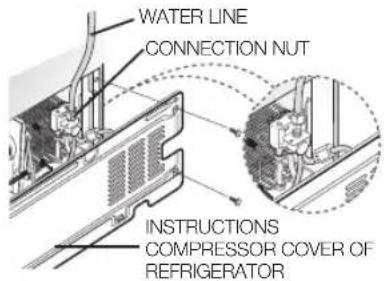
text_image
WATER LINE CONNECTION NUT INSTRUCTIONS COMPRESSOR COVER OF REFRIGERATORSecure the water line.
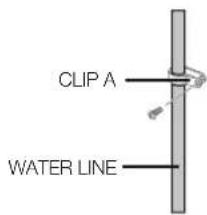
- Using clip "A", fi x the water line to the wall (the back of refrigerator).
- When the water line is secure, make sure whether the water line is not excessively bent, pinched or squashed.
text_image
CLIP A WATER LINERemoving any residual matter inside the water supply line after installing fi Iter.
- Turn ON the main water supply & turn OFF the valve to the water supply line.
- Run water through the dispenser until the water runs clear (approximate 3 liter). This will clean the water supply system and remove air from the lines.
- Additional fl ushing may be required in some households.
- Open the refrigerator door and make sure there are no water leaks coming from the water filter.

A newly installed water filter cartridge may cause water to briefy spurt from the water dispenser. This is due to air getting into the line. It should pose no problem to operation.
operating the SAMSUNG side-by-side refrigerator
text_image
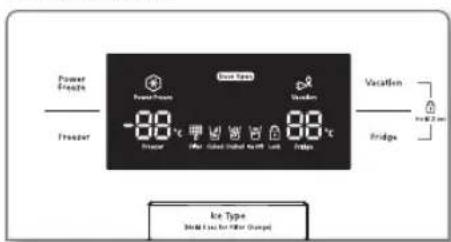
1 2 3 4 Freezer Power Freezer Freezer 8 -88 °C Vacation Vacation Fridge Vaccation Fridge 5 6 7 Ice Type (No MI less for Ice Changed) 9" Smart EcoDISPENSER MODEL
text_image
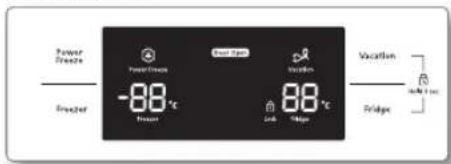
Power Freeze Freezer -80°C Refriger Water Cafe Air Cafe Lack Fridge Vaccation Bridge 4 mm Ice Type Shelf Ice for Filter (Change)NORMAL MODEL
text_image
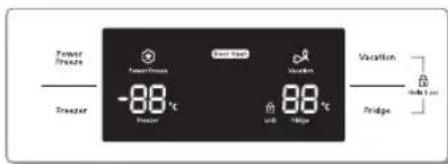
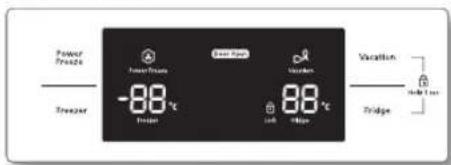
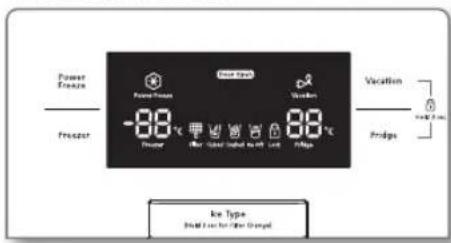
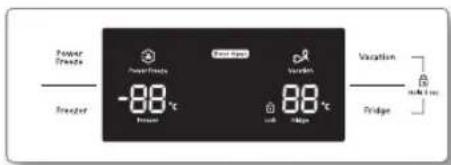
Power Freeze Firejet -88°C Firewood Fire type Vacation Link Ridge Vacation Bridge min 1 sec| POWER1 FREEZEBUTTON | Speeds up the time needed to freeze products in the freezer. This can be helpful if you need to quickly freeze items that spoil easily or if the temperature in the freezer has warmed dramatically (For example, if the door was left open). |
| 2 FREEZERBUTTON | Press the Freezer button to set the freezer to your desired temperature, You can set the temperature between -15 °C (6 °F) and -23 °C (-10 °F). |
| 3 ICE TYPE BUTTON | Use this button to choose Cubed, Crushed or to turn the Ice feature off. Note that Ice Maker Off mode will be deactivated if you press and hold the ice lever (marked "ICE" on the lever) for more than 5 seconds. |
| 4 FILTER CHANGE BUTTON | When you change the fi lter, press this button for 3 seconds to reset the fi lter schedule. |
| 5 VACATION BUTTON | If you are going on vacation or business trip or you do not need to use the refrigerator, press the Vacation button. When you select vacation button for fridge compartment off, display LED of Vacation will be on.⚠ It is strongly requested to remove foods in the fresh-food compartment and do not leave the door open when you select Vacation function. |
| 6 CHILD LOCK FUNCTION | By pressing the Vacation button and the Fridge button simultaneously for 3 seconds, all buttons will be locked. The Water dispenser lever and the Ice lever will not work either. To cancel this function, Press these two buttons for 3 seconds again. |
| 7 FRIDGE BUTTON | Press the Fridge button to set the fridge to your desired temperature. You can set temperature between 1 °C and 7 °C (34 °F and 46 °F). |
| 8 DOOR OPEN FUNCTION | 1. If the fridge or the freezer door is open, the "Door Open" icon is lit.2. If the condition that generates a door alarm is satisfi ed because the fridge or the freezer door is open, the "Door Open" icon blinks. |
English - 24
When you use Power Freeze the energy consumption of the refrigerator will increase. Remember to turn it off when you don't need it and return the freezer to your original temperature setting. If you need to freeze large amount of food stuff, activate Power Freeze function at least 20 hours before.
Display Off Function
To energy conservation the Panel Display turns off automatically under the following conditions: When no button has been pressed, when no doors are open, or when no Dispenser Lever has been pushed.
However, the icon indicating your Vacation or Cubed / Crushed / Ice Off, will stay on.
When you press a button, open a door, or push Dispenser Lever, the Panel Display will turn on again. Except for the Ice Type button, all function buttons will become operational after you remove your finger from the button you are currently pressing.
CONTROLLING THE TEMPERATURE
The freezer temperature can be set between -15 ^ ( 6 ^ ) and -23 ^ (- 10 ^ ) to suit your particular needs. Press the Freezer button repeatedly until the desired temperature is shown in the temperature display. Keep in mind that foods like ice cream may melt at -16 ^ ( 4 ^ ).
The temperature display will move sequentially from -15 °C (6 °F) and -23 °C (-10 °F). When the display reaches -23 °C (-10 °F), it will begin again at -15 °C (6 °F).
Five seconds after the new temperature is set the display will again show the actual current freezer temperature. However, this number will change as the Freezer adjusts to the new temperature.
When you place the SHELF-BOTTOM instead of Bottom drawer, the SHELF-BOTTOM is two star section (All models). The Bottom door guard in the freezer is two star section. (RSH7, RS77, RS7528, RS7527, RS54H, RS57H, RS76 models). So, the Temperature in the two star sections are slightly higher than other freezer compartment.
CONTROLLING THE FRIDGE TEMPERATURE
The refrigerator temperature can be set between 7 °C (46 °F) and 1 °C (34 °F) to suit your particular needs. Press the Fridge button repeatedly until the desired temperature is shown in the temperature display.
The temperature control process for the Fridge works just like the Freezer process.
Press the Fridge button to set your desired temperature.
After a few seconds, the Fridge will begin tracking towards the newly set temperature.
This will be reflected in the digital display.
The temperature of the freezer or the refrigerator may rise from opening the doors too frequently, or if a large amount of warm or hot food is placed in either side.
This may cause the digital display to blink.
Once the freezer and refrigerator return to their normal set temperatures the blinking will stop.
If the blinking continues, you may need to "reset" the refrigerator.
Try unplugging the appliance, wait about 10 minutes and then plug back in.
USING THE ICE AND COLD WATER DISPENSER
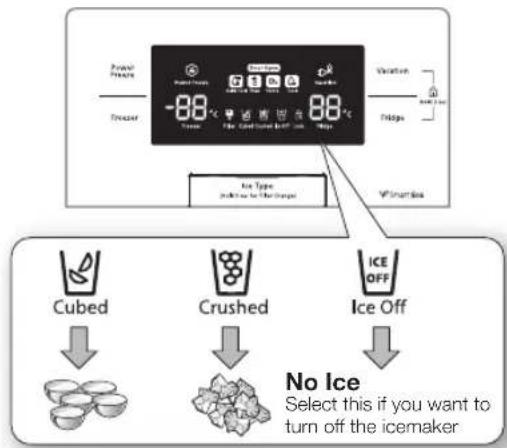
Press the Ice Type button to select the type of ice you want
flowchart
graph TD
    A["Frozen Frozen"] --> B["-88°C"]
    B --> C["Ice Type: 100%"]
    C --> D["Cubed"]
    C --> E["Crushed"]
    C --> F["Ice Off"]
    D --> G["No Ice"]
    E --> H["Select this if you want to turn off the icemaker"]
    F --> I["Ice Off"]
    J["Vacation"] --> K["Flidge"]
    L["Free Ice"] --> M["Free Ice"]
    N["Free Ice"] --> O["Free Ice"]

Ice is made in cubes. When you select "Crushed", the icemaker grinds the ice cubes into crushed ice.
Dispensing ice
Place your glass underneath the ice outlet and push gently against the ice dispenser lever with your glass. Make sure the glass is in line with the dispenser to prevent the ice from bouncing out.
Using the Water Dispenser
Place a glass underneath the water outlet and push gently against the water dispenser lever with your glass. Make sure the glass is in line with the dispenser to prevent the water from splashing out.

- Do not put your fingers, hands or any other unsuitable objects in the chute or ice-maker bucket.
- It may result in personal injury or material damage.
- Never put finger or any other objects in the dispenser opening.
- It may cause injury.
- Use only the ice maker provided with the refrigerator.
- The water supply to this refrigerator must only be installed/connected by a suitably qualified person and connect to a potable water supply only.
- In order to operate the ice maker properly, water pressure of 138 \~ 862 kPa is required.

- If you have a long vacation or business trip and won't use water or ice dispensers, close the water valve.
- Otherwise, water leakage may occur.
- Wipe excess moisture from the inside and leave the doors open.
- Otherwise, odor and mold may develop.

Some parts in the picture may differ from your refrigerator, depending of the model and option. (The Shelves)
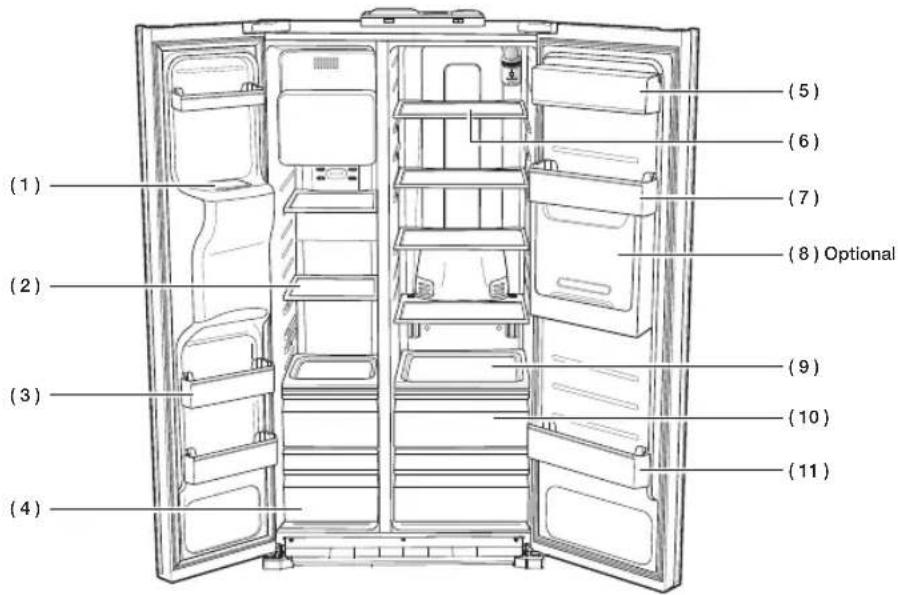
text_image
(1) (2) (3) (4) (5) (6) (7) (8) Optional (9) (10) (11)
text_image
OPERATING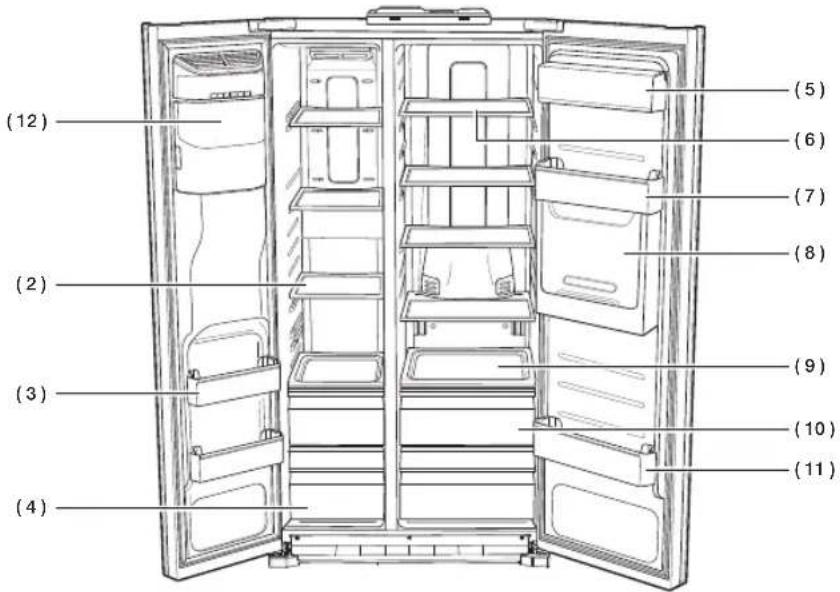
Do not put your fingers, hands or any other objects in the ice chute or the ice maker bucket. This may result in personal injury or material damage.
(2) Shelves
Can be used to store all types of frozen food.
(3) Door Bins
Can be used for small packages of frozen food.
(4) Drawers
Best used to store meats or dry foods. Stored food should be wrapped securely using foil or other suitable wrapping materials or containers.
(5) Dairy Bin
Can be used to store smaller dairy items like butter or margarine, yogurt or cream-cheese bricks.
(6) Shelves
Designed to be crack-resistant. They can be used to store all types of food and drinks. Circular marks on the glass surface are a normal phenomenon and can usually be wiped clean with a damp cloth.
(7) Egg Tray
Best place to keep eggs. Place the Egg Tray on the shelf for easy access.
(8) Beverage Station (Optional)
Can be used to store the frequently used items, such as canned beverages and snacks and allows access to these items without opening the refrigerator door.
(9) Moving Shelf (Optional)
Designed to move with foods easily. It can be used to store all types food and drinks need to move often.
(10) Fruit & Vegetable Drawer
Used to preserve the freshness of your stored vegetables and fruits. It has been specifically designed to control the level of humidity within the drawer.
(11) Door Bins
Designed to handle large, bulky items such as gallons of milk or other large bottles and containers.
(12) Ice Maker Bucket
Designed to store lots of ice easily.

Do not put your fingers, hands or any other objects in the ice chute or the ice maker bucket. This may result in personal injury or material damage.
(13) Wine Rack (Optional)
Helps wines maintain their taste by providing an optimized place for storing your wine bottles.

For more space, you can store food with Guard FRE-UPP instead of the ice bucket, and remove the COVER-ICE MAKER.
If you remove the ice bucket, ICE OFF will blink on the display panel.
Furthermore, you can remove the freezer Upper drawer and Bottom drawer and locate the 'SHELF-BOTTOM' on the bottom of the freezer since it does not affect thermal and mechanical characteristics.
A declared storage volume of frozen food storage compartment is calculated with "Guard FRE-UPP", "SHELF-BOTTOM" positioned and "COVER-ICE MAKER", "Upper Drawer", "Bottom Drawer" removed.

GUARD FRE-UPP (Optional)
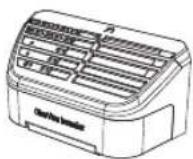
COVER-ICE MAKER
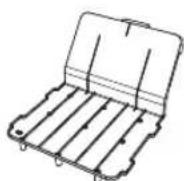
SHELF-BOTTOM (Optional)
USING THE COOLSELECT ZONE™ DRAWER (OPTIONAL)
Quick Cool

- You can use the Quick Cool feature with the CoolSelect Zone™.
- "Quick Cool" allows 1\~3 canned beverages to cool within 60 min.
- To cancel this function, press the "Quick Cool" button again. CoolSelect Zone™ returns to the previous temperature.
- When "Quick Cool" ends, it returns to the "Cool" temperature setting.
Thaw

- Drips loss and quality deterioration of meats reduces the freshness of foods.
- After "Thaw" is selected, warm and cold air is alternately supplied into the CoolSelect Zone™ Drawer.
- Depending on the weight of meat, thawing time can be selected for 4 hrs, 6 hrs, 10 hrs, and 12 hrs sequentially.
- When "Thaw" ends, CoolSelect Zone™ display returns to "Zero Zone" condition.
- When "Thaw" ends, there are no juice in the meats and they are half-freezed condition so it is easy to cut them for cooking.
- To cancel this option, press any button except "Thaw".
- The approximate thawing time of meat and fish are shown below. (Based on 1 inch thickness)
THAW TIME WEIGHT
| 4 hours 363 g (0.8 lb) |
| 6 hours 590 g (1.3 lb) |
| 10 hours 771 g (1.7 lb) |
| 12 hours 1000 g (2.2 lb) |

Depending on the size and thickness of meat and fish, the thawing time may vary.
The above weight represents the total weight of food in the CoolSelect Zone ^TM Drawer.
Ex) The total thawing time for 400 g frozen beef and 600 g frozen chicken will be 10 hours.

With the "Thaw" option, food which is not needed to thaw in the CoolSelect Zone™ Drawer should be removed.
Zero Zone (0 °C)

- When "Zero Zone" is chosen, the temperature of the CoolSelect Zone™ Drawer is kept at 0 °C regardless of the set refrigerator temperature.
- "Zero Zone" temperature helps keep meat or fish fresh longer.
Cool

- When "Cool" is chosen, the temperature will be the same as the set temperature of the refrigerator. The digital panel shows the same temperature as that of the display panel.
- The CoolSelect Zone™ Drawer allows extra refrigerator space.

Depending on the beverages, the cool-down time may vary.

For "Quick Cool" option, food stored in the CoolSelect Zone™ Drawer should be removed.
REMOVING THE FREEZER ACCESSORIES
Cleaning and rearranging the interior of the freezer is simple.
- Remove the Glass shelf by pulling the shelf out as far as it will go. Then, gently lift it up and remove it.
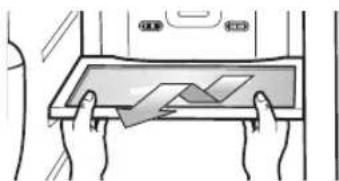
natural_image
Illustration of hands inserting a card into a device (no text or symbols visible)- Remove the door bin by holding the door bin with both hands and then gently lift it up.
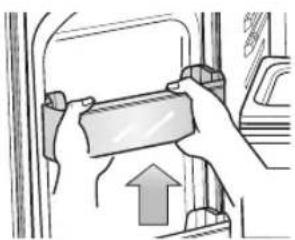
natural_image
Illustration of a hand inserting a plastic clip into a car's seat (no text or symbols)- Remove the Plastic drawer by pulling it out and slightly lifting it up.
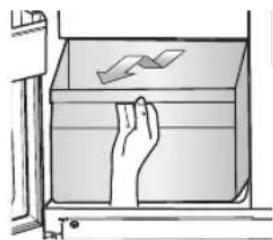
natural_image
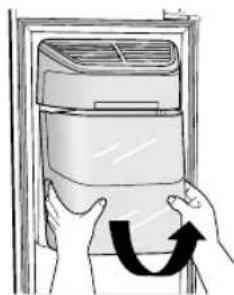
Illustration of a hand opening a rectangular box with a paper airplane flying out (no text or symbols)- ice bucket (freezer)
Remove the Icemaker Bucket by lifting up and pulling it out slowly.
- Grip the handle as shown in the figure
- Lift the low part slightly
• Take the ice bucket out slowly.
natural_image
Illustration of hands installing or adjusting a wall-mounted air conditioner unit (no text or symbols visible)
Do not use excessive force when removing the cover.
Otherwise, the cover may break and cause injury.
REMOVING THE FRIDGE ACCESSORIES
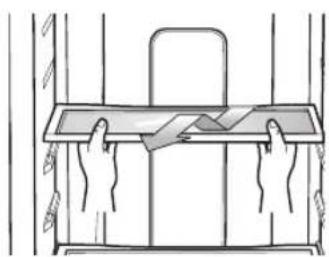
- Remove the spill Proof Glass Shelf by pulling the shelf out as far as it will go. Then, gently lift it up and gently remove it.
natural_image
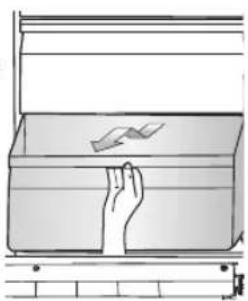
Line drawing of hands holding a rectangular object on a table, no text or symbols present- Remove the Vegetable & Fruit Drawer by pressing on the indentations found on the inside left and right sides of the Veggie Box/Dry Box
cover and remove by pulling forward. Holding the drawer with one hand, lift it up a little bit while pulling it forward and take it out of the refrigerator.
natural_image
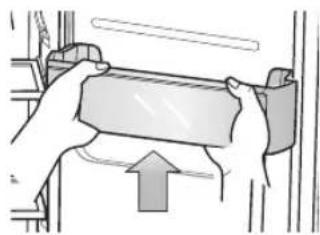
Illustration of a hand opening a box with a lightning bolt symbol (no text or labels)- Remove the Gallon Door Bin by holding the bin with both hands and gently lifting it up.
natural_image
Illustration of hands holding a cylindrical object with an upward arrow, no text or symbols present
Before removing any accessories, make sure that no food is in the way.
When possible, remove the food altogether to reduce the risk of accidents.
CLEANING THE REFRIGERATOR

Do not use Benzene, Thinner or Clorox™ for cleaning. They may damage the surface of the appliance and can create a risk of fire.

Do not spray the refrigerator with water while it is plugged in, as it may cause an electric shock.
Do not clean the refrigerator with benzene, thinner or car detergent for risk of fire.
REPLACING THE INTERIOR LIGHT

For LED lamp, please contact service engineer to replace it.
CHANGING THE WATER FILTER

To reduce risk of water damage to your property DO NOT use generic brands of water fi lers in your SAMSUNG Refrigerator. USE ONLY SAMSUNG BRAND WATER FILTERS. SAMSUNG will not be legally responsible for any damage, including, but not limited to property damage caused by water leakage from use of a generic water fi liter. SAMSUNG Refrigerators are designed to work ONLY WITH SAMSUNG Water Filter.
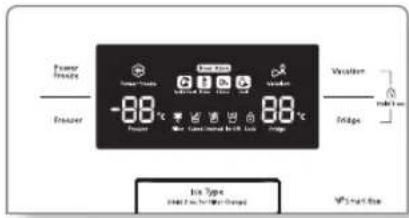
The "Filter Indicator" light lets you know when it is time to change your water filter cartridge.
When the filter indicator light changes to red, it is time to change the filter.
To give you some time to get a new filter, the light will come on up just before the capacity of the current filter runs out.
Changing the filter on time provides you with the freshest, cleanest water from your fridge.

For Internal model
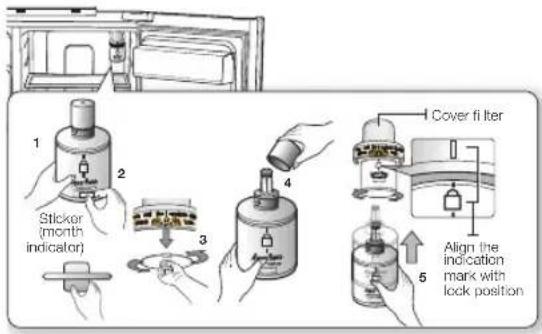
- Remove the water filter from the box and put a month indicator sticker on the filter as shown.
-
Place a sticker on the fi liter that dates six months in the future. For example, if you are replacing the water fi liter in March, put the "SEP" (September) sticker on the fi liter to remind you to replace in September. Normally fi liter life is about every 6 months.
-
Next, remove the fixed cap by turning it counter clockwise.
- Remove the new filter's protective cap and remove the old filter.
- Position and insert the new fi Iter into the fi Iter housing. Slowly turn the water fi Iter clockwise 90° to align with the indication mark on the cover, locking the fi Iter in position. Make sure that the indicator is lined up with the "lock" position. Do not over tighten.
text_image
1 2 3 4 5 Cover filter Align the indication mark with lock position
For Exterior model
- Shut off water supply.
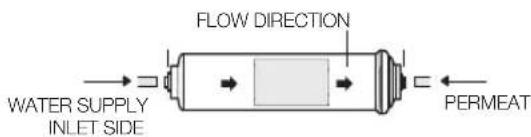
- Note the Flow direction on the filter.
- Insert water supply tube into the inlet side of the filter until the tube stop.
text_image
FLOW DIRECTION WATER SUPPLY INLET SIDE PERMEAT

Note: You must also ensure that the cut is square and not at any sort of angle as this could cause a leak
- After inserting tube, put together the clip strongly. The Clip fi x the tube.
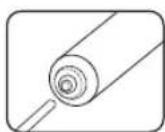
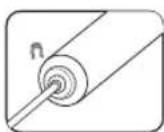
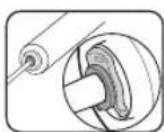
- Turn on the water and check for leaks. If leaks occur, repeat step 1,2,3,4. If leaks persist, discontinue use and call your supporting dealer.
-
Once you have completed this process, hold the Ice Type button for 3 seconds to reset the filter schedule.
-
Lastly, Dispense 1 L of water through water dispenser and throw away. Make sure that water flows clearly again before drinking.
text_image
Power Inside Explorer -88°C Vacation Bridge Irra Type Habit 2.5% for Change VPS No. 1/2
A newly installed water filter cartridge may cause water to briefly spurt from the water dispenser. This is due to air getting into the line. It should pose no problem to operation.
Ordering replacement fi Iters
To order more water filter cartridges, contact your authorized Samsung dealer.
- Internal Filter - HAFIN2/EXP
- External Filter - HAFEX/EXP
troubleshooting
| PROBLEM SOLUTION | |
| The refrigerator does not work at all or it does not chill suffi ciently. | Check that the power plug is properly connected.Is the temperature control on the display panel set to the correct temperature? Try setting it to a lower temperature.Is the refrigerator in direct sunlight or located too near a heat source?Is the back of the refrigerator too close to the wall and therefore keeping air from circulating? |
| The food in the fridge is frozen. | Is the temperature control on the display panel set to the correct temperature? Try setting it to a warmer temperature.Is the temperature in the room very low?Did you store the food with a high water content in the coldest part of the fridge? Try moving those items into the body of the fridge instead of keeping them in the CoolSelect ZoneTM drawer. |
| You hear unusual noises or sounds. | Check that the refrigerator is level and stable.Is the back of the refrigerator too close to the wall and therefore keeping air from circulating?Was anything dropped behind or under the refrigerator?A "ticking" sound is heard from inside the refrigerator. This is normal and occurs because various accessories are contracting or expanding in relation to the temperature of the refrigerator interior. |
| The front corners of the appliance are hot and condensation is occurring. | Some heat is normal as anti-condensators are installed in the front corners of the refrigerator to prevent condensation.Is the refrigerator door ajar? Condensation can occur when you leave the door open for a long time. |
| Ice is not dispensing. | Did you wait for 12 hours after installation of the water supply line before making ice?Is the water line connected and the shut-off valve open?Did you manually stop the ice making function? Make sure Ice Type is set to Cubed or Crushed.Is there any ice blocked within the ice maker bucket?Is the freezer temperature too warm? Try setting the freezer temperature lower. |
| You can hear water bubbling in the refrigerator. | This is normal. The bubbling comes from the refrigerant coolant liquid circulating through the refrigerator. |
| There is a bad smell in the refrigerator. | Has a food item spoiled?Make sure that strong smelling food (for example, fi sh) is wrapped so that it is airtight.Clean out your freezer periodically and throw away any spoiled or suspect food. |
| Frost forms on the walls of the freezer. | Is the air vent blocked? Remove any obstructions so air can circulate freely.Allow suffi cient space between the foods stored for effi cient air circulation.Is the freezer door closed properly? |
| Water dispenser is not functioning. | Is the water line connected and the shut-off valve open?Has the water supply line tubing been crushed or kinked?Make sure the tubing is free and clear of any obstruction.Is the water tank frozen because the refrigerator temperature is too low?Try selecting a warmer setting on the main display panel. |
memo
Ambient Room Temperature Limits
This refrigerator is designed to operate in ambient temperatures specified by its temperature class marked on the rating plate.
| Class Symbol Ambient Temperature range (°C) | |
| Extended Temperate SN | +10 to +32 |
| Temperate N +16 to | +32 |
| Subtropical ST +16 to | +38 |
| Tropical T +16 to | +43 |

Internal temperatures may be affected by such factors as the location of the refrigerator, ambient temperature and the frequency with which you open the door. Adjust the temperature as required to compensate for these factors.
English
natural_image
Symbol of a trash bin with crossed lines indicating no waste or restriction, and a solid rectangle below (no text or labels)Correct Disposal of This Product
(Waste Electrical & Electronic Equipment)
(Applicable in countries with separate collection systems)
This marking on the product, accessories or literature indicates that the product and its electronic accessories (e.g. charger, headset, USB cable) should not be disposed of with other household waste at the end of their working life. To prevent possible harm to the environment or human health from uncontrolled waste disposal, please separate these items from other types of waste and recycle them responsibly to promote the sustainable reuse of material resources.
Household users should contact either the retailer where they purchased this product, or their local government office, for details of where and how they can take these items for environmentally safe recycling.
Business users should contact their supplier and check the terms and conditions of the purchase contract. This product and its electronic accessories should not be mixed with other commercial wastes for disposal.
Contact SAMSUNG WORLD WIDE
If you have any questions or comments relating to Samsung products,
please contact the SAMSUNG customer care center.
Samsung Electronics Switzerland GmbH, Binzalle 4, CH-8055 Zürich
0800 726 78 64 (0800-SAMSUNG)
www.samsung.com/ch/support (German)
www.samsung.com/ch_fr/support (French)
SEAG_SWISS
RS7*
RS54H*
RS57H*
RS76*
text_image
Diagram illustrating a device with a prohibition symbol and a mechanical linkage mechanism, showing movement of the device.Deutsch - 15
ABBAUEN DER TÜREN DES KÜHLGERÄTES
natural_image
Technical line drawing of a mechanical assembly with hands holding screwdrivers (no text or symbols)text_image
Diagram illustrating a mechanical assembly process with labeled parts and directional arrows indicating motion or movement.text_image
Diagram illustrating a mechanical or fluidic process with labeled components and directional arrows indicating flow or movement.text_image
Technical diagram showing mechanical assembly steps with numbered components and directional arrowstext_image
Technical diagram showing mechanical assembly with numbered components and directional arrow indicating rotation or movementtext_image
Diagram illustrating a mechanical assembly process with labeled components and directional arrows indicating motion or movement.text_image
Technical diagram showing mechanical assembly steps with numbered components and directional arrows indicating motion or movement.text_image
Technical diagram showing mechanical assembly with labeled parts 5 and 6, including an upward arrow indicating motion or force.text_image
Technical diagram showing mechanical assembly with numbered components labeled 7 and 8WIEDERANBAUEN DER TÜREN DES KÜHLGERÄTES
text_image
Technical diagram showing a mechanical assembly with labeled parts 1 and 2, likely illustrating a component or assembly step.text_image
Technical diagram of a mechanical assembly with numbered components and directional arrows indicating movement or force.text_image
Diagram showing a hand holding a device with labeled parts 8 and 9, illustrating a process to switch or adjust the device.text_image
Technical diagram showing mechanical assembly with labeled parts 1 and 2, including a pipe fitting and connector components.text_image
Technical diagram showing a mechanical assembly with labeled parts 3 and 4, including a downward arrow indicating motion or force.text_image
Diagram of a computer motherboard with numbered components for assembly or maintenance referencetext_image
Diagram showing a hand holding a device labeled 11 before and after assembly, with component 12 indicated.text_image
Technical diagram showing mechanical assembly with labeled parts, including a zoomed-in view of a component and a close-up of the main structure.text_image
3 Schraubenschlüssel 2 Bolzen
natural_image
Illustration of hands installing or adjusting a wall-mounted air conditioner unit (no text or symbols visible)Abbildung 1
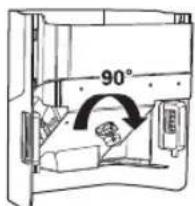
text_image
90°Abbildung 2

text_image
Eisschurrenatural_image
Technical line drawing of a mechanical component with no visible text or symbolsEisbereiter
text_image
1 2 3 4 Power Freeze Freezer 8 -88 °C Vacation 88 °C Fridge Vacation 5 6 7 Ice Type BASI Ice for Other Changed MP Smart Zootext_image
Power Freezer Freezer -80°C Power Heat/Heat -80°C Vibration Vibration Fridge Vacation Fridge Ice Types Built-in for Other ChargedNormales Modell
text_image
Power Pressure Throat -88°C Vapor Over time Window 88°C Lift Hidge Vacation Fridge 300 gm| 4 hours 363 g (0.8 lb) |
| 6 hours 590 g (1.3 lb) |
| 10 hours 771 g (1.7 lb) |
| 12 hours 1000 g (2.2 lb) |

natural_image
Illustration of hands holding a tablet device inside a vehicle (no text or symbols visible)natural_image
Illustration of a hand holding a rectangular object inside a vehicle (no text or symbols visible)natural_image
Illustration of a hand placing a document into a rectangular box (no text or symbols visible)natural_image
Illustration of hands installing or adjusting a device into a rack (no text or symbols visible)
natural_image
Line drawing of hands holding a rectangular object with a diagonal band, no text or symbols presentnatural_image
Illustration of a hand pressing down on a drawer with a directional arrow (no text or symbols)natural_image
Illustration of hands holding a rectangular object with an upward arrow, no text or symbols present
natural_image
Three-step diagram showing a spiral pipe being inserted into a circular component, with no text or symbols present.www.samsung.com/ch/support (German)
www.samsung.com/ch_fr/support (French)
SEAG_SWISS
RS7*
RS54H*
RS57H*
RS76*
Frigorifero
Manuale dell'utente
text_image
Diagram showing two refrigerators with a prohibition symbol and directional arrows indicating movement or flow.Italiano - 15
RIMOZIONE DEGLI SPORTELLI DEL FRIGORIFERO
natural_image
Technical line drawing of a door frame with two hands holding three sensors, no text or symbols presenttext_image
Diagram illustrating a medical procedure for inserting or removing a device, showing step 1 and step 2 with labeled components.text_image
Diagram illustrating a biological or mechanical process with labeled components and directional arrows indicating flow or movement.text_image
Technical diagram showing mechanical assembly with numbered components, likely illustrating a valve or clamp mechanism.text_image
Technical diagram showing mechanical assembly with labeled parts 7 and 8, likely for assembly or maintenance instructions.text_image
Diagram illustrating a mechanical assembly process with labeled components and directional arrows indicating motion or movement.text_image
Technical diagram showing mechanical assembly with numbered components and directional arrows indicating motion or movement.text_image
Technical diagram showing mechanical assembly with labeled parts 5 and 6, including an upward arrow indicating motion or force.text_image
Diagram showing a mechanical assembly with labeled parts 7 and 8, likely illustrating a repair or mounting process.RIMONTAGGIO DEGLI SPORTELLI DEL FRIGORIFERO
text_image
Technical diagram showing a mechanical assembly with labeled parts 1 and 2, likely illustrating a component or assembly step.text_image
Diagram of a mechanical assembly with numbered components, likely illustrating a gear or connector assembly.text_image
Diagram showing a hand using a tool to adjust or install a component, with numbered parts labeled 8 and 9.Italiano - 17
text_image
Technical diagram showing mechanical assembly with labeled parts, including pipe fitting and mounting bracket componentstext_image
Technical diagram showing mechanical assembly with labeled parts 3 and 4, including a downward arrow indicating motion or force.text_image
Technical diagram of a mechanical assembly with numbered components for identificationtext_image
Diagram showing a hand holding a device labeled 11 before and after assembly, with parts numbered 12 and 11 indicated.text_image
Technical diagram showing a mechanical assembly with labeled parts, including a zoomed-in view of the component and a close-up of the main view.natural_image
Illustration of hands installing or adjusting a wall-mounted air conditioner unit (no text or symbols visible)Figura 1
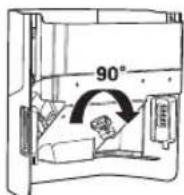
Figura 2
text_image
Discesa ghiaccio
natural_image
Technical illustration of a mechanical clamp or bracket assembly (no text or symbols visible)text_image
Power Freezer -80°C Electric Heat Vacation Fridge Ice Type (Shelf 1 rec for other charges)Modello normale
text_image
Power Freeze Tweater -88°C Finder Power Trains -88°C Finder Water Lack -88°C Finder Vacation Bridge middle levelnatural_image
Illustration of hands inserting a card into a device (no text or symbols visible)natural_image
Illustration of a hand inserting a small object into a car seatbelt (no text or symbols)natural_image
Illustration of a hand opening a rectangular box with a paper airplane icon above (no text or symbols)natural_image
Illustration of hands inserting a component into a refrigerated air conditioner unit (no text or symbols)
natural_image
Line drawing of hands holding a rectangular object with a folded paper or tape, no text or symbols presentnatural_image
Illustration of a hand placing a paper airplane into a box (no text or symbols)natural_image
Illustration of hands holding a rectangular object with an upward arrow, no text or symbols present
text_image
Power Frequency Freezer -88°C Freezer Air Condition Air Filter Air Angle Vacation Fittings Light 1 mm Low Type power as to the change Air Smart Box
natural_image
Symbol of a trash bin crossed with no visible text or labelswww.samsung.com/ch/support (German)
www.samsung.com/ch_fr/support (French)
SEAG_SWISS
RS7*
RS54H*
RS57H*
RS76*
Réfrigérateur
Mode d'emploi
text_image
Pied TourmevisATTENTION
text_image
Diagram showing two refrigerators with a prohibition symbol and a falling object, illustrating safety or hazard.Français - 15
DÉMONTAGE DES PORTES DU RÉFRIGÉRATEUR
natural_image
Technical line drawing of a door with two hands holding screwdrivers, no text or symbols presenttext_image
Diagram illustrating a mechanical assembly process with labeled parts and directional arrows indicating motion or movement.text_image
Diagram illustrating a mechanical or fluid system with labeled components and directional arrows indicating flow or movement.text_image
Technical diagram showing mechanical assembly with numbered components and directional arrow indicating motiontext_image
Technical diagram showing mechanical assembly with numbered components and directional arrow indicating rotation or movementtext_image
Diagram illustrating a mechanical assembly process with labeled components and directional arrows indicating motion or movement.text_image
Technical diagram showing mechanical assembly steps with numbered components and directional arrows indicating motion or movement.text_image
Technical diagram showing mechanical assembly with numbered components and an upward arrow indicating motion or forcetext_image
Technical diagram showing labeled mechanical components with numbered parts 7 and 8MONTAGE DES PORTES DU RÉFRIGÉRATEUR
text_image
Technical diagram showing a mechanical assembly with labeled parts 1 and 2, likely illustrating a valve or clamp mechanism.text_image
Diagram of a mechanical or electrical component with numbered parts labeled 3 through 7, showing connections and assembly.text_image
Diagram showing two-step assembly process: hand pressing on a component labeled '8' and then using tool to install a component labeled '9'.text_image
Technical diagram showing mechanical assembly with labeled parts 1 and 2, including a pipe fitting and component details.text_image
Technical diagram showing mechanical assembly with labeled parts 3 and 4, including a downward arrow indicating motion or force.text_image
Diagram of a device with numbered components, likely for assembly or labelingtext_image
Diagram showing a hand holding a device labeled 11 before and after assembly, with parts numbered 12 and 11.text_image
Technical diagram showing mechanical assembly with labeled parts 1 and 2, including a schematic view of a vehicle chassis.text_image
Toumevis Piedtext_image
Pied Tournevis
natural_image
Illustration of hands installing or adjusting a wall-mounted air conditioner unit (no text or symbols visible)Figure 1
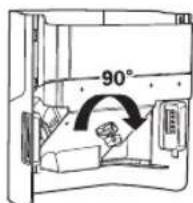
text_image
90°Figure 2
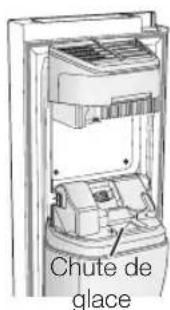
text_image
Chute de glacenatural_image
Technical line drawing of a mechanical component with no visible text or symbolsappareil à glaçons
natural_image
Diagram showing a mechanical component with arrows indicating flow and a prohibition symbol (no text or labels)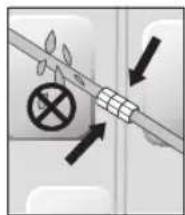
text_image
Diagram showing a mechanical or electrical component with directional arrows and a cross symbol, likely indicating movement or force.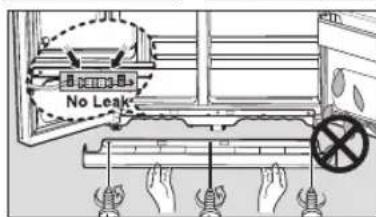
text_image
No Leaktext_image
Power Freezer Freezer 8 -88°C Vacation Vcc Vacation Fridge 5 6 7 Ice Type [100 L / 240 L / 300 L / 350 L] Smart SizeMODÈLE DU DISTRIBUTEUR
text_image
Power Freeze Freezer Power Flush -88°C Dinner After Outer Indoor to lift Air Vapor Vacation Fridge 900 gm Ice Type Shelf 1 sec for Other ChangedMODÈLE NORMAL
text_image
Power Drinks -88°C Vacation 88°C Vacation Durge Delta linetext_image
FONCTIONNEMENT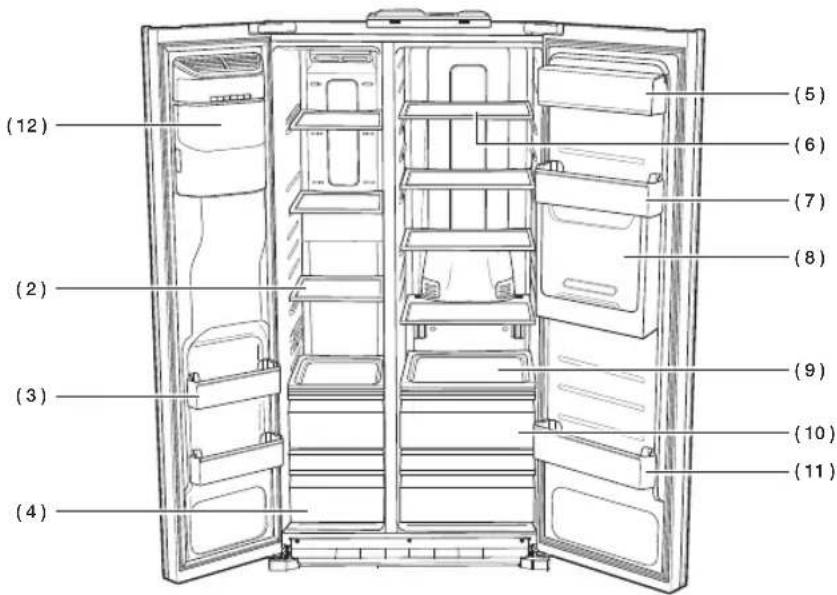
natural_image
Illustration of hands inserting a card into a device (no text or symbols visible)natural_image
Illustration of a hand inserting a small rectangular object into a door (no text or symbols visible)natural_image
Illustration of a hand placing a document into a rectangular box with a paper airplane icon (no text or symbols)natural_image
Illustration of hands inserting a package into an air conditioner unit (no text or symbols)
natural_image
Line drawing of hands holding a rectangular object with a ribbon, inside a vehicle (no text or symbols)natural_image
Illustration of a hand pressing down on a drawer with an arrow indicating motion (no text or symbols)natural_image
Illustration of hands holding a cylindrical object with an upward arrow, no text or symbols present
text_image
Power Preads Insulator -88°C Temperature -88°C Valation Flammate Flammate Flammate Flammate Flammate Flammate Flammate Flammate Flammate Flammate Flammate Flammate Flammate Flammate Flammate Flammate Flammate Flammate Flammate Flammate Flammate Flammate Flammate Flammate Flammate Flammates Flammates Flammates Flammates Flammates Flammates Flammates Flammates Flammates Flammates Flammates Flammates Flammates Flammates Flammates Flammates Flammates Flammates Flammates Flammates Flammates Flammates Flammates Flammates Flammates Flammate Flammate Flammate Flammate Flammate Flammate Flammate Flammate Flammate Flammate Flammate Flammate Flammate Flammate Flammate Flammate Flammate Flammate Flammate Flammate Flammate Flammate Flammate Flammate Flammato
natural_image
Symbol of a waste bin with crossed lines indicating no waste, and a solid black rectangle below (no text or labels)www.samsung.com/ch/support (German)
www.samsung.com/ch_fr/support (French)

DA68-02710R-12