Fresco 181 - Air Conditioning Sonnenkönig - Free user manual and instructions
Find the device manual for free Fresco 181 Sonnenkönig in PDF.
| Product type | Mobile air conditioner |
| Brand | Sonnenkönig |
| Model | Fresco 181 |
| Power supply | 230 V AC, 50 Hz |
| Required fuse | 250 V AC, 3.15 A |
| Refrigerant | R410A (R32/125: 50/50) |
| Operating temperature | 16-35°C (cooling mode max 35°C) |
| Main functions | Cooling, dehumidification, ventilation, heating (heat pump), automatic mode |
| Fan speeds | High, medium, low |
| Temperature setting range | 13-31°C (cooling mode) |
| On/off timer | 1-24 hours |
| Water tank capacity | Not specified (adjustable with drain plug) |
| Air filter | Washable, clean every 2 weeks (air filter + activated carbon filter) |
| Maintenance and cleaning | Unplug before cleaning, do not use chemical solvents |
| Continuous water drainage | Possible via bottom drain plug |
| Safety | Water level circuit breaker, full tank alarm, child protection (8 years+), automatic shutdown |
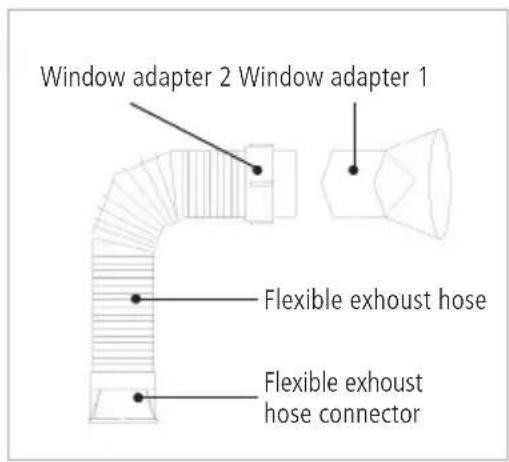
| Included accessories | Flexible exhaust hose, hose connector, exhaust adapter |
| Dimensions (approx.) | Not specified (approx. 35 x 35 x 70 cm) |
| Weight (approx.) | Not specified (approx. 25-30 kg) |
| Noise (approx.) | Not specified (stated as low) |
| Warranty | 24 months from date of purchase |
| Article number | 10000601 |
Frequently Asked Questions - Fresco 181 Sonnenkönig
User questions about Fresco 181 Sonnenkönig
0 question about this device. Answer the ones you know or ask your own.
Ask a new question about this device
Download the instructions for your Air Conditioning in PDF format for free! Find your manual Fresco 181 - Sonnenkönig and take your electronic device back in hand. On this page are published all the documents necessary for the use of your device. Fresco 181 by Sonnenkönig.
USER MANUAL Fresco 181 Sonnenkönig
Flexibler Abluftschlauch. 1/Set
Adapter for Abluftschlauch. 1/Set
Festnetz 14 Cent/Minute
Before requesting a repair or service, please check the following first.
Festnetz 14 Cent/Minute
1 Safety Information. 50
2 Portable air conditioner 52
3 Display panel and remote control 53
4 Functions 55
5 Maintenance. 57
6 Storage 58
7 Troubleshooting 58
8 Installation 59
9 Accessories 61
10 Warranty / Disposal / Technical changes 61
1 Safety Information
Please read before first commissioning the safety instructions carefully and observe the safety instructions to prevent damage due to misuse, improper operation, and improper environmental conditions to be avoided. Keep these for later reference.
Check the device after removing the packaging for damage. Do not put the unit in case of suspected corruption in operation and consult a specialist. The recyclable packaging material must not be stored or disposed accessible for young children, but must be disposed of properly.
This appliance is only for the purpose for which it was explicitly developed. Any other use is regarded as improper and therefore dangerous. The supplier is not liable for damage to persons and / or property damage due to an improper or incorrect use.
This appliance can be used by children aged from 8 years and above and persons with reduced physical, sensory or mental capabilities or lack of experience and knowledge if they have been given supervision or instruction concerning use of the appliance in a safe way and understand the hazards involved. Children shall not play with the appliance. Cleaning and user maintenance shall not be made by children without supervision. Please make sure to place the device on a suitable and waterproof surfaces, so that spilled liquids can not cause harm.
Repairs to electrical appliances must only be carried out by trained personnel only. Improperly performed repairs and alterations to the equipment can have dangerous consequences for the user according to what the warranty will be rejected.
- The appliance is for indoor use only.
- Do not use the unit with a socket that is undergoing repairs or not properly installed.
- Do not use the unit in the following conditions:
A: Near an open fire.
B: In an area where oil is likely to splash, such as a stove.
C: In an area exposed to direct sunlight.
D: In an area where water is likely to splash, such as a bath, shower or swimming pool.
- Never insert your fingers or other objects into the air outlet. Take special care to warn children of these dangers.
- Keep the unit upwards during transport and storage to ensure that the compressor remains in the correct position.
- Before cleaning the air conditioner, always turn off or disconnect the power supply.
- When moving the air conditioner, always turn off and disconnect the power supply, and move it slowly.
-
To avoid the risk of fire, do not cover the air conditioner.
-
All sockets used with the air conditioner must comply with the local electric safety requirements. If necessary, please check the requirements.
- Young children should be supervised to ensure that they do not play with the appliance.
- If the supply cord is damaged, it must be replaced by the manufacturer, its service agent or a similarly qualified persons in order to avoid a hazard.
- This appliance is not intended for use by persons (including children) with reduced physical, sensory, or mental capacities, or lack of experience and knowledge, unless they have been given supervision or proper instructions concerning the use of the appliance by a person responsible for their safety. Cleaning and maintenance shall not be made by children without supervision.
- The appliance shall be installed in accordance with national wiring regulations.
- Details of type and rating of fuses: F, 250V AC, 3.15A
- Recycling. This symbol indicates that this product should not be disposed of with other household waste throughout the EU. To prevent possible harm to the environment or human health from uncontrolled waste disposal, please recycle it responsibly to promote the sustainable reuse of resources. To return your used device, please use the return and collection system or contact the retailer where the product was purchased. They can take this product for environmentally safe recycling.
- GWP: R410A (R32/125: 50/50): 2088
- The maximum operating temperature for the air conditioner: Cooling: 35^ Operating temperature range: 16 - 35^
- Do not use the unit in a confined space with obstructions to avoid breakdowns.
- Do not use the unit in direct sunlight to prevent the colour of the surface from changing.
- Do not use the unit in or near water to avoid leakage on to the electric components.
- Do not use near gas appliances, fires or in the vicinity of flammable liquids.
- Do not use with a damaged or faulty AC socket.
- When unplugging the unit, hold the power plug (not the cable) securely and pull it out carefully.
- Keep the unit at least one metre away from TV sets or radios to avoid the risk of electromagnetic interference.
- Do not use with the air outlet positioned close to walls and do not cover the outlet to avoid overheating.
Note
- If any parts are damaged, please contact your retailer or a designated repair shop.
- If any damage occurs, please turn off the air conditioner, disconnect the power supply and contact your retailer or a designated repair shop.
- The power cord must always be fully earthed.
- To avoid any danger from a damaged power cord, please turn off the air conditioner and disconnect the power supply. It must be replaced by the retailer or a designated repair shop.
- Do not tilt the unit, tip it over or allow it to fall. If the unit does tip over or fall, please unplug it immediately and seek advice from your retailer.
- Do not spray with insecticide or other chemicals as the plastic cover may become deformed.
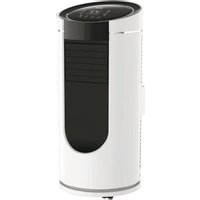
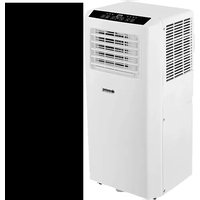
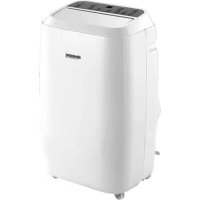
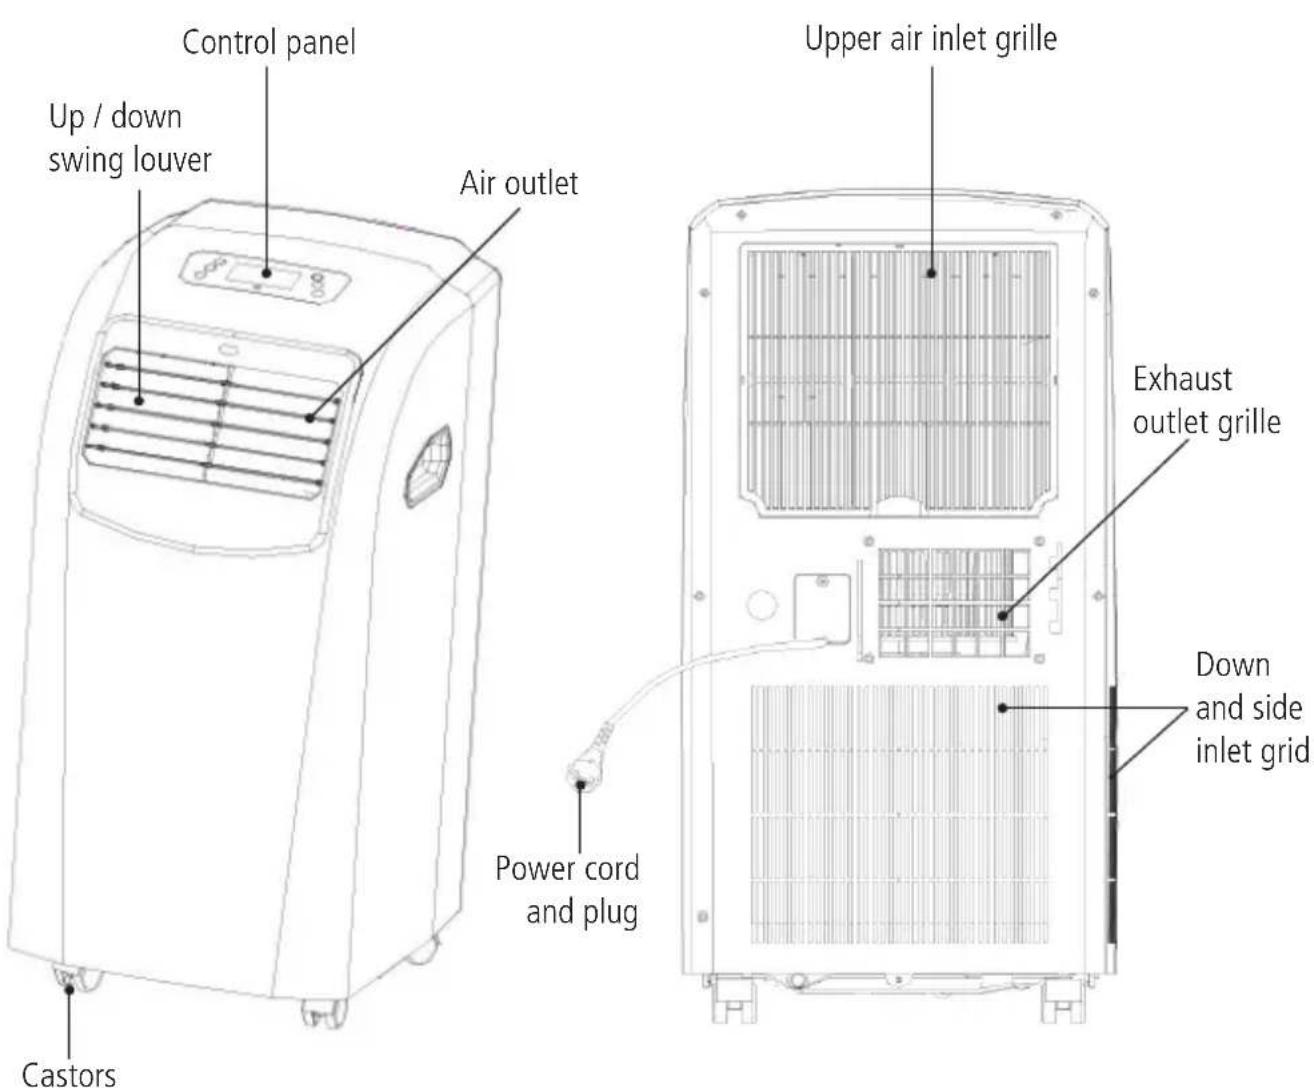
2 Portable air conditioner
This portable air conditioner is a small appliance designed to regulate the indoor temperature and humidity. Its flexibility makes it easy to use in a range of different circumstances. It has multiple functions, including cooling, dehumidifying and ventilation. This unit has been designed especially for use in family homes, offices, etc. It has a compact design compared to other models with the same cooling capacity. Its power consumption and noise levels are exceptionally low.
Heating: The air is heated by the heating pump before it is expelled into the room. This function is not affected by the ambient temperature.
Cooling: Other air conditioning modes are recommended if the indoor temperature is either below 16^ or above 31^ .
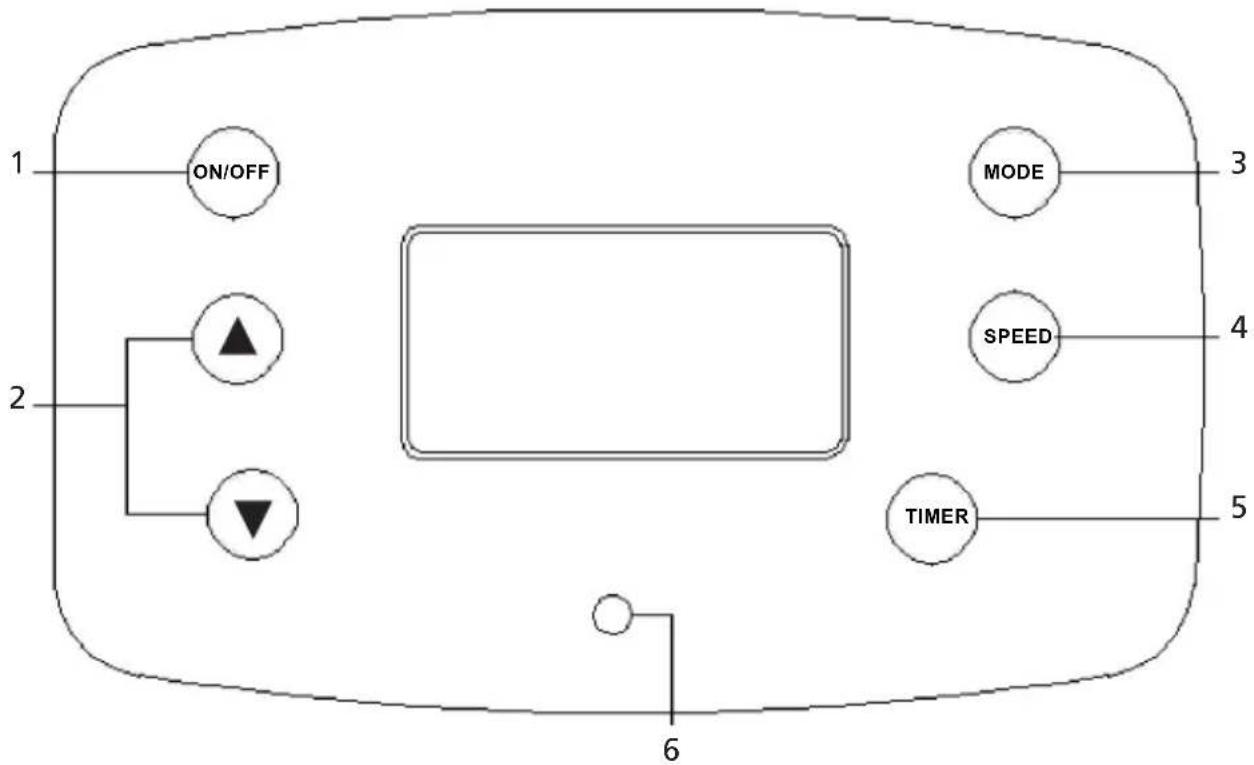
3 Display panel and remote control
GB
- On/off button: press this button to turn the machine ON or OFF.
- Temperature setting button: for to set the room temperature with increase or decrease by 1^
- Mode button: Press this button to select cooling or dehumidifying mode.
- Fan speed button: Press this button to select high, medium or low fan speed.
- Timer button: Press this button to set the time for timed switch-on or switch-off.
- Water tank full indicator light.

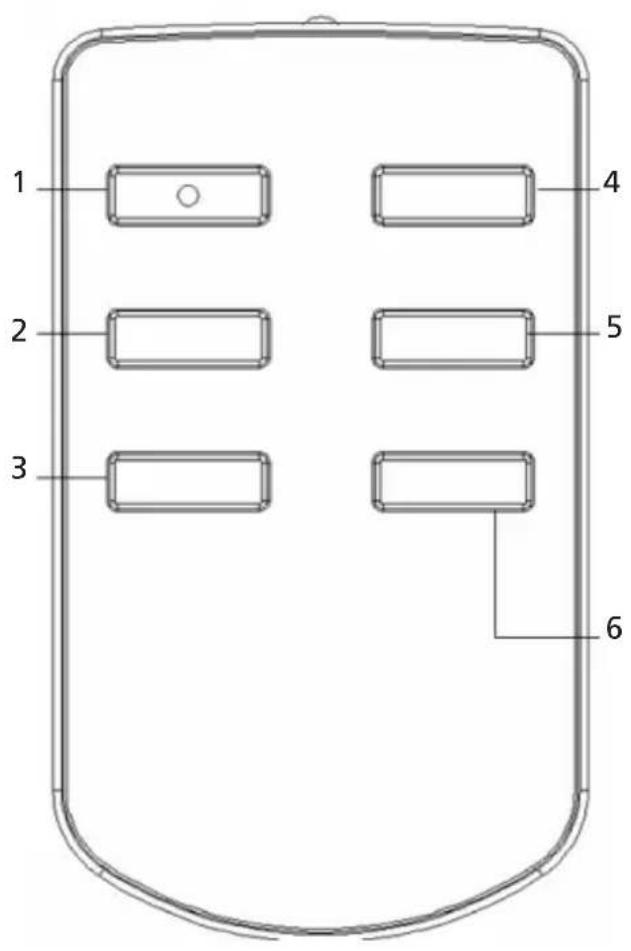
- Power button: for to turn the appliance on or off.
- Temperature/timer setting button: fot to set the room temperature/timer. with increase or decrease by 1^ / 1h
- Speed button: for to select high, medium or low fan speed.
- Timer button: for to the set the time for the appliance to switch on or off.
- Temperature/timer setting button: fot to set the room temperature/timer. with increase or decrease by 1^ / 1h .
- Mode button: for to select cooling, fan or dehumidifying mode.
4 Functions
Note
- The AC socket must be undamaged and safe.
- Do not connect the portable air conditioner to a multi-socket adapter used simultaneously for other electrical appliances. Insert the AC power plug securely into the AC socket. After two seconds, it will beep. Then press the ON/OFF button, and the unit will begin to operate.
AUTO MODE
Depending on the current room temperature, the device will automatically select from the following modes: cooling, dehumidifying or fan:
| Room Temperature | < 23 °C | 23 °C - 26 °C | ≥26 °C |
| Mode Fan Dehumidify Cooling | |||
| Set temperature | --- | 23 °C 25 °C | |
COOLING MODE
- To select cooling mode, repeatedly press the MODE button until the LED display shows the snowflake: . Always insert the duct through an open window in cooling mode to expel the warm air from the room.
- Repeatedly press the or button to set the desired room temperature between 13^ and 31^ .
- Press the spee button to select the desired fan speed. You can choose between high, medium and low speed.
Note. In order to improve the cooling efficiency, make sure that:
a) If your room is directly exposed to the sun, please draw the curtains.
b) Do not place the unit near heat sources.
DEHUMIDIFYING MODE
- Keep the windows and doors closed to help effectively dehumidify the room.
- To select dehumidifying mode, repeatedly press the MODE button until the LED display shows the drop symbol: . The fan speed cannot be adjusted in this mode.
- When the unit is used as dehumidifier only, do not use the exhaust duct.
TIMER FUNCTION
- To set the timer, start with the unit switched off but connected to the power supply.
- Press the timer button, and the LED display will show. Now press again the timer button to set the desired time. The setting range is 1-24 hours.
Note. If you have set the unit to switch on/off after 24 hours, press this key again to cancel the timer.
GB
FAN SPEED FUNCTION
Press the SPEED button to select high, medium or low ventilation speed.
"WATER TANK FULL" ALARM FUNCTION
The internal water tank in the air conditioner has a water level safety switch that controls the water level. When the water level reaches a predetermined height, the "water tank full" indicator light illuminates. (If the water pump is damaged, please remove the rubber plug at the bottom of the unit when the tank is full to allow the water to drain.)
CONTINUOUS DRAINAGE
- If you are planning to leave this unit unused for a long time, please remove the rubber plug from the drainage hole at the bottom of the unit and connect a drainage hose to the lower fixing clip. All the water in the water tank will drain.
- You can drain the water as described above when the unit is set to HEAT mode.
- If the water pump is damaged, continuous drainage can be used. In this case, the water pump is not activated. The unit can still be used.
- If the water pump is damaged, intermittent drainage can also be used. In this case, please connect a drainage hose to the lower fixing clip when the "Water Tank Full" indicator light illuminates. This will allow the water in the tank to drain. The unit can still be used.
5 Maintenance
- Pull the plug out of the socket before cleaning.
- Make sure that the unit is not connected to the power supply before beginning any maintenance or repairs to prevent accidents caused by electric shock.
- Do not use chemical solvents (such as benzene, alcohol or thinner) to clean the surface of the unit. This will cause the surface to become scratched, damaged or even completely deformed.
- First clean the surface with a mild detergent and wet cloth, then wipe it with a dry cloth.
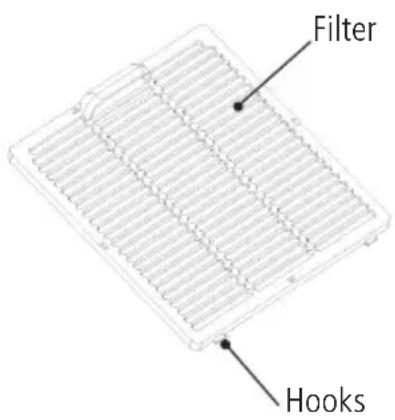
AIR FILTER
The air filter should be cleaned every two weeks or earlier if it becomes clogged with dust or dirt.
Opening the air filter:
- Open the air filter cover by sliding, then remove the air filter.
- Remove the air filter and active carbon filter from the filter cover.
Cleaning:
Wash the air filter by immersing it gently in warm water (about 40^ ) with a mild detergent, rinse the filter and dry it thoroughly in a shaded place.
Installation:
- Attach the filters to the filter cover using the attachment hooks on the inside of the cover.
- Insert the hooks at the bottom of the filter cover into the holes in the housing, then push it back into its original position.
6 Storage
- Remove the drainage plug. Then operate the unit in fan mode for half a day until the pipe is completely dry.
- Switch off the unit and disconnect the plug from the power supply.
- Tie the cable with the string.
- Wrap the machine in a plastic bag, and keep it in a dry place.
7 Troubleshooting
Before requesting a repair or service, please check the following first.
| Problem Possible | causes Suggested Solution | |
| Unit does not start when the ON/OFF switch is pressed | 1. Is there power? 2. Is it plugged in? 3. Has the fuse or circuit breaker tripped? 4. If the timer set to a suitable time | 1. Turn on the power 2. Insert the plug into the wall socket 3. Change the fuse 4. Change the timer setting |
| Ineffective cooling | 1. Is the air inlet or outlet blocked? 2. Is there any other heat source in the room? 3. Are the air filters very dirty? 4. Is the temperature set to a suitable temperature? 5. Is the indoor fan speed setting too low? | 1. Clear the blockage 2. Move the heat source 3. Clean the air filter 4. Set to a suitable temperature 5. Set to a suitable fan speed |
| Too noisy and/or too many vibrations | 1. The ground is not level or not flat enough 2. The sound is caused by the flow of the refrigerant inside the air conditioner | 1. Place the unit on a flat, level surface if possible 2. This is normal |
| The machine starts and stops frequently | 1. It is the voltage of the power source normal? 2. Is the air exhaust fixed incorrectly or bent? 3. Are you adding air exhaust yourself? | 1. Make sure the power source corresponds to the rated supply 2. Try to keep the air exhaust straight. Do not allow it to split. 3. Do not add air exhaust yourself |
| FAULT E0 | Room temperature sensor has failed / replace the room temperature sensor (the unit can still operate without a replacement). |
| FAULT E2 Water | tank full / empty the water tank |
CAUTION
In the event of a major malfunction such as those described below, pull the plug out immediately and call for service.
- The fuse and switch often break.
- The power cord is overheating, or the sleeve of the cord is split.
- Something is abnormal.
8 Installation
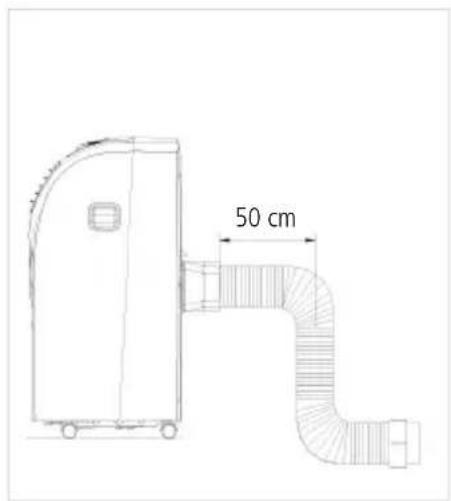
Place the air conditioner on a flat, firm surface where the air outlets are not covered and ensuring that there is at least 50cm (20 inches) of empty space around it.
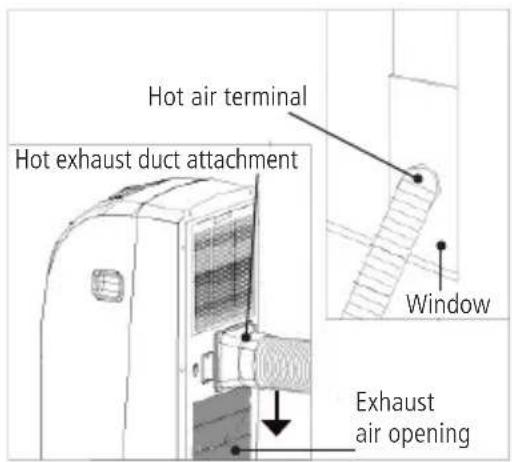
Attaching the exhaust hose
- Attach the square end of the exhaust hose to the exhaust opening on the unit.
- Insert the other end (discharge) through the nearest window.
Attention: The length of the hose stretches from 50cm to 1.5m. We recommend always using the shortest length necessary.
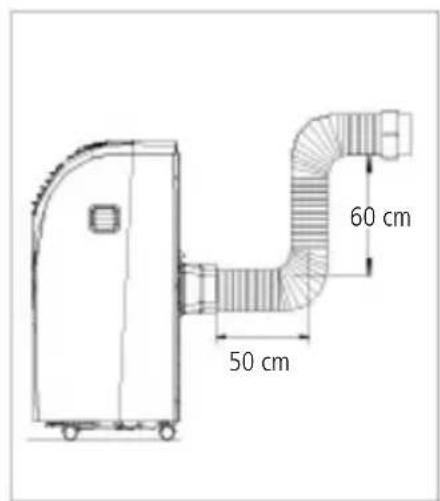
When attaching, try to keep the air exhaust straight or at a 90^ angle at the maximum.
Installation on a wall
The correct installation is shown below (if mounted on a wall, the height of the hole should be 40cm - 130cm (16 inches-51 inches).
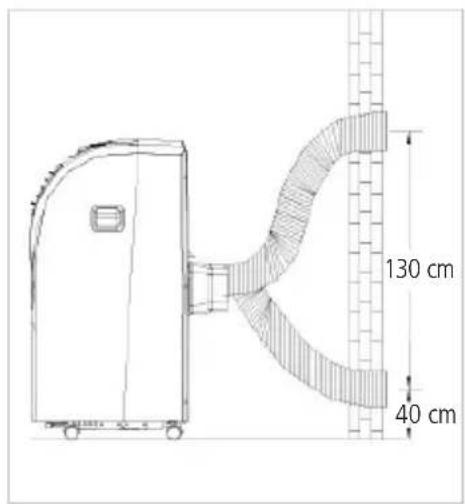
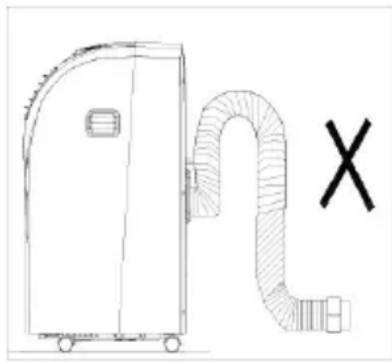
If the air exhaust has to be bent, see below.
Incorrect hose installation (eg. the bend in the air exhaust is too large) can easily cause malfunctions.
GB
9 Accessories
Flexible exhaust hose. 1/set
Flexible exhaust hose connector. 1/set
Cycle exhaust adapter. 1/set
10 Warranty / Disposal / Technical changes
Warranty: All products are checked from our company before the delivery. In case that there is a lack on your product, please contact the vendor. Please bring your proof of purchase for guarantees.
Disposal: Please remove the heater properly. You can bring the product to any specialist dealer for he removal.
Technical changes: Technical changes in technique and design are possible.
Please save the packaging materials of the unit.
CE declaration of Conformity
This device complies with the following standards:
EN 60335-2-40:2003/A13:2012
EN 60335-1:2012/A11:2014
EN 62233:2008
Firma
Armin Schmid
Olensbachstrasse 9-15
CH-9631 Ulisbach
Tel. Int. +41 71 987 60 60
Tel.Nat.0848870850
Festnetz 14 Cent/Minute