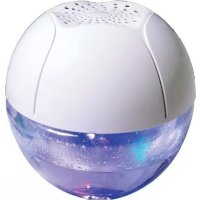
Harmony - Aroma diffuser Sonnenkönig - Free user manual and instructions
Find the device manual for free Harmony Sonnenkönig in PDF.
| Product type | Aroma diffuser |
| Brand | Sonnenkönig |
| Model | Harmony |
| Power supply | DC 5V |
| Power | 1.5 Watts |
| Airflow (high speed) | 1.2 - 2.0 m³/h |
| Airflow (low speed) | 0.4 - 0.6 m³/h |
| Noise level (high speed) | < 38 dB |
| Noise level (low speed) | < 34 dB |
| Filter type | HEPA |
| Dimensions (L x W x H) | 20.2 x 7.2 x 7.2 cm |
| Weight | Approximately 250 g |
| Reservoir capacity | 3 compartments for dried flowers |
| Control | On/off button with two speeds |
| Status indicator | Three-color LED (red, purple, blue) |
| Material | Plastic |
| Recommended use | Dried flowers only |
| Safety | Detailed safety instructions in the manual |
| Maintenance | Filter replacement every 3 to 6 months |
| Spare parts | Replacement HEPA filter |
| Warranty | 24 months |
| Included accessories | Filter, fragrance reservoir |
Frequently Asked Questions - Harmony Sonnenkönig
User questions about Harmony Sonnenkönig
0 question about this device. Answer the ones you know or ask your own.
Ask a new question about this device
Download the instructions for your Aroma diffuser in PDF format for free! Find your manual Harmony - Sonnenkönig and take your electronic device back in hand. On this page are published all the documents necessary for the use of your device. Harmony by Sonnenkönig.
USER MANUAL Harmony Sonnenkönig
Festnetz 14 Cent/Minute
Modifications techniques
Mobiel network 42 Cent/Minute
HARMONY
Aroma diffuser user's manual
GB
Index
- Safety instructions 41
2.Product features 42
3.How to use it. 43 - Aromatherapy switching operation 44
5.Filter replacement. 45 - Warranty / Disposal / Technical change 46
1. Safety instructions
Please read before first commissioning the safety instructions carefully and observe the safety instructions to prevent damage due to misuse, improper operation, and improper environmental conditions to be avoided. Keep these for later reference.
Check the device after removing the packaging for damage. Do not put the unit in case of suspected corruption in operation and consult a specialist. The recyclable packaging material must not be stored or disposed accessible for young children, but must be disposed of properly.
This appliance is only for the purpose for which it was explicitly developed. Any other use is regarded as improper and therefore dangerous. The supplier is not liable for damage to persons and / or property damage due to an improper or incorrect use.
This appliance can be used by children aged from 8 years and above and persons with reduced physical, sensory or mental capabilities or lack of experience and knowledge if they have been given supervision or instruction concerning use of the appliance in a safe way and understand the hazards involved. Children shall not play with the appliance. Cleaning and user maintenance shall not be made by children without supervision. Please make sure to place the device on a suitable and waterproof surfaces, so that spilled liquids can not cause harm.
Repairs to electrical appliances must only be carried out by trained personnel only. Improperly performed repairs and alterations to the equipment can have dangerous consequences for the user according to what the warranty will be rejected. For safety reasons, please carefully read the following instructions before using this product.
- Do not fill any liquid perfume into the fragrance box.
- Please remove the PE bag of the filter before using the product for the
first time.
- Keep away from heated surfaces.
- Do not place or store this product where it can fall or be dropped into a tub or sink.
- Do not place or drop this product into water or any other liquid.
- Not for use by children. THIS IS NOT A TOY.
- Never operate this product if it has a damaged cord, plug, cable or housing.
- Only place on dry surfaces.
GB
2. Product features
| Voltage DC 5V | |
| Power 1.5 Watt | |
| High Speed 1.2 – 2.0 m | 3/h |
| Low Speed 0.4 – 0.6 m³/h (theoretical calculation) | |
| Noise The distance around the | product is min. 0.9m, high speed ≤ 38dB, low-speed ≤ 34dB |
| Filter Compond HEPA filter hel | ps to remove 99% PM 2.5 and all kinds of harmful gas |
| Fan DC 5V axial flow fan, low | noise |
| Dimensions of the product 20. | 2 x 7.2 x 7.2 cm |
| Net weight about 250 gr |
3. How to use it
GB
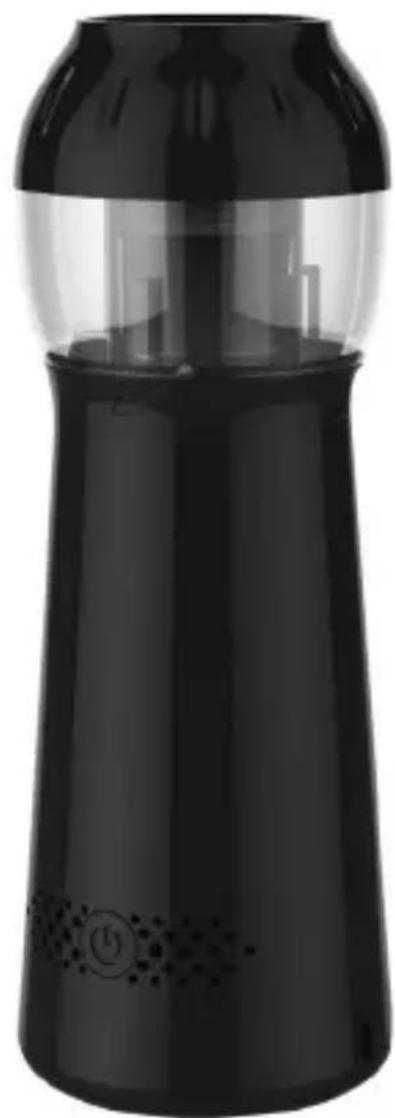
1. Placing the dried flower
Place the dried flower according to the following steps:
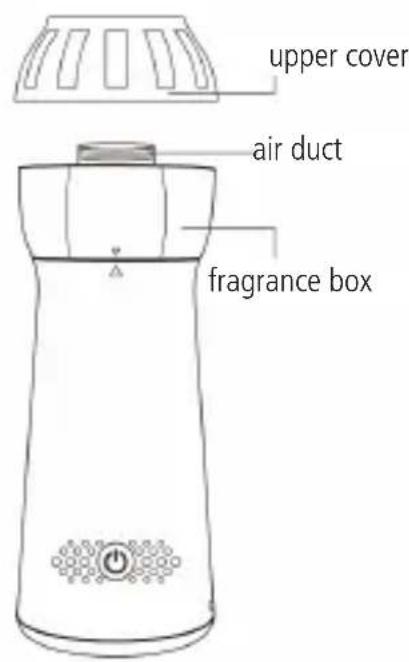
1) Taking out the upper cover: Rotate the cover anti-clockwise until you can take it out, then take out the transparent fragrance box that goes up along the air duct.
2) Taking out the fragrance box lid: Rotate anti-clockwise on the dent of the fragrance box lid using your thumb and forefinger until you are able to remove it.
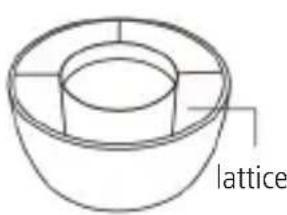
3) Placing the dried flower: Place the required dried flower into the fragrance box (there are three lattices, which means you can place three different dried flowers into the three lattices at the same time), then screw the fragrance box lid clockwise into the fragrance box.
4) Fixing the upper cover: Put the fragrance box down along the air duct, then turn the upper cover into the air duct in a clockwise direction.
fragrance box

fragrance box lid
GB
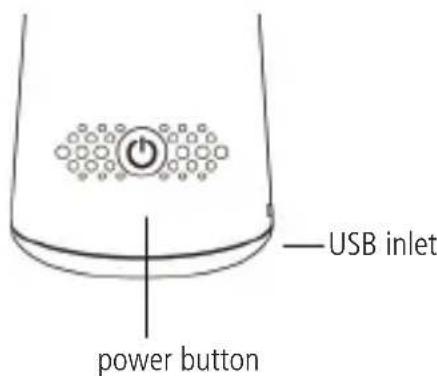
2. Control and charge instruction
- Press the power button and hold it for 2 seconds to turn the power on and the product works in high speed;
- Press the power button again and the product works in low speed;
- Press the power button and hold it for 1 second again and the power is off.
3. Battery status indicator
High brightness for high speed status
Low brightness for low speed status
- Flash for charging
- Three-coloured indication:
Red - Low battery
Purple - Half-charged battery
Blue - Full battery
4. Aromatherapy switching operation
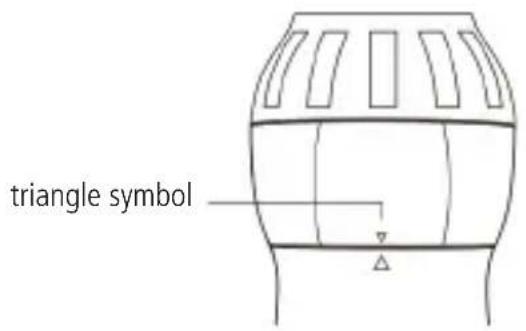
There are three lattices in the fragrance box, which means you can load three different dried flowers into the three lattices at the same time. This way it is up to you to choose which fragrance to use or not to use any fragrance. To do so, proceed as indicated below:
1) There is a white triangle symbol on each fragrance lattice as well as on the housing. To select a fragrance, please rotate the fragrance box to make sure its white triangle symbol aligns with the white triangle symbol of the housing.
2) If aromatherapy is not needed, please rotate the fragrance box to make sure its white triangle symbol does not align with the white triangle symbol of the housing or do not place any dried flower into the fragrance box.
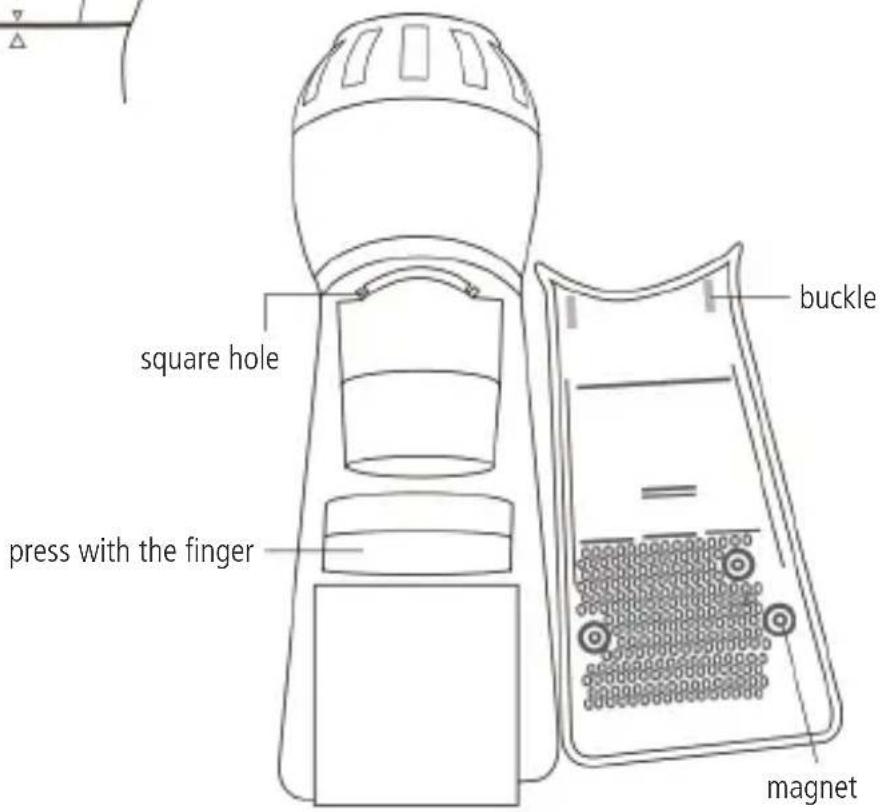
5. Filter replacement
You may need to replace the filter after using the product for 3 - 6 months. If you need to do so, please proceed according to the following steps:
1) Removing the back shell: At the bottom of the product you will see the word "OPEN" and the symbol "↑. Please hold the front shell with one hand and open the back shell with the other hand according to the symbols. You will then see the filter inside.
2) Replacing the filter: Remove the old filter and place it into the recovery bag, then take the new filter from the package and place it into the original position of the old filter.
3) Fixing the back shell: First, make sure the two projections of the back shell are each inserted into the two corresponding square holes under the fragrance box, and then press the back shell into the product. Please note that there is a magnet on the back shell, so please be careful to avoid your finger or the skin being hurt when you fix the back shell.
6. Warranty / Disposal / Technical change
Warranty
The Products are controlled just before delivery. If despite a lack of your product, try trustfully your seller. Please bring your receipt, as this is to be submitted for each warranty. The guarantee period is 24 months from date of purchase.
Disposal
The device must be disposed of properly. The device can be distributed free of charge for disposal at each dealer.
Technical changes
Subject to changes in technology and design. We shall not be liable for technical or editorial changes or omissions in this document. Please save the packaging materials of the unit.
CE Declaration of Conformity
This device complies with the following standards
EN 60335-1: 2014
EN 60335-2-65: 2012
EN 62233: 2008
EN 55014-1:2011
EN 55014-2: 2008
EN 61000-3-2: 2014
EN 61000-3-3: 2013
Firma
Armin Schmid
Olensbachstrasse 9-15
CH-9631 Ulisbach
Tel. Int. +41 71 987 60 60
Tel. Nat. 0848870850
www.sonnenkoenig.ch
Firma
Armin Schmid
Landline 14 Cent/Minute
Mobiel network 42 Cent/Minute