
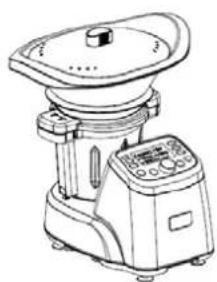
FG508 - Multi-cooker FAGOR - Free user manual and instructions
Find the device manual for free FG508 FAGOR in PDF.

| Product type | Multi-cooker |
| Brand | Fagor |
| Model | FG508 |
| Power supply | 220-240 V, 50/60 Hz |
| Motor power | 500 W |
| Heating power | 1000 W |
| Bowl capacity | 3 L (max), 2 L (usable) |
| Main functions | Cooking, steam, blender, beater, pulse, turbo, automatic program (32 recipes) |
| Temperature range | 20 °C to 120 °C (in 1 °C increments) |
| Timer | 1 s to 99 min 60 s (variable increments) |
| Speeds | 12 speeds (1-12) |
| Bowl material | Metal (with handle) |
| Safety | Bowl safety lock, overheat protection, dry heating protection, automatic stop with beep |
| Included accessories | Blade (2 types), mixer (butterfly), blade guard, steamer (2 levels), measuring cup, key, spatula |
| Care and cleaning | Hand wash with soapy water; do not immerse the motor unit; do not put blades and metal bowl in dishwasher |
| Spare parts and repairability | Removable and replaceable accessories; repair by authorized center only |
| Warranty | 1 year |
| Country of distribution | France (distributed by Euromenage) |
Frequently Asked Questions - FG508 FAGOR
User questions about FG508 FAGOR
0 question about this device. Answer the ones you know or ask your own.
Ask a new question about this device
Download the instructions for your Multi-cooker in PDF format for free! Find your manual FG508 - FAGOR and take your electronic device back in hand. On this page are published all the documents necessary for the use of your device. FG508 by FAGOR.
USER MANUAL FG508 FAGOR
Heating: 1000W Motor: 500W
Important:
- Before using the appliance, Read these instructions and illustrations carefully.
- Keep these instructions for use for future reference.
- Check if the voltage indicated on the appliance corresponds to the local mains voltage before you connect the appliance.
- Never use any accessories of parts from other products. Your guarantee will become invalid if such accessories or parts have been used.
- Don't use the appliance if the mains cord, the plug or other parts is damaged.
- Thoroughly clean the parts that will come into contact with food before you use the appliance for the first time.
- Always put the main appliance on a flat, dry and clean surface.
- Don't touch the blade especially they are running. They are very sharp. Only hold the upper part of the blade while removing or re-inserting it.
- Don't use your attachment or appliance if it has been damaged. You should contact an approved service center.
- This appliance shall not be used by children. Keep the appliance and its cord out of reach of children.
- Never let the appliance run unattended.
- Switch the appliance off before detaching and install any accessory.
- Wait until moving parts have stopped running before you remove the parts of the appliance.
- Never immerse the main appliance in water or any other liquid, nor rinse it under the tap. Use only a moist cloth to clean the appliance.
- Unplug the appliance immediately after use.
- Switch off the appliance and disconnected from supply before changing accessories or approaching parts which move in use.
- Appliances can be used by persons with reduced physical, sensory or mental capabilities or lack of experience and knowledge if they have been given supervision or instruction concerning use of the appliance in a safe way and if they understand the hazards involved.
- This appliance is intended to be used in household and similar applications as:
- staff kitchen areas in shops, offices and other working environments;
-farm houses; - by clients in hotels, motels and other residential type environments;
- bed and breakfast type environments
- Children shall not play with the appliance.
20.Never abruptly increase the speed when the temperature or heating temperature is more than 60 C. - When processing hot food (for temperature above 60^ ) don't touch the measuring cup or press the pulse button.
- Be sure to place the appliance on a clean, solid, even and non-heat able surface, particularly when using the steam tool.
23.Dry boil protection.
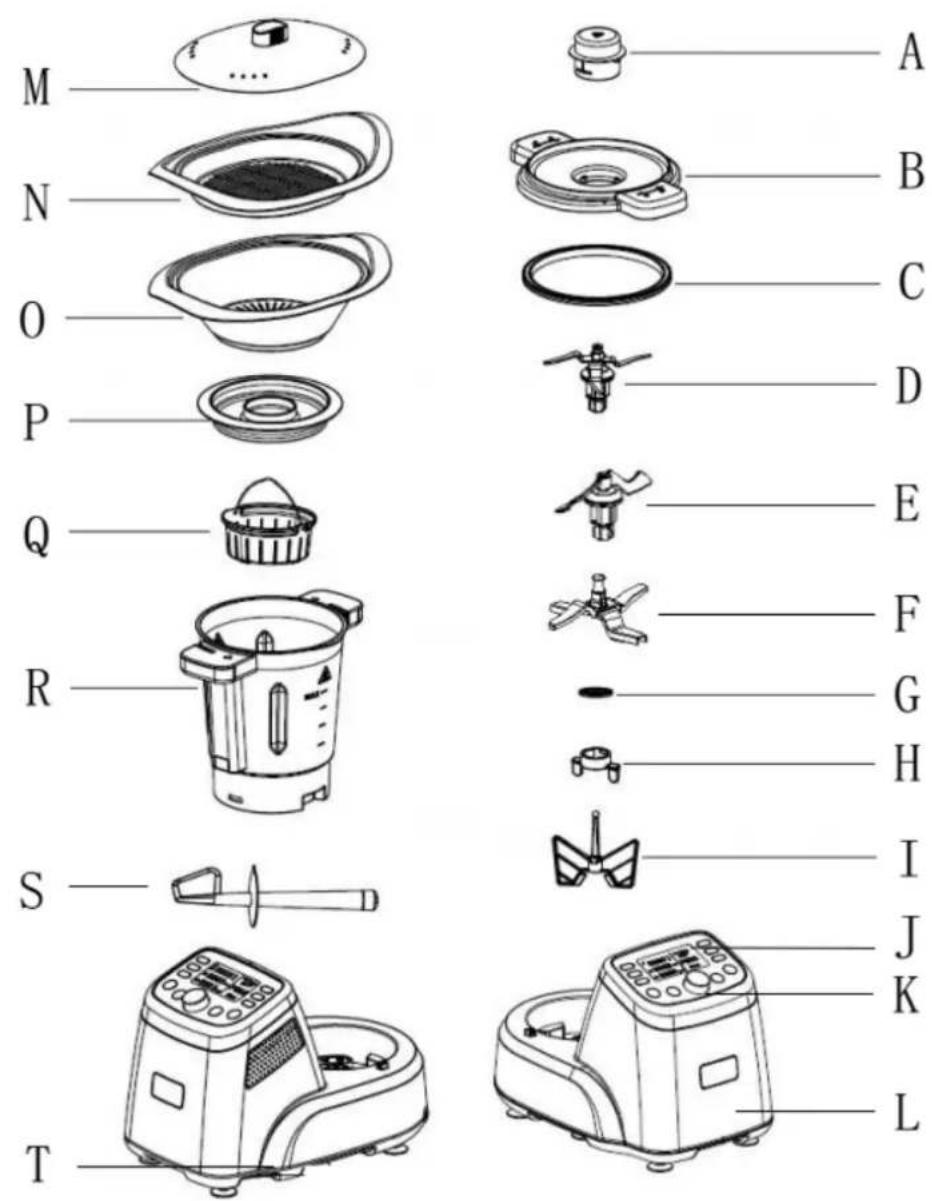
PARTS NAME:
A. Measuring cup N. Food steamer (Tray)
B. Bowl lid O. Steamer
C. Airproof ring 1
P. Soup storage lid
D. Blade 1 Q.plastic inside steamer(PP)
E. Blade 2 R. Bowl
F. Blade cover S. Spatula
G. Airproof ring 2
T. Power switch
H. Spanner
I. Stirring attachment (Butterfly)
J.LCD
K. Control panel
L. Main appliance
M.lid
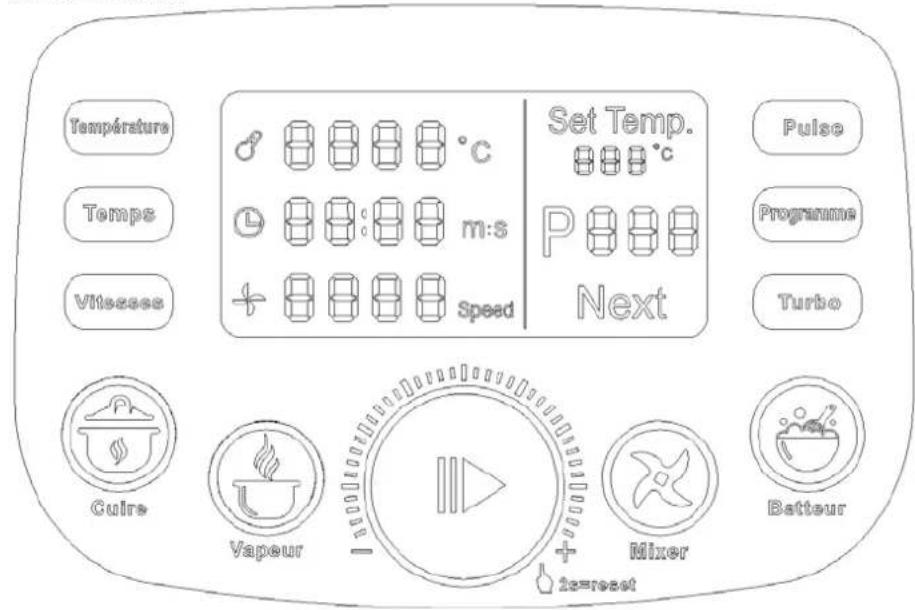
Control Panel
Temperature button
Press temperature button then Rotate Start/Stop/Reset knob can setting temperature you want: clockwise rotation is "+" , contra rotate is "-".
Temperature range: 20 °C20
°C. The temperature increases by 1^ .
Timer button
For the timer: (Timer range: 1 second-100minutes '99:60')
Press timer button then Rotate Start/Stop/Reset knob can setting time you want: clockwise rotation is “+”, contra rotate is “-”.
1-60 seconds: the time increases or decreases interval is 1 second.
1-10minutes: the time increases or decreases interval is 30 seconds.
10-60minutes: the time increases or decreases interval is 1 minute.
If setting time, the appliance timer is counting down (.5 4 3 2 1), until reach your set time appliance automatically stopped.
If not setting time, the appliance timer is counting (1 2 3 4 5...), until reach 60 minutes appliance automatically stopped.
Speed button
Press speed button then Rotate Start/Stop/Reset knob can setting speed you want: clockwise rotation is "+"
contra rotate is "—".
Speed range: 1-12.
Cook
Under standby mode, press "Cquire" button by hand, indicator light, appliance will work in the following way(in other work mode by pressing the button is invalid)
default time is 20 minutes.(users can also change the time setting) with blending by 2 speeds
heated to 100^
Notes:the speed and actual temperature and set temperature will show on the LCD when the appliance working.
Steam
Under standby mode, press "Vapeur" button by hand, indicator light, appliance will work in the following way(in other work mode by pressing the button is invalid)
default time is 30 minutes.(users can also change the time setting)
heated to 120^
Notes:the speed and actual temperature and set temperature will show on the LCD when the appliance working.
Mixer
Under standby mode, press "Mixer" button by hand, indicator light, appliance will work in the following way(in other work mode by pressing the button is invalid). If temperature ≥ 60^ , press the
Mixing 3 minutes by 9 speed
Beater
Under standby mode, press "Batreur" button by hand, indicator light, appliance will work in the following way(in other work mode by pressing the button is invalid). If temperature ≥ 60^ , press the
Mixing 3 minutes by 3 speed
Waiting 10 second
Mixing 20 second by 3 speed
sounds "beep" 30 second finish work, lights out.
Notes: press "Batteur" button default time is 4 minutes and run will be counted by 3 speed,press "Batteur" or "start/stop-reset"button the appliance will stop working when process of the program is running,than light out and exit the pattern(in other work mode by pressing the button is invalid)
Pulse button
Keep press "Pulse" button by hand, appliance can reach to maximum 12 speeds in seconds, until loosen exit working mode, recover former status. If temperature ≥ 60^ , press the button is
Programme button
Press this button you can select the automatic program you want. 32 kinds of programs:
Turbo button
Keep press "Turbo" button by hand, appliance can reach to maximum 12 speeds in seconds, until loosen exit working mode, recover former status. If temperature ≥ 60^ , press the button is
Start/Stop/Reset Knob
Rotate Start/Stop/Reset knob can adjust 'Temperature' 'Timer' 'Speed' when you press Temperature Timer Speed button, clockwise rotation is "+" , contra rotate is "- "
After you set the working instruction press this button appliance will work, press it again appliance will stop or pause.
Press it for 2 seconds appliance will reset all of the data that you setting.
Safety protection under the high temperature
When then actual temperature the heating will be closed.
≥ 50 e n p t p h s o wll arrive the target speed slowly and
Prompt function:
When appliance automatically stopped "Beep" sound 30 seconds.
LCD Display
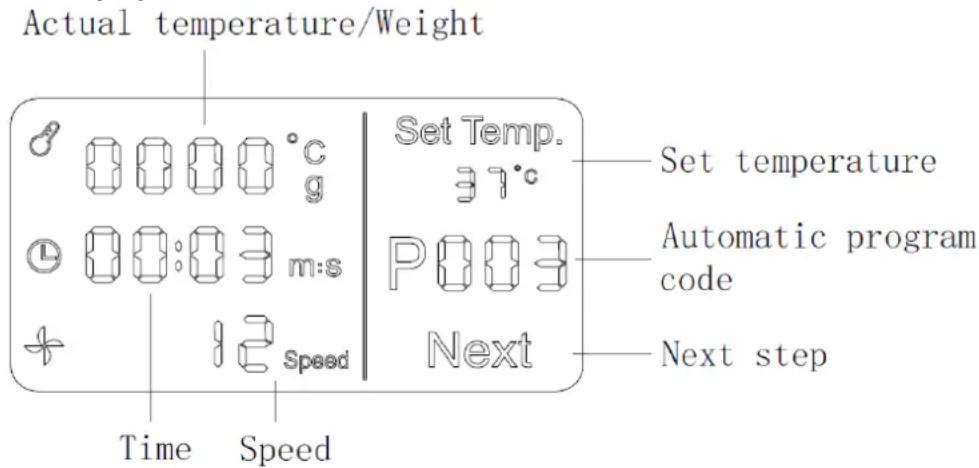
Time display:
If setting time, the LCD Time is down counting (...5 4 3 2 1) display; If not setting time, the LCD Time is counting (1 2 3 4 5...) display.
Actual temperature display:
LCD will display the real temperature of bowl inner.
Set temperature display
LCD will display the set temperature
Speed display:
Speed range: 1-12
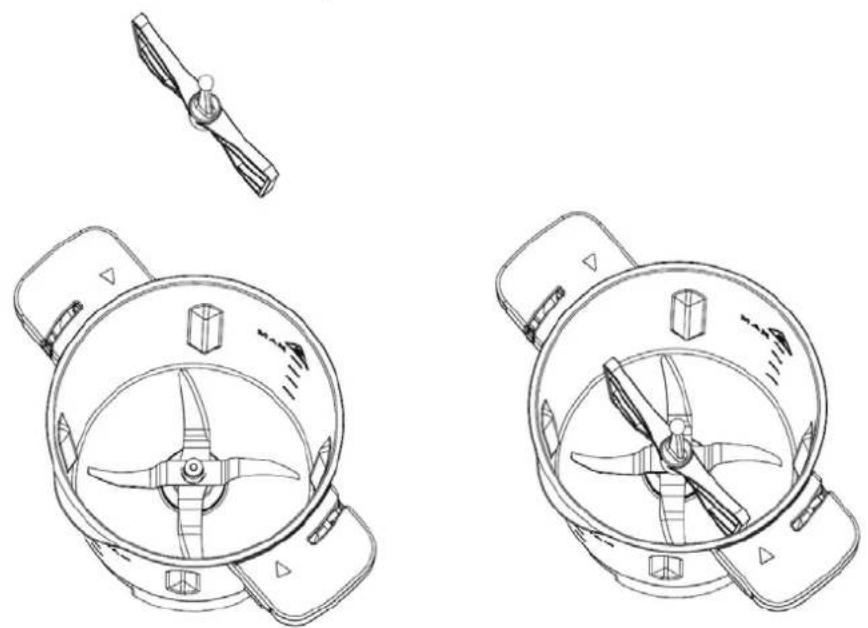
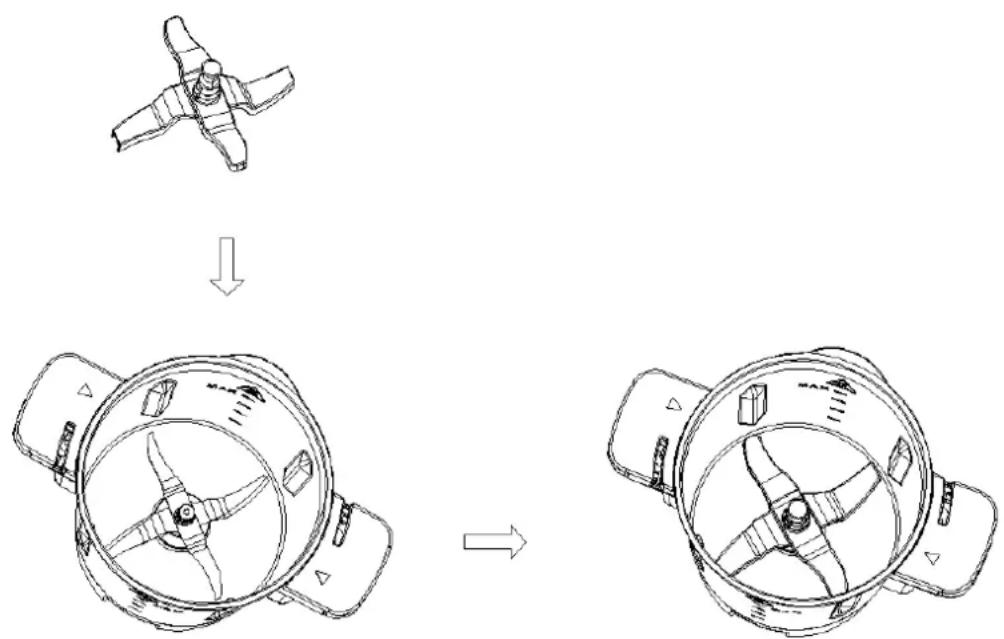
How to assemble the blade

- Push the blade through the opening in the bottom of the bowl, ensure blade lock buckle in correct position.(See above figure)
- Put the spanner lock on blade base from the other side of bottom.
- Rotate the spanner clockwise slightly to ensure locked. (See above figure)
Caution:
- The blade is very sharp. Handle it with care. Only hold the upper part of the blade!
- The airproof ring must to be fitted on the blade. If there is no airproof ring,
the food to be chopped or cooked may leak out and damage the appliance.
While remove the blade from the bowl, please hold the upper part of the blade with one hand, and release the nut by spanner with the other hand. The blade is very sharp. Please handle it with care!
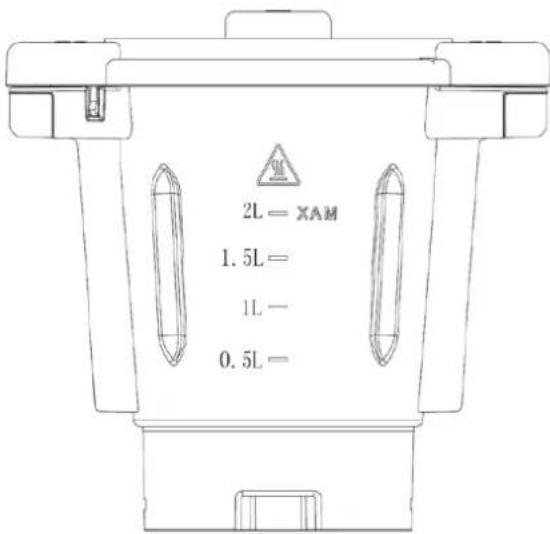
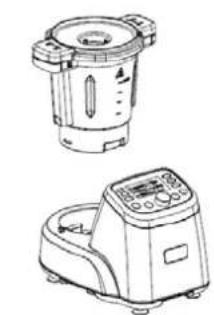
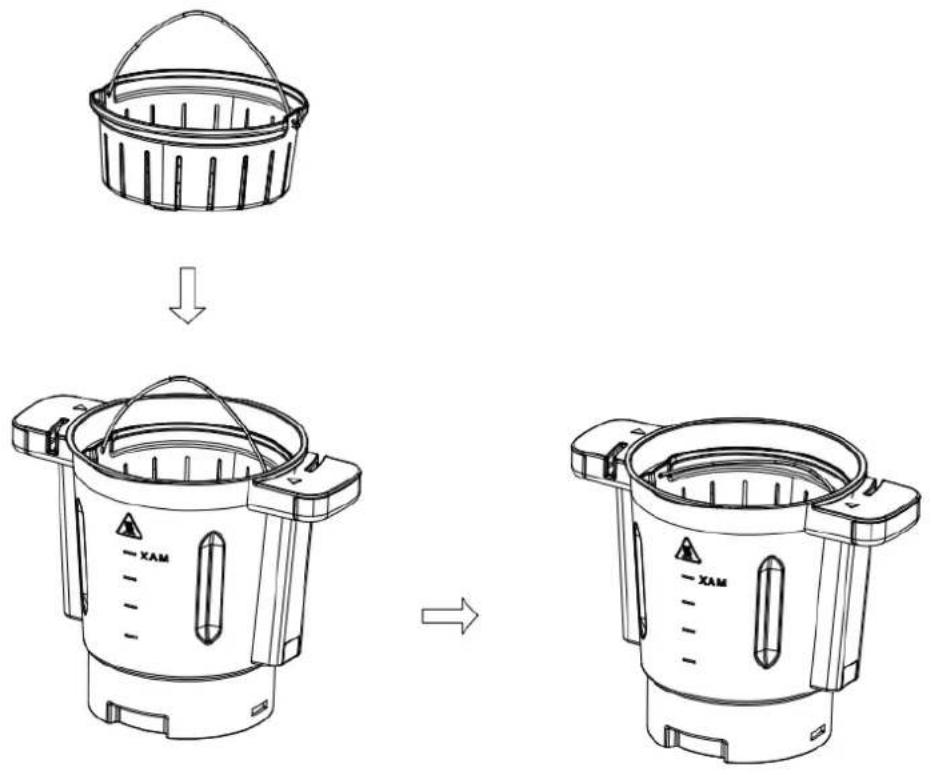
Bowl
Caution: "Hot surface" logo marked on the bowl
To indicate that the marked item can be hot and should not be touched without taking care! Maximum capacity: 3 liters Using capacity: 2 liters.
Take care: Never exceed maximum capacity (2L) limit of the bowl to ensure safe usage.
How to assemble/remove the bowl
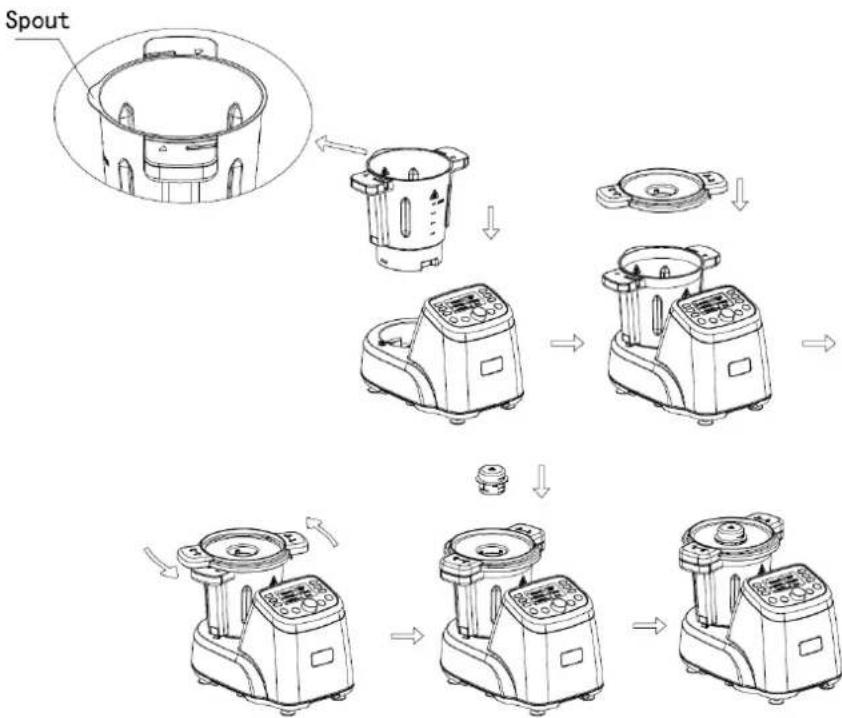
Place the bowl
Make sure that the blades have been placed inside the bowl.
- Place the bowl onto the bowl socket. Be sure to the spout of the bowl on the front.
- Rotate the bowl lid clockwise to lock bowl.
- Assembly the measure cup.
WARNING!
The appliance is fitted with a safety lock between the bowl and the main unit. The appliance will not work unless the lid has been closed properly.
Danger of the burns from the projection of food, never try and force open the lid of the bowl. Open the lid of the bowl only after the food prepared has stopped mixing.
Remove the bowl from the main appliance, please follow below steps:
- Stop the appliance
- Rotate the bowl lid anti-clockwise to release bowl.
- Draw the bowl out of the main appliance.
How to install the Airproof ring1/2
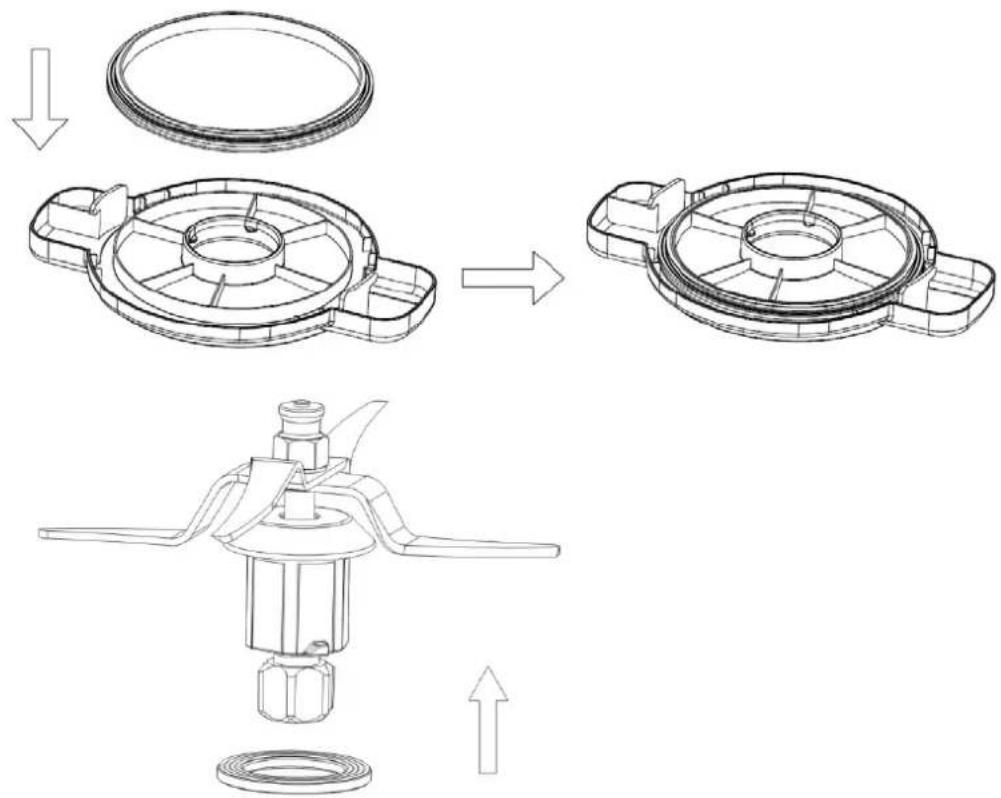
Please install "airproof ring" according to the above figure.
Working mode
Mode 1-Only mix food
The blade is perfectly suited for such as chopping food and making dough etc.
Please follow the steps:
- assemble the blade to the bowl
- assemble the bowl to the main appliance.
- Then cover the bowl lid.
- Plug in and turn on the power switch.
- Set the time you need, select the speed. Press the Start/Stop/Reset button the appliance start working.
- Sound "Beep" will be heard 30 seconds when the working automatically stopped.
-
After use, turn the main appliance off. Remove the bowl from the bowl socket; take off the chopping bowl lid.
-
Take out the processed food from the bowl.
Caution:
- The blade is very sharp. Handle it with care!
- Only hold the upper part of the blade!
- For processing the hard food such as coffee beans and almond, don't chop it longer than 40 seconds. And rest the appliance at least 10 minutes before the next operation!
- The maximum of kneading dough is 500g. Don't make the dough more than 500g!
Mode 2-Only heating food
The appliance is perfectly suited for preparing some food, such as cooking baby food, risotto, marmalade, vegetable soup etc.
Please follow the steps:
- assemble the blade to the bowl
- assemble the bowl to the main appliance.
- Then cover the bowl lid.
- Plug in and turn on the power switch.
- Set the time you need. Set the temperature. Press the Start/Stop/Reset button, machine start heating; the heating indicator light is flashing.
- Sound "Beep" will be heard 30 seconds when the working automatically stopped.
- Turn the main appliance off. Remove the bowl lid.
- Take out the processed food from the bowl.
Caution:
- Don't touch the metal part of the bowl or blade while it is hot!
- Only hold the handle of the bowl to move the bowl!
- Never heat up the bowl when it is empty!
- Don't heating milk more than 500ml!
Mode 3-Heating+mixing
The appliance is perfectly suited for preparing some food, such as cooking baby food, risotto, marmalade, vegetable soup etc.
Please follow the steps:
- assemble the blade to the bowl
- assemble the bowl to the main appliance.
- Then cover the bowl lid.
- Plug in and turn on the power switch.
- Set the time you need. Set the temperature. Select the speed. Press the Start/Stop/Reset button the appliance starts to working and the heating indicator light is flashing, appliance will keep warm in the set temperature
- Sound "Beep" will be heard 30 seconds when the working automatically stopped.
- Turn the main appliance off. Remove the bowl lid.
- Take out the processed food from the bowl.
Caution:
- Don't touch the metal part of the bowl or blade while it is hot!
- Only hold the handle of the bowl to move the bowl!
- Never heat up the bowl when it is empty!
- Don't heating milk more than 500ml!
- Safety protection under the high temperature: When then actual temperature
appliance will arrive the target speed slowly and the heating will be closed .
Mode 4- Steaming 1(outside steamer)
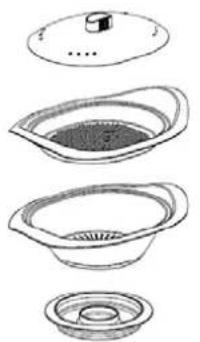
The steamer is perfectly suited for preparing some food such as vegetables with meat, sausages, steamed bread, steamed fish etc.
You can use the steamers in either of the following two combinations:
Combination 1: Lid+ steamer (Tray) (M) + Steamer (N)
Use this combination for cooking different foods.
Combination 2: Lid + Steamer (N)
Use this combination for larger amount of the same food, e.g. vegetables, potatoes or large pieces of meat or sausages.
Please follow the steps:
-
Assemble the blade to the bowl.
-
Assemble the bowl to the main appliance.
-
Add the water (0.5L≤ water ≤ 2L) in the bowl. (Caution: The water in the bowl should be more than 0.5 liter. 0.5L water can be used for steaming food for 30 minutes.)
-
Then cover the bowl lid and remove the measure cup.
- Assemble the outside steamer.
- Plug in and turn on the power switch.
- Choose working mode (only heating mode or heating+ mixing mode optional) to steaming.
Tips: Make sure airproof ring (C) install on the bowl lid, and then cover the bowl lid.
Steaming 2(inside steamer)
Install the inside steamer
- Assemble the blade to the bowl
- Assemble the bowl to the main unit
- Add the water (0.5L≤water≤2L) in the bowl. (Caution: The water in the bowl should be more than 0.5 liter. 0.5L water can be used for steaming food for 30 minutes.)
- Then cover the bowl lid.
- Then install the inside steamer into the bowl.
- Final select working mode (optional : heating mode or heating+ mixing mode) to steaming.
- When steaming finished please use the spatula take out the inside steamer, please don't take it by hand in case of scalding.
Tips: Make sure airproof ring (C) install on the bowl lid, and then cover the bowl lid
Caution:
- Danger of scalding by hot steam and hot condensed water!
-
Never use the steamer without lid!
-
If the lid is not fitted properly, the steam will escape and food inside steamer will not cook properly!
- Never leave the measuring cup on the bowl lid when using the steamer!
- The hot steam and hot condensed water is dangerous. Please handle it carefully!
- 30 minutes steam cooking requires 0.5 liter (500ml) of water, you need add around 250ml of water for each additional 15 minutes!
- The spatula is used for take out of the inside steamer and moving the food out of the bowl. Don't use it while the blade is running!
Remove the inside steamer
- Use the spatula take out the inside steamer.
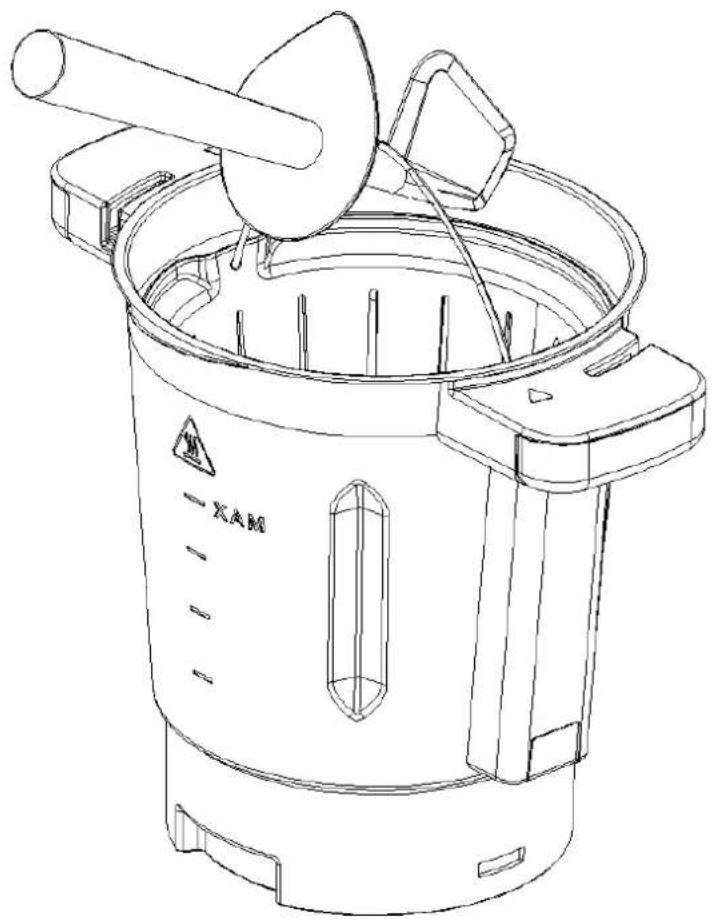
How to use stirring attachment (Butterfly)
The butterfly will help you to achieve the best results while whisking cream, beating mayonnaise or egg white. Install/remove the butterfly
- Hold the ball-shaped end of the butterfly.
- Insert the butterfly on the upper part of the blade. (See the above figure) If you want to remove the butterfly from the blade, just hold the ball-shaped end and pull it out with rotations in both directions.
- The speed is limited 1 to 5 speeds when use butterfly. Otherwise the butterfly easy breaks.
Use the butterfly
Please follow the steps:
-
Install the blade and butterfly, put the food in to the bowl
-
Assemble the bowl to the main unit.
- Install the bowl on the main appliance.
- Plug in and start the appliance.
- Set the time you need, select the speed (1-5).
- Sound "Beep" will be heard 30 seconds when the working time is automatic stop.
- After use, turn the main appliance off. Remove the chopping bowl lid.
- Take out the processed food from the bowl.
Caution:
- Only starts appliance after the butterfly has been positioned into place!
- Don't add too hard ingredients that might damage or block the butterfly when the blade is in motion and the butterfly is fitted!
How to use stirring attachment (blade cover)
Install/remove the blade cover
- Hold the ball-shaped end of the blade cover.
- Insert the blade cover on the upper part of the blade. (See the above figure)
If you want to remove the cover blade from the blade, just hold the ball-shaped end and pull it out with rotations in clockwise directions.
3. The speed is limited 1 to 5 speeds when use butterfly. Otherwise the blade cover is easy break.
Caution:
- The speed is limited 1 to 5 speeds when use blade cover. Otherwise the cover is easy break.
-
The temperature limited less than 100 °C.
-
Please don't use the blade cover if stirring the liquid foods.
Fault code:
| Code Explanation Solution | ||
| E01 | When machine heating the temperature detector open circuit, or meaning the NTC open circuit. | Maintenance department to repair |
| E02 | Machine failures | Return to seller and repair |
| E03 | 2. The bowl does not install on the unit. 2. bowl lid does not install 3. or bowl lid was installed incorrectly | Turn off the machine, install the bowl, or cover the lid, or take out the bowl lid and reinstall it correctly according to the IM, reset the machine. |
| E04 | 1. The ingredients is too more or the speed is too low lead to motor cannot running. 2. The machine motor have high temperature protect, after the machine working long time cause motor's temperature too high lead to motor cannot running. | 1. Reduce some ingredients or set higher speed. 2. Stop working few minutes. |
| E05 Dry burning | Turn off the machine and let the appliance cool down then restart it. | |
| E06 | Machine failures | Return to seller and repair |
| E07 | Machine failures | Return to seller and repair |
Noted: if all of solutions still not working, please return to seller and repair.
Cleaning
- Before you clean the appliance, switch the appliance off and remove the plug from the socket.
- While cleaning, don't immerse the bowl in water.
- After the bowl cool down, remove the blade from the bowl. Clean the inside and outside of the bowl. Always keep the contact pins at the bottom of the bowl clean and dry. Only Wipe the contact pins with a wet cloth!
- Unscrew the screw ring and remove all parts of the attachment. Don't clean the metal bowl and blade in the dishwasher!
- Never use pointed or sharp objects for cleaning as this may damage functional parts or affect the safety of the appliance.
- The blade is very sharp! Handle it with care!
- Wash all parts in hot soapy water. Clean them immediately after use. Rinse them with clear hot water and dry them immediately.
- We advise you to lubricate the blade with some vegetable oil.
- Only wipe the main appliance with a damp soft cloth!
- If the bowl and blade is hard to clean. You may add some hot soapy water in the bowl and run the appliance at speed 1 for few seconds.
REMOVAL OF APPLIANCES USED

Directive 2002/96/EC on waste electrical and electronic Equipment (WEEE) requires that the appliance uses are not disposed of using the normal municipal waste. Old appliances must be collected separately in order to optimize the recovery and recycling of materials they contain and reduce the impact on human health and the environment.
The symbol of the dustbin is used on all products to remind the obligations for separate collection. Consumers should contact their local authorities or dealer regarding the steps to follow for the removal of their old appliance. If you proceed with the scrapping of old equipment, be sure to render useless what could be dangerous: disconnect the power cable flush with the device.
Danger:
Never attempt to use your appliance, if it shows signs of damage or the power cord or plug is damaged. If the power cord is defective it is important to have it replaced with the after sales service to eliminate any danger.
Only qualified and authorized persons are authorized to carry out repairs to your appliance. Any repairs not in accordance with standards could significantly increase the level of risk for the user!
Defect resulting from improper handling, degradation or attempted repairs by third parties voids the warranty on the product. This also applies in case of normal wear and accessories from the appliance.
Important!
We recommend that you keep the packaging of your device at least for the duration of the warranty. The
guarantee does not apply without the original packaging.
Warranty:
Your device has one year warranty. The warranty does not cover wear and breakage following a wrong use of the product.
FAGOR


- Important:
- PARTS NAME:
- Temperature button
- Timer button
- Speed button
- Cook
- Steam
- Mixer
- Beater
- Pulse button
- Programme button
- Turbo button
- Start/Stop/Reset Knob
- Safety protection under the high temperature
- Prompt function:
- LCD Display
- Time display:
- Actual temperature display:
- Set temperature display
- Speed display:
- How to assemble the blade
- Caution:
- Bowl
- How to assemble/remove the bowl
- Place the bowl
- WARNING!
- Remove the bowl from the main appliance, please follow below steps:
- How to install the Airproof ring1/2
- Working mode
- Mode 1-Only mix food
- Mode 2-Only heating food
- Mode 3-Heating+mixing
- Mode 4- Steaming 1(outside steamer)
- Combination 2: Lid + Steamer (N)
- Steaming 2(inside steamer)
- Install the inside steamer
- How to use stirring attachment (Butterfly)
- Use the butterfly
- How to use stirring attachment (blade cover)
- Install/remove the blade cover
- Cleaning
- REMOVAL OF APPLIANCES USED
- Danger:
- Important!
- Warranty:
- FAGOR
Brand : FAGOR
Model : FG508
Category : Multi-cooker