USER MANUAL Viva Prestige RI8437 GAGGIA
natural_image
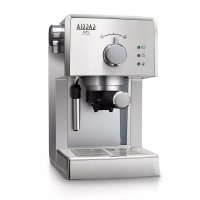
Exterior view of a Gaggia VIVA Prestige espresso machine (no text or symbols on the device itself)
ENGLISH
DANSK
DEUTSCH
ESPAÑOL
FRANÇAIS
ITALIANO
NEDERLANDS
NORSK
PORTUGUÊS
SVENSKA
ΕΛΛΗΝΙΚΑ
РУССКИЙ
GAGGIA VIVA
STYLE - CHIC / DELUXE / PRESTIGE
RI8433 (SIN044 GBUL) / RI8435 (SIN044 GMUL) / RI8437 (SIN044 GTUL)
Operating instructions
Brugsanvisning
Bedienungsanleitung
flowchart
graph TD
    A["Panel 1"] --> B["Panel 2"]
    B --> C["Panel 3"]
    C --> D["Panel 4"]
    D --> E["Panel 5"]
    E --> F["Panel 6"]
    F --> G["Panel 7"]
    G --> H["Panel 8"]
    H --> I["Panel 9"]
    I --> J["Panel 10"]
    J --> K["Panel 11"]
    K --> L["Panel 12"]
    L --> M["Panel 13"]
    M --> N["Panel 14"]
    N --> O["Panel 15"]
    O --> P["Panel 16"]
    P --> Q["Panel 17"]
    Q --> R["Panel 18"]
    R --> S["Panel 19"]
    S --> T["Panel 20"]





English 6
Dansk 20
Deutsch 33
Español 48
Français 62
Italiano 77
Nederlands 92
Norsk 107
Português 120
Svenska 135
Ελληνικα
Русский 163
148
6 English
This machine is equipped with safety features. Nevertheless, read and follow the safety instructions carefully and only use the machine as described in these instructions, to avoid accidental injury or damage due to improper use of the machine. Keep this safety booklet for future reference.
Warning
General
- Check if the voltage indicated on the machine corresponds to the local mains voltage before you connect the appliance.
- Connect the machine to an earthed wall socket.
- Do not let the power cord hang over the edge of a table or worktop and do not let it touch hot surfaces.
- To avoid the danger of electric shock, never immerse the machine, mains plug or power cord in water or any other liquid.
- Do not pour liquids on the power cord connector.
- To avoid the danger of burns, keep body parts away from hot water jets produced by the machine.
- Do not touch hot surfaces. Use handles and knobs.
- Switch off the machine with the main switch located on the back (if present) and remove the mains plug from the wall socket:
- If a malfunction occurs.
- If you are not going to use the appliance for a long time.
- Before you clean the machine.
- Pull at the plug, not at the power cord.
- Do not touch the mains plug with wet hands.
- Do not use the machine if the mains plug, the power cord or the machine itself is damaged.
- Do not make any modifications to the machine or its power cord.
- Only have repairs carried out by a service center authorized by Gaggia to avoid a hazard.
- The machine should not be used by children younger than 8 years old.
English
- This machine can be used by children aged from 8 years and above and by persons with reduced physical, sensory or mental capabilities or lack of experience and knowledge if they have been given supervision or instruction concerning use of the machine in a safe way and if they understand the hazards involved.
- Cleaning and user maintenance shall not be made by children unless they are older than 8 and supervised.
- Keep the machine and its cord out of the reach of children aged less than 8 years.
- Children should be supervised to ensure that they do not play with the machine.
- Be careful when you dispense hot water. Dispensing may be preceded by small jets of hot water. Wait until the end of the dispensing cycle before you remove the hot water dispensing spout.
Caution
General
- This machine is intended for normal household use only. It is not intended for use in environments such as staff kitchens of shops, offices, farms or other work environments.
- Always put the machine on a flat and stable surface. Keep it in upright position, also during transport.
- Do not place the machine on a hotplate or directly next to a hot oven, heater or similar source of heat.
- Only put ground coffee in the pressurized filter holder. Putting coffee beans, instant coffee, unroasted coffee beans or any other substance in the pressurized filter holder may cause damage to the machine. In this case repair is not covered by warranty.
- Let the machine cool down before you insert or remove any parts. The heating surfaces may retain residual heat after use.
- Never touch the water drain hose (if any) when using the machine, since it could be hot. Let it cool down first.
8 English
- Never fill the water tank with warm, hot or sparkling water, as this may cause damage to the water tank and the machine.
- Never use souring pads, abrasive cleaning agents or aggressive liquids such as petrol or acetone to clean the machine. Simply use a soft cloth dampened with water.
- Descale your machine regularly. Not doing this will make your appliance stop working properly. In this case repair is not covered by your warranty.
- Do not keep the machine at temperatures below 0^ C/ 32^ F. Water left in the heating system may freeze and cause damage.
- Do not leave water in the water tank when you are not going to use the machine for a long period of time. The water can become contaminated. Use fresh water every time you use the machine.
- Never use any accessories or parts from other manufacturers or that Gaggia does not specifically recommend. If you use such accessories or parts, your warranty becomes invalid.
- Regular cleaning and maintenance prolongs the lifetime of your machine and ensures optimum quality and taste of your coffee.
- The machine is exposed continuously to moisture, coffee and scale. Therefore it is very important to regularly clean and maintain the machine as described in the user manual and shown on the website. If you do not perform these cleaning and maintenance procedures, your machine eventually may stop working. In this case repair is not covered by warranty.
- Do not clean the pressurized filter holder in the dishwasher and do not use washing-up liquid or a cleaning agent to clean it. This may cause the pressurized filter holder to malfunction and may have a negative effect on the coffee taste.
- Do not dry the brew group with a cloth to prevent fibers from collecting inside the brew group.
- Never drink the solution dispensed during the descaling process.
- Do not remove the pressurized filter holder while brewing coffee. Hot water drips may spill out during the warm-up phase of the brew group.
- The machine shall not be placed in a cabinet when in use.
Machines with classic milk frother
Warning
- To avoid the danger of burns, be aware that dispensing may be preceded by small jets of hot water.
- Never touch the classic milk frother with bare hands, as it may become very hot. Use the appropriate protective handle only.
Caution
- After frothing milk, quickly clean the classic milk frother by dispensing a small quantity of hot water into a container. Then remove the external part of the classic milk frother and wash it with lukewarm water.
Machines with automatic milk frother
Warning
- To avoid the danger of burns, be aware that dispensing steam or hot water may be preceded by small jets of hot water. Never touch the hot water/steam dispensing spout with bare hands, as it may become very hot. Use the appropriate protective handle only.
- Never drink the solution dispensed during the monthly cleaning procedure of the automatic milk frother.
Caution
- For hygienic reasons, make sure that the outer surface of the hot water/steam dispensing spout is clean.
- After frothing milk, quickly clean the automatic milk frother by dispensing a small quantity of hot water. Follow the cleaning instructions in the user manual.
- Be careful, the hot water/steam dispensing spout could be hot if the machine has recently been used.
10
English
- Do not push the rubber fitting too far on the hot water/steam dispensing spout when you insert it. In this case, the automatic milk frother would not work correctly as it would not be able to suck up milk.
Electromagnetic fields (EMF)
This machine complies with all applicable standards and regulations regarding exposure to electromagnetic fields.
Recycling
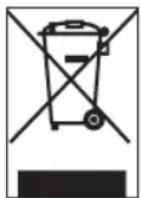
- This symbol means that this product shall not be disposed of with normal household waste (2012/19/EU).
- Follow your country's rules for the separate collection of electrical and electronic products. Correct disposal helps prevent negative consequences for the environment and human health.

Warranty and support
For service or support, contact your local dealer or an authorized service center.
Contact details are included in the warranty booklet supplied separately or visit www.gaggia.com or www.gaggia.it.
Table of Contents
Overview of the machine 11
First installation 12
Priming the circuit 12
Manual rinse cycle 12
How to use the machine 13
Brewing coffee using pre-ground coffee 13
Brewing coffee using coffee pods 14
Dispensing hot water 15
Frothing the milk 15
Cleaning 15
Cleaning the drip tray 15
Cleaning the classic pannarello 16
Cleaning the pressurized filter holder 16
Descaling 16
Descaling procedure 16
Troubleshooting 17

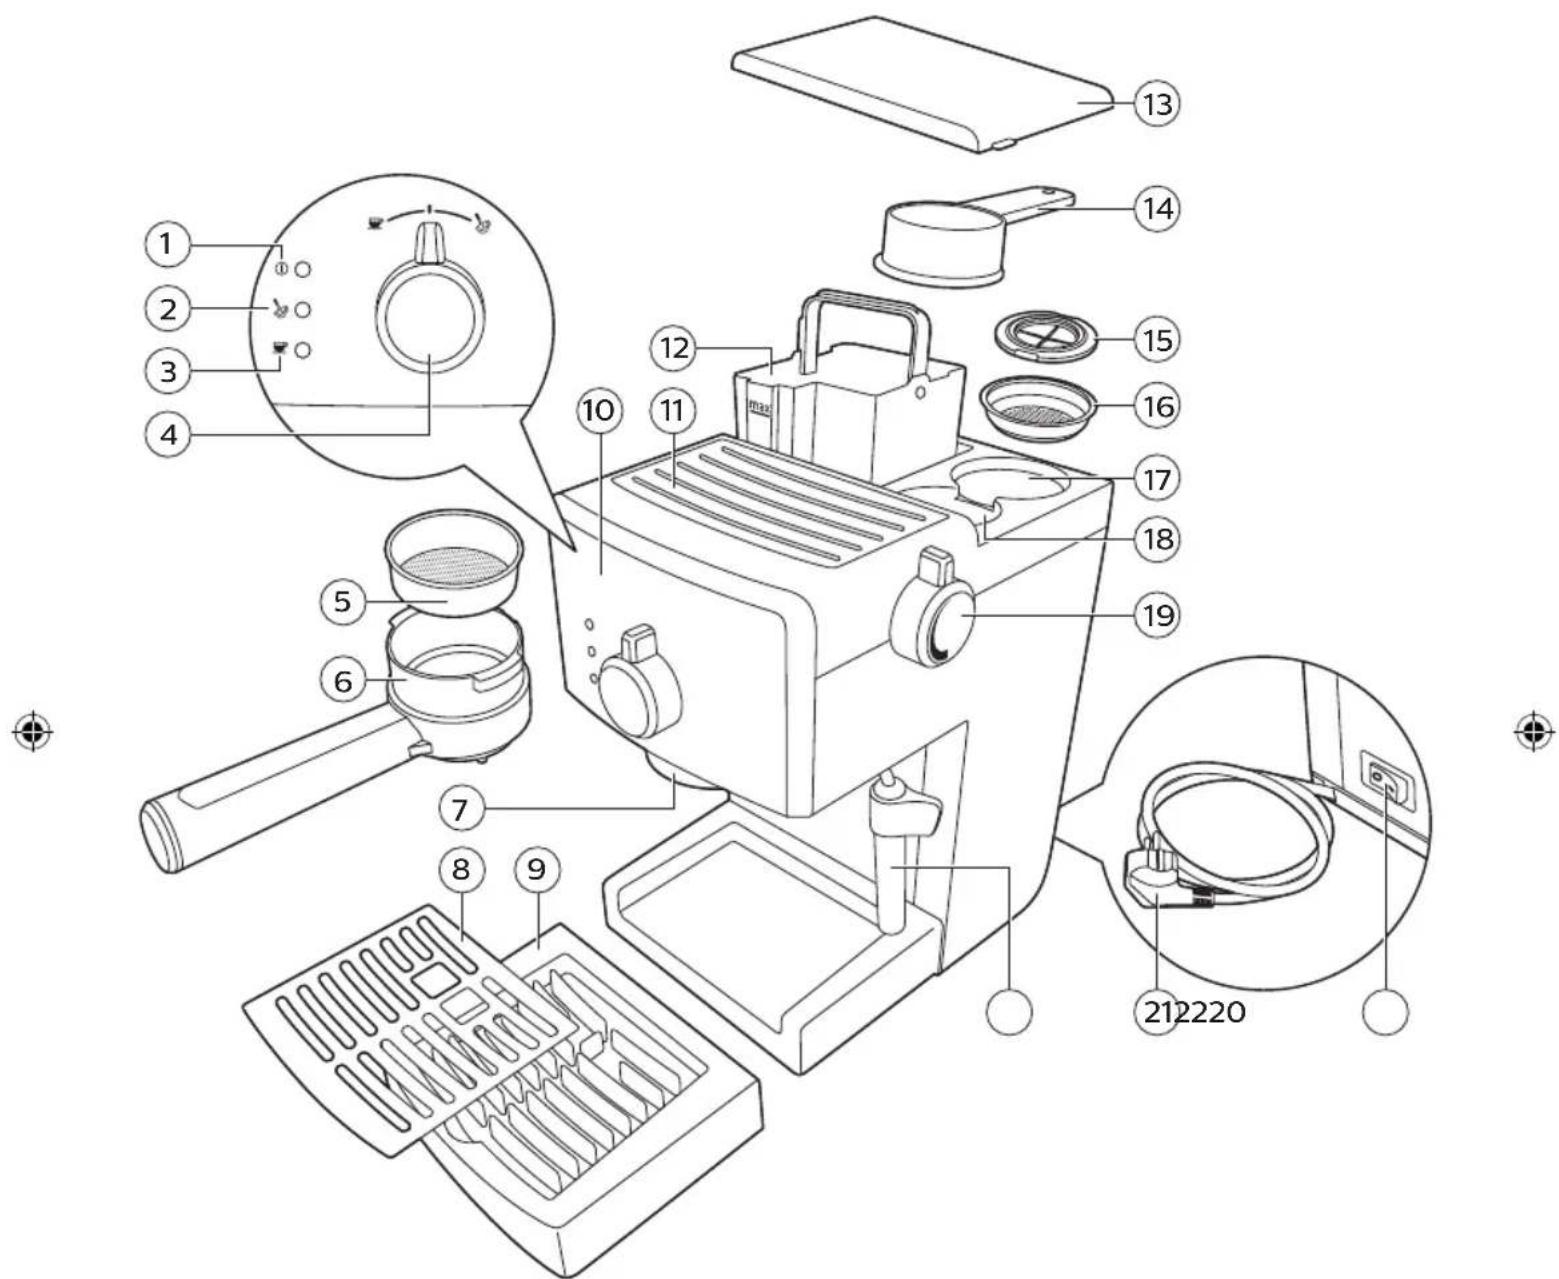
Overview of the machine
1 Power-on light
2 Steam ready indicator light
3 Machine ready indicator light
4 Selection knob
5 Pre-ground coffee filter
6 Pressurized filter holder
7 Coffee brewing unit
8 Drip tray grill (specific types only)
9 Drip tray
10 User interface
11 Cup holder rest
12 Water tank
13 Water tank lid
14 Pre-ground coffee measuring scoop
15 Pod filter adapter (specific types only)
16 Coffee pod filter (specific types only)
17 Seat for accessories
18 Pre-ground coffee measuring scoop seat
19 Hot water/steam knob
20 Classic Pannarello (specific types only)
21 Power cord
22 Power button (with energy saving switch)

12 English
First installation
1 Remove all packaging material from the machine.
2 Place the machine on a table or work surface away from the tap, from the sink and from sources of heat.
Note: leave at least 15 cm of vacant space at the top, at the rear and at the sides of the machine (fig. 1).
3 Remove the water tank lid, then remove water tank from the machine (fig. 2).
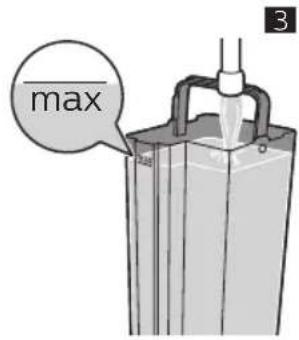
4 Rinse the water tank. Fill the tank with fresh water up to the maximum level (MAX) graduation mark (fig. 3).
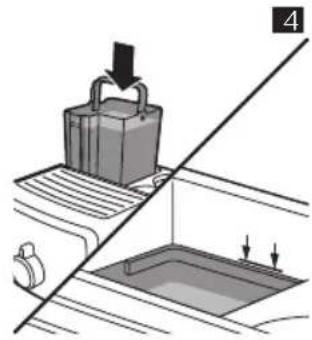
5 Place the water tank in the machine once again and push it downwards until the reference marks are visible (fig. 4).
6 Place the water tank lid on the machine.
Priming the circuit
When using the machine for the first time, or after the machine has not been used for more than 2 weeks, proceed as follows:
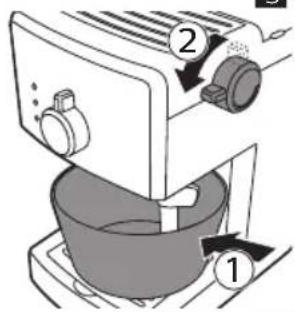
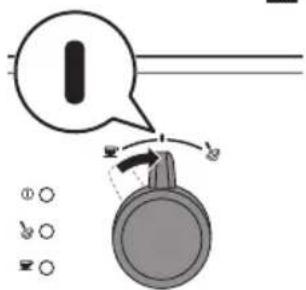
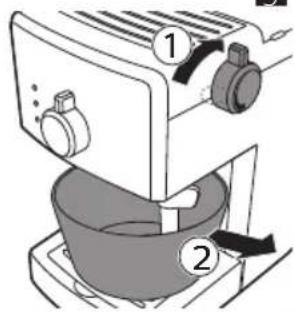
1 Place a container under the pannarello with the selection knob at the central standby position (fig.8). Turn the hot water/steam knob counter-clockwise (fig. 5).
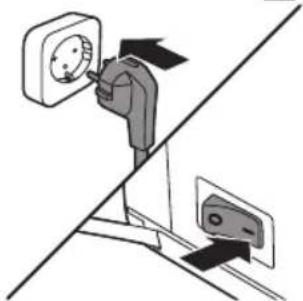
2 Insert the plug into the wall power socket and set the power button on "I" to switch on the machine (fig. 6).
- The power-on light will come on.
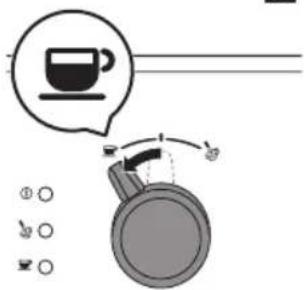
3 Turn the selection knob up to the coffee position (fig. 7).
- Hot water will flow out from the pannarello.
Note: To empty the container when full, move the selection knob to stand-by position (fig.8) and turn the hot water/steam knob clockwise to stop dispensing.
4 Once the water tank is empty, move the selection knob back to the central standby position (fig. 8).
5 Turn the hot water/steam knob clockwise. Remove the container (fig. 9).
Note: when using the machine normally, to prime the circuit you only need to dispense just one cup of water from the pannarello.
Manual rinse cycle
Note: the circuit needs to be primed should the the tank be completely empty.
1 Rinse the water tank. Fill the tank with fresh water up to the maximum level (MAX) graduation mark (fig. 3).
2 Place the water tank in the machine once again and push it downwards until the reference marks are visible (fig. 4).
3 Place a container under the classic pannarello and turn the hot water/steam knob counterclockwise (fig. 5).
4 Turn the selection knob up to the coffee position (fig. 7).
- Let the machine dispense water until the water tank is empty.
5 Move the selection knob back to the standby position (fig. 8) and turn the steam/hot water knob clockwise.
6 Fill the tank with fresh water up to the maximum level (MAX) graduation mark.

English
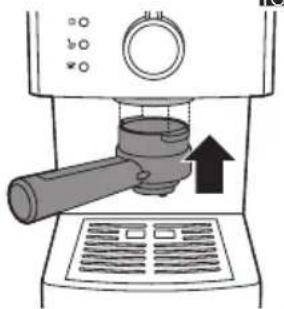
7 Insert the pressurized filter holder into the brewing unit from the bottom (fig. 10).
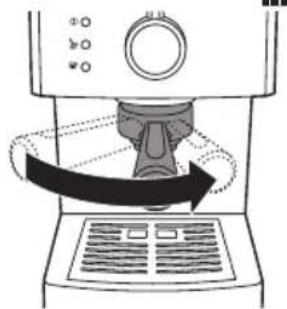
8 Turn the filter holder from left to right as much as possible and release the filter holder handle. The handle will automatically return leftwards again (fig. 11).
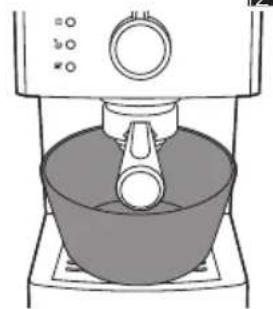
9 Place a container under the filter holder (fig. 12).
10 Turn the selection knob up to the coffee position (fig. 7).
- Let the machine dispense water until the water tank is empty.
Note: To empty the container when full, turn the selection knob to stand-by (fig. 8) to stop dispensing.
11 Once the water tank is empty, move the selection knob back to the standby position (fig. 8).
12 Fill the water tank with fresh water up to the MAX level graduation mark and wait until the "machine ready" indicator light comes on.
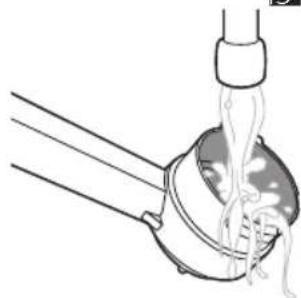
13 Turn the filter holder from right to left to remove it from the coffee brewing unit and rinse it using fresh water (fig. 13).
The machine is ready for use.
How to use the machine
Brewing coffee using pre-ground coffee
Warning: In order to avoid the risk of burns, do not turn the pressurized filter holder to remove it while dispensing is in progress.

1 Pre-heat the pressurized filter holder before brewing coffee for the first time.
2 Insert the filter holder into the coffee brewing unit from the bottom (fig. 10).
3 Turn the filter holder from left to right in position and release the filter holder handle (fig. 11). The handle will turn slightly to the left.
4 Turn the selection knob to the coffee position (fig. 7) until water flows out from the coffee brewing spouts.
5 Let the machine dispense one cup of water. Turn the selection knob to the standby position (fig. 8) to stop dispensing.
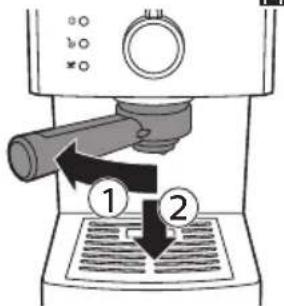
6 Turn the filter holder from right to left to remove it from the machine and pour the residual water (fig. 14).
Note: remove any coffee residue from the edge of the filter holder.
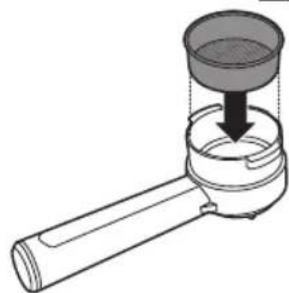
7 Ensure that the pre-ground coffee filter is inserted into the pressurized filter holder (fig.16). When using the machine for the first time, it comes with the pre-ground coffee filter already inserted.
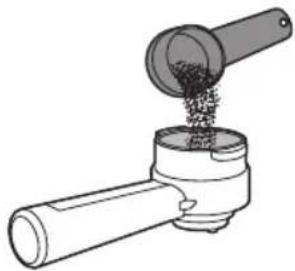
8 Use the measuring scoop found under the water tank lid, to add pre-ground coffee into the pressurized filter holder.
- To dispense one cup of coffee, add 1-1.5 measuring scoops of pre-ground coffee.
- To dispense two cups of coffee, add 2 measuring scoops of pre-ground coffee (fig. 15).
Note: The pre-ground coffee is pressed automatically. However, for better performance we recommend to press the coffee using the rear side of the measuring scoop.
9 Insert the filter holder into the coffee brewing unit.
10 Turn the filter holder from left to right in position and release the filter holder handle (fig. 11). The handle will turn slightly to the left.

14 English
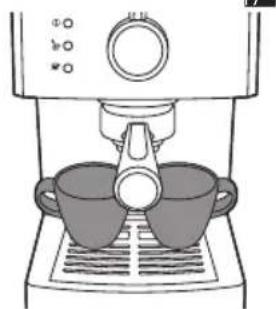
11 Place one or two cups under the pressurised filter holder (fig. 17).
Ensure that the cups are correctly positioned under the coffee brewing spouts.
12 Turn the selection knob up to the coffee position.
- The machine will start dispensing the coffee.
13 Turn the selection handle to the standby position once the cup or cups have the desired amount of coffee.
14 Remove the pressurized filter holder and empty it. Clean the pressurized filter holder under running water.
Note: The machine switches off after 30 minutes and switches to energy saving mode. Should this occur, use the on/off button located at the rear of the machine to restart the machine.
Brewing coffee using coffee pods
Tip: Clean the filter and coffee pod adapter after each use.
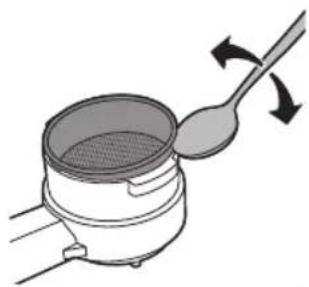
1 Use a teaspoon to remove pre-ground coffee from the pressurised filter holder (fig. 18).
2 Take the pod adapter and filter positioned beneath the water tank lid.
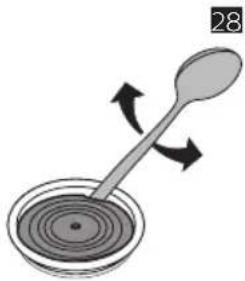
3 Use a teaspoon to remove the adapter from the pod filter. (fig. 28).
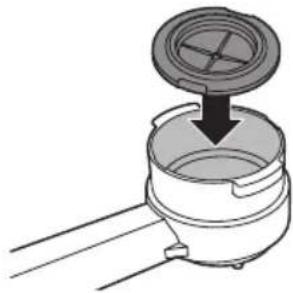
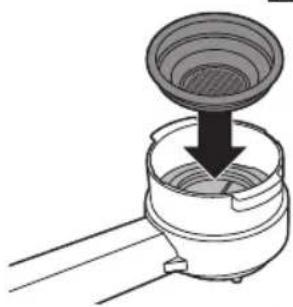
4 Insert the pod filter adapter into the pressurised filter holder with the convex side facing downwards (fig. 19).
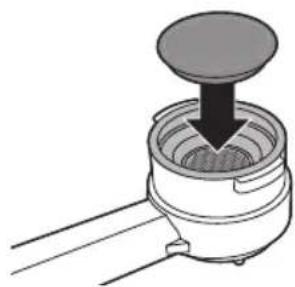
5 Place the coffee pod filter on the adapter into the filter holder (fig. 20).
6 Insert the pressurized filter holder into the coffee brewing unit from the bottom (fig. 10).
7 Turn the filter holder from left to right in position and release the filter holder handle (fig. 11). The handle will turn slightly to the left.
Note: The pressurized filter holder must be pre-heated when brewing coffee for the first time.
8 Turn the selection knob to the coffee position (fig. 7) to dispense one cup of water. Turn the selection knob back to the standby position (fig. 8) to stop dispensing.
9 Turn the filter holder from right to left to remove it from the machine and pour the residual water (fig. 14) but do not dry it.
10 Insert one single-dose coffee pod into the filter holder (fig. 21).
Note: ensure that the pod foil does not project from the edge of the filter holder.
11 Insert the filter holder into the coffee brewing unit from the bottom.
12 Turn the filter holder from left to right in position and release the filter holder handle. The handle will turn slightly to the left.
13 Place a cup under the filter holder.
14 Turn the selection knob up to the coffee position (fig. 7).
- The machine will start dispensing the coffee.
15 Turn the selection handle to the standby position once the cup has the desired amount of coffee.
16 Remove the filter holder and dispose the used coffee pod.

Dispensing hot water
Warning: Beware that dispensing could be preceded by little jets of hot water. Hence, move the steam dispenser using the protective handle only so as to avert the danger of burning.
1 Place a container or a glass under the classic pannarello and turn the hot water/steam knob counter-clockwise (fig. 5).
2 Turn the selection knob up to the coffee position (fig. 7).
- The machine starts dispensing hot water.
3 Turn the selection knob to the standby position once the machine has dispensed the desired amount of water (fig. 8).
4 Turn the hot water/steam knob clockwise. Remove the container or glass (fig. 9).
Frothing the milk
Warning: Beware that dispensing could be preceded by little jets of hot water. Hence, move the steam dispenser using the protective handle only so as to avert the danger of burning.
1 Place a cup under the pannarello.
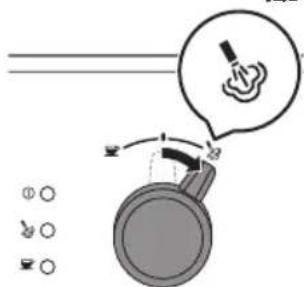
2 Turn the selection knob up to the steam position (fig. 22).
- The "machine ready" indicator light goes off.
3 Wait until the "steam ready" indicator light comes on. The machine is ready to dispense steam.
4 Turn the hot water/steam knob counter-clockwise to discharge any water from the pannarello.
5 Move the selection knob back to the central standby position and turn the hot water/steam knob clockwise. Remove the cup and empty it.
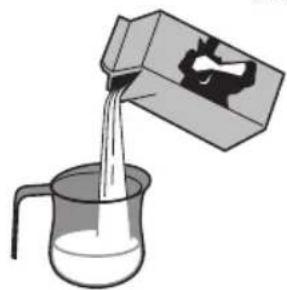
6 Fill a carafe with cold milk up to 1/3 (fig. 23).
7 Place a carafe under the pannarello.
8 Turn the hot water/steam knob counter-clockwise and move to the steam position. The machine will start dispensing steam, move the carafe carefully to create foam and turn the hot water/steam knob clockwise to stop dispensing steam.
9 Remove the carafe.
10 Place a cup under the pannarello, turn the hot water/steam knob counter-clockwise and discharge the water and milk residues from the pannarello. Remove the cup.
11 Turn the hot water/steam knob clockwise and move the selection knob to the standby position.
Cleaning
Regular cleaning and descaling will extend the useful life of the machine and will help to obtain supreme taste and quality coffee.
Cleaning the drip tray
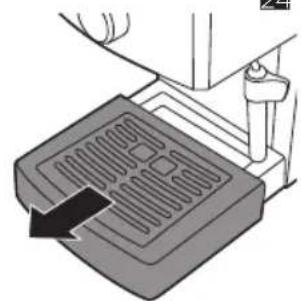
1 Remove the drip tray from the machine (fig. 24).
2 Empty the drip tray and rinse it under running water.
3 Place the drip tray in the machine once again.
16 English
Cleaning the classic pannarello
After preparing milk-based beverages, clean the classic pannarello.
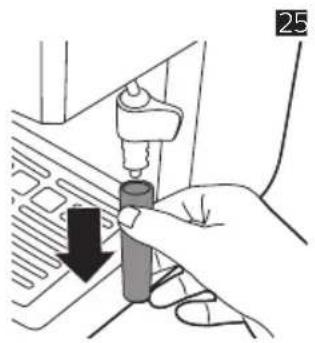
1 Remove the classic pannarello (fig. 25).
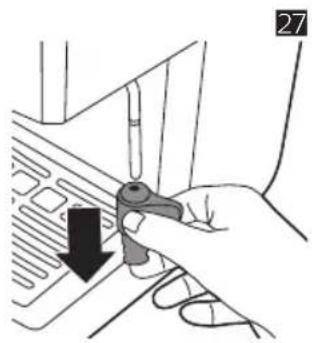
2 Remove the plastic handle of the classic pannarello from the steam wand (fig. 27).
3 Rinse with using fresh water.
4 Clean the steam wand using a damp cloth.
5 Insert the plastic handle and the classic pannarello into the steam wand once again (fig. 27).
Cleaning the pressurized filter holder
1 Remove the pre-ground coffee filter or the coffee pod filter from the filter holder and rinse it thoroughly using hot water.
2 If present, remove the adapter from the filter holder and rinse it thoroughly using hot water.
3 Rinse the pressurized filter holder both inside and outside using hot water (fig. 13).
Warning: Do not wash the pressurized filter holder in a dishwasher so as to avoid damaging it.
Descaling
Use Gaggia descaling solution only. Under no circumstances should you use a descaling solution based on sulfuric acid, hydrochloric acid, sulfamic or acetic acid (vinegar) as this may damage the water circuit in your machine and not dissolve the limescale properly. Not using the Gaggia descaling solution will void your
warranty. Failure to descale the appliance will also void your warranty

Descaling procedure
1 Insert the pressurized filter holder into the coffee brewing unit.
2 Remove the water tank and empty it.
3 Pour half of the descaling solution into the water tank. Fill the tank with fresh water up to the maximum level (MAX) graduation mark. Put the tank back into the machine.
4 Switch the power button to "I" to turn on the machine. Turn the selection knob up to the standby position.
5 Remove the classic pannarello and place a container under the steam wand.
6 Wait until the coffee ready indicator light comes on and dispense two cups of water (about 150 ml each) by turning the hot water/steam knob counter-clockwise and the selection knob to the coffee position (fig.7). Move the selection knob back to the standby position and turn the hot water/steam knob clockwise to stop dispensing.
7 Switch the power button to "O" to turn off the machine.
8 Let the descaling solution take effect for 15-20 minutes with the machine turned off.
9 Switch the power button to "I" to restart the machine.
10 Dispense another two cups (about 150 ml each) of hot water from the steam wand.
11 Switch the power button to "O" to turn off the machine and wait for 3 minutes.
12 Repeat steps 9 to 11 until the water tank is empty.
13 Rinse the water tank and fill it with fresh water up to the MAX graduation mark.
English
14 Place a container under the filter holder.
15 Set the power button on "I" to switch on the machine and turn the selection knob to the coffee position.
16 Dispense water until the water tank is empty. Move the selection knob back to the standby position.
17 Fill the tank with fresh water up to the maximum level (MAX) graduation mark.
18 Place a large container under the steam wand. Turn the hot water/steam knob counter-clockwise.
19 Turn the selection knob to the coffee position and let the machine dispense water until the water tank is empty.
20 Move the selection knob back to the standby position.
21 Turn the hot water/steam knob clockwise.
22 Repeat steps 13 to 21 described above.
23 Turn the filter holder from right to left to remove it from the coffee brewing unit and rinse it using fresh water.
24 Fill the tank with fresh water up to the maximum level (MAX) graduation mark.
25 Insert the classic pannarello into the steam wand once again.
The machine is ready for use.
Troubleshooting
This chapter summarises the most common problems you may encounter while using the machine. For support, please contact your local dealer or authorised service centre. The contacts are indicated in the warranty booklet provided separately, else visit www.gaggia.com or www.gaggia.it.
Problem Possible cause Solution
| The machine does not switch on. | The machine is not connected to a wall-mounted power socket. | Connect the machine to a wall-mounted power socket. |
| The power button is set to OFF position. | Ensure that the power button is on ON position. |
| The pump is very noisy. There is no water in the tank. Fill the tank with water and prime the circuit. |
| The water tank is not correctly placed. | Place the water tank in the machine once again and push it downwards until the reference marks are visible. |
| The coffee is too cold. Pre-heating not carried out. Preheat the filter holder. |
| The "machine ready" indicator light was off when you turned the selection knob to the coffee position. | Wait until the "machine ready" indicator light comes on. |
| The cups are cold. Preheat the cups using hot water. |
18
English
Problem Possible cause Solution
| The milk does not froth. The type of milk used is not suitable for frothing.. | Use of cold whole milk is recommended for the best result. Do not use powdered milk or skimmed milk. |
| It is not possible to make cappuccino. | The classic pannarello may be clogged. | Clean the classic pannarello. |
| The steam load in the boiler is discharged. | Prime the circuit. |
| No coffee is flowing out of the machine or just a few drops are dispensed. | The hot water/steam knob is in the opening position (turned counter-clockwise). | Turn the hot water/steam knob to the closing position (turned clockwise). |
| Limescale accumulated in the machine. | Descale the machine. |
| The pre-ground coffee filter or coffee pod filter in the filter holder is clogged. | Clean the pre-ground coffee filter or coffee pod filter. |
| The coffee pod used is unsuitable. | Use coffee pods made of paper with size appropriate for this machine. |
| The grain-size of the ground coffee used is too fine. | Use coffee with grain-size ground less fine. |
| The pre-ground coffee added into the coffee filter was pressed too much. | Do not press the coffee into the filter of the pre-ground coffee too much. |
| The filter is loaded with too much pre-ground coffee. | Reduce the amount of pre-ground coffee in the filter. |
English
19
| Coffee comes out from the edges of the filter holder. | The filter holder was not correctly inserted into the coffee brewing unit. | Insert the filter holder correctly. |
| The upper edge of the filter holder is not clean. | Clean the upper edge of the filter holder. |
| The coffee pod is not inserted correctly. | Insert the coffee pod correctly. Ensure that it does not project from the edge of the filter holder and that it is tightly-sealed. |
| The filter is loaded with too much pre-ground coffee. | Reduce the amount of pre-ground coffee in the special filter using the measuring scoop. |
| The machine turns off while dispensing coffee or hot water. | The energy saving mode is on. | Switch the power button to “I” to restart the machine. |
20
Dansk
Prosedyre for kalkfjerning 117
Problemløsning 118


Prosedyre for kalkfjerning
natural_image
Illustration of a kitchen appliance with two different parts, one showing upward arrows and the other showing a handle (no text or symbols)
natural_image
Diagram showing a container being placed on a surface with a drain, alongside a hand holding a downward arrow (no text or symbols present)
7
9
natural_image
Diagram showing a hand inserting a socket into a wall, with no text or symbols present.
6
11
13
natural_image
Illustration of a microwave oven with a hand mixer and upward arrow indicating action (no text or symbols)
10
natural_image
Illustration of a kitchen machine with a hand operating the oven and a black arrow indicating rotation (no text or symbols)
11
natural_image
Illustration of a kitchen appliance with a bowl on a stove (no text or symbols)
12
natural_image
Diagram of a medical procedure showing fluid flow through a tube and bulb (no text or labels)
7
14
natural_image
Diagram of a pipe feeding into a container with a funnel inserted (no text or symbols)
15
natural_image
Diagram of a mechanical device with a cylindrical component and a handle, showing a downward arrow indicating force or movement (no text or symbols present)
16
natural_image
Line drawing of a microwave oven with two cups on a stand (no text or symbols)
21
natural_image
Illustration of a pot with a stirring rod and a spoon, showing a rotating arrow (no text or symbols)
18
natural_image
Diagram of a mechanical component with a circular top and internal structure, no text or symbols present
19
natural_image
Diagram of a mechanical device with a downward arrow indicating force or direction (no text or symbols)
20
natural_image
Diagram of a mechanical device with a downward arrow indicating force or direction (no text or symbols)
21
22
natural_image
Illustration of a pouring liquid into a beaker with a lid (no text or symbols)
23
natural_image
Diagram of a mechanical component with a rectangular block and a tool, showing internal structure (no text or symbols)
24




natural_image
Hand inserting a plug into a component, showing a black arrow indicating the insertion direction (no text or symbols present)
natural_image
Illustration of a spoon stirring a bowl with liquid, no text or symbols present












flowchart
graph TD
    A["Panel 1"] --> B["Panel 2"]
    B --> C["Panel 3"]
    C --> D["Panel 4"]
    D --> E["Panel 5"]
    E --> F["Panel 6"]
    F --> G["Panel 7"]
    G --> H["Panel 8"]
    H --> I["Panel 9"]
    I --> J["Panel 10"]
    J --> K["Panel 11"]
    K --> L["Panel 12"]
    L --> M["Panel 13"]
    M --> N["Panel 14"]
    N --> O["Panel 15"]
    O --> P["Panel 16"]
    P --> Q["Panel 17"]
    Q --> R["Panel 18"]
    R --> S["Panel 19"]
    S --> T["Panel 20"]
GAGGIA S.p.A. reserves the right to make any necessary modification.
Sede Legale/Registered Office
Piazza A. Diaz, 1
20123 Milano - Italia
Capitale Sociale Euro 104.000 i.v.
REA MI1387376 - R.I. Cod.Fisc. 02069680367
Part. IVA : IT-13054780153
www.gaggia.it
www.gaggia.com
GAGGIA
MILANO