
19222 - Digital timer Rösle - Free user manual and instructions
Find the device manual for free 19222 Rösle in PDF.
| Product type | Digital timer |
| Brand | Rösle |
| Model | 19222 |
| Power supply | 2 CR2032 button cell batteries (3V) |
| Display | Large screen with red backlight |
| Clock mode | 12h/24h integrated |
| Number of timers | 2 independent (T1 and T2) |
| Maximum time per timer | 10 hours |
| Display precision | Up to 9h59 in hours/minutes, beyond that in minutes/seconds |
| Alarm signal | Visual (flashing) and audible (continuous or intermittent) |
| Pre-alarm | 5 minutes before the end for times > 15 minutes |
| Alarm duration | 1 minute, then automatic stop |
| Extension after alarm | 30 minutes without new setting |
| Mounting | Magnetic back for ferromagnetic surfaces |
| Housing material | Stainless steel plate, plastic |
| Non-slip feet | Silicone |
| Max mounting temperature | 50 °C |
| Dimensions (approx.) | 8 x 8 x 2 cm |
| Weight (with batteries) | Approx. 100 g |
| Care | Dry cloth, glass cleaner, do not immerse |
| Warranty | 5 years (excluding batteries) |
| Standards | CE (89/336/EWG) |
Frequently Asked Questions - 19222 Rösle
User questions about 19222 Rösle
0 question about this device. Answer the ones you know or ask your own.
Ask a new question about this device
Download the instructions for your Digital timer in PDF format for free! Find your manual 19222 - Rösle and take your electronic device back in hand. On this page are published all the documents necessary for the use of your device. 19222 by Rösle.
USER MANUAL 19222 Rösle
text_image
T1 T2 AM PM 88:88 M S ROSLEBatteriefachdeckel
Magnetfl äche
Silikonfüße

natural_image
Pure electrical circuit lines without any symbolstext_image
T1 T2 AM PM 88:00 H M Stext_image
CR-2032 CR-2032Thank you for choosing the superior quality digital Multi-Timer by RÖSLE. It’s a wise choice and one that will prove the test of time as a durable top quality product. To make sure you get optimum results and long-lasting service from your new kitchen accessory, we’ve compiled some important information plus tips for optimal use and aftercare, as well as safety guidelines.
Outstanding product features at a glance:
The digital Multi-Timer from RÖSLE is a reliable and practical aid when cooking, baking and barbecuing.
→ Comfortable and flexible time control with two separate digital timing functions for settings of up to ten hours
Timer also features an →inbuilt digital clock
Large ergonomic setting dial for →convenient setting of time span
Big format display with red back light for →easy readability
→ Clear audio and visual signals at rundown of pre-set timing
→ Magnetic rear plate for convenient positioning on metal surfaces such as fume extraction hoods, etc.
→Classic flat design with stainless steel front face
Uses commonly available batteries (2 pieces of type CR2032, 3V) →
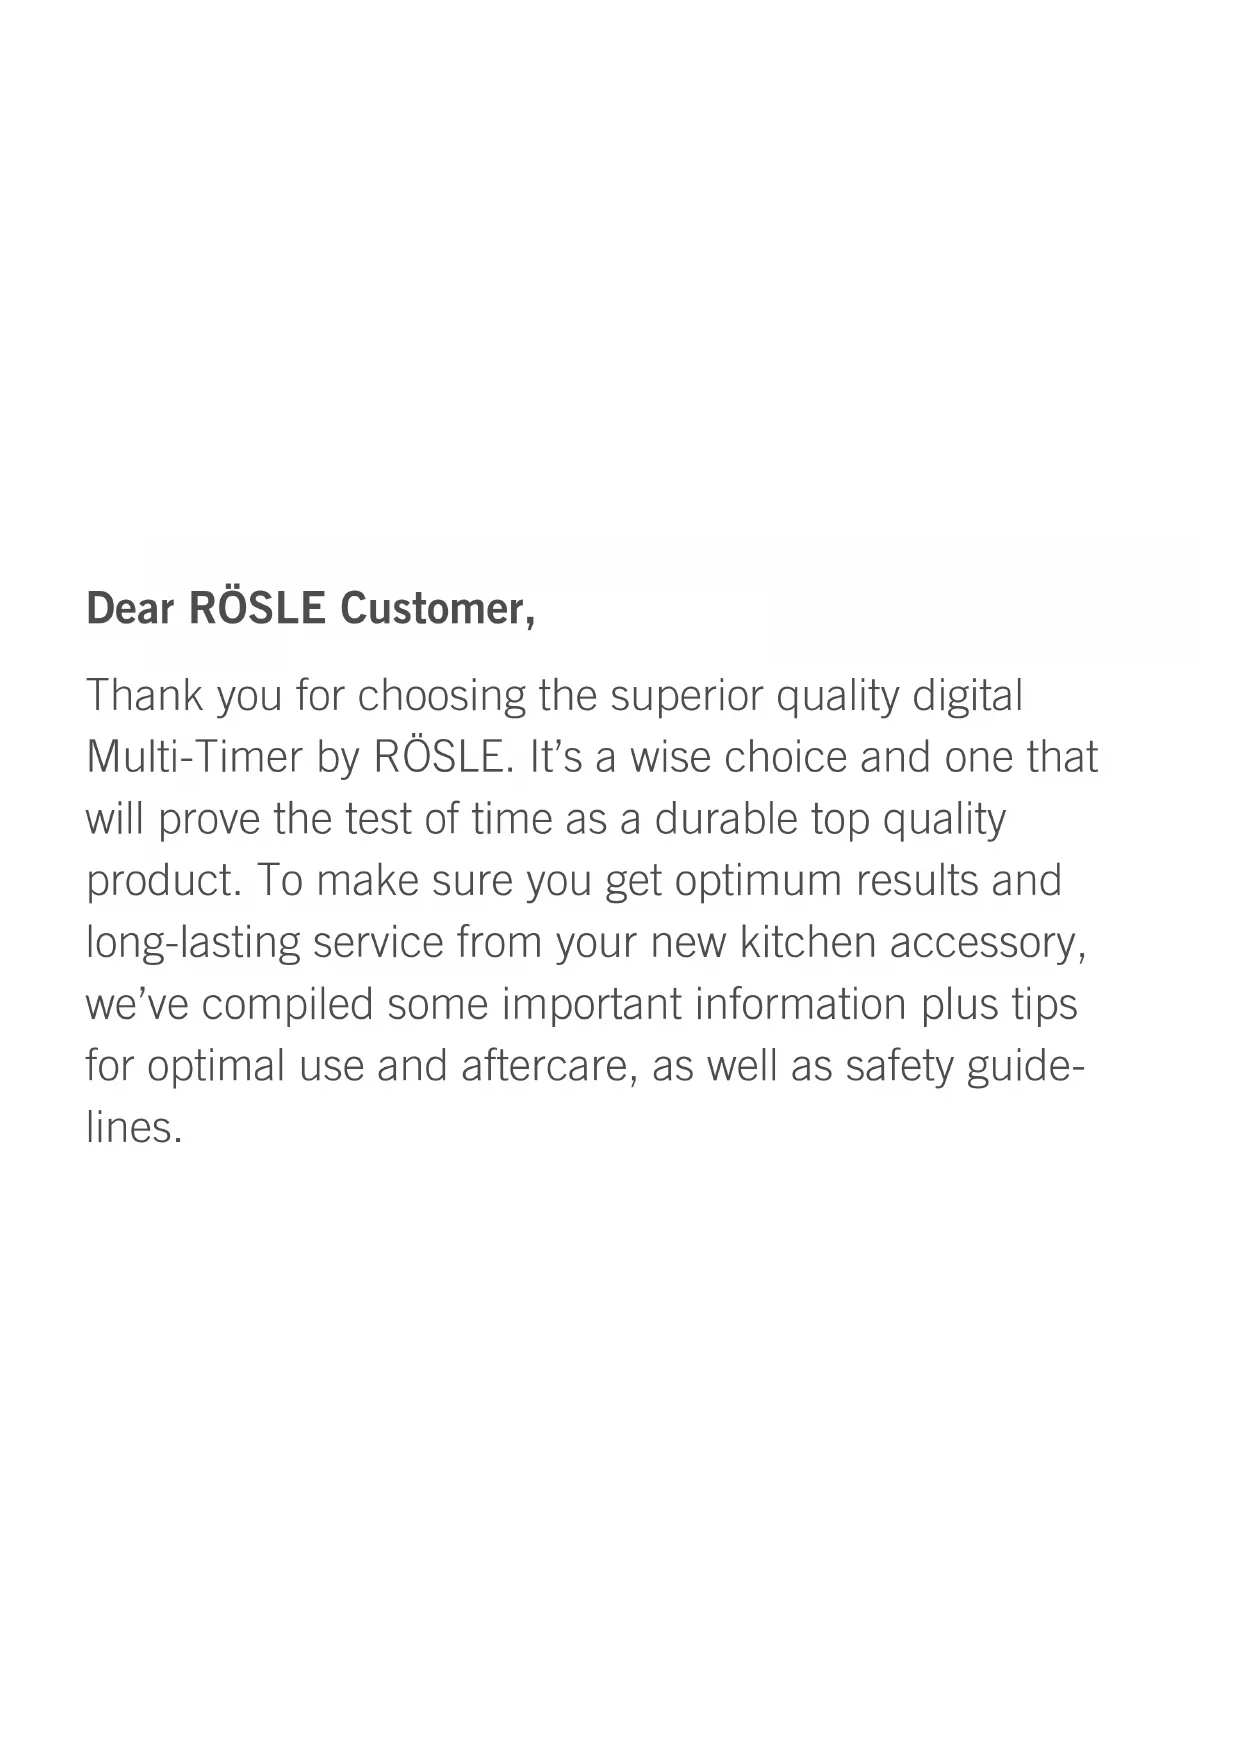
1. Close-up on the digital Multi-Timer
Setting Dial
Set Button
Display
text_image
T1 T2 AM PM 88:88 M S ROSLEBattery compartment lid
Magnetic plate
Silicone feet
natural_image
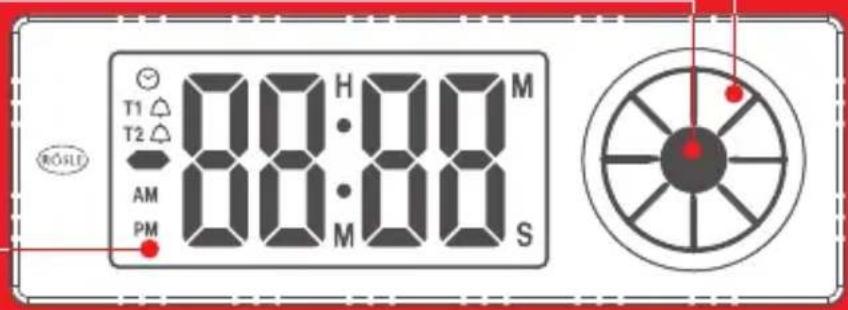
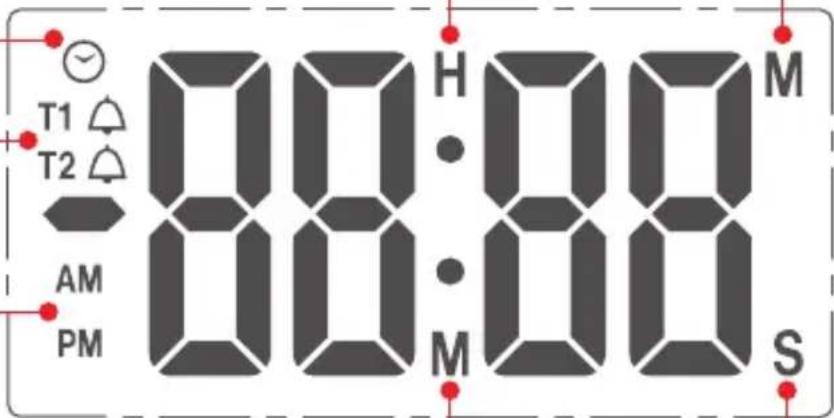
Pure diagram of a rectangular device with red dots and connecting lines, no text or symbols presentHours/minutes display
Symbol for clock function
Symbol for timer function
12 hour mode display
Minutes/seconds display
text_image
T1 T2 AM PM 88:00 H M S2. First time use / Setting time
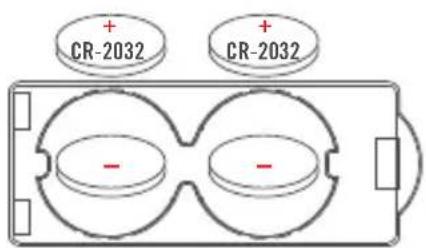
Open the battery compartment on the rear side of the timer and position the two provided batteries according to the indications on the lid. Close the battery compartment lid.
text_image
CR-2032 CR-2032The clock is now ready for setting and you can choose a display in either a 12 hour mode (i.e. from 0:00 AM to 11:59 PM) or a 24 hour mode (from 0:00 to 23:59). Use the setting dial to make your choice and confirm it by pressing the set button.
The appliance is now ready for setting the actual time in hours by using the setting dial. When done press the set button to confi rm. Minutes can be set next. Press the set button afterwards to confi rm. The set time will now appear on the display.
For re-setting press the set button and hold it down for three seconds. Re-setting is now possible starting with the choice of the 12 hour or 24 hour mode.
3. The Timer function
Starting Timer 1
To switch from the clock to the timer function, turn the setting dial clockwise. The timer mode will be activated and the display will change to 00M:00S.
Note:
When the timer is in operation the display shows minutes and seconds. If the set time span exceeds one hour, the display will change to hours and minutes. The corresponding indicators will appear in the display (see page 5). If you want to set a time span that exceeds one hour, the minutes and seconds can be set separately. To do this press the set button for three seconds while in the timer mode (00M:00S). The hour display will begin to flash and can be set using the setting dial. Confirm the change by pressing the set button. The timer will then switch to the minutes setting function. Once confirmed the timer will start - maximum time span is 9 hours 59 minutes.
To set the time span, turn the setting dial clockwise to choose the desired minutes setting and confirm by pressing the set button. The seconds can now be set in the same way and the timer can be started by pressing the set button. The display will now show the countdown of the minutes and seconds.
Note:
If the set timing period exceeds 15 minutes, a signal of 4 brief tones will be emitted 5 minutes before rundown to signal the approaching end of countdown. Cooking can be stopped earlier if desired.
If you wish to interrupt the countdown, simply press the set button. Another press on the set button will re-activate and continue the countdown.
Should you wish to reset the timer before the previous countdown has been completed, please proceed as follows: Briefly press the Set button to stop the count-down. Then press the Set button again and hold it pressed for three seconds. The display will change to 00M:00S and the timer can then be set to a new setting. If no new countdown is set within 5 seconds the Multi-Timer will return to Timer 1 (if Timer 1 is set) or otherwise to its clock function.
Once the countdown is complete (00M:00S) an alarm signal will be emitted (a continuous sequence of beeps) and the display will flash. The display will then show the time lapse since the completion of the countdown. A minus symbol (-00M:05S) will appear as an indicator. Cooking time can be extended if desired. The timer will continue to run for up to 30 minutes without reactivation. However, no further signal will be emitted so it is necessary to keep an eye on the cooking from then on.
To stop the acoustic signal, simply press the set button – the timer display will not be affected. When the timer is no longer required, press the set button to de-activate the timer function.
If the timer function is not used for a longer period the display of the appliance automatically reverts to its clock function.
Note:
In order to preserve the battery the acoustic signal and backlight are restricted to a maximum duration of one minute after which both will be switched off.
The timing display will continue to run for a maximum of 30 minutes after completion of countdown.
After that the timing will be terminated and a long acoustic signal will be emitted.
Starting Timer 2
In order to start the second timer, the first timer must already be in operation. Turn the setting dial clockwise. The display will show OOM:00S for Timer 2. Set the desired time span as described for Timer 1. The acoustic signal is distinctly different with an interrupted tone pattern. To return to Timer 1 simply turn the setting dial. A T1 or T2 symbol will be on display in the upper left corner to clearly indicate which timer is in use.
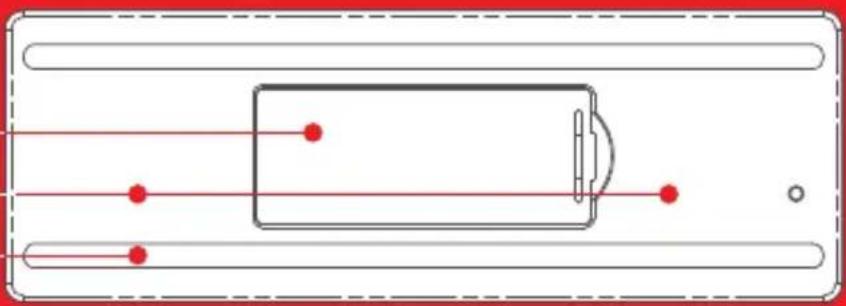
4. Attachment
The digital Multi-Timer is fitted with a magnetic rear plate and can be attached to ferromagnetic surfaces such as fridge doors, extraction hoods and oven doors.
Please test carefully beforehand whether the surface gets hot and if the timer can be attached to it safely. The timer should never be attached to a base that heats up above 50 °C/122 °F.
18/10 stainless steel surfaces are not ferromagnetic and the magnet of the timer will not stick to them.
5. Cleaning
The appliance should be wiped clean using a dry cloth with a drop of glass cleaning fluid if necessary. Never spray into the apertures of the Multi-Timer. The product should not get wet or be put into the dishwasher as this would cause damage to the Multi-Timer.
6. Note on correct disposal of batteries
To open the battery compartment and remove the batteries, please follow instructions listed in point 2. The Lithium coin cell batteries provided with this product are not re-chargeable. Batteries should never be damaged, drilled through or thrown into an open fire. Never use a combination of old and new batteries. Used batteries should never be disposed of with ordinary household waste. Used batteries may
contain hazardous material which can be harmful to health and the environment. Please deliver used batteries to retailers' recycling facilities or to your local waste disposal service for battery return. This service is free of charge and is a legal obligation in Europe. Please use provided containers only for the disposal of empty batteries. All batteries will be recycled. In this way valuable natural resources such as iron, zinc and nickel, will be re-used. Recycling of batteries is an important contribution to environment protection. Your local waste disposal facility will provide you with further information on request.
7. Disposal

This product should not be disposed of in ordinary household waste but must be channeled to an appropriate recycling facility for electric and electronic equipment. For further information contact your local authority, communal waste disposal facilities or the shop where you purchased the item.
General Safety Guidelines
The digital Multi-Timer is not a toy and should be handled with caution at all times. Small components could be accidentally swallowed by small children so please keep the appliance safely out of their reach.
We grant you a 5 year Warranty on this product (the Warranty does not cover the batteries).
CE Conformity. This apparatus complies with EU Directive 89/336/EWG pertaining to electro-magnetic interference.
We reserve the right to technical modification without prior notice.
5 Year RÖSLE Warranty
We wish you long lasting service from your new RÖSLE Kitchen Accessory.
Your RÖSLE Team