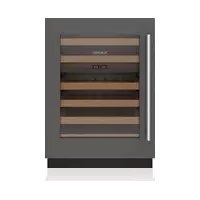
DEU2450W - Wine cellar Sub-Zero - Free user manual and instructions
Find the device manual for free DEU2450W Sub-Zero in PDF.


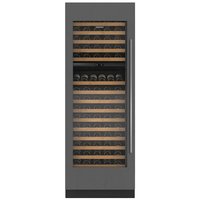
| Product Type | Under-Counter Wine Cellar (Designer Series Wine Cellar) |
| Brand | Sub-Zero |
| Model | DEU2450W |
| Width | 24 inches (610 mm) |
| Exterior Material | Stainless Steel |
| Door | Full View UV-Resistant Glass |
| Bottle Rack | Full Extension, capacity for 750 ml bottles, half-bottles and magnums |
| Bottle Rack Front | Natural Cherry, replaceable with wood matching cabinets |
| Number of Temperature Zones | 2 zones (upper and lower) on dual zone models |
| Lighting | Interior LED lighting, soft lighting and adjustable accent lighting |
| Connectivity | Wi-Fi and Bluetooth, Sub-Zero Group Owner app |
| Sabbath Function | Yes, Star-K certified, automatic shutdown after 74 hours |
| Door Alarm | Yes, adjustable duration |
| Refrigerant | Flammable (requires certified technician for any service) |
| Condenser Cleaning | Every 6 to 12 months |
| Warranty | 2 years full, 5 years sealed system, 12 years limited on sealed system |
| Customer Service | Factory certified service, contact subzero.com or 800-222-7820 |
| Power Supply | 120 V / 60 Hz (US standard) |
Frequently Asked Questions - DEU2450W Sub-Zero
User questions about DEU2450W Sub-Zero
0 question about this device. Answer the ones you know or ask your own.
Ask a new question about this device
Download the instructions for your Wine cellar in PDF format for free! Find your manual DEU2450W - Sub-Zero and take your electronic device back in hand. On this page are published all the documents necessary for the use of your device. DEU2450W by Sub-Zero.
USER MANUAL DEU2450W Sub-Zero
Designer Series Undercounter Wine Storage
Use and Care Guide
CLEANING, MAINTENANCE, AND MORE

Contents
2 Designer Series Undercounter Wine Storage
3 Safety Precautions
5 Designer Series Undercounter Wine Storage Features
6 Interactive Controls
8 Wine Storage
9 Care Recommendations
10 Troubleshooting
11 Sub-Zero Warranty
Customer Care
The model and serial number are printed on the enclosed product registration card. Both numbers are also listed on the product rating plate. Refer to page 5 for rating plate location. For warranty purposes, you will also need the date of installation and name of your authorized Sub-Zero dealer. Record this information below for future reference.
SERVICE INFORMATION
| Model Number |
| Serial Number |
| Date of Installation |
| Certified Service Name |
| Certified Service Number |
| Authorized Dealer |
| Dealer Number |
If your product ever needs attention, be sure to use a Sub-Zero Factory Certified Service provider recommended by our Customer Care Center, or select one from our list of providers available at subzero.com/locator. All Factory Certified Service providers are carefully selected and thoroughly trained by us.
Important Note
To ensure this product is installed and operated as safely and efficiently as possible, take note of the following types of highlighted information throughout this guide:
IMPORTANT NOTE highlights information that is especially important.
CAUTION indicates a situation where minor injury or product damage may occur if instructions are not followed.
WARNING states a hazard that may cause serious injury or death if precautions are not followed.
IMPORTANT NOTE: Throughout this guide, dimensions in parentheses are millimeters unless otherwise specified.
IMPORTANT INSTRUCTIONS
WARNING
Do not store explosive substances such as aerosol cans with a flammable propellant in this appliance.
WARNING
Keep ventilation openings, in the appliance enclosure or in the built-in structure, clear of obstruction.
WARNING
Do not use mechanical devices or other means to accelerate the defrosting process, other than those recommended by the manufacturer.
WARNING
Do not expose this appliance to rain.
WARNING
This appliance is only intended for residential use.
IMPORTANT INSTRUCTIONS
WARNING
- This appliance contains flammable refrigerant and must be handled, installed, serviced, and decommissioned by authorized personnel. Once decommissioned, consult local authorities for disposal instructions.
- To minimize the risk of ignition due to improper installation, replacement parts, or service procedures, only refrigeration technicians with flammable refrigerant training who are aware of the dangers of dealing with high voltage electricity and refrigerant under pressure are allowed to work on this equipment.
- Do not damage the refrigeration circuit when installing, maintaining, or servicing the unit.
This symbol indicates risk of fire/flammable materials.
WARNING
This appliance is not intended for use by persons (including children) with reduced physical, sensory or mental capabilities, or lack of experience and knowledge, unless they have been given supervision or instruction concerning use of the appliance by a person responsible for their safety. Children should be supervised to ensure they do not play with the appliance.
WARNING
DANGER: Risk of child entrapment. Before you throw away your old refrigerator or freezer:
• Take off the doors.
- Leave the shelves and drawer dividers in place so that children may not easily climb inside.
WARNING
PROPOSITION 65 FOR CALIFORNIA RESIDENTS
Cancer and Reproductive Harm—www.P65Warnings.ca.gov
Designer Series Undercounter Wine Storage Features
FEATURES
| 1 | Product Rating Plate |
| 2 | Interactive Control Panel |
| 3 | Full-Extension Wine Racks |
| 4 | Full-View, UV-Resistant Glass Door |
| 5 | Condenser (behind kickplate) |
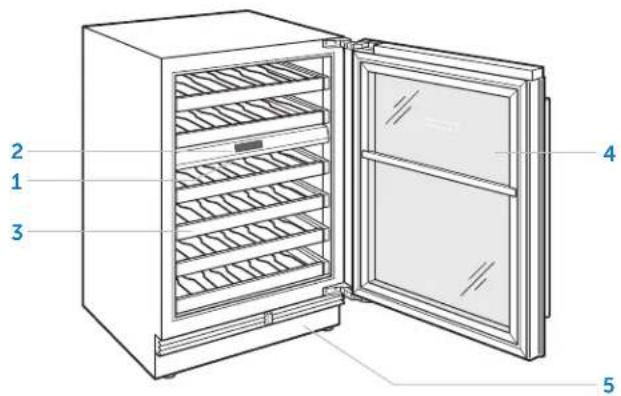
24" Undercounter wine storage
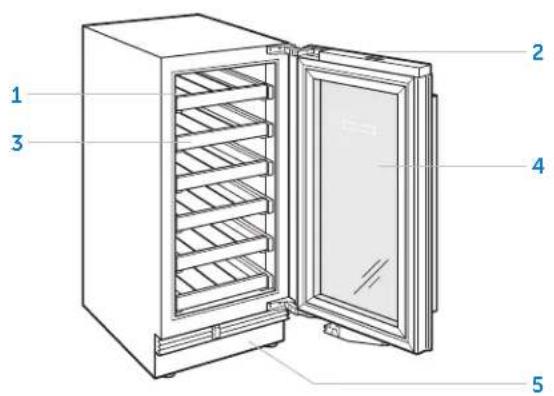
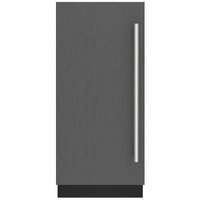
15" Undercounter wine storage
Controls
For initial start-up, touch and hold on the interactive control panel. Refer to the illustrations on the previous page for location of the control panel.
The temperature can be adjusted in one-degree increments. To adjust the temperature for a unit with two temperature zones, touch the temperature shown next to the corresponding zone icon. The temperature on the left of the display represents the lower zone and the temperature on the right represents the upper. Refer to the illustrations below.
To adjust temperature:
1 Touch the temperature to be adjusted.
2 Touch + or - until the desired temperature is displayed.
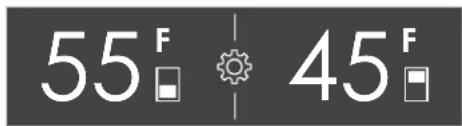
Dual-zone wine storage display
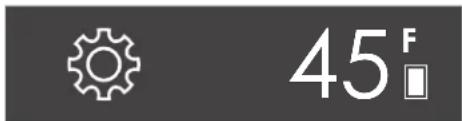
Single-zone wine storage display
SETTINGS
To access the Settings menu, touch ⚙️ on the control panel display.
SETTINGS
| Turn the unit on or off | |
| Turn accent lighting on or off and adjust brightness and select soft on duration | |
| Turn door alarm on or off and set duration | |
| Turn connect on or off | |
| Turn Sabbath on or off | |
| Adjust temperature units | |
| Adjust alarm volume and tone | |
| Select language | |
| View troubleshooting and service information |
Connect This Appliance
Connect this appliance to remotely monitor and control it. Connecting requires a wireless router, an Internet connection with a network name and password, and a compatible mobile device. There is no limit to the number of appliances you can connect to an account. Connect products from multiple homes to the same account. Connecting appliances is optional.
Connect today to:
- Receive alerts, status updates and routine maintenance notifications.
- Streamline everyday tasks with the help of remote controls and voice commands.
- Quickly access user manuals and cleaning and maintenance tips.
To connect:
1 Download the free Sub-Zero Group Owner's App from the Apple App Store or Google Play.
2 With Bluetooth ^® enabled on the device, stand within a few feet of the appliance, open the app, and follow the on-screen instructions.
3 Log in or create an account.
4 Tap Add An Appliance or tap + in upper right of the screen to add appliances. To identify which appliance to pair, open the appliance door.
5 Tap + next to the appliance to select it. If identical appliances appear, an additional step identifies which appliance to pair.
6 Tap Pair Via Bluetooth ^® . Wait for setup to complete, then tap Set Up Your Appliance For Pairing.
7 Tap Choose a Network on the Connect Your Appliance to Wi-Fi screen.
8 Select the home Wi-Fi network and enter the network password.
9 Tap Turn on Notifications to allow notifications about the appliance (for example, door left ajar).
10 Tap Done on the Success screen to complete the setup.
Wine Storage
FULL-EXTENSION WINE RACKS
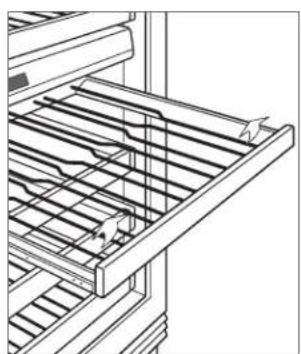
The full-extension wine racks provide easy access to 750 ml bottles, half-bottles, and magnums. When storing magnums, the rack above must be removed.
To remove a wine rack, pull out to full extension, tilt up, then lift up and out. Refer to the illustration below.
The natural cherrywood facing on wine racks can be stained or replaced with wood to complement cabinetry. For more information, refer to the Sub-Zero Design Guide, visit our website at subzero.com, or contact Sub-Zero Customer Care at 800-222-7820.
CAUTION
Remove all bottles from the wine rack before removal.
natural_image
Technical line drawing of a mechanical assembly with no visible text or symbolsWine rack removal
Lighting
SOFT ON LIGHTING
To adjust or turn off soft on lighting:
1 Touch

2 Touch

3 Touch 0, 2, or 4 seconds to select desired setting.
ACCENT LIGHTING
To adjust or turn off accent lighting:
1 Touch

2 Touch

3 Touch Hi, Med, Lo, or Off to select desired setting.
Sabbath
This appliance is certified by Star-K to meet strict religious regulations in conjunction with specific instructions found on www.star-k.org.
Sabbath mode automatically turns on the interior lights at a reduced brightness. The lights stay on when the door is closed. The lights cannot be turned off in Sabbath mode.
Sabbath mode automatically turns off after 74 hours. All lighting preferences return to the previous setting when Sabbath mode is turned off.
To turn on Sabbath:
1 Touch

2 Touch and hold for 3 seconds.
To turn off Sabbath:
1 Touch and hold for up to 10 seconds.
Cleaning
STAINLESS STEEL EXTERIOR
Use a nonabrasive stainless steel cleaner and apply with a soft lint-free cloth. To bring out the natural luster, lightly wipe the surface with a water-dampened microfiber cloth followed by a dry polishing chamois. Always follow the grain of stainless steel.
INTERIOR CLEANING
To clean interior surfaces and all removable parts, wash with a mild solution of soap, water, and baking soda. Rinse and dry thoroughly. Avoid getting water on the lights, control panel, and cherrywood facing on wine racks.
Use a standard glass cleaner to clean the UV-resistant glass door.
CAUTION
Do not use vinegar, rubbing alcohol, or other alcohol-based cleaners on any interior surface.
VACATIONS
For extended vacations, turn power off at the control panel. Empty the unit and block doors open slightly to let fresh air in and keep the interior dry.
CONDENSER CLEANING
CAUTION
Before cleaning the condenser, turn power off to the unit. Wear gloves to avoid injury from sharp condenser fins.
The condenser is located at the bottom of the unit, behind the kickplate. Remove the kickplate by extracting the two mounting screws. Use a soft bristle brush and vacuum to remove dust and lint from the condenser. Clean the condenser every 6–12 months. Refer to the illustration below.
IMPORTANT NOTE: To avoid damaging the condenser fins, vacuum in the direction of the fins.
CAUTION
Failure to clean the condenser could result in temperature loss, mechanical failure, or damage.
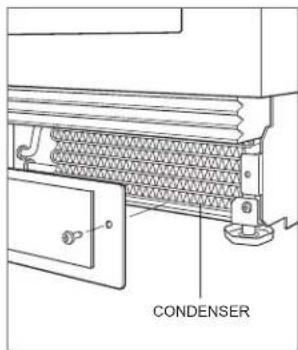
Condenser location
Troubleshooting
UNIT OPERATION
No lights or cooling.
- Verify power is on.
- Verify electrical power to the unit and home circuit breaker is on.
No lights.
- The door may have been left ajar, which has disabled lights to eliminate excess heat. If the lights are out, close the door for one hour. If the lights are still out, contact Sub-Zero Factory Certified Service.
- LED interior lighting must be replaced by Sub-Zero Factory Certified Service.
Condensation forms inside the unit.
- Verify the condenser is clean.
- Verify the door is closing properly.
- Verify the door has not been left ajar.
- Verify the door gasket does not have rips or tears. If it does, contact Sub-Zero Factory Certified Service.
High temperatures, the unit runs excessively or the unit is giving off too much heat.
- Verify the condenser is clean.
- Verify the door is closing properly.
- Verify the door has not been left ajar.
- Increased ambient temperatures may cause the compressor to run longer.
- If the temperature display shows 55°F and 45°F, but is not cooling, the unit may be in showroom mode. Contact Sub-Zero Customer Care at 800-222-7820.
ODOR
- The unit should be cleaned before using for the first time. This will clear any odors that may have been trapped during shipping.
SERVICE
- Maintain the quality built into your product by contacting Sub-Zero Factory Certified Service. For the name of the nearest Sub-Zero Factory Certified Service, check the Product Support section of our website, subzero.com or call Sub-Zero Customer Care at 800-222-7820.
- When contacting service, you will need the model and serial number of your unit. Both numbers are listed on the product rating plate. Refer to page 5 for rating plate location.
- For warranty purposes, you will also need the date of installation and name of your authorized Sub-Zero dealer. This information should be recorded on page 2 of this guide.
Sub-Zero Residential Limited Warranty
FOR RESIDENTIAL USE
FULL TWO YEAR WARRANTY\*
For two years from the date of original installation, this Sub-Zero product warranty covers all parts and labor to repair or replace, under normal residential use, any part of the product that proves to be defective in materials or workmanship. All service provided by Sub-Zero under the above warranty must be performed by Sub-Zero Factory Certified Service, unless otherwise specified by Sub-Zero, Inc. Service will be provided during normal business hours.
FULL FIVE YEAR SEALED SYSTEM WARRANTY
For five years from the date of original installation, this Sub-Zero product warranty covers all parts and labor to repair or replace, under normal residential use, these parts that prove to be defective in materials or workmanship: compressor, condenser, evaporator, drier and all connecting tubing. All service provided by Sub-Zero under the above warranty must be performed by Sub-Zero Factory Certified Service, unless otherwise specified by Sub-Zero, Inc. Service will be provided during normal business hours.
LIMITED TWELVE YEAR SEALED SYSTEM WARRANTY
For twelve years from the date of original installation, Sub-Zero will repair or replace the following parts that prove to be defective in materials or workmanship: compressor, condenser, evaporator, drier and all connecting tubing. If the owner uses Sub-Zero Factory Certified Service, the service provider will repair or replace these parts with the owner paying for all other costs, including labor. If the owner uses non-certified service, the owner must contact Sub-Zero, Inc. (using the information below) to receive repaired or replacement parts. Sub-Zero will not reimburse the owner for parts purchased from non-certified service or other sources.
TERMS APPLICABLE TO EACH WARRANTY
The warranty applies only to products installed for normal residential use. The warranty applies only to products installed in any one of the fifty states of the United States, the District of Columbia or the ten provinces of Canada. This warranty does not cover any parts or labor to correct any defect caused by negligence, accident or improper use, maintenance, installation, service or repair.
THE REMEDIES DESCRIBED ABOVE FOR EACH WARRANTY ARE THE ONLY ONES THAT SUB-ZERO, INC. WILL PROVIDE, EITHER UNDER THIS WARRANTY OR UNDER ANY WARRANTY ARISING BY OPERATION OF LAW. SUB-ZERO, INC. WILL NOT BE RESPONSIBLE FOR ANY CONSEQUENTIAL OR INCIDENTAL DAMAGES ARISING FROM THE BREACH OF THIS WARRANTY OR ANY OTHER WARRANTY, WHETHER EXPRESS, IMPLIED OR STATUTORY.
Some states do not allow the exclusion or limitation of incidental or consequential damages, so the above limitation or exclusion may not apply to you. This warranty gives you specific legal rights and you may also have other legal rights that vary from state to state.
To receive parts and/or service and the name of Sub-Zero Factory Certified Service nearest you, contact Sub-Zero, Inc., P.O. Box 44848, Madison, WI 53744; check the Product Support section of our website, subzero.com, email us at customerservice@subzero.com, or call 800-222-7820.
*Stainless steel (doors, panels, handles, product frames and interior surfaces) are covered by a limited 60-day parts and labor warranty for cosmetic defects.
*Replacement water filters and air purification cartridges are not covered by the product warranty.
Contenido
www.P65Warnings.ca.gov
natural_image
Technical line drawing of a ladder-mounted rack with horizontal slats and a central handle (no text or symbols)natural_image
Technical line drawing of a ladder-mounted rack with horizontal bars and a pointer indicating force (no text or symbols)9045420 REV-B 8/2021



- Designer Series Undercounter Wine Storage
- Contents
- Customer Care
- Important Note
- IMPORTANT INSTRUCTIONS
- WARNING
- Designer Series Undercounter Wine Storage Features
- Controls
- To adjust temperature:
- SETTINGS
- Connect This Appliance
- Connect today to:
- To connect:
- Wine Storage
- FULL-EXTENSION WINE RACKS
- CAUTION
- Lighting
- SOFT ON LIGHTING
- To adjust or turn off soft on lighting:
- ACCENT LIGHTING
- To adjust or turn off accent lighting:
- Sabbath
- To turn on Sabbath:
- To turn off Sabbath:
- Cleaning
- STAINLESS STEEL EXTERIOR
- INTERIOR CLEANING
- VACATIONS
- CONDENSER CLEANING
- Troubleshooting
- UNIT OPERATION
- No lights or cooling.
- No lights.
- Condensation forms inside the unit.
- High temperatures, the unit runs excessively or the unit is giving off too much heat.
- ODOR
- SERVICE
- Sub-Zero Residential Limited Warranty
- FOR RESIDENTIAL USE
- FULL TWO YEAR WARRANTY\*
- FULL FIVE YEAR SEALED SYSTEM WARRANTY
- LIMITED TWELVE YEAR SEALED SYSTEM WARRANTY
- TERMS APPLICABLE TO EACH WARRANTY
- THE REMEDIES DESCRIBED ABOVE FOR EACH WARRANTY ARE THE ONLY ONES THAT SUB-ZERO, INC. WILL PROVIDE, EITHER UNDER THIS WARRANTY OR UNDER ANY WARRANTY ARISING BY OPERATION OF LAW. SUB-ZERO, INC. WILL NOT BE RESPONSIBLE FOR ANY CONSEQUENTIAL OR INCIDENTAL DAMAGES ARISING FROM THE BREACH OF THIS WARRANTY OR ANY OTHER WARRANTY, WHETHER EXPRESS, IMPLIED OR STATUTORY.
- Contenido
Brand : Sub-Zero
Model : DEU2450W
Category : Wine cellar