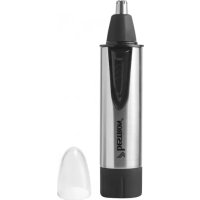
ANE1 - Nose trimmer BESTRON - Free user manual and instructions
Find the device manual for free ANE1 BESTRON in PDF.


| Product type | Nose and ear hair trimmer |
| Brand | Bestron |
| Model | ANE1 |
| Power supply | 1 AA 1.5 V battery (not included) |
| Main functions | Trimming nose, ear, and eyebrow hair |
| Interchangeable heads | Shaver head and precision trimmer |
| Starting | On/off switch |
| Blade material | Stainless steel |
| Maintenance | Clean with a damp cloth; blow into the cutting guide to remove hairs |
| Cleaning | Do not immerse in water |
| Safety | Do not use if the head is damaged; do not insert too deeply into the nose or ear |
| Warranty | 60 months (5 years) from date of purchase |
| After-sales service | Contact Bestron or the retailer |
| Use | Household use only |
| Battery type | AA 1.5 V |
| Included accessories | Shaver head, precision trimmer, head protector |
| Recycling | Do not dispose of with household waste; take to an approved collection center |
| Number of pages in the manual | 16 pages |
Frequently Asked Questions - ANE1 BESTRON
User questions about ANE1 BESTRON
0 question about this device. Answer the ones you know or ask your own.
Ask a new question about this device
Download the instructions for your Nose trimmer in PDF format for free! Find your manual ANE1 - BESTRON and take your electronic device back in hand. On this page are published all the documents necessary for the use of your device. ANE1 by BESTRON.
USER MANUAL ANE1 BESTRON
natural_image
Abstract black and white geometric arrow pattern (no text or symbols)BESTRON®
ANE1
natural_image
Illustration of a pair of hair purifiers with different designs, one emitting a toothbrush and the other a spray gun (no text or symbols)Nederlands
Instruction manual nose- and earhair-trimmer
_
| _
一
1
VEILIGHEIDSVOORSCHRIFTEN - Algemeen
natural_image
Diagram showing a mechanical component being processed into a cylindrical container with a curved arrow indicating motion (no text or symbols present)Figuur Batterij
natural_image
Diagram showing a device with a conical top and a mechanical component below, illustrating a process of rotation or assembly (no text or symbols present)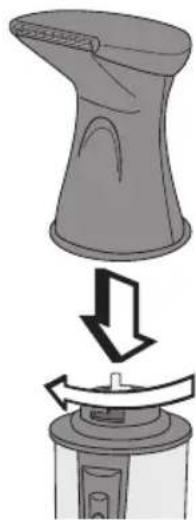
natural_image
Diagram showing a mechanical device with a downward arrow indicating rotation or change (no text or symbols present)natural_image
Abstract line drawing with overlapping curved shapes and a diagonal line (no text or symbols)natural_image
Diagram showing a mechanical component being processed into a cylindrical container with a curved arrow indicating rotation (no text or symbols present)Abbildung Batterie
natural_image
Diagram showing a mechanical component with an upward arrow indicating motion or force (no text or symbols present)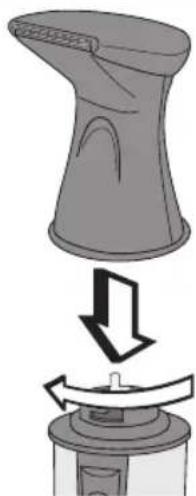
natural_image
Diagram of a mechanical device with a downward arrow indicating rotation or movement (no text or symbols present)natural_image
Diagram showing a mechanical component being processed into a cylindrical container with a curved arrow indicating motion (no text or symbols present)Figure Mise de
natural_image
Diagram showing a mechanical component with an upward arrow indicating rotation or movement (no text or symbols present)
natural_image
Diagram showing a mechanical device with a downward arrow indicating rotation or movement (no text or symbols present)Figure Placez de
pré
CONDITIONS DE GARANTIE
DÉCLARATION DE CONFORMITÉ CE
natural_image
Abstract line drawing with intersecting curves and a small mark (no text or symbols)SAFETY INSTRUCTIONS - General
- Please read these instructions carefully and retain them for reference.
- Use this appliance solely in accordance with these instructions.
- This appliance is not intended for use by persons (including children) with reduced physical, sensory or mental capabilities, or lack of experience and knowledge, unless they have been given supervision or instruction concerning use of the appliance by a person responsible for their safety.
• Children should be supervised to ensure that they do not play with the appliance.
• Have any repairs carried out solely by a qualified electrician. Never try to repair the appliance yourself.
SAFETY INSTRUCTIONS - Use
• The appliance is intended solely for trimming nose and ear hair and eyebrows.
- The cutter and internal cutting blades are both precision products; consequently they should not be subjected to heavy loads or knocks.
- Do not use the appliance if the trimmer, cutter or internal cutting blades are damaged; this could result in injury.
- Always insert solely the small end of the cutting head in your nostril or ear – never any further. Do not press the appliance too hard into your nostril or ear, and do not insert it too far; this could result in injury.
- Remove solely those hairs that project beyond your nostrils.
- Do not remove the cutting head whilst the appliance is in operation. Always switch off the appliance and remove the battery before cleaning it.
- Do not insert sharp objects in the cutting head.
- Verify that the cutting head is properly attached before switching on the appliance.
• Make sure that the appliance does not come into contact with water or other liquids.
THE ENVIRONMENT

- Dispose of packaging material, such as plastic and boxes, in the appropriate waste containers. When this product reaches the end of its useful life do not dispose of it by putting it in a dustbin; hand it in at a collection point for the reuse of electrical and electronic equipment. Please refer to the symbols on the product, the user's instructions or the packaging.
- The materials can be re-used as indicated. Your help in the re-use, recycling or other means of making use of old electrical equipment will make an important contribution to the protection of the environment.
- Contact your municipality for the address of the appropriate collection point in your neighbourhood.
OPERATION - General
The appliance is intended only for domestic use, not for professional use.
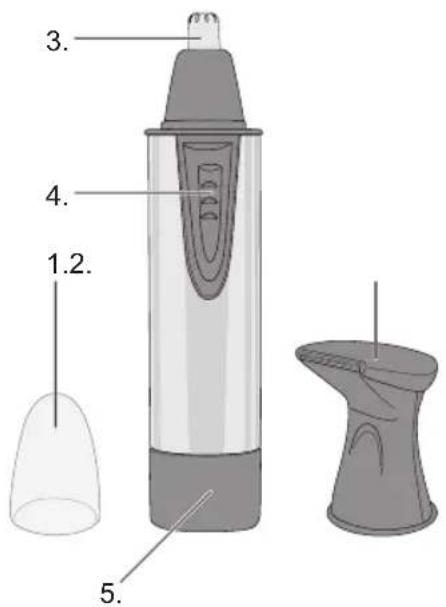
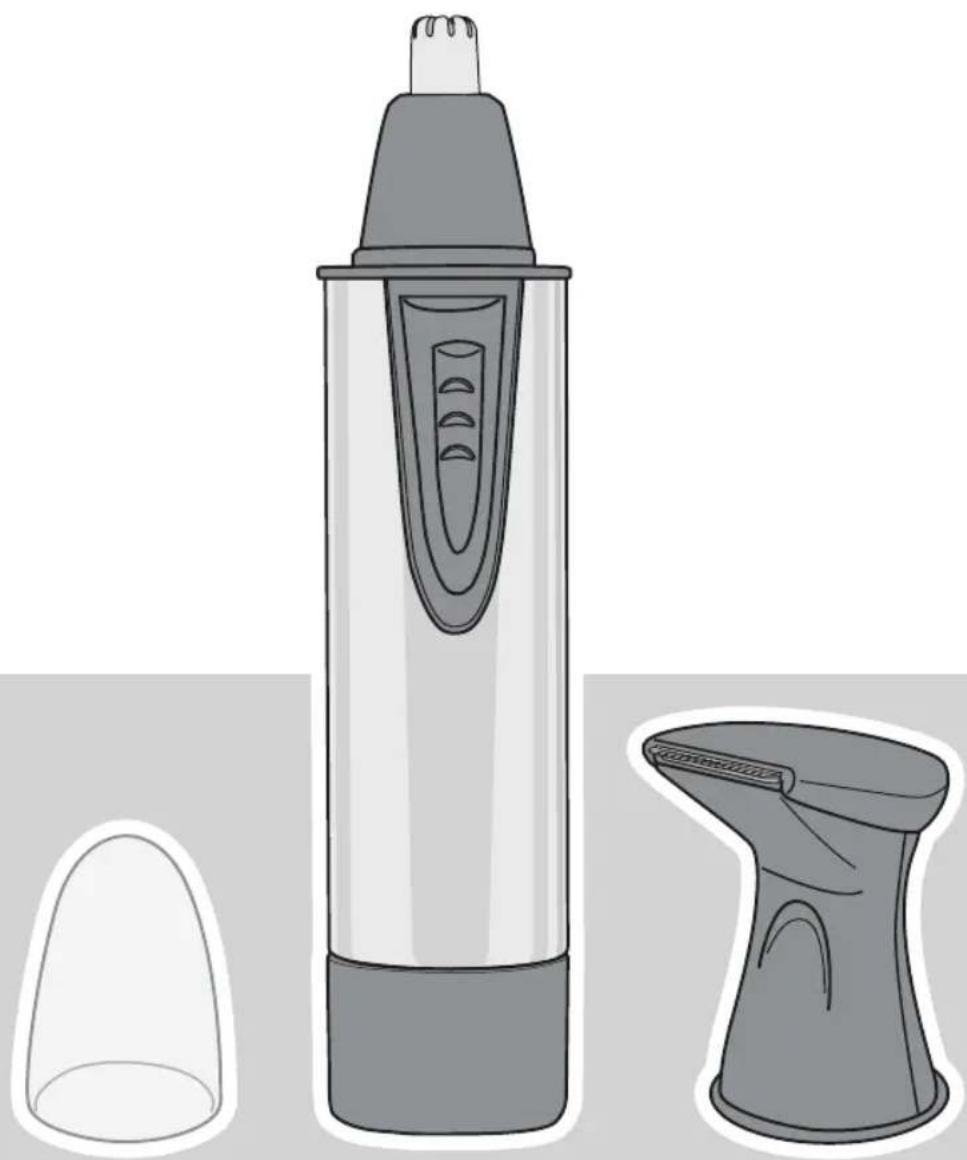
- Protective cover
- Trimmer
- Cutting head
- On/Off switch
- Battery holder
Figure
OPERATION - Fitting the battery
- Remove all packaging materials.
- Hold the appliance with the brand upwards.
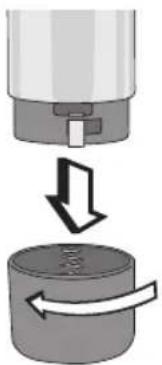
- Open the batteryholder by twisting the backside of the cover a kwater to the back.
- Insert a 1.5 V AA battery in the battery holder, with the plus terminal (+) to the left.
- Fit the cover back over the batteryholder.
natural_image
Diagram showing a mechanical component being processed into a cylindrical container with a curved arrow indicating rotation (no text or symbols present)Figure Fitting
OPERATION - Use
- Remove the protective cover from the cutting head.
- Switch on the appliance by pressing the On/Off switch.
- Insert the small end of the cutting head in your nostril or ear. The appliance will now trim your nose or ear hair.
- Switch off the appliance and remove the battery from the battery holder.
- Fit the protective cover onto the cutting head.
- Blow your nose to get rid of any loose nasal hair.

- Never use the appliance for purposes other than trimming your nose or ear hair and eyebrows. Always insert only the small end of the cutting head in your nostril or ear. Do not press the appliance too hard into your nostril or ear, and do not insert it too far; this could result in injury
- Remove solely those hairs that project beyond your nostrils.
OPERATION - Placing the precision trimmer
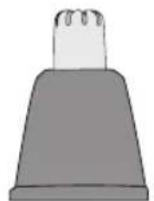
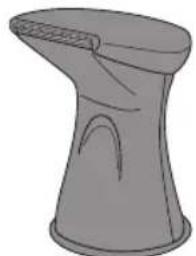
- Remove the cutting head by slightly turning it counter-clockwise.
- Place the precision trimmer by slightly turning it clockwise.
natural_image
Illustration of a stylized, conical object resembling a food item or tool (no text or symbols)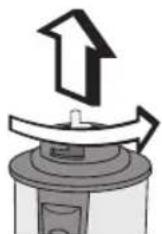
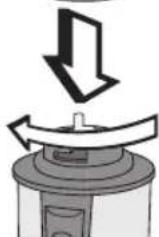
Figure Placing precision
OPERATION - Precision trimming
- Switch on the appliance by pressing the On/Off switch.
- Move the trimmer head diagonally across your skin to remove the unwanted hairs.
- After use, switch off the device.
CLEANING AND MAINTENANCE
Switch off the appliance and remove the battery. Blow the remaining hairs from the cutting head. Clean this appliance with a damp cloth and dry afterwards with a dry soft cloth. Don't rinse it under the water tap and don't use any aggressive cleansers.
TECHNICAL DETAILS
Type: ANE1
Battery: AA, DC 1.5 V
GUARANTEE TERMS
The importer guarantees the appliance against defects caused by manufacturing and/or material faults for 60 months from the date of purchase, subject to the following conditions.
- No charges will be made for labour costs or materials during the warranty period. Any repairs carried out during the warranty period do not extend the warranty period.
- The importer automatically becomes the owner of any faulty parts that he replaces or a faulty appliance (in the event of replacement of the appliance).
- All claims submitted under warranty must be accompanied by the original bill of sale.
- Claims under warranty must be submitted to the dealer where the appliance was purchased or to the importer.
-
The warranty is issued solely to the first purchaser and cannot be transferred.
-
The warranty does not cover damage caused by:
a. Accidents, incorrect use, wear and/or neglect.
b. Faulty installation and/or use in a manner contravening the prevailing legal, technical or safety regulations.
c. Connection to a mains voltage other than the voltage specified on the type plate.
d. Unauthorized modifications.
e. Repairs carried out by third parties.
f. Careless transport, i.e. without suitable packaging materials or protection.
- No claims may be made under this warranty for:
a. Losses incurred during transport.
b. The removal or changing of the appliance's serial number.
-
The guarantee does not cover power cords, lamps or glass parts.
-
No claims can be submitted under this warranty for damage other than the repair or replacement of faulty parts. The importer can never be held responsible for any consequential loss or damage or any other consequences, resulting either directly or indirectly from the appliance supplied by the importer.
-
In case of claims under guarantee you can contact your dealer where the appliance is purchased. Bestron offers you also the possibility to send the appliance directly to our Service Department. Do not send your appliance without consulting us. The package may be refused and any any costs will be for your account. Please contact the Service Department and they will tell you how to pack and send the appliance.
-
This appliance is not suitable for professional use.
SERVICE
If a fault should occur please contact the BESTRON service department:
THE NETHERLANDS:
BESTRON NEDERLAND BV
Bestron Service
Moeskampweg 20
5222 AW 's-Hertogenbosch
Tel: +31 (0) 73 - 623 11 21
Fax: +31 (0) 73 - 621 23 96
Email: info@bestron.com
Internet: www.bestron.com
CE DECLARATION OF CONFORMITY
This product conforms to the essential requirements of the following EU safety directives:
• EMC Directive 2004/108/EC
• Low Voltage Directive 2006/95/EC
natural_image
Abstract line drawing with intersecting curves and a small mark (no text or symbols)natural_image
Illustration of a three-wheeled toothbrush with a small cup, next to a second-handled tool (no text or symbols visible)
BESTRON®
ANE1 v 190712-08
- BESTRON®
- VEILIGHEIDSVOORSCHRIFTEN - Algemeen
- CONDITIONS DE GARANTIE
- DÉCLARATION DE CONFORMITÉ CE
- SAFETY INSTRUCTIONS - General
- SAFETY INSTRUCTIONS - Use
- THE ENVIRONMENT
- OPERATION - General
- OPERATION - Fitting the battery
- OPERATION - Use
- OPERATION - Placing the precision trimmer
- OPERATION - Precision trimming
- CLEANING AND MAINTENANCE
- TECHNICAL DETAILS
- GUARANTEE TERMS
- SERVICE
- CE DECLARATION OF CONFORMITY
Brand : BESTRON
Model : ANE1
Category : Nose trimmer