Ecopro 30 - Vacuum packaging machines Reber - Free user manual and instructions
Find the device manual for free Ecopro 30 Reber in PDF.
| Product Type | Vacuum Packaging Machine |
| Brand | Reber |
| Model | Ecopro 30 |
| Housing Material | Stainless Steel |
| Pump Type | Energy-saving twin-cylinder |
| Max Power | 280 W |
| Suction Flow | 40 L/min |
| Max Vacuum | -900 mbar |
| Vacuum Gauge | Yes (with color graduation) |
| Container Connection | Yes (suction hose included) |
| Adjustment Potentiometer | Yes (except NEL version) |
| Dust Filter | Integrated EMC filter |
| Protection Fuse | 6 A (with spare fuse) |
| Included Accessories | 20 bags 20x30 cm, container accessory |
| Warranty | 24 months (domestic) / 12 months (professional) |
| Standards | CE, EU directives 2014/30, 2014/35, 2011/65 |
| Cleaning | Damp cloth with mild detergent - Do not immerse |
| Storage | In a clean, dry place between +10°C and +30°C |
| Intended Use | Vacuum packaging of food in Reber textured bags |
| Thermal Protection | Yes (automatic shutdown in case of overheating) |
Frequently Asked Questions - Ecopro 30 Reber
User questions about Ecopro 30 Reber
0 question about this device. Answer the ones you know or ask your own.
Ask a new question about this device
Download the instructions for your Vacuum packaging machines in PDF format for free! Find your manual Ecopro 30 - Reber and take your electronic device back in hand. On this page are published all the documents necessary for the use of your device. Ecopro 30 by Reber.
USER MANUAL Ecopro 30 Reber
text_image
Reber Professionisti in cucinaUser's Reference: Use and Maintenance - Original instructions
Read all instructions and save for future reference
text_image
Technical diagram of a front-mounted kitchen appliance with numbered parts for identification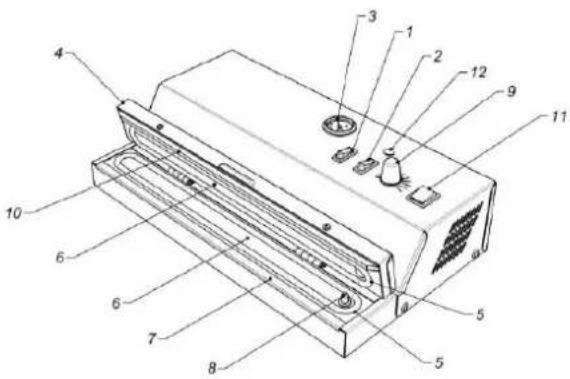
text_image
Technical diagram of a device with numbered components for identificationLegenda
natural_image
Close-up of a hand holding a transparent plastic sheet with a black cylindrical object inside a transparent case (no visible text or symbols)Immagine/Image 3
natural_image
Close-up of a black rectangular electronic component with mounting holes, mounted on a metallic frame (no visible text or symbols)
pie
SEAL POWERnatural_image
Hand holding a white cylindrical object with a coiled tube inserted into a metal rack (no visible text or symbols)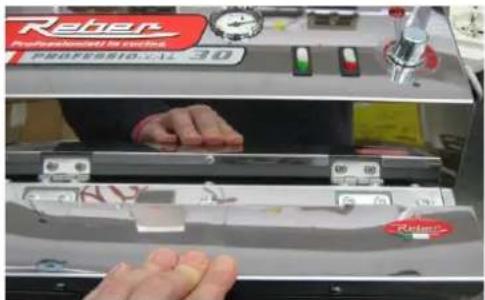
text_image
Reher PROFESSIONAL IN PARTS PROFESSIONAL 30Imagine/Image 8
natural_image
Close-up of hands holding a transparent plastic bag containing white powder (no text or symbols visible)Immagine/Image 9
natural_image
Close-up of hands holding a white plastic bag over a transparent sheet of paper (no text or symbols visible)Immagine/Image 10
natural_image
Close-up of a hand holding a transparent plastic bag, with a white rectangular device in the background (no visible text or symbols)Immagine/Image 11
natural_image
Close-up of a transparent plastic bag filled with white material, no visible text or symbolsNORME COSTRUTTIVE
- The aim of this handbook is to provide the costumer with as much information as possible about the item and with the instructions for its use and maintenance in order to keep it working efficiently and to preserve performances.
- This handbook should be given to people in charge for the use and periodical maintenance of the item
- The handbook should be kept in good conditions and stored in an easily accessible place for rapid reference.
- Reber is in a continuous development of its products to improve technical, safety, ecological and commercial features; products could be different from this data sheet due to this non-stop evolution.
- This appliance is not intended for use by persons (including children) with reduced physical, sensory or mental capabilities, or lack of experience and knowledge, unless they have been given supervision or instruction concerning use of the appliance by a person responsible for their safety.
Reber Srl - Via Valbrina, 11 - I-42045 Luzzara (RE) - www.rebersrl.it - info@rebersrl.it
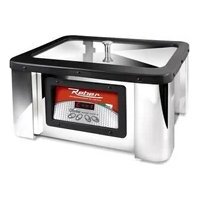
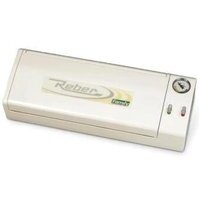
STAINLESS STEEL VACUUM PACKERS
artt.: 9714 N - 9714 NF - 9716 N - 9712 N - 9712 NF - 9709 NE - 9709 N - 9709 NEL - 9709 NF - 9714 NEL - 9716 NEL - 9709 NELF
Service / Spare Parts: www.rebersrl.it
The characteristics – photos – drawings are indicative and the manufacturer can modify them without any notice
RESPONSABILITY OF THE SUPPLIER
The supplier will be not responsible of any damage to people or things different from the vacuum machine.
The supplier does not guarantee the conformity of the machine to the rules in force in the extra UE countries where the machines could be installed and particularly regarding accident prevention.
It is at purchasers charge to put machines in conformity to the above mentioned rules, and he assumes all relative responsibility releasing the supplier from all responsibility.
MAIN VOLTAGE
Before plugging in, check that the mains voltage corresponds to the voltage indicated on the technical data sticker of the machine. Please check the notes and instructions concerning electrical connection.


WARNINGS: CAUTIONS TO BE TAKEN AND SAFETY RULES
When using electrical appliances, basic safety precautions should always be followed including the following:
- Read all instructions.
- Do not operate any appliance with a damaged cord or plug or after the appliance malfunction, or is dropped or damaged in any manner. Return appliance to the nearest authorized service facility for examination, repair or electrical or mechanical adjustment.
- The use of attachments not recommended or sold by the manufacturer may cause fire, electric shock or injury.
- Do not use outdoors.
- Do not use in wet places or wet support
- Do not submerge the item in water or other liquid when cleaning
- Do not use extension cables
- Do not unplug by pulling the cable.
- Do not use the machine with wet hands or bare feet.
- Do not let cord hang over edge of table or counter.
- Acoustic level less than 80 dBA.
- Save these instructions.
- Be careful during machine operation as heating elements are present on the welding bar (7.).
Only use embossed bags for food preservation in vacuum conditions, of the same type as those supplied with the unit.
Do not plunge the unit into water and do not use it if the plug or supply cord are wet to avoid risks of fire or electric shock.
- Do not overfill the bags to avoid risks to damage the aspiration circuit or to short-circuit the vacuum pump.
Carry out any operations on the unit (cleaning included) with plug disconnected from the socket to avoid risks of electric shock, in such a way that an operator located near the machine can check that the plug remains removed.
- Vacuum packaging does not replace other preservation methods but it can be combined with them.
- Perishable food requires cooling or freezing to prevent deterioration. Vacuum packaging prolongs preservation times and helps the organoleptic qualities to be kept unaltered.
In any case pre-packaged products shall be used within the date indicated on packing.
- A higher vacuum level corresponds to a lower oxygen quantity with resulting possibilities of better preservation.
Liquids shall be refrigerated before vacuum-packaging in bags to prevent them from leaking out and being sucked into the vacuum chamber.
Clean the vacuum chamber in case of aspiration of liquid or powder with normal cleaner for plastic material, be careful to let the vacuum
chamber dry after cleaning.
- Do not change the plug in any way.
- Close supervision is required when this product is used near children.
- Products in powder or grains shall be covered with a cloth or protected by a first bag before being vacuum-packaged, so that they are not sucked into the vacuum chamber and do not obstruct the valve.
- Containers unsuitable for vacuum packaging can implode through the effect of air pressure and cause damages and injuries. In case of storage in freezers, only special containers in toughened glass shall be used.
- The air pump and the welding system are equipped with thermal protection: in case of overheating the unit stops automatically and can resume work after some minutes.
Experience and practice will enable you to obtain the best results with each product.
- Wrinkles and creases on the bag surface can prevent the package from reaching a satisfactory vacuum level as a small air quantity can be sucked through them. To avoid such inconveniences, place the bag in spread conditions within the vacuum chamber.
- Adjustments related to automatic operation are carried out in the factory in order to offer the best performances, both as for safety and reliability. Should different performances be required in particular cases, operate the unit manually.
- If you have not waited for the minimum time prescribed between connection to network and cycle starting, act as follows: unplug, plug again and wait as long as required.
- When containers are used particular attention should be paid to welding bar heating (7.) to prevent burns.
- For safety reasons, we recommend to operate manually when containers are used and the vacuum gauge pointer (3.) reaches the limit of the yellow area.
- Check the supply cord periodically, if damaged replace it with a supply cord of the same type as the one provided; its replacement must be done by qualified technician in order to avoid a hazard
The appliance is protected by a fuse placed in a tray under the connection socket of the machine; in case of problem, a spare fuse is placed in the same tray. Take off the tray and change the fuse. The fuse is not cover by warranty.
“Only for U.S.A. use” To reduce risks of electric shock, this product has a polarized plug (one blade is wider than the other). This plug is intended to fit in a polarized outlet only one way. When the plug does not fit fully in the outlet, reverse the plug. When it still does not fit, contact a qualified electrician to install the proper outlet.
TECHNICAL CHARACTERISTICS
| Code | 9714 N - NEL | 9716 N - NEL | 9712 N |
| Model | Professional 40 | EcoPro 40 | Professional 55 |
| Body | Stainless Steel | Stainless Steel | Stainless Steel |
| Pump | Twin cilinder Energy saving | Twin cilinder Energy saving | Twin cilinder Energy saving |
| Max. Power Absorbed | 345 W | 335 W | 355 W |
| Max vacuum level | -900 mbar | -900 mbar | -900 mbar |
| Aspiration | 40 lt/min | 40 lt/min | 40 lt/min |
| Outlet for canister attachment | YES | YES | YES |
| Vacuometer | YES | YES | YES |
| Potentiometer | YES - NO on NEL | YES - NO on NEL | YES |
| Filter for EMC | YES | YES | YES |
| Fuse 6A | YES | YES | YES |
| Spare Fuse 6A | YES | YES | YES |
| Code | 9714 NF | 9712 NF | |
| Liquids Protection Filter | YES | YES | |
| Code | 9709 NE | 9709 N - NEL - NELF | 9709 NF |
| Model | Professional 30 Eco | Professional 30 | Professional 30 with filter |
| Body | Inox | Inox | Inox |
| Pump | One cilinder Energy saving | Twin cilinder Energy saving | Twin cilinder Energy saving |
| Max. Power Absorbed | 200 W | 280 W | 280 W |
| Max vacuum level | -850 mbar | -900 mbar | -900 mbar |
| Aspiration | 18 lt/min | 40 lt/min | 40 lt/min |
| Outlet for canister attachment | YES | YES | YES |
| Vacuometer | YES | YES | YES |
| Potentiometer | NO | YES - NOT ON NEL | YES |
| Filter for EMC | YES | YES | YES |
| Fuse 6A | YES | YES | YES |
| Spare Fuse 6A | YES | YES | YES |
| Led | 2 | 1 - 2 ON NEL | 1 |
| Liquids Protection Filter | NO | YES only on NELF | YES |
Packaging contains: 20 Bags cm. 20x30, Canisters attachment
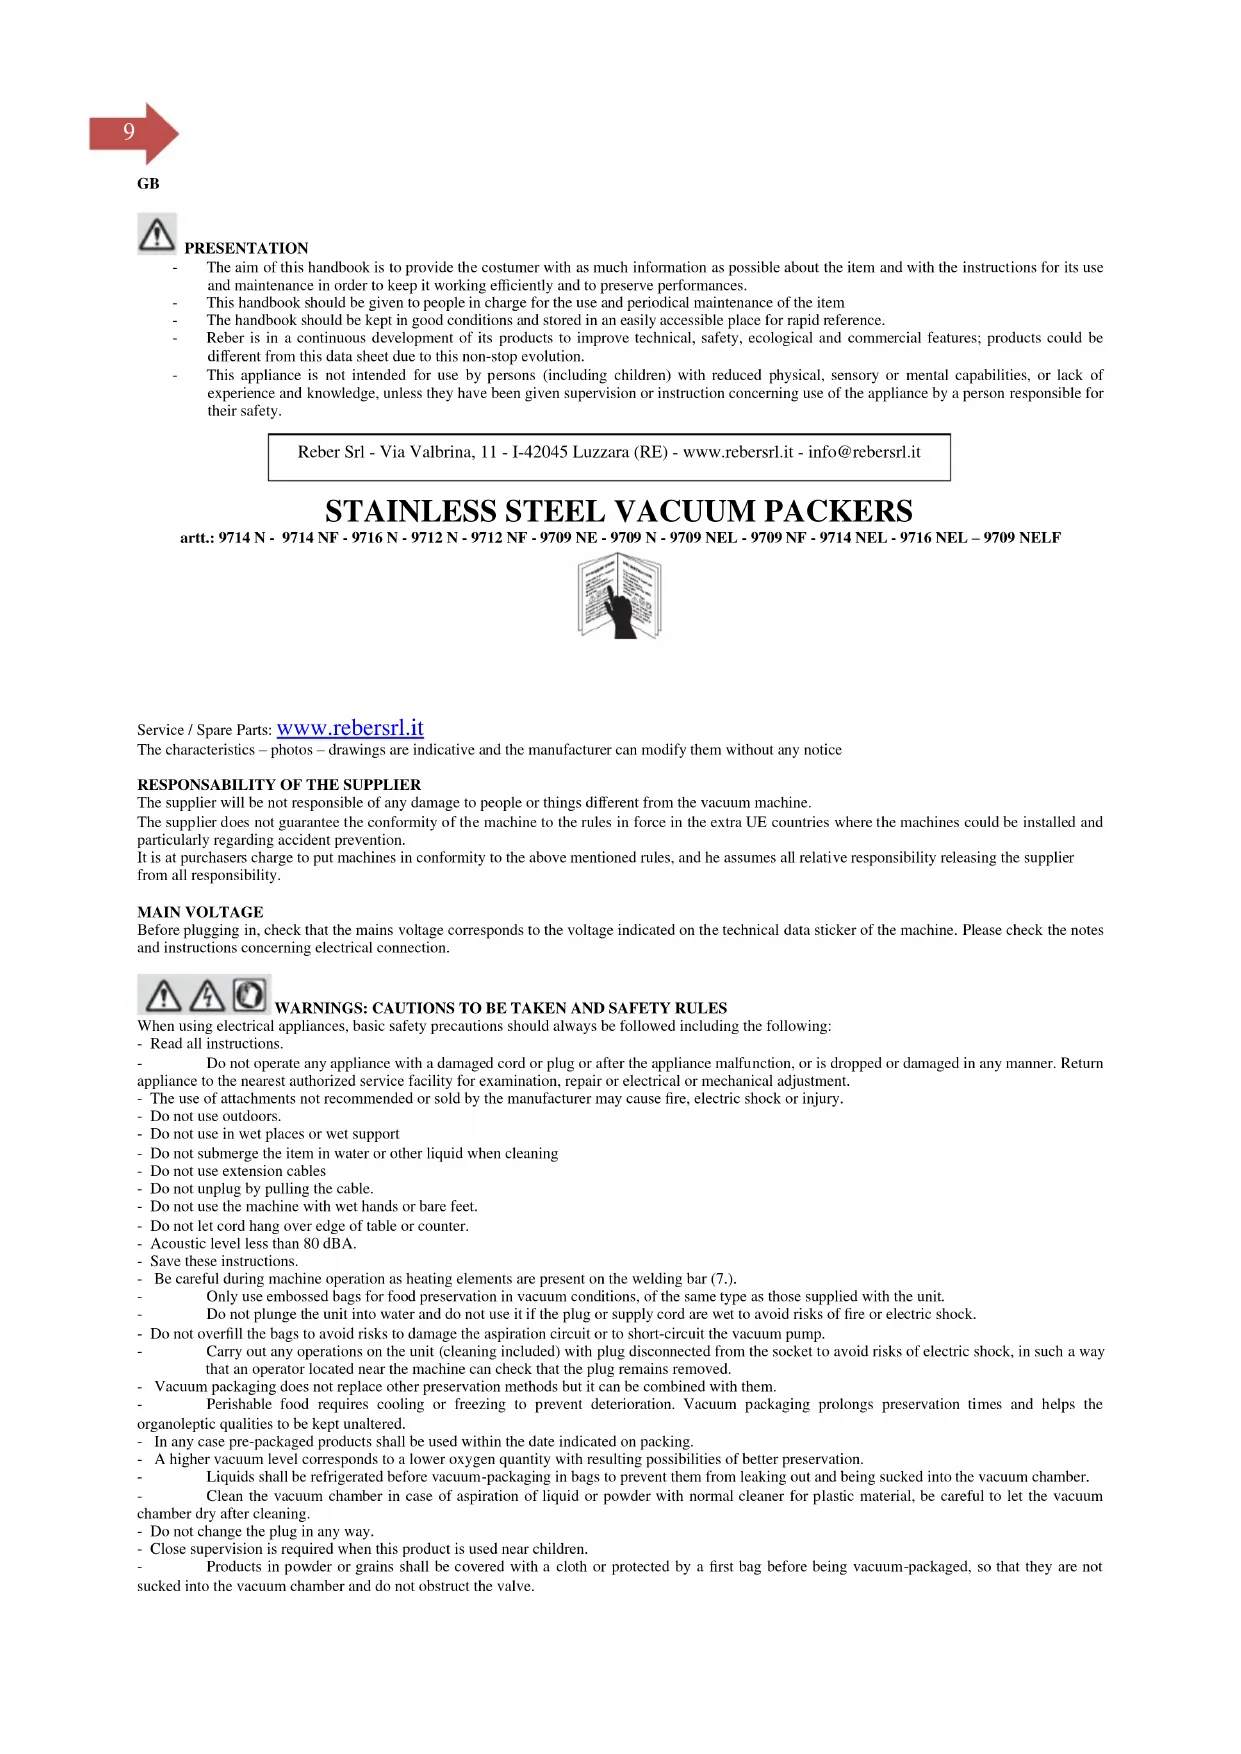
Legend
- Start cycle switch 7. Welding bar
- Seal Switch 8. Air outlet
- Vacuum gauge 9. Potentiometer/LED on models NE-NEL
- Cover 10. Welding bar gasket
- Vacuum Chamber Gasket 11. Main power switch
- Vacuum chamber 12. Led
APPLIED STANDARDS
Refer to the Declaration at the end of this document
IMPORTANCE OF THE HANDBOOK
The handbook is integral part of the machine. It includes important information regarding safety and warnings pointed with those symbols

The information included, will allow you to use the machine in perfect safety conditions and to preserve performances

WARRANTY
The appliance is prepared for use Reber embossed bags of the same type as furnished with the machine, if used with different or other label bags the machine could not have same performances.
This appliance is not intended for use with high grade humidity food; liquids suction may damage the appliance (Pump, El. Card and vacuum chamber Gasket) and this is considered inappropriate use and out of warranty cover.
Domestic use: European warranty cover the machine for 24 months form the purchasing date.
Professional use: The supplier restricts himself to repair or replace all components should have constructions faults in the first 12 months from the date of installation and however not later than 18 months from the shipment date.
Components subjected to normal consumption such as Fuses, Welding bar gasket, Welding bar resistance, Welding bar cover or Vacuum Chamber Gasket are excluded from warranty. The costumer must indicate to the supplier, in order du benefit from the warranty, the faults pointing out, the serial number of the machine, the purchase date (from invoice), and furthermore he will have to send the faulty part at his charges for reparation or replacement. The supplier fulfils completely his warranty obligations by the reparation or replacement of the faulty piece. If reparation is requested where the machine is installed, all charges regarding, labor, trip and hotel fees of the technicians will be entirely at the purchaser charges.
The damage due to an inappropriate use, missed maintenance, tampering are not included in the warranty.

WARNING AND RULES
Read carefully all instructions before using the machine, taking particular care of the paragraphs with the safety and danger symbols.
Remove the plug before all maintenance and cleaning operations

WARNING FOR USE
The manufacturer declines all responsibility in case of improper use of the machine
- Check the supply cord periodically, if damaged replace it with a supply cord of the same type as the one provided; its replacement must be done by qualified technician in order to avoid a hazard.
- Do not immerse the machine in water or other liquids for cleaning
- Do not remove the plug from the socket gripping the power cord
- Do not use extension cables
- Do not use the machine with wet hands or bare feet
- Disconnect the plug from the socket before cleaning or maintenance in such a way that an operator located near the machine can check that the plug remains removed
TRANSPORT - HANDLING - STORAGE
The machine is pace in a cardboard box with protection plugs.
The package is proper to travel by all means of transport.
Stacking cartons is suggested for a maximum of 5 pieces.

The package must be stored in a dry and no dust place. When on pallets, handling by lifters is suggested.
UNPACKING
Open the cardboard box, take off the machine and place on a flat support.
DIRECTIVE 2002/96/CEE
At the end of his working life the product must not be disposed as urban waste. It must be taken to a special local authority differentiated waste collection centre or to a dealer providing this service.

INSTALLATION
The surface where the machine has to be installed must take into consideration the support dimensions. Furthermore, it must be smooth, dry, strong and with an height from the ground of about 80 cm. and with around the necessary space for use and maintenance.
Environmental conditions :
Minimum temperature +10° - Max. temperature +30°
Minimum moisture 30% - Max. moisture 80%

ELECTRICAL CONNECTION
Preliminary controls
Before connecting the machine to a socket, take care:
- Make sure the socket is provided with a ground protection
- Make sure that the voltage and frequency of supply correspond to those indicated on the data plate of the machine
- Make sure about the way on how to connect the power cable to avoid the possibility of sliding and tripping
- It is user responsibility that the connection of the machine to the electric system is in compliance with the rules in force in the country where the machine is installed, and it has been made by a qualified technician.
- Once all preliminary controls have been correctly done, use the main power switch to start your machine
USE OF THE MACHINE
This machine is equipped with an innovative technology suitable to reach high performances with energy saving (up to 50% less compared to other machines with same performances).
The electronic card supplies the welding bar with the correct power, changing automatically the welding time, depending on the network voltage; the seal control is a balance between electronic (automatic) and user (manual) setting.
Once connected, the machine is ready for use by pressing the main power switch (11) if present.
Correct vacuum packaging extends food storage time.
The appliance is intended to be used with Reber embossed bags of the same type as furnished with the machine, if used with different or other label bags the machine may not have same performances.
This appliance is not intended for use with high grade humidity food; liquids suction may damage the appliance (pump, el. card and vacuum chamber gasket) and this is considered inappropriate use and out of warranty cover.
Correct storage:
Bags and appliance must be stored in a dry and no dust place with temperature between +10° to +30°.
VACUUM PACKAGING IN BAGS
AUTOMATIC USE
Prepare the food which is to be vacuum preserved taking off every thorns or spikes could pierce the bag, in an embossed bag of adequate size, leaving about 5 cm from the edge of the bag and the food.
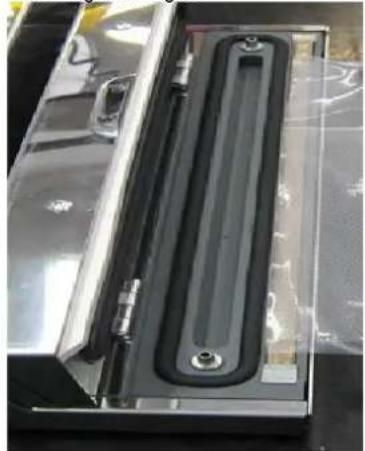
- Lift the cover up (4).
- Place the open side of vacuum bag in the vacuum chamber (6), between the gaskets (5). Image 1
- Close the cover and press pump switch (1). This will start vacuum operation.
- As soon as vacuum pump starting, slightly press with both hands the cover so as it sticks to the surface of the bag. After a few seconds the depression created by the pump will permit to release the cover, while the machine will keep on suction.
- Seal will start automatically and the machine will automatically stop at the end of the cycle.
USER INTERVENTION
- Every operation will stop when pressing pump switch (1).
It is possible to start sealing cycle when a correct vacuum level is attended (between the two black lines on green space of the manometer), by pressing welding switch (2). Low vacuum level could affect welding efficiency, if cover (4) doesn't exert a minimum power on the welding bar. - BE CAREFUL: pressing the welding switch (2) after the start of automatic welding will end welding operation.
USE OF ROLLS - welding without vacuum
- Lift the cover (4) and place the roll (in well spread conditions) on the welding bar. Make sure that the open side of the roll is NOT inside the vacuum chamber (6). Image 2
- Start the air pump by pressing switch (1). Slightly press your hands on the cover (6) to close the vacuum chamber.
- When the vacuum level is reached, welding starts automatically.
- After welding the unit stops. Cut the roll and use like a bag.
VACUUM PACKAGING IN CONTAINER
(containers provided with vacuum valve are required for this operation; only containers suitable for vacuum packaging, in plastic material or toughened glass, shall be used).
- Set on Manual cycle.
- Lift the cover.
- Introduce the adapter hose into the air suction plugs.
- Fill the container leaving at least 3 cm. free room from the upper rim and place the cover on it.
- Slightly unscrew the cover cap to unlock the valve (attention: the cap must not be unscrewed completely, some turns are enough).
- Place the adapter for containers on the cap.
- Start up the air pump by pressing switch (1) and wait for the desired vacuum level.
- Press switch (1) to stop the machine, remove the adapter for containers from the container cover and screw the cap to lock the valve.
- To open the container, slightly unscrew the cap to unlock the valve; then move the valve to let air into the container.
VACUUM PACKAGING WITH REBER UNIVERSAL COVERS
(REBER universal covers are available in different sizes to be suitable for containers, jars, bowls, pots and pans of common domestic use)
- Operate as described for vacuum packaging in container, making sure that the container edge perfectly adheres to the universal cover gasket.
- In case of prolonged use on the same container, the cover gasket may show a groove caused by container edge. To avoid any problems, turn the gasket upside down: the groove will disappear in a short time.
- The gasket can be removed for washing purposes. After drying, place it correctly in its place; gasket can be washed only by hand, never in dishwasher.
ELECTRONIC SETTINGS
Default set:
1- Minimum electronic power of sealing of 2 units time/power, suitable for 95/105 microns bags furnished (potentiometer at lower green level); starting work, with cold machine place the knob on second level and progressive lower the power.
2- Pontentiometer (9) can multiply by 10 electronic set welding power. Use carefully.
3- Models 9709 NE - 9714 NEL - 9716 NEL - 9709 NELF are not equipped with potentiometer, only electronic setting via switches is allowed.
4- The machine is set by automatic cycle vacuum/seal,
5- It is possible to set to manual cycle by programming the electronic card.
6- The machine is set by 10 secs. delay from reaching vacuum level before welding start (to reach more vacuum); this delay time can be set by programming the electronic card.
7- The machine is set by a waiting time at the end of welding to obtain a best quality seal; this waiting time can be stopped by press the start switch (1) when the Led (12) is off, showing the end of welding operation.
THE POTENTIOMETER - only models N or NF (not present on NE, NELF and NEL models)
The potentiometer (9) sets the seal power of the appliance. GREEN sector = low, RED = high. For furnished bags use the potentiometer (Image 3) as follows:
1- First and second seal: place on ORANGE.
2- Third and fourth seal: reduce of one sector on YELLOW.
3- From fifth seal: reduce on GREEN.
4- For extended and continuous use, the seal power can be reduced again QUITE TO zero to avoid pre-seal of the bags.
5- The potentiometer can be used with high power (RED) for high thickness bags; this will reduce the possibility of continuous use of the machine up to 1 cycle each 10 min.
INFO
Welding time could be different using different kind of bags even if thickness is the same; we suggest to test welding after changing welding time. Less seal power = faster cycle.
IMPORTANT
If the machine is not used for a long period and/or in the case of non-adequate or low temperatures, it is recommendable, before using the machine, to try it once without using the bag and keep the machine working in automatic cycle for one/two cycles.
WELDING POWER SETTING models 9709 NE - 9709 NEL - 9714 NEL - 9716 NEL - 9709 NELF
To change welding power on appliances not equipped with potentiometer:
1- Connect appliance to power supply.
2- Push 10 times in 10 seconds the seal switch (2), green led will light on fast to indicate you are in setting mode.
3- If green led do not light fast, re-start from point 1.
4- Push the pump switch (1) once per each unit of time/power you need (default is 5 units), green led will light once per each time you push.
5- If pushing on pump switch (1) starts the pump, it means you didn't reach setting mode; re-start from point 1.
6- Wait 10 seconds before starting normal operation with new seal power set;
7- New set will be permanent up to a new setting or reset to default.
SETTING THE MACHINE TO MANUAL/AUTOMATIC USE
To set the machine to manual use, proceed as described below:
- Unplug the machine from electric power or switch off main power switch (11) if present.
- Press and keep pump switch (1).
- Switch on the power switch (11) or connect the plug to power supply.
- Wait for at least 5 seconds.
- Release switch (1).
To set the machine to automatic use, proceed as described below:
- Unplug the machine from electric power or switch off main power switch (11) if present.
- Press and keep seal switch (2).
- Switch on the power switch (11) or connect the plug to power supply.
- Wait for at least 5 seconds.
- Release switch (2).
(Settings will be permanent, until a new setting operation)
DEFAULT SETTING
To return to default setting:
- Unplug the machine from electric power or switch off main power switch (11) if present.
Press and keep both pump and seal switches (1) and (2). - Switch on the power switch (11) or connect the plug to power supply.
- Wait for at least 5 seconds.
- Release switches (1) and (2).
Models with filter - 9714 NF - 9712 NF - 9709 NF - 9709 NELF
The external filter is essential to avoid liquids or powder can damage the internal circuit of the machine. Liquids and powder stops in the filter cover. To clean the filter unscrew by hand the cover and clean. Pay attention in screws the cover as the gasket must be correctly placed to avoid problems in machine functioning. Filter could affect the speed of suction, causing the machine to be a little slower than normal.
END OF OPERATION
At the end of vacuum/welding operation unplug the machine.

gauge
| Segment Color | Value | |---|---| | Yellow | 100 | | Green | 80 | | Red | 20 |VACUUM LEVEL
The vacuum gauge is provided with 3 differently colored areas showing the vacuum level. The yellow area corresponds to operation start, when the air quantity in the circuit is still high. In the green area the vacuum level is already sufficient for a correct food preservation for a short or medium time, when the indicator lies between the two black lines. When the indicator reaches the red area, the maximum vacuum level has been obtained.
There are also products (such as fish, tomatoes, etc.) containing liquids which, in case of compression, leak out and can be sucked by the machine with resulting damages to the same. Other products are not very compact and an excessive vacuum level can damage or crush them. We recommend to check the adherence of the bag and weld before the product is crushed.

MAINTENANCE AND CLEANING
Disconnect the plug from the socket before cleaning or maintenance. In such a way that an operator located near the machine can check that the plug remains removed.
Do not use water splash for cleaning. Do not use brushes that can deteriorate the surface of the machine.
Use a soft cloth moistened with normal neutral detergent to avoid deteriorate the surface of the machine.
Do not wash the machine and do not put in water or liquids to clean. Contact immediately the supplier in case of malfunctioning or damaged parts.
QUESTIONS / ANSWERS
In case of doubts about the correct functioning of the appliance, some test can be done by the user to verify the performances of the machine.
Internal functioning:
1- Open the cover (4) and start the cycle once introduced the adapter hose into the air suction plugs (8) (Image 6) and lock the adapter on a plane surface to make vacuum.
2- If the manometer arrives on red and the seal starts automatically, the machine is OK.
3- If the manometer arrives on red but the seal do not start automatically, set the unit on automatic cycle and re-test.
4- If the manometer does not arrive on red, the machine must be repaired (air loss or pump damaged).
Cover and vacuum gasket functioning:
1- Close the cover (4) (without bag) and press pump switch (1) to start the cycle, slightly press with both hands the cover. (Image 7)
2- If the manometer arrives on red and the seal starts automatically, the machine is OK.
3- If the manometer arrives on red but the seal does not start automatically, set the unit to automatic cycle and re-test;
4- If the manometer does not arrive on red, check the vacuum chamber gasket, clean or replace and re-test;
Bag test:
1- Open the cover (4)
2- Place the open side of an empty vacuum bag in the vacuum chamber (6), between the gaskets (5). (Image 1)
3- Close the cover and press pump switch (1). This will start vacuum operation.
4- As soon as vacuum pump starting, slightly press with both hands the cover so as it sticks to the surface of the bag. After a few seconds the depression created by the pump will permit to release the cover, while the machine will keep on suction.
5- If the manometer arrives on red and the welding starts automatically, the machine is OK.
6- If the manometer arrives on red but the seal does not start automatically, set the unit on automatic cycle and re-test.
With the above 3 tests you can check the correct functioning of the appliance and the correct placing of the bag in the vacuum chamber.
The unit does not start:
1- Check if the IEC plug is well connected.
2- Check if the power switch (11) is on (green light on).
3- Check the fuse in the IEC socket on the rear part of the machine and change it, if necessary, with the spare fuse you find in the IEC of the machine.
The bag is not well sealed / Air come in the bag:
1- In winter season, the sealing bar can be charged in humidity, at first use start a complete vacuum/seal cycle with cover closed and no bag. To avoid problems, the unit must be stored in a dry and no dust place at +10°-+30°.
2- Bags outside is in nylon (PA), nylon is a hygroscopic material, to avoid seal problems due to humidity, store bags in a dry and no dust place at +10°-+30°.
3- To have a correct seal, use the potentiometer as per explicated above in "The Potentiometer" paragraph.
4- You can have a good vacuum only if there is enough empty free space between the food and the machine to avoid the creation of wrinkles and folds, which may reduce the vacuum reached inside the bag. Without wrinkles and folds you can have a correct cover closing and the vacuum/seal cycle can be done without problems. Good seal can be done only if the cover press correctly the sealing bar and cover can press correctly only if a good vacuum level is reached
5- Check if the open part of the bag is clean; placing food inside the bag can leave some food residuals: the part of the bag to be sealed, must be properly clean for an effective sealing.
6- Check if the food which is to be vacuum preserved is free of every thorns or spikes could pierce the bag.
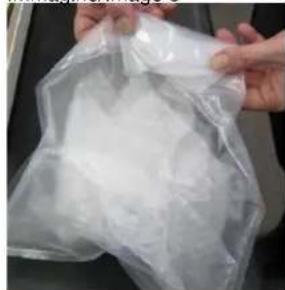
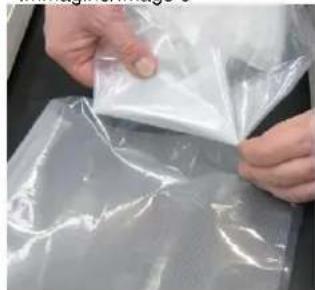
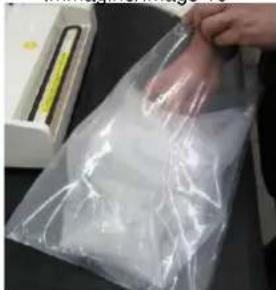
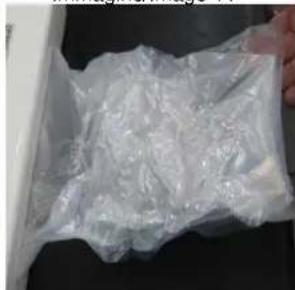
7- Humidity of the food can damage the seal: check if food is correctly dried or use a double bag. Place food in a first bag, bend repeatedly the open part of the bag (Image 8) and put the first bag in a second one with the upper part to the bottom of the second (Images 9 and 10). You can have same vacuum but the humidity will remains in the first bag (Image 11)
8- Using rolls, the first seal must be done placing the open part of the roll on seal bar only avoiding to put in the vacuum chamber (Image 2); the appliance can correctly seal only if there is a correct vacuum level and the cover 4 press correctly on the sealing bar.
9- Only seal cycle: place the open part of the bag as per Image 2, on the sealing bar only and not in the vacuum chamber and make a complete automatic vacuum/seal cycle to have a good seal.
10- If the air comes into the bag in seal cycle, and after a correct vacuum cycle, the bag is damaged and must be changed.
No vacuum in the bag:
1- Check the open part of the bag is correctly placed in the vacuum chamber and between the black gasket. (Image 1)
2- Perform the tests "Internal functioning", "Cover and vacuum gasket" and "Bag test" to check the appliance.
3- Suction of liquids can damage the gasket of vacuum chamber reducing the vacuum possibility of the machine, check the gasket and change if necessary.
4- The appliance is prepared for use Reber embossed bags of the same type as furnished with the machine, if used with different or other label bags the machine could not have same performances.
5- In Summer period, when ambient temperature become high, or in case of continuous and intensive use, the residual heat of the sealing bar could pre-seal the bag and prevents vacuum. Use potentiometer or electronic setting to reduce seal power, wait some minutes and re-start working with new settings.
The unit does not seal with automatic cycle:
1- Perform the tests "Internal functioning", "Cover and vacuum gaskets" and "Bag test" to check the appliance.
2- Start vacuum cycle and seal manually to verify the welding bar efficiency.
3- Set the appliance to "Automatic use" as described above;
4- You can have a good vacuum only if there is enough empty free space between the food and the machine to avoid the creation of wrinkles and folds can limit the vacuum reached inside the bag. Without wrinkles and folds you can have a correct cover closing and the vacuum/seal cycle can be done automatically. Automatic seal can be done only if the cover press correctly the sealing bar and cover can press correctly only if a good vacuum level is reached.
The unit does not reach a good vacuum level in the bag:
1- Check if the open part of the bas is correctly placed as per Image 1 and a there is correct free space between food and machine.
2- Perform the tests "Internal functioning", "Cover and vacuum gasket" and "Bag test" to check the appliance.
3- Check if the food which is to be vacuum preserved is free of every thorns or spikes could pierce the bag.
4- The appliance is prepared for use Reber embossed bags of the same type as furnished with the machine, if used with different or other label bags the machine may not have same performances.
FR

PRESENTATION
IMPORTANCE DU MANUEL
FONCTIONNEMENT MANUEL
QUESTIONS / REPONSES
Test auto-diagnostic:
GB Name of the manufacturer
F Nom du fabricant
GB Address of the manufacturer
GB Year of manufacturing
GB The undersigned declares in conformity with the European Union legislation that the above mentioned goods are in compliance with the following directives:
GB and to the following standards:
The name of the person who has got this technical documentation could be the same who signs.