
PD2A - Power strip DataVideo - Free user manual and instructions
Find the device manual for free PD2A DataVideo in PDF.

| Product Type | Power Strip |
| Brand | DataVideo |
| Model | PD2A |
| Power Supply | Mains, 15 A max |
| Maximum Total Current | 15 A |
| Protection | Overcurrent Protection |
| Rack Mounting | Mounting instructions included |
| Operating Temperature | Maximum rack ambient temperature (Tam) |
| Maintenance | Clean with a damp cloth |
| Safety - Water | Do not use near water |
| Safety - Ventilation | Do not block ventilation openings |
| Safety - Cleaning | Unplug before cleaning |
| Repairs | Refer to qualified personnel only |
| Warranty | Opening the unit voids the warranty |
| Usage | For indoor use only |
| Power Cord | Do not walk on the cord |
| Extension Cords | Respect the rated currents |
| Environment | Do not place on unstable surfaces |
| Grounding | Maintain reliable grounding in rack mounting |
Frequently Asked Questions - PD2A DataVideo
User questions about PD2A DataVideo
0 question about this device. Answer the ones you know or ask your own.
Ask a new question about this device
Download the instructions for your Power strip in PDF format for free! Find your manual PD2A - DataVideo and take your electronic device back in hand. On this page are published all the documents necessary for the use of your device. PD2A by DataVideo.
USER MANUAL PD2A DataVideo
natural_image
Front view of a rack-mounted server unit with ports and connectors (no visible text or labels)POWER CENTER
PD-2A
Instruction Manual
Table of Contents
ATTENTION: 3
AVERTISSEMENT:....3
DANGER: 3
SAFETY INSTRUCTIONS - RACK MOUNT ....4
FCC COMPLIANCE STATEMENT....6
WARNINGS AND PRECAUTIONS......6
WARRANTY 7
STANDARD WARRANTY....7
THREE YEAR WARRANTY ....7
DISPOSAL....7
FEATURES 8
FRONT PANEL 8
REAR PANEL....10
DATAVIDEO PRODUCT VOLTAGE REQUIREMENTS....10
SPECIFICATION....11
SERVICE & SUPPORT......12
Disclaimer of Product & Services
The information offered in this instruction manual is intended as a guide only. At all times, Datavideo Technologies will try to give correct, complete and suitable information. However, Datavideo Technologies cannot exclude that some information in this manual, from time to time, may not be correct or may be incomplete. This manual may contain typing errors, omissions or incorrect information. Datavideo Technologies always recommend that you double check the information in this document for accuracy before making any purchase decision or using the product. Datavideo Technologies is not responsible for any omissions or errors, or for any subsequent loss or damage caused by using the information contained within this manual. Further advice on the content of this manual or on the product can be obtained by contacting your local Datavideo Office or dealer.
ATTENTION:
Safety Instructions - Rack Mount
Marking or Instruction Details:
"Rack Mount Instructions - The following or similar rack-mount instructions are included with the installation instructions:
A) Elevated Operating Ambient - If installed in a closed or multi-unit rack assembly, the operating ambient temperature of the rack environment may be greater than room ambient. Therefore, consideration should be given to installing the equipment in an environment compatible with the maximum ambient temperature (Tma) specified by the manufacturer.
B) Reduced Air Flow - Installation of the equipment in a rack should be such that the amount of air flow required for safe operation of the equipment is not compromised.
C) Mechanical Loading - Mounting of the equipment in the rack should be such that a hazardous condition is not achieved due to uneven mechanical loading.
D) Circuit Overloading - Consideration should be given to the connection of the equipment to the supply circuit and the effect that overloading of the circuits might have on overcurrent protection and supply wiring. Appropriate consideration of equipment nameplate ratings should be used when addressing this concern.
E) Reliable Earthing - Reliable earthing of rack-mounted equipment should be maintained. Particular attention should be given to supply connections other than direct connections to the branch circuit (e.g. use of power strips)."
FCC Compliance Statement
This device complies with part 15 of the FCC rules. Operation is subject to the following two conditions:
-
This device may not cause harmful interference, and
-
This device must accept any interference received, including interference that may cause undesired operation.
Warnings and Precautions
-
Read all of these warnings and save them for later reference.
-
Follow all warnings and instructions marked on this unit.
-
Unplug this unit from the wall outlet before cleaning. Do not use liquid or aerosol cleaners. Use a damp cloth for cleaning.
-
Do not use this unit in or near water.
-
Do not place this unit on an unstable cart, stand, or table. The unit may fall, causing serious damage.
-
Slots and openings on the cabinet top, back, and bottom are provided for ventilation. To ensure safe and reliable operation of this unit, and to protect it from overheating, do not block or cover these openings. Do not place this unit on a bed, sofa, rug, or similar surface, as the ventilation openings on the bottom of the cabinet will be blocked. This unit should never be placed near or over a heat register or radiator. This unit should not be placed in a built-in installation unless proper ventilation is provided.
-
This product should only be operated from the type of power source indicated on the marking label of the AC adapter. If you are not sure of the type of power available, consult your Datavideo dealer or your local power company.
-
Do not allow anything to rest on the power cord. Do not locate this unit where the power cord will be walked on, rolled over, or otherwise stressed.
-
If an extension cord must be used with this unit, make sure that the total of the ampere ratings on the products plugged into the extension cord do not exceed the extension cord rating.
-
Make sure that the total amperes of all the units that are plugged into a single wall outlet do not exceed 15 amperes.
-
Never push objects of any kind into this unit through the cabinet ventilation slots, as they may touch dangerous voltage points or short out parts that could result in risk of fire or electric shock. Never spill liquid of any kind onto or into this unit.
-
Except as specifically explained elsewhere in this manual, do not attempt to service this product yourself. Opening or removing covers that are marked "Do Not Remove" may expose you to dangerous voltage points or other risks, and will void your warranty. Refer all service issues to qualified service personnel.
-
Unplug this product from the wall outlet and refer to qualified service personnel under the following conditions:
a. When the power cord is damaged or frayed;
b. When liquid has spilled into the unit;
c. When the product has been exposed to rain or water;
d. When the product does not operate normally under normal operating conditions. Adjust only those controls that are covered by the operating instructions in this manual; improper adjustment of other controls may result in damage to the unit and may often require extensive work by a qualified technician to restore the unit to normal operation;
e. When the product has been dropped or the cabinet has been damaged;
f. When the product exhibits a distinct change in performance, indicating a need for service.

Warranty
Standard Warranty
- Datavideo equipment are guaranteed against any manufacturing defects for one year from the date of purchase.
- The original purchase invoice or other documentary evidence should be supplied at the time of any request for repair under warranty.
- The product warranty period begins on the purchase date. If the purchase date is unknown, the product warranty period begins on the thirtieth day after shipment from a Datavideo office.
- All non-Datavideo manufactured products (product without Datavideo logo) have only one year warranty from the date of purchase.
- Damage caused by accident, misuse, unauthorized repairs, sand, grit or water is not covered under warranty.
- Viruses and malware infections on the computer systems are not covered under warranty.
- Any errors that are caused by unauthorized third-party software installations, which are not required by our computer systems, are not covered under warranty.
- All mail or transportation costs including insurance are at the expense of the owner.
- All other claims of any nature are not covered.
- All accessories including headphones, cables, and batteries are not covered under warranty.
- Warranty only valid in the country or region of purchase.
- Your statutory rights are not affected.
Three Year Warranty
- All Datavideo products purchased after July 1st, 2017 are qualified for a free two years extension to the standard warranty, providing the product is registered with Datavideo within 30 days of purchase.

- Certain parts with limited lifetime expectancy such as LCD panels, DVD drives, Hard Drive, Solid State Drive, SD Card, USB Thumb Drive, Lighting, Camera module, PCIe Card are covered for 1 year.
- The three-year warranty must be registered on Datavideo's official website or with your local Datavideo office or one of its authorized distributors within 30 days of purchase.
Disposal

natural_image
Symbol of a trash bin crossed out by two crossed lines, no text or labels presentFor EU Customers only - WEEE Marking
This symbol on the product or on its packaging indicates that this product must not be disposed of with your other household waste. Instead, it is your responsibility to dispose of your waste equipment by handing it over to a designated collection point for the recycling of waste electrical and electronic equipment. The separate collection and recycling of your waste equipment at the time of disposal will help to conserve natural resources and ensure that it is recycled in a manner that protects human health and the environment. For more information about where you can drop off your waste equipment for recycling, please contact your local city office, your household waste disposal service or the shop where you purchased the product.

CE Marking is the symbol as shown on the left of this page. The letters "CE" are the abbreviation of French phrase "Conformité Européenne" which literally means "European Conformity". The term initially used was "EC Mark" and it was officially replaced by "CE Marking" in the Directive 93/68/EEC in 1993. "CE Marking" is now used in all EU official documents.
Features
• 400 watt rated power supply
- Input connections:
AC: 100-240V AC Max 6.3 A, 50Hz or 60HZ
DC: 12V 400W
• Output connections:
4 x 12V DC 3A XLR
2 x 12V DC 5A XLR
2 x 12V DC 10A XLR
- Combine up-to 10 mains power supplies into a single convenient power connection
- Chassis Ground terminal
• Embedded three units of heat sink fan design
• Selectable of Auto/AC input switch
• AC overload protection, non-recovery fuse on the AC input outlet
• DC overload protection, auto-recovery fuses on each DC output terminal
• AC Power switch LED indicator
• DC output LED indicators
Front Panel
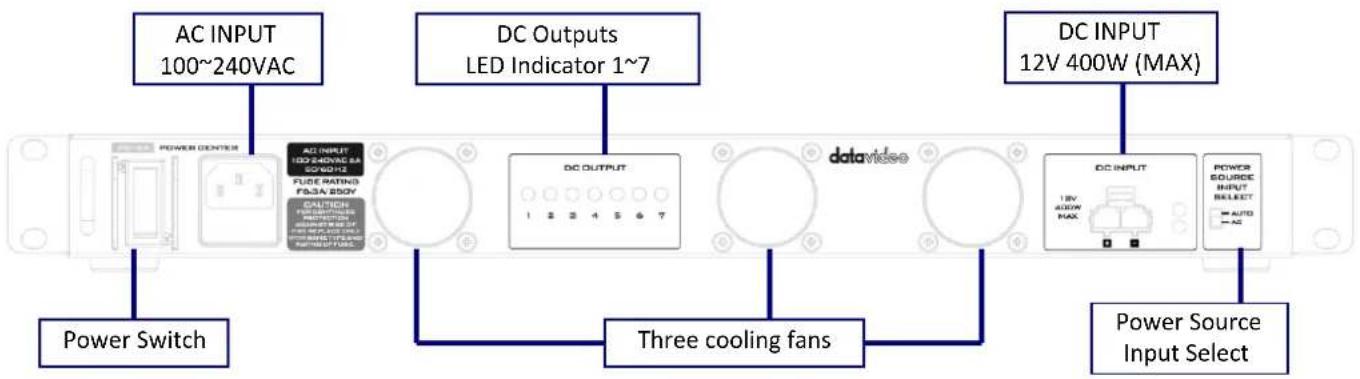
flowchart
graph LR
    A["AC INPUT 100~240VAC"] --> B["DC OUTPUTS LED Indicator 1~7"]
    B --> C["DC INPUT 12V 400W (MAX)"]
    C --> D["Three cooling fans"]
    D --> E["Power Source Input Select"]
    F["Power Switch"] --> A
    G["DC INPUT"] --> C
    H["DC INPUT"] --> C
    I["DC INPUT"] --> D
On / Off Switch
Powers the PD-2A On / Off when using AC Power.
Note: The On / Off Switch is not functional if the power input is DC.
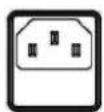
AC In with built-in fuse
AC Inlet for connecting to suitable mains power outlet – 100-240VAC. The socket contains a fuse holder fitted with a 6.3A fuse.

Cooling Fan
The PD-2A has three built-in cooling fans; please ensure that fans are not blocked, and the air flow is available.
Note: The right two fans will start operation when internal ambient temperature reaches 50^ C. The left fan will start operation when internal ambient temperature reaches 70^ C.
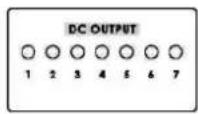
XLR DC OUTPUT LED Indicators (1-7)
Indicator lights ON during normal operation.
Indicator lights OFF if the output is overloaded or faulty.
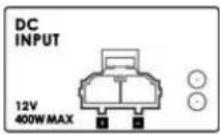
DC Input (Euro Type Terminal)
The PD-2A can be powered from a suitable 12V power source. When working from DC the PD-2A will not regulate the power outlets.
Please ensure that the 12V power source that you use is regulated. If you intend to run the PD-2A from a car or van power outlet, please make sure a suitable regulator is used on the power feed.
LED indicator
Green: DC input power connected
Blinking Red: Internal ambient temperature exceeds 70^ C degrees.
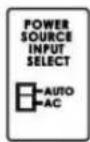
Power Source Input Select Switch (AUTO / AC)
The Input Select Switch can be set to AC or AUTO depending on the power input that you intend to use.
AUTO: When AC and DC power sources are connected at the same time, the DC power source will start supplying current to the DC outputs until the AC source rises above 11.3V.
AC: Current supplied to the DC output from the AC power source ONLY.
Rear Panel
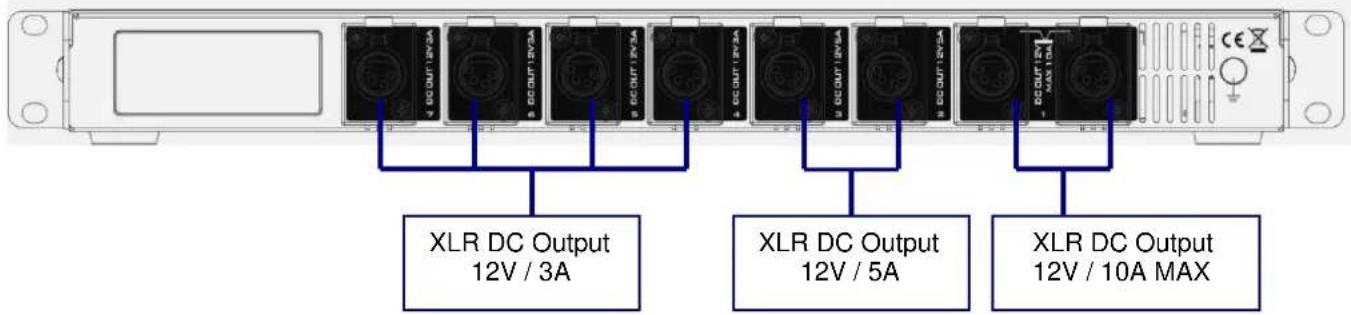
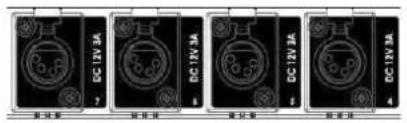
DC Out 12V 3A
12V 3A DC Output via XLR In-Line Socket x 4

DC Out 12V 5A
12V 5A DC Output via XLR In-Line Socket x 2
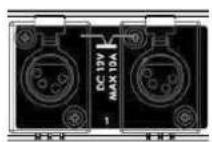
DC Out 12V 10A
12V 10A MAX DC Output via XLR In-Line Socket x 2
Note: Status of these two DC outputs is indicated by LED indicator 1 on the front panel. These two DC outputs supply a total of maximum 12V 10A DC power, i.e. the left output 1 supplies 7V and the right output 1 supplies 3V.

Ground Terminal
When connecting this unit to any other component, make sure that it is properly grounded by connecting this terminal to an appropriate point. When connecting, use the socket and be sure to use wire with a cross-sectional area of at least 1.0 mm^2 .
Datavideo Product Voltage Requirements
This table is a guideline for Datavideo products, if you are using products from other manufacturers please check their voltage requirements carefully before connecting to the PD-2A.
DC 12V 3A SE-500 / SE-600 / SE-2000 / DVK-300HD / ITC-100 / AM-100
DC 12V 5A HS-550 / HS-600 / HS-2000 / HS-2000L / SE-2800
DC 12V10A HS-2800 / SE-3000
Specification
| Input | |
| AC input outlet | One AC input |
| AC input voltage | 100 - 240VAC |
| AC input current rating | 100 – 240VAC MAX 6.3A |
| AC frequency | 50Hz or 60Hz |
| DC input | One DC 12V, supports non-regulated DC 12V output |
| DC input watt | 400W |
| Output | |
| DC Output(Two of the outputs can combine the rating to become one 12V±5%, 10A DC output) | 12V±5%, 3A XLR DC Female Jack x 412V±5%, 5A XLR DC Female Jack x 212V±5%,10A XLR DC Female Jack x 2 |
| General | |
| Output Efficiency | More than 80% |
| DC Output Noise | +5%, -3% |
| Operating Temperature | 0 to 40 °C ambient |
| Operating Humidity | 5% to 90% RH, Non-condensing |
| Storage Temperature | -20 to 85 degrees C |
| Storage Humidity | 5% to 90% RH, Non-condensing |
| Dimensions | 440*214*46 mm |
| Weight | 4.9Kg |
Service & Support
It is our goal to make owning and using Datavideo products a satisfying experience. Our support staff is available to assist you to set up and operate your system. Contact your local office for specific support requests. Plus, please visit www.datavideo.com to access our FAQ section.

Please visit our website for latest manual update.
www.datavideo.com/product/PD-2A
datavideo
www.datavideo.com

@DatavideoUSA @DatavideoIndia2016
@DatavideoEMEA @Datavideojapan
@DatavideoTaiwan @DatavideoLatam
@DatavideoAsia @DatavideoBrasil

@Datavideo
@Datavideo_EMEA
@Datavideo Taiwan

@DatavideoUSA
@DVTWDVCN

@DatavideoUSA
@DatavideoEurope